Introduction
Welcome to the vibrant world of nail art—a realm where creativity meets elegance and personal style shines through every stroke of polish.
Whether you’re a seasoned pro or a curious beginner, our expansive guide is designed to inspire and instruct on how to achieve the most coveted nail art designs.
From the swirling elegance of marble patterns to the futuristic shimmer of chrome finishes, this blog post delves into a wide range of styles.
Each design is thoughtfully explained with detailed steps and expert tips, ensuring that you can recreate these looks with confidence and flair.
So, gather your brushes, polishes, and imagination as we embark on a journey through the art of nail design, transforming the ordinary into the extraordinary.
01. Exploring The Art Of Marble Elegance Nails

How To Achieve The Perfect Marble Swirl
Marble elegance nails are a classic and luxurious choice that can elevate any look.
To achieve the perfect marble swirl, start by applying a base coat of white or light grey polish to your nails.
Once dry, add drops of darker grey and black polish onto the nail.
Using a fine-tipped tool, such as a toothpick or a dotting tool, gently swirl the colors together to create the marble effect.
Work quickly while the polishes are still wet to ensure a smooth blend.
Seal your design with a high-gloss topcoat to enhance the marble appearance and add a professional finish.
Incorporating Gold Accents For A Luxurious Finish
To add a touch of luxury to your marble elegance nails, incorporate gold accents.
After creating your marble design and while the polish is still tacky, use a fine brush to apply small lines or dots of gold polish along the swirls.
These accents should be subtle, enhancing the overall design without overwhelming it.
Another method is to use gold leaf flakes.
Apply these flakes randomly over the marble design with tweezers and press them gently into place.
Finish with a clear topcoat to protect your nail art and ensure longevity.
02. Mastering Geometric Minimalism In Nail Design
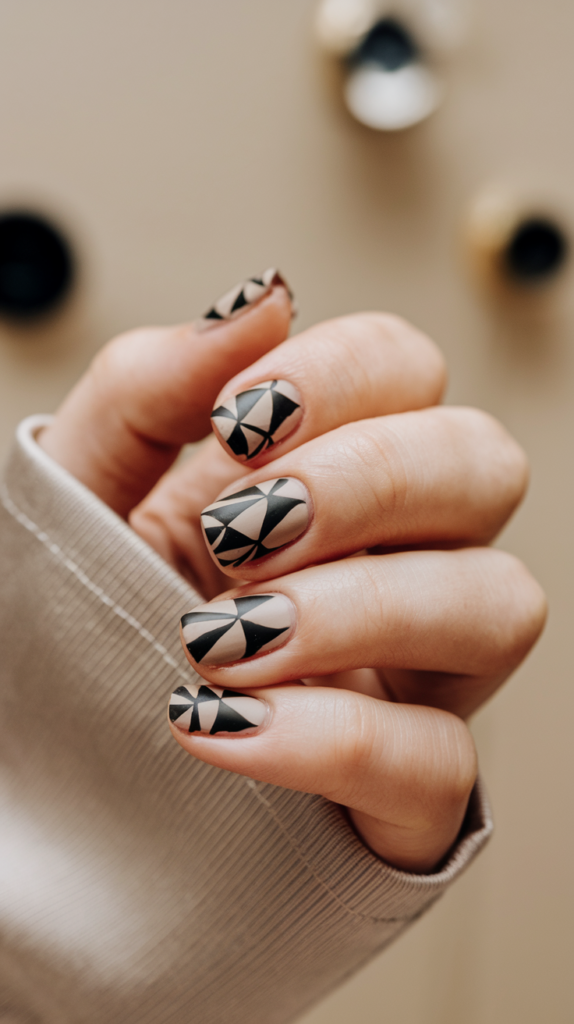
Choosing The Right Geometric Patterns
Geometric minimalism is all about precision and simplicity.
To master this design, choose geometric patterns that are clean and straightforward, such as triangles, rectangles, and straight lines.
Begin by sketching your designs lightly with a pencil on a piece of paper to plan their placement and size.
Use tape or stencils to mask areas of your nails to paint sharp, clean lines.
This preparation ensures that your geometric patterns are neat and uniform.
Selecting Neutral Bases For Geometric Nails
The key to nailing the geometric minimalist look is a neutral base color.
Opt for shades like nude, soft grey, or pastel tones that provide a subtle background, allowing the geometric patterns to stand out.
Apply a base coat in your chosen neutral color and let it dry completely before applying geometric patterns.
This not only enhances the design but also prevents the base color from lifting when you remove the tape or stencils.
03. Creating Soft Watercolor Effects On Nails
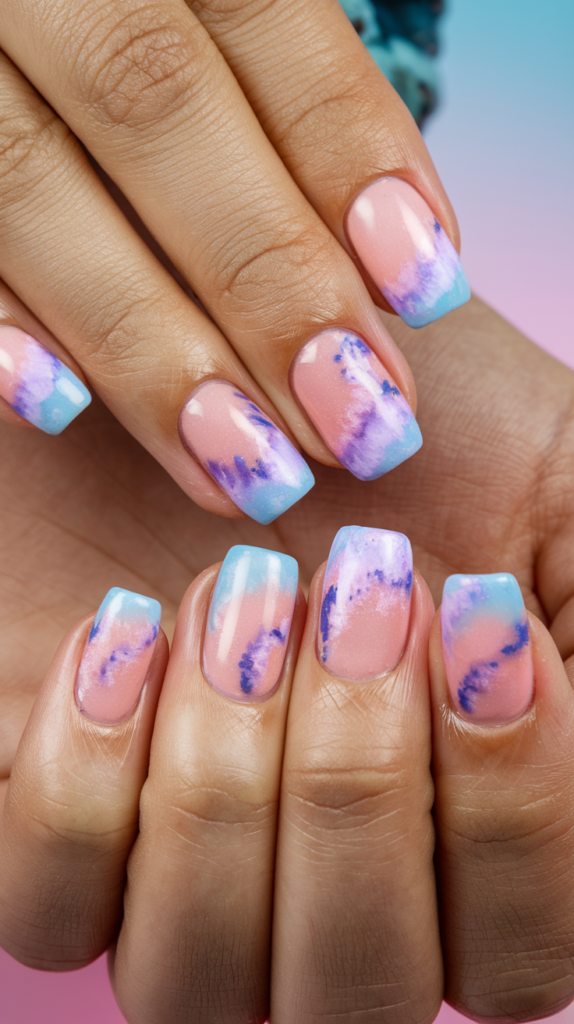
Techniques For Gentle Gradient Applications
Creating soft watercolor effects on your nails can mimic the beautiful fluidity of real watercolors.
To achieve this, use a sponge to dab on a blend of light colors.
Start with a white base coat to make the colors pop.
Once dry, apply small dots of your chosen pastel colors in spots where you want them to appear.
Then, use a small sponge to gently dab and blur the colors together, creating a soft gradient that resembles watercolor paint.
Best Polishes For Watercolor Nail Art
The best polishes for watercolor effects are those that are slightly translucent and can blend well.
Look for polishes labeled as “jelly” or “sheer” finishes, as these tend to have a water-like consistency that is perfect for creating watercolor effects.
Avoid quick-drying polishes as they might not give you enough time to blend the colors properly.
04. Achieving Velvet Texture On Your Nails
Tools And Materials Needed For Velvet Nails
To achieve a velvet texture on your nails, you will need flocking powder, which is available in a variety of colors to match your desired look.
You will also need a base coat that matches the flocking powder color.
Apply the base coat and while it’s still wet, sprinkle a generous amount of flocking powder over the nail.
Use a fluffy brush to remove excess powder and create an even velvet texture.
Step-By-Step Guide To Applying Velvet Overlays
After preparing your nails with the base coat and flocking powder, gently press the powder into the wet polish to ensure it adheres well.
Allow it to set for a few minutes before using a soft brush to remove any excess powder.
This will help you achieve a smooth, velvet-like surface that feels soft to the touch.
Seal the design with a topcoat to ensure longevity, being careful not to smudge the velvet effect.
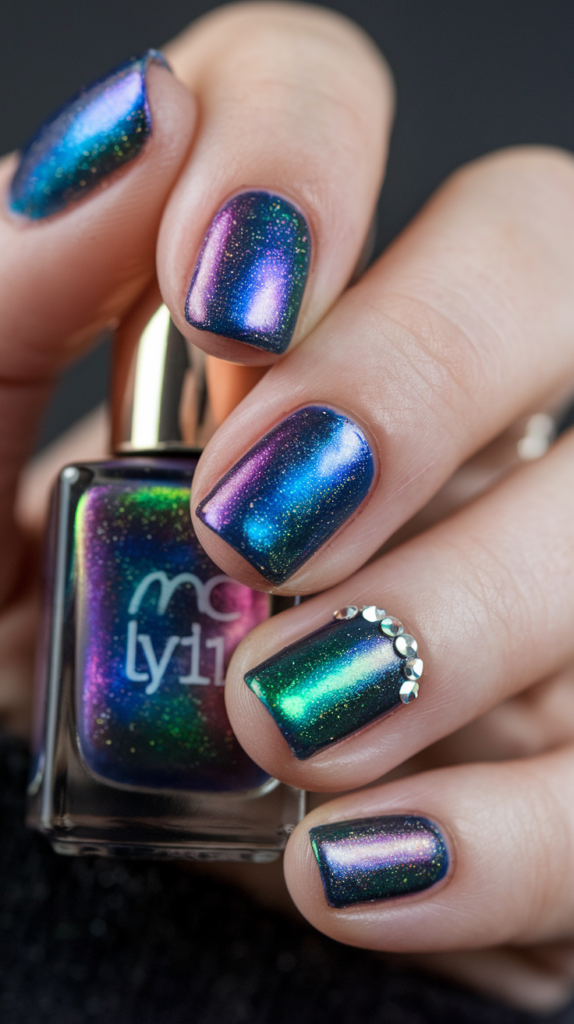
05. How To Create Holographic Shine On Nails
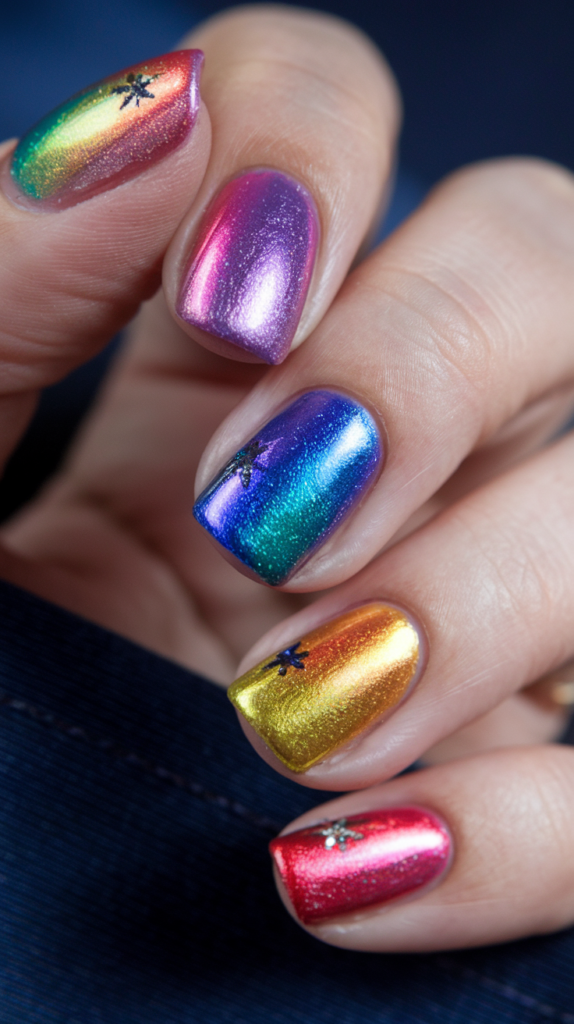
Types Of Holographic Polishes
Holographic polishes come in various forms, including linear, scattered, and flakie.
Linear holographic polishes create a smooth rainbow shine, scattered polishes offer a more subtle sparkle, and flakie polishes contain irregular holographic flakes that catch the light at different angles.
Choose the type that best fits the look you’re going for.
Tips For Applying Holographic Accents
To maximize the holographic effect, apply a base coat in a dark color before your holographic polish.
The contrast between the base and the sparkle will make the holographic colors pop.
Apply the holographic polish in thin, even layers, allowing each layer to dry before applying the next.
Finish with a high-gloss topcoat to enhance the holographic effect and protect your nails.
06. Drawing Constellations: A Guide To Starry Nail Designs
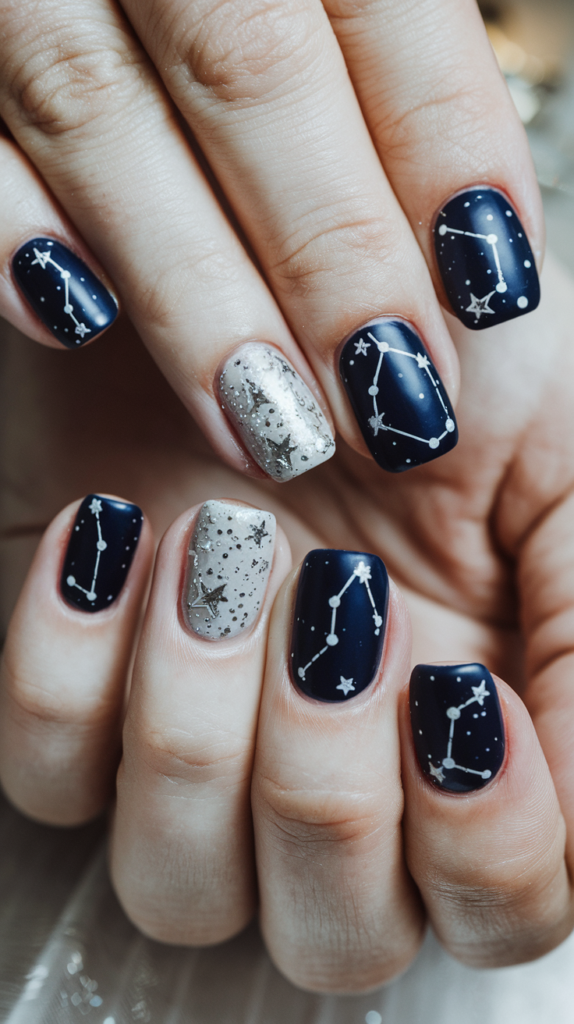
Techniques For Fine Line Drawing
Fine line drawing requires a steady hand and precision.
Use a very fine brush or a nail art pen, which allows for detailed work.
Practice drawing the constellations on paper before attempting them on your nails.
Dip your tool in black or white nail polish and gently draw your chosen constellations.
If you make a mistake, you can wipe it off quickly with nail polish remover without disturbing the base coat.
Inspiration For Constellation Patterns
Look to the night sky for inspiration or search for constellation charts online.
Popular choices include Orion, Ursa Major (the Big Dipper), and Cassiopeia.
Consider adding tiny dots for stars and connecting them with thin lines to bring the constellations to life.
You can also add a touch of glitter or a small rhinestone at significant stars within the constellation to enhance the celestial feel.
07. The Elegance Of Rose Gold Glam Nails
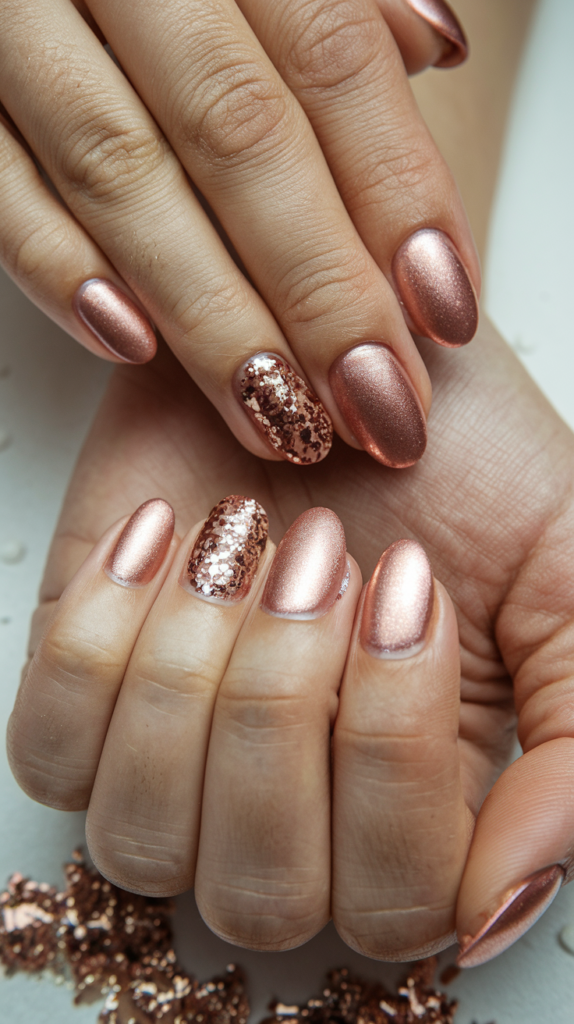
Selecting The Perfect Rose Gold Polish
When choosing a rose gold polish, look for one that offers a good balance of pink and gold tones.
Test the polish under different lighting conditions to see how it looks, as some polishes may lean more towards gold or pink depending on the light.
A good rose gold polish should have a metallic finish that provides both color depth and sparkle.
Adding Sparkle With Glitter And Metallic Accents
To enhance your rose gold nails, consider adding glitter or metallic accents.
Use a fine brush to apply a gold glitter topcoat along the tips or near the cuticle as an accent.
Alternatively, you can use metallic strips to create geometric designs or frame the nail for a more structured look.
These accents will add complexity and glamour to your rose gold nails, making them stand out even more.
08. Crafting Opalescent Nails With Opal Magic

Achieving The Opal Gemstone Look
To create the look of opal gemstones on your nails, start with a white or light blue base coat.
Then, sponge on small patches of light pink, green, and blue, mimicking the play of color typical of opal stones.
Use a sheer iridescent topcoat to give the nails that characteristic opal shimmer.
Recommended Polishes For Opal Effects
The key to perfect opal nails is using iridescent and holographic polishes that reflect different colors depending on the angle and lighting.
Look for polishes that specifically mention opalescent or holographic effects.
These polishes often come in light, pastel colors that can be layered to create a multidimensional, shimmering effect reminiscent of real opal.
09. Innovative Checkerboard Tips For Nails
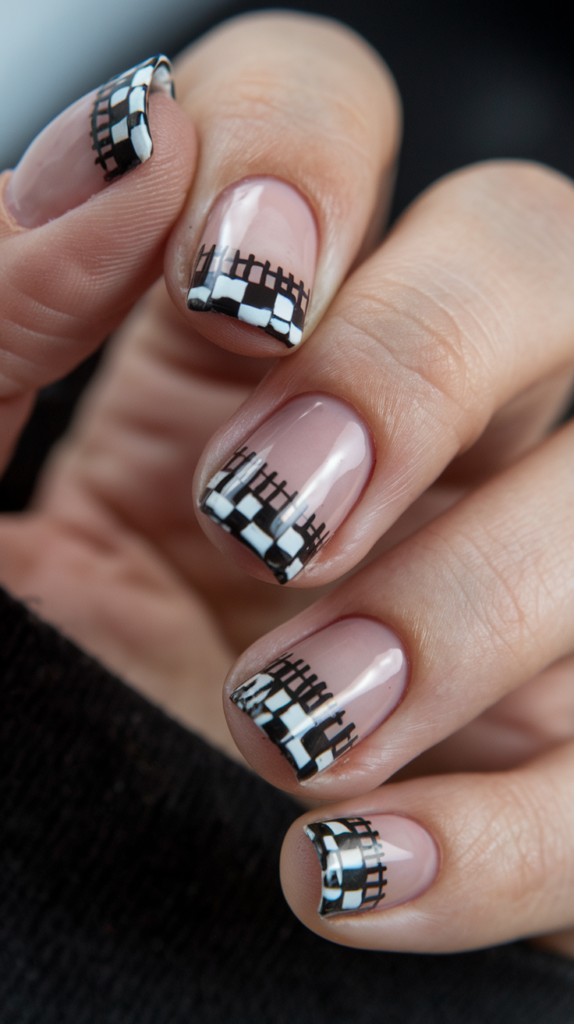
Designing Mini Checkerboard Patterns
Creating mini checkerboard patterns requires precision and patience.
Paint your nails with a white base coat and let it dry completely.
Use thin tape to create a grid pattern over the tips of your nails.
Paint over the tape with a black polish, then carefully remove the tape while the polish is still wet.
This will leave you with a sharp, clear checkerboard pattern.
Color Combinations For Checkerboard Tips
While black and white are classic choices for checkerboard patterns, you can experiment with other color combinations for a more personalized look.
Consider pastel shades like pink and blue or contrasting colors like red and yellow for a bold effect.
Ensure that the colors you choose have a good opacity to prevent them from blending together when creating the checkerboard pattern.
10. Incorporating Pearls In Nail Art For A Sophisticated Look
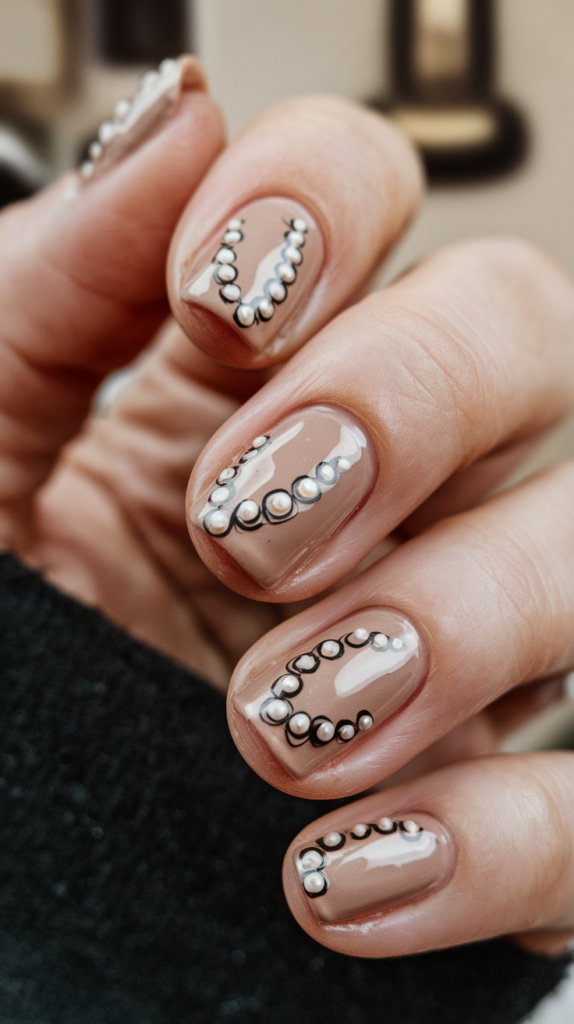
Embedding Tiny Pearls On Nails
To embed tiny pearls onto your nails, apply a base coat and the color of your choice.
While the polish is still tacky, use a tweezer to place the pearls onto your nails.
You can create patterns or scatter them randomly depending on the desired effect.
Press them gently into the polish to ensure they adhere properly.
Maintaining Pearl Embedded Nails
Pearl-embedded nails require careful maintenance to ensure the pearls stay in place.
Avoid using your nails as tools to prevent dislodging the pearls.
When applying a top coat, use a gentle touch to avoid moving the pearls.
Opt for a top coat that offers a thick layer of protection to encase the pearls securely.
11. Neon Outlines For A Bold Nail Statement

Techniques For Neon Outlining
Neon outlines are a fantastic way to add a pop of color to your nails.
Use a fine brush and neon nail paint to outline the edges of your nails or create bold patterns.
You can outline the entire nail or just certain parts, such as the base or tip, to create different effects.
Make sure to use a black or dark-colored base to make the neon stand out.
Best Neon Colors For Different Skin Tones
When choosing neon colors, consider your skin tone to ensure the colors pop.
For lighter skin tones, bright oranges and pinks work well, while deeper skin tones look great with vibrant greens, blues, and purples.
Testing different colors against your skin under natural light will help you choose the best neon shades for your complexion.
12. Stained Glass Nail Art: A Colorful Trend
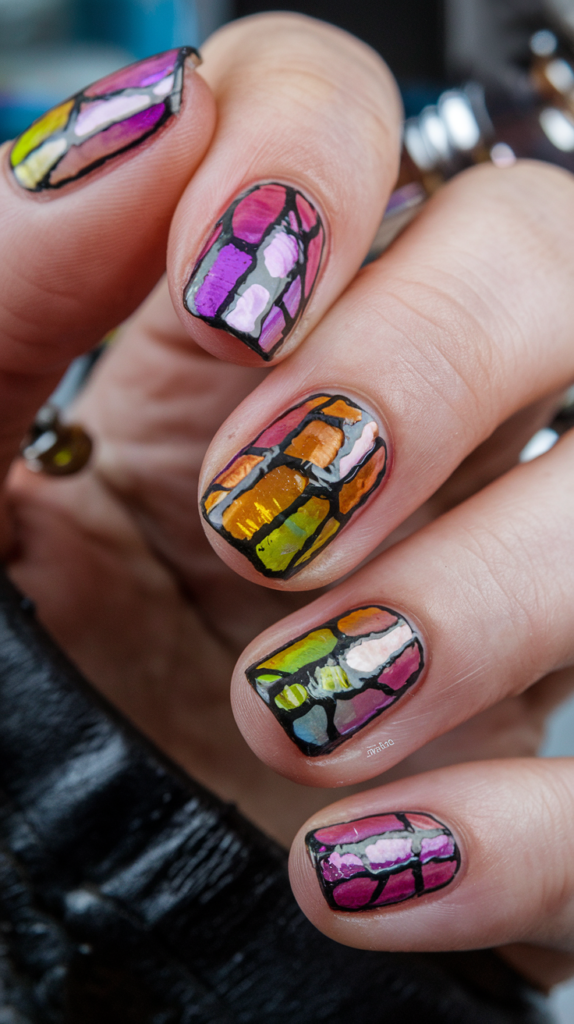
Mimicking Stained Glass Patterns
To mimic stained glass on your nails, use a thin brush to create black lines that divide the nail into sections, similar to the lead in stained glass windows.
Fill each section with a different color using a small brush or dotting tool, using jewel tones like blue, green, red, and yellow for a traditional stained glass look.
Color Selection For Stained Glass Designs
The key to stunning stained glass nails is choosing the right colors.
Opt for bold, translucent colors that resemble the look of colored glass.
You can use either traditional stained glass colors or a pastel palette for a softer look.
Ensure the colors are well separated by the black lines to enhance the stained glass effect.
13. Achieving A Chic Tortoiseshell Nail Texture
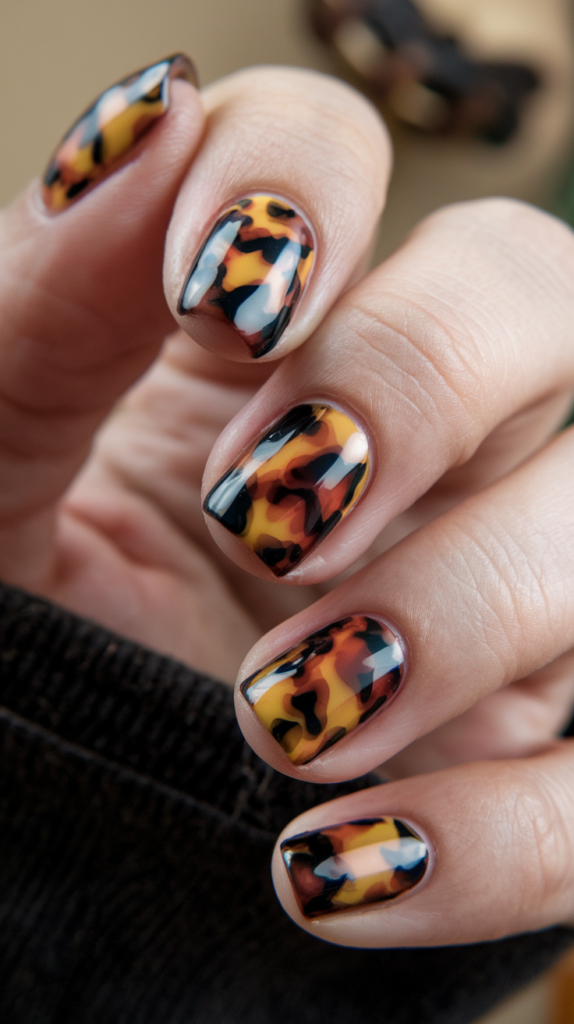
Step-By-Step Guide To Tortoiseshell Nails
Tortoiseshell nails are a timeless design that offers warmth and depth.
Start with an orange or amber base coat.
Once dry, layer spots of dark brown and black, allowing some overlap.
Use a sponge or plastic wrap to dab and blur the spots slightly to mimic the natural variations in tortoiseshell.
Finish with a glossy top coat to enhance the depth and texture.
Combining Colors For A Realistic Effect
The key to realistic tortoiseshell nails is the combination and blending of colors.
Use a palette of amber, orange, brown, and black, and work in thin layers to build up a rich, multi-dimensional look.
Pay attention to how the colors overlap and blend, mimicking the natural irregularities of tortoiseshell patterns.
14. Botanical Line Art For A Natural Nail Look
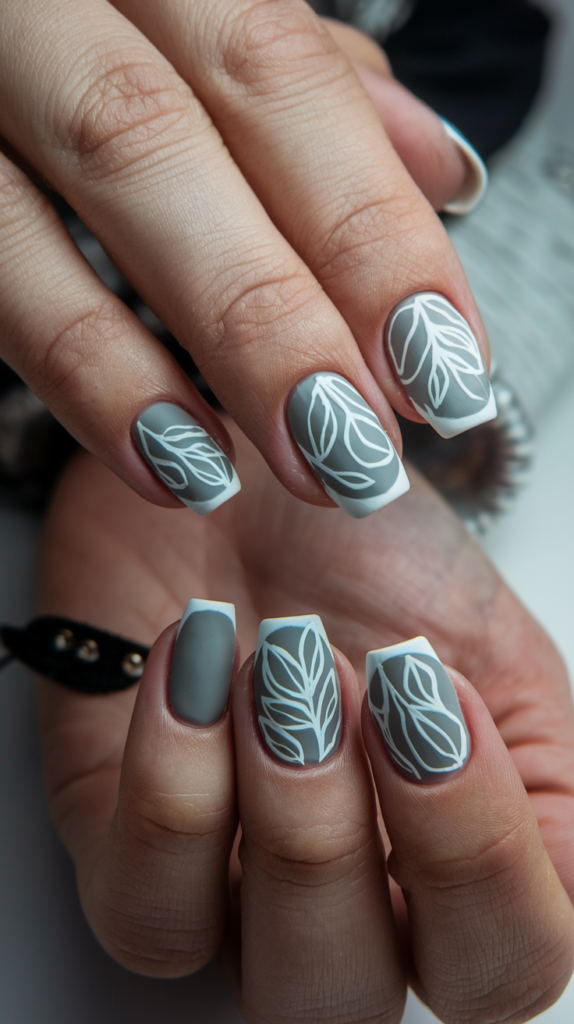
Drawing Techniques For Botanical Elements
Botanical line art requires a steady hand and a fine brush.
Practice drawing simple leaves, branches, and flowers on paper before moving to your nails.
Use a light touch to create thin, delicate lines.
Start with a base coat in a soft pastel or neutral color to make your botanical designs stand out.
Choosing The Right Base Colors
The right base color can make your botanical line art pop.
Opt for soft pastels like pale pink, mint green, or sky blue.
These colors provide a subtle background that enhances the delicate lines of your botanical designs.
Avoid using very dark or very bright colors as they can overshadow the intricate details of your line art.
15. Sunset Ombre Nails: Capturing The Evening Glow
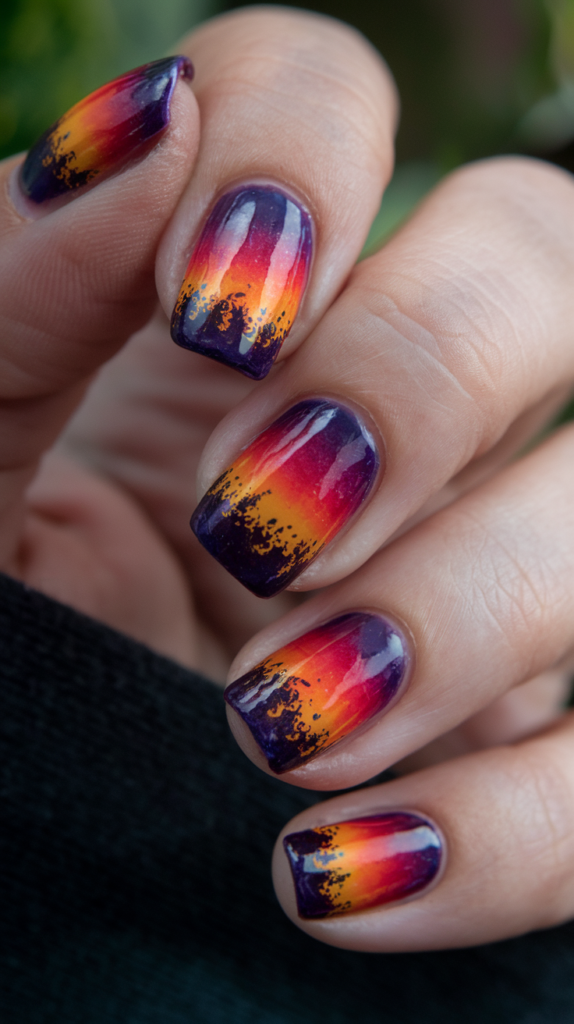
Gradient Techniques For A Sunset Effect
To create a sunset ombre effect, choose colors that represent the evening sky—typically shades of yellow, orange, red, and purple.
Start by applying a yellow polish at the nail base.
While it’s still wet, blend in orange, followed by red, and finish with purple at the tip.
Use a sponge to dab and blend the colors together, creating a smooth gradient that mimics the sky at sunset.
Color Palettes For Sunset Ombre Nails
The key to a beautiful sunset ombre is choosing the right color palette.
Opt for warm tones that blend well together.
You can experiment with different shades to see how they transition into one another.
For a more dramatic sunset look, include a hint of dark blue or black at the tips to represent the approaching night sky.
16. Gilded Lace Nail Designs For An Elegant Touch
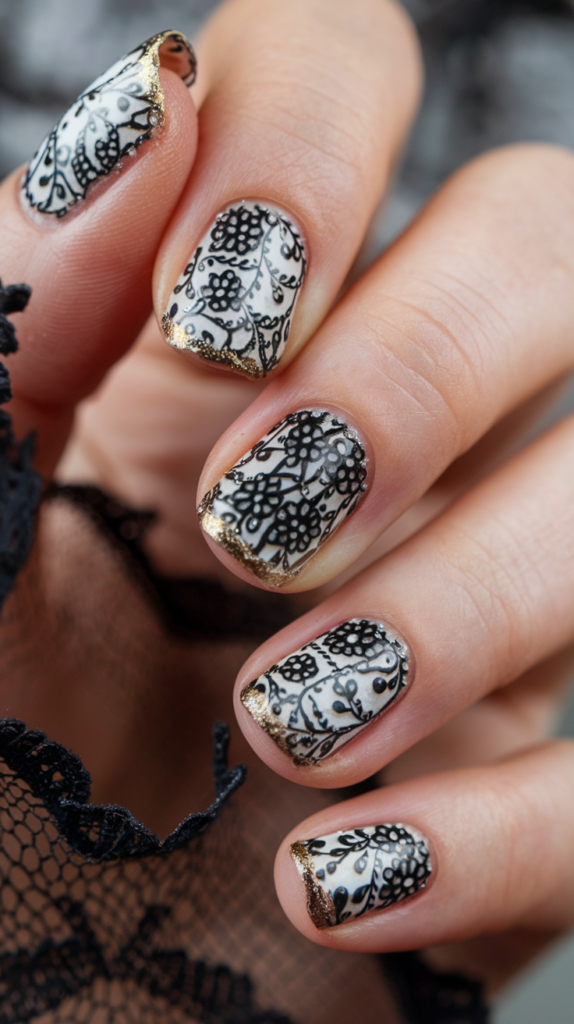
Creating Lace Patterns With Nail Tools
To create gilded lace designs, start with a base coat in a light color like white or cream.
Use a fine brush or a stamping tool designed with lace patterns.
Once you stamp or draw the lace design, apply a thin line of gold polish along the edges of the lace to highlight the intricate patterns.
This requires precision but results in a beautifully detailed and refined look.
Using Gold Edges To Enhance Designs
Adding gold edges to lace designs brings an extra touch of elegance.
Use a very fine brush or a striping tape to create clean, precise lines.
The gold polish should be metallic or glittery to catch the light and add a luxurious finish to your lace nails.
17. Galaxy Nail Art: Bringing The Cosmos To Your Fingertips
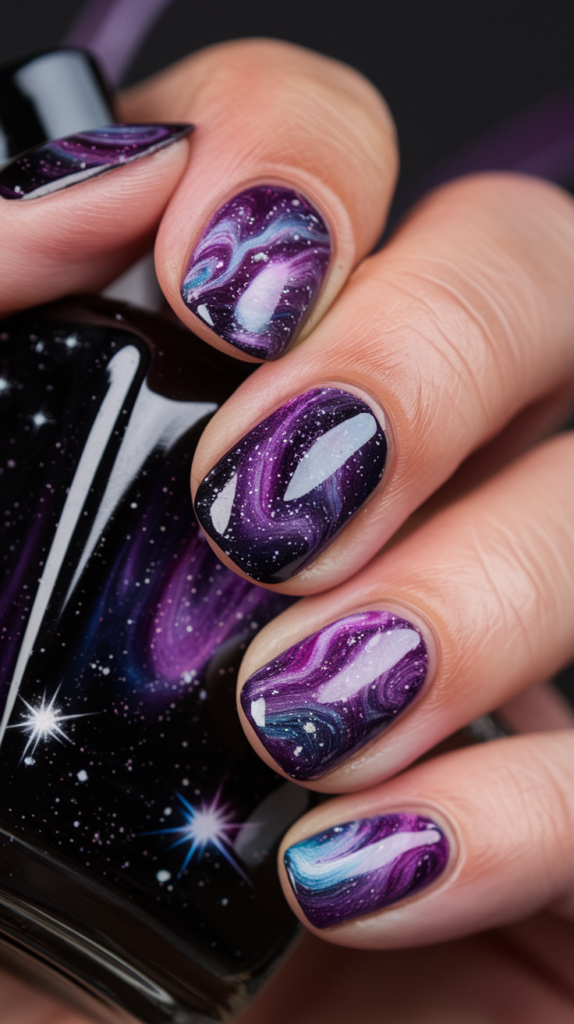
Colors And Techniques For A Galactic Look
Galaxy nail art is all about creating a deep, space-like effect on your nails.
Use a black or deep navy blue base coat to represent the night sky.
Over this, sponge on small amounts of purple, blue, and pink to create the look of distant nebulae.
Add tiny dots of white or use a toothpick dipped in white polish to dot on stars.
For extra sparkle, sprinkle a small amount of glitter over the wet polish.
Adding Sparkle With Glittering Stars
To enhance your galaxy nails, add glittering stars.
Use a fine-tipped tool or a toothpick to apply small dots of glitter polish over your base design.
Focus on areas where you have applied lighter colors to represent galaxies, as this will help the stars stand out.
For a more dramatic effect, add one or two larger stars by placing a rhinestone or a larger glitter flake.
18. Chrome Mirrors: A Futuristic Nail Trend

Achieving A Perfect Chrome Finish
Chrome mirror nails require a special mirror powder that is rubbed onto a gel polish base.
Apply a base coat of black or another dark color gel polish and cure it under a UV lamp.
Then, using a sponge applicator, gently rub the chrome powder over the cured polish until you achieve a mirror-like finish.
Seal it with a topcoat and cure again to set your futuristic chrome nails.
Care And Maintenance Of Chrome Nails
Chrome nails can chip and lose their mirror finish if not properly maintained.
Apply a topcoat every few days to protect the finish.
Be mindful of activities that can cause chips or scratches, and wear gloves when doing tasks that could damage your nails.
Regular maintenance will keep your chrome nails looking shiny and new.
19. Modern Twists On The Classic French Tip
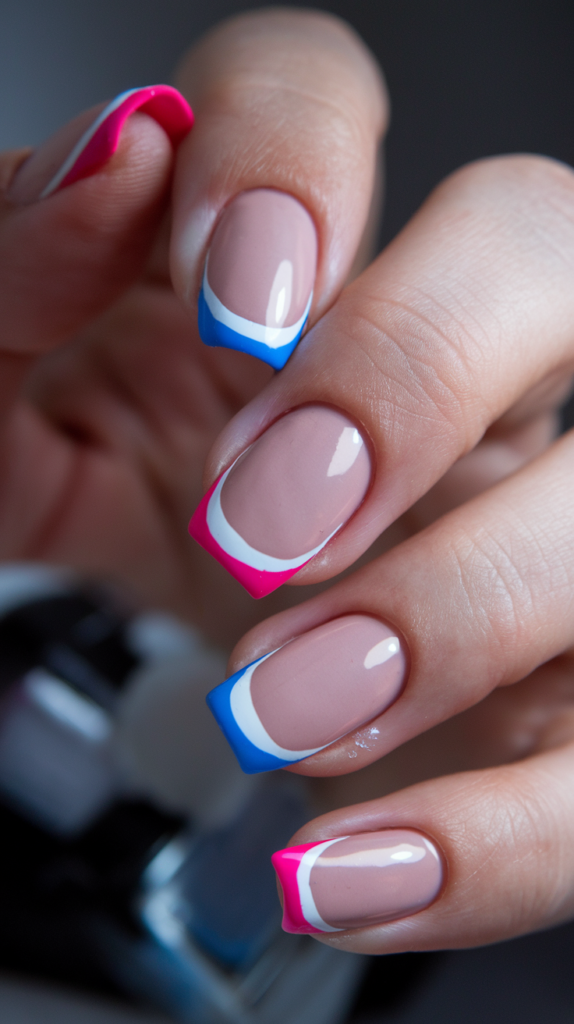
Innovative Color Ideas For French Tips
Traditional French tips are white, but you can modernize them by using other colors.
Try metallics like silver or gold, neons for a pop of color, or pastel shades for a soft, modern look.
You can also experiment with glitter or small graphic designs like tiny hearts or stars at the tip instead of a straight line.
Techniques For Sharp And Clean Lines
For perfect French tips, use striping tape or nail guides to ensure straight, clean lines.
Apply the tape across your nails where you want the tip color to start, and make sure it’s firmly pressed down.
Apply the tip color, and then carefully remove the tape while the polish is still wet to avoid smudging.
This technique helps achieve a professional-looking French tip with sharp, clean lines.
20. Half-Moon Manicure: A Vintage Revival
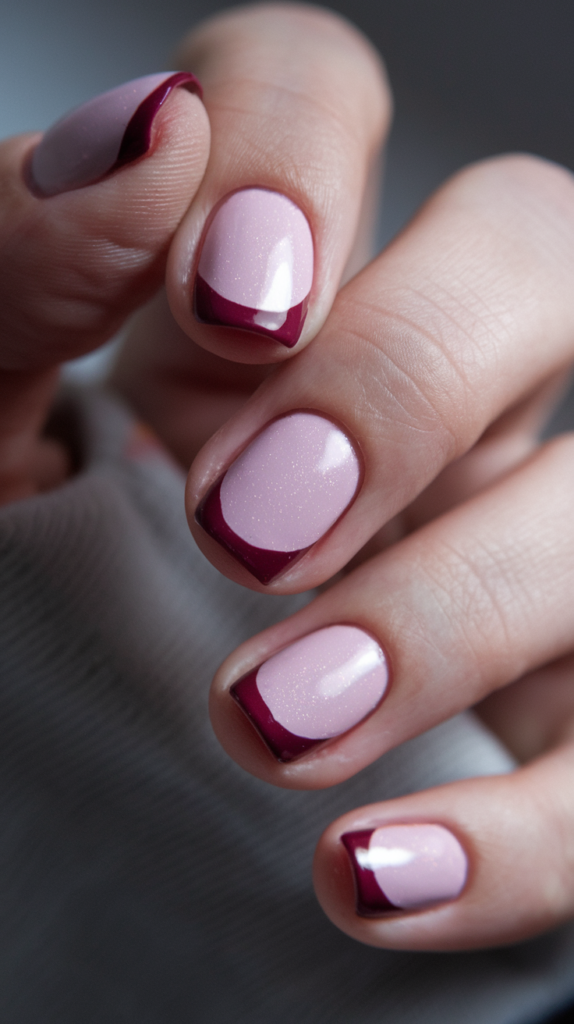
Designing The Perfect Half-Moon
The half-moon manicure is a vintage style that’s making a comeback.
Use nail guides or reinforcement stickers placed at the base of the nail to create the half-moon shape.
Paint above the sticker in a bold color, leaving the base of the nail nude or painted in a contrasting shade.
Carefully remove the sticker to reveal a crisp half-moon.
Color Combinations For Modern Looks
For a modern twist on the half-moon manicure, try unusual color combinations like black and gold, navy and silver, or teal and grey.
Consider the occasion and your outfit when choosing colors to ensure your nails complement your overall look.
21. Cat Eye Nails: Magnetic Polishes And Techniques
Applying Cat Eye Effects With Magnetic Polish
Cat eye nails use a special magnetic polish that contains fine metallic particles.
After applying a base coat, apply a layer of cat eye polish.
Immediately hold a magnet over the nail while the polish is still wet.
The magnetic field causes the metallic particles to create a pattern that resembles a cat’s eye.
Experiment with different magnets to vary the effect.
Troubleshooting Common Cat Eye Issues
If you’re having trouble getting a clear cat eye effect, make sure the polish has not begun to dry before you use the magnet.
Keep the magnet close to the nail for a few seconds to ensure the particles move into place.
If the effect is still not as pronounced as you would like, apply a thicker layer of polish and try again.
22. Sweater Pattern Nails: A Cozy Winter Design
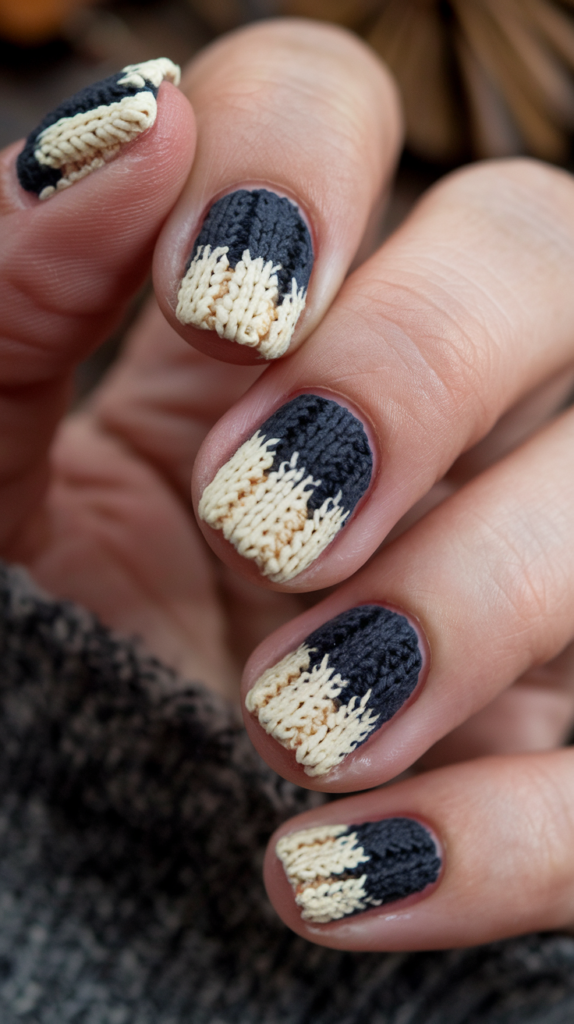
Texturing Techniques For Sweater Patterns
To create a textured sweater pattern on your nails, use a dotting tool or a small brush to apply a cable knit design with gel polish.
After painting your base color, draw the sweater design in a contrasting color.
If you’re using regular polish, look for textured nail polishes that give a fabric-like finish to enhance the sweater effect.
Best Colors And Polishes For A Knitted Look
Soft, muted colors like cream, grey, and pastel pink make great bases for sweater nails, mimicking the colors of cozy winter wear.
Look for polishes labeled as “textured” to achieve an authentic sweater effect.
These polishes often contain fibers that give the nails a three-dimensional appearance similar to knitted wool.
23. Embracing Abstract Expressionism In Nail Art
Creating Abstract Designs With Bold Colors
Abstract expressionism in nail art allows for creative freedom and bold color use.
Start with a base coat in a neutral color, then splatter or swipe bold colors across your nails using a brush or sponge.
The key is to let the colors blend and overlap naturally, without striving for any specific pattern, which mimics the spontaneity of abstract expressionist art.
Tools For Splashing And Detailing
To create your abstract designs, you’ll need brushes, sponges, or even pieces of plastic wrap to dab and drag the polish.
Each tool will give a different texture and effect.
Experiment with different tools to see which ones create the effects you like best.
24. Mosaic Tiles: A Playful Nail Art Trend
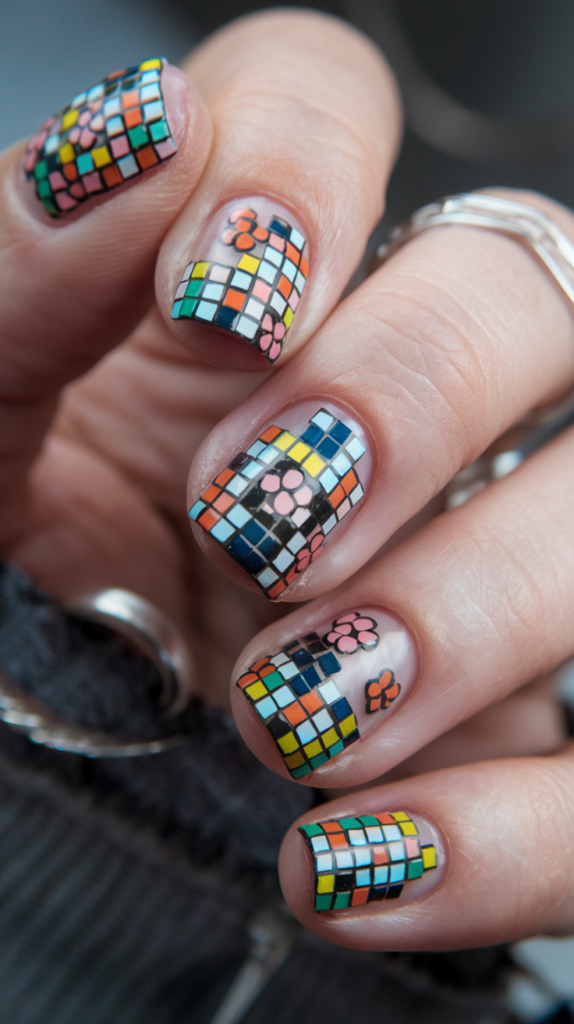
Planning And Designing Mosaic Tile Patterns
Creating a mosaic tile effect requires planning.
Sketch your design on paper first to decide on colors and shapes.
Once you’re happy with your design, transfer it to your nails using a fine brush.
Start with larger shapes and fill in with smaller ones, ensuring that the colors do not blend together.
Application Tips For Precise Results
Use a very fine brush for precision in creating the small, detailed shapes of a mosaic.
Work slowly and methodically to keep the lines sharp and the colors separate.
A clear topcoat will help seal your design and prevent the colors from wearing off.
25. The Beauty Of Negative Space With Florals

Techniques For Incorporating Negative Space
Negative space designs let part of your natural nail show through.
To create these looks, apply stickers or stencils in the shape of flowers or leaves to your nails, then paint over them with your chosen color.
Carefully remove the stickers to reveal the design.
This technique requires precision to ensure clean lines around the negative space.
Floral Designs That Complement Negative Space
Choose floral designs that are simple and not too crowded.
Large, bold flowers work well as they stand out against the negative space.
You can also add small dots or lines to emulate flower stems or additional details, enhancing the overall design.
26. Art Deco Nails: A Touch Of Vintage Glamour
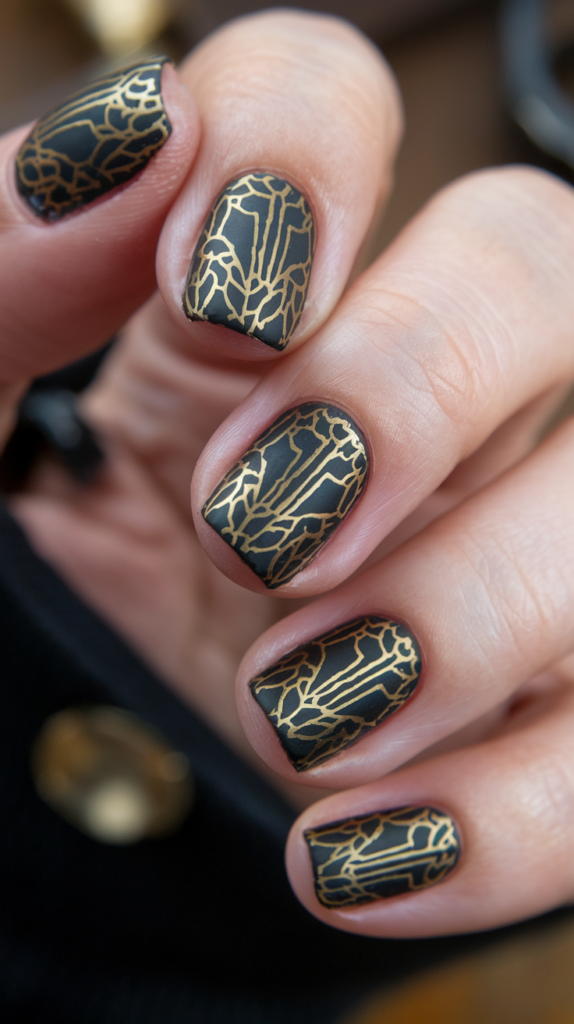
Art Deco Design Principles For Nails
Art deco designs are characterized by bold geometric shapes and luxurious detail.
Use metallic polishes and sharp lines to create the structured look typical of art deco.
Triangles, straight lines, and arches are all suitable shapes for an art deco-inspired nail design.
Metallic Line Techniques For A Luxe Look
To achieve clean, metallic lines, use striping tape or a fine brush dipped in metallic polish.
Measure and tape off your designs to ensure symmetry and precision.
Metallic accents not only add a touch of glamour but also highlight the architectural beauty of art deco design.
27. Vintage Wallpaper Designs On Nails
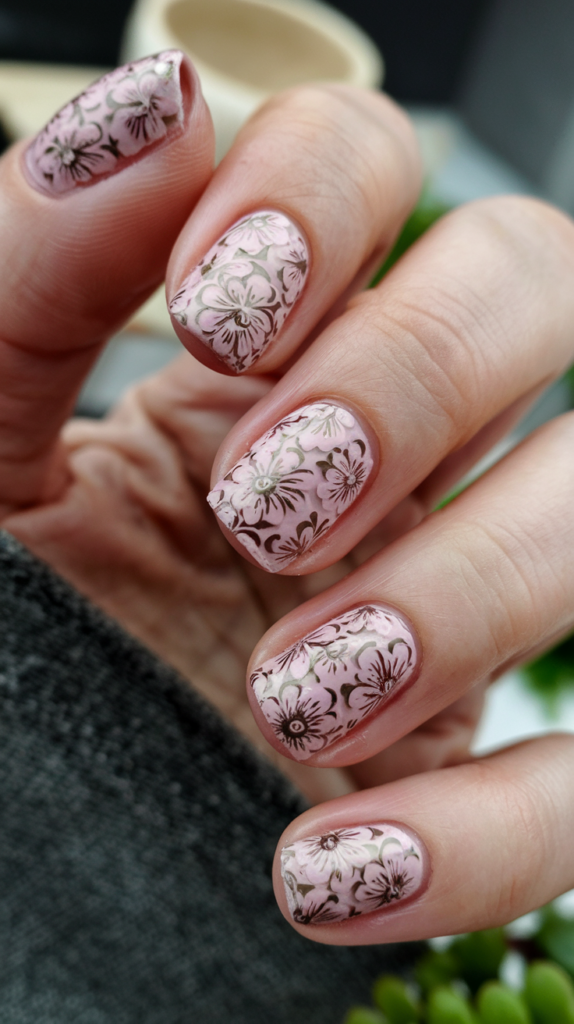
Achieving Detailed Floral Patterns
Vintage wallpaper designs often feature intricate floral patterns.
Use a fine brush to hand-paint small, detailed flowers and vines over a light base coat.
Look for inspiration in vintage design books or online to find patterns that capture the old-world charm of vintage wallpapers.
Color Palettes That Reflect Vintage Aesthetics
Choose soft, muted colors like dusty rose, sage green, and pale yellow to mimic the colors typically found in vintage wallpapers.
These colors provide a soft background that makes the detailed designs stand out, offering a classic and romantic nail look.
28. Mastering The Glitter Dust Fade Technique
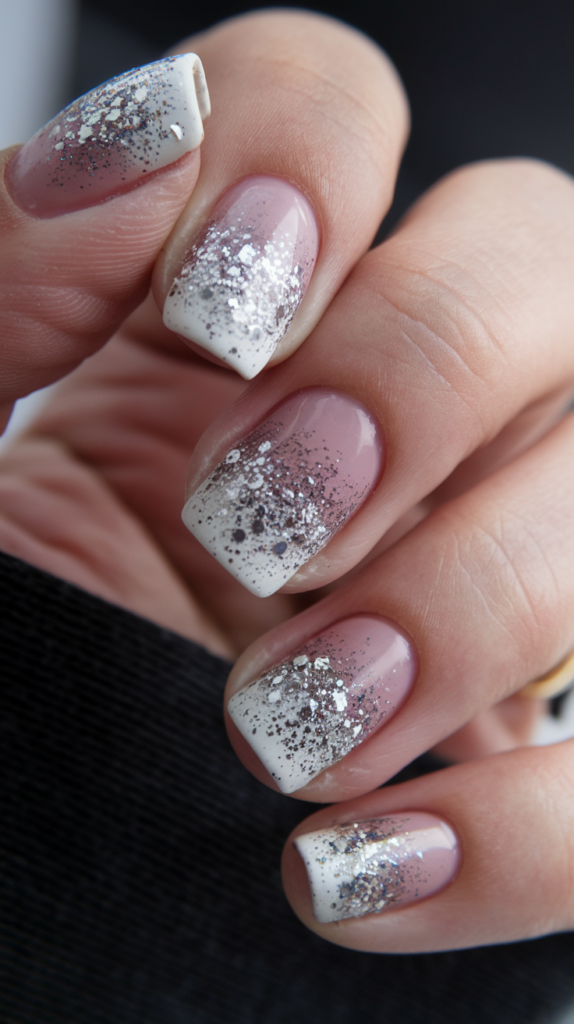
Choosing The Right Glitter Dust
Select fine glitter dust for a subtle sparkle or larger glitter flakes for a more pronounced effect.
The color of the glitter should complement the base color of your nails.
Holographic glitters can add a multi-dimensional look as they catch the light.
Fade Techniques For A Seamless Gradient
Apply a base coat in your chosen color, then while it’s still tacky, sprinkle glitter dust starting at the tip of the nail and fading towards the base.
Use a fan brush to gently blend the glitter down the nail, creating a gradient or ombre effect.
The key is to have more glitter at the tip and less as you move down for a smooth fade.
29. Monochrome Dots: A Simple Yet Striking Look

Techniques For Perfect Dot Placement
Use a dotting tool or the end of a bobby pin to create dots.
Dip your tool into the polish and carefully dot it onto your nail.
Start with larger dots and add smaller ones around them to fill in the space.
Practice on paper first if necessary to get the feel for how much polish to use and how to space your dots.
Ideal Tools For Creating Dots
Besides dotting tools and bobby pins, you can also use the pointed end of a toothpick or a small paintbrush trimmed to a point.
Choose a tool that you’re comfortable with and that gives you the size of dots you want for your design.
30. Luxurious Gold Leaf Accents On Nails
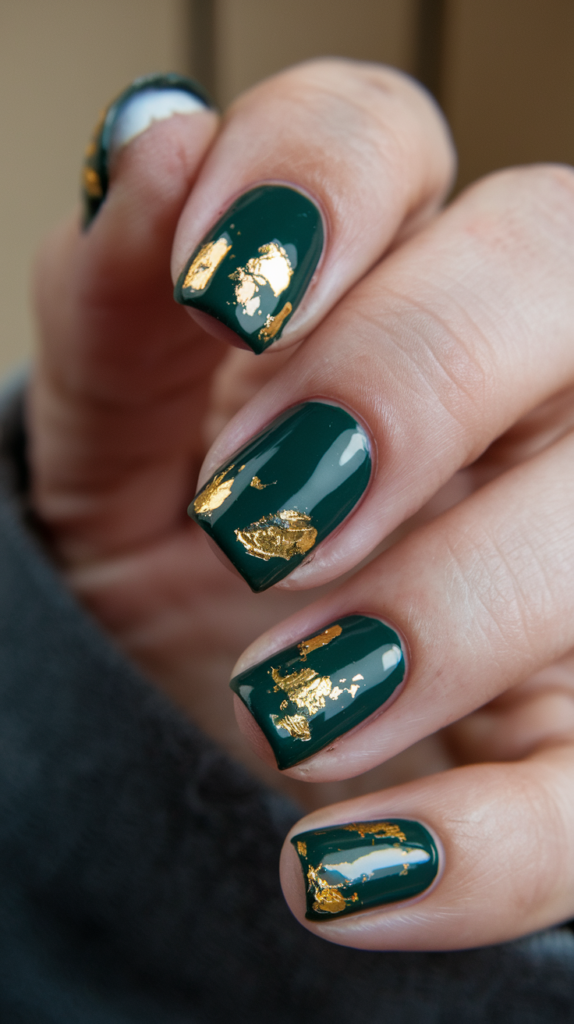
Applying Gold Leaf For Maximum Impact
Gold leaf can be tricky to work with as it’s very delicate.
Apply a base coat and color as usual, then use tweezers to place small pieces of gold leaf on your nails.
The gold leaf should stick to the tacky polish; then, gently press it flat with a clean, dry brush.
Apply a top coat to seal the gold leaf in place.
Combining Gold Leaf With Other Design Elements
Gold leaf looks great with a variety of designs, from simple, elegant looks to more complex art.
It pairs well with geometric shapes, floral designs, or even a plain, glossy base for a minimalist but luxurious look.
The key is to let the gold leaf be the star of the show, so use other design elements sparingly.
31. Mystic Moons: Celestial Patterns In Nail Art
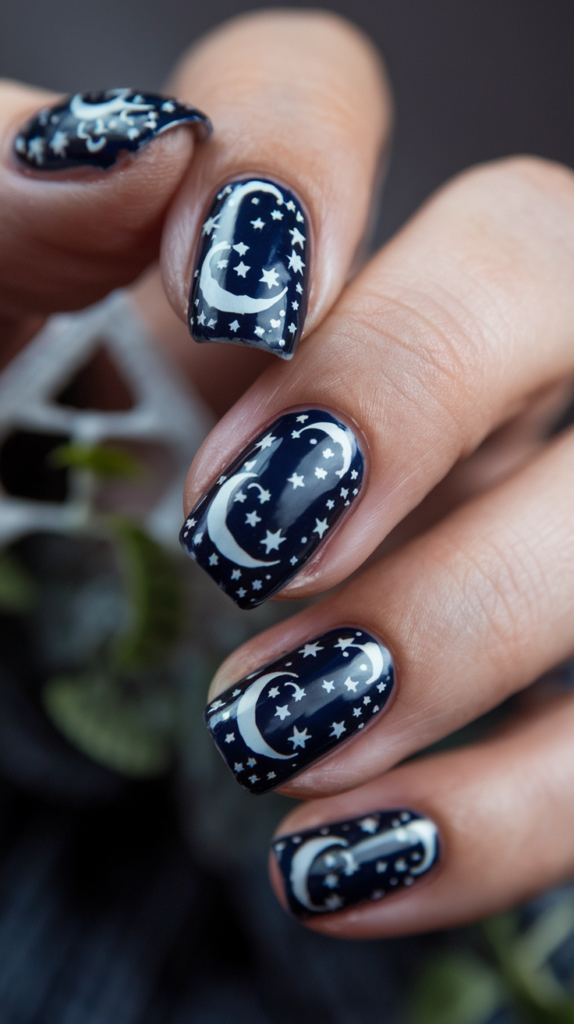
Drawing Techniques For Moon And Star Patterns
To draw moons and stars, start with a dark base color like navy blue or black.
Use a fine brush or a toothpick dipped in white or metallic silver polish to draw crescent moons and small stars.
You can also add glitter or rhinestones to represent stars for additional sparkle.
Night Sky Color Schemes For Celestial Nails
A night sky color scheme should include dark and moody hues such as deep blues, purples, and blacks.
You can add accents in silver, white, or glittery polishes to mimic the twinkling stars.
Experiment with sponging lighter colors on top of darker ones to create a galaxy effect.
32. Hosting A Polka Dot Party On Your Nails
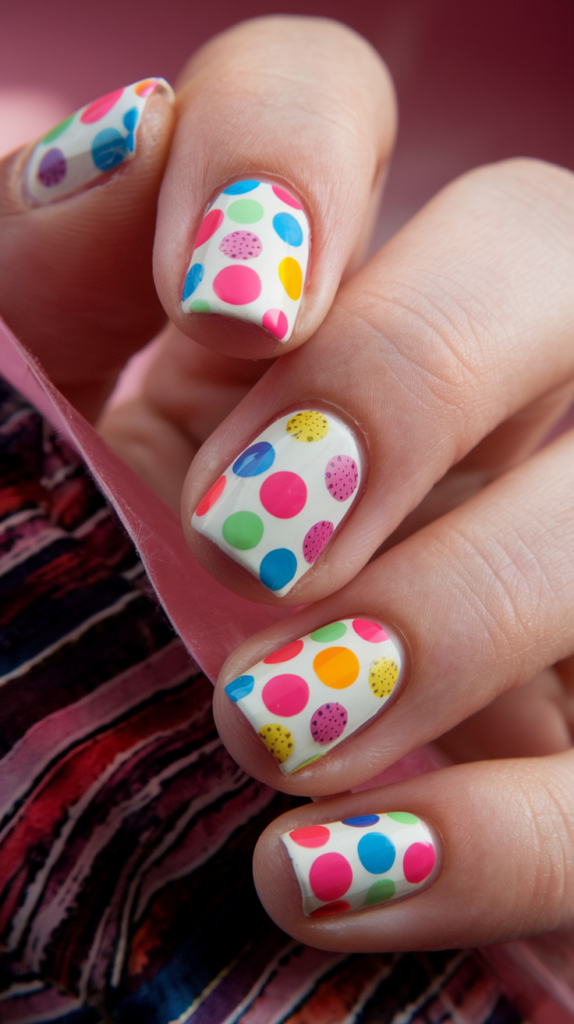
Dotting Techniques For Varied Sizes
For a fun and playful polka dot design, use tools of different sizes to create dots of varying sizes.
This adds interest and movement to your design.
Space the dots randomly or in a pattern, depending on the look you want.
Choosing Vibrant Colors For Polka Dots
Choose bright and contrasting colors to make your polka dots pop.
Consider the color wheel for combinations that stand out, like purple and yellow or blue and orange.
You can also use pastels for a softer, more whimsical look.
33. Liquid Metal Nails: A Dripping Effect
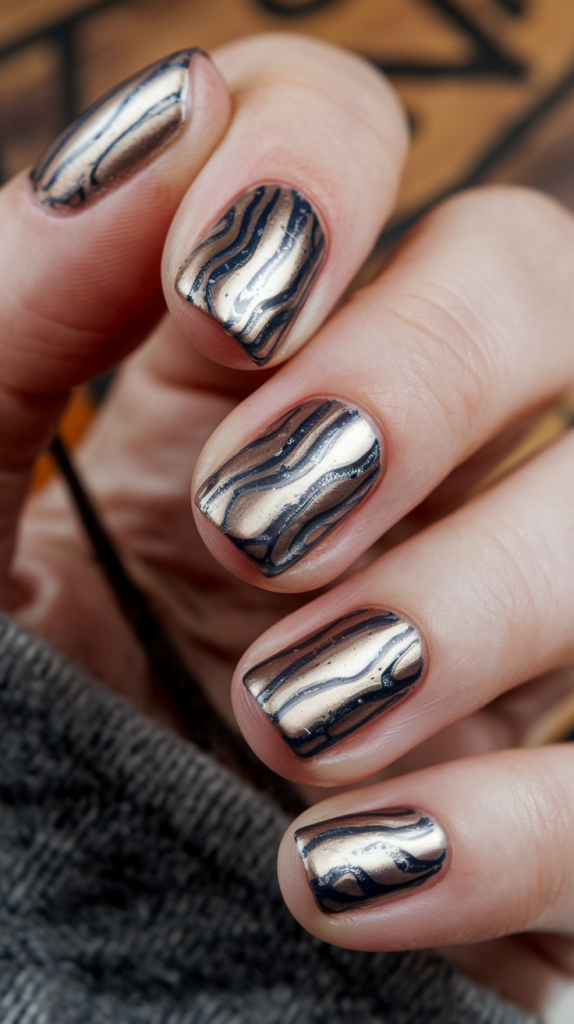
Creating Fluid Metallic Designs
To create a liquid metal effect, choose metallic polishes with a high shine.
Apply a thick layer of metallic polish at the tip of the nail and use a brush to drag the polish down in thin streaks to mimic dripping metal.
The key is to work quickly before the polish dries to ensure a smooth, fluid effect.
Tools And Materials For A Metallic Drip Look
You’ll need a small brush to pull the polish down the nail.
A fine-tipped brush works best for creating thin, dripping lines.
You can also use a dotting tool to add larger droplets of metallic polish at the tips before dragging them down for added effect.
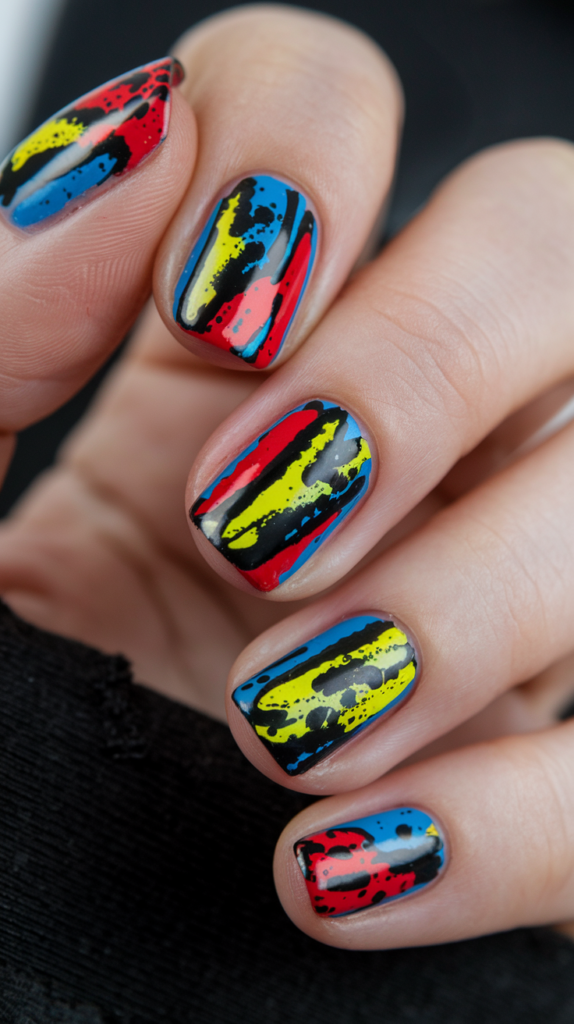
34. Pop Art Splatter: A Bold Artistic Expression

Techniques For Creating Splatter Effects
To create a splatter effect, you can use a stiff brush or a straw.
Dip the brush in polish and flick it over your nails for a random splatter effect, or blow through a straw dipped in polish for larger, more controlled splots.
Cover the skin around your nails with tape or petroleum jelly for easy cleanup.
Color Choices For Pop Art Inspired Nails
Pop art is known for its bold and vibrant colors, so choose polishes in primary colors like red, blue, and yellow, as well as black and white for contrast.
Bright neon colors can also work well for a more modern pop art look.
34. Preserving Beauty: Pressed Flower Nail Art
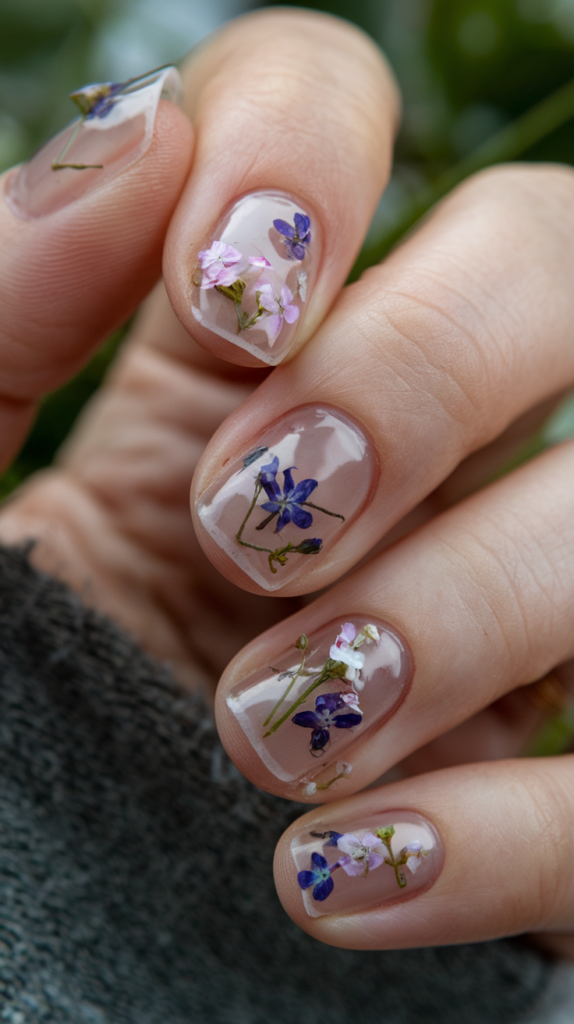
Techniques For Embedding Real Flowers
To embed real flowers in your nails, start with a base coat and a light color polish.
Apply a layer of clear polish and gently place the pressed flowers on the nail using tweezers.
Once in place, apply several layers of clear polish, allowing each layer to dry completely to fully encase the flowers.
Maintaining The Longevity Of Pressed Flower Designs
Pressed flower nails can be delicate, so it’s important to seal them well with a topcoat.
Reapply a clear topcoat every few days to prevent the edges of the flowers from lifting or getting damaged.
Be gentle with your nails to avoid catching the flowers on clothing or hair.
Conclusion
We hope this guide has sparked your creativity and equipped you with the skills to explore the dynamic world of nail art.
Each design, from the subtle sophistication of rose gold glam to the bold drama of pop art splatters, offers a unique way to express your personal style and elevate your look.
Remember, nail art is not just about following trends—it’s about making each design your own.
So, experiment with colors, play with patterns, and don’t be afraid to step outside the box.
Your nails are your canvas, and the possibilities are endless.
Keep practicing, stay inspired, and most importantly, have fun with every manicure masterpiece you create.


