Introduction
Gold nail art designs are synonymous with luxury, elegance, and timeless fashion.
Whether you’re looking for a bold, statement-making look or something more subtle and chic, incorporating gold into your manicure instantly elevates your style.
From shimmering gold foil to bold chrome finishes, gold accents can transform your nails into a work of art.
This blog explores 35 stunning gold nail designs that range from minimalist elegance to glamorous and intricate patterns.
These designs will inspire you to take your nail game to the next level, ensuring you shine no matter the occasion.
01. Gold Leaf Minimalist Nails: A Chic, Understated Elegance

How To Achieve The Perfect Gold Leaf Minimalist Look
Gold leaf nails are all about sophistication and subtle luxury.
To achieve this chic look, begin by selecting a nude base coat, which will serve as a soft backdrop for the gold leaf accents.
Paint your nails with two even coats of a nude polish and allow them to dry completely.
Using tweezers, carefully place small, irregular pieces of gold leaf onto the surface of your nails.
Gold leaf is extremely delicate, so handle it with care.
Gently press the gold pieces onto the tacky surface of the nail polish.
Once satisfied with the placement, seal the design with a clear topcoat to ensure the gold leaf stays in place and to give the nails a glossy finish.
Tips For Maintaining This Design
Gold leaf nails are stunning but require a bit of maintenance.
To keep the gold leaf looking fresh, make sure to apply a topcoat every couple of days.
Avoid using harsh chemicals or scrubbing your nails, as this can wear away the delicate gold accents.
Additionally, be cautious when doing activities that involve your hands, such as washing dishes or gardening, to prevent chipping.
Best Base Colors For Gold Leaf
While a nude base provides a timeless, minimalist contrast to the gold leaf, other colors can also elevate the look.
Soft pinks, pastels, or even pale lavender can provide a feminine touch.
For a more dramatic contrast, you could opt for a matte black base, allowing the gold leaf to truly stand out.
02. Full Gold Chrome Nails: Make A Bold, Statement Look
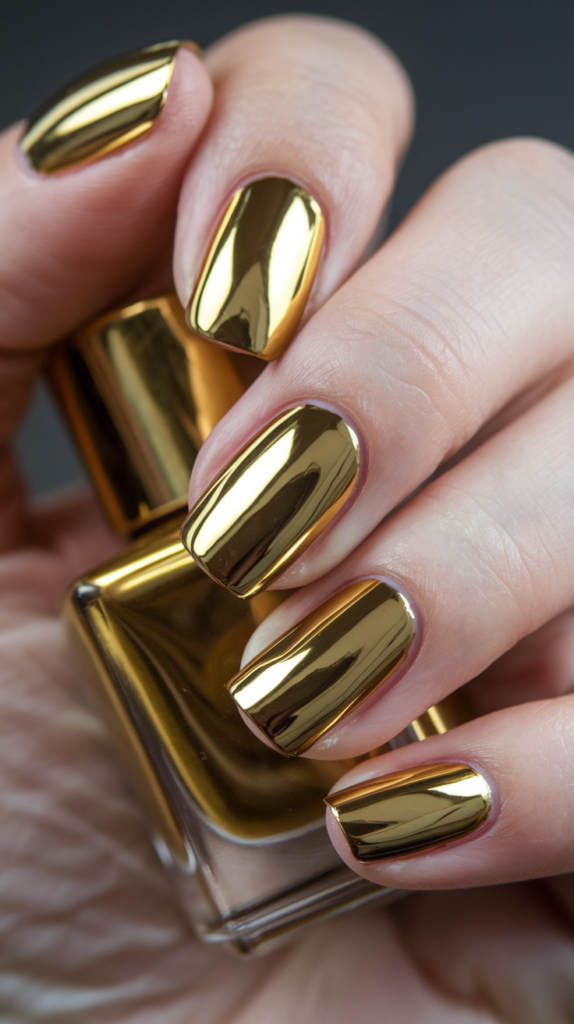
Step-By-Step Guide To Achieving Full Gold Chrome Nails
Creating full gold chrome nails is a bold fashion statement that exudes confidence and luxury.
Begin by prepping your nails with a base coat, ensuring that the nail surface is smooth and ready for application.
Use a chrome powder in gold and rub it gently over a black or nude base coat using a sponge applicator.
The chrome powder will bond with the nail polish, creating a mirror-like metallic finish.
Ensure the application is even and smooth to avoid any streaks or bumps.
Once the chrome is applied, seal the look with a clear topcoat to enhance the shine and longevity of the design.
The Benefits Of Using Chrome Finish For An Edgy Look
Chrome finishes are ideal for making a bold statement because they provide a high-shine, mirror-like effect that stands out in any crowd.
Gold chrome, in particular, elevates the edgy aesthetic with a touch of sophistication.
The reflective nature of chrome also catches light beautifully, making your nails sparkle from every angle.
This design is perfect for special occasions or when you want to add a little extra glamour to your daily style.
How To Maintain A Reflective, Mirror-Like Finish
To keep your gold chrome nails looking flawless, it’s essential to maintain the glossy finish.
Applying a topcoat every two to three days can help prevent the chrome from dulling or chipping.
Additionally, be mindful of using hand creams and oils that can potentially reduce the shine.
Wearing gloves while doing household chores can also help prolong the life of your gold chrome manicure.
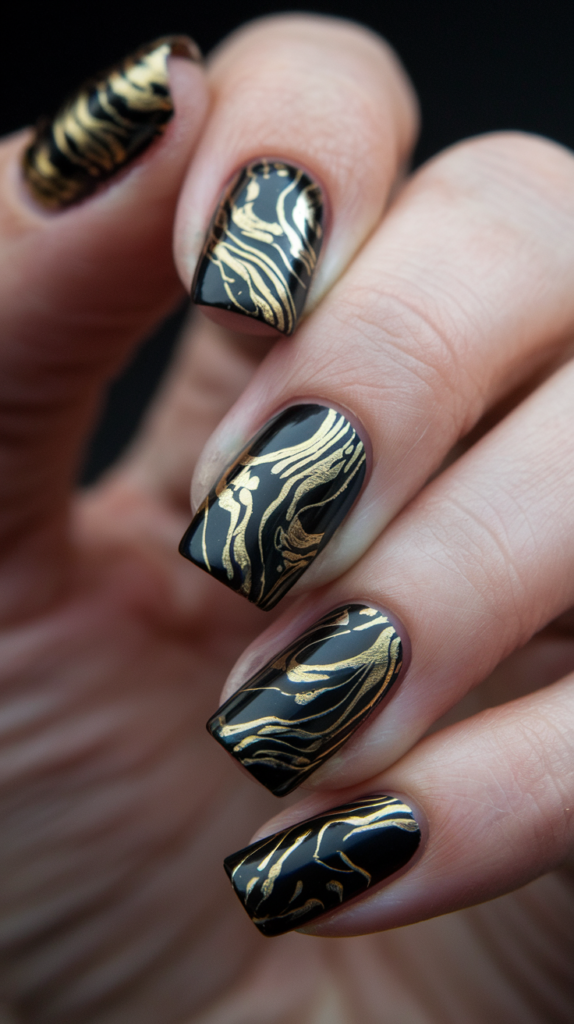
03. Black And Gold Marble: Luxurious And Dramatic Contrast
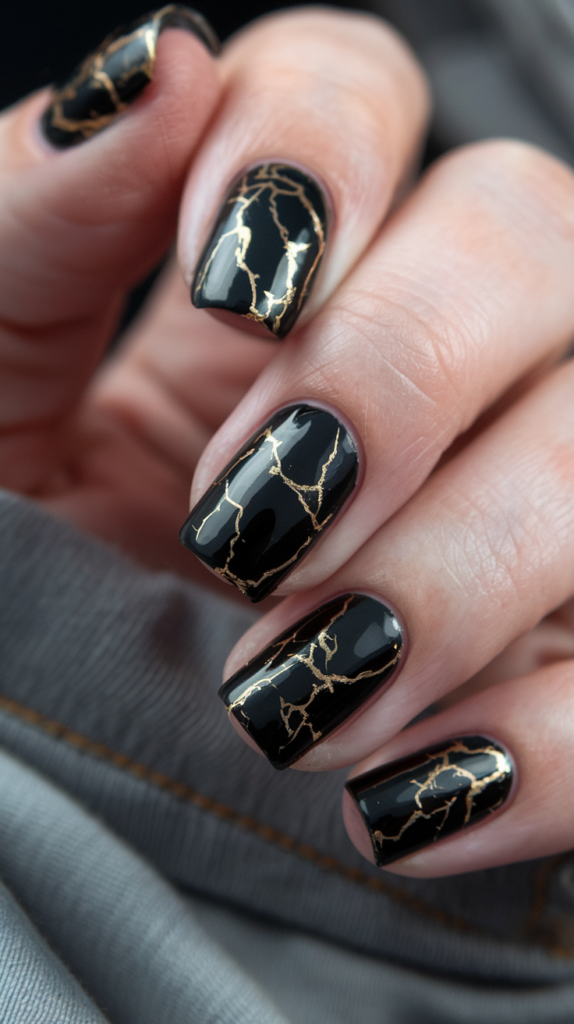
Achieving The Perfect Marble Effect With Gold Veins
To create a stunning black and gold marble nail design, start with a jet-black base coat.
Once dry, use a fine nail art brush dipped in metallic gold polish to create thin, random veins across each nail.
These veins should mimic the look of natural marble stone, with irregular patterns and curves.
If you want to soften the edges of the veins, lightly smudge the gold polish using a makeup sponge or your finger before it fully dries.
This will give the effect of the veins naturally fading into the black base, enhancing the marble-like appearance.
The Best Black Polish For A Dramatic Backdrop
For the best results, choose a black nail polish with a high-gloss finish.
A glossy black provides a sleek canvas for the gold detailing to shine against.
Matte black can also work for a more subtle, muted version of the design, but glossy finishes tend to enhance the marble effect by making the gold veins pop.
Brands like OPI or Essie offer high-quality black polishes that provide a smooth and even coat.
Pro Tips For Using Gold Detailing In Marble Designs
When working with gold polish to create marble veins, less is often more.
The goal is to create delicate lines that add sophistication to the design, not overpower the black base.
Use a thin nail art brush to control the width of the lines, and avoid repeating the same pattern on every nail.
Varying the size and placement of the gold veins across each nail will help create a more natural, marble-like appearance.
04. Gold Glitter Ombre: A Dazzling, Gradual Fade
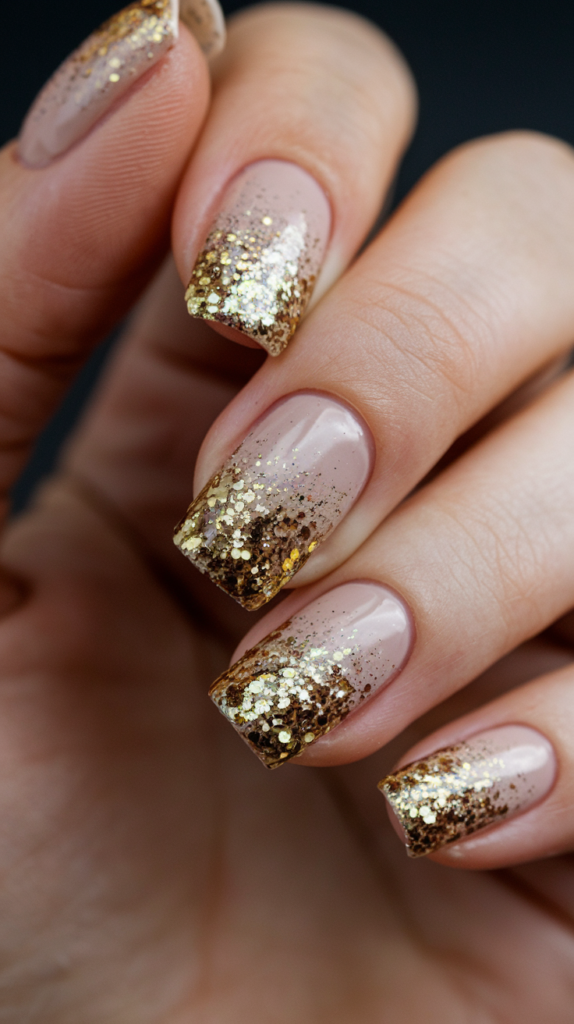
How To Create A Smooth Ombre Transition
Creating a gold glitter ombre is easier than it looks.
Begin with a nude or clear base coat.
Once dry, take a sponge and apply gold glitter polish to the tip.
Dab the sponge onto your nails, concentrating the glitter on the tips and gradually fading it out as you move toward the middle of the nail.
This technique allows the glitter to be most concentrated at the tips, giving the desired ombre effect.
Apply multiple layers of glitter for a more intense sparkle, but be sure to blend it seamlessly into the base color.
The Best Glitter Types For Maximum Shine
For the best glitter ombre effect, choose fine, reflective glitter rather than chunky glitter.
Fine glitter creates a more polished and sophisticated look, while still catching the light beautifully.
Holographic or iridescent glitter can also be used for a more multidimensional effect, adding extra depth and shine to your nails.
Top Color Bases To Pair With Gold Glitter
Nude and clear bases are classic options for pairing with gold glitter, as they allow the gold to shine without any distraction.
However, for a bolder look, you can experiment with darker colors like deep burgundy or navy blue.
These colors create a striking contrast with the gold glitter, making the ombre effect even more eye-catching.
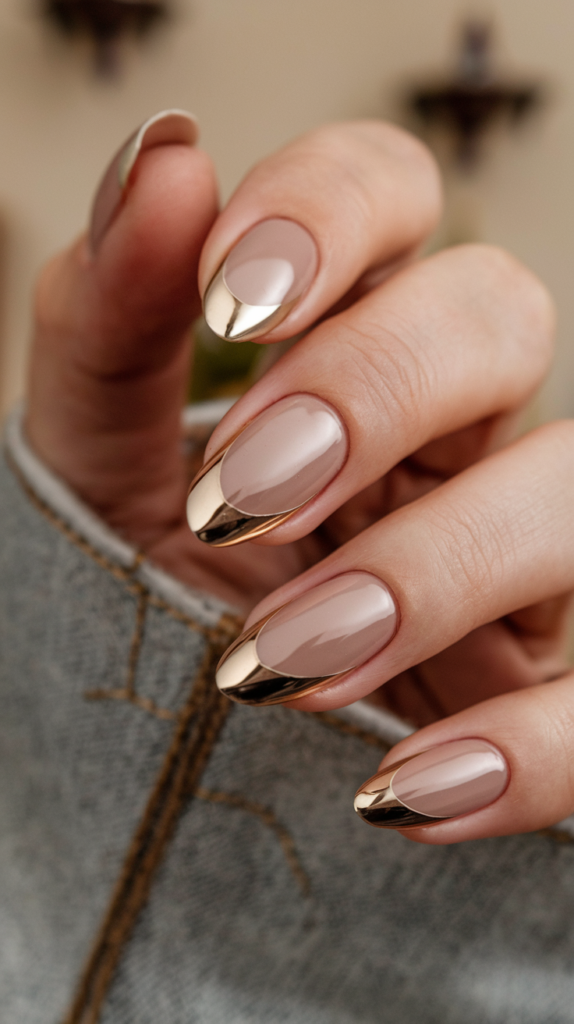
05. Gold French Tips: A Modern Twist On A Classic

Step-By-Step Guide To Creating Gold French Tips
Gold French tips are a fresh, modern take on the classic French manicure.
Start by applying a sheer pink or nude base coat.
Once dry, use a nail guide or freehand a clean line of metallic gold polish across the tip of each nail.
To achieve a sharp, even tip, it’s best to use a thin, precision brush for the gold polish.
Allow the gold polish to dry fully before sealing the design with a clear topcoat to enhance the shine and protect the tips from chipping.
Why Gold French Tips Are Trending
The modern twist of swapping white for gold in a French manicure has become a major trend due to its blend of sophistication and glamour.
Gold French tips offer a subtle yet luxurious feel, making them perfect for both casual and formal occasions.
The metallic finish elevates the classic style, making it more fashion-forward and chic, which is why it’s been seen on red carpets and fashion runways alike.
Best Ways To Complement Gold French Tips With Nail Shapes
While gold French tips look great on any nail shape, they particularly shine on almond and square shapes.
Almond-shaped nails elongate the fingers and provide an elegant canvas for the gold tips, while square nails offer a more modern, clean-cut look.
Coffin-shaped nails also work well with this design, as the sharp edges complement the clean lines of the French tips.
06. Matte Black With Gold Foil Accents: Edgy Meets Luxurious

How To Apply Gold Foil To Matte Nails For Maximum Impact
To achieve a striking contrast between matte black and gold foil, begin by painting your nails with a matte black polish.
Once the black polish has dried completely, carefully apply small pieces of gold foil to the nails using tweezers.
The gold foil should be placed randomly on each nail to create a natural, scattered effect.
Press the foil down gently to ensure it adheres to the polish.
Finish with a matte topcoat to lock the foil in place while maintaining the matte black finish.
Matte Vs. Glossy Finish: When To Choose Which
Matte black creates a sophisticated backdrop for gold foil, allowing the metallic elements to take center stage.
However, if you prefer a shinier finish, you can opt for a glossy black polish instead.
A glossy finish provides a more polished, glamorous look, while matte black adds an edgy, modern vibe.
Both options are stunning, but the choice depends on the overall aesthetic you’re aiming for.
Creative Placement Ideas For Gold Foil Accents
Gold foil can be used in a variety of ways to create unique nail art designs.
You can scatter small pieces of foil across the entire nail for a random, abstract look, or place larger chunks along the tips for a more structured, French-tip style.
Another creative idea is to apply the foil in geometric shapes or along the edges of the nails for a more architectural, artistic design.
07. Gold Chevron Tips: Sharp, Geometric, And Stylish
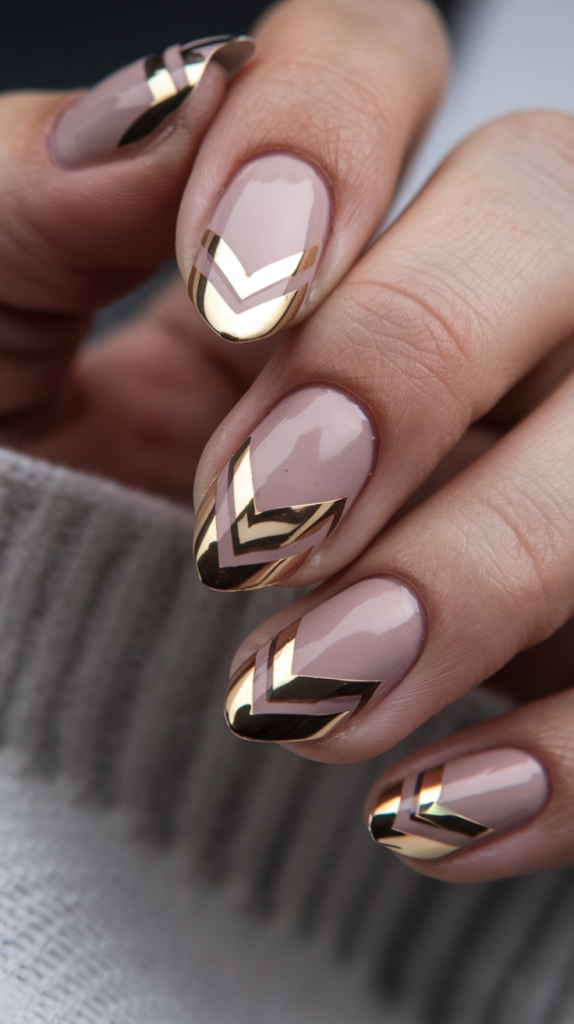
Creating Crisp Gold Chevron Patterns At Home
To create perfect gold chevron tips, start by applying a nude or pale pink base coat.
Once dry, use a striping tape or nail guides to create the sharp, chevron pattern at the tips of each nail.
Paint the tips with metallic gold polish, ensuring the lines are crisp and even.
Remove the tape or guides before the gold polish fully dries to avoid smudging.
Allow the polish to dry fully before applying a clear topcoat to seal the design.
Combining Chevron Tips With Nail Art For A Unique Twist
Chevron tips can be combined with other nail art elements to create a more intricate design.
You can add small dots or studs along the edges of the chevron for added texture, or incorporate a contrasting color beneath the chevron for a layered effect.
Another option is to add subtle glitter to the gold chevron tips for an extra touch of sparkle.
Best Nail Shapes For Chevron Patterns
Chevron tips look particularly striking on almond and stiletto-shaped nails, as the sharp points complement the angular design of the chevrons.
Coffin-shaped nails also provide a long, flat surface that showcases the pattern beautifully.
Short square nails can also work for this design, but the pattern may need to be scaled down to fit the shorter length.
08. Gold And White Stripes: The Perfect Blend Of Minimalism And Glam
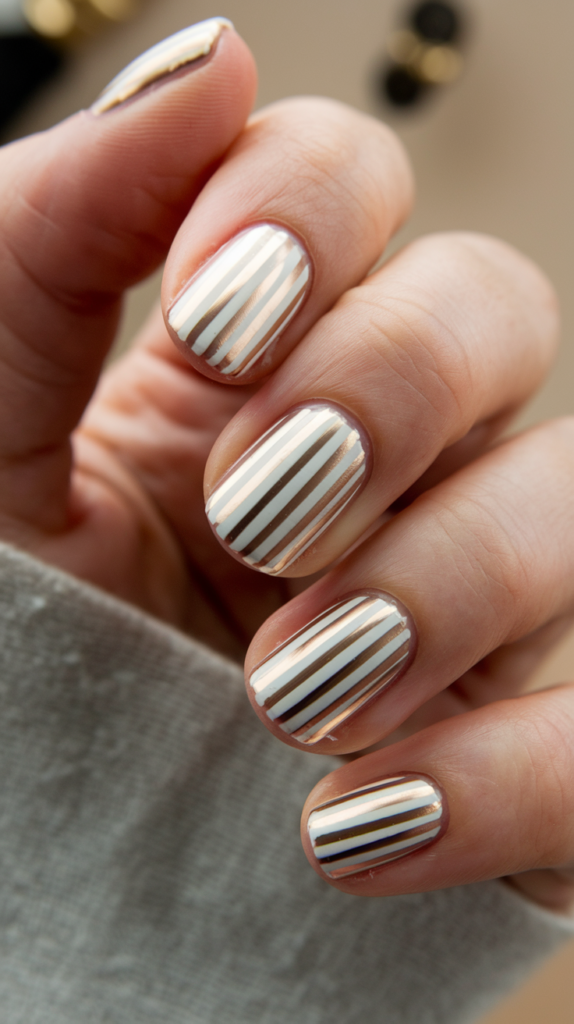
Achieving Straight, Clean Stripes With Gold
To create straight, clean gold stripes, begin by painting your nails with a white or pastel base coat.
Once dry, use striping tape to create evenly spaced lines across the nails.
Apply a metallic gold polish over the tape, ensuring that the lines are crisp and free of streaks.
Remove the tape before the gold polish dries to avoid smudging.
Once the design is complete, apply a clear topcoat to seal the look and add shine.
Ideas For Alternating White And Gold In Different Patterns
You can experiment with alternating white and gold stripes in various patterns for a unique design.
For example, you could alternate thick and thin stripes for a more dynamic look or create diagonal stripes for a more geometric, modern aesthetic.
Another idea is to alternate between vertical and horizontal stripes on different nails for a playful, mixed-pattern effect.
Why Gold Stripes Elevate A Minimalistic Look
Gold stripes add a touch of luxury to an otherwise minimalistic nail design.
The clean lines and metallic finish create a sophisticated contrast against the white base, making the nails look polished and refined.
This combination of minimalism and glam is perfect for those who want a stylish yet understated look.
09. Gold Studded Nails: 3D Glam For A Daring Look

How To Apply Studs For A Long-Lasting 3D Effect
Gold studs add a bold, 3D element to any manicure, but proper application is key to ensuring they stay in place.
Start by painting your nails with a base coat of your choice.
While the polish is still tacky, use tweezers to carefully place the gold studs onto the nails.
For extra hold, you can use a small dot of nail glue to secure each stud.
Once the studs are in place, seal the design with a clear topcoat, making sure to cover the edges of the studs to prevent them from lifting.
Best Nail Shapes And Lengths For Studded Nails
Gold studs can be applied to any nail shape, but they tend to look best on longer nails, such as stiletto, coffin, or almond shapes.
These shapes provide a larger canvas for the studs, allowing you to create more intricate patterns.
However, studs can also work on shorter nails if used sparingly, such as placing a single stud at the base of each nail for a subtle, chic look.
Combining Gold Studs With Other Elements Like Foil And Glitter
Gold studs can be combined with other elements like foil, glitter, or even chrome finishes to create a truly unique design.
For example, you could apply gold foil to one nail and add studs to another for a mixed-media effect.
Glitter can also be used to highlight certain areas of the nail, with the studs providing texture and dimension.
10. Gold Chrome And Glitter Combo: Shine And Sparkle At Once
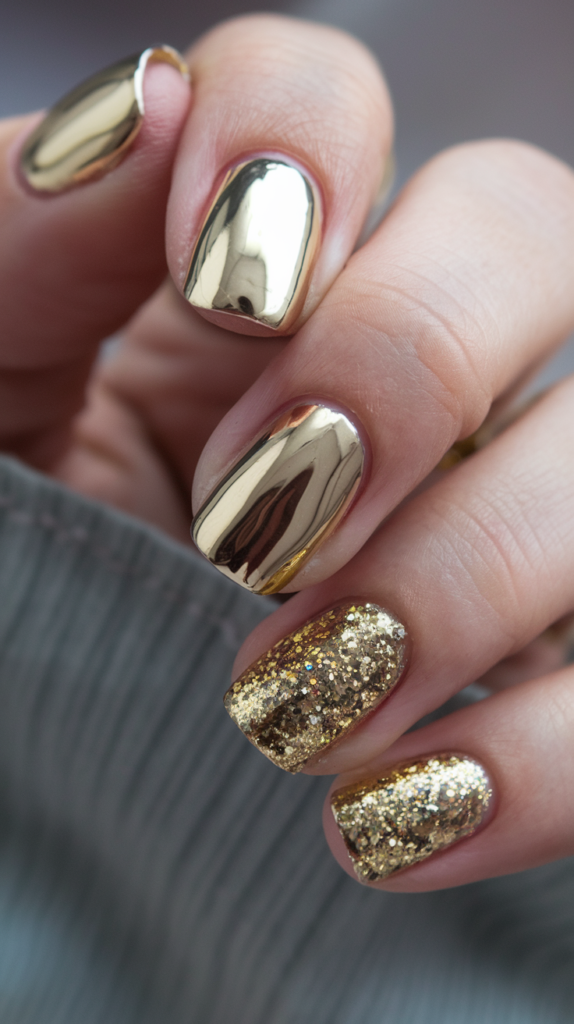
Achieving The Perfect Balance Between Chrome And Glitter
To create the perfect balance between gold chrome and glitter, start by painting a few nails with a full chrome finish and others with a glitter polish.
For the chrome nails, apply a black base coat and use a gold chrome powder to achieve the reflective finish.
For the glitter nails, apply a gold glitter polish and layer it for maximum sparkle.
The key to balancing the two finishes is to alternate between chrome and glitter on different nails, creating a cohesive yet dynamic look.
Top Base Colors For Enhancing Gold Chrome And Glitter
While black is the most common base color for gold chrome, you can also experiment with nude, white, or even deep burgundy to enhance the metallic finish.
For the glitter nails, a nude or pale pink base allows the gold glitter to stand out, while darker colors like navy or black create a more dramatic effect.
How To Switch Between Chrome And Glitter On The Same Hand
Switching between chrome and glitter on the same hand can be done by alternating finishes on different nails.
For example, you could paint the thumb, middle, and pinky fingers with chrome, while the index and ring fingers are covered in glitter.
This creates a balanced yet eye-catching design that combines the reflective shine of chrome with the sparkle of glitter.
11. Rose Gold Gradient: Soft, Feminine, And Glamorous
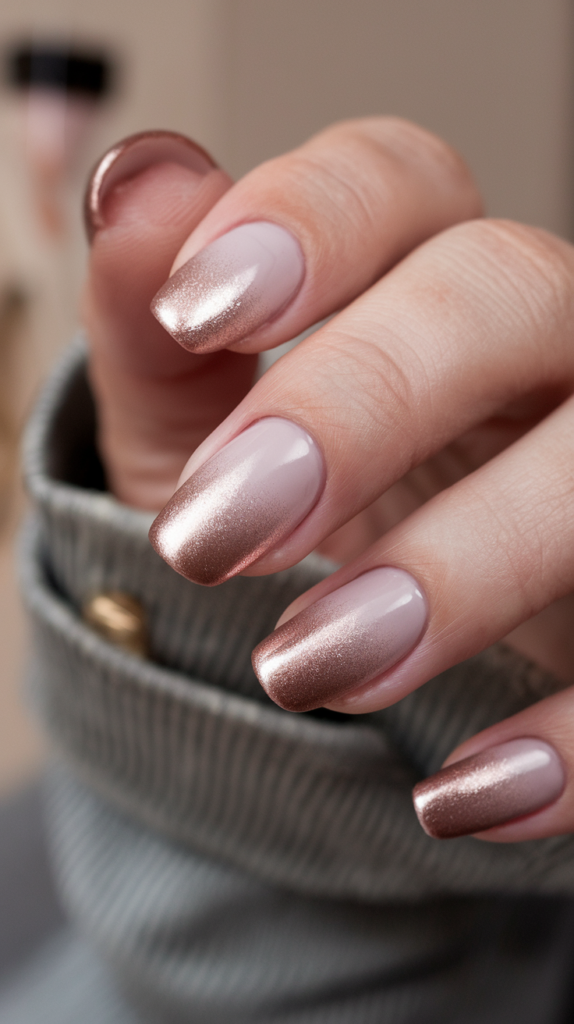
Step-By-Step Tutorial For Creating A Smooth Rose Gold Gradient
To create a smooth rose gold gradient, start by applying a nude or soft pink base coat.
Once dry, use a makeup sponge to apply rose gold polish to the tips of the nails, gradually fading it down toward the middle.
Dab the sponge lightly to blend the polish into the base color, creating a seamless ombre effect.
For a more intense gradient, you can layer the rose gold polish until you achieve the desired look.
Finish with a clear topcoat to seal the design and add shine.
Why Rose Gold Is The Perfect Color For A Subtle Look
Rose gold is a beautiful, soft color that adds a touch of femininity and glamour without being too bold.
It complements a wide range of skin tones and pairs well with both casual and formal outfits.
The metallic finish of rose gold also adds a bit of shine, making it perfect for those who want a subtle yet luxurious nail design.
The Best Color Pairings With Rose Gold
Rose gold pairs beautifully with soft, neutral tones like nude, pale pink, or beige.
For a more dramatic contrast, you can pair rose gold with deep burgundy, navy blue, or even black.
These darker colors create a striking contrast with the softness of the rose gold, making the gradient effect even more eye-catching.
12. Gold Confetti Nails: A Playful Take On Luxe Gold
How To Achieve A Scattered Gold Confetti Effect
To create a scattered gold confetti effect, start by applying a clear or nude base coat to your nails.
Once dry, use a small brush or dotting tool to apply gold confetti pieces randomly across the nails.
The confetti should be spaced out irregularly to create a playful, scattered effect.
Once you’re happy with the placement, seal the design with a clear topcoat to ensure the confetti stays in place.
Creative Ways To Incorporate Gold Confetti Into Nail Art
Gold confetti can be used in a variety of ways to create unique nail art designs.
You can scatter the confetti across all your nails for a uniform look, or use it as an accent on just one or two nails for a more subtle design.
Another creative idea is to combine gold confetti with other elements like glitter or foil to add texture and dimension to the nails.
Long-Lasting Tips For Maintaining Confetti Nails
To keep your gold confetti nails looking fresh, it’s important to apply a topcoat every few days.
This will help prevent the confetti from peeling or lifting.
Avoid using harsh chemicals or scrubbing your nails, as this can wear away the confetti.
Additionally, be cautious when doing activities that involve your hands, such as washing dishes or gardening, to prevent chipping.
13. Gold Foil Swirls: Artistic Flair With A Luxurious Twist
Creating Fluid, Natural-Looking Swirls With Gold Foil
To create fluid, natural-looking swirls with gold foil, start by applying a black or deep burgundy base coat.
Once the base is dry, use tweezers to apply small, thin pieces of gold foil to the nails, creating organic, swirling patterns.
The foil should be placed in random, flowing shapes that mimic the look of natural swirls.
Press the foil gently onto the nails to ensure it adheres, then seal the design with a clear topcoat.
Matching Swirls With Various Base Colors For A Standout Look
Gold foil swirls look stunning against a variety of base colors.
Black and deep burgundy provide a dramatic backdrop for the gold, while lighter colors like nude or pale pink create a softer, more feminine look.
You can also experiment with metallic base colors like silver or rose gold for a monochromatic design that adds depth and dimension.
Tips On Perfecting Swirl Placement For An Artistic Design
When placing gold foil swirls, it’s important to keep the design fluid and natural-looking.
Avoid creating rigid, uniform shapes, and instead focus on making the swirls appear organic and random.
You can also experiment with different sizes of swirls, combining larger, bold swirls with smaller, delicate ones for a more dynamic design.
14. Gold Cuticle Detailing: A Unique, Inverted Design Approach

Why Cuticle Detailing Is Trending In Nail Art
Gold cuticle detailing is a unique and modern take on traditional nail art.
Instead of focusing on the tips of the nails, this design highlights the cuticle area, creating an inverted look.
The trend has gained popularity due to its minimalist yet glamorous aesthetic, making it perfect for those who want a subtle but eye-catching design.
Step-By-Step Guide To Creating Gold Cuticle Designs
To create a gold cuticle design, start by applying a nude or clear base coat to your nails.
Once dry, use a thin nail art brush to apply a small amount of gold polish along the cuticle area.
The gold should be applied in a thin, even line, following the natural curve of the cuticle.
For a more dramatic look, you can extend the gold detailing further down the nail, creating a half-moon shape.
Finish with a clear topcoat to seal the design and add shine.
Creative Ways To Combine Gold Cuticle Detailing With Other Styles
Gold cuticle detailing can be combined with a variety of other nail art styles to create a unique design.
For example, you can pair it with a French manicure, applying gold detailing along the cuticles and metallic polish on the tips.
Another idea is to combine gold cuticle detailing with glitter or foil accents for a more textured, layered look.
15. Matte Nude With Gold Tips: Minimalist Glam Meets Bold Accents
How To Achieve Sharp, Clean Gold Tips On A Matte Nude Base
To create a minimalist yet bold look with matte nude and gold tips, start by applying a matte nude polish to your nails.
Once the polish is dry, use a thin nail art brush or nail guide to apply gold polish to the tips of each nail.
The gold tips should be sharp and clean, creating a striking contrast against the soft, matte base.
For an extra touch of glamour, you can use metallic gold polish for a mirror-like finish.
Seal the design with a matte topcoat to maintain the matte finish on the nude base while preserving the shine on the gold tips.
Why The Matte And Metallic Combination Works So Well
The combination of matte and metallic finishes is a popular trend in nail art because it offers a unique contrast that catches the eye.
The softness of the matte finish allows the metallic gold to stand out, creating a modern, elegant look.
This combination is perfect for those who want a minimalist design with a touch of glamour.
Nail Shapes That Best Showcase Matte Nude With Gold Tips
Matte nude nails with gold tips look best on almond, stiletto, and coffin-shaped nails, as the sharp edges of these shapes complement the clean lines of the gold tips.
Short square nails can also work for this design, but the gold tips may need to be scaled down to fit the shorter length.
16. Gold Lace Overlay: Delicate And Intricate Design For Maximum Impact

How To Create Lace-Like Patterns Using Gold Detailing
Creating a gold lace overlay requires a steady hand and attention to detail.
Start by applying a clear or pale pink base coat to your nails.
Once dry, use a thin nail art brush or stamping tool to create intricate lace-like patterns with gold polish.
The lace design should be delicate and detailed, mimicking the look of fine lace fabric.
For a more dramatic effect, you can apply the lace pattern to all nails, or use it as an accent on just one or two nails.
Base Colors That Best Complement Gold Lace
Gold lace overlays look stunning against a variety of base colors.
Clear or pale pink bases provide a soft, feminine backdrop for the gold detailing, while darker colors like black or deep burgundy create a bold, dramatic contrast.
For a more unique look, you can experiment with metallic base colors like silver or rose gold.
Tips For Achieving Intricate Lace Designs Without Professional Tools
If you don’t have professional nail art tools, you can still achieve intricate lace designs using household items like toothpicks or bobby pins.
Dip the tool into gold polish and use it to create small dots and lines that form the lace pattern.
Alternatively, you can use lace nail decals or stamping plates to create the design, then apply gold polish over the top for a metallic finish.
17. Gold And Burgundy Luxe: Rich And Opulent Nail Art
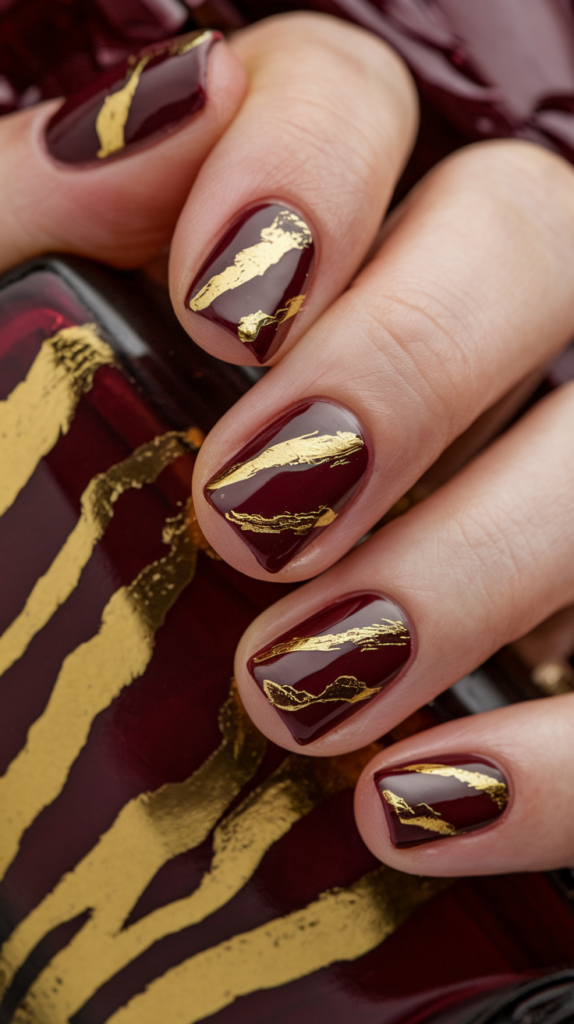
Achieving A Flawless Gold And Burgundy Combination
To create a flawless gold and burgundy nail design, start by applying a deep burgundy polish to your nails.
Once dry, use a thin nail art brush to apply gold detailing in the form of stripes, dots, or geometric patterns.
The rich, dark burgundy provides the perfect backdrop for the gold, creating a luxurious, opulent look.
For an added touch of glamour, you can apply gold foil or glitter to one or two accent nails.
Why Burgundy Enhances The Richness Of Gold
Burgundy is a deep, rich color that complements gold beautifully.
The dark tones of burgundy allow the metallic gold to stand out, creating a striking contrast that exudes luxury and sophistication.
This color combination is perfect for fall and winter, as it adds warmth and depth to any outfit.
Best Occasions For Flaunting Gold And Burgundy Nails
Gold and burgundy nails are ideal for special occasions, such as weddings, holiday parties, or formal events.
The combination of rich burgundy and metallic gold creates a glamorous, elegant look that is sure to turn heads.
Whether you’re wearing a simple black dress or a bold, colorful outfit, gold and burgundy nails add a touch of sophistication to any ensemble.
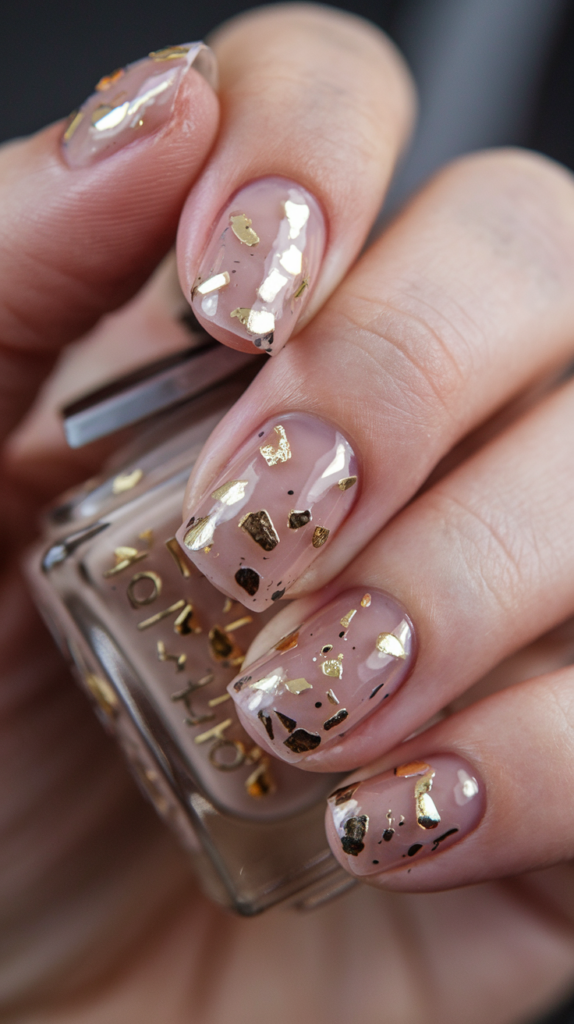
18. Clear Nails With Gold Flakes: Subtle Luxury For A Modern Look

Step-By-Step Guide To Creating Clear Nails With Gold Flakes
To create clear nails with gold flakes, start by applying a clear base coat to your nails.
Once dry, use tweezers to carefully place small pieces of gold flakes onto the nails.
The flakes should be scattered randomly across the nails, creating a subtle, luxurious effect.
Press the flakes down gently to ensure they adhere to the polish, then seal the design with a clear topcoat to protect the flakes and add shine.
Placement Tips For Gold Flakes To Achieve An Ethereal Look
When placing gold flakes on clear nails, it’s important to keep the design subtle and delicate.
Avoid overcrowding the nails with too many flakes, as this can make the design look cluttered.
Instead, focus on placing small pieces of gold flakes in random spots, allowing the clear base to show through.
This creates an ethereal, modern look that is both minimalist and luxurious.
How To Maintain Clear Nails Without Smudging Or Dulling
Clear nails with gold flakes can be prone to smudging or dulling if not properly maintained.
To keep your nails looking fresh, apply a topcoat every few days to protect the flakes and maintain the shine.
Avoid using harsh chemicals or scrubbing your nails, as this can wear away the clear polish and cause the flakes to lift.
Wearing gloves while doing household chores can also help prolong the life of your manicure.
19. Gold Chrome French Manicure: A Shiny Twist On Tradition
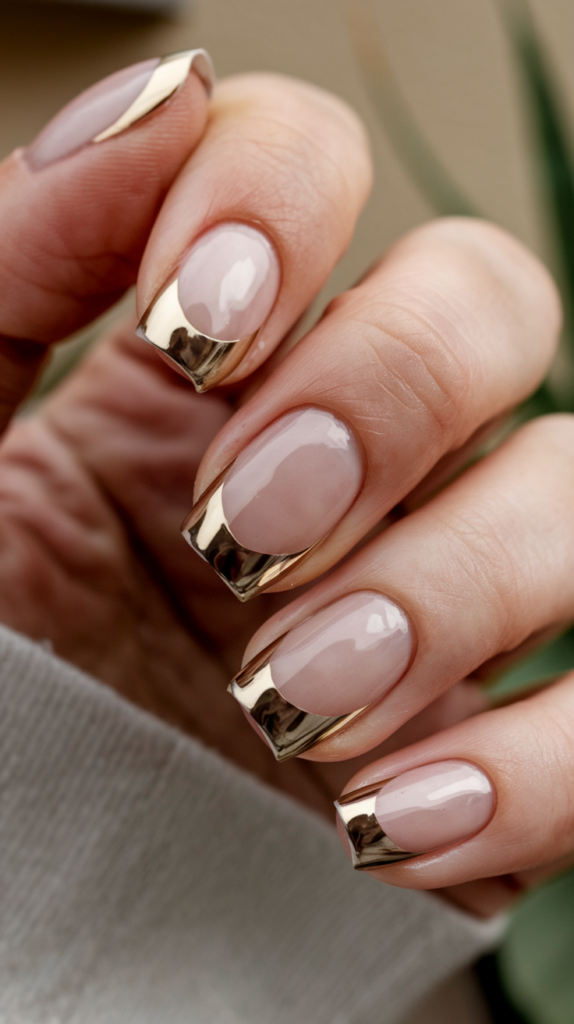
How To Master The Gold Chrome French Tip
To create a gold chrome French manicure, start by applying a clear or nude base coat to your nails.
Once dry, use a thin nail art brush or nail guide to apply a gold chrome polish to the tips of each nail.
The gold chrome should have a mirror-like finish, creating a shiny, metallic effect.
For a more precise application, you can use a nail stamping tool to create the French tips.
Once the chrome polish is applied, seal the design with a clear topcoat to enhance the shine and protect the tips from chipping.
Why Chrome Finishes Are Trending In Modern Manicures
Chrome finishes have become a popular trend in modern manicures due to their high-shine, mirror-like effect.
The reflective nature of chrome polish adds a futuristic, edgy vibe to any nail design, making it perfect for those who want to make a bold fashion statement.
Gold chrome, in particular, adds a touch of luxury and sophistication to the classic French manicure, elevating the look to a whole new level.
Nail Shapes That Work Best With Chrome French Tips
Gold chrome French tips look great on a variety of nail shapes, but they particularly shine on almond and coffin-shaped nails.
The elongated shape of these nails provides a larger canvas for the chrome tips, allowing the metallic finish to stand out.
Square nails can also work for this design, but the tips may need to be scaled down to fit the shorter length.
20. Gold And Nude Half-Moons: Minimalism Meets Glamour
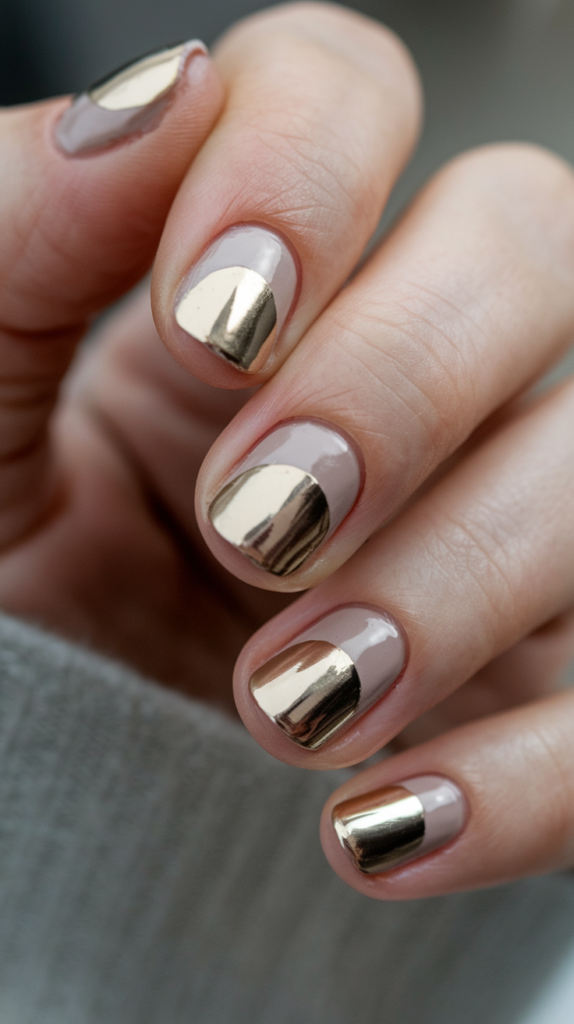
How To Perfect The Half-Moon Manicure With Gold Accents
To create a gold and nude half-moon manicure, start by applying a nude base coat to your nails.
Once the base is dry, use a nail guide or freehand a small crescent shape at the base of each nail with gold polish.
The crescent should follow the natural curve of the cuticle, creating a half-moon shape.
For a more dramatic look, you can extend the gold detailing further down the nail, creating a bolder half-moon effect.
Seal the design with a clear topcoat to enhance the shine and protect the gold accents from chipping.
Combining Nude And Gold For A Minimalist, Yet Glamorous Look
The combination of nude and gold is perfect for those who want a minimalist yet glamorous look.
The soft, neutral tones of the nude base allow the gold accents to shine without being too overpowering.
This design is perfect for both casual and formal occasions, as it adds a touch of sophistication to any outfit.
Maintenance Tips For Long-Lasting Half-Moon Designs
To keep your gold and nude half-moon manicure looking fresh, it’s important to apply a topcoat every few days.
This will help prevent the gold polish from chipping and maintain the glossy finish.
Avoid using harsh chemicals or scrubbing your nails, as this can wear away the polish and cause the design to fade.
Wearing gloves while doing household chores can also help prolong the life of your manicure.
21. Gold Glitter Accents On Matte White: A Pop Of Sparkle On A Minimal Base
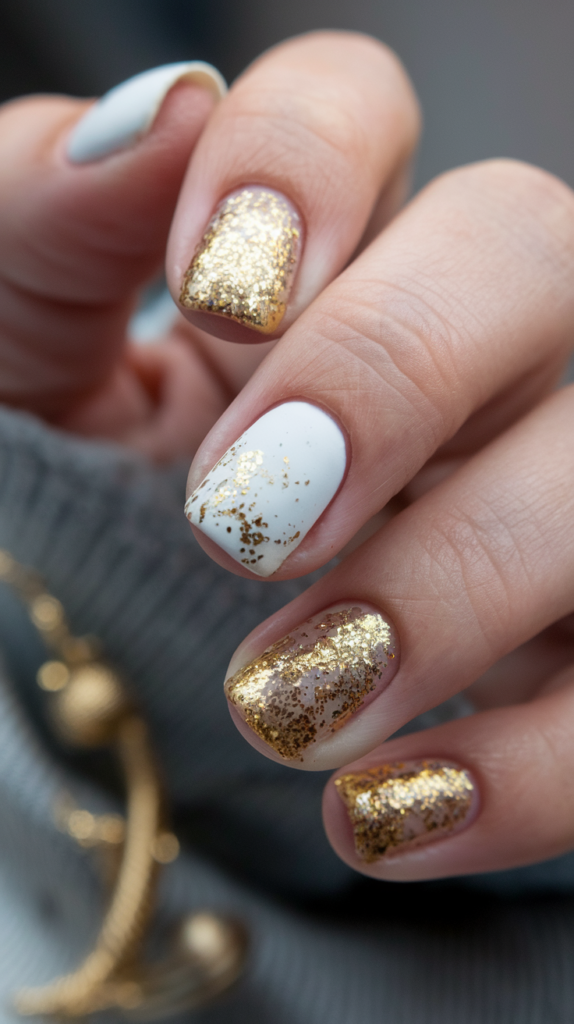
How To Apply Glitter To Matte Nails Without Smudging
To apply gold glitter accents to matte white nails, start by painting your nails with a matte white polish.
Once the polish is dry, use a small brush or dotting tool to apply gold glitter to the desired areas of the nails.
The glitter can be applied in small clusters or scattered randomly for a more abstract look.
Be sure to apply the glitter while the polish is still tacky, so it adheres properly.
Once the glitter is in place, seal the design with a matte topcoat to maintain the matte finish and protect the glitter from smudging.
Why Matte White And Gold Glitter Are The Perfect Pairing
Matte white and gold glitter create a beautiful contrast that is both modern and elegant.
The softness of the matte finish allows the gold glitter to stand out, creating a striking, eye-catching design.
This combination is perfect for those who want a minimalist look with a touch of sparkle.
Top Ways To Combine Matte And Glitter In The Same Manicure
There are many ways to combine matte and glitter in the same manicure for a unique, personalized design.
You can apply glitter to just one or two accent nails, or scatter it across all your nails for a more uniform look.
Another idea is to create a gradient effect, with the glitter concentrated at the tips of the nails and fading down toward the base.
This creates a subtle, glamorous look that is perfect for special occasions.
22. Geometric Gold And Black Nails: Bold, Modern, And Striking
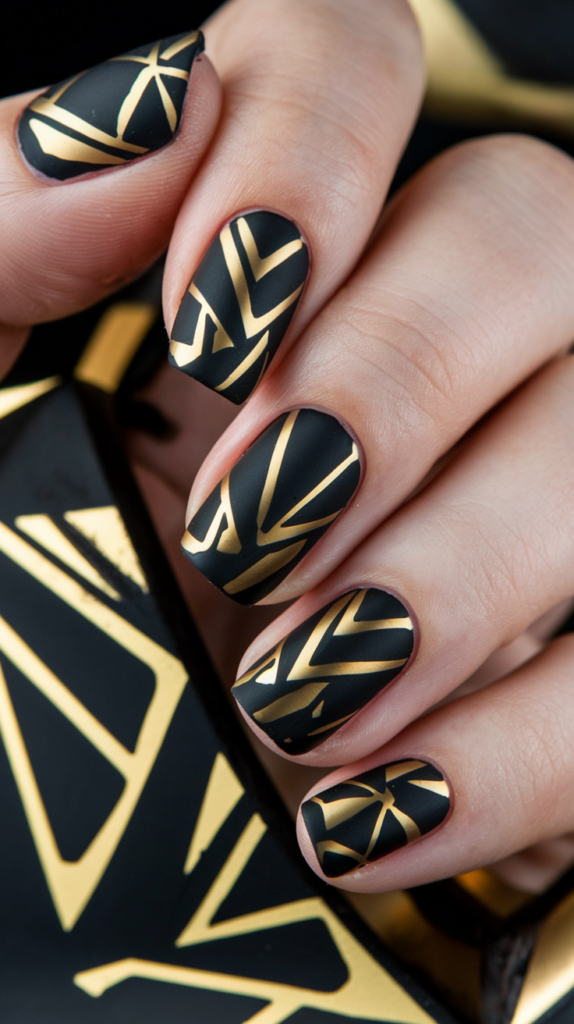
How To Create Sharp, Geometric Patterns With Gold Detailing
To create sharp, geometric patterns with gold detailing, start by painting your nails with a black base coat.
Once the base is dry, use striping tape or a thin nail art brush to create clean, straight lines and shapes with gold polish.
You can create a variety of geometric patterns, such as triangles, squares, or diagonal lines.
The key to achieving a sharp, clean design is to use precise tools and take your time when applying the gold polish.
Once the design is complete, seal it with a clear topcoat to enhance the shine and protect the gold detailing.
Why Black Is The Best Base For A Dramatic Geometric Look
Black is the perfect base color for a dramatic geometric look because it creates a striking contrast with the metallic gold detailing.
The deep, dark tones of black allow the gold to stand out, making the geometric patterns more eye-catching.
This color combination is perfect for those who want a bold, modern nail design that is both edgy and sophisticated.
Best Tools For Achieving Precise Geometric Designs At Home
To achieve precise geometric designs at home, it’s important to use the right tools.
Striping tape is a great option for creating clean, straight lines, while a thin nail art brush can be used for more detailed work.
You can also use nail guides or stencils to create more intricate shapes, such as triangles or squares.
If you’re new to nail art, practice on a piece of paper or a plastic nail wheel before applying the design to your nails.
23. Gold Studded Crescent Moon: A Celestial-Inspired Nail Look
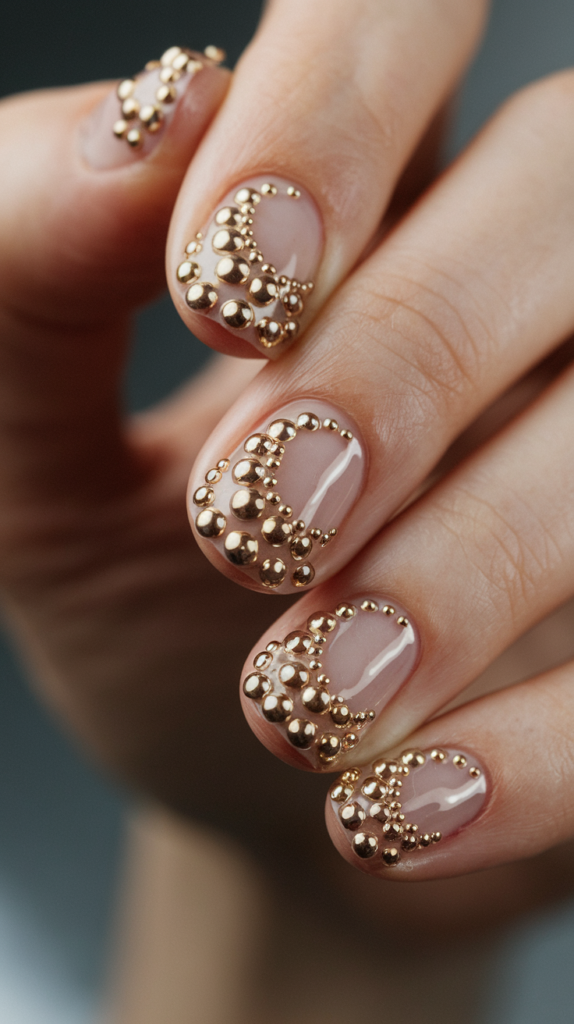
Step-By-Step Guide To Placing Gold Studs For A Crescent Moon Shape
To create a gold studded crescent moon design, start by applying a clear or nude base coat to your nails.
Once dry, use tweezers to carefully place small gold studs in a crescent shape at the base of each nail.
The studs should follow the natural curve of the cuticle, creating a crescent moon shape.
For a more dramatic look, you can extend the studs further down the nail or add additional studs to create a layered effect.
Seal the design with a clear topcoat to ensure the studs stay in place and to add shine.
How To Balance Simplicity With 3D Elements Like Studs
Gold studs add a 3D element to any nail design, but it’s important to keep the overall look balanced and not too cluttered.
When working with studs, less is often more.
Focus on placing the studs strategically, such as in a crescent moon shape or along the edges of the nails, to create a clean, modern look.
If you’re using studs on all your nails, keep the base color simple and neutral to avoid overwhelming the design.
Combining Gold Crescent Moons With Other Celestial Designs
Gold crescent moons can be combined with other celestial designs, such as stars or planets, to create a more intricate, themed manicure.
For example, you can add small gold star decals to one or two accent nails, or create a galaxy effect using a black base coat and holographic glitter.
This creates a cohesive, celestial-inspired design that is both whimsical and elegant.
24. Gold And Pink Ombre: Feminine With A Glamorous Twist

How To Achieve A Smooth Ombre Fade From Pink To Gold
To create a smooth ombre fade from pink to gold, start by applying a soft pink base coat to your nails.
Once the base is dry, use a makeup sponge to apply gold glitter polish to the tips of the nails.
Dab the sponge lightly onto the nails, blending the glitter down toward the middle of the nail to create a gradient effect.
The glitter should be most concentrated at the tips, fading out as it moves toward the pink base.
Once the ombre effect is complete, seal the design with a clear topcoat to add shine and protect the glitter from chipping.
Why Pink And Gold Make The Perfect Feminine Combination
Pink and gold are a classic color combination that exudes femininity and glamour.
The softness of the pink base complements the metallic gold, creating a balanced, elegant look.
This combination is perfect for both casual and formal occasions, as it adds a touch of sophistication to any outfit.
Tips For Long-Lasting Wear And Maintaining Ombre Nails
To keep your gold and pink ombre nails looking fresh, it’s important to apply a topcoat every few days.
This will help prevent the glitter from chipping and maintain the glossy finish.
Avoid using harsh chemicals or scrubbing your nails, as this can wear away the polish and cause the ombre effect to fade.
Wearing gloves while doing household chores can also help prolong the life of your manicure.
25. Gold Animal Print: Luxe Patterns For A Bold, Fashionable Look
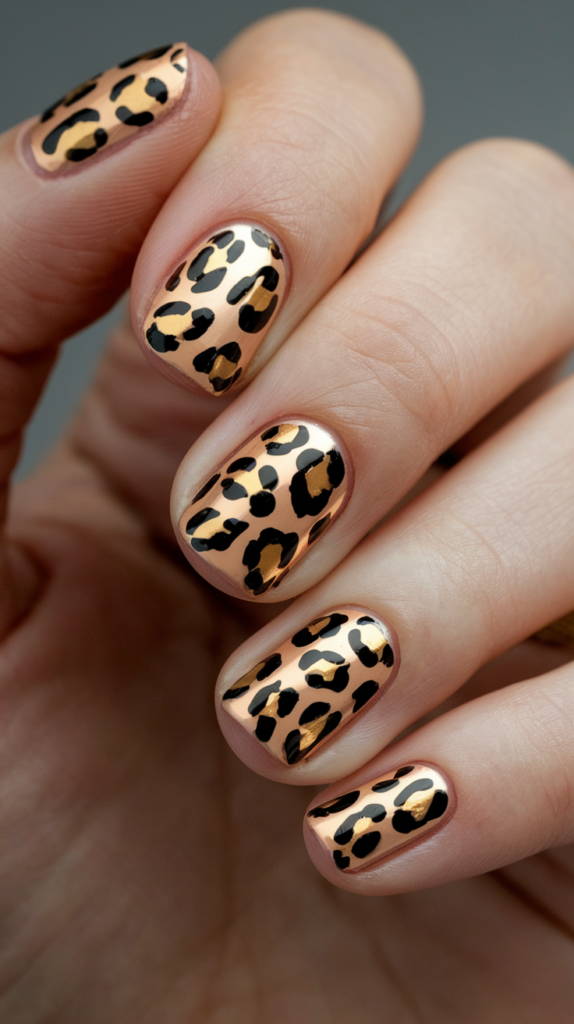
How To Create Gold Leopard Or Snake Print Designs
To create a gold leopard or snake print design, start by applying a nude or matte black base coat to your nails.
Once the base is dry, use a thin nail art brush to apply small, irregular shapes with gold polish.
For a leopard print design, create small clusters of gold spots, then outline each spot with black polish to mimic the look of leopard fur.
For a snake print design, use gold polish to create a series of scales or diamond shapes across the nails.
Once the design is complete, seal it with a clear topcoat to enhance the shine and protect the gold detailing.
Best Base Colors For Showcasing Gold Animal Prints
Nude and matte black are the best base colors for showcasing gold animal prints, as they create a striking contrast with the metallic gold detailing.
Nude provides a more subtle, natural look, while black adds drama and intensity to the design.
For a more unique look, you can experiment with darker colors like deep burgundy or navy blue.
Why Animal Print Nails Remain A Fashion Staple
Animal print nails have remained a fashion staple due to their bold, eye-catching designs.
Whether it’s leopard, snake, or zebra print, animal patterns add a touch of wildness and luxury to any manicure.
Gold animal prints, in particular, add a glamorous twist to the classic design, making them perfect for those who want to stand out from the crowd.
26. Gold Leaf On Matte Black: Edgy, Modern, And Luxurious
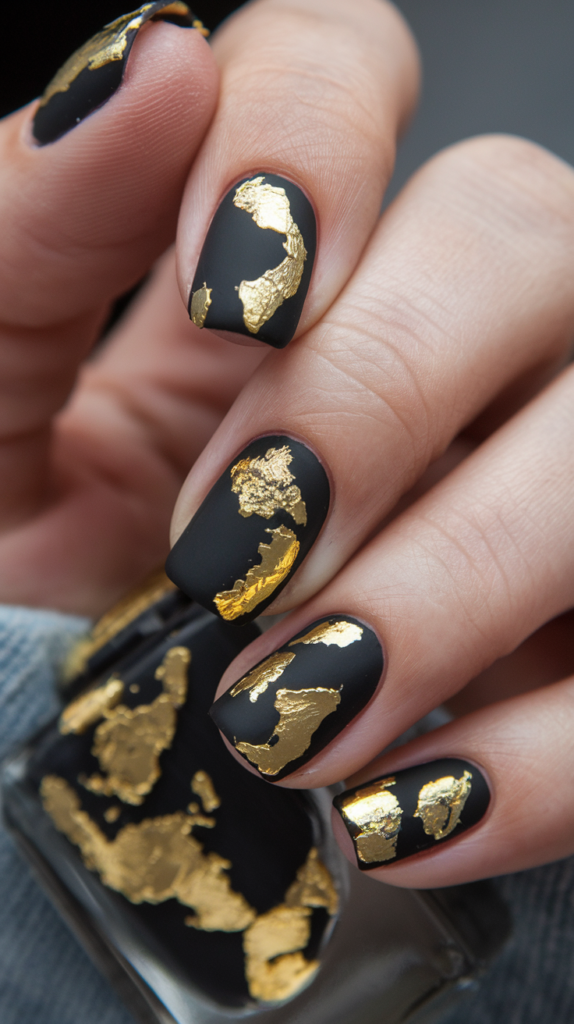
How To Apply Gold Leaf To Matte Black Nails For Maximum Contrast
To create a striking contrast between matte black and gold leaf, start by applying a matte black polish to your nails.
Once the black polish is dry, use tweezers to carefully place small pieces of gold leaf onto the nails.
The gold leaf should be scattered randomly across the nails to create a natural, abstract effect.
Press the gold leaf down gently to ensure it adheres to the polish.
Once the gold leaf is in place, seal the design with a clear topcoat to protect the gold and add shine.
The Best Tools For Placing Gold Leaf Evenly On The Nail
When working with gold leaf, it’s important to use the right tools to ensure even placement.
Tweezers are essential for picking up and placing the delicate gold leaf pieces onto the nails.
You can also use a small brush or cotton swab to press the gold leaf onto the nail, ensuring it adheres properly.
For a more precise application, you can use nail glue to secure the gold leaf in place.
Top Occasions For Wearing Gold Leaf And Matte Black Designs
Gold leaf and matte black nails are perfect for special occasions where you want to make a bold fashion statement.
Whether it’s a formal event, a night out, or a holiday party, this design exudes luxury and sophistication.
The contrast between the matte black and the metallic gold leaf adds depth and drama to the nails, making them a standout accessory for any outfit.
27. Gold Foil Flames: Fiery Glamour With A Metallic Edge
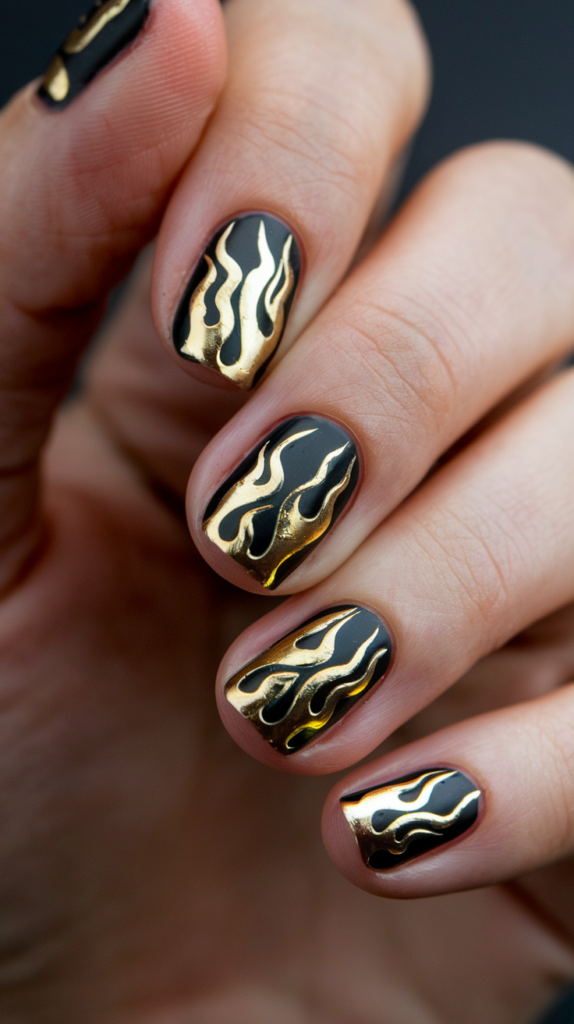
Step-By-Step Guide To Creating Flame Designs With Gold Foil
To create gold foil flames, start by applying a black or dark base coat to your nails.
Once the base is dry, use tweezers to carefully apply small, thin pieces of gold foil to the nails, creating the shape of flames.
The flames should be placed randomly across the nails, with the foil tapering off toward the tips.
Press the gold foil down gently to ensure it adheres to the polish.
Once the flames are in place, seal the design with a clear topcoat to protect the gold foil and add shine.
The Best Base Colors To Complement Gold Flames
Gold foil flames look stunning against a variety of base colors.
Black provides a dramatic backdrop that makes the gold flames stand out, while dark burgundy or navy blue adds a touch of elegance to the design.
For a more unique look, you can experiment with metallic base colors like silver or rose gold.
How To Achieve A Fiery, Yet Elegant Look For Special Events
Gold foil flames are perfect for special events where you want to make a bold, fiery fashion statement.
The metallic gold adds a touch of glamour to the design, while the flame shapes create a dynamic, edgy look.
This design is perfect for those who want to stand out from the crowd and add a bit of drama to their outfit.
28. Clear Nails With Gold Wire: Sleek, Artistic, And Minimalist
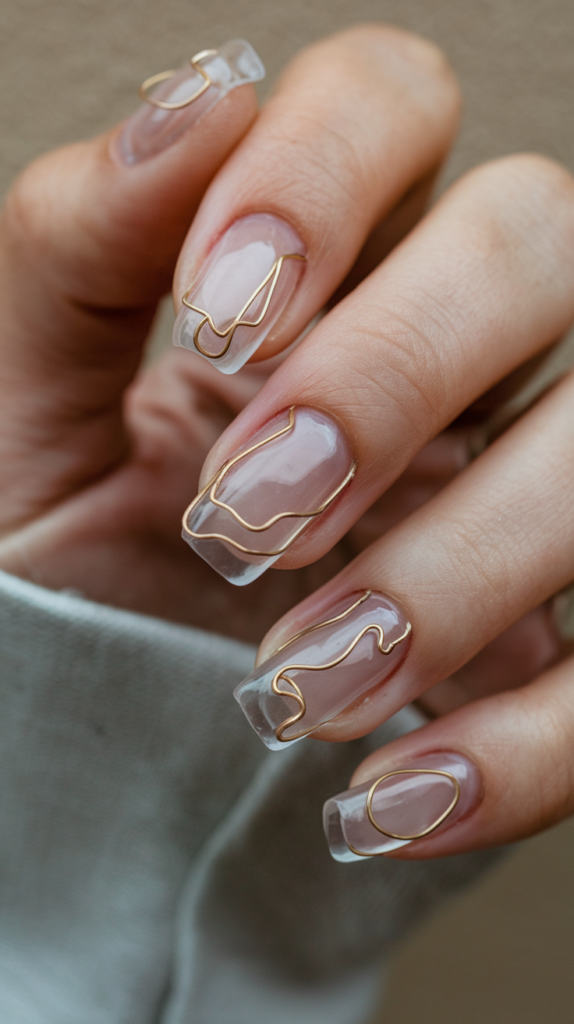
How To Work With Gold Wire For A Sleek Nail Design
Gold wire can be used to create sleek, artistic nail designs that are both modern and minimalist.
To create this look, start by applying a clear base coat to your nails.
Once the base is dry, use tweezers to carefully place thin pieces of gold wire onto the nails, creating clean, straight lines or geometric shapes.
Press the wire down gently to ensure it adheres to the polish.
Once the wire is in place, seal the design with a clear topcoat to protect the wire and add shine.
Why Clear Nails With Gold Accents Create A Modern, Artistic Look
Clear nails with gold accents create a modern, artistic look that is both minimalist and luxurious.
The transparency of the clear base allows the gold accents to stand out without being too overpowering, creating a sleek, sophisticated design.
This look is perfect for those who want a unique, fashion-forward manicure that is still subtle and elegant.
Tips For Maintaining Wire Designs Without Losing Structure
To maintain your gold wire nail design without losing structure, it’s important to apply a topcoat every few days.
This will help prevent the wire from lifting or peeling.
Be mindful of activities that could cause the wire to snag, such as typing or handling rough objects.
Wearing gloves while doing household chores can also help prolong the life of your manicure.
29. Gold Drip Nails: Bold And Artistic, With A Luxurious Feel
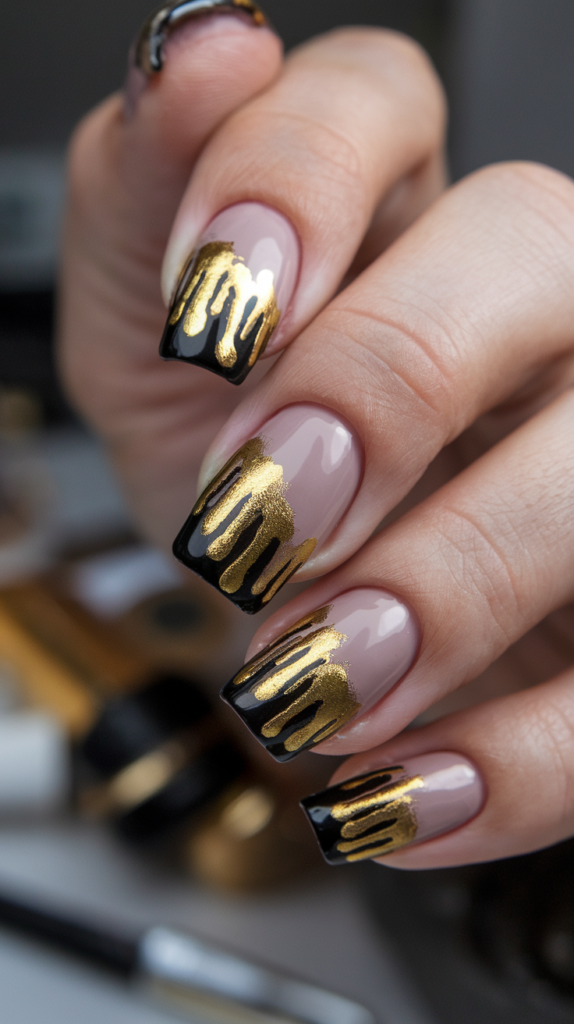
How To Create A Dripped Gold Effect On Nails
To create a dripped gold effect on your nails, start by applying a nude or black base coat.
Once the base is dry, use a thin nail art brush or dotting tool to apply gold polish in a dripped pattern at the tips of each nail.
The drips should be random and irregular, mimicking the look of liquid gold running down the nails.
For a more dramatic effect, you can extend the drips further down the nails, creating a bolder design.
Once the drips are in place, seal the design with a clear topcoat to enhance the shine and protect the gold polish.
Why Gold Drip Designs Are Perfect For Bold Fashion Statements
Gold drip designs are perfect for those who want to make a bold fashion statement, as they add a touch of luxury and drama to any manicure.
The dripped effect mimics the look of liquid gold, creating a dynamic, artistic design that is both eye-catching and glamorous.
This look is perfect for special occasions or when you want to add a bit of edge to your everyday style.
Combining Gold Drip With Different Nail Art Techniques
Gold drip designs can be combined with a variety of other nail art techniques to create a more intricate, layered look.
For example, you can pair gold drips with a matte black base for a striking contrast, or add glitter to the drips for an extra touch of sparkle.
You can also experiment with different base colors, such as deep burgundy or navy blue, to create a more unique, personalized design.
30. Gold And Navy Combo: A Regal Color Scheme For A Sophisticated Look
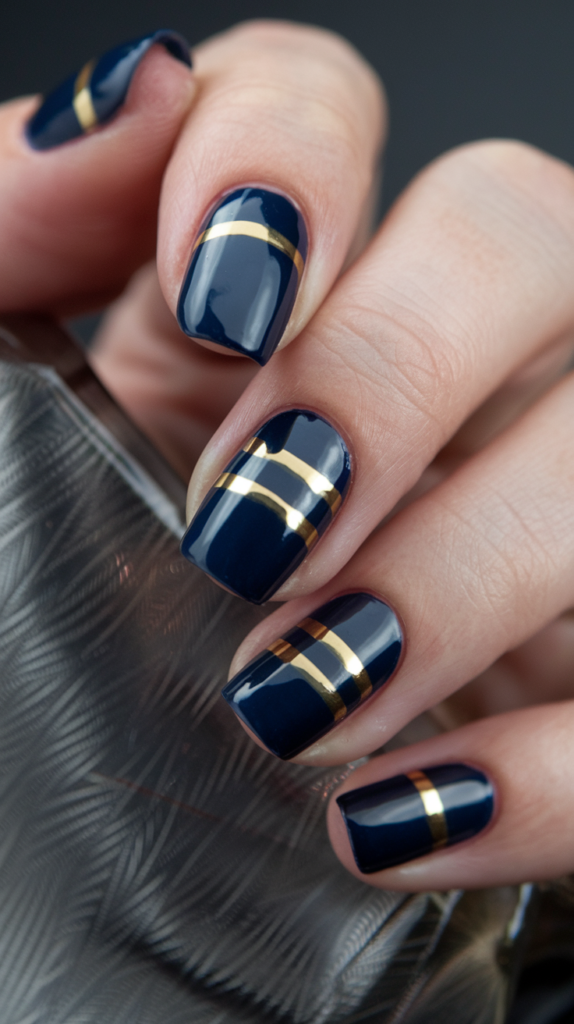
How To Combine Navy And Gold For A Regal, Sophisticated Nail Design
To create a regal navy and gold nail design, start by applying a navy blue base coat to your nails.
Once the base is dry, use a thin nail art brush to apply gold polish in the form of stripes, dots, or geometric patterns.
The rich, dark navy provides the perfect backdrop for the gold, creating a luxurious, sophisticated look.
For a more dramatic effect, you can add gold foil or glitter to one or two accent nails.
The Best Gold Accents To Pair With A Dark Navy Base
Gold stripes, dots, and geometric patterns are all great options for pairing with a dark navy base.
You can also experiment with gold foil or glitter to add texture and dimension to the design.
For a more unique look, you can create a gradient effect with gold glitter, fading from the tips of the nails down toward the navy base.
Nail Shapes That Best Suit Navy And Gold Combinations
Navy and gold combinations look stunning on a variety of nail shapes, but they particularly shine on almond and coffin-shaped nails.
The elongated shape of these nails provides a larger canvas for the gold accents, allowing the metallic finish to stand out.
Short square nails can also work for this design, but the gold detailing may need to be scaled down to fit the shorter length.
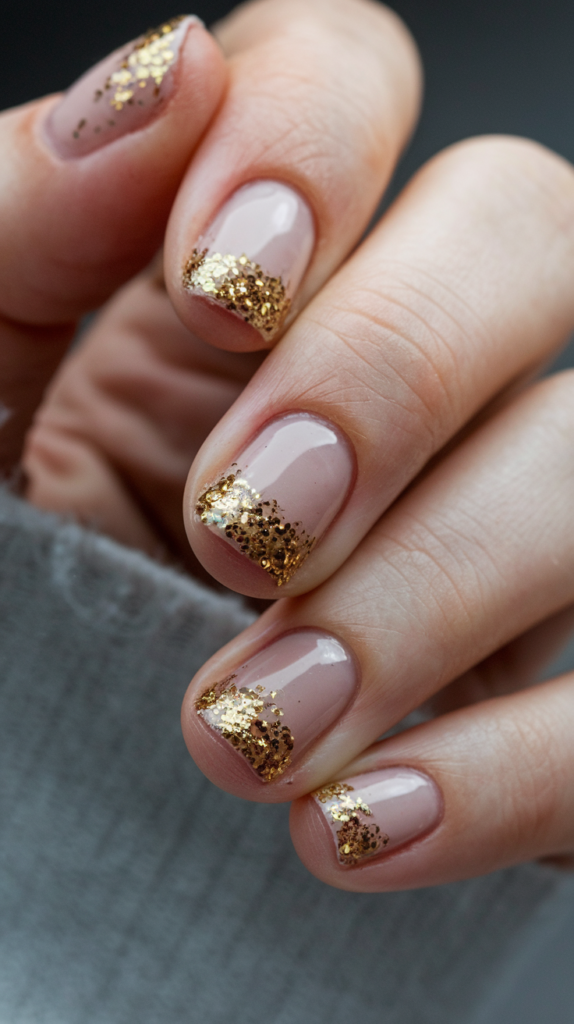
31. Gold Speckled Tips: A Subtle, Glamorous Twist On Classic Nails

Step-By-Step Guide To Applying Speckled Gold Tips
To create speckled gold tips, start by applying a nude or clear base coat to your nails.
Once the base is dry, use a small brush or dotting tool to apply tiny specks of gold glitter to the tips of the nails.
The specks should be randomly placed, creating a subtle, scattered effect.
For a more dramatic look, you can apply more glitter to the tips, or use larger pieces of gold glitter.
Once the speckled tips are in place, seal the design with a clear topcoat to add shine and protect the glitter from chipping.
Why Speckled Tips Offer A Chic, Subtle Shimmer
Speckled tips add a touch of glamour to an otherwise simple nail design, creating a chic, subtle shimmer that catches the light beautifully.
The random placement of the glitter adds a playful, artistic element to the nails, while still maintaining a minimalist, understated look.
This design is perfect for those who want a stylish, elegant manicure that is still subtle and sophisticated.
How To Pair Gold Speckled Tips With Everyday Outfits
Gold speckled tips are versatile enough to be paired with a variety of everyday outfits.
The subtle shimmer of the gold glitter adds a touch of glamour to casual looks, while still being elegant enough to complement more formal attire.
Whether you’re wearing jeans and a t-shirt or a sleek black dress, gold speckled tips add a bit of sparkle to any outfit.
32. Matte Black With Gold Chevron Stripes: Sharp, Bold, And On-Trend

How To Create Sharp Chevron Patterns Using Gold On A Matte Black Base
To create sharp chevron patterns on a matte black base, start by applying a matte black polish to your nails.
Once the polish is dry, use striping tape or a nail guide to create the chevron pattern at the tips of each nail.
Paint over the tape or guide with metallic gold polish, ensuring the lines are crisp and even.
Once the gold polish is applied, remove the tape or guide before it fully dries to avoid smudging.
Seal the design with a matte topcoat to maintain the matte black finish while preserving the shine on the gold chevron stripes.
Best Tools And Techniques For Achieving A Clean Chevron Design
The key to achieving a clean chevron design is to use precise tools, such as striping tape or nail guides.
These tools help create sharp, even lines, ensuring that the chevron pattern is crisp and professional-looking.
You can also use a thin nail art brush to freehand the chevron design, but be sure to practice on a piece of paper or a plastic nail wheel before applying it to your nails.
Why Matte And Metallic Combinations Are Timelessly Stylish
The combination of matte and metallic finishes is a popular trend in nail art because it offers a unique contrast that catches the eye.
The softness of the matte finish allows the metallic gold to stand out, creating a modern, elegant look.
This combination is perfect for those who want a stylish, on-trend manicure that is both bold and sophisticated.
33. Gold Glitter Cuticles: Reverse Glam For A Unique Look
How To Achieve The Perfect Reverse Glitter Cuticle Design
To create a reverse glitter cuticle design, start by applying a nude or clear base coat to your nails.
Once the base is dry, use a small brush or dotting tool to apply gold glitter to the cuticle area of each nail.
The glitter should be concentrated at the base, creating a reverse French manicure effect.
For a more dramatic look, you can extend the glitter further down the nails or add larger pieces of glitter for extra sparkle.
Seal the design with a clear topcoat to protect the glitter and add shine.
Why Glitter Cuticles Are A Fresh Take On Classic Manicure Styles
Glitter cuticles offer a fresh, modern twist on the classic French manicure by reversing the focus from the tips to the cuticle area.
This design adds a touch of glamour and sparkle to the nails while still maintaining a minimalist, understated look.
The reverse glitter cuticle design is perfect for those who want to add a bit of edge to their manicure without going over the top.
Tips For Ensuring Your Glitter Cuticle Design Lasts Longer
To ensure your glitter cuticle design lasts longer, it’s important to apply a topcoat every few days.
This will help protect the glitter from chipping and maintain the glossy finish.
Avoid using harsh chemicals or scrubbing your nails, as this can wear away the polish and cause the glitter to lift.
Wearing gloves while doing household chores can also help prolong the life of your manicure.
34. Gold And Lavender Marble: Soft And Luxurious With A Touch Of Glam
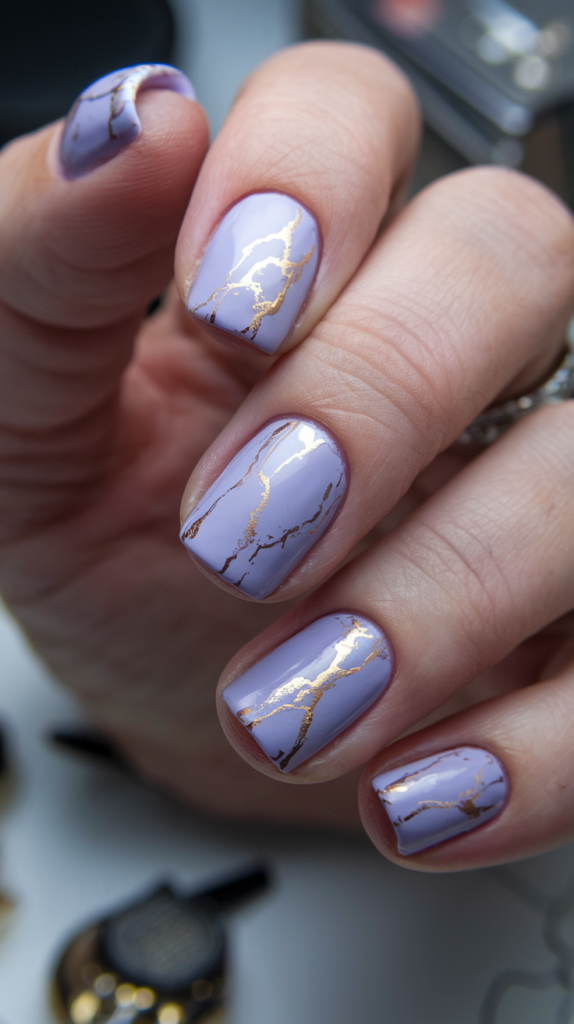
How To Create A Marbled Effect Using Gold And Lavender
To create a marbled effect using gold and lavender, start by applying a soft lavender base coat to your nails.
Once the base is dry, use a thin nail art brush or a marbling tool to apply gold polish in thin, random veins across the nails.
The gold veins should be delicate and irregular, mimicking the look of natural marble stone.
For a more dramatic effect, you can add more gold veins or create larger, bolder shapes.
Once the marbled design is complete, seal it with a clear topcoat to add shine and protect the gold detailing.
Why Lavender And Gold Make A Harmonious Combination
Lavender and gold are a perfect pairing because they create a soft, luxurious look that is both feminine and glamorous.
The softness of the lavender base complements the metallic gold, creating a balanced, elegant design.
This combination is perfect for both casual and formal occasions, as it adds a touch of sophistication to any outfit.
Best Tools For Achieving A Realistic Marble Look
To achieve a realistic marble look, it’s important to use the right tools.
A thin nail art brush or marbling tool can help create delicate, intricate veins that mimic the look of natural marble.
You can also use a makeup sponge to blend the gold polish into the lavender base, creating a more subtle, blended effect.
For a more dramatic look, you can layer the gold veins to create a bolder, more textured design.
35. Gold Tribal Nail Art: Bold, Geometric, And Eye-Catching

Step-By-Step Guide To Creating Bold, Tribal Patterns With Gold Detailing
To create bold tribal patterns with gold detailing, start by applying a white or clear base coat to your nails.
Once the base is dry, use a thin nail art brush or striping tool to apply gold polish in geometric patterns, such as triangles, diamonds, or zigzags.
The key to achieving a bold, eye-catching design is to keep the lines sharp and clean, ensuring that the patterns are evenly spaced and symmetrical.
Once the tribal design is complete, seal it with a clear topcoat to enhance the shine and protect the gold detailing.
The Best Base Colors To Enhance Tribal Designs
White or clear bases are the best options for enhancing gold tribal designs, as they create a clean, neutral backdrop that allows the gold detailing to stand out.
You can also experiment with darker base colors, such as black or deep burgundy, to create a more dramatic contrast with the gold patterns.
For a more unique look, you can try using a metallic base color, such as silver or rose gold, to create a monochromatic design with added depth and dimension.
Why Tribal Nail Art Continues To Be A Bold Statement Look
Tribal nail art has remained a popular trend because of its bold, geometric patterns that create a striking, eye-catching look.
The clean lines and sharp shapes of tribal designs add a sense of structure and symmetry to the nails, while the metallic gold detailing adds a touch of luxury and sophistication.
This combination of boldness and glamour makes tribal nail art perfect for those who want to make a fashion statement with their manicure.
Conclusion
Gold nail art is a versatile and sophisticated choice that suits every style and occasion.
From delicate, understated gold leaf designs to bold, shimmering chrome finishes, the possibilities are endless.
Whether you’re looking for a simple yet elegant manicure or a dazzling look that will turn heads, these 35 gold nail designs offer inspiration for every mood and event.
Gold is a timeless color, and when incorporated into your nail art, it adds a touch of luxury and glamour to any outfit.
So, go ahead and experiment with these stunning designs, and let your nails sparkle with gold brilliance!


