Floral nail art designs have always been a symbol of beauty, elegance, and creativity, offering an endless variety of styles to suit any occasion or personal taste.
Whether you prefer minimalist designs or bold, vibrant patterns, floral motifs can bring a touch of nature and artistry to your nails.
This comprehensive guide explores a range of floral nail art ideas, from delicate watercolor florals to striking black and red roses, offering inspiration for every aesthetic.
Dive into this world of blossoming nail art and discover the perfect design to complement your style, mood, and season.
1. Blossom Elegance Nail Art
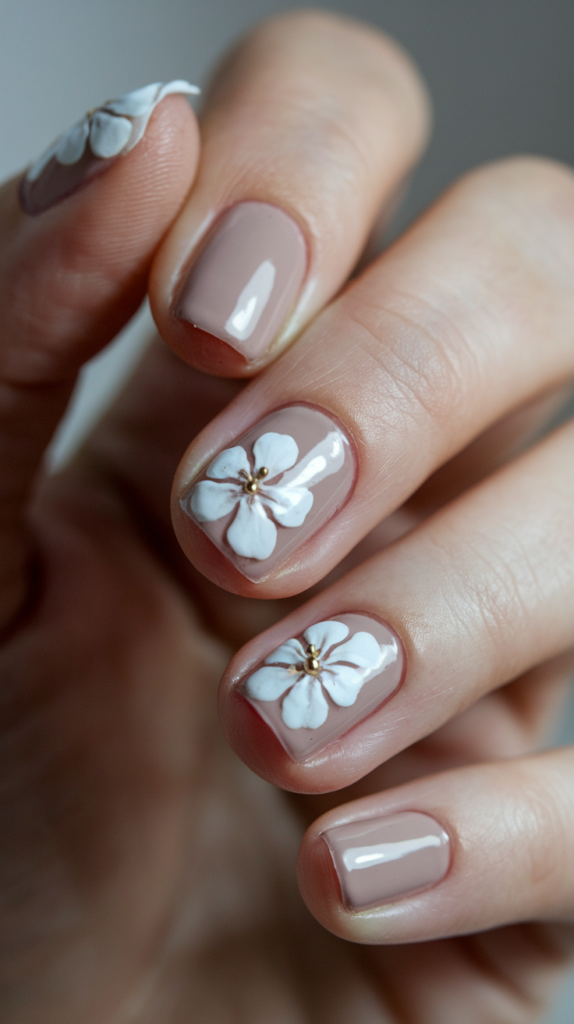
Blossom Elegance nails bring a refined and feminine touch with their soft nude base and delicate white flower details, enhanced by a touch of gold at the center.
Perfect for weddings, springtime events, or an everyday look that exudes sophistication, this design is both versatile and timeless.
Creating the Delicate Floral Design
Step 1: Prepare the Base
Start by applying a clear or soft nude polish as the base.
Ensure the base is even and fully dry before proceeding to the floral details.
Step 2: Paint the Petals
Using a fine nail art brush or dotting tool, paint four or five overlapping petals on each nail with white polish.
Keep the petals slightly asymmetrical to give a natural and organic appearance.
Step 3: Add the Golden Center
Once the petals are dry, use a gold dotting tool or small bead to create the flower’s center.
This detail adds a luxurious finish and a hint of sparkle to the design.
Step 4: Seal with a Top Coat
Apply a glossy top coat to protect the design and enhance the shine.
This step ensures the floral elements remain intact and vibrant.
Finishing Touches for Elegance
Step 1: Accent Nails
Consider creating the floral design on one or two accent nails for a minimalist look.
Leave the other nails with just the nude base to keep the overall design balanced.
Step 2: Add Subtle Details
For extra flair, include soft glitter or microdots of gold polish around the flowers on accent nails.
Step 3: Maintain the Shape
File your nails into a clean, rounded or square shape that complements the delicate floral design.
Why It Works
Blossom Elegance Nail Art combines simplicity and sophistication, making it perfect for both special occasions and everyday wear.
The soft nude base creates a versatile backdrop, while the intricate white flowers and golden centers add depth and charm.
The glossy finish ties everything together, ensuring the design looks polished and effortlessly elegant.
2. Pastel Blossom Nail Art
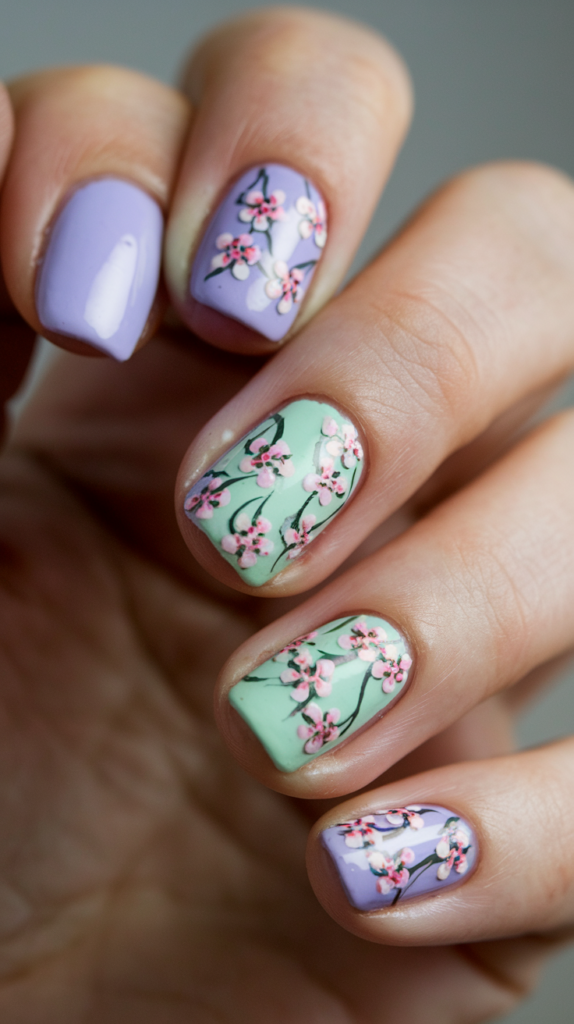
Pastel Blossom nails feature soft lilac and mint green bases adorned with intricate cherry blossom designs, creating a look that is fresh, feminine, and perfect for spring.
This design captures the beauty of blooming flowers, bringing elegance and a touch of nature to your fingertips.
Creating the Cherry Blossom Look
Step 1: Apply the Base Colors
Begin by alternating between mint green and lilac polish on your nails.
Apply two coats for an even, opaque finish, and allow them to dry completely.
Step 2: Paint the Branches
Use a fine nail art brush and black or dark brown polish to create thin, curving branches on each nail.
Focus on organic, flowing lines to mimic the natural shape of tree branches.
Step 3: Add the Blossoms
With a small dotting tool or detail brush, paint tiny flowers along the branches using soft pink polish.
Each flower can be created with four to five small dots for petals.
Step 4: Highlight with White
Add a small white dot at the center of each flower to give the blossoms more dimension and detail.
Finishing Details for a Blooming Effect
Step 1: Accent Placement
Choose one or two nails to feature more elaborate cherry blossom designs, leaving others simpler for balance.
Step 2: Add Subtle Glitter
Apply a fine layer of glitter polish over the blossoms or branches for a dewy, sparkling effect.
Step 3: Seal with a Top Coat
Finish with a glossy top coat to protect the artwork and enhance the overall shine of the design.
Why It Works
Pastel Blossom Nail Art captures the delicate beauty of springtime with its soft pastel hues and intricate floral details.
The mint green and lilac bases provide a fresh and harmonious contrast, while the cherry blossom motifs add a touch of elegance and artistry.
The glossy finish and subtle sparkle elevate the design, making it both eye-catching and perfect for celebrating the season.
3. Velvet Rose Nail Art
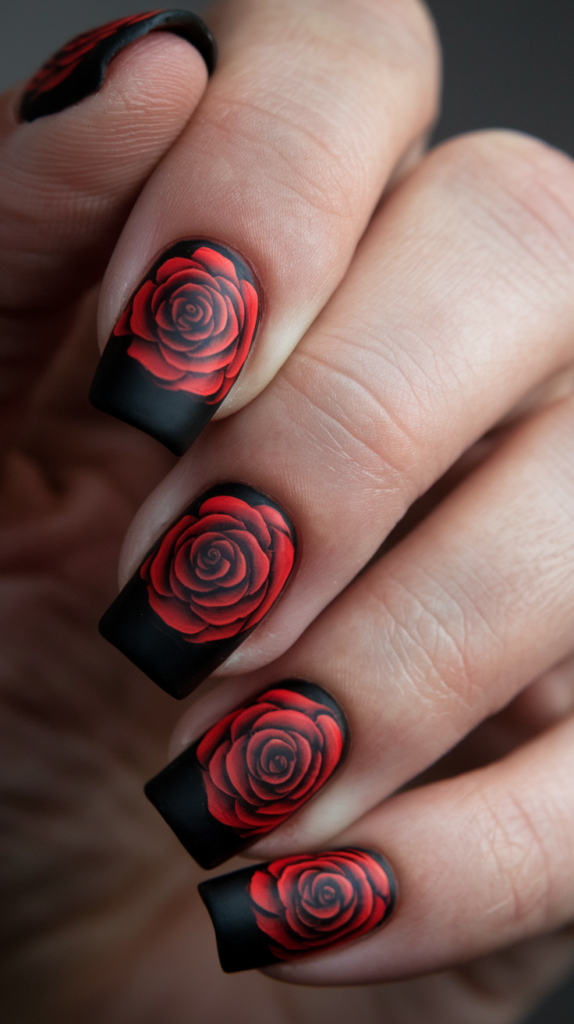
Velvet Rose nails exude drama and sophistication with their bold red rose designs set against a matte black background.
This design combines elegance with a touch of mystery, making it perfect for romantic evenings or gothic-inspired looks.
Crafting the Bold Rose Design
Step 1: Apply the Matte Black Base
Begin by applying a matte black polish to all nails.
Allow the base to dry completely for a smooth, velvety finish.
Step 2: Outline the Roses
Use a thin nail art brush and red polish to outline the petals of a rose on each nail.
Start at the center of the nail and work outward, creating concentric petal shapes.
Step 3: Fill in the Rose
With the same red polish, carefully fill in the petals, keeping the edges defined for a crisp look.
Use a darker red or black polish to shade the base of each petal, adding depth and dimension.
Adding Depth and Drama
Step 1: Highlight the Petals
Using a slightly lighter shade of red, add highlights to the tips of the petals for a realistic, 3D effect.
Blend the colors gently to maintain a smooth transition.
Step 2: Accent Nails
Focus the rose designs on all nails for a bold statement, or choose one or two accent nails for a minimalist effect.
Step 3: Clean Up and Seal
Carefully clean any edges with a precision brush dipped in remover.
Apply a matte top coat over the entire design to preserve the velvety finish.
Why It Works
Velvet Rose Nail Art captures the striking beauty of red roses against a matte black backdrop, creating a design that is both elegant and captivating.
The bold contrast between the red and black ensures the roses stand out, while the matte finish adds a modern, edgy twist.
The shading and highlighting techniques bring the roses to life, making this design a true showstopper for any occasion.
4. Watercolor Bloom Nail Art
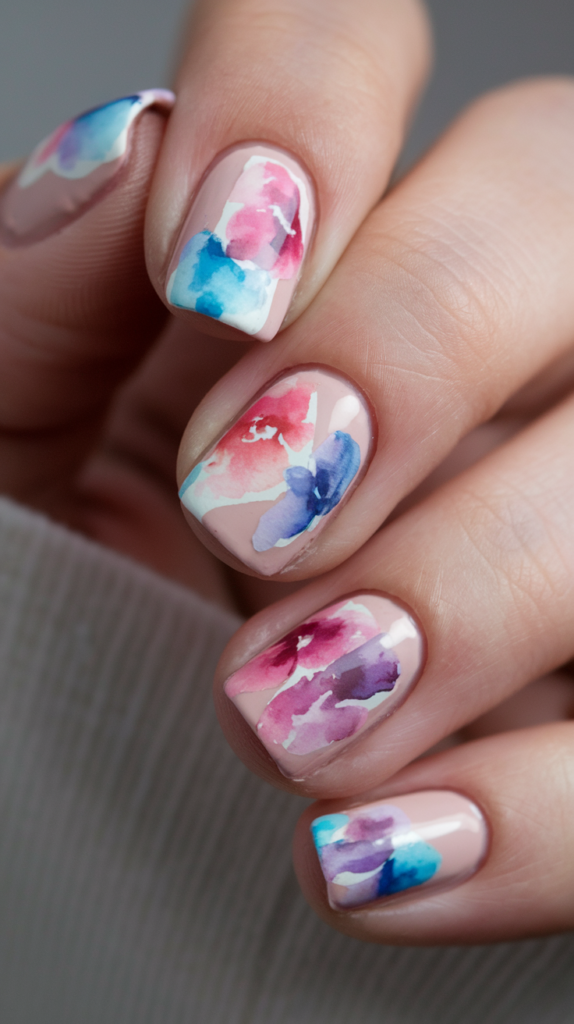
Watercolor Bloom nails are a delicate and artistic design that mimics the soft, flowing beauty of watercolor paintings.
With splashes of vibrant pink, blue, and purple over a nude base, this style is perfect for expressing creativity and elegance.
Creating the Soft Watercolor Look
Step 1: Apply the Base Coat
Start with a clear or nude polish to create a neutral canvas for the watercolor effect.
Let the base coat dry completely for smooth application.
Step 2: Blend the Colors
Choose vibrant polishes in pink, blue, and purple tones.
Dilute each color with a few drops of clear polish or nail art thinner to create a semi-transparent, watercolor-like consistency.
Step 3: Apply the Color Layers
Using a small, soft brush or sponge, gently dab the diluted colors onto the nails in random patterns.
Let each color dry slightly before layering another to prevent smudging and achieve a blended effect.
Adding Depth and Finishing Touches
Step 1: Enhance the Flowing Effect
Use a clean brush dipped in nail art thinner or acetone to soften the edges of the colors, creating a seamless, flowing appearance.
Blend colors into one another for a natural, watercolor transition.
Step 2: Add Highlights
For extra dimension, use a white polish to paint subtle streaks or highlights within the colored areas.
This step gives the design more depth and an artistic touch.
Step 3: Seal with a Glossy Top Coat
Finish with a high-shine top coat to protect the delicate design and enhance its painterly effect.
The glossy finish adds a polished and professional look.
Why It Works
Watercolor Bloom Nail Art combines the softness of pastel hues with the creativity of abstract painting, making it a versatile and artistic choice.
The nude base enhances the vibrant splashes of color, creating a balanced and elegant contrast.
The seamless blending of tones and the glossy finish bring out the design’s intricate, hand-painted charm, making it a true statement of creativity and style.
5. Tropical Bloom Nail Art

Tropical Bloom nails transport you to a lush paradise with their vibrant hibiscus flowers and bold leafy designs.
Perfect for vacations or summer days, this colorful and exotic nail art captures the essence of tropical beauty.
Creating the Tropical Flower Design
Step 1: Prepare the Base
Start with a white or light cream polish as the base to make the vibrant colors pop.
Let the base dry completely before adding the floral details.
Step 2: Paint the Leaves
Using a fine nail art brush and green polish, create leafy shapes around the edges of each nail.
Add depth by layering different shades of green for a realistic, textured effect.
Step 3: Create the Hibiscus Flowers
Choose bright colors like pink, orange, and yellow for the hibiscus flowers.
Use a detail brush to paint five large petals, ensuring they overlap slightly for a natural look.
Step 4: Add Flower Details
Using a darker shade, add thin lines at the base of each petal for dimension.
Finish by painting the stamen with a fine brush and adding tiny yellow or white dots at the tip.
Adding the Finishing Touches
Step 1: Highlight the Design
Use a small brush and a lighter shade of green or white to add highlights to the leaves for added dimension.
Step 2: Frame the Design
Ensure the flowers and leaves flow harmoniously across all nails by connecting elements on neighboring nails.
Step 3: Apply a Glossy Top Coat
Seal the design with a high-shine top coat to enhance the colors and protect the artwork.
Why It Works
Tropical Bloom Nail Art is a vibrant celebration of nature, combining bold hibiscus flowers with lush green foliage for an exotic and summery vibe.
The bright colors and intricate details make this design stand out, while the glossy finish adds a polished and professional touch.
Perfect for tropical vacations or adding a splash of color to your everyday look, this nail art is a must for anyone seeking a bold yet elegant design.
6. Vintage Rose Nail Art
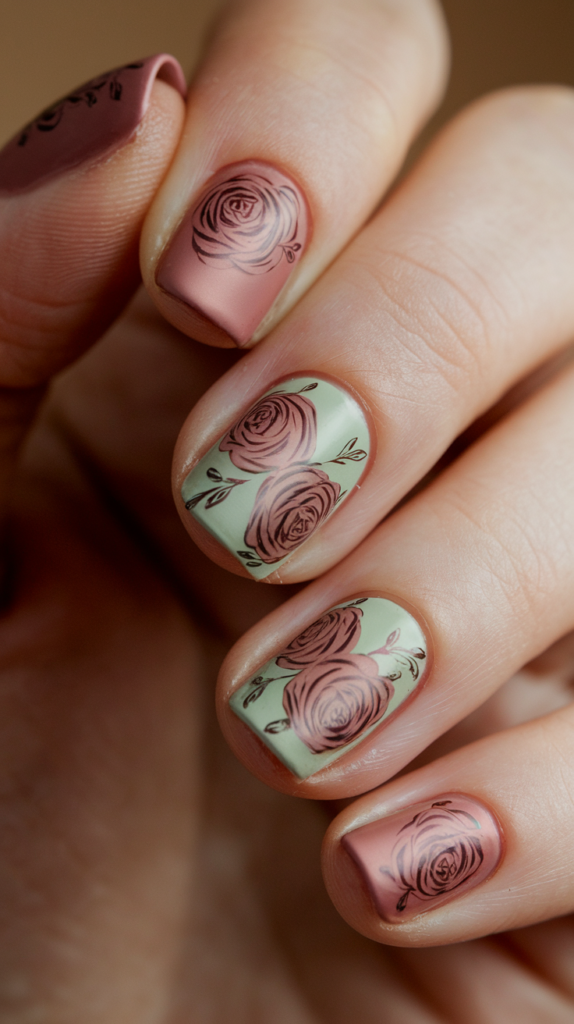
Vintage Rose nails offer a classic and romantic design featuring delicate rose patterns on muted tones of sage green and dusty pink.
This timeless style is perfect for weddings, formal occasions, or adding a subtle vintage charm to your everyday look.
Crafting the Delicate Rose Design
Step 1: Apply the Base Colors
Alternate between sage green and dusty pink polishes for the base on each nail.
Apply two coats for an even and opaque finish, letting the polish dry completely.
Step 2: Outline the Roses
Using a thin nail art brush or stamping tool with black polish, create intricate rose outlines on each nail.
Focus on soft, swirling strokes to mimic the natural pattern of rose petals.
Step 3: Add Leaf Details
Add small leaves extending from the rose outlines using the same thin brush and black polish.
Ensure the placement is balanced to enhance the floral design.
Perfecting the Vintage Look
Step 1: Accent Placement
Choose one or two nails to feature more detailed roses, while keeping others minimal for a refined effect.
Step 2: Matte Finish
Seal the design with a matte top coat to emphasize the vintage vibe and soften the overall appearance.
Step 3: Clean Up Edges
Use a precision brush dipped in polish remover to clean up any stray lines or polish around the nails.
Why It Works
Vintage Rose Nail Art captures the elegance of a bygone era with its soft color palette and intricate rose designs.
The muted tones of sage green and dusty pink create a harmonious base, while the delicate black outlines add a touch of sophistication.
The matte finish completes the look, making this design a perfect choice for lovers of classic, understated beauty.
7. Crystal Blossom Nail Art
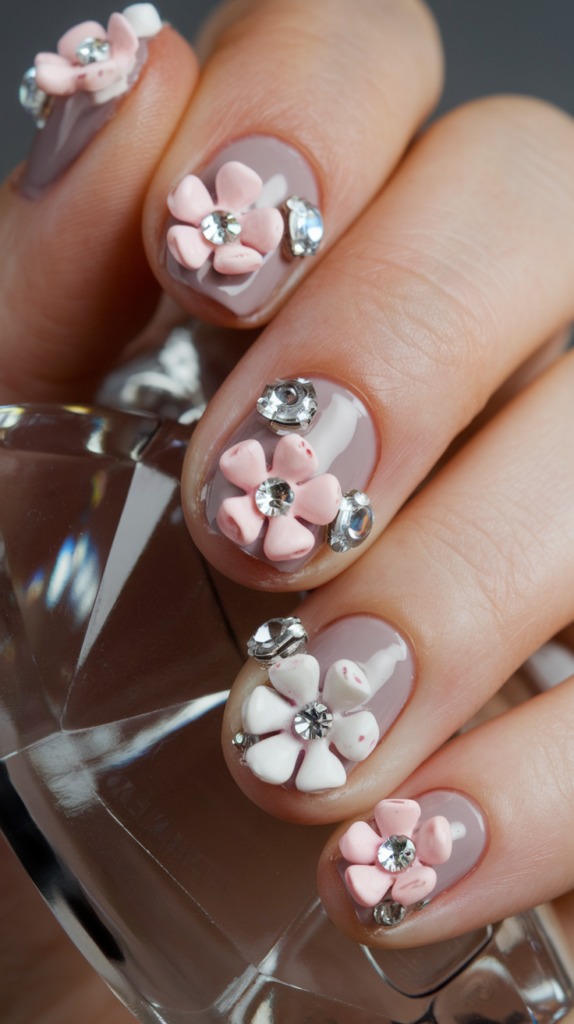
Crystal Blossom nails combine delicate 3D floral designs with sparkling rhinestones for a glamorous, textured look.
This design is perfect for weddings, parties, or any occasion that calls for an extra touch of elegance.
Creating the 3D Floral Design
Step 1: Apply the Base Color
Begin with a soft nude or taupe polish as the base for all nails.
Apply two coats for an even, polished look and allow them to dry completely.
Step 2: Sculpt the Flowers
Use pink and white acrylic to sculpt the flower petals directly onto the nails.
Carefully layer each petal to create a realistic, dimensional effect.
Step 3: Add the Rhinestone Centers
Place a small dot of nail glue in the center of each flower and attach a rhinestone for a sparkling focal point.
Press gently to secure the rhinestones in place.
Enhancing with Rhinestone Details
Step 1: Add Accent Rhinestones
Scatter additional rhinestones around the flowers on a few nails for a cohesive and luxurious look.
Use varying sizes to add depth and visual interest.
Step 2: Balance the Design
Keep some nails simpler by adding a few rhinestones without the 3D flowers to balance the overall design.
Step 3: Seal with a Top Coat
Apply a thick layer of clear top coat around the rhinestones and acrylic flowers (without covering them) to ensure they stay secure and the base remains glossy.
Why It Works
Crystal Blossom Nail Art offers a stunning combination of texture and shine, making it perfect for formal and special occasions.
The 3D flowers bring a delicate, handcrafted feel, while the rhinestones add dazzling sparkle that catches the light beautifully.
The soft nude base keeps the design elegant and balanced, ensuring the intricate details stand out without being overwhelming.
8. Floral French Tip Nail Art
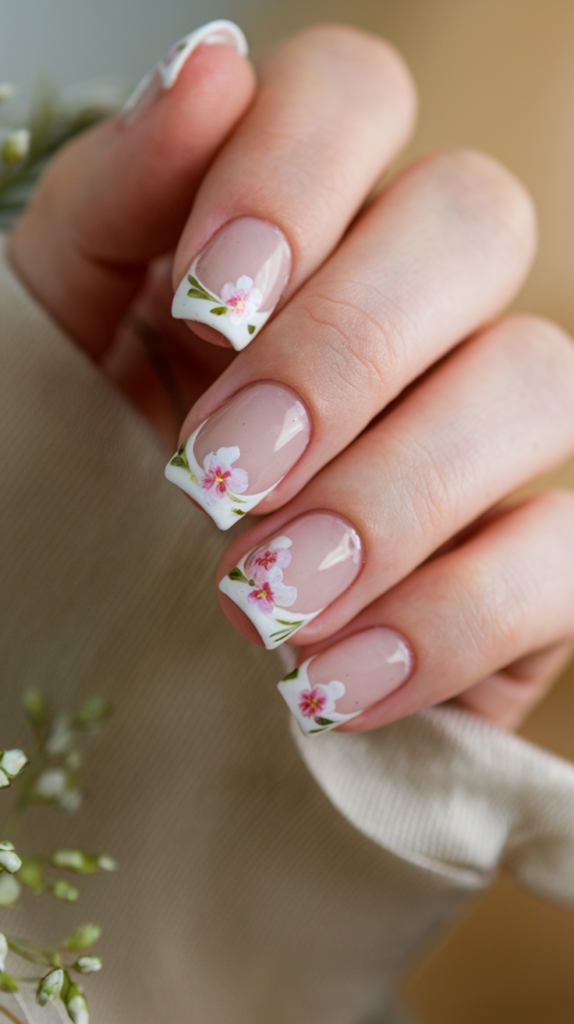
Floral French Tip nails are a fresh and elegant twist on the classic French manicure, featuring delicate pink blossoms and leafy accents along crisp white tips.
This timeless design is ideal for springtime, weddings, or any occasion that calls for a sophisticated yet feminine look.
Creating the Floral French Tips
Step 1: Prepare the Base
Apply a soft pink or clear polish as the base to give your nails a natural, glossy finish.
Let the base coat dry completely before adding the tips.
Step 2: Paint the French Tips
Using white polish or a French tip stencil, carefully paint clean, curved tips on each nail.
Ensure even coverage and let the polish dry before proceeding.
Step 3: Add the Floral Details
Use a fine brush or dotting tool to paint small pink flowers near the edges of the tips.
Add subtle green leaves for a natural, balanced design.
Step 4: Highlight the Blossoms
Use a darker pink or red polish to add fine lines to the petals, creating depth and definition.
For added charm, paint small white or yellow dots at the center of each flower.
Finishing the Elegant Look
Step 1: Refine the Edges
Clean up any stray polish or uneven edges with a fine brush dipped in nail polish remover.
Step 2: Seal the Design
Apply a clear top coat over the entire nail to protect the floral details and enhance the shine.
This will also give the design a polished, professional finish.
Step 3: Accentuate with Subtle Glitter
For a touch of sparkle, lightly brush a fine glitter top coat over the flowers and leaves.
Why It Works
Floral French Tip Nail Art blends the timeless elegance of a classic French manicure with the charm of delicate blossoms.
The soft pink and white base creates a clean and fresh look, while the intricate floral accents add a touch of creativity and femininity.
The glossy finish ensures the design looks refined and polished, making it versatile for both formal events and everyday wear.
9. Delicate Daisy Nail Art
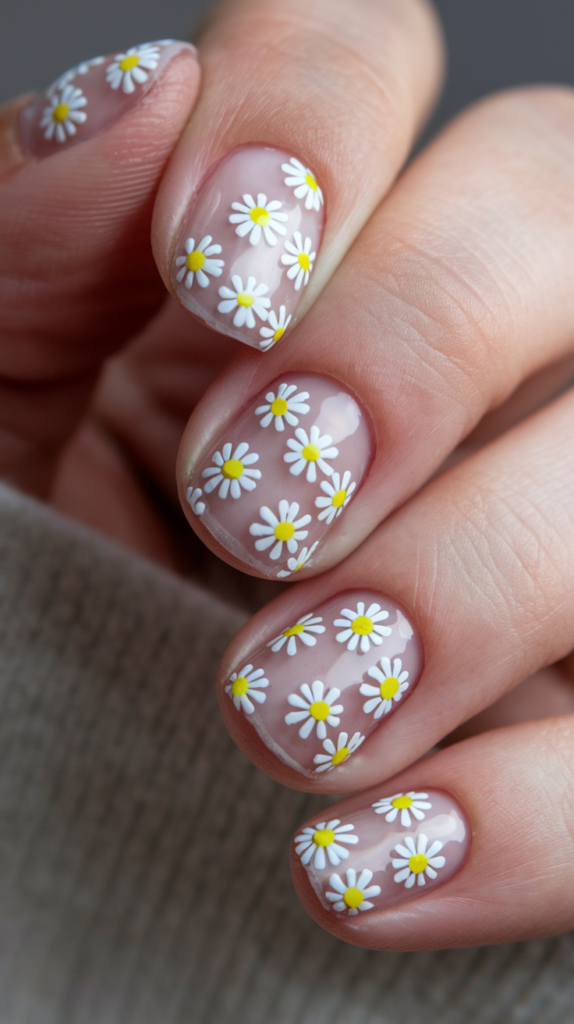
Delicate Daisy nails bring a cheerful and fresh vibe with a seamless pattern of white daisies against a soft nude base.
This charming and playful design is perfect for springtime or when you want to add a touch of brightness to your look.
Creating the Daisy Pattern
Step 1: Apply the Base Coat
Start by applying a clear or nude polish to create a smooth, natural backdrop for the daisy design.
Let the base coat dry completely for a polished finish.
Step 2: Paint the Petals
Use a small detail brush and white polish to paint the daisy petals.
Create 5-6 small, evenly spaced petals around a central point on each nail.
Step 3: Add the Centers
With a dotting tool or the tip of a small brush, add a yellow dot in the center of each daisy.
Ensure the dot is vibrant and fills the center neatly.
Enhancing the Daisy Design
Step 1: Balance the Pattern
Cover each nail with 3-4 daisies, spacing them evenly for a cohesive and balanced look.
For a minimalist touch, focus the daisies on the tips or the corners of the nails.
Step 2: Highlight the Details
Use a fine brush to clean up any edges or add tiny white accents around the flowers for a refined finish.
Step 3: Seal with a Glossy Top Coat
Apply a glossy top coat over the entire nail to protect the delicate design and give it a polished, professional look.
Why It Works
Delicate Daisy Nail Art captures the essence of spring with its fresh and cheerful floral motif.
The soft nude base enhances the vibrant white and yellow daisies, creating a harmonious and eye-catching contrast.
This versatile design is perfect for both casual and formal occasions, adding a playful yet sophisticated touch to your nails.
10. Cherry Blossom Nail Art
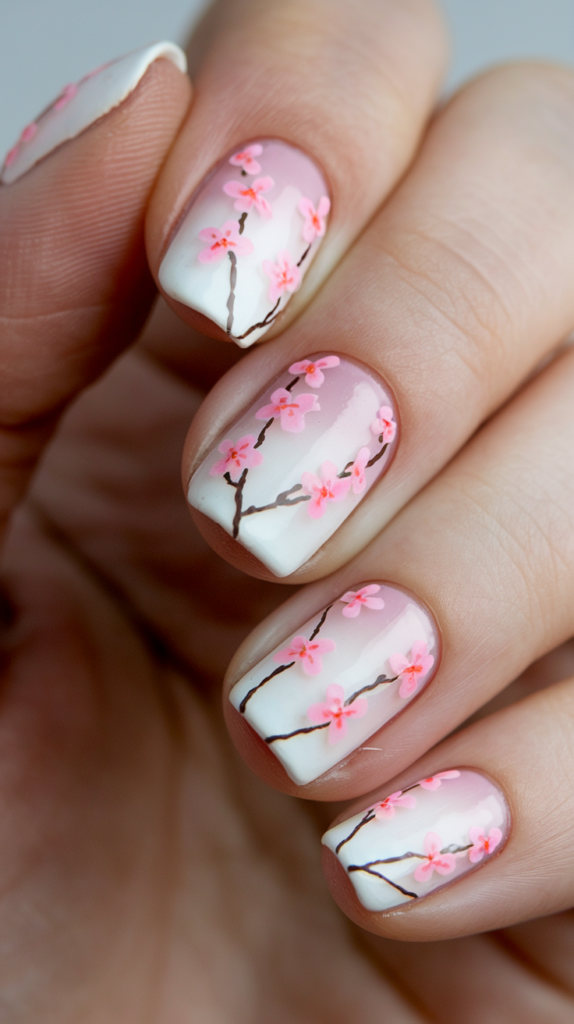
Cherry Blossom nails capture the serene beauty of springtime with soft pink blooms delicately painted on branches over a gradient pink and white base.
This design is perfect for nature lovers and those seeking an elegant yet feminine nail look.
Creating the Cherry Blossom Design
Step 1: Prepare the Gradient Base
Start with a white base coat to ensure a clean canvas.
Using a sponge, apply a gradient effect with light pink at the cuticle blending into white at the tips.
Let the gradient dry completely for a smooth finish.
Step 2: Paint the Branches
With a fine nail art brush and dark brown polish, create thin, flowing branches across the nails.
Focus on organic, natural curves to mimic real cherry tree branches.
Step 3: Add the Blossoms
Using a dotting tool or fine brush, paint small clusters of pink flowers along the branches.
Each flower can be created with five small dots for petals.
Step 4: Add Highlights
Use a lighter pink or white polish to add tiny highlights to the petals, giving them depth and a lifelike appearance.
Perfecting the Delicate Look
Step 1: Balance the Design
Ensure each nail features a harmonious mix of branches and blossoms for a cohesive appearance.
Step 2: Refine Details
Clean up any excess polish or uneven edges with a precision brush dipped in remover.
Step 3: Seal with a Glossy Top Coat
Apply a glossy top coat to protect the intricate design and enhance the gradient’s seamless look.
Why It Works
Cherry Blossom Nail Art combines the delicate charm of blooming flowers with a soft gradient base, creating a design that feels both serene and sophisticated.
The flowing branches and detailed blossoms add a natural and artistic touch, while the glossy finish ties the look together with a polished, professional appearance.
Perfect for springtime events or adding a subtle elegance to your nails, this design is a true celebration of beauty in nature.
11. Wildflower Meadow Nail Art
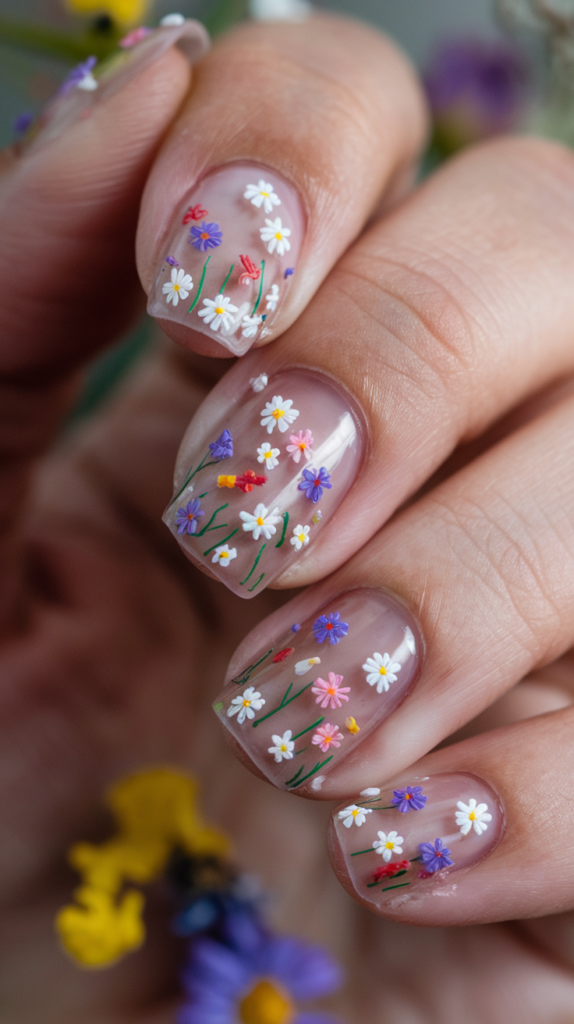
Wildflower Meadow nails bring the beauty of nature to your fingertips with a delicate array of colorful wildflowers painted over a clear base.
This whimsical and intricate design is ideal for spring or summer and adds a touch of natural elegance to any look.
Crafting the Wildflower Design
Step 1: Apply the Clear Base
Start with a clear or sheer nude polish to create a natural, glossy foundation for the design.
Let the base coat dry completely before adding floral details.
Step 2: Paint the Stems and Leaves
Using a fine nail art brush and green polish, paint thin, vertical stems on each nail.
Add small leaves along the stems for a realistic, botanical look.
Step 3: Add the Wildflowers
Use a dotting tool or a fine brush to paint small flowers in a variety of colors, such as white, purple, pink, yellow, and red.
Create each flower by painting 4–5 small petals around a central dot in a contrasting color.
Step 4: Layer for Depth
Overlap a few flowers and stems to create a layered, meadow-like effect.
Vary the size and placement of the flowers for a natural and organic appearance.
Enhancing the Natural Look
Step 1: Highlight the Flowers
Add tiny white or yellow dots to the flower centers for added detail and vibrancy.
Step 2: Keep the Balance
Ensure the design is evenly distributed across all nails, focusing on keeping the wildflower look light and airy.
Step 3: Seal with a Glossy Top Coat
Apply a high-shine top coat to protect the design and give it a polished, professional finish.
The glossy coat enhances the vibrant colors and adds a dewy, fresh appearance.
Why It Works
Wildflower Meadow Nail Art captures the delicate charm of a blooming meadow with its variety of colorful flowers and lush green stems.
The clear base keeps the design light and modern, allowing the intricate details to stand out.
Perfect for casual days or special occasions, this design celebrates the beauty of nature with elegance and creativity.
12. Pastel Mandala Nail Art
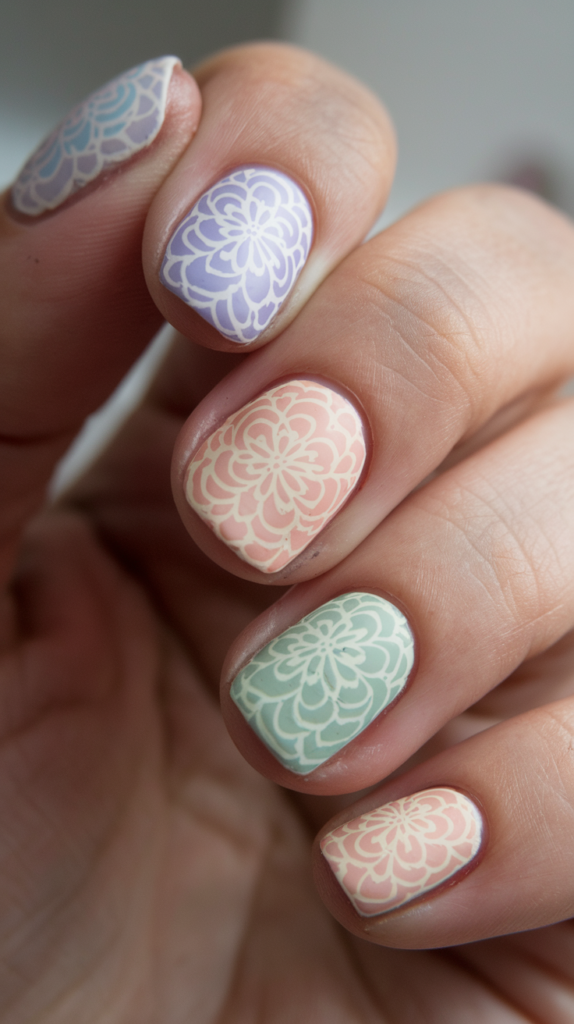
Pastel Mandala nails combine soft, soothing shades with intricate mandala patterns for a calming and elegant look.
This design is perfect for anyone seeking a subtle yet artistic manicure that stands out with delicate details.
Creating the Mandala Design
Step 1: Apply the Pastel Base
Choose pastel shades like lavender, mint green, peach, and light pink for each nail.
Apply two coats for a smooth, opaque finish and let them dry completely.
Step 2: Paint the Mandala Patterns
Using a fine nail art brush or stamping tool, paint intricate mandala designs in white polish over the pastel base.
Start from the center of the nail and work outward, creating symmetrical patterns with fine lines and shapes.
Step 3: Refine the Details
Go over the mandala lines with a fine brush to ensure they are crisp and clean.
For added detail, include small dots or curved lines between the shapes.
Perfecting the Subtle Look
Step 1: Balance the Colors
Ensure the pastel shades are evenly distributed across the nails for a cohesive appearance.
Step 2: Use a Matte Top Coat
Seal the design with a matte top coat to emphasize the delicate patterns and create a soft, velvety finish.
Step 3: Clean Up the Edges
Use a precision brush dipped in polish remover to clean up any stray polish or imperfections around the nails.
Why It Works
Pastel Mandala Nail Art blends soft, calming colors with intricate patterns, creating a look that is both sophisticated and artistic.
The pastel shades provide a serene and understated backdrop, allowing the detailed mandala designs to take center stage.
The matte finish enhances the elegance of the design, making it perfect for casual days or more refined occasions.
13. Pressed Flower Nail Art

Pressed Flower nails showcase the natural beauty of real or faux dried flowers encased in a crystal-clear base.
This ethereal and whimsical design is perfect for spring, summer, or special occasions like weddings, adding a touch of nature’s charm to your look.
Creating the Pressed Flower Design
Step 1: Prepare a Clear Base
Begin with a clear or slightly sheer nude base coat to ensure a clean and natural background.
Apply two coats for a smooth and polished finish, allowing each layer to dry completely.
Step 2: Select and Prepare the Flowers
Choose small dried flowers or faux floral accents in a variety of colors like purple, pink, yellow, and white.
Trim the flowers to fit the size and shape of your nails for a seamless application.
Step 3: Arrange the Flowers
Apply a thin layer of clear gel or nail glue over the nail.
Carefully place the flowers onto the nail using tweezers, arranging them in a scattered or balanced pattern.
Gently press down to ensure the flowers adhere properly without air bubbles.
Sealing and Perfecting the Look
Step 1: Encapsulate the Flowers
Apply a generous layer of clear builder gel or top coat over the flowers to encase them completely.
Cure under a UV lamp if using gel, or allow the polish to dry thoroughly.
Step 2: Smooth the Surface
Buff the surface lightly if needed to remove any unevenness, then apply another layer of clear top coat for a glossy, glass-like finish.
Step 3: Refine the Edges
Use a fine brush dipped in polish remover to clean up any excess gel or glue around the edges of the nails.
Why It Works
Pressed Flower Nail Art captures the delicate beauty of nature in a timeless and elegant design.
The clear base enhances the vibrant colors and intricate details of the flowers, creating a look that feels light, fresh, and effortlessly sophisticated.
Perfect for special occasions or when you want to celebrate the beauty of nature, this design is a true statement of creativity and style.
14. Golden Bloom Nail Art
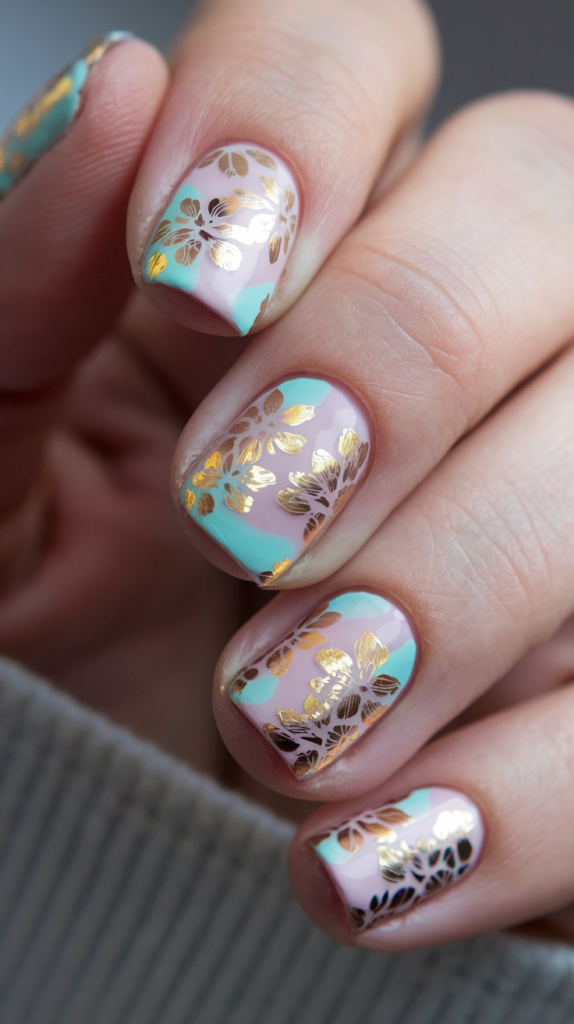
Golden Bloom nails combine soft pastel tones with intricate gold floral accents for a luxurious and elegant look.
Perfect for weddings, parties, or any time you want to make a bold yet refined statement, this design is a blend of sophistication and creativity.
Crafting the Golden Bloom Design
Step 1: Create the Base Colors
Apply alternating pastel shades, such as mint green and light pink, on your nails as the base.
Use two coats for full opacity and allow the polish to dry completely.
Step 2: Add Diagonal Pastel Accents
Using a thin nail art brush, paint diagonal sections of contrasting pastel colors on each nail.
Let these accents dry to create a clean and vibrant color-blocked base.
Step 3: Apply the Gold Foil or Stickers
Use gold nail foils or stickers featuring floral designs.
Carefully press them onto the nails, aligning the floral patterns with the base color transitions for a harmonious look.
Perfecting the Look
Step 1: Seal the Gold Design
Apply a thin layer of clear gel or top coat over the gold accents to secure them.
This step ensures the gold elements remain intact and glossy.
Step 2: Smooth the Edges
Gently press down any edges of the foil or stickers to keep the surface even and flawless.
Step 3: Apply a Glossy Top Coat
Seal the entire design with a high-shine top coat to enhance the gold details and give the nails a polished finish.
Why It Works
Golden Bloom Nail Art captures the balance between pastel softness and metallic luxury, making it versatile for both formal and celebratory occasions.
The mint and pink tones provide a fresh and modern base, while the gold floral accents add depth, elegance, and a touch of opulence.
With its clean lines and shimmering details, this design exudes sophistication and creativity in equal measure.
15. Blossom Ombre Nail Art
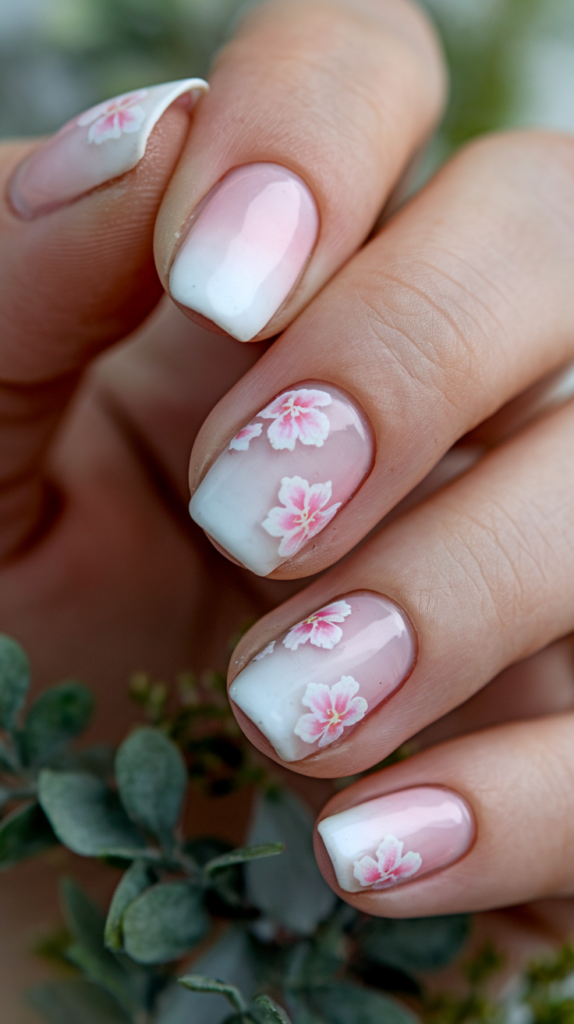
Blossom Ombre nails combine a soft pink-to-white gradient with delicate floral accents, creating a design that is both graceful and feminine.
Perfect for weddings, springtime, or any occasion that calls for understated elegance, this look is timeless and versatile.
Creating the Ombre Gradient
Step 1: Prepare the Base
Start with a sheer pink polish as the base for the gradient.
Apply one or two coats and allow them to dry completely.
Step 2: Blend the Ombre Effect
Using a makeup sponge, layer pink polish at the cuticle and white polish at the tips.
Dab the sponge onto the nail to create a seamless gradient, blending the colors together.
Repeat this step until the desired opacity is achieved, letting each layer dry before applying the next.
Step 3: Smooth the Surface
Apply a clear top coat over the gradient to smooth out any texture from the sponging process.
Adding the Floral Accents
Step 1: Paint the Flowers
Using a fine brush or nail art stickers, add soft pink flowers to the nails.
Focus on the sides or base of the nail to complement the ombre design without overpowering it.
Step 2: Add Details
Use white polish to add fine lines and details to the petals for a realistic touch.
Place a small dot of yellow or gold polish in the center of each flower for a subtle pop of color.
Step 3: Seal the Design
Finish with a glossy top coat to protect the floral artwork and enhance the gradient’s soft, dewy appearance.
Why It Works
Blossom Ombre Nail Art blends the delicate charm of florals with the elegance of a gradient finish, making it ideal for both casual and formal occasions.
The soft pink and white tones create a harmonious, feminine base, while the floral accents add a touch of sophistication and artistry.
This design is perfect for those who love subtle yet detailed nail art that complements any outfit or event.
16. Lavender Fields Nail Art
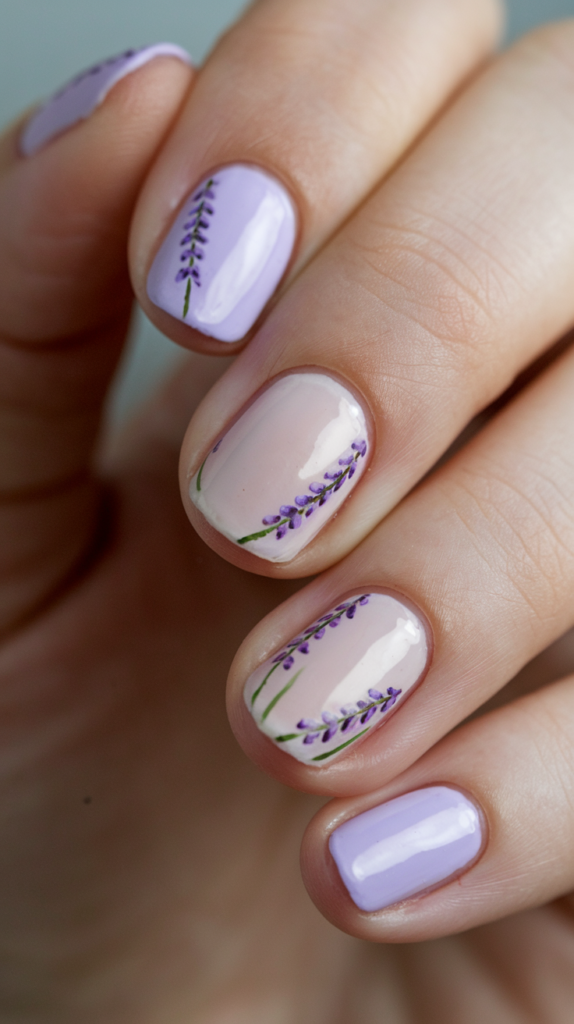
Lavender Fields nails offer a serene and elegant design inspired by the calming beauty of lavender sprigs.
With soft pastel hues and minimalist botanical details, this look is perfect for spring, summer, or anyone who loves understated floral nail art.
Crafting the Lavender Design
Step 1: Apply the Base Colors
Alternate between a soft lavender polish and a sheer nude polish for the base of each nail.
Apply two coats for full coverage and let them dry completely.
Step 2: Paint the Stems
Using a fine nail art brush and green polish, paint thin vertical stems on the nude-based nails.
Keep the stems straight and delicate to mimic the natural look of lavender sprigs.
Step 3: Add the Lavender Buds
With a dotting tool or fine brush, paint small purple dots along each stem to create the appearance of lavender buds.
Layer the dots slightly for a realistic, textured effect.
Finishing the Look
Step 1: Refine the Details
Use a darker shade of purple to add small accents or shadows to the buds for more dimension.
Step 2: Balance the Design
Keep the lavender sprigs limited to the nude nails, allowing the solid lavender nails to serve as elegant accents.
Step 3: Seal with a Glossy Top Coat
Apply a glossy top coat to protect the design and enhance the shine, giving the nails a polished and professional finish.
Why It Works
Lavender Fields Nail Art captures the beauty of nature in a subtle, minimalist way.
The combination of soft lavender hues and delicate floral details creates a calming and sophisticated aesthetic.
Perfect for everyday wear or special occasions, this design brings elegance and tranquility to your fingertips.
17. Sunflower Bliss Nail Art

Sunflower Bliss nails radiate warmth and positivity with their bold yellow petals and intricate details.
This vibrant and cheerful design is perfect for summer or any time you want to brighten your look with a nature-inspired manicure.
Crafting the Sunflower Design
Step 1: Apply the Base Color
Start with a deep black or dark brown polish as the base to make the sunflower design stand out.
Apply two coats for full coverage and allow them to dry completely.
Step 2: Paint the Petals
Using a thin nail art brush and bright yellow polish, paint long, pointed petals radiating outward from the center of the nail.
Layer the petals slightly to create depth and dimension.
Step 3: Add the Flower Centers
For the center of the sunflower, use a brown polish to create a textured circular core.
Add tiny black or darker brown dots inside the circle to mimic the seeds and give it a realistic look.
Enhancing the Design
Step 1: Add Petal Highlights
Use a lighter shade of yellow or white polish to add highlights to the petals, giving them a vibrant, 3D effect.
Blend the highlights gently for a natural appearance.
Step 2: Balance the Pattern
For a cohesive design, paint a large sunflower on one or two nails and smaller sunflower accents or partial blooms on the others.
Step 3: Seal with a Glossy Top Coat
Apply a glossy top coat to enhance the shine and protect the design.
The glossy finish makes the sunflowers appear vivid and fresh.
Why It Works
Sunflower Bliss Nail Art captures the beauty and energy of sunflowers with its bright, cheerful colors and intricate details.
The contrast between the dark base and the vibrant yellow petals creates a striking look, while the textured centers add depth and realism.
This design is perfect for making a bold statement and celebrating the sunny joy of nature.
18. Botanical Bliss Nail Art
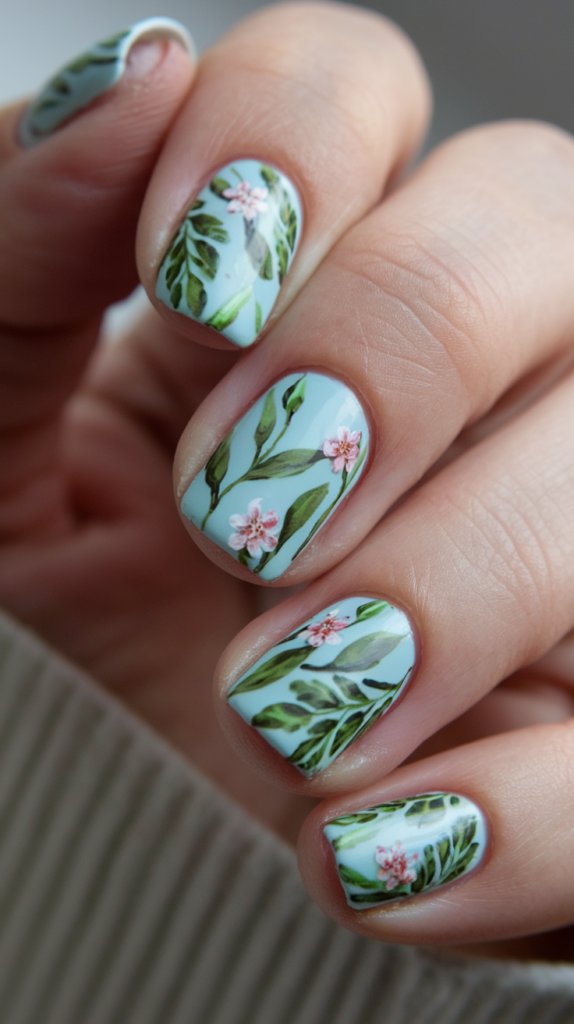
Botanical Bliss nails bring nature to your fingertips with intricate leafy designs and delicate pink flowers set against a soft blue base.
This refreshing and serene design is perfect for spring and summer, offering a look that is both elegant and whimsical.
Creating the Botanical Design
Step 1: Apply the Base Color
Start with a pastel blue polish to create a soft and calming backdrop for the design.
Apply two coats for full opacity and allow them to dry completely.
Step 2: Paint the Leaves
Using a fine nail art brush and green polish, paint flowing leafy stems across the nails.
Layer different shades of green for added depth and dimension, focusing on natural, organic shapes.
Step 3: Add the Flowers
Use a dotting tool or fine brush to create small pink flowers on a few stems.
Each flower can be made with five tiny petals and a small white or yellow center for a realistic touch.
Perfecting the Look
Step 1: Enhance the Details
Add thin white or lighter green highlights on the leaves to create a 3D effect.
Blend gently for a polished and professional appearance.
Step 2: Balance the Design
Ensure each nail features a harmonious mix of leaves and flowers for a cohesive look.
Keep some nails leaf-focused while others highlight the delicate pink blooms.
Step 3: Seal with a Glossy Top Coat
Apply a glossy top coat to protect the design and enhance the colors, giving the nails a fresh, dewy finish.
Why It Works
Botanical Bliss Nail Art captures the beauty of nature with its intricate leafy patterns and soft floral accents.
The pastel blue base creates a serene canvas, while the layered greens and pink flowers add depth and visual interest.
This versatile design is perfect for any occasion, blending elegance and creativity to celebrate the natural world.
19. Romantic Rose Nail Art
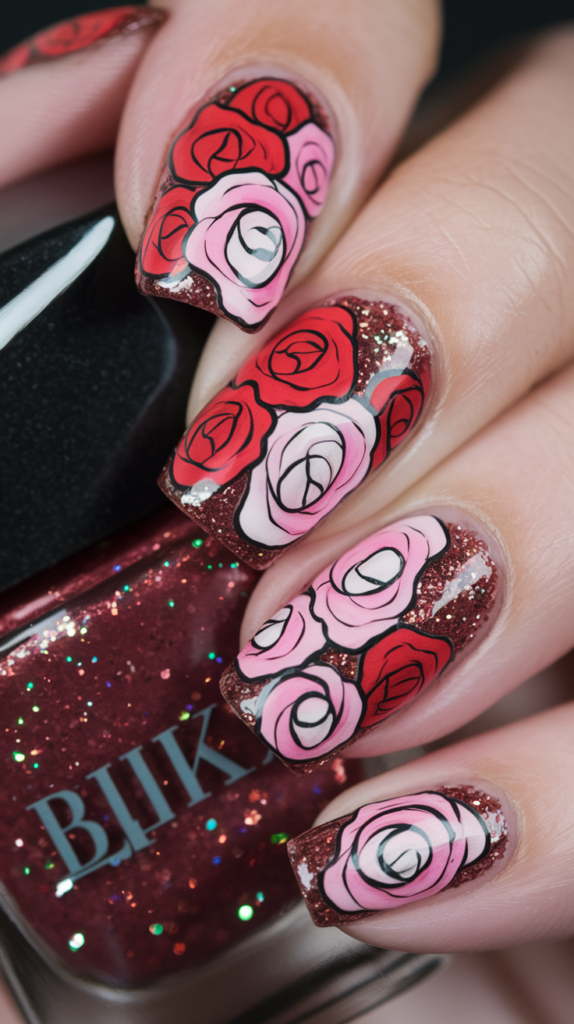
Romantic Rose Nail Art combines elegance and charm, making it perfect for special occasions like Valentine’s Day or weddings.
The design features vibrant red and pink roses that bloom against a glittering base, creating a sophisticated yet playful look.
Crafting the Perfect Rose Design
Step 1: Prepare the Glittering Base
Start with a shimmering burgundy polish as the base. Apply two coats for a rich and even finish.
Allow the base to dry completely before moving to the next step.
Step 2: Outline the Roses
Using a fine nail art brush or a detailing tool, outline rose shapes on each nail in black polish.
Alternate between smaller and larger roses for variety, ensuring they fit the nail’s shape.
Step 3: Fill in the Roses
Fill each rose with red or pink polish, depending on your desired look.
For a dimensional effect, use a lighter shade of pink on select petals or layer the colors.
Step 4: Add Fine Details
Once the rose colors have dried, use the black polish to refine the petal lines.
This step enhances the design’s intricacy and makes the roses stand out.
Finishing Touches for a Polished Look
Step 1: Apply a Glitter Overlay
Add a subtle glitter overlay on the base to enhance the shimmer beneath the roses.
Focus on scattering the glitter for a natural sparkling effect.
Step 2: Seal with a Top Coat
Finish with a clear top coat to lock in the design and provide a glossy, smooth surface.
This step also ensures the artwork lasts longer without chipping.
Why It Works
Romantic Rose Nail Art captures the timeless beauty of roses with its elegant color palette and intricate details.
The shimmering burgundy base provides a luxurious backdrop, while the hand-painted roses add a touch of artistry and romance.
This design stands out for its balance of sophistication and whimsy, making it a versatile choice for any occasion where you want to feel effortlessly chic.
20. Succulent Bloom Nail Art
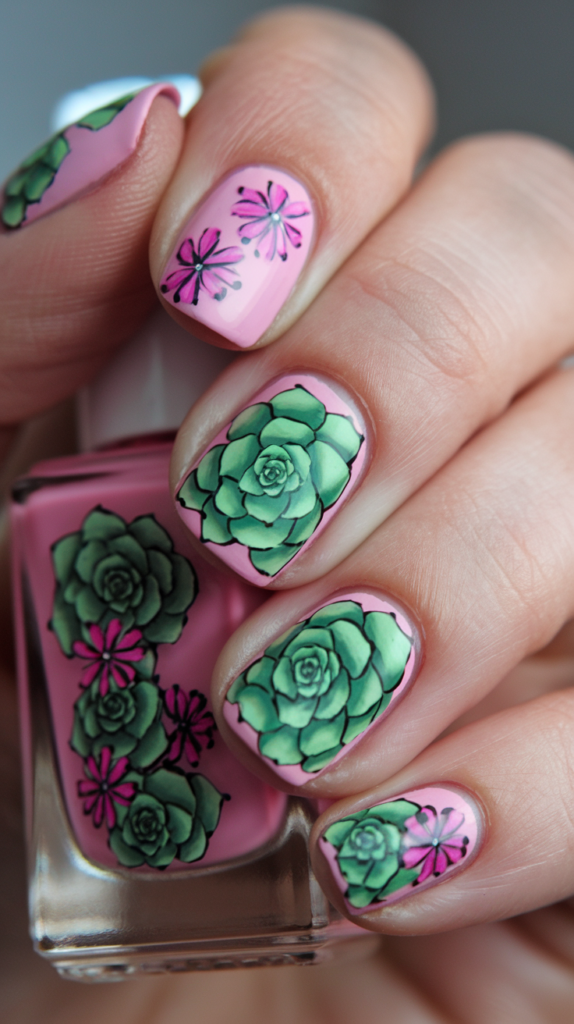
Succulent Bloom Nail Art blends earthy tones with vibrant florals, offering a fresh and botanical-inspired look.
Featuring intricate succulents paired with delicate pink blossoms, this design is perfect for nature enthusiasts and springtime occasions.
Designing the Succulent and Floral Look
Step 1: Start with the Base Color
Begin by applying two coats of soft pink polish as the base.
Ensure the color is even and let it dry completely before adding details.
Step 2: Paint the Succulent Shapes
Using a fine nail art brush, outline succulent shapes on the nails with green polish.
Focus on layering the petals outward to mimic the natural arrangement of succulents.
Step 3: Add Dimension to the Succulents
Mix darker and lighter green shades to add shading and highlights to the succulent petals.
This step brings depth and a lifelike quality to the design.
Step 4: Create the Floral Accents
On the remaining space, paint small pink flowers with a fine detailing brush.
Add darker pink or purple lines radiating from the flower centers for a textured effect.
Finishing Touches for a Natural Vibe
Step 1: Define the Details
Use black polish or a fine-tipped pen to outline the succulents and flowers.
This step emphasizes the shapes and gives the design a bold, polished appearance.
Step 2: Apply a Glossy Top Coat
Seal the entire design with a glossy top coat to protect the artwork and add shine.
This final step ensures the design’s longevity and a professional finish.
Why It Works
Succulent Bloom Nail Art combines the calming beauty of succulents with the lively charm of florals for a harmonious, nature-inspired design.
The soft pink base enhances the green succulents, creating a pleasing contrast, while the floral accents add a touch of whimsy.
This unique and refreshing nail art is ideal for those who want a chic, botanical look that stands out.
21. Bright Floral Nail Art
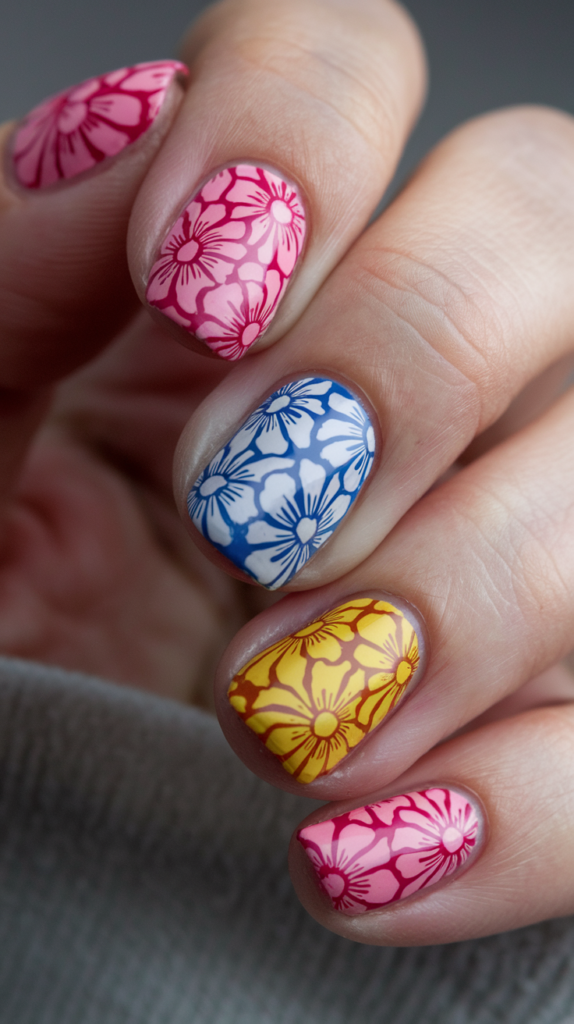
Bright Floral Nail Art is the perfect design to add a burst of color and a playful touch to your nails.
Featuring bold, vibrant flowers in pink, blue, and yellow, this design brings an energetic and fresh feel that’s ideal for spring or summer.
Creating the Bold Floral Design
Step 1: Apply the Base Color
Start by applying a soft pink, blue, or yellow polish to each nail.
Use two coats for a smooth and even base, ensuring the colors are bright and saturated. Allow the nails to dry fully.
Step 2: Outline the Flowers
Once the base color is dry, use a fine nail art brush to draw bold flowers with a contrasting color.
For instance, use white or black polish to create flower outlines. Focus on creating large blooms with distinct petals.
Step 3: Add Petal Details
Fill in the center of each flower with a darker shade of the same color.
Use a thinner brush to add delicate details to the petals, enhancing the design’s depth and texture.
Step 4: Add Small Flowers and Accents
On some nails, consider adding smaller flowers or dots around the main blooms for variety.
This step adds a sense of balance and makes the design feel fuller and more lively.
Finishing Touches for a Polished Look
Step 1: Refine the Edges
Carefully outline the edges of the flowers with a thin brush to make the petals crisp and defined.
This step sharpens the design and ensures each flower stands out against the background.
Step 2: Apply a Glossy Top Coat
Seal the design with a shiny top coat to add a glossy finish.
This top coat protects the artwork and gives the nails a sleek, polished look.
Why It Works
Bright Floral Nail Art combines bold colors with intricate flower details, creating a vibrant, eye-catching design.
The use of contrasting colors—pink, blue, and yellow—ensures each bloom pops, while the precise outlines and details give the design depth.
This lively and playful nail art is perfect for those who want to embrace the cheerful spirit of the season with a fresh and bold design.
22. Lace Elegance Nail Art
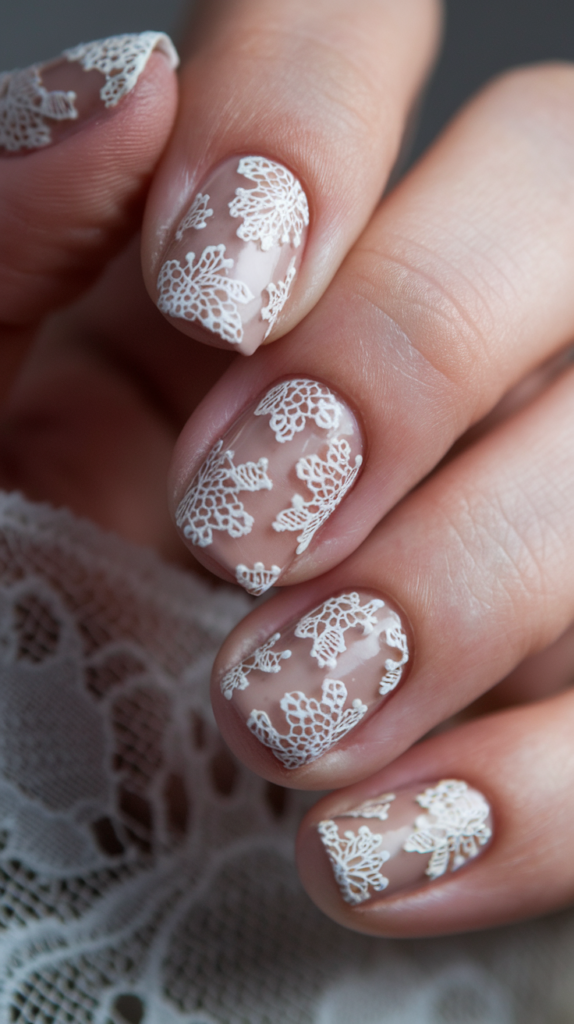
Lace Elegance Nail Art adds a delicate, sophisticated touch to your nails, perfect for formal events, weddings, or anyone who loves intricate, feminine designs.
The sheer base combined with white lace patterns creates a timeless and graceful look.
Creating the Lace Effect
Step 1: Apply the Nude Base
Start by applying a nude or sheer pink polish as the base.
Ensure you apply two coats for an even, translucent finish, and allow it to dry completely.
Step 2: Create the Lace Pattern
Using a fine detailing brush, paint delicate lace designs on each nail with white polish.
Focus on creating intricate floral and geometric patterns that mimic lace fabric. Be sure to vary the designs to give each nail its own unique touch.
Step 3: Add Shading and Details
For added depth, lightly shade areas of the lace design using a soft gray or light pink polish.
This subtle detail enhances the look of the lace and gives the design a more sophisticated, layered feel.
Step 4: Refine the Lace Details
Once the design is dry, go over the lace outlines with white polish to sharpen the details and ensure crisp, clear lines.
Finishing Touches for a Perfect Look
Step 1: Apply a Top Coat
Finish with a glossy top coat to seal in the lace design and provide a smooth, shiny finish.
This step ensures the lace art lasts longer and adds a polished, elegant look to your nails.
Why It Works
Lace Elegance Nail Art combines the soft, feminine appeal of lace with the modern touch of a sheer base, resulting in a design that is both delicate and timeless.
The white lace designs stand out beautifully against the nude background, creating an elegant contrast that is both eye-catching and refined.
This nail art is perfect for special occasions, adding a touch of grace and sophistication to your overall look.
23. Neon Floral Nail Art
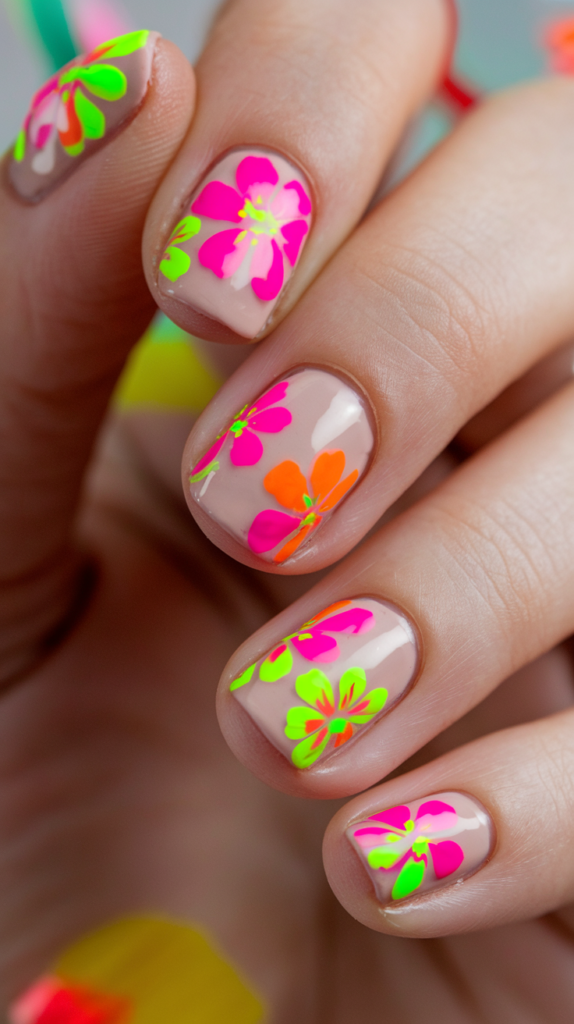
Neon Floral Nail Art brings an exciting pop of color to your nails, perfect for anyone looking to add a fun and vibrant touch to their style.
With bright neon flowers against a soft nude base, this design radiates energy and is ideal for summer or festival looks.
Creating the Neon Floral Look
Step 1: Apply the Nude Base
Start by applying a nude or light pink polish to the nails as a base.
Use two coats for a smooth, natural finish and let the nails dry fully before moving to the next step.
Step 2: Create the Flower Shapes
Using neon pink, orange, and green polishes, paint vibrant flowers on each nail.
Focus on creating large, bold blooms with varying petal shapes, placing them randomly across your nails for a playful and lively effect.
Step 3: Add Details to the Flowers
Once the flowers have dried, add small dots or lines inside the petals using contrasting neon colors for added texture and depth.
This extra detail makes each flower pop and enhances the overall design.
Step 4: Fine Tune the Edges
Outline the flowers with a fine brush and black polish to give the design structure and clarity.
The sharp contrast between the neon colors and the black outlines will make the flowers stand out even more.
Finishing Touches for a Perfect Look
Step 1: Apply a Top Coat
Seal the design with a glossy top coat to lock in the neon colors and provide a smooth, shiny finish.
This step ensures the longevity of the nail art and adds a polished look to the overall design.
Why It Works
Neon Floral Nail Art captures the essence of summer with its bold, bright flowers and playful design.
The neon colors stand out vibrantly against the nude base, creating a striking visual contrast that grabs attention.
This design is perfect for anyone looking to make a bold statement with their nails, offering a fun and colorful way to express individuality.
24. Golden Blossom Nail Art
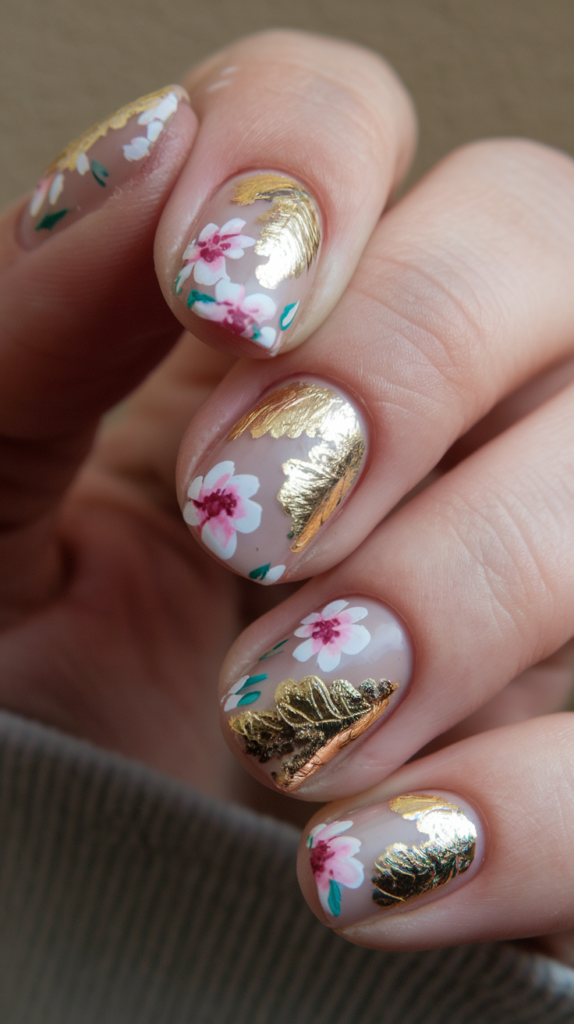
Golden Blossom Nail Art combines delicate florals with striking gold accents, creating a luxurious and sophisticated design.
The soft nude base enhances the vibrant flowers, while the gold foil adds a rich, elegant touch that makes this nail art perfect for special events or a chic everyday look.
Designing the Floral and Gold Look
Step 1: Apply the Nude Base
Begin with a nude or light taupe polish as the base color.
Apply two coats for an even and smooth finish, ensuring the color is light and subtle. Let the base dry completely before moving to the next step.
Step 2: Paint the Flowers
Using a fine nail art brush, paint small delicate flowers with soft pink and white polish.
Position the flowers randomly across the nails, making sure they are scattered evenly for a balanced design.
Step 3: Add Green Leaves
Use a green polish to paint small leaves around the flowers.
Focus on adding a few leaves to each flower, using fine detailing to ensure the leaves complement the overall design.
Step 4: Apply the Gold Foil
Once the floral design has dried, carefully apply small pieces of gold foil to some of the nails.
Place the foil along the edges of the nails or around the flowers to add a luxurious touch.
Finishing Touches for a Luxurious Look
Step 1: Seal the Design
Apply a clear top coat over the entire design to protect the artwork and smooth out the surface.
The top coat helps the gold foil adhere better and ensures the flowers and gold accents stay vibrant.
Why It Works
Golden Blossom Nail Art is the perfect blend of elegance and creativity, showcasing beautiful florals paired with the luxury of gold accents.
The soft nude background creates a timeless and versatile look, while the delicate flowers and gold foil add a touch of glamour and sophistication.
This design is ideal for anyone seeking a chic and refined nail art style, adding a beautiful and bold statement to any occasion.
25. Glittering Daisy Nail Art

Glittering Daisy Nail Art beautifully blends delicate floral designs with a sparkling gradient, perfect for adding a touch of elegance to your look.
The combination of soft florals and shimmering glitter creates a balanced yet captivating design that is ideal for spring or any special occasion.
Creating the Glittering Daisy Look
Step 1: Apply the Nude Base
Start by applying a nude or soft pink polish as the base color.
Apply two coats for an even, smooth finish, ensuring the color is subtle and light. Allow the nails to dry completely.
Step 2: Add the Daisy Flowers
Using a fine nail art brush, paint small, delicate daisy flowers near the tips of each nail.
Use white polish for the petals and a yellow polish for the flower centers. Keep the flowers light and airy to maintain a soft, feminine feel.
Step 3: Apply the Glitter Gradient
Using a fine brush or a sponge, apply a glitter polish to the tips of the nails, creating a gradient effect.
Start from the tip and gently blend the glitter downward, fading it as you move toward the base of the nails.
Step 4: Blend the Glitter into the Flowers
Ensure the glitter blends seamlessly into the floral designs, making the transition from flowers to glitter smooth and natural.
Finishing Touches for a Soft and Elegant Look
Step 1: Seal the Design
Apply a clear top coat to seal in the design and add a glossy finish.
This helps the glitter stay in place while enhancing the shine of the flowers and the overall nail art.
Why It Works
Glittering Daisy Nail Art offers a delicate, refined look with the beauty of floral designs paired with a sparkling, subtle gradient.
The soft pink nude base allows the white daisies to shine, while the glittery tips add an element of luxury and sophistication.
This nail art is perfect for anyone looking for a romantic, elegant design that offers both charm and sparkle in a balanced, harmonious way.
26. Poppy Field Nail Art

Poppy Field Nail Art brings a vibrant, floral touch to your nails, featuring bold red poppies set against a soft blue backdrop.
This design captures the essence of spring and is perfect for adding a lively, nature-inspired vibe to any look.
Creating the Poppy Field Look
Step 1: Apply the Base Color
Begin by applying a light blue polish to each nail as the base color.
Ensure an even coat by applying two layers of polish, letting each layer dry completely.
Step 2: Paint the Poppy Flowers
Using a fine nail art brush, paint poppy flowers in a bright red color, varying the size and placement across your nails for a natural, scattered effect.
Leave some space between the flowers for a balanced look.
Step 3: Add the Flower Centers
Use black polish to create the centers of the poppies.
Add small black dots or a round shape in the middle of each flower to give it depth.
Step 4: Refine the Petals
Once the flowers have dried, outline the edges of the petals with a darker red or black polish to define the poppies more clearly and give them a realistic appearance.
Finishing Touches for a Bright, Bold Look
Step 1: Seal the Design
Finish the design by applying a glossy top coat to protect the artwork and add a high-shine finish.
This will help the vibrant colors stay vibrant and the flowers stand out.
Why It Works
Poppy Field Nail Art combines bold red poppies with a soft blue base for a striking yet harmonious look.
The contrast between the bright red flowers and the calming blue background creates a visually captivating design that is both lively and refreshing.
This design is perfect for anyone looking to add a pop of color and a touch of nature-inspired beauty to their nails, making it a perfect choice for spring or casual chic looks.
27. Black and White Floral Nail Art

Black and White Floral Nail Art offers a sophisticated and timeless design with delicate floral patterns set against a clean, nude base.
The high contrast between black and white makes this design bold yet elegant, perfect for any occasion that calls for a chic, modern look.
Creating the Black and White Floral Look
Step 1: Apply the Nude Base
Start by applying a nude or light pink polish as the base color to each nail.
Ensure the base is smooth and even by applying two coats, and allow it to dry completely.
Step 2: Paint the Black Floral Designs
Using a fine detailing brush, create simple yet elegant black flowers across your nails.
Position the flowers randomly, ensuring each nail has a unique design. The flowers can vary in size, some large and others small, for a natural look.
Step 3: Add Leaf and Stem Details
Once the flowers are dry, add small black leaves and stems to complement the blooms.
Use thin lines to connect the flowers and create a sense of flow across the nails.
Step 4: Refine the Petals and Stems
Go over the petals and stems with black polish to sharpen the details.
Make sure the lines are crisp and clean to give the design a polished, refined appearance.
Finishing Touches for a Clean, Elegant Look
Step 1: Apply a Top Coat
Finish with a clear top coat to protect the design and enhance the shine.
This will also help smooth out the surface and ensure the flowers stay crisp and vibrant.
Why It Works
Black and White Floral Nail Art creates a striking contrast between the delicate flowers and the neutral base, offering a design that is both bold and refined.
The simplicity of the black and white palette ensures the design remains timeless, while the intricacy of the floral details adds elegance and sophistication.
This nail art is perfect for anyone looking for a chic, modern look that makes a statement while maintaining subtlety and class.
28. Crystal Bloom Nail Art
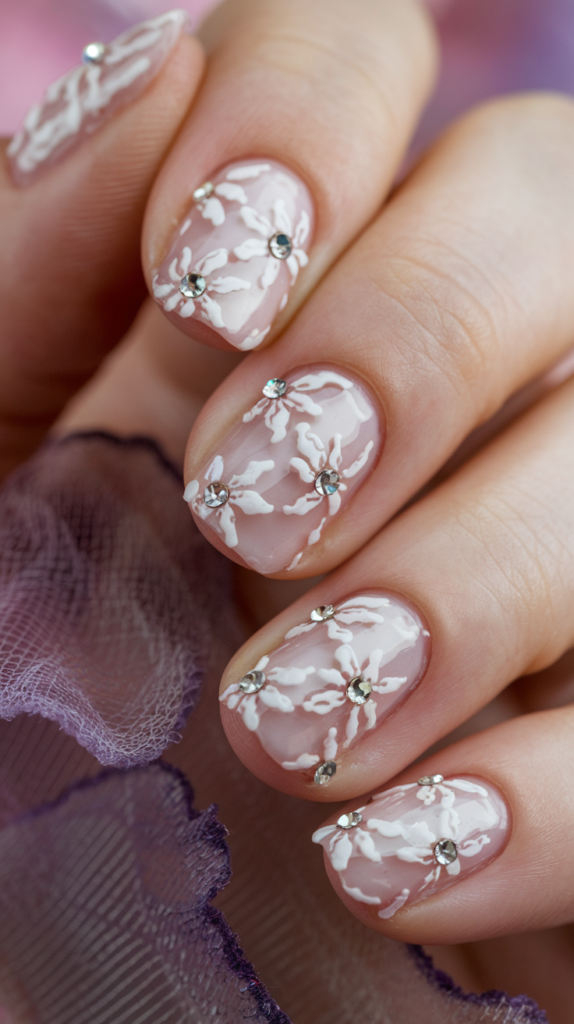
Crystal Bloom Nail Art combines the delicate beauty of floral designs with the elegance of sparkling rhinestones, creating a sophisticated and eye-catching look.
This design features soft white flowers with a touch of sparkle, making it perfect for special occasions or anyone who loves subtle yet refined nail art.
Creating the Crystal Bloom Look
Step 1: Apply the Nude Base
Start by applying a nude or light pink polish to each nail as the base color.
Ensure the color is even by applying two coats and allowing it to dry completely.
Step 2: Paint the Floral Design
Using a fine nail art brush, create soft white flowers on each nail.
Position the flowers randomly, ensuring some overlap for a natural, scattered effect. Keep the petals delicate and thin to maintain a subtle look.
Step 3: Add the Flower Centers
Place small rhinestones in the center of each flower for a touch of sparkle.
Use a nail glue or top coat to carefully attach the rhinestones, making sure they are securely placed.
Step 4: Refine the Flowers
Once the flowers and rhinestones are dry, use white polish to add subtle details around the petals, enhancing the design’s overall depth and texture.
Finishing Touches for a Polished Look
Step 1: Apply a Top Coat
Finish with a clear top coat to seal in the design and add a glossy, smooth finish.
This will help protect the rhinestones and keep the design vibrant.
Why It Works
Crystal Bloom Nail Art exudes sophistication with its delicate floral patterns and shimmering rhinestones.
The nude base allows the white flowers to stand out while the rhinestones add an element of elegance and shine.
This design is perfect for anyone who wants to add a touch of luxury and femininity to their nails, making it ideal for weddings, parties, or special occasions.
29. Rose Gold Floral Nail Art
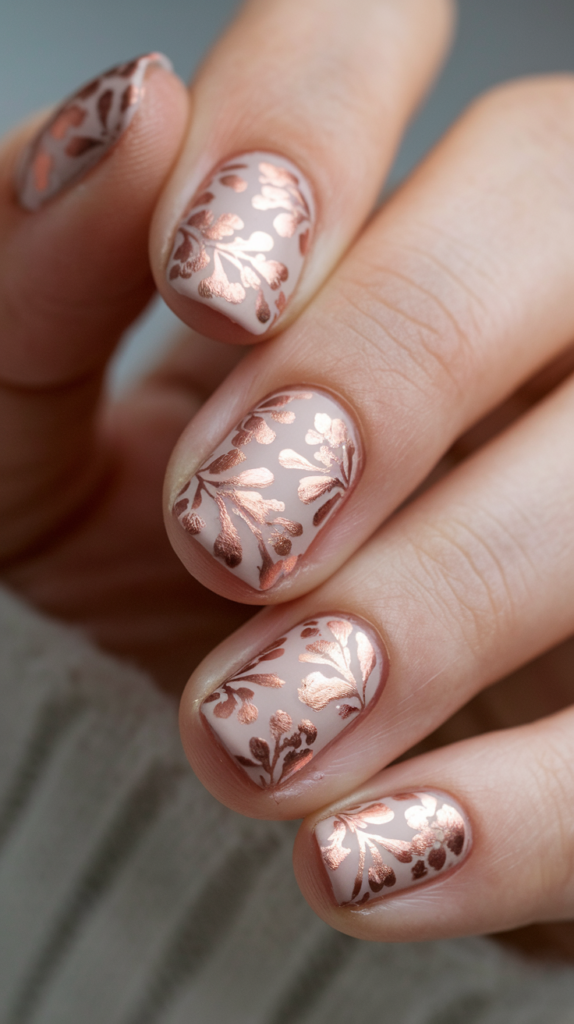
Rose Gold Floral Nail Art combines the elegance of rose gold with delicate floral designs, creating a sophisticated and chic look.
The soft nude base enhances the shimmering metallic accents, making this design perfect for those who love a modern and refined style.
Creating the Rose Gold Floral Look
Step 1: Apply the Nude Base
Begin by applying a nude or soft pink polish to each nail as the base color.
Apply two coats for a smooth, even finish, and allow it to dry completely.
Step 2: Paint the Floral Design
Using a fine nail art brush or stamping tool, create intricate floral patterns with rose gold polish.
Position the flowers strategically on each nail, ensuring they form a balanced design with varying flower sizes.
Step 3: Add Delicate Details
Once the flowers are dry, add finer details to the petals and stems using the same rose gold polish.
This step enhances the design and gives it a more polished, detailed appearance.
Step 4: Refine the Edges
Outline the floral design lightly with a darker shade of rose gold or a complementary brown polish.
This helps to define the flowers and creates a subtle depth to the artwork.
Finishing Touches for a Polished Look
Step 1: Apply a Top Coat
Finish with a clear top coat to seal in the design and provide a smooth, glossy finish.
This will protect the artwork and ensure the nails maintain their shine and vibrancy.
Why It Works
Rose Gold Floral Nail Art perfectly combines the timeless elegance of floral patterns with the modern shimmer of rose gold.
The nude base provides a soft, neutral canvas for the bold metallic accents, allowing the rose gold flowers to stand out beautifully.
This design is ideal for anyone seeking a refined and stylish nail art look that makes a subtle yet sophisticated statement.
30. Blossoming Ombre Nail Art
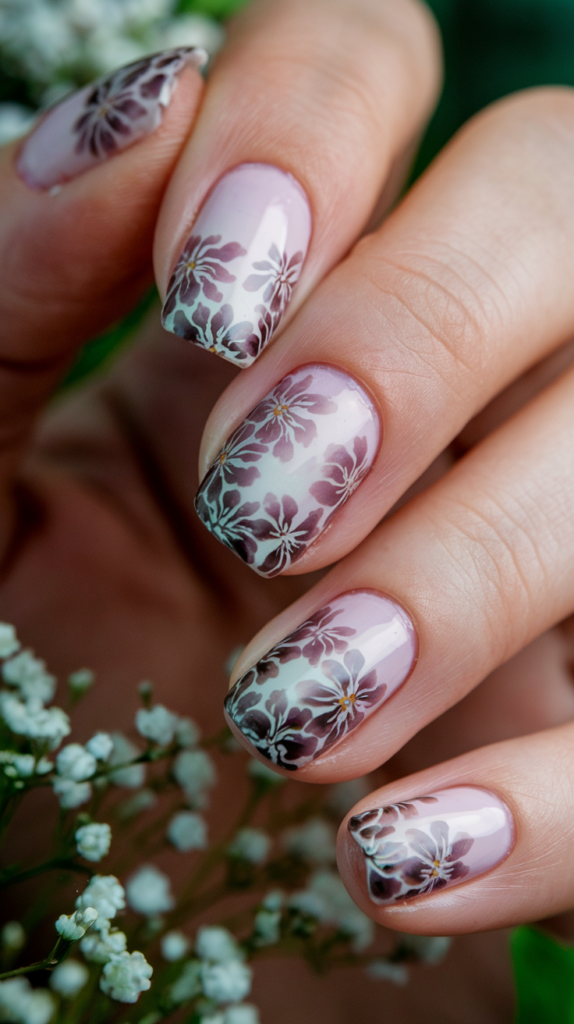
Blossoming Ombre Nail Art combines soft gradient hues with intricate floral designs, creating a romantic and delicate look.
The fading effect of the ombre background, paired with the soft flowers, makes this design ideal for spring or any occasion where you want a subtle yet sophisticated touch.
Creating the Blossoming Ombre Look
Step 1: Apply the Ombre Base
Start by applying a soft pink or nude polish as the base.
Next, create the ombre effect by using a sponge to blend a lighter pink at the base of the nails, gradually transitioning into a darker pink or mauve towards the tips.
Step 2: Paint the Floral Design
Once the ombre gradient is dry, use a fine detailing brush to paint small, delicate flowers near the tips of each nail.
Focus on using soft burgundy or mauve for the petals and a yellow or white polish for the centers. Arrange the flowers randomly for a natural look.
Step 3: Add Leaves and Details
Add small leaves and additional details around the flowers using green polish.
Refine the petals and stems with darker shades for a more dimensional effect.
Step 4: Softly Blend the Design
Lightly blur the flower edges where they meet the ombre background to make the transition smooth and cohesive, creating a seamless, artistic effect.
Finishing Touches for a Soft and Elegant Look
Step 1: Apply a Top Coat
Finish the design by applying a clear top coat to seal everything in place.
This will help the design last longer and give it a glossy, smooth finish.
Why It Works
Blossoming Ombre Nail Art perfectly combines the elegance of an ombre gradient with the beauty of detailed floral accents.
The soft pink tones blend beautifully with the delicate flowers, creating a romantic and feminine aesthetic.
This design is perfect for anyone looking to embrace a fresh, airy nail art look with a subtle yet striking flair.
31. Pastel Blossom Nail Art

Pastel Blossom Nail Art combines soft, pastel hues with delicate floral details, creating a serene and elegant design.
The light green base paired with soft pink flowers brings a fresh, spring-inspired look to your nails, making it perfect for a feminine and understated style.
Creating the Pastel Blossom Look
Step 1: Apply the Pastel Green Base
Start by applying a soft pastel green polish to each nail as the base color.
Ensure an even coverage by applying two coats, and allow it to dry completely.
Step 2: Paint the Blossom Flowers
Using a fine nail art brush, create small, delicate flowers with light pink and white polish.
Place the flowers randomly across your nails, ensuring the petals are soft and flowing to maintain a natural, organic feel.
Step 3: Add the Leaves and Stems
Using a light brown or olive green polish, paint thin stems and small leaves around the flowers.
Keep the lines delicate to complement the soft floral design.
Step 4: Refine the Flowers
Once the flowers are dry, add subtle shading and highlight the edges of the petals with a slightly darker pink or brown polish.
This will give the flowers depth and make them pop against the pastel background.
Finishing Touches for a Soft, Elegant Look
Step 1: Apply a Matte Top Coat
Finish the design with a matte top coat to give the nails a soft, velvety finish.
The matte effect enhances the delicate floral design and adds a sophisticated touch.
Why It Works
Pastel Blossom Nail Art combines the calming effect of pastel colors with the gentle beauty of floral designs, creating a refined, romantic look.
The soft green base provides a perfect backdrop for the subtle pink flowers, while the delicate brown stems add dimension and elegance to the overall design.
This design is ideal for anyone looking for a fresh, feminine style that radiates grace and tranquility.
32. Dark Floral Elegance Nail Art
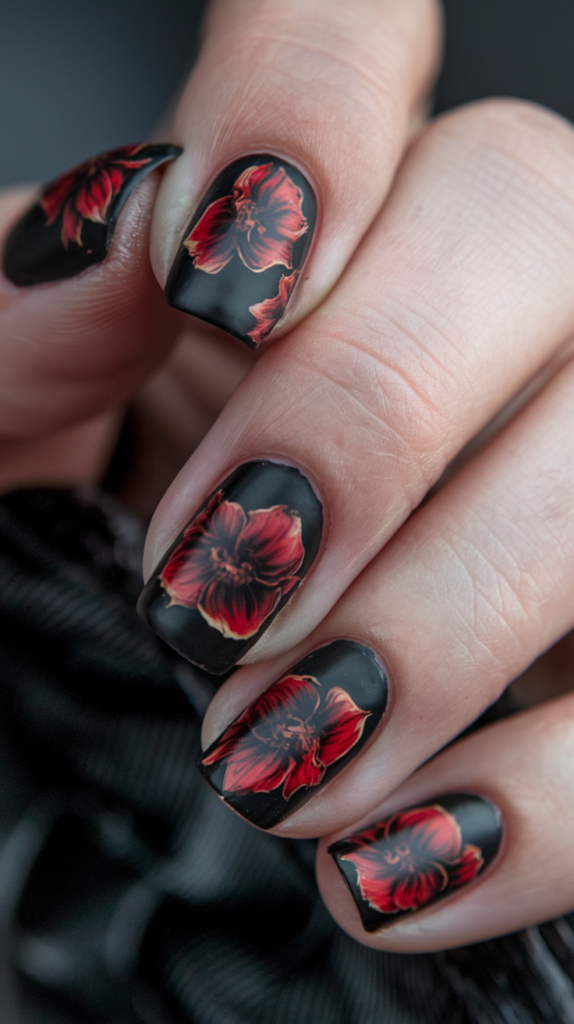
Dark Floral Elegance Nail Art brings a bold yet refined contrast to your nails with vibrant red flowers against a deep black background.
This striking design is perfect for those who want to add a touch of mystery and sophistication to their style.
Creating the Dark Floral Elegance Look
Step 1: Apply the Black Base
Start by applying a deep black polish to each nail as the base color.
Make sure to apply two coats for an even and smooth finish, allowing it to dry completely.
Step 2: Paint the Red Flowers
Using a fine nail art brush, create bold red flowers on each nail.
Position the flowers strategically, focusing on placing them near the tips of the nails or scattered across each nail. Use a gradient of red to create dimension within the petals.
Step 3: Add Flower Detailing
Once the flowers are dry, use black polish to add shading to the petals and make the flowers more dimensional.
Outline the edges of the flowers lightly to enhance their shape and create depth.
Step 4: Refine the Flowers
Use white or lighter red polish to add subtle highlights to the petals.
This will make the flowers appear more vibrant and realistic against the dark background.
Finishing Touches for a Bold Look
Step 1: Apply a Top Coat
Finish with a glossy top coat to seal the design and give it a smooth, shiny finish.
This step helps protect the artwork and ensures the design lasts longer.
Why It Works
Dark Floral Elegance Nail Art combines the mystery of a black base with the vibrancy of red flowers, creating a design that is bold and eye-catching.
The rich red flowers stand out beautifully against the black background, making a dramatic yet sophisticated statement.
This design is ideal for anyone looking to add an elegant, edgy touch to their nails while maintaining a sense of refinement and class.
Based on the image, here’s a blog section tailored to your style and formatting preferences:
33. Blossoming Rose Nail Art
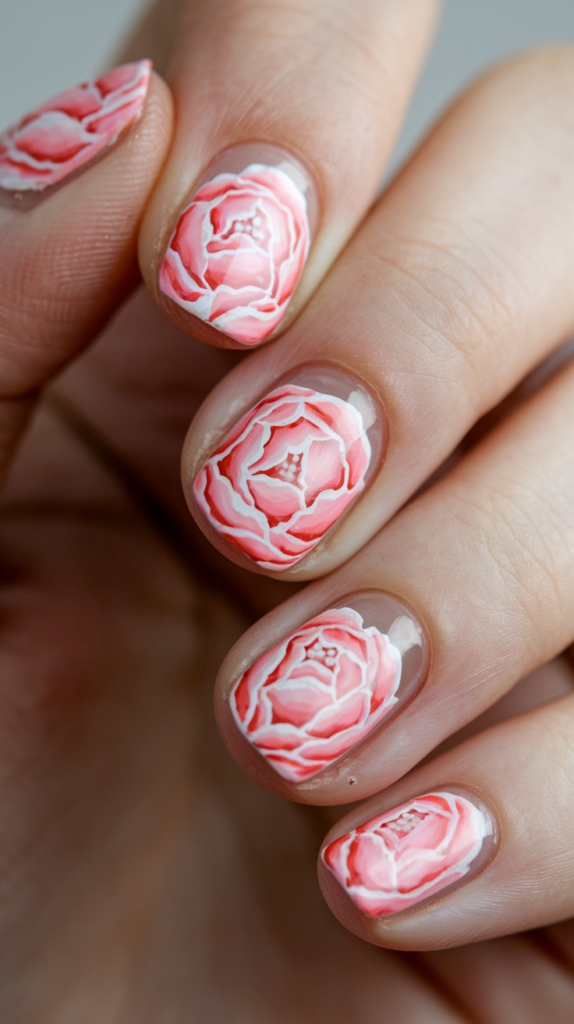
Blossoming Rose nails offer a soft yet striking floral design, featuring delicate pink roses with subtle white highlights, creating a timeless, elegant look.
Perfect for springtime or any occasion that calls for a touch of femininity and grace, these nails will capture attention with their intricate, hand-painted details.
Creating the Rose Design
Step 1: Apply the Base Color
Start by applying a nude or light pink polish as the base for all nails. This will serve as the perfect canvas for the floral design.
Step 2: Paint the Rose Petals
Using a fine nail art brush, begin painting the first layer of rose petals with a soft pink polish. Create rounded, overlapping shapes to form the outer layers of the rose.
Step 3: Add Depth and Detail
After the first layer dries, use a darker pink polish to add depth to the petals. Apply the darker shade to the center of the flowers and around the edges of the petals.
Step 4: Highlight the Petals
Using a white polish, gently outline the petals to create a soft, realistic effect. Add small highlights around the edges of the petals to enhance the flower’s dimensionality.
Step 5: Seal the Design
Once the design has dried completely, apply a top coat to seal in the artwork and give the nails a shiny, smooth finish.
Finishing Touches: Perfecting the Floral Look
Step 1: Refine the Details
Use a fine dotting tool to add small details like tiny white dots in the center of the roses or to accentuate the highlights.
Step 2: Apply a Matte Top Coat (Optional)
For a unique twist, finish off the design with a matte top coat for a more sophisticated, understated look.
Why It Works
Blossoming Rose Nail Art blends soft, romantic colors with intricate detailing, making it a perfect design for those who love floral elegance.
The delicate layers of pink and white bring out the natural beauty of roses, while the highlights and shading give the design depth and realism.
This design is versatile enough for both casual and formal events, making it a must-try for those looking to add a touch of springtime charm to their nails.
34. Lavender Dreams Nail Art
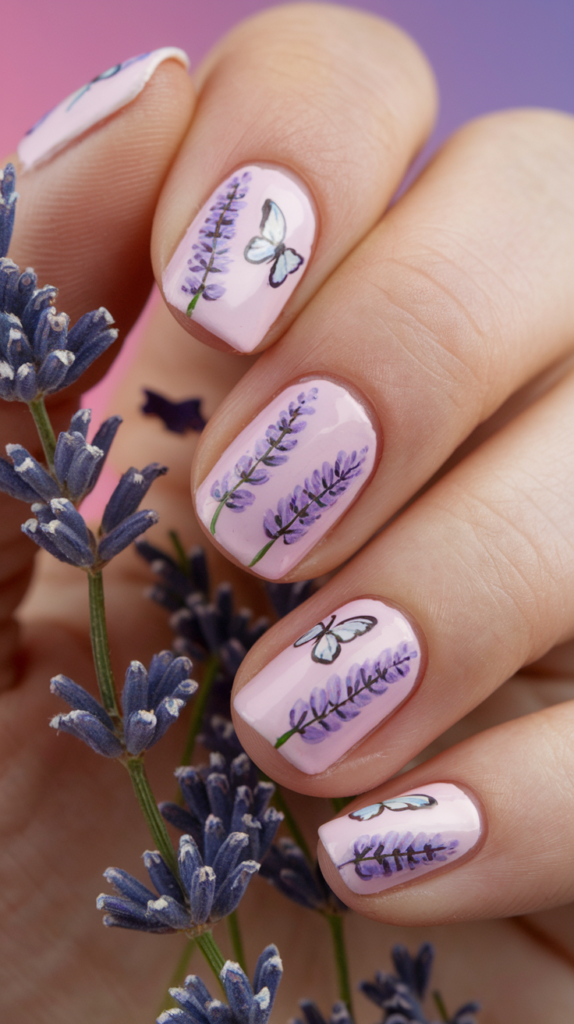
Lavender Dreams nails embody the serene and calming beauty of lavender flowers paired with delicate butterflies, creating an ethereal and peaceful design perfect for those who love soft, nature-inspired art.
This design evokes the tranquility of blooming lavender fields and the gentle flutter of butterflies, ideal for spring or a romantic, nature-themed event.
Creating the Lavender Flower Design
Step 1: Apply a Soft Pink Base Color
Start by applying a soft pink polish as the base color on all your nails. This will set the foundation for the delicate lavender flowers.
Step 2: Paint the Lavender Stems
Using a thin brush or nail art pen, carefully paint the stems of the lavender flowers in a light green color. Position the stems vertically down the center of your nails.
Step 3: Add the Lavender Flowers
On each stem, paint small clusters of lavender flowers using a lavender or purple color. Make sure to vary the size of the flowers to give a natural and organic look.
Step 4: Let It Dry
Allow the lavender flower designs to dry completely before proceeding with the next steps.
Adding the Butterflies
Step 1: Draw Butterfly Outlines
On one or two accent nails, use a fine brush to outline small butterflies near the lavender flowers. You can use black or dark purple for a more defined outline.
Step 2: Fill in the Butterfly Wings
Fill in the butterfly wings with soft pastel colors such as light blue or purple to complement the lavender theme. Add small details like antennae for extra precision.
Step 3: Add Final Details
If desired, add tiny white accents to the butterflies’ wings or light shading on the lavender flowers to bring them to life.
Finishing Touches
Step 1: Apply a Top Coat
Finish your design with a glossy top coat to seal in the details and give your nails a polished, smooth finish.
Why It Works
Lavender Dreams Nail Art perfectly captures the essence of nature’s peaceful beauty.
The soft pink base provides a gentle contrast to the vivid lavender flowers, while the butterflies add an extra layer of charm.
The combination of intricate flower detailing and delicate butterfly accents gives the design a refined yet effortless look, making it perfect for those who appreciate nature-inspired elegance.
35. Floral Plaid Nail Art
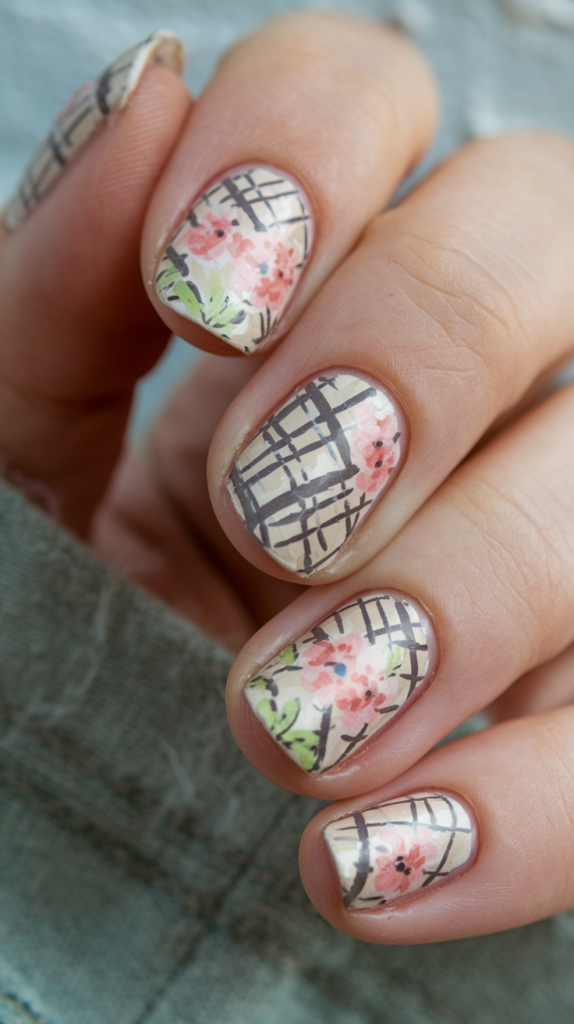
Floral Plaid nails offer a chic blend of classic plaid patterns and delicate floral accents.
This design combines a timeless, structured look with the softness of blooming flowers, perfect for those seeking a balance of sophistication and charm.
With its mix of bold lines and subtle florals, this nail art design is perfect for spring or any occasion that calls for a touch of elegance.
Creating the Plaid Pattern
Step 1: Apply the Base Color
Begin by applying a soft, neutral base color to all your nails. A beige or light tan polish works well to create a subtle foundation for the plaid design.
Step 2: Draw the Plaid Lines
Using a fine nail art brush or striping tape, create intersecting horizontal and vertical lines across the nail. Choose a dark brown or black polish for a bold contrast against the light base.
Step 3: Fill in the Plaid Spaces
For added depth, you can fill in the small sections of the plaid pattern with soft colors like light pink or beige, giving it a more refined and balanced look.
Step 4: Let the Design Dry
Allow the plaid lines to dry completely before moving on to the next step.
Adding the Floral Accents
Step 1: Paint the Flower Petals
Using a fine brush, paint small flower shapes near the edges of the plaid pattern. Opt for soft, pastel colors like pink and light green for the petals and leaves.
Step 2: Add Details
Once the flower petals are dry, use a darker shade to add tiny accents to the flowers, such as dots in the center for more definition.
Step 3: Final Touches
Add a few more floral touches around the plaid pattern for balance, ensuring the flowers are scattered without overpowering the design.
Finishing Touches
Step 1: Apply a Top Coat
Finish with a glossy top coat to seal in the design and provide a smooth, polished finish.
Why It Works
Floral Plaid Nail Art combines two contrasting yet complementary elements: the sharp lines of plaid and the delicate beauty of flowers.
The neutral base color ensures that the plaid design stands out, while the soft floral accents bring a touch of whimsy and femininity.
This combination creates a look that is both structured and playful, making it perfect for anyone who wants a balanced, stylish nail design.
Conclusion
Floral nail art continues to evolve, blending classic beauty with modern trends to offer something for everyone.
Whether you’re drawn to soft pastel gardens, bold neon florals, or intricate 3D designs, there’s no limit to the creativity you can express through floral nail art.
From the subtle elegance of minimalist flowers to the glamour of glitter and rhinestone accents, each design reflects the unique beauty of nature while allowing for personal expression.
With so many options available, you’re sure to find a floral nail art design that perfectly captures your personality and style.
