Introduction
White nail art designs have long been a staple in the beauty world, offering a clean, sophisticated look that can be easily transformed into bold and artistic creations.
Whether you’re drawn to minimalist elegance or want to experiment with textures, patterns, and embellishments, white nails provide the perfect blank canvas.
In this blog post, we’ll explore 35 eye-catching and trendy white nail art designs to inspire your next manicure.
From modern geometric shapes and delicate lace patterns to playful polka dots and luxurious marble effects, there’s something for every style and occasion.
Get ready to elevate your nail game with these stunning white designs.
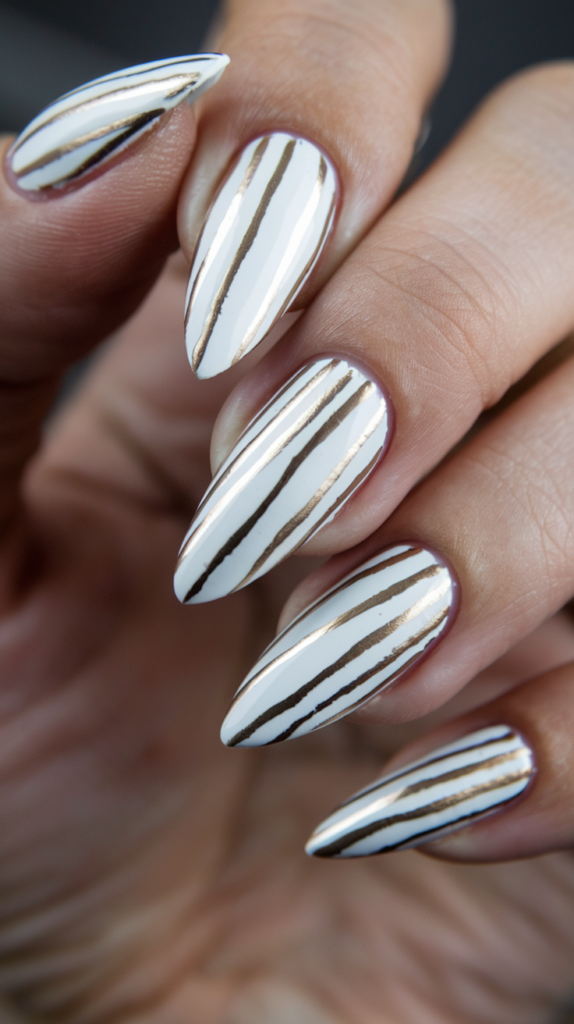
1. Matte White With Glossy Stripes: A Chic Contrast For Everyday Elegance

What Is Matte White Nail Art?
Matte white nail art is a timeless and versatile design that combines simplicity with elegance.
Unlike traditional glossy nails, matte nails have a non-reflective finish, giving them a velvety appearance.
The muted effect of matte white nails adds a subtle sophistication to any outfit, making it a popular choice for everyday wear or even formal events.
Matte white nails allow the wearer to experiment with various textures, colors, and designs, all while maintaining a sleek, understated look.
With its ability to complement almost any accessory or clothing choice, matte white nail art is a go-to for those who seek both minimalism and style.
How To Add Glossy Stripes For Extra Dimension
To elevate the basic matte white nail, adding glossy stripes can bring a dynamic contrast that plays with textures rather than colors.
Begin by applying a matte white base coat to all nails.
Once the matte polish is completely dry, use a glossy topcoat to paint thin, precise stripes.
You can choose to create vertical, horizontal, or diagonal stripes depending on your preference.
For a more artistic approach, experiment with asymmetrical stripes that wrap around the nail or form geometric patterns.
The combination of the matte finish with the shiny gloss strips creates a multi-dimensional effect that is both chic and modern.
This design is perfect for those who love minimalist nail art but want to add a touch of sophistication.
Perfect Occasions To Wear Matte White With Glossy Stripes
Matte white nails with glossy stripes are highly versatile and can be worn for various occasions.
This look is perfect for professional settings where a polished yet subtle style is required.
It works wonderfully for formal events like weddings, as the glossy accents can catch the light without overpowering the overall look.
Additionally, matte white with glossy stripes is ideal for casual outings when you want something stylish but understated.
Whether you’re heading to a business meeting, a brunch with friends, or a date night, this design adds a level of chicness suitable for any occasion.
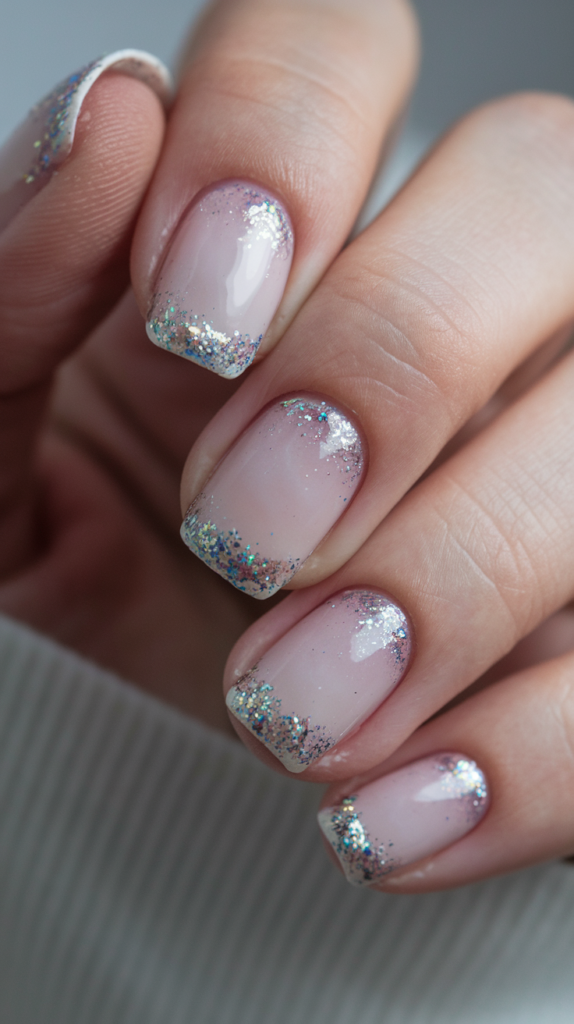
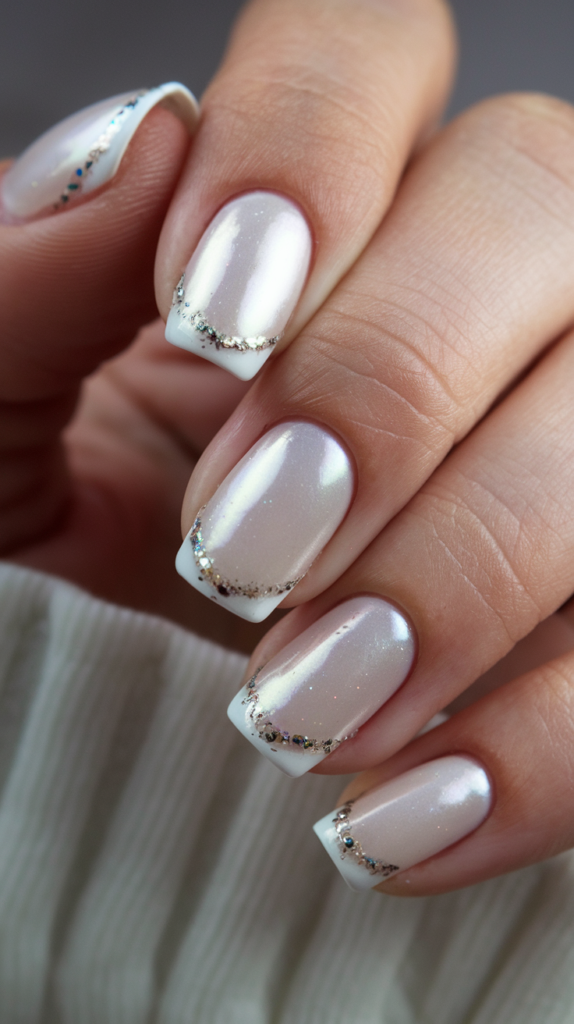
2. White French Tips With Glitter: Elevate The Classic Manicure
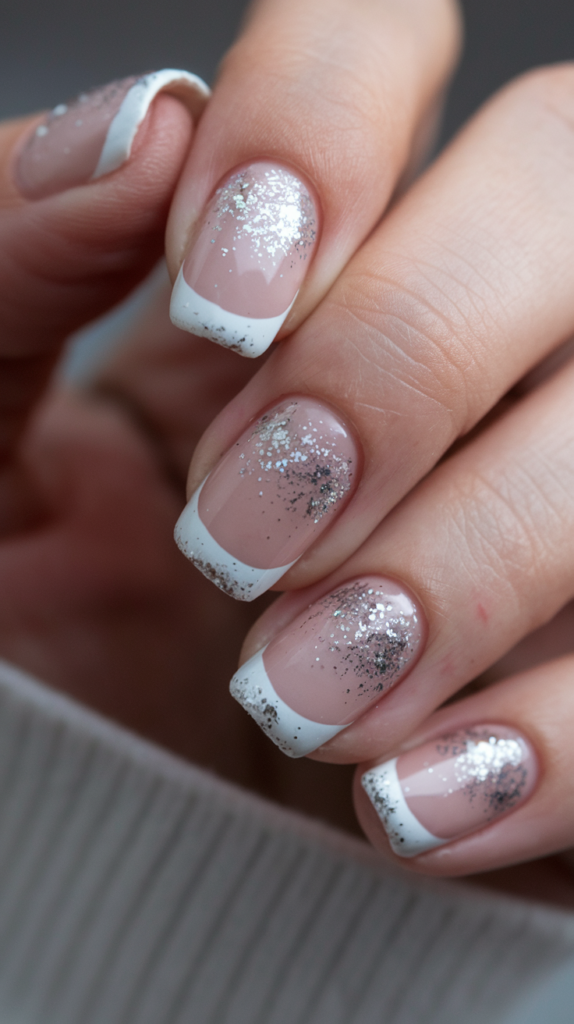
Why French Tips Are Timeless
The French manicure is a classic design that has remained popular for decades due to its clean and sophisticated look.
Originating in the 1970s, French tips are defined by their white tips paired with a nude or pale pink base, creating an elegant contrast.
This minimalist design complements all nail shapes and lengths, making it a timeless choice for both everyday wear and special occasions.
The beauty of French tips lies in their simplicity and the way they enhance the natural look of nails without being overly flashy.
Adding Glitter For A Modern Touch
While the classic French tip is elegant, adding a touch of glitter can modernize the look and give it a playful twist.
After applying the nude base and white tips, lightly dust a fine glitter along the border where the white meets the natural nail color.
This subtle hint of sparkle adds a glamorous touch without overpowering the simplicity of the French tips.
For more dramatic flair, opt for chunky glitter or apply a glitter topcoat to the entire nail, giving the design a fresh and festive feel.
This modern variation on the French tip is perfect for events like weddings, parties, or even the holiday season.
Best Glitter Colors To Complement White Tips
When adding glitter to white French tips, it’s important to choose complementary colors that enhance the overall look.
Silver glitter is a classic choice, offering a sleek and refined shimmer that pairs beautifully with the crisp white tips.
For a bolder look, gold glitter can add warmth and luxury to the design.
Holographic glitter can also be used for a fun, multi-dimensional effect that reflects various colors in the light.
Soft pink or rose gold glitter adds a feminine touch, while rainbow glitter is perfect for a fun, playful look.
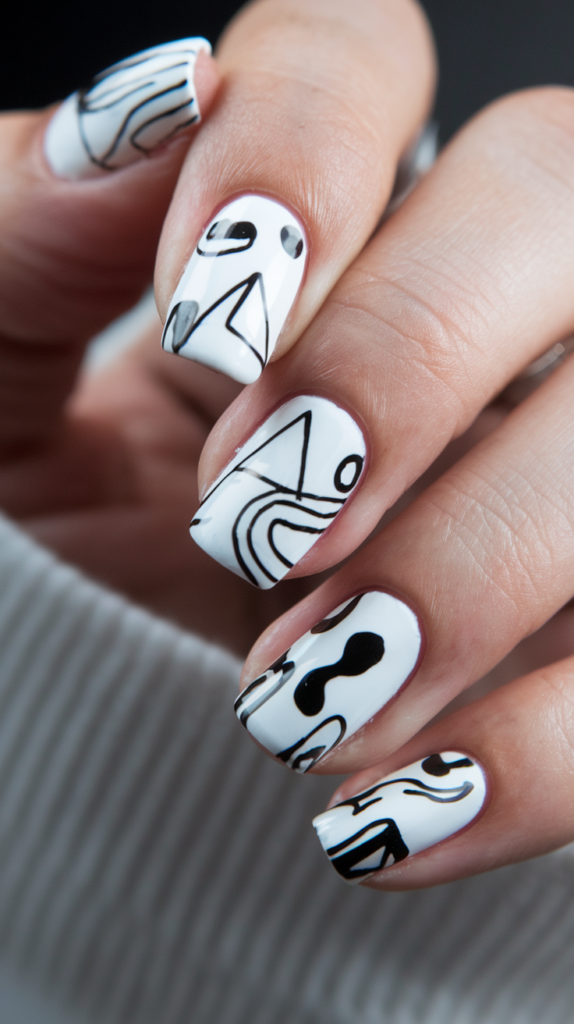
3. White Geometric Accents: Minimalist Nail Art With A Bold Edge

Geometric Nail Art: Why It’s Trending
Geometric nail art has taken the nail industry by storm due to its clean lines, modern aesthetics, and versatility.
These designs often incorporate shapes like triangles, diamonds, squares, and lines to create visually striking patterns.
The minimalist nature of geometric nail art appeals to those who prefer sleek, simple designs while still making a bold statement.
The sharp angles and symmetrical patterns offer a contemporary look that stands out in a subtle, sophisticated way.
Whether it’s a small accent on a few nails or a full set of geometric patterns, this trend has become a favorite for fashion-forward individuals who love a fresh, modern look.
How To Create Sharp Geometric Shapes On White Nails
To create sharp geometric shapes on white nails, you can either use nail striping tape or fine detailing brushes to achieve precise lines.
Start with a matte or glossy white base, allowing it to dry completely before proceeding with the design.
Using a thin detailing brush or tape, outline the desired geometric shape, such as triangles, diamonds, or hexagons.
Fill in the shapes with contrasting colors like black, metallics, or even different shades of white.
You can also use negative space by leaving certain areas of the nail bare to add depth and contrast.
For those who want a bold, striking look, opt for clean, sharp lines and shapes that add drama and dimension to the nails.
Perfect Shape Combinations For A Modern Look
When combining geometric shapes, it’s important to create balance and harmony within the design.
For a minimalist look, choose a single shape like triangles or squares and repeat it on a few nails.
For a more dynamic design, mix and match shapes such as circles with straight lines or triangles with hexagons.
The key is to maintain symmetry and ensure the shapes are evenly spaced.
A modern combination that works well with white nails is black triangles paired with metallic silver accents, creating a sleek and sophisticated design.
Another popular combination is using sharp diagonal lines with smaller geometric shapes to create a layered, textured effect.
4. White Marble With Gold Foil: A Luxurious Take On White Nail Art
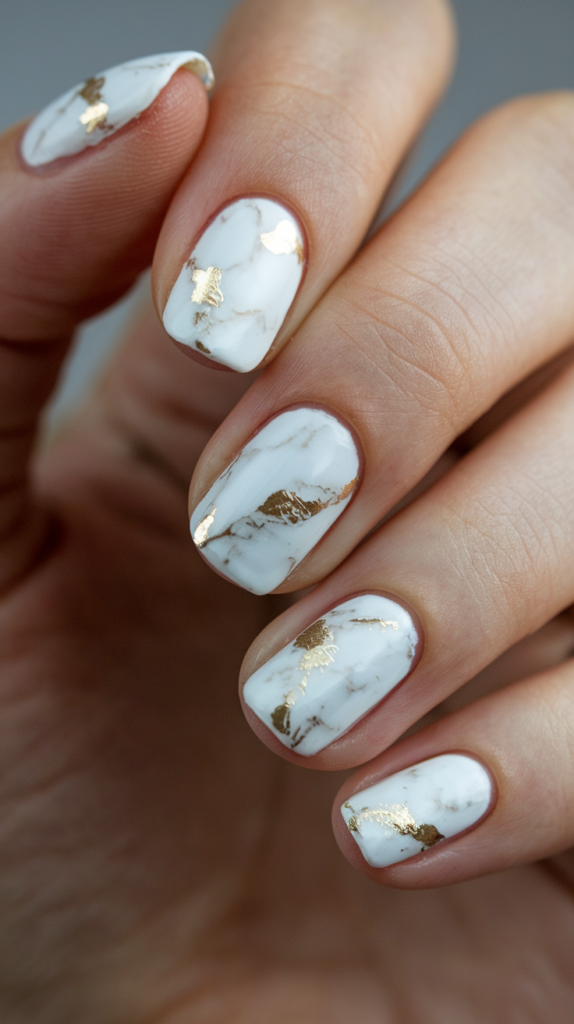
The Popularity Of Marble Nails
Marble nails have gained immense popularity in recent years due to their luxurious and high-end appearance.
Mimicking the natural patterns found in marble stone, this nail design incorporates soft veins of color running through a white or light base.
The subtle blending of colors gives the nails a soft, sophisticated look that exudes elegance.
Marble nails are highly versatile and can be dressed up with various accents, such as metallic foils, glitter, or 3D elements.
Their popularity stems from the fact that they look intricate and detailed while being relatively easy to achieve with the right techniques.
How To Achieve A White Marble Effect
Creating a white marble effect requires a steady hand and a bit of creativity.
Begin with a clean white base coat, allowing it to dry completely.
Next, use a thin nail art brush dipped in a light grey or soft black polish to draw thin, winding lines across the nail.
The lines should be irregular and organic, mimicking the natural patterns found in marble.
You can also use a small piece of plastic wrap to dab lightly on the nail after applying the lines, giving the veins a softer, more blended appearance.
Once satisfied with the marble effect, apply a clear topcoat to seal the design and add shine.
Incorporating Gold Foil For A Glamorous Finish
To take the marble effect to the next level, incorporate gold foil for a touch of luxury.
Gold foil adds a glamorous, high-end feel to the design by contrasting with the soft, organic marble patterns.
After creating the marble effect, use tweezers to place small pieces of gold foil on various parts of the nail.
The foil should be placed sparingly to avoid overwhelming the marble effect.
Lightly press the foil into the nail, ensuring it adheres well.
Seal the design with a clear topcoat to lock in the foil and give the nails a glossy, polished finish.
5. Matte White And Silver Glitter Ombre: A Shimmering Gradient Look
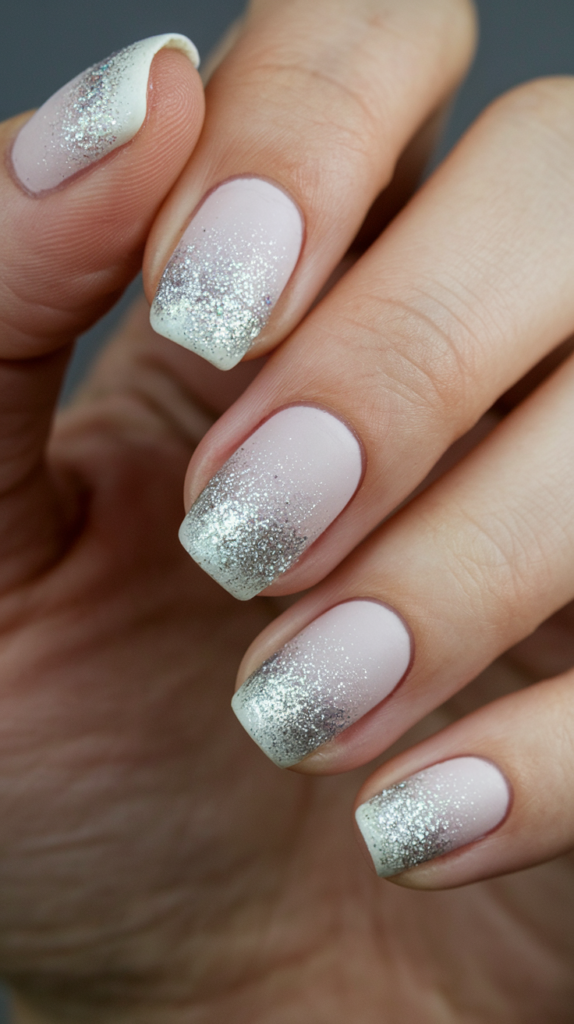
How To Create A Seamless Matte And Glitter Ombre
Creating a seamless ombre from matte white to silver glitter involves a bit of blending to ensure the transition is smooth.
Begin by applying a matte white base to the nails.
Once dry, take a makeup sponge and dab a small amount of silver glitter polish onto the tip of the nail.
Gently tap the sponge against the nail, allowing the glitter to fade into the white base.
Repeat the process on each nail, adding more glitter for a more intense gradient.
The key to a flawless ombre is to blend the edges where the glitter meets the matte polish, ensuring a smooth transition from one texture to the next.
Choosing The Right Silver Glitter For White Nails
When choosing silver glitter for white nails, it’s important to select a glitter that complements the matte base without overpowering it.
Fine, iridescent glitter works best for a soft, subtle ombre, giving the nails a delicate shimmer that catches the light.
For a bolder look, opt for chunky glitter or holographic glitter that adds extra sparkle and dimension.
The size and density of the glitter should be proportional to the length and shape of the nails, ensuring a balanced and harmonious design.
Styling Tips For Matte White And Glitter Ombre Nails
Matte white and glitter ombre nails are perfect for both formal and casual occasions.
The soft shimmer of the glitter adds a touch of glamour without being too over-the-top, making this design versatile enough for day-to-night wear.
Pair these nails with silver jewelry or metallic accessories to enhance the sparkle.
For a chic, monochromatic look, match your outfit to the matte white polish and let the glitter be the standout element.
6. White Floral Lace Design: Delicate And Feminine Nail Art

How To Achieve A Detailed Floral Lace Design
White floral lace designs are intricate and timeless, often associated with elegance and femininity.
To achieve this look, start with a soft pink or sheer nude base to make the lace design stand out.
Using a fine nail art brush or a stamping tool, carefully paint delicate floral patterns in white across the nails.
The lace design can either cover the entire nail or be placed on just a portion, creating an accent nail effect.
Popular lace designs include roses, vines, and petals, all interconnected with thin, swirling lines that mimic real lace fabric.
The key to a flawless lace design is precision and detail, so take your time to ensure each stroke is clean and crisp.
Best Background Colors For White Lace Patterns
While white lace can be applied over various background colors, soft pastel shades such as blush pink, baby blue, and lavender provide a romantic and delicate contrast.
For a bolder look, deep tones like black, navy, or burgundy create a striking juxtaposition, making the white lace pop.
A sheer or nude base, however, is the most popular choice as it keeps the focus entirely on the lace design, allowing the intricate details to shine.
Occasion Ideas For White Floral Lace Nails
White floral lace nails are perfect for weddings, bridal showers, and other romantic occasions where femininity and elegance are desired.
They also work beautifully for formal events such as galas and anniversaries.
These nails pair well with flowy dresses, lace fabrics, and soft, romantic accessories.
Additionally, lace nails can add a vintage touch to your look, making them a lovely choice for anyone seeking an old-world, glamorous aesthetic.
7. White With 3D Pearl Accents: A Bridal-Inspired Look
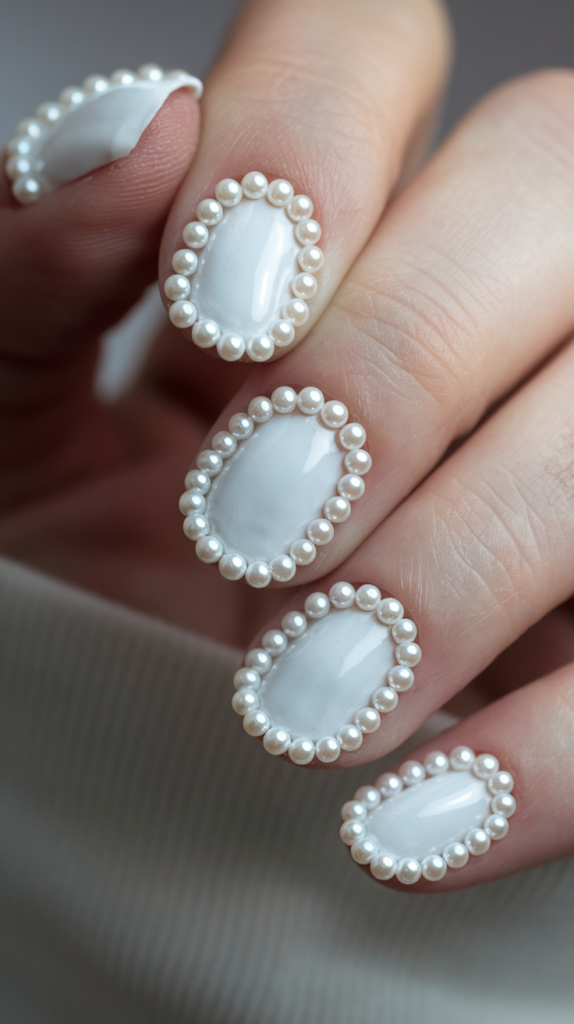
Why Pearls Are A Perfect Addition To White Nails
Pearls have long been associated with sophistication, purity, and luxury, making them the perfect embellishment for white nails.
Their soft sheen adds dimension and texture to the otherwise flat nail surface, transforming a simple design into something that feels elegant and opulent.
Pearls are especially popular in bridal nail designs because they complement the traditional white or ivory bridal gown while adding a touch of refinement.
The addition of pearls creates a delicate, sophisticated effect that enhances the beauty of the nails without overwhelming them.
How To Safely Apply 3D Pearls On White Polish
To apply 3D pearls on white nails, begin by painting your nails with a white base coat.
Once the base is dry, use a nail adhesive or a strong topcoat to attach the pearls.
You can place the pearls at the base of the nail near the cuticle, along the tips, or scattered across the surface for a more textured design.
Tweezers can help you position the pearls accurately, ensuring they stick securely.
Once the pearls are in place, seal the design with a clear topcoat to keep them from falling off and to add an extra layer of shine.
Ideal Occasions For 3D Pearl Nail Art
3D pearl nails are perfect for formal events like weddings, engagements, or galas, where an elegant and luxurious look is desired.
The soft glow of the pearls complements bridal gowns and evening dresses, making this nail art a favorite for brides, bridesmaids, and attendees at special occasions.
You can also wear pearl-embellished nails for more casual settings if you want to add a touch of refinement to your everyday look.
8. White Polka Dots On Nude: Playful And Fun
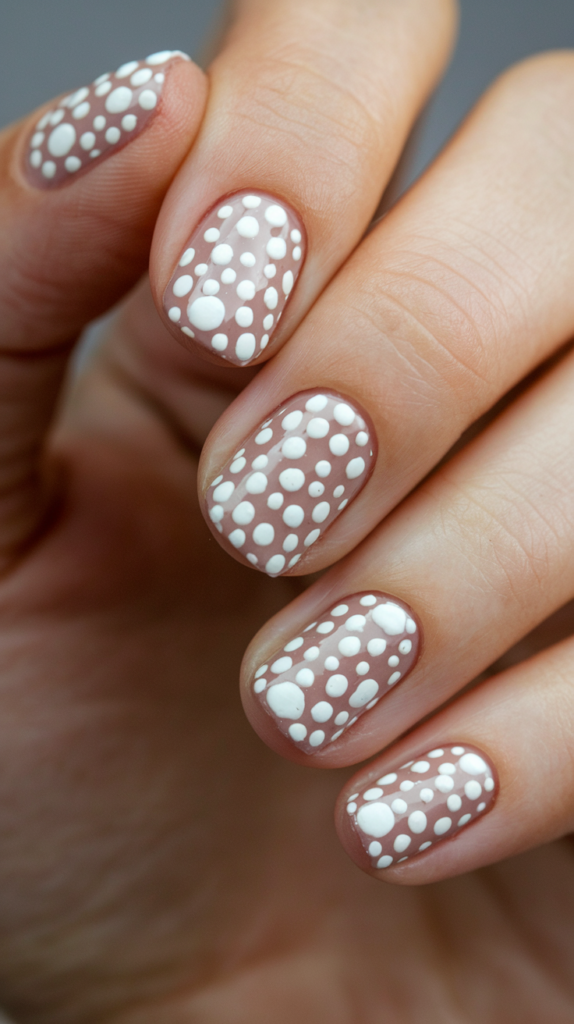
Creating The Perfect Polka Dot Pattern
White polka dots on a nude base are a fun and playful design that can be worn for any occasion.
Start by applying a nude or beige base coat to the nails.
Once the base is dry, use a dotting tool to create evenly spaced white dots across the nails.
You can vary the size of the dots for a more dynamic look or keep them uniform for a classic, vintage-inspired design.
The key to perfect polka dots is to ensure even spacing and consistency in size, which can be achieved using a steady hand and patience.
Choosing The Right Nude Base For White Dots
The nude base you choose will greatly influence the overall look of the design.
For a soft and subtle appearance, opt for a pale beige or blush pink base.
For a bolder contrast, go for a deeper nude or taupe shade.
A sheer nude base will allow the natural color of your nails to show through, creating a more delicate and understated effect.
Regardless of the shade you choose, the nude base provides the perfect canvas for the playful white dots, making them stand out without being too overpowering.
Best Polka Dot Nail Art Combinations For Different Seasons
White polka dots on a nude base can be styled to suit different seasons.
In the spring and summer, you can pair the polka dots with pastel-colored accents, such as mint or lavender, for a fresh and vibrant look.
In the fall, warm nude tones like beige or caramel provide a cozy backdrop for the white dots.
For winter, combine the polka dots with silver or gold accents to create a festive and elegant design.
9. White Negative Space Manicure: A Modern Twist On Minimalism
What Is Negative Space Nail Art?
Negative space nail art is a design technique where portions of the nail are left unpainted, creating contrast between the natural nail and the polished sections.
This modern, minimalist trend plays with the idea of “less is more,” allowing the negative or unpainted areas to become part of the design.
Negative space nail art is versatile and can be combined with various colors, patterns, and textures to create an edgy, contemporary look.
The design works well with any nail shape and length, making it a favorite for those who love clean, modern aesthetics.
Popular Negative Space Patterns For White Nails
When it comes to white negative space nails, geometric shapes are the most popular pattern.
Triangles, stripes, and chevrons are commonly used to create sharp, clean lines that contrast beautifully against the unpainted portions of the nail.
You can also incorporate more organic shapes, such as swirls or waves, for a softer look.
One popular design involves painting the entire nail white but leaving a small triangle or square near the cuticle unpainted.
This creates a chic, minimalistic design that highlights the natural beauty of the nails while still adding a modern twist.
Why Negative Space Manicures Are A Top Trend
Negative space manicures have gained popularity due to their ability to create striking designs with minimal effort.
The use of unpainted areas allows the design to feel light and airy, making it perfect for those who prefer subtle nail art.
Additionally, negative space designs are incredibly versatile and can be customized to suit different styles, from edgy and modern to soft and romantic.
The trend has become a favorite in the fashion world because it complements a wide range of outfits, allowing the nails to enhance the overall look without overpowering it.
10. White With Chrome Tips: A Futuristic Approach To Nail Art
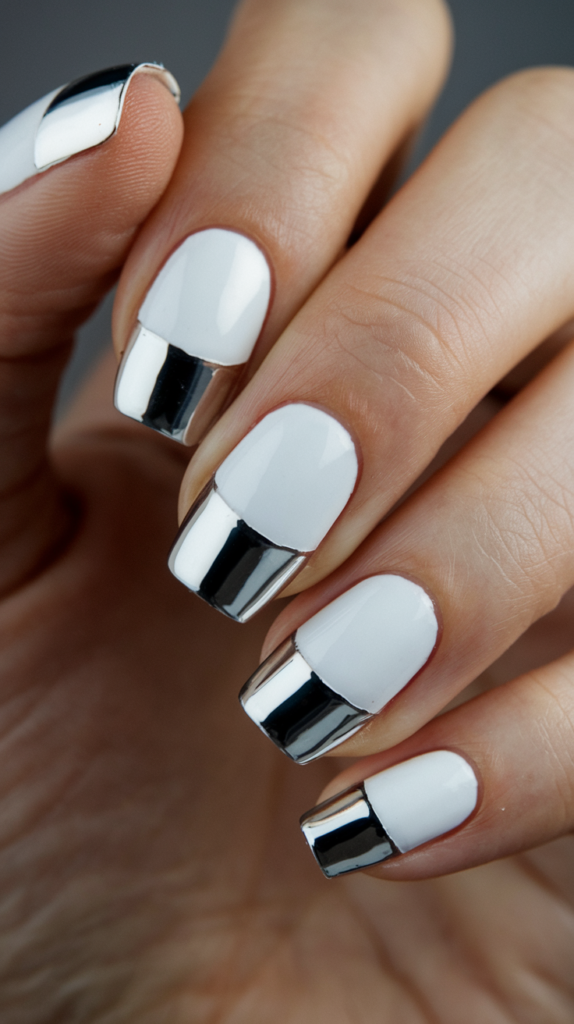
The Appeal Of Chrome Tips On White Nails
Chrome nails have a futuristic and high-shine finish that adds a modern edge to any design.
When combined with a white base, chrome tips create a striking contrast that is both sleek and eye-catching.
The reflective nature of chrome polish gives the nails a metallic, mirror-like effect that captures the light and adds dimension to the overall look.
The combination of a clean, crisp white base with shiny chrome tips creates a modern and luxurious aesthetic that works for both casual and formal occasions.
How To Get The Perfect Chrome Finish
Achieving the perfect chrome finish requires a bit of technique and the right products.
After applying a white base coat, use a chrome powder or chrome nail polish to carefully apply the metallic tips.
If using powder, buff it gently into the nail tip until the desired shine is achieved.
To ensure the chrome powder adheres properly, use a special topcoat designed for chrome finishes.
For an ultra-shiny, mirror-like effect, apply a high-gloss topcoat over the chrome tips.
This will not only enhance the shine but also seal in the design and prevent chipping.
Styling Ideas For Chrome-Tipped Nails
Chrome-tipped nails are versatile and can be styled for both day and night looks.
For a casual daytime outfit, pair chrome-tipped nails with neutral tones and minimalist jewelry to keep the focus on the nails.
For an evening event, chrome-tipped nails can be paired with metallic accessories and bold makeup to enhance the futuristic vibe.
The reflective nature of chrome nails makes them a statement piece, so they work well with simple, monochromatic outfits that allow the nails to stand out.
11. White And Holographic Glitter: Add A Dazzling Shine
Why Holographic Glitter Is A Must-Have
Holographic glitter has taken the beauty world by storm due to its light-reflecting properties and ability to create a multi-dimensional effect.
When combined with a white base, holographic glitter transforms a simple manicure into a dazzling, eye-catching design that shifts colors depending on the light.
The tiny, reflective particles in holographic glitter create a rainbow-like effect that adds depth and dimension to the nails, making them sparkle and shine from every angle.
Whether you’re looking for a subtle shimmer or a full-on statement, holographic glitter is a must-have for anyone who loves bold, dynamic nails.
How To Blend White With Holographic Glitter
To create a seamless blend between white polish and holographic glitter, start by applying a clean white base to the nails.
Once the base is dry, lightly apply holographic glitter to the tips or along the edges of the nails using a makeup sponge or a fine brush.
For a more intense sparkle, layer the glitter to create a gradient effect that fades into the white polish.
You can also use holographic glitter as an accent on one or two nails for a more understated look.
Be sure to seal the design with a glossy topcoat to enhance the shine and keep the glitter in place.
Best Occasions To Wear White Holographic Nails
White holographic nails are perfect for special occasions where you want to make a statement.
They’re ideal for parties, weddings, and holiday celebrations where a bit of extra sparkle is always welcome.
The rainbow-like effect of the holographic glitter makes these nails a showstopper, especially in settings with bright lights or sunlight.
For a more casual look, you can tone down the glitter by using it sparingly on one or two nails, making it suitable for everyday wear as well.
12. White Animal Print: Bold And Trendy Nail Art
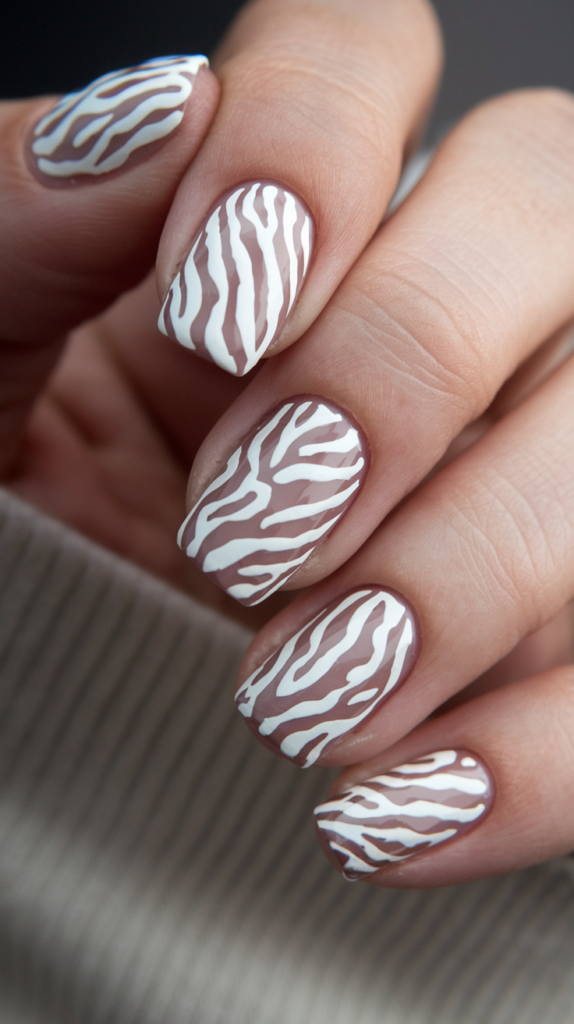
Popular Animal Prints For White Nails
Animal print nails have been a fashion staple for years, offering a bold, stylish look that instantly grabs attention.
When paired with a white base, animal prints like zebra, leopard, and snake skin create a high-contrast design that’s both striking and versatile.
Zebra print is a popular choice, as the black-and-white pattern mimics nature’s wild side while maintaining a sleek and sophisticated feel.
Leopard print, with its irregular spots and playful design, adds an element of fun to white nails, making it perfect for those who want to express their bold personality.
Snake skin patterns, which are typically created using stamping techniques, give a textured and edgy look that’s both exotic and fashionable.
How To Create White Leopard Or Zebra Print Nails
To create leopard print nails, start with a solid white base coat and allow it to dry completely.
Using a thin detailing brush or a dotting tool, paint irregular black or brown spots across the nails, leaving some gaps between them.
To make the design more intricate, you can outline each spot with a fine black line, giving it a more realistic, leopard-like appearance.
For zebra print nails, after applying the white base, use a striping brush to create thin black stripes that curve slightly to mimic the look of a zebra’s coat.
Be sure to alternate the direction of the stripes to avoid a uniform appearance, making the design look more natural.
Once your design is complete, finish with a glossy topcoat to lock in the look and add shine.
Styling Tips For Animal Print Nails
White animal print nails are perfect for making a bold fashion statement, so they pair best with simple, monochromatic outfits that allow the nails to be the focal point.
If you’re going for a chic and edgy look, wear your animal print nails with black leather accessories or structured jackets.
For a more playful and casual style, pair your nails with neutral tones or denim.
These prints work especially well for evening events and parties, where you can let your wild side shine through.
No matter the occasion, white animal print nails will always add a trendy, stylish touch to your ensemble.
13. White Abstract Swirls: Artistic And Sophisticated
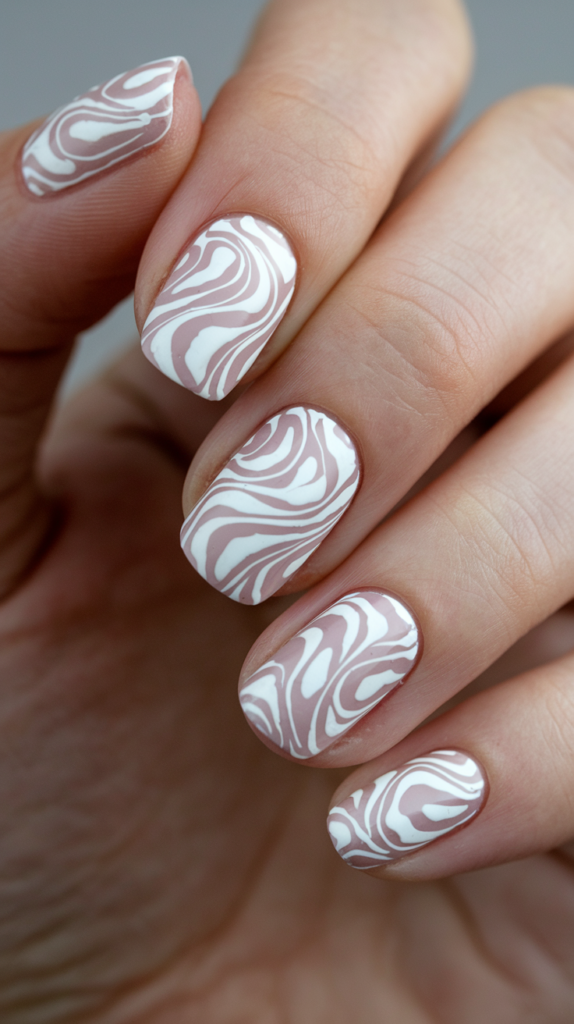
The Art Of Creating Abstract Swirls On Nails
Abstract swirl designs offer a modern, artistic twist to classic white nails.
To create this look, begin by applying a white base coat to the nails.
Once dry, use a thin nail art brush to paint freeform swirls in various shades, such as black, silver, or even subtle pastels.
The beauty of abstract swirl nail art lies in its lack of structure, allowing the artist to create flowing, organic shapes that move freely across the nail.
You can choose to keep the swirls subtle and delicate or make them bold and dramatic depending on your personal style.
The key to achieving an elegant abstract swirl design is to maintain fluidity in your lines, avoiding harsh angles or overly structured shapes.
Best Background Colors For White Swirls
While a pure white base is a classic choice, abstract swirls can be enhanced with different background colors to create a more unique look.
A sheer nude or pale pink base adds a soft, feminine touch to the design, allowing the white swirls to stand out without being too stark.
For a more dramatic effect, try pairing white swirls with a black or deep navy background, creating a high-contrast look that’s both bold and sophisticated.
Silver or metallic backgrounds can also add a luxurious element, especially when paired with abstract swirls in different shades of white or cream.
Why Abstract Nail Art Is Here To Stay
Abstract nail art has become a popular trend due to its versatility and creative freedom.
Unlike more structured designs, abstract art allows for personal expression, giving each manicure a one-of-a-kind look.
The ability to mix colors, shapes, and textures means that no two designs are ever the same, making abstract nail art perfect for those who love to experiment with their style.
Additionally, abstract designs are highly adaptable to different occasions, working equally well for casual daytime looks or more formal evening events.
The timeless elegance and modern appeal of abstract nail art ensure that this trend will remain a favorite for years to come.
14. White And Rose Gold Accents: A Chic Metallic Combo
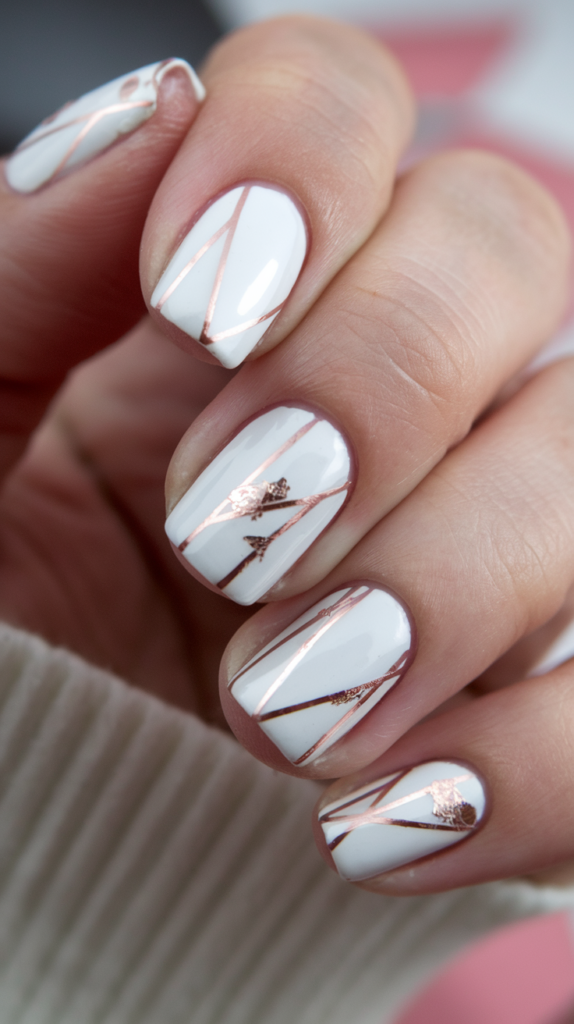
How To Combine Rose Gold With White For A Luxurious Look
Rose gold has become a beloved color in fashion and beauty, offering a warm metallic hue that pairs beautifully with white.
To create a chic metallic combo, start with a white base coat on all nails.
Once the base is dry, add rose gold accents using nail foils, striping tape, or rose gold polish.
You can apply the rose gold in thin, geometric shapes like lines or triangles, or use it as a subtle border around the edges of the nails.
For a more luxurious look, consider incorporating rose gold leaf foil into the design, pressing it lightly onto the nail and sealing it with a clear topcoat.
The combination of white and rose gold creates an elegant contrast that’s both sophisticated and trendy.
Best Techniques For Applying Metallic Foil To Nails
To achieve a flawless metallic foil finish, start by applying your white base coat and allowing it to dry completely.
Next, cut small pieces of rose gold foil and use tweezers to place them on the nails.
Apply a thin layer of clear topcoat or nail adhesive to help the foil stick.
Gently press the foil onto the nail, smoothing out any wrinkles or bubbles.
You can choose to cover the entire nail with foil or place it in specific areas for a more subtle effect.
Once the foil is securely in place, apply a clear topcoat to seal the design and give the nails a high-shine finish.
Metallic foils are a quick and easy way to add a touch of luxury to any nail design.
When To Wear White And Rose Gold Nail Designs
White and rose gold nail designs are perfect for formal events, such as weddings, galas, and anniversaries, where an elegant and refined look is required.
The soft shimmer of the rose gold complements the crispness of the white, making this design ideal for those who want a polished, sophisticated appearance.
Rose gold accents can also be worn for everyday occasions, especially when paired with minimalist jewelry and neutral-toned outfits.
Whether you’re attending a special event or just want to add a touch of glamour to your day-to-day style, white and rose gold nails are a versatile choice that can be dressed up or down.
15. White Checkerboard Design: Bold And Eye-Catching
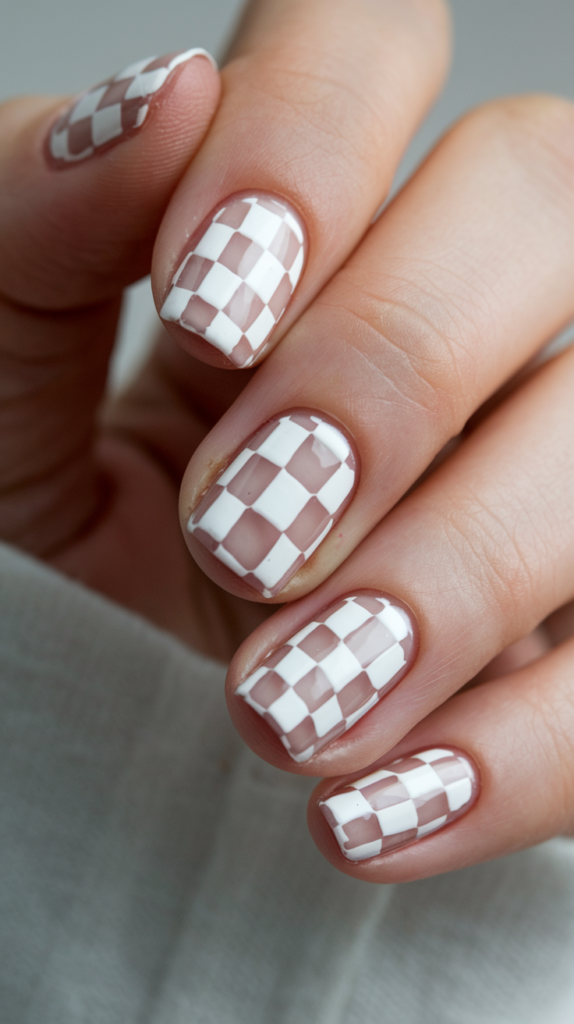
Creating A Crisp Checkerboard Pattern
The checkerboard pattern is a bold, graphic design that creates a striking visual contrast.
To achieve a crisp checkerboard look, begin by applying a white base coat to the nails.
Once the base is dry, use a striping brush or tape to section off even squares on the nail.
Fill in every other square with black or a contrasting color, creating a checkered effect.
For the cleanest results, make sure to use thin layers of polish and steady hands, ensuring each square is uniform in size.
If you prefer a more abstract take on the checkerboard pattern, consider playing with different sizes of squares or combining the checkerboard with other geometric shapes for a modern twist.
Why White Checkerboard Nails Are A Statement Look
White checkerboard nails are bold and attention-grabbing, offering a striking contrast that stands out in any crowd.
The sharp, clean lines of the checkerboard pattern create a structured, graphic look that’s both modern and timeless.
This design is perfect for those who want to make a statement with their nails, as the high contrast between the white and the checkered pattern ensures that the nails will be the focal point of any outfit.
Whether you’re attending a fashion-forward event or just want to add a bold touch to your everyday look, white checkerboard nails are a statement style that’s sure to turn heads.
Styling Outfits To Match Bold Checkerboard Nail Art
When wearing bold checkerboard nail art, it’s important to let the nails be the star of the show.
Pair them with simple, monochromatic outfits to create a sleek and cohesive look.
Black and white clothing works particularly well with checkerboard nails, as it complements the color palette without overwhelming the design.
For a more playful style, consider pairing your checkerboard nails with pops of color, such as bright accessories or bold shoes.
Checkerboard nails are incredibly versatile and can be worn with everything from casual jeans and t-shirts to more formal attire, making them a perfect choice for any occasion.
16. White Snowflakes On Clear Base: A Winter Wonderland
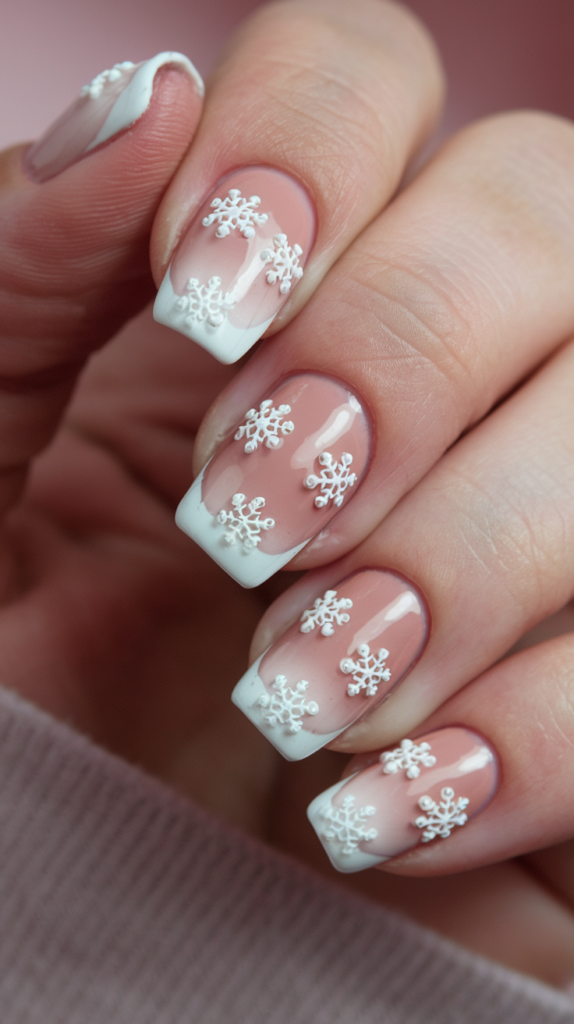
Why Snowflake Nail Art Is Perfect For Winter
Snowflake nail art is the ultimate winter design, capturing the essence of the season with delicate, intricate patterns that mimic real snowflakes.
The beauty of snowflake nail art lies in its versatility—each snowflake can be unique, just like in nature, allowing for endless design possibilities.
White snowflakes on a clear or frosted base create a soft, ethereal look that evokes the magic of winter.
This design is perfect for holiday parties, winter weddings, or simply celebrating the colder months in style.
The delicate nature of the snowflakes combined with the crisp white color makes this nail art both festive and elegant.
How To Hand-Paint Delicate White Snowflakes
To hand-paint white snowflakes, start by applying a clear or light blue base coat to the nails, allowing them to dry completely.
Using a fine detailing brush, paint thin lines intersecting in the shape of a snowflake, starting with a central point and branching outwards.
You can add smaller details such as dots or shorter lines at the ends of the snowflake arms to create a more intricate design.
For a more dimensional look, consider adding glitter or tiny rhinestones at the center of the snowflakes to mimic the shimmer of real snow.
The key to achieving beautiful snowflakes is to keep the lines thin and delicate, ensuring the design remains elegant and refined.
Choosing The Right Base For A Wintery Look
When creating snowflake nail art, the choice of base color is essential to achieving the desired wintery effect.
A clear base is a classic option, giving the design a frosty, transparent look that mimics the appearance of snowflakes floating in the air.
For a more subtle winter theme, a pale blue or light grey base works beautifully, creating the illusion of a cold winter sky.
If you want to add a bit of sparkle, consider using a shimmer or glitter polish as the base to reflect the light, adding an extra touch of winter magic to the design.
17. White With Rhinestone Accents: A Glamorous And Dazzling Look
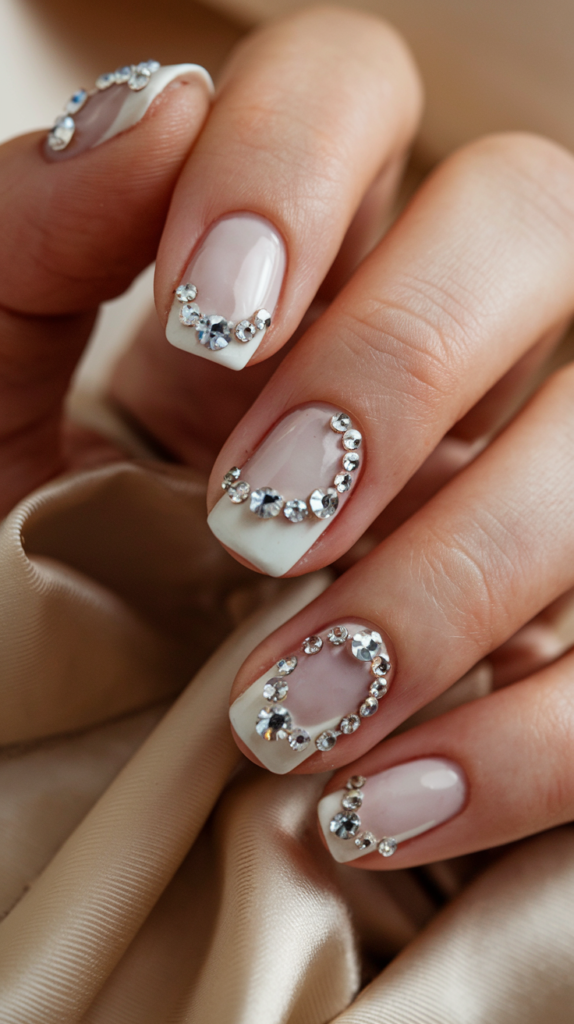
How To Apply Rhinestones Without Damage
Rhinestones are a stunning way to add glamour to your nails, but applying them correctly is crucial to avoid damaging your natural nails or the design underneath.
Start by painting your nails with a white base coat and allow them to dry completely.
Using a pair of tweezers, gently pick up the rhinestones and apply them to your nails using a small drop of nail adhesive.
For a more seamless look, you can also press them into a clear, thick topcoat before it dries.
Be sure to arrange the rhinestones carefully, either along the cuticle, down the center of the nail, or in a creative pattern to enhance the design.
Once in place, seal the design with a strong topcoat to keep the rhinestones secure while adding an extra layer of shine.
This not only holds the rhinestones in place but also protects the rest of the design from chipping.
Balancing White Polish With Rhinestone Placement
Balancing rhinestones with white polish is key to achieving a sophisticated look without making the design too busy or overwhelming.
White acts as the perfect canvas for rhinestones because its simplicity allows the gems to stand out.
When placing rhinestones, consider using them sparingly—focusing on one or two accent nails rather than covering all the nails.
You can opt for a minimalist approach by adding a single rhinestone near the cuticle or create a more elaborate design by arranging the rhinestones into shapes like stars or floral patterns.
Always aim for balance to keep the overall design looking elegant rather than cluttered.
When To Rock Rhinestone Accented Nails
Rhinestone-accented nails are perfect for formal events, parties, or any occasion where you want your nails to stand out.
Weddings, engagements, and galas are ideal for showcasing rhinestone designs, as the sparkle adds a luxurious touch that complements evening gowns and jewelry.
Additionally, you can wear these nails during the holiday season or special celebrations to match the festive atmosphere.
Rhinestones can also be toned down for a chic day-to-day look if applied subtly.
Whether for a night out or a grand event, white rhinestone nails will always make a dazzling impression.
18. Matte White With Glossy Half Moons: Subtle Elegance

How To Create The Perfect Half-Moon Design
The half-moon manicure is a timeless design that adds an elegant touch to any nail look.
To create this style using a matte white base with glossy half moons, start by applying a matte white polish to your nails.
Once the matte polish is fully dry, use a fine detailing brush or nail vinyls to create a curved shape near the cuticle, forming the half-moon.
Fill in the half-moon with a glossy topcoat to create a subtle but eye-catching contrast against the matte white background.
The smooth shine of the glossy half-moon catches the light beautifully, giving your nails an understated yet chic finish.
If you want a more playful look, you can reverse the design by having the nail be glossy and the half-moon matte.
Matte Vs Glossy: Finding The Right Balance
Finding the right balance between matte and glossy finishes is essential to achieving a harmonious look.
When using both finishes on the same nail, as with this half-moon design, it’s important to ensure that one element doesn’t overpower the other.
The matte finish should serve as a soft background that allows the glossy half-moon to stand out subtly.
The juxtaposition of the two textures adds depth and dimension without relying on bold colors or patterns.
This balance makes the design both refined and modern, offering a sophisticated take on traditional nail art.
Best Outfit Pairings For Matte And Glossy White Nails
Matte and glossy white nails are versatile and can be paired with a variety of outfits.
For a more formal setting, these nails work beautifully with monochromatic outfits, such as an all-white ensemble or a sleek black dress, allowing the subtle nail design to complement the overall look.
The understated elegance of this nail design also pairs well with minimalist jewelry, such as simple gold or silver bands.
For a casual day look, matte and glossy nails can be styled with relaxed, neutral-colored outfits to keep things polished yet effortless.
The simplicity of the design means it works in both formal and casual settings, making it an ideal choice for any occasion.
19. White With Rainbow Glitter Tips: Playful And Fun
How To Create A Rainbow Glitter Effect On White Nails
Rainbow glitter tips are a playful way to add some sparkle and color to white nails.
To achieve this design, begin by applying a crisp white base coat and allowing it to dry completely.
Next, use a small makeup sponge to dab on rainbow-colored glitter polish, focusing on the tips of your nails.
Start with a thin layer of glitter and gradually build up the intensity by adding more layers until the desired level of sparkle is achieved.
The key to creating a smooth gradient is to blend the glitter gently down from the tips, fading it into the white base.
You can use multi-colored glitter in one polish or layer different colored glitters for a more distinct rainbow effect.
Finish the look with a glossy topcoat to seal the design and enhance the shine.
Choosing The Right Glitter Colors For A Festive Look
When selecting glitter for this design, consider using a mix of bright, cheerful colors like pink, blue, green, and yellow to create a vibrant rainbow effect.
Holographic glitter works particularly well, as it reflects a wide range of colors in the light, giving the nails an extra sparkle.
For a more subtle approach, you can use pastel glitters or choose glitter with finer particles for a softer look.
If you want to make the design even more playful, opt for chunky glitter with larger pieces, which will add texture and dimension to the tips of your nails.
Styling Ideas For Rainbow Glitter-Tipped Nails
Rainbow glitter-tipped nails are perfect for festive occasions, parties, and celebrations.
They pair well with colorful outfits and accessories, especially when you want your nails to match the vibrant energy of the event.
For a casual summer look, these nails work beautifully with light, airy dresses or denim shorts and a bright top.
For a more polished evening look, pair them with a simple black or white outfit to let the nails take center stage.
Whether you’re attending a birthday party, a music festival, or just want to add some fun to your everyday look, rainbow glitter-tipped nails are a great way to express your playful side.
20. White French Tips With Angular Twist: A Modern Redesign
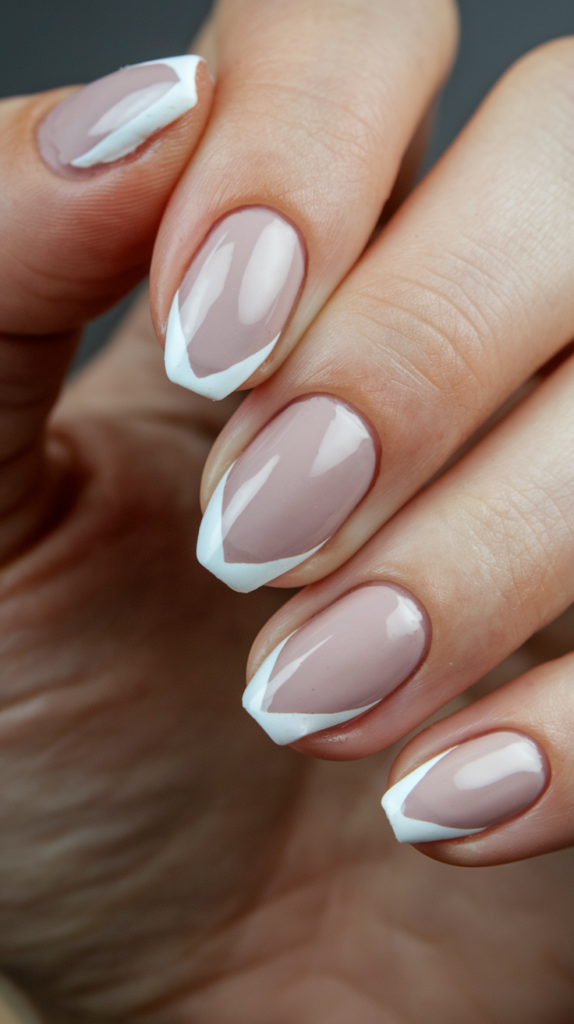
How To Update The Classic French Manicure
The French manicure is a timeless classic, but giving it an angular twist adds a fresh, modern edge.
To create this updated version, start by applying a sheer nude or light pink base coat to the nails.
Once the base is dry, use striping tape or a fine nail art brush to paint angular white tips instead of the traditional curved tips.
The angular design can be sharp, with clean lines that create a sleek and contemporary look.
You can angle the tips diagonally or create a chevron pattern for more drama.
The clean, crisp lines of the angular tips give the design a bold, modern feel while still maintaining the elegance of the original French manicure.
Best Shapes For Angular French Tips
The shape of the angular tips can greatly affect the overall look of the manicure.
For a sleek and modern aesthetic, consider sharp diagonal lines that create a geometric effect.
Alternatively, you can create a V-shaped chevron at the tips of the nails for a more dramatic, edgy look.
If you prefer a more subtle update, a slightly angled line at the tip of the nail can add just enough of a twist without deviating too much from the traditional French manicure.
This design works well on both square and almond-shaped nails, with the angles accentuating the natural shape of the nail.
Styling Tips For Angular French Manicures
The angular French manicure is perfect for anyone looking to add a modern twist to a classic look.
These nails pair well with clean, minimalist outfits, such as tailored suits or monochromatic dresses, allowing the geometric tips to be the focal point of the overall look.
For a more casual style, wear them with neutral tones like beige or grey, which will highlight the crisp white tips without overpowering the design.
The modern design makes it a great choice for both work settings and evening events, offering a chic yet daring look that works for any occasion.
21. White Stiletto Nails With Gold Stripes: Bold And Fierce
How To Achieve Sharp Stiletto Nails
Stiletto nails are defined by their sharp, elongated shape that ends in a pointed tip, creating a fierce and dramatic look.
To achieve this shape, your nails (or nail extensions) need to be filed into a sharp point, with the sides tapered inward.
Once the desired stiletto shape is achieved, apply a white base coat to all the nails, ensuring an even and opaque coverage.
The sharpness of the stiletto shape pairs beautifully with bold designs, such as gold stripes, which accentuate the sleek, elongated look of the nails.
This shape is perfect for those who want a bold, high-fashion statement nail.
The Importance Of Precision In Applying Gold Stripes
Gold stripes add a touch of luxury and glamour to stiletto nails, but precision is key to making the design look clean and polished.
After applying the white base, use a striping brush or nail tape to create thin, perfectly straight gold lines across the nails.
The stripes can be placed horizontally, vertically, or diagonally depending on the look you want to achieve.
For a more intricate design, consider crisscrossing the stripes or combining them with geometric patterns.
The contrast between the sharp stiletto shape, the white base, and the metallic gold stripes creates a striking, bold design that stands out.
Always finish with a high-shine topcoat to ensure the gold remains vibrant and long-lasting.
Perfect Occasions To Wear Stiletto Nails
Stiletto nails are bold and fierce, making them ideal for special occasions where you want to make a statement.
They’re perfect for fashion events, parties, and galas where a dramatic look is appreciated.
The sharp shape and bold design pair well with edgy outfits, such as leather jackets or tailored suits, for a high-fashion look.
Stiletto nails with gold stripes also work beautifully for evening events, where the metallic stripes catch the light and add a glamorous touch to your outfit.
While stiletto nails are less practical for day-to-day wear due to their sharp tips, they are perfect for those moments when you want to stand out and make a lasting impression.
22. White With Pastel Polka Dots: A Cute And Colorful Look
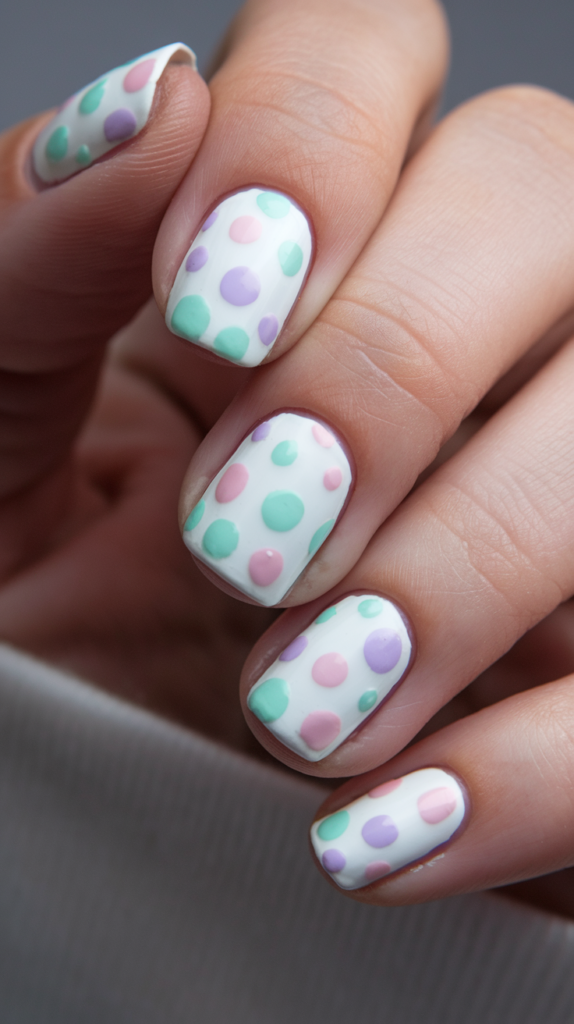
How To Incorporate Pastel Colors With White Nails
White nails with pastel polka dots are a cute and playful design that’s perfect for spring and summer.
To create this look, start by applying a white base coat and allowing it to dry.
Using a dotting tool or the tip of a brush, carefully apply pastel-colored polka dots across the nails in a random or evenly spaced pattern.
You can use pastel shades like soft pink, lavender, mint green, and baby blue to create a fun, colorful effect.
The soft, muted tones of the pastels contrast beautifully with the clean white base, creating a fresh, vibrant design.
For a more intricate look, you can vary the size of the polka dots or overlap them slightly to add depth.
Creating Uniform Polka Dots For A Clean Design
To achieve uniform polka dots, it’s important to use a dotting tool that allows for consistent sizing.
Dip the tool into the pastel polish, making sure to apply even pressure as you place the dots onto the nails.
For a more polished look, space the dots evenly across the nail and avoid overcrowding.
You can alternate the placement of the dots on each nail to create a playful, dynamic design.
For a more whimsical look, consider using different sizes of polka dots or layering them to create a multi-dimensional effect.
Perfect Occasions For Pastel Polka Dot Nails
Pastel polka dot nails are perfect for casual, fun occasions such as brunches, picnics, or vacations.
Their light, airy design pairs beautifully with floral dresses, denim, and soft, feminine colors.
These nails are also great for springtime events, such as baby showers or garden parties, where you want to embrace the fresh, playful energy of the season.
Pastel polka dot nails are also a great option for everyday wear, adding a touch of cuteness and color to your look without being too bold or dramatic.
23. White And Transparent Stripes: Minimalist Elegance
How To Achieve The Perfect Transparent Stripe Effect
White and transparent stripes create a modern, minimalist look that’s sleek and sophisticated.
To achieve this effect, start by applying a white base coat to your nails and allowing it to dry completely.
Next, use striping tape to create thin lines across the nail, leaving spaces where the natural nail will show through as transparent stripes.
Apply a second coat of white polish over the tape, then carefully remove the tape while the polish is still wet to reveal the transparent stripes underneath.
This design works best with thin, even stripes that create a clean, modern look.
Finish with a clear topcoat to give the nails a smooth, glossy finish and enhance the contrast between the white and transparent sections.
Why Transparent Designs Are Trending
Transparent nail designs have become increasingly popular due to their clean, modern aesthetic and their ability to create striking visual effects with minimal effort.
The use of negative space in nail art allows for a fresh, airy look that feels light and modern.
Transparent stripes, in particular, add an element of sophistication without being overpowering, making them perfect for those who prefer minimalist designs.
These designs are versatile and can be adapted to suit various occasions, from casual to formal, making them a favorite among fashion-forward individuals who appreciate understated elegance.
Styling Minimalist White And Transparent Nails
Minimalist white and transparent nails pair beautifully with simple, monochromatic outfits and minimal jewelry.
The sleek, clean lines of the design make these nails perfect for professional settings, where a polished and refined look is desired.
For a casual, everyday look, these nails can be styled with neutral tones like beige, grey, or black to create a cohesive, understated outfit.
For more formal occasions, pair them with sleek, tailored pieces to enhance the minimalist vibe.
The simplicity of the design ensures that your nails will always look chic and modern, no matter the occasion.
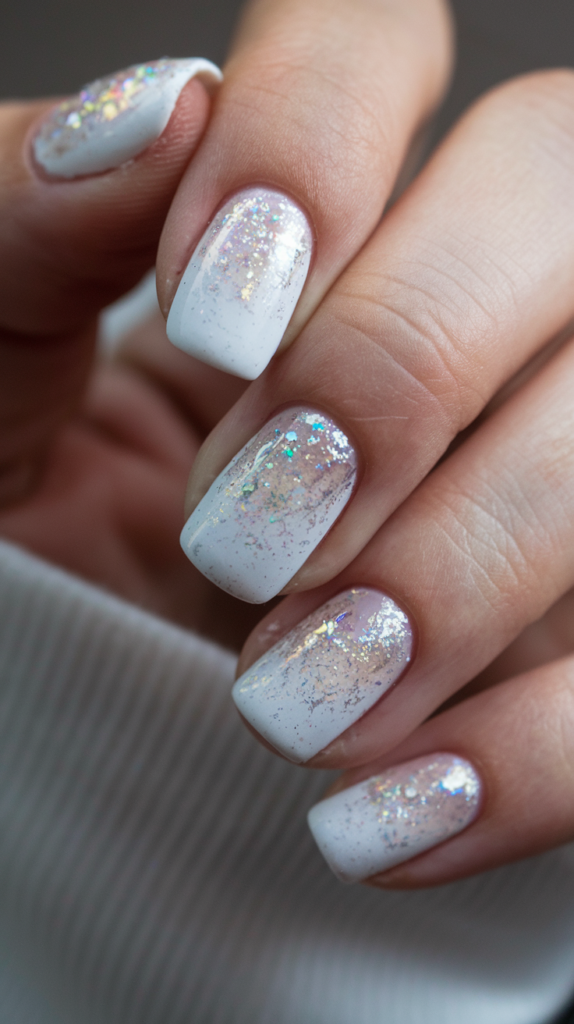
24. White Pearl Finish With Glitter Accents: A Subtle Shimmer
How To Get The Perfect Pearlized Finish
The pearl finish is a soft, iridescent sheen that gives nails a subtle, glowing effect.
To achieve a pearlized look, start by applying a white base coat with a slight shimmer.
Next, use a pearl-effect topcoat to add a soft, luminous glow to the nails.
The key to a perfect pearl finish is to apply the polish in thin, even layers to avoid streaking and ensure a smooth, glossy surface.
If you want to enhance the shimmer, consider adding a fine layer of iridescent glitter on top for a more pronounced effect.
The combination of the pearlescent finish and the glitter accents will give your nails a subtle, elegant sparkle that catches the light beautifully.
Glitter Accent Placement For Maximum Impact
When adding glitter accents to a pearl finish, placement is key to achieving a balanced, elegant look.
For a subtle effect, apply glitter near the cuticles or along the edges of the nails, creating a soft, sparkling border.
If you want a bolder look, you can apply glitter in a gradient, starting at the tips of the nails and fading downwards.
The fine, iridescent glitter will complement the pearl finish, enhancing its natural glow without overwhelming the design.
The goal is to create a delicate shimmer that adds depth and dimension while maintaining the overall elegance of the look.
When To Wear White Pearl-Glitter Nails
White pearl-glitter nails are perfect for formal events like weddings, galas, or elegant dinners where a refined, sophisticated look is desired.
The soft shimmer of the pearl finish, combined with the subtle sparkle of the glitter, makes these nails a versatile choice for any occasion where understated glamour is the goal.
They can also be worn for more casual events, adding a touch of elegance to everyday outfits.
The pearlized finish gives the nails a timeless, classic appeal that pairs well with both neutral tones and bold colors, making these nails suitable for any season or event.
25. Matte White With Studded Accents: Edgy And Cool

How To Safely Apply Studs On Matte Nails
Studded accents add an edgy, rock-and-roll vibe to matte white nails, creating a bold and unique look.
To safely apply studs without damaging your nails or the matte finish, start by applying a matte white polish and allowing it to dry completely.
Using a pair of tweezers, place small metallic studs onto the nails, securing them with a drop of clear nail adhesive or by pressing them into a thick layer of topcoat.
Be sure to position the studs carefully, either in a straight line down the center of the nail or clustered near the cuticle for a more subtle effect.
Once the studs are in place, apply a matte topcoat to seal the design and ensure the studs stay secure without losing the matte finish.
Why Matte Nails Are Ideal For An Edgy Look
Matte nails have a velvety, non-reflective finish that adds an air of sophistication to any design, making them the perfect backdrop for edgy elements like studs.
The contrast between the smooth, matte surface and the metallic studs creates a striking visual effect that’s both bold and modern.
Matte nails are also versatile, working well with various shapes, lengths, and colors, allowing you to customize the design to suit your personal style.
The matte finish adds a sleek, contemporary edge to the overall look, making it ideal for those who want a cool, fashion-forward manicure.
Best Outfit Ideas For Studded White Nails
Studded white nails pair perfectly with edgy, street-style outfits, such as leather jackets, distressed denim, and chunky boots.
The metallic studs add a rebellious touch to the nails, making them the perfect accessory for a bold, statement-making outfit.
For a more casual look, you can wear these nails with simple, monochromatic outfits like black jeans and a white t-shirt, allowing the nails to stand out as the focal point.
These nails also work well for evening events, where you can pair them with sleek, tailored pieces and minimal jewelry for a chic, modern look.
Whether you’re going for a casual, cool vibe or a high-fashion look, studded white nails will always add an edgy touch to your style.
26. White With Black Outline Art: Bold And Graphic
How To Draw Clean Black Outlines On White Nails
Black outline art on white nails creates a bold, graphic design that is both striking and modern.
To achieve this look, start by applying a white base coat and allowing it to dry completely.
Using a thin nail art brush or a fine-tipped pen, carefully outline shapes, patterns, or designs in black.
You can create simple shapes like circles or triangles for a minimalist look or go for more intricate designs such as florals or geometric patterns.
The key to achieving clean, crisp outlines is to use a steady hand and thin, controlled lines.
Finish the look with a glossy topcoat to protect the design and enhance the contrast between the black and white.
Popular Patterns For Black And White Nail Art
Black and white nail art is incredibly versatile, and there are many popular patterns to choose from.
For a simple yet striking look, consider outlining the edges of the nails in black, creating a framed effect.
You can also experiment with graphic patterns such as stripes, polka dots, or grids, which create a high-contrast, modern look.
Floral designs outlined in black on a white base add a touch of femininity to the graphic design, while abstract shapes or lines offer a more artistic, contemporary vibe.
Whether you prefer minimalist or intricate patterns, black outline art on white nails is a bold and stylish choice.
When To Wear Bold Black-Outlined White Nails
Bold black-outlined white nails are perfect for making a statement, whether you’re attending a fashion event, an art gallery opening, or a night out with friends.
The graphic nature of the design pairs well with edgy, modern outfits, such as leather jackets, tailored blazers, or bold accessories.
These nails are also great for casual settings, where you can wear them with monochromatic outfits or simple, neutral tones to let the nail art stand out.
The versatility of the black-and-white color palette means that these nails can be worn for both formal and casual occasions, making them a go-to design for anyone who loves bold, artistic nail art.
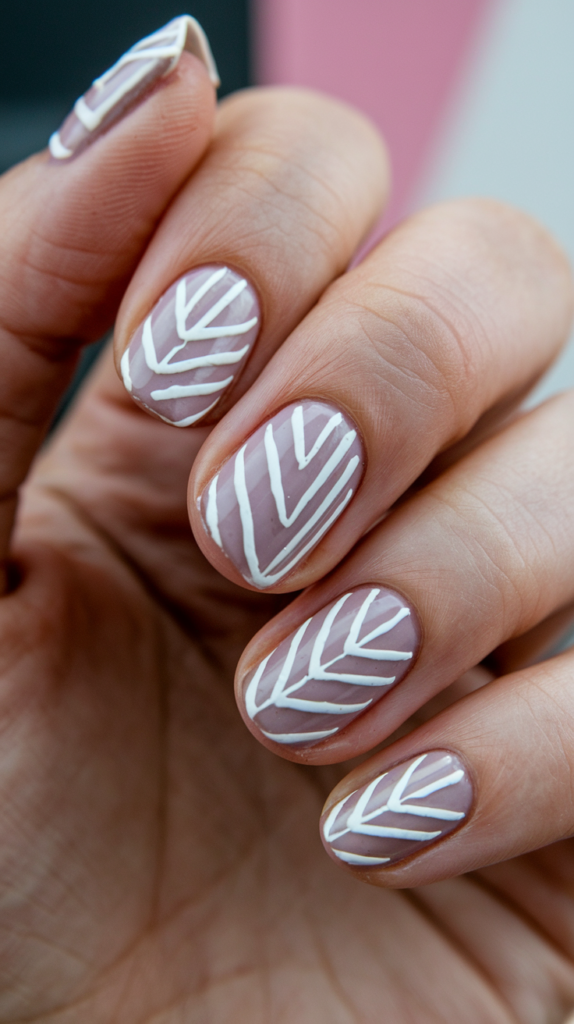
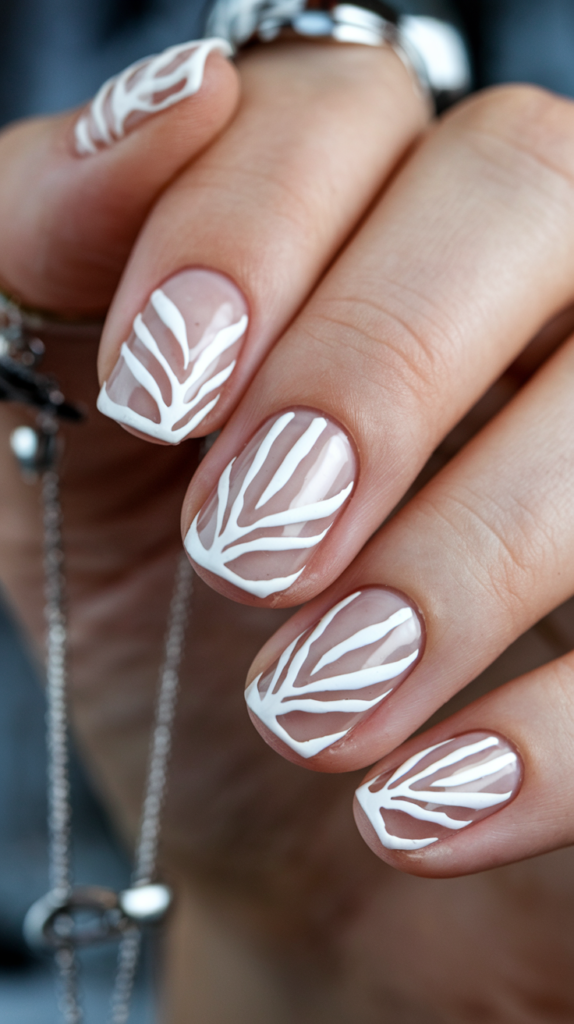
27. White Leaves And Branches: Nature-Inspired Elegance
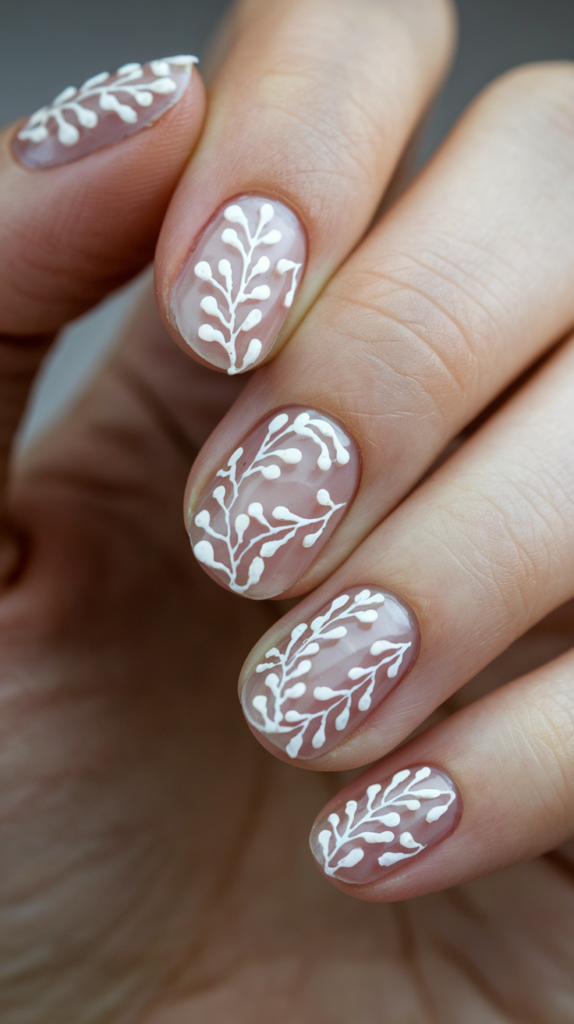
How To Hand-Paint Delicate Leaves On Nails
Nature-inspired nail art, featuring delicate leaves and branches, is a soft and elegant design that adds a touch of natural beauty to your nails.
To create this look, start by applying a white or light-colored base coat.
Once the base is dry, use a fine detailing brush to hand-paint thin, delicate branches and leaves in white or a light grey color.
Begin by painting a single, thin line to represent the branch, and then add small leaf shapes along the branch.
For added dimension, consider using different shades of white or grey to create a more realistic, layered effect.
The key to achieving a beautiful leaf design is to keep the lines thin and the shapes simple, mimicking the natural elegance of real leaves and branches.
Best Background Colors For White Nature Designs
While a pure white base is a classic choice for nature-inspired designs, you can also experiment with soft, muted background colors to enhance the overall look.
Light shades of green, grey, or beige create a soft, earthy tone that complements the delicate leaf designs.
A pale blue background can evoke the feeling of a clear sky, while a blush pink or soft lavender base adds a touch of femininity.
For a more striking contrast, try pairing white leaves with a dark base color like navy or forest green, creating a bold and dramatic look that still maintains the elegance of the design.
Why Leaf Designs Are Perfect For Every Season
Leaf designs are incredibly versatile and can be adapted to suit any season.
In the spring and summer, soft green or pastel leaves on a white base create a fresh, lively look that’s perfect for the warmer months.
For fall, you can incorporate warm tones like gold, orange, or burgundy into the leaf design to reflect the changing colors of the season.
In winter, a simple white-on-white leaf design evokes the feeling of frost-covered branches, creating a subtle, elegant winter look.
The natural beauty of leaves makes this design perfect for any time of year, offering a timeless and sophisticated nail art option.
28. White And Silver Glitter Gradient: A Dazzling Transition
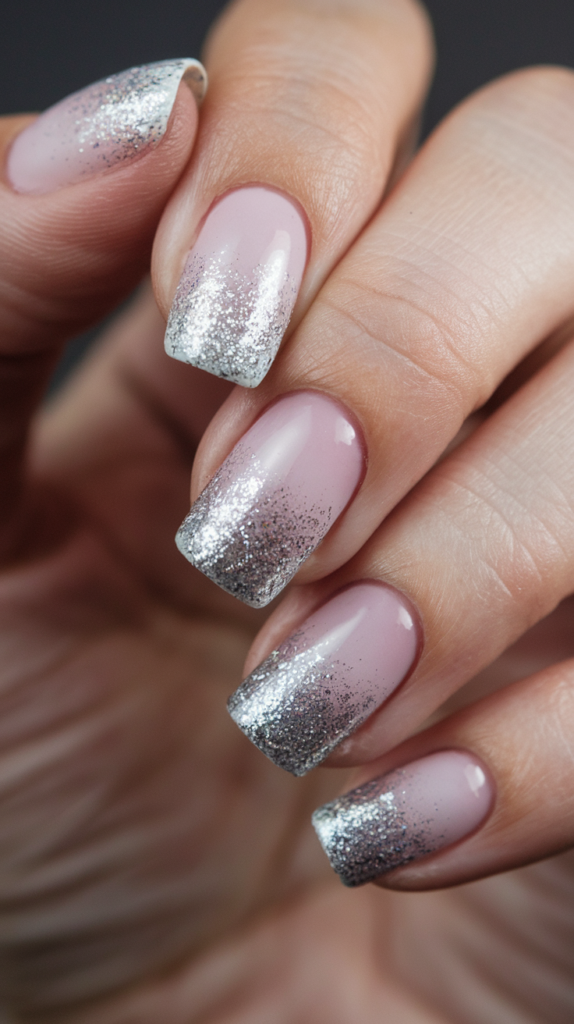
How To Create A Seamless White To Silver Gradient
A white-to-silver glitter gradient is a dazzling design that adds a touch of sparkle to your nails without being too overpowering.
To create this look, start by applying a white base coat to your nails.
Once the base is dry, use a makeup sponge to dab on a layer of silver glitter polish, starting at the tips of the nails and gradually fading the glitter downward.
The goal is to create a smooth transition between the white base and the glitter, with the most intense sparkle at the tips and a more subtle shimmer toward the cuticle.
You can build up the glitter in layers until you achieve the desired level of sparkle.
Finish the look with a glossy topcoat to enhance the shine and ensure the glitter stays in place.
Choosing The Right Silver Glitter For The Design
When selecting silver glitter for a gradient design, consider the size and texture of the glitter particles.
Fine glitter works best for a subtle, seamless gradient, as it blends smoothly with the white base and creates a soft, shimmering effect.
If you prefer a more dramatic look, opt for chunky glitter or holographic glitter that catches the light and adds dimension to the design.
The key is to choose a glitter that complements the white base without overwhelming it, ensuring that the gradient effect remains soft and elegant.
Styling Tips For Glitter Gradient Nails
Glitter gradient nails are perfect for special occasions like weddings, parties, or holiday events, where a touch of sparkle is always welcome.
Pair these nails with metallic accessories or silver jewelry to enhance the glittery effect.
For a more casual look, wear them with neutral or pastel tones to keep the focus on the nails.
Glitter gradient nails also work beautifully for evening events, where the shimmer can catch the light and add a touch of glamour to your overall look.
Whether for a formal event or a night out with friends, white and silver glitter gradient nails are a versatile and eye-catching choice.
29. White Lace With Rhinestones: Bridal And Elegant

How To Create Intricate White Lace On Nails
White lace nails are a delicate and elegant design that’s perfect for bridal occasions or formal events.
To create this look, start by applying a sheer or nude base coat to the nails, allowing the lace design to stand out.
Using a fine detailing brush or a nail stamping tool, carefully paint intricate lace patterns in white polish.
Popular lace designs include florals, vines, and swirls, mimicking the delicate look of real lace fabric.
For a more dimensional look, consider adding a few 3D elements like tiny pearls or rhinestones to accentuate the lace pattern.
The key to achieving a beautiful lace design is precision and attention to detail, ensuring that each element of the pattern is clean and crisp.
Strategically Placing Rhinestones For Maximum Sparkle
Rhinestones can be used to enhance the elegance of a lace nail design by adding a touch of sparkle.
To achieve the best results, place the rhinestones strategically, either along the edges of the lace pattern or at key points in the design, such as the center of flowers or at the base of swirls.
Using rhinestones sparingly ensures that the overall look remains refined and elegant, rather than overwhelming the delicate lace.
You can also experiment with different sizes of rhinestones, placing smaller stones in intricate areas and larger ones as accents on one or two nails.
Why White Lace Designs Are Perfect For Brides
White lace nails are a popular choice for brides because they offer a timeless, elegant look that complements the bridal gown and adds a touch of romance to the overall ensemble.
The delicate lace patterns evoke the femininity and beauty of traditional wedding lace, while the addition of rhinestones adds a touch of sparkle and glamour.
Whether paired with a classic white gown or a more modern wedding dress, white lace nails are the perfect finishing touch for any bride who wants to look elegant and sophisticated on her special day.
30. White Watercolor Effect: Soft And Dreamy
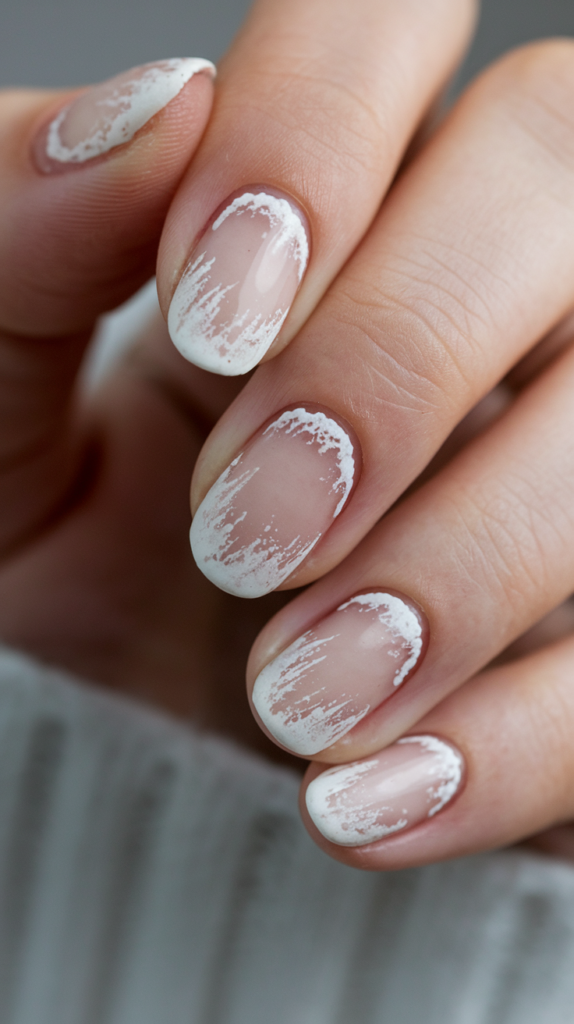
How To Achieve The Perfect Watercolor Design
The watercolor effect is a soft, dreamy nail design that creates a diffused, painterly look on the nails.
To achieve this design, start by applying a sheer white or nude base coat.
Once the base is dry, use a small, damp brush to apply thin, translucent layers of white polish in random, swirling patterns.
The key to creating a watercolor effect is to blend the polish softly, avoiding any harsh lines or sharp edges.
You can also add other soft colors, like pastel pink or blue, to enhance the watercolor effect and create a multi-dimensional look.
Finish with a glossy topcoat to seal the design and give the nails a smooth, polished finish.
Best Color Combinations With White Watercolor
While a pure white watercolor design is soft and elegant on its own, you can also incorporate other colors to create a more dynamic look.
Soft pastels like blush pink, lavender, or baby blue work beautifully with white, creating a romantic, ethereal design.
For a more dramatic effect, consider adding shades of grey or silver to the watercolor pattern, giving the design a cool, modern feel.
The goal is to keep the colors soft and blended, ensuring that the overall look remains subtle and dreamy.
Ideal Occasions For Soft Watercolor Nails
Watercolor nails are perfect for spring and summer, as their soft, airy design evokes the lightness and beauty of the warmer months.
They are ideal for outdoor events like garden parties, weddings, or vacations, where a fresh, feminine look is desired.
Watercolor nails also work beautifully for more casual settings, adding a touch of elegance and artistry to your everyday style.
The soft, blended colors and delicate patterns make these nails a versatile choice for any occasion, offering a subtle, refined look that’s perfect for both formal and casual events.
31. White Ombre With Gold Foil: A Luxurious Look
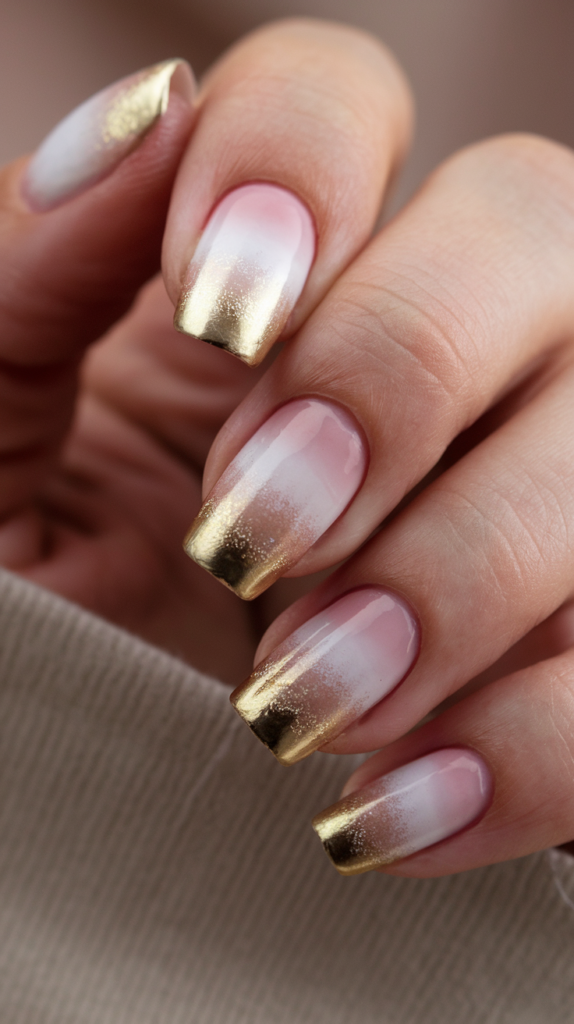
Creating A Smooth Ombre Transition From White To Gold
White ombre nails with gold foil create a luxurious and sophisticated design that’s perfect for special occasions.
To achieve this look, start by applying a white base coat to your nails.
Once the base is dry, use a makeup sponge to gently dab on a sheer layer of nude or light beige polish, creating a soft, faded ombre effect from the cuticle to the middle of the nail.
Once the ombre is in place, apply gold foil to the tips of the nails, pressing the foil lightly to ensure it adheres smoothly.
The key to creating a seamless transition is to blend the colors softly and ensure that the gold foil is applied evenly, creating a smooth, luxurious gradient from white to gold.
How To Apply Gold Foil Without Overdoing It
Gold foil adds a touch of luxury to any nail design, but it’s important to apply it sparingly to avoid overpowering the look.
When adding gold foil to a white ombre design, focus on placing small pieces of foil at the tips of the nails, creating a subtle, gilded effect.
You can also add a few tiny pieces of gold foil near the cuticle for a more balanced design.
The goal is to create a light, shimmering effect that enhances the ombre without overwhelming it.
Always finish with a clear topcoat to seal the foil and ensure the design stays intact.
Styling Tips For Luxurious Ombre Nails
White ombre nails with gold foil are the epitome of luxury and sophistication, making them perfect for formal events like weddings, galas, or black-tie affairs.
Pair these nails with gold jewelry or metallic accessories to enhance the gilded effect.
For a more casual look, wear them with neutral tones or simple outfits to let the nails be the focal point of the overall ensemble.
The combination of white ombre and gold foil creates a timeless, elegant look that works for any occasion where you want to feel chic and glamorous.
32. White Chevron Stripes: Sharp And Geometric
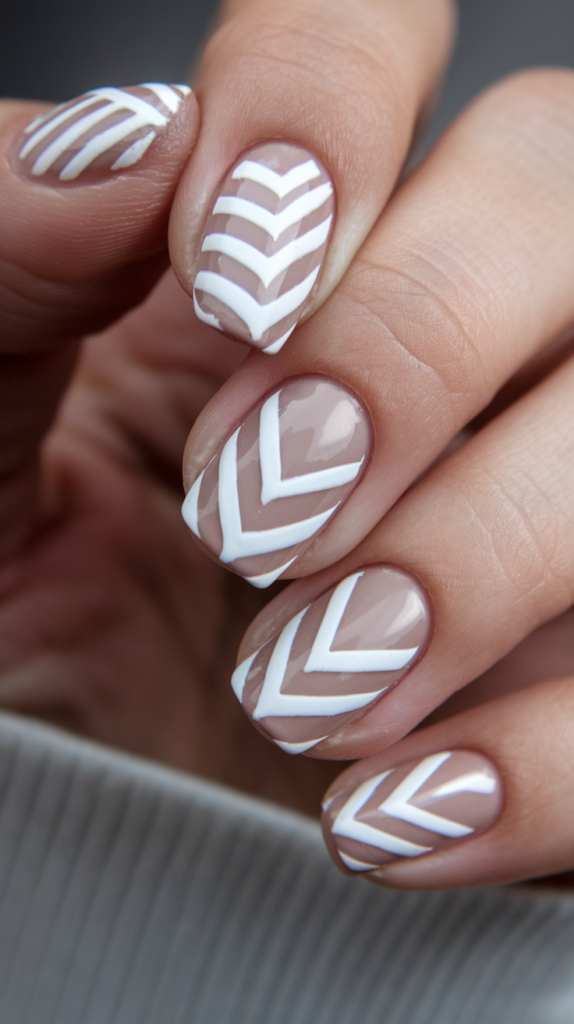
Why Chevron Stripes Are A Timeless Design
Chevron stripes are a sharp, geometric pattern that has remained popular in fashion and nail art for years.
The clean, angular lines of the chevron pattern create a bold, graphic look that’s both modern and timeless.
Chevron stripes work well with any color palette, but when paired with white, they create a sleek, high-contrast design that stands out without being overly complicated.
The simplicity of the chevron pattern makes it a versatile choice for both casual and formal occasions, offering a chic, polished look that’s always in style.
How To Draw Precise Chevron Patterns On Nails
To create a precise chevron pattern on your nails, start by applying a white base coat and allowing it to dry completely.
Next, use striping tape or nail guides to mark off the chevron shape on each nail.
Apply a contrasting color, such as black or metallic, over the tape, filling in the chevron shape.
Once the polish is dry, carefully remove the tape to reveal the crisp, clean lines of the chevron pattern.
If you prefer a more subtle look, you can use a tone-on-tone approach by applying a glossy white polish over the matte base to create a soft, understated chevron effect.
Finish with a topcoat to seal the design and give the nails a smooth, polished finish.
Matching Chevron Nails With Your Outfit
Chevron nails are bold and graphic, making them a great choice for those who love statement-making fashion.
Pair these nails with geometric or minimalist outfits, such as tailored blazers, monochromatic ensembles, or sleek accessories.
For a more casual look, chevron nails can be styled with simple, neutral pieces like jeans and a white t-shirt, allowing the sharp lines of the design to be the focal point.
The clean, modern aesthetic of chevron nails works well for both casual and formal occasions, making them a versatile and stylish choice for any event.
33. White Matte With Glossy Geometric Shapes: Modern And Sleek
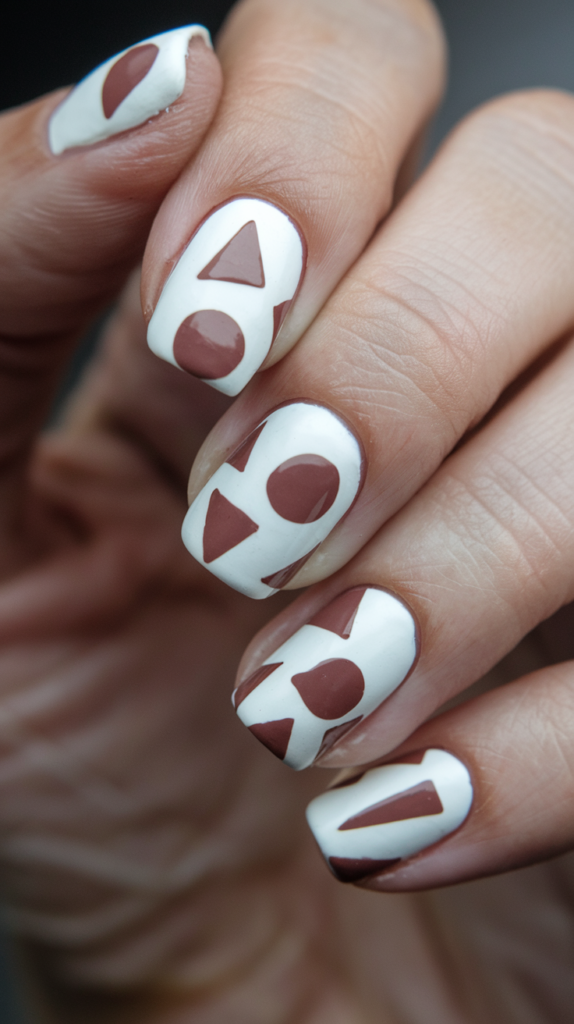
How To Combine Matte And Glossy Finishes
Combining matte and glossy finishes creates a sleek, modern look that adds depth and dimension to your nails without the need for bold colors or patterns.
To achieve this look, start by applying a matte white base coat to your nails and allowing it to dry completely.
Next, use a fine detailing brush or striping tape to create geometric shapes, such as triangles, squares, or circles, in a glossy topcoat.
The contrast between the matte and glossy finishes adds texture and interest to the design while maintaining a clean, minimalist aesthetic.
Finish with a clear topcoat to enhance the glossy shapes and protect the matte base.
Popular Geometric Shapes For White Nails
Geometric shapes are a popular choice for modern nail art, offering clean lines and a sleek, structured look.
When creating matte and glossy designs, consider using simple shapes like triangles, squares, or chevrons, which can be arranged in various patterns to create a unique, eye-catching design.
You can also experiment with more complex shapes, such as hexagons or diamonds, for a bolder, more intricate look.
The key to achieving a modern, polished design is to keep the shapes clean and precise, ensuring that the contrast between the matte and glossy finishes remains sharp and defined.
Why Geometric Designs Are Perfect For A Sleek Look
Geometric designs are perfect for those who prefer a sleek, modern aesthetic.
The clean lines and structured patterns of geometric shapes create a sophisticated, minimalist look that’s both stylish and timeless.
Whether you’re going for a bold, high-contrast design or a more subtle tone-on-tone look, geometric shapes add depth and interest to your nails without being too flashy.
The combination of matte and glossy finishes enhances the overall effect, giving the design a polished, professional look that’s perfect for any occasion.
34. White With Neon Accents: A Bold Pop Of Color
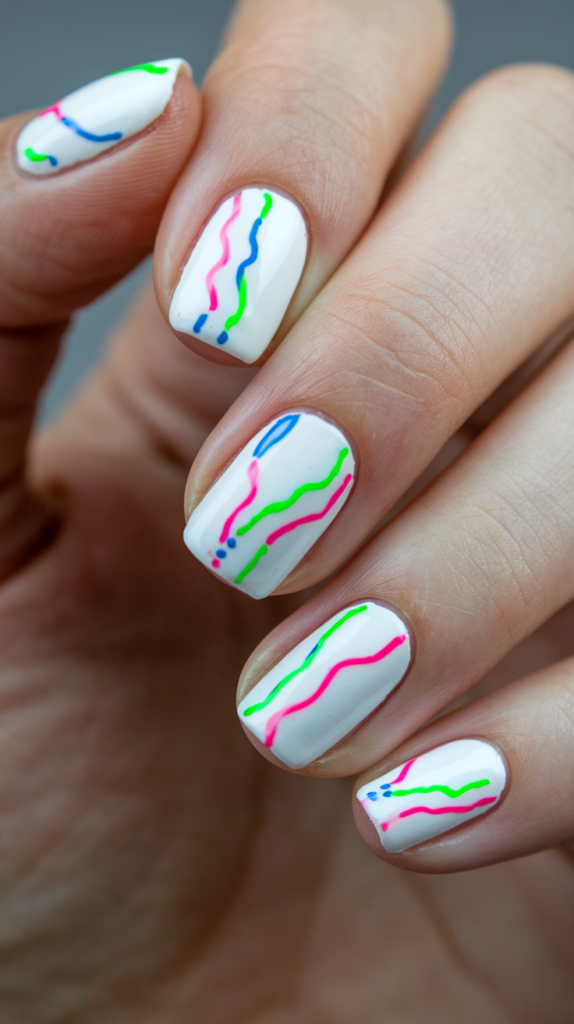
How To Incorporate Neon Colors With White Polish
White nails with neon accents are a fun and bold design that adds a pop of vibrant color to your look.
To create this design, start by applying a white base coat and allowing it to dry.
Next, use neon polish to add accents in the form of stripes, dots, or geometric shapes.
You can also use a thin brush or striping tape to create neon lines or borders around the edges of the nails.
The key to achieving a balanced look is to keep the neon accents simple, allowing the bright colors to stand out against the clean white base without overwhelming the design.
Choosing The Right Neon Colors For Contrast
When choosing neon colors to pair with white polish, opt for shades that are bright and bold, such as neon pink, lime green, electric blue, or fluorescent orange.
The contrast between the vibrant neon and the crisp white base creates a striking visual effect that’s sure to turn heads.
For a more playful look, consider using multiple neon colors in one design, creating a rainbow effect with different neon accents on each nail.
If you prefer a more subtle approach, you can stick to one neon color and use it sparingly for a sleek, modern look.
Best Occasions To Wear Neon Accented Nails
Neon-accented nails are perfect for fun, casual occasions where you want to make a bold statement.
They’re ideal for music festivals, beach vacations, or summer parties, where the bright colors can complement the energetic atmosphere.
These nails also work well for nighttime events, where the neon accents can glow under UV light, adding an extra layer of fun to your look.
Whether you’re going for a playful, colorful vibe or a bold, edgy style, neon-accented nails are a great way to add some excitement to your manicure.
35. White Cloud Design: Dreamy And Playful

How To Hand-Paint Realistic Cloud Shapes
White cloud nails are a soft, dreamy design that evokes a sense of calm and playfulness.
To create this look, start by applying a light blue or pastel base coat to mimic the sky.
Once the base is dry, use a small brush or a dotting tool to create fluffy, rounded cloud shapes in white polish.
The key to achieving realistic-looking clouds is to keep the edges soft and uneven, mimicking the natural, billowy shape of real clouds.
You can add depth to the clouds by layering different shades of white or using a sponge to lightly dab the polish onto the nails for a more textured look.
Finish with a clear topcoat to give the nails a smooth, polished finish.
Pairing Cloud Designs With Soft Backgrounds
Cloud designs look best when paired with soft, pastel backgrounds that complement the dreamy, whimsical theme of the nails.
Light blue is the most popular choice for a cloud design, as it creates the illusion of a clear sky.
However, you can also experiment with other soft colors like pale pink, lavender, or mint green for a more playful, colorful look.
For a more ethereal effect, consider using a gradient background that fades from light blue to white, mimicking the appearance of a soft, cloudy sky.
Why White Cloud Nails Are Perfect For A Relaxed Vibe
White cloud nails are the perfect choice for anyone looking to add a touch of whimsy and relaxation to their manicure.
The soft, billowy clouds create a calming, peaceful effect that’s ideal for casual, laid-back occasions like vacations, weekend getaways, or lazy days at home.
These nails also work beautifully for spring and summer, where the light, airy design complements the fresh, warm weather.
Whether you’re looking for a fun, playful design or a more subtle, serene look, white cloud nails offer a versatile and charming option that’s perfect for any occasion.
Conclusion
White nail art is incredibly versatile, offering endless possibilities for creating unique and beautiful designs.
Whether you’re looking for something soft and subtle like watercolor effects and lace details or prefer bold, graphic looks with rhinestones, animal prints, or neon accents, white nails provide the perfect base for creativity.
These 35 white nail art designs showcase just how much you can do with this classic color, allowing you to express your personality through playful, elegant, or edgy styles.
No matter the season or occasion, white nail art is a timeless choice that can be customized to suit any mood or outfit.
Try one of these designs for your next manicure and make a stylish statement.

