Introduction
Nail art has become an incredible way for individuals to express their creativity and style, and with each new month comes fresh inspiration for stunning designs.
Whether it’s the icy beauty of January, the romantic flair of February, or the festive spirit of December, there’s always a perfect nail art look to match the season.
This blog will take you through twelve months of nail design ideas, each carefully curated to reflect the themes, holidays, and colors of the month.
From soft pastels in spring to dark, moody tones for Halloween, we’ll explore how you can transform your nails into mini masterpieces year-round.
January: Icy Winter Wonderland Nail Designs
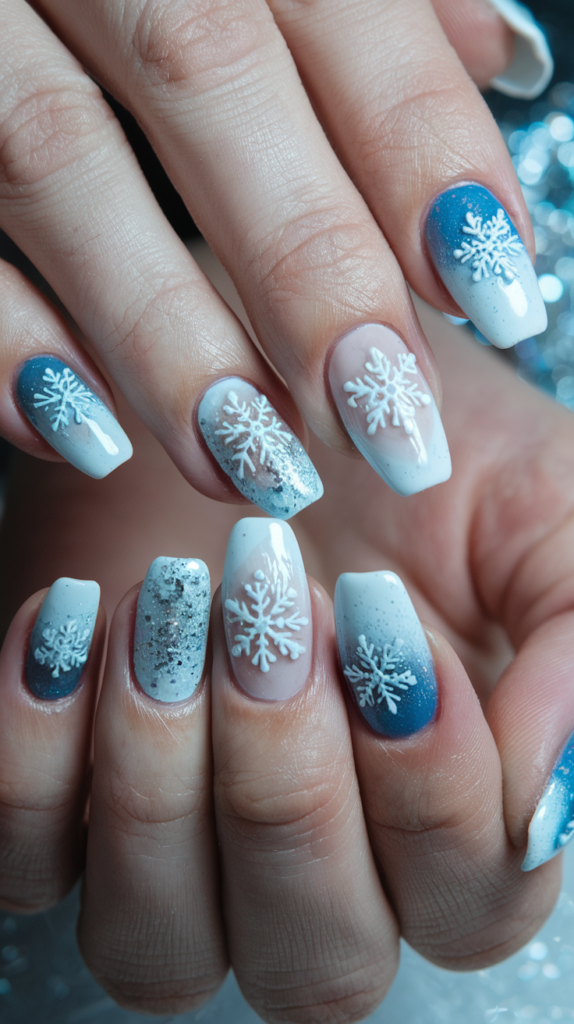
Why Icy Blues And Silvers Dominate January Nail Trends
January is synonymous with cold weather, frost, and the magical beauty of winter landscapes.
It’s no wonder that icy blues and silvers dominate the nail art trends during this time of year.
These cool-toned shades reflect the serene yet striking appearance of a winter wonderland.
Blue is reminiscent of frozen lakes, clear winter skies, and crisp, cold air.
Meanwhile, silver mirrors the sparkle of fresh snow and the glint of ice crystals.
Together, they create a calming, elegant, and seasonally appropriate look that’s both chic and festive.
The versatility of these colors also allows them to blend well with a variety of designs, making them the perfect choice for January.
Inspiration From Winter Elements: Snowflakes, Ice Crystals, And Frost
Winter brings an array of beautiful natural elements that inspire nail designs.
Snowflakes, with their delicate and intricate patterns, make for stunning nail art.
No two snowflakes are alike, so your creativity can flourish by incorporating a variety of unique snowflake shapes across each nail.
Ice crystals, too, add a glamorous touch to nail designs, often depicted with shimmering finishes or fine glitter to mimic their glistening appearance.
Frosted tips and icy gradients can add depth to the design, making the nails look like they’ve been kissed by winter frost.
Together, these elements capture the beauty of winter in a sophisticated yet playful manner.
How To Create The Perfect Icy Gradient Nail Look
To create the perfect icy gradient nail look, start with a base coat of light, frosty blue.
Once the base is dry, use a makeup sponge to dab on a gradient effect, blending white at the tips into the blue at the base for a frosty finish.
You can add a layer of sheer, silver glitter to give the design a shimmering, icy feel.
For added dimension, use a thin brush to paint tiny snowflakes or ice crystal designs on a few accent nails.
Finish with a glossy topcoat to seal the design and add a glass-like shine, ensuring the nails reflect light just like ice in the winter sun.
February: Romantic Valentine’s Day Nail Ideas
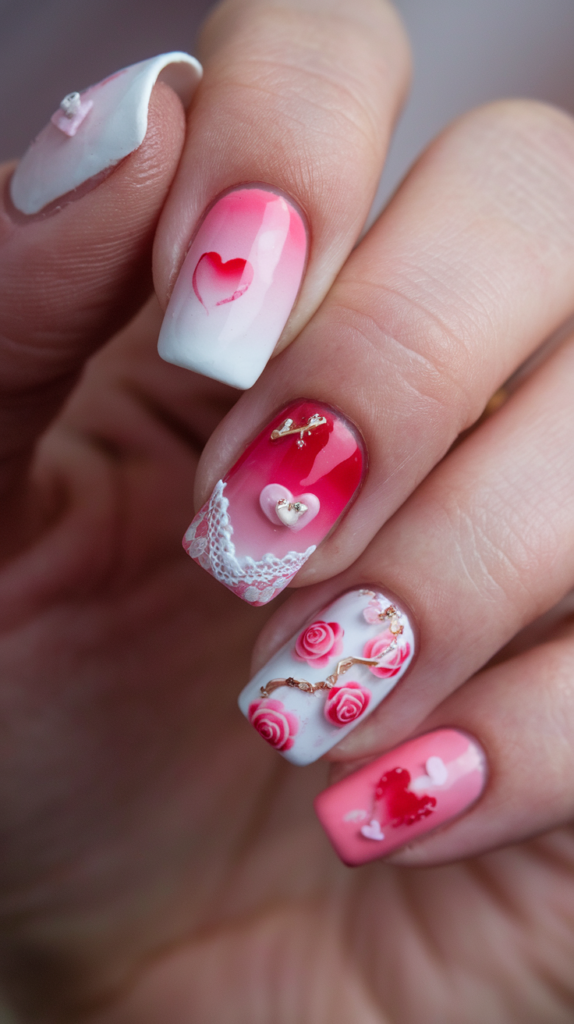
Best Valentine’s Day Nail Colors: Soft Pinks, Reds, And Whites
Valentine’s Day is the perfect time to embrace romantic hues on your nails.
Soft pinks, warm reds, and crisp whites are classic colors that exude the spirit of love and affection.
Pink represents softness and sweetness, while red is bold and passionate, symbolizing deep love and desire.
White, often associated with purity and innocence, provides a beautiful contrast to the other shades, allowing the designs to pop.
Together, these colors create a cohesive and romantic palette perfect for February nail designs.
Whether you opt for a simple monochrome look or mix and match these colors across each nail, this color palette will always be a Valentine’s Day favorite.
Heart And Floral Nail Art For A Romantic Aesthetic
No Valentine’s Day nail design is complete without some romantic motifs.
Hearts are an obvious choice and can be incorporated in a variety of ways, from tiny, delicate heart patterns to larger, statement heart designs.
Floral nail art, especially roses, can add an extra touch of femininity and elegance to your Valentine’s Day look.
Opt for subtle, hand-painted flowers or go bold with 3D rose accents for a more textured appearance.
Combining hearts and florals can create a charming and romantic aesthetic that feels soft and luxurious without being overwhelming.
Adding Sparkle With Glitter Accents For Valentine’s Day
A little sparkle goes a long way in making your Valentine’s Day nails stand out.
Glitter accents can be added to any design to elevate the look, providing a sense of glamour and celebration.
Whether you use fine glitter to create shimmering gradients or add bold glitter accents to specific designs like hearts or roses, the result will be stunning.
A glittery accent nail in red or pink is a fun way to complement the overall romantic theme.
You can even opt for glitter topcoats to make the entire set shine, creating a dazzling finish that’s perfect for any Valentine’s Day celebration.
March: Spring Bloom Nail Art For A Fresh Look
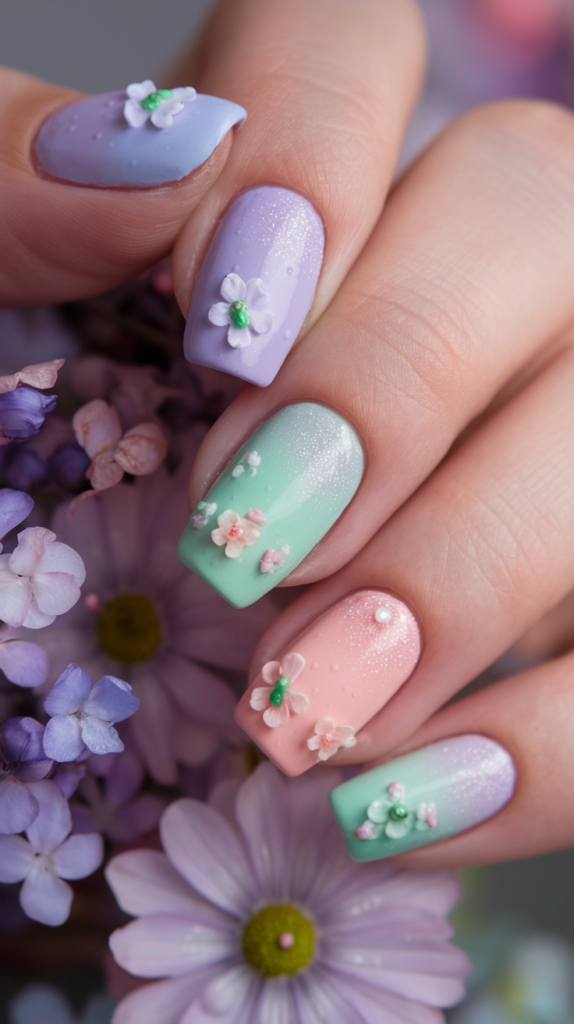
Why Pastel Colors Are Perfect For Spring Nail Designs
Pastel colors are the perfect representation of spring.
As the season of new beginnings, pastel shades like lavender, mint green, and baby pink mirror the delicate blooms and soft hues of spring flowers.
These colors evoke feelings of freshness and lightness, providing a softer and more subtle look compared to the deep, bold colors often seen in winter.
Pastel shades are also versatile, allowing for a variety of designs, from floral patterns to geometric shapes.
Whether you’re looking to create a minimalistic design or something more intricate, pastels are a timeless choice for spring nails.
Incorporating Floral Patterns Into Your March Nail Art
Spring is synonymous with flowers, so it’s only natural to incorporate floral patterns into your March nail designs.
You can opt for dainty, hand-painted flowers, such as daisies or cherry blossoms, for a subtle and elegant look.
Alternatively, larger, bold floral patterns can make a statement, with each nail showcasing a different bloom.
Mixing flowers with leaves, vines, or stems creates a more detailed and natural-looking design.
Florals can be placed on an accent nail or scattered across all nails for a cohesive, garden-inspired look.
The key is to keep the colors light and the lines delicate to maintain that airy, spring feel.
Step-By-Step Guide To Creating A Pastel Gradient Manicure
To achieve a pastel gradient manicure, start by choosing two or three pastel shades that blend well together, such as lavender, mint, and baby blue.
Apply a base coat of the lightest shade to all nails.
Once dry, use a sponge to gently blend the other colors onto the nails, creating a seamless gradient.
Start by dabbing the middle shade near the base of the nail and gradually blending upward, then apply the darkest shade near the tip, blending it downward.
Once the gradient is complete, apply a sheer glitter topcoat for added dimension, or leave it glossy for a smooth, polished finish.
April: Easter Egg Delight Nail Designs
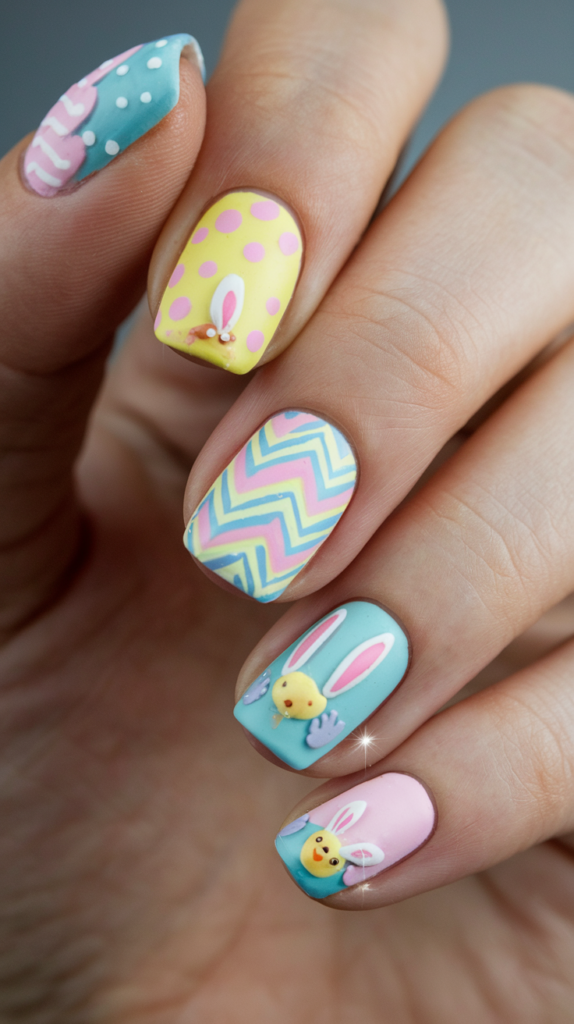
Bright Pastel Nail Art For Easter Celebrations
April is all about Easter celebrations, and bright pastels are the go-to choice for festive nail designs.
Pastel colors like baby pink, lilac, pale yellow, and soft mint are reminiscent of Easter eggs, making them perfect for this holiday.
These shades are light, fun, and playful, capturing the spirit of Easter and spring.
For a cohesive Easter theme, alternate these colors across your nails, or blend them together in an ombre effect.
The key is to keep the colors vibrant yet soft, creating a whimsical look that’s perfect for the occasion.
Cute Patterns Like Polka Dots And Bunny Ears For April Nails
To add some festive flair to your Easter nails, incorporate fun patterns like polka dots, stripes, and zigzags, which are often seen on decorated Easter eggs.
You can also add adorable designs like bunny ears, baby chicks, and mini eggs to some accent nails for a playful touch.
These patterns can be hand-painted or created using nail decals for a more polished look.
To make the design even more festive, consider adding tiny 3D embellishments like miniature eggs or a bunny tail on one of the nails.
The result will be an eye-catching, cheerful nail set perfect for celebrating Easter.
How To Achieve Soft Ombre Shades For Easter Nails
Ombre nails are a great way to blend different pastel shades for a soft and subtle Easter nail design.
Start with a light base coat and choose two to three complementary pastel colors.
Using a makeup sponge, dab the colors onto the nails in a gradient, starting with the lightest shade at the cuticle and transitioning to darker hues at the tip.
To create a smoother gradient, lightly blend the colors with the sponge until you achieve a seamless transition.
Add a glossy or matte topcoat to finish the look, and consider adding tiny Easter-themed details like polka dots or bunny ears for a festive twist.
May: Floral Frenzy Nail Art Designs
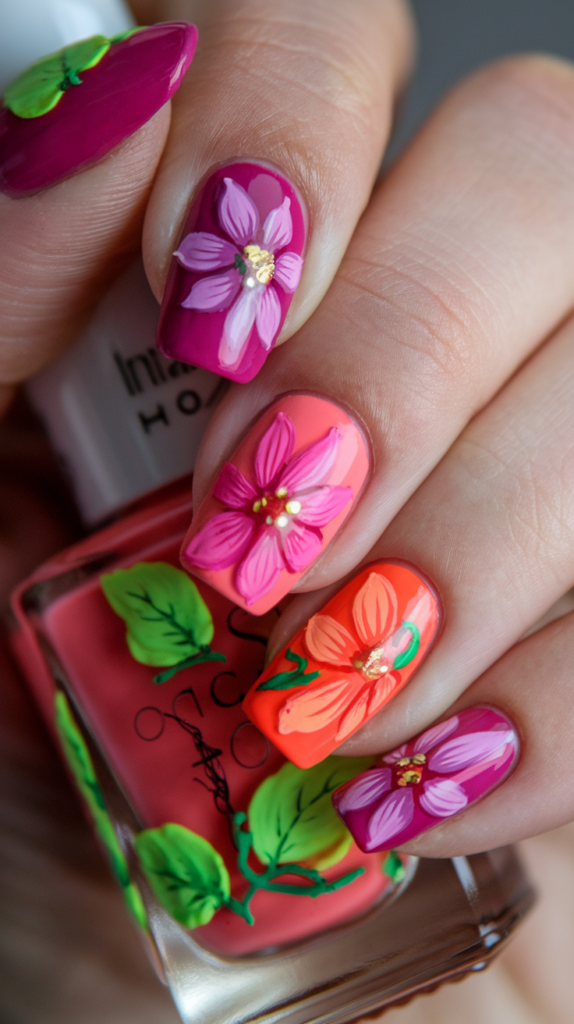
Bold Colors Like Fuchsia And Orange For May Nails
As spring reaches its peak in May, it’s time to embrace vibrant, bold colors in your nail designs.
Fuchsia, orange, and green are lively and energetic shades that reflect the abundance of flowers and lush greenery in bloom.
These colors are perfect for creating statement nails that stand out, whether you choose to apply them solidly or blend them in intricate designs.
Bold colors like these also provide a great base for detailed floral nail art, making the designs pop.
Pairing these colors together can create a lively, garden-inspired look that feels fresh and celebratory for the season.
Intricate Floral Detailing To Celebrate Spring’s Peak
Floral nail art reaches its peak in May, with intricate flower designs taking center stage.
From roses to sunflowers, the options for floral detailing are endless.
Hand-painted flowers with fine, delicate lines can add a touch of elegance to any nail design, while bolder, more abstract flowers create a modern, artistic vibe.
Mixing florals with foliage like leaves and vines creates a dynamic, nature-inspired look that feels vibrant and full of life.
For added dimension, you can incorporate 3D floral elements or use rhinestones and crystals to highlight the center of each flower, giving the nails a truly luxurious appearance.
Leaf Accents And Vines: Bringing Nature To Your Nails
To complement the floral designs, leaf accents and vines can be added to bring a sense of movement and natural flow to your nail art.
Small, detailed leaves or trailing vines can be painted in shades of green to add contrast against the bold flower designs.
The key is to keep the leaves and vines delicate, allowing them to enhance the flowers without overwhelming the design.
You can also incorporate metallic accents like gold or silver for the leaf veins, adding a touch of glamour and refinement to your May nail look.
With the right balance, these nature-inspired elements will elevate your floral frenzy nails.
June: Summer Sunset Nail Art Inspiration
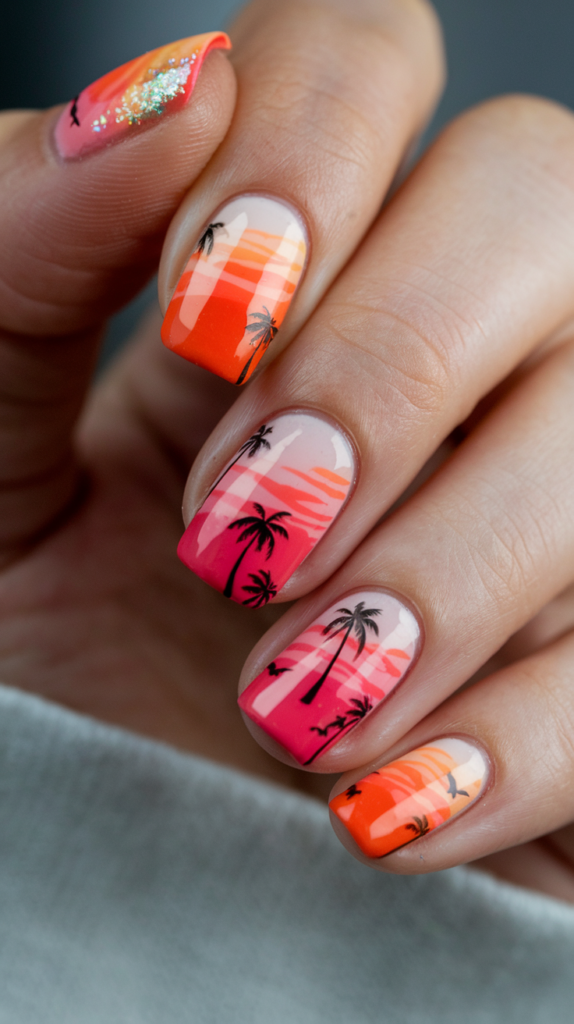
Why Sunset Gradients Are Trending For Summer Nails
As the warm summer days roll in, sunset gradients become a trending look for June nail designs.
The beauty of a summer sunset, with its rich, warm hues of orange, coral, and pink, serves as perfect inspiration for nail art.
These colors blend seamlessly to create a stunning ombre effect that mirrors the natural transitions seen in the sky as the sun sets.
Sunset gradients are not only visually striking but also evoke a sense of relaxation and warmth, making them ideal for summer.
The soft blend of colors provides a versatile look that can be worn to both casual and formal summer events.
Tropical Vibes: Adding Palm Trees And Silhouettes To June Nails
To complement the sunset gradient, add tropical-themed designs such as palm trees, island silhouettes, and birds in flight.
These small yet detailed designs can be placed on accent nails, creating a picturesque scene that evokes the feeling of a tropical beach getaway.
Palm trees can be hand-painted in black for a striking contrast against the warm gradient background.
You can also include small island silhouettes or a pair of flying birds near the horizon to enhance the tropical vibe.
These elements, when combined with the gradient, will give your nails a perfect, vacation-ready look.
Shimmering Glitter For A Sunset-Inspired Look
To complete the summer sunset look, add a touch of shimmering glitter to mimic the reflection of the setting sun on water.
You can apply fine glitter to the tips of your nails or over specific areas of the gradient to create a soft, glowing effect.
For a more subtle look, opt for a glittery topcoat with a sheer finish, which will add just the right amount of sparkle without overwhelming the design.
This final touch of shimmer will give your nails a radiant, sun-kissed appearance, making them the perfect accessory for warm summer evenings.
July: Patriotic Sparkle (Independence Day) Nail Art
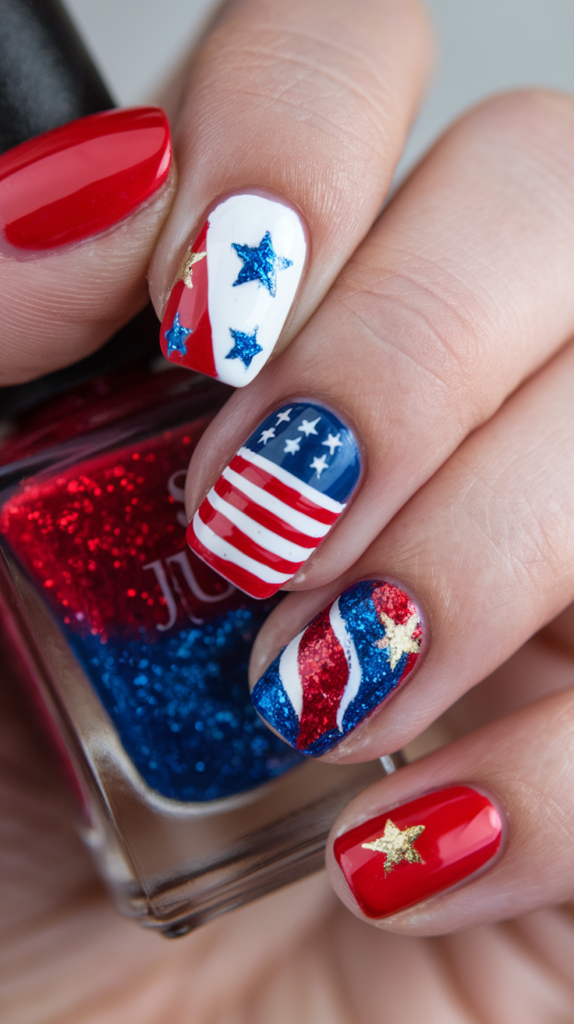
Red, White, And Blue Nail Designs For Independence Day
July 4th is all about celebrating patriotism, and what better way to show off your national pride than with a set of red, white, and blue nails? These three bold colors come together to create a striking and festive look.
You can opt for a solid color on each nail or mix and match red, white, and blue across different nails for a cohesive theme.
Consider adding stripes, stars, and even fireworks to enhance the patriotic design.
Red, white, and blue nails are a fun and easy way to celebrate Independence Day in style.
Star And Stripe Motifs: How To Incorporate Them Into Your Nails
To take your patriotic nail art to the next level, incorporate star and stripe motifs into the design.
Tiny, crisp white stars can be painted on a blue base to mimic the American flag, while red and white stripes can be added to alternating nails for a coordinated look.
For a more creative twist, try using negative space designs, where the natural nail peeks through as part of the star or stripe pattern.
The key is to keep the lines clean and the stars sharp, ensuring that the design looks polished and professional.
Best Glitter And Chrome Finishes For A Patriotic Look
Glitter and chrome finishes are great additions to any patriotic nail design, adding sparkle and shine that captures the festive spirit of July 4th.
You can apply glitter accents to the tips of your nails or use it to highlight specific areas of your design, such as the stars or stripes.
Chrome finishes in silver or metallic blue can create a futuristic, high-shine effect that elevates the entire look.
These finishes not only make your nails stand out but also give them a luxurious and celebratory feel, perfect for any Independence Day festivities.
August: Tropical Vibes Nail Designs
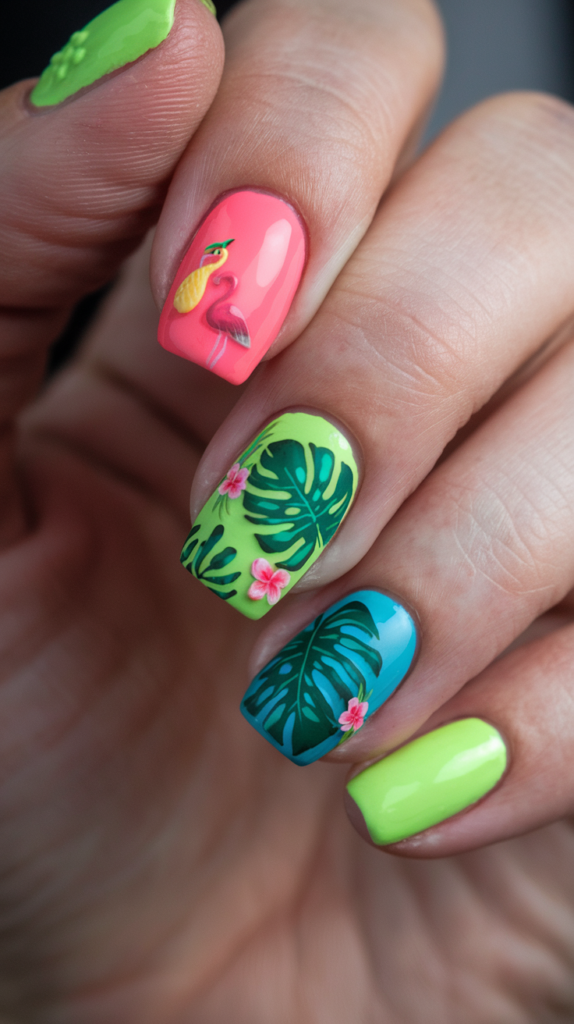
Neon Colors And Tropical Leaf Patterns For August Nails
As summer peaks in August, it’s time to embrace bold, neon colors and tropical leaf patterns in your nail art.
Neon shades like lime green, coral, and turquoise evoke the vibrant energy of summer and are perfect for creating statement nails.
Tropical leaf patterns, such as monstera or palm leaves, can be hand-painted onto a few accent nails or applied using nail decals for a more detailed look.
The bright neon colors provide the perfect backdrop for these leafy designs, making them pop.
Together, neon hues and tropical patterns create a fun, vacation-ready look that’s ideal for August.
Adding Hibiscus And Flamingo Accents To Tropical Nail Art
To enhance the tropical vibe of your August nails, consider adding hibiscus flowers and flamingo accents.
Hibiscus flowers, with their large, colorful petals, are a classic symbol of tropical beauty and can be hand-painted in bright colors like red, orange, or pink.
Flamingos, with their signature pink feathers, add a playful touch to the design.
These elements can be placed on accent nails, surrounded by tropical leaves or set against a neon gradient background for a cohesive look.
The combination of hibiscus flowers, flamingos, and tropical leaves will transport your nails to an island paradise.
How To Use Gradients To Mimic A Tropical Sunset On Nails
Gradients are a great way to mimic the beauty of a tropical sunset on your nails.
Start by choosing a palette of warm, sunset-inspired colors like coral, pink, and orange.
Using a sponge, blend the colors together to create a seamless gradient that transitions from one shade to the next.
For added depth, you can incorporate a touch of purple or deep blue near the tips to represent the evening sky.
To complete the tropical sunset look, add palm trees or hibiscus flowers to a few accent nails, or apply a glitter topcoat to mimic the shimmer of the sun reflecting on the ocean.
September: Back-To-School Chic Nail Art
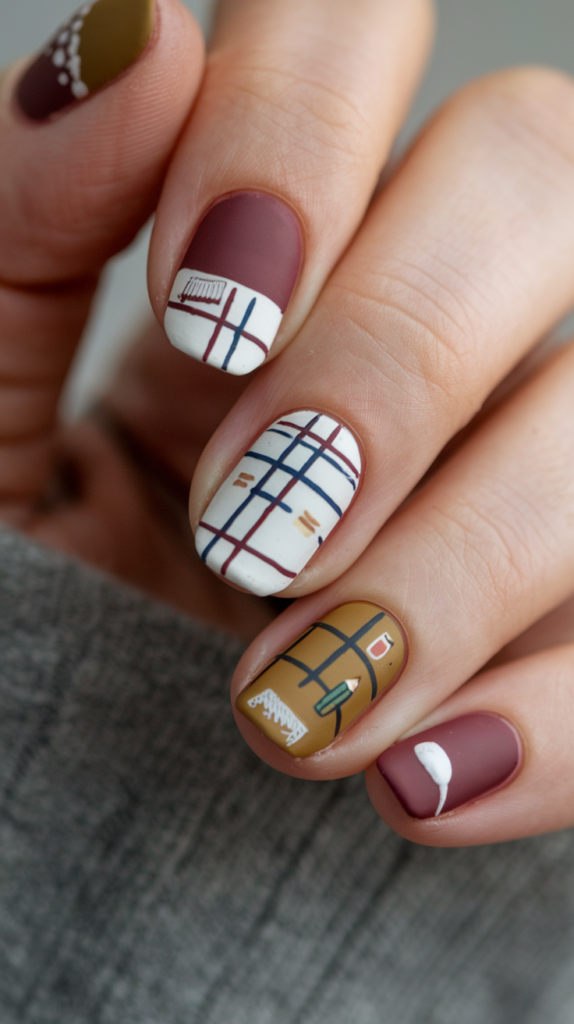
Muted Tones For A Sophisticated September Nail Look
As summer fades and the school year begins, September is the perfect time to transition into more sophisticated, muted tones for your nail designs.
Colors like burgundy, navy, mustard, and olive are ideal for creating a polished, academic-inspired look.
These shades are rich and warm, yet understated enough for everyday wear.
You can keep the design simple with solid color nails or incorporate small accents like stripes or dots for added detail.
Muted tones provide a chic, refined look that’s perfect for back-to-school season.
Geometric Shapes And Plaid Patterns: Academic-Inspired Nail Art
To give your September nails a scholarly touch, consider incorporating geometric shapes and plaid patterns into your design.
Geometric shapes, such as triangles, squares, and lines, can be arranged in clean, modern patterns on a few accent nails.
Plaid patterns, often associated with school uniforms, can be painted in muted tones like burgundy and navy for a classic, academic look.
These patterns add structure and sophistication to your nails, making them feel more tailored and polished for the back-to-school season.
Minimalist Designs For A Fresh Back-To-School Manicure
For those who prefer a more minimalistic approach to nail art, September is the perfect time to embrace simple, clean designs.
A minimalist manicure can be achieved by using muted tones and adding small, subtle details like a single line or dot on each nail.
You can also experiment with negative space designs, where part of the natural nail is left exposed to create a clean, modern look.
Minimalist nails are perfect for back-to-school, as they offer a polished and professional appearance without being overly flashy.
October: Halloween Spook Nail Art Designs
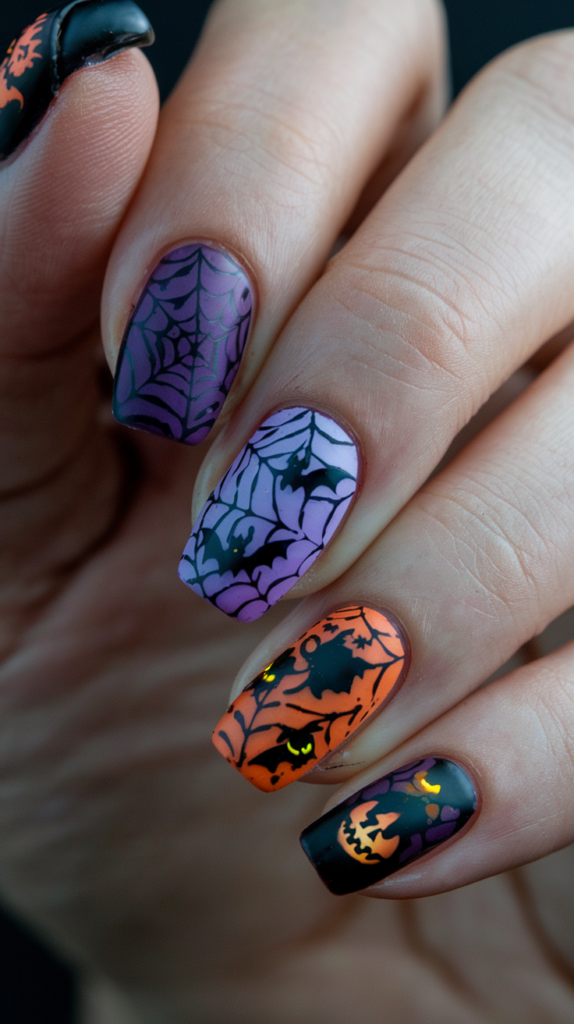
Dark, Moody Colors For A Spooky Halloween Nail Look
October is all about embracing dark, moody colors for a spooky and mysterious Halloween nail look.
Shades like black, deep purple, and dark orange set the tone for a hauntingly beautiful manicure.
These colors provide the perfect backdrop for intricate Halloween designs, such as spider webs, bats, and pumpkins.
Whether you opt for solid dark nails or add spooky accents, the key is to keep the colors bold and rich for maximum impact.
Spider Webs, Bats, And Pumpkins: Must-Try Halloween Nail Art
Halloween wouldn’t be complete without iconic symbols like spider webs, bats, and pumpkins.
These motifs can be hand-painted onto your nails for a creepy yet stylish look.
Spider webs can be delicately drawn across a few nails, while tiny bats can be placed on accent nails for a spooky effect.
Pumpkins, with their signature orange hue, can be painted in a more detailed or abstract style, depending on your preference.
These designs capture the essence of Halloween and are sure to make your nails the talk of the party.
Using Glow-In-The-Dark Elements For A Fun Halloween Twist
For a fun and playful twist on Halloween nail art, consider using glow-in-the-dark elements in your design.
Glow-in-the-dark polish can be applied over specific designs, such as spider webs or ghost shapes, to make them come alive in the dark.
This effect is perfect for Halloween parties or trick-or-treating and adds an extra layer of excitement to your nail art.
The glow-in-the-dark elements will give your nails a spooky glow, making them stand out even in the darkest of settings.
November: Autumn Harvest Nail Ideas
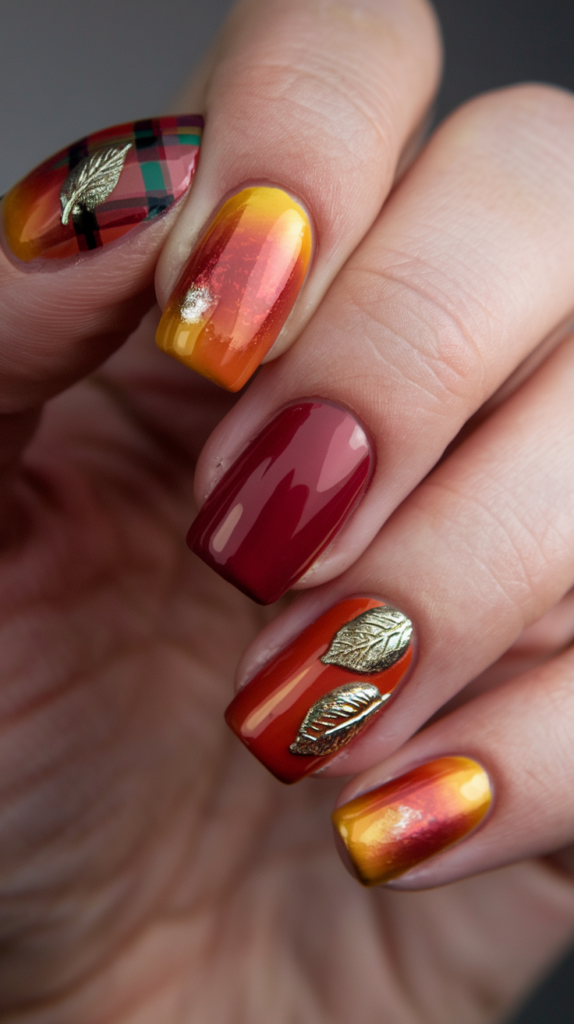
Warm Autumnal Colors For November Nail Designs
As the weather cools down and the leaves begin to fall, November is the perfect time to embrace warm autumnal colors in your nail designs.
Shades like burnt orange, deep red, and golden yellow capture the essence of fall and create a cozy, seasonal look.
These colors are perfect for transitioning into the colder months and can be worn in solid shades or combined in intricate designs.
Warm autumnal colors evoke the feeling of sitting by the fire with a cup of cider, making them the perfect choice for November nails.
Incorporating Leaf Prints And Plaid Patterns Into Fall Nail Art
To celebrate the beauty of fall, consider incorporating leaf prints and plaid patterns into your November nail designs.
Leaf prints can be painted in warm shades like orange and yellow, with each nail featuring a different leaf shape.
Plaid patterns, often associated with fall fashion, can be added to accent nails for a cozy, rustic feel.
These patterns add depth and texture to your nails, making them feel warm and inviting.
Combining leaves and plaid creates a classic autumn look that’s both stylish and seasonal.
Metallic And Glittery Accents For A Seasonal Autumn Look
To add a touch of glamour to your autumn nail designs, consider incorporating metallic or glittery accents.
Gold or bronze metallic polish can be used to highlight certain areas of your design, such as the veins of a leaf or the lines in a plaid pattern.
Glitter can be applied to the tips of your nails or used as an overlay to create a shimmering effect.
These accents catch the light and give your nails a festive, seasonal look that’s perfect for fall gatherings and celebrations.
December: Festive Christmas Nail Art Designs
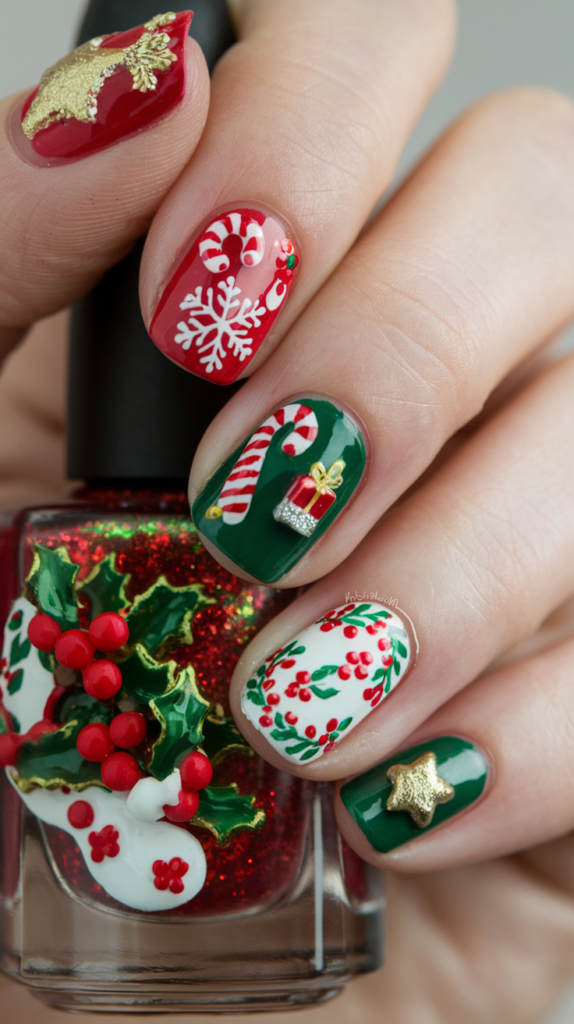
Classic Christmas Colors: Red, Green, And Gold For December Nails
December is all about embracing the festive spirit, and classic Christmas colors like red, green, and gold are the go-to choice for holiday nail designs.
These colors are bold, rich, and instantly recognizable as symbols of the holiday season.
Red represents warmth and love, green evokes images of Christmas trees and holly, and gold adds a touch of luxury and glamour.
Together, these colors create a festive palette that’s perfect for celebrating the holiday season.
You can apply them in solid shades or mix and match them across different nails for a cohesive Christmas look.
Holiday Motifs Like Candy Canes, Snowflakes, And Gift Boxes
To take your December nails to the next level, consider incorporating holiday motifs like candy canes, snowflakes, and tiny gift boxes into your design.
Candy canes can be painted as red and white stripes, snowflakes can be intricately drawn in white or silver, and gift boxes can be adorned with tiny bows and ribbons.
These designs are playful and festive, capturing the joy and excitement of the holiday season.
You can place these motifs on accent nails or scatter them across all nails for a more detailed, holiday-themed manicure.
Adding Sparkle With Metallic And Glitter Accents For A Festive Vibe
No Christmas nail design is complete without a little sparkle.
Metallic and glitter accents can be used to enhance your holiday motifs and add a touch of glamour to your nails.
Gold and silver metallic polish can be used to outline gift boxes or snowflakes, while glitter can be applied to the tips of your nails for a frosty, shimmering effect.
A glitter topcoat can also be applied over the entire design to create a cohesive, sparkling finish.
These accents will catch the light and make your nails shine, giving them a festive vibe that’s perfect for holiday parties and celebrations.
Conclusion
Nail art offers endless opportunities to celebrate the changing seasons, holidays, and personal style.
Each month provides a unique canvas, allowing you to experiment with different colors, patterns, and motifs that capture the spirit of the time.
Whether you’re into bold, eye-catching designs or prefer something more subtle and refined, there’s a nail art look for every occasion.
By following these month-by-month inspirations, you can keep your nails looking fresh, trendy, and seasonal all year long.
So, grab your favorite polish and let your creativity shine through with these stunning designs that perfectly complement each month’s vibe.


