
The holiday season sparkles with joy, and nothing captures that magic like a set of stunning Christmas nails crafted with festive flair.
From dazzling party looks to cozy fireside vibes, these 35 nail art ideas blend classic holiday motifs with creative twists to elevate your seasonal style.
Picture vibrant reds and greens, delicate snowflakes, or whimsical Santas—there’s a design for every mood, whether you’re hosting a gala or unwrapping gifts.
This guide offers inspiration for subtle elegance or bold cheer, turning your nails into merry masterpieces that shine all December long.
1. Classic Red and Green Christmas Nail Designs
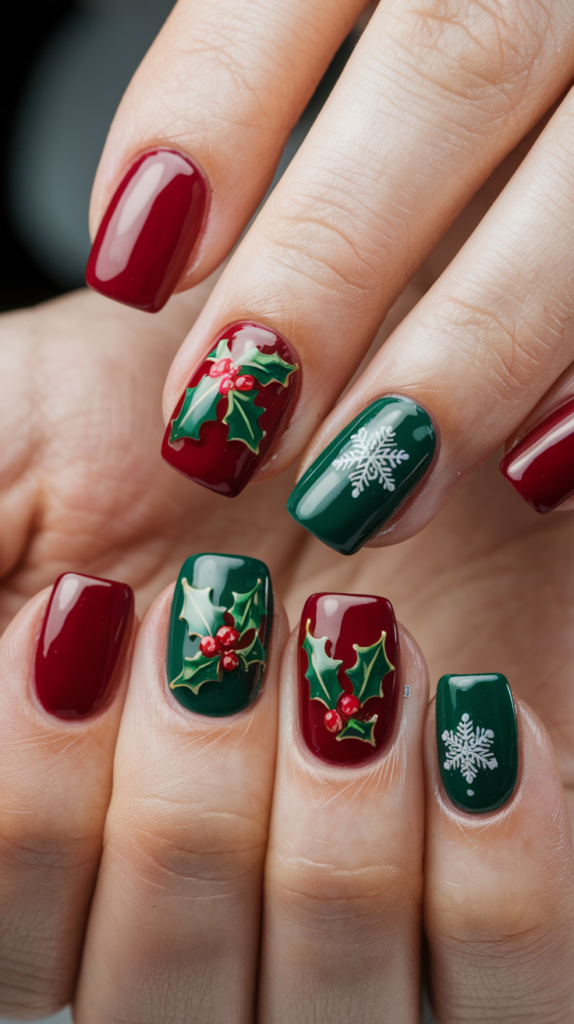
Embrace the timeless charm of Classic Red and Green Christmas Nail Designs, a quintessential holiday duo that radiates warmth and tradition. Perfect for tree-trimming parties or sipping cocoa by the fire, this versatile look blends bold colors with festive accents for instant seasonal magic.
Creating the Classic Red and Green Nail Look
Step 1: Prep and Base
Start with a nourishing base coat to protect your nails, then apply a rich red polish on half your nails and a deep green on the others. Use two coats for vibrant, even coverage, letting each dry fully.
Step 2: Alternate Colors
For a striking contrast, alternate red and green across your fingers, or paint a single accent nail in the opposite shade. Ensure clean edges with a small brush dipped in acetone for a polished finish.
Step 3: Add Holly Leaves
With a fine brush, paint dark green holly leaves on a red nail, adding tiny red dots for berries using a dotting tool. Layer two leaves per design for a lush, natural look.
Step 4: Sketch Snowflakes
On a green nail, use white polish to draw delicate snowflakes with a nail art pen, varying sizes for a whimsical snowfall effect. Add a silver glitter dot at the center for subtle sparkle.
Step 5: Seal with Top Coat
Finish with a glossy top coat to enhance the colors and protect your art, or opt for matte on non-accent nails for a cozy texture contrast. Apply a second layer after 24 hours for lasting cheer.
Why It Works
Red and green scream Christmas with their nod to holly, trees, and gift wrap, offering a bold yet balanced palette that’s instantly recognizable. The holly and snowflake accents elevate this classic combo, adding festive depth that’s both nostalgic and chic.
2. Snowy French Tip Christmas Nail Ideas
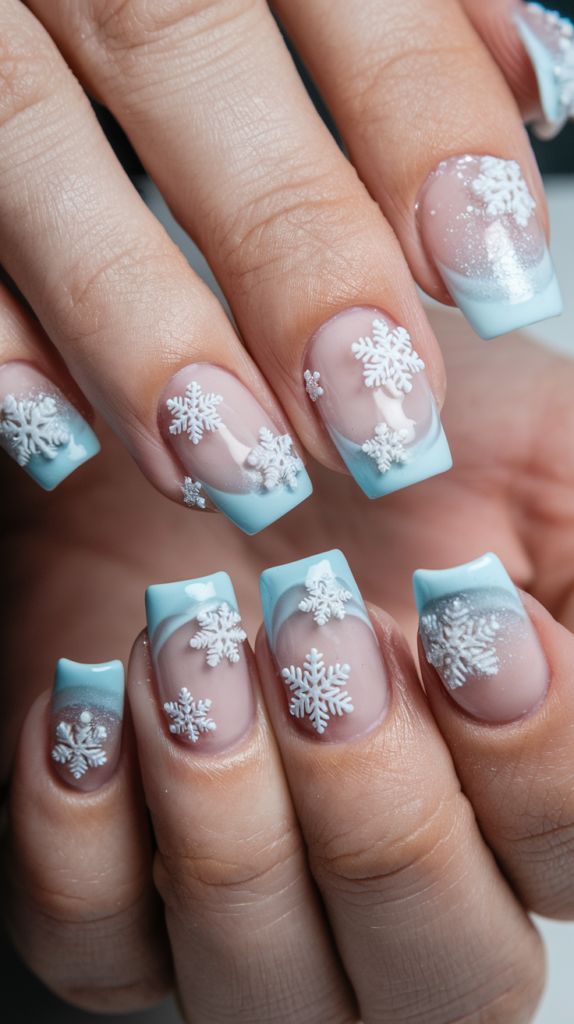
Reimagine a timeless manicure with Snowy French Tip Christmas Nail Ideas, blending elegance with winter’s frosty allure. Ideal for holiday brunches or snowy evenings, this design swaps classic white tips for icy blues and snowflakes, delivering a chic seasonal twist.
Creating the Snowy French Tip Nail Look
Step 1: Base Prep
Apply a hydrating base coat, then coat your nails with a sheer pink or clear polish for a natural glow. Let it dry completely to set the stage for your frosty tips.
Step 2: Paint Frosty Tips
Use a striping brush to apply a soft blue polish across each nail tip, curving slightly for a French tip shape. Double up for opacity, cleaning edges with a Q-tip dipped in remover.
Step 3: Add Snowflake Details
With a fine brush, paint white snowflakes on the blue tips, using a stamping tool for symmetry if preferred. Vary flake sizes—large on thumbs, small on pinkies—for a balanced flurry.
Step 4: Enhance with Shimmer
Brush a sheer silver glitter polish over the tips to mimic sparkling snow, focusing on the snowflake areas for extra shine. Keep it light to maintain elegance.
Step 5: Seal with Top Coat
Finish with a glossy top coat to lock in the design and boost the icy sheen, ensuring durability through winter festivities. Add a second layer for a crystal-clear finish.
Why It Works
The frosty blue tips turn a classic French manicure into a winter wonder, evoking crisp air and snowy vistas with understated sophistication. Snowflakes and shimmer add a delicate, magical touch, making this design a refined yet festive holiday staple.
3. Candy Cane Stripes: Fun Christmas Nail Inspiration

Unwrap holiday joy with Candy Cane Stripes, a playful design that channels the sweet, swirling charm of this iconic treat. Perfect for festive bake-offs or gift exchanges, these bold red-and-white nails bring a sugary pop to your Christmas celebrations.
Creating the Candy Cane Stripes Nail Look
Step 1: Base Prep
Start with a strengthening base coat, then apply a creamy white polish across all nails for a clean candy canvas. Use two coats, drying each to avoid streaks.
Step 2: Stripe It Up
Lay down diagonal red stripes with a thin brush or striping tape, spacing them evenly to mimic candy cane twists. Adjust angles—steep on thumbs, shallow on pinkies—for dynamic flair.
Step 3: Refine Edges
Clean up wobbly lines with a small brush and acetone, ensuring crisp, sharp stripes that pop against the white. Let the red dry fully before moving on.
Step 4: Add Glitter Twist
Brush a fine silver glitter polish over the red stripes or tips, blending with a sponge for a modern, sparkly upgrade. Keep it subtle to let the stripes shine through.
Step 5: Seal with Top Coat
Finish with a high-gloss top coat to give your candy canes a glossy, edible sheen, protecting the design through holiday fun. Double up for extra durability.
Why It Works
The red-and-white stripes instantly evoke peppermint nostalgia, offering a bold, cheerful vibe that’s unmistakably Christmas. Glitter adds a contemporary edge, making this design a fun, festive standout that’s as sweet as the season itself.
4. Glittering Gold Snowflake Nails for a Glamorous Christmas
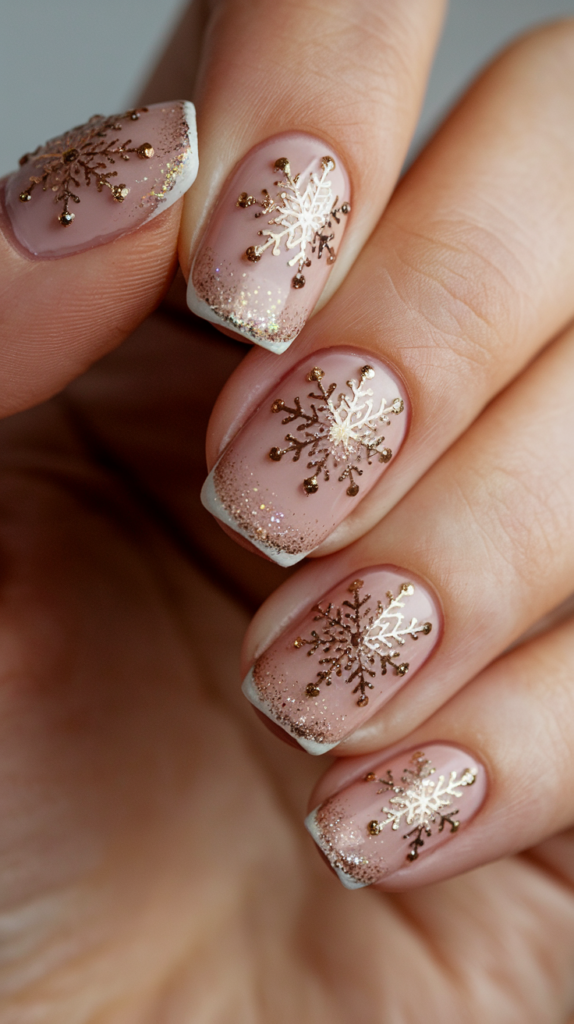
Shine bright with Glittering Gold Snowflake Nails, a luxurious design that drapes your fingertips in holiday opulence. Ideal for glamorous soirées or gifting moments, this look pairs subtle bases with dazzling gold snowflakes for a festive, high-end glow.
Creating the Glittering Gold Snowflake Nail Look
Step 1: Base Prep
Apply a protective base coat, then layer a nude or pale pink polish for a soft, elegant foundation. Use two coats, drying each for a smooth, even tone.
Step 2: Sketch Snowflakes
With a fine brush, paint gold glitter polish into intricate snowflake shapes on each nail, varying designs for a handmade feel. Start with a central dot, branching out into delicate arms.
Step 3: Build Glitter Layers
Add a second layer of gold glitter over the snowflakes for extra sparkle, focusing on tips for a gradient effect. Use a fan brush to dust loose glitter for a luxe touch.
Step 4: Place Rhinestones
Glue tiny clear rhinestones at each snowflake’s core with nail adhesive, pressing firmly for a jeweled, 3D sparkle. Opt for gold stones on accent nails for variety.
Step 5: Seal with Top Coat
Finish with a glossy top coat to secure the glitter and rhinestones, enhancing the golden sheen for lasting brilliance. Reapply after a day to keep the luxe intact.
Why It Works
The nude base keeps this design chic and wearable, while gold glitter snowflakes bring a lavish holiday sparkle that’s both festive and sophisticated. Rhinestones elevate it into a showpiece, perfect for those who love a touch of extravagance with their Christmas cheer.
5. Santa Hat Nails: Playful Christmas Nail Art
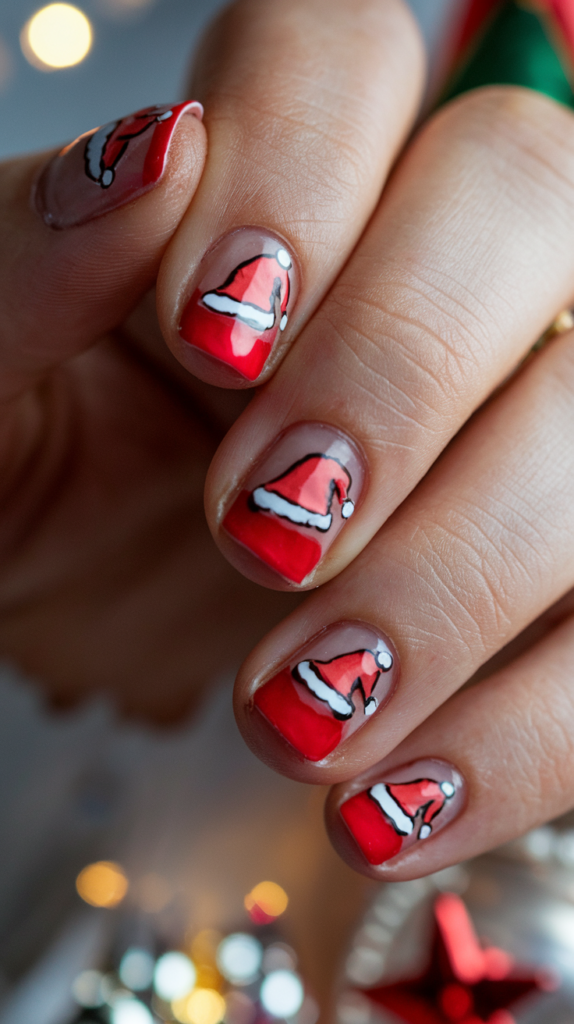
Jingle all the way with Santa Hat Nails, a whimsical design that crowns your fingertips with the jolly spirit of St. Nick. Great for kids’ parties or cozy gift-opening mornings, this playful red-and-white look delivers instant holiday fun.
Creating the Santa Hat Nail Look
Step 1: Base Prep
Start with a strengthening base coat, then paint a bold red polish across all nails to mimic Santa’s suit. Apply two coats for a rich, festive hue, drying each fully.
Step 2: Shape the Trim
Use a striping brush to paint a thick white band across each nail tip, curving it slightly for a fluffy hat trim effect. Smooth edges with a clean-up brush for a neat finish.
Step 3: Add Pom-Poms
With a dotting tool, place a small white dot at the base of each nail to form the hat’s pom-pom, layering twice for a plush look. Position it off-center for playful asymmetry.
Step 4: Accent with Glitter
Dab a touch of silver glitter onto the white trim for a snowy sparkle, using a sponge to blend lightly. Keep it minimal to preserve the hat’s charm.
Step 5: Seal with Top Coat
Finish with a glossy top coat to lock in the design and give it a merry shine, ensuring it lasts through holiday hugs. Add a second layer for extra festive resilience.
Why It Works
The bold red and white combo instantly evokes Santa’s iconic hat, infusing your nails with a cheerful, recognizable holiday vibe. Its simplicity paired with glitter keeps it fun yet stylish, perfect for spreading joy without overwhelming the look.
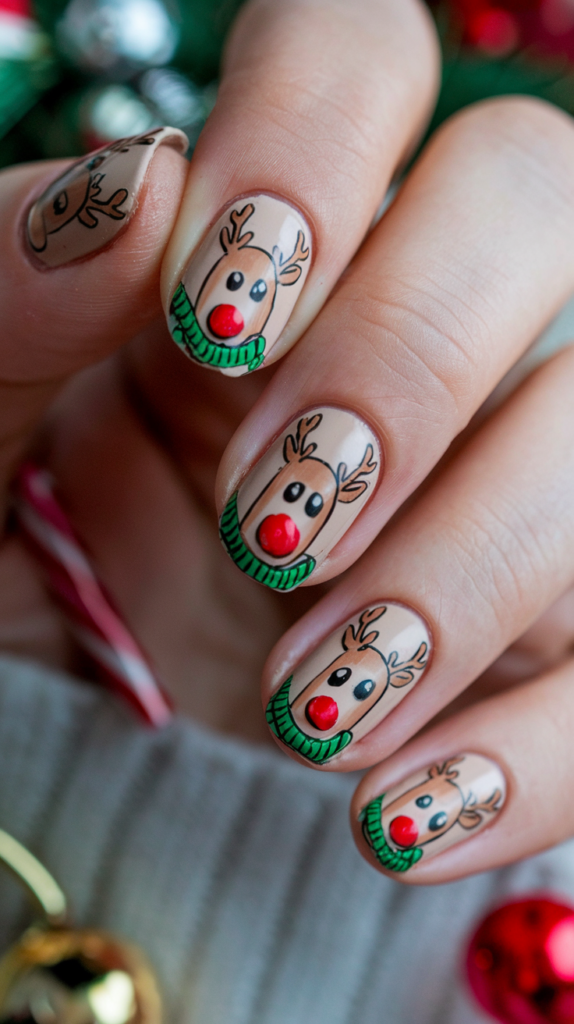
6. Reindeer Face Nail Designs for a Cute Holiday Look

Dash into the season with Reindeer Face Nail Designs, a heartwarming tribute to Rudolph and his crew that’s adorable yet festive. Ideal for caroling nights or cozy storytime, this cute design blends neutral tones with playful details for a charming holiday touch.
Creating the Reindeer Face Nail Look
Step 1: Base Prep
Apply a smoothing base coat, then layer a beige or light brown polish to echo reindeer fur tones. Use two coats for a warm, even finish, drying each well.
Step 2: Shape the Face
With a fine brush, paint a white oval on each nail for the reindeer’s face, keeping it centered and slightly elongated. Let it dry before adding details.
Step 3: Add Eyes and Nose
Dot two small black circles for eyes within the oval, then place a bright red dot below for Rudolph’s nose using a dotting tool. Layer the red twice for a bold, raised effect.
Step 4: Draw Antlers
Use brown polish to sketch thin, branching antlers above the eyes, curving them outward for a playful silhouette. Add a second layer for depth and definition.
Step 5: Seal with Top Coat
Finish with a glossy top coat to protect the cute faces and enhance their charm, ensuring they stay merry all season. Opt for a matte finish on non-accent nails for contrast if desired.
Why It Works
The neutral base keeps this design soft and wearable, while the reindeer faces—especially Rudolph’s red nose—add a burst of holiday whimsy that’s universally loved. It’s a simple yet detailed look that balances cuteness with festive spirit, perfect for all ages.
7. Christmas Tree Accents: A Festive Nail Design
Deck your nails with Christmas Tree Accents, a festive design that brings the evergreen magic of the season to your fingertips. Perfect for holiday markets or decorating days, this look shines with glittery trees against a rich green backdrop.
Creating the Christmas Tree Accent Nail Look
Step 1: Base Prep
Start with a protective base coat, then apply a deep forest green polish across all nails for a woodland vibe. Use two coats, drying each for a solid, lush finish.
Step 2: Shape the Tree
On one or two accent nails, paint a green triangle with a fine brush, layering it slightly darker at the base for depth. Taper it upward to mimic a tree’s natural shape.
Step 3: Decorate with Ornaments
Dot red, gold, and silver polish along the triangle using a dotting tool, spacing them like ornaments on a tree. Add a gold star at the top with a tiny brush stroke.
Step 4: Add Glitter
Brush green glitter polish over the tree for a sparkling canopy, focusing on the edges to enhance the festive glow. Sprinkle loose glitter for extra dazzle if desired.
Step 5: Seal with Top Coat
Finish with a glossy top coat to lock in the sparkle and protect your mini trees, keeping them merry through the season. Apply a second layer for a vibrant, lasting shine.
Why It Works
The deep green evokes a classic Christmas tree, offering a bold yet elegant base that’s instantly festive. Glittery accents and ornaments make it pop, blending tradition with a playful sparkle that’s perfect for holiday celebrations.
8. Golden Ornament Nail Art: Elegant Holiday Nail Ideas
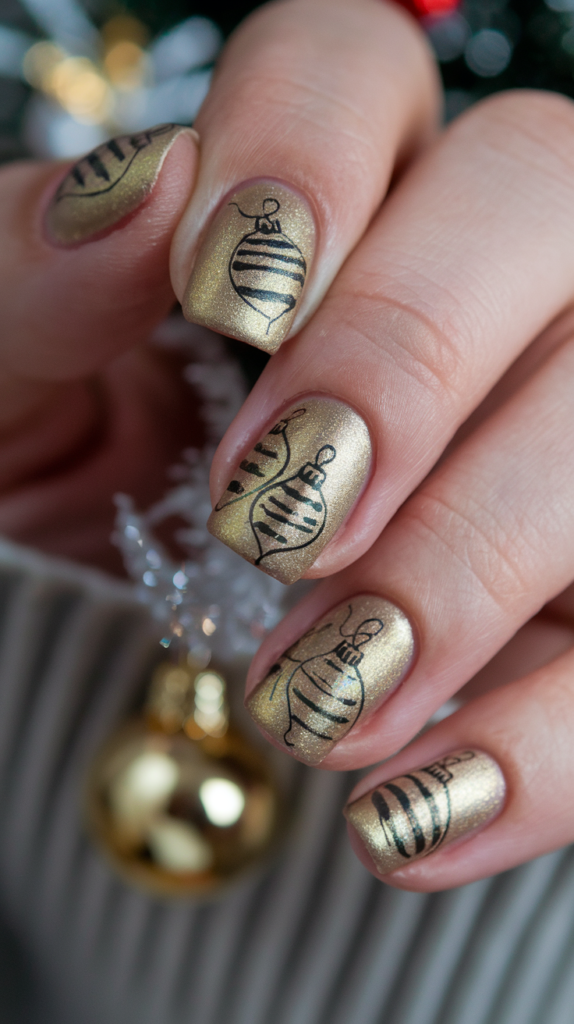
Adorn your nails with Golden Ornament Nail Art, an elegant design that mirrors the opulent glow of holiday baubles. Ideal for upscale dinners or festive galas, this metallic masterpiece combines rich gold with intricate details for a luxurious Christmas vibe.
Creating the Golden Ornament Nail Look
Step 1: Base Prep
Apply a durable base coat, then layer a metallic gold polish for a radiant, ornament-like sheen across all nails. Use two coats, drying each for a mirror-smooth finish.
Step 2: Draw Ornament Patterns
With a fine brush, paint swirling white lines and red dots on each nail, mimicking classic ornament designs. Vary patterns—spirals on some, dots on others—for a handmade charm.
Step 3: Add Glitter Details
Brush gold glitter polish over select swirls or dots, blending with a sponge for a textured, festive sparkle. Focus on tips or centers to keep it balanced.
Step 4: Place Rhinestones
Glue tiny clear rhinestones atop key design points with nail adhesive, pressing firmly for a 3D, jeweled effect. Space them evenly for elegant symmetry.
Step 5: Seal with Top Coat
Finish with a glossy top coat to secure the embellishments and amplify the gold’s luster, ensuring a polished look. Add a second layer for a durable, gala-ready shine.
Why It Works
The metallic gold base radiates luxury, evoking holiday ornaments with a sophisticated edge that’s timelessly festive. Intricate patterns and rhinestones add a lavish depth, making this design a glamorous standout for any Christmas occasion.
9. Festive Plaid Christmas Nail Designs
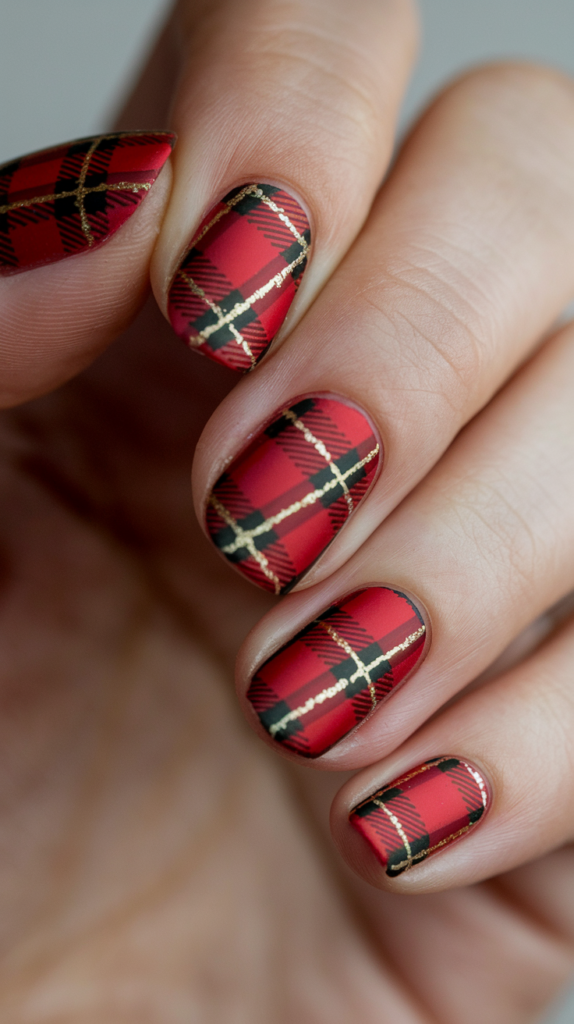
Wrap your nails in Festive Plaid Christmas Designs, a cozy pattern that channels the snug warmth of holiday flannel. Perfect for chilly evenings or rustic gatherings, this red, green, and gold look blends comfort with festive sophistication.
Creating the Festive Plaid Nail Look
Step 1: Base Prep
Start with a smoothing base coat, then apply a red polish across all nails for a warm, festive foundation. Use two coats, drying each for a rich, even tone.
Step 2: Lay Horizontal Lines
With striping tape, place green polish in thin horizontal lines across each nail, spacing them unevenly for a plaid effect. Remove tape carefully after drying to reveal crisp lines.
Step 3: Add Vertical Lines
Paint gold vertical lines intersecting the green with a fine brush, varying thickness for a handwoven look. Clean edges with acetone for precision.
Step 4: Enhance with Detail
Add a second thin green line parallel to some horizontals, mimicking plaid’s layered weave. Keep it subtle to maintain the cozy vibe.
Step 5: Seal with Top Coat
Finish with a glossy top coat to protect the pattern and boost the colors’ vibrancy, ensuring a polished finish. Opt for matte on alternate nails for a flannel-like texture.
Why It Works
The red and green plaid taps into holiday nostalgia, evoking fireside blankets with a timeless, cozy appeal. Gold lines add a festive shimmer, balancing warmth with elegance for a versatile Christmas classic.
10. Peppermint Swirl Nails for a Sweet Christmas Look
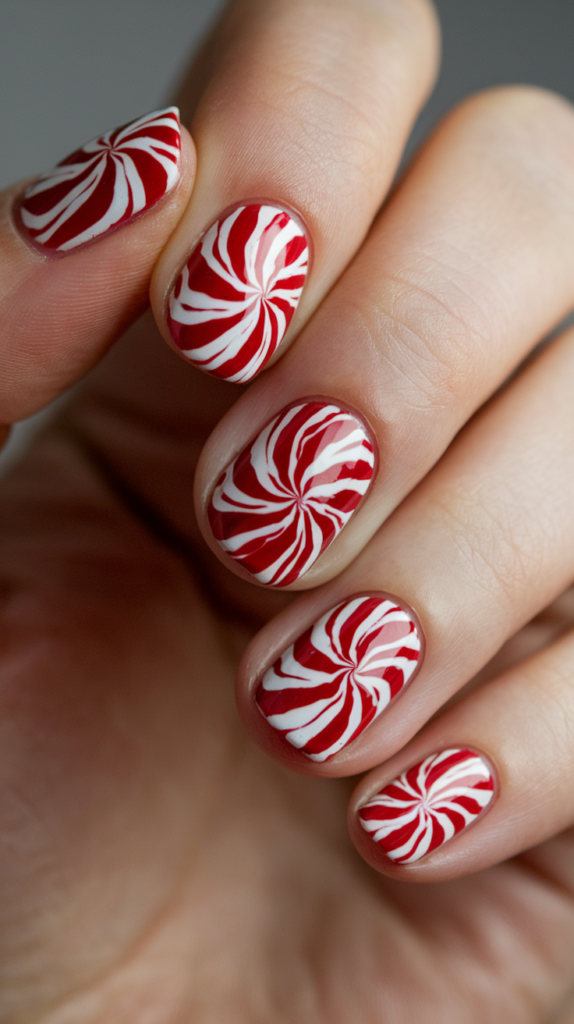
Sweeten your season with Peppermint Swirl Nails, a delightful design that twists red and white into a candy-inspired treat. Perfect for holiday baking or sipping peppermint mochas, this look blends playful swirls with festive shine.
Creating the Peppermint Swirl Nail Look
Step 1: Base Prep
Apply a protective base coat, then coat your nails with a bright white polish for a crisp candy base. Use two coats, drying each for a smooth, solid finish.
Step 2: Draw Swirls
With a fine brush, paint red swirls spiraling from the nail’s center outward, using a steady hand or stencil for smooth curves. Vary swirl sizes—bold on thumbs, delicate on pinkies—for dynamic flair.
Step 3: Refine Lines
Clean up swirl edges with a small brush and acetone, ensuring sharp, flowing lines that mimic peppermint twists. Let the red dry fully to avoid smudging.
Step 4: Add Glossy Shine
Brush a high-shine top coat over the swirls to give them a glossy, candy-like finish, enhancing the sweet illusion. Add a second layer for a wet, sugary look.
Step 5: Optional Glitter
Dust fine silver glitter over one nail for a frosty twist, tapping off excess to keep it subtle. Seal with another top coat to lock in the sparkle.
Why It Works
The red-and-white swirls capture the essence of peppermint candies, offering a sweet, festive vibe that’s both bold and charming. The glossy finish and optional glitter elevate it into a modern holiday treat, perfect for indulging in seasonal delight.
11. Frosted Icicle Christmas Nail Designs
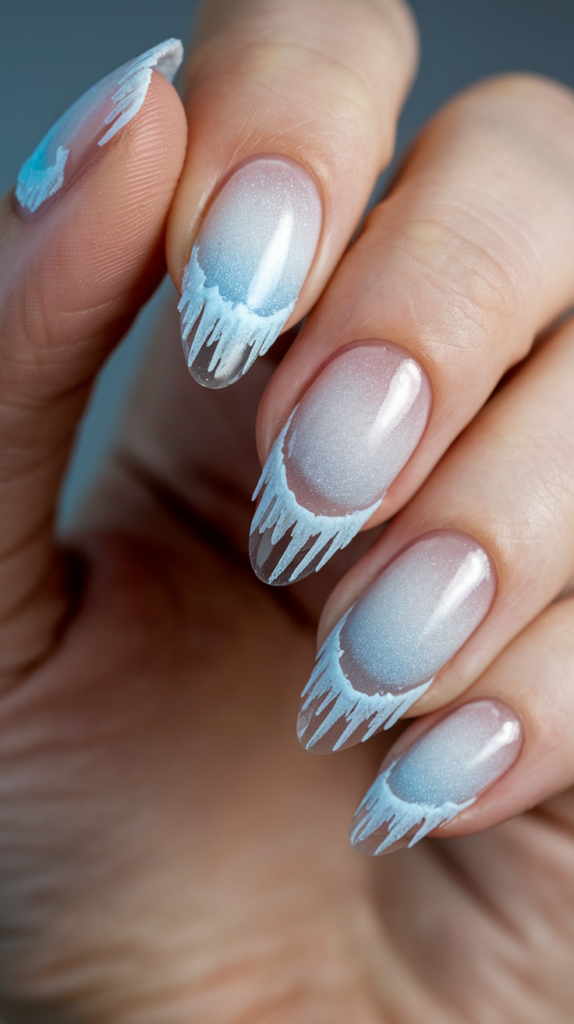
Chill out with Frosted Icicle Christmas Nail Designs, a cool, crystalline look that drips with winter’s icy beauty. Perfect for snowy outings or quiet nights in, this design blends soft blues and silvers into a frosty, elegant statement.
Creating the Frosted Icicle Nail Look
Step 1: Base Prep
Apply a hydrating base coat, then layer a light blue polish for an icy foundation across all nails. Use two coats, drying each for a smooth, wintry glow.
Step 2: Shape Icicles
With a fine brush, paint jagged white polish lines hanging from each nail tip, tapering them downward like real icicles. Vary lengths—longer on thumbs, shorter on pinkies—for a natural drip effect.
Step 3: Add Silver Accents
Brush silver glitter polish along the icicle edges, blending with a sponge for a frosted, reflective sheen. Layer lightly to keep the design crisp.
Step 4: Enhance Texture
Dot a sheer shimmer polish over the tips to mimic glistening ice, focusing on the icicle points for extra sparkle. Avoid overdoing it to maintain the chill elegance.
Step 5: Seal with Top Coat
Finish with a glossy top coat to lock in the frosty details and enhance the icy shine, ensuring it lasts through winter’s chill. Add a second layer for a glass-like finish.
Why It Works
The light blue and silver palette evokes icicles glistening in the cold, offering a serene yet striking holiday look that’s effortlessly elegant. The jagged details and shimmer create a realistic, frosty effect, perfect for capturing winter’s ethereal charm.
12. Christmas Lights Nail Art: Bright and Colorful Ideas
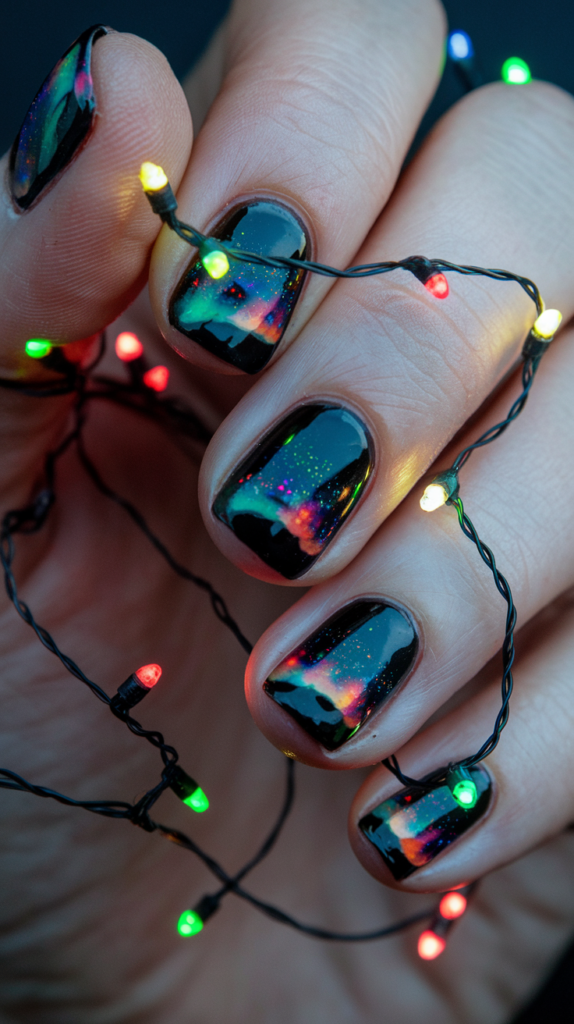
Light up the season with Christmas Lights Nail Art, a vibrant design that twinkles with the joy of holiday bulbs. Ideal for festive parades or tree-lighting nights, this playful mix of dark bases and colorful dots glows with celebration.
Creating the Christmas Lights Nail Look
Step 1: Base Prep
Apply a strengthening base coat, then paint a deep navy or black polish across all nails for a night-sky effect. Use two coats, drying each for a solid, dark canvas.
Step 2: Draw Wires
With a fine brush, paint thin black lines winding across each nail, twisting them randomly to mimic tangled light strands. Keep lines light and varied for a natural look.
Step 3: Add Light Bulbs
Dot red, green, blue, and yellow polish along the lines with a dotting tool, spacing them like glowing bulbs. Layer twice for bright, vivid pops of color.
Step 4: Enhance with Shine
Brush a metallic top coat over the dots for a lit-up effect, focusing on the centers to mimic bulb reflections. Add a tiny glitter fleck for extra twinkle.
Step 5: Seal with Top Coat
Finish with a glossy top coat to protect the design and boost the lights’ shine, ensuring a festive glow all season. Apply a second layer for lasting brilliance.
Why It Works
The dark base sets a dramatic stage, making the multi-colored lights pop like real holiday strands against a winter night. Its playful chaos and vibrant shine capture the season’s energy, offering a bold, joyful design.
13. Gingerbread Men Nail Designs for a Fun Holiday Look
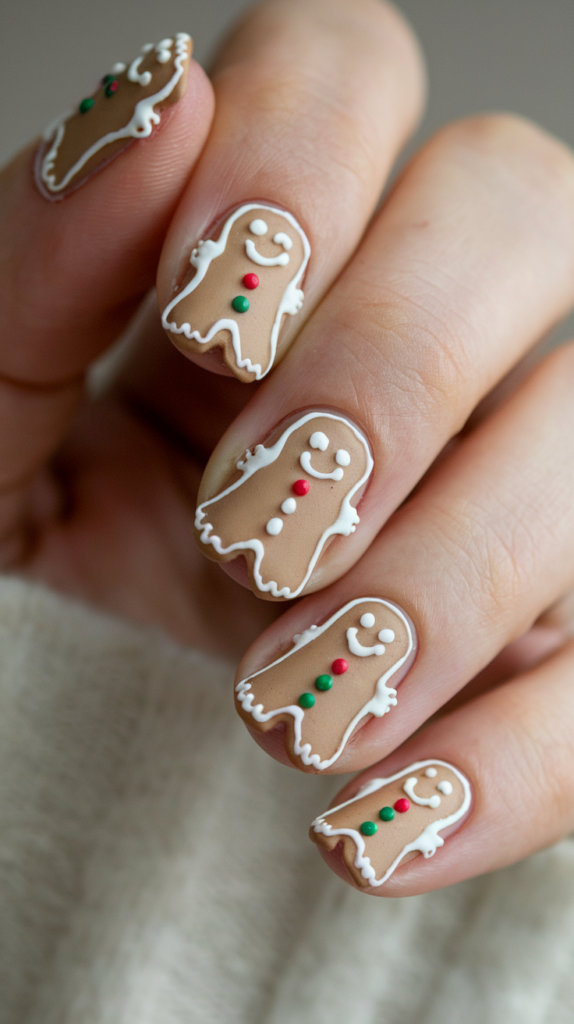
Bake up some fun with Gingerbread Men Nail Designs, a sweet nod to holiday treats that’s as cute as it is festive. Perfect for cookie swaps or family baking days, this design blends warm neutrals with playful details for a deliciously charming look.
Creating the Gingerbread Men Nail Look
Step 1: Base Prep
Apply a nourishing base coat, then layer a nude or light beige polish for a gingerbread dough tone. Use two coats, drying each for a smooth, even finish.
Step 2: Shape the Figures
With a fine brush, paint brown gingerbread men or houses on each nail, keeping shapes simple—ovals for men, rectangles for houses. Outline with a darker brown for definition.
Step 3: Add Icing Details
Use white polish to pipe icing lines along edges and dot red and green buttons or windows with a dotting tool. Layer twice for a raised, sugary effect.
Step 4: Enhance with Texture
Brush a matte top coat over the figures to mimic baked dough, leaving icing glossy for contrast. Add a tiny sprinkle of glitter for a candied sparkle.
Step 5: Seal with Top Coat
Finish with a glossy top coat to protect the design and boost its sweetness, ensuring it lasts through holiday feasts. Apply a second layer for extra durability.
Why It Works
The nude base evokes fresh-baked gingerbread, offering a warm, inviting canvas that’s subtle yet festive. The icing and colorful details add a playful, edible charm, making this design a delightful holiday standout.
14. Silver and White Snowfall Nail Art
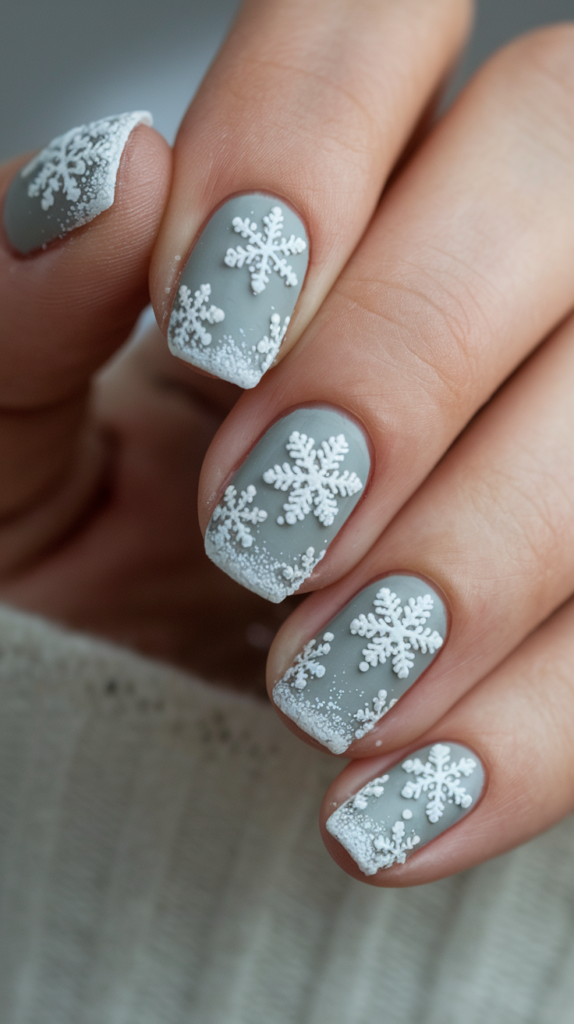
Drift into elegance with Silver and White Snowfall Nail Art, a serene design that captures the gentle beauty of falling snow. Ideal for winter weddings or quiet holiday nights, this look blends metallic sheen with delicate flakes for a sophisticated Christmas glow.
Creating the Silver and White Snowfall Nail Look
Step 1: Base Prep
Apply a protective base coat, then layer a soft silver polish for a shimmering, wintry foundation. Use two coats, drying each for a smooth, reflective finish.
Step 2: Paint Snowflakes
With a fine brush, paint white snowflakes across each nail, varying sizes—large on thumbs, small on pinkies—for a natural snowfall effect. Use a stamping tool for precision if needed.
Step 3: Add Falling Snow
Dot tiny white specks around the flakes with a dotting tool, scattering them randomly to mimic gentle snow. Layer lightly to keep the design airy and elegant.
Step 4: Enhance with Glitter
Brush a fine silver glitter polish over the tips or snowflakes for a frosty sparkle, blending with a sponge for a soft glow. Keep it subtle to maintain sophistication.
Step 5: Seal with Top Coat
Finish with a glossy top coat to protect the delicate design and enhance the silver shine, ensuring a polished look. Add a second layer for a pristine, snowy finish.
Why It Works
The silver base offers a cool, elegant sheen that pairs perfectly with white snowflakes, evoking a peaceful winter night with timeless grace. The falling snow and glitter add a magical, delicate touch, making this design a refined holiday gem.
15. Pinecone and Holly Nail Art for a Rustic Christmas
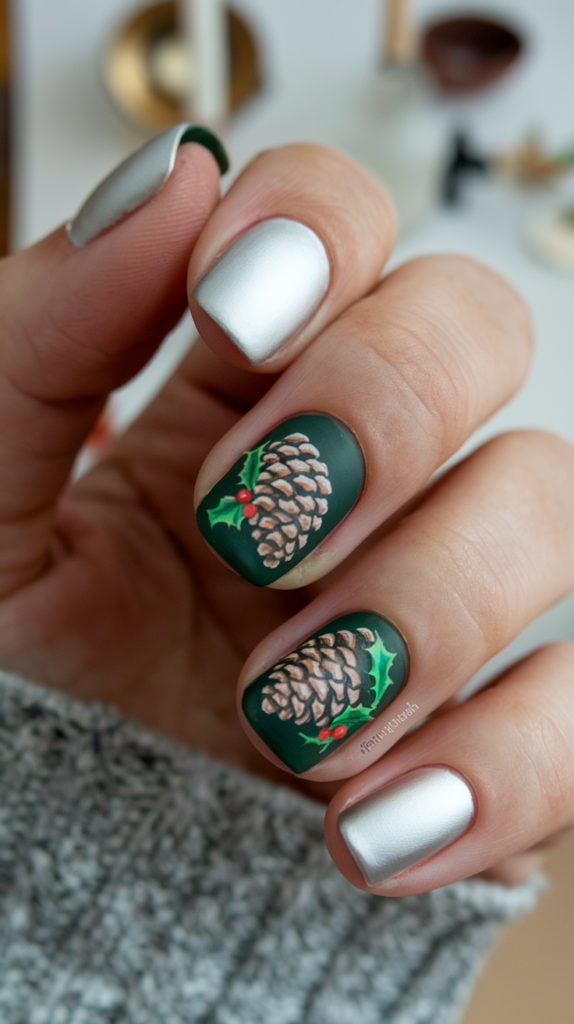
Ground your holiday style with Pinecone and Holly Nail Art, a rustic design that brings nature’s earthy beauty to your fingertips. Perfect for woodland walks or cozy cabin nights, this look blends matte greens with detailed accents for a warm, festive feel.
Creating the Pinecone and Holly Nail Look
Step 1: Base Prep
Apply a smoothing base coat, then layer a matte forest green polish for a deep, earthy backdrop. Use two coats, drying each for a velvety, natural finish.
Step 2: Shape Pinecones
With a fine brush, paint brown pinecones on accent nails, layering scales in a teardrop pattern for texture. Add a lighter brown highlight for a 3D, woody effect.
Step 3: Add Holly Leaves
Paint dark green holly leaves around the pinecones with a striping brush, curving them naturally for a lush look. Dot red berries with a dotting tool for pops of color.
Step 4: Enhance with Detail
Brush a subtle gold glitter over the pinecone edges or berry centers for a frosty, festive touch. Keep it minimal to preserve the rustic charm.
Step 5: Seal with Top Coat
Finish with a matte top coat to lock in the design and maintain the earthy vibe, or use glossy on berries for contrast. Apply a second layer for lasting woodland appeal.
Why It Works
The matte green base grounds this design in nature’s palette, offering a rustic warmth that’s uniquely festive. Pinecones and holly add detailed, organic charm, making it a cozy, elegant nod to Christmas’s natural roots.
16. Elf-Inspired Christmas Nail Designs
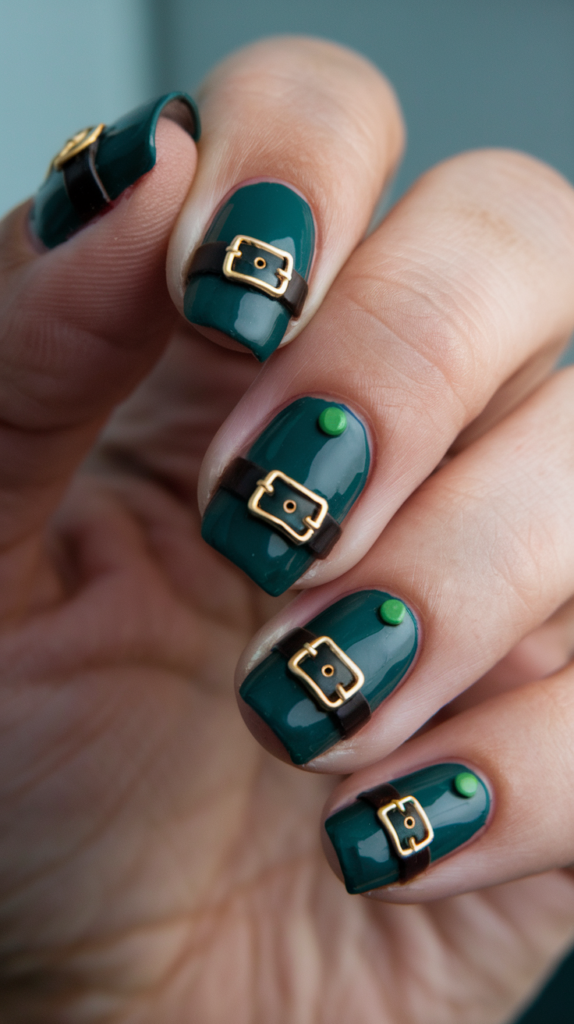
Step into Santa’s workshop with Elf-Inspired Christmas Nail Designs, a playful tribute to the North Pole’s busiest helpers. Perfect for toy-making parties or holiday crafts, this green-and-red design pops with cheeky belts and golden buckles.
Creating the Elf-Inspired Nail Look
Step 1: Base Prep
Apply a protective base coat, then paint half your nails green and half red for an elf-uniform vibe. Use two coats, drying each for bold, even color.
Step 2: Add Belts
With a fine brush, paint a black horizontal stripe across each nail’s middle, keeping it straight for a belt-like effect. Vary thickness slightly for a handmade touch.
Step 3: Draw Buckles
Use gold polish to paint a small square buckle in each belt’s center, layering twice for a shiny, raised look. Clean edges with acetone for crispness.
Step 4: Enhance with Details
Add tiny white dots along the belt edges with a dotting tool to mimic stitching, keeping it subtle for whimsy. Brush gold glitter on one nail for extra elf magic.
Step 5: Seal with Top Coat
Finish with a glossy top coat to protect the design and boost the festive shine, ensuring it lasts through holiday hustle. Add a second layer for a polished, elf-approved finish.
Why It Works
The green and red split mirrors elf attire, offering a bold, playful base that’s pure Christmas fun. Gold buckles and subtle details add a quirky charm, making this design a merry, mischievous standout.
17. Red Velvet Matte Nails: Luxurious Christmas Designs
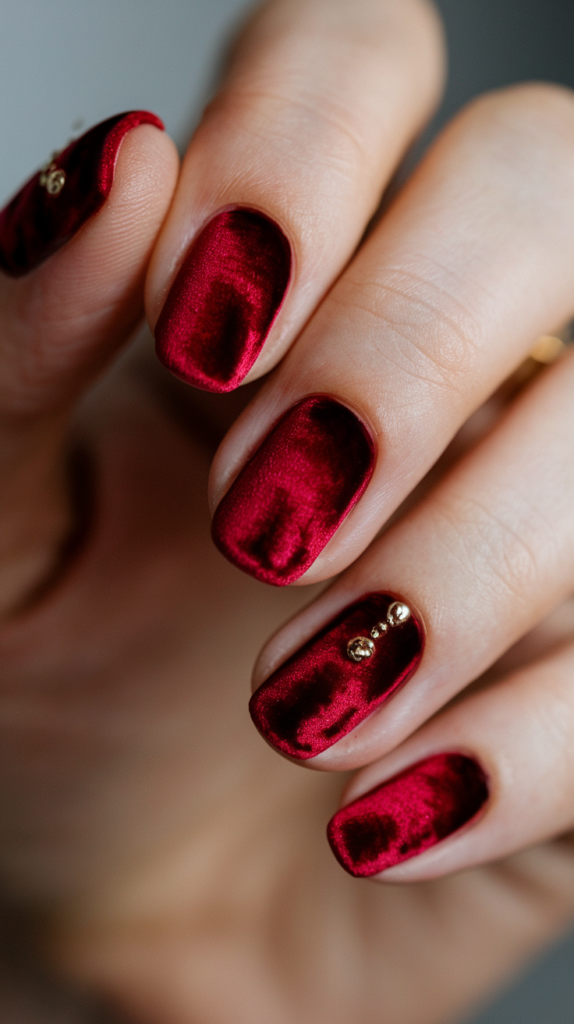
Indulge in luxury with Red Velvet Matte Nails, a rich design that drapes your nails in the plush elegance of holiday velvet. Perfect for upscale gatherings or quiet luxury moments, this deep red look blends matte sophistication with subtle gold accents.
Creating the Red Velvet Matte Nail Look
Step 1: Base Prep
Apply a strengthening base coat, then layer a deep red polish for a plush, velvety base tone. Use two coats, drying each for a solid, rich finish.
Step 2: Matte It Down
Brush a matte top coat over the red, letting it dry to a soft, light-absorbing texture that mimics velvet fabric. Ensure even coverage for a seamless plush effect.
Step 3: Add Gold Accents
With a fine brush, paint thin gold lines or dots along the cuticles or tips, keeping them minimal for elegance. Layer gold foil flecks on one nail for a luxe twist.
Step 4: Enhance with Detail
Glue tiny gold rhinestones along the gold lines with nail adhesive, pressing gently for a subtle, jeweled pop. Space them sparingly to maintain sophistication.
Step 5: Seal with Top Coat
Finish with a matte top coat to lock in the design and preserve the velvety feel, or use glossy on accents for contrast. Apply a second layer for lasting luxury.
Why It Works
The deep red matte finish offers a plush, luxurious vibe that’s festive yet refined, evoking holiday elegance with a modern twist. Gold accents add just enough sparkle, making this design a sophisticated standout for Christmas opulence.
18. Candy Cane Ombre Christmas Nails
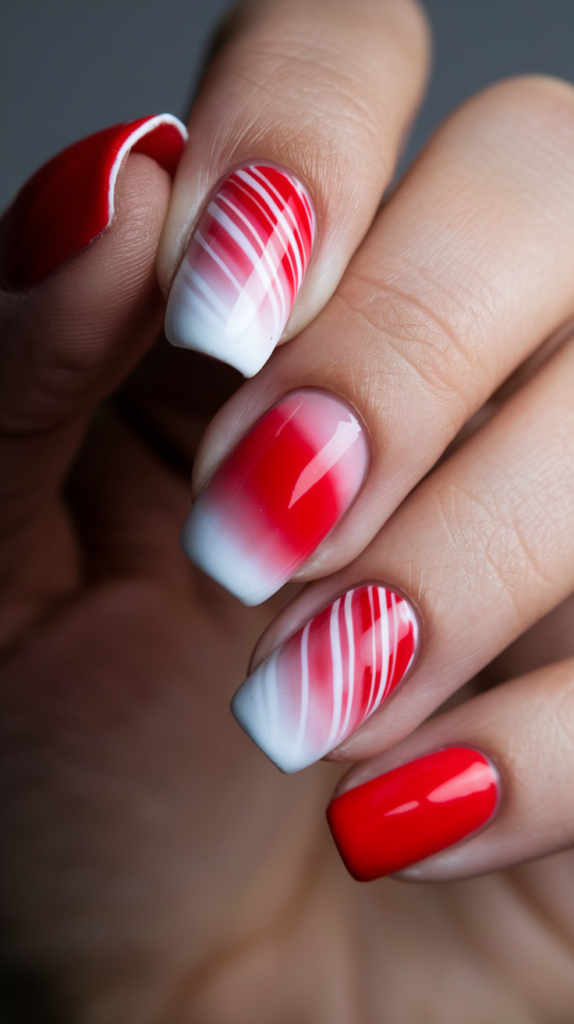
Savor a modern twist with Candy Cane Ombre Christmas Nails, blending red and white into a smooth, sweet gradient. Perfect for holiday teas or festive brunches, this design fuses classic candy cane vibes with chic sophistication.
Creating the Candy Cane Ombre Nail Look
Step 1: Base Prep
Apply a protective base coat, then paint a bright red polish from the cuticle to midway up each nail. Use two coats, drying each for a bold start.
Step 2: Blend the Ombre
With a makeup sponge, dab white polish from the tips downward, overlapping the red slightly, then blend with light taps for a seamless fade. Repeat until the gradient flows smoothly.
Step 3: Add Accent Stripes
On one or two nails, paint thin red and white diagonal stripes with a fine brush, keeping them crisp to echo candy canes. Clean edges with acetone for precision.
Step 4: Enhance with Shine
Brush a glossy top coat over the ombre and stripes to give them a candy-slick finish, enhancing the sweet vibe. Add a touch of silver glitter to tips for sparkle.
Step 5: Seal with Top Coat
Finish with a second glossy top coat to lock in the design and boost its sheen, ensuring a polished look through holiday cheer. Let it cure fully for lasting sweetness.
Why It Works
The ombre gradient softens the candy cane theme into a chic, modern look, offering a fresh take on a holiday classic that’s effortlessly stylish. Accent stripes tie it back to tradition, balancing playfulness with sophistication for a versatile festive design.
19. Christmas Sweater Pattern Nails: Cozy Designs for the Holidays
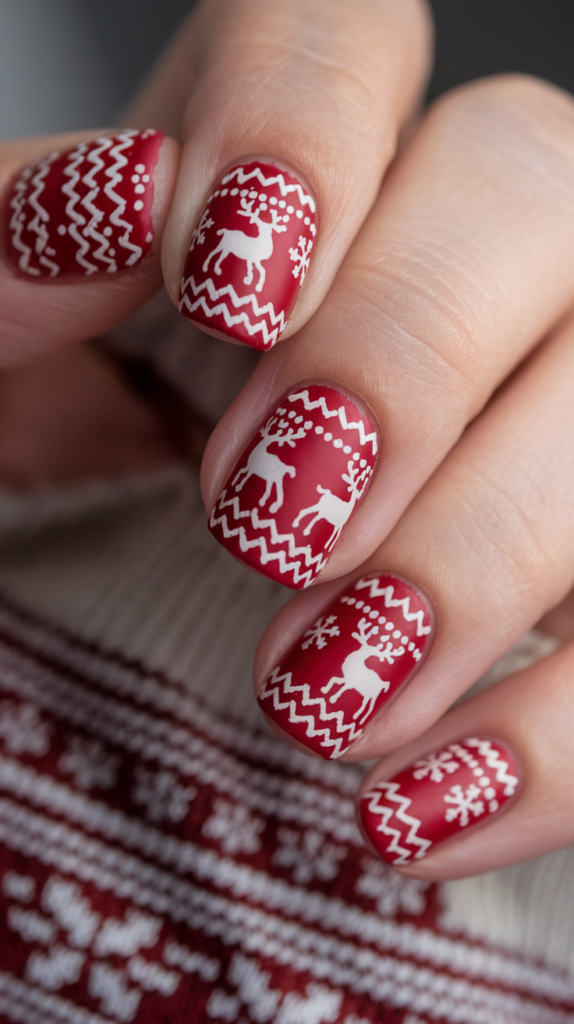
Snuggle up with Christmas Sweater Pattern Nails, a cozy design that weaves holiday warmth into intricate, knit-inspired art. Perfect for ugly sweater parties or fireside chats, this look blends bold bases with festive motifs for a snug, stylish vibe.
Creating the Christmas Sweater Pattern Nail Look
Step 1: Base Prep
Apply a smoothing base coat, then paint a red or green polish across all nails for a cozy sweater feel. Use two coats, drying each for a rich, even tone.
Step 2: Add Reindeer
With a fine brush, paint white reindeer on one nail, sketching simple antlers and dots for eyes and noses. Layer twice for a bold, knit-like outline.
Step 3: Draw Snowflakes and Zigzags
Paint white snowflakes on another nail and zigzag lines on a third, using a stamping tool for precision if preferred. Vary patterns for a sweater patchwork effect.
Step 4: Enhance with Texture
Brush a matte top coat over the patterns to mimic knit fabric, leaving some areas glossy for contrast. Add a gold thread detail with a thin brush for warmth.
Step 5: Seal with Top Coat
Finish with a matte top coat to lock in the cozy vibe and protect the design, ensuring it lasts through holiday snuggles. Apply a second layer for a soft, tactile finish.
Why It Works
The bold base and sweater patterns evoke the comfort of holiday knits, offering a warm, nostalgic vibe that’s pure Christmas. The mix of reindeer, snowflakes, and zigzags adds playful intricacy, making this design a cozy, festive masterpiece.
20. Silver Glitter Gradient Nails: Subtle Christmas Elegance
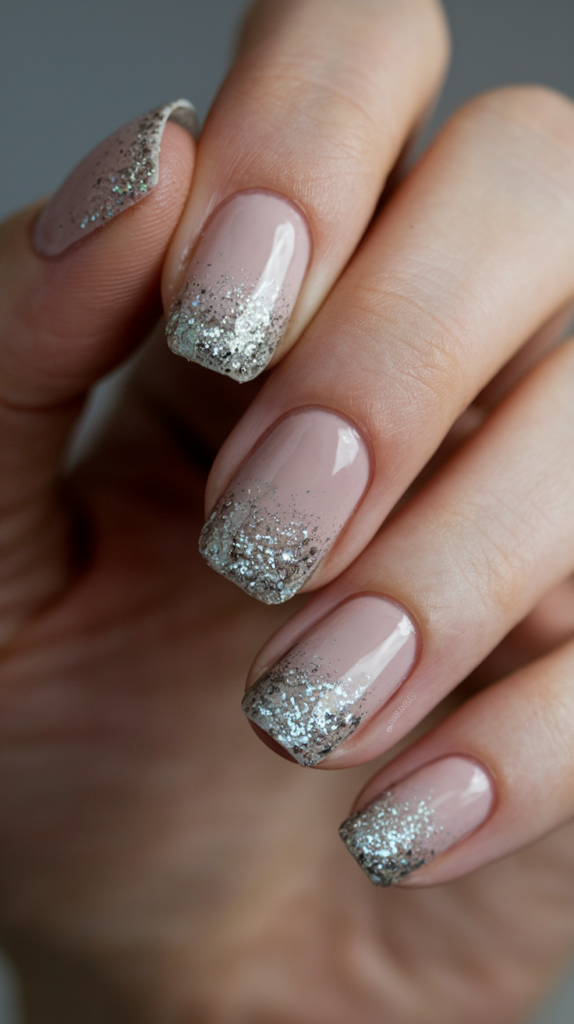
Glow softly with Silver Glitter Gradient Nails, a subtle design that shimmers with understated holiday elegance. Ideal for office parties or quiet winter nights, this look blends nude bases with a sparkling fade for a refined Christmas touch.
Creating the Silver Glitter Gradient Nail Look
Step 1: Base Prep
Apply a protective base coat, then layer a nude polish for a soft, elegant foundation across all nails. Use two coats, drying each for a smooth, even tone.
Step 2: Start the Gradient
With a makeup sponge, dab silver glitter polish from the tips downward, fading it into the nude base for a seamless gradient. Build layers lightly for a subtle shimmer.
Step 3: Refine the Fade
Use a clean sponge section to blend the glitter further, ensuring a soft transition that’s concentrated at the tips. Let it dry fully to avoid smudging.
Step 4: Enhance with Shine
Brush a sheer silver polish over the tips for extra sparkle, focusing on the gradient’s edge for a frosty glow. Keep it minimal to maintain elegance.
Step 5: Seal with Top Coat
Finish with a glossy top coat to lock in the glitter and boost the shine, ensuring a polished look through holiday calm. Add a second layer for lasting subtlety.
Why It Works
The nude base offers a soft, versatile canvas, while the silver gradient adds a delicate holiday sparkle that’s chic and restrained. Its understated glow evokes snowy elegance, making it a perfect balance of festivity and sophistication.
21. Holiday Bow Nail Art for Wrapped-Up Christmas Nails
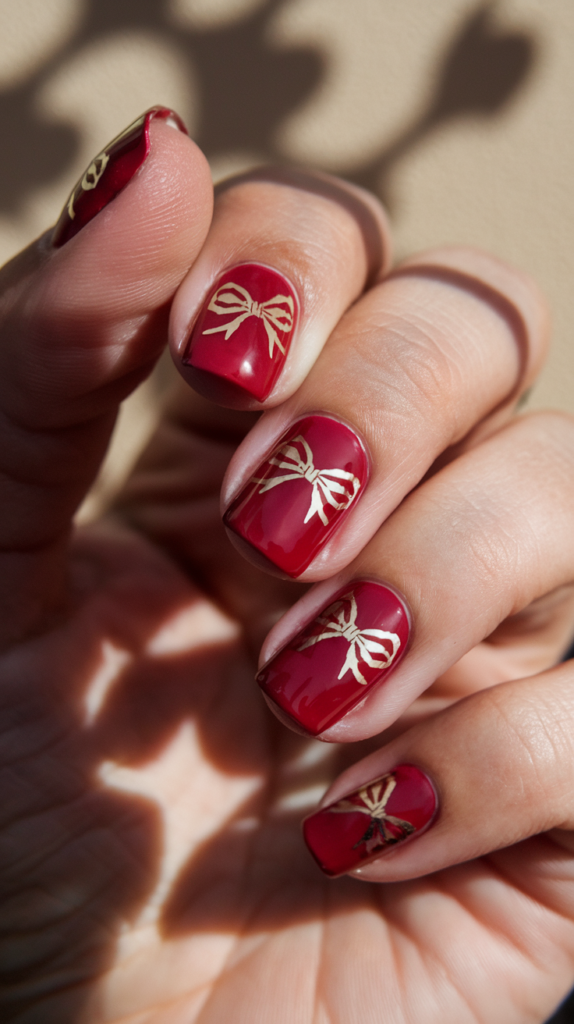
Tie up the season with Holiday Bow Nail Art, a charming design that turns your nails into perfectly wrapped presents. Perfect for gift-giving days or festive teas, this look blends bold reds with delicate bows for a sweet, celebratory vibe.
Creating the Holiday Bow Nail Look
Step 1: Base Prep
Apply a protective base coat, then paint a shiny red polish across all nails for a gift-wrap glow. Use two coats, drying each for a bold, even finish.
Step 2: Shape the Bows
With a fine brush, paint small red bows on each nail, forming loops and tails with a central knot for a 3D effect. Keep them dainty—larger on thumbs, smaller on pinkies.
Step 3: Add Bow Details
Use gold polish to dot the bow centers or outline the loops, layering twice for a shiny accent. Clean edges with acetone for crisp, gift-ready precision.
Step 4: Enhance with Shine
Brush a glossy top coat over the bows to give them a wrapped-ribbon sheen, enhancing the festive illusion. Add a touch of gold glitter to one bow for sparkle.
Step 5: Seal with Top Coat
Finish with a second glossy top coat to lock in the design and boost its shine, ensuring it lasts through holiday unwrapping. Let it cure fully for a polished look.
Why It Works
The shiny red base mirrors festive wrapping paper, offering a bold yet elegant canvas that’s pure Christmas joy. Tiny bows add a delicate, gift-like charm, making this design a chic, celebratory treat for the season.
22. Pine Branches Christmas Nail Designs

Bring forest charm to your nails with Pine Branches Christmas Nail Designs, a nature-inspired look that blends evergreen elegance with holiday warmth. Ideal for outdoor caroling or rustic dinners, this design pairs nude bases with detailed pine and berries for a subtle festive glow.
Creating the Pine Branches Nail Look
Step 1: Base Prep
Apply a protective base coat, then layer a nude polish for a soft, snowy-ground effect across all nails. Use two coats, drying each for a smooth, natural finish.
Step 2: Paint Pine Branches
With a fine brush, paint deep green pine branches on each nail, using short, needle-like strokes for a realistic evergreen look. Vary branch angles for organic flow.
Step 3: Add Red Berries
Dot tiny red berries along the branches with a dotting tool, layering twice for a bold, juicy pop. Space them naturally to mimic holly’s growth pattern.
Step 4: Enhance with Detail
Brush a light green highlight on some needles for depth, or add a gold glitter fleck to berries for a frosty touch. Keep it subtle to preserve the rustic vibe.
Step 5: Seal with Top Coat
Finish with a glossy top coat to protect the design and boost its natural shine, ensuring it lasts through holiday outings. Opt for matte on non-accent nails for contrast if desired.
Why It Works
The nude base offers a soft, understated canvas, letting the green pine and red berries shine with earthy, festive charm. Its detailed yet simple design evokes a woodland Christmas, blending rustic beauty with holiday elegance.
23. Jingle Bell Nail Designs: Fun and Festive Holiday Nails

Ring in the season with Jingle Bell Nail Designs, a lively look that chimes with the merry sound of holiday bells. Perfect for carol sing-alongs or festive dances, this gold-based design jingles with playful 3D flair.
Creating the Jingle Bell Nail Look
Step 1: Base Prep
Apply a durable base coat, then layer a metallic gold polish for a shiny, bell-like sheen across all nails. Use two coats, drying each for a radiant finish.
Step 2: Shape the Bells
With a fine brush, paint small gold circles on each nail, adding a tiny cut-out slit at the bottom to mimic jingle bells. Layer twice for a bold, raised effect.
Step 3: Add 3D Elements
Glue small gold studs or rhinestones atop some bells with nail adhesive, pressing firmly for a tactile, jingling look. Space them evenly for balanced festivity.
Step 4: Enhance with Glitter
Brush a fine silver glitter polish around the bells for a snowy sparkle, blending lightly with a sponge for contrast. Keep it subtle to highlight the 3D effect.
Step 5: Seal with Top Coat
Finish with a glossy top coat to secure the studs and boost the gold’s shine, ensuring a festive jingle all season. Add a second layer for lasting durability.
Why It Works
The metallic gold base rings with holiday luxury, while the jingle bell shapes and 3D studs add a playful, musical charm that’s pure Christmas fun. Its shimmering details make it a lively, festive standout that dances with joy.
24. Santa Suit Nails: Festive Fashion for Your Nails
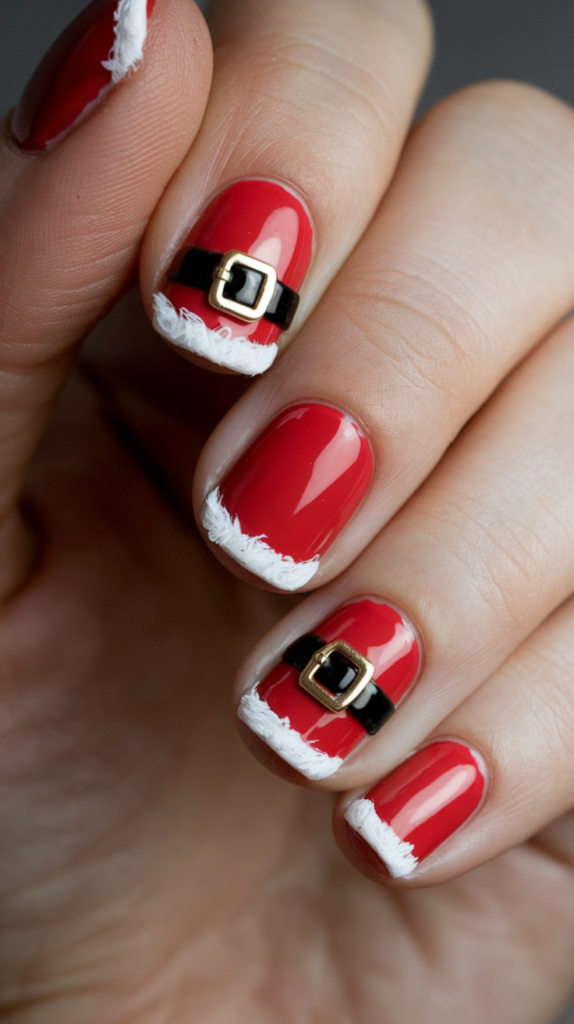
Dress your nails in Santa Suit Nails, a festive fashion statement that wraps your fingertips in the jolly charm of St. Nick’s iconic outfit. Perfect for Christmas Eve gatherings or delivering holiday cheer, this bold red design pops with black belts and white trim.
Creating the Santa Suit Nail Look
Step 1: Base Prep
Apply a strengthening base coat, then layer a bright red polish across all nails for Santa’s suit vibe. Use two coats, drying each for a rich, even finish.
Step 2: Add White Trim
With a striping brush, paint a thick white band across each nail tip to mimic Santa’s fluffy coat trim. Smooth edges with a clean-up brush for a crisp, plush look.
Step 3: Draw Black Belts
Paint a horizontal black stripe across the middle of each nail with a fine brush, keeping it straight for a belt effect. Layer twice for bold definition.
Step 4: Add Gold Buckles
Use gold polish to paint a small square buckle in the center of each black belt, layering for a shiny, raised accent. Clean edges with acetone for precision.
Step 5: Seal with Top Coat
Finish with a glossy top coat to lock in the design and boost its festive shine, ensuring it lasts through holiday deliveries. Add a second layer for a polished, Santa-ready finish.
Why It Works
The bold red base with white trim and black belts mirrors Santa’s classic suit, offering an instantly recognizable holiday look that’s full of cheer. Gold buckles add a chic, festive touch, making this design a merry blend of tradition and style.
25. Snow Globe Accent Nails for a Winter Wonderland Look
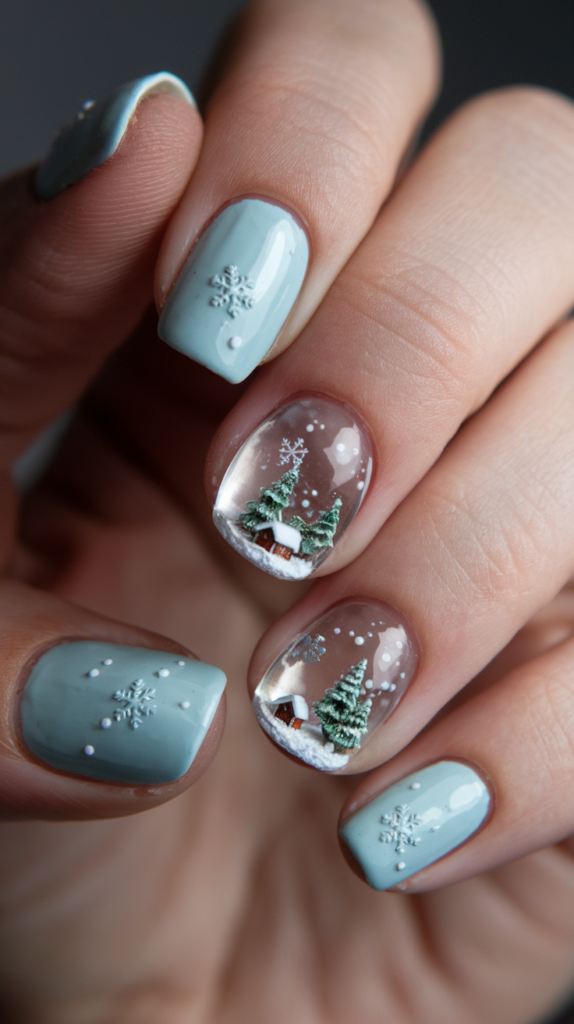
Shake up the season with Snow Globe Accent Nails, a whimsical design that traps winter magic on your fingertips. Ideal for holiday storytelling or snowy daydreams, this look blends glittery bases with tiny, detailed scenes for a nostalgic glow.
Creating the Snow Globe Accent Nail Look
Step 1: Base Prep
Apply a protective base coat, then layer a clear glitter polish across all nails for a snowy, globe-like shimmer. Use two coats, drying each for a sparkling foundation.
Step 2: Shape the Globes
On accent nails, paint a silver circle with a fine brush to outline the snow globe, adding a small base line for stability. Let it dry fully before detailing.
Step 3: Add Winter Scenes
Inside the circle, paint tiny white houses and green trees with a detail brush, dotting white snow atop them for a cozy effect. Keep shapes small and precise for a miniature charm.
Step 4: Enhance with Snow
Dot white specks around the scene with a dotting tool, layering silver glitter over them for a falling-snow sparkle. Focus on the globe’s edges for a shaken look.
Step 5: Seal with Top Coat
Finish with a glossy top coat to protect the delicate scenes and boost the glittery shine, ensuring a magical finish. Add a second layer for a crystal-clear, globe-like effect.
Why It Works
The glittery base evokes a shaken snow globe, offering a playful yet elegant canvas that’s pure holiday nostalgia. Tiny scenes add a detailed, storybook charm, making this design a whimsical winter standout.
26. Polar Bear Nail Art for a Cute Winter Look
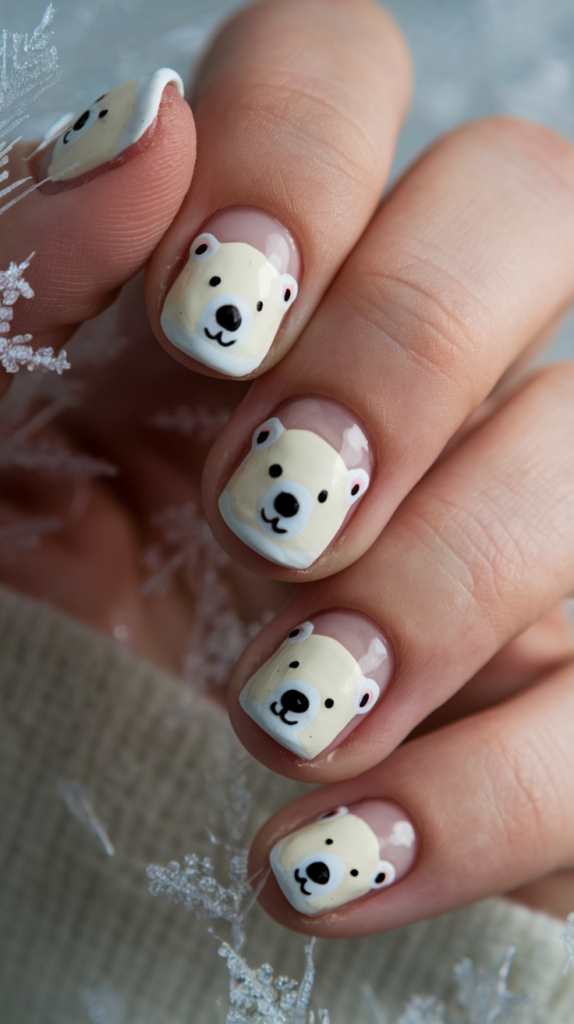
Waddle into winter with Polar Bear Nail Art, a cute design that brings Arctic charm to your holiday style. Perfect for ice-skating dates or cozy movie nights, this look blends icy blues with adorable bears for a playful, festive vibe.
Creating the Polar Bear Nail Look
Step 1: Base Prep
Apply a hydrating base coat, then layer a light blue polish across all nails for an icy backdrop. Use two coats, drying each for a cool, even finish.
Step 2: Shape the Bears
With a fine brush, paint white ovals on each nail for polar bear faces, keeping them round and centered. Layer twice for a bold, fluffy look.
Step 3: Add Facial Details
Dot black eyes and noses with a dotting tool, then paint red or green scarves around their necks for festive flair. Add a tiny Santa hat on one bear with red and white polish.
Step 4: Enhance with Snow
Dot white specks around the bears with a fine brush for a snowy effect, brushing silver glitter over them for sparkle. Keep it light to highlight the bears.
Step 5: Seal with Top Coat
Finish with a glossy top coat to protect the cute design and boost its wintry shine, ensuring it lasts through holiday chills. Add a second layer for a polished, icy finish.
Why It Works
The light blue base sets a frosty scene, while the polar bears with scarves and hats add an adorable, festive charm that’s pure winter joy. Its playful yet simple design makes it a cute, chic holiday favorite.
27. Frozen-Inspired Snowflake Nails for a Wintery Christmas
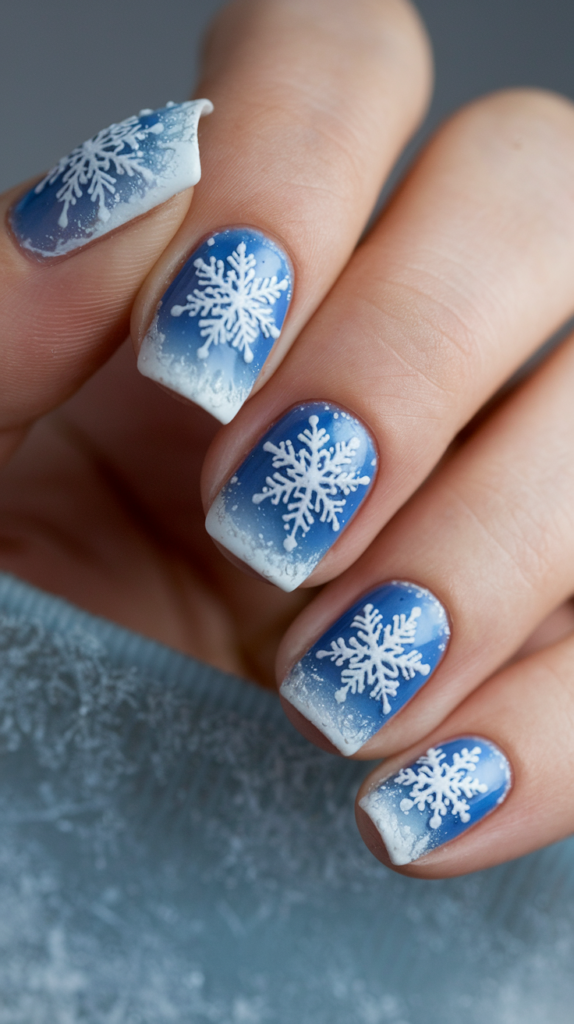
Channel icy magic with Frozen-Inspired Snowflake Nails, a wintry design that evokes the enchanting chill of Elsa’s realm. Perfect for movie marathons or frosty outings, this ice-blue look sparkles with detailed snowflakes for a fairytale Christmas vibe.
Creating the Frozen-Inspired Snowflake Nail Look
Step 1: Base Prep
Apply a protective base coat, then layer an ice-blue polish for a frosty, magical foundation across all nails. Use two coats, drying each for a cool, even finish.
Step 2: Paint Snowflakes
With a fine brush, paint intricate white snowflakes on each nail, varying designs—large stars on thumbs, small flakes on pinkies—for a Frozen-inspired flurry. Use a stamping tool for symmetry if desired.
Step 3: Add Glitter Layers
Brush silver glitter polish over the snowflakes, blending with a sponge for a shimmering, icy glow. Focus on the centers for a magical sparkle effect.
Step 4: Enhance with Rhinestones
Glue tiny clear rhinestones at some snowflake cores with nail adhesive, pressing gently for a crystalline touch. Space them sparingly for elegance.
Step 5: Seal with Top Coat
Finish with a glossy top coat to protect the design and boost its icy shine, ensuring a fairytale finish. Add a second layer for a dazzling, Frozen-worthy look.
Why It Works
The ice-blue base captures Frozen’s ethereal chill, offering a cool, enchanting canvas that’s pure winter magic. Detailed snowflakes and glitter evoke a fairytale snowfall, making this design a stunning, festive tribute to the season.
28. Christmas Wreath Nail Designs for a Festive Accent
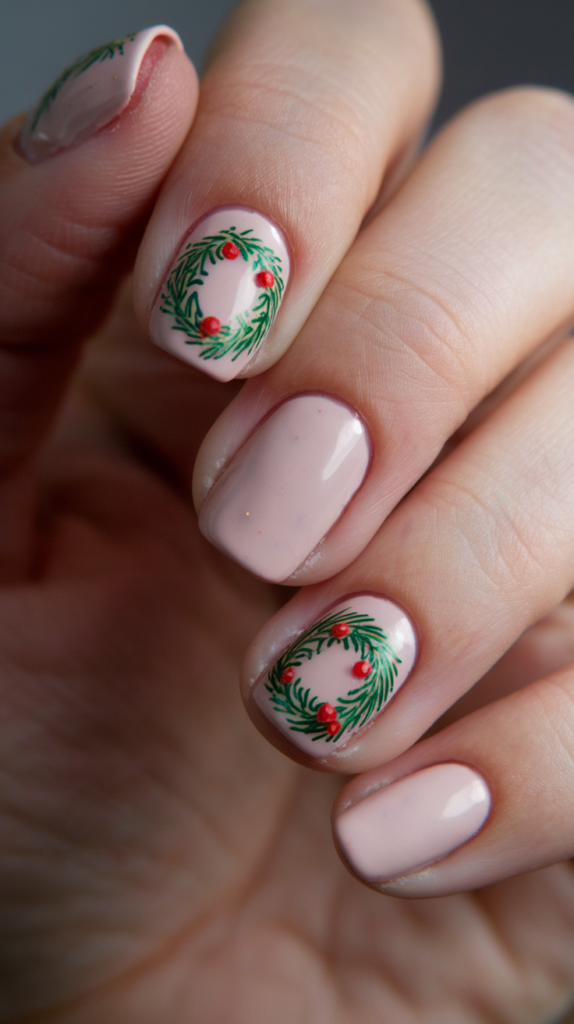
Welcome the season with Christmas Wreath Nail Designs, a festive accent that crowns your nails with holiday cheer. Perfect for door-decorating days or cozy welcomes, this subtle nude look blooms with tiny wreaths for a warm, elegant touch.
Creating the Christmas Wreath Nail Look
Step 1: Base Prep
Apply a protective base coat, then layer a nude polish for a soft, neutral canvas across all nails. Use two coats, drying each for a smooth, even finish.
Step 2: Shape the Wreaths
On accent nails, paint a small green circle with a fine brush, adding tiny leaf strokes around it for a wreath effect. Layer twice for a lush, evergreen look.
Step 3: Add Berries and Bows
Dot red berries along the wreath with a dotting tool, then paint a small red bow at the bottom with a fine brush. Layer the bow for a raised, festive pop.
Step 4: Enhance with Detail
Brush a light gold glitter over the berries or bow for a subtle holiday sparkle, keeping it minimal for elegance. Add a green highlight to some leaves for depth.
Step 5: Seal with Top Coat
Finish with a glossy top coat to protect the wreaths and boost their shine, ensuring a polished look. Add a second layer for a lasting, welcoming finish.
Why It Works
The nude base keeps this design subtle and chic, while the tiny wreaths with berries and bows add a festive, welcoming charm that’s pure Christmas. Its delicate balance makes it an elegant, understated holiday accent.
29. Winter Wonderland Scene Nails: Detailed Christmas Nail Art
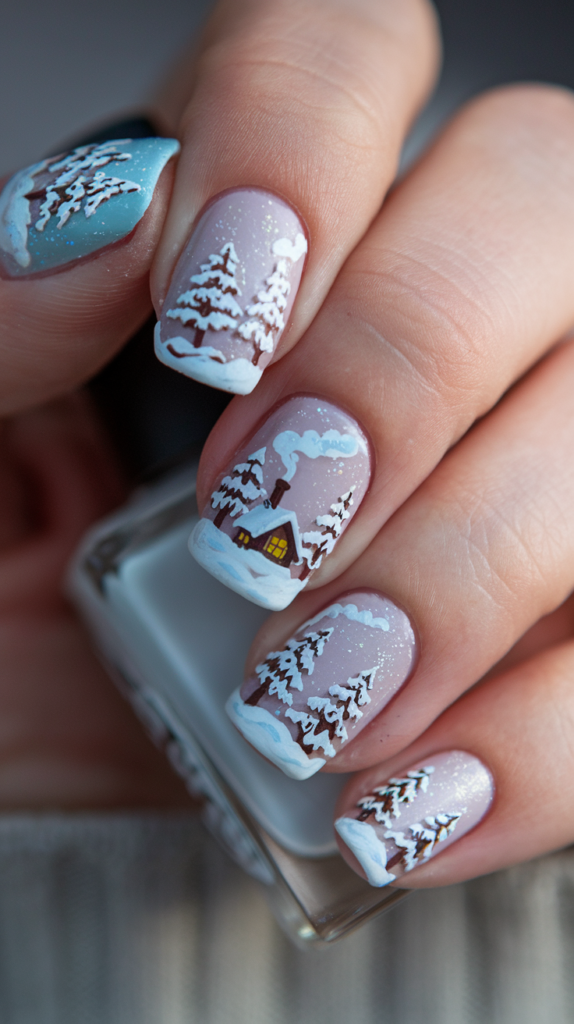
Step into a storybook with Winter Wonderland Scene Nails, a detailed design that paints a snowy village on your fingertips. Perfect for holiday storytelling or winter escapes, this light blue look weaves intricate scenes for a magical Christmas vibe.
Creating the Winter Wonderland Scene Nail Look
Step 1: Base Prep
Apply a protective base coat, then layer a light blue polish for a snowy sky across all nails. Use two coats, drying each for a cool, even finish.
Step 2: Paint Houses
With a fine brush, paint white houses on each nail, adding slanted roofs and tiny chimneys for a village feel. Layer brown windows and doors for cozy detail.
Step 3: Add Trees and Reindeer
Paint green pine trees with a striping brush, then dot brown reindeer with antlers near them using a dotting tool. Keep them small for a miniature scene effect.
Step 4: Enhance with Snow
Dot white snow atop houses and trees with a fine brush, brushing silver glitter over it for a frosty sparkle. Add a few falling flakes for depth.
Step 5: Seal with Top Coat
Finish with a glossy top coat to protect the intricate design and boost its wintry shine, ensuring a storybook finish. Add a second layer for a lasting, magical look.
Why It Works
The light blue base sets a snowy stage, while the detailed houses, trees, and reindeer create a charming, storybook scene that’s pure winter magic. Its intricate yet cohesive design makes it a captivating, festive masterpiece.
30. Glam Gold Foil Christmas Nail Designs
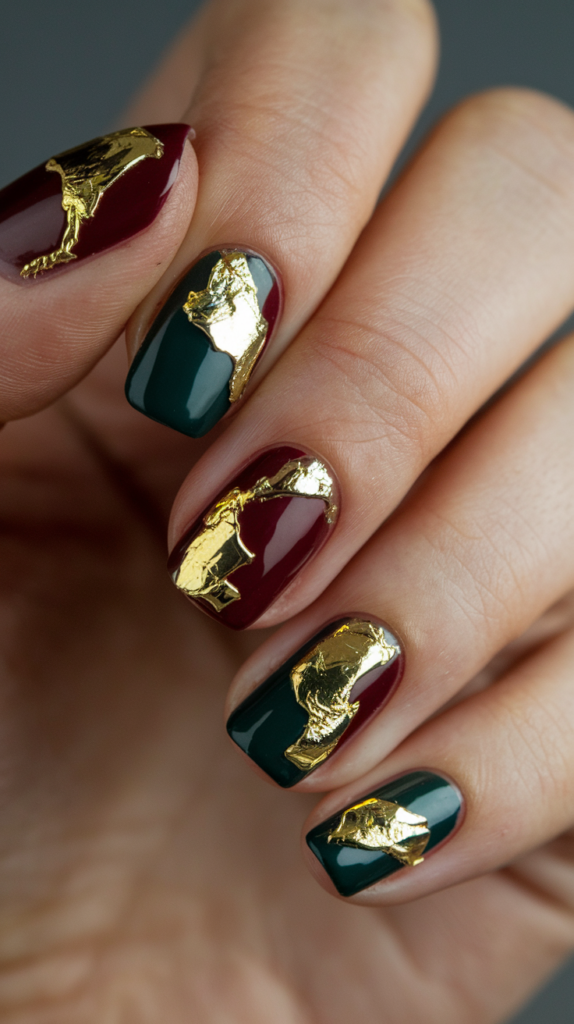
Shimmer with Glam Gold Foil Christmas Nail Designs, a luxurious look that fuses bold reds with dazzling gold for holiday glamour. Ideal for New Year’s Eve parties or festive toasts, this design sparkles with metallic elegance.
Creating the Glam Gold Foil Nail Look
Step 1: Base Prep
Apply a strengthening base coat, then layer a rich red polish for a bold, festive foundation across all nails. Use two coats, drying each for a solid, vibrant finish.
Step 2: Apply Gold Foil
With tweezers, place gold foil flakes randomly on each nail, pressing them into wet polish for an abstract, metallic sheen. Vary placement—tips on some, cuticles on others—for artistic flair.
Step 3: Refine Placement
Use a brush to adjust foil edges, ensuring a smooth, scattered effect without overloading the red base. Let it dry fully to secure the foil.
Step 4: Enhance with Glitter
Brush a fine gold glitter polish over some foil areas for extra sparkle, blending with a sponge for a seamless glow. Keep it light to highlight the foil’s texture.
Step 5: Seal with Top Coat
Finish with a glossy top coat to lock in the foil and boost the shine, ensuring a glamorous finish. Add a second layer for a durable, party-ready look.
Why It Works
The rich red base offers a bold, festive canvas, while the gold foil adds a luxurious, metallic shimmer that’s pure holiday glamour. Its abstract elegance makes it a chic, standout design for festive celebrations.
31. Gift Wrapping Stripes: Bold and Bright Christmas Nails
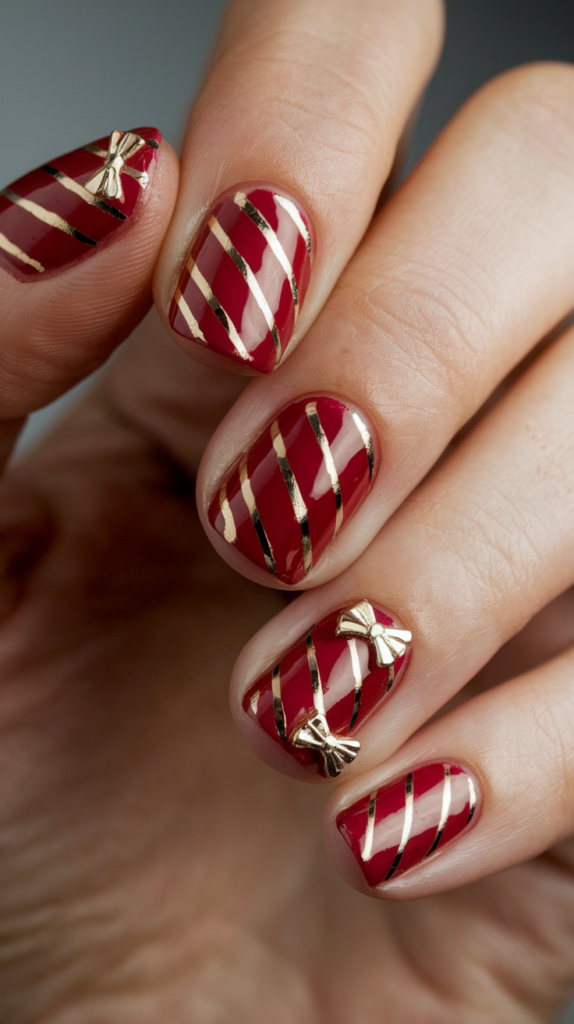
Package your nails in Gift Wrapping Stripes, a bold design that mirrors the bright cheer of holiday presents. Perfect for gift exchanges or festive shopping trips, this look blends vibrant stripes with tiny bows for a wrapped-up Christmas vibe.
Creating the Gift Wrapping Stripes Nail Look
Step 1: Base Prep
Apply a protective base coat, then layer a red polish across all nails for a festive gift-wrap base. Use two coats, drying each for a bold, even finish.
Step 2: Paint Stripes
With striping tape, lay green and gold diagonal lines across each nail, spacing them evenly for a wrapping paper effect. Remove tape after drying for crisp, sharp lines.
Step 3: Add Bows
Paint small gold bows at stripe intersections with a fine brush, forming loops and tails for a gift-topped look. Layer twice for a raised, festive pop.
Step 4: Enhance with Shine
Brush a glossy top coat over the stripes and bows to give them a wrapped-package sheen, enhancing the bright vibe. Add a touch of glitter to bows for sparkle.
Step 5: Seal with Top Coat
Finish with a second glossy top coat to lock in the design and boost its shine, ensuring it lasts through holiday unwrapping. Let it cure fully for a polished finish.
Why It Works
The red, green, and gold stripes mimic festive wrapping paper, offering a bold, cheerful look that’s pure Christmas excitement. Tiny bows add a playful, gift-like charm, making this design a bright, celebratory holiday treat.
32. Festive Confetti Nails for a Fun Christmas Look
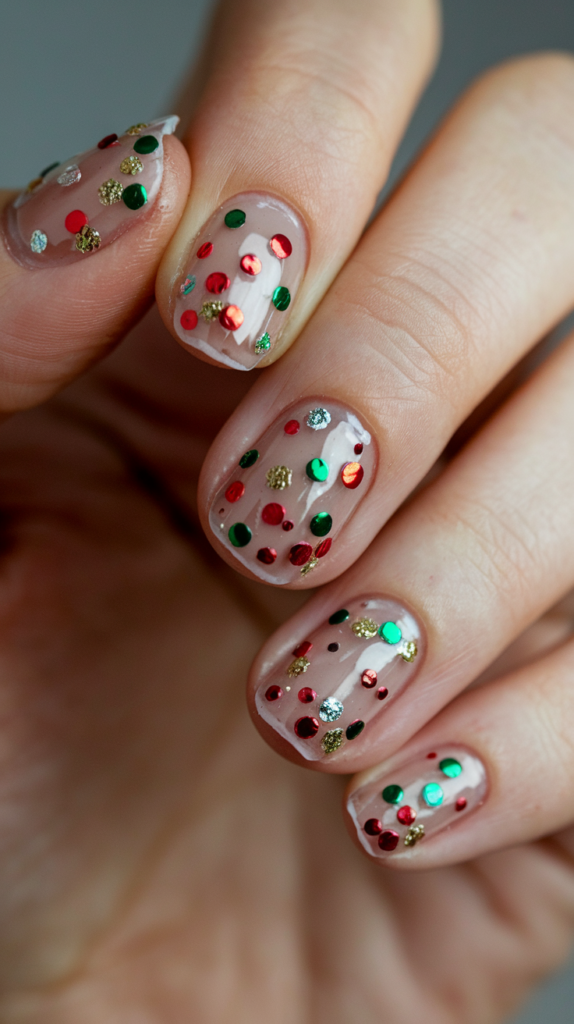
Pop the party with Festive Confetti Nails, a fun design that sprinkles your nails with holiday cheer. Perfect for New Year’s countdowns or festive dances, this neutral-based look bursts with colorful dots for a lively Christmas vibe.
Creating the Festive Confetti Nail Look
Step 1: Base Prep
Apply a protective base coat, then layer a nude polish for a soft, neutral canvas across all nails. Use two coats, drying each for a smooth, even finish.
Step 2: Scatter Confetti
With a dotting tool, randomly dot red, green, and gold polish across each nail, varying sizes for a confetti effect. Layer twice for bold, festive pops.
Step 3: Refine Placement
Use a fine brush to adjust any overlapping dots, ensuring a scattered, party-like look without clutter. Let them dry fully to avoid smudging.
Step 4: Enhance with Glitter
Brush a fine silver glitter polish over some dots for a sparkling, confetti-like shine, blending lightly with a sponge. Keep it subtle to highlight the colors.
Step 5: Seal with Top Coat
Finish with a glossy top coat to lock in the design and boost its festive glow, ensuring it lasts through holiday revelry. Add a second layer for a polished, party-ready finish.
Why It Works
The nude base keeps this design chic and versatile, while the colorful confetti dots add a playful, celebratory burst that’s pure holiday fun. Its glittery shine makes it a lively, festive standout that’s perfect for ringing in the season.
33. Nutcracker Soldier Nail Art for a Playful Holiday Look
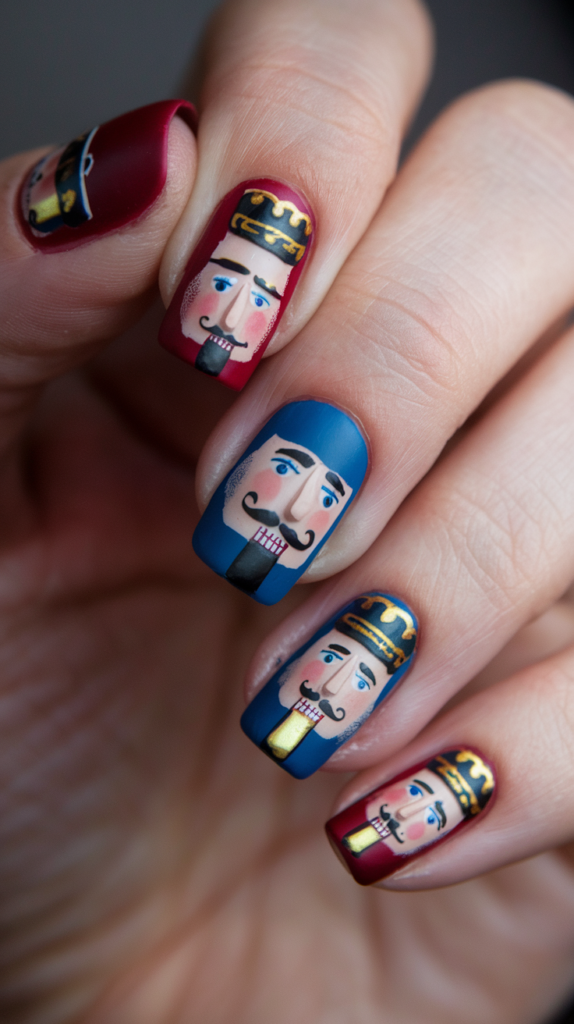
March into the holidays with Nutcracker Soldier Nail Art, a playful design that salutes the classic Christmas guardian with festive flair. Ideal for ballet nights or holiday plays, this navy-based look pops with nutcracker faces and bold colors.
Creating the Nutcracker Soldier Nail Look
Step 1: Base Prep
Apply a protective base coat, then layer a navy blue polish across all nails for a soldier-uniform vibe. Use two coats, drying each for a deep, even finish.
Step 2: Paint Faces
On accent nails, paint white rectangles with a fine brush for nutcracker faces, adding black mustaches and eyes for character. Layer red hats atop them for a bold touch.
Step 3: Add Details
Dot gold buttons down the face with a dotting tool, then paint red and gold accents on other nails for a uniform effect. Keep details crisp with acetone cleanup.
Step 4: Enhance with Shine
Brush a glossy top coat over the faces and accents to give them a polished, soldier-like shine, enhancing the festive vibe. Add a touch of gold glitter to hats for sparkle.
Step 5: Seal with Top Coat
Finish with a second glossy top coat to lock in the design and boost its shine, ensuring it lasts through holiday marches. Let it cure fully for a standout finish.
Why It Works
The navy base offers a bold, classic backdrop, while the nutcracker faces add a playful, storybook charm that’s pure Christmas nostalgia. Red and gold accents tie it to tradition, making this design a festive, whimsical delight.
34. Snowy Penguin Nail Art: Adorable Winter Nail Designs
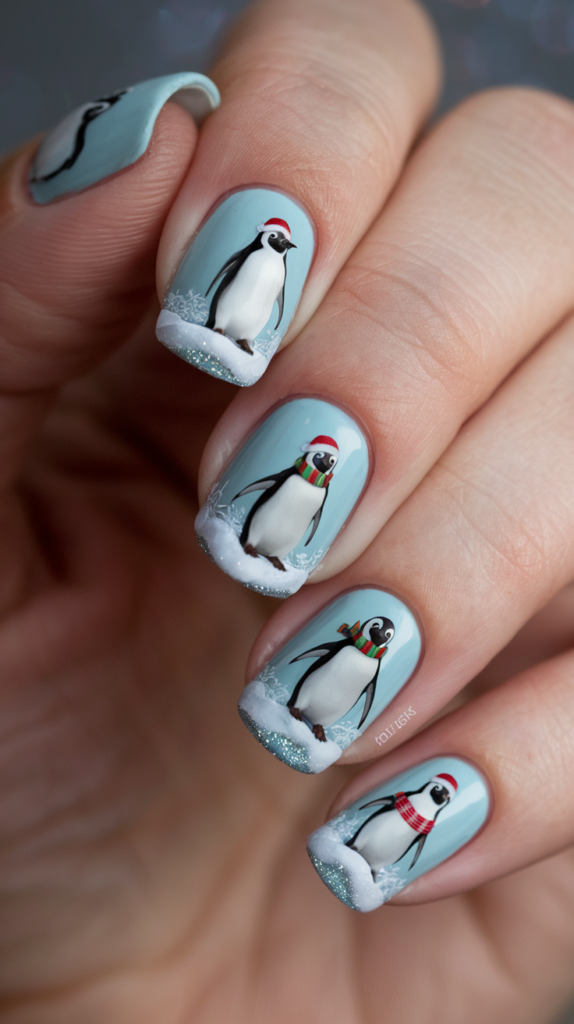
Slide into cuteness with Snowy Penguin Nail Art, an adorable design that waddles your nails into winter with festive charm. Perfect for ice-skating outings or cozy cuddles, this light blue look shines with playful penguins and holiday accessories.
Creating the Snowy Penguin Nail Look
Step 1: Base Prep
Apply a hydrating base coat, then layer a light blue polish for a frosty backdrop across all nails. Use two coats, drying each for a cool, even finish.
Step 2: Shape Penguins
With a fine brush, paint black ovals on each nail for penguin bodies, adding white bellies and faces for a cute contrast. Layer twice for a bold, fluffy look.
Step 3: Add Details
Dot black eyes and orange beaks with a dotting tool, then paint red scarves or green hats with a fine brush for festive flair. Keep accessories small for charm.
Step 4: Enhance with Snow
Dot white snowflakes around the penguins with a fine brush, brushing silver glitter over them for a wintry sparkle. Focus on the background to highlight the penguins.
Step 5: Seal with Top Coat
Finish with a glossy top coat to protect the design and boost its icy shine, ensuring a cute, lasting look. Add a second layer for a polished, snowy finish.
Why It Works
The light blue base sets a frosty, playful scene, while the penguins with scarves and hats add an adorable, festive charm that’s pure winter delight. Its simple yet detailed design makes it a cute, chic holiday standout.
35. Mistletoe Magic Nail Designs for a Subtle Christmas Touch
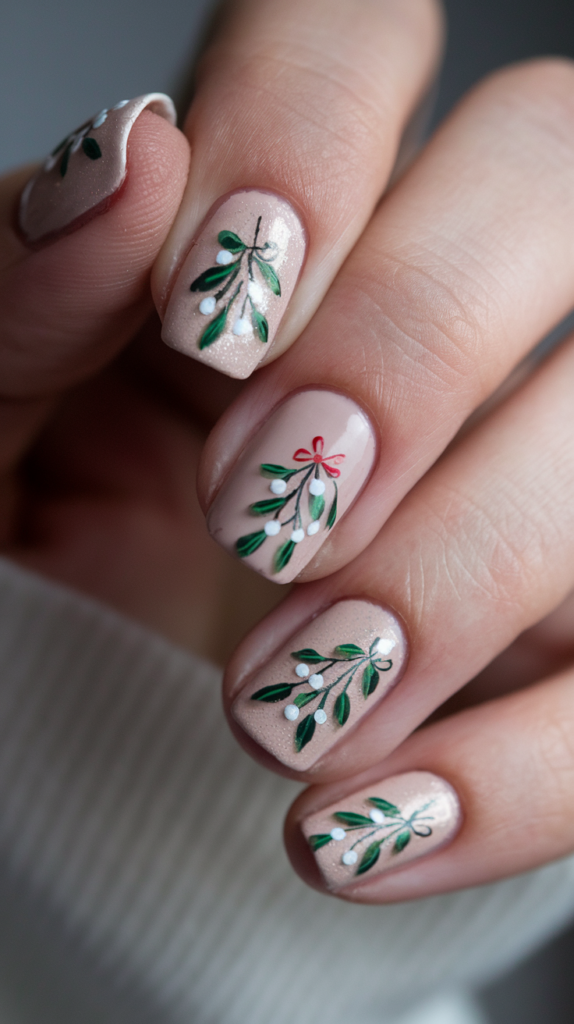
Kiss the season hello with Mistletoe Magic Nail Designs, a subtle design that whispers holiday romance with delicate elegance. Perfect for mistletoe moments or quiet celebrations, this nude-based look blooms with mistletoe and pearls for a refined festive touch.
Creating the Mistletoe Magic Nail Look
Step 1: Base Prep
Apply a protective base coat, then layer a nude polish for a soft, elegant canvas across all nails. Use two coats, drying each for a smooth, even finish.
Step 2: Paint Mistletoe
With a fine brush, paint dark green mistletoe leaves on accent nails, curving them naturally for a delicate, romantic look. Layer twice for a lush, vibrant effect.
Step 3: Add Berries
Dot white berries among the leaves with a dotting tool, or glue tiny pearls with nail adhesive for a glamorous twist. Space them evenly for a balanced charm.
Step 4: Enhance with Shine
Brush a fine silver glitter polish around the mistletoe for a subtle, snowy sparkle, blending lightly with a sponge. Keep it minimal to preserve the elegance.
Step 5: Seal with Top Coat
Finish with a glossy top coat to protect the design and boost its delicate shine, ensuring a polished look. Add a second layer for a lasting, romantic finish.
Why It Works
The nude base offers a subtle, chic canvas, while the mistletoe with pearls adds a delicate, romantic charm that’s pure holiday magic. Its understated elegance makes it a refined, festive whisper perfect for quiet celebrations.
Conclusion
Christmas nail art weaves the season’s joy into every brushstroke, offering endless ways to reflect your festive spirit with style and flair. From classic reds to whimsical penguins, these 35 designs blend tradition with creativity for a holiday look that’s uniquely yours.
Whether you’re dazzling at a party or cozying up by the fire, let these ideas inspire your next manicure with merry magic. Grab your polish and transform your nails into a celebration of the season’s warmth, wonder, and cheer.