
Abstract nail art has become a powerful way to express your personal style, making it the perfect medium for showcasing your creativity and individuality.
Whether you’re heading to a special event, enjoying a casual day out, or simply want to elevate your everyday look, abstract nail designs offer endless possibilities for self-expression.
From bold geometric shapes to delicate watercolor effects, there’s an abstract nail design that perfectly captures your unique aesthetic and personality.
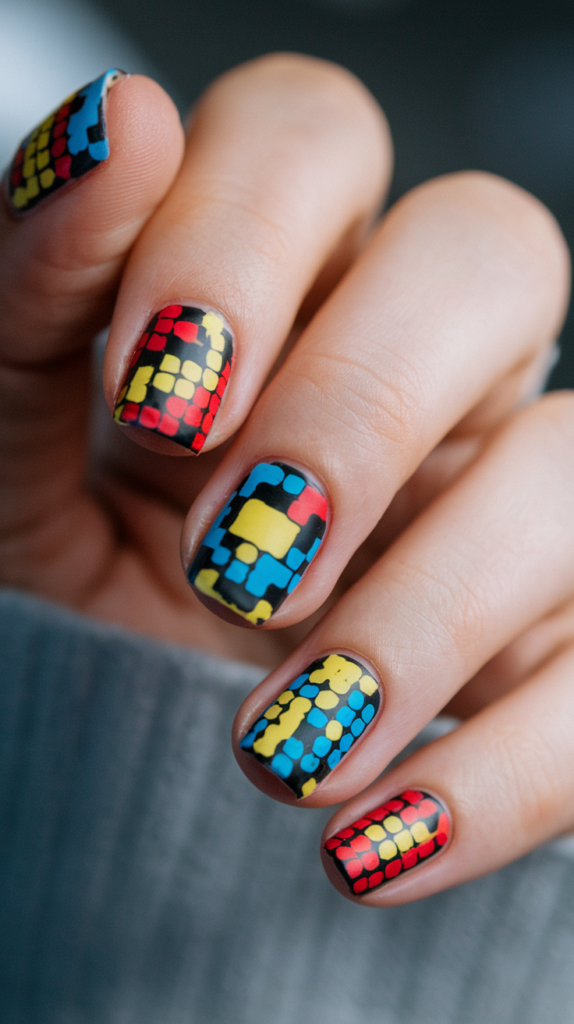
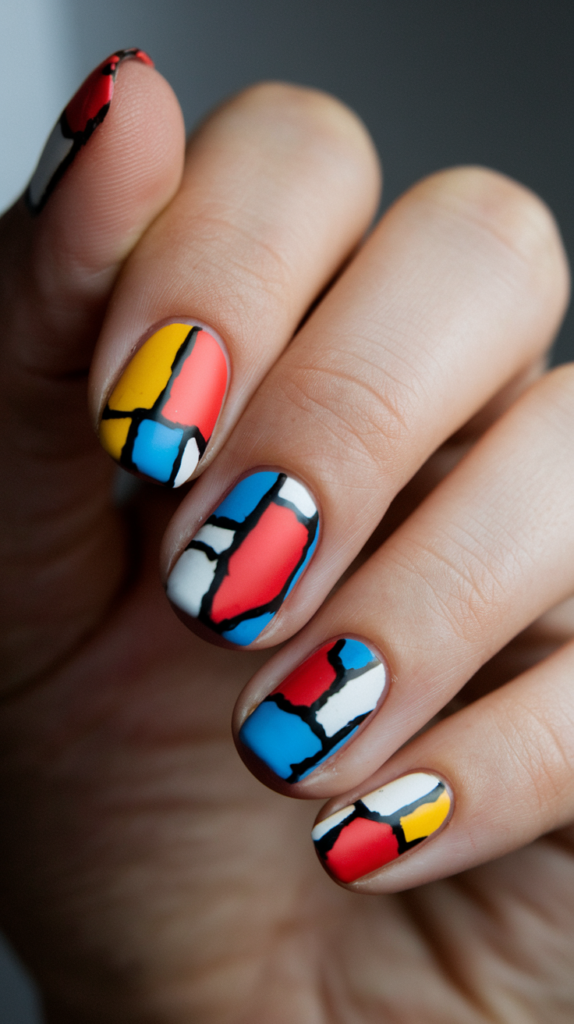
1. Geometric Color Block Nail Designs
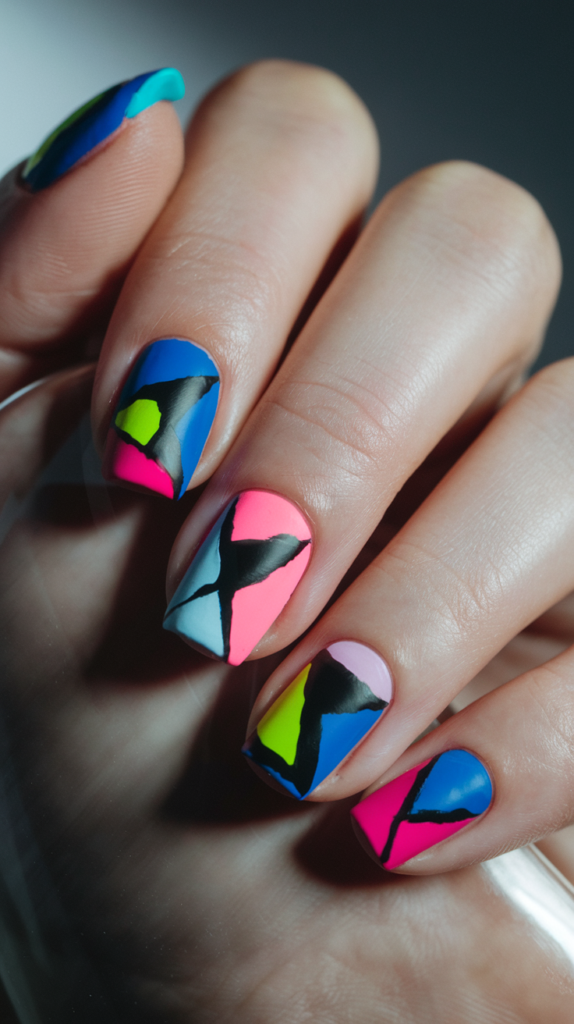
Geometric color block nail art combines clean lines and bold shapes to create a strikingly modern manicure.
This versatile design features squares, triangles, and other geometric forms in vibrant colors, perfect for those who appreciate contemporary style with an artistic edge.
How to Achieve Geometric Nail Art
Step 1: Apply Your Base Color
Start with a neutral base like white or nude to help your geometric shapes stand out. Apply two coats for even coverage and let dry completely.
Step 2: Create Your Geometric Shapes
Using nail tape or a fine brush, outline the shapes you want to create. This provides clean, precise lines essential for geometric designs. You can create triangles, squares, or other angular shapes.
Step 3: Add Color
Fill in each shape with bold, contrasting colors. Take care to stay within the lines for a crisp, professional finish. Allow each section to dry before moving to adjacent areas to prevent smudging.
Step 4: Seal the Design
Finish with a glossy top coat to protect your design and add dimension to your geometric masterpiece.
Best Color Combinations for Geometric Nails
The beauty of geometric nail art lies in its versatility with color. Classic black and white create a minimalist statement, while primary colors offer a playful, retro vibe.
For a sophisticated look, try combining muted tones like dusty rose, sage green, and pale blue with metallic gold or silver accents. These subtle combinations maintain elegance while showcasing the striking geometric patterns.
Don’t hesitate to experiment with unexpected color pairings—contrasting hues create visual interest and make your geometric shapes truly stand out.
Why It Works
Geometric Color Block Nail Art balances precision with creativity, creating a design that’s both structured and artistic.
The clean lines and bold color combinations make this style perfect for both casual and formal occasions, offering versatile wear throughout the seasons.
With its contemporary aesthetic, this design adds a touch of modern sophistication to your overall look.
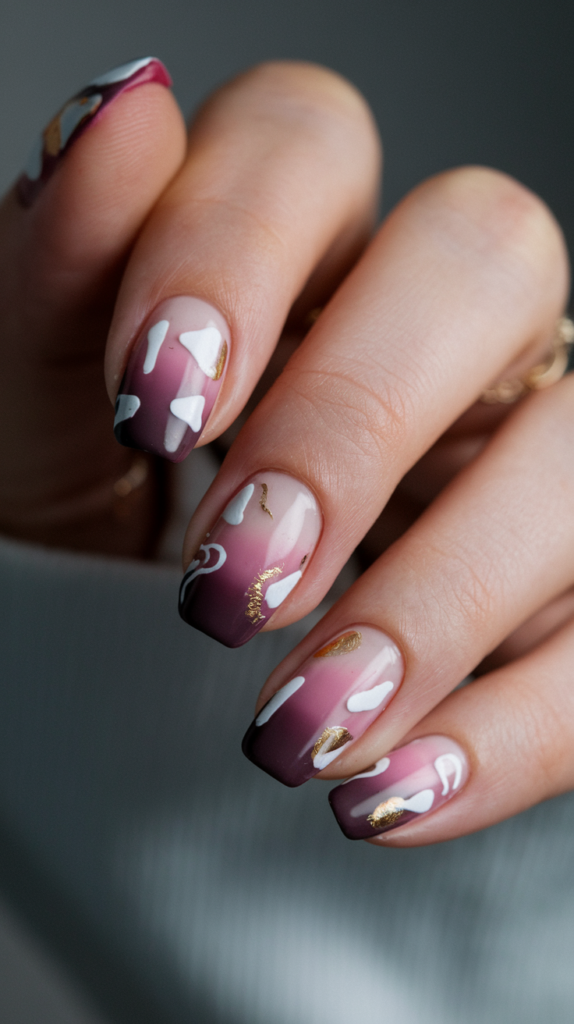
2. Abstract Pastel Strokes
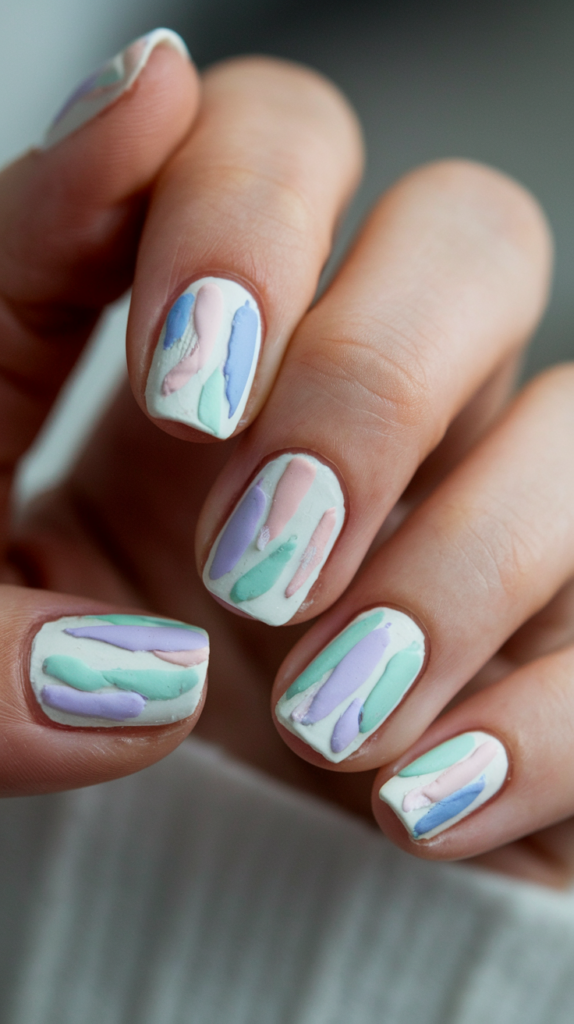
Abstract pastel strokes bring a dreamy, artistic feel to your nails, creating a soft and elegant look perfect for any occasion.
The gentle blending of colors mimics watercolor paintings, offering a refined yet creative aesthetic that showcases your artistic side.
Step-by-Step Guide to Creating Abstract Pastel Strokes
Step 1: Apply a Base Coat
Begin with a clear or nude base to create a neutral canvas for your pastel masterpiece. Allow it to dry completely.
Step 2: Select Your Pastel Colors
Choose complementary pastel shades like baby pink, lavender, mint green, and sky blue. Soft, muted tones work best for this ethereal style.
Step 3: Create the Brushstrokes
Using a small, flat nail brush, gently swipe each pastel color onto your nails in random, flowing strokes. Don’t worry about perfection—the beauty of this design lies in its organic, painterly quality.
Step 4: Blend and Layer
While the colors are still slightly wet, use a clean brush to softly blend where colors meet, creating a seamless transition. Layer additional strokes for depth and dimension.
Step 5: Seal the Design
Once dry, apply a glossy top coat to protect your abstract artwork and enhance the pastel colors.
Perfect Shades for Abstract Pastel Nail Art
The key to successful abstract pastel nail art lies in selecting colors that complement each other while maintaining a soft, dreamy quality.
Lavender paired with mint green creates a cool, refreshing combination, while pale pink and baby blue offer a gentle, romantic feel. For a warmer palette, try peach with lilac or buttercream with pale coral.
For added interest, incorporate subtle metallic or pearl accents to catch the light and give your abstract design an ethereal glow.
Why It Works
Abstract Pastel Strokes nail art combines artistic freedom with elegant sophistication, creating a look that’s both expressive and refined.
The soft color palette ensures versatility, making this design appropriate for both casual settings and special occasions.
With its dreamy, watercolor-like appearance, this nail art style offers a peaceful visual experience that complements any outfit or personal style.
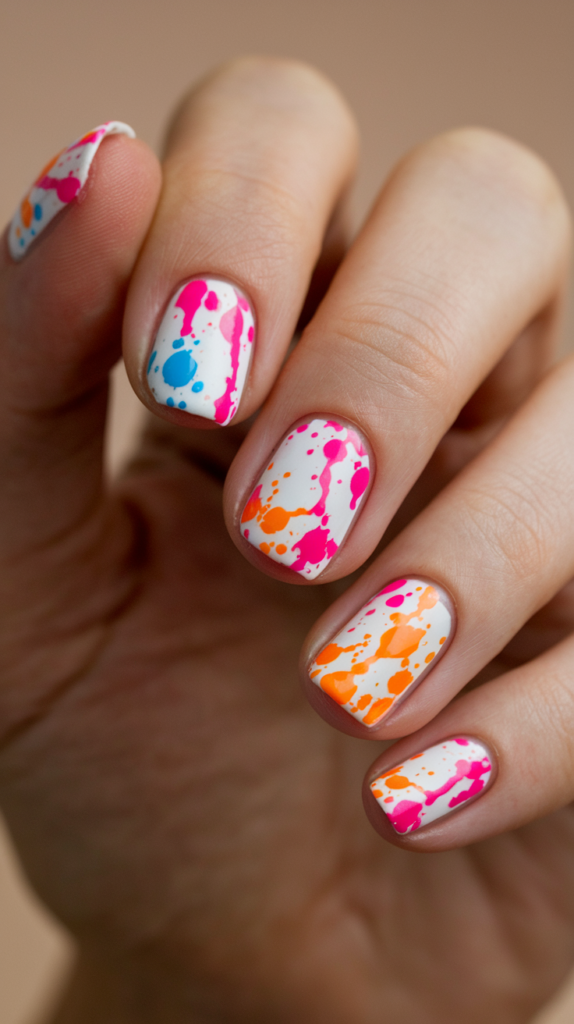
3. Watercolor Splatter Nails
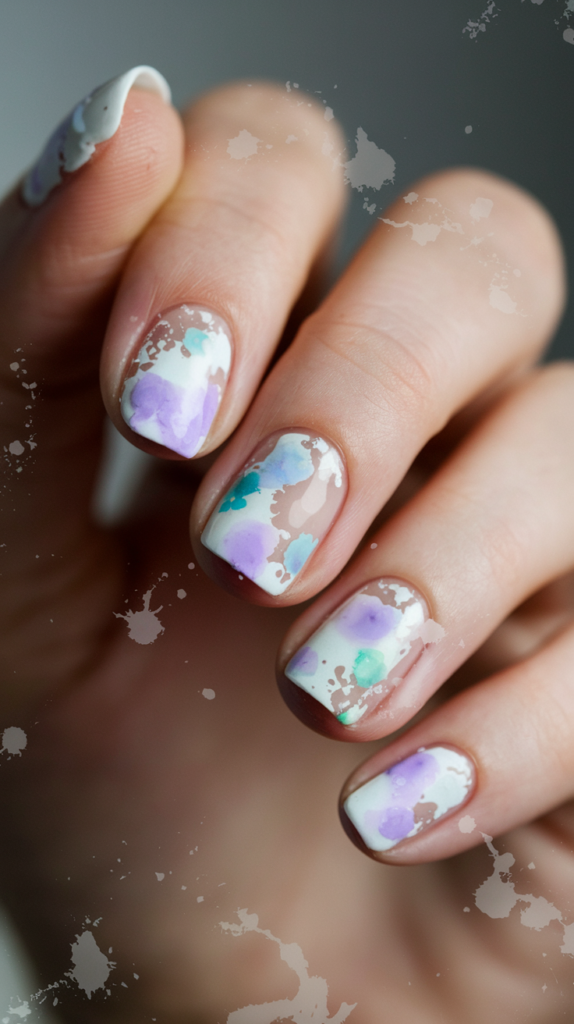
Watercolor splatter nails create a delicate, artistic design reminiscent of beautiful watercolor paintings.
This dreamy technique produces soft, blended splatters of color that blend seamlessly together, perfect for those who appreciate fine art and subtle elegance.
Techniques to Master Watercolor Splatter Nails
Step 1: Prepare the Canvas
Apply a white or light-colored base coat to your nails. This creates the perfect background for your watercolor design to shine.
Step 2: Dilute Your Colors
Select complementary polish colors and dilute them slightly with clear polish or acetone. This creates the translucent effect essential for authentic watercolor looks.
Step 3: Create the Splatter Effect
Using a small brush or sponge, gently dab the diluted colors onto your nails. Allow the colors to blend naturally where they meet, creating soft transitions between shades.
Step 4: Add Texture
For authentic watercolor splatters, use a small brush to flick tiny dots of color across the nail. This creates dimension and mimics the spontaneous nature of watercolor painting.
Step 5: Seal the Artwork
Finish with a glossy top coat to protect your design and enhance the watercolor effect.
Popular Color Combos for Watercolor Splatter Nails
Soft, complementary colors create the most harmonious watercolor effects. Pink, lavender, and sky blue blend beautifully together for a serene, dreamy look.
For a more vibrant approach, try coral, teal, and yellow, which create a lively yet artistic design. The key is choosing colors that blend well without becoming muddy.
Monochromatic watercolor designs using different shades of the same color family—like varying tones of blue or purple—create an elegant, sophisticated appearance.
Why It Works
Watercolor Splatter Nail Art captures the fluid, organic beauty of watercolor painting while maintaining a refined and delicate appearance.
The gentle blending of colors creates a soft, dreamy effect that’s both artistic and elegant, making it suitable for any occasion.
This versatile design can be customized with different color combinations to match your mood, outfit, or the season.
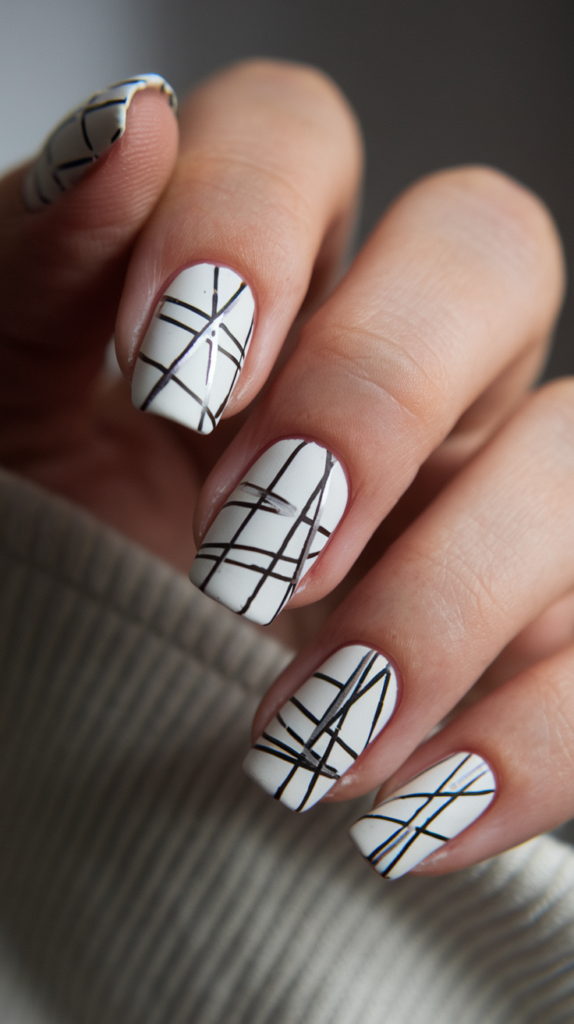
4. Minimalist Dots and Lines
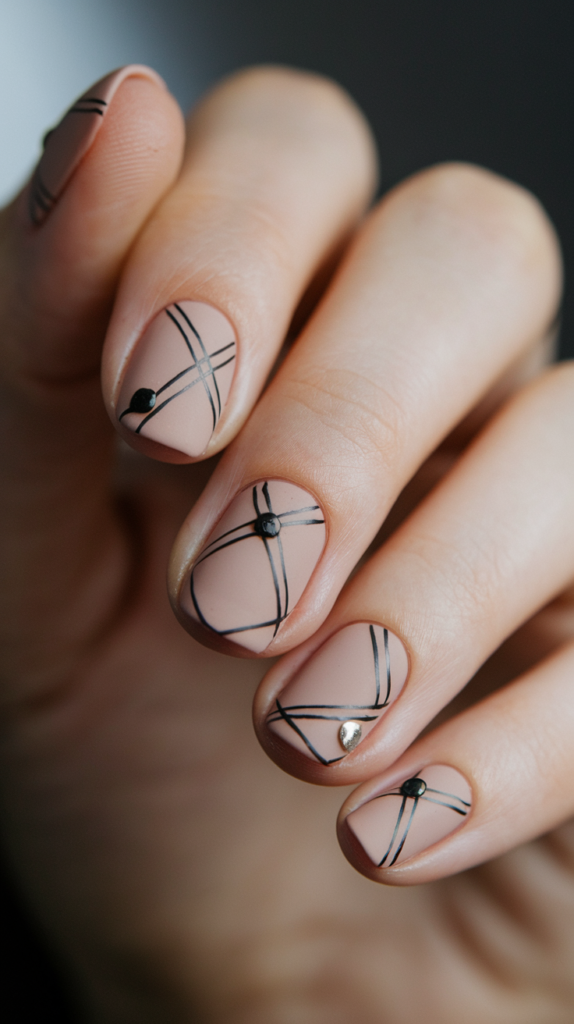
Minimalist dots and lines create a sophisticated and modern abstract nail design that speaks volumes through simplicity.
This elegant style combines clean backgrounds with precisely placed elements, offering a refined yet creative look perfect for those who appreciate understated elegance.
Minimalist Dots and Lines: Key Tips for Precision
Step 1: Create a Clean Base
Apply a neutral or sheer base coat to your nails. Allow it to dry completely—this flawless foundation is essential for showcasing the precise details to come.
Step 2: Prepare Your Tools
For perfect precision, use a fine nail brush, dotting tool, or even a toothpick. These tools allow you to create the delicate lines and dots that define this style.
Step 3: Create Your Design
With a steady hand, add small dots and thin lines to your nails in an asymmetrical pattern. Keep the elements sparse—minimalism relies on negative space to create impact.
Step 4: Experiment with Patterns
Try various arrangements—straight lines, zigzags, crosses, or random placements. The beauty of this design lies in its versatility and personal expression.
Step 5: Seal with a Top Coat
Apply a clear top coat to protect your precise design and enhance its polished appearance.
Top Nail Colors to Complement Minimalist Designs
The power of minimalist nail art lies in its color contrast. A neutral base like beige, pale pink, or soft grey provides the perfect backdrop for your design elements.
For the dots and lines, black creates a classic, timeless look, while white offers a softer alternative. Metallic shades like gold or silver add a touch of luxury without compromising the minimal aesthetic.
For a subtle twist, try using pastel shades for your lines and dots against a neutral background—this creates a softer, more delicate version of the classic minimalist design.
Why It Works
Minimalist Dots and Lines nail art embodies the principle that less is more, creating an effortlessly sophisticated look that never goes out of style.
The precision and intentionality behind each element demonstrate attention to detail and artistic restraint.
This versatile design works beautifully for both professional environments and special occasions, offering a modern take on nail art that’s subtle yet distinctive.
5. Gradient Waves
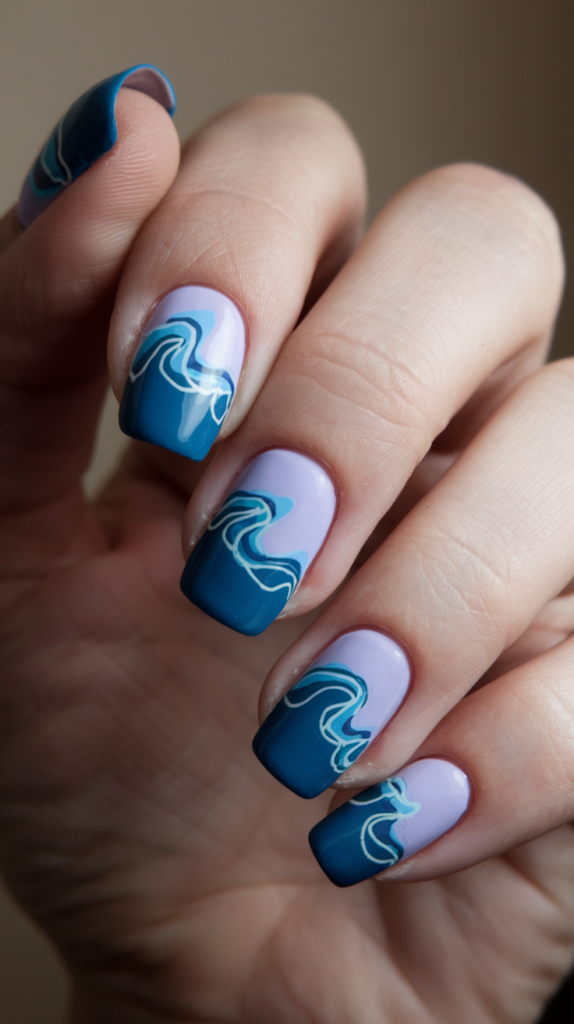
Gradient wave nails capture the mesmerizing flow of ocean waves with smooth color transitions and fluid patterns.
This calming, abstract design creates a sense of movement and tranquility, perfect for those who appreciate organic patterns and soothing aesthetics.
How to Create Gradient Waves on Nails
Step 1: Apply Your Base Color
Begin with the lightest shade of your gradient as the base. Apply evenly and let dry completely before moving to the next step.
Step 2: Prepare Your Gradient
Select two or three complementary colors that will blend together beautifully. Using a makeup sponge, apply horizontal stripes of each color, slightly overlapping where they meet.
Step 3: Create the Wave Effect
Press the sponge onto your nail and gently roll it from side to side to create the wave-like motion. This technique transfers the colors while creating the flowing pattern.
Step 4: Build Dimension
Repeat the sponging process, shifting the position slightly each time to build depth and enhance the wave pattern. The colors should blend seamlessly into each other.
Step 5: Seal with a Top Coat
Apply a glossy top coat to smooth any texture from the sponging process and enhance the liquid-like appearance of the waves.
Best Gradient Colors for a Flowing Design
Ocean-inspired blues and greens create a natural, tranquil wave effect, transitioning from deep navy to turquoise or seafoam green.
For a more dramatic look, try purple fading into lavender or magenta blending into pale pink. The key is choosing colors that create a smooth, natural transition.
Metallic gradients add a luxurious dimension to wave nails, with gold blending into rose gold or silver fading into gunmetal. The reflective quality enhances the fluid, rippling effect.
Why It Works
Gradient Wave Nail Art captures the fluid beauty of natural movement, creating a design that’s both dynamic and peaceful.
The seamless color transitions mimic the organic flow of water, bringing a sense of calm and balance to your manicure.
This versatile design can be adapted with different color combinations to suit any mood or occasion, from subtle neutral waves to bold, vibrant gradients.
6. Abstract French Tips
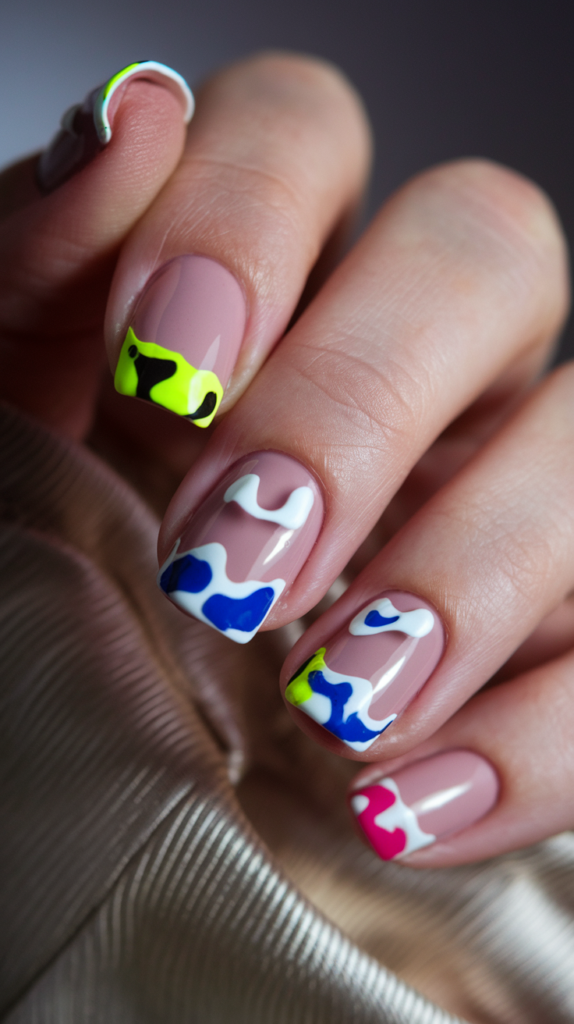
Abstract French tips reimagine the classic French manicure with creative, irregular shapes and bold colors at the nail edge.
This modern twist on a timeless design offers endless possibilities for personalization, perfect for those who appreciate tradition with a contemporary flair.
DIY Abstract French Tips: A Step-by-Step Guide
Step 1: Prepare Your Base
Apply a sheer nude or clear base coat to your nails. This creates a clean canvas that allows your abstract tips to stand out. Let it dry completely.
Step 2: Design Your Abstract Tips
Using a fine brush, create irregular shapes at the tips of your nails. Break away from the traditional straight line by incorporating curves, zigzags, or asymmetrical edges.
Step 3: Add Color
Fill in your abstract tip shapes with bold, contrasting colors. You can use a single color for a more subtle look or multiple colors for a vibrant, playful design.
Step 4: Enhance with Details
For added interest, incorporate small details like dots, thin lines, or metallic accents within or around your abstract tips.
Step 5: Seal the Design
Finish with a clear top coat to protect your creative design and add a glossy finish.
Best Colors to Use for Abstract French Tips
Bold, vibrant colors create a striking contrast against a neutral base. Neon shades like electric pink, lime green, or cobalt blue make a playful statement.
For a more sophisticated take, try deep jewel tones like emerald, sapphire, or burgundy. These rich colors add elegance while maintaining the modern abstract edge.
Metallic finishes in gold, silver, or copper bring a luxurious dimension to abstract French tips, catching the light with every movement of your hands.
Why It Works
Abstract French Tips honor the classic French manicure while infusing it with contemporary creativity and personal expression.
The combination of a clean, neutral base with bold, irregular tips creates a balanced design that’s both eye-catching and sophisticated.
This versatile style works for any occasion, from professional environments to special events, offering a modern twist on a timeless favorite.
7. Asymmetrical Shapes
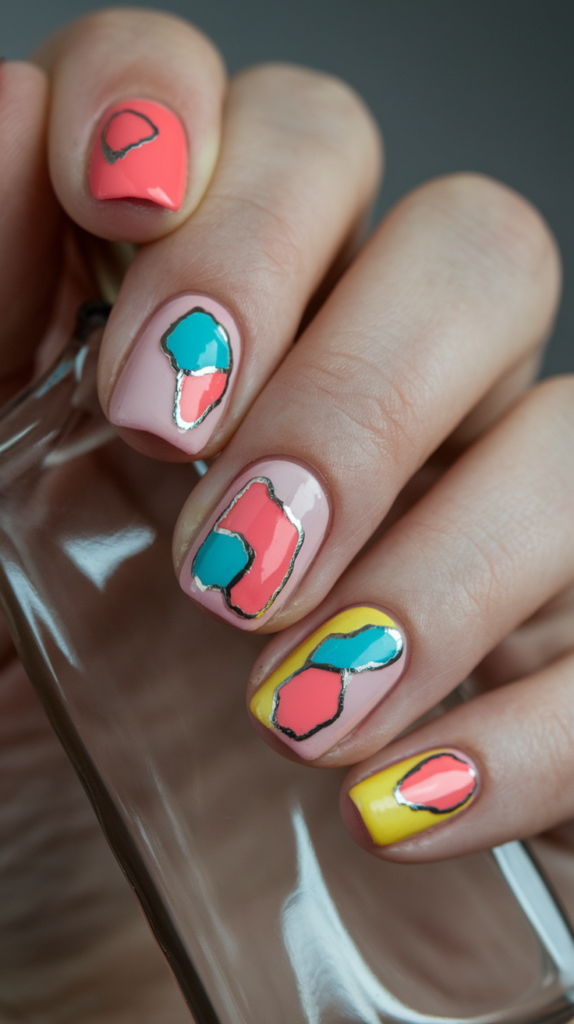
Asymmetrical shape nail art embraces the beauty of imbalance, creating dynamic designs that catch the eye and spark conversation.
This bold abstract style features mismatched shapes, sizes, and placements, perfect for those who appreciate artistic expression and unexpected visual interest.
Asymmetrical Nail Art: The Art of Mismatching Shapes
Step 1: Prepare Your Canvas
Apply a neutral base coat to your nails. This provides a clean background that allows your asymmetrical shapes to stand out. Let it dry completely.
Step 2: Create Your Shapes
Using a fine brush, draw various shapes like circles, triangles, arcs, and rectangles on each nail. The key is to place them asymmetrically—avoid perfect symmetry or alignment.
Step 3: Add Color
Fill in your shapes with bold, contrasting colors. Vary the color placement across nails to enhance the asymmetrical effect.
Step 4: Add Dimension
Create depth by overlapping some shapes or adding outlines in contrasting colors. This adds complexity and visual interest to your design.
Step 5: Seal Your Creation
Apply a glossy top coat to protect your asymmetrical masterpiece and add shine.
Creative Asymmetrical Shape Ideas for Nails
The possibilities for asymmetrical nail art are endless. Try combining geometric shapes with organic forms—pair sharp triangles with soft circles or flowing lines with structured rectangles.
Experiment with scale by placing large shapes on some nails and clustered smaller shapes on others. This creates visual rhythm and enhances the asymmetrical theme.
For a sophisticated approach, use a consistent color palette across all nails while varying the shapes and placements. This creates cohesion within the asymmetry, offering a balanced yet dynamic design.
Why It Works
Asymmetrical Shape Nail Art celebrates artistic freedom and individual expression through deliberate imbalance and unexpected compositions.
The strategic placement of varied shapes creates visual movement across the nails, drawing the eye and sparking conversation.
This bold, contemporary style makes a statement about embracing uniqueness and finding beauty in imperfection.
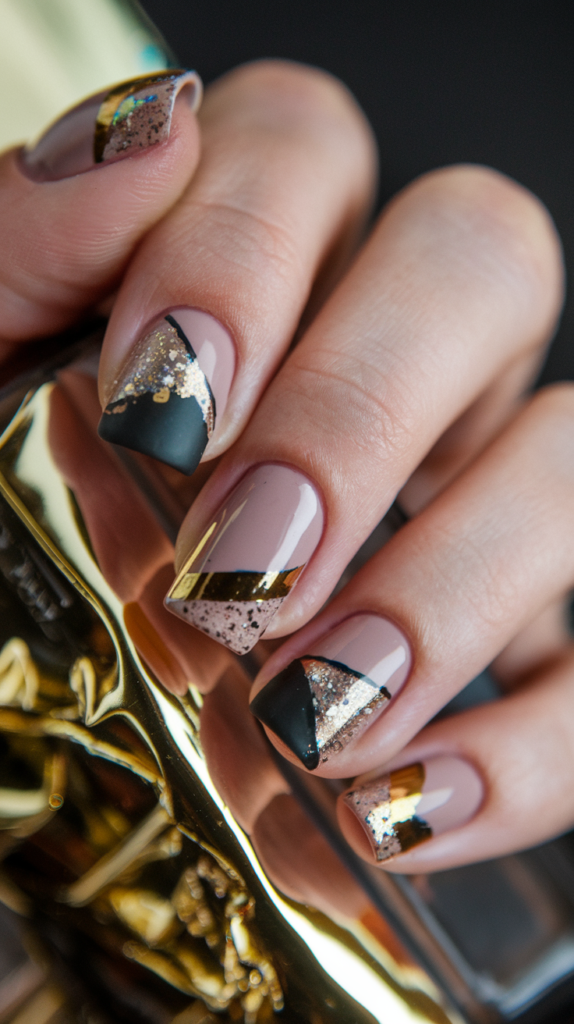
8. Negative Space Geometry
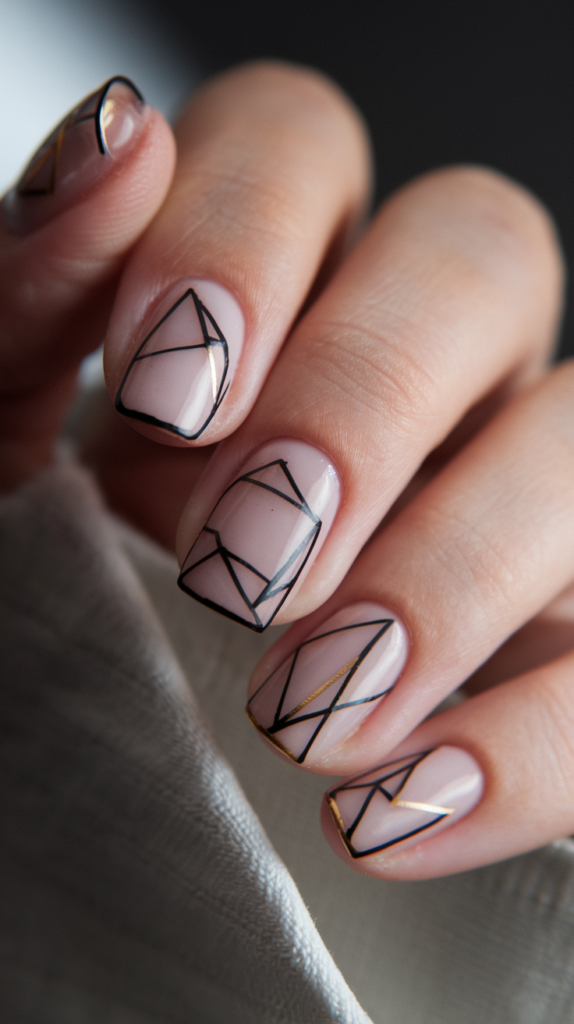
Negative space geometry nail art creates a sophisticated, minimalist design by incorporating the natural nail into geometric patterns.
This elegant style balances painted and unpainted areas, resulting in a clean, modern look that’s both subtle and striking.
What Is Negative Space Nail Art?
Negative space nail art is a technique that intentionally leaves portions of the natural nail visible as part of the design. In geometric negative space designs, painted shapes work in harmony with unpainted areas, creating contrast and visual interest.
This technique creates depth and dimension without adding bulk, resulting in a sleek, contemporary look that works beautifully for both casual and formal occasions.
The unpainted areas become an active part of the design rather than simply a background, offering a fresh approach to nail art that celebrates minimalism and thoughtful composition.
Geometry Designs That Complement Negative Space
Sharp, angular shapes like triangles, diamonds, and chevrons work beautifully with negative space, creating clear definition between painted and unpainted areas.
Thin lines and grids offer a delicate approach to negative space geometry, allowing more of the natural nail to show through while still creating a defined pattern.
For a more dramatic look, try half-moons, asymmetrical color blocking, or diagonal splits. These bold designs make a statement while maintaining the elegant negative space aesthetic.
Why It Works
Negative Space Geometry Nail Art balances simplicity with sophistication, creating a design that’s both understated and visually interesting.
The contrast between painted geometric shapes and the natural nail creates depth and dimension without complexity.
This versatile style works with any color palette, from bold primary colors to subtle neutrals or metallic accents, making it adaptable to any personal style or occasion.
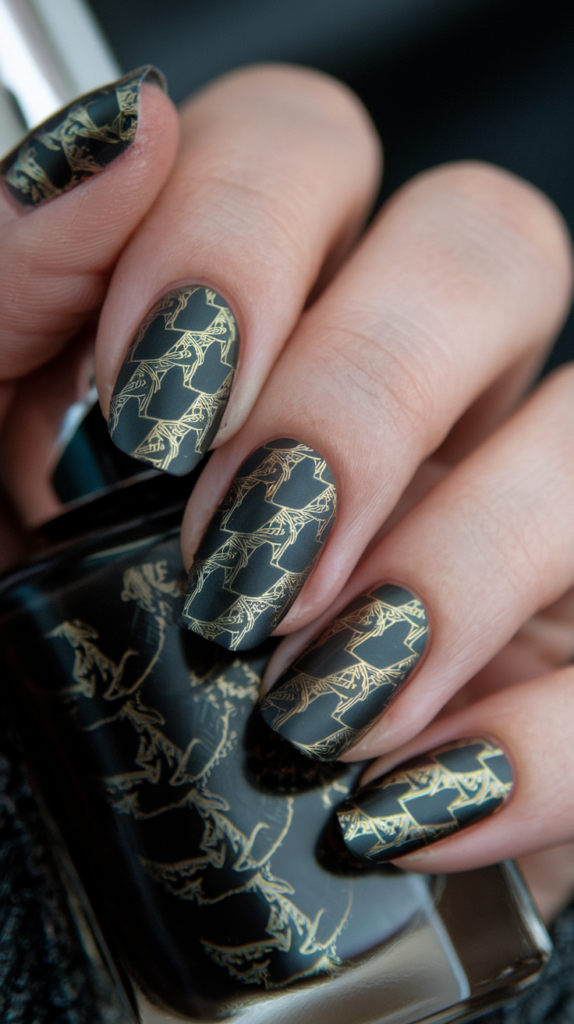
9. Abstract Animal Prints
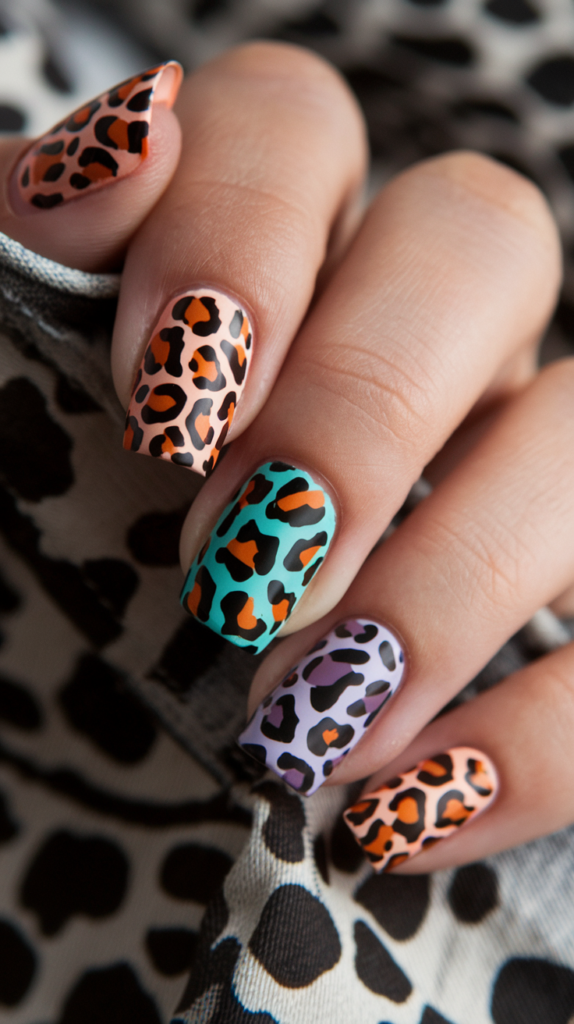
Abstract animal print nail art reimagines traditional animal patterns with unconventional colors and shapes, creating a fresh, artistic interpretation of classic designs.
This playful, creative style combines the wild spirit of animal prints with the freedom of abstract art, resulting in a unique and eye-catching manicure.
How to Recreate Abstract Animal Prints
Step 1: Choose Your Base
Apply a base color that will contrast with your abstract animal pattern. This could be a neutral shade or a bold color depending on your desired effect.
Step 2: Select Your Animal Print
Decide which animal pattern to abstract—leopard spots, zebra stripes, giraffe patches, or snake scales are all excellent options. Each offers unique possibilities for creative interpretation.
Step 3: Create Your Abstract Pattern
Using a fine brush, paint irregular shapes that mimic your chosen animal print but with an abstract twist. Make the shapes more angular, fluid, or exaggerated than traditional patterns.
Step 4: Add Unconventional Colors
Instead of traditional animal print colors, use unexpected shades like neon pink, electric blue, or metallic gold. This transforms the familiar into something fresh and artistic.
Step 5: Seal the Design
Finish with a clear top coat to protect your abstract animal print and add a glossy finish.
Choosing Unique Colors for Abstract Animal Print Nails
The key to abstract animal prints is breaking away from traditional color schemes. Instead of brown leopard spots, try lavender spots on a mint green background. Replace black and white zebra stripes with turquoise and coral.
Neon colors create a playful, energetic look—think electric pink leopard spots on a neon yellow base or lime green zebra stripes on a purple background.
Metallic shades add sophistication to abstract animal prints. Gold leopard spots on a navy background or silver snake scales on a deep burgundy base offer an elegant twist on wild patterns.
Why It Works
Abstract Animal Print Nail Art combines the timeless appeal of animal patterns with modern, artistic interpretation, creating a design that’s both familiar and fresh.
The unexpected color combinations and creative pattern variations make this style a true expression of personal creativity.
This versatile design works for both casual settings and special occasions, offering a playful sophistication that’s always conversation-worthy.
10. Swirls and Twirls
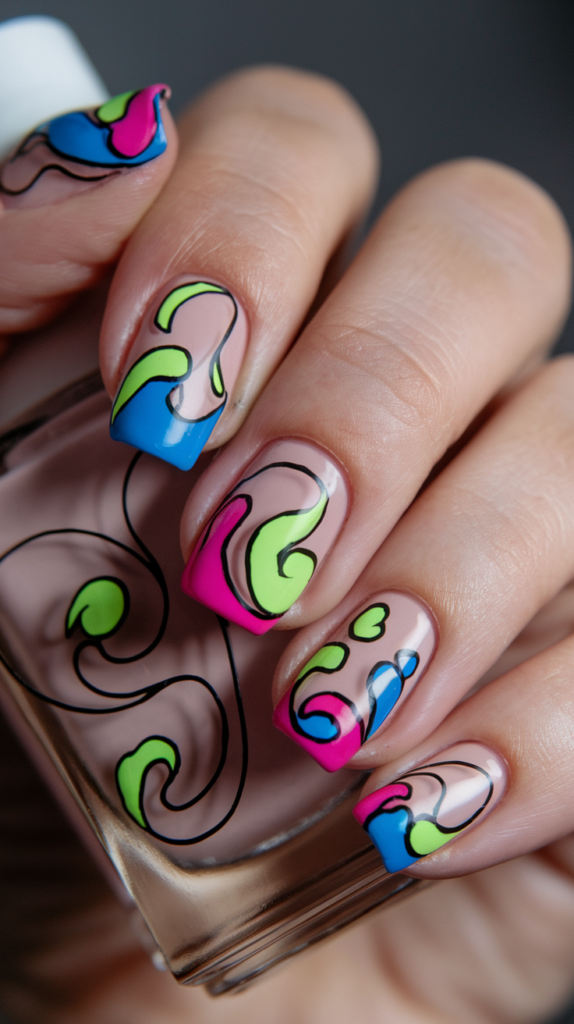
Swirls and twirls nail art captures the joy of movement and fluidity, creating a playful, energetic design that’s full of life.
This whimsical style features flowing curves and spirals that dance across the nails, perfect for those who love bold, expressive nail art with a carefree spirit.
Best Techniques for Perfect Swirls on Nails
Step 1: Prepare Your Canvas
Apply a light-colored base coat to your nails. A neutral background will help your colorful swirls stand out. Allow it to dry completely.
Step 2: Select Your Swirl Colors
Choose two or three complementary colors that will create beautiful contrast in your swirl design. Bold, vibrant shades work especially well for this playful style.
Step 3: Create the Swirls
Using a fine brush, draw flowing, curved lines across your nails. Allow the lines to loop and curl naturally, creating a sense of movement and energy.
Step 4: Add Dimension
Layer different colored swirls, allowing them to overlap in places. This creates depth and visual interest, enhancing the dynamic nature of the design.
Step 5: Seal the Design
Finish with a glossy top coat to protect your swirls and enhance their vibrant colors.
Color Ideas to Make Swirls Pop
Bright, contrasting colors create the most striking swirl designs. Bold combinations like fuchsia and turquoise, orange and purple, or yellow and blue produce eye-catching results.
For a more sophisticated look, try monochromatic swirls using different shades of the same color family. Varying tones of blue or purple create elegant depth while maintaining the playful swirl aesthetic.
Metallic accents add luxurious dimension to swirl designs. Try incorporating gold, silver, or copper swirls among colored ones for a touch of glamour and reflective shine.
Why It Works
Swirls and Twirls Nail Art captures the joy of movement and spontaneity, creating a design that’s both playful and artistically expressive.
The flowing lines and curves create visual movement across the nails, drawing the eye and adding dynamic energy to your look.
This versatile style can be adapted with different color combinations and swirl densities to suit any mood or occasion, from subtle elegant swirls to bold, vibrant patterns.
11. Mixed Media Nail Designs
Mixed media nail designs combine different textures, finishes, and materials to create multi-dimensional abstract art on your fingertips.
This luxurious approach to nail art offers rich visual and tactile interest, perfect for those who love to experiment with innovative techniques and materials.
How to Use Mixed Media in Nail Art
Step 1: Create Your Base
Apply a base color that will complement your mixed media elements. This could be a neutral shade or a bold color depending on your design concept.
Step 2: Plan Your Textures
Decide which textures and finishes you want to incorporate. Popular combinations include matte and glossy finishes, metallic foils, glitter, and 3D elements like tiny studs or beads.
Step 3: Layer the Elements
Begin applying your mixed media elements, working from flat to dimensional. Start with color blocking or patterns, then add metallic foils or glitter, and finally place any 3D elements.
Step 4: Create Contrast
The beauty of mixed media lies in contrasts. Pair matte areas with glossy sections, smooth surfaces with textured elements, or opaque colors with translucent effects.
Step 5: Seal Appropriately
Depending on your design, you may need different top coats for different areas—glossy for some sections, matte for others. Apply carefully to maintain the intended texture contrasts.
Top Textures for Abstract Nail Art
Matte and gloss combinations create subtle but striking texture contrasts. Try a matte base with glossy abstract shapes or a glossy base with matte geometric patterns.
Metallic elements add luxury and dimension. Gold, silver, or copper foils can be applied in torn pieces for an organic look or in precise shapes for a more structured design.
3D elements like microbeads, tiny studs, or thin chains create tactile interest. Use these sparingly and strategically as accents to avoid a bulky or uncomfortable finish.
Why It Works
Mixed Media Nail Designs offer unparalleled depth and dimension through the strategic combination of different textures, finishes, and materials.
The contrast between elements creates visual interest from every angle, with details that catch the light and engage the eye in different ways.
This versatile approach allows for endless creativity and personalization, resulting in truly unique nail art that showcases artistic innovation.
12. Brushstroke Art Nails
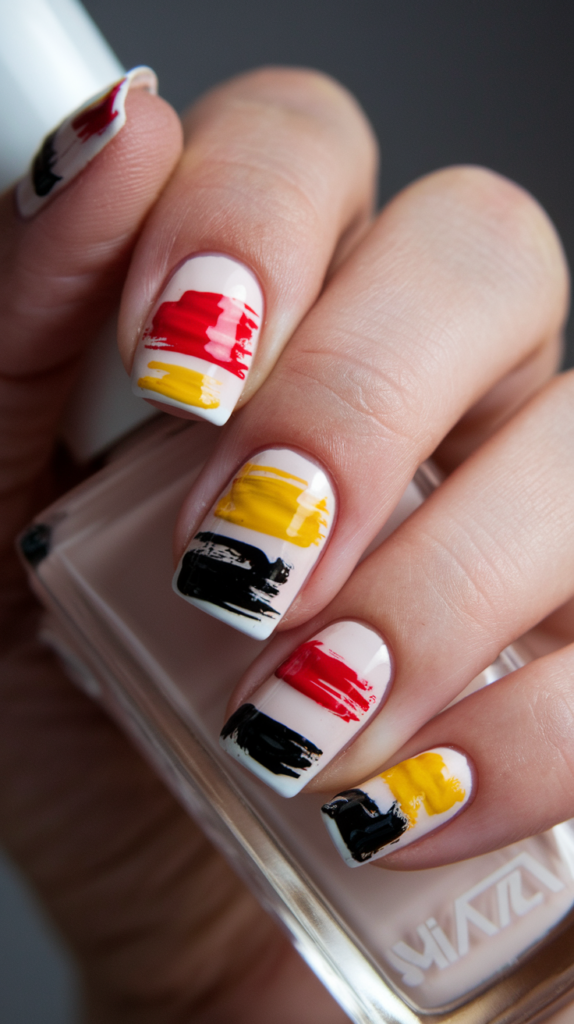
Brushstroke art nails transform your fingertips into miniature canvases, showcasing bold, expressive strokes that capture the essence of abstract painting.
This artistic style celebrates spontaneity and freedom, creating a design that’s both sophisticated and uninhibited.
Creating Unique Brushstroke Art on Nails
Step 1: Prepare Your Canvas
Apply a neutral or clear base coat to your nails. A clean background allows your brushstrokes to stand out as the focal point of the design.
Step 2: Select Your Palette
Choose colors that will create beautiful contrast and complement each other. Like a painter, consider how your colors will interact and blend on the nail.
Step 3: Master the Brushstroke
Using a flat, wide brush, apply bold strokes of color across your nails. Vary the pressure and direction to create different textures and shapes. The goal is to mimic the spontaneous, confident strokes of an artist’s brush.
Step 4: Layer and Overlap
Build depth by layering different colors and allowing brushstrokes to overlap. This creates interesting intersections and color mixing that enhance the artistic effect.
Step 5: Seal the Artwork
Finish with a clear top coat to protect your brushstroke masterpiece and add dimension to the textured design.
Color Combos to Make Brushstroke Art Stand Out
Bold, primary colors create a striking, modern look reminiscent of abstract expressionist paintings. Red, blue, and yellow brushstrokes on a white background offer dramatic contrast.
Monochromatic color schemes using different shades of the same color family create subtle depth and sophistication. Try varying tones of blue from navy to pale sky, or purples from deep violet to soft lavender.
Metallic brushstrokes add luxurious dimension and catch the light beautifully. Gold, silver, and bronze strokes on a dark background create an elegant, artistic statement.
Why It Works
Brushstroke Art Nails capture the spontaneous energy and artistic freedom of abstract painting in miniature form.
The bold, confident strokes create visual movement and expression, making each nail a unique work of art.
This versatile design can be adapted to suit any personal style, from subtle, elegant brushstrokes to bold, vibrant expressions of color.
13. Splatter Paint Nails
Splatter paint nails bring the joyful chaos of abstract expressionism to your fingertips, creating a playful, energetic design full of spontaneous beauty.
This fun technique creates random, organic patterns that are unique every time, perfect for those who love bold, artistic nail art with a carefree spirit.
How to Splatter Paint Nails Without the Mess
Step 1: Prepare Your Workspace
Before beginning, lay down a protective surface like newspaper or paper towels to catch any stray splatters. You may also want to apply petroleum jelly around your nails to make cleanup easier.
Step 2: Apply a Base Coat
Choose a solid base color—white creates a bright canvas for vibrant splatters, while dark colors offer dramatic contrast. Apply evenly and let dry completely.
Step 3: Prepare Your Splatter Tools
Select a few contrasting polish colors for your splatters. A small brush, straw, or even a toothbrush can be used to create different splatter effects.
Step 4: Create the Splatters
Dip your tool in polish and flick it gently over your nails. For a brush or toothbrush, load it with polish and run your finger along the bristles to create a spray effect. A straw works by blowing through it to disperse drops of polish.
Step 5: Seal and Protect
Once your splatters have dried, apply a clear top coat to seal the design and add shine.
Best Colors for Creating Fun Splatter Paint Nails
Neon colors create high-energy splatter nails that practically vibrate with intensity. Electric pink, lime green, and bright orange splatters on a white background make a bold, playful statement.
Contrasting colors produce dynamic, eye-catching results. Try black splatters on white, metallic gold on navy, or white on black for a striking, artistic effect.
Coordinated color families create a more cohesive splatter design. Different shades of the same color, like varying tones of blue or purple, offer a sophisticated take on the splatter technique.
Why It Works
Splatter Paint Nail Art embraces creative spontaneity, resulting in designs that are perfectly imperfect and uniquely expressive.
The random, organic pattern of splatters creates visual interest and captures the free-spirited energy of abstract art.
This playful technique allows for endless color combinations and variations, making each manicure a one-of-a-kind artistic expression.
14. Chaotic Lines
Chaotic lines nail art creates dynamic movement and energy through seemingly random, intersecting lines that dance across your nails.
This contemporary abstract style offers sophisticated edge with its artistic disorder, perfect for those who appreciate modern, graphic designs.
How to Master Chaotic Lines Nail Art
Step 1: Create a Smooth Base
Apply a solid base color to your nails—white, nude, or a bold shade. The base will determine the overall mood of your chaotic lines design
Add a small dot of clear polish on top of the brightest stars while the nail is still slightly tacky. This creates a raised, dimensional effect like twinkling stars.
Step 5: Seal with Top Coat
Apply a generous layer of glossy top coat to protect your cosmic masterpiece and enhance the depth and shine of your galaxy design.
Best Colors for Galactic Nail Art Designs
Deep, rich colors create the most authentic cosmic backgrounds. Black, navy blue, or deep purple bases represent the darkness of space, providing perfect contrast for brighter galactic elements.
Nebula colors add vibrancy and dimension to your cosmic design. Purples, blues, pinks, and teals blend beautifully to mimic the colorful gas clouds of distant nebulae and galaxies.
Metallic accents in gold, silver, or copper represent celestial bodies and add luxurious dimension to your cosmic nails. These can represent planets, shooting stars, or other astronomical phenomena.
Why It Works
Cosmic Splatter Nail Art captures the vast beauty of the universe in miniature form, creating a design that’s both awe-inspiring and artistic.
The contrast between the dark background and the vibrant nebula colors creates depth and dimension that mimics the infinite expanse of space.
This versatile design can be as subtle or as bold as you desire, allowing you to create a personalized interpretation of the cosmos on your fingertips.
15. Marble Abstract Nails
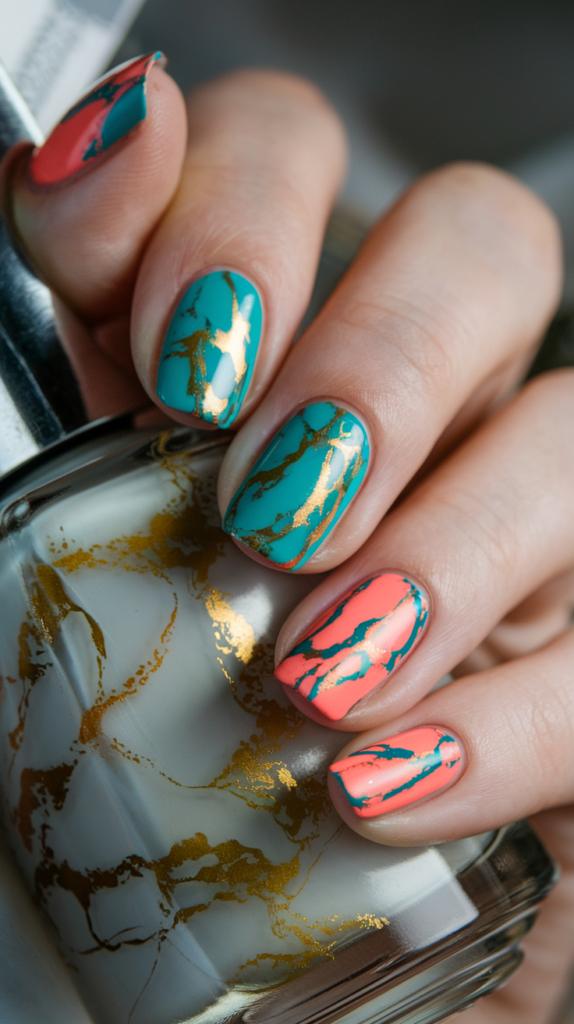
Marble abstract nails reimagine the classic elegance of marble with vibrant, unconventional colors and flowing patterns.
This luxurious design mimics the natural veining and movement of stone in a colorful, modern interpretation, creating a sophisticated yet playful manicure.
How to Create Colorful Marble Abstract Nails
Step 1: Apply a Light Base
Begin with a light-colored base like white or pale pink. This provides a clean canvas that will allow your marble veining to stand out clearly. Apply two coats for even coverage and let dry completely.
Step 2: Select Your Marble Colors
Choose two or three colors that will blend beautifully together. For vibrant marble, select bright, unconventional shades rather than traditional marble colors.
Step 3: Create the Marble Effect
Drop small amounts of your chosen colors onto the nail. Using a thin brush or toothpick, gently swirl the colors together, creating delicate veins that mimic the natural patterns found in marble.
Step 4: Add Dimension
For realistic marble veining, add a few very thin lines in a contrasting color to represent the deeper veins in stone. White or metallic veins on colorful marble creates beautiful dimension and realism.
Step 5: Seal the Design
Finish with a glossy top coat to protect your marble design and enhance its luxurious, stone-like appearance.
Unique Color Schemes for Marble Nail Art
Vibrant jewel tones create a bold, modern marble effect. Try combinations like emerald green with royal blue, or amethyst purple with magenta for rich, striking designs that stand out.
Pastel marbling offers a softer, more delicate approach. Blend gentle shades of lavender with mint green, or baby blue with pale pink for a dreamy, ethereal marble effect.
Metallic accents elevate marble designs to luxurious heights. Add gold or silver veining to colored marble for a glamorous twist that catches the light and adds dimension.
Why It Works
Marble Abstract Nail Art combines the timeless elegance of stone with modern color interpretations, creating a design that’s both classic and contemporary.
The fluid, organic patterns of marble veining add natural beauty and movement to your nails, creating visual interest from every angle.
This versatile design can be customized with countless color combinations, allowing you to create marble nail art that perfectly complements your personal style.
16. Geode Inspired Nails
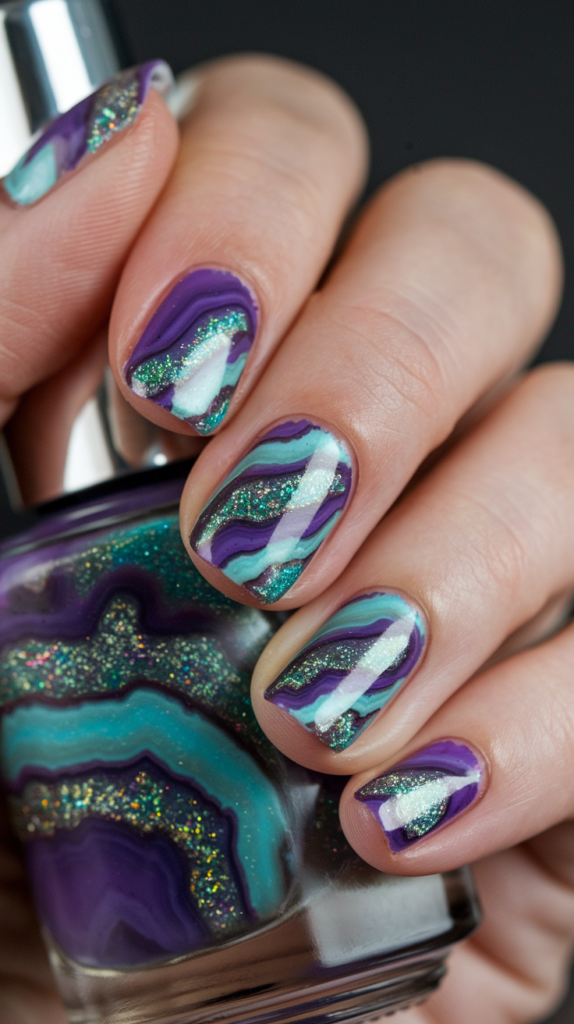
Geode inspired nail art captures the natural beauty of crystal formations with glittering centers and rich, encasing layers.
This luxurious design transforms your nails into miniature gemstone masterpieces, perfect for those who love statement manicures with organic elegance.
Geode Nail Art: What You Need to Get Started
Step 1: Create a Dark Base
Apply a deep, rich base color like navy blue, deep purple, or black. This will represent the outer stone of the geode and provide dramatic contrast for the crystal center. Allow it to dry completely.
Step 2: Form the Geode Shape
Using a fine brush, create an irregular shape in the center of each nail. This will be the crystal formation at the heart of your geode. The shape should be organic and asymmetrical, mimicking natural crystal cavities.
Step 3: Add the Crystal Layers
Working from the outer edge inward, apply layers of color that gradually lighten toward the center. For example, if creating an amethyst geode, start with dark purple at the edge, then medium purple, then light lavender.
Step 4: Add Sparkle and Dimension
Apply glitter or metallic polish to the innermost section to represent the crystalline center. For added realism, use a dotting tool to create small crystal points along the inner edges.
Step 5: Finish with Gold or Silver Edging
Using metallic polish, outline the geode formation to represent the mineral deposits often found in natural geodes. Seal with a generous layer of glossy top coat for dimension and protection.
Color Palettes for Stunning Geode Nails
Amethyst geodes feature rich purple tones ranging from deep plum to pale lavender, with clear or silver crystals at the center. This classic geode coloration offers sophisticated beauty with royal undertones.
Teal and turquoise geodes mimic rare minerals with oceanic blue-green hues. Start with deep teal at the outer edge, progressing to aqua and finally pale mint at the center, with silver or white crystals for contrast.
For a bold statement, try pink agate-inspired geodes with shades transitioning from magenta to pale rose, finished with gold edging and clear crystals at the center. This feminine twist on geode nails offers vibrant elegance.
Why It Works
Geode Inspired Nail Art transforms natural geological formations into wearable art, creating a design that’s both organic and luxurious.
The contrast between the dark outer edge and the glittering crystal center creates depth and visual interest that catches the light beautifully.
This versatile design can be customized with countless color combinations, allowing you to create geode nails that reflect your personal style and color preferences.
17. Retro Abstract Nails
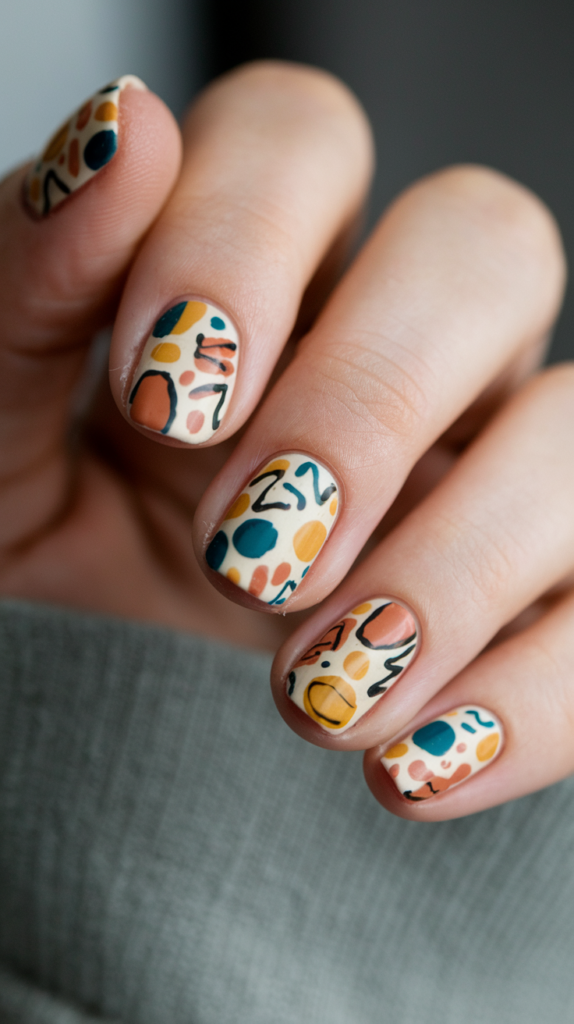
Retro abstract nails bring back the bold, geometric patterns of decades past with a modern, artistic twist.
This nostalgic yet fresh design combines vintage-inspired shapes and colors for a manicure that’s both stylish and conversation-starting.
How to Incorporate Retro Patterns into Nail Art
Step 1: Choose a Retro-Inspired Base
Apply a base color that evokes vintage charm—think cream, tan, or a muted pastel. These softer backgrounds allow your bold retro patterns to stand out. Let it dry completely.
Step 2: Select Your Retro Patterns
Decide which vintage-inspired patterns to incorporate. Popular choices include geometric shapes, wavy lines, circles, and psychedelic swirls reminiscent of the ’60s and ’70s.
Step 3: Create Your Retro Designs
Using a fine brush, carefully paint your chosen patterns onto each nail. For precision with geometric shapes, use nail tape to create clean lines and perfect angles.
Step 4: Add Vintage Color Accents
Fill in your patterns with retro color combinations like mustard yellow and avocado green, burnt orange and brown, or teal and coral. These nostalgic color pairings enhance the vintage feel.
Step 5: Seal with a Top Coat
Finish with a glossy or matte top coat depending on the era you’re channeling—glossy for ’60s mod, slightly matte for ’70s bohemian.
Bold Color Combos for Retro Abstract Nails
’70s-inspired earth tones create a warm, nostalgic palette. Combinations of mustard yellow, burnt orange, chocolate brown, and avocado green evoke the decade’s distinctive aesthetic.
’60s mod style features bold, contrasting colors. Try black and white geometric patterns accented with pops of red, royal blue, or sunshine yellow for an eye-catching, graphic look.
Psychedelic color schemes blend vibrant hues in swirling patterns. Combinations of purple, pink, orange, and electric blue create the trippy, energetic vibe of late ’60s design.
Why It Works
Retro Abstract Nail Art captures the distinctive aesthetic of past decades while infusing it with contemporary nail art techniques and finishes.
The bold patterns and nostalgic color combinations create a statement look that’s both familiar and fresh, appealing to those who appreciate vintage style with a modern twist.
This versatile design can channel different eras and moods, from sleek ’60s modernism to earthy ’70s bohemian vibes, allowing for personal expression within the retro framework.
18. Abstract Faces on Nails
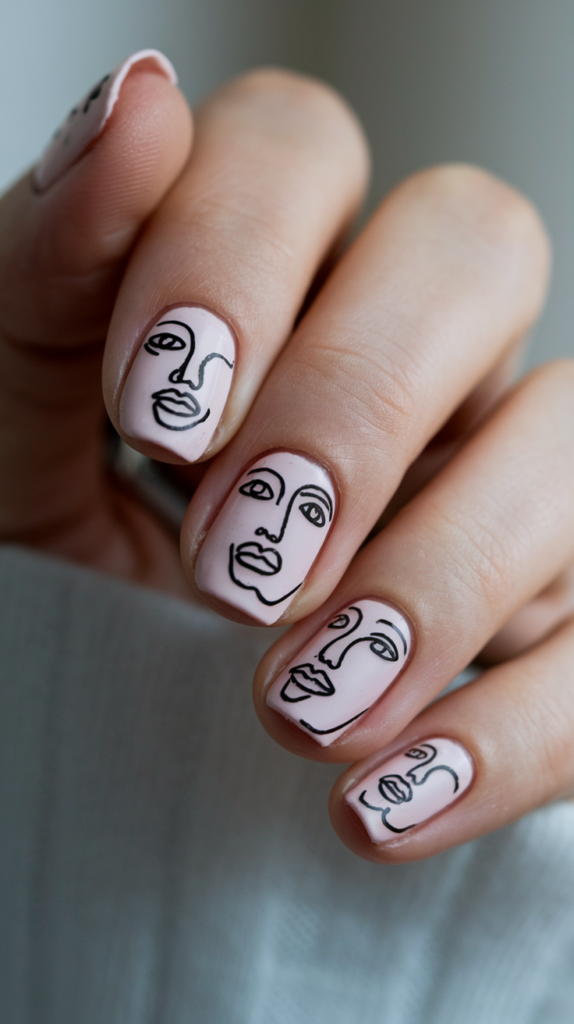
Abstract face nail art transforms your fingertips into miniature modern art canvases, featuring minimalist line drawings that capture the essence of facial expressions.
This artistic, sophisticated design brings a gallery-worthy aesthetic to your nails, perfect for those who appreciate contemporary art and minimalist style.
Creating Minimalist Line Drawings on Nails
Step 1: Prepare a Clean Canvas
Apply a neutral base color like white, nude, or soft pink. This creates the perfect backdrop for your abstract face designs, similar to a gallery wall. Let it dry completely.
Step 2: Practice Your Face Designs
Before painting on your nails, sketch a few simple, abstract face designs on paper. Focus on capturing expressions with minimal lines—a curve for a brow, a small arc for a smile, two dots for eyes.
Step 3: Draw the Faces
Using a fine nail art pen or an extremely thin brush, carefully draw your abstract faces on each nail. Keep the lines thin and deliberate, embracing the minimalist aesthetic.
Step 4: Add Character
Create variety by giving each face a different expression or orientation. Some can be profile views, others front-facing, with various emotions from contemplative to joyful.
Step 5: Seal with a Top Coat
Once your abstract faces have dried, apply a clear top coat to protect your artistic design and add a polished finish.
How to Make Abstract Face Art Look Chic
Embrace negative space in your designs, allowing the clean background to frame your abstract faces. The contrast between the minimalist line drawings and the empty space creates a sophisticated, gallery-like aesthetic.
For a cohesive yet varied look, maintain a consistent style across all nails while changing the expression or position of each face. This creates a collection of related works rather than identical designs.
Consider subtle color variations to enhance your abstract face art. While black lines on a white background offer classic contrast, try navy on cream, gold on nude, or white on black for an equally chic effect.
Why It Works
Abstract Face Nail Art transforms the simple line drawing into sophisticated nail art, creating a design that’s both intellectual and stylish.
The minimalist approach emphasizes the artistry of creating expressive faces with just a few carefully placed lines, showcasing both restraint and creativity.
This versatile design works beautifully in professional environments and artistic settings alike, offering a subtle yet distinctive way to express your appreciation for modern art.
19. Iridescent Abstract Nails
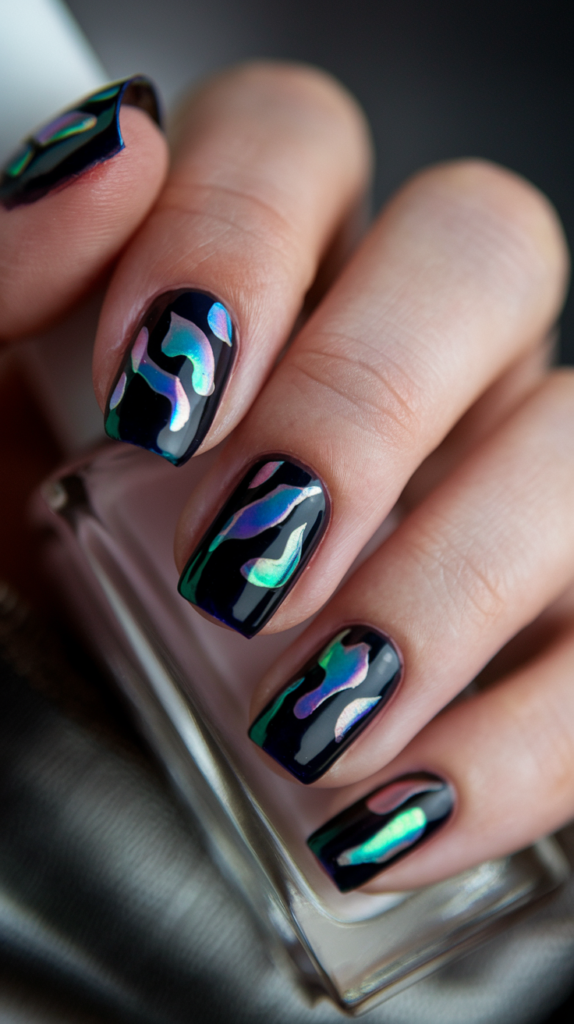
Iridescent abstract nails capture the magical color-shifting properties of holographic materials, creating a mesmerizing design that changes with every movement.
This enchanting style transforms your nails into prismatic works of art, perfect for those who love dynamic, light-catching nail designs.
How to Create Stunning Iridescent Nail Art
Step 1: Apply a Dark Base Coat
Start with a dark base color like black, navy, or deep purple. This creates dramatic contrast that enhances the iridescent effect. Apply two coats for even coverage and let dry completely.
Step 2: Choose Your Iridescent Materials
Select holographic or iridescent polishes, foils, or powders for your design. These special finishes contain light-reflecting particles that shift colors when viewed from different angles.
Step 3: Create Abstract Shapes
Using a fine brush, apply the iridescent polish in abstract shapes across your nails. For foils, apply a thin layer of clear polish to the areas you want to cover, then press small pieces of iridescent foil onto the sticky surface.
Step 4: Layer Different Iridescent Effects
For added dimension, layer different types of iridescent materials. Try combining holographic polish with iridescent flakes or shimmering powders for a multi-dimensional effect.
Step 5: Seal with a Glossy Top Coat
Apply a generous layer of glossy top coat to seal and protect your design while maximizing the iridescent shine.
Best Iridescent Polishes for Abstract Nails
Blue-to-purple shifting iridescent polishes create a cosmic, otherworldly effect reminiscent of galaxies and northern lights. These cool-toned shifts work beautifully against black or deep blue bases.
Pink-to-gold shifting holographics offer a warm, romantic glow that transforms from rose to amber depending on the light. These warm-toned iridescent finishes complement deep burgundy or chocolate bases.
Multi-chrome iridescent polishes that shift between three or more colors create the most dynamic abstract designs. These complex color-shifters can transform from green to blue to purple, offering endless visual interest.
Why It Works
Iridescent Abstract Nail Art harnesses the magical quality of color-shifting materials to create a design that’s constantly changing and evolving with movement and light.
The contrast between the dark base and the luminous, prismatic elements creates depth and drama that draws attention to your nails.
This versatile design works for both special occasions and everyday wear, offering a touch of enchantment that elevates any look.
20. Cosmic Splatter Nails
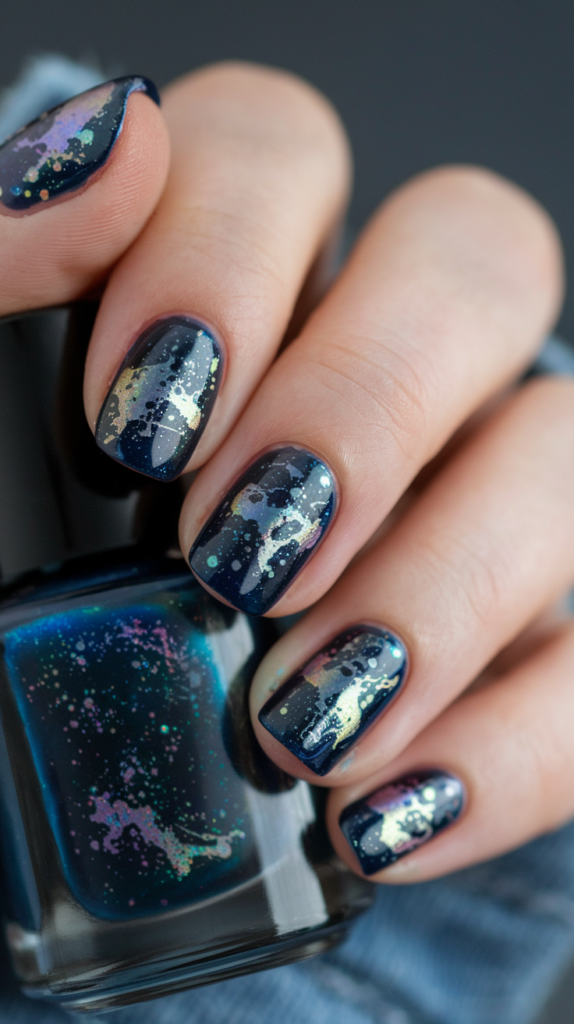
Cosmic splatter nails bring the breathtaking beauty of the night sky to your fingertips with abstract galaxies, nebulae, and stardust effects.
This celestial-inspired design creates a mystical, otherworldly manicure that’s both artistic and awe-inspiring.
Step-by-Step Guide to Creating Cosmic Nails
Step 1: Create a Dark Galaxy Base
Apply a black or deep navy base to your nails. This represents the darkness of space and provides the perfect backdrop for your cosmic elements. Let it dry completely.
Step 2: Build the Galaxy
Using a makeup sponge, dab purple, blue, and pink polish onto your nails in an overlapping pattern. Focus the colors in certain areas to create the look of nebulae and galactic clouds. Blend the edges for a seamless cosmic effect.
Step 3: Add Stardust
Dip a small brush or toothbrush in white polish and flick it over your nails to create tiny stars. Vary the size and density of the splatters to mimic the random pattern of stars in the night sky.
Step 4: Create Bright Stars
Using a dotting tool, add a few larger white dots to represent brighter stars. For extra dimension, add a tiny dot of silver or gold in the center of some of these stars to create a twinkling effect.
Add a small dot of clear polish on top of the brightest stars while the nail is still slightly tacky. This creates a raised, dimensional effect like twinkling stars.
Step 5: Seal with Top Coat
Apply a generous layer of glossy top coat to protect your cosmic masterpiece and enhance the depth and shine of your galaxy design.
Best Colors for Galactic Nail Art Designs
Deep, rich colors create the most authentic cosmic backgrounds. Black, navy blue, or deep purple bases represent the darkness of space, providing perfect contrast for brighter galactic elements.
Nebula colors add vibrancy and dimension to your cosmic design. Purples, blues, pinks, and teals blend beautifully to mimic the colorful gas clouds of distant nebulae and galaxies.
Metallic accents in gold, silver, or copper represent celestial bodies and add luxurious dimension to your cosmic nails. These can represent planets, shooting stars, or other astronomical phenomena.
Why It Works
Cosmic Splatter Nail Art captures the vast beauty of the universe in miniature form, creating a design that’s both awe-inspiring and artistic.
The contrast between the dark background and the vibrant nebula colors creates depth and dimension that mimics the infinite expanse of space.
This versatile design can be as subtle or as bold as you desire, allowing you to create a personalized interpretation of the cosmos on your fingertips.
21. Mosaic Tile Nails
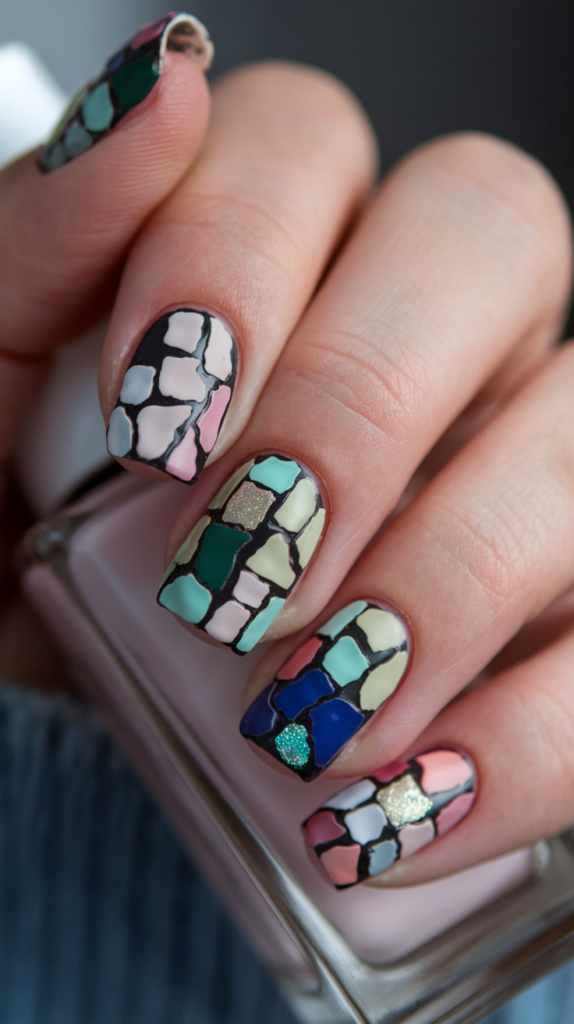
Mosaic tile nails transform your fingertips into miniature works of art, featuring small, colorful shapes that fit together like ancient mosaic masterpieces.
This intricate design combines precision with vibrant colors, creating a sophisticated and eye-catching manicure that honors an age-old art form.
How to Recreate Mosaic Art on Nails
Step 1: Create a Neutral Base
Apply a neutral base color like beige, white, or light gray. This represents the grout or background of traditional mosaics and helps your colorful tiles stand out. Let it dry completely.
Step 2: Plan Your Mosaic Pattern
Decide whether you want a geometric mosaic with regular shapes or a more artistic design with varied pieces. Having a mental image of your pattern will help guide your application.
Step 3: Create the Mosaic Tiles
Using a fine brush, paint small shapes in various colors across your nails. Traditional mosaic tiles are squares or rectangles, but you can also incorporate triangles, diamonds, or irregular shapes for a modern twist.
Step 4: Add Detail with Tiny Gaps
Leave small spaces between each “tile” to mimic the grout lines in real mosaics. These negative spaces are what give the design its authentic mosaic appearance.
Step 5: Seal with a Top Coat
Apply a glossy top coat to protect your intricate design and unify the mosaic pieces with a smooth, polished finish.
Popular Colors for Mosaic Tile Nails
Mediterranean-inspired color schemes feature rich blues, teals, whites, and golds, evoking the traditional mosaics of ancient Greece and Rome. This timeless palette creates an elegant, classic mosaic look.
Moroccan tile patterns incorporate vibrant jewel tones like emerald green, sapphire blue, ruby red, and amber yellow. These bold combinations create an exotic, ornate mosaic design reminiscent of North African art.
Contemporary color palettes might include pastel pinks, lavenders, mint greens, and soft blues for a modern interpretation of the traditional mosaic technique. These softer hues create a delicate, feminine take on the classic tile design.
Why It Works
Mosaic Tile Nail Art transforms an ancient decorative technique into a wearable modern masterpiece, creating a design that’s both timeless and fresh.
The intricate arrangement of small, colorful shapes creates visual interest and texture that catches the light from every angle.
This versatile design can be customized with countless color combinations and patterns, allowing you to create mosaic nail art that reflects your personal style and cultural inspirations.
22. Abstract Floral Nail Art
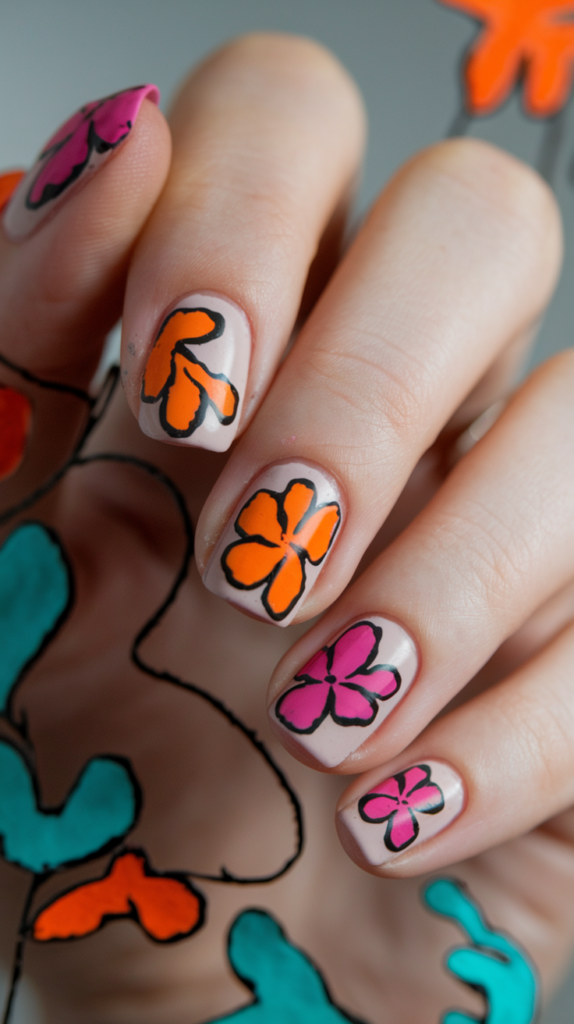
Abstract floral nail art captures the essence of flowers through loose, artistic interpretations rather than literal depictions.
This free-spirited design celebrates the beauty of blooms with expressive brushstrokes and fluid forms, perfect for those who appreciate artistic, feminine nail art.
How to Create Abstract Floral Designs on Nails
Step 1: Apply a Soft Base
Start with a light-colored base like pale pink, white, or nude. This creates a soft canvas that allows your abstract flowers to stand out. Let it dry completely.
Step 2: Prepare Your Floral Palette
Select a few complementary colors for your flowers. Bold, vibrant shades like fuchsia, coral, and violet create striking abstract blooms, while pastels offer a more delicate, dreamy effect.
Step 3: Create Loose Floral Shapes
Using a fine brush, paint abstract flower shapes with loose, fluid strokes. Focus on capturing the essence rather than the details—a few curved lines for petals, a small dot or circle for the center.
Step 4: Add Stems and Leaves
With a thin brush, add simple green stems and leaf shapes. Keep these elements abstract and gestural rather than detailed and realistic.
Step 5: Enhance with Details
Add small dots, dashes, or swirls to suggest flower centers, pollen, or additional petals. These subtle details bring life to your abstract florals without making them too literal.
Step 6: Seal with a Top Coat
Finish with a glossy top coat to protect your abstract floral design and unify the elements with a smooth finish.
Color Ideas for Soft, Abstract Florals
Vibrant tropical colors create bold, energetic floral designs. Combinations of fuchsia, coral, orange, and turquoise evoke exotic blooms and make a striking statement against a soft base.
Pastel garden hues offer a delicate, romantic interpretation of abstract florals. Soft pinks, lavenders, mint greens, and pale yellows blend beautifully for a dreamy, English garden-inspired design.
Monochromatic florals using varying shades of the same color family create sophisticated depth and dimension. Try different tones of pink from pale blush to deep rose, or blues from sky to navy for an elegant ombré effect.
Why It Works
Abstract Floral Nail Art captures the beauty and essence of flowers without getting caught in the details, creating a design that’s both artistic and feminine.
The loose, expressive brush strokes celebrate creative freedom while maintaining a refined and elegant overall aesthetic.
This versatile design works beautifully for any season or occasion, offering a timeless yet modern approach to floral nail art.
23. Smudged Brushstrokes
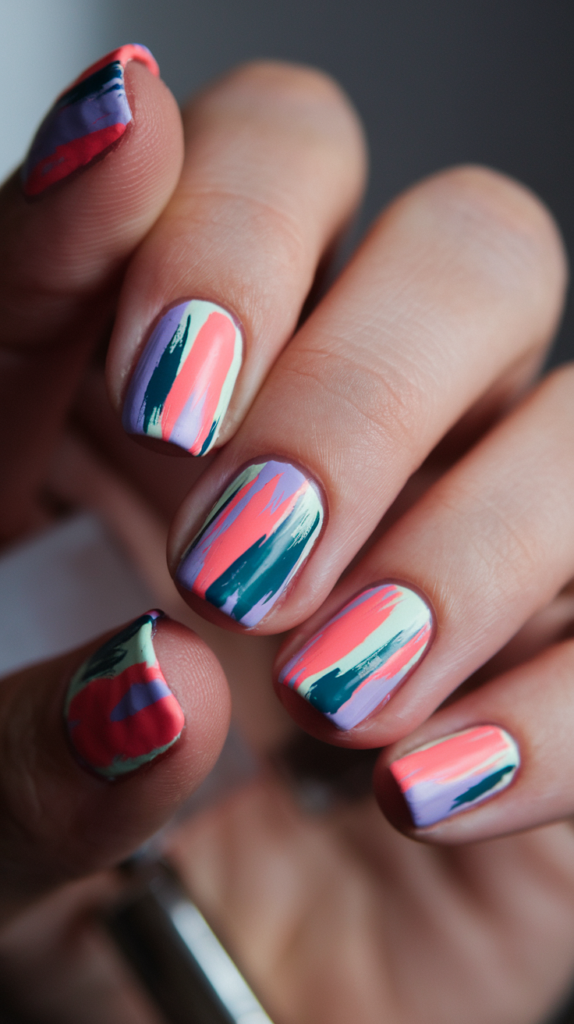
Smudged brushstroke nails celebrate beautiful imperfection with deliberate, artistic blending of colors and textures.
This expressive design mimics the spontaneous character of oil painting, creating a manicure that’s both sophisticated and refreshingly carefree.
How to Achieve a Perfectly Smudged Look
Step 1: Apply a Neutral Base
Start with a white, nude, or light-colored base. This provides the perfect canvas for your colorful brushstrokes to stand out. Let it dry completely.
Step 2: Select Complementary Colors
Choose two or three colors that blend beautifully together. Bold combinations like coral and teal or purple and yellow create striking contrast, while related shades offer subtle, harmonious blending.
Step 3: Create Initial Brushstrokes
Using a flat nail art brush, apply your first color in loose, confident strokes across the nail. Allow some areas to be more heavily coated than others for natural variation.
Step 4: Add a Second Color and Smudge
While the first color is still slightly wet, apply your second color beside or partially overlapping it. Use a clean brush, toothpick, or even the edge of a makeup sponge to gently drag through the colors, creating a smudged, blended effect.
Step 5: Enhance with Additional Colors or Details
Optional: Add a third color or metallic accents to create more dimension and interest in your smudged design.
Step 6: Seal with a Top Coat
Once your design has dried, apply a glossy top coat to protect the artwork and enhance the blended colors.
Brushstroke Techniques for Messy Abstract Nail Art
Directional smudging creates movement in your design. Try dragging your smudging tool in the same direction across all nails for a cohesive, wind-swept look, or vary the direction on each nail for more dynamic energy.
Layering different opacity levels adds depth to smudged brushstroke designs. Apply some colors more heavily and others more translucently to create a sense of foreground and background in your abstract creation.
The dry brush technique creates beautiful texture in smudged designs. Load your brush with polish, then wipe most of it off before lightly dragging the nearly-dry brush across your nail for a textured, feathered effect.
Why It Works
Smudged Brushstroke Nail Art embraces the beauty of imperfection, creating a design that balances artistic expression with sophisticated style.
The blended, painterly effect captures the spontaneous energy of abstract art while remaining wearable and elegant.
This versatile technique can be adapted from subtle, neutral smudges to bold, vibrant color blends, allowing for personal expression within the artistic framework.
24. Shattered Glass Abstract Nails
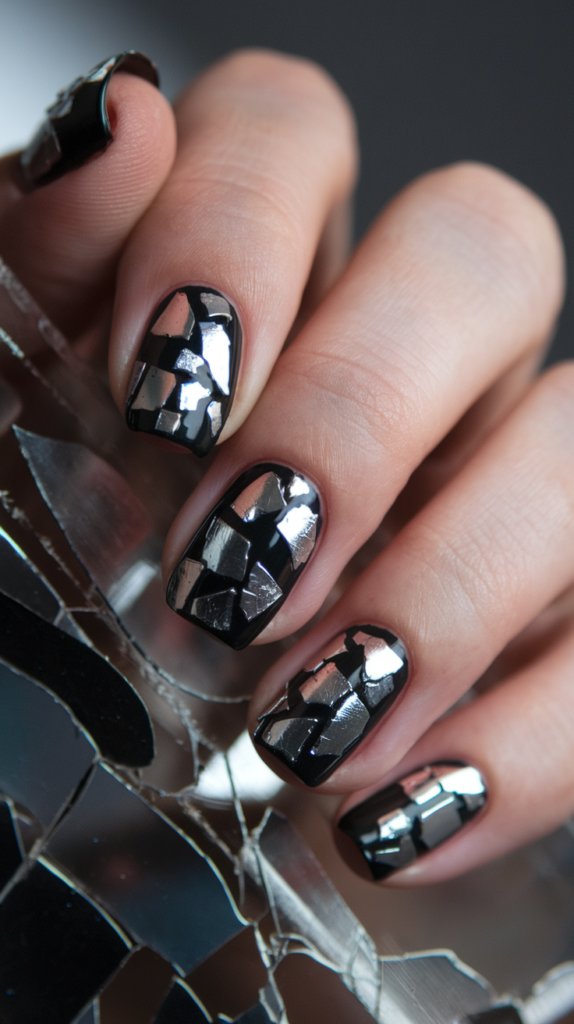
Shattered glass nails create a mesmerizing, multi-dimensional effect that mimics the reflective beauty of broken glass.
This striking design combines depth and light-catching elements for a manicure that’s both edgy and luxurious.
How to Use Foils for Shattered Glass Nail Art
Step 1: Create a Dark Base
Apply a deep, rich base color such as black, navy blue, or dark purple. This dramatic backdrop will make your shattered glass elements stand out brilliantly. Apply two coats for full opacity and let dry completely.
Step 2: Prepare Your Foil
Select holographic or metallic nail foils in silver, gold, or iridescent finishes. Cut or tear small, irregular pieces that will represent the shattered glass fragments.
Step 3: Apply Foil Adhesive
Using a small brush, apply a thin layer of foil adhesive or clear polish to the areas where you want to place your shattered glass pieces. Allow it to become tacky but not completely dry.
Step 4: Apply the Foil
Gently press the foil pieces onto the tacky adhesive, shiny side up. Arrange them in a random pattern to mimic natural shattered glass. Use tweezers for precise placement of smaller pieces.
Step 5: Seal with Top Coat
Once all foil pieces are in place, seal the design with a generous layer of glossy top coat. This protects the delicate foil and enhances the glass-like shine.
Best Color Bases for a Shattered Glass Effect
Dark, dramatic bases create the most striking contrast with shattered glass elements. Black offers classic intensity, while deep navy or royal purple add a touch of color while maintaining the dramatic effect.
For a softer approach, try muted bases like charcoal gray, deep burgundy, or forest green. These colors still provide enough contrast while offering a more subtle backdrop for your shattered glass design.
For a truly unique look, experiment with jewel tones like emerald, sapphire, or amethyst. These rich colors add depth while complementing the reflective qualities of the shattered glass effect.
Why It Works
Shattered Glass Abstract Nails combine edgy fragmentation with luxurious shine, creating a design that’s both sophisticated and eye-catching.
The reflective quality of the foil catches light from every angle, creating movement and visual interest that changes as you move your hands.
This versatile design can be as subtle or dramatic as you desire, working beautifully for both special occasions and everyday glamour.
25. Pixel Art Nails
Pixel art nails bring the nostalgic charm of retro video games to your fingertips with their distinctive blocky, geometric aesthetic.
This digital-inspired design combines modern abstract art with vintage gaming nostalgia, creating a unique and playful manicure.
Creating Pixelated Designs on Nails
Step 1: Apply a Base Color
Choose a solid base color that will complement your pixel design. White provides maximum contrast, while black or another bold color can create a more dramatic effect. Apply two coats for full coverage and let dry completely.
Step 2: Create a Grid (Optional)
For precise pixels, you can lightly map out a grid pattern using a fine brush and a light color. This will serve as a guide for your pixel placement.
Step 3: Paint the Pixels
Using a fine, square-tipped brush or dotting tool, paint small squares in your chosen colors. Keep the squares uniform in size and arrange them in a grid-like pattern to achieve the authentic pixelated look.
Step 4: Create Your Pixel Pattern
Arrange your colored squares to form abstract patterns, simple shapes, or even recognizable 8-bit style images. The key is maintaining the blocky, non-curved aesthetic that defines pixel art.
Step 5: Seal with Top Coat
Once your pixel design is complete and dry, apply a glossy top coat to protect your artwork and give it a finished look.
Color Ideas for Retro Pixel Nail Art
8-bit inspired color schemes feature bright primary colors like red, blue, yellow, and green. This classic video game palette creates an authentic retro gaming feel, instantly recognizable to any arcade enthusiast.
Monochromatic pixel designs using varying shades of the same color create a sophisticated, modern interpretation of pixel art. Try gradations of blue from navy to sky, or pinks from pale rose to magenta.
Neon pixel art brings a futuristic twist to the retro aesthetic. Electric pink, lime green, and cyber blue create an ’80s synthwave vibe that’s both nostalgic and contemporary.
Why It Works
Pixel Art Nails combine digital nostalgia with modern abstract design, creating a unique manicure that appeals to both retro gaming fans and contemporary art lovers.
The structured, geometric nature of pixels creates a clean, precise aesthetic that’s both playful and artistic.
This versatile design can be as simple or complex as desired, from basic color blocks to intricate 8-bit inspired imagery.
26. Bold Chevron Nail Designs
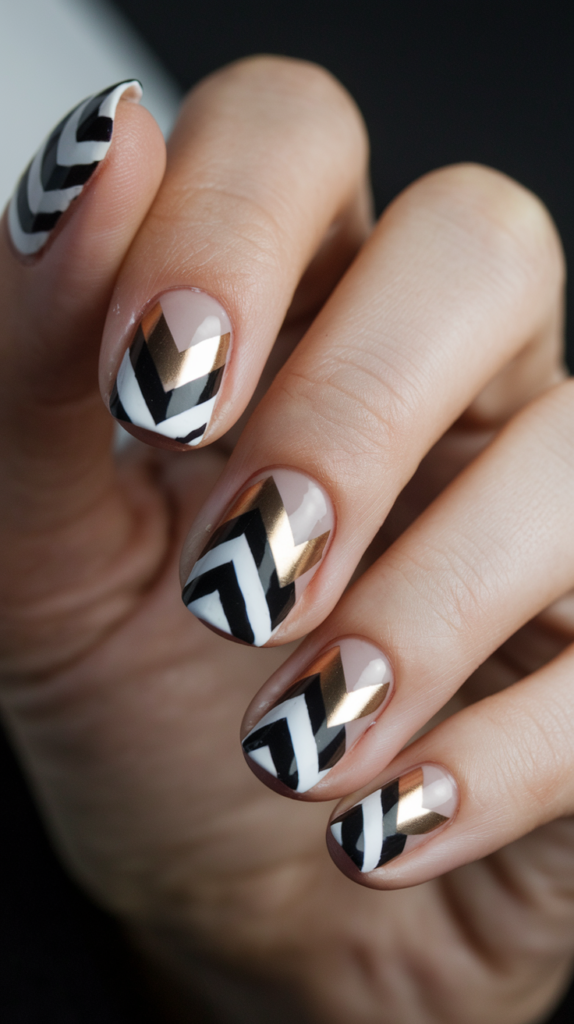
Bold chevron nail designs create a striking geometric pattern with their distinctive zigzag lines and sharp angles.
This contemporary abstract style offers clean precision with dynamic energy, perfect for those who appreciate modern, graphic nail art.
How to Master Bold Chevron Nail Art
Step 1: Apply a Base Color
Choose a solid base color that will contrast beautifully with your chevron pattern. Nude, white, or a bold color all work wonderfully as a foundation. Apply two coats for full coverage and allow to dry completely.
Step 2: Prepare for Precision
For clean chevron lines, nail tape or chevron nail guides are essential. Place the guides on your nails in a V-shape pattern, pressing down firmly to ensure clean edges.
Step 3: Apply Contrasting Color
Using a contrasting color, paint over the exposed areas of your nail. Work quickly but carefully to ensure even coverage. For multi-colored chevrons, use different shades in alternating sections.
Step 4: Remove Guides Carefully
While the polish is still slightly wet, carefully remove the tape or guides by pulling straight up in one smooth motion. This prevents smudging and ensures crisp, clean lines.
Step 5: Add Accents (Optional)
For extra dimension, add metallic accents, glitter, or a third color to certain sections of your chevron pattern.
Step 6: Seal with Top Coat
Once your chevron design is completely dry, apply a glossy top coat to protect your artwork and enhance the colors.
Top Colors for Chevron Patterns
High-contrast combinations create the most striking chevron designs. Black and white is a timeless pairing that offers maximum visual impact, while gold and black add a touch of luxury to the geometric pattern.
Bold, vibrant color pairs like coral and turquoise or purple and yellow create energetic, playful chevron designs. These bright combinations add a fun, contemporary vibe to the classic zigzag pattern.
Tonal chevrons using different shades of the same color family offer a more subtle, sophisticated approach. Navy and pale blue or deep burgundy and soft pink create elegant depth while maintaining the graphic impact.
Why It Works
Bold Chevron Nail Designs combine geometric precision with dynamic movement, creating a manicure that’s both structured and energetic.
The clean lines and sharp angles offer a contemporary, graphic aesthetic that works beautifully for both casual and formal occasions.
This versatile design can be customized with countless color combinations, chevron widths, and placements, allowing for personal expression within a classic geometric framework.
27. Graphic Art Lines
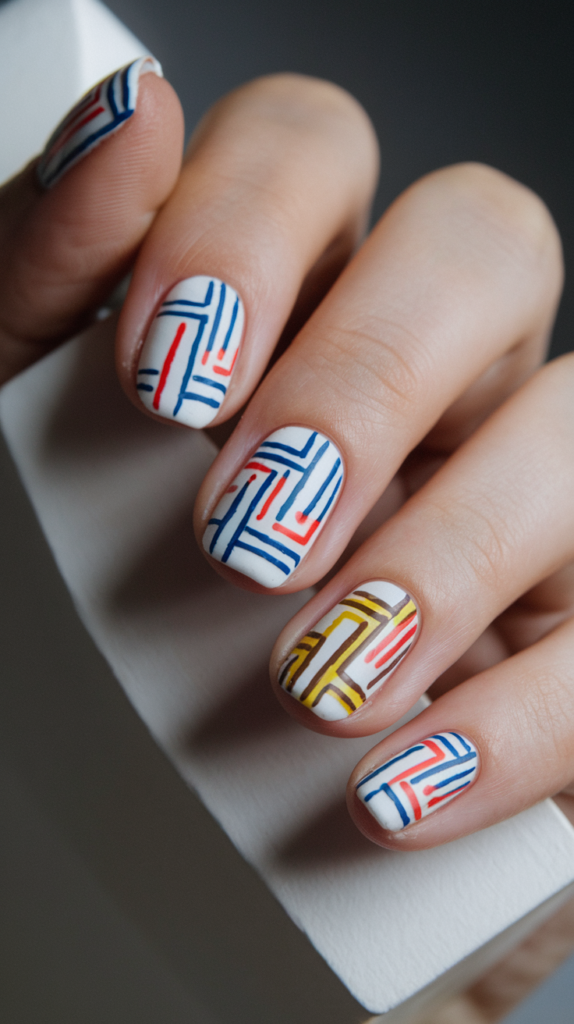
Graphic art lines nail designs feature precise, deliberate linework that transforms your nails into miniature abstract art pieces.
This minimalist yet impactful style combines clean aesthetics with artistic expression, perfect for those who appreciate modern, gallery-worthy nail art.
How to Draw Precise Graphic Lines on Nails
Step 1: Create a Clean Base
Apply a solid base color that will showcase your graphic lines effectively. White creates a stark gallery-like backdrop, while black or another solid color offers different artistic effects. Apply two coats for full coverage and let dry completely.
Step 2: Select Your Tools
For precision line work, use a fine detail nail art brush, nail art pen, or even a thin striping brush. The tool you choose will affect the character of your lines, so select one that matches your desired aesthetic.
Step 3: Plan Your Composition
Before painting, consider the arrangement of your lines. Will they be geometric and structured or more organic and flowing? Having a mental picture helps create a cohesive design across all nails.
Step 4: Draw Your Graphic Lines
With a steady hand, draw your lines in contrasting colors. Focus on clean execution and deliberate placement. Geometric shapes, abstract forms, or minimalist patterns all work beautifully in this style.
Step 5: Add Detail (Optional)
For added dimension, incorporate varying line weights, intersecting patterns, or small accents like dots or tiny shapes at strategic points.
Step 6: Seal with Top Coat
Once your graphic lines are completely dry, apply a glossy or matte top coat depending on your desired finish. A matte top coat can enhance the modern art gallery feel.
Graphic Nail Art Designs for a Modern Look
Minimalist line compositions featuring a few strategic lines in black on white create a clean, gallery-worthy aesthetic. This restrained approach emphasizes negative space and precise placement for maximum impact.
Geometric arrangements with intersecting lines, triangles, circles, and other shapes offer more complex graphic designs. Try color-blocking certain sections for added visual interest.
Primary color palettes pay homage to modern art movements like De Stijl or Bauhaus. Red, blue, and yellow lines on a white or black base create a bold, artistic statement that references iconic 20th-century design.
Why It Works
Graphic Art Lines Nail Design transforms simple linework into sophisticated abstract art, creating a manicure that’s both intellectual and visually striking.
The clean, precise execution showcases attention to detail while allowing for creative expression through composition and color.
This versatile style works beautifully in professional environments while still offering artistic flair and personal expression.
28. Splattered Neon
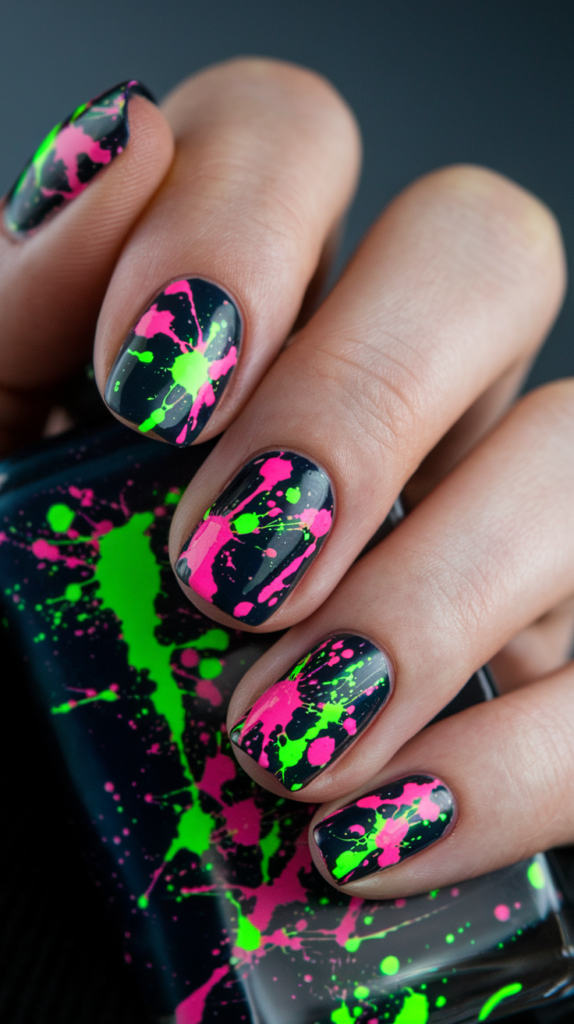
Splattered neon nail art delivers a high-energy, electric design that combines vibrant colors with spontaneous, abstract patterns.
This bold, party-ready style creates an eye-catching manicure that radiates fun and creative energy.
How to Splatter Neon Colors on Nails
Step 1: Apply a Dark Base
Start with a dark base color, preferably black, to make your neon splatters pop with maximum impact. Apply two coats for full coverage and let dry completely.
Step 2: Protect Your Skin
Before beginning the splatter technique, apply petroleum jelly or liquid latex around your nails to make cleanup easier. The splatter method can be messy but yields beautiful results.
Step 3: Prepare Your Neon Colors
Select several neon polishes for your splatter effect. Electric pink, lime green, neon orange, and bright blue work wonderfully for this vibrant design.
Step 4: Create the Splatter Effect
For each color, dip a small brush or straw into the polish and either blow through the straw or flick the brush to create random splatters across your nails. Vary the pressure and distance for different splatter sizes and patterns.
Step 5: Layer Different Colors
Build dimension by layering different neon colors, allowing some to overlap for interesting color mixing. Keep the distribution random for an authentic splatter effect.
Step 6: Clean Up and Seal
Once all splatters are dry, remove the protective barrier from around your nails and clean up any stray polish. Finish with a glossy top coat to seal the design and enhance the neon brightness.
Best Neon Colors for a Bold Look
UV-reactive neons create the ultimate statement splatter nails. Shades like electric pink, atomic green, and laser blue actually glow under blacklight, making them perfect for night events and parties.
Neon color combinations can create different moods and styles. Tropical combinations of hot pink, neon orange, and lime green evoke summer vibes, while electric blue with purple and green creates a cosmic, futuristic effect.
For a more curated splatter look, try limiting your palette to two complementary neons, like electric yellow and hot pink. This creates a bold but more controlled abstract design.
Why It Works
Splattered Neon Nail Art combines the organic spontaneity of splatter technique with the high-impact vibrancy of neon colors.
The stark contrast between the dark base and electric splatters creates a dramatic, eye-catching effect that’s full of energy and personality.
This versatile design works beautifully for parties, festivals, vacations, or anytime you want to make a bold, artistic statement with your nails.
29. Gradient Abstract Nail Art
Gradient abstract nail art combines smooth color transitions with artistic shapes and patterns, creating a sophisticated yet creative manicure.
This versatile design offers endless possibilities for personalization, perfect for those who appreciate both precision and artistic freedom.
How to Achieve a Smooth Gradient in Abstract Designs
Step 1: Apply a Base Color
Choose a light color that will serve as one end of your gradient. Apply two coats for full coverage and let dry completely.
Step 2: Prepare Your Gradient Colors
Select two or three colors that will blend beautifully together for your gradient. Colors within the same family create subtle transitions, while contrasting colors offer more dramatic effects.
Step 3: Create the Gradient
Using a makeup sponge, apply horizontal stripes of your chosen colors, slightly overlapping where they meet. Dab the sponge onto your nail, gently rolling to transfer the colors and create a smooth blend.
Step 4: Build the Gradient
Repeat the sponging process several times, building up the gradient until the color transition appears seamless and vibrant.
Step 5: Add Abstract Elements
Once your gradient base is dry, use a fine brush to add abstract shapes, lines, or patterns over the gradient. These elements can be geometric, organic, or a combination of both.
Step 6: Seal with Top Coat
Finish with a glossy top coat to protect your design and blend all elements together into a cohesive look.
Color Ideas for Stunning Gradient Abstract Nails
Sunset-inspired gradients blending warm oranges, pinks, and purples create a romantic, dreamy backdrop for abstract elements. This color combination evokes the magical hues of twilight skies.
Ocean-themed gradients transitioning from deep navy to turquoise to pale aqua offer a refreshing, serene foundation. Add white abstract shapes to represent sea foam or waves.
Monochromatic gradients using different shades of the same color family create sophisticated depth. A lavender to deep purple gradient with gold abstract accents offers elegant contrast and dimension.
Why It Works
Gradient Abstract Nail Art combines the softness of blended color transitions with the definition of abstract designs, creating a balanced manicure with both flow and structure.
The smooth color gradient provides a dynamic backdrop that adds depth and dimension to the abstract elements layered on top.
This versatile design can be customized to suit any mood, season, or occasion, from subtle nude gradients with minimalist accents to bold color transitions with dynamic abstract patterns.
30. Fractal Patterns
Fractal pattern nail art captures the mesmerizing beauty of mathematical art with its infinitely repeating, self-similar designs.
This intricate style combines precision with natural beauty, creating a sophisticated manicure that’s both organic and structured.
How to Create Intricate Fractal Designs on Nails
Step 1: Apply a Base Color
Choose a solid base color that will showcase your fractal pattern effectively. Deep colors like black, navy, or burgundy create dramatic contrast, while neutral tones offer subtle elegance. Apply two coats for full coverage and let dry completely.
Step 2: Plan Your Fractal Pattern
Consider which fractal pattern you want to recreate. Fern-like structures, spiral formations, or snowflake patterns are all beautiful options that capture the essence of fractal mathematics.
Step 3: Create the Main Structure
Using a fine detail brush, paint the main framework of your fractal pattern. For spiral fractals, start with a central curve; for ferns, begin with a central stem; for snowflakes, start with intersecting lines.
Step 4: Add Repeating Elements
The beauty of fractals lies in their repeating patterns at different scales. Add smaller versions of your initial shape branching off from the main structure, then continue adding even smaller versions to those branches.
Step 5: Refine the Details
Using the finest brush available, add the smallest details to complete the self-similar pattern. For precise dots, use a dotting tool.
Step 6: Seal with Top Coat
Once your fractal design is complete and dry, seal it with a glossy top coat to protect your intricate artwork.
Unique Color Palettes for Fractal Nails
Metallic fractals on dark backgrounds create elegant, sophisticated designs. Gold fractals on black, silver on navy, or rose gold on burgundy offer luxurious contrast that showcases the intricate pattern.
Nature-inspired color combinations reflect the organic origins of many fractal patterns. Green fern fractals on brown, blue spiral fractals on white, or purple branching patterns on lavender create beautiful, natural designs.
Gradient fractal designs incorporate color transitions within the pattern itself. Start with a darker shade at the base of the fractal and gradually shift to lighter tones at the tips for added dimension and visual interest.
Why It Works
Fractal Pattern Nail Art captures the mathematical beauty found in nature, creating a design that’s both precisely structured and organically flowing.
The intricate, repeating patterns draw the eye and create visual interest that reveals new details upon closer inspection.
This sophisticated design showcases exceptional nail art skill while maintaining a natural elegance that works for both special occasions and artistic everyday wear.
31. Cubism Inspired Nail Art
Cubism inspired nail art pays homage to the revolutionary art movement with fragmented shapes, multiple perspectives, and bold geometric forms.
This artistic design transforms your nails into miniature modern art masterpieces, perfect for those who appreciate avant-garde aesthetics.
Bringing Cubism to Nail Art
Step 1: Apply a Neutral Base
Begin with a neutral base color like beige, white, or light gray. This creates a gallery-worthy backdrop for your cubist design. Apply two coats for even coverage and let dry completely.
Step 2: Plan Your Composition
Cubism is characterized by fragmented shapes showing multiple viewpoints simultaneously. Consider how you’ll break down your design into angular segments before beginning.
Step 3: Create Geometric Sections
Using a fine detail brush, divide your nail into irregular geometric shapes. Think triangles, rectangles, and polygons with sharp angles and varying sizes.
Step 4: Add Bold Colors
Fill in the geometric sections with bold, contrasting colors. Primary colors (red, blue, yellow) are traditional in cubist art, but feel free to experiment with your palette.
Step 5: Define with Outlines
Using black or a dark color, outline some of the geometric shapes to enhance the fragmented appearance and add definition to your cubist design.
Step 6: Seal with Top Coat
Once your cubist masterpiece is dry, apply a glossy top coat to protect the design and unify all elements.
Best Color Schemes for a Cubism-Inspired Look
Classic cubist palettes feature primary colors (red, blue, yellow) with neutrals like black, white, and brown. This traditional combination pays direct homage to artists like Picasso and Braque.
Monochromatic cubism creates a sophisticated, contemporary interpretation. Using varying shades of blue or purple with black and white outlines offers a modern take on the historic style.
Metallic accents add luxurious dimension to cubist nail art. Incorporating gold, silver, or bronze elements among your geometric shapes elevates the artistic design with reflective contrast.
Why It Works
Cubism Inspired Nail Art translates a revolutionary art movement into wearable design, creating nails that are truly artistic and conversation-worthy.
The fragmented geometric shapes and bold color contrasts create visual interest and depth that changes depending on the viewing angle.
This sophisticated design showcases artistic knowledge and creativity while maintaining a structured, graphic appeal that works for art enthusiasts and fashion-forward individuals alike.
32. Dripping Paint Nails
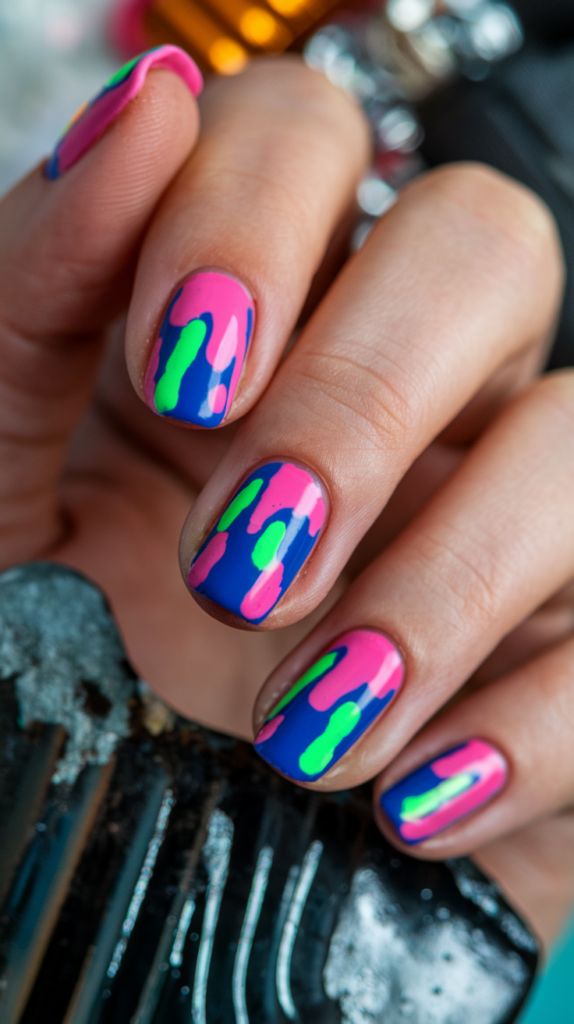
Dripping paint nails create a dynamic, fluid effect that mimics the spontaneous beauty of paint dripping down a canvas.
This artistic design combines bold colors with organic movement, perfect for those who appreciate edgy, expressive nail art.
How to Create Dripping Paint Nails at Home
Step 1: Apply a Base Color
Choose a solid base color that will contrast with your drip colors. White creates maximum impact, while black offers dramatic flair. Apply two coats for full coverage and let dry completely.
Step 2: Select Your Drip Colors
Choose colors for your paint drips. Bold, vibrant shades create the most striking effect, but any contrasting colors will work beautifully.
Step 3: Create the Drip Effect at the Tip
Apply a generous amount of your drip color at the tip of the nail. Use enough polish that it naturally wants to drip downward. For controlled drips, use a thin brush to guide the polish down the nail in varying lengths.
Step 4: Add Multiple Drip Colors (Optional)
For a more complex design, repeat the process with additional colors, placing them between your initial drips. Allow each color to set slightly before adding the next to prevent unwanted mixing.
Step 5: Perfect the Drips
Use a thin brush to refine the shape of each drip, creating pointed ends for realistic paint drops. Vary the length and width of drips for a natural, random appearance.
Step 6: Seal with Top Coat
Once your drips are dry, apply a glossy top coat to protect your design and enhance the fluid, wet-look effect.
Color Combinations for Abstract Dripping Nail Art
Neon drips on white or black bases create eye-catching, contemporary designs. Electric pink, lime green, and bright blue drips offer vivid contrast that mimics urban graffiti art.
Metallic drips add luxurious dimension to the fluid design. Gold drips on black, silver on navy, or rose gold on white create an elegant interpretation of the dripping paint effect.
Ombré drips that fade from one color to another add sophisticated complexity. Try purple fading to pink, or blue transitioning to teal for a graduated color effect within each drip.
Why It Works
Dripping Paint Nail Art captures the spontaneous, flowing quality of liquid paint, creating a design that feels both artistic and edgy.
The contrast between the solid base and the fluid drips creates visual interest and movement that draws attention to your nails.
This versatile design works with countless color combinations, allowing for personal expression while maintaining the distinctive dripping effect that makes this style so recognizable.
33. Abstract Comic Style Nail Art
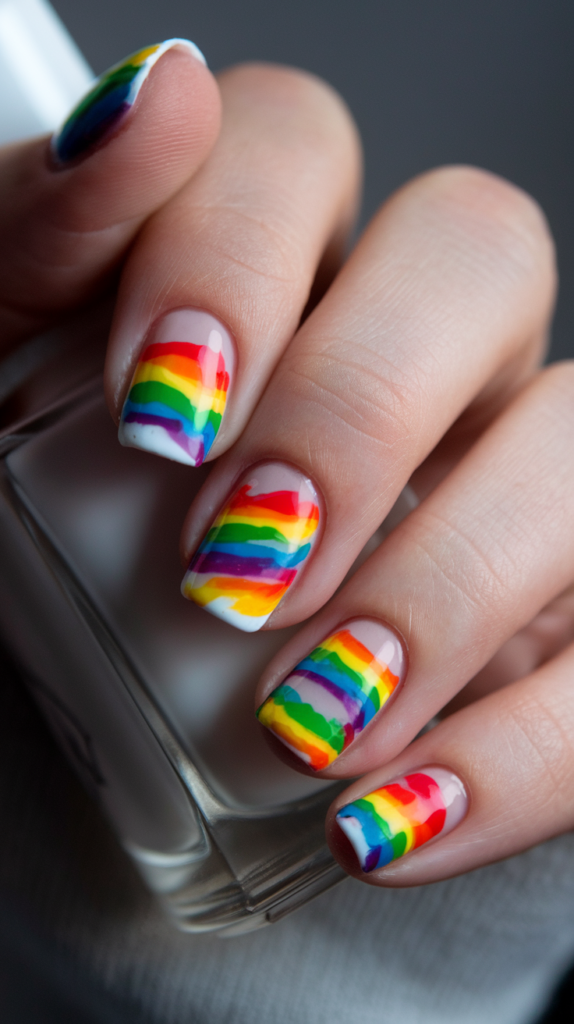
Abstract comic style nail art combines the bold graphic elements of comic books with creative abstract design for nails that tell a visual story.
This playful yet sophisticated style features strong lines, vibrant colors, and dynamic shapes that capture the energy of pop art and comic illustrations.
How to Recreate Comic Art on Nails
Step 1: Apply a Bold Base
Choose a base color that evokes comic book pages. White creates a classic comic paper look, while bold colors like yellow or blue reference the vibrant backgrounds of vintage comics. Apply two coats for full coverage and let dry completely.
Step 2: Create Comic Outlines
Using a fine black liner brush or nail art pen, add strong black outlines to create comic-style shapes. Sharp, geometric forms, speech bubbles, star bursts, or action lines all capture the comic aesthetic.
Step 3: Add Bold Color Blocks
Fill some sections with vibrant primary colors like red, yellow, and blue. Traditional comics use bold, flat colors without gradients or blending for a graphic look.
Step 4: Include Comic Details
Add characteristic comic book details like dots for shading (Ben-Day dots), exclamation marks, small stars, or abstract motion lines to enhance the comic book feel.
Step 5: Refine with Sharp Edges
Ensure all lines are crisp and colors are contained within their outlines for that classic comic book precision.
Step 6: Seal with Top Coat
Finish with a glossy top coat to protect your comic creation and give it a polished finish.
Best Colors for Pop-Art Inspired Nails
Primary colors (red, blue, yellow) with black outlines create the most authentic vintage comic book look. This classic combination instantly evokes nostalgic pop art and comic aesthetics.
Modern comic palettes incorporate secondary colors like purple, green, and orange for a contemporary twist. These bolder combinations maintain the comic spirit while offering more creative freedom.
Black and white comic nail art pays homage to newspaper comics and graphic novels. This high-contrast approach creates sophisticated, striking designs that work beautifully for minimalist comic style.
Why It Works
Abstract Comic Style Nail Art transforms familiar graphic elements from popular culture into wearable art, creating a design that’s both nostalgic and contemporary.
The bold outlines and vibrant colors create high-impact visuals that make a statement while remaining playful and accessible.
This versatile style works for pop culture enthusiasts, art lovers, and anyone who appreciates graphic design with a touch of whimsy.
34. Rainbow Abstract
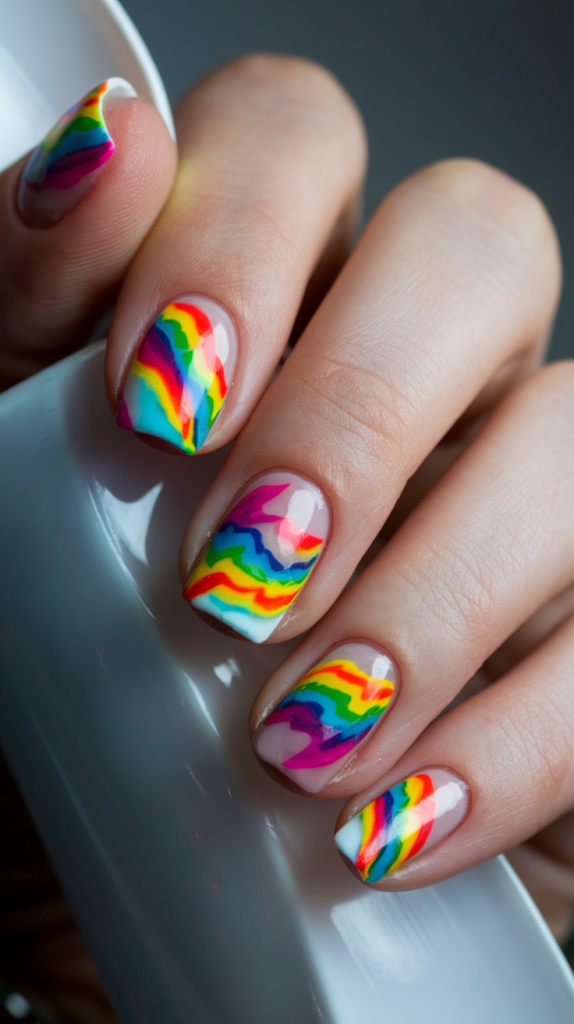
Rainbow abstract nail art celebrates the full spectrum of color with vibrant, flowing designs that blend hues in creative, artistic patterns.
This joyful, expressive style brings a cheerful energy to your manicure, perfect for those who embrace color and artistic freedom.
Techniques for Perfect Rainbow Nail Art
Step 1: Apply a Light Base
Start with a white or very light neutral base to make your rainbow colors pop with maximum vibrancy. Apply two coats for full coverage and let dry completely.
Step 2: Select Your Rainbow Palette
Choose 5-7 colors that represent the rainbow spectrum. Traditional ROYGBIV (red, orange, yellow, green, blue, indigo, violet) creates a classic rainbow, but feel free to select your own color story.
Step 3: Create Your Abstract Rainbow Design
Using a fine brush, apply each color in your chosen abstract pattern. Options include:
-
- Swirling, overlapping brushstrokes
-
- Geometric rainbow segments
-
- Scattered rainbow dots or shapes
-
- Rainbow gradient effects
Step 4: Blend Where Colors Meet
For a seamless rainbow effect, gently blend where colors meet while they’re still slightly wet. A clean brush or toothpick can help create smooth transitions between hues.
Step 5: Add Definition (Optional)
For more structured rainbow designs, use a thin black or white liner to add definition to certain elements after your rainbow colors have dried.
Step 6: Seal with Top Coat
Apply a generous layer of glossy top coat to protect your vibrant rainbow design and enhance the colors’ brightness.
How to Mix Colors for a Bold Abstract Rainbow Look
Full-spectrum rainbows including all traditional colors (red, orange, yellow, green, blue, purple) create the most vibrant, joyful effect. This classic approach celebrates color in its purest form.
Color-family rainbows focusing on variations within a specific range offer a more curated look. Try a “sunset rainbow” with reds, oranges, pinks, and purples, or an “ocean rainbow” with blues, teals, and greens.
For added dimension, incorporate metallic or shimmer finishes among your rainbow colors. A metallic gold between orange and yellow or silver between blue and purple adds luxurious depth to your rainbow design.
Why It Works
Rainbow Abstract Nail Art captures the full spectrum of color in an artistic, expressive design that radiates joy and creative energy.
The harmonious progression of colors creates a naturally pleasing visual effect, while the abstract application allows for personal artistic expression.
This versatile design works for celebrations, everyday wear, or anytime you want to bring a splash of color and artistic flair to your look.
35. Modern Art-Inspired Nail Art
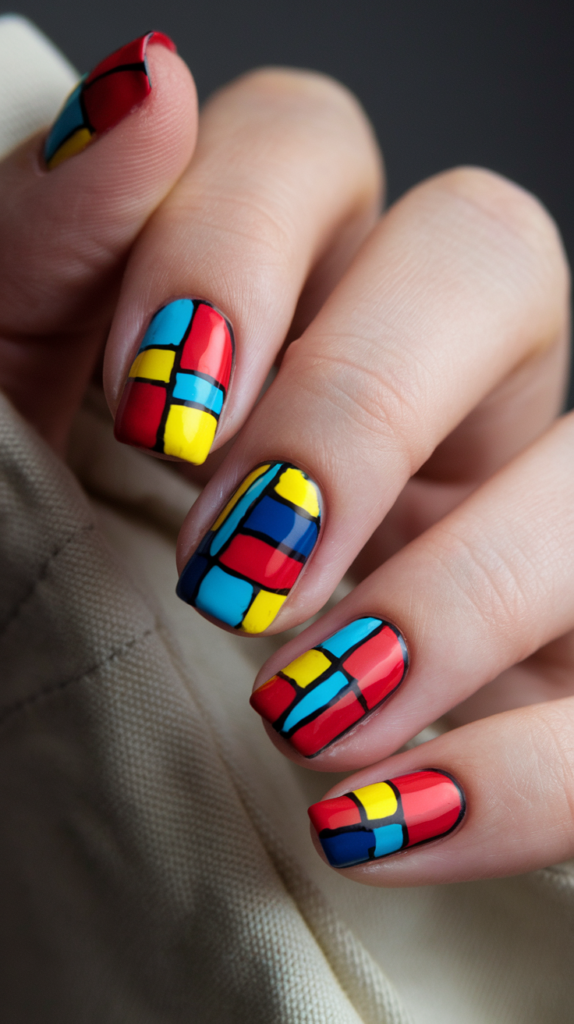
Modern art-inspired nail designs transform your fingertips into miniature gallery pieces, drawing influence from iconic art movements and celebrated painters.
This sophisticated style showcases your appreciation for fine art while creating a truly unique, conversation-starting manicure.
How to Incorporate Famous Abstract Art into Nail Designs
Step 1: Choose Your Artistic Inspiration
Select a modern art movement or artist that resonates with you. Popular choices include Mondrian’s color blocks, Kandinsky’s organic shapes, or Pollock’s splatter technique. Research their signature style to understand the key elements.
Step 2: Apply a Suitable Base
Choose a base color that complements your chosen art style. White works well for Mondrian-inspired designs, while black might better suit Kandinsky’s vibrant forms. Apply two coats for full coverage and let dry completely.
Step 3: Create the Artistic Elements
Using fine brushes and appropriate colors, recreate key elements of your chosen art style. This might include:
-
- Geometric color blocks with black dividing lines (Mondrian)
-
- Colorful, floating shapes and lines (Kandinsky)
-
- Chaotic paint splatters and drips (Pollock)
-
- Bold primary colors with simple shapes (Pop Art)
Step 4: Refine the Details
Add finishing touches that capture the essence of the artistic style, such as clean black lines for Mondrian or fine color splatters for Pollock.
Step 5: Seal with Top Coat
Apply a glossy or matte top coat depending on the original art style. Mondrian’s work might be best with glossy, while Rothko-inspired designs might benefit from a matte finish.
Bold Colors and Patterns for Modern Art-Inspired Nails
De Stijl-inspired designs feature primary colors (red, blue, yellow) with black grid lines on white backgrounds. This striking combination, made famous by Piet Mondrian, creates bold, graphic nail art with architectural precision.
Abstract Expressionist color schemes embrace emotional, spontaneous application with bold contrasts. Deep blues against fiery reds, vibrant yellows alongside rich purples—these dynamic combinations capture the movement’s energetic essence.
Color Field-inspired nails feature large blocks of single colors with soft edges. Inspired by artists like Mark Rothko, these designs use saturated hues that blend subtly into each other for a meditative, immersive effect.
Why It Works
Modern Art-Inspired Nail Designs transform iconic artistic styles into wearable nail art, creating a manicure that’s intellectually stimulating and visually distinctive.
The artistic references showcase cultural knowledge while maintaining the playful creativity that makes nail art so appealing.
This sophisticated approach works beautifully for gallery openings, creative events, or anytime you want your nails to make an artistic statement.
Conclusion
Abstract nail art offers a boundless canvas for creative expression, allowing you to showcase your personality and artistic sensibilities through intricate designs that speak volumes without saying a word.
The 35 inspiring designs we’ve explored demonstrate the incredible versatility of abstract nail art, from geometric precision to fluid watercolor effects, from minimalist elegance to bold, expressive statements.
Whether you’re drawn to the clean lines of negative space geometry, the playful energy of splatter paint, or the sophisticated flow of marble abstractions, there’s an abstract nail design that perfectly captures your unique aesthetic.
As abstract nail art continues to evolve and inspire, we encourage you to experiment with these techniques, mixing and matching elements to create your own signature look. Let your nails become tiny canvases for self-expression, and watch as your abstract masterpieces spark joy and conversation wherever you go.