Introduction
Gothic beauty nail art is more than just a trend—it’s an expression of individuality, mystery, and artistry.
With influences drawn from nature, mysticism, ancient symbols, and fantasy, gothic nail designs allow wearers to embody elegance with a dark, edgy twist.
Whether it’s the subtle allure of black lace overlays or the bold statement of vampire-inspired fangs and roses, these designs offer countless ways to showcase creativity while embracing the beauty in darkness.
This guide presents 35 captivating gothic nail art designs, each with detailed descriptions and styling tips to inspire your next look.
From sleek black finishes to intricate patterns and 3D accents, these ideas will help you explore a variety of gothic aesthetics.
No matter the occasion—whether it’s Halloween, a gothic wedding, or simply expressing your personal style—there’s a perfect design waiting for you.
Matte Black & Glossy Accents: A Timeless Gothic Statement
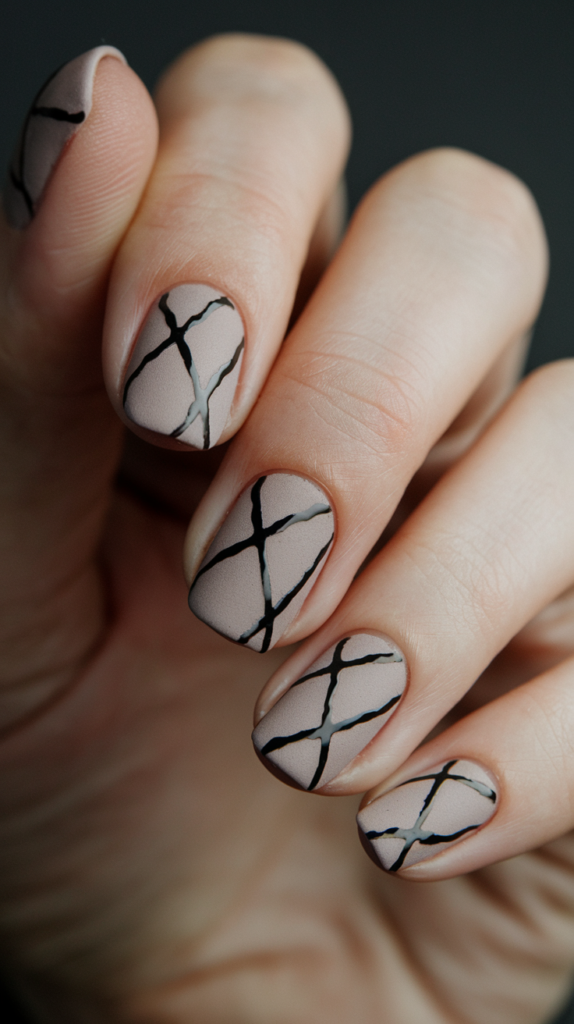
How To Achieve The Perfect Matte And Gloss Combination
Matte black nails create a soft, velvety finish, exuding elegance with a subtle, non-reflective look.
To achieve the perfect combination of matte and gloss accents, start by applying a matte black base coat to your nails.
This can be achieved with a matte polish or a matte top coat over regular black polish.
After it dries, use a fine detail brush dipped in glossy top coat to create precise patterns, such as stripes or crosses.
The glossy effect adds just enough shine to make the design pop, contrasting beautifully against the matte surface without overpowering it.
Ideas For Using Cross And Stripe Gloss Accents
Glossy crosses are a popular motif in gothic nail art, adding a religious or symbolic element to the look.
You can experiment with vertical and horizontal stripes to frame the nails or create an abstract design.
Try alternating patterns on different nails—some with diagonal lines, others with tiny crosses—for an eclectic, edgy vibe.
The versatility of gloss accents allows you to personalize the style, whether you want to keep it minimal or go bold with multiple lines across each nail.
Why Matte And Gloss Nails Are Popular In Gothic Nail Art
The popularity of matte and gloss nails in gothic nail art lies in their sophisticated yet rebellious appeal.
The matte finish exudes a subtle luxury, while the glossy accents bring attention to intricate details.
This combination embodies the gothic aesthetic’s duality—dark and elegant, minimal yet powerful.
It suits a variety of occasions, from formal events to casual outings, making it a timeless choice for gothic nail enthusiasts.
Black Lace Overlay: Elegance Meets Mystery
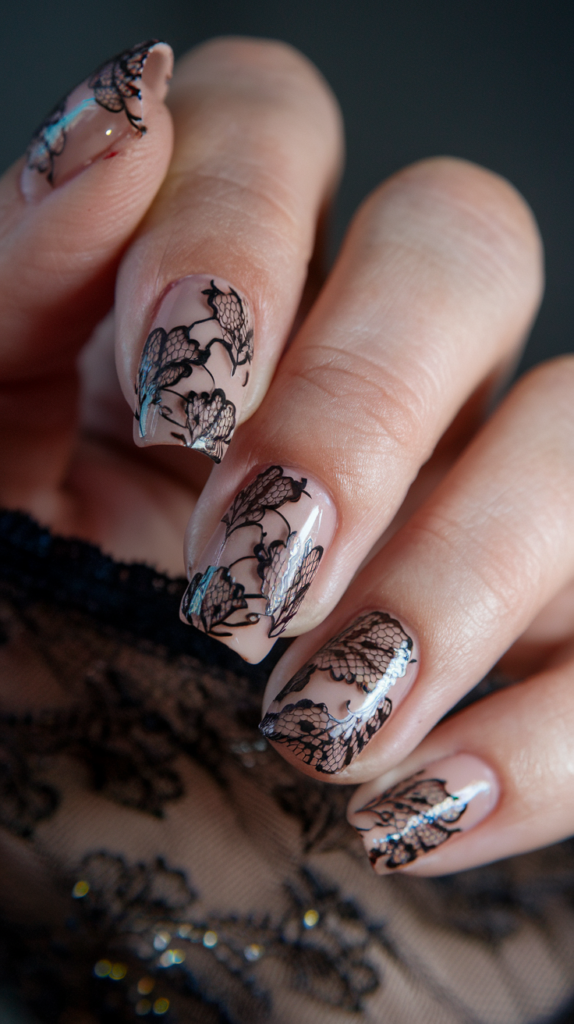
How To Create Intricate Lace Patterns On Nails
Creating intricate lace patterns requires precision and a steady hand.
Start by applying a sheer nude or black base coat, depending on the desired effect.
Using a fine nail art brush, paint delicate floral or lace-inspired patterns with black polish over the base.
If freehand painting seems challenging, lace stamping kits are a great alternative.
Finish the design with a glossy or matte top coat to lock in the details, adding texture and depth to the lace pattern.
Nude Vs. Black Base: Which Works Best?
Choosing between a nude or black base depends on the overall vibe you want to achieve.
A nude base with black lace patterns gives a softer, romantic look, perfect for occasions requiring a subtle gothic touch.
On the other hand, a black base intensifies the design, making the lace pattern more dramatic and suitable for bold statements.
Both options offer elegance, but the black base leans more towards a mysterious and edgy aesthetic.
Perfect Occasions To Wear Lace-Inspired Gothic Nails
Lace-inspired nails are versatile enough for various occasions.
They are ideal for formal events, such as weddings, where the intricate lace pattern complements gothic or vintage attire.
Additionally, these nails work well for casual gatherings, adding a touch of elegance without being too overpowering.
Whether it’s a romantic dinner or a music festival, lace overlay nails will elevate any gothic look effortlessly.
Black Ombre Fade: A Smooth Transition Into Darkness
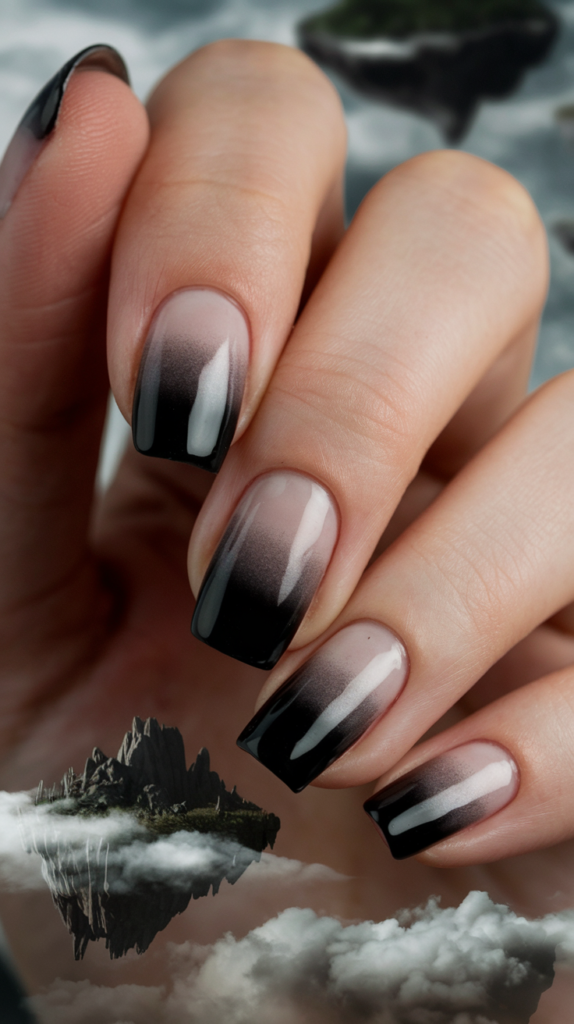
Step-By-Step Guide To Creating The Perfect Ombre Fade
Creating an ombre fade involves blending two or more colors seamlessly.
Begin by applying a black base coat to the nail.
Once dry, use a makeup sponge to layer on gray or silver polish at the tip of the nail.
Dab the sponge lightly over the nail to create a gradient effect.
Repeat this process until the desired opacity is achieved.
Finish with a glossy or matte top coat to smooth out any rough edges and enhance the transition between colors.
Best Color Combinations For Gothic Ombre Nails
The classic black-to-gray ombre fade remains a popular choice for gothic nails.
However, you can experiment with other combinations to suit your style.
Black fading into dark purple creates a mysterious allure, while black transitioning to blood red adds a dramatic, vampy touch.
For a celestial vibe, try blending black with silver or metallic blue, evoking the beauty of a night sky.
Tools And Techniques For Seamless Blends
To achieve the smoothest ombre effect, using a makeup sponge is essential.
It allows for better control over the blending process compared to brushes.
Make sure to use light tapping motions when applying the polish to avoid streaks.
To prevent smudging, wait for each layer to dry before adding the next one.
Top coats are crucial in smoothing out the final blend and giving the nails a polished finish, whether matte or glossy.
Glossy Black Coffin Nails: Sleek And Mysterious
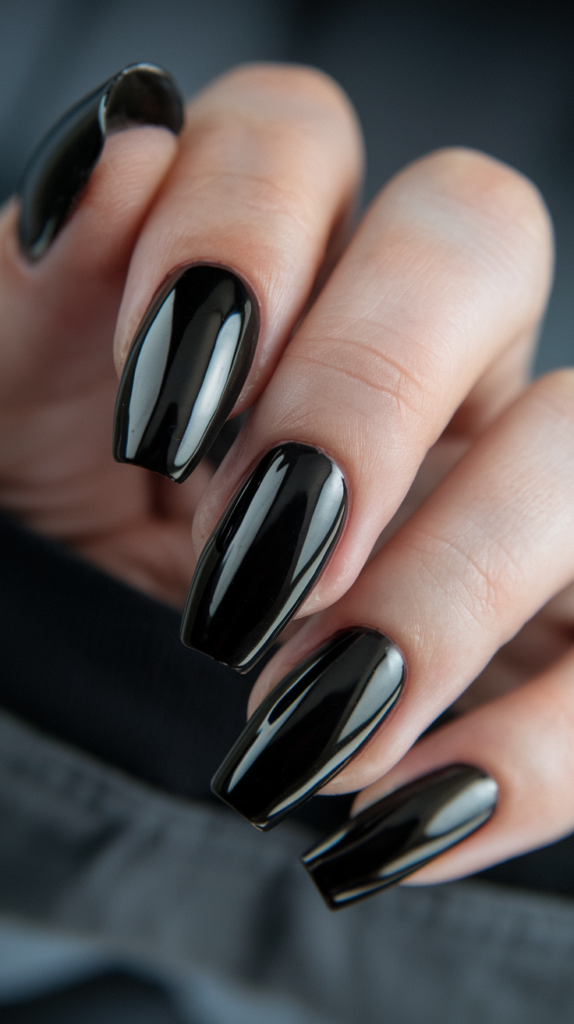
Why Coffin Nails Are Ideal For A Gothic Look
Coffin nails are known for their sleek shape, which narrows towards the tip, resembling a coffin.
This shape naturally complements the gothic aesthetic, exuding an aura of mystery and sophistication.
The elongated shape creates a bold canvas for intricate designs, making it ideal for showcasing the glossy black finish.
Coffin nails also give the hands an elegant silhouette, enhancing the dramatic effect of the polish.
Achieving A High-Gloss Finish: Tips & Tricks
To achieve the perfect high-gloss finish, start with a smooth base coat to even out the nail surface.
Apply two to three layers of black polish, allowing each layer to dry thoroughly.
Finish with a glossy top coat that provides a mirror-like shine.
For an even more polished look, buff the nails lightly before applying the top coat to ensure a flawless finish.
A quick-drying spray can also be used to prevent smudges.
Styling Ideas For Glossy Coffin Nails
Glossy black coffin nails are versatile and can be styled to suit various occasions.
For a minimalistic look, wear them plain without additional designs.
If you prefer a more embellished style, add small rhinestones or metallic studs near the cuticle.
Pairing glossy black coffin nails with gothic rings and accessories enhances the overall aesthetic, making it perfect for both casual outings and special events.
Spider Web Design: Spooky Elegance At Its Best
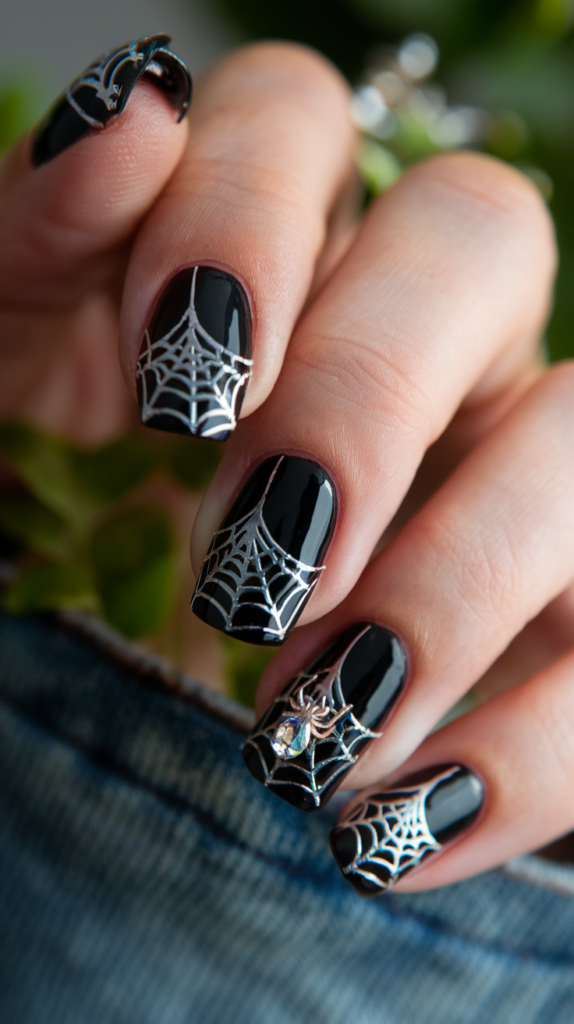
Techniques To Draw Thin, Intricate Spider Webs
Creating delicate spider webs requires precision and patience.
Start with a black base coat and allow it to dry completely.
Use a thin detail brush dipped in white or silver polish to draw intersecting lines that radiate outward like the spokes of a wheel.
Connect these spokes with tiny curved lines, forming the web.
For best results, draw the web on one side of the nail to leave negative space, making the design more elegant.
Practice on a plastic sheet if you’re new to fine detailing.
Using Rhinestones And Glitter To Enhance Web Designs
Adding rhinestones or glitter can elevate the spider web design, giving it a touch of glamour.
Place a small rhinestone where the web lines intersect to mimic a dewdrop.
You can also dust fine glitter along the web lines to make the design sparkle under light.
For a spookier effect, try using holographic glitter that changes color with movement.
These small details bring life to the web design, balancing between gothic and glamorous.
When To Wear Spider Web Nail Art
Spider web nail designs are perfect for Halloween or themed events.
However, they also work well year-round for those who embrace a gothic aesthetic.
Pairing these nails with dark, lacy outfits or gothic accessories enhances the spooky vibe.
Whether you’re attending a party or just want to express your style, spider web nails are a striking choice.
Gothic French Tips: A Bold Twist On A Classic
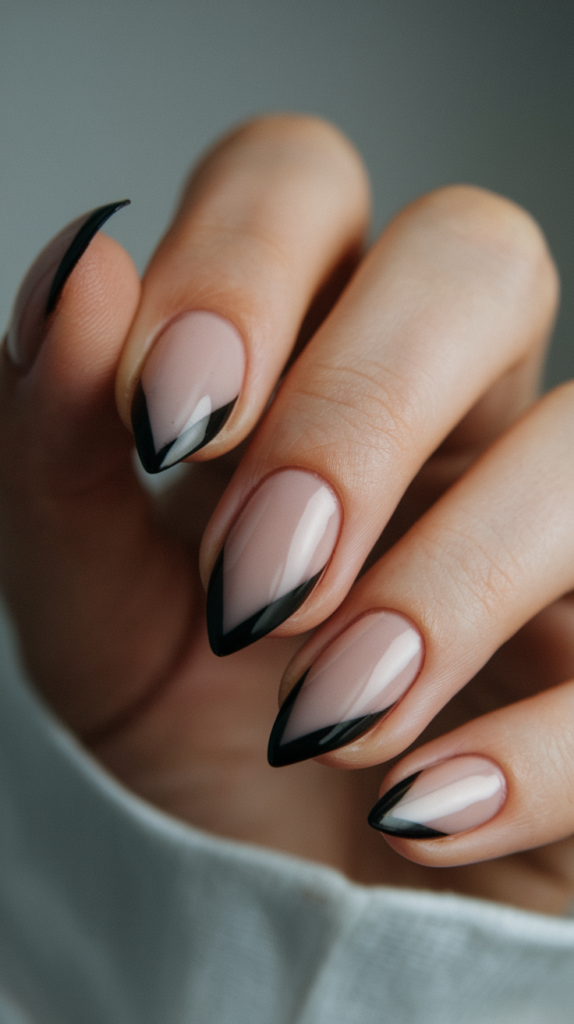
Designing Sharp Black-Tipped French Nails
To create gothic French tips, start with a matte or glossy nude base coat.
Once dry, use black polish to paint the tips in a sharp, angular style rather than the traditional rounded curve.
You can use striping tape for cleaner lines if needed.
This twist on the classic French manicure gives it a modern, edgy feel while still being elegant and versatile.
Nude Or Matte Base? How To Choose The Perfect Finish
The choice between a nude or matte base depends on the desired final look.
A matte base enhances the gothic aesthetic, giving the nails a velvety finish, while a glossy nude base creates a more sophisticated vibe.
For an even bolder statement, try experimenting with shimmer or iridescent bases, which add an unexpected twist to the gothic French style.
Styling Ideas For Gothic French Tips
Gothic French tips pair well with both casual and formal outfits.
For a minimal yet impactful look, keep the tips black and clean.
You can also add silver accents or small gems along the edge of the tips for extra flair.
These nails are ideal for events like dinners or concerts, but they’re also subtle enough for everyday wear.
Textured Velvet Nails: Dark Luxury On Fingertips
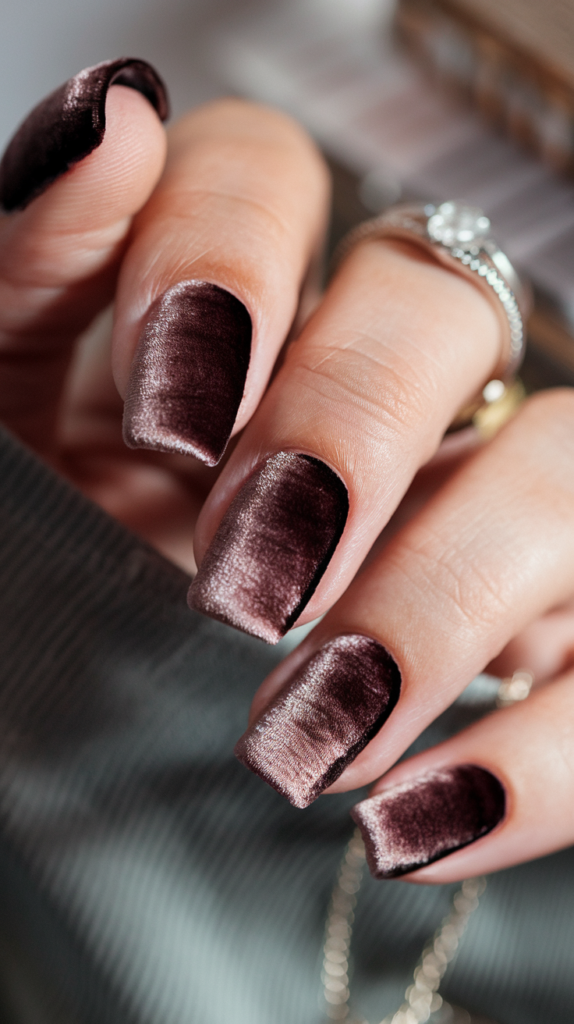
How To Create A Soft Velvet Nail Effect
To achieve a velvet effect, start with a black base coat.
Once dry, apply a layer of velvet powder while the top coat is still wet.
Press the powder gently into the nail to ensure it adheres well, then brush off any excess with a soft brush.
This technique gives the nails a plush, textured look, making them feel as luxurious as they appear.
Velvet nails work best with matte finishes, enhancing the soft, non-reflective appearance.
Best Occasions To Rock Velvet-Textured Nails
Velvet nails exude sophistication and are perfect for formal events like galas or weddings.
They also work well for winter gatherings, as the texture complements cozy fabrics like velvet dresses or knitwear.
These nails make a bold statement, so they’re ideal for those looking to elevate their look without adding intricate designs.
Color Variations To Elevate Velvet Nails
While black is the most popular color for velvet nails, experimenting with dark purples, deep greens, or burgundy shades can create a striking effect.
These alternative colors maintain the gothic vibe while adding a unique touch to the design.
You can also mix velvet finishes with glossy accents, such as a single glossy nail among matte velvet ones, to add visual interest.
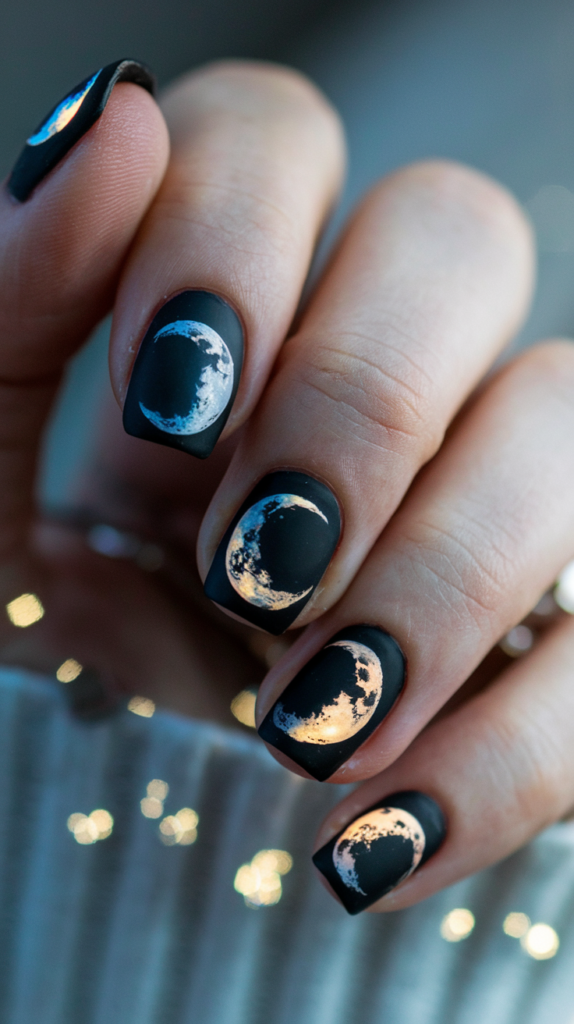
Moon Phases Nail Art: Embrace The Celestial Vibes
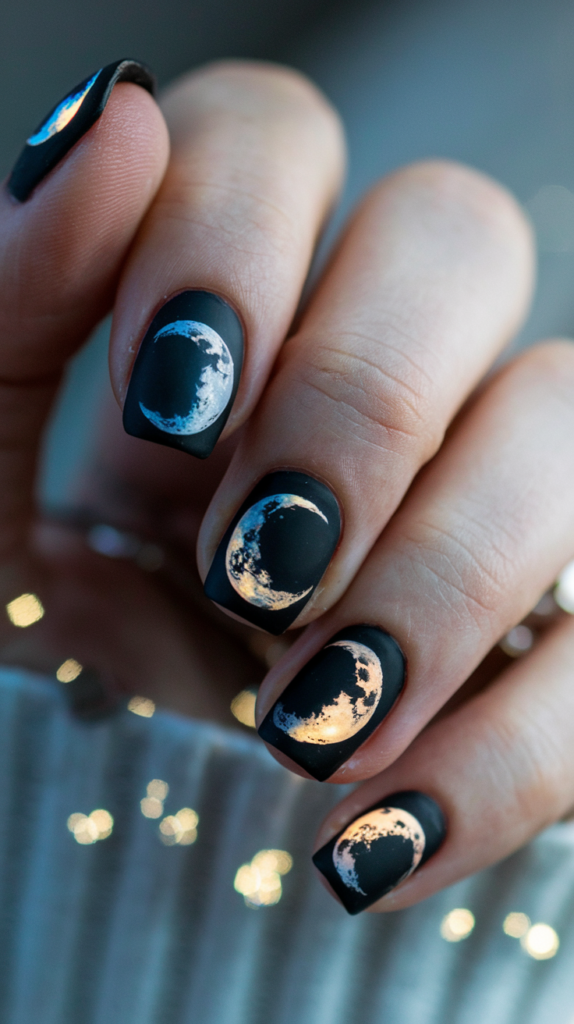
Designing Crescent And Full Moon Nail Patterns
To create moon phase patterns, start with a black base to represent the night sky.
Use a fine brush or stamping tool to paint crescents, half-moons, and full moons in silver or white polish.
Arrange the phases across the nails, either in a sequence or scattered randomly for an artistic touch.
Adding subtle shading to the moons can enhance the three-dimensional effect, making them appear more realistic.
How To Incorporate Metallic Silver For Extra Glow
Using metallic silver polish can elevate the moon phase design, giving it a celestial glow.
Apply silver to highlight specific moon phases or add tiny star details around the moons.
You can also mix metallic foil with polish to create a shimmering background, enhancing the cosmic feel.
This combination gives the nails a magical aura, making them perfect for celestial enthusiasts.
Styling Ideas For Cosmic Gothic Nails
Moon phase nails complement a variety of styles, from bohemian to gothic.
They are ideal for nighttime events or full moon gatherings, adding a mystical touch to your look.
Pair these nails with celestial jewelry or flowing fabrics to enhance the cosmic theme.
They also work well as everyday nails for those who embrace a spiritual or witchy aesthetic.
Astrological Symbols: Channeling Cosmic Energy
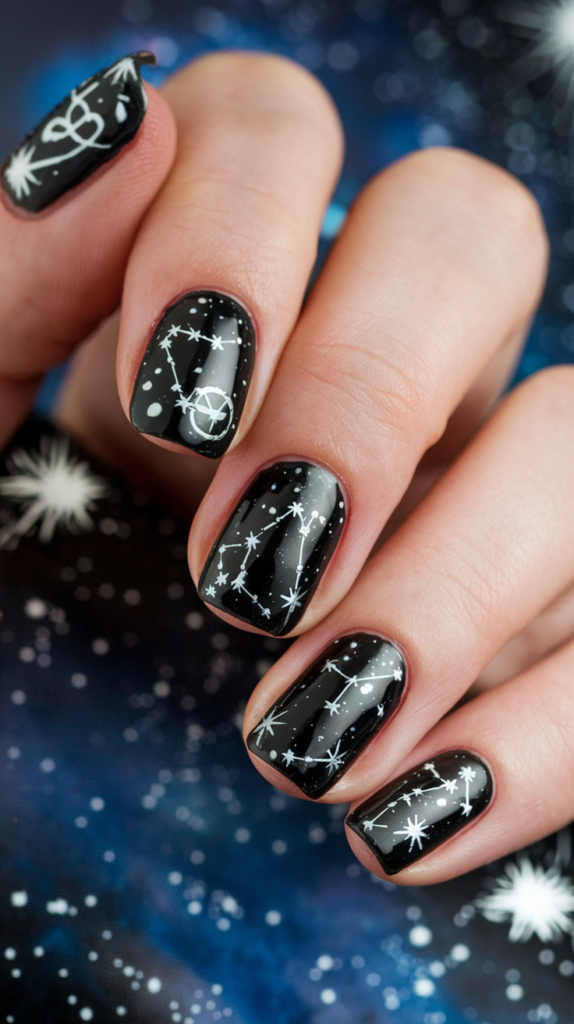
Zodiac Sign Nail Designs For Gothic Enthusiasts
Astrological symbols are a popular choice among gothic nail art lovers, offering a personal touch.
Start with a black or dark purple base and use metallic polish to paint zodiac symbols.
You can choose to feature your own zodiac sign or create a collection of all twelve signs across the nails.
Adding stars and constellations around the symbols enhances the cosmic feel, creating a mystical vibe.
Mixing Astrology With Dark Aesthetic Elements
Astrological designs blend beautifully with other gothic elements, such as runes or moon phases.
You can combine zodiac symbols with dark florals or lace patterns to create a unique, layered look.
Mixing metallic accents with matte finishes adds depth to the design, giving it a more refined appearance.
This fusion of astrology and gothic aesthetics makes the nails both meaningful and stylish.
Perfect Base Colors To Complement Zodiac Symbols
While black is the traditional base color for gothic nails, experimenting with dark blues, purples, and greens can add variety.
Metallic or shimmer polishes also work well as a background, creating the illusion of a starry sky.
Choosing the right base color enhances the visibility of the symbols, ensuring they stand out beautifully.
Rune-Inspired Patterns: Ancient Magic In Nail Art
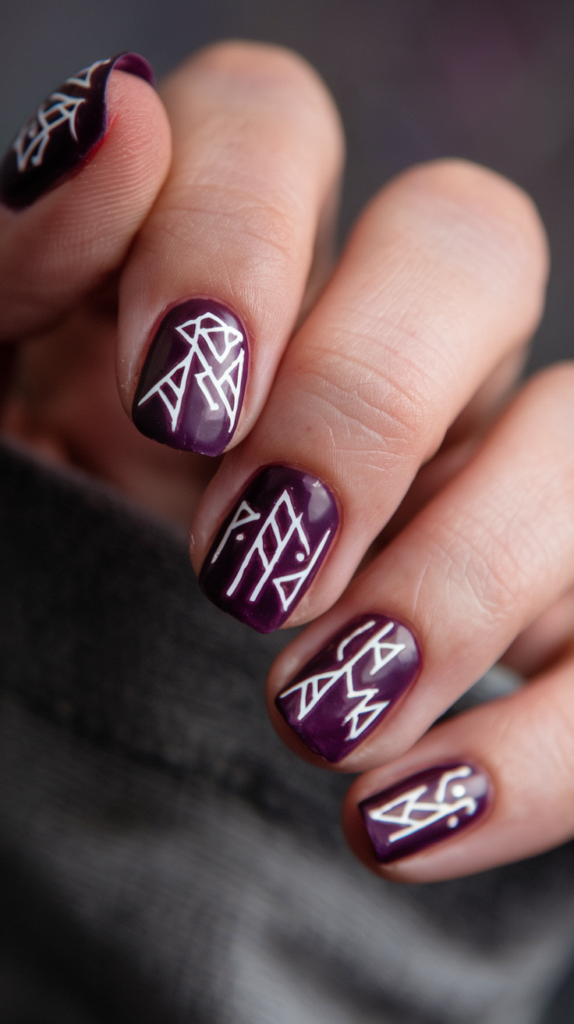
How To Draw Intricate Rune Symbols On Nails
Drawing rune symbols requires a steady hand and attention to detail.
Start with a matte black or dark purple base, then use a fine brush dipped in white or metallic polish to paint the runes.
Research rune meanings to choose symbols that resonate with you, adding a personal touch to the design.
For added precision, practice the symbols on paper before painting them on your nails.
Choosing The Right Colors For Mystical Vibes
Black and deep purple are ideal base colors for rune-inspired nails, as they create a mysterious and magical atmosphere.
You can also experiment with dark greens or navy blues for a more subtle look.
Metallic accents in gold or silver enhance the runes, giving them a mystical glow that catches the light.
Ideas For Incorporating Runes Into Everyday Looks
Rune designs are versatile and can be worn as subtle accents or bold statements.
Incorporate runes on just one or two nails for a minimalist look, or cover all your nails with different symbols for a more dramatic effect.
These nails pair well with gothic jewelry or rune-inspired accessories, making them perfect for everyday wear or special occasions.
All-Seeing Eye Design: Mysticism Meets Art
Step-By-Step Guide To Drawing The All-Seeing Eye
To create the All-Seeing Eye design, start with a matte black base coat for a mystical backdrop.
Using a fine detail brush, paint the outline of an eye in white or silver polish.
Add intricate details such as eyelashes, a glowing iris, and surrounding patterns like small triangles or rays of light.
For a cosmic effect, paint the iris in a vivid color such as electric blue or green.
Surround the eye with tiny stars or dots to complete the design.
Adding Cosmic Elements Around The Eye Design
Enhancing the All-Seeing Eye with celestial patterns makes the design even more captivating.
Add crescent moons and small constellations around the eye to emphasize the cosmic theme.
You can also incorporate glitter to create a starry effect, making the nails shimmer when they catch the light.
This combination of mysticism and cosmic symbolism gives the design an otherworldly feel.
When To Wear This Mystical Nail Look
The All-Seeing Eye design is perfect for spiritual events, full moon ceremonies, or even everyday wear for those who love mystical aesthetics.
It works well with bohemian or gothic outfits, adding a touch of mystery and meaning to your look.
Pair these nails with cosmic jewelry or gemstone rings to complete the ensemble.
Pentagram Art: The Ultimate Symbol Of Power
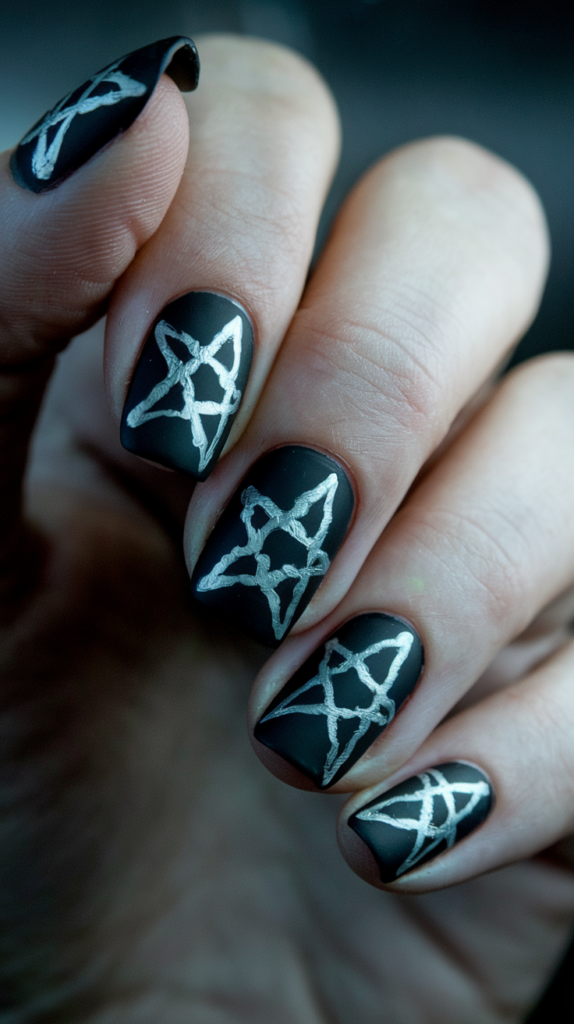
Designing Precise Pentagrams On Nails
Creating precise pentagrams requires steady hands and sharp tools.
Start by applying a matte black base coat.
Use a fine brush or nail art pen to draw a pentagram with thin white or silver lines.
Ensure that the star is symmetrical and evenly spaced for a polished appearance.
For added dimension, you can use metallic polish or foil to outline the pentagram.
Using Metallic Accents To Elevate Your Design
Metallic accents, such as gold or silver, can take pentagram nails to the next level.
Outline the star in metallic polish or add small studs at each point of the pentagram.
You can also use holographic foil to create a shimmering effect, adding a modern twist to the traditional symbol.
These metallic elements give the nails a more luxurious feel without losing the gothic essence.
Styling Pentagram Nails For A Gothic Aesthetic
Pentagram nails are ideal for events like concerts, festivals, or Halloween parties.
They pair well with leather jackets, combat boots, and other edgy clothing.
For a softer look, combine them with velvet fabrics or lace accessories.
These nails not only make a statement but also showcase your connection to gothic symbols and aesthetics.
Tarot Card Motifs: Nail Art With A Story To Tell
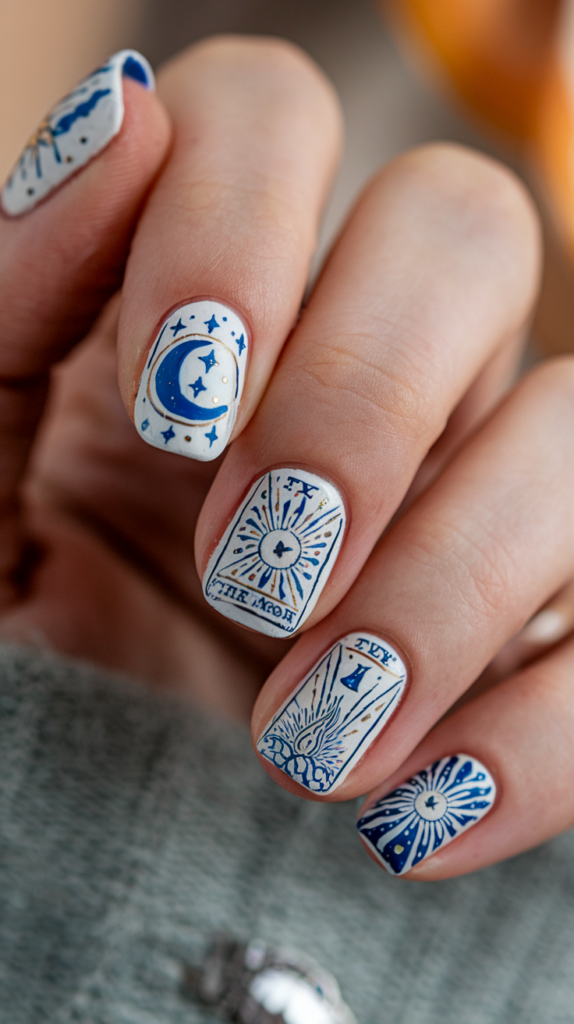
Creating ‘The Moon’ And ‘The Star’ Tarot Patterns
Tarot-inspired nails allow you to carry meaningful symbols on your fingertips.
Start by painting a black base coat.
Use a fine brush to depict elements from ‘The Moon’ or ‘The Star’ tarot cards, such as crescent moons, stars, or glowing rays of light.
For intricate details, such as faces or animal motifs, practice on a nail palette first to perfect the design.
How To Combine Tarot Symbols With Gothic Elements
Combining tarot motifs with gothic elements, such as lace patterns or rune symbols, adds depth to the design.
You can use metallic accents to outline the tarot symbols, giving them a mystical glow.
Pairing tarot symbols with darker colors like navy, plum, or emerald enhances the gothic theme while keeping the design visually interesting.
Tarot-Inspired Nails For Special Occasions
Tarot-inspired nails are perfect for themed parties, spiritual gatherings, or even personal rituals.
They also work well as everyday nails for those who love meaningful designs.
Pair these nails with gemstone rings or tarot-themed accessories to complete the mystical look.
Mystic Crystals And Gemstones: Add A 3D Touch
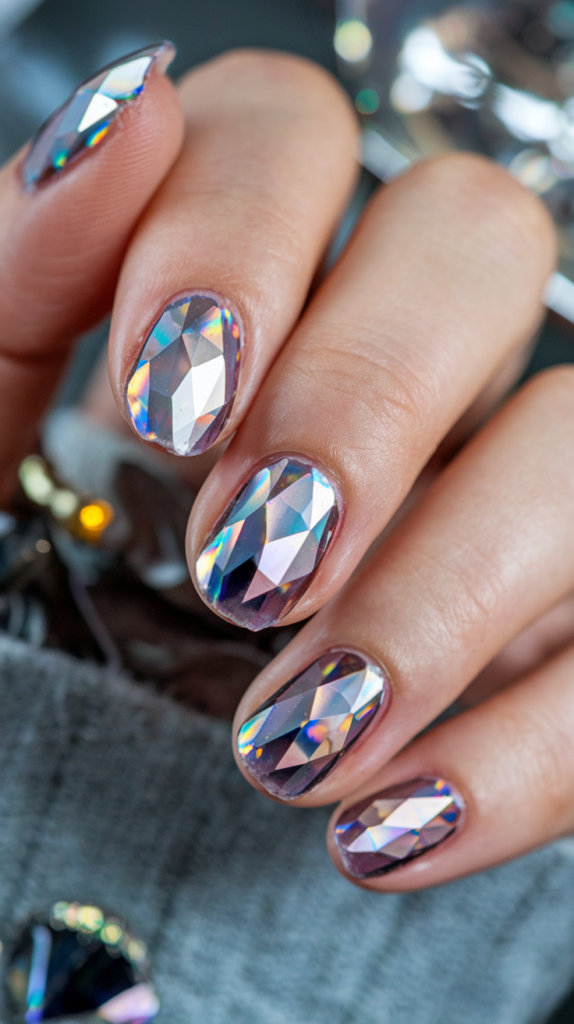
How To Apply Amethyst And Holographic Crystals
Applying crystals to nails adds dimension and sparkle.
Begin by applying a dark base coat, such as black or deep purple, to enhance the gemstones’ shine.
Use nail glue to carefully place 3D amethyst crystals or holographic gems on the nail surface.
Arrange the crystals in clusters or along the nail edge for a cascading effect.
Seal everything with a strong top coat to ensure the crystals stay in place.
Best Techniques For Long-Lasting Crystal Nails
To ensure your crystal nails last, apply a gel top coat over the design and cure it under a UV lamp.
This creates a sturdy finish that holds the crystals in place.
Avoid using excessive glue, as it can dull the shine of the gems.
For long-lasting wear, keep your nails short to minimize the chance of crystals catching on clothing or surfaces.
Styling Ideas For Crystal-Inspired Gothic Nails
Crystal nails pair beautifully with gothic outfits, especially those featuring velvet, lace, or dark leather.
They are ideal for formal events, such as galas or weddings, but also work for casual wear if styled minimally.
Matching the gemstone colors with your accessories, such as amethyst rings or crystal necklaces, enhances the overall aesthetic.
Black Roses On Matte Base: Romance In Darkness
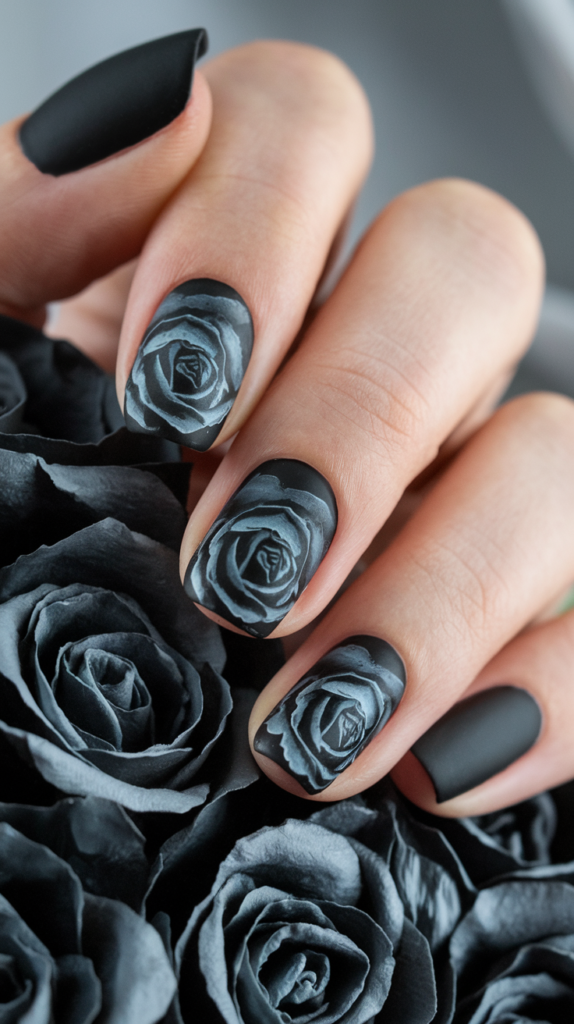
How To Create 3D Rose Petals On Nails
Creating 3D roses requires sculpting skills and patience.
Start by applying a matte black base coat.
Use acrylic powder to sculpt tiny rose petals, layering them carefully to form a blooming rose.
Once dry, paint the roses with black polish and finish with a matte top coat.
The result is a stunning, lifelike rose that adds texture and dimension to the nails.
Matte Vs. Gloss: Which Base Works Best?
While a matte base enhances the softness of the roses, a glossy base provides a more dramatic effect.
A matte finish is ideal for those seeking subtle elegance, while a glossy finish suits bolder looks.
You can also experiment with combining both finishes by having some nails matte and others glossy, adding variety to the design.
When To Wear This Gothic Floral Nail Look
Black rose nails are perfect for romantic occasions, such as anniversaries or gothic weddings.
They also work well for events where you want to make a statement without being too flashy.
Pair these nails with dark floral outfits or lace accessories for a cohesive look.
Vampire Red Rose Art: Love And Danger Combined
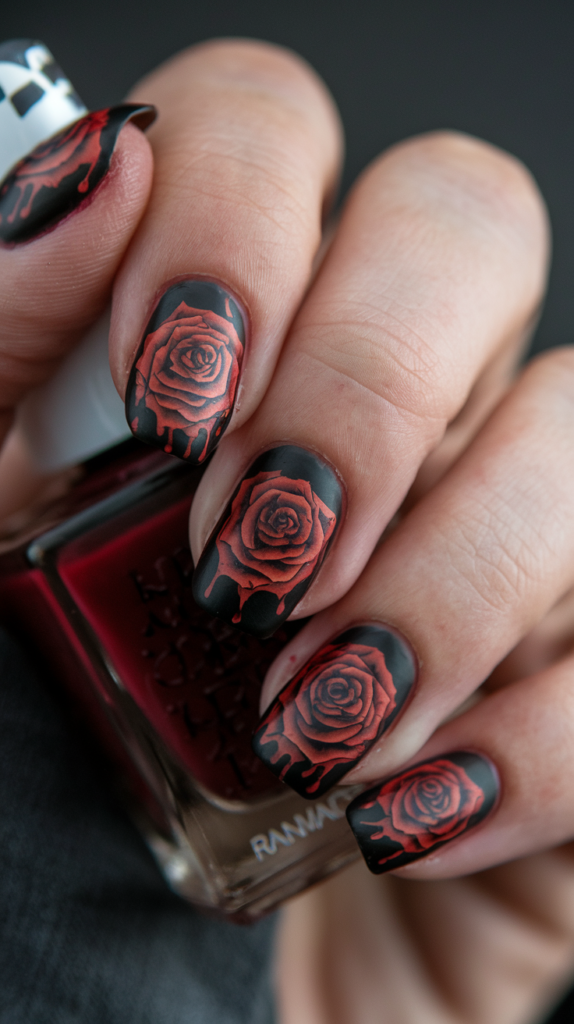
Techniques To Add Blood-Like Drips To Roses
To create the blood-drip effect, start by painting vibrant red roses on a black base.
Use a detail brush to add thin lines of red polish dripping from the petals, mimicking the appearance of blood.
For a more realistic effect, use a glossy red polish for the drips, giving them a wet look.
Seal the design with a top coat to prevent smudging.
How To Draw Thorns For A Sharp Look
Adding thorny vines enhances the dramatic effect of vampire roses.
Use a fine brush to draw thin black vines winding around the roses, with small pointed thorns along the stems.
These thorns create a sense of danger and elegance, perfectly capturing the gothic theme.
Styling Red Rose Nails For A Bold Gothic Look
Vampire red rose nails are ideal for special occasions, such as Halloween parties or gothic-themed events.
Pair them with dark makeup and bold accessories to complete the look.
These nails also complement outfits with red and black elements, creating a cohesive aesthetic.
Dark Botanical Motifs: Nature’s Gothic Side
Designing Ivy And Fern Patterns On Nails
To create ivy or fern patterns, begin with a black or dark green base coat.
Use a fine brush to paint delicate ivy leaves or ferns, ensuring the lines are thin and graceful.
If you want more dimension, you can add a slight gradient to the leaves, with darker tones at the tips and lighter ones near the veins.
For extra detail, incorporate small tendrils or vines curling around the leaf edges.
This nature-inspired design embodies the gothic aesthetic by bringing out the darker side of natural elements.
Using Gloss To Highlight Botanical Elements
Applying a glossy top coat over the ivy or fern designs enhances the details, making the greenery appear more vibrant against the dark background.
You can also experiment with glitter or metallic polish to add a subtle shimmer to the leaves, giving the design a dewy effect.
Glossy elements offer depth and contrast to matte backgrounds, making the botanical patterns pop.
Dark Botanical Nails For Different Occasions
These botanical nails are perfect for those who appreciate nature but want a darker twist.
They work well for casual outdoor events, gothic festivals, or even as everyday nails.
Pairing them with floral dresses or ivy-inspired jewelry creates a cohesive, nature-meets-gothic vibe.
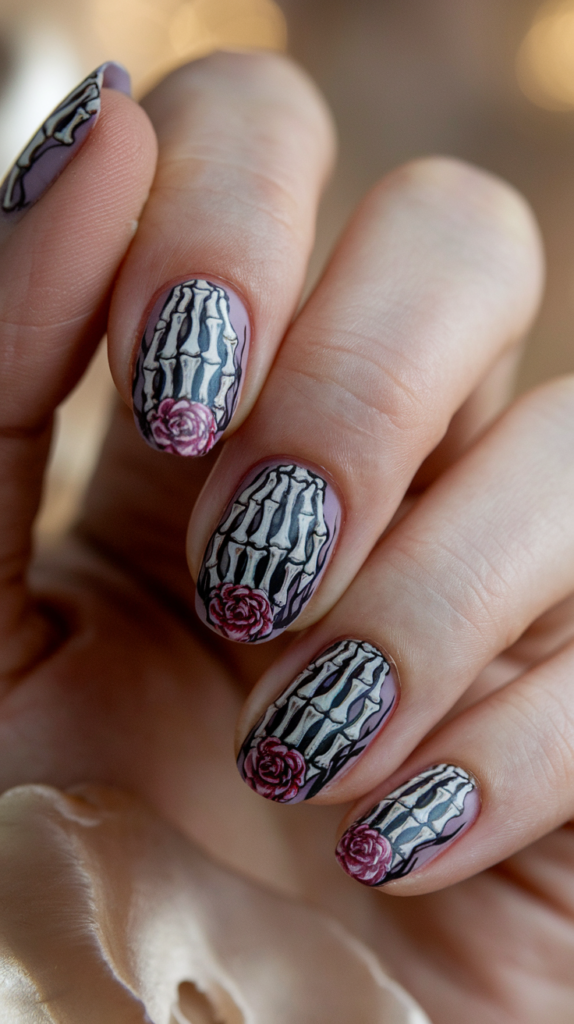
Skeleton Hand Holding Roses: Art In Motion

How To Create A Skeleton And Rose Combo Design
Creating this intricate design requires patience and skill.
Start with a matte black base coat.
Use a fine brush to paint the outline of a skeletal hand in white or silver polish.
On another nail, paint a blooming rose.
When the nails are aligned side by side, the two images should connect seamlessly, making it appear as if the skeleton hand is holding the rose.
Add shading and fine details to both elements to enhance realism.
Aligning Nails To Form A Continuous Art Piece
The key to making this design work is precise alignment.
Sketch the design on paper before applying it to your nails to ensure each piece fits perfectly.
You can also use nail decals for more precision.
Make sure the hand and rose connect across two or three nails, creating a visual narrative when the fingers are positioned correctly.
Perfect Occasions To Wear This Look
This design is ideal for gothic weddings, Halloween events, or romantic dates with a twist.
It pairs beautifully with outfits that incorporate lace, roses, or skeletal motifs.
These nails not only make a bold artistic statement but also reflect a deeper appreciation for both beauty and decay.
Wilted Flowers Design: Faded Elegance
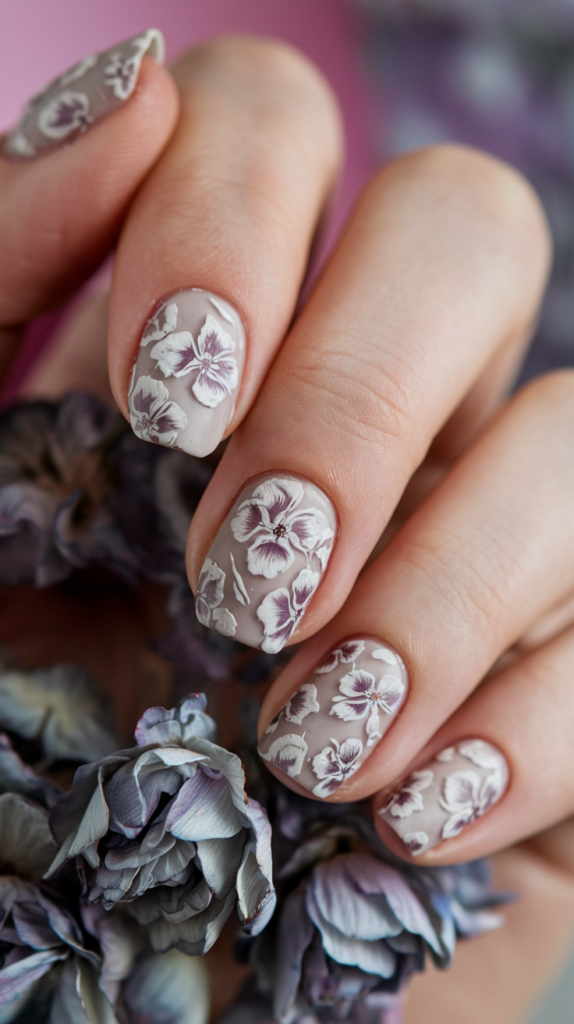
How To Create Realistic Faded Flower Patterns
To achieve a wilted flower effect, start with a gray or muted black base coat.
Use a detail brush to paint petals that appear slightly curled and frayed, simulating the look of withering flowers.
Add a light gradient to the petals, fading from a darker center to pale, almost translucent edges.
This subtle color transition gives the flowers a lifelike, melancholic appearance.
Choosing The Right Colors For A Withering Effect
Muted tones such as dusty lavender, pale gray, and faded pink work best for wilted flower designs.
These colors evoke a sense of nostalgia and sadness, aligning perfectly with the gothic aesthetic.
Adding touches of gold or silver to the flower centers can provide contrast, giving the design an ethereal glow without detracting from the wilted effect.
Styling Ideas For Melancholic Floral Nails
Wilted flower nails pair beautifully with vintage-inspired clothing, lace accessories, or earthy tones.
They are perfect for autumn events, gothic festivals, or personal rituals.
These nails convey a sense of quiet beauty, making them suitable for introspective occasions or creative gatherings.
Floral Decay Nails: Beauty In Deterioration
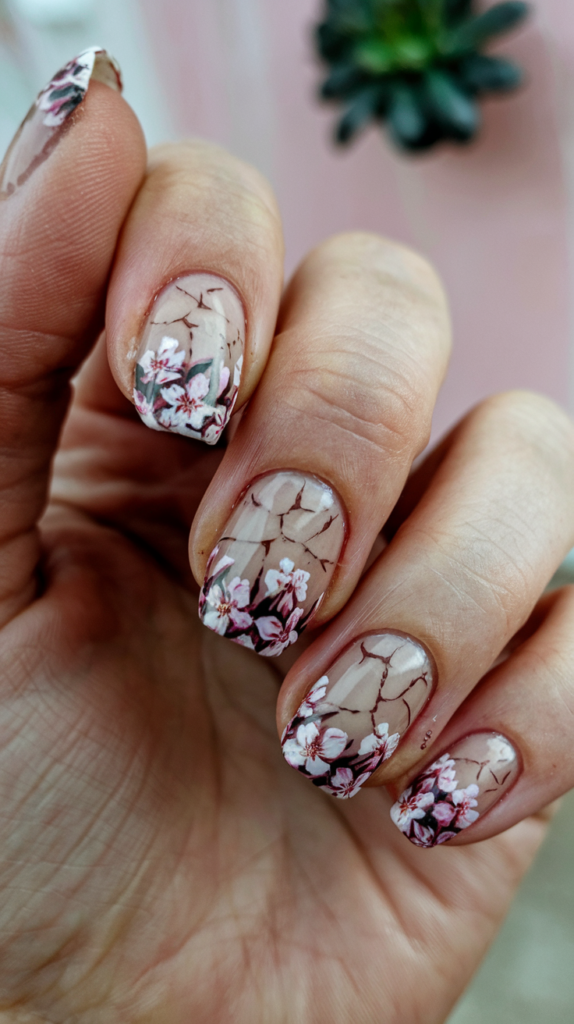
Techniques For Blending Blooming And Cracked Elements
Creating floral decay nails involves a mix of blooming flowers and cracked patterns.
Start by painting blooming flowers on the nail, using vibrant colors such as red or purple.
As you move toward the cuticle or tip, introduce subtle cracks and fragmented petals, blending the two elements seamlessly.
You can use a sponge to dab on the cracks for a natural effect.
Using Subtle Cracks To Enhance The Gothic Look
Subtle cracks add an air of deterioration, making the flowers appear as though they are slowly decaying.
Use a fine brush or stamping tool to apply the cracks with precision.
A matte top coat helps to emphasize the cracked texture, while small glitter accents can add depth and create contrast between the blooming and deteriorated areas.
When To Wear Floral Decay-Inspired Nail Art
Floral decay nails are perfect for gothic weddings, themed parties, or autumn events.
They also work well for those who appreciate symbolism, as the design captures the fleeting nature of beauty.
Pair these nails with floral prints or cracked leather accessories for a cohesive gothic look.
Thorn Vine Accents: Sharp And Stylish
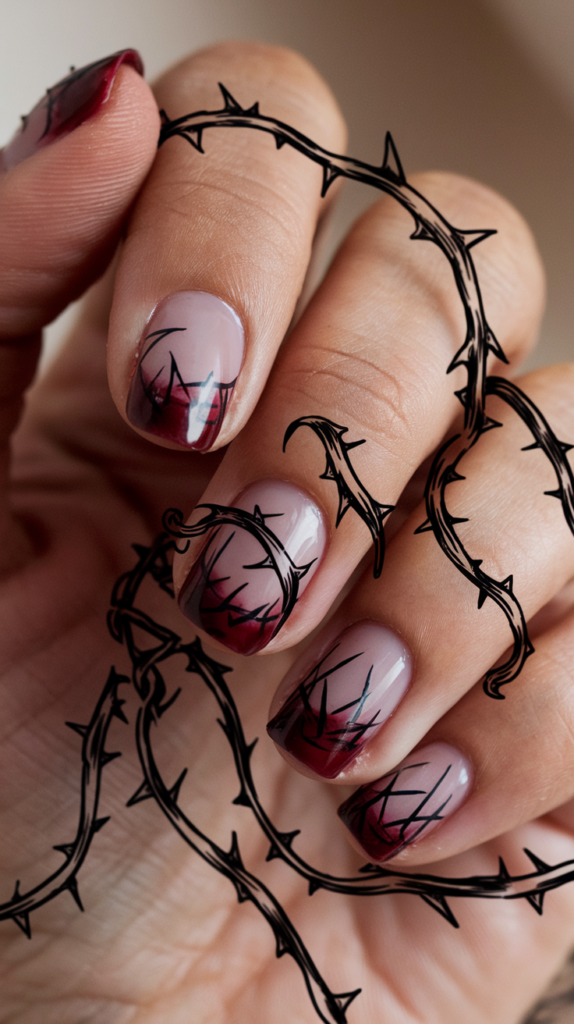
How To Draw Thorn Vines With 3D Effects
To create thorn vine nails, start with a black base coat.
Use a fine brush to paint thin vines spiraling across the nails.
Add small, pointed thorns along the vines, ensuring they vary in size for a realistic look.
For a 3D effect, apply a slightly thicker layer of polish or use gel to sculpt the thorns.
This dimensional approach makes the vines appear as if they are wrapping around the nails.
Adding Metallic Droplets For A Gothic Edge
Metallic droplets along the vines enhance the design, giving the illusion of morning dew or blood.
Use silver or red polish to create tiny droplets at the tips of the thorns.
A glossy top coat over the droplets makes them appear wet, adding depth to the design.
This small detail adds a luxurious touch to the otherwise edgy aesthetic.
Styling Ideas For Thorn-Inspired Nails
These thorny nails are perfect for concerts, gothic-themed events, or even date nights.
Pair them with leather jackets, spiked jewelry, or floral prints to enhance the dark romance of the look.
The design captures the essence of beauty and danger, making it a favorite among gothic enthusiasts.
Dragon Claw Nails: Fierce And Powerful
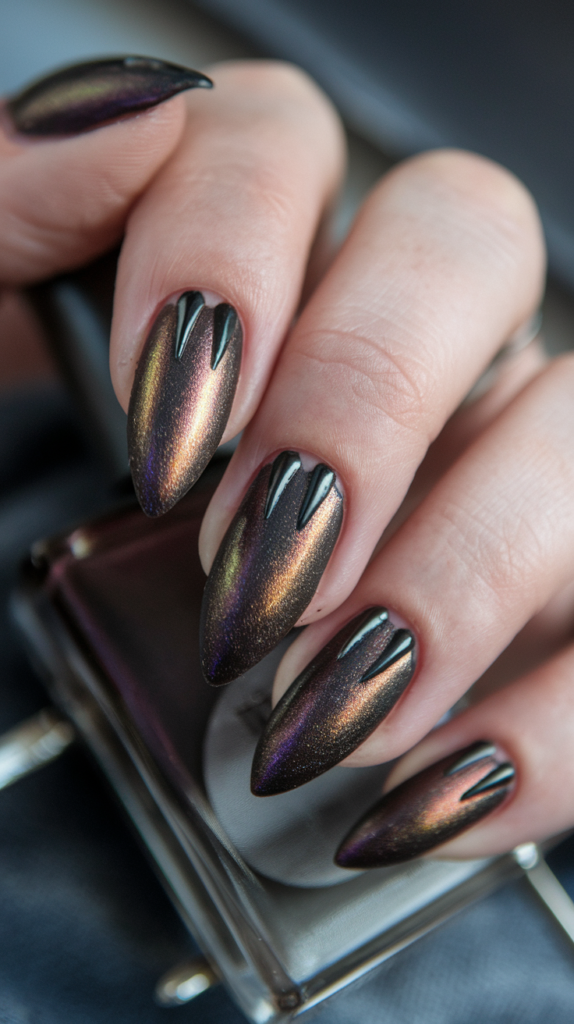
Creating Stiletto-Shaped Dragon Claw Nails
Dragon claw nails are achieved with long, stiletto-shaped tips.
Start with a black base coat and use metallic polish to add jagged accents along the edges, mimicking the scales of a dragon.
You can also use glitter or foil to highlight certain areas, giving the claws a shimmering effect.
The sharp, pointed shape enhances the fierce vibe, making these nails a statement piece.
Using Metallic Shades For A Sharp Look
Metallic shades such as gold, silver, or copper work well with dragon claw designs.
Apply these colors along the edges of the nails or as an ombre effect from the tip to the base.
The metallic sheen reflects light, enhancing the sharp, dangerous appearance of the claws.
A glossy top coat completes the look, making the metallic accents stand out even more.
How To Style Dragon-Inspired Nails
These nails are perfect for festivals, costume parties, or nights out.
Pair them with bold accessories such as rings or bracelets that feature dragon motifs.
Dragon claw nails also complement gothic outfits, especially those with metallic or leather elements, creating a powerful and edgy look.
Vampire Fangs Design: Small Details With A Bite
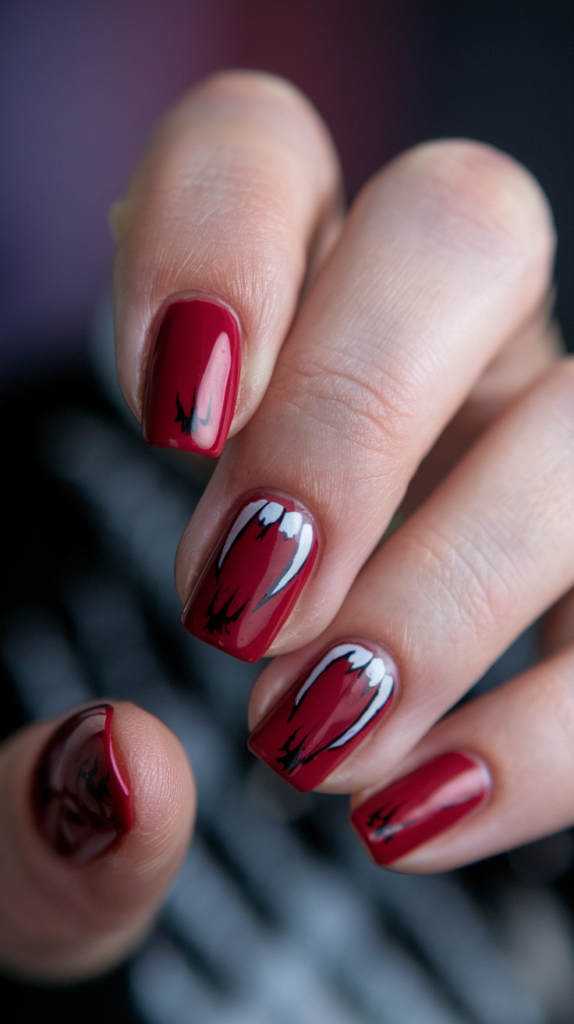
Drawing Tiny Fang Motifs On Nails
To achieve the vampire fang design, start with a matte black or deep burgundy base coat.
Use a fine nail art brush to paint tiny, sharp fang shapes near the tips of the nails.
The fangs should appear slightly curved, resembling realistic vampire teeth.
Make sure the spacing between the fangs is even, and add a subtle shadow with dark gray polish to enhance depth.
Adding Blood Droplets For A Realistic Effect
Once the fangs are complete, apply small red droplets along the edges, mimicking fresh blood.
A glossy red polish works best to create a wet effect, making the droplets look realistic.
Use a dotting tool or a fine brush for precise application.
You can even add a drop or two trailing down the nail for an extra dramatic touch.
When To Wear Vampire-Inspired Nails
Vampire fang nails are ideal for Halloween, gothic festivals, or themed parties.
Pair them with bold makeup—such as dark lipstick or smoky eyes—and gothic jewelry for a complete vampire-inspired look.
These nails add a playful yet dangerous vibe, perfect for making a statement.
Bat Silhouette Nails: Dark Shapes In Flight
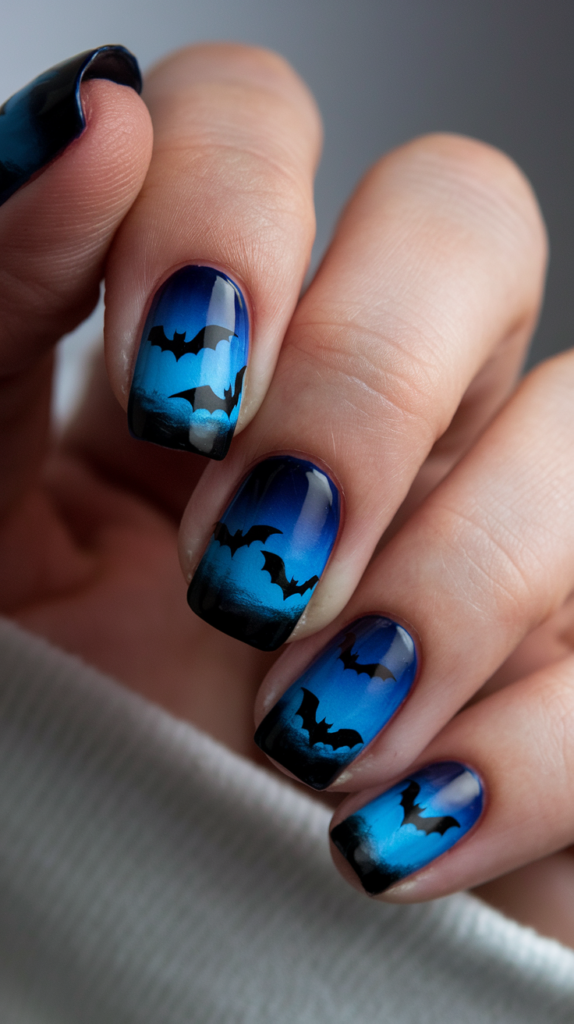
How To Draw Bat Silhouettes Across Nails
To create bat silhouettes, begin with a gradient night sky background.
Start by blending navy blue and black polish using a sponge to achieve the ombre effect.
Once dry, use a fine brush to paint small bat shapes in black polish, flying across the nails.
Focus on sharp, angular wings and tiny details to make the bats stand out.
Creating A Gradient Night Sky Background
A seamless gradient background enhances the bat silhouettes.
Use dark blues, purples, or grays to create a twilight or night sky effect.
Add tiny silver dots to mimic stars, making the background more dynamic.
A glossy top coat will give the nails a smooth, polished finish, enhancing the gradient and bat details.
Styling Bat-Inspired Nails For Halloween
Bat nails are perfect for Halloween or gothic-themed events.
They also work well for everyday wear if you enjoy subtle gothic details.
Pair these nails with outfits featuring lace or leather, and add bat-themed jewelry to complete the look.
These nails are a fun way to embrace the spooky season or express your love for gothic aesthetics.
Haunted Castle Art: Gothic Architecture On Nails
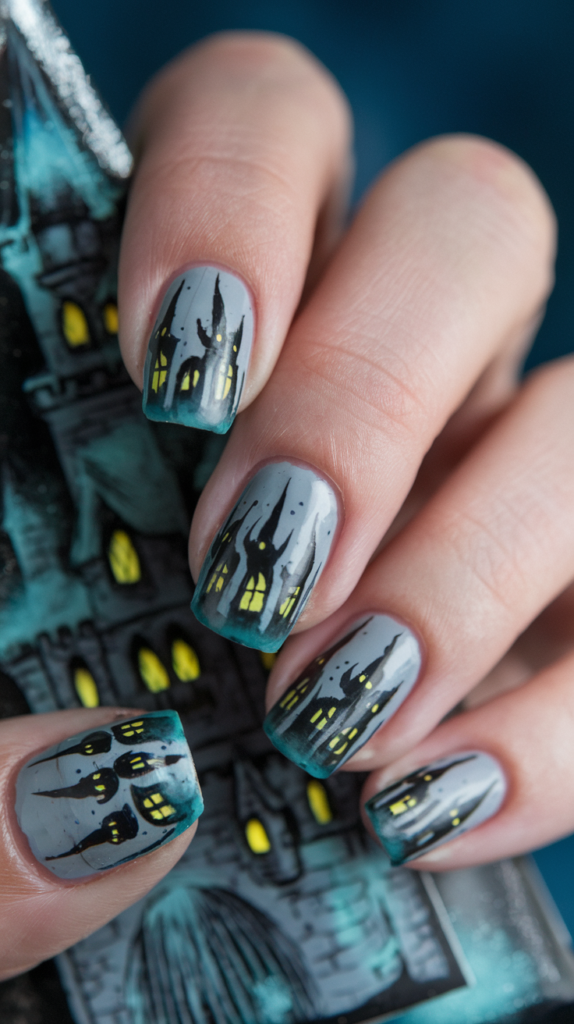
Designing Misty Castles With Tiny Details
To create a haunted castle design, begin with a matte black or dark gray base.
Use a fine brush to outline the castle in misty gray polish.
Add small turrets, windows, and gothic arches to make the design more detailed.
For an eerie effect, paint wispy clouds or fog around the castle, creating a mysterious atmosphere.
Adding Glowing Windows For A Spooky Effect
To enhance the haunted look, paint small windows in glowing yellow or orange polish.
These glowing accents make it appear as if lights are flickering inside the castle.
You can also add tiny ghost shapes or bats flying around the castle to emphasize the spooky vibe.
A matte top coat can help keep the design from being too shiny, reinforcing the gothic atmosphere.
When To Wear Haunted Castle Nail Art
These nails are perfect for Halloween or haunted house events.
They also work well for gothic festivals or themed parties.
Pair them with dark clothing and gothic accessories to complete the look.
These nails are both intricate and captivating, making them ideal for those who enjoy artistic, detailed designs.
Raven Feathers And Skulls: A Gothic Duo
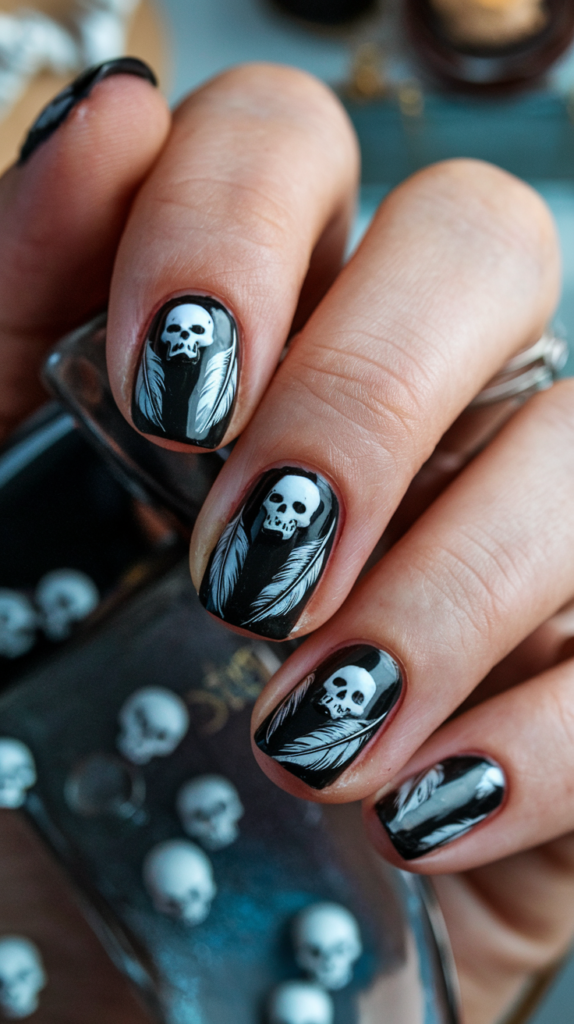
Drawing Feathery Textures On Nails
Start with a matte black base and use a fine brush to paint feathery textures in dark gray or metallic polish.
Focus on creating delicate, overlapping strokes that mimic the softness of real feathers.
You can also add a slight gradient to the feathers, fading from black to dark silver, for added dimension.
Adding Tiny Skulls For Extra Gothic Flair
Incorporate small skull designs at the base or tip of the nails to enhance the gothic feel.
Use white or silver polish to paint the skulls, and add subtle shading for depth.
For a bolder look, you can use 3D skull embellishments glued to the nails.
These small details make the design edgier and more captivating.
Styling Feather-And-Skull Nails For Special Occasions
Feather-and-skull nails are perfect for concerts, gothic festivals, or Halloween events.
They pair well with outfits that feature feathers, skull motifs, or dark fabrics.
These nails embody a balance between softness and edginess, making them ideal for those who enjoy unique and artistic designs.
Cemetery Silhouettes: Simple Yet Eerie
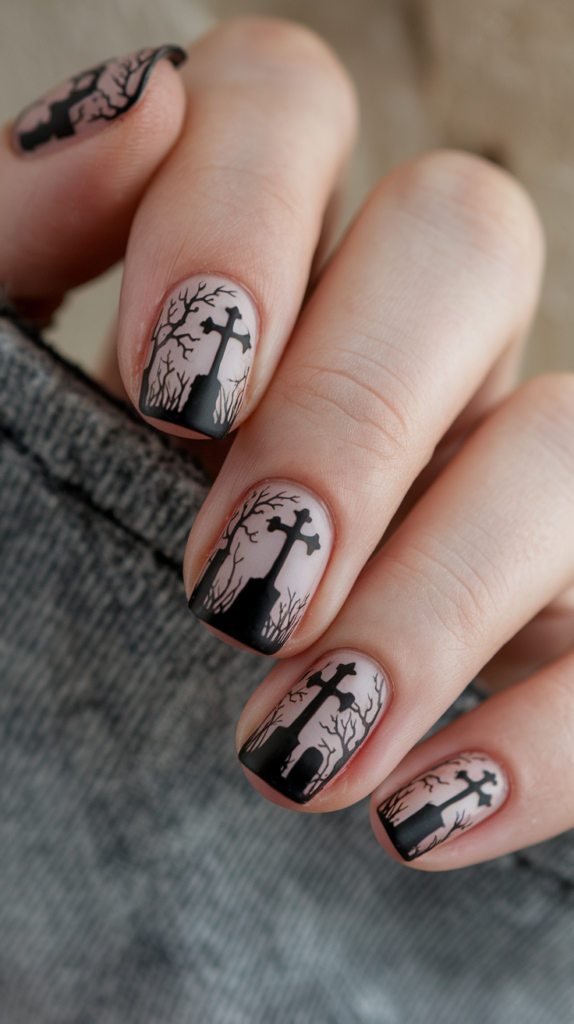
How To Create Minimalist Tombstone Designs
To create cemetery silhouettes, start with a matte black or dark gray base coat.
Use a fine brush to paint simple tombstones and crosses in black or dark gray polish.
Focus on minimal details—just enough to suggest the eerie atmosphere of a cemetery at night.
You can also add a few scattered leaves or cracks in the tombstones for added depth.
Using Matte And Gloss For Depth And Texture
A combination of matte and glossy finishes can elevate the design.
Use a matte base for the background and apply glossy polish to the tombstones and crosses, creating subtle contrast.
This technique adds depth to the design, making it more visually interesting without overpowering the minimalist concept.
When To Rock Cemetery-Inspired Nails
These nails are ideal for Halloween or gothic events.
They also work well as everyday nails for those who enjoy subtle, spooky designs.
Pair them with dark outfits and accessories for a cohesive gothic look.
These nails are understated yet eerie, making them perfect for those who prefer minimalistic gothic styles.
Witch Hat And Cauldron Art: Playful And Dark
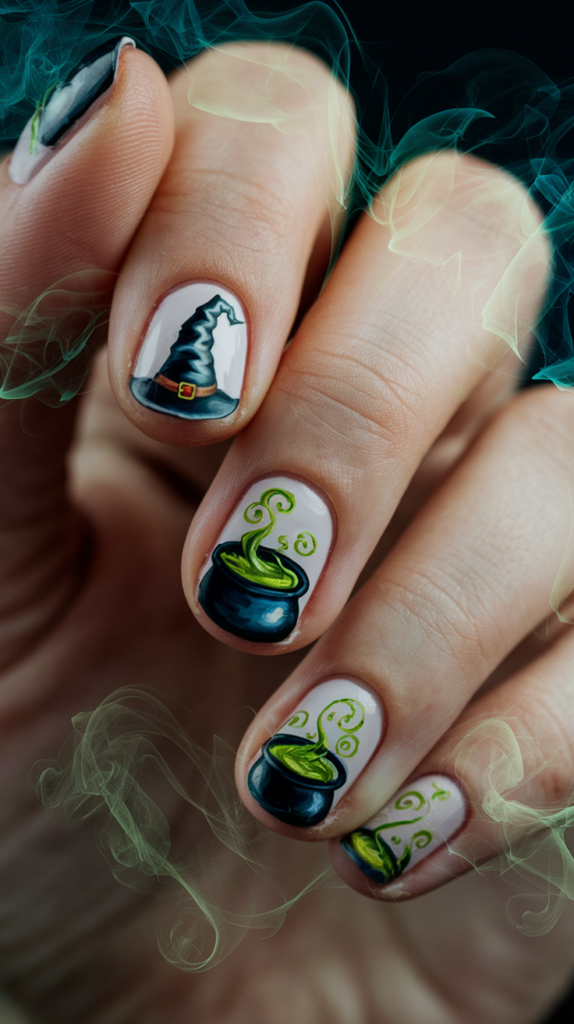
Drawing Miniature Witch Hats And Cauldrons
Begin with a deep purple or black base coat.
Use a fine brush to paint small witch hats with curved brims and pointed tops.
On other nails, paint bubbling cauldrons with green or purple potion spilling over the edge.
Add tiny stars or moons around the designs for extra detail.
This playful combination of elements adds a whimsical touch to the gothic theme.
Adding Swirling Smoke In Purple And Green
To enhance the cauldron design, paint swirling smoke trails in light purple or green polish.
Use a fine brush to create delicate, curling lines that mimic the movement of smoke.
You can also add a touch of glitter to the smoke for a magical effect, making the design even more enchanting.
Styling Ideas For Witchy Nails
These nails are perfect for Halloween, cosplay events, or themed parties.
Pair them with witch hats, robes, or moon-themed jewelry for a complete look.
These playful nails capture the fun side of gothic aesthetics while still maintaining an air of mystery.
Gold Accents On Black Nails: A Luxurious Touch
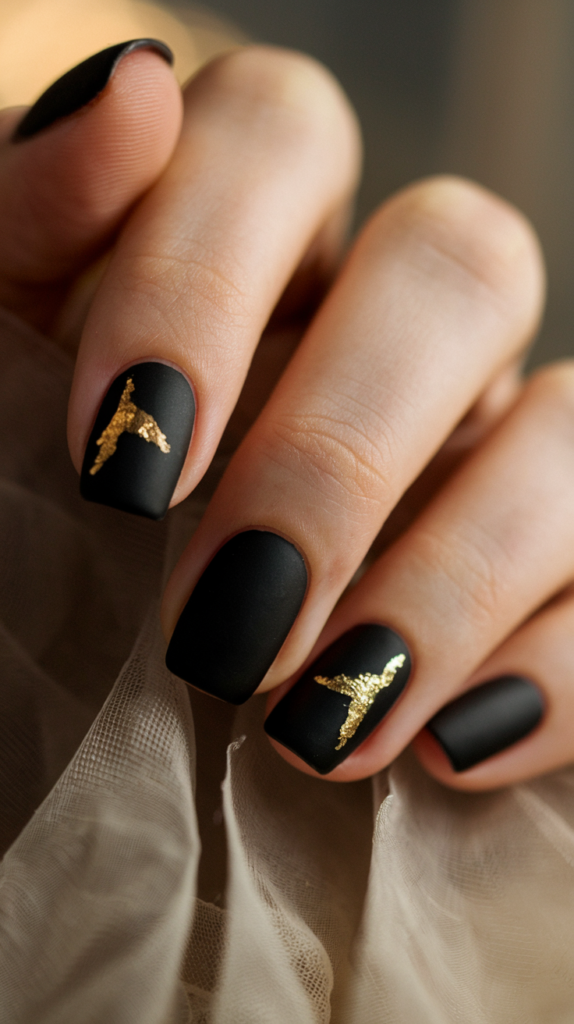
How To Use Gold Leaf On Matte Black Nails
Start by applying a matte black base coat.
Use tweezers to carefully place small pieces of gold leaf on the nails while the top coat is still wet.
Gently press the gold leaf into place, then seal it with a glossy or matte top coat.
This technique adds a luxurious touch to the nails, making them stand out without overwhelming the design.
Creating Minimalist Gold Accents For A Gothic Look
For a more minimalist approach, paint thin gold lines or dots along the edges of the nails.
You can also create simple geometric patterns using gold polish, balancing elegance with subtlety.
These gold accents add sophistication to the gothic aesthetic without being too flashy.
Styling Gold-Accented Nails For Evening Events
Gold-accented nails are perfect for formal occasions, such as galas, weddings, or evening events.
They pair beautifully with black dresses or outfits featuring metallic details.
These nails exude luxury and elegance, making them ideal for those who want to elevate their gothic style.
Black And Burgundy Gradient: Smooth And Sultry
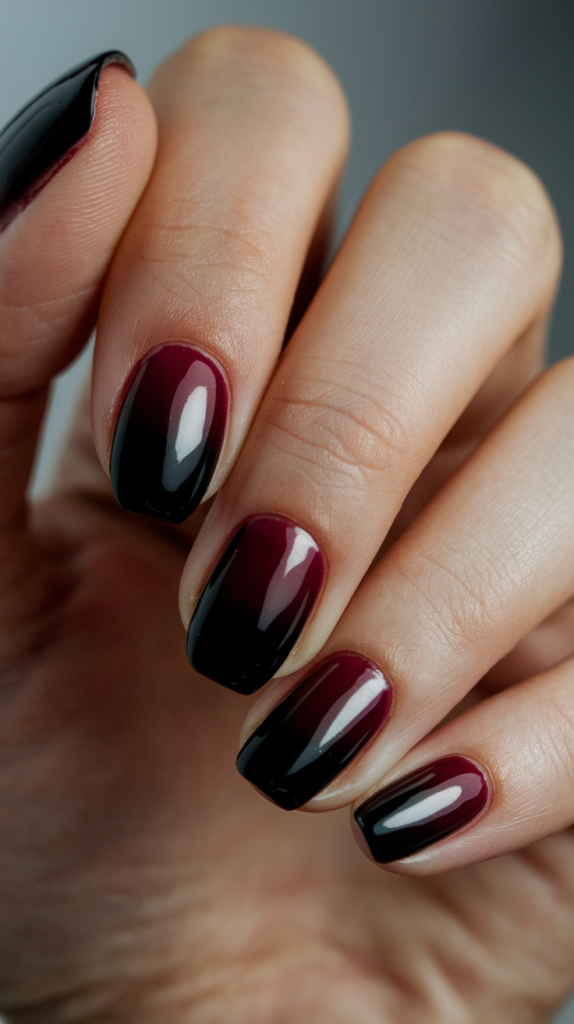
How To Create A Gradient From Black To Burgundy
To achieve the perfect gradient, start by applying a black base coat.
Use a makeup sponge to dab burgundy polish from the middle to the tip of the nail, creating a smooth transition.
Repeat the process until the colors blend seamlessly.
A glossy top coat will enhance the gradient, making it appear rich and vibrant.
Choosing The Right Gloss For A Polished Look
A high-gloss top coat brings out the richness of the burgundy color, adding depth to the gradient.
Alternatively, a matte top coat can create a velvety effect, giving the nails a softer appearance.
Both options work well, depending on the look you want to achieve.
Styling Ideas For Black And Burgundy Nails
These nails are perfect for formal events, gothic weddings, or date nights.
Pair them with burgundy or black outfits for a cohesive look.
These nails exude sophistication and mystery, making them a versatile choice for various occasions.
Conclusion
Gothic beauty nail art offers endless possibilities for self-expression, blending elegance, mysticism, and bold creativity.
Whether you gravitate toward minimalist black accents, intricate lace patterns, celestial symbols, or nature-inspired designs, these 35 ideas provide the foundation for exploring new looks that reflect your unique style.
The versatility of gothic nail art makes it suitable for both everyday wear and special occasions, ensuring your nails always make a statement.
By experimenting with finishes, textures, and intricate patterns, you can transform your nails into works of art that convey the duality of beauty and darkness.
No matter which design you choose, each look celebrates individuality and offers a glimpse into the intriguing world of gothic aesthetics.
So, embrace the dark elegance, let your nails do the talking, and enjoy the artistic freedom that comes with gothic beauty nail art.
