Welcome to your ultimate guide for eye-aweing nail designs, perfectly timed for the vibrant energy of mid-June 2025.
This is the season to let your fingertips do the talking, embracing bold colors, chic shimmers, and artistic touches that reflect your unique style.
Get ready to discover thirty-five sensational nail art ideas that are not just on-trend but are designed to inspire and captivate.
Whether you adore playful brights, ethereal pastels, or edgy modern looks, there is something here to make your next manicure your most memorable one yet.
Dopamine Brights Mismatch

This electrifying nail trend is all about embracing pure, unadulterated joy through a vibrant explosion of color on your fingertips.
It is a playful and bold statement, perfect for the sunny disposition of mid-June.
Design Features
The core feature of Dopamine Brights Mismatch is the use of a different, highly saturated mood-boosting color on each individual nail.
Think of hues like energetic hot pink, radiant coral, lively bright green, passionate cherry red, and cheerful sunshine yellow.
To elevate the design, tiny contrasting details such as a small dot or a simple, clean line can be added.
These subtle accents provide an extra pop and a touch of intentionality to the playful mismatch.
How To Achieve This Look
Begin by selecting five distinct, vibrant nail polish colors that make you happy and prepare your nails with a good base coat for protection and longevity.
Apply two coats of each chosen color to a different nail, ensuring full opacity and a smooth finish, allowing adequate drying time between coats.
Once the base colors are completely dry, use a fine dotting tool dipped in a contrasting polish, like crisp white or classic black, to add a tiny dot near the cuticle or the tip of one or two nails.
Alternatively, a thin striping brush can be used to paint a delicate vertical or horizontal line for that extra visual interest, sealing everything with a glossy top coat.
Why This Stands Out
This design stands out due to its fearless use of color and its inherent celebration of individuality and fun.
It is an instant mood-lifter that perfectly captures the carefree and exuberant spirit of summer.
The trend aligns beautifully with the broader fashion movement of “dopamine dressing,” where color is used to boost happiness and express joy.
It is an eye-aweing look that allows for complete creative freedom and is sure to garner compliments and spark conversations.
Neon French Twist

The Neon French Twist offers a contemporary and electrifying update to the timeless classic French manicure.
It infuses a burst of vibrant energy perfect for the lively atmosphere of mid-June.
Design Features
This design retains the sophisticated sheer nude or pale pink base of a traditional French manicure, creating a clean and polished foundation.
The defining feature is the replacement of the classic white tip with a shockingly bright neon color.
Popular choices for the neon tip include electric blue, vibrant neon pink, zesty highlighter yellow, or even a fiery neon orange.
The contrast between the understated base and the vivid tip is what makes this look so visually striking.
How To Achieve This Look
Start by applying a sheer nude or pale pink polish as your base, ensuring it is smooth and even for a chic backdrop.
Once the base is fully dry, carefully apply your chosen neon color to the tips of your nails.
For a crisp line, you can use French tip guide stickers or a thin nail art brush for freehand application if you have a steady hand.
Finish with a high-gloss top coat to seal the design and enhance the vibrancy of the neon.
Why This Stands Out
The Neon French Twist stands out because it masterfully blends classic elegance with modern boldness, creating a look that is both sophisticated and playful.
It is a fantastic way to incorporate bright summer colors without committing to an all-over neon manicure.
This style is incredibly versatile, suitable for both everyday wear and special summer events where you want your nails to make a subtle yet impactful statement.
The unexpected pop of neon is undeniably eye-aweing and injects a youthful, trendy vibe into a beloved classic.
Color Block Geometrics

Color Block Geometrics are a fantastic way to showcase your artistic side with sharp lines and bold, contrasting shapes.
This nail design is all about making a confident and contemporary statement this summer.
Design Features
The primary characteristic of this design is the use of clean, sharp lines to create distinct geometric shapes such as triangles, squares, chevrons, or abstract angular forms.
These shapes are then filled with contrasting summer brights to maximize impact.
Color combinations like vibrant turquoise paired with juicy tangerine, or vivid fuchsia with electric lime green, are particularly effective.
The key is to choose colors that create a strong visual contrast and highlight the precision of the geometric patterns.
How To Achieve This Look
Begin with a base coat, and then apply your lightest base color if your design incorporates multiple layers, or work directly on a clear base.
Use thin nail art tape or striping tape to mask off sections and create your desired geometric shapes with incredibly sharp edges.
Carefully paint within the taped-off sections with your chosen bright polishes, applying two coats for full opacity.
Allow each color to dry completely before removing the tape or applying tape for the next section, and finish with a glossy top coat to smooth everything out.
Why This Stands Out
Color Block Geometrics stand out due to their modern, edgy aesthetic and the striking visual appeal of the contrasting bright colors.
The precision required for the sharp lines and shapes speaks to a meticulous and fashionable sensibility.
This design is highly customizable, allowing for endless variations in shapes, colors, and arrangements, making each manicure feel unique.
It is an eye-aweing choice for those who love contemporary art and want their nails to reflect a bold, graphic style.
Rainbow Ombre
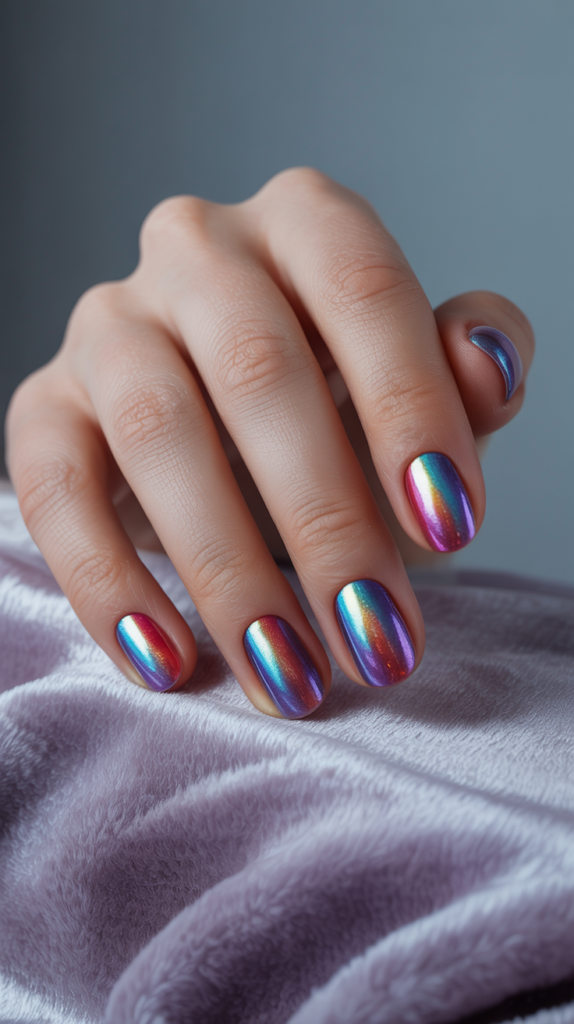
A Rainbow Ombre nail design offers a breathtakingly smooth gradient of vibrant colors across each nail, or a different color gradient on each nail, creating a full spectrum effect.
This look is pure summertime joy, bottled into a manicure.
Design Features
The defining feature of this design is the seamless transition between multiple colors of the rainbow, typically red, orange, yellow, green, blue, and violet.
The colors should blend effortlessly into one another without any harsh lines, creating a soft, diffused effect.
This can be achieved vertically on each nail, or you can have each nail feature a different two-color or three-color ombre that contributes to an overall rainbow effect across your hands.
A high-gloss finish enhances the fluidity and vibrancy of the colors.
How To Achieve This Look
To achieve a Rainbow Ombre, you will typically use a makeup sponge and your chosen rainbow-colored polishes.
Apply stripes of the colors directly onto the sponge in the order you want them to appear, slightly overlapping them to encourage blending.
Dab the sponge onto a nail prepared with a white or light base coat to make the colors pop, repeating until you achieve the desired opacity.
Clean up the excess polish from around your cuticles using a brush dipped in acetone, and finish with a generous layer of glossy top coat to smooth out the sponge texture and blend the colors further.
Why This Stands Out
The Rainbow Ombre design is exceptionally eye-aweing due to its vibrant display of multiple colors and the skillful blending required.
It is a cheerful and optimistic statement that perfectly encapsulates the bright, sunny days of mid-June.
This look is incredibly versatile and can be adapted to different nail lengths and shapes, always providing a stunning visual impact.
It is a celebration of color that is both playful and artistically impressive, guaranteed to turn heads and spread smiles.
Hot Pink And Orange Gradient

The Hot Pink and Orange Gradient nail design captures the fiery beauty of a summer sunset directly on your fingertips.
This look blends two incredibly vibrant shades for a warm and passionate statement.
Design Features
This design features a seamless ombre blend, transitioning from a deep, vibrant hot pink into a bright, zesty orange.
The gradient can be vertical, horizontal, or even diagonal, depending on your preference.
For a modern twist, a matte top coat can be applied, which gives the fiery colors a velvety, sophisticated finish.
Otherwise, a high-gloss top coat will amplify the vibrancy and juiciness of the pink and orange hues.
How To Achieve This Look
Similar to the rainbow ombre, the sponge technique is ideal for creating this hot pink and orange gradient.
Apply stripes of hot pink and vibrant orange polish directly onto a makeup sponge, ensuring they slightly overlap.
Gently dab the sponge onto your nails, which should be prepped with a base coat (a white base can make the colors even more intense).
Repeat the dabbing motion to build up the color opacity, then meticulously clean the skin around your nails and apply your chosen top coat, be it matte or glossy.
Why This Stands Out
The Hot Pink and Orange Gradient is a showstopper because of its intense, warm color combination that evokes passion and energy.
It is like wearing a miniature sunset on your nails, making it perfect for summer days and vibrant evenings.
The choice between a matte or glossy finish allows for customization, with matte offering a contemporary edge and gloss providing a classic, juicy look.
This design is undeniably eye-aweing, radiating confidence and a love for bold, beautiful color.
Tropical Floral Explosion

A Tropical Floral Explosion manicure brings the lush vibrancy of a tropical paradise to your nails.
This design is filled with brightly colored flowers and foliage, creating an instant vacation vibe for mid-June.
Design Features
This intricate design typically features hand-painted representations of exotic flowers like vibrant hibiscus, elegant bird-of-paradise, or frangipani.
These are often complemented by lush green monstera leaves or other tropical foliage.
The base color is usually a stark contrast to make the florals pop, such as a crisp opaque white, a pale sky blue, or even a soft sandy beige.
The level of detail in the flowers and leaves can range from simple and graphic to highly detailed and realistic.
How To Achieve This Look
Achieving this look often requires patience and some artistic skill, or the help of a talented nail technician.
Start with your chosen contrasting base color, ensuring it is fully opaque and dry.
Using fine nail art brushes and various bright acrylic paints or highly pigmented nail polishes, carefully paint your chosen tropical flowers and leaves.
Build up the colors in layers for depth, and consider adding tiny details like veins on leaves or stamen in flowers, then seal with a glossy top coat.
Why This Stands Out
The Tropical Floral Explosion is exceptionally eye-aweing due to its vibrant colors and intricate, artistic details that transport you to an exotic locale.
It is a celebration of nature’s beauty and the joyful spirit of summer.
This design allows for a high degree of personalization with different flower types and color schemes, making each manicure a unique piece of art.
It is perfect for anyone wanting to make a bold, beautiful statement that is full of life and color.
Iced French Manicure

The Iced French Manicure is a chic and contemporary take on the timeless classic, offering a cool, frosted elegance.
It is perfect for those who love a refined look with a subtle, modern twist for summer.
Design Features
This manicure maintains the traditional structure of a French manicure, with a natural, sheer pink or nude base.
The defining characteristic is the tip, which is a pearlescent, almost translucent white with a subtle shimmer.
This “iced” tip gives a frosted appearance, as if the nails have been lightly dusted with diamond frost or delicate ice crystals.
The overall effect is luminous, sophisticated, and refreshingly cool.
How To Achieve This Look
Begin by applying a flawless sheer pink or nude base coat that complements your skin tone.
Once dry, carefully apply the pearlescent, shimmery white polish to the tips of your nails, aiming for a clean, crisp smile line.
You can use French tip guides for precision or a thin brush for freehand application.
The key is to choose a white that is not too opaque but has that translucent, frosted quality, and finish with an ultra-glossy top coat to enhance the iced effect.
Why This Stands Out
The Iced French Manicure stands out for its subtle yet stunning elegance, offering a sophisticated update to a beloved classic.
The pearlescent, frosted tip catches the light beautifully, adding a touch of ethereal glamour.
It is a versatile look that is perfect for any occasion, from everyday wear to more formal summer events, providing a clean, polished, and modern aesthetic.
This eye-aweing design is for those who appreciate understated beauty with a hint of cool shimmer.
Strawberry Milk Nails

Strawberry Milk Nails are the epitome of chic minimalism, featuring a soft, milky pink hue that is both sweet and sophisticated.
This trend offers a polished and effortlessly elegant look for mid-June.
Design Features
The hallmark of Strawberry Milk Nails is their creamy, semi-sheer pink color that mimics the delightful shade of strawberry-infused milk.
The polish provides a wash of soft color that looks incredibly clean and healthy.
The finish is typically very glossy, enhancing the milky, luscious appearance of the nails.
This design is all about subtle perfection, emphasizing well-groomed nails with a delicate touch of flattering color.
How To Achieve This Look
To achieve Strawberry Milk Nails, start with immaculately prepped nails – perfectly shaped and with neat cuticles.
Apply a high-quality ridge-filling base coat if needed to ensure a smooth canvas.
Then, apply one to two coats of a semi-sheer, milky pink polish; the goal is a soft wash of color rather than full opacity.
Finish with a super glossy top coat to achieve that signature luscious, almost wet look.
Why This Stands Out
Strawberry Milk Nails stand out for their understated elegance and universally flattering appeal, proving that sometimes less is more.
The soft, milky pink hue imparts a youthful, healthy glow to the nails and hands.
This trend is incredibly versatile and perfect for those who prefer a minimalist aesthetic or need a sophisticated nail look for professional settings that still feels summery.
It is eye-aweing in its simplicity and effortless chic.
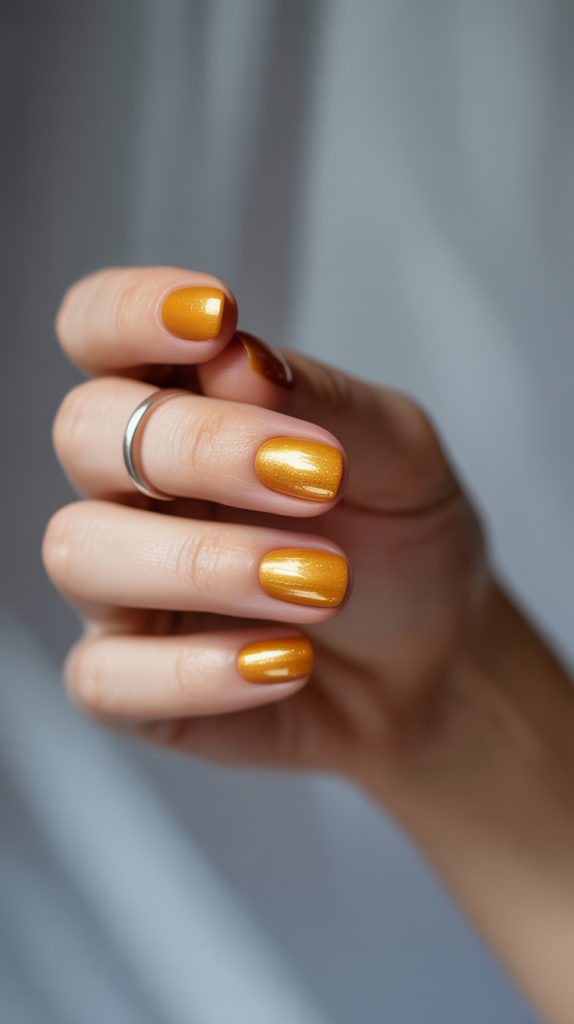
Butter Yellow Pastels

Butter Yellow Pastels are a key trending color for summer 2025, bringing a creamy, soft, and cheerful warmth to your nails.
This shade is like bottled sunshine, perfect for brightening your mid-June days.
Design Features
The defining feature is the specific shade of yellow: a creamy, soft, pale butter yellow that is gentle rather than overtly bright or neon.
It can be applied as a solid color across all nails for a chic, cohesive look.
Alternatively, butter yellow can be used in French tips for a subtle nod to the trend, or incorporated into color-blocking designs.
The finish is typically opaque with a high gloss to enhance its creamy texture.
How To Achieve This Look
For a solid Butter Yellow Pastel look, begin with a smoothing base coat to ensure an even application of the pastel shade.
Apply two to three thin coats of your chosen creamy butter yellow polish, allowing each coat to dry thoroughly to prevent streaking, which can be common with pastel polishes.
If using it for French tips, apply your sheer nude base first, then carefully paint the tips with the butter yellow.
Always finish with a glossy top coat to bring out the creamy richness of the color and ensure longevity.
Why This Stands Out
Butter Yellow Pastels stand out for their cheerful yet sophisticated charm, offering a dose of optimism and warmth.
This specific shade of yellow is universally flattering and feels incredibly fresh and modern for summer.
It is a versatile color that can be dressed up or down, making it suitable for various occasions and styles.
This eye-aweing trend is perfect for those who want to embrace a trending color in a soft, approachable, and utterly delightful way.
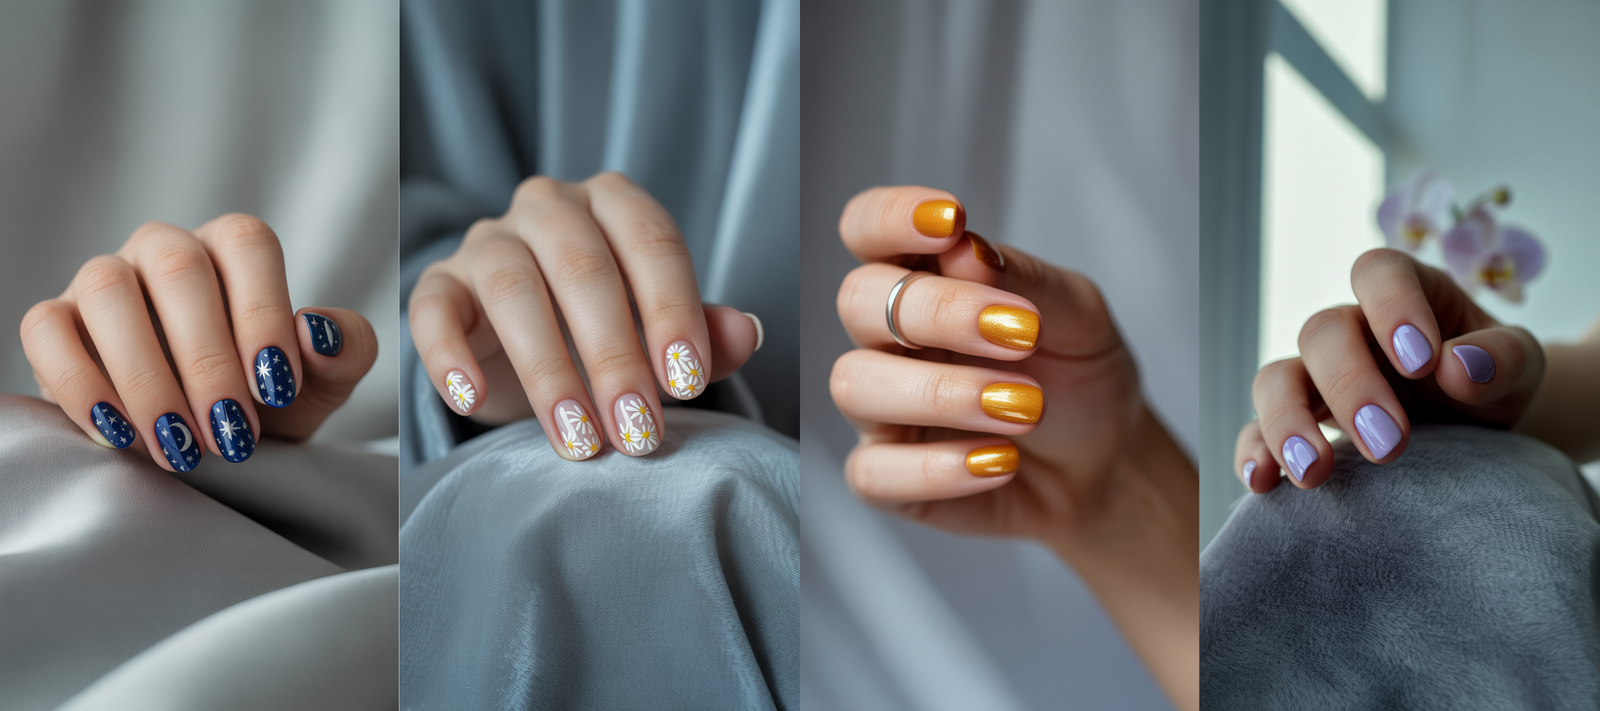
Lavender Haze

A Lavender Haze manicure envelops your nails in a dreamy, soft lavender shade, evoking a sense of calm and sophisticated whimsy.
This ethereal color is perfect for creating a serene yet stylish look for mid-June.
Design Features
The core of this design is its beautiful soft lavender hue, which can range from a pale, dusty lavender to a slightly more saturated, milky lilac.
The “haze” aspect suggests a certain softness and subtlety to the color.
This look can be enhanced with a delicate shimmer running through the lavender polish, or it can be given a modern, sophisticated edge with a perfectly smooth matte finish.
Both options emphasize the dreamy quality of the shade.
How To Achieve This Look
Start by applying a good quality base coat to ensure a smooth application and protect your natural nails.
Apply two to three thin coats of your chosen soft lavender polish, ensuring even coverage and allowing each coat to dry.
If you opt for a shimmer, select a polish with fine, integrated shimmer particles.
If you prefer a matte finish, apply a dedicated matte top coat over your dried lavender polish, which will transform the look instantly, giving it that velvety, hazy appearance.
Why This Stands Out
Lavender Haze stands out for its enchanting and tranquil beauty, offering a sophisticated alternative to more common pastels.
The soft lavender shade is universally flattering and exudes an air of gentle elegance and mystique.
The option of a subtle shimmer or a modern matte finish allows for personalization while maintaining the dreamy essence of the trend.
It is an eye-aweing choice for those seeking a chic, calming, and utterly romantic nail look.
Soap Nails Two Point Zero

Soap Nails 2.0 elevates the concept of “clean girl” nails to an art form, focusing on an ultra-glossy, impeccably clean, and hydrated look.
This mid-June trend is all about subtle perfection and an almost wet-looking sheen.
Design Features
The defining characteristics are super glossy, impeccably clean nails with a translucent wash of color, typically a very pale pink, a subtle beige, or just a hint of pearlescent white.
The key is that the natural nail still peeks through, looking healthy and pristine.
To take it to “2.0,” subtle iridescent flakes might be sparsely embedded within the top coat, catching the light for a hint of unexpected magic.
The overall effect is an almost “wet” look, emphasizing extreme shine and nail health.
How To Achieve This Look
Meticulous nail preparation is paramount: perfectly shaped nails, pushed-back or trimmed cuticles, and buffed nail surfaces are essential.
Apply a high-quality, ultra-glossy clear base coat or a very sheer, translucent perfecting polish in a pale hue.
If adding iridescent flakes, you can mix a tiny amount into your clear top coat or apply a top coat that already contains them very sparsely.
The final step is a thick, ultra-shiny top coat to achieve that signature “wet” look and encapsulate any flakes perfectly.
Why This Stands Out
Soap Nails 2.0 stands out for its celebration of natural beauty amplified by an incredible, almost liquid-like gloss.
It is the epitome of understated chic, making nails look effortlessly healthy, polished, and luminous.
The addition of subtle iridescent flakes provides a surprising and delicate shimmer that catches the eye without being overt.
This eye-aweing trend is perfect for those who appreciate minimalist elegance and a hyper-real, perfected natural nail look.
Glazed Peach

The Glazed Peach nail trend combines a warm, flattering peachy nude base with a high-shine, “glazed donut” chrome effect.
This look is deliciously chic and perfect for adding a touch of radiant warmth to your mid-June style.
Design Features
The foundation of this design is a warm, creamy, and opaque peachy nude polish that complements a variety of skin tones.
Over this base, a very fine, reflective chrome powder is applied to create the signature “glazed” effect.
This chrome finish isn’t a full mirror chrome but rather a subtle, pearlescent shimmer that gives the nails a smooth, luminous, and almost wet-looking sheen.
The overall appearance is soft, radiant, and incredibly polished.
How To Achieve This Look
Start by applying two coats of your chosen warm peachy nude gel polish, curing each coat thoroughly under a UV/LED lamp.
After the second color coat, apply a no-wipe gel top coat and cure it, but ensure it is not overly cured as the chrome powder needs a slightly receptive surface.
Using a silicone applicator or a sponge eyeshadow applicator, gently rub a small amount of white or pearl chrome powder onto the nail surface until the glazed effect is achieved.
Dust off any excess powder and seal the design with another layer of gel top coat, curing it completely.
Why This Stands Out
Glazed Peach nails are exceptionally eye-aweing due to their beautiful fusion of a warm, universally flattering base color with a trendy, luminous chrome finish.
The effect is sophisticated, radiant, and subtly glamorous, like a perfect summer glow for your fingertips.
This trend has a soft, approachable elegance that makes it suitable for both everyday wear and special occasions.
It is a delicious and modern take on nude nails, offering a high-shine, polished look that feels both current and timeless.
Mermaidcore Shimmer

Mermaidcore Shimmer nails dive deep into fantasy, capturing the mystical allure of mermaids with iridescent blues, greens, and purples.
This trend is perfect for making a magical and enchanting statement in mid-June.
Design Features
This design is characterized by its use of captivating multichromatic polishes or chrome powders that shift between shades of iridescent blue, seafoam green, and soft violet, mimicking the scales of a mermaid’s tail.
A high-shine pearlescent or chrome finish is essential to capture the underwater magic.
To enhance the theme, tiny flat-back pearls, miniature seashell decals, or subtle glitter accents can be added to a few accent nails.
The overall effect is ethereal, shimmering, and deeply enchanting.
How To Achieve This Look
Begin with a base coat, and then apply your chosen iridescent or multichromatic polish; these often look best over a dark base like black or deep blue to enhance their shifting properties.
Alternatively, use chrome powders in mermaid-esque shades over a cured gel base.
If adding embellishments, carefully place tiny pearls or seashell decals onto a slightly tacky top coat or use nail glue for more secure adhesion before applying the final glossy top coat.
Ensure the top coat fully encapsulates any 3D elements for a smooth finish.
Why This Stands Out
Mermaidcore Shimmer nails are undeniably eye-aweing due to their magical, color-shifting properties and whimsical embellishments that evoke a fairytale world.
They capture the dreamy, ethereal beauty associated with mermaids and the ocean’s depths.
This trend allows for a lot of creativity with color combinations and decorative accents, making each manicure a unique piece of underwater-inspired art.
It is perfect for those who love a touch of fantasy and want their nails to be a captivating conversation starter.
Pastel Aura Nails

Pastel Aura Nails create a soft, ethereal, and almost mystical effect on your fingertips, with a gentle diffusion of color.
This dreamy trend is perfect for a subtle yet captivating look for mid-June.
Design Features
The defining feature of Pastel Aura Nails is a soft, circular bloom of pastel color at the center of each nail.
This central aura of color, perhaps in baby blue, mint green, soft pink, or lilac, then seamlessly blends outwards into a sheer nude or milky white base towards the edges of the nail.
The transition between the pastel center and the neutral base is very soft and diffused, creating a glowing effect.
An ultra-glossy top coat enhances the ethereal, blended appearance.
How To Achieve This Look
To create Pastel Aura Nails, start with a sheer nude or milky white base color and let it dry completely or cure it if using gel.
Using an airbrush is the easiest way to achieve the diffused aura effect with pastel gel polish or acrylic ink.
Alternatively, you can use a small sponge or a blooming gel technique: apply a small dot of your chosen pastel color to the center of the nail and use a clean brush or sponge to gently blend it outwards in a circular motion before it sets, or allow blooming gel to diffuse the color.
Finish with a high-gloss top coat to meld the colors beautifully.
Why This Stands Out
Pastel Aura Nails are eye-aweing because of their soft, glowing, and almost spiritual aesthetic, suggesting a gentle energy emanating from the nails.
The delicate blend of pastel hues against a neutral background is both subtle and mesmerizing.
This trend feels very modern and artistic, offering a unique take on pastel manicures that is both sophisticated and dreamy.
It is perfect for those who appreciate subtle artistry and a touch of ethereal beauty in their nail design.
Three D Floral Accents

3D Floral Accents bring a touch of romantic, sculptural beauty to your nails, with delicate flowers seemingly blooming from the surface.
This trend adds an elegant and tactile dimension to your mid-June manicure.
Design Features
This design involves sculpting small, delicate three-dimensional flowers, such as daisies, roses, or cherry blossoms, directly onto the nail.
These are typically created using acrylic powder and monomer, or with thick sculpting gel.
The 3D flowers are often placed on one or two accent nails over a complementary base color, like a soft pastel, a milky white, or even a sheer nude.
The flowers themselves can be white for a classic look or incorporate soft colors.
How To Achieve This Look
This look is best achieved by a skilled nail technician due to the intricate sculpting involved.
After the base color is applied and cured (if using gel), tiny beads of acrylic or sculpting gel are meticulously shaped into petals and assembled to form flowers directly on the nail.
A fine brush and sculpting tools are used to create the delicate details and textures of the petals.
Once the 3D elements are complete and cured, a top coat is carefully applied around, but not usually over, the 3D art to maintain its texture, though sometimes a light seal is applied.
Why This Stands Out
3D Floral Accents are exceptionally eye-aweing because they transform the nail into a miniature canvas for sculptural art, adding a luxurious and tactile element.
The delicate, raised flowers are incredibly detailed and showcase a high level of artistry.
This trend is perfect for special occasions or for anyone who wants a truly standout manicure that is both feminine and sophisticated.
It is a romantic and elegant choice that brings a touch of couture to your fingertips.
Gold Chrome Accents

Gold Chrome Accents offer a touch of minimalist luxury, pairing a subtle base with the high-impact shine of metallic gold.
This sophisticated trend is perfect for adding a refined yet glamorous touch to your mid-June nails.
Design Features
This design typically features a minimalist base, such as a sheer nude, a milky white, or even a pale pastel.
The stars of the show are the delicate gold chrome details.
These accents can take the form of fine swirls, clean geometric lines, tiny precise dots, or even abstract sweeps of liquid-look gold chrome.
The contrast between the understated base and the brilliant, reflective gold is key to its appeal.
How To Achieve This Look
After applying and curing your chosen base color (gel polish works best for chrome effects), apply a no-wipe gel top coat and cure it.
Then, using a fine nail art brush dipped into gold chrome gel paint or by carefully applying gold chrome powder over a specifically designed transfer gel or tacky layer, create your desired accents.
For chrome powder, you would paint the design with a gel that allows powder to adhere, cure, then rub the powder in and dust off excess.
Seal the entire nail with another layer of top coat, ensuring the chrome accents are fully encapsulated for durability and shine.
Why This Stands Out
Gold Chrome Accents stand out for their elegant fusion of minimalism and opulence, providing a sophisticated way to wear metallics.
The high shine of the gold chrome creates a luxurious focal point against the subtle base.
This trend is incredibly versatile, allowing for designs that can be either delicately understated or more boldly artistic, depending on the complexity of the gold accents.
It is an eye-aweing choice for those who appreciate refined glamour and a touch of modern Midas.
Pearlcore Mani

The Pearlcore Mani embraces the timeless elegance of pearls, adorning nails with these classic gems for a touch of sophisticated charm.
This trend is perfect for a refined and feminine look for mid-June.
Design Features
This design involves embellishing the nails with tiny flat-back pearls or pearl-like cabochons.
The base color is often a neutral shade like soft pink, creamy beige, or a milky white, or it could be a delicate pastel like lavender or baby blue.
Pearls can be scattered artfully across the nail, placed as a delicate border along the cuticle or French tip, or used as a central accent on one or more nails.
The key is to maintain an elegant and not overly cluttered appearance.
How To Achieve This Look
Apply your chosen base color and let it dry or cure completely.
To adhere the pearls, you can use a strong nail glue for regular polish or embed them into a layer of thick gel top coat or builder gel if using a gel system, then cure.
Use a wax-tipped pen or tweezers to pick up and precisely place each pearl.
After placing the pearls, carefully apply a top coat around the pearls to secure them without covering their luster, or if they are small enough, a full top coat can be applied.
Why This Stands Out
The Pearlcore Mani stands out for its classic, sophisticated, and inherently feminine appeal, bringing a touch of old-world glamour to modern nail art.
Pearls have a unique luster that adds an element of soft luxury.
This trend is incredibly versatile, fitting for elegant daytime looks as well as more formal evening occasions.
It is an eye-aweing choice that speaks of refined taste and timeless beauty, perfect for a graceful summer statement.
Textured Flowers

Textured Flowers bring a unique tactile and visual dimension to floral nail art, with designs that you can both see and feel.
This artistic trend adds a subtle yet intriguing element to your mid-June manicure.
Design Features
The core of this design is the creation of floral patterns using a polish or gel that has a discernible texture or is applied to be slightly raised.
This could involve using specialized textured polishes, or building up layers of gel polish to create a bas-relief effect.
The floral designs themselves can be simple or intricate, often rendered in soft, complementary colors over a contrasting base, which might be matte to further emphasize the texture of the flowers.
Examples include slightly raised cherry blossoms, daisies, or abstract petal shapes.
How To Achieve This Look
After applying your base color (a matte base can enhance the textured effect), use a thicker gel polish or a specialized 3D gel to create the floral shapes.
A dotting tool or a fine nail art brush can be used to sculpt small petals or entire flowers.
Build the texture carefully, curing each layer if using gel, to achieve the desired raised effect.
The textured element itself is usually not covered with a glossy top coat to preserve its tactile quality, though the rest of the nail might be.
Why This Stands Out
Textured Flowers stand out because they engage more than just the sense of sight, adding a tactile element that is both surprising and sophisticated.
The subtle three-dimensionality creates an intriguing interplay of light and shadow on the nail surface.
This trend offers a modern and artistic take on floral nail art, moving beyond flat designs into something more sculptural.
It is an eye-aweing choice for those who appreciate subtle innovation and unique textural details in their manicure.
Polka Dot Fun

Polka Dot Fun is a timeless and playful nail design that brings a cheerful, retro vibe to your fingertips.
This versatile pattern is perfect for adding a touch of lighthearted charm to your mid-June look.
Design Features
This design is characterized by the application of perfectly round dots, which can vary in size and color.
Classic combinations include black dots on a white base or white dots on a red base, but for summer, think pastel dots on a creamy base or even multi-colored dots.
The dots can be uniformly sized and spaced for a traditional look, or varied in size and scattered randomly for a more whimsical effect.
A high-gloss finish typically enhances the playful nature of the design.
How To Achieve This Look
Begin by applying your chosen base color and allowing it to dry completely.
To create the polka dots, use a dotting tool; these come in various sizes, allowing you to create different-sized dots.
Dip the end of the dotting tool into your chosen dot color polish and gently press it onto the nail surface.
For uniform dots, re-dip the tool for each dot; for dots that vary in size, you can use the same dip for a few dots as less polish is deposited each time.
Finish with a glossy top coat.
Why This Stands Out
Polka Dot Fun stands out for its enduring appeal, cheerful disposition, and incredible versatility.
It is a simple yet highly effective way to add personality and a touch of retro charm to your nails.
The design can be customized endlessly with different color combinations and dot arrangements, making it suitable for all ages and styles.
It is an eye-aweing choice that is inherently happy, easy to achieve, and always in vogue.
Watercolor Washes

Watercolor Washes create a soft, artistic, and dreamy effect on the nails, mimicking the delicate transparency and blended hues of a watercolor painting.
This ethereal trend is perfect for a sophisticated and unique mid-June manicure.
Design Features
The hallmark of this design is the soft, blended application of translucent colors, often in pastel shades or diluted brights.
The colors appear to bleed gently into one another, creating fluid, organic patterns with no harsh lines.
The effect is often achieved over a light or white base to enhance the transparency of the watercolor hues.
An ultra-glossy top coat can further enhance the watery, blended look, making the nails appear like miniature abstract paintings.
How To Achieve This Look
After applying a white or very light base coat, you can create watercolor washes using a few methods.
One way is to place small dots of different colored polishes onto the nail and then, while they are still wet, use a fine brush dipped in a small amount of acetone or polish remover to gently swirl and blend them.
Another technique involves using “blooming gel” with gel polishes: apply a coat of blooming gel, then dot your gel colors onto it and watch them spread and diffuse before curing.
Finish with a high-gloss top coat to enhance the fluid, artistic effect.
Why This Stands Out
Watercolor Washes are eye-aweing due to their delicate, artistic beauty and the unique, dreamy patterns created on each nail.
The soft, blended colors evoke a sense of calm and sophistication, like wearable art.
This trend allows for a high degree of creativity and personalization, as no two watercolor designs will be exactly alike.
It is a perfect choice for those who appreciate subtle, artistic expressions and a touch of romantic whimsy.
Abstract Swirls And Lines

Abstract Swirls and Lines offer a modern, artistic, and dynamic nail design that allows for complete creative freedom.
This trend is perfect for those who want their nails to be a canvas for contemporary expression in mid-June.
Design Features
This design is characterized by free-flowing, organic swirls and sharp, intersecting lines, often in a mix of complementary or contrasting colors.
These abstract elements are typically applied over a neutral or solid-colored base to allow the artwork to take center stage.
The lines can vary in thickness, from hair-thin to bold strokes, and the swirls can be loose and flowing or tight and graphic.
Metallic accents, like gold or silver chrome lines, can be incorporated for an extra touch of sophistication.
How To Achieve This Look
Begin with your chosen base color, ensuring it is fully dry or cured.
Using fine nail art brushes (a striping brush for lines, a detail brush for swirls) and various polish colors or acrylic paints, carefully create your abstract design.
Experiment with different pressures and angles to vary line thickness, and allow colors to overlap or intersect in interesting ways.
For chrome lines, use a chrome gel paint or apply chrome powder over a tacky design layer, and always seal the entire design with a top coat, usually glossy to enhance the artwork.
Why This Stands Out
Abstract Swirls and Lines stand out for their bold, artistic, and highly individualistic nature, turning each nail into a miniature piece of modern art.
The dynamic interplay of shapes and colors creates a visually stimulating and sophisticated look.
This trend is endlessly customizable and allows for the expression of personal style, from minimalist and graphic to bold and complex.
It is an eye-aweing choice for the creatively inclined who want their nails to make a unique and contemporary statement.
Ditsy Fruit Salad

A Ditsy Fruit Salad manicure brings a touch of playful, summery sweetness to your nails with tiny, adorable painted fruits.
This charming trend is perfect for a fun and youthful mid-June vibe.
Design Features
The core of this design is the scattering of miniature, meticulously hand-painted fruits across the nails.
Popular choices include tiny strawberries, pairs of cherries, lemon or orange slices, watermelon wedges, or even little blueberries or kiwis.
These ditsy fruit motifs are typically painted over a clear, sheer nude, or a light pastel base to make them pop.
The fruits themselves are rendered in vibrant, true-to-life colors with small details like seeds or leaves, and a glossy finish enhances their juicy appeal.
How To Achieve This Look
After applying your base coat (a clear or light color works best), use fine nail art brushes and dotting tools with various bright acrylic paints or highly pigmented nail polishes to create the tiny fruit shapes.
Start with the main body of the fruit, then add details like stems, leaves, seeds, or highlights.
Patience and a steady hand are key for achieving the detailed ditsy look.
Once all the fruits are painted and dry, apply a generous layer of glossy top coat to protect the artwork and give it a juicy shine.
Why This Stands Out
The Ditsy Fruit Salad manicure is exceptionally eye-aweing due to its adorable, whimsical charm and the intricate detail of the miniature fruits.
It is an instant mood-booster that perfectly captures the fun and sweetness of summer.
This trend is playful and youthful, evoking happy memories of summer picnics and fruity treats.
It is a delightful way to add a touch of personality and fun to your nails, guaranteed to bring smiles.
Ocean Waves

Ocean Waves nail art captures the dynamic beauty and calming essence of the sea, with artistic representations of waves crashing onto the shore.
This design is perfect for a serene yet impactful mid-June look.
Design Features
This design features artistic interpretations of ocean waves, typically using various shades of blue (from deep navy to bright turquoise and sky blue), teal, and foamy white.
The colors are often blended and layered to create a sense of depth and movement.
A touch of fine iridescent blue or silver glitter can be incorporated into the white “foam” of the waves to mimic the sparkle of sunlight on water.
A high-gloss, almost “wet-look” finish enhances the aquatic theme.
How To Achieve This Look
There are several techniques to create ocean waves: one popular method involves applying stripes of different blue polishes and white polish, then using a clean-up brush or a specialized tool to gently drag the colors into each other to mimic a wave’s crest before it fully dries or cures.
Another method involves layering and marbling techniques.
For the foamy effect, you can use a sponging technique with white polish or carefully paint delicate white lines and dots.
If using gel, blooming gel can also help create diffused wave patterns, and finish with a glossy top coat.
Why This Stands Out
Ocean Waves nail art is eye-aweing due to its captivating depiction of nature’s power and beauty, bringing a sense of calm and movement to your fingertips.
The skillful blending of blues and whites creates a realistic and mesmerizing effect.
This trend is perfect for beach lovers and anyone who appreciates the serene yet dynamic energy of the ocean.
It is a beautiful and artistic way to carry a piece of summer’s coastal charm with you.
Celestial Shimmer

Celestial Shimmer nails transport you to a starry night sky, with deep, cosmic bases adorned with glittering stars, moons, and constellations.
This magical trend is perfect for an enchanting and mysterious mid-June look.
Design Features
The base for this design is typically a deep, inky color like midnight blue, black, or a dark galaxy purple, often with a subtle existing shimmer.
This dark canvas is then decorated with tiny silver or gold stars, delicate crescent moons, and sometimes faint, glittery constellation-like trails or nebula effects.
The celestial elements can be hand-painted, applied as decals, or created using strategically placed glitter particles or holographic flakes.
An ultra-glossy top coat enhances the “night sky” illusion and protects the intricate details.
How To Achieve This Look
After applying your dark base color, use a fine nail art brush or a dotting tool with metallic silver or gold polish/acrylic paint to create tiny stars (five-pointed or simple dots) and crescent moons.
For constellations, you can connect some star dots with very fine lines.
Holographic glitter polish can be lightly sponged or painted on in specific areas to create a nebula effect or a galaxy swirl before adding the stars.
Seal everything with a high-shine top coat to give depth and protect your cosmic creation.
Why This Stands Out
Celestial Shimmer nails are exceptionally eye-aweing due to their mystical, dreamy, and often intricate depiction of the night sky.
The contrast between the dark, deep base and the bright, sparkling celestial elements is captivating.
This trend evokes a sense of wonder, magic, and mystery, making it a sophisticated and enchanting choice.
It is perfect for those who love a touch of cosmic glamour and want their nails to tell a story of starry nights.
Delicate Daisy Chains

Delicate Daisy Chains offer a sweet, feminine, and subtly charming nail design, featuring simple yet beautiful daisies.
This lovely trend is perfect for a fresh and gentle mid-June look.
Design Features
This design showcases simple, small white daisies with bright yellow centers, often painted to look like they are forming a chain or are lightly scattered.
The daisies are typically flat and crisp, emphasizing their delicate nature.
The base for these daisy chains is usually a sheer pink, a clear coat over natural nails, or a soft pastel, allowing the daisies to be the gentle focal point.
The overall effect is pretty, fresh, and understated.
How To Achieve This Look
Begin with your chosen sheer or pastel base coat and let it dry thoroughly.
To create the daisies, use a dotting tool: make a small yellow dot for the center, then use a slightly larger dotting tool or a fine brush with white polish to create five or six petals around the center dot.
You can arrange these daisies in a line along the tips (like a floral French manicure), along the cuticle, or scatter them lightly across the nail surface.
Finish with a glossy top coat to protect the delicate design and add shine.
Why This Stands Out
Delicate Daisy Chains stand out for their sweet, unassuming charm and their celebration of simple, natural beauty.
The design is inherently feminine and evokes a sense of innocence and springtime freshness that carries beautifully into summer.
It is a versatile look that is pretty without being overly bold, making it suitable for everyday wear and for those who prefer more understated nail art.
This eye-aweing design is a gentle nod to nature’s simple elegance.
Picnic Gingham

Picnic Gingham nail art brings the charming, retro pattern of a classic picnic blanket to your fingertips.
This sweet and nostalgic design is perfect for a cheerful and stylish mid-June statement.
Design Features
The defining feature of this design is the iconic gingham check pattern, typically created with intersecting horizontal and vertical lines.
Summer-appropriate color combinations include pastel pink and white, baby blue and white, sunny yellow and white, or even a classic red and white.
The key to an authentic gingham look is achieving clean, fine lines and ensuring the intersecting squares are a slightly darker shade where the colored lines overlap, or by using a sheerer colored polish over an opaque white base.
A smooth, glossy finish completes the charming aesthetic.
How To Achieve This Look
Start with an opaque white base coat and let it dry completely.
Using a very thin striping brush or nail art pen, carefully paint thin, evenly spaced horizontal lines in your chosen gingham color (e.g., pastel pink).
Once these are dry, paint evenly spaced vertical lines of the same color, ensuring they intersect the horizontal lines cleanly.
To create the darker intersections, you can go over those small squares with another sheer layer of the colored polish, or use a slightly darker shade for those specific squares.
Finish with a glossy top coat.
Why This Stands Out
Picnic Gingham nails stand out for their nostalgic charm, clean graphic appeal, and cheerful disposition.
The pattern is instantly recognizable and evokes feelings of sunny days, leisurely picnics, and retro sweetness.
This design is surprisingly versatile and can be adapted with different color palettes to suit individual styles.
It is an eye-aweing choice that is both playful and chic, perfect for adding a touch of whimsical pattern to your summer look.
Denim Blue Texture

Denim Blue Texture nails cleverly mimic the look and subtle feel of classic denim fabric, offering an edgy yet casual vibe.
This innovative trend is perfect for a unique and stylish mid-June manicure.
Design Features
The core of this design is achieving a color and texture that resembles denim, typically a medium-wash blue, though light or dark denim looks are also possible.
The finish often has a subtle matte or satin texture, rather than high gloss, to enhance the fabric illusion.
To elevate the realism, tiny, precise “stitch-like” details can be painted along the edges of one or two accent nails, usually in a lighter, contrasting color like off-white or pale yellow, mimicking the seams on jeans.
Some designs might even incorporate a very fine, almost imperceptible crosshatch detailing within the blue.
How To Achieve This Look
Start with a base coat and then apply your chosen denim blue polish.
To create the textured effect, you can use a matte top coat, or some polishes are specifically formulated with a denim-like finish.
For a subtle fabric texture before a matte top coat, you could experiment by lightly dabbing a sponge with a slightly darker or lighter blue over the base while it’s still tacky, or using a dry brush technique.
For the “stitches,” use a very fine striping brush and a contrasting polish to paint small, even dashes along the nail edges.
Why This Stands Out
Denim Blue Texture nails stand out for their clever illusion and the way they transform a common material into chic nail art.
The subtle texture and stitch details add a layer of unexpected realism and cool, casual style.
This trend is perfect for those who appreciate innovative designs and want a manicure that is both unique and effortlessly stylish.
It is an eye-aweing choice that blends fashion-forward thinking with a touch of everyday cool.
Cat Eye Effect Summer Edition
The Cat-Eye Effect (Summer Edition) takes the mesmerizing magnetic nail trend and infuses it with vibrant, sunny colors perfect for the season.
This look offers a dynamic, light-catching shimmer that is truly captivating for mid-June.
Design Features
This design utilizes special magnetic nail polish that contains metallic particles.
When a magnet is held over the wet polish, these particles align to create a sharp, luminous band of light that shifts and moves with the viewing angle, resembling a cat’s eye.
For the Summer Edition, think brighter, more playful shades like vibrant fuchsia, electric teal, sunny gold, or even a sparkling coral or lime green.
The characteristic diagonal or vertical light band remains the key feature, set against the rich base color of the polish, all under a glossy top coat.
How To Achieve This Look
Apply a base coat and, if recommended by the magnetic polish brand, a dark base color (like black) to make the cat-eye effect more pronounced, though summer editions might be vibrant enough on their own.
Apply a thick coat of the magnetic cat-eye polish to one nail.
Immediately hold the magnet (which often comes with the polish or can be bought separately) close to the wet polish for about 10-15 seconds, positioning it to create the desired line (diagonal, vertical, etc.).
Work one nail at a time, applying polish and then using the magnet before moving to the next, then cure if using gel or let air dry, and finish all nails with a glossy top coat.
Why This Stands Out
The Cat-Eye Effect is inherently eye-aweing due to its dynamic, shifting band of light that creates a sense of depth and movement on the nail.
The Summer Edition amplifies this with cheerful, vibrant colors, making it even more striking.
This trend is modern, glamorous, and has a touch of magic to it, as the luminous line seems to float within the polish.
It is a fantastic choice for those who want a manicure that is both interactive and incredibly stylish.
Blue Chrome

Blue Chrome nails make a bold and futuristic statement, with a striking, mirror-like finish in a captivating shade of blue.
This high-impact trend is perfect for a sleek and unforgettably modern mid-June look.
Design Features
The defining characteristic of this design is the full, flawless chrome finish that coats the entire nail, creating a highly reflective, mirror-like surface.
The blue color can range from a deep, intense sapphire to a bright electric sky blue or even a lighter, icy blue.
The surface must be perfectly smooth to achieve the true chrome effect, with no bumps or imperfections.
The intense metallic shine and the clarity of reflections are key to this ultra-modern aesthetic.
How To Achieve This Look
Blue Chrome is best achieved using gel polish and chrome powder.
After applying and curing a base coat and a base color (often black is used under chrome powders to enhance their effect, but for some blue chromes a blue base might work), apply a no-wipe gel top coat and cure it.
Using a silicone applicator or a sponge eyeshadow applicator, pick up a small amount of blue chrome powder and rub it vigorously onto the nail surface until it becomes a smooth, reflective mirror.
Dust off all excess powder meticulously and seal with one or two layers of gel top coat, ensuring the edges are capped to prevent chipping.
Why This Stands Out
Blue Chrome nails are exceptionally eye-aweing due to their intense, liquid-metal shine and bold color statement.
The mirror-like reflectivity is incredibly futuristic and chic, transforming nails into sleek, polished jewels.
This trend is for those who are unafraid to make a strong style statement and love a high-impact, modern look.
It is a guaranteed head-turner that speaks of confidence and a fashion-forward sensibility.
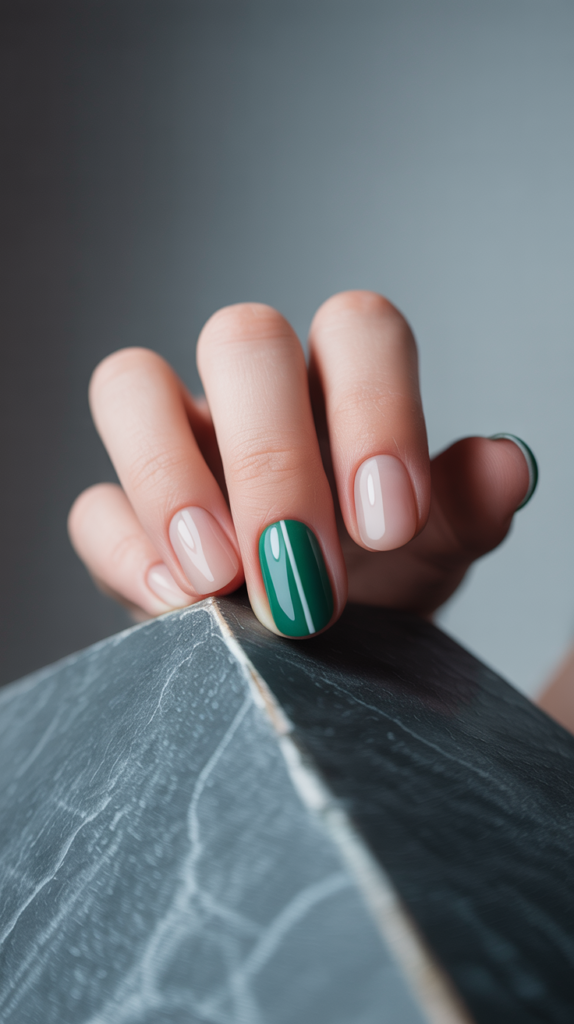
Negative Space Florals

Negative Space Florals offer a modern, airy, and artistic take on floral nail art by incorporating the natural nail into the design.
This chic trend is perfect for a sophisticated yet delicate mid-June manicure.
Design Features
This design features floral elements—such as outlines of flowers like poppies or magnolias, simple leaves, or abstract petal shapes—where significant portions of the natural, unpolished nail are left exposed and become an integral part of the artwork.
The painted elements are often rendered in opaque white, soft pastels, or even bold brights for contrast.
The interplay between the painted design and the “negative space” of the bare nail creates a light, contemporary, and often minimalist feel.
A glossy top coat is usually applied over the entire nail to unify the look.
How To Achieve This Look
Begin with immaculately clean, buffed natural nails, or apply a very sheer, clear base coat if desired.
Using a fine nail art brush, carefully paint your floral outlines or shapes directly onto the nail, strategically leaving areas of the natural nail exposed within and around the design.
You can use regular nail polish for this, but gel polish can offer more control and crispness for the lines.
Once the painted elements are dry or cured, apply a clear glossy top coat over the entire nail surface to seal the design and give a polished finish.
Why This Stands Out
Negative Space Florals stand out for their clever use of the natural nail as part of the design, creating a look that is both artistic and refreshingly modern.
The technique adds an element of lightness and sophistication to floral manicures.
This trend is highly versatile, allowing for designs that range from delicately minimalist to more intricately detailed, all while maintaining an airy, contemporary feel.
It is an eye-aweing choice for those who appreciate subtle artistry and a chic, modern aesthetic.
Minimalist Lines On Brights
Minimalist Lines on Brights is a chic and contemporary nail design that pairs the boldness of vibrant, solid colors with the understated elegance of a single, clean line.
This trend offers a striking yet simple look for mid-June.
Design Features
The foundation of this design is a set of nails painted in different solid, opaque, and vibrant bright colors – think lemon yellow, tangerine orange, fuchsia pink, or electric blue.
The key accent is a single, ultra-fine, perfectly straight line, typically in matte white or black, painted on each nail.
This line is usually placed vertically, either down the center or slightly off-center, creating a sharp, graphic contrast against the high-gloss bright base.
The juxtaposition of the vivid color, glossy finish, and the precise matte line is what defines this look.
How To Achieve This Look
Start by painting each nail with two to three coats of your chosen vibrant bright polish, ensuring a smooth, opaque, and glossy finish; let these dry completely.
For the line, use a very thin striping brush or a nail art pen with a matte white or black polish.
Carefully draw a single, straight vertical line on each nail, trying to keep the thickness and placement consistent.
Allow the line to dry thoroughly, and then, if desired, you can carefully apply a glossy top coat only to the colored base, avoiding the matte line, or skip the top coat over the line to preserve its matte finish.
Why This Stands Out
Minimalist Lines on Brights stand out due to their impactful yet simple design, showcasing a sophisticated understanding of color, finish, and form.
The sharp contrast between the glossy bright base and the clean, often matte, line is incredibly modern and chic.
This trend is perfect for those who love bold colors but appreciate a refined, graphic aesthetic.
It is an eye-aweing look that is both playful and polished, making a subtle yet confident statement.
Subtle Animal Print Accents

Subtle Animal Print Accents offer a chic and sophisticated way to incorporate the perennial trend of animal prints into your manicure without it being overwhelming.
This stylish approach is perfect for adding a touch of wild elegance to your mid-June look.
Design Features
This design typically involves painting most nails in a solid, complementary color, often a neutral like creamy beige, soft taupe, or even a muted pastel.
One or two accent nails, usually the ring finger and/or the thumb, then feature a delicate, small-scale animal print.
Popular choices for the print include classic leopard spots (brown and black spots on a tan background), cheetah spots, or even subtle zebra stripes.
The key is that the print is refined and not overly large or loud, maintaining an overall sophisticated feel with a high-gloss finish on all nails.
How To Achieve This Look
First, paint your non-accent nails with your chosen solid color and let them dry.
For the accent nails, apply the base color for your animal print (e.g., tan for leopard print).
Then, using a fine dotting tool or a small brush, create the spots: for leopard print, make irregular C-shapes or broken circles in a darker brown or black, and then fill some of the centers with a slightly lighter brown or leave them open.
Seal all nails with a glossy top coat once the designs are completely dry.
Why This Stands Out
Subtle Animal Print Accents stand out for their ability to make a trendy pattern feel timeless and sophisticated through controlled application.
It is a grown-up way to wear animal print, adding just a touch of playful pattern and personality.
This approach ensures the manicure remains elegant and versatile, suitable for various occasions while still offering that eye-aweing hint of wild charm.
It is perfect for those who want to embrace the trend in a chic and understated manner.
Jelly Gloss Nails

Jelly Gloss Nails are a fun, playful, and deliciously vibrant trend that gives your nails a translucent, candy-like appearance.
This look is perfect for a juicy and eye-catching mid-June manicure.
Design Features
The defining characteristic of Jelly Gloss Nails is their translucent, high-gloss finish in bright, fun “jelly” shades.
Think of colors like see-through strawberry red, juicy grape purple, zesty lime green, or vibrant blueberry.
The nail tips should remain visibly translucent, allowing the natural nail underneath to peek through, which contributes to the three-dimensional, gummy candy-like effect.
The finish is always ultra-glossy, almost wet-looking, to enhance the jelly illusion.
How To Achieve This Look
To achieve Jelly Gloss Nails, you will need specialized “jelly” nail polishes, which are formulated to be translucent yet pigmented.
Apply one to three coats of your chosen jelly polish, depending on the desired depth of color and translucency.
Ensure each coat is thin and even to maintain clarity.
The key is to build up the color without making it fully opaque, especially at the tips, and always finish with an exceptionally glossy top coat to maximize the juicy, see-through effect.
Why This Stands Out
Jelly Gloss Nails are exceptionally eye-aweing due to their unique, playful translucency and vibrant, candy-like colors that look almost edible.
The glossy, three-dimensional effect is fun, youthful, and incredibly summery.
This trend is a refreshing departure from opaque manicures, offering a lighthearted and cheerful aesthetic.
It is perfect for those who love a touch of whimsy and want their nails to have a fun, vibrant, and irresistibly juicy appeal.
Mocha Mousse With A Twist

Mocha Mousse with a Twist takes a rich, creamy brown—a sophisticated predicted trend—and gives it a summery update.
This elegant design is perfect for a chic yet seasonally appropriate mid-June look.
Design Features
The primary feature is the luxurious, opaque mocha brown base color, reminiscent of a smooth, decadent mousse.
This rich brown is then elevated with a “twist” for summer.
The twist could be a fine gold shimmer integrated throughout the mocha polish, lending it a subtle, luxurious depth.
Alternatively, a single accent nail could be painted in a contrasting bright summer color, like a vibrant glossy coral or turquoise, for an unexpected pop.
All nails typically have a high-gloss finish.
How To Achieve This Look
For the mocha base, apply two to three coats of a rich, creamy brown polish, ideally one with a built-in fine gold shimmer, ensuring even and opaque coverage.
If adding a colored accent nail, paint that nail with two to three coats of your chosen bright contrast color (e.g., coral).
Allow all polish to dry completely.
Finish all nails with a high-gloss top coat to enhance the richness of the brown, the sparkle of the shimmer, and the vibrancy of the accent color.
Why This Stands Out
Mocha Mousse with a Twist stands out for its sophisticated blend of a rich, trending neutral with a subtle or bold summer accent, making it both elegant and seasonally relevant.
The fine gold shimmer adds a touch of understated luxury, while a bright accent nail provides a playful contrast.
This design is perfect for those who love classic, chic colors but want to incorporate a nod to summer trends in a refined way.
It is an eye-aweing choice that feels both grounded and surprisingly fresh.
Sketchbook Inspired Doodles
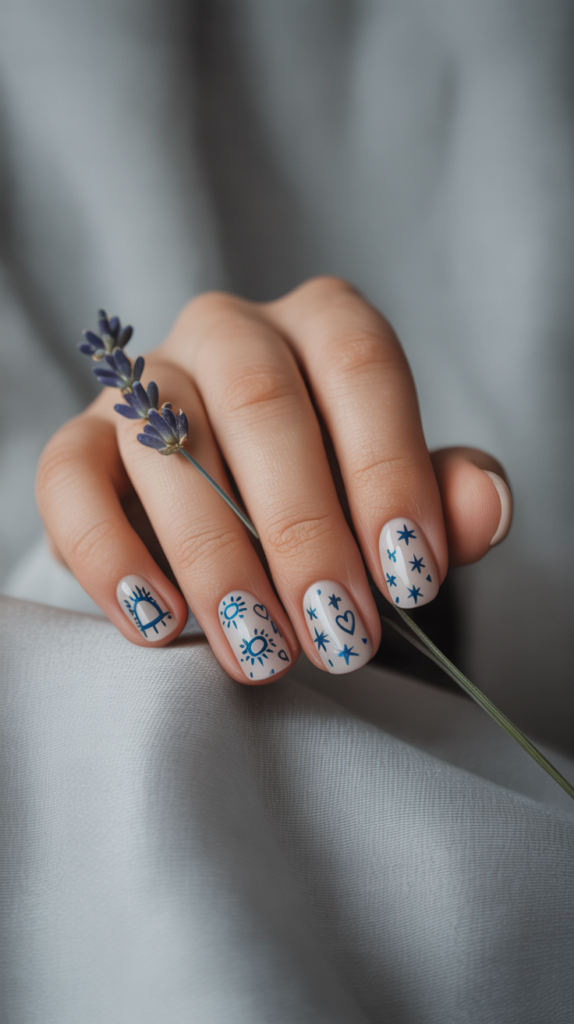
Sketchbook-Inspired Doodles bring a touch of charming, hand-drawn artistry to your nails, reminiscent of whimsical scribbles in a personal journal.
This creative and playful trend is perfect for a unique and expressive mid-June manicure.
Design Features
The base for this design is typically a light, often matte color like soft off-white, pale beige, or a muted pastel, mimicking the look of paper.
Over this canvas, simple, charming, hand-drawn looking motifs are applied in a contrasting thin line, usually black or dark grey.
These doodles can include tiny smiling suns, playful squiggles, small solid hearts, five-pointed stars, little flowers, or abstract marks.
The key is that they appear slightly imperfect and spontaneous, as if genuinely sketched by hand, and the overall finish is often matte to enhance the sketchbook feel.
How To Achieve This Look
Start by applying your light-colored matte base polish and let it dry completely.
Using a very fine nail art brush or a nail art pen with black (or another contrasting) polish, carefully draw your chosen doodle motifs onto each nail.
Embrace slight imperfections, as this adds to the hand-drawn charm.
Keep the doodles small and relatively simple, and once they are dry, you can either leave them as is to maintain the matte “paper” effect or apply a matte top coat over the entire nail to seal the design.
Why This Stands Out
Sketchbook-Inspired Doodles are eye-aweing due to their unique, personalized, and artistic charm, transforming nails into miniature pages from a creative journal.
The hand-drawn quality makes each manicure feel special and expressive.
This trend is perfect for those who appreciate quirky, artistic details and want a manicure that reflects their individuality and playful side.
It is a delightful and creative way to wear your art on your fingertips.
Conclusion
As we embrace the radiant days of mid-June 2025, let these thirty-five nail designs be your wellspring of inspiration.
From the electrifying zest of Dopamine Brights to the whimsical charm of Sketchbook Doodles, there is a style to perfectly match every personality and summer occasion.
Experiment with these eye-aweing looks, express your creativity, and allow your nails to become your most captivating accessory.
Remember, the best manicure is one that makes you feel confident, joyful, and ready to soak up all the beauty the season has to offer.