Welcome to the vibrant world of nail art—a realm where creativity meets elegance and personal style shines through every stroke of polish.
Whether you’re a seasoned pro or a curious beginner, our expansive guide is designed to inspire and instruct on how to achieve the most coveted nail art designs.
From the swirling elegance of marble patterns to the futuristic shimmer of chrome finishes, this blog post delves into a wide range of styles.
Each design is thoughtfully explained with detailed steps and expert tips, ensuring that you can recreate these looks with confidence and flair.
So, gather your brushes, polishes, and imagination as we embark on a journey through the art of nail design, transforming the ordinary into the extraordinary.
1. Elegant Marble Nail Art

Elegant Marble Nail Art brings timeless sophistication to your fingertips with its soft white base and delicate black and gold marbling.
This design perfectly balances minimalism and luxury, making it an ideal choice for both casual and formal occasions.
Crafting the Marble Effect
Step 1: Prepare the Base
Start with clean, manicured nails. Apply a base coat to protect your nails and enhance the longevity of the design.
Follow with a layer of soft white polish as the base color. Allow it to dry completely before moving to the next step.
Step 2: Add the Marble Pattern
Place small drops of black polish onto the nail. Using a fine-tipped nail art brush or a toothpick, swirl the black polish lightly to create natural marbling effects.
Introduce subtle gold accents by adding fine strokes or specks of gold polish for an elegant touch.
Step 3: Blend and Refine
Gently blend the edges of the black and gold strokes to achieve a seamless, organic look. Avoid over-mixing to maintain the distinct marble-like appearance.
Step 4: Let It Dry
Allow the design to dry completely before applying the top coat.
Adding the Perfect Finish
Step 1: Apply a Glossy Top Coat
Seal your design with a high-shine top coat to enhance the marble effect and ensure a smooth finish.
Step 2: Clean Up the Edges
Use a fine brush dipped in nail polish remover to clean any excess polish around your cuticles, ensuring a polished, professional look.
Why It Works
Elegant Marble Nail Art combines classic white tones with striking black and gold accents to create a luxurious, timeless design.
The organic marbling effect adds depth and sophistication, while the gold details provide a touch of glamour.
This versatile look is perfect for those seeking understated elegance that effortlessly complements any outfit or occasion.
2. Modern Geometric Nail Art
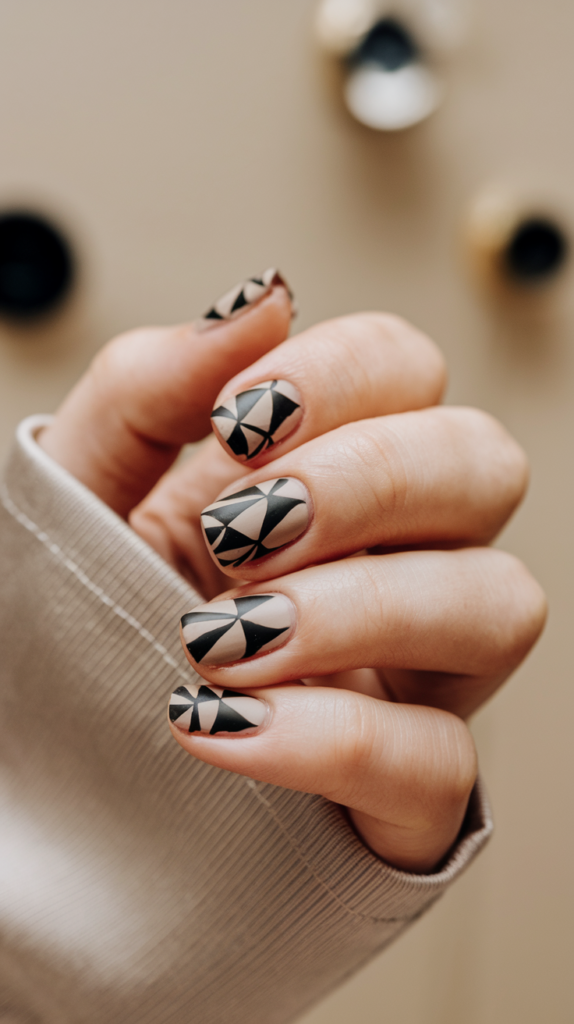
Modern Geometric Nail Art brings a sleek and contemporary flair to your manicure with bold patterns and contrasting tones.
This design showcases sharp lines and striking angles, making it a perfect choice for lovers of minimalist and abstract aesthetics.
Creating the Geometric Patterns
Step 1: Apply the Base Color
Start by painting your nails with a neutral base color, such as beige or light taupe, to create a clean canvas for the geometric patterns. Allow the base coat to dry completely.
Step 2: Plan Your Design
Using striping tape or a fine nail art brush, outline triangular and angular shapes on your nails.
Focus on creating a balanced mix of large and small triangles for a dynamic composition.
Step 3: Fill in the Shapes
Fill the outlined sections with black nail polish, ensuring clean edges for a polished look.
For an added touch of sophistication, fill a few sections with metallic silver or gold polish to create contrast and highlight the design.
Step 4: Remove the Tape and Clean Up
Carefully remove the striping tape while the polish is still wet to avoid smudging.
Use a fine brush to clean up any uneven edges or stray polish marks.
Perfecting the Look
Step 1: Add a Matte Top Coat
Seal your design with a matte top coat to give the nails a modern and velvety finish.
Step 2: Final Touches
Inspect the nails for any imperfections and make minor adjustments as needed.
This ensures a clean, professional appearance that highlights the sharp geometric lines.
Why It Works
Modern Geometric Nail Art stands out with its clean lines and bold contrasts, offering a chic and modern look.
The combination of neutral tones with sharp black and metallic accents creates a versatile design that pairs well with any outfit.
This style is perfect for those seeking a sophisticated yet eye-catching manicure that embraces contemporary artistry.
3. Dreamy Watercolor Nail Art
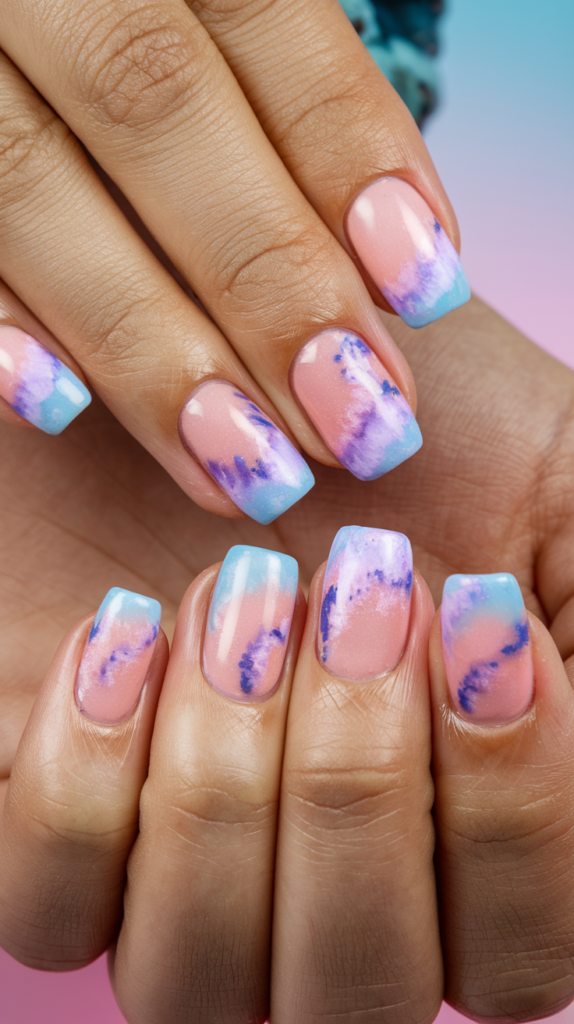
Dreamy Watercolor Nail Art captures the soft and serene beauty of pastel hues blending seamlessly into one another. With its delicate pink, blue, and purple tones, this design is perfect for anyone who loves an airy, artistic vibe.
Creating the Watercolor Effect
Step 1: Apply the Base Coat
Start by applying a base coat to protect your nails and ensure a smooth surface.
Follow with a soft pink polish as the base color, creating a dreamy canvas for the watercolor design. Let it dry completely.
Step 2: Add the Watercolor Layers
Using a makeup sponge or a fine nail art brush, dab light blue polish on the tips of your nails, blending it slightly into the pink base.
Next, apply a touch of lavender polish between the blue and pink areas, blending the edges for a soft gradient effect.
Step 3: Refine the Design
Use a small brush dipped in acetone to gently blur the colors further, mimicking the fluidity of watercolor paint.
Repeat the process on each nail, ensuring that the colors blend seamlessly without harsh lines.
Finishing the Look
Step 1: Add a Subtle Shimmer
For an ethereal touch, apply a thin layer of iridescent or glitter polish over the design.
Step 2: Seal with a Top Coat
Finish with a high-shine or semi-gloss top coat to enhance the watercolor effect and protect the design.
Step 3: Clean Up
Use a fine brush and nail polish remover to clean any excess polish around your cuticles for a professional finish.
Why It Works
Dreamy Watercolor Nail Art is a stunning blend of soft pastels that evokes a sense of calm and creativity.
The fluid, blended colors mimic the look of watercolor paintings, while the iridescent finish adds a magical touch.
This versatile and artistic design is ideal for spring, summer, or any time you want a fresh and unique manicure that feels like a work of art.
4. Regal Ruby Nail Art
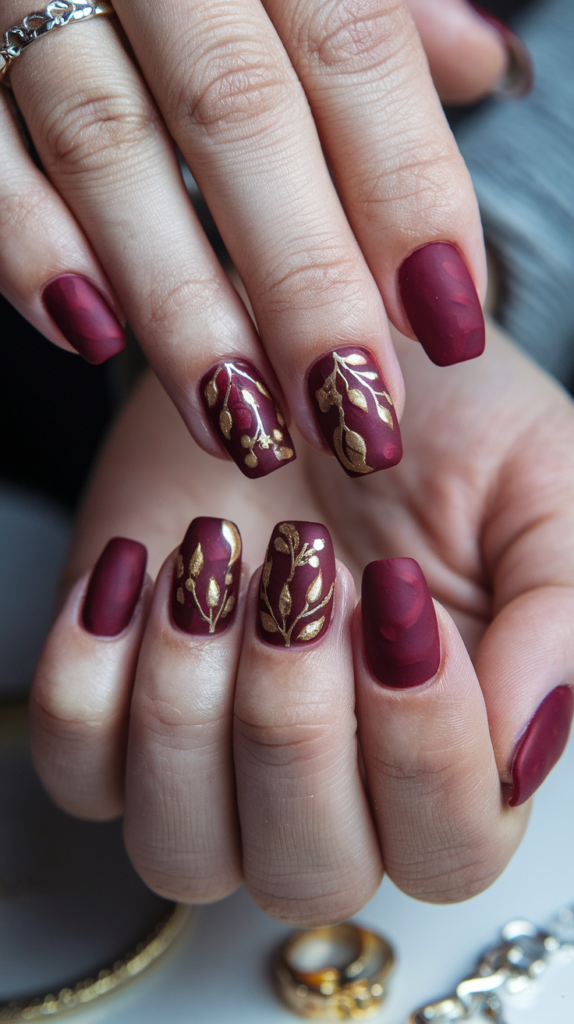
Regal Ruby Nail Art combines the richness of deep red hues with the elegance of intricate gold accents, creating a look that exudes sophistication and luxury.
This design is perfect for special occasions or whenever you want to make a bold and regal statement.
Crafting the Regal Look
Step 1: Apply the Base Color
Start with a clean, manicured base. Apply a matte base coat to ensure the design stays in place.
Follow with two coats of a rich ruby-red polish, allowing each coat to dry completely. The matte finish adds a velvety, elegant touch.
Step 2: Add Gold Leaf Accents
Using a fine nail art brush, create delicate leaf and vine patterns on one or two accent nails with metallic gold polish.
Focus on balanced and intricate designs, keeping the patterns elegant and refined.
Step 3: Highlight the Details
For an extra touch of luxury, add small gold dots or embellishments along the vines or at the tip of the leaves.
This step brings depth and sparkle to the overall design.
Perfecting the Design
Step 1: Seal the Accent Nails
Use a semi-gloss or satin-finish top coat on the accent nails to protect the gold details and maintain the matte-red contrast.
Step 2: Clean Up the Edges
Dip a fine brush in nail polish remover to clean any stray polish around the cuticles for a professional finish.
Why It Works
Regal Ruby Nail Art is a striking combination of rich red tones and shimmering gold accents that capture elegance and luxury.
The matte base adds a modern, velvety finish, while the gold leaf patterns provide a timeless, royal touch.
This design is perfect for formal events, festive celebrations, or anytime you want a manicure that radiates class and sophistication.
5. Prismatic Rainbow Nail Art
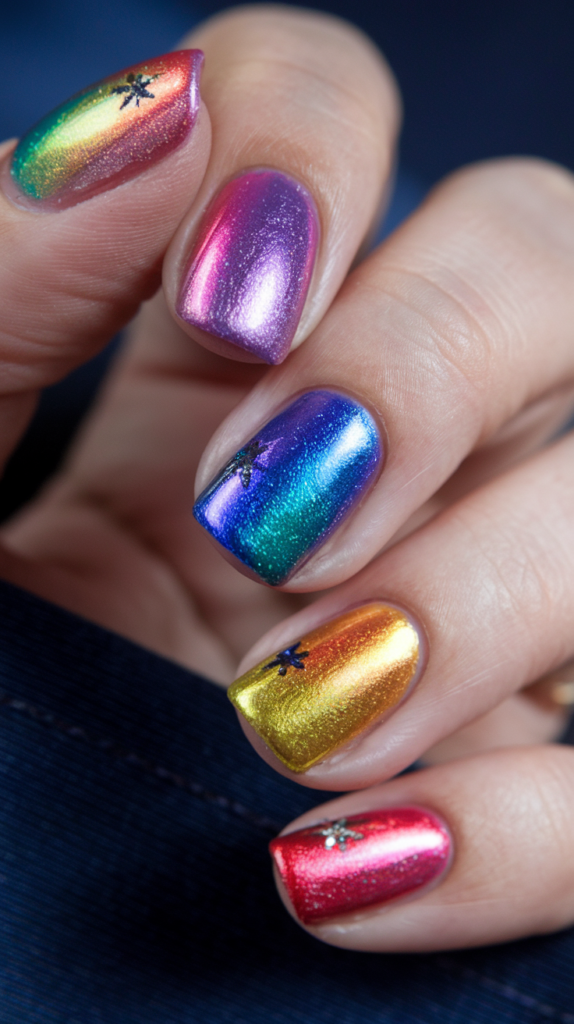
Prismatic Rainbow Nail Art is a vibrant and dazzling design that captures the spectrum of colors in a luminous metallic finish.
Perfect for celebrations, pride events, or whenever you want to add a touch of joy and radiance to your look, this design is truly eye-catching.
Achieving the Rainbow Gradient
Step 1: Apply a Base Coat
Start by applying a base coat to protect your nails and enhance the longevity of the design.
Step 2: Create the Rainbow Gradient
Using a metallic polish set, paint each nail a different bold color from the rainbow spectrum, such as red, orange, yellow, green, blue, and violet.
For a gradient effect, lightly blend the edges of the colors on each nail using a sponge or a fine nail art brush.
Step 3: Enhance the Shine
Layer an iridescent or holographic polish over the colors to give the nails a prismatic and radiant finish.
Adding Starry Embellishments
Step 1: Apply Star Decals
Place tiny star-shaped nail decals or paint delicate stars using a fine detailing brush and silver or black polish.
Position the stars near the center of the nail for maximum impact.
Step 2: Secure the Design
Apply a clear top coat over the stars to lock them in place and add a glossy finish to the design.
Final Touches
Step 1: Clean Up Edges
Use a small brush dipped in nail polish remover to clean any excess polish around the cuticles for a polished look.
Step 2: Inspect for Consistency
Check that the gradient is smooth and the star details are evenly placed for a cohesive finish.
Why It Works
Prismatic Rainbow Nail Art combines a bold spectrum of colors with a shimmering metallic finish, making it vibrant and uplifting.
The addition of starry embellishments adds a whimsical, celestial touch that complements the radiant design.
This playful and joyous manicure is perfect for expressing individuality, celebrating diversity, or simply brightening up your style.
6. Celestial Constellation Nail Art
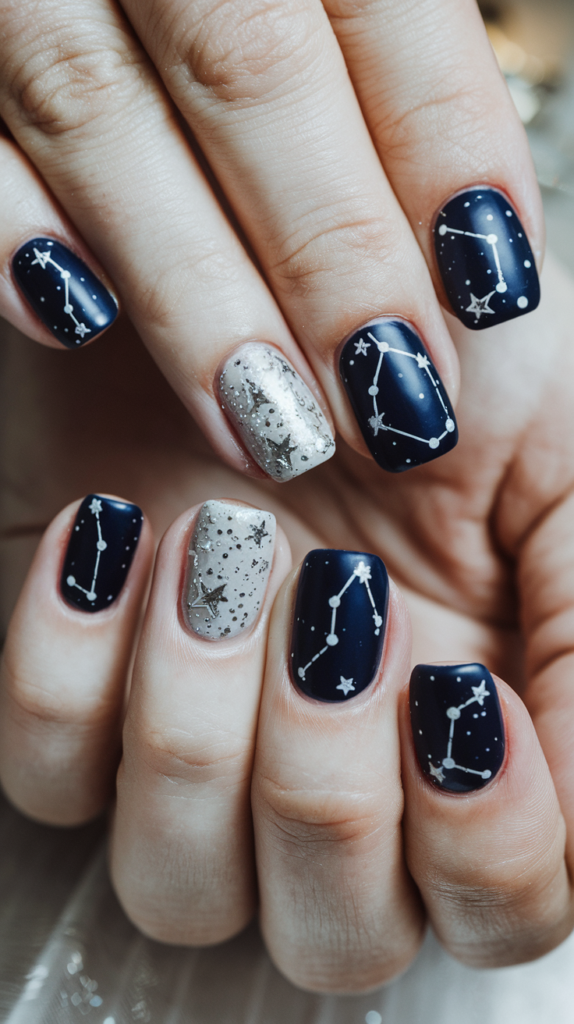
Celestial Constellation Nail Art brings the beauty of the night sky to your fingertips with intricate star patterns and shimmering cosmic details.
This design is perfect for stargazers and anyone inspired by the mysteries of the universe.
Designing the Starry Sky
Step 1: Apply the Base Colors
Begin with a deep navy blue polish for most nails to mimic the night sky.
On an accent nail or two, use a shimmering silver or glitter polish to represent starlit skies or the moon. Allow the base layers to dry completely.
Step 2: Paint the Constellations
Using a fine nail art brush or a detailing pen, create small white dots on the navy nails to represent stars.
Connect the stars with fine white lines to form constellations. Choose real constellations, like Orion or the Big Dipper, for an authentic touch.
Step 3: Add Star Accents
Enhance the design by painting or applying decals of tiny stars or shooting stars around the constellations.
For added dimension, use silver or holographic polish to highlight some stars for a glowing effect.
Finalizing the Cosmic Look
Step 1: Add Glitter Details
On the silver accent nails, scatter small star-shaped decals or paint tiny stars to complement the celestial theme.
Step 2: Seal with a Top Coat
Finish the design with a high-gloss top coat to protect the constellations and bring a polished, radiant look to the nails.
Why It Works
Celestial Constellation Nail Art transforms your nails into a canvas of the night sky, offering a design that is both intricate and mesmerizing.
The contrast of deep navy with sparkling silver and delicate constellations creates a celestial elegance that suits any occasion.
This design is perfect for those seeking a mystical, dreamy manicure inspired by the wonders of the universe.
7. Rose Gold Elegance Nail Art
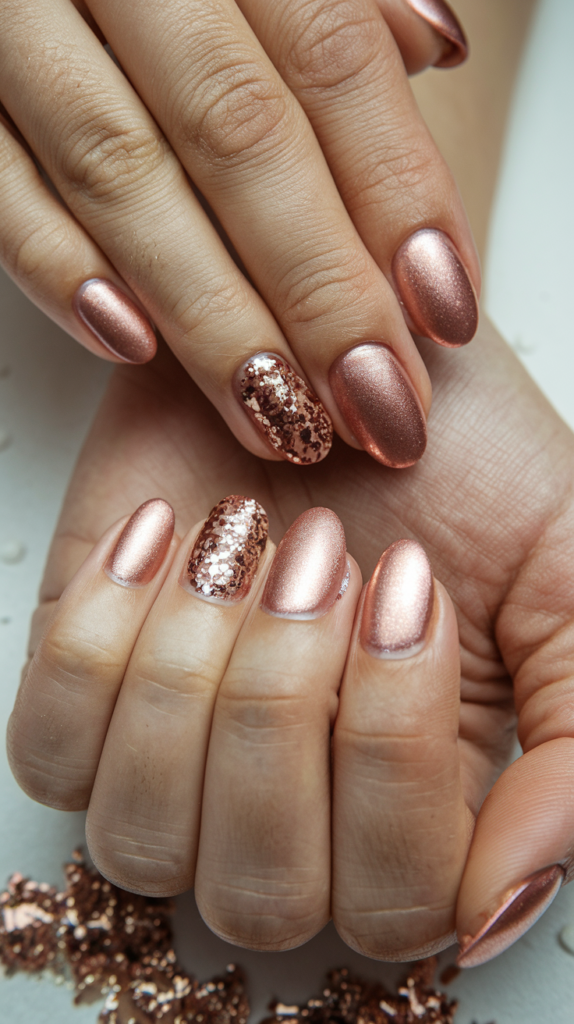
Rose Gold Elegance Nail Art is the epitome of sophistication, combining the soft metallic sheen of rose gold with dazzling glitter accents.
This timeless design is perfect for weddings, parties, or adding a luxurious touch to your everyday look.
Creating the Metallic Base
Step 1: Apply the Rose Gold Polish
Begin by applying a base coat to protect your nails and ensure the polish adheres smoothly.
Follow with two coats of rose gold metallic polish on most of your nails. Allow each coat to dry completely for an even finish.
Step 2: Highlight with Glitter
Choose one or two accent nails to make a statement. Apply a layer of clear polish to the chosen nails and immediately sprinkle rose gold glitter over the wet polish.
Press the glitter gently onto the nail to ensure it adheres evenly.
Step 3: Refine the Edges
Use a small brush to remove any excess glitter from the edges of your nails for a clean and polished look.
Perfecting the Shimmer
Step 1: Seal the Glitter
Apply a clear top coat over the glitter nails to lock in the sparkle and create a smooth finish.
Step 2: Add a Second Top Coat
To enhance the shine and longevity of the design, add a second layer of top coat to all nails, ensuring a cohesive finish.
Why It Works
Rose Gold Elegance Nail Art strikes the perfect balance between chic and glamorous with its soft metallic tones and dazzling glitter accents.
The warm rose gold hue flatters all skin tones, while the glitter details add a touch of drama and sophistication.
This design is versatile and timeless, making it ideal for special occasions or simply indulging in a touch of everyday luxury.
8. Iridescent Pearl Nail Art

Iridescent Pearl Nail Art captures the luminous beauty of natural pearls with its soft, opalescent shimmer and delicate hues.
This elegant design is perfect for weddings, parties, or any occasion that calls for a sophisticated and ethereal look.
Achieving the Iridescent Effect
Step 1: Prep Your Nails
Start by applying a base coat to protect your nails and ensure a smooth surface for the design.
Follow with a sheer, soft pink or nude polish as the base color to create a natural, pearlescent foundation.
Step 2: Apply Iridescent Foil
Once the base polish is dry, cut small pieces of iridescent nail foil or cellophane.
Apply a thin layer of clear gel polish or nail adhesive to the nails, then carefully place the foil pieces on the nail, gently pressing them down to create a shattered glass effect.
Step 3: Smooth the Surface
Seal the foil with a layer of clear gel polish, ensuring the surface is smooth and even. Allow it to cure or dry completely before proceeding.
Perfecting the Pearl Finish
Step 1: Add a Shimmering Top Coat
Apply a layer of holographic or opalescent top coat to enhance the iridescent effect and give the nails a radiant, multidimensional finish.
Step 2: Final Touches
Use a fine brush dipped in clear polish to fix any uneven edges or adjust foil placement, ensuring a polished look.
Why It Works
Iridescent Pearl Nail Art exudes elegance and grace with its luminous, opalescent shimmer that reflects light beautifully.
The delicate foil detailing mimics the texture of natural pearls, creating a unique and captivating design.
This manicure is perfect for those seeking a refined yet eye-catching look that pairs effortlessly with any outfit or occasion.
9. Modern Checkered Tip Nail Art
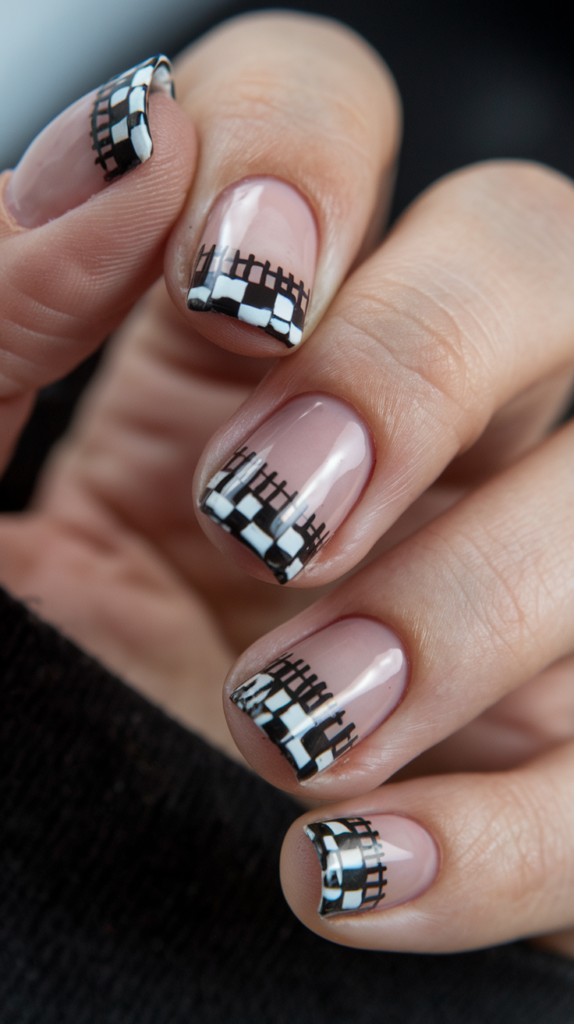
Modern Checkered Tip Nail Art combines the classic appeal of checkerboard patterns with a contemporary twist.
This sleek and stylish design features bold black and white details against a natural base, making it perfect for a minimalist yet edgy look.
Creating the Checkered Tips
Step 1: Prep the Base
Start by applying a clear base coat to protect your nails and create a smooth surface.
Follow with a sheer or nude polish as the foundation for the design, allowing the natural beauty of the nails to shine through. Let it dry completely.
Step 2: Outline the Tips
Using a fine nail art brush or striping tape, outline a horizontal strip across the tips of your nails to define the checkered area.
Step 3: Paint the Checkerboard
Create alternating black and white squares within the outlined strip using a nail art brush or dotting tool.
For clean lines, work on one square at a time, allowing each color to dry before moving on to the next.
Step 4: Add the Modern Twist
Incorporate unique patterns, like vertical stripes or wavy lines, alongside the checkerboard to add a contemporary flair.
Perfecting the Look
Step 1: Seal with a Glossy Top Coat
Apply a clear, glossy top coat to lock in the design and enhance the sharp contrast of the black and white pattern.
Step 2: Clean the Edges
Use a small brush dipped in nail polish remover to tidy up any excess polish around the cuticles for a professional finish.
Why It Works
Modern Checkered Tip Nail Art is a chic and versatile design that blends classic checkerboard patterns with bold, modern elements.
The minimalist nude base highlights the detailed tips, making the design both sophisticated and playful.
This manicure is ideal for anyone seeking a trendy, fashion-forward style that complements any outfit or occasion.
10. Pearl Chain Nail Art
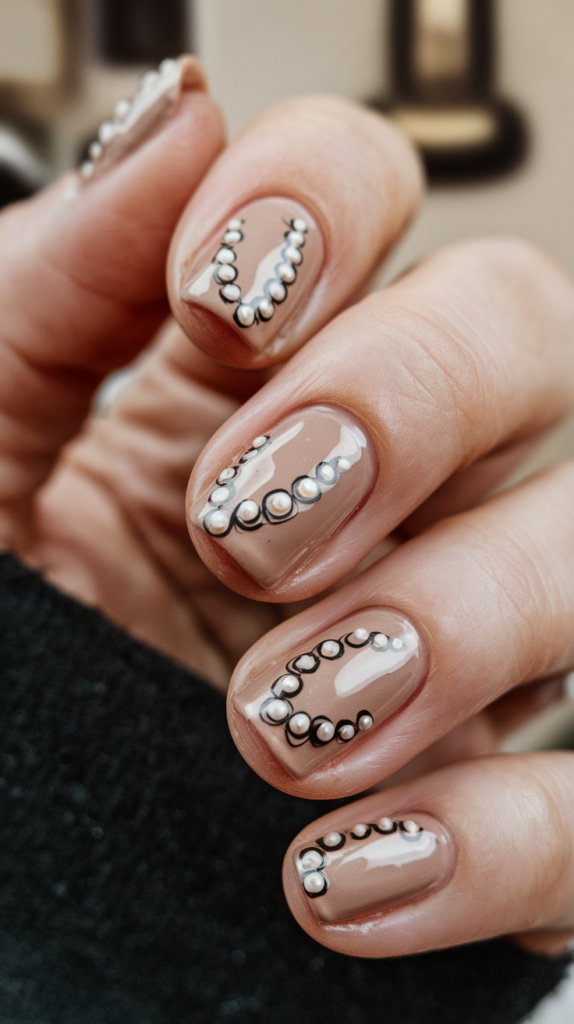
Pearl Chain Nail Art combines elegance with a modern twist by featuring delicate pearl-like accents arranged in chain-like patterns.
This sophisticated design is ideal for those who love understated yet unique manicures.
Creating the Pearl Chain Effect
Step 1: Apply the Base Color
Start by applying a base coat to protect your nails.
Follow with two coats of a soft nude or taupe polish to create a clean, neutral foundation for the design. Let it dry completely.
Step 2: Outline the Chain Pattern
Using a thin nail art brush and black polish, outline a curved or looped chain shape on each nail.
Ensure the lines are delicate and even to maintain a polished look.
Step 3: Add the Pearls
Place small, pearl-like embellishments along the chain outline. If using pearl polish dots, create uniform dots along the chain using a dotting tool or the back of a bobby pin.
Gently press each pearl or dot into place and allow it to set.
Perfecting the Details
Step 1: Enhance the Shine
Add a clear top coat over the pearls and base design to secure the embellishments and provide a glossy finish.
Step 2: Clean Up the Edges
Use a fine brush dipped in polish remover to clean any stray lines or excess polish for a professional result.
Why It Works
Pearl Chain Nail Art brings together classic and contemporary styles with its soft nude base and intricate pearl details.
The chain-like patterns add a touch of modern elegance, while the pearls give a timeless, luxurious feel.
This design is perfect for weddings, formal events, or anyone seeking a chic and refined manicure with a unique edge.
11. Neon Edge Nail Art
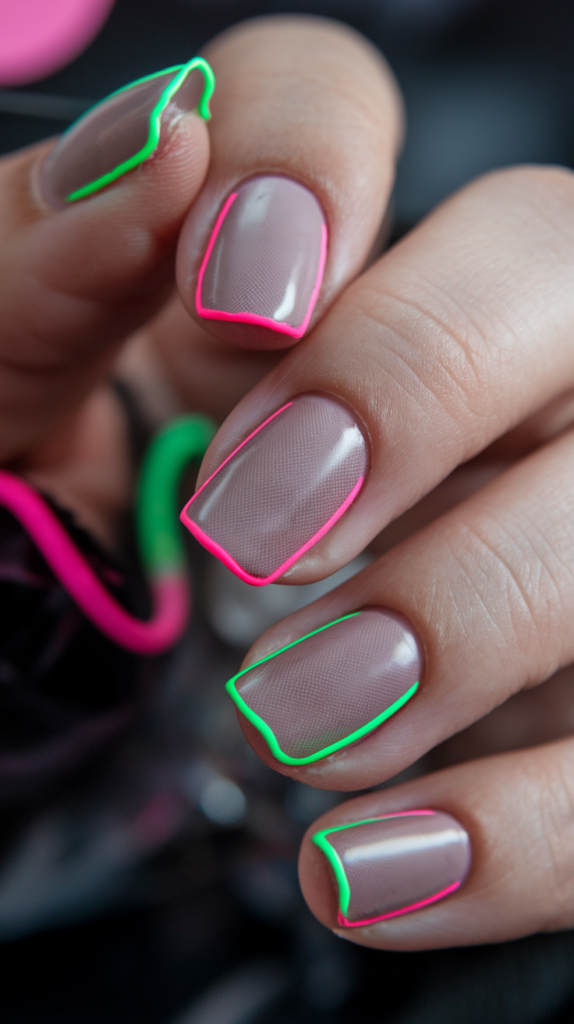
Neon Edge Nail Art is a bold and modern twist on the classic French manicure.
With glowing neon pink and green accents, this design adds a futuristic and vibrant flair to your nails, making it perfect for parties, festivals, or whenever you want to stand out.
Creating the Neon Outline
Step 1: Apply the Base Color
Start by applying a base coat to protect your nails and ensure a smooth surface.
Follow with a neutral sheer or nude polish as the base, creating a clean and understated canvas for the neon accents. Let it dry completely.
Step 2: Outline the Edges
Using a fine nail art brush, carefully trace the edges of your nails with neon polish. Alternate between neon pink and neon green for a dynamic and playful look.
For precise lines, work slowly and clean up any mistakes with a small brush dipped in nail polish remover.
Step 3: Add a Glow Effect
If desired, layer a translucent neon polish over the outlines to create a glowing effect and enhance the vibrancy.
Perfecting the Neon Design
Step 1: Seal with a Glossy Top Coat
Apply a clear, glossy top coat to smooth out the design, protect the neon edges, and add a sleek finish.
Step 2: Clean the Edges
Ensure the edges of the nails are crisp and clean by using a fine brush to remove any excess polish.
Why It Works
Neon Edge Nail Art is a striking and futuristic design that reinvents the classic manicure with bold, glowing accents.
The minimalist nude base allows the neon outlines to take center stage, creating a high-contrast and ultra-modern look.
This manicure is perfect for those who want to make a bold statement and showcase their adventurous side.
12. Stained Glass Nail Art
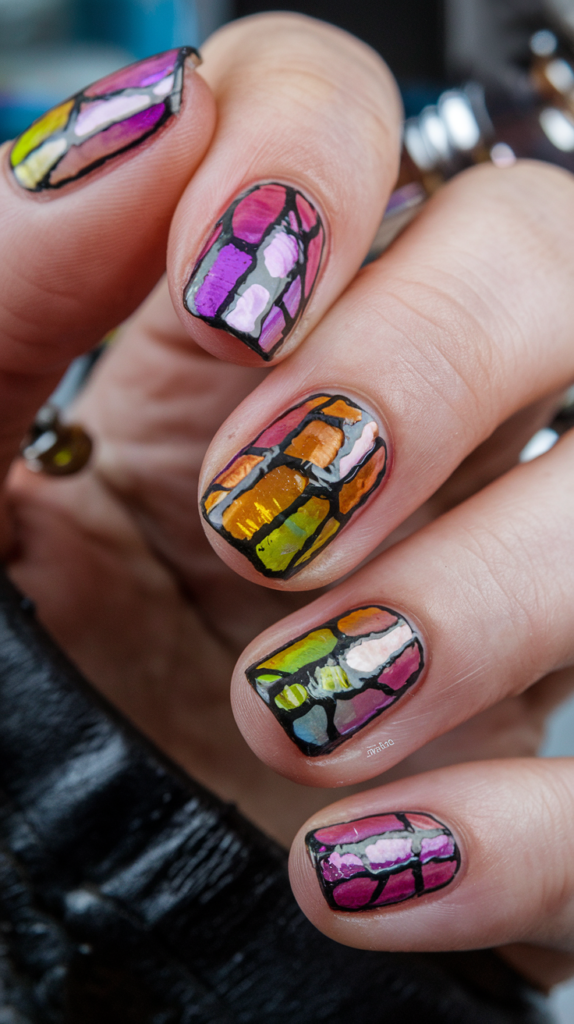
Stained Glass Nail Art transforms your nails into miniature works of art, featuring vibrant colors and intricate black outlines reminiscent of classic stained glass windows.
This eye-catching design is perfect for art lovers and anyone looking to make a bold statement.
Crafting the Stained Glass Look
Step 1: Apply the Base Color
Start by applying a base coat to protect your nails and ensure smooth application.
Follow with a sheer or nude polish to create a neutral backdrop for the stained glass effect. Let it dry completely.
Step 2: Outline the Design
Using a fine nail art brush or black nail polish pen, draw random abstract shapes on each nail, leaving space between the outlines to mimic the leaded edges of stained glass.
Ensure the lines are clean and bold for an authentic look.
Step 3: Fill in the Shapes
Choose a vibrant selection of polishes, such as pinks, yellows, blues, and greens, to fill in the outlined shapes.
Use a fine brush to carefully apply the colors, leaving a small gap around the edges to maintain the stained glass effect.
Step 4: Add a Touch of Glow
For a glass-like shine, layer an iridescent or jelly polish over each color to enhance the luminous effect.
Perfecting the Design
Step 1: Seal with a Glossy Top Coat
Apply a high-gloss top coat to bring out the vibrant colors and give the nails a smooth, polished finish.
Step 2: Clean Up Edges
Use a small brush dipped in nail polish remover to clean any stray polish around the cuticles and maintain a crisp look.
Why It Works
Stained Glass Nail Art is a unique and creative design that showcases a mix of bold colors and intricate details.
The black outlines provide structure and depth, while the vibrant hues and glossy finish mimic the beauty of real stained glass.
This manicure is perfect for anyone seeking an artistic, one-of-a-kind style that turns their nails into a masterpiece.
13. Golden Tortoise Nail Art
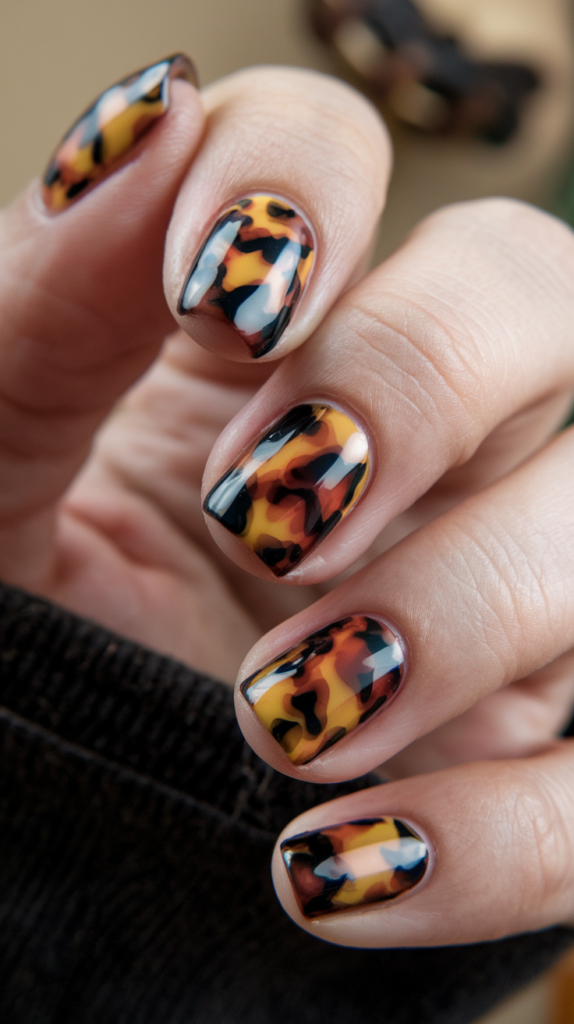
Golden Tortoise Nail Art combines the timeless elegance of tortoiseshell patterns with a modern twist, featuring warm amber and black tones that exude sophistication.
This versatile design is perfect for elevating any outfit, whether you’re heading to a formal event or adding a touch of class to your everyday look.
Crafting the Tortoiseshell Effect
Step 1: Apply the Base Coat
Begin by applying a clear or light beige base coat to protect your nails and enhance the tortoiseshell effect.
Step 2: Layer the Amber Tone
Apply a sheer amber or caramel-colored polish as the base for the design. Allow this layer to dry completely.
Step 3: Add the Black Patterns
Using a thin nail art brush, create irregular patches of black polish on each nail. These should mimic the natural patterns of tortoiseshell, so avoid making the shapes too uniform.
Step 4: Blend the Colors
While the black polish is still wet, use a dotting tool or fine brush to gently swirl in a darker amber or brown shade around the black patches. This adds depth and enhances the organic feel of the design.
Step 5: Add a Second Layer
Repeat the layering process to create a more vibrant and multidimensional look. Allow each layer to dry before proceeding.
Finishing Touches for a Polished Look
Step 1: Seal the Design
Finish with a high-gloss top coat to seal the design and give it a smooth, glass-like shine.
Step 2: Clean Up Edges
Use a small brush dipped in nail polish remover to clean up any polish that may have strayed onto your skin or cuticles.
Why It Works
Golden Tortoise Nail Art brings a timeless, luxurious aesthetic to your nails with its rich, warm tones and intricate patterns.
The combination of amber and black creates a chic, versatile look that works for any occasion, while the glossy finish ensures a flawless, professional appearance.
This design is not only elegant but also surprisingly easy to achieve, making it an ideal choice for nail art enthusiasts and beginners alike.
14. Serene Leaf Nail Art
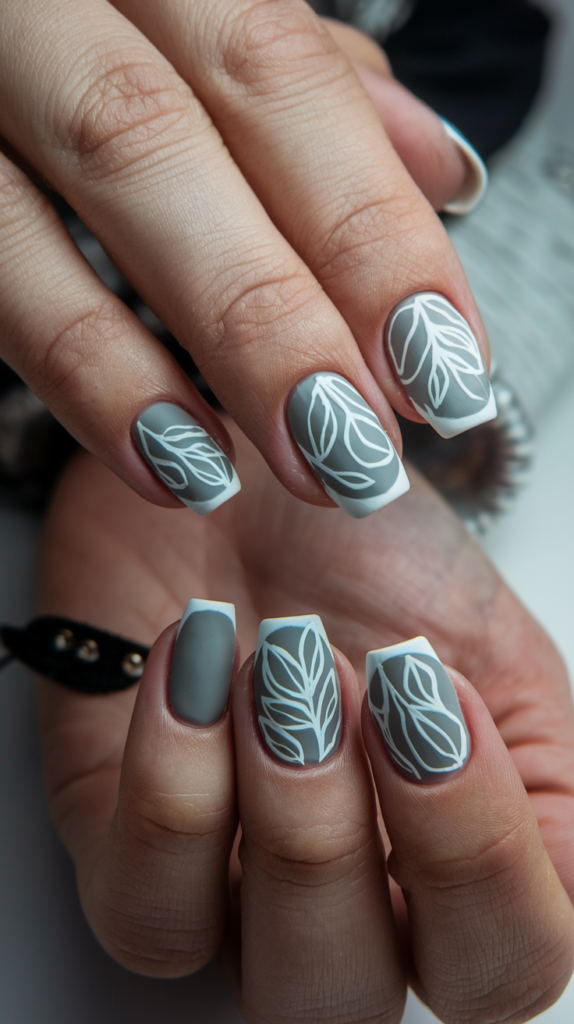
Serene Leaf Nail Art offers a minimalist yet elegant design, featuring soft gray tones and delicate white leaf patterns. This calming style is perfect for those who love understated beauty with a nature-inspired twist.
Designing the Leafy Look
Step 1: Prepare the Base
Apply a matte gray polish to all your nails as the base color. The soft matte finish enhances the subtle and serene aesthetic.
Step 2: Create the Leaf Outline
Using a fine nail art brush or a detail pen, draw delicate leaf outlines with white polish on a few accent nails. Focus on organic, flowing shapes to mimic natural leaves.
Step 3: Add Detailing
For a more intricate look, add vein details inside the leaves. Keep the lines light and subtle to maintain the minimalist charm.
Subtle French Tips for a Modern Touch
Step 1: Paint the Tips
On the non-accent nails, apply a clean white French tip. The contrast of gray and white adds a contemporary vibe to the overall design.
Step 2: Refine the Edges
Use a striping brush to ensure the lines of the French tips are crisp and even.
Step 3: Matte Finish
Seal the design with a matte top coat for a uniform finish. The matte texture ties the whole look together with a modern and sophisticated touch.
Why It Works
Serene Leaf Nail Art balances simplicity and elegance with its neutral gray tones and delicate white details.
The nature-inspired leaf design exudes calmness and sophistication, making it ideal for casual days or professional settings.
The matte finish and subtle French tips elevate the look with a modern twist, offering a versatile design that’s both stylish and unique.
15. Fiery Sunset Nail Art
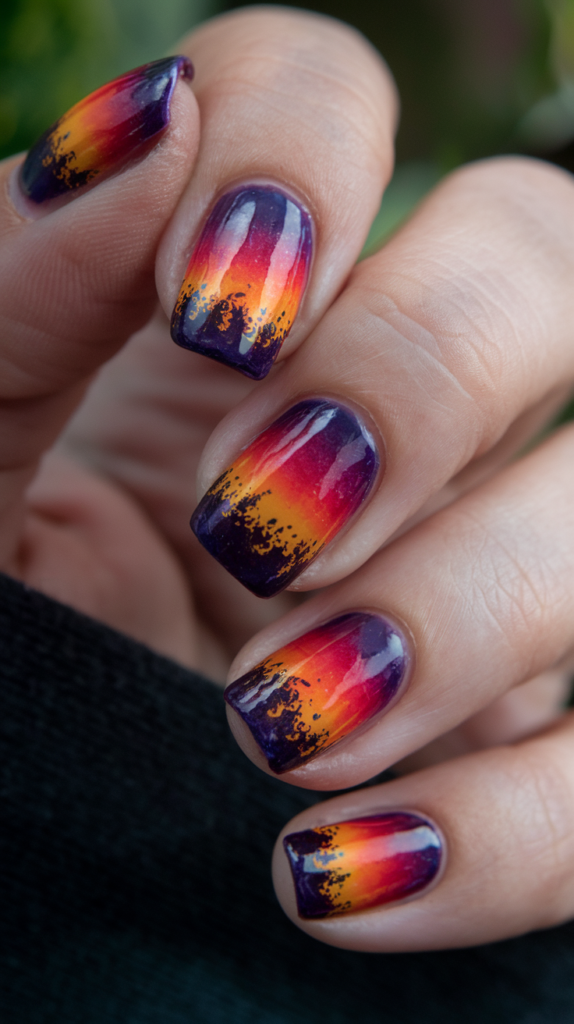
Fiery Sunset Nail Art captures the breathtaking beauty of a vivid sunset, blending vibrant oranges, reds, and purples for a dramatic, gradient effect. This design is perfect for making a bold, artistic statement.
Creating the Sunset Gradient
Step 1: Apply the Base Coat
Start with a clear base coat to protect your nails and enhance the vibrancy of the colors.
Step 2: Blend the Gradient
Using a makeup sponge, layer orange, red, and purple polishes in stripes. Gently dab the sponge onto your nails to create a seamless gradient.
Repeat the process until the colors are bold and blended, allowing each layer to dry slightly before reapplying.
Step 3: Smooth the Transition
Use a small detail brush to touch up the blend, ensuring the colors transition smoothly. This step enhances the realistic sunset effect.
Adding the Silhouette Accents
Step 1: Create the Silhouette
With a fine nail art brush and black polish, paint small silhouettes resembling trees or grass at the base of the nails.
Keep the designs minimal to maintain focus on the gradient.
Step 2: Enhance the Details
Add tiny dots or specks above the silhouettes to create depth, mimicking the twilight ambiance.
Finishing the Look
Step 1: Add a Glossy Top Coat
Seal the design with a high-gloss top coat to bring out the richness of the colors and give your nails a polished, professional finish.
Step 2: Clean Up the Edges
Use a small brush dipped in nail polish remover to clean up any excess polish around the edges of your nails.
Why It Works
Fiery Sunset Nail Art is a show-stopping design that beautifully captures the transition of warm and cool tones in a sunset.
The gradient effect creates a vibrant and dynamic background, while the silhouette accents add contrast and artistic flair.
This design is perfect for anyone looking to express creativity and stand out with a bold, sunset-inspired statement.
16. Lace Elegance Nail Art
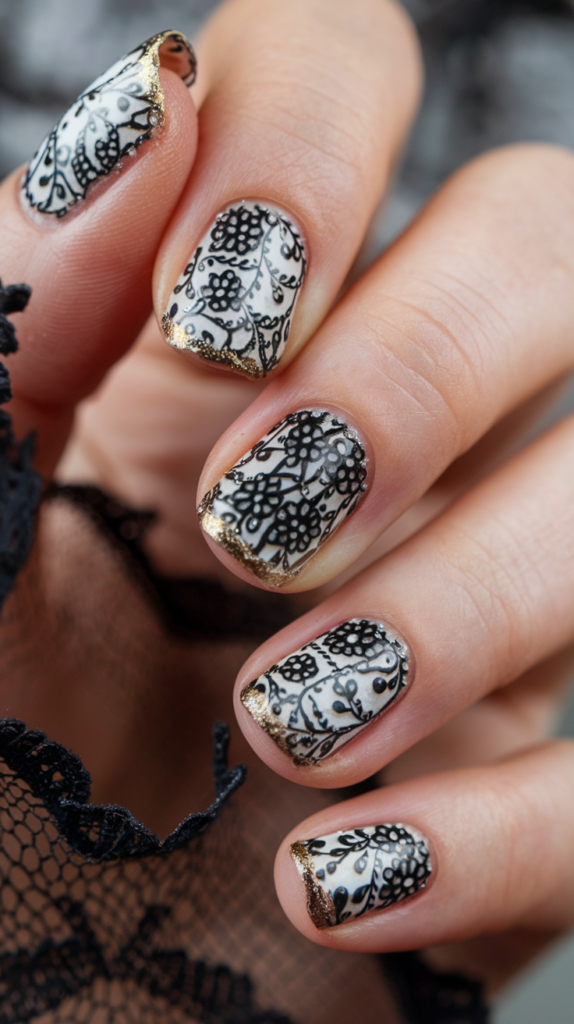
Lace Elegance Nail Art brings timeless sophistication to your fingertips, featuring intricate black lace patterns against a soft, neutral base.
Accented with delicate gold touches, this design exudes vintage charm and luxury.
Creating the Lace Pattern
Step 1: Prepare the Base
Apply a sheer nude or pale beige polish as the base color. This creates a soft and elegant background for the lace details.
Step 2: Draw the Lace Design
Using a fine nail art brush or a stamping plate, create intricate lace patterns with black polish. Focus on floral and vine-like details for a classic lace effect.
Ensure the design covers the majority of the nail to highlight the intricate artistry.
Step 3: Add Subtle Details
For added dimension, use a dotting tool to place small black dots within the lace pattern. This enhances the texture and mimics the delicacy of real lace.
Adding Golden Accents
Step 1: Highlight with Gold
Apply a thin line of gold polish along the tips or edges of the nails. This adds a luxurious touch and frames the lace design beautifully.
Step 2: Refine the Details
Use a fine brush to ensure the gold accents are neat and evenly applied. Allow this layer to dry completely.
Final Touches for a Polished Look
Step 1: Seal the Design
Finish with a clear, high-gloss top coat to protect the lace details and add a glossy, professional finish.
Step 2: Clean the Edges
Use a small brush dipped in nail polish remover to clean up any stray polish for a crisp and clean look.
Why It Works
Lace Elegance Nail Art captures the timeless beauty of lace with its intricate black patterns and soft, neutral base.
The gold accents elevate the design with a touch of luxury, making it perfect for formal events or special occasions.
This delicate and refined design strikes the perfect balance between vintage charm and modern sophistication, ensuring your nails are a true statement piece.
17. Cosmic Galaxy Nail Art
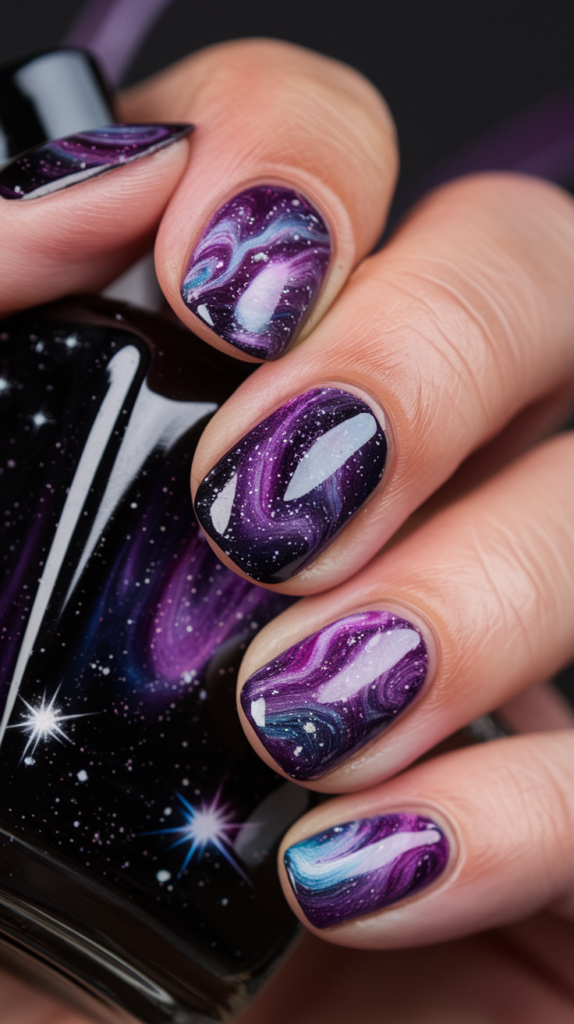
Cosmic Galaxy nails bring the mesmerizing beauty of the universe to your fingertips with deep purples, shimmering stars, and swirling galactic patterns.
This design is perfect for anyone who wants their nails to look out of this world, whether for a celestial-themed party or to add a touch of cosmic elegance to your everyday look.
Creating the Galactic Swirls
Step 1: Apply the Base Color
Start by applying a deep black or midnight blue polish as the base color. This creates the dark canvas needed to mimic the vastness of space.
Step 2: Add the Galaxy Colors
Using a sponge or a detail brush, dab a combination of purple, magenta, and teal polishes onto your nails.
Focus on creating blended, organic swirls that mimic the glowing clouds of a galaxy.
Step 3: Highlight with White
Add subtle streaks of white polish using a fine brush to highlight areas of your design. These will act as the shining, luminous edges of the galaxy.
Adding Starry Details
Step 1: Create the Stars
Use a dotting tool or a fine brush to paint small white dots across the nail. Scatter the dots to resemble stars, varying their size for a natural look.
Step 2: Add Sparkle
For an extra celestial effect, apply a thin layer of glitter polish over the design. This enhances the starry vibe and adds depth to the nails.
Step 3: Seal the Look
Finish with a clear, high-shine top coat to protect your design and give the nails a smooth, glossy finish.
Finishing Touches: Shooting Stars and Nebulas
Step 1: Add Shooting Stars
Using a fine brush, paint thin, white streaks across a few nails to represent shooting stars. These subtle details bring movement to the design.
Step 2: Enhance with Holographic Accents
For a nebula-like shimmer, add holographic nail stickers or foil accents to one or two nails. This adds a dynamic, multidimensional touch to your galaxy.
Why It Works
Cosmic Galaxy Nail Art captures the breathtaking beauty of the universe with its rich, dark tones and luminous details.
The swirling blend of purples, magentas, and teals evokes the ethereal beauty of galaxies, while the starry accents and glitter polish create depth and sparkle.
This design is perfect for those seeking a captivating and otherworldly look that will leave everyone starstruck.
18. Liquid Gold Nail Art

Liquid Gold nails exude luxury and sophistication, offering a sleek metallic finish that mirrors the brilliance of polished gold.
Perfect for weddings, special occasions, or simply to elevate your everyday style, this design radiates elegance and timeless charm.
Achieving the Perfect Metallic Finish
Step 1: Prep Your Nails
Start by shaping your nails and gently buffing the surface to create a smooth base.
Apply a clear base coat to protect your nails and ensure the metallic polish adheres evenly.
Step 2: Apply the Gold Chrome Polish
Use a high-quality gold chrome nail polish or a mirror-effect powder for the metallic look.
Carefully apply two thin layers of the polish, allowing each layer to dry completely to avoid streaks.
Step 3: Smooth and Seal
Once the polish is dry, finish with a glossy top coat to enhance the shine and lock in the metallic effect.
Adding Luxury Details
Step 1: Incorporate Accents
For added elegance, consider applying small embellishments such as gold studs or rhinestones on one or two accent nails.
Place them near the cuticle or at the nail tips for a subtle yet striking effect.
Step 2: Create a Two-Tone Effect
Experiment with a two-tone design by incorporating a contrasting metallic color like silver or rose gold on an accent nail.
Use a fine striping brush to create clean lines or geometric patterns for a modern twist.
Step 3: Add a Matte Top Coat Option
For a unique take, apply a matte top coat to a few nails to create contrast against the glossy finish.
Why It Works
Liquid Gold Nail Art embodies luxury and refinement with its dazzling metallic sheen and smooth, mirror-like finish.
The gold chrome effect delivers an effortlessly glamorous look, while subtle embellishments or two-tone accents add personalized touches of elegance.
This versatile design is ideal for anyone seeking a statement-making manicure that radiates opulence and style.
19. Modern Duo-Tone French Tips
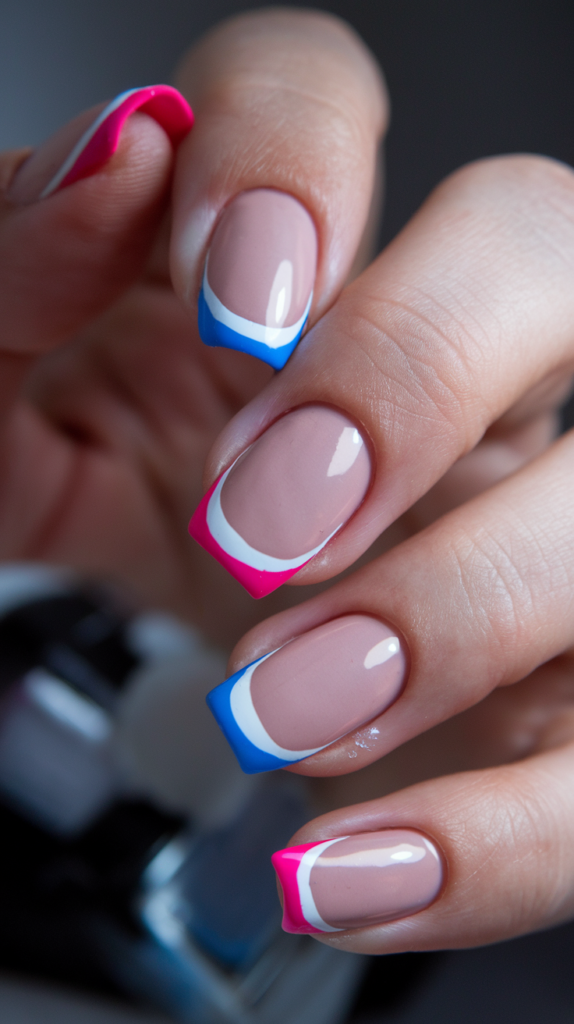
Modern Duo-Tone French Tips take the classic French manicure and give it a vibrant, contemporary twist.
Featuring bold, contrasting colors like hot pink and electric blue, this design is perfect for adding a playful yet stylish flair to your nails.
Creating the Bold Duo-Tone Tips
Step 1: Prep the Nails
Start with clean, well-shaped nails.
Apply a nude or sheer pink polish as the base color and let it dry completely.
Step 2: Create the French Base Line
Using white polish, paint a thin arc along the edge of your nail tips. This acts as the foundation for the colorful accents.
Ensure the white line is neat and even, as it will define the final look.
Step 3: Add the Duo-Tone Colors
With a fine nail art brush or tape for precision, paint one half of the nail tip in a vibrant blue and the other half in hot pink.
Overlap the colors slightly at the center for a seamless transition, or keep them distinctly separate for a bold, graphic look.
Customizing the Duo-Tone Design
Step 1: Experiment with Color Combinations
Switch up the color pairing to match your style or mood. Try pastel shades for a soft, whimsical look or metallic tones for an edgy vibe.
Step 2: Add Additional Details
Enhance the design by outlining the French tips with a thin silver or gold stripe for added elegance.
Step 3: Highlight with Glitter
Apply a light glitter overlay to one or two nails for a subtle shimmer that ties the design together.
Why It Works
Modern Duo-Tone French Tips blend the timeless elegance of a French manicure with bold, contemporary colors for a fresh, eye-catching look.
The vibrant contrasts and clean lines make this design versatile and trendy, perfect for those who want to express their personality through their nails.
This playful yet sophisticated style is ideal for everyday wear or making a statement at special events.
20. Deep Crimson French Tips
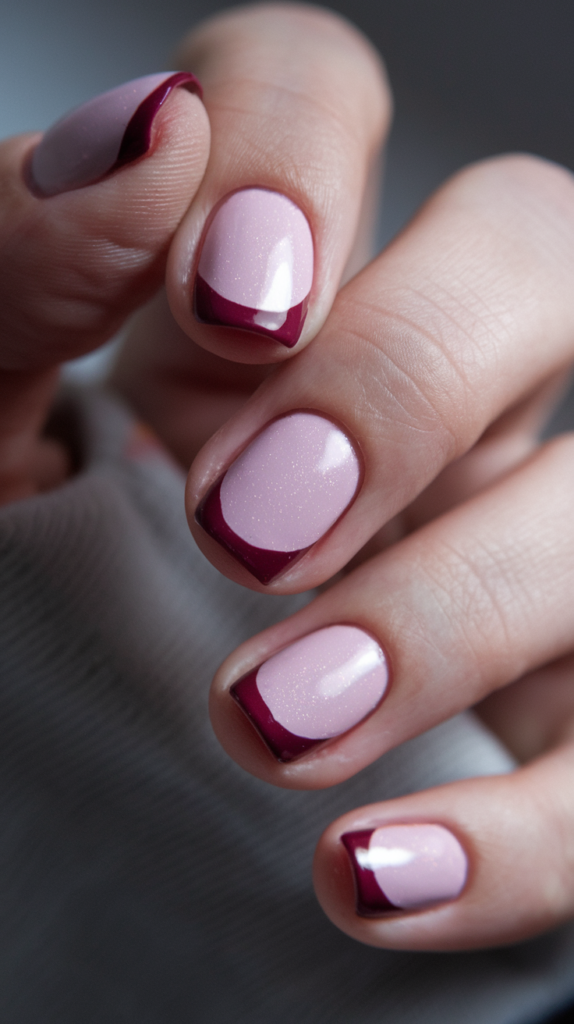
Deep Crimson French Tips offer a sophisticated twist on the classic French manicure by incorporating rich, burgundy accents against a soft pink base.
This chic and timeless design is ideal for formal events, romantic evenings, or whenever you want to add an elegant touch to your nails.
Creating the Elegant Crimson Tips
Step 1: Prepare Your Nails
Begin by shaping and buffing your nails to create a smooth surface.
Apply a soft pink or nude polish as the base color, ensuring an even finish. Let it dry completely.
Step 2: Outline the Tips
Using a burgundy or deep crimson polish, carefully outline the tips of your nails.
To achieve a clean, curved line, use nail guide stickers or a fine detail brush for precision.
Step 3: Fill in the Tips
Once the outline is set, fill in the tips with the same crimson polish. Apply a second coat if needed for a rich, opaque finish.
Enhancing the Sophisticated Look
Step 1: Add Subtle Accents
For a refined touch, consider adding a fine gold stripe along the base of the crimson tips. This adds a hint of luxury without overpowering the design.
Step 2: Incorporate Glossy and Matte Finishes
Experiment with a mix of finishes by applying a matte top coat over the pink base and a glossy top coat on the crimson tips.
Step 3: Highlight with Minimal Embellishments
Add a small crystal or metallic dot at the cuticle of one or two nails for a touch of understated glamour.
Why It Works
Deep Crimson French Tips blend timeless elegance with a bold, modern flair through their striking contrast of soft and deep tones.
The rich burgundy tips provide a refined and dramatic edge, while the soft pink base keeps the design balanced and versatile.
This manicure is perfect for those who want a polished and sophisticated look that effortlessly transitions from day to night.
21. Mystical Galaxy Nail Art
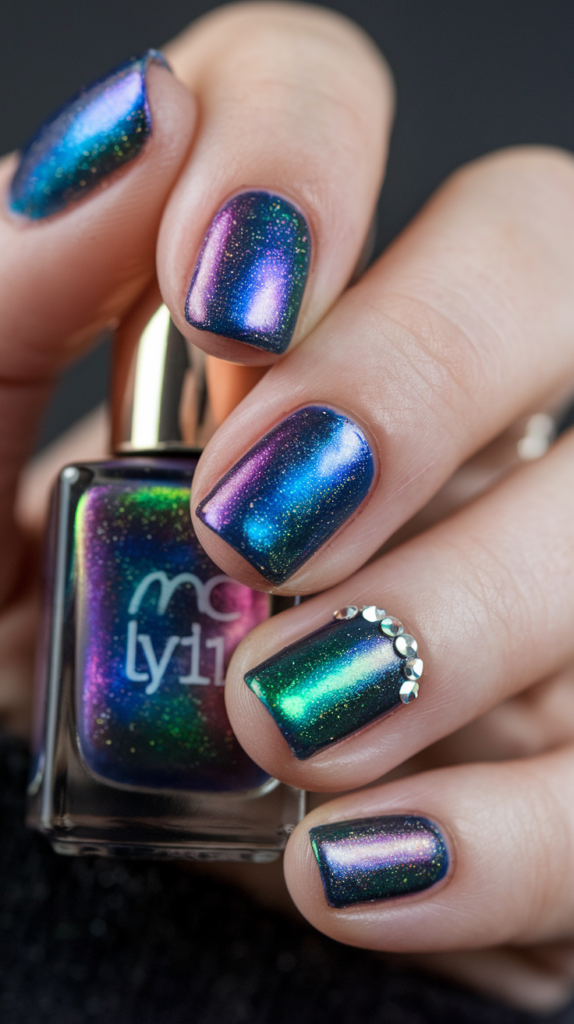
Mystical Galaxy nails bring the wonders of the cosmos to your fingertips, blending vibrant hues and shimmering effects that mimic the mesmerizing beauty of the night sky.
The ethereal transitions between deep blue, green, and purple create an out-of-this-world design, perfect for those who love bold, cosmic-inspired looks.
Creating the Galactic Base
Step 1: Prep Your Nails
Begin by shaping your nails and applying a clear base coat to protect them and enhance the longevity of the design.
Step 2: Apply the Base Color
Choose a dark shade, such as black or deep navy, as the base for your galaxy effect. Let it dry completely before proceeding.
Step 3: Add Multichrome Magic
Use a multichrome polish that shifts between shades of blue, green, and purple. Apply it in thin, even layers to achieve a vibrant, reflective look.
Adding the Cosmic Sparkle
Step 1: Apply a Glitter Overlay
Once the multichrome base has dried, apply a fine holographic glitter polish over your nails to add the sparkling effect of distant stars.
Step 2: Accent with Rhinestones
On one or two nails, place small rhinestones near the cuticle or along the edge to mimic the brilliance of constellations. Use nail glue or a dot of clear polish to secure them.
Finishing Touches: Seal the Galaxy
Step 1: Smooth and Protect
Apply a high-gloss top coat to smooth the surface and seal in your design. This step also enhances the shine and durability of the manicure.
Step 2: Clean Up Edges
Use a small brush dipped in nail polish remover to clean up any excess polish around your cuticles for a flawless finish.
Why It Works
Mystical Galaxy Nail Art captures the breathtaking allure of the cosmos with its dynamic color shifts and sparkling accents.
The multichrome polish creates a stunning visual effect reminiscent of a galaxy’s depth, while the glitter overlay and rhinestones add an elegant, celestial touch.
This design is perfect for anyone who wants to showcase bold, space-inspired nails that are sure to turn heads.
22. Cozy Knit Sweater Nail Art
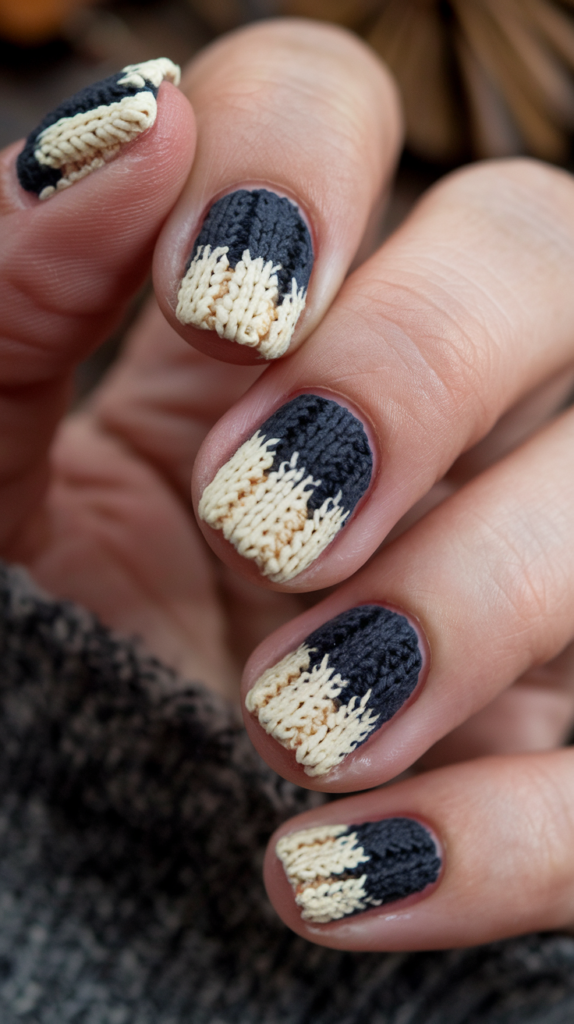
Cozy Knit Sweater nails bring the warmth and charm of your favorite winter attire to your fingertips. With intricate knitted patterns and soft neutral tones, this design is perfect for embracing chilly weather in style.
Crafting the Knit Texture
Step 1: Apply a Base Color
Start with a dark, muted base coat like navy or charcoal to create a bold contrast for the knit details. Let it dry completely before proceeding.
Step 2: Create the Knit Effect
Using a nail art brush or detailing tool, paint small, intricate lines to mimic the texture of a knitted sweater.
Choose a cream or off-white polish for the design to replicate the look of cozy stitches.
Step 3: Build the Texture
To achieve a 3D effect, go over the knit pattern with a second layer of polish once the first layer has dried.
Focus on creating depth by thickening certain areas, ensuring the pattern stands out against the base.
Adding Finishing Details
Step 1: Enhance with Matte Finish
Seal your design with a matte top coat to emphasize the knitted texture and give the nails a soft, fabric-like appearance.
Step 2: Clean the Edges
Use a precision brush with nail polish remover to tidy up the edges for a professional look.
Why It Works
Cozy Knit Sweater Nail Art captures the essence of winter with its charming and intricate patterns.
The textured knit effect adds a unique, tactile quality, while the neutral tones keep the design elegant and versatile.
This look is perfect for pairing with seasonal outfits, making your nails the ultimate winter accessory.
23. Bold Abstract Splash Nail Art
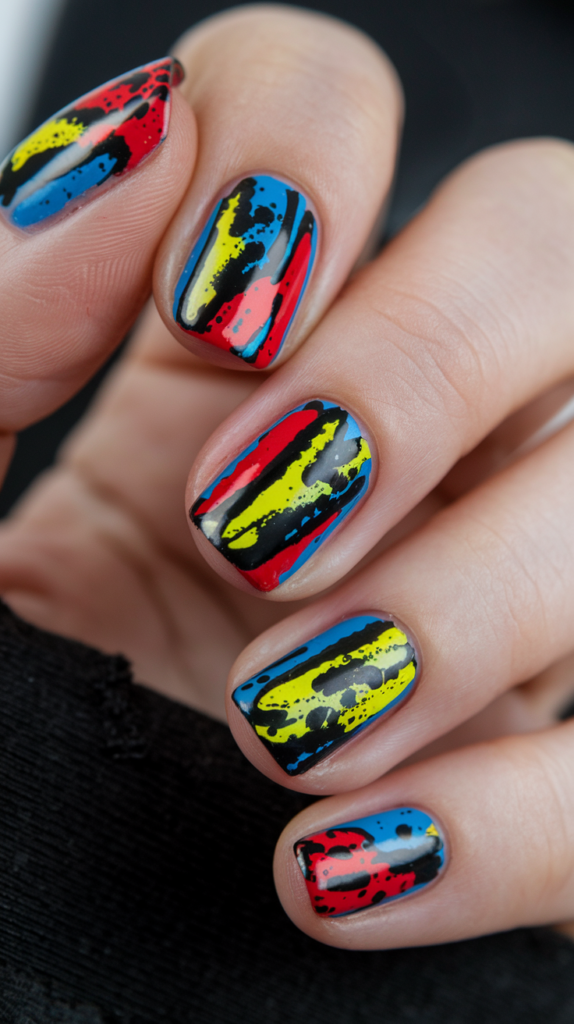
Bold Abstract Splash nails bring a pop of color and creative energy to your fingertips.
This design features striking splashes of red, blue, yellow, and black, creating an eye-catching, abstract pattern that will make a statement wherever you go.
Creating the Colorful Splashes
Step 1: Apply the Base Color
Start with a black polish as the base to give the vibrant colors a dramatic contrast. Allow the base coat to dry completely.
Step 2: Create the Colorful Splashes
Using a thin nail art brush or a fine-tipped dotting tool, apply bold splashes of red, yellow, and blue across your nails.
Focus on making the splashes random, allowing the colors to overlap and create an abstract, energetic design.
Step 3: Add Texture with the Black Base
Once the colorful splashes are dry, go back with the black polish to define the edges and add more abstract lines, enhancing the overall design.
Adding a Polished Finish
Step 1: Apply a Glossy Top Coat
Seal the design with a glossy top coat to smooth out the surface and add shine.
This will also protect the design and give it a sleek, polished look.
Step 2: Clean Up the Edges
Use a brush dipped in nail polish remover to clean any excess polish around the cuticles for a neat and professional finish.
Why It Works
Bold Abstract Splash Nail Art captures the energetic essence of modern abstract art.
The vibrant splashes of color against a black background create a striking visual contrast, while the random placement gives it a playful and dynamic feel.
This design is perfect for those looking to add an artistic and bold touch to their nail look.
24. Colorful Puzzle Nail Art
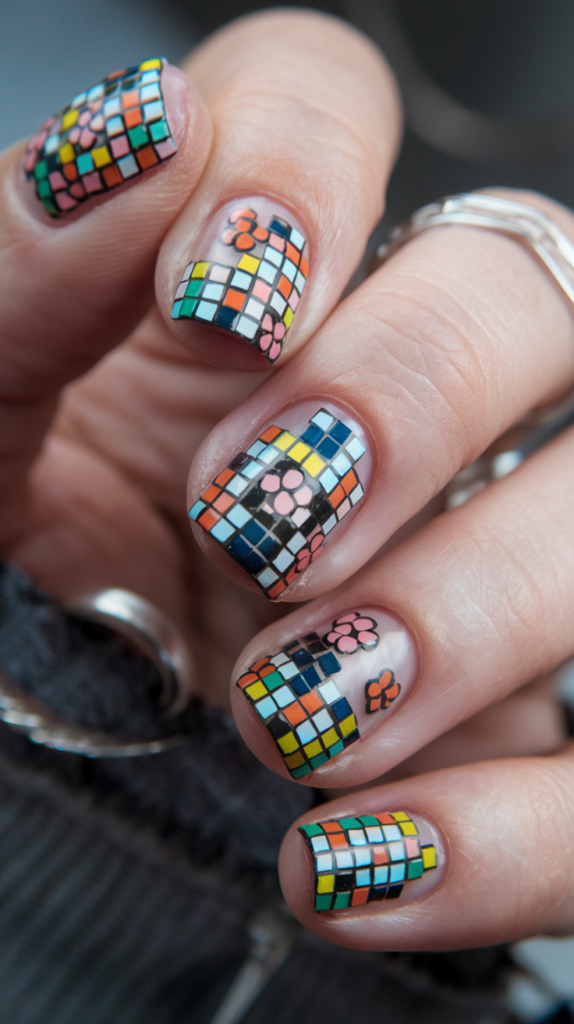
Colorful Puzzle nails bring a playful and vibrant twist to your look with their bold, grid-like patterns and whimsical floral accents.
This design combines the fun of puzzle pieces with a soft, floral touch for a unique, eye-catching manicure.
Crafting the Puzzle Grid Design
Step 1: Apply a Base Color
Start by applying a neutral or pale base color to each nail, ensuring a clean, subtle backdrop for the puzzle design. Allow the base coat to dry thoroughly.
Step 2: Create the Grid Pattern
Using a thin nail art brush or striping tape, create a grid of small squares on each nail. Alternate between bright colors like orange, turquoise, green, and black to fill in the squares, creating a fun, pixelated puzzle effect.
Step 3: Refine the Design
Ensure the grid lines are clean and sharp, adding more layers if needed to achieve the vibrant, block-like look. Let the design dry before proceeding.
Adding Whimsical Floral Accents
Step 1: Paint the Flowers
On select sections of the grid, paint small, cute flowers in soft pink, yellow, or orange tones. Use a dotting tool or small brush to create the petals and centers of the flowers.
Step 2: Highlight the Flowers
Outline the flowers with black polish to add contrast and make them stand out against the colorful grid.
Finishing Touches: Seal and Clean
Step 1: Apply a Glossy Top Coat
Seal your design with a glossy top coat to add shine and protect the artwork. This also smooths out any texture from the puzzle grid and floral details.
Step 2: Clean the Edges
Use a small brush dipped in nail polish remover to clean any excess polish around your cuticles for a tidy, professional finish.
Why It Works
Colorful Puzzle Nail Art combines vibrant, geometric shapes with delicate floral details, creating a fun and dynamic contrast.
The bright grid pattern gives the design a modern, playful feel, while the floral accents soften the look, adding a touch of whimsy.
This design is perfect for those looking to express their creative side with a nail art style that is both bold and charming.
25. Floral Garden Nail Art

Floral Garden nails offer a delicate and vibrant design that brings the beauty of blooming flowers to your fingertips.
With bright reds, blues, and whites scattered across a neutral base, this manicure is perfect for adding a touch of nature-inspired elegance to any occasion.
Creating the Floral Base
Step 1: Apply a Neutral Base Coat
Start with a nude or light beige base color to create a soft backdrop for the vibrant floral designs. Allow the base to dry completely before proceeding.
Step 2: Outline the Flowers
Using a fine nail art brush, begin creating the flower outlines with white and soft pink polish. Focus on placing flowers near the cuticle and spreading them across the nail.
Step 3: Add Detail to the Flowers
Add small petals to each flower with a dotting tool or a thin brush. Use colors like red, blue, and yellow to fill in the petals and centers, creating a diverse and lively floral pattern.
Adding the Greenery and Accents
Step 1: Paint the Leaves
Using a green polish, add small leaves and vines around the flowers. Keep the design delicate by painting thin, flowing stems and leaves to enhance the natural look.
Step 2: Add Small Flower Buds
For added interest, paint tiny buds in complementary colors like blue or yellow. This adds depth and creates a fuller floral garden effect.
Finishing Touches: Seal and Polish
Step 1: Apply a Glossy Top Coat
Seal the design with a glossy top coat to smooth the surface and add a polished shine to the artwork. This also enhances the longevity of the design.
Step 2: Clean the Edges
Use a small brush dipped in nail polish remover to clean up any excess polish around the cuticles for a flawless finish.
Why It Works
Floral Garden Nail Art captures the beauty of spring and summer with its vibrant flower designs.
The mix of soft neutrals and bright floral colors creates a perfect balance, making it versatile for both casual and formal occasions. The addition of delicate leaves and buds adds a natural flow, making the design feel light and organic.
This nail art is ideal for anyone wanting to carry a blooming garden with them wherever they go.
26. Golden Geometric Nail Art
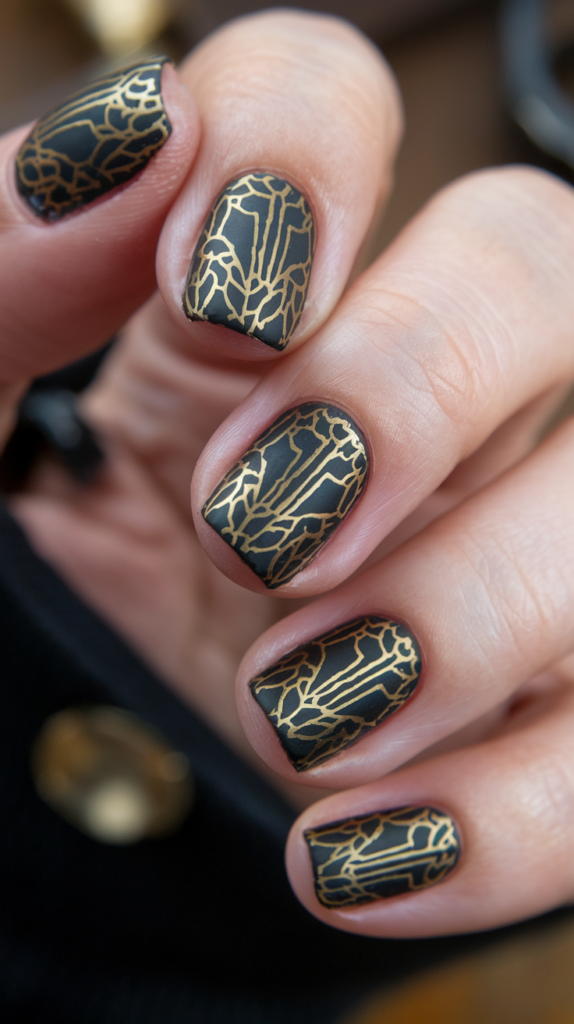
Golden Geometric nails make a bold statement with sharp, intricate designs paired with a sophisticated black base.
The metallic gold lines create an elegant, modern contrast that elevates this manicure to a luxurious level.
Crafting the Geometric Design
Step 1: Apply a Black Base Coat
Begin by applying a black matte or glossy base coat to each nail. This will serve as the backdrop for the geometric gold design. Let it dry completely.
Step 2: Create the Geometric Lines
Using a fine detailing brush or a striping tape, create geometric lines and shapes on your nails with gold polish. Focus on crisp, angular patterns, such as triangles, rectangles, and intersecting lines, to achieve a modern look.
Step 3: Refine the Design
Ensure the gold lines are clean and precise. You can use a thin brush to touch up any uneven sections. Let the design dry thoroughly before proceeding.
Adding Finishing Touches
Step 1: Apply a Matte Top Coat
To maintain the sleek look, apply a matte top coat over the entire design. This enhances the contrast between the gold design and the black base.
Step 2: Clean the Edges
Use a precision brush and nail polish remover to clean up any excess polish around the cuticles, ensuring a neat, professional finish.
Why It Works
Golden Geometric Nail Art is a perfect balance of elegance and modernity.
The bold gold geometric design on the matte black base creates a striking contrast that is visually impactful yet sophisticated. This design is ideal for those seeking a refined yet edgy look that will stand out on any occasion.
The combination of sharp lines and luxurious gold accents makes these nails a chic choice for evening events or special occasions.
27. Delicate Floral Stamping Nail Art
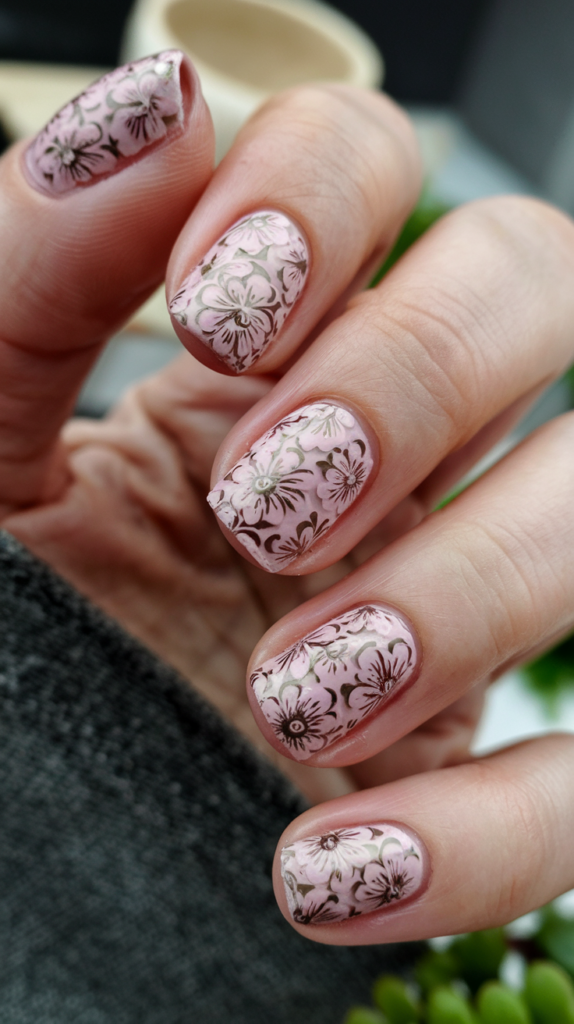
Delicate Floral Stamping nails offer a soft, feminine look with intricate floral designs stamped onto a subtle, pink base. This design exudes elegance and charm, perfect for a refined, nature-inspired manicure.
Creating the Floral Base
Step 1: Apply a Soft Pink Base Coat
Start by applying a soft pink polish as the base color for each nail. This delicate shade will create a gentle backdrop for the floral stamping. Allow the base coat to dry completely.
Step 2: Prepare the Stamping Plate
Choose a floral design from a stamping plate that features intricate, small flowers. Using a scraper and stamper, apply a metallic or dark color such as brown or gold to the floral pattern.
Step 3: Stamp the Floral Design
Stamp the floral design onto each nail, ensuring the flowers are evenly distributed across the nail surface. You can stamp the design entirely or selectively place the flowers for a more customized look.
Adding Finishing Touches
Step 1: Apply a Glossy Top Coat
Seal your design with a glossy top coat to protect the stamped art and enhance its shine. This also smooths out the design and makes the colors pop.
Step 2: Clean the Edges
Use a small brush dipped in nail polish remover to clean any excess polish around the cuticles for a crisp, polished finish.
Why It Works
Delicate Floral Stamping Nail Art beautifully combines soft pastel tones with detailed floral imagery.
The intricate floral stamping adds a sophisticated touch to the gentle pink base, while the metallic or dark polish provides a rich contrast, making the flowers stand out.
This design is perfect for those who want a refined and elegant nail art look that is both timeless and charming.
Ideal for spring events, weddings, or any occasion where you want your nails to bloom with grace.
28. Glitter Ombre Nail Art
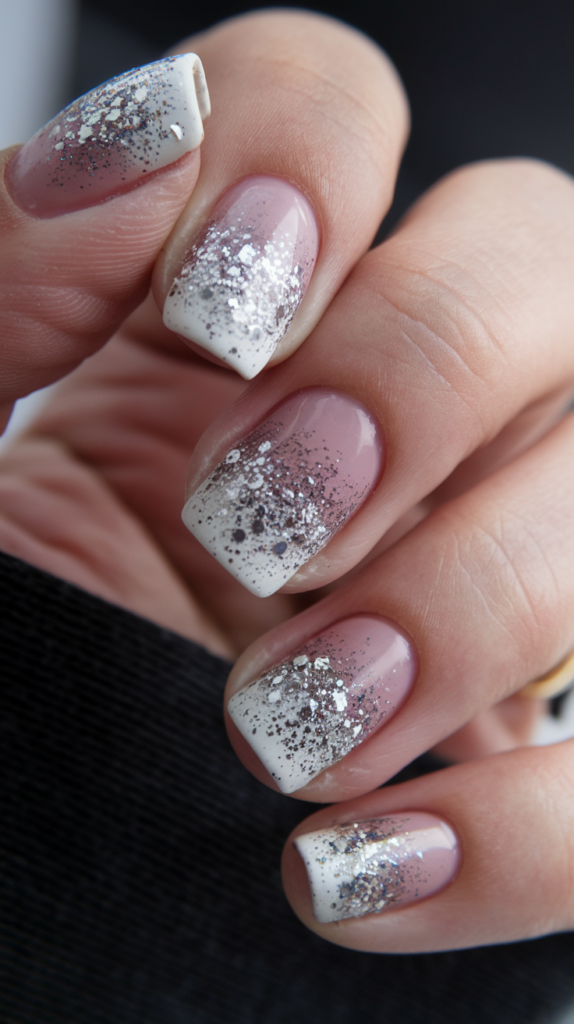
Glitter Ombre nails combine the elegance of a soft ombre fade with the sparkle of shimmering glitter.
This design is perfect for those looking to add a touch of glam to their nails while maintaining a sophisticated and refined look.
Creating the Ombre Base
Step 1: Apply a Soft Pink Base Coat
Start by applying a soft pink or nude color to your nails, covering the entire nail surface. This neutral base will serve as a subtle backdrop for the ombre design. Let it dry completely.
Step 2: Create the Ombre Gradient
Using a makeup sponge or a sponge applicator, apply a white polish to the tips of your nails, blending it downwards towards the base color. The result should be a smooth transition from the pink to white, creating the ombre effect. Let the gradient dry before moving on.
Adding Glitter Accents
Step 1: Apply the Glitter
While the ombre gradient is still slightly tacky, lightly dab glitter polish at the tips of your nails. Focus on placing a heavier layer of glitter near the tip, fading it gently towards the middle of the nail.
Step 2: Build Up the Glitter Effect
Apply additional layers of glitter if necessary, allowing each layer to dry before adding more. You can also mix silver and holographic glitter for a more dimensional, sparkly finish.
Finishing Touches
Step 1: Apply a Glossy Top Coat
Once the glitter has dried, apply a glossy top coat to seal the design and add a sleek, shiny finish. This will also smooth the surface and enhance the glitter’s sparkle.
Step 2: Clean the Edges
Use a small brush with nail polish remover to clean any excess polish around the cuticles for a neat, professional look.
Why It Works
Glitter Ombre Nail Art beautifully combines the soft elegance of an ombre gradient with the sparkling allure of glitter.
The subtle pink to white gradient creates a sophisticated base, while the glitter accent adds a fun and glamorous touch.
This design is perfect for special occasions, giving your nails an enchanting, festive appearance that is still chic and refined.
29. Dotty Geometric Nail Art
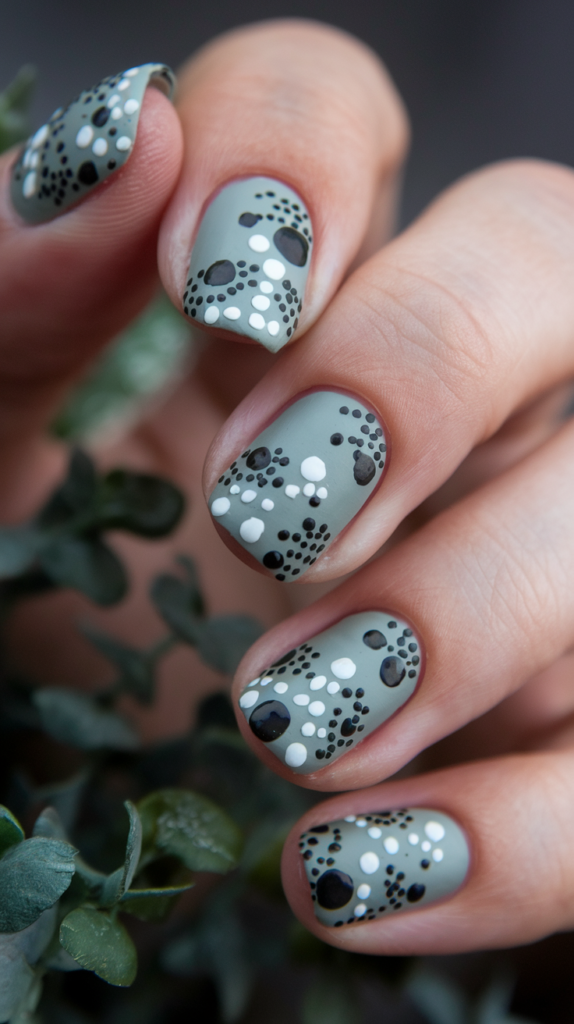
Dotty Geometric nails combine playful dot patterns with modern geometric shapes, creating a unique and stylish look.
The contrasting black, white, and muted green colors bring a balance of boldness and subtlety, making this design perfect for those who love minimal yet eye-catching nail art.
Creating the Dotty Design
Step 1: Apply a Soft Green Base Coat
Start with a soft, muted green polish as the base coat for each nail. This calming color will set a perfect backdrop for the bold dot designs. Allow the base coat to dry completely.
Step 2: Add the Black and White Dots
Using a dotting tool or a small brush, create varying sizes of dots in black and white. Begin by applying larger dots near the cuticle area, and gradually make smaller dots as you move towards the tip of the nails.
Step 3: Create a Random Pattern
Ensure the dots are randomly placed but still have a natural flow across the nail. Some dots can overlap, while others should stand alone for a dynamic, geometric feel.
Finishing Touches
Step 1: Apply a Matte Top Coat
To emphasize the modern design and create a smooth finish, apply a matte top coat. This will also give the nails a sleek, polished look.
Step 2: Clean the Edges
Use a small brush dipped in nail polish remover to clean up any excess polish around the cuticles for a neat, professional finish.
Why It Works
Dotty Geometric Nail Art combines bold patterns with clean, minimalistic elements.
The soft green base serves as a calming backdrop to the energetic contrast between the black and white dots. The varying dot sizes create movement and flow, making this design visually appealing.
This manicure is perfect for anyone looking to add a touch of contemporary art to their nails while maintaining a balanced and stylish aesthetic.
30. Emerald and Gold Leaf Nail Art
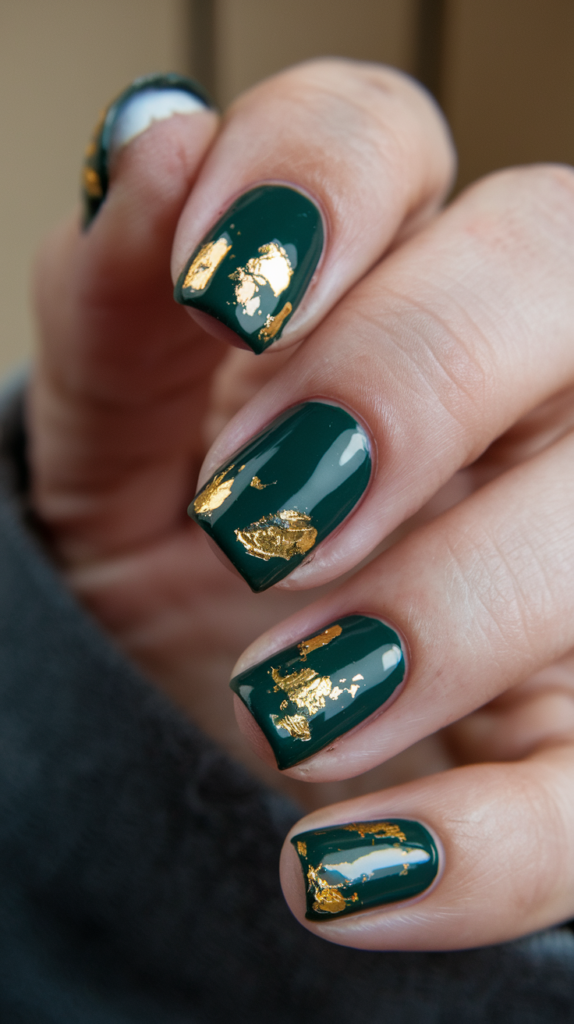
Emerald and Gold Leaf nails offer a luxurious, chic look with a stunning combination of rich green polish and delicate gold leaf accents.
This design exudes elegance and sophistication, perfect for making a statement at any event.
Creating the Emerald Base
Step 1: Apply an Emerald Green Base Coat
Start by applying a rich emerald green polish to each nail. This deep, vibrant color will create a bold foundation for the gold leaf accents. Allow the base coat to dry completely.
Step 2: Apply a Second Coat
For an even deeper, glossy finish, apply a second coat of emerald green polish. Let it dry before moving on to the gold leaf application.
Adding the Gold Leaf
Step 1: Apply Gold Leaf Flakes
Once the base coat is dry, gently place pieces of gold leaf onto the nails. You can use a small brush or your fingers to carefully apply the gold leaf to various parts of each nail. Focus on creating organic patterns, allowing some areas to have more gold leaf than others for a balanced look.
Step 2: Press and Set the Gold Leaf
Once the gold leaf is in place, lightly press it down with a clean brush or a small piece of plastic to ensure it adheres well to the nail surface.
Finishing Touches
Step 1: Apply a Glossy Top Coat
Seal the design with a glossy top coat to smooth the surface and enhance the shine of both the emerald polish and the gold leaf. This will also help protect the gold leaf from peeling.
Step 2: Clean the Edges
Use a small brush with nail polish remover to clean any excess polish around the cuticles for a neat and polished finish.
Why It Works
Emerald and Gold Leaf Nail Art is a perfect fusion of luxurious, bold colors and delicate metallic accents.
The emerald green base creates a rich, captivating look, while the gold leaf adds a touch of opulence and uniqueness.
The design is visually striking yet sophisticated, making it perfect for formal events, holiday gatherings, or whenever you want your nails to shine with glamour.
31. Celestial Moon and Stars Nail Art
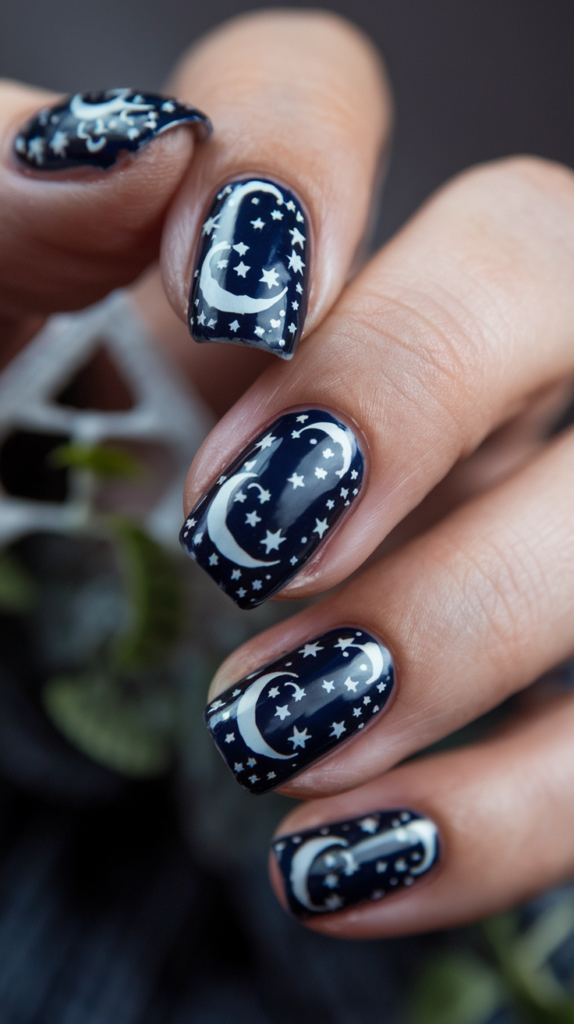
Celestial Moon and Stars nails bring the beauty of the night sky to your fingertips.
This design features delicate white crescent moons and sparkling stars against a deep, starry night backdrop. It’s perfect for anyone who loves mystical, cosmic-inspired nail art.
Creating the Starry Night Base
Step 1: Apply a Deep Blue Base Coat
Start by applying a deep blue or navy polish to each nail. This rich, dark color will set the perfect background for the moon and star designs. Let it dry completely.
Step 2: Add a Second Layer
For a more vibrant, opaque finish, apply a second coat of blue polish. Allow it to dry thoroughly before proceeding with the starry design.
Adding the Moon and Star Details
Step 1: Paint the Crescent Moons
Using a fine nail art brush or a dotting tool, paint small crescent moons with white or off-white polish. Place them randomly across the nails, ensuring some moons are larger for visual interest.
Step 2: Add the Stars
With a small dotting tool or the tip of a fine brush, create tiny stars around the moons. Scatter them evenly across the nail, varying their sizes for a natural, twinkling effect.
Step 3: Create Additional Star Details
For extra sparkle, add a few larger star shapes or small dots in varying sizes to enhance the celestial design.
Finishing Touches
Step 1: Apply a Glossy Top Coat
Seal the design with a glossy top coat to add shine and protect the artwork. This will also help smooth the surface and enhance the glow of the stars and moons.
Step 2: Clean the Edges
Use a small brush dipped in nail polish remover to clean up any excess polish around the cuticles for a neat, professional finish.
Why It Works
Celestial Moon and Stars Nail Art captures the serene beauty of the night sky, with the delicate moons and stars creating a mesmerizing and elegant design.
The contrast between the deep blue base and the white celestial details evokes a sense of calm and wonder. This design is perfect for anyone looking to add a touch of magic and cosmic charm to their nail art.
It’s ideal for evening events, stargazing, or simply embracing the mystical beauty of the night sky.
32. Colorful Polka Dot Nail Art
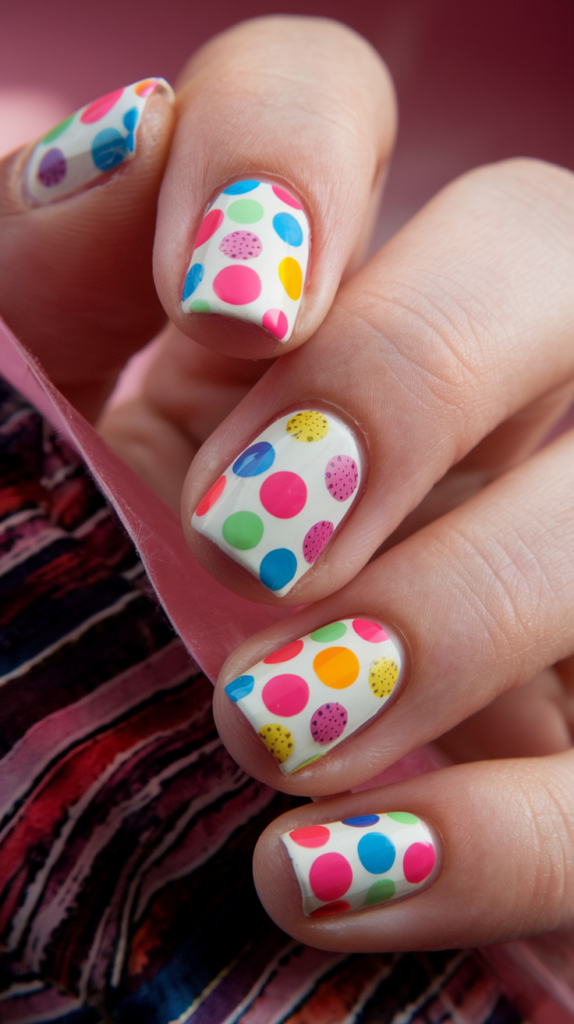
Colorful Polka Dot nails are playful, vibrant, and perfect for adding a cheerful touch to any look. With bright, contrasting colors against a neutral base, this design will make your nails pop with fun and creativity.
Creating the Polka Dot Base
Step 1: Apply a Neutral Base Coat
Start by applying a soft white or off-white base coat to each nail. This neutral color will allow the bright dots to stand out. Let the base coat dry completely.
Step 2: Create the Polka Dots
Using a dotting tool or a small brush, create large dots in various colors such as pink, blue, green, orange, and yellow. Randomly place the dots across the nails, ensuring each nail has a mix of colors.
Step 3: Add Different Dot Textures
For added dimension, you can create different textures for the dots by using varying techniques, like a sponged effect or adding smaller dots within some larger ones. This will give your design a more dynamic, playful look.
Finishing Touches
Step 1: Apply a Glossy Top Coat
Seal your design with a glossy top coat to add shine and protect the artwork. This will also give the nails a smooth finish, making the dots pop even more.
Step 2: Clean the Edges
Use a small brush dipped in nail polish remover to clean up any excess polish around the cuticles for a polished, neat finish.
Why It Works
Colorful Polka Dot Nail Art is a fun, whimsical design that’s full of energy.
The bright, contrasting dots against the soft white base create a balanced, yet playful look.
This design is perfect for those who love to express their creativity and vibrant personality through their nails.
It’s ideal for parties, summer events, or whenever you want to add a pop of fun to your style.
33. Metallic Marble Nail Art
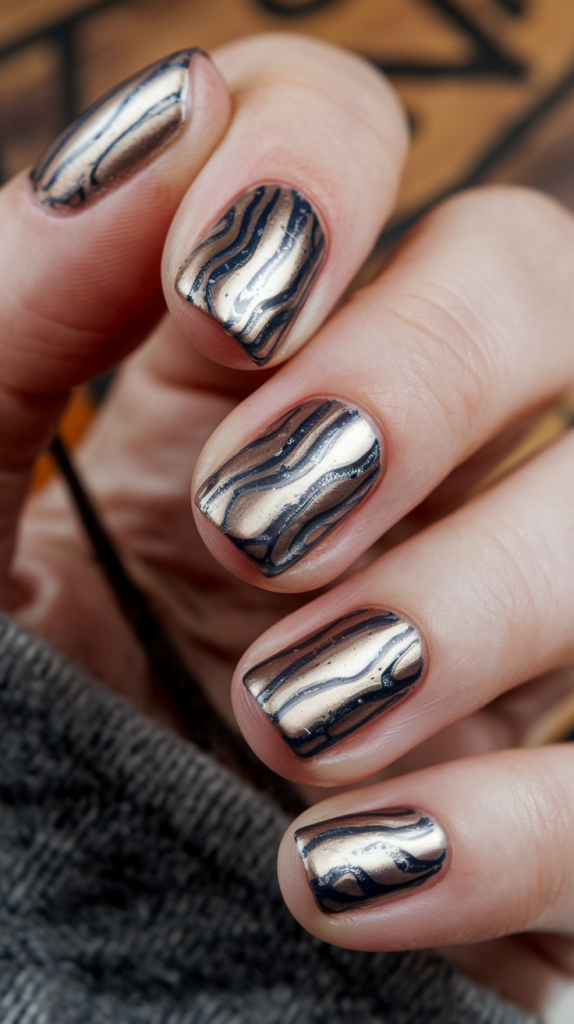
Metallic Marble nails offer a chic, contemporary design with sleek, swirling metallic lines against a smooth base. This design exudes sophistication and elegance, perfect for those looking for a high-fashion, edgy look.
Creating the Marble Base
Step 1: Apply a Neutral Base Coat
Start by applying a neutral, light-colored base coat to each nail. A soft beige, nude, or light gray works well to create a sophisticated backdrop for the marble design. Allow the base coat to dry completely.
Step 2: Apply the Metallic Polish
Apply a shiny metallic polish in shades of gold, bronze, or silver to the nails, leaving some areas of the base coat exposed. This will give the nails a sleek, shiny texture that contrasts beautifully with the swirling design to come.
Adding the Marble Swirls
Step 1: Create the Swirls
Using a fine nail art brush or a detailing tool, gently add wavy, fluid lines using a darker metallic color, such as black or deep bronze. Focus on creating organic swirls, making them random but evenly spread across the nails. The goal is to create a marble-like effect with a mix of smooth and jagged lines.
Step 2: Blend the Design
For a more natural marble effect, use a small brush dipped in a small amount of clear polish to soften and blend the lines. This will help achieve a fluid, marble texture that flows seamlessly across the nail.
Finishing Touches
Step 1: Apply a Glossy Top Coat
Seal your design with a glossy top coat to enhance the shine and protect the intricate marble design. This will also smooth out any textured lines, giving the nails a polished, sleek finish.
Step 2: Clean the Edges
Use a small brush dipped in nail polish remover to clean up any excess polish around the cuticles for a neat and professional finish.
Why It Works
Metallic Marble Nail Art is an elegant, sophisticated design that combines the timeless beauty of marble with modern metallic finishes.
The contrast between the dark swirls and the light metallic base creates a striking visual effect, while the glossy top coat adds a high-end, polished look.
This design is perfect for special occasions or anyone who wants to add a touch of luxurious elegance to their manicure.
34. Pop Art Splash Nail Art

Pop Art Splash nails combine bold, graphic shapes with a vibrant, colorful background, creating an energetic and fun design.
With bright splashes of color and playful heart, star, and triangle shapes, this design is perfect for anyone who loves to make a statement with their nails.
Creating the Colorful Base
Step 1: Apply a Bold Base Color
Start by applying a bright, bold color like red or yellow to each nail. This will be the base for the splashes and shapes. Let the base coat dry completely.
Step 2: Create the Paint Splashes
Using a dotting tool or a fine brush, splatter bright colors like blue, pink, and yellow onto the nails. Focus on creating random splashes that mimic paint drops for an artistic, messy effect. Don’t worry about perfection—let the colors overlap and blend for a fun, dynamic design.
Adding the Graphic Shapes
Step 1: Outline the Shapes
Using a black nail art brush, carefully outline the shapes you want to feature on your nails. You can add hearts, stars, and triangles to each nail, ensuring they stand out against the colorful background. The bold black outline adds a striking contrast that highlights each shape.
Step 2: Fill in the Shapes
Once the outline is done, fill the shapes with bright, solid colors like pink for hearts, blue for stars, and red or yellow for triangles. Let the colors dry before moving on to the next step.
Finishing Touches
Step 1: Apply a Glossy Top Coat
Seal your design with a glossy top coat to add shine and protect the artwork. This will give your nails a sleek, polished finish and enhance the vibrant colors of the paint splashes and shapes.
Step 2: Clean the Edges
Use a small brush dipped in nail polish remover to clean up any excess polish around the cuticles for a neat, professional finish.
Why It Works
Pop Art Splash Nail Art combines bold colors, graphic shapes, and playful paint splashes, making it a fun and eye-catching design.
The bright colors and geometric shapes create a dynamic, energetic look, while the black outlines add a comic-inspired flair.
This design is perfect for anyone who wants to add a pop of color and creativity to their style, whether it’s for a special event or simply for a fun, everyday look.
35. Pressed Floral Nail Art
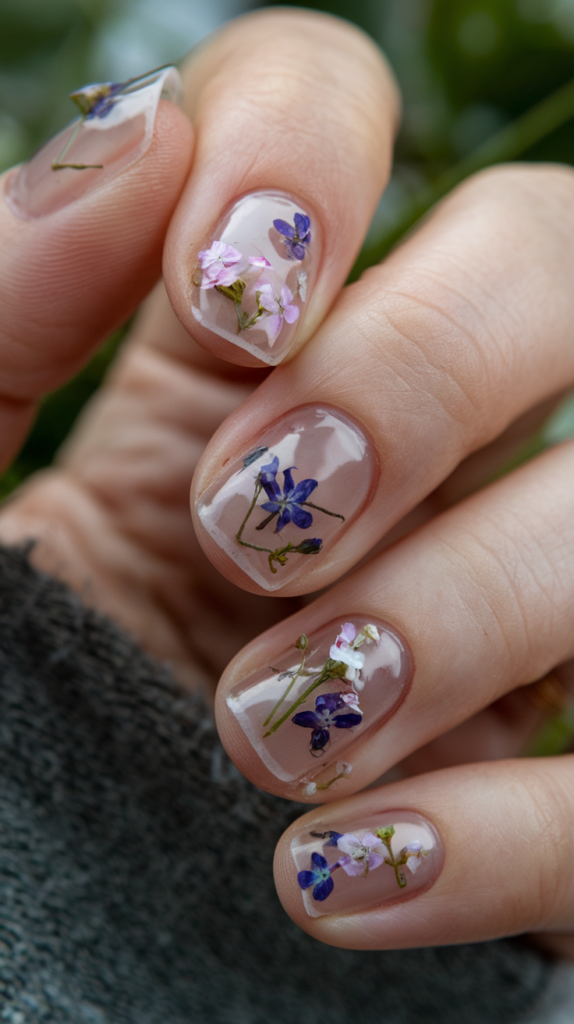
Pressed Floral nails create a delicate, nature-inspired look, showcasing tiny, intricate flowers that seem to bloom directly on your nails. With soft, pastel tones and a neutral base, this design is perfect for those who appreciate understated elegance and botanical beauty.
Creating the Base
Step 1: Apply a Clear or Nude Base Coat
Start by applying a clear or nude base coat to each nail. This will allow the floral designs to stand out while maintaining a soft, natural look. Let it dry completely.
Step 2: Apply a Sheer Coat for Extra Shine
Once the base coat is dry, you can apply a thin layer of a sheer polish or a neutral color to give the nails a polished, clean finish. This creates the perfect foundation for the flowers.
Adding the Pressed Flowers
Step 1: Prepare the Flowers
Carefully press small, real flowers onto your nails. You can use dried flowers or small, artificial flowers that mimic the delicate petals of wildflowers. Select soft colors such as light purple, pink, and white for an elegant and cohesive look.
Step 2: Place the Flowers
Using tweezers or a fine tool, gently place the pressed flowers onto the surface of each nail. Arrange them randomly or in clusters, focusing on the cuticle area or spreading them across the nail for a natural, floral look.
Sealing and Finishing Touches
Step 1: Apply a Top Coat
Carefully apply a clear top coat to seal in the flowers and protect the delicate petals. This will give the design a smooth, polished finish and ensure the flowers stay intact. A glossy top coat will enhance the shine and vibrancy of the flowers.
Step 2: Clean the Edges
Use a small brush dipped in nail polish remover to clean up any excess polish around the cuticles for a neat and professional finish.
Why It Works
Pressed Floral Nail Art captures the natural beauty of flowers with a delicate, minimalist approach.
The soft, neutral base allows the colorful pressed flowers to take center stage, creating a light and feminine look.
This design is perfect for spring or summer, weddings, or any occasion where you want your nails to bloom with elegance and charm.
Conclusion
We hope this guide has sparked your creativity and equipped you with the skills to explore the dynamic world of nail art.
Each design, from the subtle sophistication of rose gold glam to the bold drama of pop art splatters, offers a unique way to express your personal style and elevate your look.
Remember, nail art is not just about following trends—it’s about making each design your own.
So, experiment with colors, play with patterns, and don’t be afraid to step outside the box.
Your nails are your canvas, and the possibilities are endless.
Keep practicing, stay inspired, and most importantly, have fun with every manicure masterpiece you create.
