As the holiday season approaches, it’s the perfect time to get creative with your nails and embrace the festive spirit.
Christmas nail art is all about capturing the magic, joy, and warmth of the holidays, with designs ranging from playful and whimsical to elegant and sophisticated.
Whether you’re looking to showcase classic holiday symbols like candy canes and snowflakes or want to add a touch of luxury with gold accents and velvet textures, there’s a Christmas nail design to suit every style and occasion.
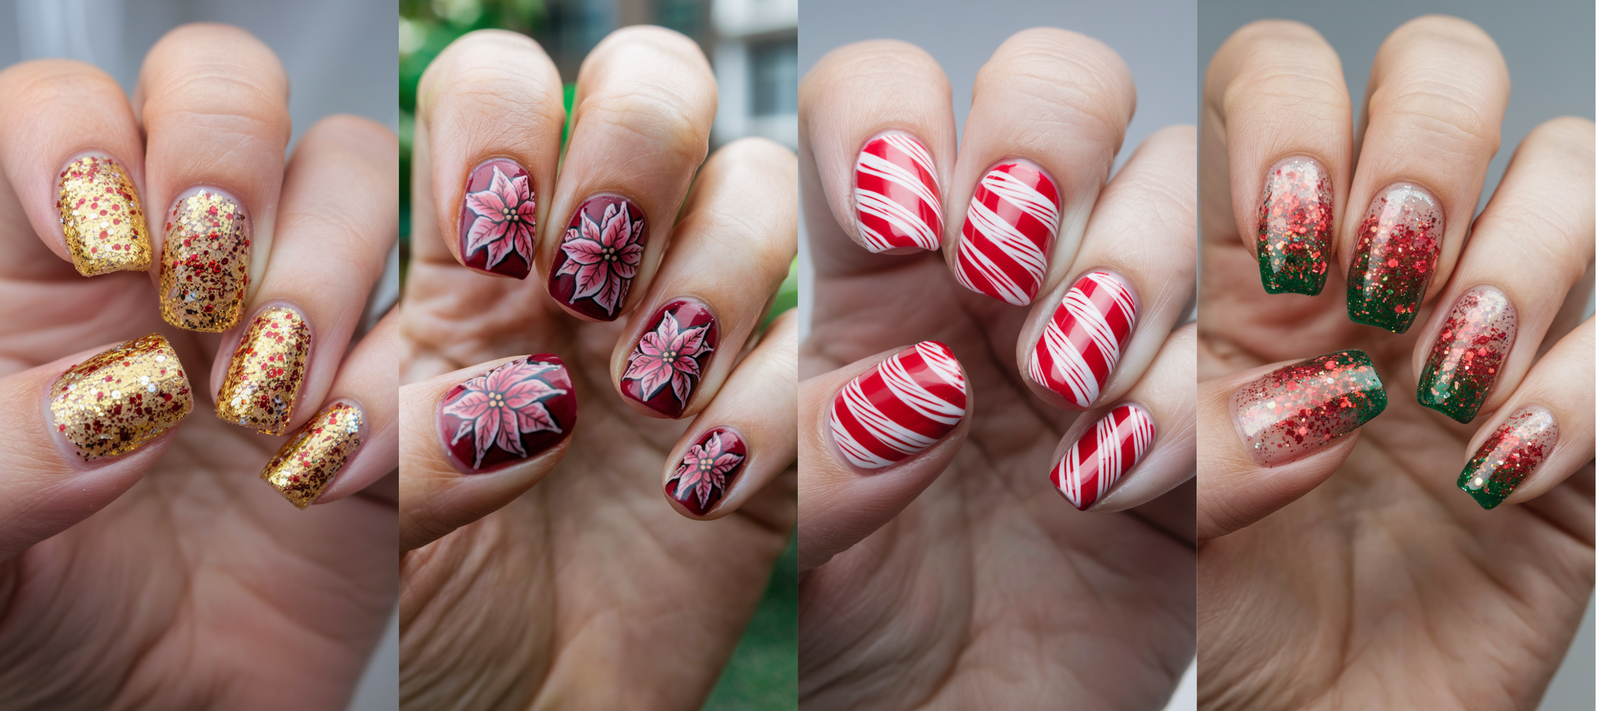
In this blog post, we’ve compiled 35 stunning Christmas nail designs that are sure to inspire and awe.
Each design is not only a celebration of the season but also a chance to express your unique personality and creativity.
From intricate hand-painted details to glittering, glamorous finishes, these ideas will help you make a statement this holiday season.
So, get ready to deck your nails with these festive and eye-catching designs that will have you feeling merry and bright all season long.
1. Candy Cane Stripes Nail Art
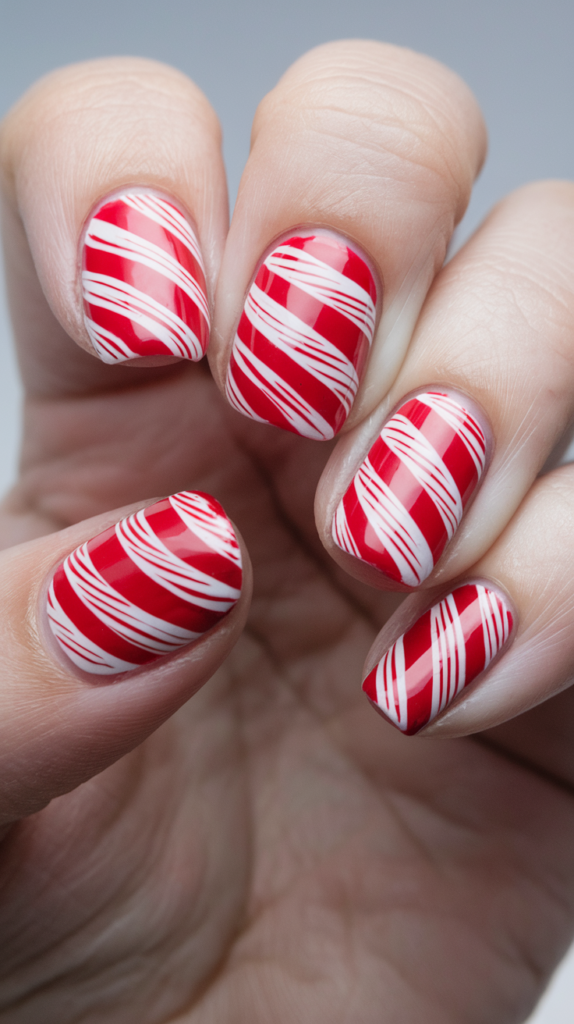
Candy Cane Stripes bring a sweet, festive charm to your nails, embodying the joy and warmth of the holiday season with their bold red and white contrast.
This design evokes the magic of Christmas, resembling the candy canes that decorate festive trees and stockings.
Perfect for spreading holiday cheer, these stripes offer a playful yet classic look for any Christmas celebration.
Creating Candy Cane Stripes
Step 1: Prepare the Base Coat
Start by applying a protective base coat to ensure smooth, long-lasting wear.
Then, apply two coats of bright red polish, allowing each layer to dry completely.
Step 2: Add the White Stripes
Using a thin nail art brush or striping tape, carefully draw diagonal white stripes across each nail.
Make sure the lines are even and precise to achieve the classic candy cane effect.
Step 3: Apply the Top Coat
Finish your design with a glossy top coat.
The top coat will add shine, smooth out any imperfections, and seal in your design, keeping the stripes vibrant throughout the holiday season.
Why It Works
Candy Cane Stripes Nail Art captures the essence of Christmas with its bright, cheerful colors and clean, crisp lines.
The red and white combination evokes the classic candy cane, making it an instantly recognizable symbol of holiday cheer.
The glossy finish ensures a polished look, while the use of striping tape or a fine brush makes achieving precision simple, even for beginners. This design is the perfect way to celebrate the season with a fun and festive touch.
2. Golden Snowflakes Nail Art
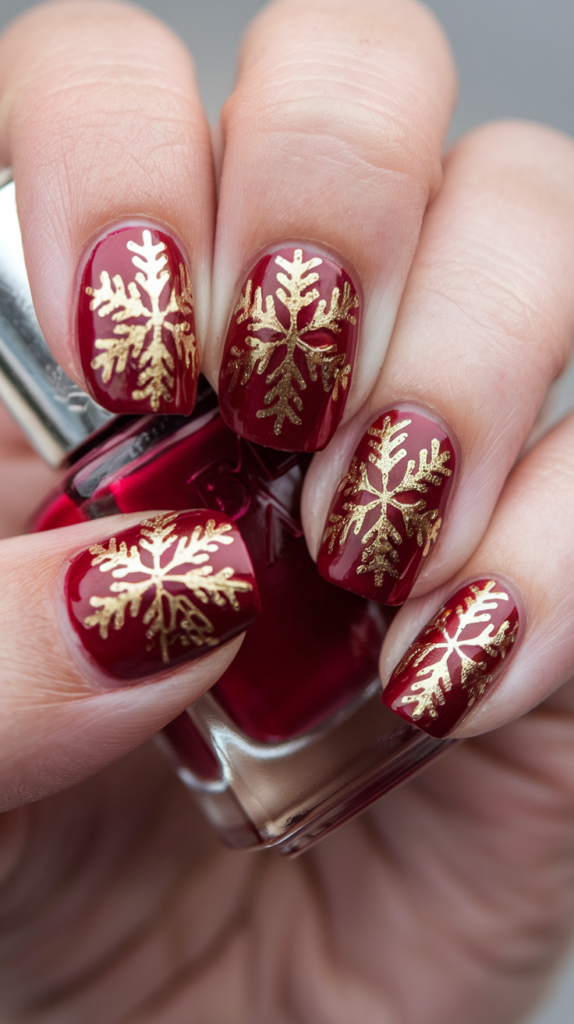
Golden Snowflakes bring an air of sophistication and luxury to your Christmas nails, adding a shimmering elegance to your holiday look.
The combination of metallic gold snowflakes set against a rich red or green base creates a stunning contrast that sparkles like freshly fallen snow on a crisp winter day. Perfect for those who seek to elevate their festive style with a touch of glamour, this design captures the beauty and magic of the season.
Creating Golden Snowflakes on Your Nails
Step 1: Prepare the Base Color
Start with a deep red or emerald green base coat. Apply two coats to ensure a smooth, even finish.
Allow the base to dry completely before moving on to the snowflakes.
Step 2: Paint the Golden Snowflakes
Using a thin detailing brush, dip into gold nail polish and begin by drawing a simple cross on your nails.
Add diagonal lines to create the snowflake shape, and for added detail, incorporate tiny dots or additional lines branching off each point of the snowflake.
Step 3: Apply a Glossy Top Coat
Finish the design with a glossy top coat to protect the intricate snowflakes and add shine.
This will also ensure the design lasts throughout the holiday season, keeping your nails sleek and polished.
Why It Works
Golden Snowflakes Nail Art is the epitome of holiday luxury, with its shimmering gold accents creating a striking contrast against deep, rich colors.
The gold snowflakes add a layer of sophistication, making this design perfect for those who want a more refined, yet festive look.
The glossy top coat not only seals the design but enhances the brilliance of the gold, ensuring your nails sparkle with every movement, just like the magic of Christmas.
3. Santa Hat Tips Nail Art

Santa Hat Tips offer a playful, festive twist on the classic French manicure, bringing holiday cheer to your fingertips with a fun and chic design.
Instead of traditional white tips, this design features bright red tips with fluffy white ends, mimicking the iconic look of Santa’s hat.
The red and white color combo is instantly recognizable, making it a perfect way to add some Christmas spirit to your nails without going overboard.
Crafting Fluffy, Realistic Santa Hat Tips
Step 1: Prepare the Base Coat
Start by applying a clear or nude base coat to your nails, allowing it to dry completely.
Step 2: Paint the Red Tips
Using bright red polish, paint the tips of your nails in a curved shape, similar to a French manicure.
Be sure to create smooth, even lines to achieve a polished look.
Step 3: Add the Fluffy White Trim
Dip a dotting tool or small brush into white polish and gently dab along the edge of the red tip.
This will create the fluffy trim of Santa’s hat. Take your time to ensure the white trim is soft and textured for a realistic effect.
Step 4: Add the Pom-Pom Detail
Finish the design by adding a small white dot at the tip of each nail, symbolizing the pom-pom on Santa’s hat.
Step 5: Apply a Top Coat
Seal in the design with a glossy top coat for added shine and durability.
Why It Works
Santa Hat Tips Nail Art brings a festive yet simple design to life, merging the elegance of a French manicure with the whimsy of Christmas.
The bright red tips and fluffy white trim instantly evoke the holiday season, while the small pom-pom detail adds a playful touch.
This design is easy to create but still eye-catching, making it an ideal choice for those who want a subtle yet festive look for their nails this Christmas.
4. Christmas Tree Accent Nail Art

The Christmas Tree Accent Nail is a charming way to bring the holiday spirit to your nails, featuring a beautifully decorated mini tree on one or more nails. This design turns your manicure into a festive centerpiece, perfect for celebrating the season with style.
A deep green base paired with a detailed Christmas tree makes for an eye-catching accent that captures the magic of the holidays.
Creating the Christmas Tree on Your Accent Nail
Step 1: Apply the Base Color
Start by applying a deep green polish to all of your nails as a base coat, ensuring a smooth, even layer.
Step 2: Paint the Tree Shape
On your chosen accent nail, use a fine brush to paint a triangular tree shape with a lighter green shade.
This will serve as the outline of your Christmas tree.
Step 3: Add Depth with Shading
Use a slightly darker green polish to add shading to the branches, enhancing the tree’s depth and dimension.
For an added effect, outline the tree with a dark green or black polish to make it pop.
Decorating Your Christmas Tree Accent Nail
Step 1: Add Ornaments
Once your tree shape is complete, decorate it using a tiny dotting tool or small brush.
Add vibrant red, gold, and silver ornaments to give your tree a festive look.
Step 2: Create Tinsel Effects
For an extra touch of realism, paint thin lines of silver or gold to mimic tinsel wrapped around the tree.
Step 3: Top with a Star
Finish off your tree with a small star at the top. You can create this star with metallic polish or use a nail decal for precision.
Step 4: Add Sparkle
To make your tree truly shine, apply a layer of glitter polish over the tree. This will give your accent nail a magical, sparkling effect, perfect for the holiday season.
Why It Works
The Christmas Tree Accent Nail adds a playful, festive touch to your holiday look with its intricate design and vibrant colors.
The deep green base contrasts beautifully with the bright ornaments and sparkling accents, making the tree stand out.
By incorporating shading, tinsel, and a star, you create a multi-dimensional and realistic tree that feels like a tiny holiday masterpiece on your nails.
5. Festive Plaid Nail Art
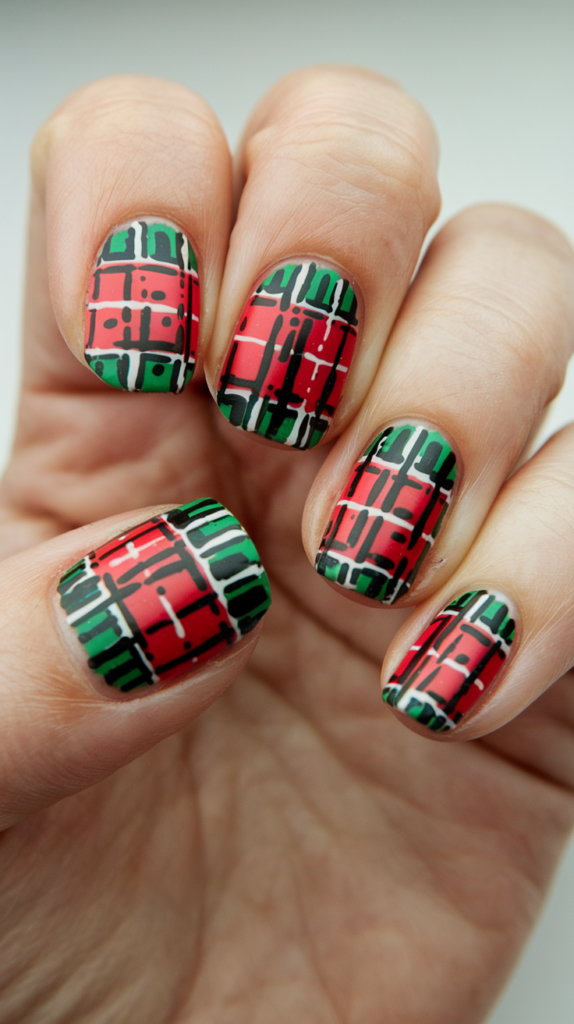
Festive Plaid Nail Art brings the warmth and coziness of winter wear to your nails, making it the perfect design for the holiday season. The timeless combination of red, green, and black creates a festive, chic look that captures the spirit of Christmas in a stylish way.
Plaid patterns evoke comfort, and when paired with holiday elements, they turn your nails into a seasonal statement.
Mastering the Perfect Plaid Pattern for Christmas Nails
Step 1: Apply the Base Color
Start by applying a base coat in a warm red or green polish. Allow it to dry completely for a smooth foundation.
Step 2: Create the Plaid Design
Using a thin striping brush, draw horizontal and vertical lines across the nail in alternating colors, such as black and white.
The key to creating a classic plaid design is layering, so start with thicker lines and gradually add thinner lines on top to build the woven effect.
Step 3: Finish with a Matte Top Coat
To enhance the fabric-like texture of your plaid nails, finish the design with a matte top coat. This adds a cozy, soft finish, perfect for the winter season.
Combining Plaid with Other Holiday Elements
Step 1: Mix Plaid with Solid Colors
For a unique touch, alternate plaid nails with solid colors. Try pairing your plaid design with a rich red, green, or gold polish.
Step 2: Add Holiday Icons
Consider adding small festive designs like snowflakes, holly leaves, or even a tiny reindeer on some nails.
This combination brings a playful element to the plaid pattern, making your manicure even more festive.
Step 3: Add Sparkle
For extra holiday sparkle, incorporate glitter or metallic stripes within the plaid pattern. This adds a touch of glamour and festivity to the overall design.
Why It Works
Festive Plaid Nail Art captures the essence of cozy Christmas wear with its warm, inviting colors and structured design.
The layered lines create a visually appealing woven effect, while the matte finish adds a soft, fabric-like texture. By combining plaid with other holiday motifs and metallic accents, you can create a unique yet cohesive look that celebrates the season in a stylish way.
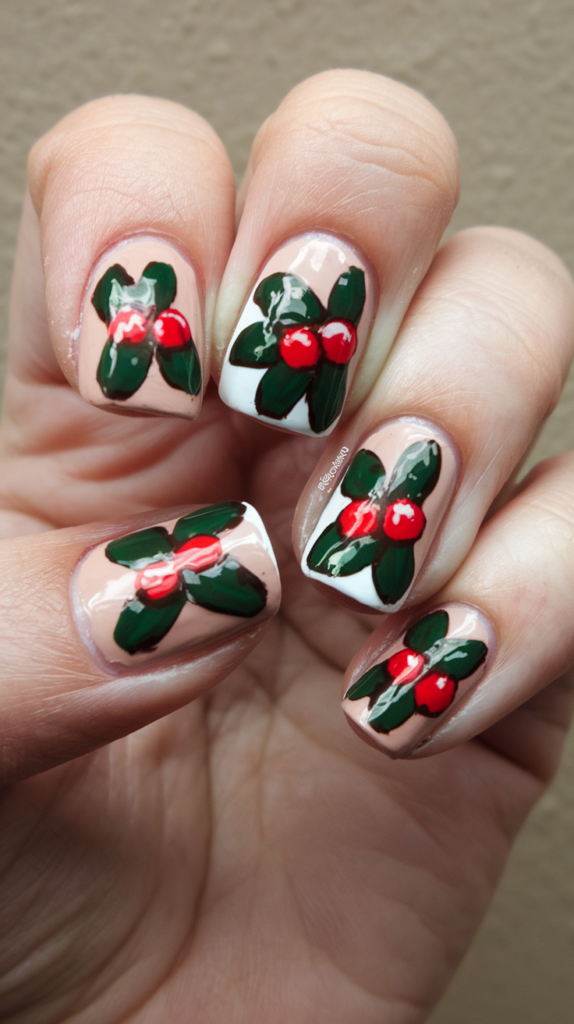
6. Holly Berries and Leaves Nail Art

Holly Berries and Leaves Nail Art brings the timeless beauty of Christmas to your fingertips, with vibrant red berries and lush green leaves capturing the essence of the holiday season.
This classic design features a festive combination of bold colors against a neutral or white background, creating a traditional and cheerful look that’s perfect for celebrating the holidays.
Bringing Holly to Life on Your Nails
Step 1: Prepare the Base Color
Start by applying a base coat in a neutral or white polish. This provides a clean canvas for your holly design.
Step 2: Paint the Green Leaves
Using a small brush, paint the leaves in a dark green shade with subtle veins for added realism. The leaves should have a slightly pointed shape, mimicking the natural appearance of holly leaves.
Step 3: Add the Red Berries
Using a dotting tool, create small red dots for the berries. Place them near the base of the leaves for a balanced and festive design.
Step 4: Add Highlights to the Berries
To give the berries more dimension, add a small white highlight to each berry. This will create the illusion of light reflecting off them, enhancing their three-dimensional appearance.
The Best Colors and Tools for Holly Berry and Leaf Nail Art
Step 1: Choose the Right Colors
For the leaves, opt for a dark green polish with a slight shimmer or satin finish. This will add depth and dimension to the leaves, making them appear more lifelike.
For the berries, choose a bright, glossy red polish that contrasts beautifully with the green leaves and stands out against the background.
Step 2: Use the Right Tools
A dotting tool is ideal for creating perfectly round, uniform berries. Its precision ensures that each berry looks smooth and professional.
Step 3: Add Festive Glitter
To complete the look, consider adding a touch of gold or silver glitter around the holly design or across the background. This will enhance the festive feel of your nails, making them sparkle like the holiday season.
Why It Works
Holly Berries and Leaves Nail Art celebrates the classic symbols of Christmas with vibrant red and green hues that immediately evoke holiday cheer.
The realistic details, such as the subtle veins on the leaves and the added highlight on the berries, bring this design to life. Adding a glittery touch elevates the festive atmosphere, making your nails a beautiful expression of Christmas tradition.
7. Glitter Gradient Nail Art

The Glitter Gradient Nail Art brings a touch of sparkle and shine to your Christmas nails, with a seamless fade from one festive color to another.
Perfect for adding extra holiday glam, this design features glitter that catches the light, creating a dazzling, elegant effect.
Whether you choose a red-to-green gradient or another festive combination, this nail art is sure to elevate your holiday style.
Achieving a Seamless Red and Green Glitter Gradient
Step 1: Apply the Base Coat
Start with a solid base coat in either red or green polish, allowing it to dry completely.
Step 2: Add Glitter to the Tips
Once the base is dry, apply a layer of glitter polish at the tips of your nails, using the same color as the base.
Step 3: Blend the Glitter
Using a makeup sponge, gently dab the glitter polish from the tip towards the middle of your nail. This will create a fading effect that transitions smoothly into the natural nail color.
Step 4: Apply the Second Glitter Color
Next, apply the second glitter color at the base of your nails and repeat the dabbing process toward the middle.
Blend the two colors where they meet to create a seamless gradient effect.
Step 5: Finish with a Top Coat
Once your glitter gradient is blended perfectly, finish the design with a glossy top coat. This will seal the design, add shine, and give your nails a polished, smooth finish.
Tips for Making Your Glitter Gradient Last Through the Holidays
Step 1: Use a Strong Base Coat
Start with a high-quality base coat to protect your nails and create a smooth surface for the glitter polish to adhere to.
Step 2: Apply Thin Layers
When applying the glitter, use thin layers to avoid clumps. Allow each layer to dry completely before applying the next one.
Step 3: Seal with a Top Coat
To ensure your glitter gradient lasts, finish with a high-quality top coat. This will help prevent chipping and enhance the sparkle of your design.
Step 4: Reapply Top Coat Regularly
To keep your nails looking fresh throughout the holiday season, reapply the top coat every few days. This will maintain the shine and protect the glitter from wear and tear.
Why It Works
Glitter Gradient Nail Art offers a dazzling, festive look with minimal effort. The smooth transition between red and green glitter creates a stunning, multidimensional effect that catches the light beautifully.
By using thin layers and sealing the design with a top coat, you ensure that your nails stay flawless and sparkling all season long. This design is perfect for those who want a glamorous, eye-catching manicure that lasts throughout the holidays.
8. Reindeer Silhouette Nail Art

Reindeer Silhouette Nail Art offers a subtle and elegant way to celebrate the holiday season, combining minimalist design with festive charm. The serene look of a dark reindeer silhouette against a light, snowy background creates a timeless, wintery aesthetic perfect for any Christmas occasion.
Creating the Perfect Reindeer Silhouette
Step 1: Apply the Base Color
Start with a light blue or white base coat to represent a snowy sky. Let it dry completely for a smooth canvas.
Step 2: Paint the Reindeer Silhouette
Using a thin detailing brush and black or dark brown polish, carefully paint the outline of a reindeer on your nail.
Begin with the body, then add slender antlers for a recognizable and elegant silhouette. Keep the design simple for a minimalist look.
Step 3: Add Depth with Shadows
To give the silhouette more depth, lightly blend the edges with a slightly lighter shade of the silhouette color. This creates a subtle shadow effect that enhances the design.
Enhancing the Reindeer Nail Design
Step 1: Add Snowflakes or Stars
Use a dotting tool to create small white dots around the reindeer, mimicking falling snow or twinkling stars.
For a magical touch, add a fine layer of glitter to the dots to make them sparkle.
Step 2: Include a Crescent Moon
Paint a crescent moon in one corner of the nail using silver or gold polish. This adds a glowing element that complements the serene winter scene.
Step 3: Apply a Top Coat
Seal the design with a glossy top coat to protect your artwork and enhance its shine, ensuring the design lasts throughout the holiday season.
Why It Works
Reindeer Silhouette Nail Art combines minimalism with festive elegance, making it a versatile choice for any holiday look.
The light background creates a snowy, serene setting, while the dark reindeer silhouette adds contrast and sophistication.
Snowflakes, stars, and a crescent moon elevate the design, turning it into a magical winter scene. This subtle yet festive nail art is perfect for anyone seeking a refined Christmas manicure.
9. Christmas Lights Nail Art
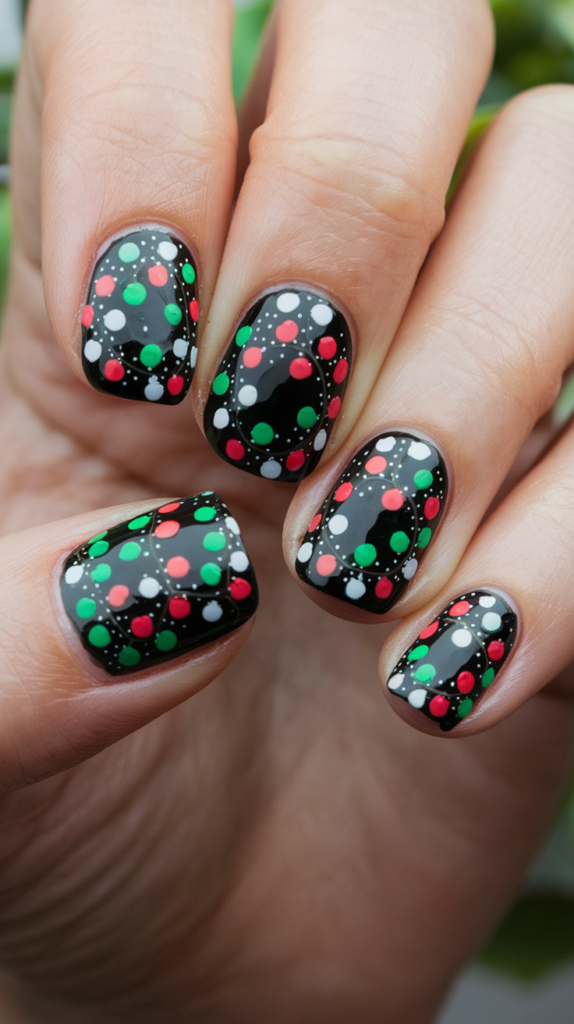
Christmas Lights Nail Art brings festive cheer to your fingertips with colorful bulbs strung across a dark background, mimicking the magical glow of holiday lights. This playful design is a perfect way to brighten up your nails for the holiday season, combining vibrant colors with a fun, whimsical style.
Step-by-Step Guide to Creating Christmas Light Nail Art
Step 1: Apply the Base Color
Begin by applying a dark base color, such as black or navy blue, to represent the night sky.
Let the base dry completely before moving to the next step.
Step 2: Create the Wire
Using a thin brush or striping tool, paint a wavy line across your nails in black or dark brown polish.
This will serve as the wire for your Christmas lights.
Step 3: Add the Bulbs
Use a dotting tool to create small, colorful circles along the wire. Choose festive colors like red, green, yellow, blue, and purple for the bulbs.
Space the bulbs evenly along the wire for a balanced and cohesive look.
Step 4: Add Highlights for Realism
Using white polish, add tiny highlights to each bulb to create the illusion of light reflection. This small detail makes the bulbs appear as though they are glowing.
Step 5: Seal with a Top Coat
Finish with a glossy top coat to give the bulbs a shiny, glass-like appearance and to protect your design.
The Best Colors and Techniques for Realistic Christmas Lights
Step 1: Choose Bright, Festive Colors
Opt for vibrant colors like red, green, yellow, blue, and purple to make the bulbs stand out against the dark background.
For added depth, use jelly or semi-transparent polishes to give the bulbs a more realistic, glassy look.
Step 2: Add Glitter for Extra Sparkle
To enhance the festive feel, add a touch of glitter polish to the bulbs, giving them a sparkling effect reminiscent of real Christmas lights.
Step 3: Maintain the Design
Apply a layer of top coat every few days to keep the colors vibrant and protect the design from chipping, ensuring your nails stay bright and festive throughout the holiday season.
Why It Works
Christmas Lights Nail Art captures the joyful spirit of the holidays with its colorful bulbs and playful design.
The dark background contrasts beautifully with the bright, vibrant colors, while the highlights and glossy finish create a realistic, glowing effect.
This cheerful design is easy to customize and adds a festive, eye-catching touch to your holiday look.
10. Snowman Faces Nail Art
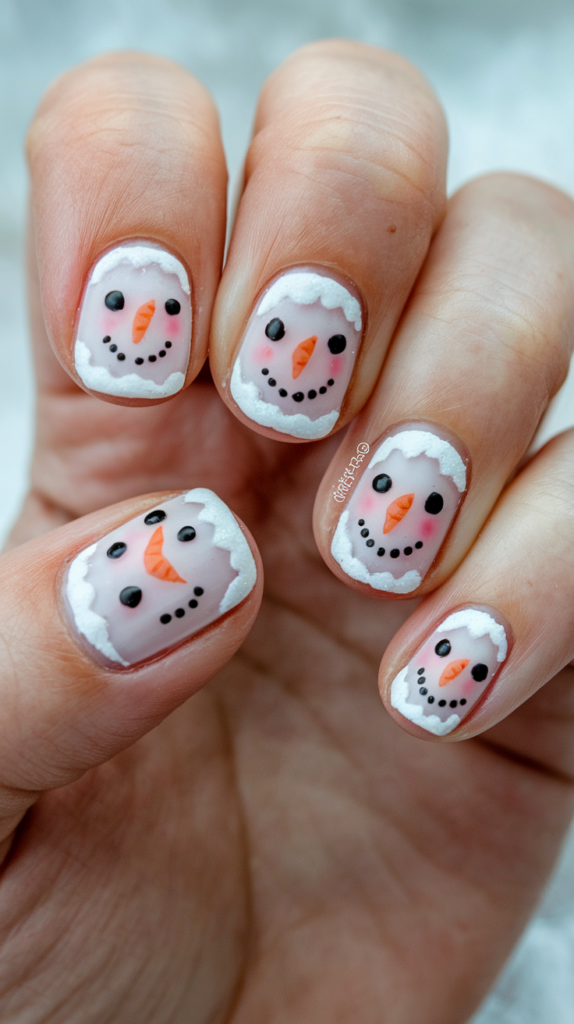
Snowman Faces Nail Art brings a playful and whimsical touch to your Christmas nails, featuring the charming details of a snowman’s face.
This design is perfect for the holiday season, combining simplicity with creative opportunities for customization.
From the coal eyes and carrot nose to a dotted smile, these adorable snowman faces are sure to bring joy to your fingertips.
Crafting Adorable Snowman Faces on Your Nails
Step 1: Apply the White Base Coat
Begin with a white base coat to represent the snowman’s face. Allow it to dry completely before adding details.
Step 2: Add the Eyes
Using a dotting tool and black polish, create two dots near the top of the nail for the snowman’s eyes.
Step 3: Paint the Carrot Nose
With a small detailing brush and orange polish, paint a tiny carrot-shaped nose in the center of the nail.
Step 4: Create the Smile
Use the dotting tool again to make a series of small black dots in a curved line below the nose, forming the snowman’s smile.
Step 5: Add Optional Details
For extra charm, paint a small top hat or scarf using a thin brush and colorful polish.
Step 6: Seal with a Glossy Top Coat
Finish the design with a glossy top coat to protect your artwork and give the snowman faces a polished, shiny finish.
Tips for Adding Extra Details to Your Snowman Nail Art
Step 1: Incorporate Accessories
Add a scarf around the snowman’s neck using bright, festive colors or paint a top hat for a classic look.
For more variety, you could add earmuffs, a bow tie, or even glasses for unique snowmen.
Step 2: Add Snowflakes and Frosty Effects
Use a fine brush or dotting tool to paint tiny snowflakes or white dots around the snowman to represent falling snow.
A layer of glitter polish can create a frosty, sparkling effect, enhancing the wintery vibe.
Step 3: Personalize Expressions
Make each snowman unique by giving them different facial expressions or accessories. This adds a fun, creative touch to your nail art.
Why It Works
Snowman Faces Nail Art combines playful charm with festive creativity, making it an ideal design for the holiday season.
The simple yet iconic details—coal eyes, a carrot nose, and a dotted smile—instantly evoke the joy of building snowmen on a winter’s day.
Adding accessories like scarves and hats, along with frosty snowflake details, allows you to personalize the design while keeping it cohesive and festive.
11. Peppermint Swirls Nail Art
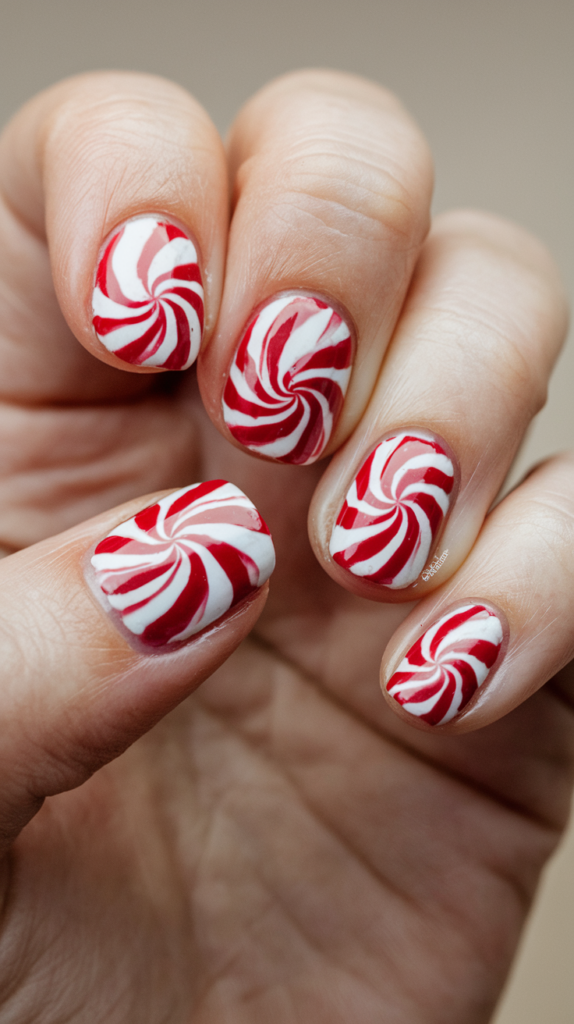
Peppermint Swirls Nail Art brings a sweet and festive charm to your manicure, mimicking the iconic red and white pattern of peppermint candies.
This simple yet striking design is perfect for the holiday season, offering a cheerful and whimsical touch to your nails.
How to Create Perfect Peppermint Swirls on Your Nails
Step 1: Apply the White Base Coat
Start by applying a solid white base coat to all your nails. Allow it to dry completely to ensure a smooth foundation.
Step 2: Draw the Swirls
Using a striping brush and red polish, draw thin, curved lines starting from the center of the nail and extending outward.
Make sure the lines curve in the same direction to create the characteristic swirling effect of peppermint candies.
Step 3: Perfect the Lines
Ensure the lines are evenly spaced and of consistent thickness for a polished and professional look.
Step 4: Finish with a Glossy Top Coat
Seal the design with a glossy top coat to give the swirls a shiny, candy-like finish while protecting the design.
Combining Peppermint Swirls with Other Festive Elements
Step 1: Alternate with Solid Nails
Alternate peppermint swirl nails with solid red or white nails to add variety and balance to your manicure.
Step 2: Incorporate Festive Details
Add small holiday-themed elements, such as holly leaves, snowflakes, or tiny candy canes, to enhance the design.
These details can be painted on accent nails for added interest.
Step 3: Add Glitter or Metallic Accents
For extra sparkle, use glitter or metallic polish for the swirls or as an overlay. This adds a glamorous touch while maintaining the festive theme.
Why It Works
Peppermint Swirls Nail Art captures the joyful essence of the holidays with its vibrant red and white color scheme and playful swirling pattern.
The glossy finish enhances the candy-like appearance, while the option to combine swirls with other festive elements adds versatility and depth.
This design is both simple and eye-catching, making it a perfect choice for anyone looking to celebrate the season with a sweet and stylish manicure.
12. Golden Bells Nail Art
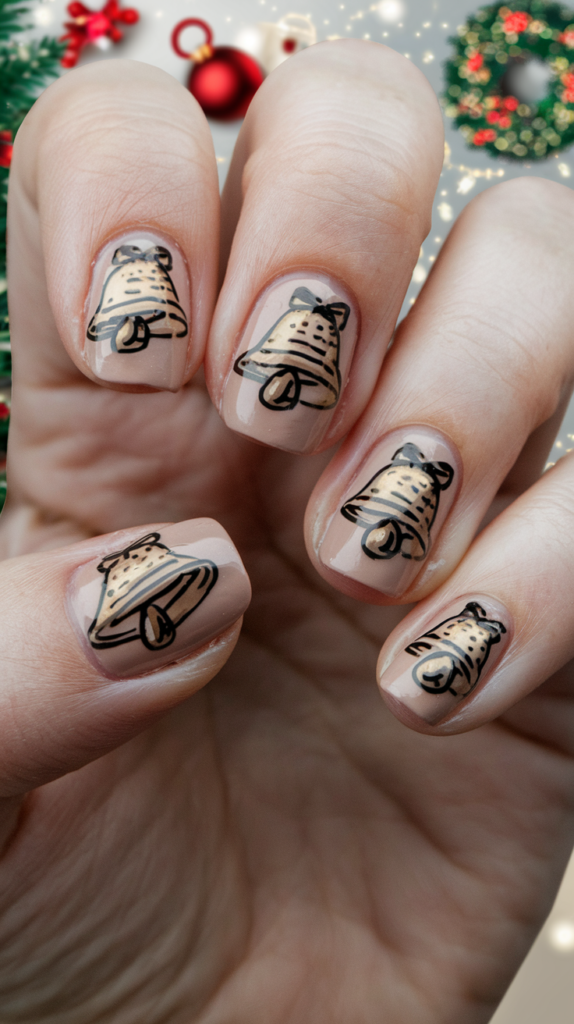
Golden Bells Nail Art exudes luxury and elegance, featuring shimmering golden bells that capture the festive spirit of the holiday season.
Set against a white or nude base, this design creates a sophisticated and timeless look perfect for Christmas celebrations.
Designing Detailed Golden Bells on a White or Nude Base
Step 1: Apply the Base Color
Begin with a smooth, even base coat in white or nude polish. Allow it to dry completely for a flawless foundation.
Step 2: Paint the Bell Shape
Using a fine brush and gold polish, carefully paint the shape of a bell.
Start with an inverted U-shape, then add a small loop at the top to represent the bell’s handle.
Step 3: Add Dimension
For a three-dimensional effect, use a slightly darker gold or brown polish to add subtle shading along the edges of the bell.
Blend the colors gently to create depth and realism.
Step 4: Seal with a Glossy Top Coat
Finish with a glossy top coat to enhance the shine of the golden bells and make them stand out against the base.
Adding Ribbons and Other Accents to Your Golden Bell Nails
Step 1: Add Ribbons
Using a thin brush and red or green polish, paint a small ribbon tied around the top of the bell.
Ensure the ribbon has a soft, flowing appearance for a realistic look.
Step 2: Incorporate Festive Details
For added charm, paint tiny holly leaves and berries near the ribbon using green and red polish.
This detail enhances the festive theme while complementing the gold bells.
Step 3: Create a Sparkling Background
Use glitter polish to add a sparkling effect around the bells or paint small white dots to mimic falling snow.
This adds a magical, holiday-inspired touch to your design.
Why It Works
Golden Bells Nail Art captures the luxurious essence of the holidays with its shimmering gold details and festive accents.
The white or nude base provides a clean, elegant backdrop, allowing the bells to take center stage.
Adding ribbons, holly, and glitter creates a multidimensional, festive scene that is both sophisticated and cheerful. This design is perfect for those who want to ring in the holidays with a touch of class and creativity.
13. Gingerbread Men Nail Art

Gingerbread Men Nail Art brings the sweetness of holiday baking to your nails, featuring adorable gingerbread men complete with icing details and colorful buttons.
This playful design is perfect for capturing the joy of Christmas in a unique and creative way.
How to Create Lifelike Gingerbread Men on Your Nails
Step 1: Apply the Base Color
Start with a light brown base coat to represent the color of a gingerbread cookie. Allow it to dry completely.
Step 2: Outline the Gingerbread Men
Using a fine brush and white polish, paint the outline of the gingerbread men, including their arms, legs, and head.
Keep the shapes simple and iconic for a recognizable design.
Step 3: Add Facial Features and Buttons
Use a dotting tool and colorful polish to add eyes, a smile, and buttons to each gingerbread man.
Place the buttons in the center of the body for balance and symmetry.
Step 4: Add Shading for Depth
To give the gingerbread men a more lifelike appearance, use a slightly darker brown polish to add shading around the edges.
Blend the darker color subtly for a realistic effect.
Step 5: Finish with a Matte Top Coat
Seal the design with a matte top coat to give the nails a soft, cookie-like texture, enhancing the gingerbread look.
Decorating Gingerbread Men Nails with Colorful Buttons and Icing
Step 1: Use Bright Colors for Buttons
Add tiny buttons to the gingerbread men using red, green, and yellow polish. These vibrant colors give the design a festive touch.
Step 2: Create Icing Details
Using white or pastel-colored polish, draw wavy lines along the arms and legs to mimic icing decorations.
For extra charm, add a tiny bow tie or hat to each gingerbread man.
Step 3: Add Powdered Sugar Effect
Sprinkle the design with a touch of glitter or lightly dust white polish around the gingerbread men to resemble powdered sugar.
This additional detail enhances the festive, baked-cookie vibe.
Why It Works
Gingerbread Men Nail Art captures the playful essence of Christmas with its charming cookie-inspired design and festive details.
The soft brown base combined with colorful buttons and intricate icing decorations brings a cheerful holiday feel to your nails.
The matte finish and added details like powdered sugar effects or glitter create a multidimensional, whimsical look, perfect for sweetening up your holiday manicure.
14. Frozen Icicles Nail Art
Frozen Icicles Nail Art brings the beauty of winter to your nails with its frosty, shimmering design. Featuring icy blue tones and glittering icicles, this elegant style is perfect for capturing the magic of the season.
Crafting Realistic Frozen Icicles on Your Nails
Step 1: Apply the Base Color
Start with a light blue or silver base coat to represent a frosty winter background. Let the polish dry completely for a smooth canvas.
Step 2: Paint the Icicles
Using a thin brush and a slightly darker shade of blue or silver, paint tapered, uneven lines extending from the tips of your nails.
The lines should vary in length to mimic the natural, organic shape of icicles.
Step 3: Add Sparkle to the Icicles
Apply a touch of glitter or a holographic polish to the icicles to give them a sparkling, frozen appearance.
This step enhances the icy effect and adds dimension to the design.
Step 4: Finish with a Glossy Top Coat
Seal the design with a glossy top coat to enhance the shine, making your nails look as though they’re coated in ice.
Enhancing Your Frozen Icicle Nails with Glitter and Shimmer
Step 1: Add a Gradient Glitter Effect
Apply a fine silver or white glitter to the tips of your nails, blending it downward for a gradient effect that mimics frost spreading across the nail.
Step 2: Use a Holographic Top Coat
A holographic top coat can reflect light in multiple colors, giving your nails a magical, icy glow.
Step 3: Layer Different Shades
For added depth, layer different shades of blue or silver polish. Apply the lighter shades as the base and use darker tones for the icicles and accents.
Step 4: Optional Snowflake Details
Enhance the design with tiny painted snowflakes or white dots around the icicles to create a snowy, winter wonderland effect.
Why It Works
Frozen Icicles Nail Art combines icy tones with shimmering details to capture the essence of winter elegance.
The uneven, tapered icicles create a realistic and dynamic effect, while the addition of glitter and holographic polish enhances the frosty aesthetic.
This design is both versatile and eye-catching, making it perfect for adding a touch of winter magic to your holiday manicure.
15. Ornament Accents Nail Art
Ornament Accents Nail Art brings the joy of Christmas decorations to your nails with intricate, tiny ornaments that are playful and festive.
This design transforms your manicure into a holiday masterpiece, combining metallics, glitter, and creative details.
Designing Intricate Christmas Ornaments on Your Nails
Step 1: Apply the Base Color
Choose a base color that complements the festive theme, such as deep red, green, or gold. Apply an even coat and let it dry completely.
Step 2: Paint the Ornament Shapes
Using a fine brush and metallic polish, paint the ornaments in various shapes, such as round, oval, or teardrop.
Ensure the shapes are proportionate to your nail size for a balanced look.
Step 3: Add Patterns and Details
Decorate the ornaments with patterns like stripes, polka dots, or swirls using contrasting colors.
For added elegance, incorporate fine details like snowflakes or stars.
Step 4: Create the Ornament Hook
Use black or silver polish to paint a tiny loop at the top of each ornament to represent the hook.
You can also draw a thin line connecting the loop to the edge of your nail, making it look like the ornaments are hanging.
Step 5: Finish with a Glossy Top Coat
Seal the design with a glossy top coat to enhance the shine and make the ornaments pop.
Using Metallics and Glitter for a Festive Ornament Look
Step 1: Add Metallic Shine
Use metallic polishes in gold, silver, or copper to create reflective ornaments that catch the light beautifully.
Step 2: Incorporate Glitter for Sparkle
Apply glitter polish to add sparkle and dimension to the ornaments. You can use glitter as a fill for the ornaments or as accents for outlining and detailing.
Step 3: Create a Glitter Gradient Background
For a festive backdrop, apply a glitter gradient to the base color, blending from the tips downwards to add depth and shimmer.
Step 4: Enhance with Nail Gems or Beads
For a three-dimensional look, use small nail gems or beads to mimic the texture and shine of real ornaments. Place these elements strategically on or around the painted ornaments.
Why It Works
Ornament Accents Nail Art captures the festive spirit of Christmas with its intricate details and luxurious finishes.
The use of metallics and glitter creates a sparkling, elegant effect that mimics the beauty of real holiday ornaments.
The combination of creative shapes, patterns, and embellishments makes this design versatile and customizable, perfect for celebrating the holiday season in style.
16. Santa Claus Nail Art
Santa Claus Nail Art brings the magic of Christmas to life on your nails with a charming design that features Santa’s jolly face and his iconic red suit.
This festive design is perfect for spreading holiday cheer in a creative and playful way.
Creating a Detailed Santa Claus Face on Your Nails
Step 1: Apply the Base Color
Start with a nude or light pink base coat to represent Santa’s face. Allow it to dry completely.
Step 2: Paint Santa’s Beard and Mustache
Using a fine brush and white polish, paint Santa’s fluffy beard and mustache at the bottom half of the nail.
For added texture, use small, curved strokes to mimic the fluffiness of his beard.
Step 3: Add Santa’s Hat
Paint a red triangle or curved shape at the top of the nail for Santa’s hat.
Use white polish to add a fluffy trim and a pom-pom at the tip of the hat.
Step 4: Create Facial Features
Use a small dotting tool to add Santa’s rosy cheeks, a round nose, and black dots for his eyes.
For a more detailed look, add a tiny white twinkle in each eye using a fine brush or toothpick.
Step 5: Finish with a Glossy Top Coat
Seal the design with a glossy top coat to enhance the shine and protect Santa’s cheerful face.
Tips for Perfecting Santa’s Iconic Red Suit on Your Nails
Step 1: Apply the Red Base Color
Paint one or more nails with a bright red polish to represent Santa’s suit.
Let the base dry completely before adding details.
Step 2: Add the Fluffy Trim
Using white polish, paint a fluffy trim at the edges of the nail to represent the fur on Santa’s suit.
Consider using a dotting technique or small brush strokes for a realistic texture.
Step 3: Paint the Belt
Use black polish to create a horizontal stripe across the nail for Santa’s belt.
Add a gold or metallic buckle using a fine brush for added detail.
Step 4: Enhance with Festive Touches
Add glitter to the white trim for a sparkling effect or use metallic polish for the belt buckle to make it pop.
You can also add stitching or button details using a fine brush to make the suit look more realistic.
Why It Works
Santa Claus Nail Art captures the festive joy of Christmas with its playful and detailed design.
The fluffy beard, rosy cheeks, and bright red suit instantly evoke the magic of Santa, while the addition of glitter and metallic details adds a festive, polished touch.
This creative design is a fun and cheerful way to celebrate the holiday season in style.
17. Gift Wrap Nails Nail Art

Gift Wrap Nails transform your manicure into a playful and festive showcase of tiny wrapped presents.
Featuring colorful bases, ribbons, and bows, this design brings the joy of holiday gift-giving to your fingertips, making it a perfect choice for the season.
How to Create Realistic Gift Wrap Nails with Ribbons and Bows
Step 1: Apply the Base Color
Choose a base color to represent the wrapping paper, such as red, green, or gold. Apply an even coat and let it dry completely.
Step 2: Paint the Ribbon
Using a striping brush and a contrasting polish, paint a cross shape on the nail to mimic a ribbon.
Make sure the lines are thin and straight for a neat and polished look.
Step 3: Add the Bow
At the center of the cross, use a fine brush or dotting tool to create a small bow.
You can make the bow as simple or detailed as you like, adding loops and tails for a realistic effect.
Step 4: Enhance the Ribbon with Patterns
Add tiny details like polka dots, stripes, or stars to the ribbon using contrasting colors.
These elements add depth and make the design more intricate.
Step 5: Seal with a Glossy Top Coat
Finish with a glossy top coat to give the nails a shiny, wrapping paper-like finish that enhances the festive design.
Combining Colors and Textures for a Perfect Gift Wrap Look
Step 1: Alternate Colors and Patterns
Mix solid and patterned nails within your design. For example, pair a red base with gold ribbons on some nails and use green glitter for others.
Step 2: Use Metallic and Glitter Polishes
Incorporate metallic polishes for the ribbons and bows, and glitter polishes for the wrapping paper to add sparkle and dimension.
Step 3: Play with Textures
Use a matte top coat on the wrapping paper nails and a glossy top coat on the ribbons and bows to create an eye-catching contrast.
Step 4: Add Accents
Consider placing small rhinestones or gems at the center of the bow for an extra touch of elegance.
Why It Works
Gift Wrap Nails Nail Art captures the festive spirit of the holidays with its playful and creative design.
The combination of vibrant colors, intricate ribbons, and bows creates a joyful, decorative effect that mimics beautifully wrapped presents.
By adding glitter, metallics, and textured finishes, you can elevate the design, making it both unique and luxurious for the holiday season.
18. Frosty French Tips Nail Art
Frosty French Tips bring a wintery elegance to the classic French manicure, transforming simple white tips into snow-covered, frosty accents.
This subtle yet festive design is perfect for adding a touch of holiday charm to your nails.
Designing Frosty, Snow-Covered French Tips
Step 1: Apply the Base Coat
Start with a clear or nude base coat to create a clean, natural foundation. Allow it to dry completely.
Step 2: Paint the White Tips
Using white polish, paint the tips of your nails in a traditional French manicure style.
Ensure the tips are neat and even for a polished appearance.
Step 3: Add a Frosty Effect
With a fine brush and a slightly shimmery white polish, create a frosty effect by lightly blending the shimmer into the white tips.
This soft gradient gives the appearance of snow-covered edges.
Step 4: Enhance with Glitter or Snowflakes
Add tiny snowflakes or a touch of glitter to the tips for a festive look.
Snowflakes can be painted using a thin brush or created with nail decals for precision.
Step 5: Seal with a Glossy Top Coat
Finish the design with a glossy top coat to enhance the frosty shimmer and give your nails a sleek, polished finish.
Adding Snowflakes and Shimmer to Your Frosty French Nails
Step 1: Create Snowflakes
Use a thin brush or dotting tool to paint small snowflakes along the tips of your nails.
For an intricate design, add tiny dots or lines branching off the snowflakes for added detail.
Step 2: Incorporate Glitter and Shimmer
Apply a fine glitter or holographic top coat to the tips for a sparkling, frosty effect.
You can also layer shimmery polishes to add depth and dimension to the frosty look.
Step 3: Gradient Shimmer Effect
For added elegance, create a gradient effect by concentrating glitter or shimmer at the tips and blending it toward the base of the nail.
Step 4: Optional Rhinestones
Add small rhinestones or gems at the center of snowflakes or scattered along the tips for a touch of glamour.
Why It Works
Frosty French Tips Nail Art combines the timeless elegance of a French manicure with the festive charm of winter.
The subtle shimmer and frosty accents create a soft, snow-covered effect, while the addition of glitter, snowflakes, and gradient details enhances the design’s festive appeal.
This look is versatile and sophisticated, making it an ideal choice for holiday parties or everyday winter elegance.
19. Plaid and Snowflakes Nail Art
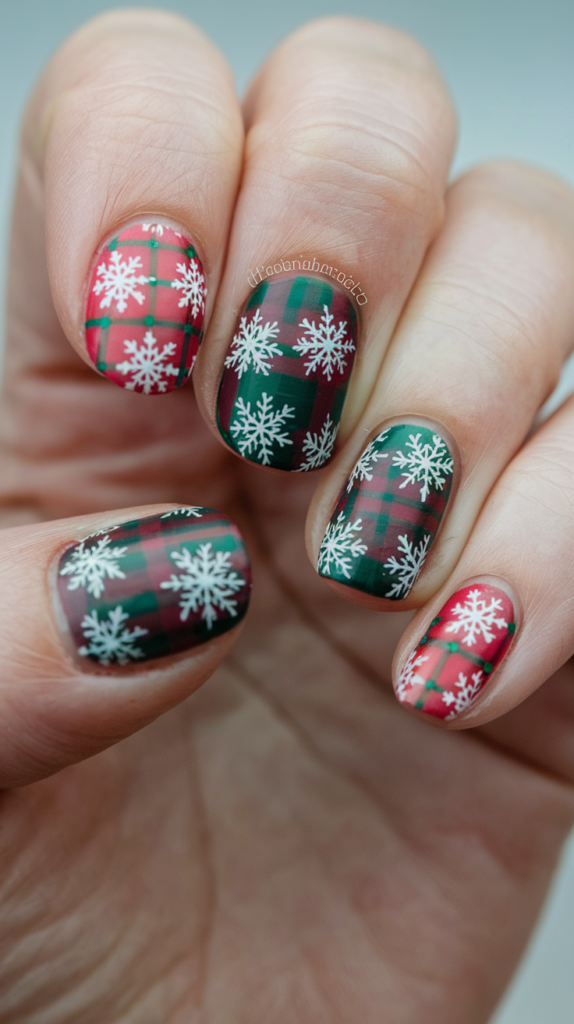
Plaid and Snowflakes Nail Art combines the cozy warmth of plaid patterns with the delicate elegance of snowflakes, creating a festive and stylish winter design.
This chic combination is perfect for celebrating the holiday season in a unique and creative way.
Creating a Chic Combination of Plaid and Snowflakes
Step 1: Apply Base Colors
Alternate your base colors between red and green for the plaid nails and white or light blue for the snowflake nails.
Let the polish dry completely before adding designs.
Step 2: Create the Plaid Pattern
On the plaid-designated nails, use a striping brush to draw horizontal and vertical lines with contrasting colors like black and white.
For a classic plaid look, layer thinner lines over thicker ones, ensuring clean and precise edges.
Step 3: Paint the Snowflakes
On the snowflake nails, use a fine brush and white polish to paint intricate snowflake designs.
Start with a simple cross shape, then add diagonal lines and fine branches to create the snowflake’s delicate structure.
Step 4: Add Glitter and Metallic Accents
Enhance the snowflakes by adding a touch of glitter or metallic polish for a frosty, elegant finish.
Apply glitter sparingly on the plaid nails for subtle sparkle and cohesion across the design.
Step 5: Seal with Top Coats
Use a glossy top coat on the snowflake nails to highlight their delicate details, and opt for a matte top coat on the plaid nails for a cozy, fabric-like texture.
Tips for Balancing Plaid Patterns with Delicate Snowflakes
Tip 1: Keep the Plaid Clean and Simple
Use thin, precise lines for the plaid pattern to avoid overcrowding the nails and maintain a balanced look.
Tip 2: Focus on Intricate Snowflakes
Contrast the boldness of the plaid by making the snowflakes intricate and detailed. This balance adds elegance and sophistication to the overall design.
Tip 3: Play with Texture Contrasts
Combine a matte finish for the plaid nails with a glossy finish for the snowflake nails. This creates a dynamic contrast that makes each pattern stand out.
Tip 4: Add Subtle Accents
Incorporate small glitter accents or rhinestones to unify the design without overwhelming it.
Why It Works
Plaid and Snowflakes Nail Art beautifully blends cozy and elegant elements, capturing the essence of winter.
The contrasting patterns create visual interest, while the combination of textures and subtle glitter accents adds depth and sophistication.
This versatile design is perfect for those who want a festive yet refined look for the holiday season.
20. Nutcracker Soldiers Nail Art
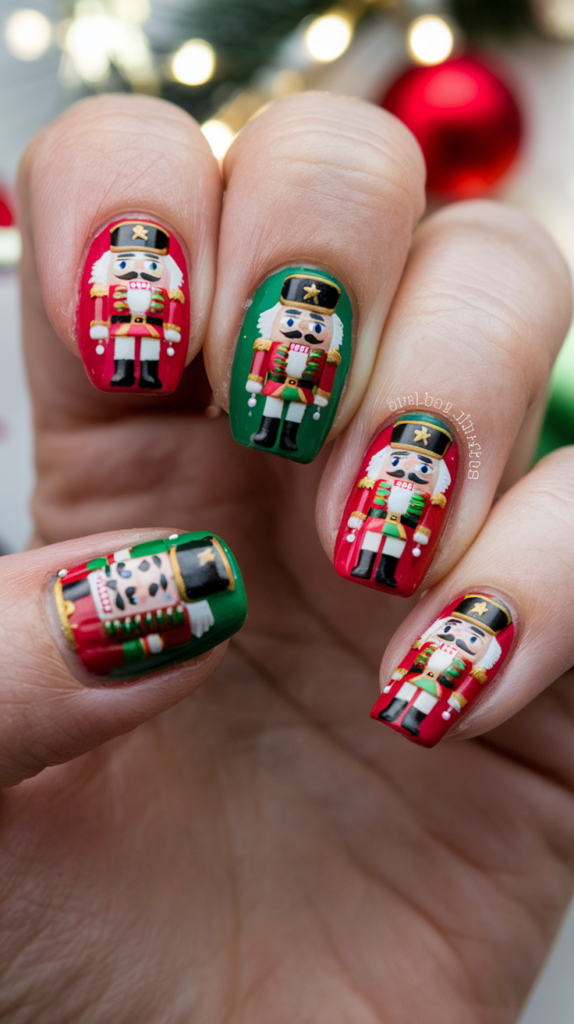
Nutcracker Soldiers Nail Art brings the charm and nostalgia of Christmas to your fingertips with detailed depictions of these iconic holiday characters.
Featuring their ornate uniforms and festive accessories, this design is a playful and creative way to celebrate the season.
How to Paint Detailed Nutcracker Soldiers on Your Nails
Step 1: Apply the Base Color
Choose a festive base color such as red, green, or blue. Apply an even coat and let it dry completely.
Step 2: Outline the Nutcracker Soldier
Using a fine brush and black polish, paint the outline of the nutcracker soldier, including the hat, uniform, and boots.
Keep the shapes simple but recognizable for a neat look.
Step 3: Add Uniform Details
Fill in the uniform with colorful polish, adding details such as buttons, epaulets, and belts.
Use metallic gold or silver polish for accents like buttons and embellishments to enhance the festive feel.
Step 4: Paint the Face
Use a small dotting tool to create the soldier’s eyes, nose, and mouth. Add white polish for the beard and small strokes of black for the mustache.
For extra charm, you can give the nutcracker rosy cheeks with a tiny dab of pink polish.
Step 5: Seal with a Glossy Top Coat
Finish with a glossy top coat to protect the design and give your nutcracker soldiers a polished, shiny appearance.
Pairing Nutcracker Soldiers with Other Holiday Designs
Step 1: Alternate with Festive Elements
Pair nutcracker nails with solid-colored nails in complementary hues or add holiday designs like holly leaves, candy canes, or snowflakes on alternate nails.
Step 2: Add Glitter and Metallics
Use glitter or metallic polish to embellish the nutcracker soldiers’ uniforms. This adds sparkle and dimension, making the design more festive.
Step 3: Incorporate Background Details
For added intricacy, paint small details like stars or garlands in the background of the nutcracker nails to create a complete holiday scene.
Step 4: Vary the Nutcracker Designs
Customize each nutcracker soldier with unique colors, expressions, or accessories, such as a drum, sword, or crown, to make your manicure more dynamic.
Why It Works
Nutcracker Soldiers Nail Art captures the festive spirit and nostalgia of Christmas with its intricate details and iconic characters.
The combination of bold colors, metallic accents, and festive embellishments creates a striking and cheerful design.
Pairing nutcracker soldiers with other holiday elements adds versatility and depth, making this manicure a true celebration of the season’s magic.
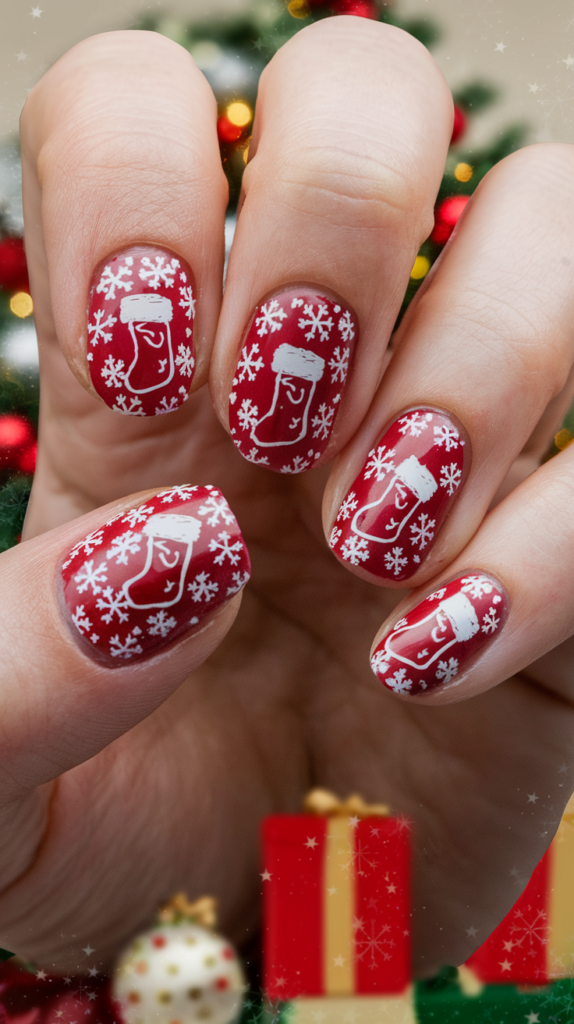
21. Christmas Stockings Nail Art
Christmas Stockings Nail Art brings the holiday tradition of hanging stockings to your nails, creating a playful and festive design. Featuring tiny, detailed stockings complete with fluffy trims and decorative patterns, this nail art is perfect for spreading Christmas cheer.
Designing Cute and Realistic Christmas Stockings on Your Nails
Step 1: Apply the Base Color
Start with a base color that complements the design, such as white, nude, or light blue. Allow it to dry completely for a smooth canvas.
Step 2: Paint the Stocking Shape
Using a fine brush and red polish, paint the shape of a stocking hanging from the top edge of your nail.
Ensure the stocking has a small loop at the top for a realistic hanging effect.
Step 3: Add the Fluffy Trim
Use white polish or a dotting tool to create a fluffy trim at the top of each stocking.
For added texture, use small, curved strokes to mimic the look of soft fabric.
Step 4: Decorate the Stockings
Add festive patterns to the stockings, such as stripes, polka dots, or snowflakes, using contrasting colors.
These details make the stockings more playful and festive.
Step 5: Seal with a Glossy Top Coat
Finish with a glossy top coat to enhance the shine and give the stockings a polished appearance.
Adding Patterns and Details to Your Stocking Nail Art
Step 1: Incorporate Contrasting Patterns
Use white, green, or metallic polish to paint stripes, stars, or other holiday-themed patterns on the stockings.
Alternate designs on different nails for variety.
Step 2: Add Festive Details
Enhance the stockings with tiny holly leaves and berries, or paint small gifts peeking out from the top of the stockings.
Step 3: Use Glitter for Sparkle
Apply glitter polish to the stockings or their trims to add sparkle and make the design more eye-catching.
You can also use glitter to outline the edges of the stockings for a decorative touch.
Step 4: Personalize the Stockings
Consider customizing the stockings with initials, bows, or unique patterns to make each nail stand out.
Why It Works
Christmas Stockings Nail Art captures the festive joy of the holidays with its playful and detailed design.
The combination of bright red stockings, fluffy white trims, and intricate patterns creates a cheerful and eye-catching look.
Adding glitter, holly, or tiny gifts enhances the festive spirit, making this nail art a perfect way to celebrate the holiday season with a fun and creative twist.
22. Elegant Gold Foil Nail Art
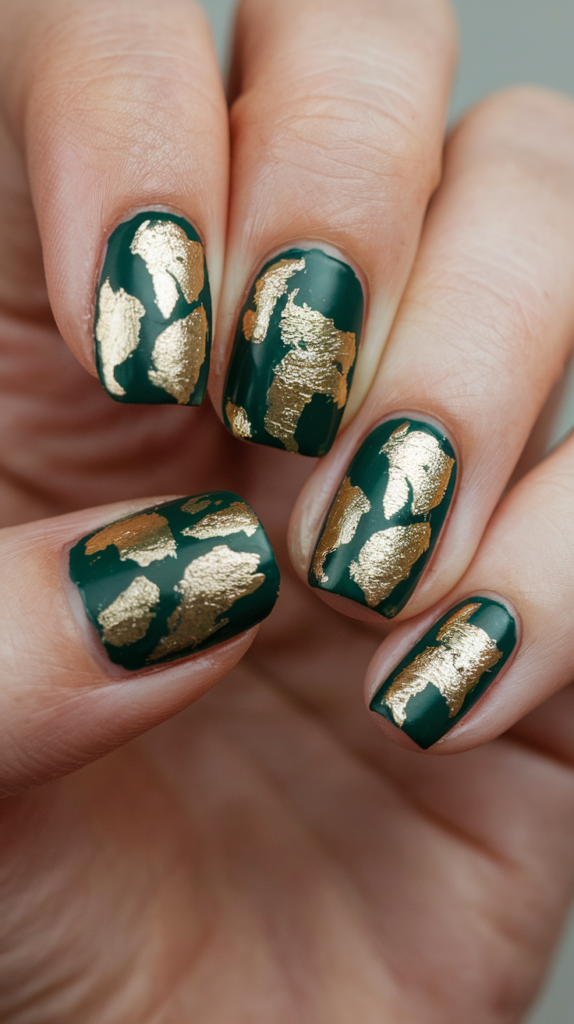
Elegant Gold Foil Nail Art combines the rich allure of deep holiday colors with the luxurious shine of gold foil, creating a chic and festive manicure.
This design is perfect for those looking to add glamour and sophistication to their Christmas nails.
Using Gold Foil to Elevate Your Christmas Nail Design
Step 1: Apply the Base Color
Start with a rich base color, such as deep green, burgundy, or navy blue.
Let the polish dry completely to provide a smooth surface for the foil.
Step 2: Apply Adhesive or Clear Polish
Using foil adhesive or clear polish, apply a thin layer to the areas where you want the gold foil to adhere.
You can create irregular patches for a more abstract and artistic look.
Step 3: Apply the Gold Foil
Carefully place the gold foil on the adhesive using a small brush or tweezers.
Gently press it down to ensure it sticks, and tear away any excess foil for clean edges.
Step 4: Seal with a Glossy Top Coat
Finish with a glossy top coat to protect the foil and give your nails a smooth, polished appearance.
The top coat also enhances the shine of the gold foil, making it the focal point of your design.
Pairing Gold Foil with Deep Holiday Colors for a Stunning Effect
Step 1: Choose a Complementary Base Color
Pair gold foil with deep holiday shades like emerald green, burgundy, or royal blue for a bold, elegant contrast.
These colors provide a luxurious backdrop that enhances the gold foil’s brilliance.
Step 2: Create a Gradient Effect
Apply the gold foil selectively, focusing on specific areas such as the tips, base, or center of the nails to create a gradient effect.
This technique adds depth and dimension to the design.
Step 3: Add Metallic Accents
Combine gold foil with other metallic elements, such as gold striping tape or metallic polish, to create a cohesive and sophisticated look.
Step 4: Use Glitter or Holographic Polish
For added festivity, layer a fine gold glitter or holographic polish over the design. This enhances the sparkle without overpowering the elegance of the gold foil.
Why It Works
Elegant Gold Foil Nail Art blends the richness of holiday hues with the opulence of gold foil, resulting in a design that is both festive and chic.
The abstract, irregular placement of the foil adds an artistic flair, while the deep base colors provide a stunning contrast that elevates the overall look.
This luxurious design is ideal for holiday parties, celebrations, or simply indulging in the glamour of the season.
23. Polar Bears Nail Art
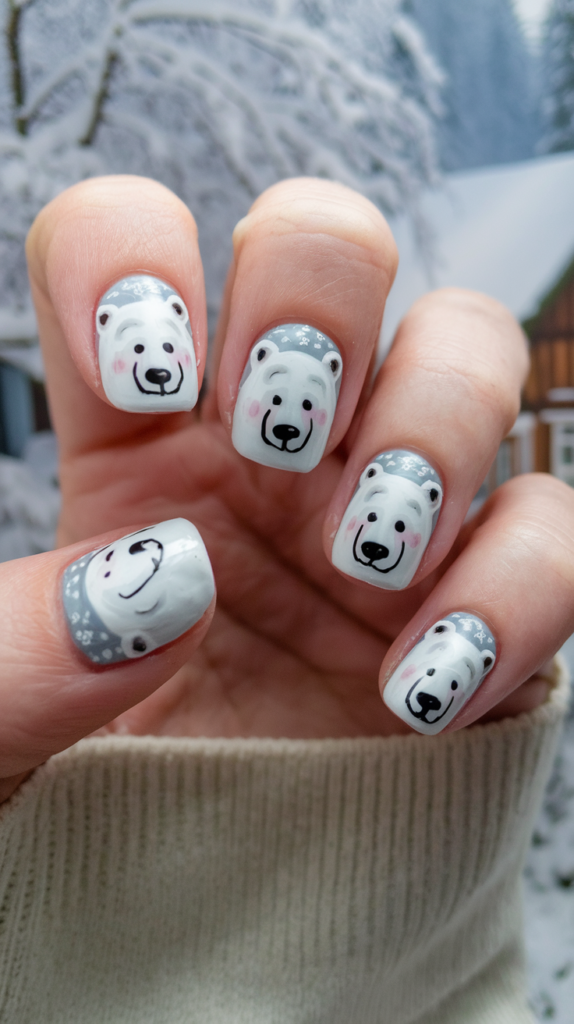
Polar Bears Nail Art brings the charm of winter to your nails with adorable polar bears on a snowy background.
This cute and cozy design is perfect for celebrating the holiday season with a festive and playful manicure.
Creating Adorable Polar Bears on a Snowy Background
Step 1: Apply the Base Color
Start with a light blue or white base coat to represent a snowy background. Allow it to dry completely.
Step 2: Paint the Polar Bear Shape
Using a fine brush and white polish, paint the rounded shape of the polar bear’s body and head.
Add small ears and paws to complete the bear’s silhouette.
Step 3: Add Facial Features
Use a dotting tool and black polish to create the eyes, nose, and mouth, giving the polar bear a friendly expression.
For extra charm, add small pink dots on the cheeks to mimic a rosy, wintery glow.
Step 4: Add Shading and Dimension
Using a slightly darker shade of white or gray, add shading along the edges of the polar bear’s body, ears, and paws to create depth.
Step 5: Finish with a Matte Top Coat
Seal the design with a matte top coat to give the polar bear a soft, cozy appearance reminiscent of fur.
Tips for Adding Texture and Depth to Polar Bear Nails
Step 1: Use Textured Polish
Incorporate a fluffy or textured white polish to mimic the polar bear’s fur. Apply it carefully for a three-dimensional effect.
Step 2: Add Shading
Use a small brush and gray polish to add shading around the edges of the polar bear, enhancing its lifelike appearance.
Step 3: Enhance the Background
Paint tiny snowflakes or use glitter polish to create a sparkling, snowy effect in the background.
You can also add a gradient of light blue and white for a more dynamic, wintry sky.
Step 4: Include Accessories
For added playfulness, give the polar bear a tiny scarf, hat, or earmuffs using red, green, or another festive color.
Why It Works
Polar Bears Nail Art combines a wintery aesthetic with adorable details, making it perfect for the holiday season.
The soft, snowy background complements the cute polar bears, while added texture and shading bring depth and realism to the design.
With options to personalize the bears with accessories or enhance the background with snowflakes, this manicure is both festive and versatile, ideal for spreading holiday cheer.
24. Mistletoe Accent Nail Art
Mistletoe Accent Nail Art adds a romantic and festive touch to your Christmas manicure with a delicate sprig of mistletoe.
This subtle yet elegant design is perfect for capturing the holiday spirit while maintaining a chic and refined look.
Designing Realistic Mistletoe on a Simple Nail Base
Step 1: Apply the Base Color
Choose a simple base color, such as white, nude, or light pink, to create a clean and elegant background for the mistletoe.
Let the base coat dry completely.
Step 2: Paint the Mistletoe Leaves
Using a fine brush and green polish, paint the mistletoe leaves.
Make the leaves small and pointed with a slight curve to create a realistic shape. Aim for symmetry and balance in the design.
Step 3: Add the Berries
Use a dotting tool and white polish to create clusters of berries near the base of the leaves.
Place the berries in groups of three or four for a natural look.
Step 4: Enhance with Details
Add a slightly darker shade of green to the leaves for shading, creating depth and dimension.
For extra festivity, apply a touch of silver or gold glitter to the berries to make them sparkle.
Step 5: Finish with a Glossy Top Coat
Seal the design with a glossy top coat to give the mistletoe a polished and shiny appearance.
Combining Mistletoe with Other Holiday Accents
Step 1: Alternate with Solid Nails
Alternate mistletoe accent nails with solid-colored nails in festive shades like red, green, or gold for a balanced and cohesive manicure.
Step 2: Add Complementary Designs
Incorporate additional holiday elements like holly leaves, snowflakes, or tiny bows on other nails to enhance the festive theme.
Step 3: Use Glitter or Metallic Polishes
Apply glitter or metallic polish to highlight the mistletoe design or to add sparkle to the solid-colored nails.
For example, use a metallic gold or silver polish to outline the mistletoe or add shimmering accents.
Step 4: Create a Gradient Background
For a dynamic touch, use a gradient background transitioning from a light base color to a soft green or blue, mimicking a frosty winter sky.
Why It Works
Mistletoe Accent Nail Art combines elegance with a festive holiday theme, making it a versatile choice for Christmas manicures.
The delicate mistletoe design is both romantic and subtle, while added details like glitter and shading enhance its charm.
Paired with complementary accents or solid colors, this design becomes a standout holiday manicure perfect for any celebration.
25. Christmas Sweater Patterns Nail Art
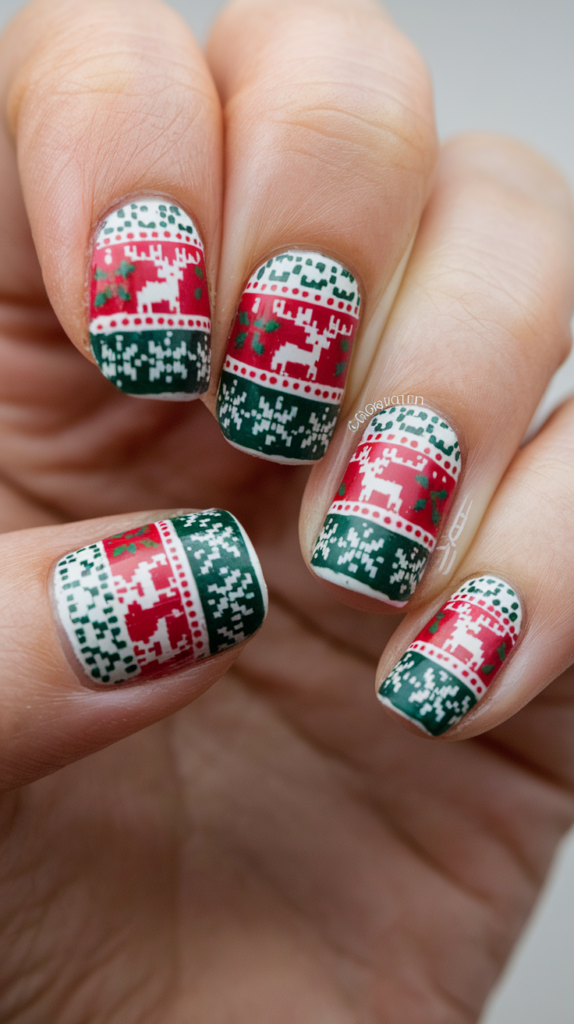
Christmas Sweater Patterns Nail Art brings the warmth and charm of cozy knitwear to your nails, featuring intricate designs like reindeer, snowflakes, and geometric shapes.
This nostalgic and festive look is perfect for celebrating the holiday season with a touch of creativity.
How to Create Detailed Sweater Patterns on Your Nails
Step 1: Apply the Base Color
Choose a base color that complements the festive theme, such as red, green, or white. Apply an even coat and let it dry completely.
Step 2: Paint the Sweater Pattern
Using a fine brush and a contrasting polish, paint intricate sweater patterns on your nails.
Include elements like reindeer, snowflakes, or geometric shapes to mimic the look of a knitted sweater.
Step 3: Add Texture for Realism
Use a slightly thicker polish or a textured polish to create a raised effect, giving the pattern a realistic, knit-like texture.
Work in small sections to maintain precision.
Step 4: Seal with a Matte Top Coat
Finish with a matte top coat to enhance the cozy, fabric-like appearance of the design, adding a soft and warm touch.
Combining Sweater Patterns with Festive Colors and Textures
Step 1: Alternate Patterns and Solid Colors
Mix sweater pattern nails with solid-colored nails in festive shades like gold, silver, or glittery red to add variety and balance.
Step 2: Add Glitter or Metallic Accents
Use glitter or metallic polish to highlight specific parts of the pattern, such as snowflakes or reindeer, for a touch of sparkle.
Step 3: Play with Finishes
Apply a matte top coat to sweater pattern nails and a glossy top coat to solid nails for a contrast in textures that adds depth to the design.
Step 4: Incorporate Gradient Effects
Create a gradient background on some nails, transitioning from one festive color to another, and overlay the sweater pattern for a dynamic look.
Why It Works
Christmas Sweater Patterns Nail Art captures the cozy and nostalgic spirit of the holiday season with its intricate knit-like designs and warm color palette.
The combination of textured patterns, glitter accents, and matte finishes creates a multidimensional and festive manicure.
This design is versatile and customizable, making it a perfect choice for anyone looking to cozy up their nails with a classic holiday aesthetic.
26. Silent Night Nail Art

Silent Night Nail Art captures the serene and magical essence of Christmas Eve with a stunning night sky design featuring stars, a crescent moon, and a touch of sparkle.
This peaceful and elegant manicure is perfect for the holiday season, evoking the quiet beauty of a starry winter night.
Designing a Night Sky with Stars and a Crescent Moon
Step 1: Apply the Base Color
Begin with a deep blue or black base coat to represent the night sky. Allow it to dry completely for a smooth canvas.
Step 2: Paint the Stars
Using a fine brush and silver or white polish, paint tiny stars across the nails.
For variation, use a dotting tool to create larger stars and a fine brush for smaller ones. Arrange them randomly to mimic a natural night sky.
Step 3: Add the Crescent Moon
Paint a crescent moon in one corner of the nail using the same silver or white polish.
For a realistic glow, lightly blend a small amount of white polish around the edges of the moon with a fine brush or sponge.
Step 4: Create a Sparkling Background
Apply a thin layer of glitter polish over the entire nail or focus it around the stars and moon to add a starry, shimmering effect.
Step 5: Seal with a Glossy Top Coat
Finish with a glossy top coat to smooth the design and enhance the polished, reflective appearance of the night sky.
Enhancing Your Silent Night Nails with Glitter and Glow
Step 1: Add Holographic Glitter
Use a holographic or iridescent glitter polish to create a multidimensional, sparkling effect that mimics twinkling stars.
Step 2: Use Glow-in-the-Dark Elements
Apply glow-in-the-dark polish to the stars or the crescent moon for a magical effect that illuminates in low light.
Step 3: Incorporate Additional Details
For a more intricate design, add shooting stars, soft clouds, or even a silhouette of a reindeer flying across the moon using black or dark gray polish.
Step 4: Vary the Star Patterns
Experiment with starburst shapes or clusters of stars for added depth and variety in the night sky.
Why It Works
Silent Night Nail Art beautifully combines elegance and festivity with its serene night sky design.
The deep base color creates a dramatic backdrop for the stars and moon, while glitter and glow-in-the-dark elements add a magical, ethereal touch.
This versatile design is both peaceful and enchanting, making it a perfect way to celebrate the beauty of Christmas Eve.
27. Red Velvet Matte Nail Art
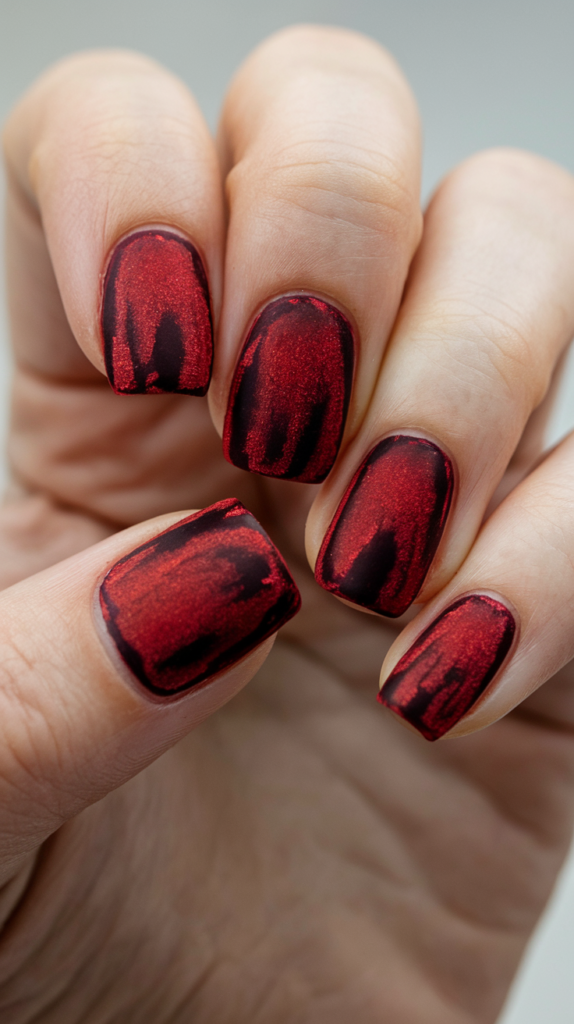
Red Velvet Matte Nail Art offers a luxurious and soft finish that is both sophisticated and festive, making it a perfect choice for Christmas.
The rich, deep red combined with a velvety matte texture creates an elegant statement manicure for the holiday season.
Achieving the Perfect Red Velvet Matte Texture on Your Nails
Step 1: Apply a Base Coat
Start with a clear base coat to protect your nails and create a smooth foundation for the polish.
Step 2: Apply the Red Polish
Use a deep red polish and apply two thin coats, allowing each coat to dry completely before applying the next.
This ensures even color and prevents streaking.
Step 3: Add the Matte Top Coat
Finish with a matte top coat to achieve the soft, velvety texture.
Make sure the top coat is evenly applied to avoid any glossy patches.
Optional: Add Texture with Velvet Nail Powder
For a fabric-like effect, sprinkle velvet nail powder over the matte top coat while it is still wet. Gently press the powder into place and allow it to set.
Pairing Velvet Matte Nails with Metallic Accents for a Festive Look
Step 1: Add Metallic Striping Tape
Place gold or silver striping tape along the tips or edges of the nails to create sleek, elegant lines that contrast with the matte finish.
Step 2: Create Metallic Patterns
Use metallic polish to paint small details, such as stars, snowflakes, or geometric shapes, over the red velvet base for a festive touch.
Step 3: Include a Metallic Gradient Accent Nail
For a dramatic effect, create an accent nail with a metallic gradient or glitter ombre that transitions from the cuticle to the tip, adding sparkle and shine to the overall design.
Step 4: Mix Finishes for Contrast
Combine matte and glossy elements by leaving certain areas glossy, such as stripes or patterns, for a dynamic and eye-catching look.
Why It Works
Red Velvet Matte Nail Art combines the richness of deep red with the softness of a matte finish, evoking the elegance of velvet fabric.
Metallic accents provide a striking contrast, adding a festive and luxurious touch that elevates the design.
This versatile and glamorous manicure is perfect for holiday parties, celebrations, or simply embracing the warmth and sophistication of the season.
28. Christmas Eve Moon Nail Art

The Christmas Eve Moon Nail Art captures the enchanting spirit of Christmas Eve with a glowing moon, reindeer silhouettes, and a starry sky.
This magical design evokes the wonder of the season, making it a perfect choice for festive nails.
Creating a Realistic Moon and Reindeer Silhouette on Your Nails
Step 1: Apply the Base Color
Begin with a deep blue or black base coat to represent the night sky. Let it dry completely for a smooth, even finish.
Step 2: Paint the Moon
Using a fine brush and white or silver polish, paint a circular moon in one corner of the nail.
To create a glowing effect, use a slightly diluted white polish and blend outward from the edges of the moon, forming a soft halo.
Step 3: Add the Reindeer Silhouettes
Use a thin detailing brush and black polish to paint small reindeer silhouettes flying across the nail.
Focus on sleek, simple shapes with delicate antlers for a recognizable yet minimalistic look.
Step 4: Enhance with Clouds and Details
Add soft, wispy clouds around the moon and reindeer using a fine brush and light gray or silver polish. This detail adds depth to the nighttime scene.
Step 5: Seal with a Glossy Top Coat
Finish the design with a glossy top coat to smooth out the details and give the nails a polished, radiant appearance.
Adding Stars and Glitter to Enhance Your Christmas Eve Design
Step 1: Create Stars
Use a dotting tool or fine brush to add tiny stars around the moon and reindeer.
Silver or white polish works best for a shimmering, celestial effect. For variety, add a few larger starbursts.
Step 2: Add Glitter for Sparkle
Apply glitter polish sparingly to the stars and moon for a twinkling effect that catches the light beautifully.
Step 3: Gradient Glitter Effect
For a dramatic touch, create a gradient of glitter starting at the cuticle and fading toward the tips, mimicking the sparkle of a starry night.
Step 4: Optional Extras
Enhance the scene further by adding a silhouette of Santa’s sleigh behind the reindeer or incorporating small, shining constellations into the background.
Why It Works
The Christmas Eve Moon Nail Art combines the serenity of a winter night with the festive imagery of reindeer flying across the moonlit sky.
The glowing moon, delicate reindeer silhouettes, and sparkling stars create a magical and nostalgic scene, while the glitter and gradients add depth and drama.
This design is a captivating way to celebrate the enchantment of the holiday season.
29. Golden Stars Nail Art
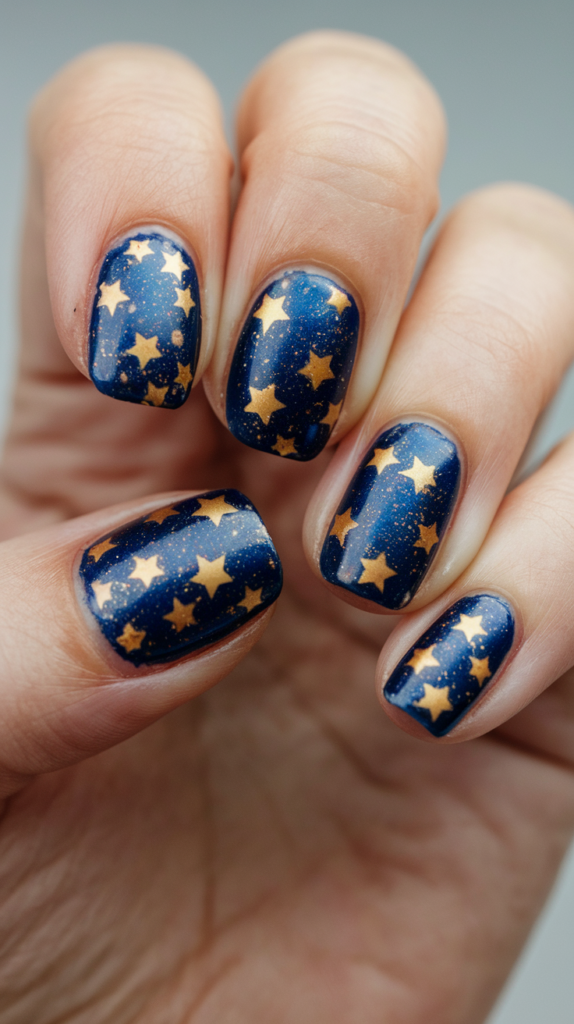
Golden Stars Nail Art transforms your nails into a stunning depiction of a sparkling night sky, perfect for the festive holiday season.
Featuring tiny, shimmering stars against a deep, dark base, this design exudes elegance and charm.
Designing Tiny Golden Stars on a Dark Nail Base
Step 1: Apply the Base Color
Start with a deep blue or black base coat to represent the night sky. Allow the polish to dry completely for a smooth surface.
Step 2: Paint the Stars
Using a fine brush and gold polish, paint tiny stars across the nails.
Create a variety of star sizes by using a dotting tool for larger stars and a fine brush for smaller ones.
Step 3: Add Dimension to the Stars
For a more lifelike appearance, use a slightly darker shade of gold or metallic polish to add depth to the stars.
Blend this color subtly to create a gradient effect on larger stars.
Step 4: Seal with a Glossy Top Coat
Finish with a glossy top coat to enhance the shine of the stars and make the design sparkle.
Using Metallics and Glitter to Make Your Stars Shine
Step 1: Add Metallic Accents
Use a metallic gold polish for the stars, incorporating hints of silver or copper to create a varied and luxurious effect.
Step 2: Glitter Background
Apply a fine glitter polish over the entire nail or concentrate it near the base to mimic a sparkling, starry sky.
This adds depth and makes the design more dynamic.
Step 3: Create a Glitter Gradient
For a dramatic touch, create a gradient of glitter starting at the tips or cuticle and fading toward the center of the nail.
Step 4: Add Rhinestones
Place tiny rhinestones at the center of some stars for an extra twinkling effect, giving the design a multidimensional look.
Why It Works
Golden Stars Nail Art is a luxurious and festive design that captures the beauty of a star-filled night sky.
The contrast of the deep base color with the shimmering gold stars creates a bold and elegant look.
By incorporating metallics, glitter, and rhinestones, this design gains depth and brilliance, making it a perfect choice for holiday parties or a sophisticated seasonal manicure.
30. Pinecone Accents Nail Art
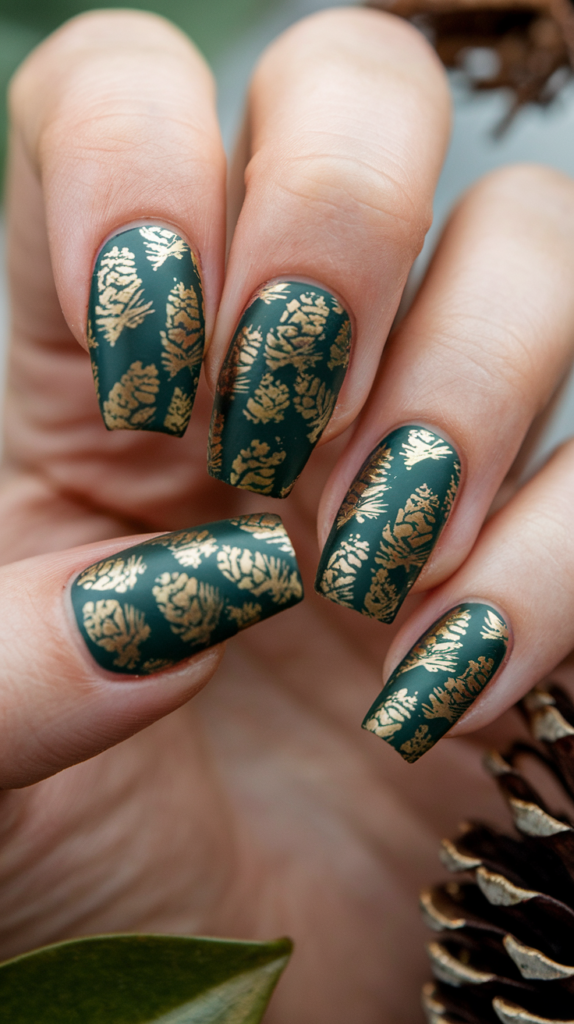
Pinecone Accents Nail Art brings the beauty of nature to your manicure with realistic pinecones accented by glitter for a festive and elegant look.
This rustic design is perfect for the holiday season, combining natural textures with a touch of sparkle.
Creating Realistic Pinecones with a Touch of Glitter
Step 1: Apply the Base Color
Start with a forest green or deep brown base coat to create a natural and earthy backdrop. Let it dry completely.
Step 2: Paint the Pinecone Shape
Using a fine brush and a slightly lighter shade of brown, paint the rounded shape of the pinecones.
Add small, overlapping scales by creating curved, semi-circular strokes to mimic the texture of real pinecones.
Step 3: Add a Frosty Effect
Apply a thin layer of glitter polish to the tips of the pinecones, creating the appearance of frost or snow.
Choose a fine silver or white glitter for a subtle, wintery effect.
Step 4: Finish with a Top Coat
Seal the design with either a matte or glossy top coat. A matte finish enhances the rustic texture, while a glossy top coat adds shine for a polished appearance.
Pairing Pinecone Nails with Forest Green for a Festive Look
Step 1: Alternate Pinecone and Green Accent Nails
Combine pinecone nails with solid forest green accent nails for a cohesive and festive look.
Step 2: Add Holiday Details
Enhance the green nails with small, complementary details like holly leaves, berries, or snowflakes.
These elements tie the design together while adding a seasonal touch.
Step 3: Use Metallic Accents
Outline the pinecones with metallic gold or bronze polish to add depth and a hint of luxury.
Alternatively, use a glitter gradient on the green nails for a shimmering effect.
Step 4: Create a Nature-Inspired Gradient
Blend a gradient of forest green and brown on select nails to represent a natural, woodland-inspired theme.
Why It Works
Pinecone Accents Nail Art combines the rustic beauty of nature with festive holiday charm, making it both elegant and versatile.
The combination of earthy colors, realistic textures, and glitter creates a balanced design that is both understated and eye-catching.
Paired with forest green and subtle holiday details, this manicure captures the essence of winter and the magic of the season.
31. Christmas Wreath Nail Art
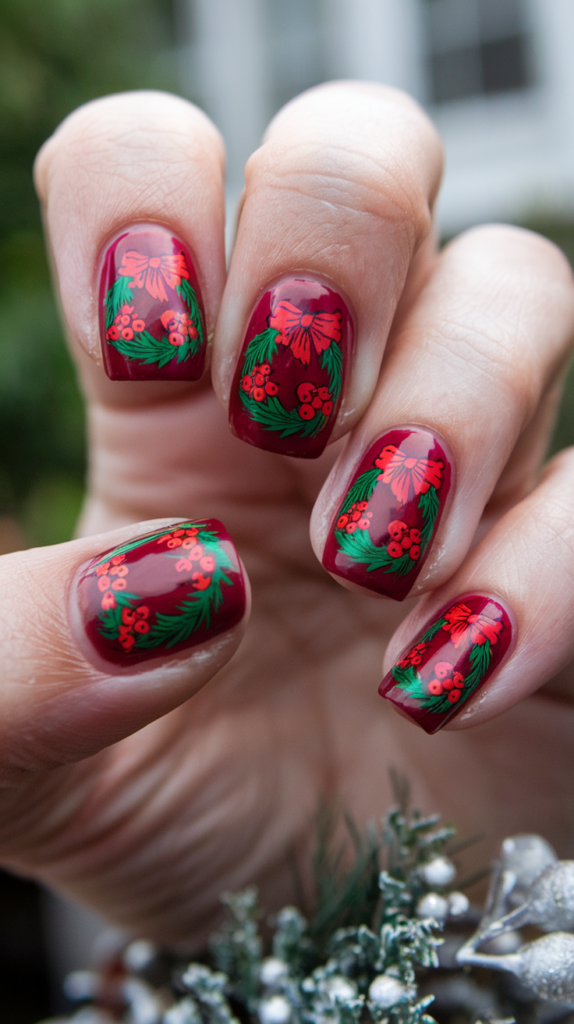
Christmas Wreath Nail Art brings the festive charm of holiday wreaths to your fingertips with intricate details like bows, berries, and textured greenery.
This decorative design is perfect for spreading Christmas cheer through a beautifully festive manicure.
Designing Intricate Christmas Wreaths on Your Nails
Step 1: Apply the Base Color
Choose a festive base color such as red, green, or white to complement the wreath design. Let it dry completely for a smooth canvas.
Step 2: Paint the Wreath Shape
Using a fine brush and dark green polish, paint a circular shape on your nail.
Create the texture of pine branches by adding small, overlapping strokes to mimic the look of real leaves.
Step 3: Add Berries
Use a dotting tool and red polish to add tiny berries along the wreath.
Place the berries in clusters or evenly spaced around the circle for balance.
Step 4: Paint a Bow
Using a fine brush and red or gold polish, paint a small bow at the top or bottom of the wreath.
For added dimension, use a slightly darker shade to outline the bow.
Step 5: Enhance with Shading and Glitter
Add a lighter shade of green to highlight the leaves and give the wreath more depth.
Apply a touch of glitter to the berries or the bow for a frosty, festive effect.
Step 6: Seal with a Glossy Top Coat
Finish with a glossy top coat to protect the design and give it a polished, shiny appearance.
Adding Bows and Berries for a Complete Wreath Look
Step 1: Create a Realistic Bow
Use gold or metallic red polish to make the bow stand out, adding small details like loops and tails for realism.
For extra flair, use glitter polish to highlight the bow.
Step 2: Add Shading to the Leaves
Incorporate a darker green polish to create shadows and a lighter green polish to add highlights, enhancing the three-dimensional effect of the wreath.
Step 3: Glitter Accents
Apply glitter to the berries or use a holographic top coat on the wreath for a sparkling finish.
This adds a magical, frosty look to the design.
Step 4: Include Extra Details
Consider adding small ornaments, snowflakes, or stars to the wreath for a more decorative touch.
These details make the wreath look more elaborate and festive.
Why It Works
Christmas Wreath Nail Art combines the intricate beauty of holiday decorations with vibrant colors and textures, creating a festive and cheerful manicure.
The addition of bows, berries, and glitter enhances the design, making it visually striking and seasonally appropriate.
This manicure is perfect for anyone looking to celebrate the holidays with a touch of elegance and creativity.
32. Candy Cane Hearts Nail Art

Candy Cane Hearts Nail Art combines sweetness and romance with festive charm, featuring two candy canes forming a heart shape on your nails.
This design is perfect for adding a playful yet elegant touch to your holiday manicure.
Creating Candy Cane Hearts on a White or Red Base
Step 1: Apply the Base Color
Choose a white or red base coat for a clean and festive canvas. Apply an even coat and let it dry completely.
Step 2: Paint the Candy Canes
Using a fine brush and contrasting polish (red on a white base or white on a red base), paint two curved candy canes on each nail.
Position the candy canes so their ends meet at the center, forming a heart shape.
Step 3: Add Stripes to the Candy Canes
Paint evenly spaced stripes on the candy canes to mimic the look of real candy canes.
Ensure the stripes are consistent in thickness for a polished and professional appearance.
Step 4: Seal with a Glossy Top Coat
Finish the design with a glossy top coat to give the candy canes a shiny, candy-like finish.
Adding Glitter and Gloss for an Extra Festive Touch
Step 1: Apply Glitter to the Candy Canes
Use a fine glitter polish to outline the candy canes or add sparkle to the stripes, making them stand out.
Focus the glitter on the candy canes for a subtle yet festive effect.
Step 2: Create a Glitter Gradient
Add a glitter gradient on one or more accent nails, blending the glitter from the tips to the base for a multidimensional look.
Step 3: Use Metallic Accents
Outline the candy canes with metallic gold or silver polish to add depth and a luxurious touch to the design.
Step 4: Add Rhinestones or Gems
Place tiny rhinestones or gems at the center of the candy cane hearts or along the edges for extra sparkle and elegance.
Why It Works
Candy Cane Hearts Nail Art combines festive charm with romantic symbolism, making it a unique and delightful choice for Christmas.
The glossy finish and glitter accents enhance the candy-like appearance, while the heart shape adds a sweet, playful element.
This manicure is perfect for spreading holiday cheer with a touch of romance and creativity.
33. Poinsettia Flowers Nail Art

Poinsettia Flowers Nail Art is a timeless and elegant choice for the holiday season, featuring vibrant red petals and green leaves with festive details.
This classic design adds sophistication and charm to your Christmas manicure, making it perfect for any celebration.
How to Paint Realistic Poinsettia Flowers on Your Nails
Step 1: Apply the Base Color
Choose a base color that complements the poinsettia design, such as white, nude, or light green. Apply an even coat and let it dry completely.
Step 2: Paint the Petals
Using a fine brush and red polish, paint pointed, slightly curved petals in a circular pattern on each nail.
Layer the petals slightly to create a realistic, three-dimensional effect.
Step 3: Add the Leaves
With a fine brush and green polish, paint small, pointed leaves around the petals.
Make the leaves less prominent than the petals to keep the focus on the flower.
Step 4: Add Shading and Highlights
Use a slightly darker shade of red for the petals and green for the leaves to add shading and depth.
Blend these colors gently to create a natural, lifelike appearance.
Step 5: Finish with a Glossy Top Coat
Seal the design with a glossy top coat to enhance the vibrant colors and give the nails a polished, shiny finish.
Pairing Poinsettias with Green Leaves and Gold Accents
Step 1: Add Gold Outlines
Use a fine brush and gold polish to outline the petals and leaves, adding a luxurious, festive touch to the design.
Step 2: Incorporate Glitter Accents
Apply a glitter polish to the center of the poinsettia flowers or along the edges of the petals and leaves for extra sparkle.
Step 3: Create a Balanced Design
Alternate poinsettia nails with solid green or red nails to create a balanced and cohesive manicure.
Consider using a glitter or metallic polish for the solid nails to enhance the festive vibe.
Step 4: Use Matte and Glossy Finishes
Experiment with a matte top coat on the poinsettia nails and a glossy top coat on the solid nails to add contrast and texture to the design.
Why It Works
Poinsettia Flowers Nail Art combines the vibrant beauty of Christmas blooms with festive accents, creating a timeless and elegant manicure.
The layered petals, realistic shading, and addition of gold or glitter make the design stand out, while the contrast between matte and glossy finishes adds depth and sophistication.
This manicure captures the essence of holiday elegance, making it perfect for both casual and formal Christmas celebrations.
34. Holiday Glitter Bomb Nail Art
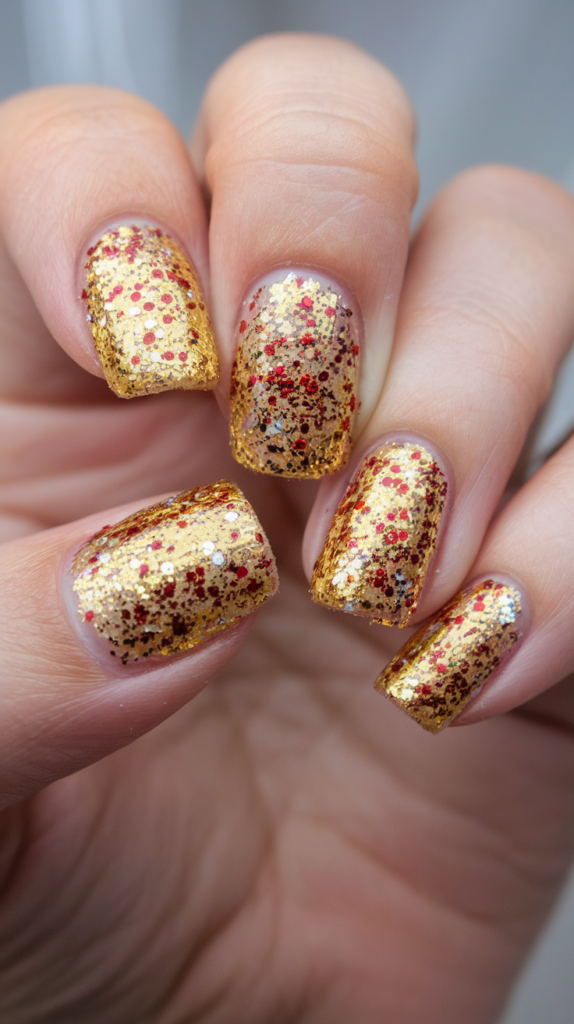
The Holiday Glitter Bomb Nail Art is a show-stopping, festive design that takes sparkle to the next level.
This dazzling look features nails completely covered in glitter, perfect for adding bold glamour to your holiday celebrations.
Creating a Full Glitter Nail Look in Festive Colors
Step 1: Apply a Base Color
Choose a base color that complements your glitter polish, such as red, green, gold, or silver.
Apply an even coat and let it dry completely to create a smooth foundation.
Step 2: Apply Glitter Polish
Using a glitter polish, cover the entire nail evenly.
For a subtle sparkle, use a fine glitter polish. For a more dramatic effect, opt for chunky glitter or a combination of both.
Step 3: Layer for Dimension
For a multidimensional effect, layer different sizes and colors of glitter polish.
Focus finer glitter at the base and chunkier glitter at the tips, or mix them evenly across the nail.
Step 4: Finish with a Glossy Top Coat
Seal the glitter with a high-quality glossy top coat to enhance the shine and intensify the sparkle.
A top coat also smooths out the texture, leaving your nails with a polished finish.
Tips for Making Your Glitter Nails Last All Season
Step 1: Start with a Strong Base Coat
Apply a strong base coat to protect your nails and create a smooth surface for the glitter.
This also helps with easier removal later.
Step 2: Apply Thin Layers
When applying glitter polish, use thin layers to prevent clumping.
Allow each layer to dry completely before adding the next for a long-lasting finish.
Step 3: Seal with a Top Coat
Use a durable top coat to lock in the glitter and protect against chipping.
A gel top coat is an excellent choice for extra longevity.
Step 4: Reapply the Top Coat
Refresh your manicure by reapplying the top coat every 2-3 days to keep the glitter shiny and prevent wear.
Step 5: Protect During Removal
When it’s time to remove your glitter nails, soak them in acetone and use foil wraps to minimize damage to your natural nails.
Why It Works
The Holiday Glitter Bomb Nail Art is the ultimate festive manicure, combining bold colors and multidimensional sparkle to make a dramatic statement.
The layering of glitter sizes and colors adds depth and movement, while the glossy finish enhances the brilliance of the glitter.
This versatile design is perfect for holiday parties, New Year’s celebrations, or any occasion where you want to shine.
35. Snow Globe Nails Nail Art
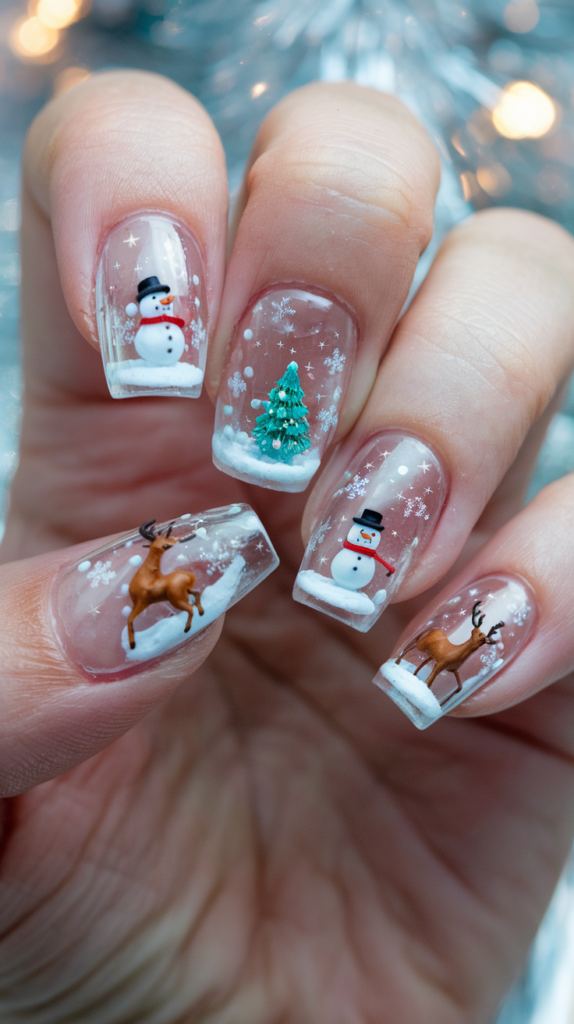
Snow Globe Nails Nail Art is a magical and detailed design that brings tiny Christmas scenes to your fingertips.
This enchanting style captures the charm of a snow globe, complete with festive miniatures and falling snow, making it a perfect choice for the holiday season.
Designing Realistic Snow Globe Nails with Christmas Scenes
Step 1: Apply the Base Coat
Start with a clear or light blue base coat to represent the glass of the snow globe.
Let the polish dry completely to ensure a smooth foundation for the design.
Step 2: Paint the Scene
Using a fine brush, paint your chosen Christmas scene inside the snow globe.
- Christmas Tree: Use green polish to create a small tree, adding red or gold dots for ornaments and a yellow star at the top.
- Snowman: Use white polish to paint a tiny snowman with black dots for eyes and buttons and an orange carrot nose.
- Reindeer or House: Add a small reindeer or a cozy house with brown polish, and decorate with tiny festive details.
Step 3: Add Snowflakes
Use a dotting tool and white polish to paint snowflakes or small dots around the scene, mimicking falling snow.
For extra sparkle, use glitter polish or iridescent flakes for a shimmering snow effect.
Step 4: Seal with a Glossy Top Coat
Finish the design with a glossy top coat to enhance the smooth, glass-like appearance of the snow globe.
The top coat also protects the intricate details and adds a polished finish.
Enhancing Your Snow Globe Nails
Step 1: Add Glitter for Magic
Apply glitter polish to the snowflakes or as a background to create a twinkling, magical effect.
Focus the glitter toward the tips of the nails for a gradient snow effect.
Step 2: Use 3D Elements
Incorporate tiny nail art accessories like rhinestones, microbeads, or decals to add depth and make the scene more dynamic.
Step 3: Vary the Scenes
Create different Christmas scenes on each nail to make your manicure a collection of snow globes.
Ideas include Santa’s sleigh, a gingerbread house, or a snowy pine forest.
Step 4: Include a Frosty Frame
Outline the edges of the nail with white or silver polish to mimic the frosty border of a snow globe.
Why It Works
Snow Globe Nails Nail Art combines intricate detailing with the festive magic of Christmas, turning your nails into miniature works of art.
The clear or light blue base captures the essence of glass, while the tiny scenes and glittery snowflakes create depth and enchantment.
This versatile design is perfect for spreading holiday cheer in a fun and creative way.
Conclusion
Christmas is a time of joy, celebration, and creativity, and your nails are the perfect canvas to showcase your holiday spirit.
Whether you prefer the classic elegance of golden snowflakes and velvet matte finishes or the playful charm of snowman faces and candy cane hearts, these 35 Christmas nail designs offer endless inspiration to help you celebrate the season in style.
Each design allows you to add a personal touch to your holiday look, making your nails a reflection of the festive cheer that fills the air.
As you prepare for holiday parties, gatherings with loved ones, or simply want to add a bit of seasonal magic to your everyday routine, these nail designs will help you shine bright.
Embrace the beauty of the season, experiment with colors and textures, and most importantly, have fun creating your own unique Christmas nail art.
With these ideas at your fingertips, you’re sure to spread holiday cheer wherever you go.
Happy holidays, and may your nails be as festive as the season itself!