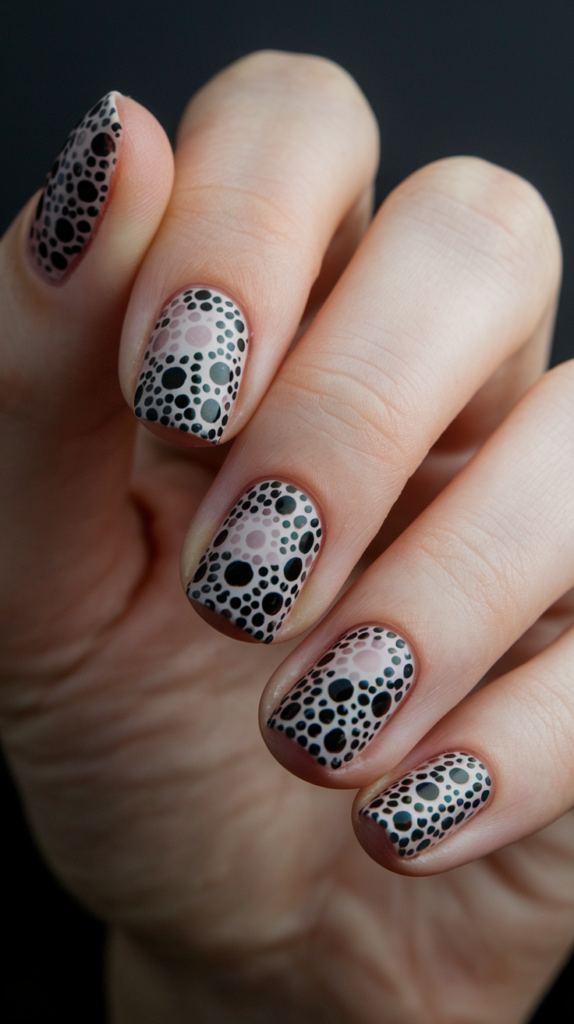
Polka dots bring a timeless, playful charm to nail art, blending versatility with endless creative possibilities.
From minimalist elegance to vibrant, bold statements, this classic pattern adapts to any style or occasion.
In this guide, we present 35 polka dot nail designs that range from retro-inspired classics to modern, avant-garde looks.
Whether you’re a nail art novice or a seasoned enthusiast, these ideas will inspire your next manicure with fun, sophistication, and flair.
1. Classic Red & White Polka Dots
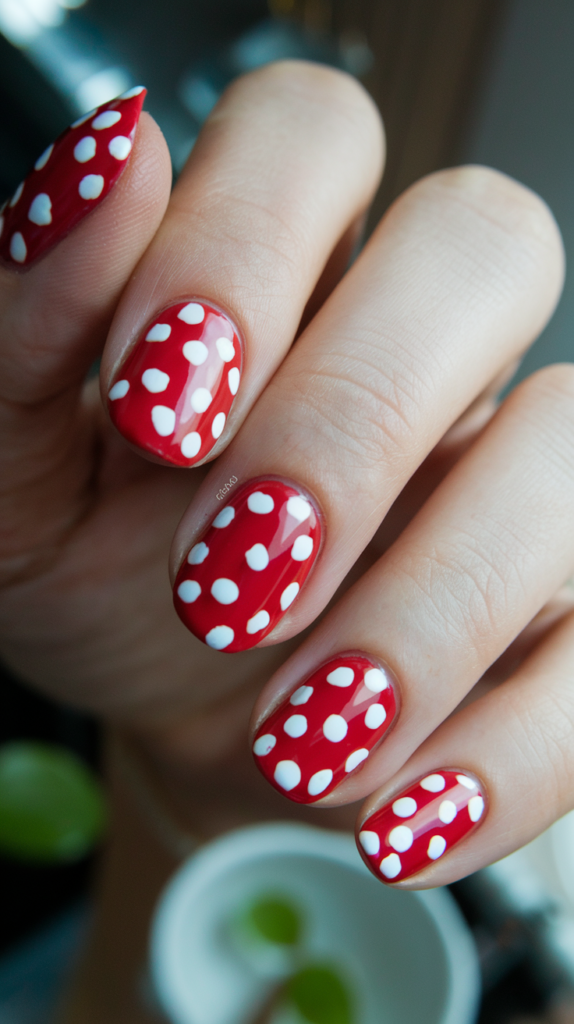
This retro-inspired design pairs a bold red base with crisp white polka dots, evoking 1950s charm and timeless elegance.
How to Create Red & White Polka Dots
Step 1: Red Base
Apply two coats of vibrant red polish for a smooth, opaque finish. Let it dry completely.
Step 2: White Dots
Use a dotting tool or bobby pin dipped in white polish to place evenly spaced dots across each nail.
Step 3: Seal the Design
Finish with a glossy top coat to protect the dots and add shine.
Styling Tips
Perfect for retro-themed parties or casual outings, pair with a polka dot dress or red lipstick for vintage flair.
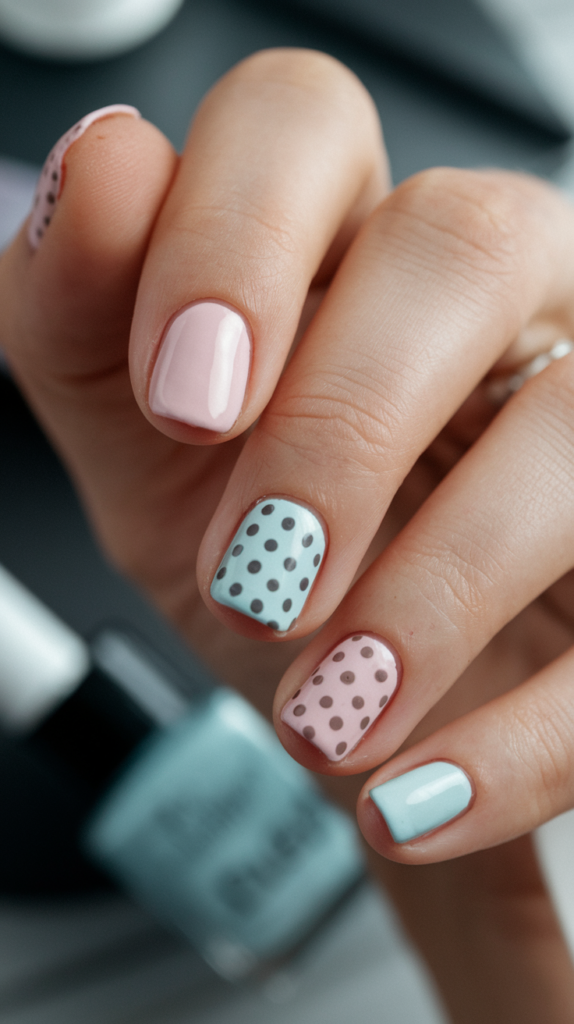
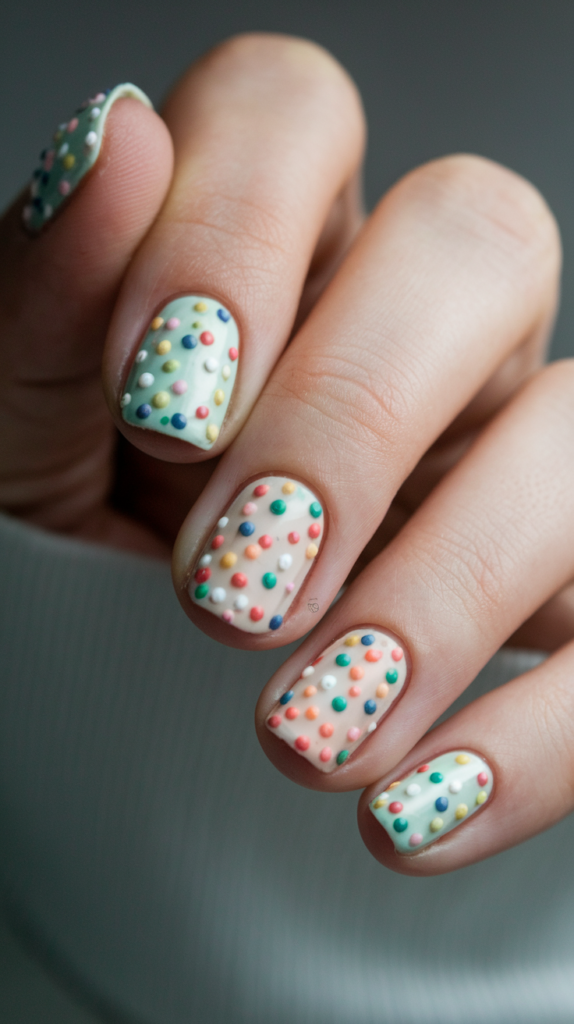
2. Pastel Polka Dots
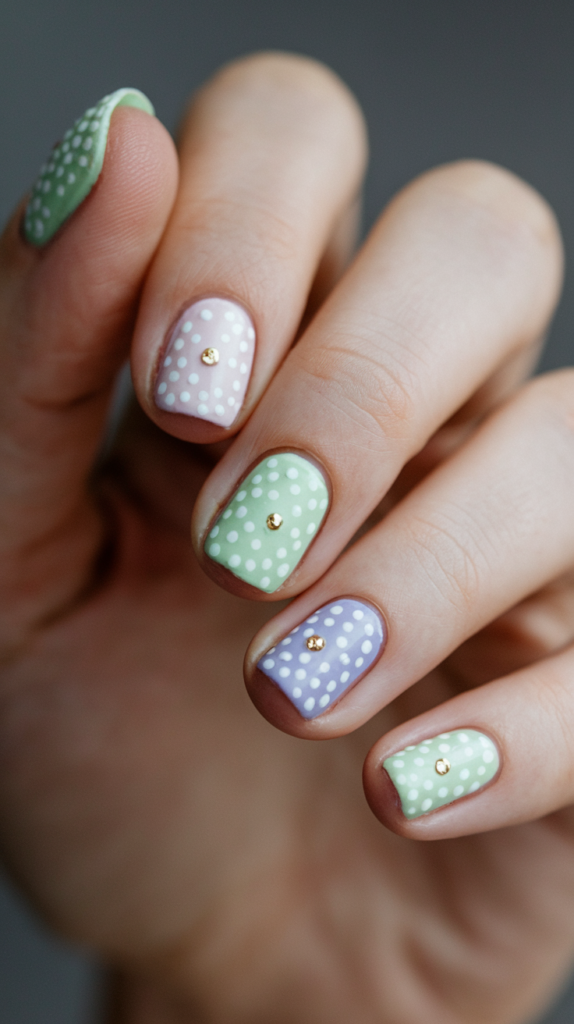
Soft pastel shades adorned with delicate white or gold dots create a dreamy, whimsical manicure ideal for spring.
How to Create Pastel Polka Dots
Step 1: Pastel Base
Apply two coats of a pastel shade like mint or lavender. Mix shades across nails for variety. Let dry fully.
Step 2: Add Dots
Use a dotting tool to apply white or gold dots, spacing them evenly for a delicate look.
Step 3: Seal the Design
Finish with a glossy top coat to enhance the soft pastel hues and protect the dots.
Styling Tips
Ideal for weddings or baby showers, pair with pastel dresses or floral accessories for a gentle, feminine vibe.
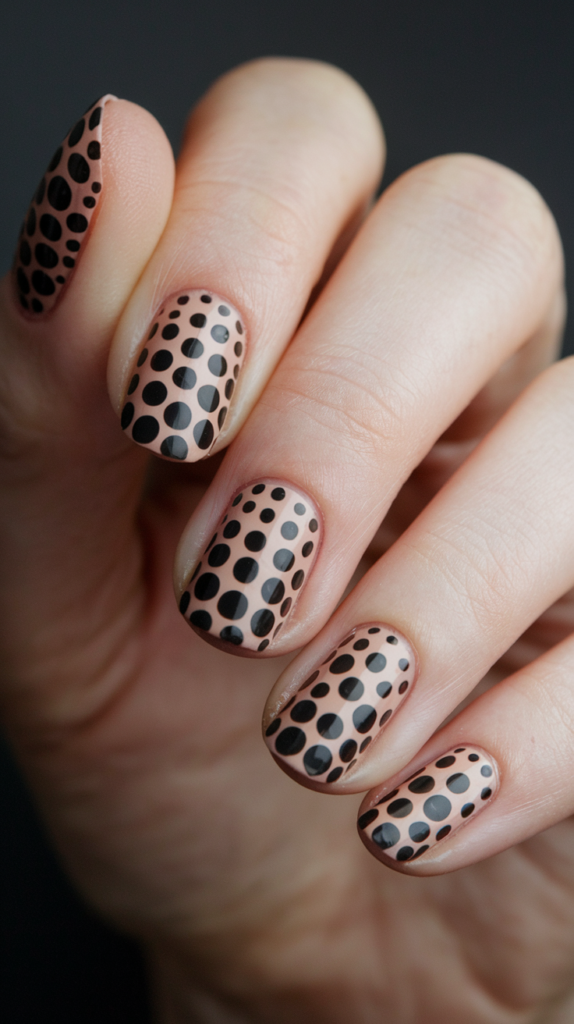
3. Monochrome Chic
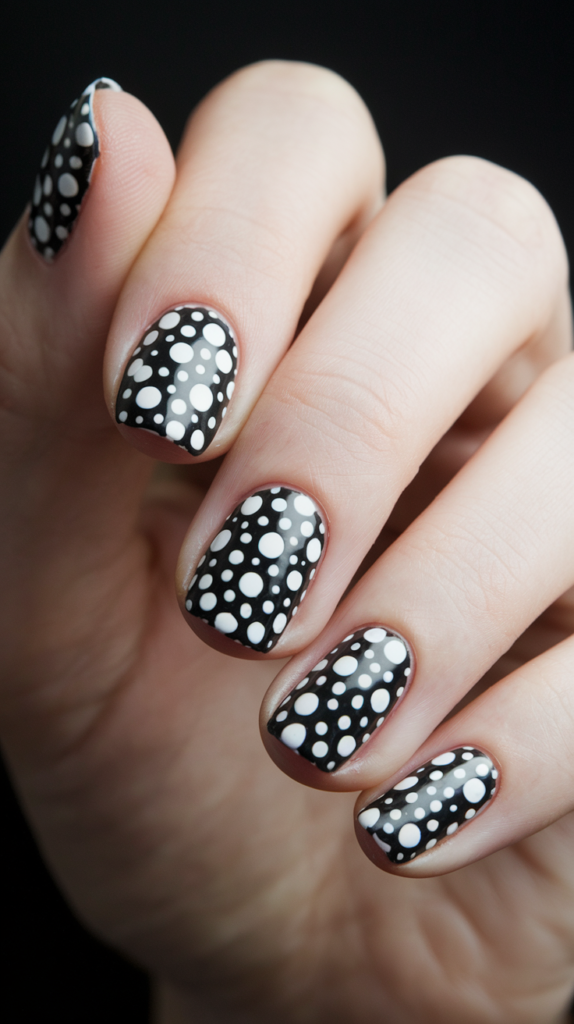
Black and white polka dots offer a sleek, high-contrast look that’s both bold and sophisticated.
How to Create Monochrome Polka Dots
Step 1: Base Color
Apply two coats of black or white polish as the base. Let it dry completely.
Step 2: Contrasting Dots
Use a dotting tool to add white dots on black nails or black dots on white nails, keeping them uniform.
Step 3: Seal the Design
Finish with a glossy top coat for a polished, striking finish.
Styling Tips
Perfect for office wear or evening events, pair with monochrome outfits or bold accessories for a chic look.
4. Gold Accented Polka Dots
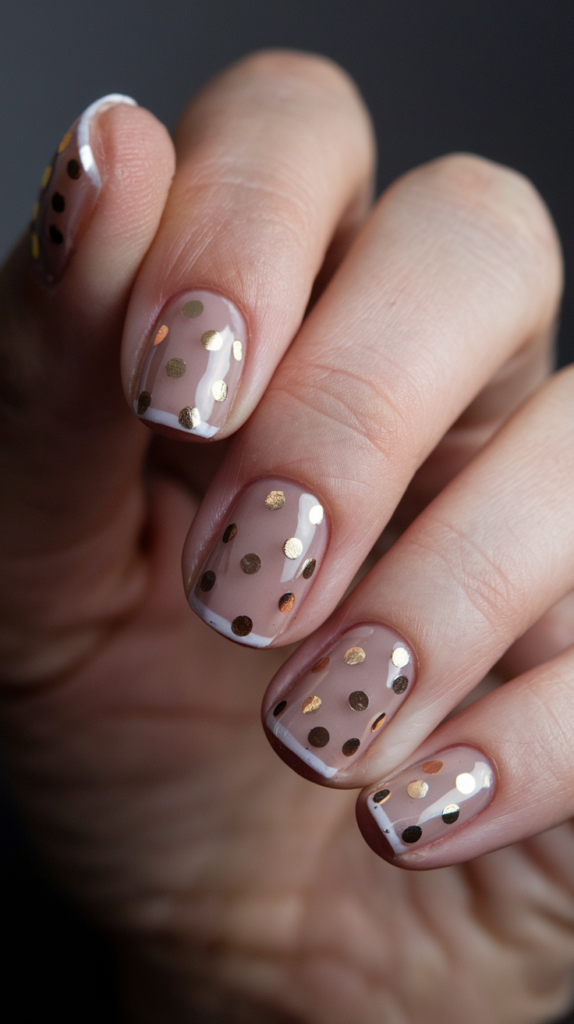
Gold foil or metallic dots on a nude base add a luxurious, glamorous touch to classic polka dots.
How to Create Gold Accented Polka Dots
9987
Step 1: Nude Base
Apply two coats of nude or beige polish for a smooth base. Let it dry fully.
Step 2: Gold Dots
Use a dotting tool to apply gold foil or metallic polish dots, spacing them evenly.
Step 3: Seal the Design
Finish with a glossy top coat to secure the gold accents and enhance shine.
Styling Tips
Ideal for galas or nights out, pair with gold jewelry and elegant evening wear for a luxe look.
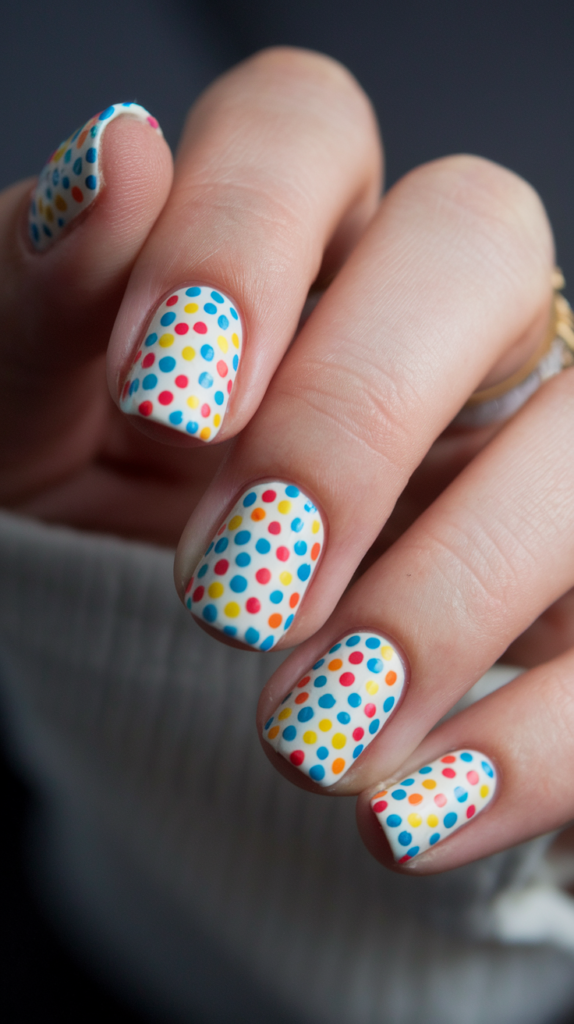
5. Rainbow Dots
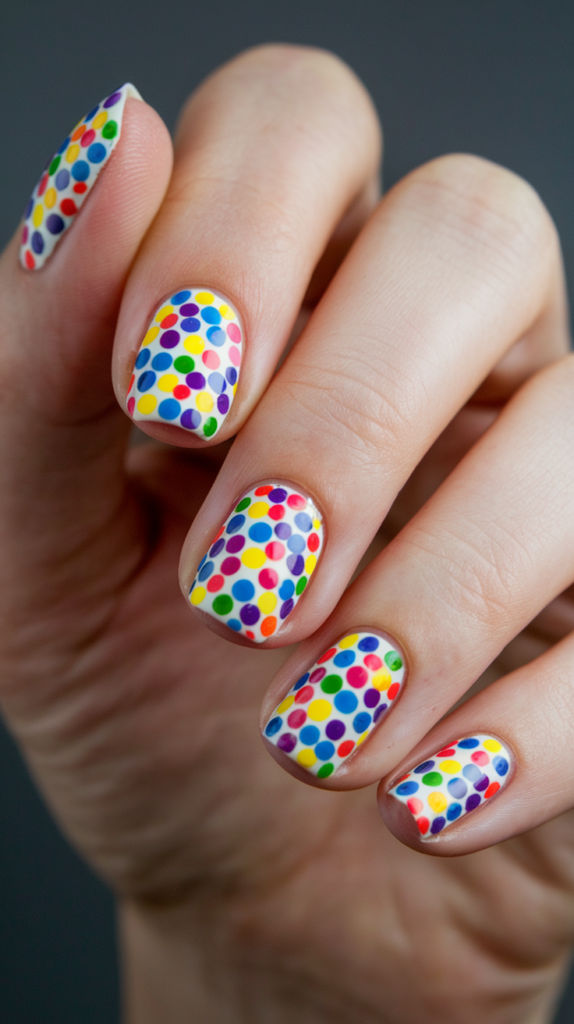
Vibrant rainbow-colored dots on a white base create a bold, joyful manicure bursting with energy.
How to Create Rainbow Dots
Step 1: White Base
Apply two coats of white polish for a bright, neutral canvas. Let it dry completely.
Step 2: Rainbow Dots
Use a dotting tool to apply dots in red, orange, yellow, green, and blue, varying sizes for fun.
Step 3: Seal the Design
Finish with a glossy top coat to protect the vibrant colors and add shine.
Styling Tips
Perfect for festivals or summer outings, pair with colorful outfits to match the playful, vibrant energy.
6. Polka Dot Ombré
A gradient of polka dots, fading from large to small, offers a modern, sophisticated twist on the classic pattern.
How to Create Polka Dot Ombré
Step 1: Base Color
Apply two coats of a neutral or pastel base color. Let it dry fully.
Step 2: Gradient Dots
Use a dotting tool to place larger dots near the cuticle, gradually reducing size toward the tip.
Step 3: Seal the Design
Finish with a glossy top coat to smooth the gradient and enhance the design.
Styling Tips
Great for casual or semi-formal events, pair with monochrome outfits to let the gradient shine.
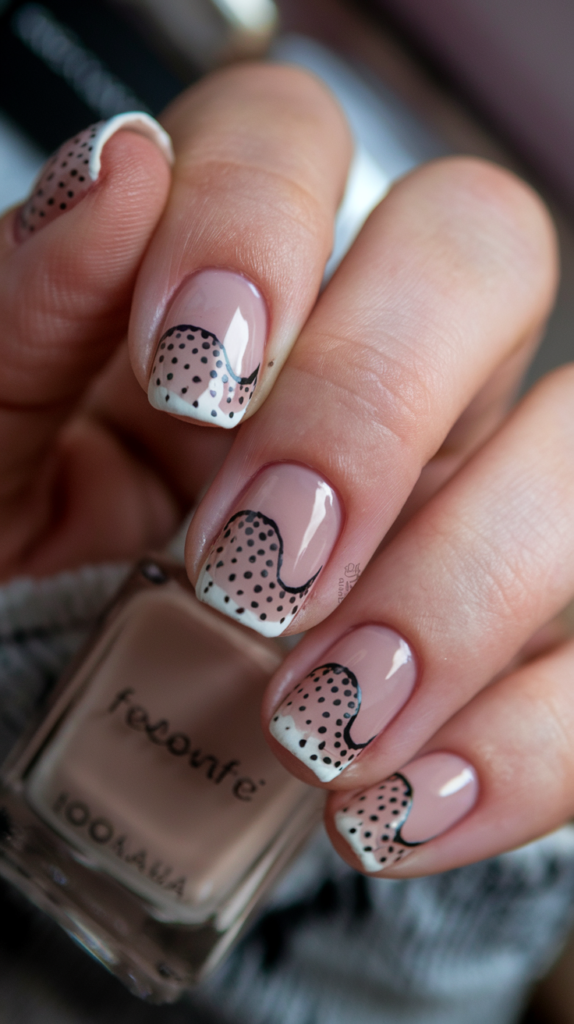
7. French Tip with Dots
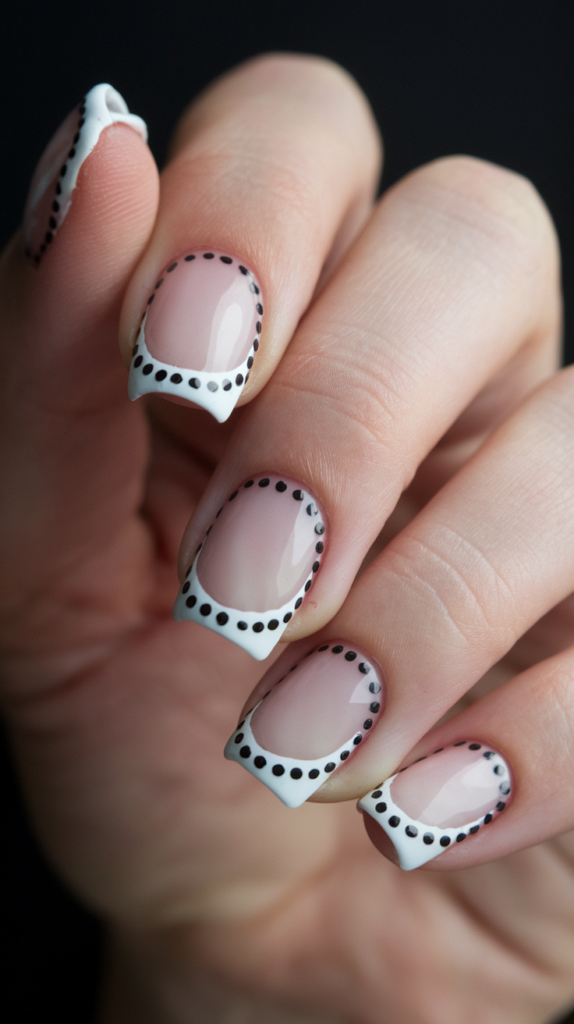
Tiny polka dots along a classic French tip add a playful twist to this timeless manicure.
How to Create French Tip Dots
Step 1: Nude Base
Apply two coats of nude or pink polish. Let it dry completely.
Step 2: White Tips & Dots
Paint white French tips, then add tiny black or colored dots along the tip with a dotting tool.
Step 3: Seal the Design
Finish with a glossy top coat for a refined, elegant finish.
Styling Tips
Suitable for weddings or office wear, pair with tailored outfits for a chic, polished look.
8. Matte & Glossy Polka Dots
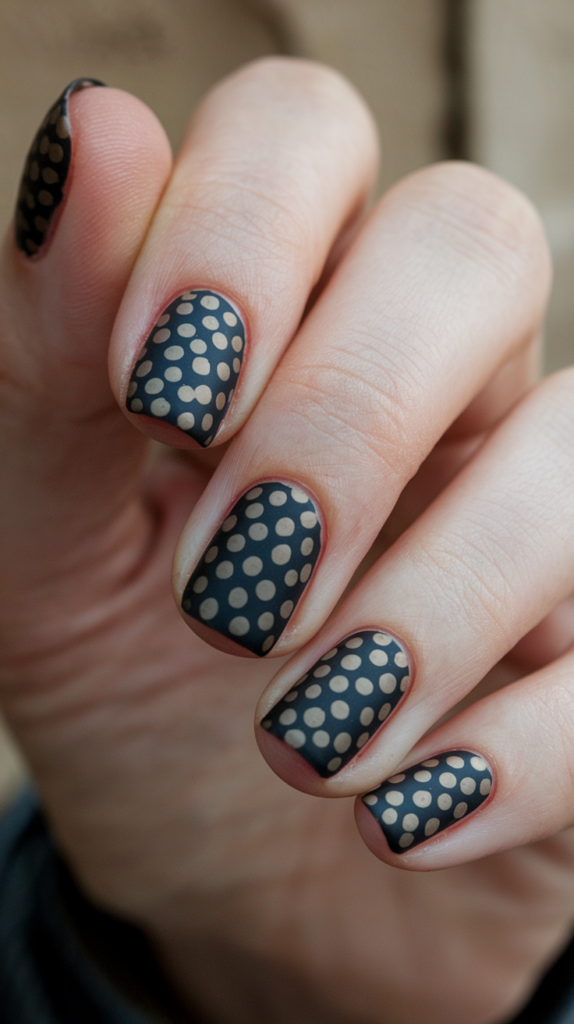
Mixing matte and glossy finishes creates a textured, sophisticated polka dot design with subtle elegance.
How to Create Matte & Glossy Polka Dots
Step 1: Matte Base
Apply two coats of black polish, followed by a matte top coat. Let it dry fully.
Step 2: Glossy Dots
Add glossy black or white dots with a dotting tool for a textured contrast.
Step 3: Seal the Design
Apply a glossy top coat only to the dots to maintain the matte base.
Styling Tips
Great for minimalist or formal looks, pair with neutral outfits to highlight the textured contrast.
9. Polka Dot Glitter Bomb
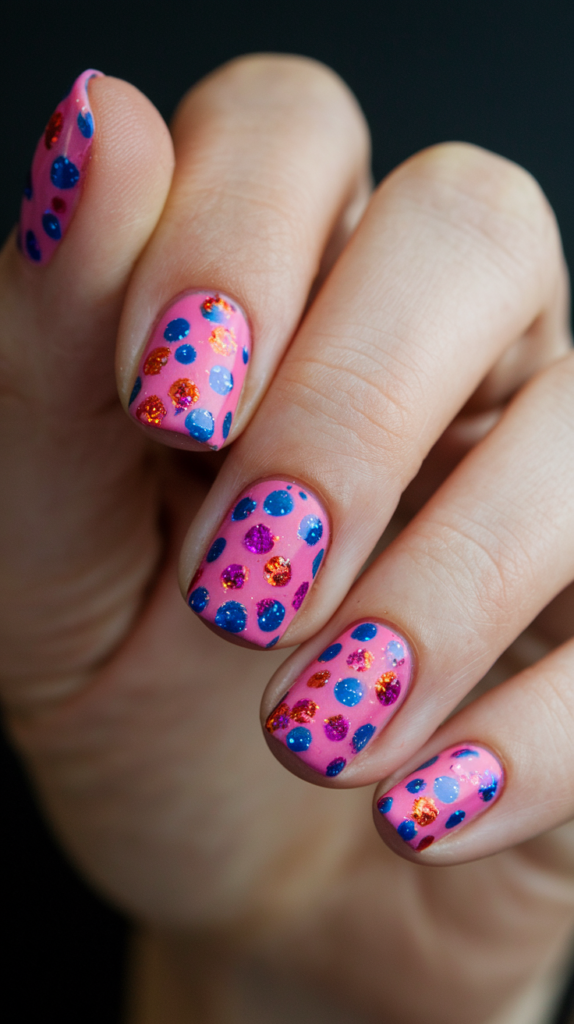
Glitter polka dots on a bold base create a dazzling, eye-catching manicure perfect for celebrations.
How to Create Glitter Polka Dots
Step 1: Bold Base
Apply two coats of a vibrant color like hot pink or blue. Let it dry completely.
Step 2: Glitter Dots
Use a dotting tool to apply glitter polish dots, varying sizes for sparkle.
Step 3: Seal the Design
Finish with a glossy top coat to lock in the glitter and enhance shine.
Styling Tips
Ideal for holiday parties or nights out, pair with metallic outfits for maximum dazzle.
10. Polka Dot Accent Nail
A single polka dot accent nail adds a subtle, stylish flair to a solid-color manicure.
How to Create Polka Dot Accent Nails
Step 1: Solid Base
Apply two coats of a solid color like pink or blue to all nails. Let dry.
Step 2: Accent Dots
On one or two nails, add contrasting dots with a dotting tool, such as white on pink.
Step 3: Seal the Design
Finish with a glossy top coat to protect the design and unify the look.
Styling Tips
Perfect for daily wear or subtle flair, pair with minimalist outfits to highlight the accent nail.
11. Dot Outline Nails

Polka dots outlining the nail’s edge create a minimalist, modern border effect with subtle charm.
How to Create Dot Outline Nails
Step 1: Nude Base
Apply two coats of nude or clear polish. Let it dry completely.
Step 2: Outline Dots
Use a dotting tool to place small black or colored dots along the nail’s edge, following its shape.
Step 3: Seal the Design
Finish with a glossy top coat to secure the dots and enhance the minimalist look.
Styling Tips
Ideal for understated elegance, pair with clean, modern outfits for daily or professional settings.
12. Polka Dot Gradient
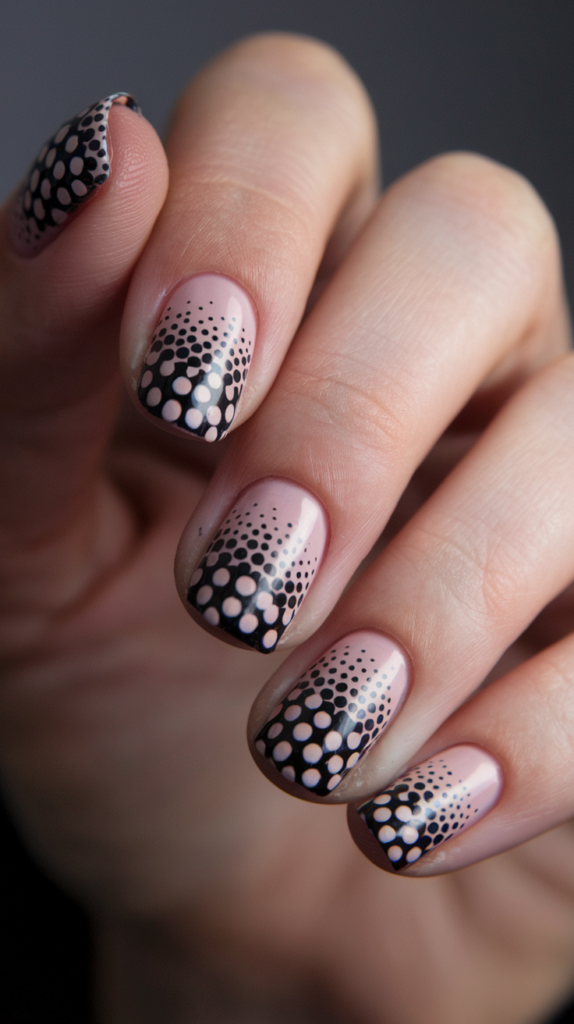
Dense polka dots near the cuticle fading to sparse dots at the tip create a chic gradient effect.
How to Create Polka Dot Gradient
Step 1: Base Color
Apply two coats of a pastel or neutral base color. Let it dry fully.
Step 2: Gradient Dots
Place dense, larger dots near the cuticle, spacing them out and reducing size toward the tip.
Step 3: Seal the Design
Finish with a glossy top coat to enhance the gradient and protect the design.
Styling Tips
Great for casual or semi-formal looks, pair with soft, flowing outfits to complement the gradient.
13. Negative Space Dots
Bold polka dots on transparent nails create a minimalist, edgy look with negative space flair.
How to Create Negative Space Dots
Step 1: Clear Base
Apply two coats of clear polish for a transparent base. Let it dry fully.
Step 2: Bold Dots
Use a dotting tool to place vibrant or metallic dots randomly across the bare nails.
Step 3: Seal the Design
Finish with a glossy top coat to protect the dots and maintain the transparent look.
Styling Tips
Perfect for modern, artsy vibes, pair with bold outfits to emphasize the edgy negative space design.
14. Mini Metallic Polka Dots
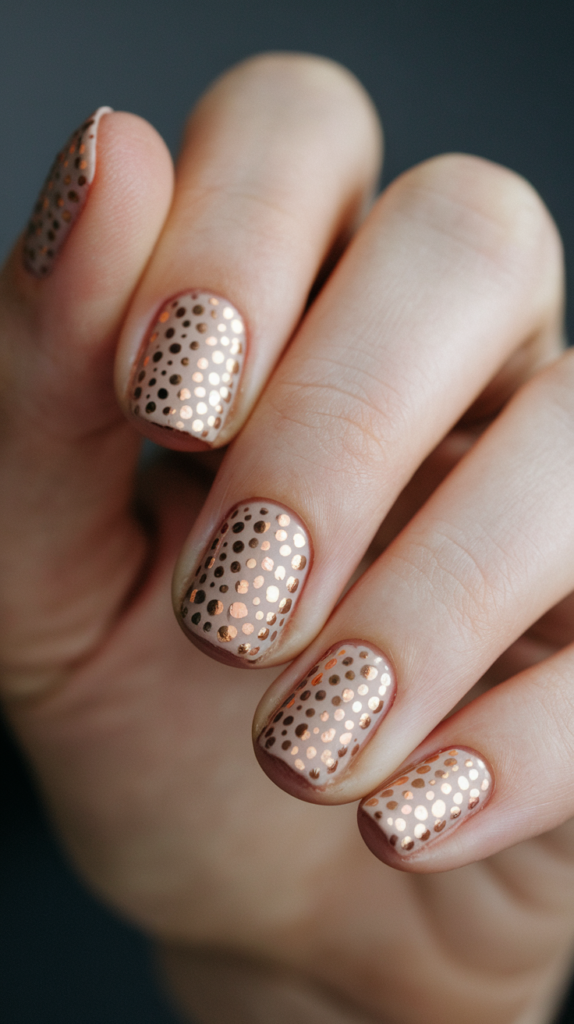
Tiny metallic dots on a nude base add subtle shine for an elegant, understated manicure.
How to Create Mini Metallic Polka Dots
Step 1: Nude Base
Apply two coats of nude polish for a smooth base. Let it dry completely.
Step 2: Metallic Dots
Use a fine dotting tool to place small gold, silver, or rose gold dots evenly across nails.
Step 3: Seal the Design
Finish with a glossy top coat to enhance the metallic sheen and protect the design.
Styling Tips
Great for daily wear or subtle glamour, pair with neutral outfits and metallic accessories.
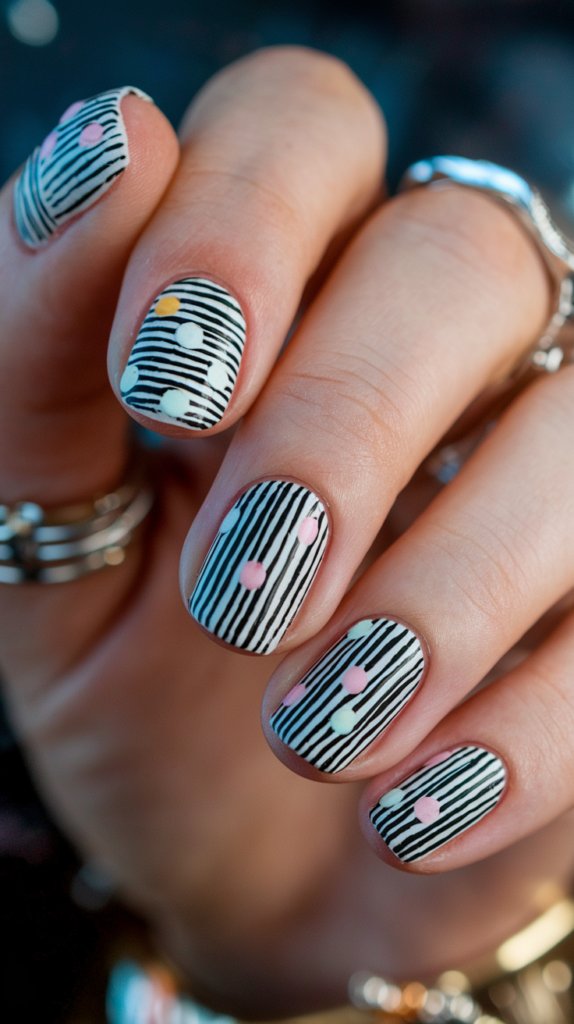
15. Polka Dot Stripes
Polka dots paired with bold stripes create a graphic, modern design with dynamic flair.
How to Create Polka Dot Stripes
Step 1: Base Color
Apply two coats of white or black polish as the base. Let it dry fully.
Step 2: Stripes & Dots
Use striping tape to paint bold stripes, then add contrasting dots with a dotting tool.
Step 3: Seal the Design
Finish with a glossy top coat to protect the graphic pattern and add shine.
Styling Tips
Ideal for artsy or bold looks, pair with geometric outfits for a striking, modern vibe.
16. Polka Dot Hearts
Polka dots arranged into heart shapes add a romantic, whimsical touch to your manicure.
How to Create Polka Dot Hearts
Step 1: Pink Base
Apply two coats of light pink polish. Let it dry completely.
Step 2: Heart Dots
Use a dotting tool to arrange red or white dots into heart shapes on one or two nails.
Step 3: Seal the Design
Finish with a glossy top coat to protect the heart patterns and add shine.
Styling Tips
Perfect for Valentine’s Day or romantic dates, pair with soft, feminine outfits.
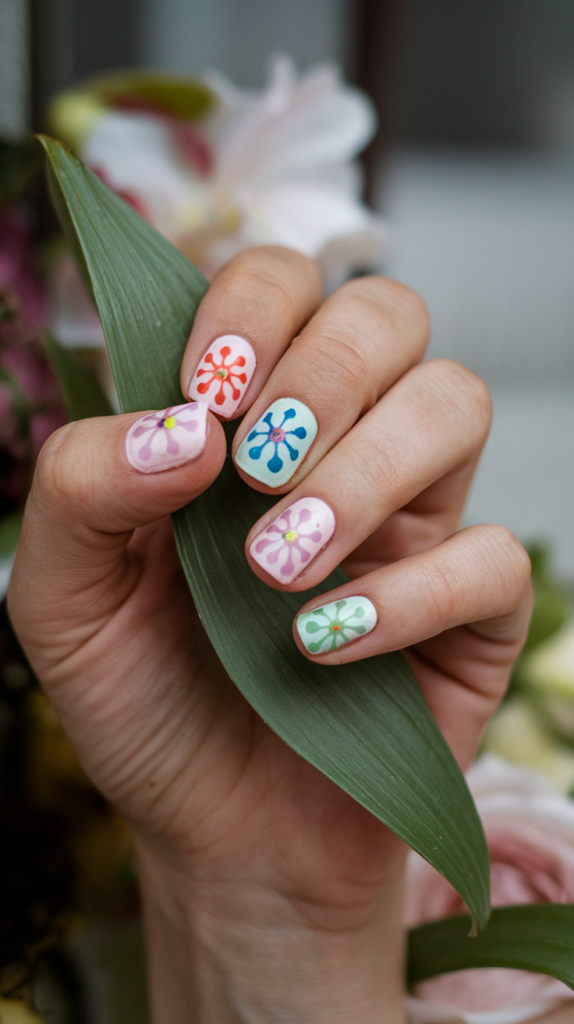
17. Polka Dot Flowers
Dots arranged into floral patterns create a delicate, nature-inspired polka dot design.
How to Create Polka Dot Flowers
Step 1: White Base
Apply two coats of white polish for a clean canvas. Let it dry fully.
Step 2: Floral Dots
Use a dotting tool to create flowers with a central dot and petal-like dots around it in pastel colors.
Step 3: Seal the Design
Finish with a glossy top coat to protect the floral patterns and add shine.
Styling Tips
Ideal for spring events or garden parties, pair with floral dresses for a cohesive look.
18. Polka Dot Checkerboard

Polka dots mixed with a checkerboard pattern create a retro-modern look with bold contrast.
How to Create Polka Dot Checkerboard
Step 1: White Base
Apply two coats of white polish. Let it dry completely.
Step 2: Checkerboard & Dots
Paint a black checkerboard pattern with tape, then add white dots on black squares.
Step 3: Seal the Design
Finish with a glossy top coat for a polished, retro finish.
Styling Tips
Great for retro or graphic looks, pair with bold, patterned outfits for a striking effect.
19. Polka Dot Waves
Dots arranged in wavy patterns create a flowing, dynamic design with a modern twist.
How to Create Polka Dot Waves
Step 1: Blue Base
Apply two coats of light blue polish. Let it dry fully.
Step 2: Wavy Dots
Use a dotting tool to place white or silver dots in wavy, flowing patterns across nails.
Step 3: Seal the Design
Finish with a glossy top coat to protect the wavy design and add shine.
Styling Tips
Perfect for summer or beach vibes, pair with flowing dresses or nautical outfits.
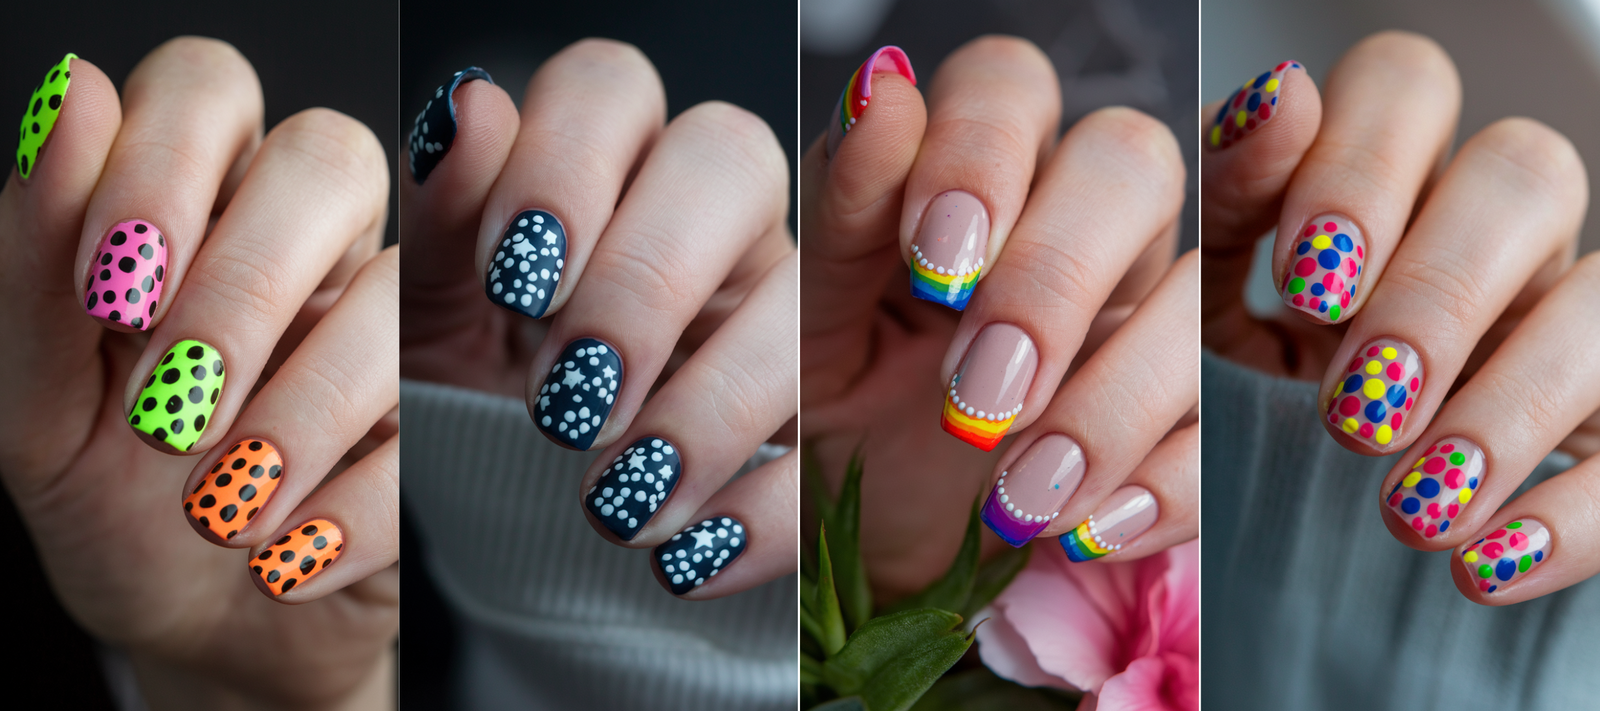
20. Polka Dot Moons
Dots forming crescent moon shapes offer a celestial, dreamy take on polka dots.
How to Create Polka Dot Moons
Step 1: Navy Base
Apply two coats of navy polish for a night-sky effect. Let it dry fully.
Step 2: Moon Dots
Arrange silver or white dots in crescent moon shapes with a dotting tool.
Step 3: Seal the Design
Finish with a glossy top coat to enhance the celestial look.
Styling Tips
Great for starry nights or cosmic themes, pair with dark, mystical outfits.
21. Polka Dot Grid
Dots arranged in a grid pattern create a structured, modern design with clean lines.
How to Create Polka Dot Grid
Step 1: Black Base
Apply two coats of black polish. Let it dry completely.
Step 2: Grid Dots
Use a dotting tool to place white dots in a precise grid pattern across nails.
Step 3: Seal the Design
Finish with a glossy top coat for a clean, modern finish.
Styling Tips
Ideal for minimalist or professional looks, pair with sleek, structured outfits.
22. Polka Dot & Stripes Combo
Alternating polka dots and stripes across nails create a bold, contrasting design with playful energy.
How to Create Polka Dot & Stripes Combo
Step 1: White Base
Apply two coats of white polish. Let it dry fully.
Step 2: Dots & Stripes
Add black dots on some nails with a dotting tool and paint stripes on others with tape.
Step 3: Seal the Design
Finish with a glossy top coat to unify the bold contrast.
Styling Tips
Great for bold, graphic looks, pair with patterned outfits for a vibrant, artsy vibe.
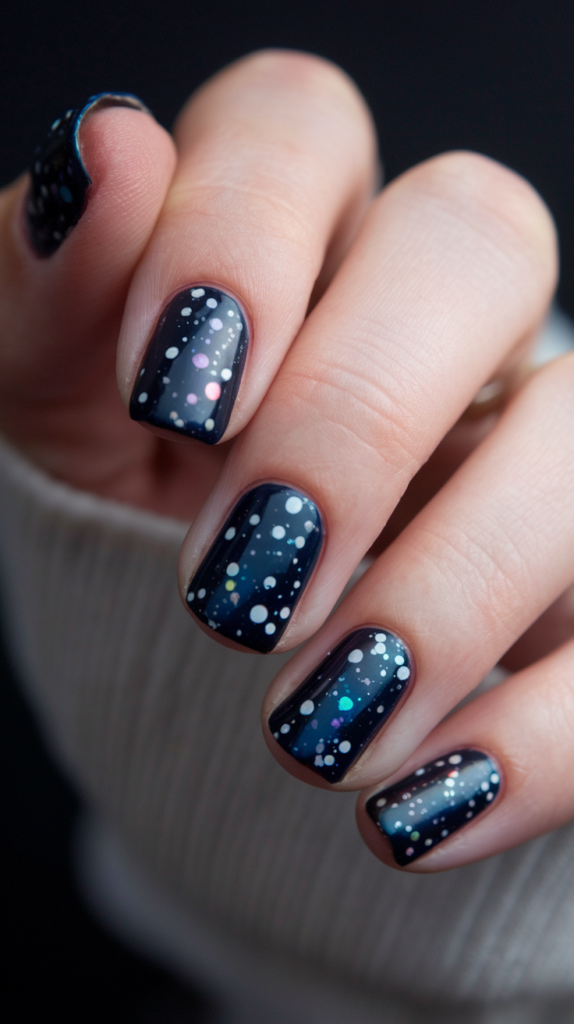
23. Frosted Polka Dots
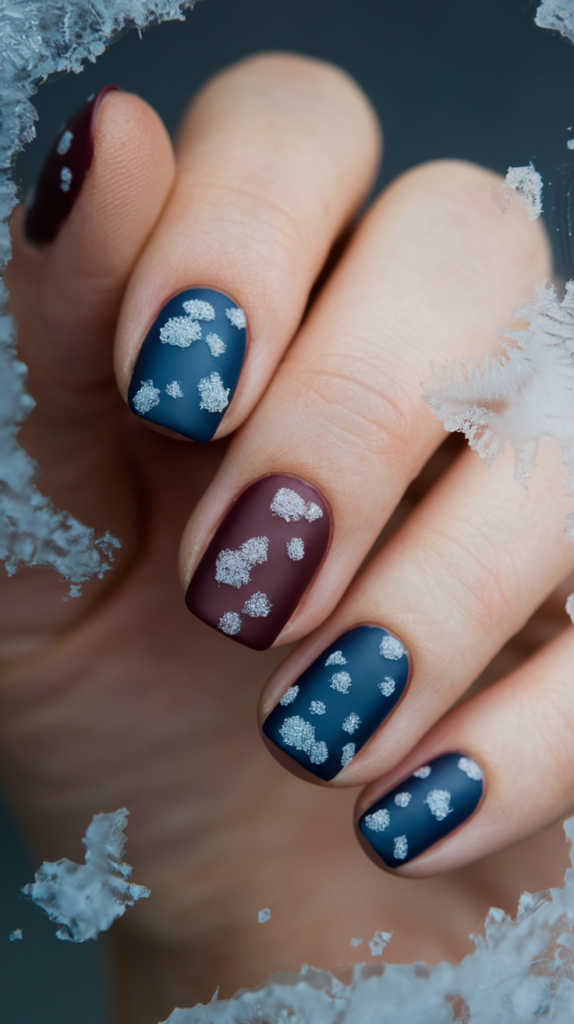
Frosty, iridescent polka dots on a dark base evoke a wintry, elegant aesthetic reminiscent of snowflakes.
How to Create Frosted Polka Dots
Step 1: Dark Base
Apply two coats of deep blue or charcoal polish for a wintery backdrop. Let it dry fully.
Step 2: Frosty Dots
Use a dotting tool to place white or iridescent dots, mimicking snowflakes, across each nail.
Step 3: Seal the Design
Finish with a matte top coat to enhance the frosty effect and protect the design.
Styling Tips
Ideal for winter parties or holiday events, pair with cozy knits or silver accessories for a snowy, chic look.
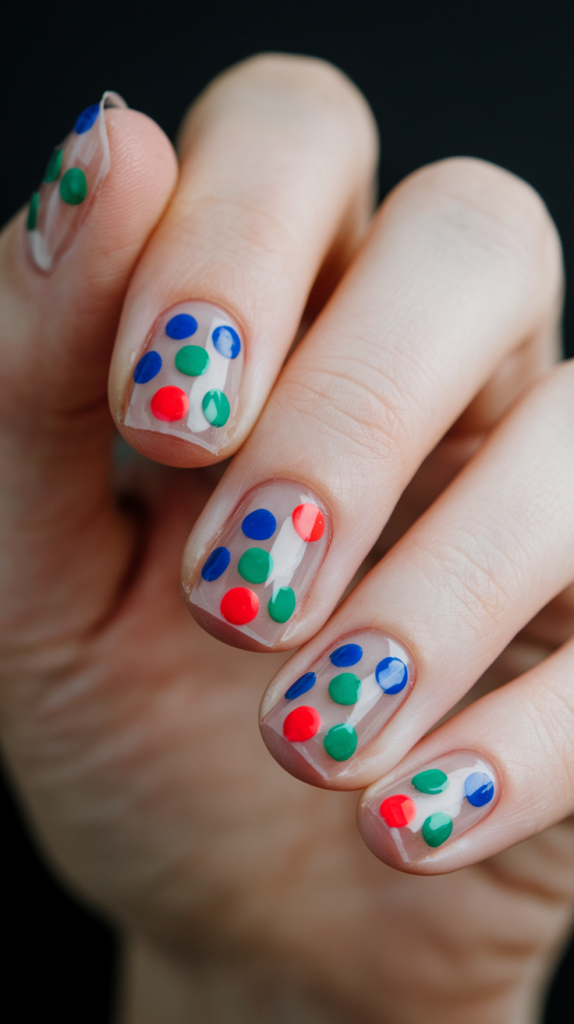
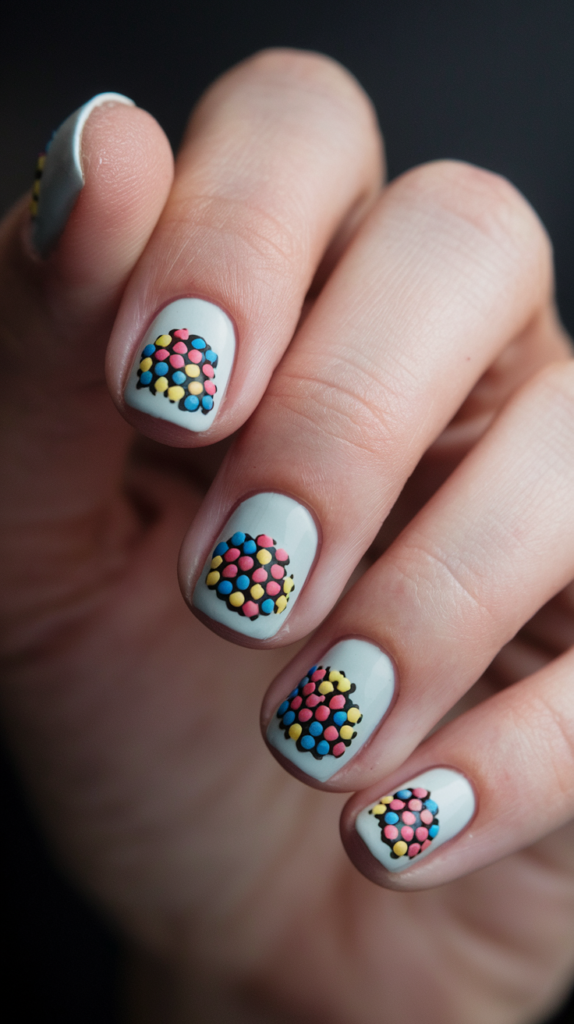
24. Polka Dot Confetti Nails
Multicolored polka dots scattered like confetti create a festive, vibrant manicure bursting with celebration.
How to Create Polka Dot Confetti Nails
Step 1: Neutral Base
Apply two coats of clear or nude polish for a transparent base. Let it dry completely.
Step 2: Confetti Dots
Use a dotting tool to randomly place multicolored dots (pink, blue, yellow) in varying sizes for a confetti effect.
Step 3: Seal the Design
Finish with a glossy top coat to protect the colorful dots and enhance shine.
Styling Tips
Perfect for birthdays or festive parties, pair with bright, playful outfits to match the celebratory vibe.
25. Geometric Polka Dots
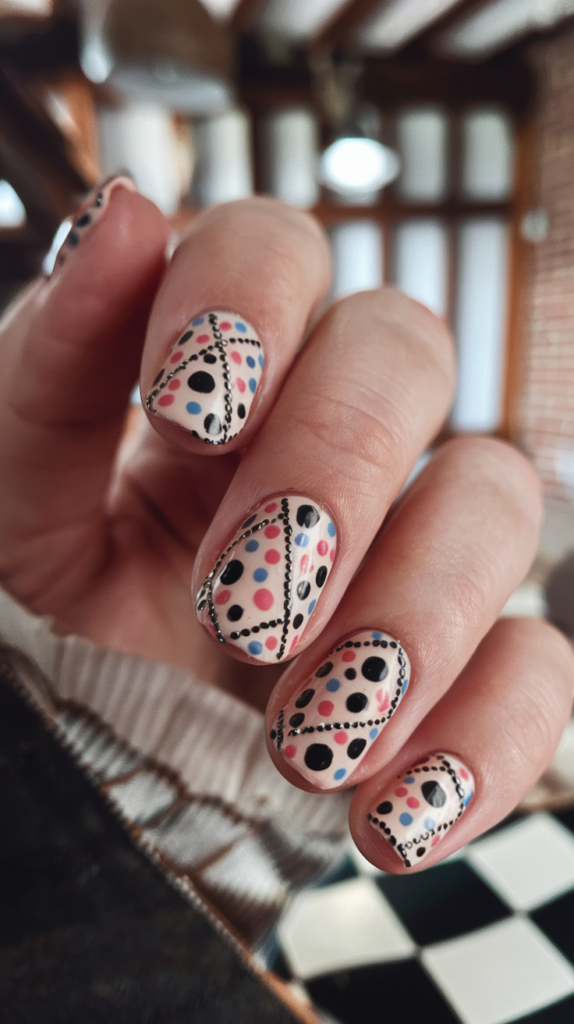
Polka dots paired with geometric shapes like triangles or squares create a bold, modern design with structured flair.
How to Create Geometric Polka Dots
Step 1: White Base
Apply two coats of white polish for a clean backdrop. Let it dry fully.
Step 2: Geometric Shapes & Dots
Use striping tape to paint black triangles or squares, then add contrasting dots inside or around them with a dotting tool.
Step 3: Seal the Design
Finish with a glossy top coat to protect the geometric patterns and enhance contrast.
Styling Tips
Ideal for edgy or avant-garde looks, pair with structured outfits or bold patterns for a contemporary vibe.
26. Candy Dot Nails
Pastel or neon dots resembling candy sprinkles create a sweet, playful manicure full of whimsy.
How to Create Candy Dot Nails
Step 1: Pastel Base
Apply two coats of a pastel shade like pink or mint. Let it dry completely.
Step 2: Candy Dots
Use a dotting tool to randomly place neon or pastel dots (yellow, blue, pink) in varying sizes.
Step 3: Seal the Design
Finish with a glossy top coat to mimic the glossy look of candy and protect the design.
Styling Tips
Perfect for summer or playful events, pair with bright, colorful outfits to enhance the candy-inspired vibe.
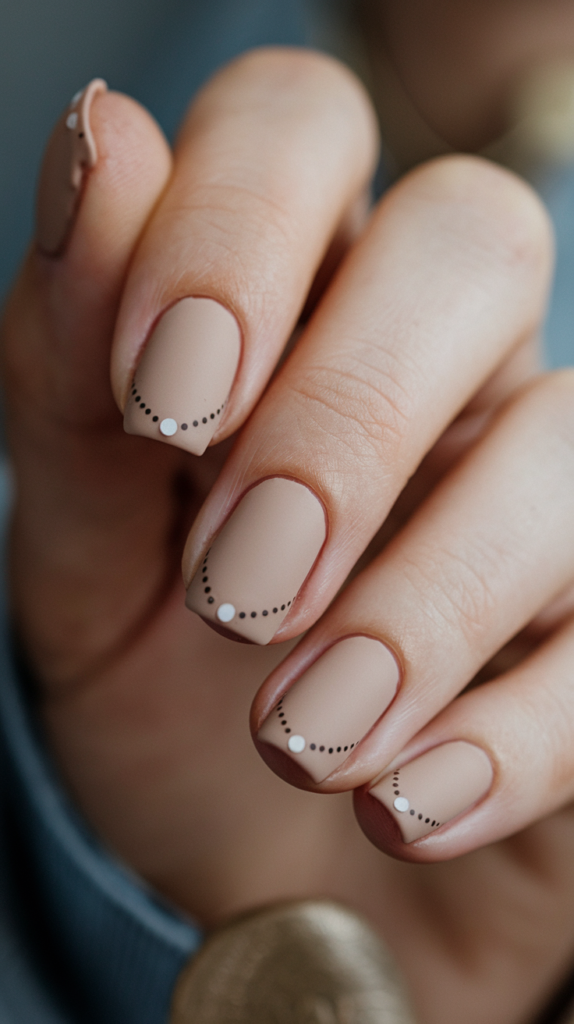
27. Half-Moon Polka Dots
Polka dots concentrated in the half-moon area near the cuticle create a minimalist, elegant design.
How to Create Half-Moon Polka Dots
Step 1: Nude Base
Apply two coats of nude polish for a clean, neutral base. Let it dry fully.
Step 2: Half-Moon Dots
Use a dotting tool to place small black or white dots in the half-moon area near the cuticle.
Step 3: Seal the Design
Finish with a glossy top coat to protect the delicate dots and enhance elegance.
Styling Tips
Ideal for office wear or subtle glamour, pair with tailored outfits for a refined, polished look.
28. Minimalist Dot Nails
A single dot per nail near the tip or cuticle offers a subtle, sophisticated take on polka dots.
How to Create Minimalist Dot Nails
Step 1: Clear Base
Apply two coats of clear or nude polish for a transparent base. Let it dry completely.
Step 2: Single Dots
Use a fine dotting tool to place one black or metallic dot near the cuticle or tip of each nail.
Step 3: Seal the Design
Finish with a glossy top coat to protect the minimalist design and add shine.
Styling Tips
Perfect for everyday wear or professional settings, pair with neutral outfits for understated elegance.
29. 3D Polka Dots
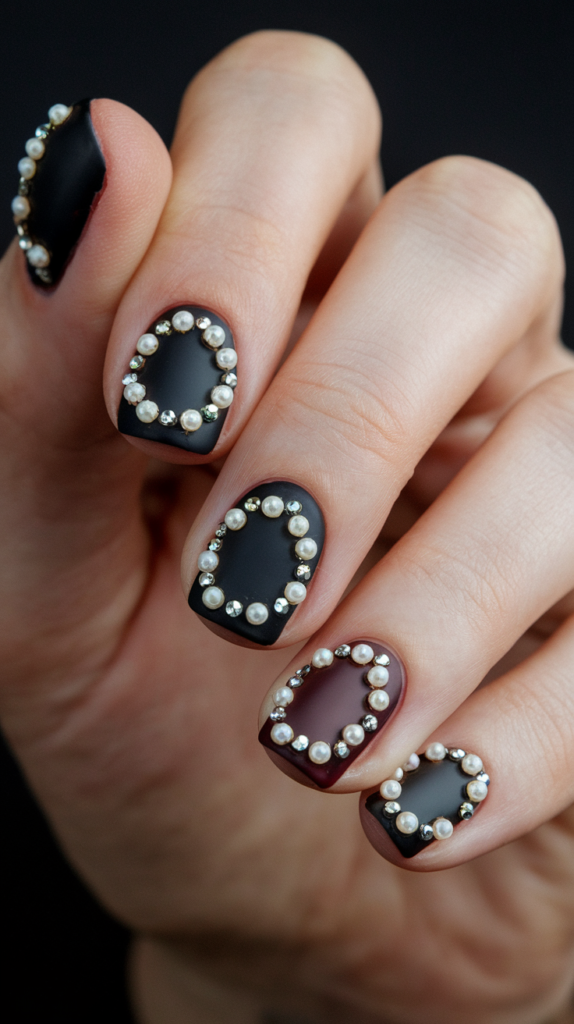
Rhinestones or pearls as 3D polka dots add texture and luxury to a glamorous manicure.
How to Create 3D Polka Dots
Step 1: Black Base
Apply two coats of black polish for a bold backdrop. Let it dry fully.
Step 2: 3D Dots
Use nail glue and tweezers to place small rhinestones or pearls as dots on each nail.
Step 3: Seal the Design
Apply a clear top coat around the 3D elements to secure them and enhance shine.
Styling Tips
Ideal for weddings or galas, pair with elegant evening wear and sparkling jewelry for maximum glamour.
30. Dotty Ombré Effect
A gradient of polka dots fading from dark to light creates a modern, eye-catching twist on the classic pattern.
How to Create Dotty Ombré Nails
Step 1: Light Base
Apply two coats of a light polish like white or nude for a clean canvas. Let it dry fully.
Step 2: Gradient Dots
Using a dotting tool, place larger, darker dots (e.g., navy) near the cuticle, transitioning to smaller, lighter dots (e.g., sky blue) toward the tip.
Step 3: Seal the Design
Finish with a glossy top coat to smooth the gradient and enhance the ombré effect.
Styling Tips
Perfect for summer or casual outings, pair with flowy dresses or denim to highlight the soft gradient.
31. Rainbow Tips with Polka Dots
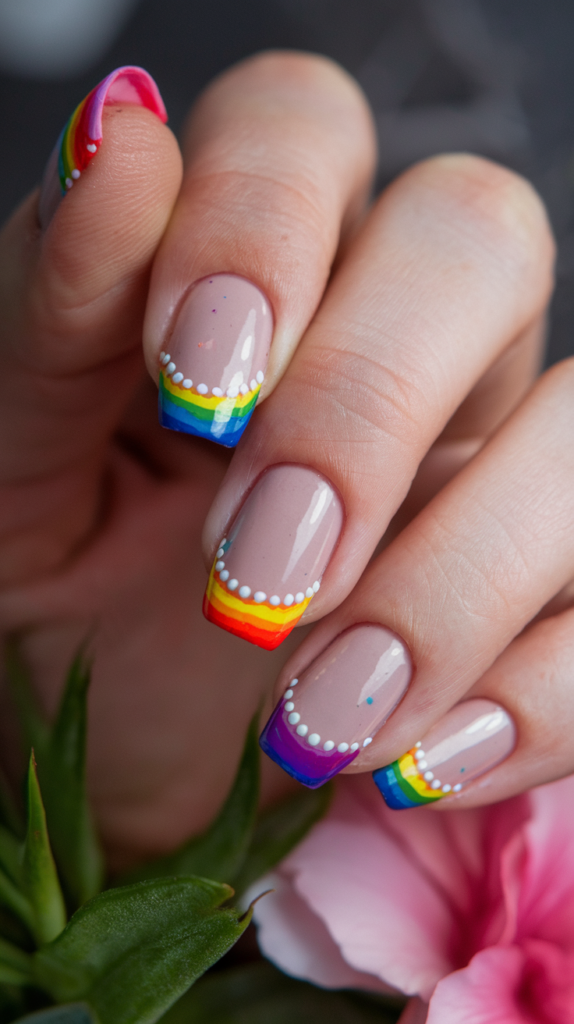
Rainbow-colored French tips adorned with white polka dots offer a vibrant, playful spin on the classic manicure.
How to Create Rainbow Tip Polka Dots
Step 1: Nude Base
Apply two coats of nude polish for a neutral base. Let it dry completely.
Step 2: Rainbow Tips & Dots
Paint rainbow-colored tips (red, orange, yellow, etc.) using a thin brush, then add tiny white dots with a dotting tool.
Step 3: Seal the Design
Finish with a glossy top coat to protect the vibrant tips and dots.
Styling Tips
Ideal for festivals or summer parties, pair with colorful outfits to match the lively rainbow energy.
32. Monochrome Dotted French Tips
Black or white French tips with contrasting polka dots create a sleek, modern take on the classic manicure.
How to Create Monochrome Dotted French Tips
Step 1: Nude Base
Apply two coats of nude polish for a clean base. Let it dry fully.
Step 2: Monochrome Tips & Dots
Paint black or white French tips, then add contrasting dots (white on black or black on white) with a dotting tool.
Step 3: Seal the Design
Finish with a glossy top coat for a polished, high-contrast finish.
Styling Tips
Perfect for office or evening wear, pair with monochrome outfits for a chic, sophisticated look.
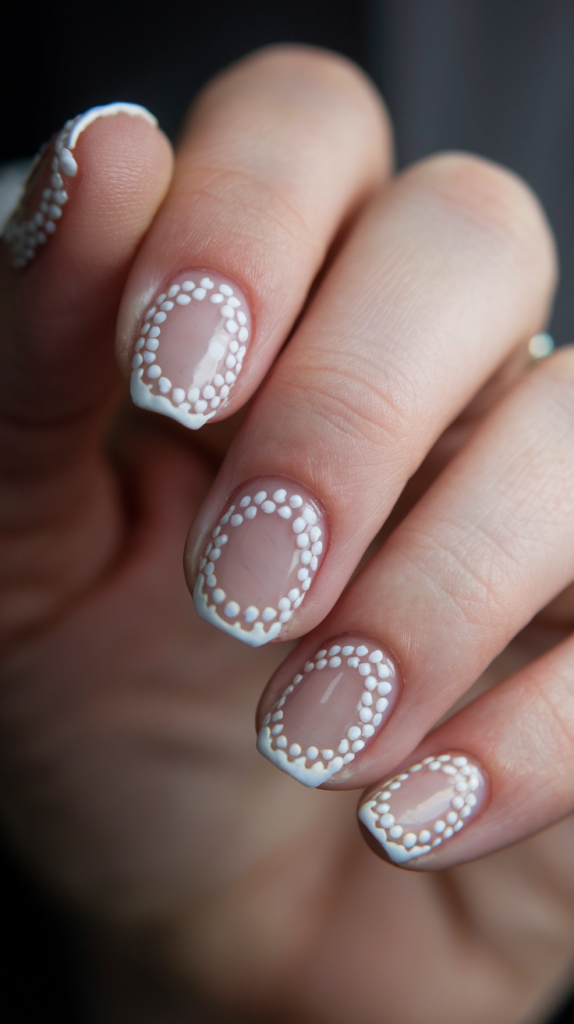
33. Polka Dot Lace Design
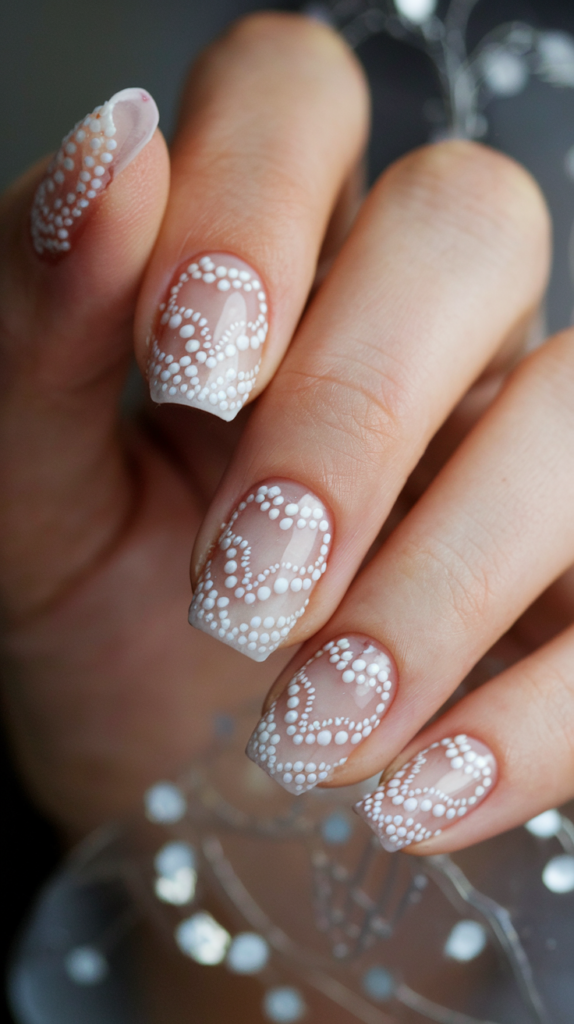
Delicate lace patterns combined with tiny polka dots create a feminine, elegant manicure.
How to Create Polka Dot Lace Nails
Step 1: Light Base
Apply two coats of nude or pale pink polish for a soft base. Let it dry completely.
Step 2: Lace & Dots
Use a fine brush or stamping tool to create lace patterns, then add tiny white dots within or around the lace.
Step 3: Seal the Design
Finish with a glossy top coat to protect the intricate lace and dots.
Styling Tips
Ideal for weddings or formal events, pair with lace dresses or delicate accessories for a romantic look.
34. Polka Dot Stars
Polka dots arranged into star shapes create a whimsical, celestial design that evokes a starry night sky.
How to Create Polka Dot Stars
Step 1: Dark Base
Apply two coats of navy or black polish for a night-sky effect. Let it dry completely.
Step 2: Star Dots
Use a dotting tool to place white or silver dots in star shapes, with a central dot and smaller dots forming points.
Step 3: Seal the Design
Finish with a glossy top coat to protect the starry design and enhance its sparkle.
Styling Tips
Perfect for evening events or cosmic-themed parties, pair with dark, shimmery outfits to amplify the celestial vibe.
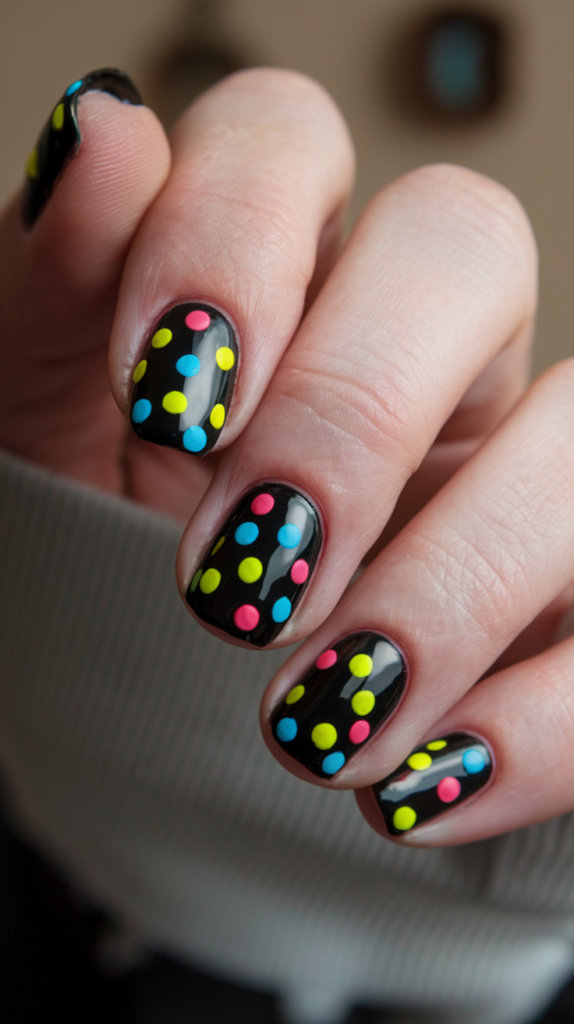
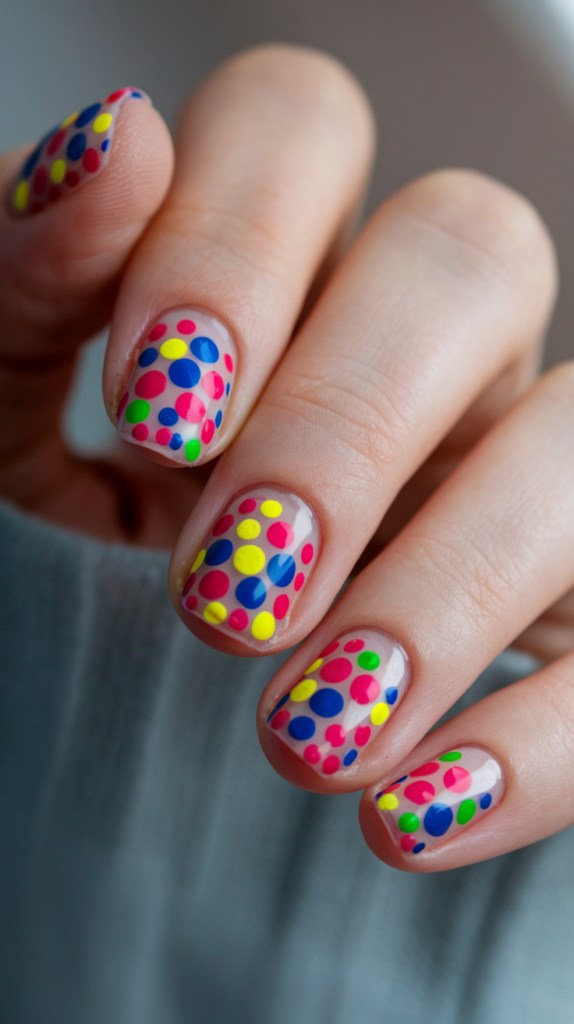
35. Bold and Neon Polka Dots
Neon polka dots on a vibrant base deliver a bold, energetic manicure that demands attention.
How to Create Bold and Neon Polka Dots
Step 1: White Base
Apply two coats of white polish to make neon colors pop. Let it dry fully.
Step 2: Neon Dots
Use a dotting tool to place neon pink, green, or yellow dots, mixing sizes for a dynamic look.
Step 3: Seal the Design
Finish with a glossy top coat to enhance the neon vibrancy and protect the design.
Styling Tips
Ideal for summer festivals or bold party looks, pair with bright, colorful outfits to match the neon energy.
Conclusion
Polka dot nail art blends timeless charm with endless creativity, offering designs that range from playful and bold to elegant and minimalist.
These 35 ideas—from classic red and white dots to vibrant neon patterns and intricate lace accents—provide inspiration for every style and occasion.
Whether you’re experimenting with gradients, textures, or celestial motifs, polka dots transform your nails into a canvas of fun and sophistication.
Try these techniques, mix colors and patterns, and let your manicure shine with personality and flair.