Easter is a time of renewal, joy, and vibrant celebration, making it the perfect occasion to refresh your nail art with designs that capture the essence of the season.
Whether you’re attending an Easter brunch, participating in an egg hunt, or simply enjoying the warmth of spring, your nails can be a canvas for creativity that showcases the festive spirit of this beloved holiday.
From pastel bunny silhouettes to glittery Easter eggs, there are endless possibilities to explore when it comes to Easter nail designs.
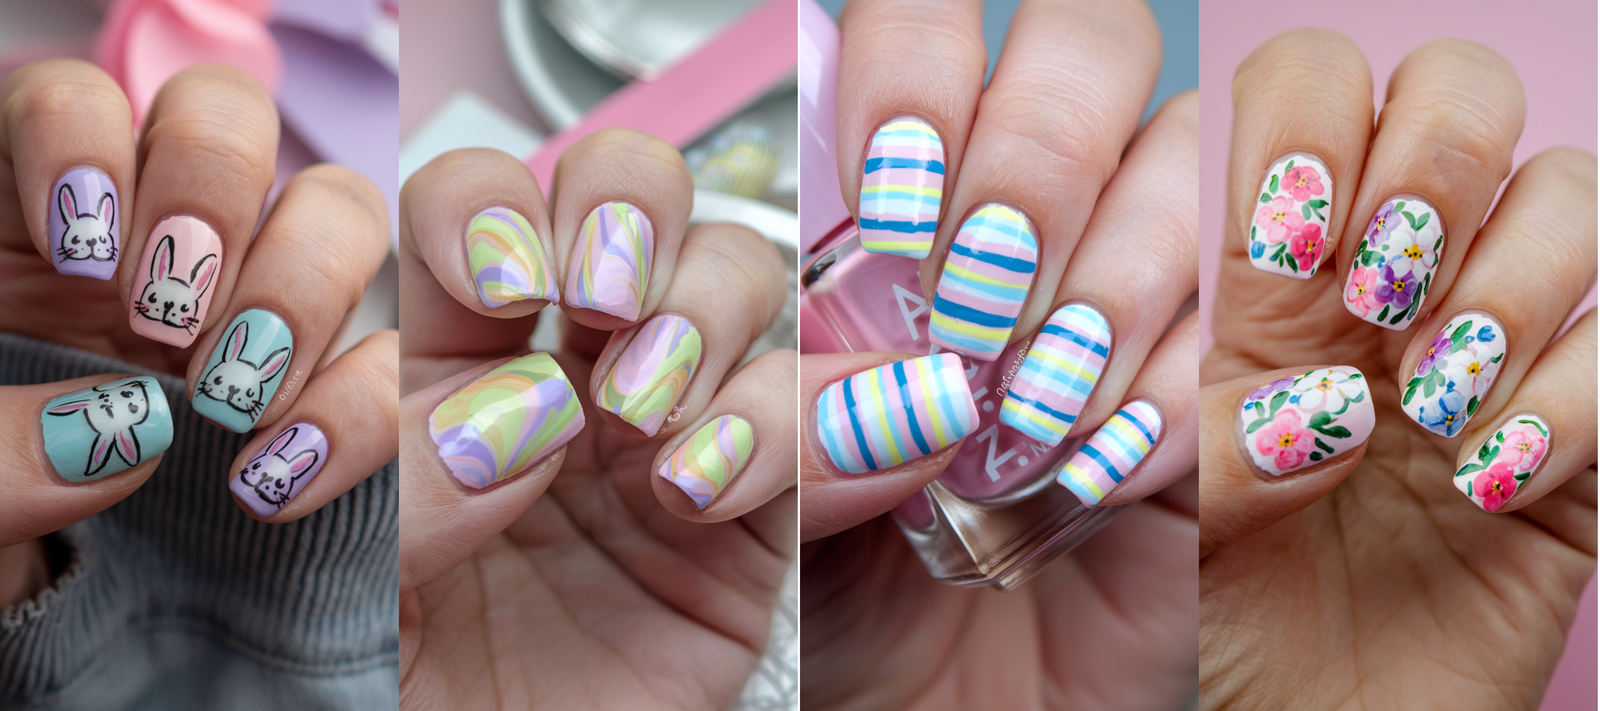
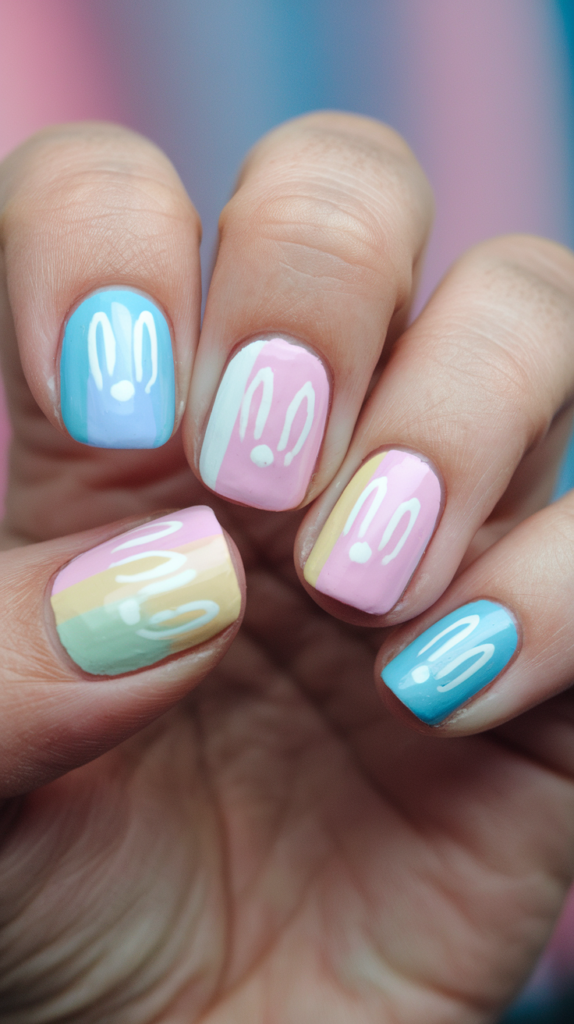
1. Pastel Bunny Silhouette Nail Art

Pastel bunny silhouettes bring a whimsical touch to your nails, making them the perfect way to celebrate Easter and welcome the spring season.
The blend of soft pastel hues and playful bunny shapes creates a design that is both elegant and charming, ideal for any occasion.
Why Pastel Colors Work for Easter Nails
Pastel shades are a springtime classic, symbolizing renewal and the blossoming beauty of the season. These gentle tones—like mint green, baby blue, lavender, and blush pink—are reminiscent of fresh blooms and Easter traditions.
Incorporating pastels into your nail designs creates a look that is light, airy, and effortlessly stylish. The subtlety of these colors ensures a refined finish, while their versatility allows for creative accents, like bunny silhouettes.
Whether you’re going for a simple look or something more detailed, pastels provide the perfect canvas for celebrating Easter in style.
Step-by-Step Guide to Painting Bunny Silhouettes
Step 1: Apply Your Base Color
Choose your favorite pastel polish and apply it as the base layer on your nails. Allow it to dry completely before moving to the next step.
Step 2: Outline the Bunny Silhouette
Using a fine-tipped nail art brush, paint a bunny silhouette in white or a complementary pastel shade. Start by outlining the bunny’s head and ears, then fill in the shape with smooth, even strokes.
Step 3: Add Finishing Details
For extra charm, use a dotting tool to add a tiny eye to the bunny. If you want a more creative twist, embellish your bunny with a flower crown, bow tie, or other accessories.
Step 4: Seal the Design
Finish with a glossy top coat to protect the design and give your nails a radiant shine. This step ensures your bunny silhouettes stay flawless throughout the season.
Adapting Pastel Bunny Nails for Any Occasion
Pastel bunny silhouettes are more than just a festive Easter design—they’re a versatile option for all of spring.
The soft colors and delicate details make them suitable for any event, whether it’s a casual outing or a formal occasion. You can customize the design by experimenting with different pastel shades or adding accents like floral patterns or polka dots.
This design offers endless possibilities, from minimalist styles to more elaborate creations, ensuring your nails remain fresh and trendy all season.
Why It Works
Pastel Bunny Silhouette Nail Art captures the playful spirit of Easter while embracing the elegance of pastel shades.
The combination of soft hues and charming bunny details creates a balanced and versatile look, perfect for both casual and formal occasions.
With its light and airy aesthetic, this design is a timeless choice for celebrating spring in style.
2. Speckled Easter Egg Nail Art
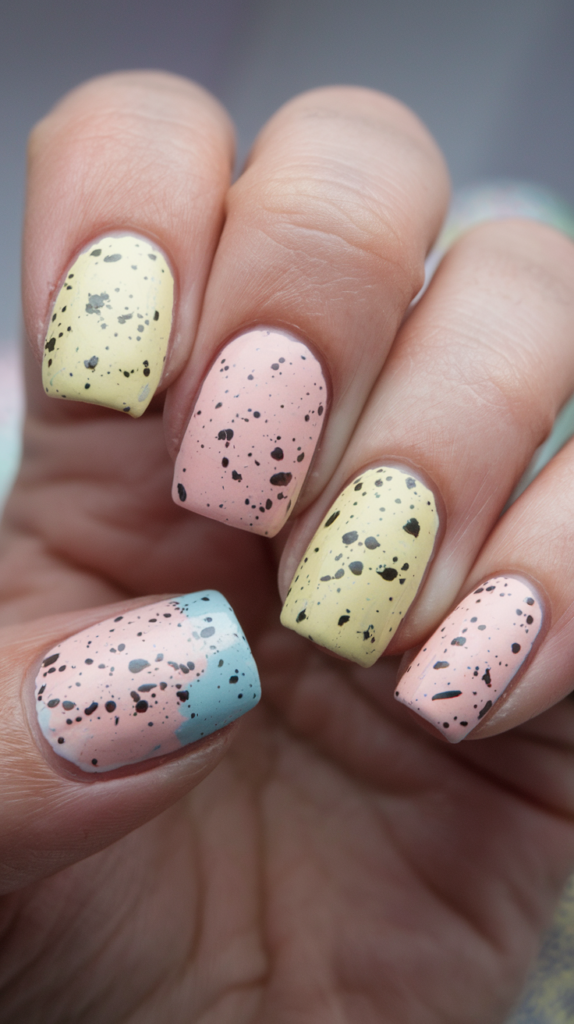
Speckled Easter egg nails bring the charm of this holiday classic to your manicure, combining simplicity with elegance.
The whimsical speckled effect adds a playful touch while keeping your nails chic and sophisticated—a perfect way to celebrate Easter in style.
The Art of Creating a Natural Speckled Look
Step 1: Choose Your Base Color
Start with a pastel shade that embodies the essence of spring. Light blues, pinks, yellows, and greens are all excellent choices.
Apply two coats of your chosen color and let it dry completely to ensure a smooth, even base.
Step 2: Create the Speckled Effect
Dip a small, stiff-bristled brush into a dark polish, such as black or brown. Lightly flick the bristles against a paper towel to remove any excess polish.
Gently tap the brush against your nails to create a pattern of tiny specks. Vary the size and placement of the speckles to achieve a natural, organic look.
Step 3: Seal Your Design
Finish with a clear top coat to protect the speckled design and give your nails a polished, glossy finish.
Best Color Combinations for Speckled Nail Art
Pastel shades paired with darker speckles offer a striking contrast that highlights the delicate beauty of the design.
- For a traditional Easter look, opt for pastel pink with black speckles or pale blue with dark brown speckles.
- For a modern twist, experiment with mint green and gold speckles or lavender and silver speckles.
Metallic speckles, like gold and silver, add a touch of glamour, making your nails perfect for special occasions.
By mixing and matching colors, you can personalize your design to reflect your unique style and preferences.
From Minimalist to Bold: Adapting the Speckled Design
Speckled Easter egg nails can be tailored to match your style, whether you prefer a subtle or bold look.
- For a minimalist vibe: Keep the speckles small and sparse to let the pastel base color shine.
- For a bold statement: Opt for larger, more densely packed speckles for a dramatic effect. You can also experiment with mixing speckle sizes and colors across your nails for a more dynamic and eye-catching design.
This versatile style allows you to celebrate Easter in a way that perfectly complements your aesthetic.
Why It Works
Speckled Easter Egg Nail Art combines the playful spirit of Easter with the sophistication of pastel shades and intricate speckled patterns.
The versatility of this design lets you create anything from understated elegance to bold, eye-catching statements.
Whether traditional or modern, the speckled effect ensures your nails are both stylish and festive, making them a timeless choice for Easter celebrations.
3. Floral Easter Egg Nail Art
Floral Easter egg nail art combines the elegance of springtime blooms with the festive charm of Easter, creating a sophisticated and creative manicure.
Perfect for showcasing your artistry, this design brings a polished, refined touch to your fingertips.
How to Paint Intricate Floral Designs
Step 1: Select a Pastel Base Color
Start by applying a pastel shade that complements the floral accents you wish to create. Allow it to dry completely before moving on to the next step.
Step 2: Outline the Flowers
Using a fine-tipped nail art brush, outline the flowers in a contrasting color. Begin with simple shapes, such as daisies or roses, to build confidence if you’re new to nail art.
Step 3: Add Depth and Details
Fill in the petals with lighter or darker shades to create dimension. For added realism, use a thin brush to paint delicate veins on the petals or tiny dots at the center of the flowers.
Step 4: Seal the Design
Finish with a glossy top coat to protect the intricate details and give your nails a polished shine.
Choosing the Best Pastel Backgrounds for Floral Accents
The background color plays a crucial role in enhancing your floral designs and ensuring they stand out.
- Soft pinks, peaches, and lavenders create a feminine and romantic base.
- Mint greens and baby blues offer a fresh, modern feel.
When selecting a background, think about the type of flowers you plan to paint. For instance:
- White flowers stand out beautifully against a pale pink background.
- Yellow flowers pop against a mint green base.
Experimenting with different pastel shades lets you tailor your design to match your mood and style, from subtle and delicate to bold and vibrant.
Matching Your Floral Nails with Your Easter Outfit
Floral Easter egg nail art is versatile, making it easy to coordinate with your Easter attire.
- If you’re wearing a floral dress, choose nail colors that complement the shades in your outfit. For a cohesive look, you can even replicate the floral pattern from your dress onto your nails.
- If your outfit is neutral, let your nails shine as a statement piece by opting for bolder floral designs with contrasting colors.
Matching your nails to your outfit ties your look together, adding a stylish and festive touch that’s perfect for celebrating Easter.
Why It Works
Floral Easter Egg Nail Art elegantly captures the beauty of spring flowers while embracing the playful spirit of Easter.
The combination of intricate floral details and pastel backgrounds creates a sophisticated and versatile manicure that suits any occasion.
Whether paired with a floral dress or used as a statement accessory, this design ensures your nails remain the highlight of your Easter celebration.
4. Chick Hatching Nail Art
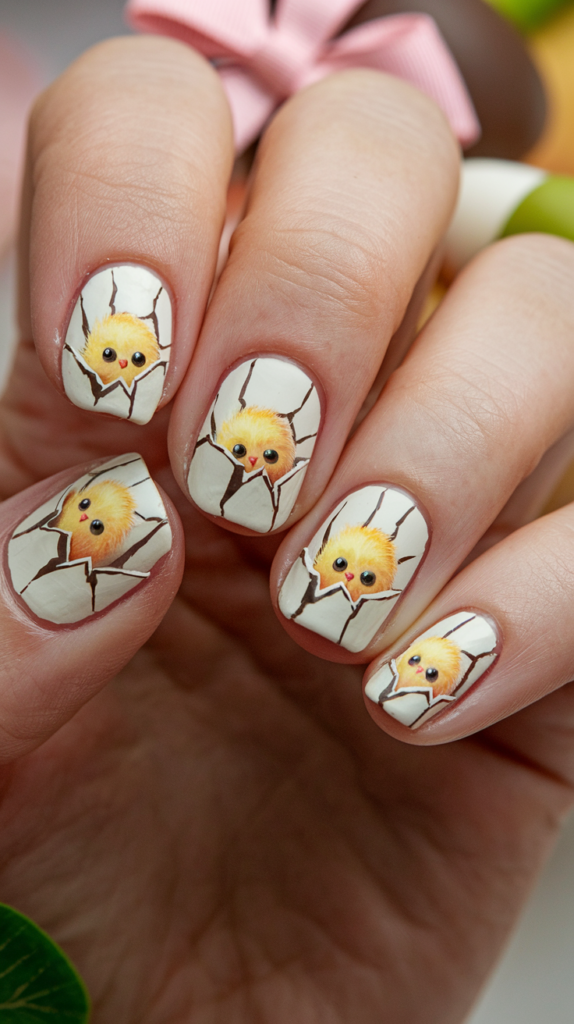
Chick hatching nail art brings a playful and whimsical touch to your manicure, making it a delightful way to celebrate Easter.
This fun design captures the charm of the holiday while showcasing your creative flair.
How to Paint Adorable Easter Chicks
Step 1: Apply the Base Coat
Choose a pastel base color, such as soft yellow or pale blue, to set the stage for your design. Apply two coats for an even finish and allow it to dry completely.
Step 2: Create the Eggshell
Using a fine-tipped nail art brush, outline a cracked eggshell in white. Fill in the shell with the same color, leaving space in the middle for the chick to appear.
Step 3: Paint the Chick
Fill the space between the shell halves with bright yellow polish to create the chick’s body. Add small details like tiny wings, eyes, and a beak using a dotting tool or fine brush.
Step 4: Add Final Details
To enhance the design, paint small cracks around the edges of the shell to give the appearance of the chick just hatching.
Step 5: Seal the Design
Finish with a glossy top coat to protect your artwork and add a polished shine.
Choosing the Best Pastel Shades for Chick Nail Art
Selecting the right pastel shades is key to creating a cohesive and visually appealing design.
- Soft yellow is the go-to choice for the chick’s body, representing the cheerful nature of Easter.
- For the eggshell, white is a classic and clean option, but you can experiment with pastel hues like lavender or mint green for a unique twist.
- Use complementary shades like peach, light pink, or pale blue for the base to tie the entire design together.
The combination of these colors creates a harmonious and festive look perfect for celebrating the season.
Featuring Your Chick Design as an Accent Nail
To make your chick hatching design stand out, consider using it as an accent nail.
- Keep the remaining nails simple with solid pastel colors or subtle speckled patterns that complement the chick design.
- For a cohesive Easter theme, add additional elements like bunny ears or floral accents to the other nails.
This approach ensures a balanced and stylish manicure that highlights the playful centerpiece without overwhelming the overall design.
Why It Works
Chick Hatching Nail Art captures the joyful essence of Easter with its playful yet refined design.
The combination of soft pastels, adorable details, and a whimsical theme makes this nail art a standout choice for the holiday.
Featuring the design as an accent nail adds focus and charm while keeping the rest of the manicure simple and elegant.
Perfect for showcasing creativity and celebrating the season, this design is both festive and stylish.
5. Gradient Pastel Ombré Nail Art

Gradient pastel ombré nails beautifully capture the spirit of Easter with a seamless blend of soft, elegant hues.
This design is perfect for anyone who wants to embrace the full spectrum of pastel colors while creating a dreamy and sophisticated look.
Mastering the Gradient Technique for Ombré Nails
Step 1: Apply a White Base Coat
Begin with a white base coat to make the pastel shades pop. Allow it to dry completely for a smooth foundation.
Step 2: Select Your Pastel Shades
Choose two or three pastel colors that blend well together. Popular combinations include pink, lavender, and baby blue for a classic gradient.
Step 3: Create the Gradient Effect
Using a makeup sponge, apply the pastel shades in overlapping horizontal stripes. Gently dab the sponge onto your nails in a light, tapping motion to blend the colors seamlessly.
Repeat the dabbing process until you achieve the desired gradient effect.
Step 4: Clean Up the Edges
Use a small brush dipped in nail polish remover to clean any excess polish around your cuticles for a neat finish.
Step 5: Seal the Design
Finish with a glossy top coat to smooth out the gradient and give your nails a radiant shine.
Best Pastel Color Combinations for Ombré Nails
Choosing complementary pastel colors is essential for a cohesive and visually stunning gradient.
- Classic combinations: Soft pinks, lavenders, and baby blues create a delicate and harmonious look.
- Playful pairings: Mint green with pale yellow or peach with light coral add a cheerful and vibrant touch.
- Monochromatic gradients: Shades within the same color family, like different tones of pink or purple, offer a subtle and elegant transition.
Experimenting with these combinations allows you to create a personalized look that reflects your unique style.
Why Gradient Ombré Nails Are Perfect for Easter
Gradient pastel ombré nails are the ultimate choice for Easter, blending timeless pastel hues with a modern twist.
- The soft transitions between colors capture the light, airy essence of the season.
- This versatile design suits any occasion, from casual gatherings to formal Easter celebrations.
- The dreamy gradient effect adds an elegant and eye-catching element, ensuring your manicure stands out.
Why It Works
Gradient Pastel Ombré Nail Art embodies the joy and beauty of Easter with its harmonious blending of colors.
The versatile and ethereal design complements any style, whether you prefer a subtle and understated look or something bold and vibrant.
A perfect choice for celebrating the season, this design is both timeless and inspiring, making it a must-try for your Easter manicure.
6. Easter Basket Nail Art
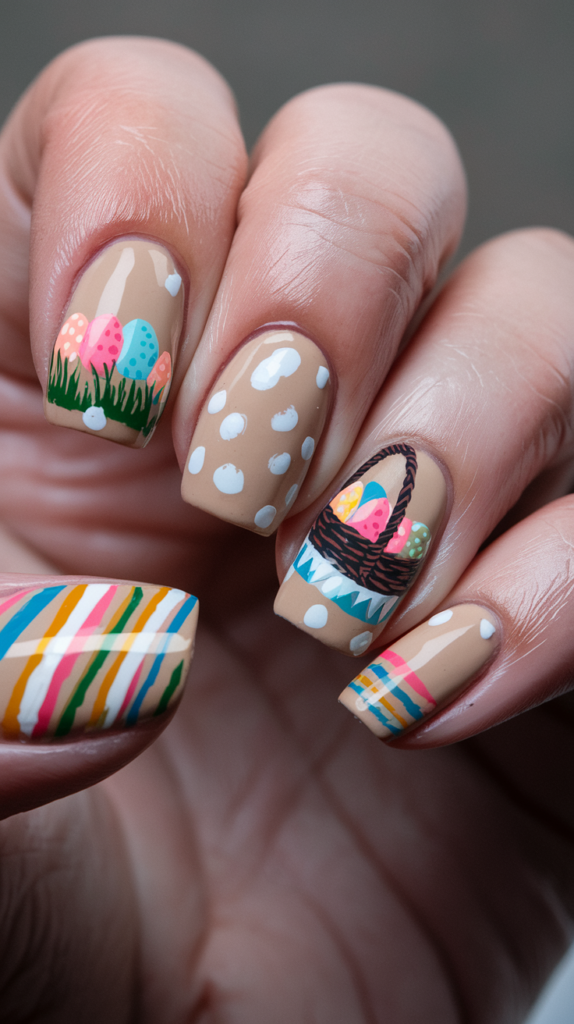
Easter basket nail art brings the charm of traditional Easter symbols to your manicure in a playful and creative way.
This delightful design is perfect for celebrating the holiday while showcasing your artistic flair.
Creating Miniature Baskets with Nail Art
Step 1: Apply a Pastel Base Coat
Start by applying a pastel base color, such as soft blue or lavender, to set the stage for your design. Let it dry completely.
Step 2: Paint the Basket Outline
Using a fine-tipped nail art brush, outline the shape of the basket with a light brown or beige polish.
Step 3: Add the Woven Texture
Create the basket’s woven pattern by painting small, horizontal lines across the outline, leaving spaces between each line. Follow with vertical lines to complete the woven effect.
Use a darker brown shade to add depth and shading, enhancing the basket’s realistic look.
Step 4: Paint the Easter Eggs
Fill the basket with tiny Easter eggs using pastel shades like pink, yellow, and green. A dotting tool or fine brush works well for this step.
Step 5: Seal the Design
Finish with a glossy top coat to protect your artwork and give your nails a polished shine.
Adding Realistic Egg Designs to Your Basket
Adding intricate details to your Easter eggs makes your design stand out and adds a touch of realism.
- Use a dotting tool or fine brush to paint oval egg shapes inside the basket.
- Choose pastel colors for the eggs and add patterns like speckles, stripes, or polka dots for a playful touch.
- For added sparkle, include metallic or glitter finishes on a few eggs to elevate the design.
- Experiment with floral accents or unique patterns to give each egg its own personality.
These details bring your Easter basket nails to life, creating a festive and eye-catching look.
Why Easter Basket Nails Are a Festive Accent
Easter basket nails are a fun and creative way to celebrate the holiday while adding a unique touch to your style.
- Feature the basket design as an accent nail for a subtle statement, or apply it across multiple nails for a bolder look.
- Pair the design with complementary Easter-themed elements, like bunny ears or floral patterns, for a cohesive and charming manicure.
- The intricate details of the basket and eggs make this design a true work of art, perfect for sparking conversations and showcasing your creativity.
Why It Works
Easter Basket Nail Art combines traditional holiday symbols with creative nail techniques to create a charming and festive manicure.
The combination of the woven basket and detailed Easter eggs ensures your nails are a standout feature, capturing the playful spirit of the season.
This delightful design is perfect for elevating your Easter look and making your nails the center of attention.
7. Polka Dot Bunny Ear Nail Art
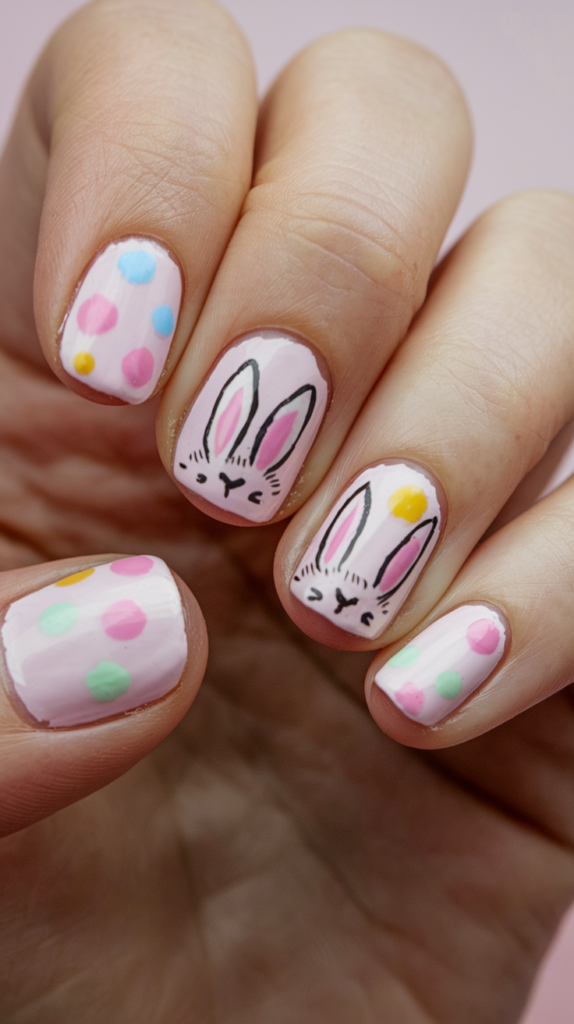
Polka dot bunny ear nail art combines timeless polka dots with the whimsical charm of bunny ears, creating a playful and festive design.
Perfect for celebrating Easter, this fun twist on classic nail art adds a touch of personality and creativity to your manicure.
Painting Perfect Polka Dots for Easter Nails
Step 1: Apply a Pastel Base Coat
Start by applying a pastel shade, such as light pink or mint green, as your base color. Allow it to dry completely before adding the polka dots.
Step 2: Create the Polka Dots
Use a dotting tool or the rounded end of a bobby pin to paint evenly spaced dots on your nails. For a classic look, opt for white polka dots, or experiment with various pastel colors for a more vibrant design.
Dip the tool into the polish for each dot, gently pressing it onto the nail to ensure uniform size and shape.
Step 3: Add Variations
For a dynamic look, vary the size of the polka dots or create a gradient effect by using multiple shades of the same color.
Step 4: Seal the Design
Finish with a glossy top coat to protect your design and give your nails a polished shine.
How to Add Bunny Ears for a Playful Touch
Adding bunny ears to your polka dot design enhances the festive charm of your manicure.
Step 1: Paint the Bunny Ears
Using a fine-tipped nail art brush, paint two elongated ovals at the tip of the nail to form the bunny ears. Slightly curve the ovals for a more natural look.
Step 2: Add Details
For a classic look, paint the outer part of the ears in white and the inner part in soft pink. If desired, add a small dot at the base of the ears to represent the bunny’s nose.
Step 3: Embellish the Ears
For extra flair, consider decorating the bunny ears with tiny bows, flowers, or even a subtle glitter accent.
The combination of polka dots and bunny ears creates a fun, playful, and perfectly festive Easter design.
Combining Polka Dots with Other Easter Designs
Polka dots are incredibly versatile and can be paired with other Easter-themed designs for a cohesive and unique manicure.
- Mix and Match: Feature different elements on each nail, such as polka dot bunny ears on one nail and a speckled Easter egg on another.
- Floral Accents: Pair polka dots with delicate spring flowers for an elegant touch.
- Easter Egg Patterns: Add stripes, speckles, or other festive patterns alongside the polka dots.
This flexibility allows you to create a personalized manicure that showcases your creativity and celebrates Easter in style.
Why It Works
Polka Dot Bunny Ear Nail Art brings together the playful spirit of Easter with a timeless and whimsical design.
The versatility of polka dots combined with the charm of bunny ears creates a manicure that’s festive, fun, and perfect for any Easter celebration.
Whether kept simple or combined with other designs, this nail art ensures your nails are a standout feature for the holiday.
8. Carrot Patch Nail Art
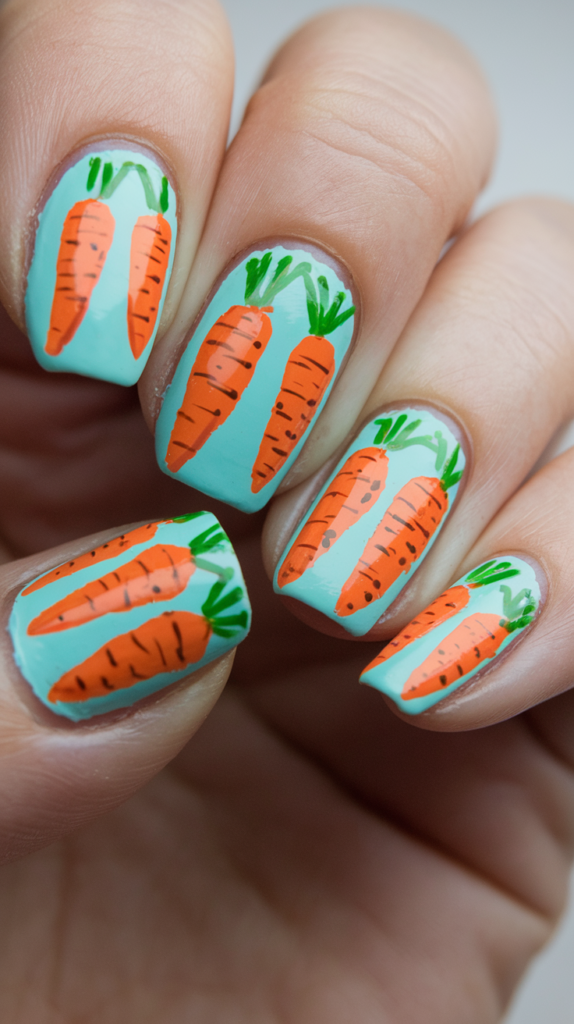
Carrot patch nail art brings the freshness of springtime and the charm of Easter to your manicure.
This vibrant and whimsical design is perfect for celebrating the season with a touch of nature and creativity.
Step-by-Step Guide to Painting Carrot Patch Nails
Step 1: Apply the Base Coat
Choose a light blue or white polish to create a sky-like background for your carrot patch. Let the base coat dry completely.
Step 2: Paint the Carrots
Using a fine-tipped nail art brush, paint small, elongated triangles in bright orange at the base of each nail to represent the carrots.
Step 3: Add the Green Tops
Paint small, jagged lines extending upward from the top of each carrot to create the carrot tops. Use a vibrant green shade for a fresh and lively look.
Step 4: Enhance with Shading
Add depth to the design by using a slightly darker green to shade the carrot tops. This step adds realism and dimension to your artwork.
Step 5: Include Extra Details (Optional)
For a more intricate design, consider adding small details like dirt mounds, tiny flowers, or grass around the carrots to create a more dynamic scene.
Step 6: Seal the Design
Finish with a glossy top coat to protect your design and give your nails a polished shine.
Best Background Colors for Carrot Patch Designs
Choosing the right background color sets the tone for your carrot patch design and helps the vibrant oranges and greens stand out.
- Light blue or white: Creates a bright, sky-like backdrop for a fresh and cheerful look.
- Light brown or beige: Adds an earthy feel, representing the ground for a more natural design.
- Mint green: Offers a modern, spring-inspired twist while maintaining a fresh aesthetic.
Select a background color that complements the overall vibe you want to achieve, enhancing the beauty of the carrots while making them the focal point of your manicure.
Why Carrot Patch Nails Are a Fresh Take on Easter Traditions
Carrot patch nail art is a fun and creative way to celebrate Easter with a nod to nature and springtime.
- The bright orange carrots and vibrant green tops create a striking contrast that draws attention to your nails.
- This design is versatile, pairing beautifully with other Easter-themed elements like bunny faces or floral accents for a cohesive manicure.
- Whether featured on a single accent nail or across all your nails, carrot patch art adds a playful and unique touch to your Easter look.
Why It Works
Carrot Patch Nail Art captures the lively spirit of Easter with its fresh colors and whimsical design.
The combination of nature-inspired elements and vibrant hues creates a manicure that’s both eye-catching and festive.
Perfect for embracing the season, this design ensures your nails will be a delightful centerpiece for any Easter celebration.
9. Lace Easter Egg Nail Art
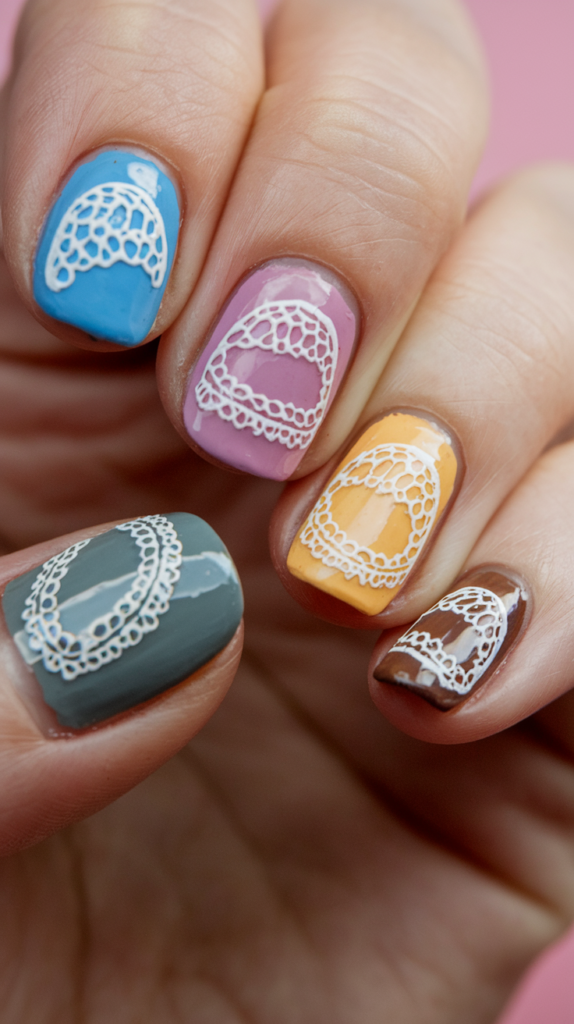
Lace Easter egg nail art combines the elegance of lace with the festive charm of Easter, creating a delicate and feminine manicure.
This chic design is perfect for celebrating the holiday in style, adding sophistication to any occasion.
How to Achieve a Lace Pattern on Nails
Step 1: Apply a Pastel Base Coat
Begin by applying a pastel base color, such as light pink or lavender, to your nails. Allow it to dry completely.
Step 2: Paint the Lace Pattern
Using a fine-tipped nail art brush, paint small, intricate loops and swirls in white or a contrasting pastel shade.
Vary the size and shape of the loops to create a delicate and realistic lace effect.
Step 3: Add Depth and Highlights
Use a slightly darker shade to add subtle shading and highlights, giving the lace design dimension and a more intricate appearance.
Step 4: Refine the Details
For beginners, start with a simple lace pattern and gradually work toward more complex designs as you gain confidence.
Step 5: Seal the Design
Finish with a glossy top coat to protect the design and give your nails a polished shine.
Combining Lace Designs with Pastel Easter Eggs
Blending lace patterns with pastel Easter eggs creates a feminine and festive look, perfect for the holiday.
Step 1: Paint the Easter Egg Outline
Start by painting an egg-shaped outline on your nails using a pastel color, such as baby blue, peach, or mint green.
Step 2: Add the Lace Details
Inside the egg outline, paint a lace pattern using loops, swirls, or tiny flowers for an elegant touch.
Step 3: Enhance the Design
Incorporate additional elements, like dots or floral accents, to make the design more intricate and eye-catching. For a more elaborate look, add lace details to the background or feature different lace designs on multiple nails.
This combination of lace and Easter eggs creates a sophisticated and stylish manicure that’s perfect for any celebration.
Why Lace Easter Eggs Are Perfect for a Chic Look
Lace Easter egg nail art is ideal for those who prefer a subtle yet refined manicure.
- The delicate lace patterns add elegance, while pastel Easter eggs bring a festive and playful element to the design.
- This versatile look is suitable for both casual and formal occasions, ensuring your nails complement any outfit.
- Whether featured on one nail as an accent or across your entire manicure, lace Easter egg designs are timeless and stylish.
Why It Works
Lace Easter Egg Nail Art combines intricate patterns with festive elements, creating a balance between sophistication and playfulness.
The subtle elegance of the lace design paired with pastel hues ensures a polished and versatile manicure for any Easter celebration.
Perfect for those seeking a timeless yet festive look, this design captures the spirit of the holiday with a chic and feminine flair.
10. Golden Easter Egg Nail Art
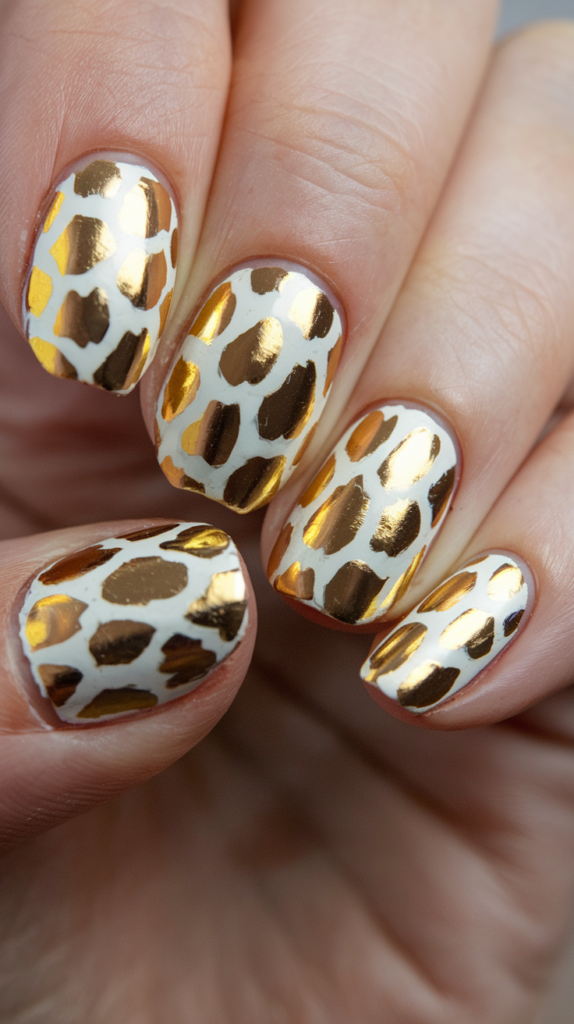
Golden Easter egg nail art is a luxurious and glamorous way to elevate your Easter manicure.
This elegant design is perfect for celebrating the holiday in style, adding a touch of opulence to any occasion.
Using Metallic Gold to Elevate Your Easter Nails
Step 1: Apply a Pastel Base Coat
Start with a pastel base color, such as soft pink or baby blue, to create a delicate backdrop for your design. Let it dry completely.
Step 2: Paint the Golden Eggs
Using a fine-tipped nail art brush, paint egg shapes in metallic gold over the pastel base. The reflective sheen of gold immediately adds a touch of luxury.
Step 3: Add Depth and Details
Enhance the design by adding shading and highlights with a darker shade of gold or bronze.
For extra flair, incorporate details like polka dots, stripes, or swirls using the gold polish.
Step 4: Seal the Design
Finish with a glossy top coat to seal the metallic finish and add an extra layer of shine, ensuring your manicure looks polished and sophisticated.
Perfect Pastel Pairings for Golden Egg Designs
Pairing metallic gold with pastel colors creates a stunning contrast that enhances the elegance of the design.
- Classic combinations: Soft pinks, lavenders, and baby blues offer a timeless and harmonious look.
- Modern pairings: Mint green or peach adds a fresh and contemporary twist to the design.
Choose pastel shades that complement the warmth and richness of the gold to create a balanced and visually appealing look.
This combination of pastels and metallic gold ensures your manicure is both luxurious and festive, making it perfect for Easter celebrations.
Golden Easter Egg Nails: A Luxurious Statement
Golden Easter egg nails are the ultimate statement of sophistication and glamour, perfect for making a bold impression this Easter.
- The opulent shine of metallic gold adds a luxurious touch to your manicure, making it a standout choice for any occasion.
- This design is versatile and pairs beautifully with other Easter-themed elements, such as bunny ears, floral accents, or pastel patterns, for a cohesive and festive look.
- Whether you feature the golden egg design on one nail as an accent or across all of your nails, it’s a sophisticated way to celebrate Easter in style.
Why It Works
Golden Easter Egg Nail Art combines the elegance of metallic gold with the soft charm of pastel hues, creating a glamorous and eye-catching design.
The luxurious finish and festive theme make it perfect for Easter brunches, celebrations, or any springtime event where you want your nails to shine.
This design offers a unique and sophisticated way to showcase your creativity while embracing the opulent spirit of the holiday.
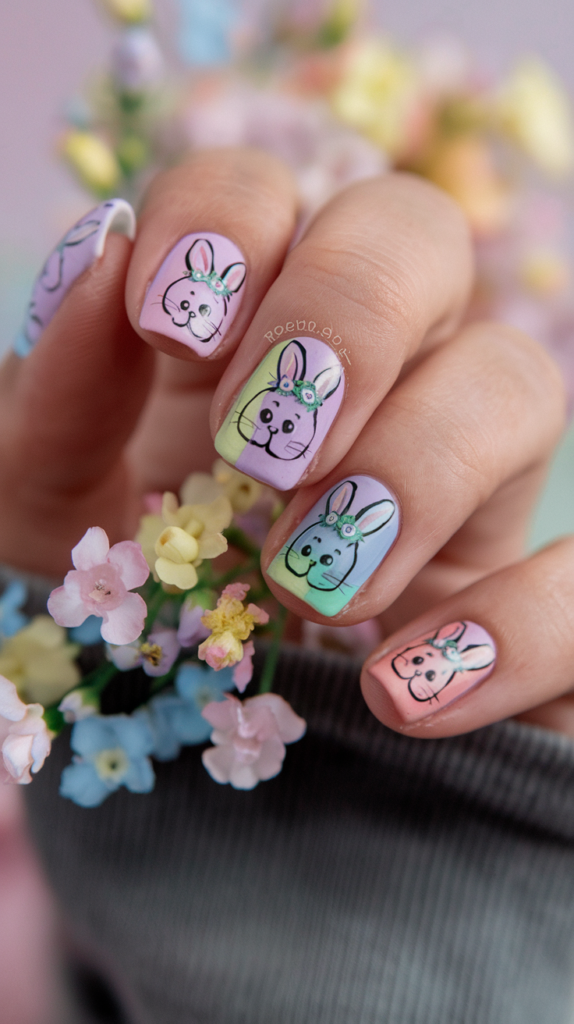
11. Easter Bunny Face Nail Art

Easter bunny face nail art is a charming and whimsical way to celebrate the holiday, bringing playful and adorable designs to your manicure.
Perfect for both adults and children, this cute design adds a touch of fun to your Easter celebrations.
Detailed Guide to Painting Bunny Faces on Nails
Step 1: Apply a Pastel Base Coat
Choose a pastel shade, such as soft pink or light blue, as the background for your bunny face design. Apply an even coat and let it dry completely.
Step 2: Paint the Bunny’s Head and Ears
Using a fine-tipped nail art brush, paint a small, rounded shape for the bunny’s head near the tip of the nail. Add two elongated ovals for the ears extending upward. Use white or a light pastel shade for these elements.
Step 3: Add Facial Details
Use a darker shade or black to paint the bunny’s eyes, a tiny pink dot for the nose, and fine lines for the whiskers. A dotting tool works well for the nose and eyes, while a thin brush is ideal for the whiskers.
Step 4: Add Shading and Highlights
For a more realistic effect, use a slightly lighter or darker shade of the base color to add shading and highlights to the bunny’s head and ears.
Step 5: Seal the Design
Finish with a glossy top coat to protect your design and add a polished shine.
Choosing the Best Pink and White Shades for Bunny Faces
The choice of colors can elevate your bunny face design and make it more cohesive and visually appealing.
- Soft pinks: Perfect for the bunny’s nose and inner ears, adding a playful and delicate touch.
- Classic white: An ideal choice for the bunny’s face, creating a beautiful contrast against a pastel background.
- Alternative shades: Experiment with light pink or peach for the bunny’s face for a modern twist.
These combinations create a harmonious and eye-catching design, allowing you to tailor the look to your personal style.
Combining Bunny Faces with Other Easter Themes
Bunny faces are versatile and pair beautifully with other Easter-themed designs, creating a cohesive and creative manicure.
- Mix and Match: Feature bunny faces on one nail, speckled Easter eggs on another, and floral accents on others for a dynamic look.
- Polka Dots and Pastels: Combine bunny faces with polka dot patterns or pastel gradients for added charm.
- Elaborate Scenes: Create an Easter-themed manicure by combining bunny faces with miniature carrot patches or lace Easter egg designs.
The possibilities are endless, allowing you to craft a personalized manicure that reflects your creativity and love for the holiday.
Why It Works
Easter Bunny Face Nail Art captures the playful essence of Easter with its cute and whimsical designs.
The delicate combination of pastel backgrounds, pink and white accents, and intricate details creates a manicure that’s both festive and stylish.
This versatile design is perfect for celebrating Easter in a fun and creative way, ensuring your nails are the highlight of the holiday.
12. Floral Bunny Crown Nail Art
Floral bunny crown nail art combines the delicate beauty of spring with the festive charm of Easter, creating a feminine and romantic manicure.
Perfect for any occasion, this design celebrates the holiday with elegance and creativity.
Step-by-Step Guide to Creating Floral Crowns on Nails
Step 1: Apply a Pastel Base Coat
Start with a pastel base color, such as soft pink or lavender, to set the foundation for your design. Let it dry completely.
Step 2: Paint the Bunny’s Head and Ears
Using a fine-tipped nail art brush, paint the bunny’s head and ears in white or a light pastel shade. Keep the shapes small and delicate to maintain the design’s elegance.
Step 3: Add the Floral Crown
Paint small, delicate flowers around the bunny’s head to create the floral crown. Use pastel shades like pink, yellow, and blue for the flowers, and add tiny green leaves for contrast.
Step 4: Enhance the Flowers with Details
Use a slightly darker shade of each color to add shading and highlights to the flowers and leaves, giving them depth and dimension.
Step 5: Seal the Design
Finish with a glossy top coat to protect your design and give it a polished shine.
Best Color Combinations for Bunny Crown Nails
Selecting the right colors is key to creating a cohesive and visually stunning bunny crown design.
- Classic combinations: Soft pinks, yellows, and blues for the flowers, paired with white or a light pastel shade for the bunny’s head.
- Metallic accents: Incorporate gold or silver for the flowers or add small crystals for a touch of sparkle and luxury.
- Modern twists: Experiment with unexpected pastel combinations like mint green and peach or lavender and coral for a unique look.
These combinations ensure a harmonious and eye-catching design, perfect for celebrating Easter in style.
Why Floral Bunny Crown Nails Are Perfect for Springtime
Floral bunny crown nail art is a beautiful way to embrace the season’s charm and elegance.
- The combination of delicate flowers and a cute bunny face creates a feminine and romantic design.
- This versatile look pairs well with other Easter-themed elements, such as polka dots or speckled egg designs, for a cohesive and festive manicure.
- Whether featured on a single accent nail or across all your nails, the floral bunny crown design is sure to impress with its timeless beauty and creativity.
Why It Works
Floral Bunny Crown Nail Art captures the essence of spring and Easter with its combination of soft pastels, intricate florals, and whimsical bunny elements.
This design’s elegance and charm make it a standout choice for anyone looking to celebrate the holiday in style.
Perfect for any occasion, this manicure is a delightful way to showcase your creativity while embracing the festive spirit of the season.
13. Candy-Colored Stripe Nail Art

Candy-colored stripe nail art brings a vibrant and playful touch to your manicure, perfectly capturing the colorful spirit of Easter.
This cheerful design is ideal for adding a pop of color to your nails while celebrating the holiday in style.
How to Paint Candy-Colored Stripes on Nails
Step 1: Apply a White Base Coat
Start with a white base coat to ensure the pastel stripes stand out and appear vibrant. Allow it to dry completely.
Step 2: Create the Stripes
Use a striping brush or nail tape to create evenly spaced stripes on your nails.
- Choose a mix of pastel shades, such as pink, yellow, blue, and green, for the stripes.
- For a dynamic look, vary the width of the stripes or create a gradient effect using different tones of the same color.
Step 3: Refine the Design
Carefully remove the tape or clean up any excess polish using a small brush dipped in nail polish remover for a polished finish.
Step 4: Seal the Design
Apply a glossy top coat to protect your design and add a radiant shine.
Top Pastel Shades for Creating Candy Stripes
Selecting the right pastel shades is key to achieving a cohesive and visually striking candy stripe design.
- Classic combinations: Soft pinks, yellows, and blues evoke the playful nature of Easter.
- Modern pairings: Mint green, peach, or lavender add a contemporary twist to the look.
Experimenting with color combinations allows you to craft a personalized design that reflects your style. Choose shades that complement each other for a harmonious and eye-catching effect.
Why Candy-Colored Stripes Are Perfect for Easter
Candy-colored stripe nail art is a fun and festive way to embrace the joyful energy of Easter.
- The vibrant stripes add a bold and cheerful element to your manicure, making it perfect for both casual and formal celebrations.
- This versatile design can be paired with other Easter-themed elements, such as polka dots, bunny faces, or floral accents, to create a cohesive and creative look.
- Whether featured as an accent nail or across all your nails, candy-colored stripes are a standout choice for the holiday.
Why It Works
Candy-Colored Stripe Nail Art perfectly balances playful colors with a stylish and polished design, making it an ideal choice for Easter celebrations.
The versatility and vibrancy of this design ensure your nails will be a fun and eye-catching centerpiece, no matter the occasion.
Perfect for anyone looking to celebrate Easter in a colorful and lively way, this design is sure to impress and bring smiles to those around you.
14. Candy-Colored Stripe Nail Art

Candy-colored stripe nail art brings a vibrant and playful touch to your manicure, perfectly capturing the colorful spirit of Easter.
This cheerful design is ideal for adding a pop of color to your nails while celebrating the holiday in style.
How to Paint Candy-Colored Stripes on Nails
Step 1: Apply a White Base Coat
Start with a white base coat to ensure the pastel stripes stand out and appear vibrant. Allow it to dry completely.
Step 2: Create the Stripes
Use a striping brush or nail tape to create evenly spaced stripes on your nails.
- Choose a mix of pastel shades, such as pink, yellow, blue, and green, for the stripes.
- For a dynamic look, vary the width of the stripes or create a gradient effect using different tones of the same color.
Step 3: Refine the Design
Carefully remove the tape or clean up any excess polish using a small brush dipped in nail polish remover for a polished finish.
Step 4: Seal the Design
Apply a glossy top coat to protect your design and add a radiant shine.
Top Pastel Shades for Creating Candy Stripes
Selecting the right pastel shades is key to achieving a cohesive and visually striking candy stripe design.
- Classic combinations: Soft pinks, yellows, and blues evoke the playful nature of Easter.
- Modern pairings: Mint green, peach, or lavender add a contemporary twist to the look.
Experimenting with color combinations allows you to craft a personalized design that reflects your style. Choose shades that complement each other for a harmonious and eye-catching effect.
Why Candy-Colored Stripes Are Perfect for Easter
Candy-colored stripe nail art is a fun and festive way to embrace the joyful energy of Easter.
- The vibrant stripes add a bold and cheerful element to your manicure, making it perfect for both casual and formal celebrations.
- This versatile design can be paired with other Easter-themed elements, such as polka dots, bunny faces, or floral accents, to create a cohesive and creative look.
- Whether featured as an accent nail or across all your nails, candy-colored stripes are a standout choice for the holiday.
Why It Works
Candy-Colored Stripe Nail Art perfectly balances playful colors with a stylish and polished design, making it an ideal choice for Easter celebrations.
The versatility and vibrancy of this design ensure your nails will be a fun and eye-catching centerpiece, no matter the occasion.
Perfect for anyone looking to celebrate Easter in a colorful and lively way, this design is sure to impress and bring smiles to those around you.
15. Plaid Pastel Nail Art

Plaid pastel nail art combines the timeless charm of plaid patterns with the delicate beauty of pastel colors, creating a chic and sophisticated manicure.
Perfect for Easter or any springtime occasion, this design adds a stylish and elegant touch to your nails.
Step-by-Step Guide to Creating Plaid Pastel Nails
Step 1: Apply a Pastel Base Coat
Choose a light pastel shade, such as soft pink or lavender, as the base color for your design. Apply an even coat and let it dry completely.
Step 2: Create the Plaid Lines
Using a striping brush or nail tape, paint evenly spaced horizontal and vertical lines in a contrasting pastel color.
- For a classic plaid look, use white or another light pastel for the lines to create a subtle crisscross pattern.
- To add dimension, incorporate a slightly darker shade for shading or highlights along the lines.
Step 3: Add Variations (Optional)
For a dynamic and unique look, vary the width of the lines or create a gradient effect by using different tones of the same color.
Step 4: Seal the Design
Finish with a glossy top coat to protect your design and add a polished shine.
The Best Color Combinations for a Chic Plaid Design
The choice of colors is key to achieving a cohesive and visually stunning plaid pastel design.
- Classic combinations: Soft pinks, lavenders, and baby blues create a harmonious and delicate look.
- Modern pairings: Mint green with pale yellow or peach with light coral adds a contemporary twist.
- Monochromatic palettes: Use varying tones of the same color for a subtle and sophisticated gradient effect.
Experimenting with these combinations allows you to tailor the design to your style while maintaining its elegant appeal.
Plaid Pastels: Ideal for a Sophisticated Easter Look
Plaid pastel nail art is a perfect choice for those seeking a chic and refined Easter manicure.
- The blend of classic plaid patterns with soft pastel hues creates a look that is both stylish and timeless.
- This versatile design pairs beautifully with other Easter elements, such as bunny ears or floral accents, for a cohesive and festive manicure.
- Whether featured as an accent nail or applied across all nails, plaid pastels add an elegant touch to your Easter look.
Why It Works
Plaid Pastel Nail Art combines the sophisticated structure of plaid with the light, airy feel of pastels, creating a manicure that’s both stylish and festive.
The timeless pattern and versatile color palette make it a standout choice for celebrating Easter in a chic and elegant way.
Perfect for any occasion, this design ensures your nails remain polished, stylish, and ready for springtime celebrations.
16. Dainty Easter Chick Nail Art
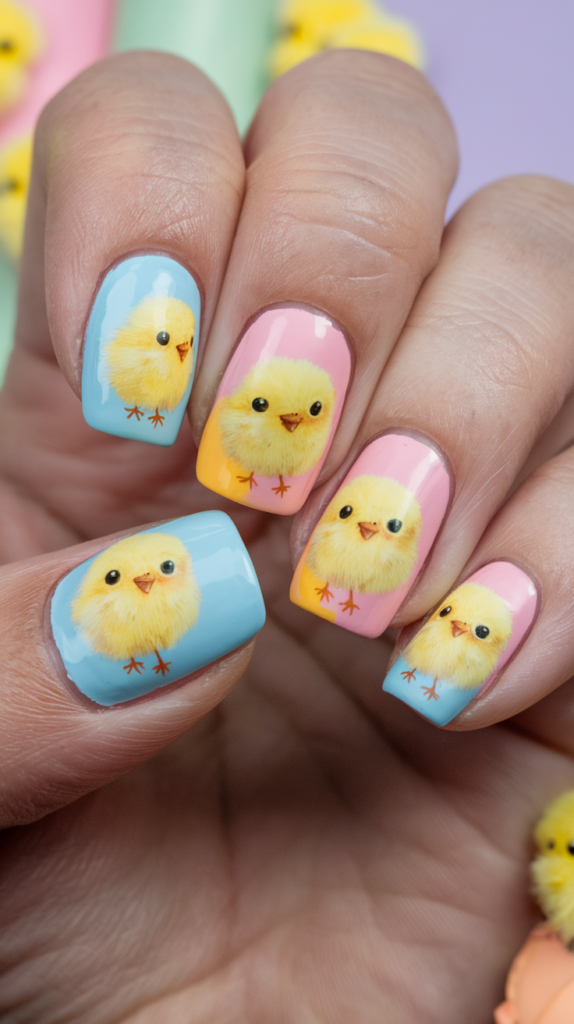
The dainty Easter chick nail art design is a sweet and subtle way to celebrate the holiday, adding a touch of whimsy and charm to your manicure.
Perfect for both adults and children, this adorable design captures the playful spirit of Easter with elegance.
How to Paint Tiny Easter Chicks on Nails
Step 1: Apply a Pastel Base Coat
Choose a pastel shade, such as soft yellow or light blue, to set the foundation for your design. Apply an even coat and let it dry completely.
Step 2: Paint the Chick’s Body
Using a fine-tipped nail art brush, paint a small, rounded shape for the chick’s head in bright yellow. Below the head, add a slightly larger oval for the chick’s body.
Step 3: Add Shading and Highlights
Use a darker yellow to add depth and shading to the chick’s body. This step makes the design look more dimensional and realistic.
Step 4: Add Details
Paint the chick’s eyes, beak, and tiny wings using a fine-tipped brush or a dotting tool. For the beak, opt for orange, and for the eyes, use black or dark brown.
Step 5: Include Decorative Accents
For a more elaborate design, add small flowers, polka dots, or tiny grass details around the chick to enhance the festive look.
Step 6: Seal the Design
Finish with a glossy top coat to protect your artwork and give your nails a polished shine.
Choosing the Best Pastel Backgrounds for Chick Designs
The choice of background colors can enhance your dainty Easter chick design, making it stand out beautifully.
- Classic choices: Light blue or white create a sky-like backdrop that highlights the chick’s vibrant yellow.
- Fresh options: Light green or lavender backgrounds add a spring-inspired vibe to the design.
- Unique twists: Experiment with peach or light pink for a softer and more personalized look.
The combination of pastel shades ensures a harmonious and visually appealing design that’s perfect for Easter.
Why Dainty Easter Chick Nails Are Perfect for Easter
Dainty Easter chick nail art is ideal for creating a delicate and playful look that celebrates the holiday in style.
- The tiny chick adds charm and whimsy, making this design sweet and approachable for all ages.
- This versatile design pairs beautifully with other Easter-themed elements, such as bunny faces or floral accents, for a cohesive and festive manicure.
- Whether you feature the chick design as an accent nail or across all your nails, it adds an elegant and timeless touch to your Easter celebrations.
Why It Works
Dainty Easter Chick Nail Art combines the lighthearted spirit of Easter with the soft elegance of pastel shades.
The intricate details and charming theme make this design a standout choice for celebrating the season with subtle sophistication.
Perfect for any occasion, this manicure ensures your nails are both festive and stylish, capturing the essence of springtime and Easter.
17. Rainbow Bunny Tail Nail Art
Rainbow bunny tail nail art adds a playful and colorful touch to your Easter manicure.
This vibrant design captures the whimsical spirit of the holiday, making it a delightful choice for celebrating in style.
How to Create 3D Bunny Tails on Nails
Step 1: Apply a Pastel Base Coat
Choose a pastel shade, such as light pink or mint green, for the base of your design. Apply an even coat and allow it to dry completely.
Step 2: Paint the Bunny Tail Base
Using a small dotting tool or brush, paint a round bunny tail shape in white or a light pastel shade at the base of the nail.
Step 3: Add the 3D Effect
While the paint is still wet, press a small piece of cotton or fluffy material onto the tail shape. Gently shape the material into a round, fluffy tail and allow it to dry completely.
Step 4: Enhance with Color and Details
For a rainbow effect, use different pastel shades to create colorful bunny tails across your nails. Add subtle shading and highlights with slightly darker tones to enhance the 3D look.
Step 5: Seal the Design
Finish with a glossy top coat to protect the design and add shine, ensuring the fluffy tails stay intact.
Choosing the Right Colors for Rainbow Bunny Tails
Selecting complementary pastel shades is essential for creating a harmonious and visually appealing rainbow bunny tail design.
- Classic combinations: Soft pinks, blues, yellows, and greens evoke the playful spirit of Easter.
- Modern twists: Mint green, peach, or lavender add a contemporary edge to the design.
Experiment with color combinations to craft a personalized and vibrant manicure. The key is to choose shades that balance well with each other for a cohesive rainbow effect.
Why Rainbow Bunny Tails Are Perfect for Easter
Rainbow bunny tail nail art is a fun and eye-catching design that embraces the festive and colorful energy of Easter.
- The vibrant tails bring a pop of color to your manicure, making it perfect for casual gatherings or special celebrations.
- This versatile design pairs beautifully with other Easter elements, such as polka dots, bunny ears, or floral accents, for a cohesive and festive look.
- Whether featured on a single accent nail or across all your nails, rainbow bunny tails are a delightful way to showcase your creativity and holiday spirit.
Why It Works
Rainbow Bunny Tail Nail Art combines the joy of Easter with the charm of 3D nail design, creating a playful and vibrant manicure.
The fluffy texture and colorful hues ensure your nails are the highlight of any celebration, capturing the whimsical and cheerful essence of the season.
Perfect for those who love bold, creative designs, this manicure is a standout choice for celebrating Easter in a fun and unique way.
18. Glittery Easter Egg Nail Art
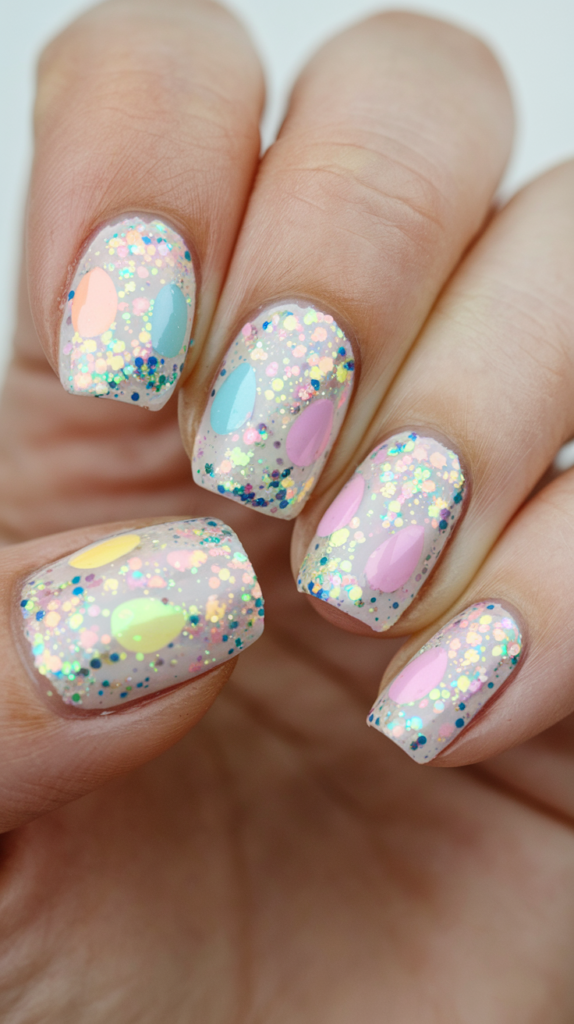
Glittery Easter egg nail art brings a glamorous and festive touch to your manicure, making it perfect for celebrating the holiday in style.
This sparkling design is a standout choice for adding shine and sophistication to any Easter look.
Step-by-Step Guide to Creating Glittery Easter Egg Designs
Step 1: Apply a Pastel Base Coat
Start with a pastel shade, such as soft pink or lavender, as the base for your design. Let it dry completely.
Step 2: Paint the Egg Shape
Using a fine-tipped nail art brush, paint an egg shape in white or a contrasting pastel color over the base.
Step 3: Add the Glitter
Apply a thin layer of clear polish or glitter adhesive to the egg shape. While it’s still wet, sprinkle fine glitter over the surface.
- Use a small brush to gently press the glitter into the polish, ensuring even coverage.
- Shake off excess glitter and allow it to dry completely.
Step 4: Add Decorative Details
Enhance the glittery egg by painting small details, such as polka dots or stripes, using a fine-tipped brush. For an extra pop, use metallic or holographic glitter accents.
Step 5: Seal the Design
Finish with a glossy top coat to lock in the glitter and add a radiant shine to your manicure.
Best Glitter Colors for Easter Nails
Choosing the right glitter shades is essential for achieving a cohesive and visually striking design.
- Classic choices: Soft pinks, lavenders, and baby blues create a delicate and harmonious look.
- Modern twists: Mint green, peach, or holographic glitter adds a contemporary and eye-catching element.
Experiment with combinations of pastel and glitter shades to personalize your design while ensuring it reflects the festive spirit of Easter.
Glittery Easter Eggs: A Glamorous Twist on Traditional Nails
Glittery Easter egg nail art offers a luxurious and playful alternative to traditional Easter designs.
- The shimmering glitter adds a festive and eye-catching element to your nails, making them perfect for celebrations.
- This versatile design pairs beautifully with other Easter elements, such as bunny faces, floral accents, or polka dots, for a cohesive and creative manicure.
- Whether you feature glittery eggs on one nail as an accent or across all your nails, this design ensures your manicure stands out in any setting.
Why It Works
Glittery Easter Egg Nail Art combines the timeless charm of pastels with the glamour of glitter, creating a sophisticated and festive manicure.
The sparkling details and delicate colors capture the essence of Easter, ensuring your nails are the centerpiece of your celebration.
Perfect for making a bold yet elegant statement, this design is ideal for anyone looking to add a touch of luxury to their Easter look.
19. Mini Easter Wreath Nail Art
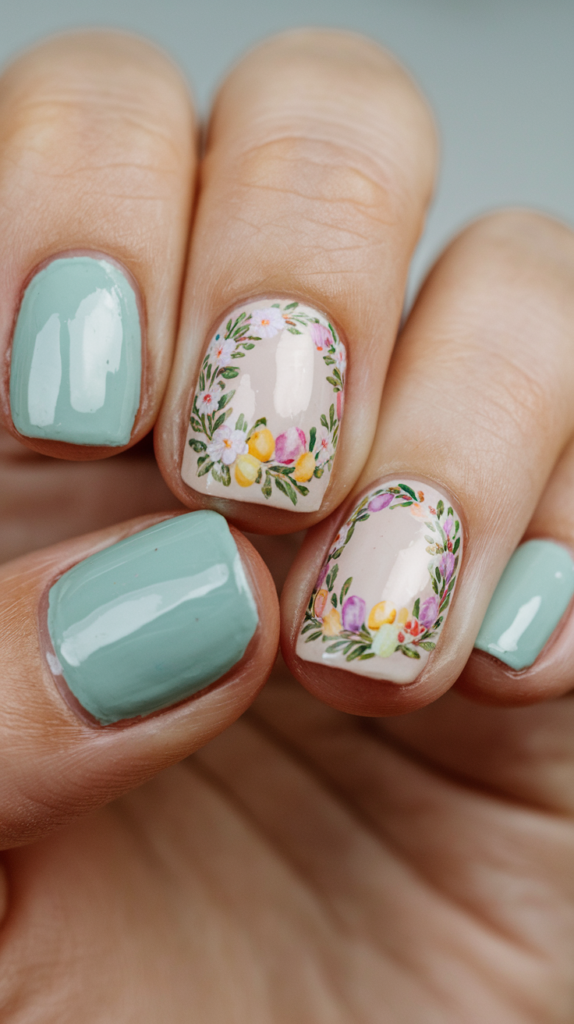
Mini Easter wreath nail art brings the charm of seasonal decor to your manicure, creating a festive and stylish look.
This delightful design is perfect for celebrating the holiday with creativity and elegance, making it a favorite for both adults and children.
How to Paint a Mini Easter Wreath on Nails
Step 1: Apply a Pastel Base Coat
Start with a pastel base color, such as soft pink or lavender, to create a delicate backdrop for your wreath design. Let it dry completely.
Step 2: Paint the Wreath Shape
Using a fine-tipped nail art brush, paint a circular wreath shape in a light green or brown shade. Keep the shape small and centered for a polished look.
Step 3: Add the Flowers
Paint small, delicate flowers around the wreath using pastel shades like pink, yellow, and blue. Add tiny green leaves for contrast.
Step 4: Enhance with Shading and Highlights
Use a slightly darker shade to add depth and dimension to the flowers and leaves, making the design look more realistic.
Step 5: Seal the Design
Finish with a glossy top coat to protect your artwork and give your nails a radiant shine.
Choosing the Best Pastel Shades for Wreath Designs
The choice of colors is crucial for creating a cohesive and visually appealing mini Easter wreath design.
- Classic combinations: Soft pinks, yellows, and blues for the flowers paired with light green or brown for the wreath base.
- Modern accents: Metallic gold or silver for the flowers or small crystals for added sparkle.
Experiment with these color combinations to craft a personalized and harmonious look that reflects your style and the spirit of Easter.
Mini Easter Wreath: A Unique and Creative Nail Design
The mini Easter wreath design is an elegant and festive way to celebrate the holiday while showcasing the beauty of seasonal decor.
- The delicate floral details and pastel shades bring a touch of sophistication to your manicure, making it suitable for any occasion.
- This versatile design pairs well with other Easter elements, such as polka dots, bunny ears, or speckled egg designs, for a cohesive and creative look.
- Whether featured as an accent nail or across all your nails, the mini Easter wreath design adds a playful and stylish touch to your holiday ensemble.
Why It Works
Mini Easter Wreath Nail Art combines the elegance of spring florals with the festive charm of Easter, creating a unique and creative manicure.
The combination of delicate wreaths and pastel hues ensures your nails are a standout feature, capturing the beauty and joy of the season.
Perfect for anyone looking to celebrate Easter in a chic and creative way, this design brings a touch of seasonal sophistication to your nails.
20. Bunny Footprint Nail Art
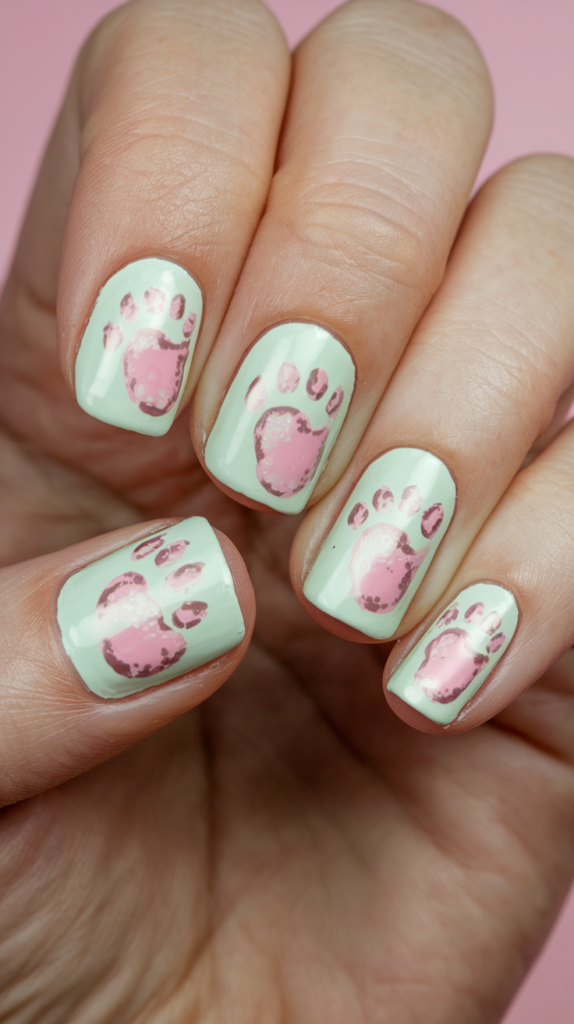
Bunny footprint nail art brings a cute and quirky touch to your Easter manicure, making it a playful choice for celebrating the holiday.
Perfect for both adults and children, this whimsical design adds charm and fun to any festive look.
Painting Tiny Bunny Footprints on Your Nails
Step 1: Apply a Pastel Base Coat
Choose a pastel shade, such as light pink or mint green, to set the stage for your design. Apply an even coat and let it dry completely.
Step 2: Paint the Footprints
Using a fine-tipped nail art brush, paint small, oval-shaped paw prints in a darker pastel shade or white.
- Add tiny dots above each paw print to represent the bunny’s toes.
- Vary the size and placement of the footprints across the nails to create the appearance of a bunny hopping.
Step 3: Add Shading and Highlights
Enhance the realism of the footprints by using a slightly darker or lighter shade to add depth and dimension.
Step 4: Seal the Design
Finish with a glossy top coat to protect your design and add a polished shine.
Combining Bunny Footprints with Other Easter Themes
Bunny footprints are versatile and can be paired with other Easter-themed elements for a cohesive and creative manicure.
- Mix and Match: Combine bunny footprints with floral accents, polka dots, or speckled Easter eggs for a dynamic look.
- Feature Multiple Themes: Use different Easter designs on each nail, such as bunny footprints on one and a carrot patch on another.
- Add Decorative Accents: Incorporate tiny flowers or pastel stripes to enhance the festive vibe.
This flexibility allows you to craft a personalized manicure that showcases your creativity and celebrates the holiday.
Bunny Footprints: A Playful Design for Easter Nails
Bunny footprint nail art captures the playful spirit of Easter, making it a fun and whimsical choice for the holiday.
- The tiny footprints add a quirky and charming element to your nails, perfect for casual gatherings or festive celebrations.
- This design pairs beautifully with other Easter elements, creating a cohesive and stylish manicure.
- Whether featured as an accent nail or across all your nails, bunny footprints are a standout choice for adding personality and fun to your look.
Why It Works
Bunny Footprint Nail Art combines the charm of Easter with the creativity of playful nail design, making it an eye-catching and delightful option.
The simple yet whimsical details ensure your nails are a highlight of the holiday, perfectly capturing the spirit of the season.
This design is ideal for anyone seeking a unique and joyful way to celebrate Easter with their manicure.
21. Easter Bunny French Tip Nail Art
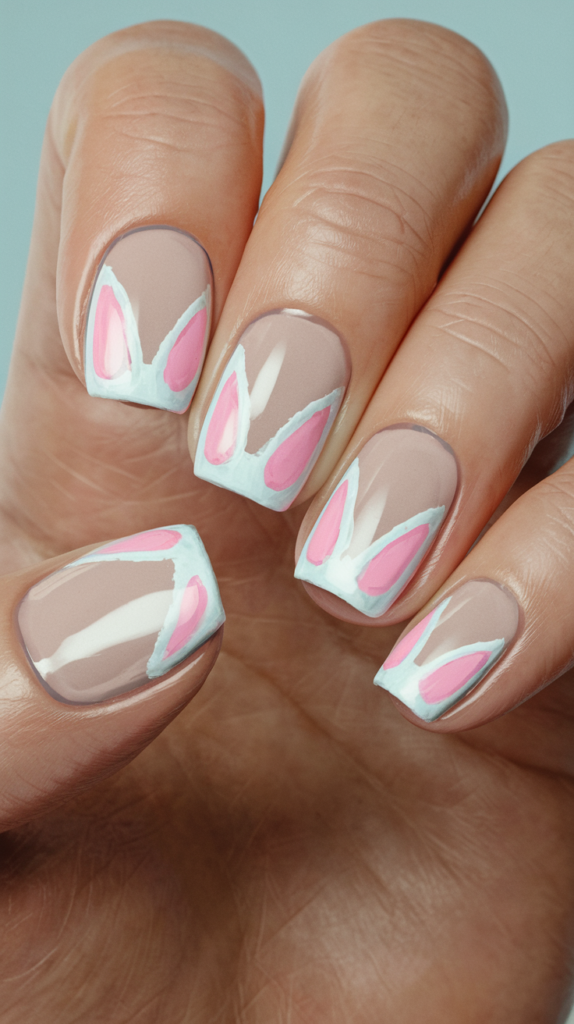
Easter bunny French tip nail art is a playful and creative twist on the classic French manicure, making it a perfect choice for celebrating Easter in style.
This whimsical design combines timeless elegance with festive charm, making it a favorite for both adults and children.
How to Add Bunny Ears to French Tips
Step 1: Apply a Pastel Base Coat
Start by applying a pastel shade, such as light pink or lavender, as the base for your nails. Allow it to dry completely.
Step 2: Paint the Bunny Ears
Using a fine-tipped nail art brush, paint two elongated ovals at the tip of each nail to create the bunny ears. Slightly curve the ovals for a natural and realistic look.
- Use white for the outer part of the ears and soft pink for the inner part to achieve the classic bunny ear design.
- Add a small dot for the bunny’s nose at the base of the ears for extra cuteness.
Step 3: Add Decorative Accents (Optional)
Make the design more playful by adding tiny bows, flowers, or subtle glitter to the bunny ears for a creative touch.
Step 4: Seal the Design
Finish with a glossy top coat to protect your artwork and give your nails a polished shine.
Choosing the Right Colors for Easter Bunny French Tips
The choice of colors can elevate your Easter bunny French tip design, creating a cohesive and visually stunning look.
- Classic combinations: Soft pink for the inner ears and white for the outer ears create a delicate and playful design.
- Modern twists: Use a light pink or peach for the bunny’s face or pastel accents for the ears to add a unique flair.
- Subtle elegance: Experiment with metallic or holographic finishes for a chic and modern touch.
Choosing colors that complement your pastel base ensures a harmonious and stylish manicure perfect for the holiday.
Easter Bunny French Tips: A Playful Take on a Timeless Design
Easter bunny French tips offer a delightful and creative variation on the classic French manicure, making them a standout choice for Easter.
- The bunny ears add a whimsical and charming element to your nails, perfect for both casual gatherings and formal celebrations.
- This versatile design pairs beautifully with other Easter elements, such as polka dots, floral accents, or glitter, for a cohesive and festive look.
- Whether featured as an accent nail or across all your nails, Easter bunny French tips are a stylish and eye-catching option.
Why It Works
Easter Bunny French Tip Nail Art brings together the elegance of a French manicure with the playful spirit of Easter, creating a unique and creative look.
The combination of soft pastel shades and whimsical bunny details ensures your nails will be a highlight of any Easter celebration.
Perfect for those seeking a playful and stylish manicure, this design captures the essence of the holiday while offering a fun twist on a timeless classic.
22. Pastel Marble Egg Nail Art
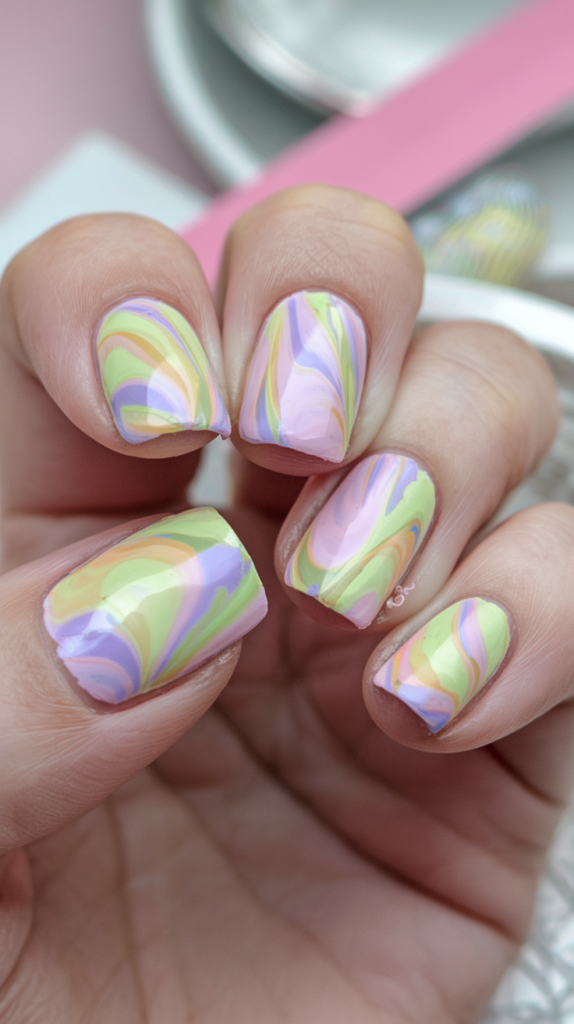
Pastel marble egg nail art is a soft and elegant way to celebrate Easter, combining the delicate beauty of pastels with the sophistication of a marbled design.
Perfect for any occasion, this manicure is a stylish choice for those who want to embrace a timeless and modern look.
Creating a Marbled Effect on Easter Nails
Step 1: Apply a White Base Coat
Start with a white base coat to make the pastel colors pop. Let it dry completely before moving to the next step.
Step 2: Select Your Pastel Shades
Choose two or three pastel colors that blend well together, such as soft pink, lavender, and baby blue.
Step 3: Create the Marbled Effect
Using a fine-tipped nail art brush, place small dots of each color randomly on the nail.
- Use a clean brush or toothpick to gently swirl the colors together, creating organic and random patterns.
- Vary the amount of polish and pressure to achieve a natural marble effect.
Step 4: Refine the Design
Once you’re satisfied with the marbled pattern, allow the design to dry completely.
Step 5: Seal the Design
Finish with a glossy top coat to protect your artwork and give your nails a radiant shine.
Best Pastel Color Combinations for Marble Designs
Selecting complementary pastel colors is essential for creating a cohesive and visually stunning marble effect.
- Classic combinations: Soft pinks, lavenders, and baby blues blend seamlessly for a delicate and harmonious look.
- Playful pairings: Mint green with pale yellow or peach with light coral adds a vibrant and modern twist.
- Subtle elegance: Stick to monochromatic shades, such as varying tones of pink or purple, for a sophisticated gradient effect.
Experimenting with different combinations allows you to craft a personalized and stylish manicure that reflects your unique style and the festive spirit of Easter.
Pastel Marble Eggs: An Elegant and Subtle Look for Easter
Pastel marble egg nail art combines the timeless charm of pastels with the contemporary elegance of a marbled effect.
- The delicate swirls of color add depth and sophistication to your nails, making them perfect for both casual gatherings and formal celebrations.
- This versatile design pairs beautifully with other Easter-themed elements, such as bunny faces or floral accents, for a cohesive and festive manicure.
- Whether featured as an accent nail or across all your nails, pastel marble eggs are a standout choice for celebrating Easter in style.
Why It Works
Pastel Marble Egg Nail Art captures the beauty of spring and Easter with its soft colors and intricate patterns, creating a chic and modern manicure.
The marbled effect adds a touch of artistry and sophistication, making this design perfect for anyone seeking a subtle yet striking look.
Perfect for celebrating the season, this timeless design ensures your nails are a centerpiece of your Easter celebrations.
23. Holographic Bunny Silhouette Nail Art
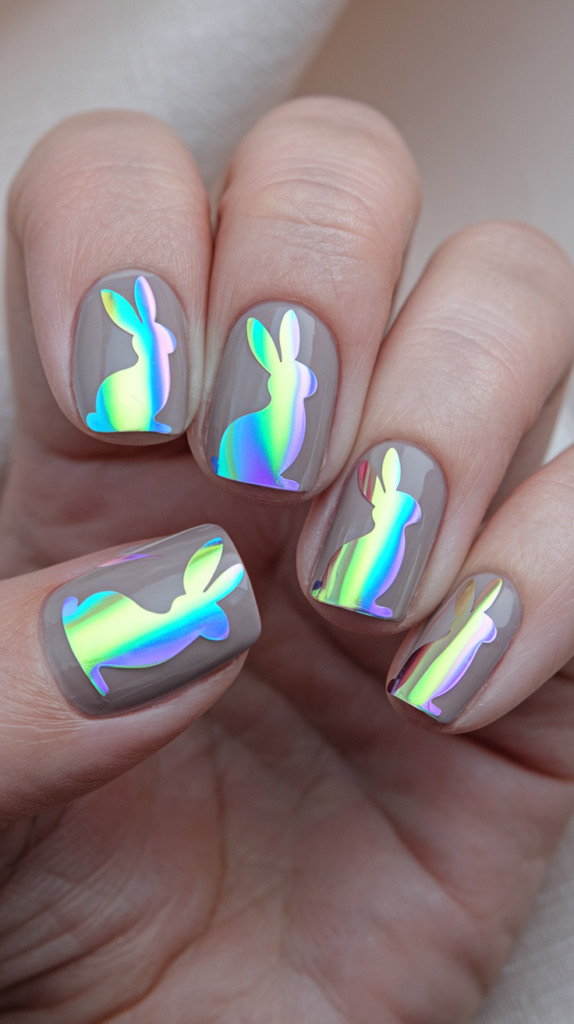
Holographic bunny silhouette nail art combines modern flair with Easter charm, creating a shiny and futuristic manicure.
This unique design is perfect for those looking to elevate their Easter nails with a touch of sophistication and iridescent beauty.
How to Use Holographic Polish for Bunny Silhouettes
Step 1: Apply a Pastel Base Coat
Start by applying a pastel shade, such as light pink or lavender, to create a delicate backdrop for the holographic design. Allow it to dry completely.
Step 2: Paint the Bunny Silhouette
Using a fine-tipped nail art brush, paint the outline of the bunny silhouette in holographic polish.
- The reflective, iridescent finish of the polish will give the bunny a dynamic look that changes with the light.
- For added realism, incorporate shading and highlights with a slightly darker shade of holographic or pastel polish.
Step 3: Add Details (Optional)
Enhance the design with small details like a pastel nose, eyes, or even tiny bows for extra charm.
Step 4: Seal the Design
Finish with a glossy top coat to lock in the holographic polish and amplify its shine.
Choosing the Best Base Colors for Holographic Designs
Selecting complementary base colors enhances the reflective sheen of the holographic bunny silhouette.
- Classic combinations: Soft pinks, lavenders, and baby blues create a harmonious and elegant look.
- Modern pairings: Mint green, peach, or light gray offer a contemporary twist.
- Bold accents: Consider a monochromatic base for high contrast or a gradient pastel background for added depth.
The key is to choose base colors that let the holographic polish take center stage while maintaining a cohesive and stylish appearance.
Holographic Bunny Silhouettes: A Contemporary Easter Look
Holographic bunny silhouettes bring a modern twist to traditional Easter nail art, offering a sleek and unique design for the holiday.
- The reflective finish of the holographic polish adds a futuristic and eye-catching element to your manicure.
- This versatile design pairs beautifully with other Easter themes, such as pastel stripes, floral accents, or polka dots, for a cohesive and creative manicure.
- Whether featured as an accent nail or across all your nails, holographic bunny silhouettes are a standout choice for celebrating Easter with style.
Why It Works
Holographic Bunny Silhouette Nail Art combines the elegance of pastel shades with the vibrancy of holographic polish, creating a manicure that’s both modern and festive.
The dynamic, light-catching finish ensures your nails will be a highlight of any Easter celebration, perfect for those who love bold, contemporary designs.
This unique take on Easter nail art is ideal for anyone looking to make a stylish and memorable impression.
24. Polka Dot Easter Egg Nail Art
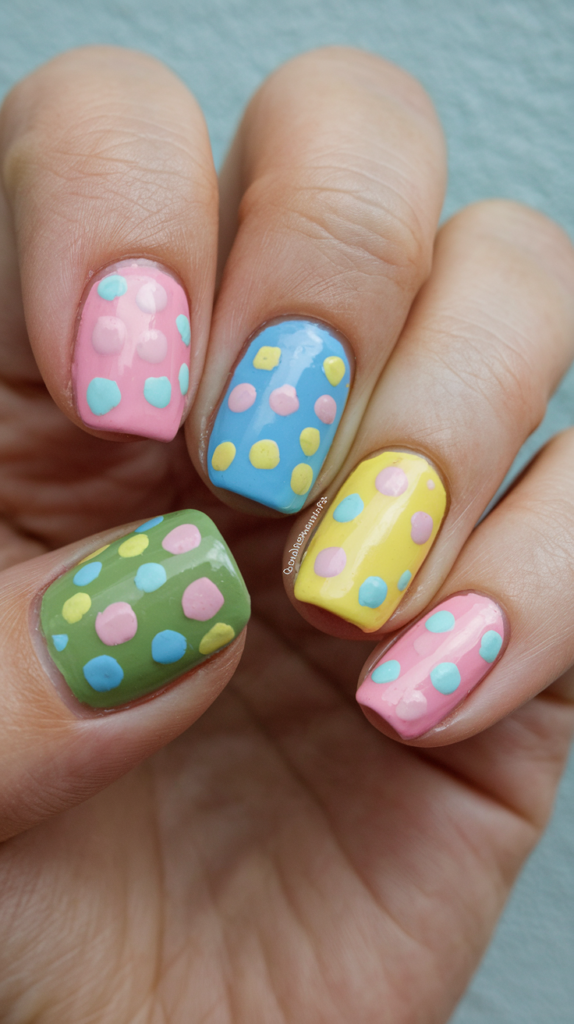
Polka dot Easter egg nail art is a fun and festive way to add a touch of playfulness to your manicure.
Perfect for both adults and children, this cheerful design captures the whimsical spirit of Easter in a colorful and creative way.
Step-by-Step Guide to Creating Polka Dot Easter Egg Nails
Step 1: Apply a Pastel Base Coat
Choose a pastel shade, such as soft pink or lavender, to set the foundation for your design. Apply an even coat and let it dry completely.
Step 2: Paint the Egg Shape
Using a fine-tipped nail art brush or dotting tool, paint an egg shape in white or a contrasting pastel shade.
Step 3: Add the Polka Dots
Create evenly spaced polka dots on the egg shape using a dotting tool or fine brush.
- Use a contrasting pastel shade for the dots to make them stand out.
- Vary the size of the dots or use different shades of the same color to create a gradient effect for added depth.
Step 4: Seal the Design
Finish with a glossy top coat to protect your artwork and give your nails a polished shine.
Best Pastel Shades for Polka Dot Designs
Selecting complementary pastel shades is essential for achieving a cohesive and visually appealing design.
- Classic combinations: Soft pinks, lavenders, and baby blues create a delicate and harmonious look.
- Modern twists: Mint green, peach, or lavender add a fresh and contemporary touch.
- Creative pairings: Experiment with bold pastel combinations for a unique and personalized look.
Choosing colors that balance and enhance each other ensures your polka dot Easter eggs stand out beautifully.
Polka Dot Easter Eggs: A Playful and Eye-Catching Look
Polka dot Easter egg nail art is a playful and eye-catching design that’s perfect for celebrating the festive spirit of Easter.
- The vibrant polka dots add a cheerful pop of color to your manicure, making it a standout choice for any occasion.
- This versatile design pairs well with other Easter elements, such as floral accents, bunny ears, or glitter, for a cohesive and creative manicure.
- Whether featured as an accent nail or across all your nails, polka dot Easter eggs bring fun and charm to your Easter celebrations.
Why It Works
Polka Dot Easter Egg Nail Art combines the joy of Easter with the timeless appeal of polka dots, creating a design that’s both playful and stylish.
The colorful dots and soft pastel base capture the lighthearted energy of the holiday, making your nails the highlight of any Easter celebration.
Perfect for anyone seeking a vibrant and festive look, this design adds a touch of whimsy to your manicure while showcasing your creativity.
25. Easter Bunny Peeking Nail Art

Easter bunny peeking nail art is a cute and subtle way to add charm and whimsy to your Easter manicure.
This delightful design is perfect for both adults and children, offering a playful twist on traditional holiday nail art.
How to Paint a Peeking Bunny on Your Nails
Step 1: Apply a Pastel Base Coat
Choose a pastel shade, such as soft pink or lavender, to create a delicate background for your design. Allow it to dry completely.
Step 2: Paint the Bunny’s Face
Using a fine-tipped nail art brush, paint the bunny’s face at the base of the nail.
- Start with a small, rounded shape for the bunny’s head, and add two elongated ovals for the ears extending upward.
- Use white or a light pastel shade for the head and ears.
Step 3: Add the Details
Paint small details like the bunny’s eyes, nose, and whiskers using a darker shade.
- Position the bunny so that only the top half of its face is visible, giving the effect of it peeking out from the nail’s edge.
Step 4: Seal the Design
Finish with a glossy top coat to protect your artwork and add a polished shine.
Choosing the Best Colors for a Peeking Bunny Design
The choice of colors is key to creating a cohesive and visually appealing peeking bunny design.
- Classic combinations: Use white for the bunny’s face and soft pink for the nose and inner ears to achieve a delicate and playful look.
- Modern accents: Experiment with light pink, peach, or even pastel gray for the bunny’s face for a unique twist.
- Creative flair: Add subtle metallic or glitter accents to elevate the design and make it stand out.
These combinations ensure your peeking bunny nails are harmonious and perfectly suited for Easter celebrations.
Easter Bunny Peeking: A Subtle and Adorable Easter Look
Easter bunny peeking nail art is a playful and charming way to celebrate the holiday with creativity and style.
- The cute, peeking bunny adds a quirky element to your manicure, making it a standout choice for Easter gatherings or festive events.
- This versatile design pairs beautifully with other Easter elements, such as floral accents or polka dots, to create a cohesive and festive manicure.
- Whether featured as an accent nail or across all your nails, the peeking bunny design adds a whimsical and delightful touch to your holiday look.
Why It Works
Easter Bunny Peeking Nail Art combines the playful spirit of Easter with the elegance of pastel colors, creating a subtle yet impactful design.
The charming details and creative positioning ensure your nails capture attention while maintaining a sophisticated and fun aesthetic.
Perfect for anyone seeking a subtle, adorable, and stylish way to celebrate Easter, this design is sure to impress and delight.
26. Watercolor Easter Egg Nail Art
Watercolor Easter egg nail art is a soft and artistic way to celebrate Easter, combining the beauty of pastel hues with a sophisticated, marbled design.
This timeless manicure is perfect for any occasion, adding a touch of elegance to your holiday look.
How to Achieve a Watercolor Effect on Nails
Step 1: Apply a White Base Coat
Start with a white base coat to enhance the vibrancy of the pastel shades. Let it dry completely.
Step 2: Choose Your Pastel Shades
Select two or three pastel colors that blend harmoniously, such as soft pink, lavender, and baby blue.
Step 3: Create the Watercolor Effect
Using a fine-tipped nail art brush, place small dots of each color randomly across the nail.
- Use a clean brush or toothpick to gently swirl the colors together, creating an organic, marbled effect.
- Vary the amount of polish and pressure for a more natural and artistic result.
Step 4: Refine the Design
Once satisfied with the watercolor effect, allow the design to dry completely.
Step 5: Seal the Design
Finish with a glossy top coat to protect your artwork and give your nails a radiant shine.
Best Pastel Colors for Watercolor Easter Egg Designs
Choosing complementary pastel colors is essential for achieving a cohesive and visually stunning design.
- Classic combinations: Soft pinks, lavenders, and baby blues blend seamlessly for a delicate and elegant look.
- Playful pairings: Mint green with pale yellow or peach with light coral adds vibrancy and a fresh twist.
- Subtle gradients: Use varying shades of a single color family, such as pinks or purples, for a sophisticated, tonal effect.
Experiment with different combinations to craft a personalized and stylish manicure that reflects your unique style and the spirit of Easter.
Watercolor Easter Eggs: A Beautiful and Artistic Look for Easter
Watercolor Easter egg nail art combines the delicate beauty of pastels with the dynamic charm of marbled patterns, making it a standout choice for Easter.
- The soft swirls and subtle transitions of color create an artistic and modern twist on traditional pastel nails.
- This versatile design pairs beautifully with other Easter elements, such as bunny silhouettes, floral accents, or polka dots, for a cohesive and creative manicure.
- Whether featured on a single accent nail or across all your nails, watercolor Easter eggs are a timeless and elegant option for celebrating the holiday.
Why It Works
Watercolor Easter Egg Nail Art captures the light, airy essence of spring with its soft pastels and intricate marbling.
This sophisticated design strikes a balance between creativity and elegance, making it perfect for anyone seeking an artistic and memorable Easter manicure.
Celebrate the season with this unique and stylish design that’s sure to impress and delight.
27. Easter Egg Geometric Pattern Nail Art
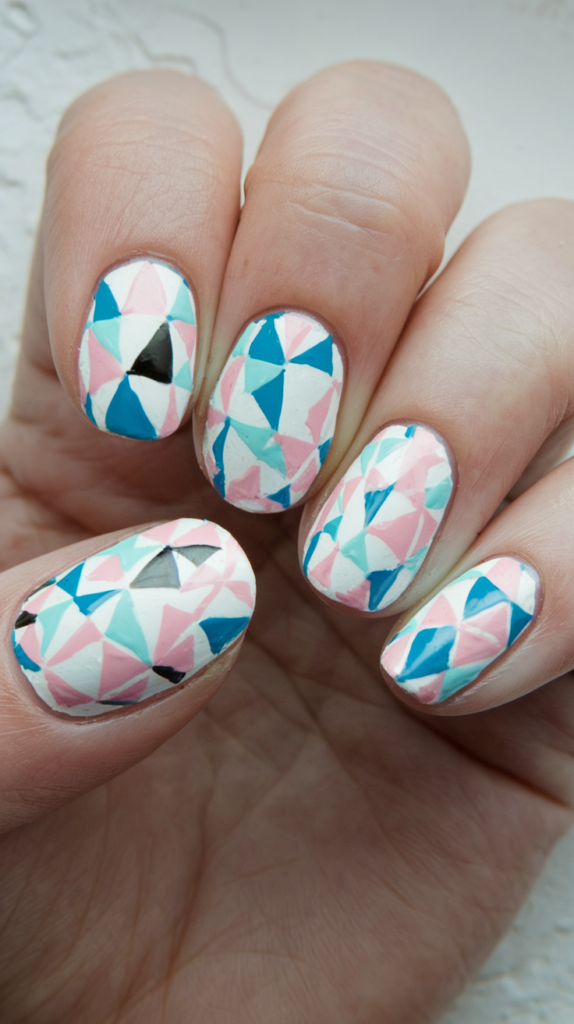
Easter egg geometric pattern nail art is a modern and stylish way to celebrate the holiday, combining sleek lines and pastel hues for a sophisticated and unique manicure.
This contemporary design is perfect for anyone looking to make a bold yet elegant statement this Easter.
Step-by-Step Guide to Painting Geometric Patterns on Easter Eggs
Step 1: Apply a Pastel Base Coat
Start by applying a pastel shade, such as soft pink or lavender, as the base for your design. Let it dry completely.
Step 2: Paint the Egg Shape
Using a fine-tipped nail art brush, paint an egg shape in white or a contrasting pastel shade to serve as the canvas for your geometric patterns.
Step 3: Add Geometric Patterns
Using a contrasting pastel shade, create geometric shapes, such as triangles, lines, or chevrons, on the egg shape.
- Vary the size and placement of the shapes to create depth and visual interest.
- For a more intricate design, overlap shapes or incorporate smaller details, like dots or stripes, within the geometric patterns.
Step 4: Refine and Finish
Allow the design to dry completely, then seal it with a glossy top coat to protect your artwork and add a polished shine.
Best Pastel Colors for Geometric Designs
Choosing complementary pastel colors is essential for achieving a cohesive and visually stunning geometric Easter egg design.
- Classic combinations: Soft pinks, lavenders, and baby blues create a delicate and harmonious look.
- Playful pairings: Mint green with pale yellow or peach with light coral adds vibrancy and freshness.
- Chic accents: Metallic pastels or hints of silver and gold can elevate the design for a more luxurious touch.
Experimenting with different color combinations allows you to craft a unique manicure that reflects your style and the festive spirit of Easter.
Easter Egg Geometric Patterns: A Contemporary and Stylish Look
Easter egg geometric pattern nail art offers a sleek and modern twist on traditional holiday designs.
- The clean lines and bold shapes add a contemporary edge to your manicure, making it a standout choice for Easter celebrations.
- This versatile design pairs beautifully with other Easter-themed elements, such as floral accents or speckled patterns, for a cohesive and creative look.
- Whether featured on an accent nail or across all your nails, geometric Easter egg designs exude sophistication and style.
Why It Works
Easter Egg Geometric Pattern Nail Art combines the timeless charm of pastels with the dynamic appeal of modern design, creating a manicure that’s both elegant and bold.
The precise patterns and soft color palette ensure your nails are the centerpiece of any celebration, offering a fresh and unique way to embrace the holiday spirit.
Perfect for anyone looking to celebrate Easter in a contemporary and artistic way, this design is sure to impress.
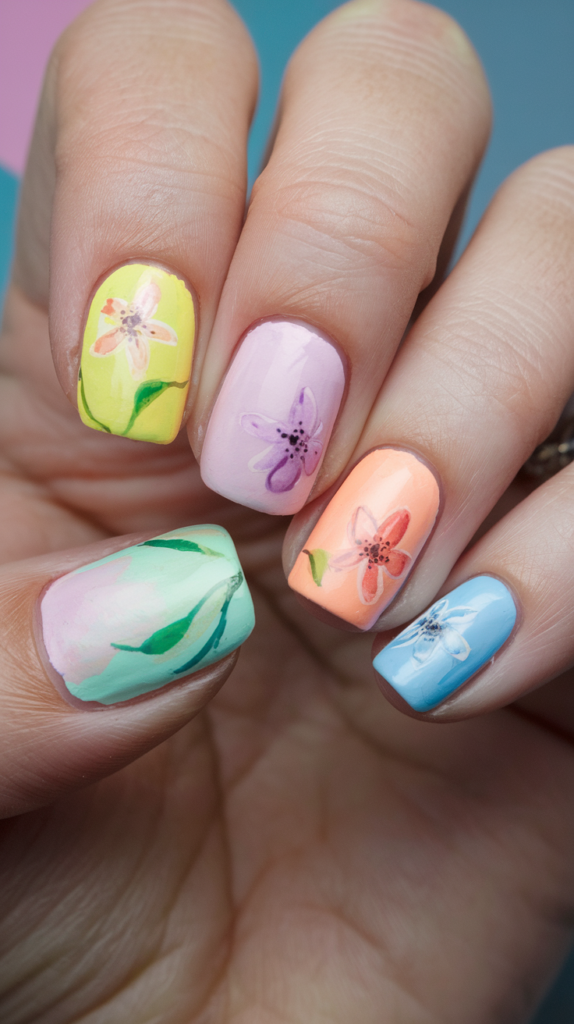
28. Spring Flower Bouquet Nail Art
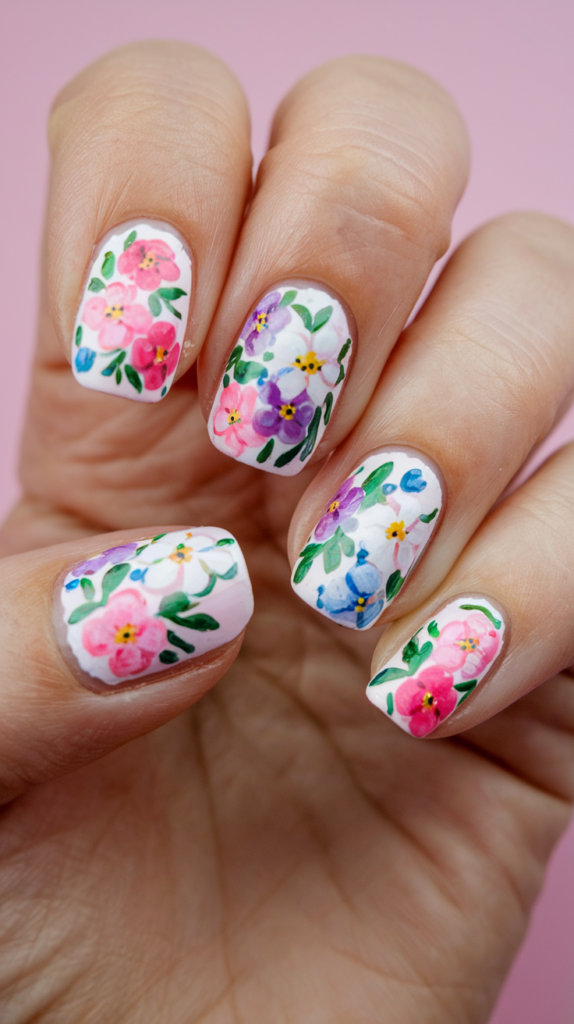
Spring flower bouquet nail art is a stunning way to celebrate Easter and embrace the beauty of the season with your manicure.
This delicate and floral design is perfect for adding sophistication and charm to any occasion.
How to Paint Tiny Spring Flower Bouquets on Nails
Step 1: Apply a Pastel Base Coat
Choose a pastel shade, such as soft pink or lavender, to create a delicate backdrop for your floral design. Allow it to dry completely.
Step 2: Paint the Flowers
Using a fine-tipped nail art brush, paint small flowers in a variety of pastel shades, such as pink, yellow, and blue.
- Vary the size and placement of the flowers to make the bouquet appear natural and dynamic.
Step 3: Add the Stems and Leaves
Use a light green polish to paint thin stems and small leaves connecting the flowers.
Step 4: Enhance the Design
For added depth, use slightly darker shades to add shading and dimension to the flowers and leaves.
Step 5: Seal the Design
Finish with a glossy top coat to protect your artwork and give your nails a polished shine.
Best Pastel Backgrounds for Spring Flower Designs
The choice of background colors can enhance the beauty and cohesiveness of your spring flower bouquet design.
- Classic combinations: Soft pinks, lavenders, and baby blues provide a harmonious and delicate backdrop.
- Modern twists: Mint green, peach, or light gray offer a fresh and contemporary feel.
- Playful pairings: Experiment with gradients or ombré effects to create a unique and artistic base.
These backgrounds complement the vibrant pastel flowers, ensuring your manicure stands out beautifully.
Spring Flower Bouquets: A Beautiful and Floral Look for Easter
Spring flower bouquet nail art captures the elegance and charm of spring, making it a perfect choice for Easter celebrations.
- The delicate flowers and soft pastel hues add a timeless sophistication to your manicure.
- This versatile design pairs beautifully with other Easter elements, such as bunny accents or polka dots, for a cohesive and creative look.
- Whether featured as an accent nail or across all your nails, spring flower bouquets bring a touch of nature-inspired beauty to your holiday style.
Why It Works
Spring Flower Bouquet Nail Art combines the freshness of spring with the elegance of pastel colors, creating a sophisticated and artistic manicure.
The intricate floral details and harmonious color palette make this design perfect for celebrating Easter or embracing the season’s beauty.
Perfect for any occasion, this design ensures your nails are a centerpiece of style and creativity.
29. Bunny and Carrot Combo Nail Art
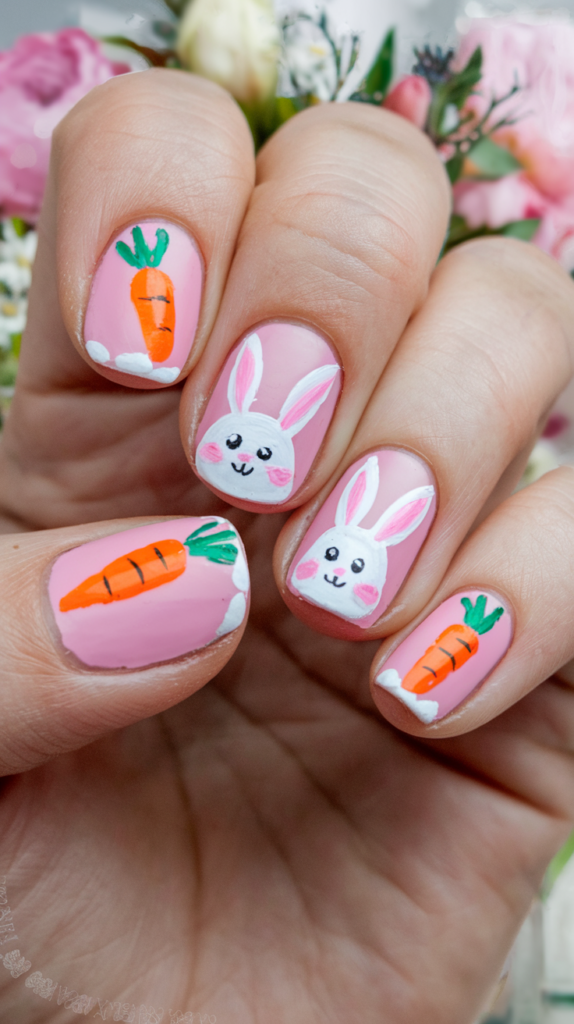
The bunny and carrot combo nail art is a playful and classic way to celebrate Easter, combining the whimsical spirit of the holiday with a stylish manicure.
This delightful design is perfect for adding charm and creativity to any occasion.
How to Paint Bunnies and Carrots on Nails
Step 1: Apply a Pastel Base Coat
Choose a pastel shade, such as soft pink or lavender, to create a soft and festive background for your design. Let it dry completely.
Step 2: Paint the Bunny
Using a fine-tipped nail art brush, paint the bunny’s face and elongated ears in white or a light pastel shade.
- Add small details like the bunny’s nose, eyes, and whiskers using a darker shade or contrasting pastel color.
Step 3: Paint the Carrots
Paint small, elongated triangles in bright orange for the carrots, and add jagged green tops to complete the look.
Step 4: Add Depth and Dimension
Use slightly darker shades of orange and green to add shading and highlights to the carrots, making them look more realistic.
Step 5: Seal the Design
Once the design is dry, finish with a glossy top coat to protect your artwork and add shine.
Best Color Combinations for Bunny and Carrot Designs
Selecting complementary pastel shades ensures a cohesive and visually appealing bunny and carrot design.
- Classic choices: Soft pinks, lavenders, and baby blues provide a delicate and harmonious backdrop.
- Modern pairings: Mint green with pale yellow or peach with light coral adds vibrancy and a fresh twist.
- Creative accents: Incorporate metallic or glitter details for a more elevated and festive look.
Experimenting with these combinations allows you to personalize your design while reflecting your unique style and the festive spirit of Easter.
Bunny and Carrot Combo: A Classic and Cute Look for Easter
The bunny and carrot combo nail art captures the playful and whimsical essence of Easter, making it a delightful choice for the holiday.
- The combination of adorable bunnies and vibrant carrots adds a touch of charm and fun to your manicure.
- This versatile design pairs beautifully with other Easter elements, such as floral accents, polka dots, or speckled eggs, for a cohesive and festive look.
- Whether featured as an accent nail or across all your nails, the bunny and carrot combo is a timeless and stylish choice for celebrating the season.
Why It Works
Bunny and Carrot Combo Nail Art blends the joy of Easter with creative nail art techniques, creating a design that’s both classic and playful.
The charming details and harmonious pastel palette ensure your nails stand out as a centerpiece of your Easter celebrations.
Perfect for those looking to embrace the holiday with a fun and elegant manicure, this design is sure to impress.
30. Striped Easter Egg Nail Art
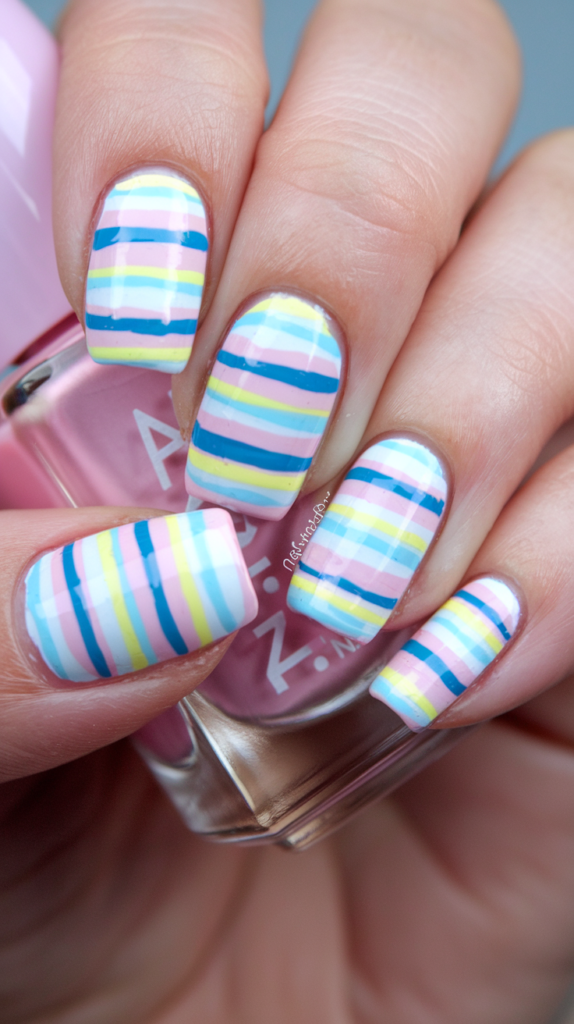
Striped Easter egg nail art is a vibrant and playful way to celebrate Easter, bringing colorful patterns and festive charm to your manicure.
This design is perfect for adding a stylish and unique touch to any occasion.
Step-by-Step Guide to Painting Striped Easter Eggs on Nails
Step 1: Apply a Pastel Base Coat
Choose a pastel shade, such as soft pink or lavender, as the foundation for your design. Apply an even coat and let it dry completely.
Step 2: Create the Stripes
Using a fine-tipped nail art brush or striping tape, paint evenly spaced stripes in a contrasting pastel color across the egg shape.
- Vary the width of the stripes for added depth and dimension.
- Experiment with a gradient effect by incorporating different shades of the same color for a more dynamic look.
Step 3: Refine the Design
Once the stripes are complete, clean up any excess polish for a polished and professional appearance.
Step 4: Seal the Design
Finish with a glossy top coat to protect your artwork and give your nails a radiant shine.
Best Pastel Colors for Striped Designs
Choosing complementary pastel colors is key to achieving a cohesive and visually stunning striped Easter egg design.
- Classic combinations: Soft pinks, lavenders, and baby blues create a delicate and harmonious look.
- Playful pairings: Mint green with pale yellow or peach with light coral adds vibrancy and freshness.
- Modern accents: Add metallic or glitter stripes for a more festive and elevated touch.
Experimenting with these combinations allows you to craft a unique and stylish manicure that reflects your personal style and the holiday spirit.
Striped Easter Eggs: A Vibrant and Festive Look for Easter
Striped Easter egg nail art is a cheerful and eye-catching design that celebrates the playful essence of Easter.
- The bold and colorful stripes add a fun pop of color to your manicure, making it a standout choice for festive gatherings.
- This versatile design pairs beautifully with other Easter elements, such as floral accents, polka dots, or bunny silhouettes, for a cohesive and creative manicure.
- Whether featured as an accent nail or across all your nails, striped Easter eggs are a fun and stylish way to embrace the season.
Why It Works
Striped Easter Egg Nail Art combines the lively spirit of Easter with the elegance of pastel hues, creating a manicure that’s both festive and chic.
The vibrant patterns and playful design ensure your nails are a highlight of any celebration, perfect for showcasing your creativity and holiday cheer.
This design is ideal for those who want to make a bold and colorful statement this Easter while keeping their manicure polished and sophisticated.
31. Crystal-Embedded Easter Egg Nail Art
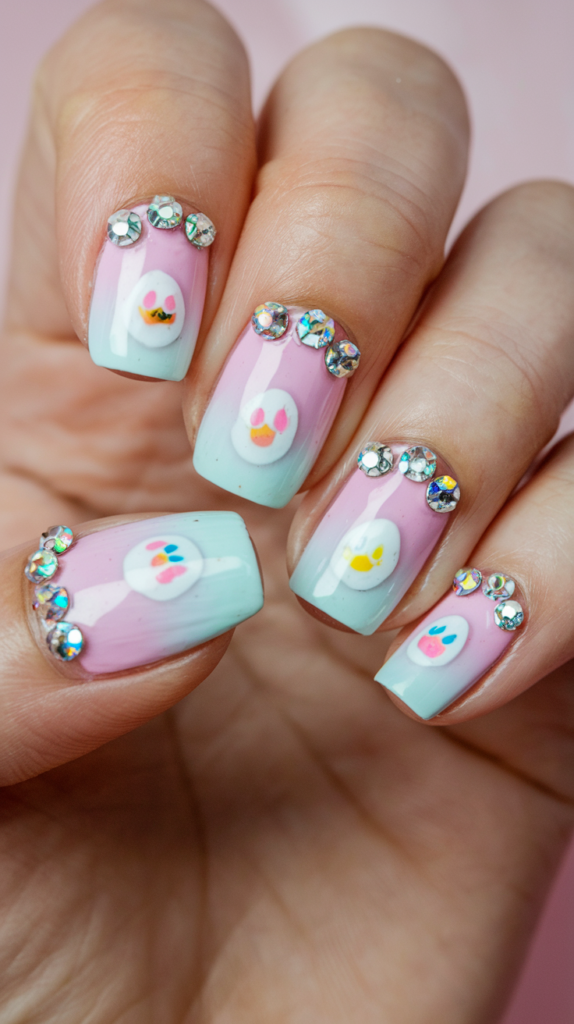
Crystal-embedded Easter egg nail art brings glamour and sparkle to your manicure, making it a dazzling choice for celebrating the holiday.
This luxurious design is perfect for creating a standout look that’s festive, stylish, and eye-catching.
How to Add Crystals to Easter Egg Designs
Step 1: Apply a Pastel Base Coat
Choose a pastel shade, such as soft pink or lavender, to set the foundation for your design. Apply an even coat and let it dry completely.
Step 2: Paint the Egg Shape
Using a fine-tipped nail art brush, paint the outline of an Easter egg in white or a light pastel shade on your nails.
Step 3: Apply the Adhesive
Use a small dotting tool or fine brush to apply a small amount of clear polish or adhesive to the areas where you want to place the crystals.
Step 4: Add the Crystals
Carefully place the crystals onto the adhesive using tweezers. Arrange them in patterns or clusters for a unique effect.
Step 5: Seal the Design
Once the crystals are secure, finish with a glossy top coat to lock them in place and add extra shine.
Best Colors and Crystals for Sparkling Easter Nails
Choosing the right combination of pastel shades and crystals ensures a harmonious and visually striking design.
- Classic colors: Soft pinks, lavenders, and baby blues create an elegant and delicate backdrop.
- Modern accents: Mint green, peach, or light gray offer a fresh and contemporary twist.
- Crystal choices: Use clear, iridescent, or colored crystals that complement the pastel base. Incorporate metallic or holographic stones for a luxurious touch.
Experimenting with different combinations of colors and crystals allows you to craft a unique and personalized manicure that reflects your style and the festive spirit of Easter.
Crystal-Embedded Easter Eggs: A Glamorous and Sparkling Look
Crystal-embedded Easter egg nail art offers a glamorous and sophisticated way to celebrate the holiday in style.
- The sparkling crystals add a touch of luxury and elegance, making your nails the highlight of any Easter celebration.
- This versatile design pairs beautifully with other Easter elements, such as floral accents or geometric patterns, for a cohesive and creative look.
- Whether featured as an accent nail or across all your nails, crystal-embedded Easter eggs are a bold and dazzling choice.
Why It Works
Crystal-Embedded Easter Egg Nail Art combines the timeless charm of pastel shades with the opulence of crystals, creating a manicure that’s both elegant and festive.
The shimmering details and delicate colors ensure your nails stand out, offering a unique and sophisticated way to celebrate Easter.
Perfect for those who love a bold and glamorous look, this design is sure to impress and delight.
32. Pastel Chevron Pattern Nail Art
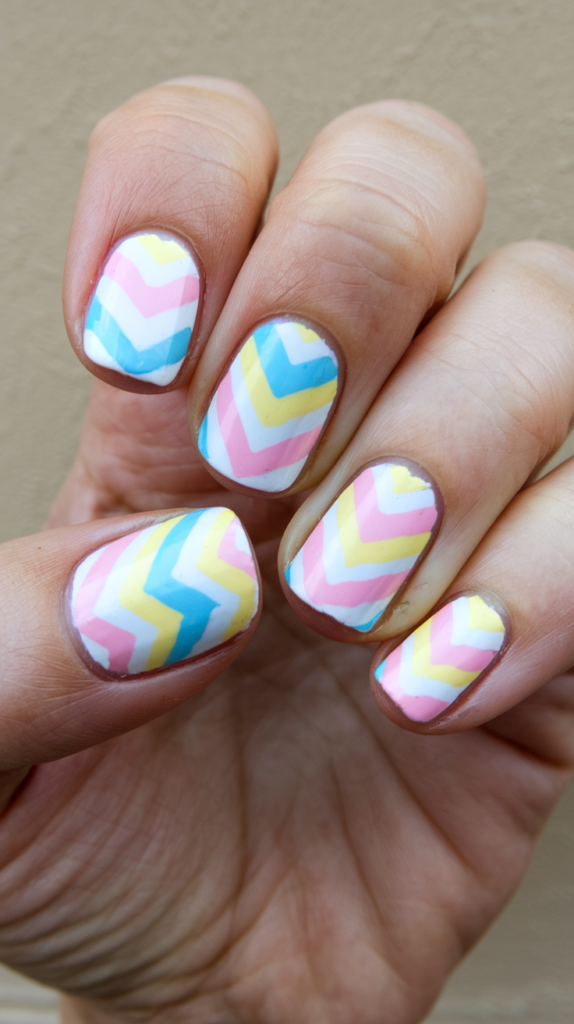
Pastel chevron pattern nail art is a trendy and stylish way to celebrate Easter, combining modern design with the soft elegance of pastel hues.
This sophisticated manicure is perfect for any occasion, offering a fresh and unique twist on holiday nail art.
How to Paint Chevron Patterns on Easter Nails
Step 1: Apply a Pastel Base Coat
Start with a pastel shade, such as soft pink or lavender, to create a delicate backdrop for your design. Allow it to dry completely.
Step 2: Create the Chevron Pattern
Using a fine-tipped nail art brush or striping tape, paint the chevron design in a contrasting pastel color.
- Arrange the chevrons in evenly spaced rows or experiment with varying sizes for added depth.
- Ensure clean edges by carefully removing the tape or refining the lines with a fine brush.
Step 3: Refine the Design
Clean up any excess polish around the cuticles for a neat and professional finish.
Step 4: Seal the Design
Apply a glossy top coat to protect your artwork and give your nails a radiant shine.
Best Pastel Shades for Chevron Designs
Selecting complementary pastel shades is key to achieving a cohesive and visually stunning chevron pattern.
- Classic combinations: Soft pinks, lavenders, and baby blues create a delicate and harmonious look.
- Playful pairings: Mint green with pale yellow or peach with light coral adds vibrancy and freshness.
- Chic accents: Add metallic or glitter chevrons for a more festive and elevated look.
Experimenting with these combinations allows you to create a personalized manicure that reflects your style and the festive spirit of Easter.
Pastel Chevron Patterns: A Trendy and Stylish Look for Easter
Pastel chevron pattern nail art offers a modern and elegant way to celebrate Easter with creativity and flair.
- The sleek chevron design adds a contemporary edge to your manicure, making it a standout choice for the season.
- This versatile design pairs beautifully with other Easter elements, such as floral accents, bunny silhouettes, or polka dots, for a cohesive and festive look.
- Whether featured as an accent nail or across all your nails, pastel chevron patterns are a timeless and stylish option for celebrating the holiday.
Why It Works
Pastel Chevron Pattern Nail Art blends the charm of Easter pastels with the dynamic appeal of geometric patterns, creating a manicure that’s both trendy and sophisticated.
The clean lines and vibrant hues ensure your nails are a centerpiece of your Easter celebrations, perfect for showcasing your creativity and style.
This design is ideal for those looking to embrace the holiday with a modern and artistic touch that’s sure to impress.
33. Lavender Bunny Field Nail Art
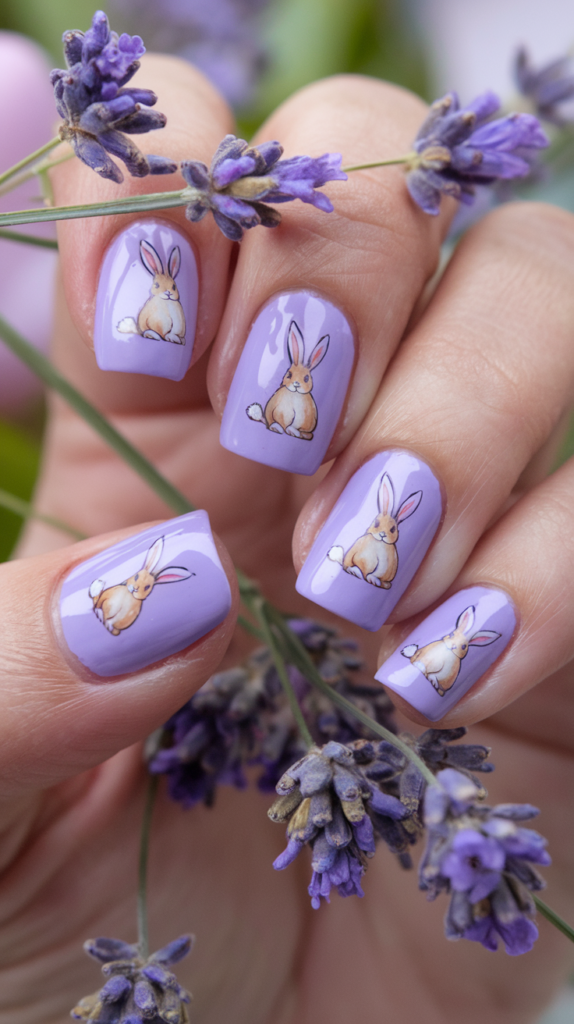
Lavender bunny field nail art is a soft and elegant way to celebrate Easter, combining the charm of tiny bunnies with the delicate beauty of pastel lavender fields.
This sophisticated design is perfect for adding a whimsical and stylish touch to your holiday manicure.
How to Paint Lavender Fields with Tiny Bunnies on Nails
Step 1: Apply a Pastel Base Coat
Choose a pastel shade, such as soft pink or lavender, to create a soft and harmonious backdrop. Allow it to dry completely.
Step 2: Paint the Lavender Fields
Using a fine-tipped nail art brush, paint delicate lavender fields with clusters of flowers in soft pastel shades like lavender, pink, and baby blue.
- Vary the size and placement of the flowers to create a natural, organic appearance.
Step 3: Add the Tiny Bunnies
Use a fine-tipped brush to paint the tiny bunnies in white or a light pastel shade.
- Create rounded shapes for the bunny’s head and body, and add elongated ovals for the ears.
- Position the bunnies in different spots across the lavender fields to give the design depth and movement.
Step 4: Refine and Seal the Design
Allow the design to dry completely, then finish with a glossy top coat to protect your artwork and add shine.
Best Pastel Backgrounds for Lavender Bunny Fields
Choosing complementary pastel backgrounds enhances the beauty and cohesiveness of your lavender bunny field design.
- Classic combinations: Soft pinks, lavenders, and baby blues create a delicate and harmonious look.
- Modern twists: Mint green, peach, or light gray provide a fresh and contemporary feel.
- Gradient options: Use ombré effects transitioning from lavender to pale pink for an artistic backdrop.
Experimenting with different backgrounds allows you to personalize your design while keeping it cohesive and visually stunning.
Lavender Bunny Fields: A Soft and Elegant Look for Easter
Lavender bunny field nail art captures the whimsical essence of Easter with its charming combination of lavender fields and tiny bunnies.
- The delicate flowers and playful bunnies add a sophisticated yet fun touch to your manicure, making it a standout choice for Easter celebrations.
- This versatile design pairs beautifully with other Easter-themed elements, such as floral accents, polka dots, or pastel stripes, for a cohesive and creative manicure.
- Whether featured on an accent nail or across all your nails, lavender bunny fields are a timeless and stylish option for celebrating the season.
Why It Works
Lavender Bunny Field Nail Art combines the elegance of spring pastels with the charm of Easter motifs, creating a design that’s both sophisticated and delightful.
The intricate details and harmonious colors ensure your nails are the highlight of your Easter celebrations, offering a unique and creative way to embrace the holiday spirit.
Perfect for those seeking a soft and elegant manicure, this design is sure to impress and inspire.
34. Bunny Silhouette with Daisy Nail Art
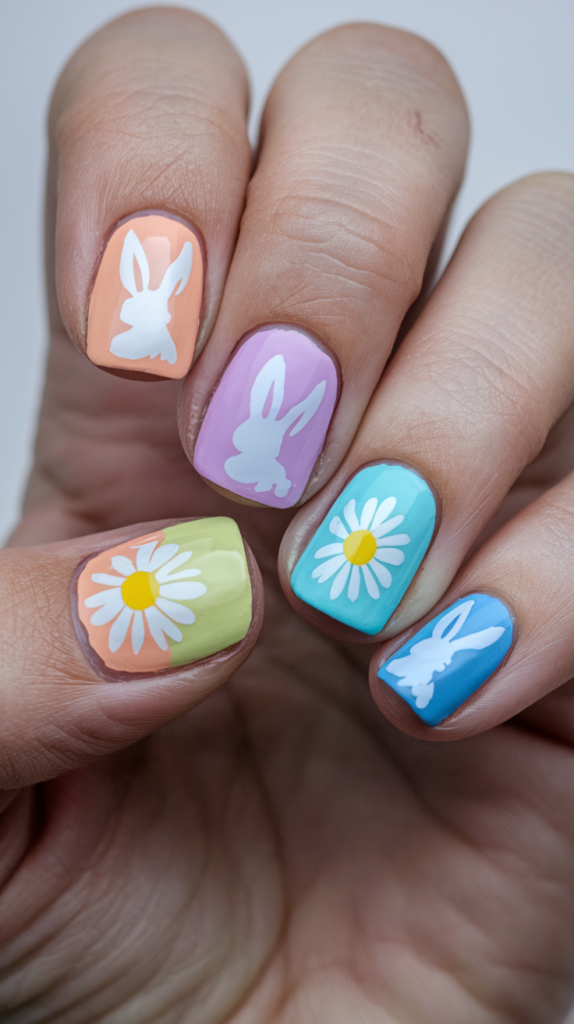
Bunny silhouettes with daisies are a delicate and floral way to celebrate Easter, combining the charm of spring blooms with the playful spirit of bunnies.
This elegant design is perfect for adding sophistication and creativity to your Easter manicure.
How to Paint Bunny Silhouettes with Daisies on Nails
Step 1: Apply a Pastel Base Coat
Choose a pastel shade, such as soft pink or lavender, to create a soft and harmonious backdrop for your design. Let it dry completely.
Step 2: Paint the Bunny Silhouettes
Using a fine-tipped nail art brush, paint bunny silhouettes in white or a light pastel shade.
- Use rounded shapes for the body and elongated ovals for the ears. Position the bunnies in various spots for a dynamic effect.
Step 3: Add the Daisies
Paint small daisies in pastel shades like yellow, pink, and blue, using a fine brush or dotting tool.
- Add a contrasting dot in the center of each daisy to make the flowers pop.
- Vary the size and placement of the daisies to create a natural and artistic look.
Step 4: Refine and Seal the Design
Allow the design to dry completely, then finish with a glossy top coat to protect your artwork and add shine.
Best Pastel Colors for Bunny and Daisy Designs
Choosing complementary pastel shades enhances the cohesiveness and beauty of the bunny silhouette and daisy design.
- Classic combinations: Soft pinks, lavenders, and baby blues create a delicate and harmonious look.
- Playful pairings: Mint green with pale yellow or peach with light coral adds vibrancy and freshness.
- Chic accents: Use metallic gold or silver to outline bunnies or daisies for a luxurious touch.
Experimenting with different combinations allows you to craft a personalized manicure that reflects your unique style and the festive spirit of Easter.
Bunny Silhouettes with Daisies: A Delicate and Floral Look for Easter
Bunny silhouette with daisy nail art perfectly captures the elegance of spring and the playful essence of Easter.
- The intricate daisies and bunny silhouettes add a whimsical yet refined touch to your manicure, making it a standout choice for Easter celebrations.
- This versatile design pairs beautifully with other Easter elements, such as pastel stripes, floral patterns, or polka dots, for a cohesive and festive manicure.
- Whether featured on an accent nail or across all your nails, bunny silhouettes with daisies create a timeless and stylish look for the holiday.
Why It Works
Bunny Silhouette with Daisy Nail Art combines the charm of spring florals with the playful elegance of bunny motifs, creating a manicure that’s both delicate and festive.
The harmonious color palette and intricate details make this design a perfect choice for celebrating Easter with grace and creativity.
Ideal for those seeking a soft and floral manicure, this design ensures your nails are the highlight of any holiday gathering.
35. Rainbow Easter Egg Tip Nail Art
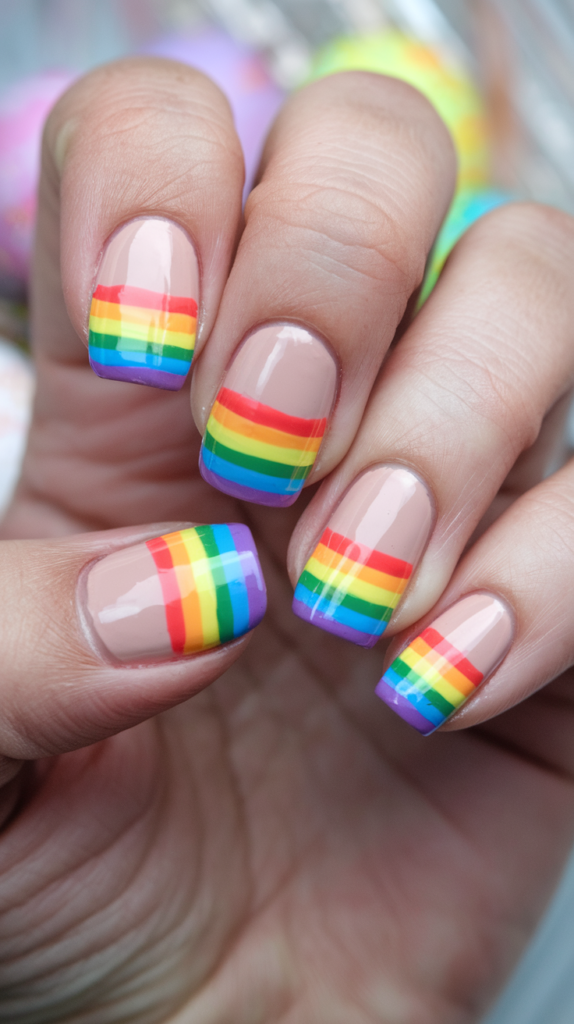
Rainbow Easter egg tips are a vibrant and festive way to celebrate Easter, blending playful colors with stylish design.
This cheerful manicure is perfect for adding a unique and creative touch to any occasion.
How to Create Rainbow-Colored Easter Egg Tips on Nails
Step 1: Apply a Pastel Base Coat
Choose a pastel shade, such as soft pink or lavender, to set the stage for your colorful tips. Allow it to dry completely.
Step 2: Create the Rainbow Tips
Using a fine-tipped nail art brush or striping tape, paint rainbow-colored tips in various pastel shades, such as pink, yellow, and blue.
- Alternate colors across nails or blend them seamlessly on each tip for a gradient effect.
- Ensure the tips have a rounded, egg-like shape for an Easter-inspired design.
Step 3: Refine the Design
Clean up any excess polish around the cuticles for a neat and professional look.
Step 4: Seal the Design
Finish with a glossy top coat to protect the rainbow design and add a radiant shine.
Best Colors for a Rainbow Easter Egg Design
Selecting harmonious pastel colors ensures a cohesive and visually stunning rainbow Easter egg tip design.
- Classic choices: Soft pinks, lavenders, and baby blues create a delicate and elegant look.
- Playful pairings: Mint green with pale yellow or peach with light coral adds vibrancy and freshness.
- Creative accents: Add glitter or metallic finishes to a few tips for a more festive touch.
Experimenting with these combinations allows you to craft a personalized manicure that reflects your unique style and the festive spirit of Easter.
Rainbow Easter Egg Tips: A Fun and Festive Look for Easter
Rainbow Easter egg tips are a joyful and eye-catching way to celebrate Easter with your nails.
- The colorful tips bring a playful element to your manicure, making it a standout choice for any Easter celebration.
- This versatile design pairs beautifully with other Easter elements, such as floral accents, polka dots, or bunny silhouettes, for a cohesive and creative manicure.
- Whether featured as an accent nail or across all your nails, rainbow Easter egg tips create a vibrant and cheerful look that’s perfect for the season.
Why It Works
Rainbow Easter Egg Tip Nail Art combines the whimsy of Easter colors with the elegance of a polished manicure, creating a design that’s both festive and stylish.
The bright and cheerful tips ensure your nails are a centerpiece of your holiday celebrations, offering a bold and playful way to embrace the season.
Perfect for anyone seeking a fun and vibrant manicure, this design is sure to impress and delight.
Conclusion
Easter is a time to celebrate new beginnings, and what better way to do that than with a fresh and festive manicure?
The 35 Easter nail designs featured in this guide offer a wide range of styles, from whimsical and playful to chic and sophisticated.
Whether you’re a nail art novice or a seasoned pro, these designs are easy to recreate and can be tailored to suit your personal style and preferences.
As you prepare for Easter, let your nails be an extension of the joy and beauty of the season.
Experiment with pastel colors, intricate patterns, and creative combinations to make your manicure a true reflection of the festive spirit.
With these inspiring designs, you’re sure to find the perfect look to complement your Easter outfit and make a statement.
So gather your favorite nail polishes, tools, and accessories, and get ready to create a manicure that’s as vibrant and joyful as the holiday itself.