As the vibrant hues of summer give way to the rich, warm tones of fall, it’s the perfect time to refresh your manicure to reflect the season’s beauty.
Autumn brings a wealth of inspiration for nail designs, from the deep reds of falling leaves to the cozy patterns of your favorite sweater.
Whether you prefer subtle elegance or bold statements, this season offers something for everyone.
In this blog post, we’ll explore 35 stunning fall nail designs that will inspire you to embrace the colors and textures of autumn, ensuring your nails are as stylish as the season itself.
1. Maple Leaf Magic Nail Art

Maple Leaf Magic nails capture the essence of fall with their deep red base and delicate gold foil accents.
This design is inspired by the iconic maple leaf, a symbol of autumn’s vibrant beauty.
The rich red tones evoke the warmth of the season, while the gold foil adds a luxurious touch, making this design perfect for both casual outings and formal events.
It’s a timeless way to celebrate the changing leaves and the cozy atmosphere of fall.
Step-by-Step Guide to Maple Leaf Magic Nails
1. Start With a Deep Red Base
- Apply a rich, deep red polish as your base color. This shade mimics the color of autumn leaves.
- Let the base coat dry completely before moving on to the next step.
2. Add Gold Foil Accents
- Use gold foil or gold leaf to create maple leaf shapes on your nails.
- Carefully place the foil on the nails, focusing on one or two accent nails for a balanced look.
- Use a fine brush to shape the foil into realistic leaf designs, including visible veins and curled edges.
Pro Tip: For a more natural look, vary the size and placement of the leaves on each nail.
3. Seal the Design
- Apply a glossy top coat to smooth out the foil and add a luxurious finish.
- The glossy finish enhances the richness of the red and gold, making the design pop.
Creative Variations
- Matte Finish: Swap the glossy top coat for a matte one to create a softer, more understated look.
- Ombre Effect: Blend the red base into a darker brown or orange at the tips for a gradient effect.
- Mixed Metals: Add silver or copper foil accents alongside the gold for a modern twist.
Why It Works
Maple Leaf Magic nails are a timeless and elegant way to celebrate fall. The combination of deep red and gold creates a luxurious, seasonal look that’s perfect for any occasion.
2. Pumpkin Patch Nail Art
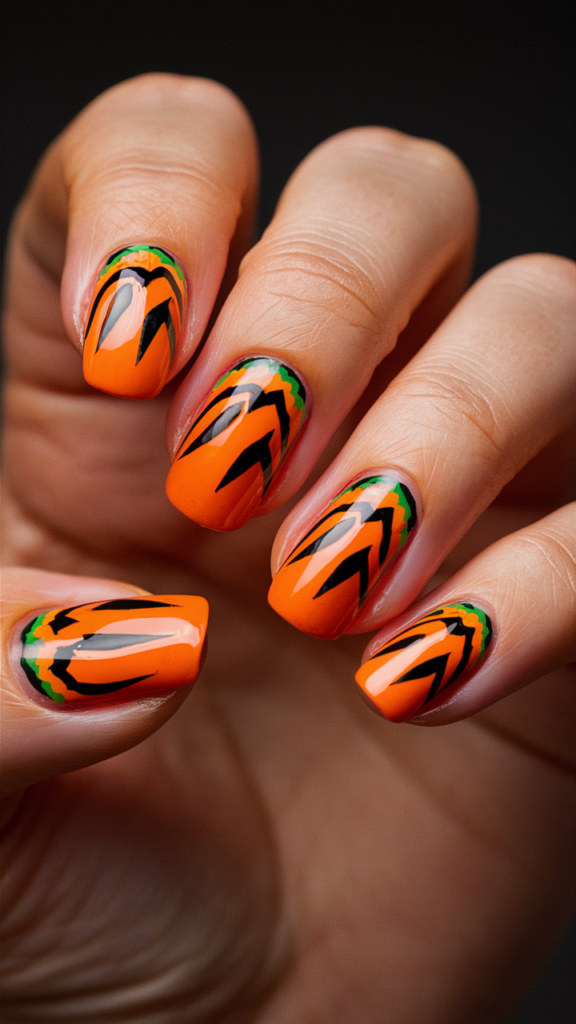
Pumpkin Patch nails bring the festive spirit of fall to your fingertips with warm orange tones and adorable pumpkin designs.
This playful and creative design is perfect for anyone who loves the charm of autumn harvests and Halloween festivities.
The vibrant orange base paired with detailed pumpkin accents adds a whimsical touch, making your nails a fun and festive accessory for the season.
Step-by-Step Guide to Pumpkin Patch Nails
1. Apply a Warm Orange Base
- Start with a pumpkin orange polish as your base color. This shade sets the tone for the design.
- Let the base coat dry completely.
2. Paint Tiny Pumpkins
- Use a fine brush or dotting tool to create small pumpkin designs on one or two accent nails.
- Add stems and vines in dark green to make the pumpkins look realistic.
- Use shading techniques to give the pumpkins a three-dimensional appearance.
Pro Tip: Add a touch of white or yellow to the pumpkins for highlights and depth.
3. Seal the Design
- Apply a glossy top coat to protect the design and add shine.
- The glossy finish enhances the vibrant orange and green colors.
Creative Variations
- Glitter Pumpkins: Add gold or orange glitter to the pumpkins for a festive sparkle.
- Plaid Background: Paint a plaid pattern on the other nails to complement the pumpkin designs.
- Mini Ghosts: Include tiny ghost designs alongside the pumpkins for a Halloween-themed look.
Why It Works
Pumpkin Patch nails are playful, festive, and perfect for celebrating the fall harvest. The detailed pumpkin designs add a touch of whimsy to your manicure.
3. Gold Leaf Tip Nail Art

Gold Leaf Tips are a sophisticated and understated design that combines a matte nude base with luxurious gold accents.
This minimalist yet elegant look is perfect for those who want to embrace the warmth of fall without overwhelming their nails.
The subtle gold foil adds a touch of glamour, making it ideal for both everyday wear and special occasions.
Step-by-Step Guide to Gold Leaf Tips
1. Apply a Matte Nude Base
- Start with a matte nude polish as your base color. This neutral shade provides a clean canvas for the gold accents.
- Let the base coat dry completely.
2. Add Gold Foil to the Tips
- Use gold foil or gold leaf to create an irregular edge at the tips of your nails.
- The irregular shape mimics the natural look of a leaf, adding an organic touch to the design.
Pro Tip: Use tweezers to carefully place the foil for precise application.
3. Seal the Design
- Apply a matte top coat to maintain the understated elegance of the design.
- For a more glamorous look, use a glossy top coat instead.
Creative Variations
- Rose Gold Tips: Swap the gold foil for rose gold for a modern, feminine twist.
- Ombre Tips: Blend the gold into the nude base for a seamless gradient effect.
- Geometric Accents: Add small geometric shapes in gold to complement the tips.
Why It Works
Gold Leaf Tips are a chic and versatile design that works for both casual and formal occasions.
The combination of matte and metallic finishes creates a stunning contrast, while the gold accents add a touch of luxury to your fall look.
It’s a timeless and elegant way to celebrate the season.
4. Burnt Orange Ombre Nail Art
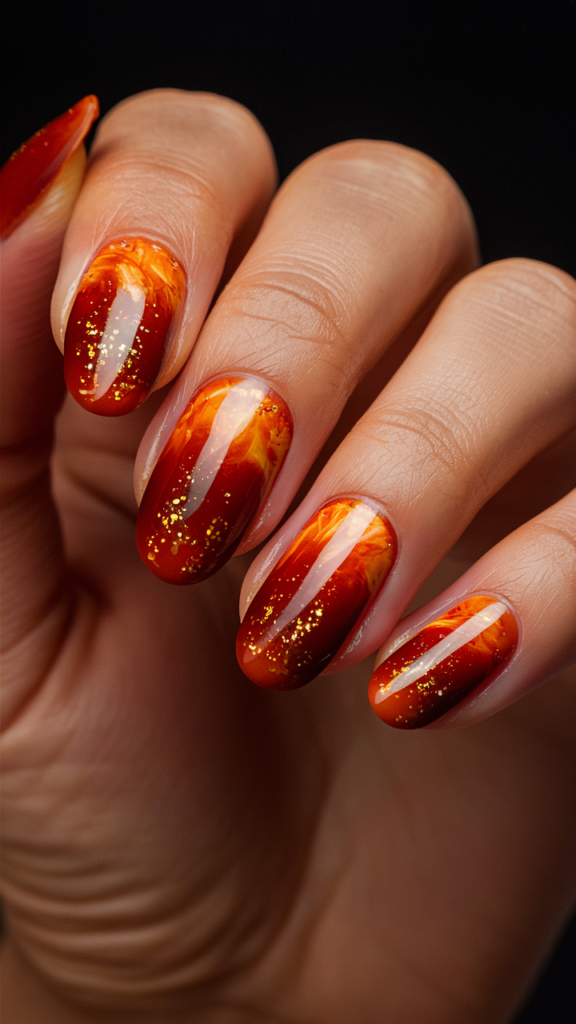
Burnt Orange Ombre nails are a stunning representation of the warm, glowing colors of fall.
This design seamlessly blends burnt orange with deep brown, creating a gradient that mimics the changing hues of autumn leaves.
The smooth transition between colors adds a modern and artistic touch, making it a versatile choice for any fall occasion.
Step-by-Step Guide to Burnt Orange Ombre Nails
1. Apply a Burnt Orange Base
- Start with a burnt orange polish as your base color. This warm shade sets the tone for the ombre effect.
- Let the base coat dry completely.
2. Blend in Deep Brown
- Use a makeup sponge to apply deep brown polish to the tips of your nails.
- Gently dab the sponge to blend the brown into the orange, creating a smooth gradient.
Pro Tip: Apply multiple thin layers for a more seamless blend.
3. Seal the Design
- Apply a glossy top coat to enhance the richness of the colors and create a glowing effect.
- The glossy finish makes the ombre transition appear even more vibrant.
Creative Variations
- Matte Ombre: Use a matte top coat for a softer, more muted look.
- Glitter Tips: Add gold or copper glitter to the brown tips for extra sparkle.
- Reverse Ombre: Start with a dark brown base and blend into burnt orange at the tips.
Why It Works
Burnt Orange Ombre nails capture the warmth and richness of fall in a simple yet striking design.
The gradient effect is both modern and timeless, making it a perfect choice for anyone looking to embrace the season’s beauty.
It’s a versatile design that works for casual outings, office wear, or even special events.
5. Sweater Weather Nail Art
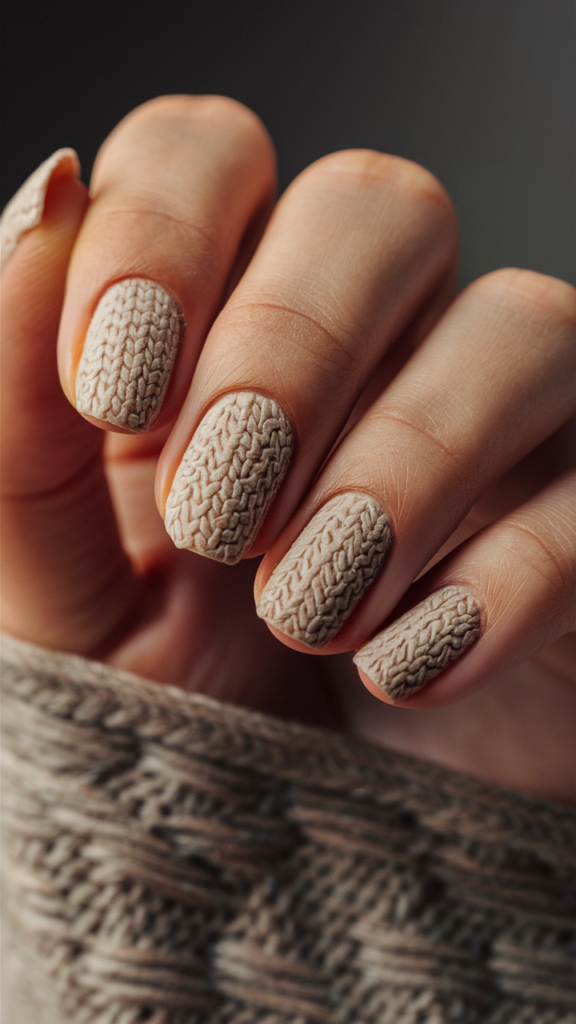
Sweater Weather nails are all about texture and warmth, making them the perfect choice for fall.
This design features a soft cream base with a 3D cable-knit texture that mimics the cozy feel of your favorite sweater.
It’s a chic and stylish way to bring the comfort of fall fashion to your fingertips.
Step-by-Step Guide to Sweater Weather Nails
1. Apply a Soft Cream Base
- Start with a soft cream polish as your base color. This cozy shade mimics the look of a warm sweater.
- Let the base coat dry completely.
2. Create a Cable-Knit Texture
- Use a textured polish or a fine brush to paint a cable-knit pattern on one or two accent nails.
- The raised, detailed pattern should mimic the look of a cozy sweater.
Pro Tip: Use a matte top coat to enhance the texture and make it look more realistic.
3. Seal the Design
- Apply a matte top coat to the textured nails to maintain the fabric-like appearance.
- For the other nails, use a glossy top coat to create a subtle contrast.
Creative Variations
- Colorful Knits: Add pops of color to the cable-knit pattern for a more playful look.
- Glitter Accents: Incorporate gold or silver glitter into the design for a festive touch.
- Plaid Background: Paint a plaid pattern on the other nails to complement the cable-knit texture.
Why It Works
Sweater Weather nails are cozy, stylish, and perfect for the cooler months.
The textured design adds a unique, tactile element to your manicure, making it stand out.
It’s a creative way to embrace the warmth and comfort of fall fashion.
6. Mossy Green Marble Nail Art
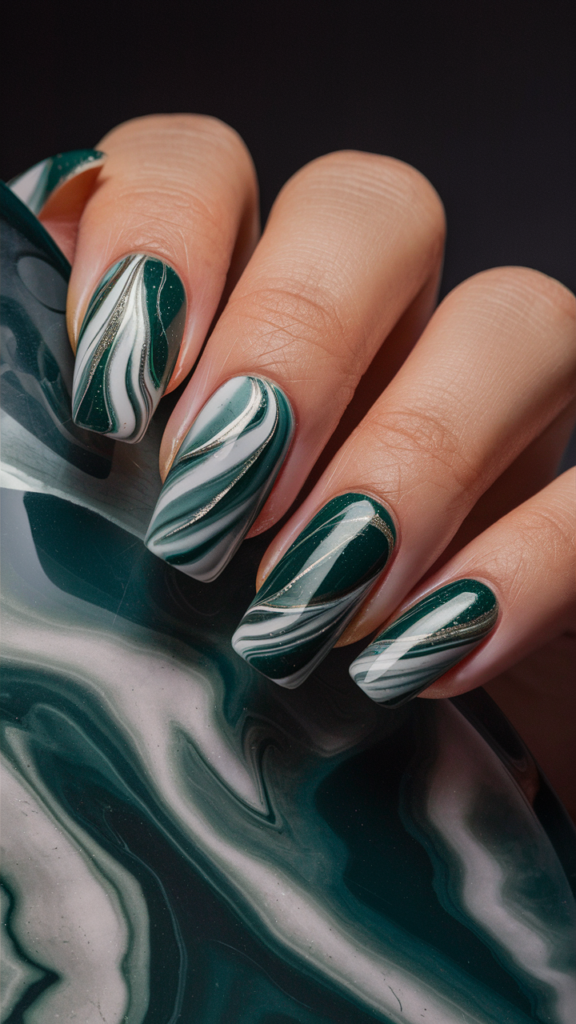
Mossy Green Marble nails are a sophisticated and elegant option for fall, featuring a marbled effect with shades of dark green and gold.
This design brings the beauty of nature to your fingertips, with swirling patterns that mimic the organic look of marble stone.
The addition of gold accents adds a touch of luxury, making it perfect for both casual and formal occasions.
Step-by-Step Guide to Mossy Green Marble Nails
1. Apply a Dark Green Base
- Start with a dark green polish as your base color. This rich shade sets the tone for the marble effect.
- Let the base coat dry completely.
2. Create the Marble Effect
- Use a fine brush or toothpick to swirl white and gold polish into the green base.
- The swirls should be fluid and organic, mimicking the look of natural marble.
Pro Tip: Work quickly to prevent the polish from drying before you finish the swirls.
3. Seal the Design
- Apply a glossy top coat to smooth out the design and enhance the marbled effect.
- The glossy finish adds depth and richness to the colors.
Creative Variations
- Matte Marble: Use a matte top coat for a softer, more understated look.
- Copper Accents: Swap the gold for copper to create a warmer marble effect.
- Geometric Marble: Add geometric shapes in gold or white to complement the marble swirls.
Why It Works
Mossy Green Marble nails are a luxurious and artistic way to embrace the beauty of fall.
The marbled effect is both elegant and eye-catching, making it a standout choice for your manicure.
It’s a versatile design that works for any occasion, from casual outings to formal events.
7. Spiced Latte-Inspired Nail Art
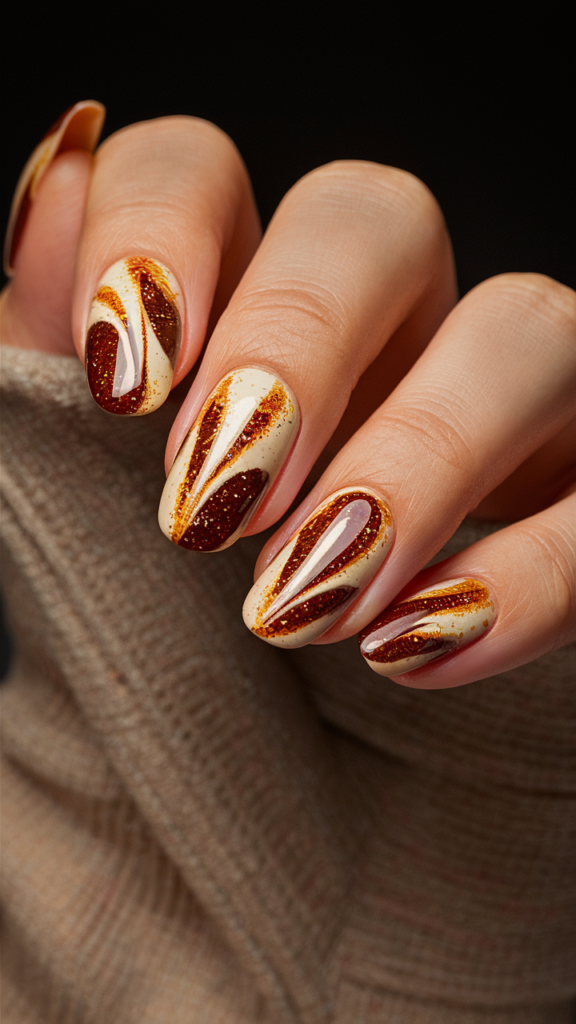
Spiced Latte-Inspired nails capture the warmth and comfort of your favorite fall beverage.
This design features a warm taupe base with intricate latte art details, bringing the cozy vibes of a spiced latte to your fingertips.
It’s a creative and elegant way to celebrate the flavors of autumn.
Step-by-Step Guide to Spiced Latte-Inspired Nails
1. Apply a Warm Taupe Base
- Start with a warm taupe polish as your base color. This cozy shade mimics the look of a spiced latte.
- Let the base coat dry completely.
2. Add Latte Art Details
- Use a fine brush to create tiny latte art designs on one or two accent nails.
- Include details like foam swirls and cinnamon sprinkles for a realistic touch.
Pro Tip: Use white and brown polish to create the latte art, adding highlights and shadows for depth.
3. Seal the Design
- Apply a glossy top coat to smooth out the design and add shine.
- The glossy finish enhances the warm tones of the taupe base.
Creative Variations
- Glitter Foam: Add gold or silver glitter to the foam details for extra sparkle.
- Pumpkin Spice Accents: Include tiny pumpkin or leaf designs alongside the latte art.
- Matte Finish: Use a matte top coat for a more muted, cozy look.
Why It Works
Spiced Latte-Inspired nails are a fun and creative way to celebrate the flavors of fall.
The latte art details add a unique and personal touch to your manicure, making it stand out.
It’s a perfect design for coffee lovers and anyone who enjoys the cozy vibes of autumn.
8. Rustic Plaid Nail Art
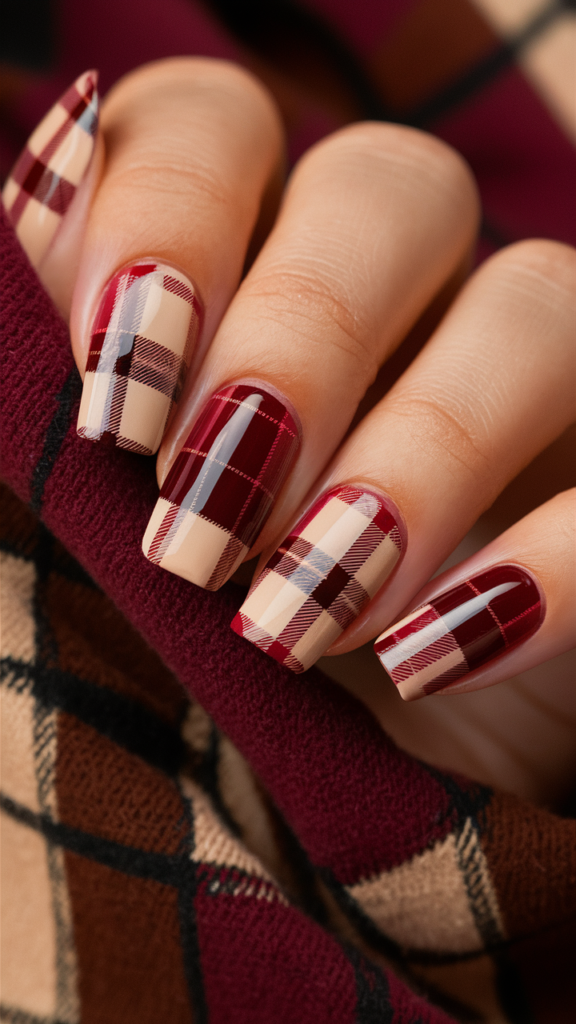
Rustic Plaid nails are a timeless and classic choice for fall, featuring a mix of burgundy, brown, and cream colors in a traditional plaid pattern.
This design is inspired by cozy flannel shirts, making it a perfect way to bring the warmth of fall fashion to your nails.
It’s a versatile and stylish look that works for any occasion.
Step-by-Step Guide to Rustic Plaid Nails
1. Apply a Burgundy Base
- Start with a burgundy polish as your base color. This rich shade sets the tone for the plaid pattern.
- Let the base coat dry completely.
2. Paint the Plaid Pattern
- Use a fine brush to create thin, precise lines in brown and cream, overlapping to mimic the look of a plaid shirt.
- The lines should be evenly spaced and intersect to create the classic plaid design.
Pro Tip: Use striping tape to help create clean, straight lines.
3. Seal the Design
- Apply a glossy top coat to smooth out the design and enhance the richness of the colors.
- The glossy finish adds a polished, finished look to the plaid pattern.
Creative Variations
- Matte Plaid: Use a matte top coat for a softer, more rustic look.
- Glitter Accents: Add gold or silver glitter to the plaid lines for extra sparkle.
- Colorful Plaid: Swap the brown and cream for other fall colors like orange or yellow.
Why It Works
Rustic Plaid nails are a classic and stylish choice for fall.
The plaid pattern is both timeless and versatile, making it perfect for any occasion.
It’s a cozy and fashionable way to embrace the warmth of fall.
9. Copper Chrome Nail Art

Copper Chrome nails are a modern and edgy choice for fall, featuring a reflective chrome finish in a rich copper tone.
This design adds a futuristic touch to your manicure, with a mirror-like surface that catches the light beautifully.
It’s a bold and glamorous way to embrace the warm tones of the season.
Step-by-Step Guide to Copper Chrome Nails
1. Apply a Base Coat
- Start with a clear base coat to prepare your nails for the chrome polish.
- Let the base coat dry completely.
2. Apply the Chrome Polish
- Use a copper chrome polish to create a reflective, mirror-like finish on your nails.
- Apply thin, even layers for the best results.
Pro Tip: Use a makeup sponge to apply the chrome polish for a smoother, more even finish.
3. Seal the Design
- Apply a glossy top coat to enhance the reflective finish and protect the chrome polish.
- The glossy finish adds extra shine and durability to the design.
Creative Variations
- Matte Chrome: Use a matte top coat for a softer, more muted look.
- Ombre Chrome: Blend the copper chrome into a darker brown or black for a gradient effect.
- Geometric Accents: Add small geometric shapes in gold or silver to complement the chrome finish.
Why It Works
Copper Chrome nails are a bold and glamorous choice for fall.
The reflective finish adds a modern and edgy touch to your manicure, making it stand out.
It’s a perfect design for anyone looking to make a statement with their nails.
10. Autumn Leaves & Glitter Nail Art
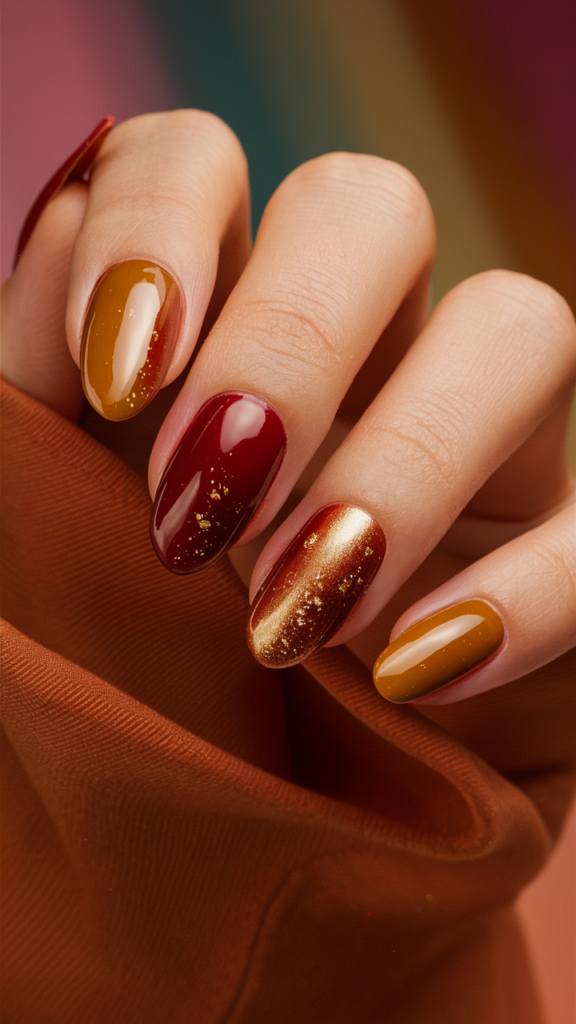
Autumn Leaves & Glitter nails combine the natural beauty of fall foliage with a touch of sparkle.
This design features warm-toned colors like burnt orange, deep red, and mustard yellow, paired with detailed leaf designs and fine gold glitter.
It’s a glamorous and festive way to celebrate the vibrant colors of autumn.
Step-by-Step Guide to Autumn Leaves & Glitter Nails
1. Apply a Warm-Toned Base
- Start with a base color in burnt orange, deep red, or mustard yellow. These shades capture the essence of autumn leaves.
- Let the base coat dry completely.
2. Paint Detailed Leaf Designs
- Use a fine brush to create detailed leaf designs on one or two accent nails.
- Include visible veins and edges to make the leaves look realistic.
Pro Tip: Use multiple shades of red, orange, and yellow to add depth to the leaves.
3. Add Gold Glitter
- Apply fine gold glitter along the edges of the leaves or as an accent on other nails.
- The glitter adds a touch of sparkle and glamour to the design.
4. Seal the Design
- Apply a glossy top coat to smooth out the design and enhance the colors.
- The glossy finish makes the leaves and glitter shine even more.
Creative Variations
- Matte Leaves: Use a matte top coat on the leaves for a softer, more natural look.
- Glitter Ombre: Blend gold glitter from the tips of the nails for a gradient effect.
- Mixed Glitter: Add silver or copper glitter alongside the gold for extra sparkle.
Why It Works
Autumn Leaves & Glitter nails are a glamorous and festive way to celebrate the beauty of fall.
The combination of warm-toned colors and sparkling glitter creates a stunning and eye-catching design.
It’s perfect for anyone who wants to embrace the season with a touch of elegance and sparkle.
11. Cinnamon Spice Nail Art
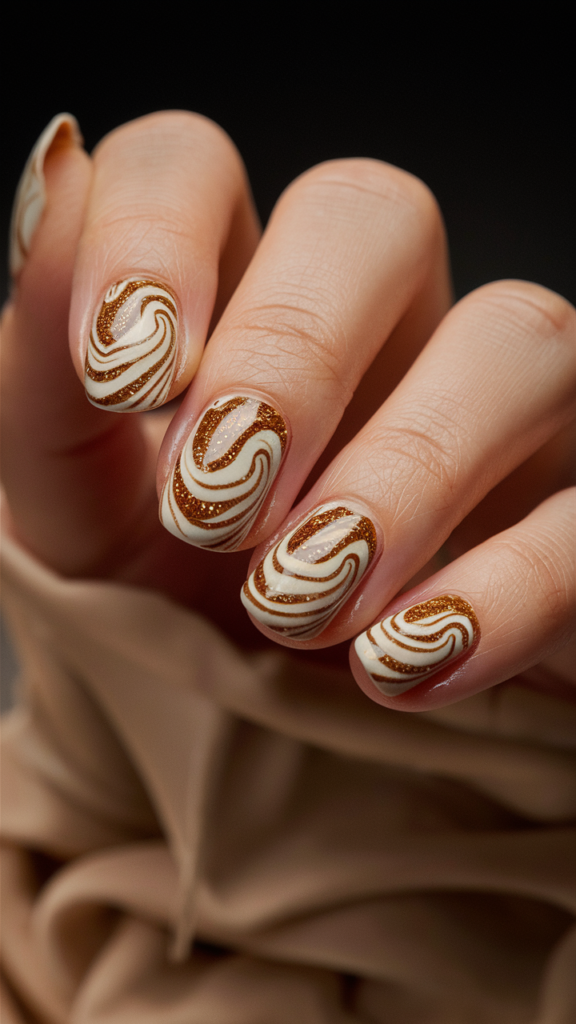
Cinnamon Spice nails are all about capturing the warmth and coziness of fall.
This design features a matte cinnamon base with subtle glitter accents, evoking the comforting aroma of cinnamon and spices.
It’s a simple yet sophisticated way to embrace the cozy vibes of the season.
Step-by-Step Guide to Cinnamon Spice Nails
1. Apply a Matte Cinnamon Base
- Start with a matte cinnamon polish as your base color. This warm shade mimics the rich tones of cinnamon.
- Let the base coat dry completely.
2. Add Glitter Accents
- Apply fine gold or copper glitter to one or two accent nails for a subtle shimmer effect.
- The glitter adds a touch of sparkle without overpowering the design.
Pro Tip: Use a sponge to dab the glitter for a more even and controlled application.
3. Seal the Design
- Apply a matte top coat to maintain the soft, cozy finish of the base color.
- For the glitter nails, use a glossy top coat to make the sparkle stand out.
Creative Variations
- Glitter Gradient: Blend the glitter from the tips of the nails for a gradient effect.
- Spice Details: Add tiny cinnamon stick or star anise designs for a festive touch.
- Mixed Textures: Combine matte and glossy finishes for a modern twist.
Why It Works
Cinnamon Spice nails are a warm and inviting choice for fall.
The matte cinnamon base paired with subtle glitter accents creates a cozy and elegant look.
It’s perfect for anyone who wants to celebrate the comforting flavors and aromas of the season.
12. Amber Ombre Nail Art
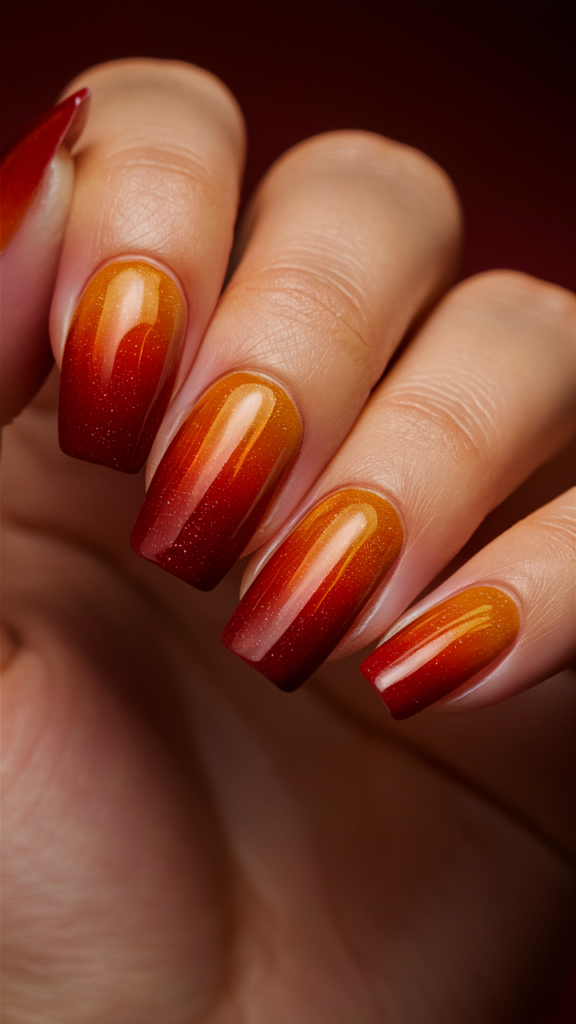
Amber Ombre nails are a stunning representation of the glowing colors of fall.
This design features a gradient that transitions from warm amber at the base to deep red at the tips, mimicking the radiant hues of autumn sunsets.
It’s a modern and artistic way to embrace the warmth and richness of the season.
Step-by-Step Guide to Amber Ombre Nails
1. Apply an Amber Base
- Start with a warm amber polish as your base color. This shade sets the tone for the ombre effect.
- Let the base coat dry completely.
2. Blend in Deep Red
- Use a makeup sponge to apply deep red polish to the tips of your nails.
- Gently dab the sponge to blend the red into the amber, creating a smooth gradient.
Pro Tip: Apply multiple thin layers for a more seamless blend.
3. Seal the Design
- Apply a glossy top coat to enhance the richness of the colors and create a glowing effect.
- The glossy finish makes the ombre transition appear even more vibrant.
Creative Variations
- Matte Ombre: Use a matte top coat for a softer, more muted look.
- Glitter Tips: Add gold or copper glitter to the red tips for extra sparkle.
- Reverse Ombre: Start with a deep red base and blend into amber at the tips.
Why It Works
Amber Ombre nails capture the warmth and radiance of fall in a simple yet striking design.
The gradient effect is both modern and timeless, making it a perfect choice for any occasion.
It’s a versatile design that works for casual outings, office wear, or even special events.
13. Muted Mustard Nail Art
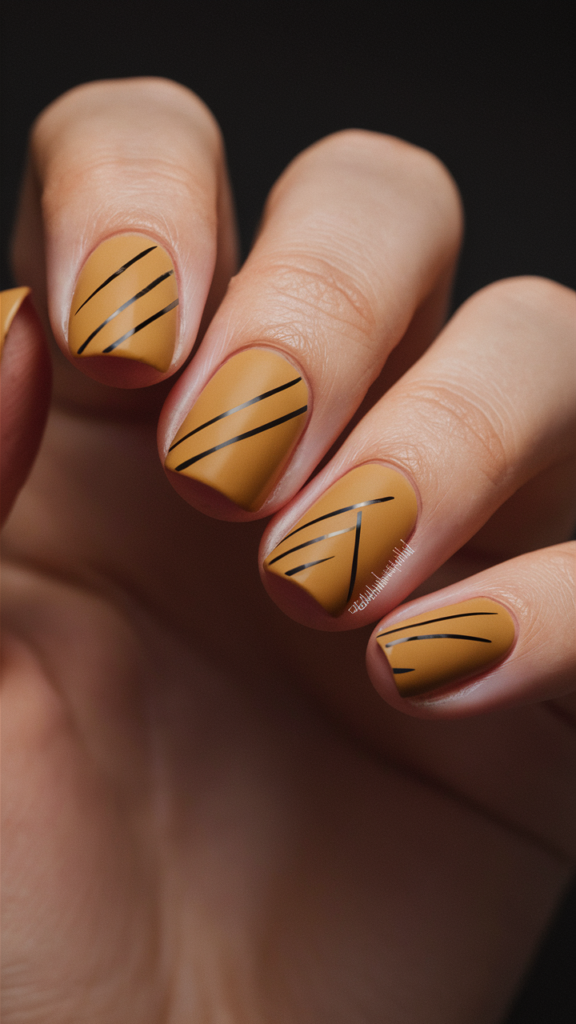
Muted Mustard nails are a chic and understated choice for fall.
This design features a muted mustard yellow base with minimal black geometric accents, creating a modern and minimalist look.
It’s perfect for those who prefer a subtle yet stylish manicure that still captures the essence of autumn.
Step-by-Step Guide to Muted Mustard Nails
1. Apply a Muted Mustard Base
- Start with a muted mustard yellow polish as your base color. This soft shade provides a warm and neutral canvas.
- Let the base coat dry completely.
2. Add Black Geometric Accents
- Use a fine brush or nail art pen to create minimal black geometric designs on one or two nails.
- Options include diagonal stripes, small triangles, or abstract lines.
Pro Tip: Keep the designs simple and clean for a modern, minimalist look.
3. Seal the Design
- Apply a matte top coat to maintain the understated elegance of the design.
- The matte finish enhances the muted tones and adds a sophisticated touch.
Creative Variations
- Glitter Accents: Add gold or silver glitter to the geometric designs for a subtle sparkle.
- Colorful Lines: Swap the black for other fall colors like burgundy or olive green.
- Mixed Textures: Combine matte and glossy finishes for added dimension.
Why It Works
Muted Mustard nails are a modern and versatile choice for fall.
The combination of warm mustard yellow and minimal black accents creates a chic and understated look.
It’s perfect for anyone who wants a stylish yet subtle manicure that complements the season.
14. Berry Harvest Nail Art
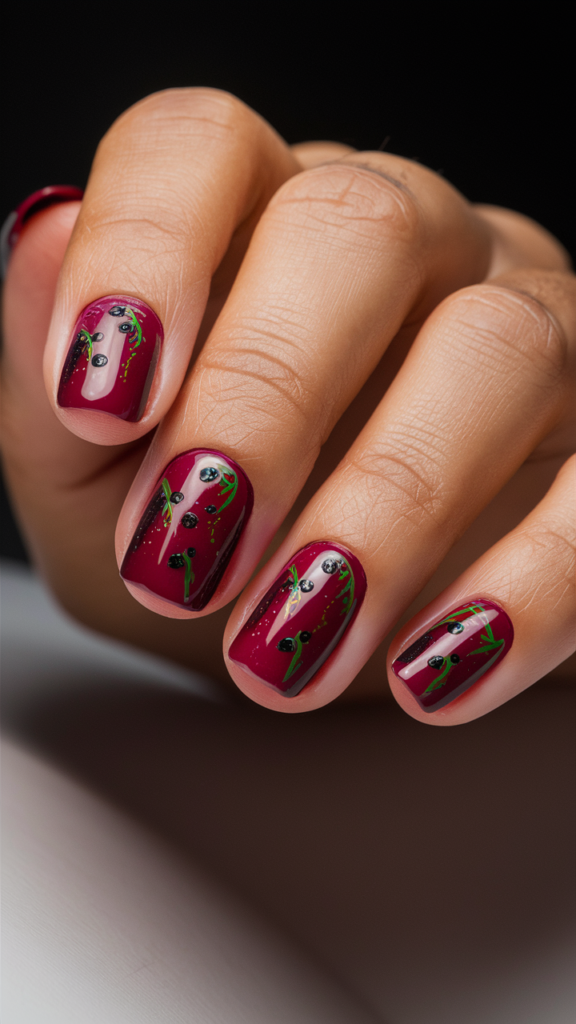
Berry Harvest nails are a rich and luxurious way to celebrate the bounty of fall.
This design features a deep berry base with hyperrealistic berry and leaf accents, evoking the feeling of a bountiful autumn harvest.
It’s a bold and elegant choice for anyone who loves the deep, vibrant colors of the season.
Step-by-Step Guide to Berry Harvest Nails
1. Apply a Deep Berry Base
- Start with a deep berry polish as your base color. This rich shade sets the tone for the design.
- Let the base coat dry completely.
2. Paint Berry and Leaf Accents
- Use a fine brush to create tiny, hyperrealistic designs of berries and leaves on one or two accent nails.
- Add highlights and shadows to give the berries a juicy, three-dimensional appearance.
Pro Tip: Use shades of red, purple, and green to make the berries and leaves look lifelike.
3. Seal the Design
- Apply a glossy top coat to smooth out the design and enhance the richness of the colors.
- The glossy finish makes the berries and leaves appear even more vibrant.
Creative Variations
- Glitter Berries: Add gold or silver glitter to the berries for extra sparkle.
- Ombre Background: Blend the berry base into a darker shade at the tips for a gradient effect.
- Mixed Fruits: Include other fall fruits like apples or pomegranates for a more elaborate design.
Why It Works
Berry Harvest nails are a bold and elegant way to celebrate the richness of fall.
The deep berry base paired with hyperrealistic accents creates a luxurious and eye-catching design.
It’s perfect for anyone who wants to embrace the season’s bounty in a unique and creative way.
15. Woodland Creatures Nail Art
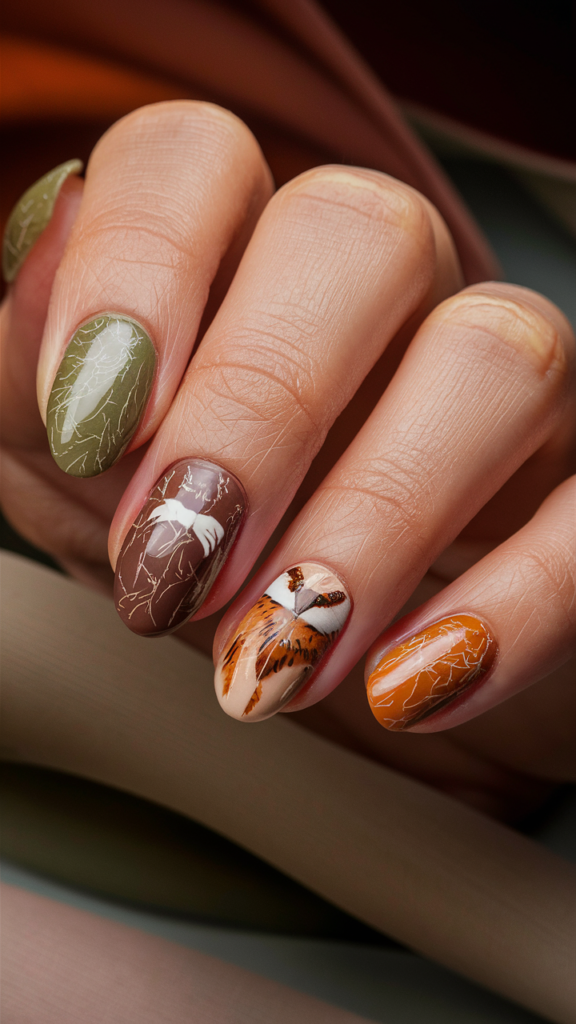
Woodland Creatures nails bring the whimsical charm of the forest to your fingertips.
This design features earthy tones like moss green, chestnut brown, and dusty orange, paired with adorable woodland animal accents like foxes, owls, or deer.
It’s a playful and creative way to celebrate the beauty of nature during fall.
Step-by-Step Guide to Woodland Creatures Nails
1. Apply an Earthy Base
- Start with a base color in moss green, chestnut brown, or dusty orange. These shades mimic the natural tones of the forest.
- Let the base coat dry completely.
2. Paint Woodland Creature Accents
- Use a fine brush to create tiny, hyperrealistic designs of woodland creatures on one or two accent nails.
- Add details like fur, feathers, or expressive eyes to bring the animals to life.
Pro Tip: Use shades of white, black, and brown to add depth and texture to the designs.
3. Seal the Design
- Apply a glossy top coat to smooth out the design and enhance the colors.
- The glossy finish makes the woodland creatures and earthy tones pop.
Creative Variations
- Glitter Accents: Add gold or silver glitter to the background for a magical forest vibe.
- Leaf Details: Include tiny leaf designs alongside the animals for a more elaborate look.
- Mixed Textures: Combine matte and glossy finishes for added dimension.
Why It Works
Woodland Creatures nails are a playful and whimsical way to celebrate the beauty of fall.
The earthy tones and adorable animal accents create a charming and creative design.
It’s perfect for anyone who loves nature and wants to bring a touch of the forest to their manicure.
16. Gilded Pinecones Nail Art
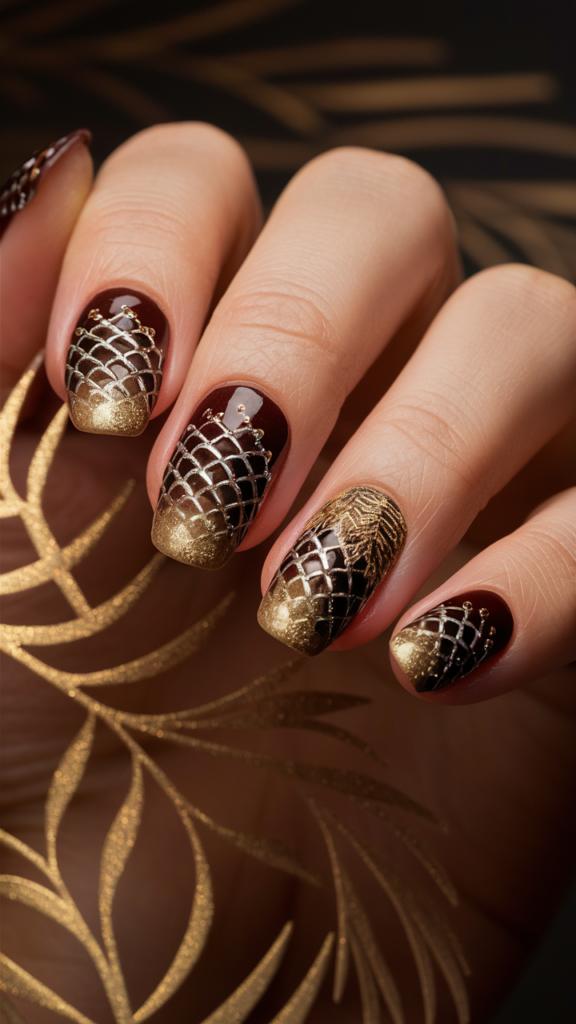
Gilded Pinecones nails are a luxurious take on a classic fall motif.
This design features a deep brown base with detailed pinecone accents in gold, adding a touch of glamour to the natural theme.
It’s a sophisticated and elegant choice for anyone who wants to embrace the beauty of fall with a hint of luxury.
Step-by-Step Guide to Gilded Pinecones Nails
1. Apply a Deep Brown Base
- Start with a deep brown polish as your base color. This rich shade mimics the earthy tones of pinecones.
- Let the base coat dry completely.
2. Add Gold Pinecone Accents
- Use a fine brush or gold foil to create detailed pinecone designs on one or two accent nails.
- Add texture and shading to make the pinecones look three-dimensional.
Pro Tip: Use a darker brown or black to add shadows and depth to the pinecones.
3. Seal the Design
- Apply a glossy top coat to smooth out the design and enhance the gold accents.
- The glossy finish adds a luxurious touch to the overall look.
Creative Variations
- Matte Finish: Use a matte top coat for a softer, more rustic look.
- Glitter Background: Add gold or copper glitter to the base for extra sparkle.
- Mixed Metals: Incorporate silver or rose gold accents alongside the gold for a modern twist.
Why It Works
Gilded Pinecones nails are a luxurious and elegant way to celebrate the beauty of fall.
The combination of deep brown and gold creates a rich and sophisticated design.
It’s perfect for anyone who wants to add a touch of glamour to their autumn manicure.
17. Matte Olive Nail Art
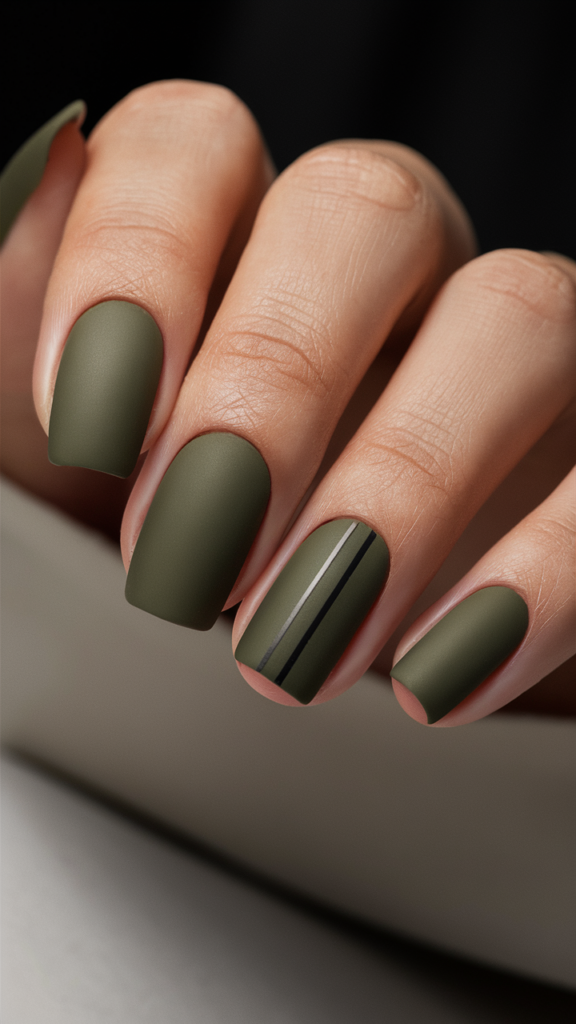
Matte Olive nails are a chic and modern choice for fall.
This design features a matte olive green base with subtle black accents, creating a minimalist yet stylish look.
It’s perfect for those who prefer a sleek and understated manicure that still captures the essence of the season.
Step-by-Step Guide to Matte Olive Nails
1. Apply a Matte Olive Base
- Start with a matte olive green polish as your base color. This muted shade provides a sophisticated and earthy tone.
- Let the base coat dry completely.
2. Add Black Accents
- Use a fine brush or nail art pen to create minimal black designs on one or two nails.
- Options include diagonal stripes, small triangles, or abstract lines.
Pro Tip: Keep the designs simple and clean for a modern, minimalist look.
3. Seal the Design
- Apply a matte top coat to maintain the understated elegance of the design.
- The matte finish enhances the muted tones and adds a polished touch.
Creative Variations
- Glitter Accents: Add gold or silver glitter to the black designs for a subtle sparkle.
- Colorful Lines: Swap the black for other fall colors like burgundy or mustard yellow.
- Mixed Textures: Combine matte and glossy finishes for added dimension.
Why It Works
Matte Olive nails are a modern and versatile choice for fall.
The combination of olive green and black accents creates a chic and understated look.
It’s perfect for anyone who wants a stylish yet subtle manicure that complements the season.
18. Bronze Swirls Nail Art
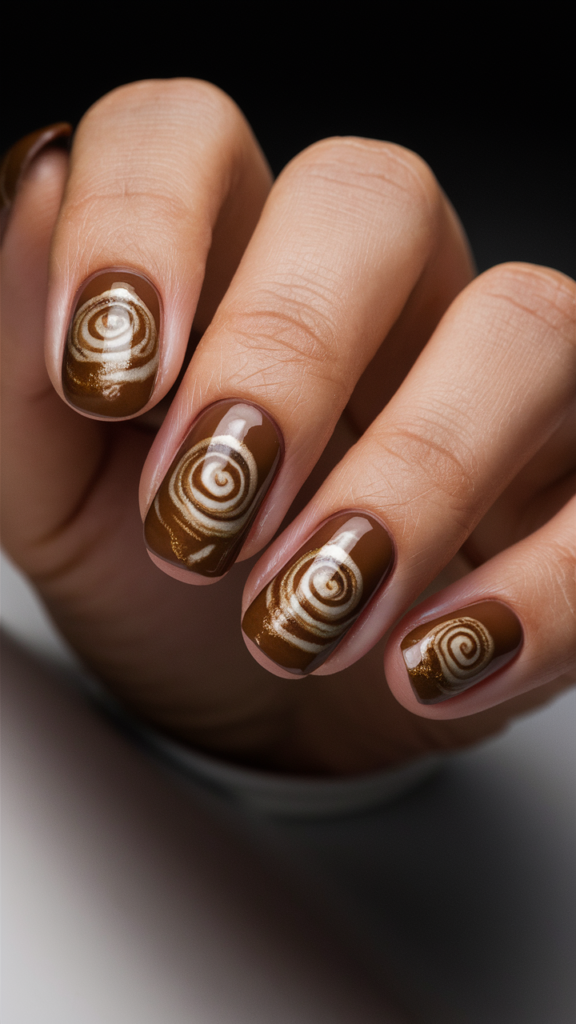
Bronze Swirls nails are a dynamic and artistic choice for fall.
This design features a deep brown base with intricate bronze swirls, creating a fluid and elegant pattern.
It’s a bold and sophisticated way to embrace the warmth and richness of the season.
Step-by-Step Guide to Bronze Swirls Nails
1. Apply a Deep Brown Base
- Start with a deep brown polish as your base color. This rich shade sets the tone for the bronze swirls.
- Let the base coat dry completely.
2. Create Bronze Swirls
- Use a fine brush or toothpick to paint intricate bronze swirls on your nails.
- The swirls should be fluid and organic, mimicking the look of flowing liquid.
Pro Tip: Work quickly to prevent the polish from drying before you finish the swirls.
3. Seal the Design
- Apply a glossy top coat to smooth out the design and enhance the bronze accents.
- The glossy finish adds depth and richness to the colors.
Creative Variations
- Matte Swirls: Use a matte top coat for a softer, more muted look.
- Mixed Metals: Add silver or gold swirls alongside the bronze for a modern twist.
- Glitter Swirls: Incorporate fine glitter into the swirls for extra sparkle.
Why It Works
Bronze Swirls nails are a bold and artistic way to celebrate the warmth of fall.
The combination of deep brown and bronze creates a luxurious and eye-catching design.
It’s perfect for anyone who wants to make a statement with their manicure.
19. Fallen Leaves Nail Art
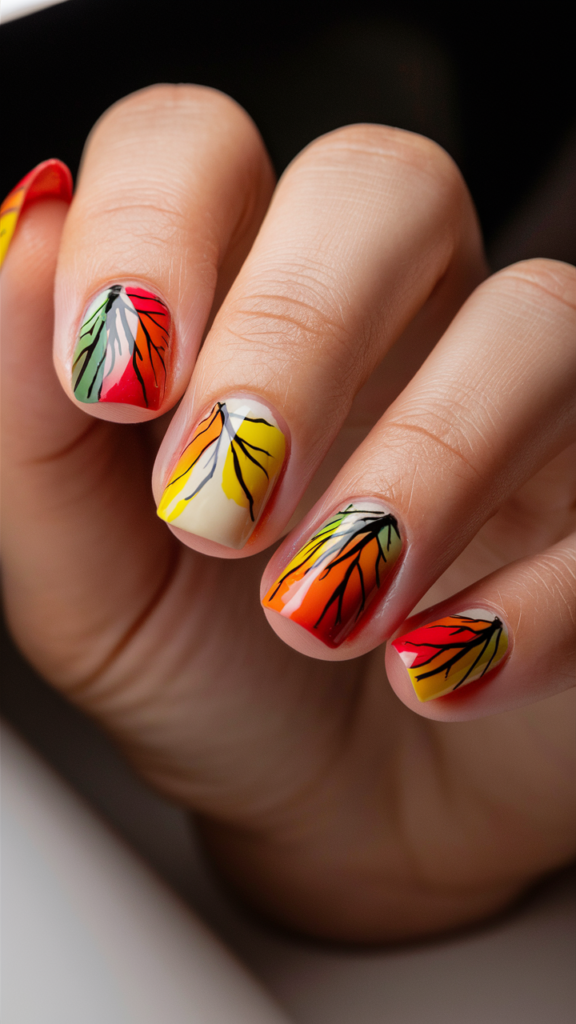
Fallen Leaves nails are a beautiful way to capture the essence of autumn foliage.
This design features a matte nude base with detailed leaf designs in various fall colors, creating a natural and elegant look.
It’s a perfect choice for anyone who wants to celebrate the beauty of fall in a subtle yet artistic way.
Step-by-Step Guide to Fallen Leaves Nails
1. Apply a Matte Nude Base
- Start with a matte nude polish as your base color. This neutral shade provides a clean canvas for the leaf designs.
- Let the base coat dry completely.
2. Paint Detailed Leaf Designs
- Use a fine brush to create detailed leaf designs on your nails.
- Use shades of red, orange, yellow, and green to mimic the colors of autumn leaves.
Pro Tip: Add visible veins and edges to the leaves for a more realistic look.
3. Seal the Design
- Apply a matte top coat to maintain the soft, natural finish of the design.
- For a more vibrant look, use a glossy top coat instead.
Creative Variations
- Glitter Leaves: Add gold or copper glitter to the leaves for extra sparkle.
- Ombre Background: Blend the nude base into a darker shade at the tips for a gradient effect.
- Mixed Textures: Combine matte and glossy finishes for added dimension.
Why It Works
Fallen Leaves nails are a natural and elegant way to celebrate the beauty of fall.
The detailed leaf designs and warm colors create a stunning and artistic look.
It’s perfect for anyone who wants to embrace the season’s beauty in a subtle yet creative way.
20. Spooky Chic Halloween Nail Art
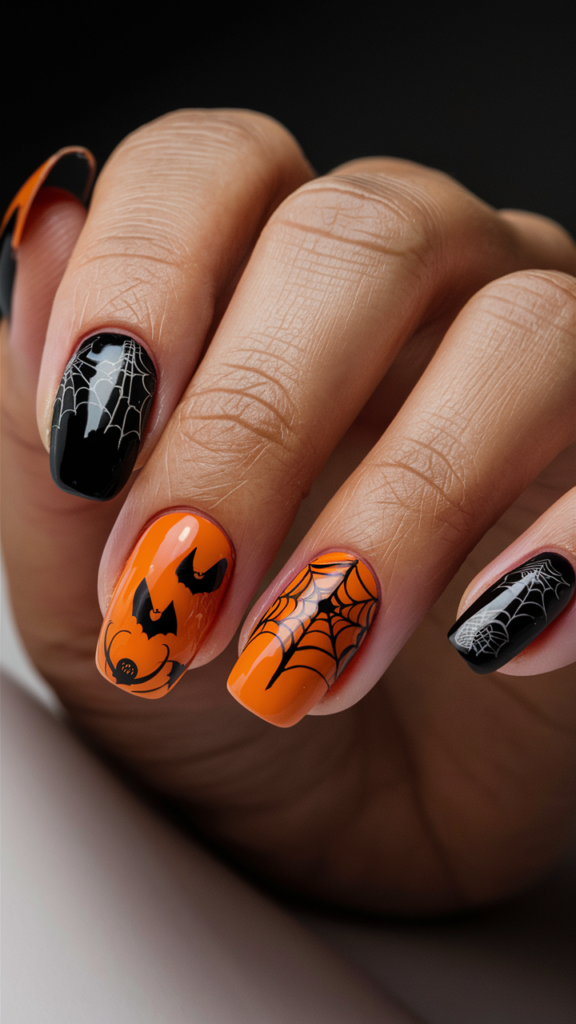
Spooky Chic Halloween nails are a sophisticated take on classic Halloween motifs.
This design features a glossy black and orange color scheme with subtle and elegant Halloween designs like bats, spiders, or haunted houses.
It’s a festive yet chic way to celebrate Halloween during the fall season.
Step-by-Step Guide to Spooky Chic Halloween Nails
1. Apply a Glossy Black Base
- Start with a glossy black polish as your base color. This bold shade sets the tone for the Halloween theme.
- Let the base coat dry completely.
2. Add Halloween Accents
- Use a fine brush or nail art pen to create subtle Halloween designs on one or two accent nails.
- Options include tiny bats, spiders, haunted houses, or cobwebs.
Pro Tip: Use white or orange polish for the designs to create a striking contrast against the black base.
3. Seal the Design
- Apply a glossy top coat to smooth out the design and enhance the colors.
- The glossy finish adds a polished and festive touch to the overall look.
Creative Variations
- Glitter Accents: Add gold or silver glitter to the Halloween designs for extra sparkle.
- Matte Finish: Use a matte top coat for a softer, more understated look.
- Mixed Themes: Combine Halloween motifs with fall elements like pumpkins or leaves.
Why It Works
Spooky Chic Halloween nails are a festive and elegant way to celebrate Halloween during fall.
The combination of black and orange with subtle Halloween designs creates a chic and creative look.
It’s perfect for anyone who wants to embrace the spooky season in style.
21. Sunset Ombre Nail Art
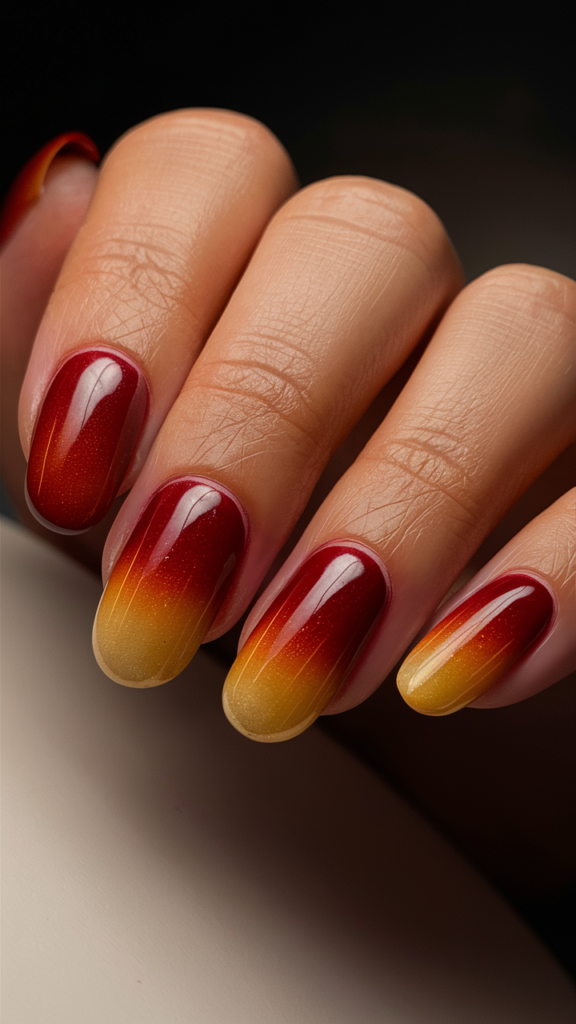
Sunset Ombre nails are a stunning way to capture the warm and glowing colors of a fall sunset.
This design features a gradient that transitions from deep red at the base to golden yellow at the tips, creating a seamless blend of colors.
It’s a vibrant and eye-catching choice for anyone who wants to embrace the beauty of autumn sunsets.
Step-by-Step Guide to Sunset Ombre Nails
1. Apply a Deep Red Base
- Start with a deep red polish as your base color. This rich shade sets the tone for the ombre effect.
- Let the base coat dry completely.
2. Blend in Golden Yellow
- Use a makeup sponge to apply golden yellow polish to the tips of your nails.
- Gently dab the sponge to blend the yellow into the red, creating a smooth gradient.
Pro Tip: Apply multiple thin layers for a more seamless blend.
3. Seal the Design
- Apply a glossy top coat to enhance the richness of the colors and create a glowing effect.
- The glossy finish makes the ombre transition appear even more vibrant.
Creative Variations
- Matte Ombre: Use a matte top coat for a softer, more muted look.
- Glitter Tips: Add gold or copper glitter to the yellow tips for extra sparkle.
- Reverse Ombre: Start with a golden yellow base and blend into deep red at the tips.
Why It Works
Sunset Ombre nails capture the warmth and radiance of fall sunsets in a simple yet striking design.
The gradient effect is both modern and timeless, making it a perfect choice for any occasion.
It’s a versatile design that works for casual outings, office wear, or even special events.
22. Burgundy Bliss Nail Art
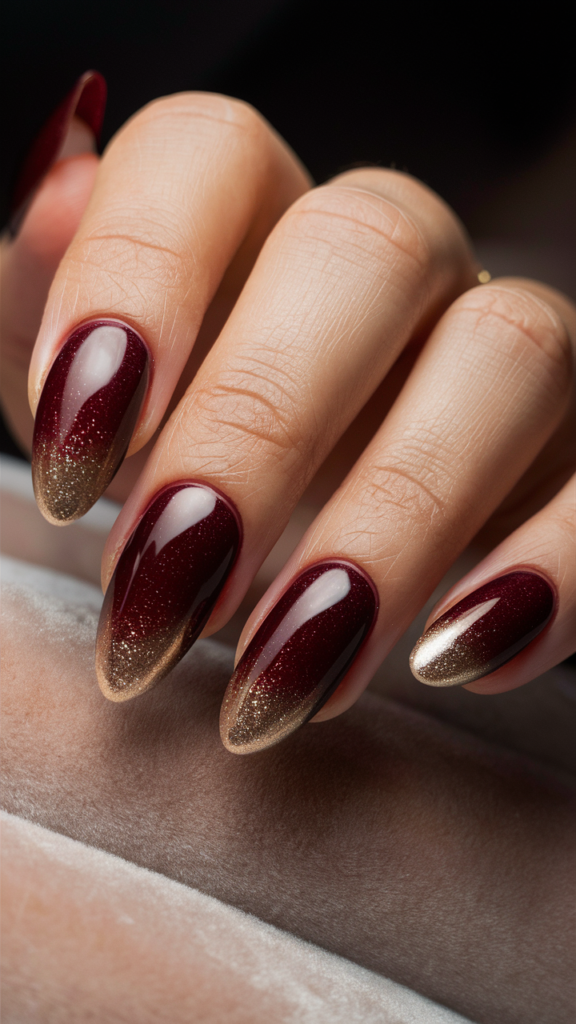
Burgundy Bliss nails are a luxurious and elegant choice for fall.
This design features a rich burgundy base with gold foil accents, creating a look that’s both sophisticated and glamorous.
It’s perfect for anyone who wants to embrace the deep, rich tones of the season with a touch of sparkle.
Step-by-Step Guide to Burgundy Bliss Nails
1. Apply a Burgundy Base
- Start with a rich burgundy polish as your base color. This deep shade sets the tone for the design.
- Let the base coat dry completely.
2. Add Gold Foil Accents
- Use gold foil or gold leaf to create random accents on your nails.
- Carefully place the foil on the nails for a luxurious and elegant look.
Pro Tip: Use tweezers to carefully place the foil for precise application.
3. Seal the Design
- Apply a glossy top coat to smooth out the design and enhance the gold accents.
- The glossy finish adds a polished and luxurious touch to the overall look.
Creative Variations
- Matte Finish: Use a matte top coat for a softer, more understated look.
- Glitter Accents: Add gold or silver glitter alongside the foil for extra sparkle.
- Mixed Metals: Incorporate silver or rose gold accents for a modern twist.
Why It Works
Burgundy Bliss nails are a luxurious and elegant way to celebrate the richness of fall.
The combination of deep burgundy and gold creates a stunning and sophisticated design.
It’s perfect for anyone who wants to add a touch of glamour to their autumn manicure.
23. Rose Gold Accents Nail Art
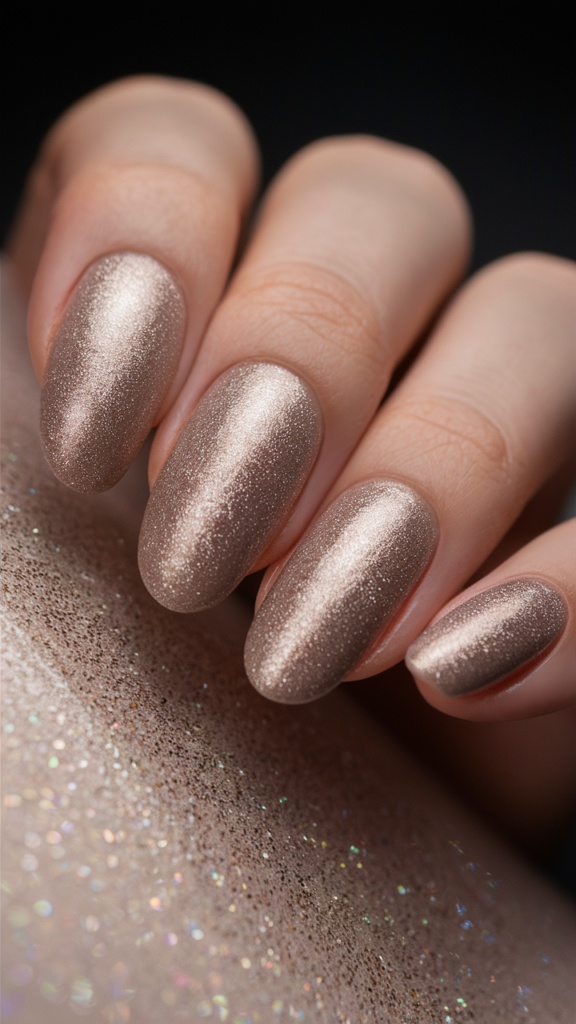
Rose Gold Accents nails are a chic and feminine choice for fall.
This design features a matte taupe base with rose gold glitter tips, creating a subtle yet stunning look.
It’s perfect for anyone who wants to embrace the warmth of the season with a modern and elegant twist.
Step-by-Step Guide to Rose Gold Accents Nails
1. Apply a Matte Taupe Base
- Start with a matte taupe polish as your base color. This neutral shade provides a clean canvas for the rose gold accents.
- Let the base coat dry completely.
2. Add Rose Gold Glitter Tips
- Use a fine brush or sponge to apply rose gold glitter to the tips of your nails.
- The glitter should create a smooth transition from the taupe base to the sparkling tips.
Pro Tip: Use a makeup sponge to dab the glitter for a more even and controlled application.
3. Seal the Design
- Apply a glossy top coat to smooth out the design and enhance the sparkle of the glitter.
- The glossy finish adds a polished and elegant touch to the overall look.
Creative Variations
- Matte Tips: Use a matte top coat on the glitter tips for a softer, more muted look.
- Ombre Effect: Blend the rose gold glitter into the taupe base for a seamless gradient.
- Mixed Metals: Add silver or gold glitter alongside the rose gold for extra sparkle.
Why It Works
Rose Gold Accents nails are a modern and elegant way to celebrate the warmth of fall.
The combination of matte taupe and rose gold creates a chic and sophisticated look.
It’s perfect for anyone who wants to add a touch of glamour to their autumn manicure.
24. Forest Moss Nail Art
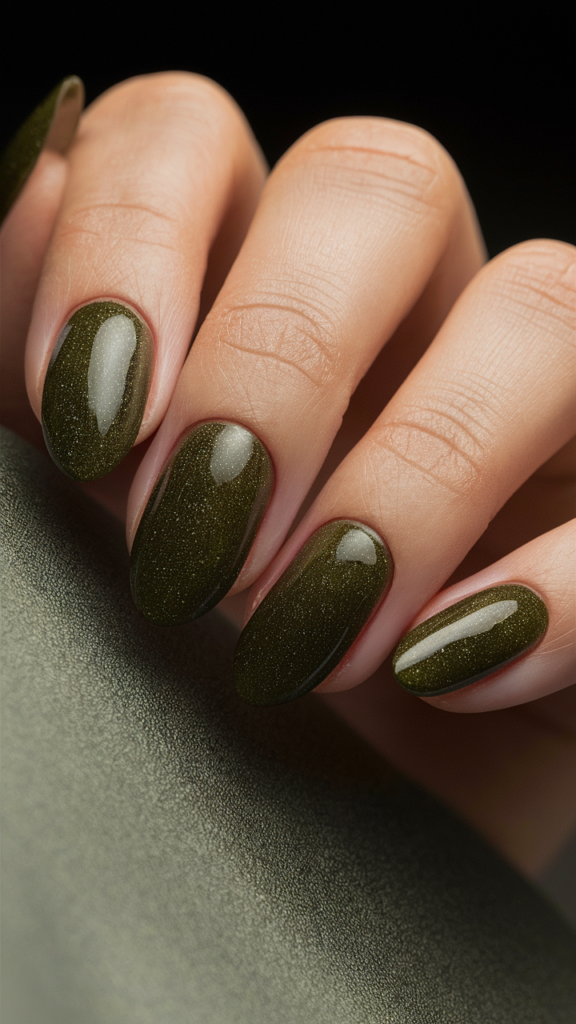
Forest Moss nails bring the beauty of the forest to your fingertips.
This design features a deep moss green base with tiny, hyperrealistic white mushroom accents, creating a natural and earthy look.
It’s a whimsical and creative way to celebrate the organic beauty of fall.
Step-by-Step Guide to Forest Moss Nails
1. Apply a Moss Green Base
- Start with a deep moss green polish as your base color. This rich shade mimics the tones of a forest floor.
- Let the base coat dry completely.
2. Paint Mushroom Accents
- Use a fine brush to create tiny, hyperrealistic white mushroom designs on one or two accent nails.
- Add details like caps, stems, and shading to make the mushrooms look lifelike.
Pro Tip: Use a darker green or brown to add shadows and depth to the mushrooms.
3. Seal the Design
- Apply a glossy top coat to smooth out the design and enhance the colors.
- The glossy finish makes the mushrooms and moss green base pop.
Creative Variations
- Glitter Moss: Add gold or silver glitter to the base for a magical forest vibe.
- Leaf Details: Include tiny leaf designs alongside the mushrooms for a more elaborate look.
- Mixed Textures: Combine matte and glossy finishes for added dimension.
Why It Works
Forest Moss nails are a whimsical and creative way to celebrate the beauty of fall.
The earthy tones and adorable mushroom accents create a charming and natural look.
It’s perfect for anyone who loves nature and wants to bring a touch of the forest to their manicure.
25. Warm Flannels Nail Art
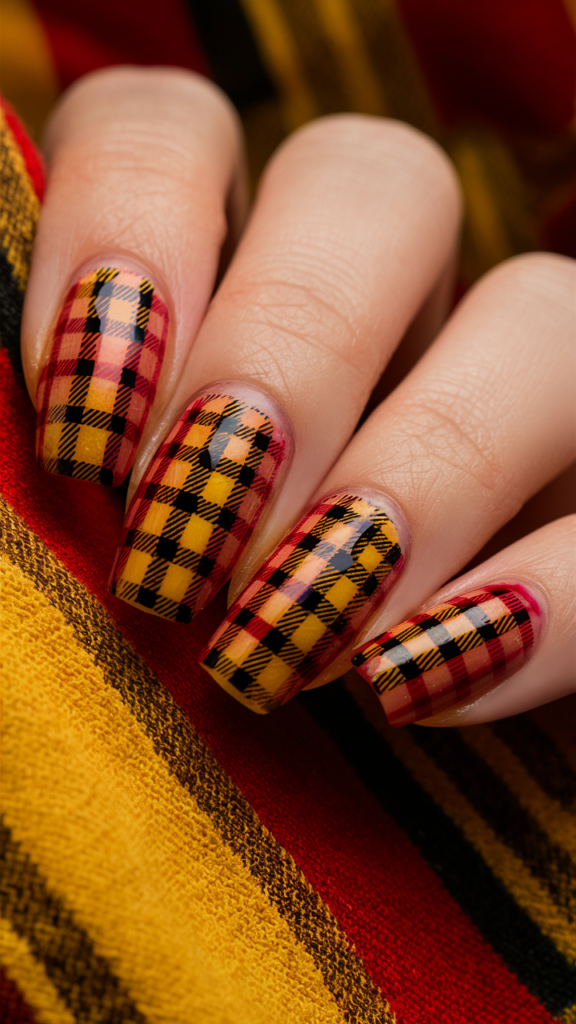
Warm Flannels nails are a cozy and stylish choice for fall.
This design features a plaid pattern in red, yellow, and black, mimicking the look of a warm flannel shirt.
It’s a classic and festive way to embrace the comfort of fall fashion.
Step-by-Step Guide to Warm Flannels Nails
1. Apply a Red Base
- Start with a red polish as your base color. This vibrant shade sets the tone for the plaid pattern.
- Let the base coat dry completely.
2. Paint the Plaid Pattern
- Use a fine brush to create thin, precise lines in yellow and black, overlapping to mimic the look of a flannel shirt.
- The lines should be evenly spaced and intersect to create the classic plaid design.
Pro Tip: Use striping tape to help create clean, straight lines.
3. Seal the Design
- Apply a glossy top coat to smooth out the design and enhance the richness of the colors.
- The glossy finish adds a polished and festive touch to the overall look.
Creative Variations
- Matte Plaid: Use a matte top coat for a softer, more rustic look.
- Glitter Accents: Add gold or silver glitter to the plaid lines for extra sparkle.
- Colorful Plaid: Swap the yellow and black for other fall colors like orange or green.
Why It Works
Warm Flannels nails are a classic and stylish choice for fall.
The plaid pattern is both timeless and festive, making it perfect for any occasion.
It’s a cozy and fashionable way to embrace the warmth of fall.
Warm Flannels nails are all about embracing the cozy and comforting patterns of fall.
These nails are painted with a plaid pattern in red, yellow, and black, mimicking the look of a warm flannel shirt.
The lines of the plaid pattern are precise and overlap to create the appearance of fabric, with a glossy finish that enhances the richness of the colors.
This design is perfect for those who want a manicure that is both classic and stylish, with a nod to traditional fall fashion.
The warm tones of the plaid pattern make this design ideal for the fall season, while the glossy finish adds a modern touch.
26. Golden Hour Nail Art
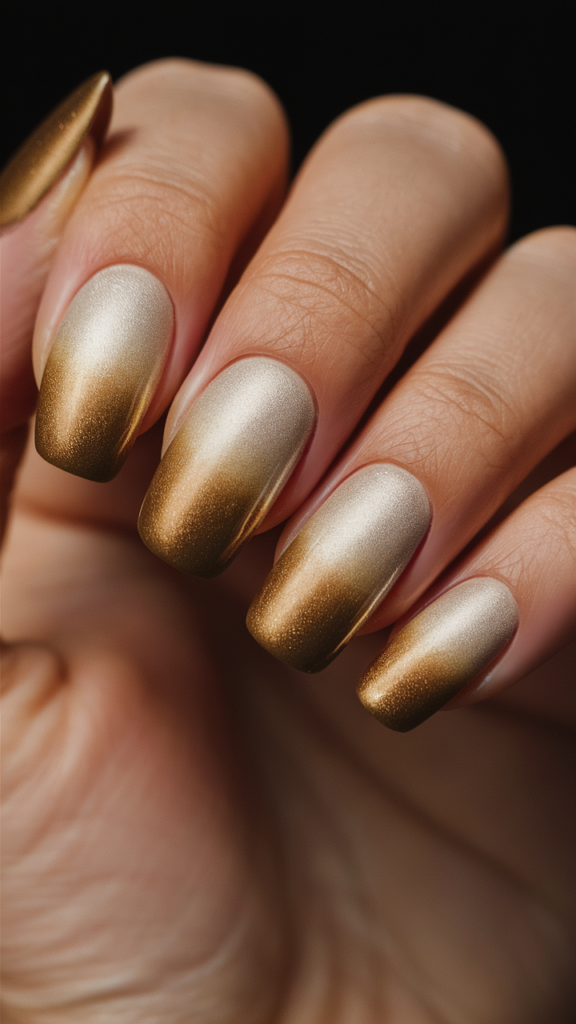
Golden Hour nails capture the warm and glowing light of the golden hour.
This design features a shimmering golden finish that blends from a darker gold at the base to a lighter, almost champagne gold at the tips.
It’s a radiant and elegant choice for anyone who wants to embrace the beauty of fall sunsets.
Step-by-Step Guide to Golden Hour Nails
1. Apply a Dark Gold Base
- Start with a dark gold polish as your base color. This rich shade sets the tone for the gradient effect.
- Let the base coat dry completely.
2. Blend in Lighter Gold
- Use a makeup sponge to apply a lighter, champagne gold polish to the tips of your nails.
- Gently dab the sponge to blend the lighter gold into the darker gold, creating a smooth gradient.
Pro Tip: Apply multiple thin layers for a more seamless blend.
3. Seal the Design
- Apply a glossy top coat to enhance the shimmering effect and create a glowing finish.
- The glossy finish makes the gradient transition appear even more radiant.
Creative Variations
- Matte Finish: Use a matte top coat for a softer, more muted look.
- Glitter Tips: Add gold or copper glitter to the lighter tips for extra sparkle.
- Reverse Ombre: Start with a champagne gold base and blend into darker gold at the tips.
Why It Works
Golden Hour nails capture the warmth and radiance of fall sunsets in a simple yet striking design.
The gradient effect is both modern and timeless, making it a perfect choice for any occasion.
It’s a versatile design that works for casual outings, office wear, or even special events.
27. Chocolate Dipped Nail Art
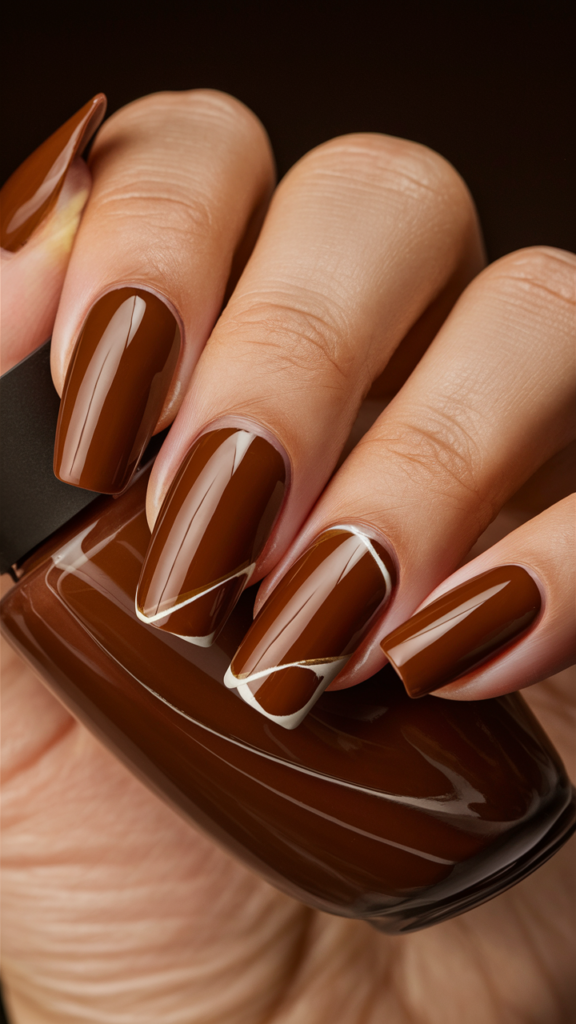
Chocolate Dipped nails are a rich and indulgent choice for fall.
This design features a deep chocolate brown base with lighter brown tips, mimicking the look of chocolate-dipped treats.
It’s a sweet and sophisticated way to embrace the cozy vibes of the season.
Step-by-Step Guide to Chocolate Dipped Nails
1. Apply a Chocolate Brown Base
- Start with a deep chocolate brown polish as your base color. This rich shade sets the tone for the design.
- Let the base coat dry completely.
2. Add Lighter Brown Tips
- Use a lighter brown polish to create a dipped effect at the tips of your nails.
- Blend the lighter brown slightly into the darker base for a smooth transition.
Pro Tip: Use a makeup sponge to dab the lighter brown for a more seamless blend.
3. Seal the Design
- Apply a glossy top coat to smooth out the design and enhance the richness of the colors.
- The glossy finish makes the chocolate-dipped effect appear even more realistic.
Creative Variations
- Matte Finish: Use a matte top coat for a softer, more muted look.
- Glitter Tips: Add gold or copper glitter to the lighter tips for extra sparkle.
- Reverse Dip: Start with a lighter brown base and dip into darker chocolate brown at the tips.
Why It Works
Chocolate Dipped nails are a sweet and indulgent way to celebrate the cozy vibes of fall.
The combination of deep and lighter brown creates a rich and luxurious design.
It’s perfect for anyone who wants to embrace the comforting flavors of the season.
28. Wine & Dine Nail Art
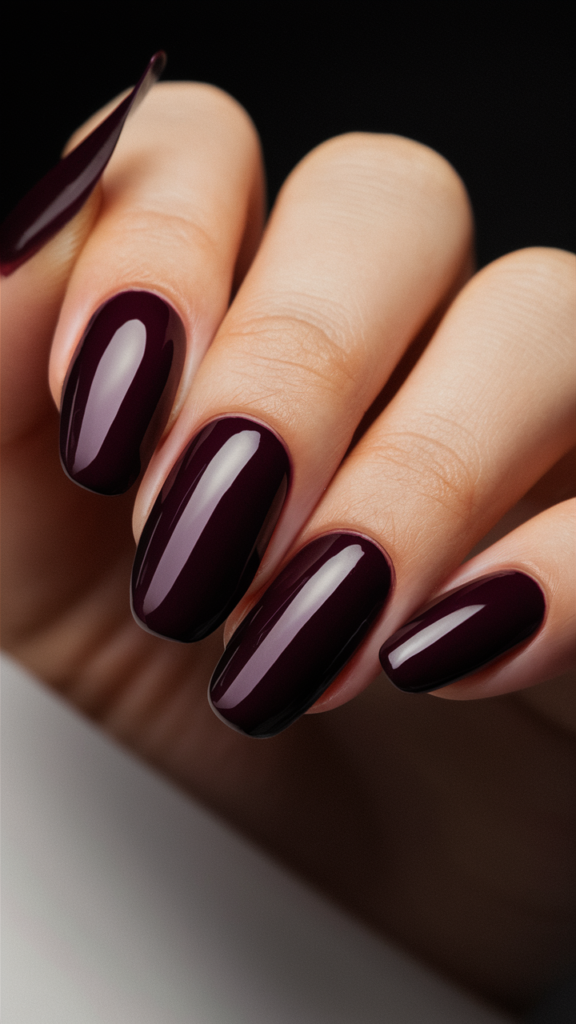
Wine & Dine nails are a luxurious and elegant choice for fall.
This design features a deep wine-colored base with a high-gloss finish, creating a look that’s both sophisticated and bold.
It’s perfect for anyone who wants to embrace the rich, dark tones of the season with a touch of glamour.
Step-by-Step Guide to Wine & Dine Nails
1. Apply a Deep Wine Base
- Start with a deep wine-colored polish as your base color. This rich shade sets the tone for the design.
- Let the base coat dry completely.
2. Add a High-Gloss Finish
- Apply a high-gloss top coat to enhance the depth and intensity of the wine color.
- The glossy finish creates a luxurious and polished look.
Pro Tip: Use multiple thin layers of top coat for a smoother, more durable finish.
3. Optional Accents
- Add subtle gold foil accents or glitter for an extra touch of glamour.
Creative Variations
- Matte Finish: Use a matte top coat for a softer, more understated look.
- Ombre Effect: Blend the wine color into a darker shade at the tips for a gradient effect.
- Glitter Accents: Add gold or silver glitter to the base for extra sparkle.
Why It Works
Wine & Dine nails are a luxurious and elegant way to celebrate the richness of fall.
The deep wine color paired with a high-gloss finish creates a bold and sophisticated design.
It’s perfect for anyone who wants to add a touch of glamour to their autumn manicure.
29. Amber Waves Nail Art
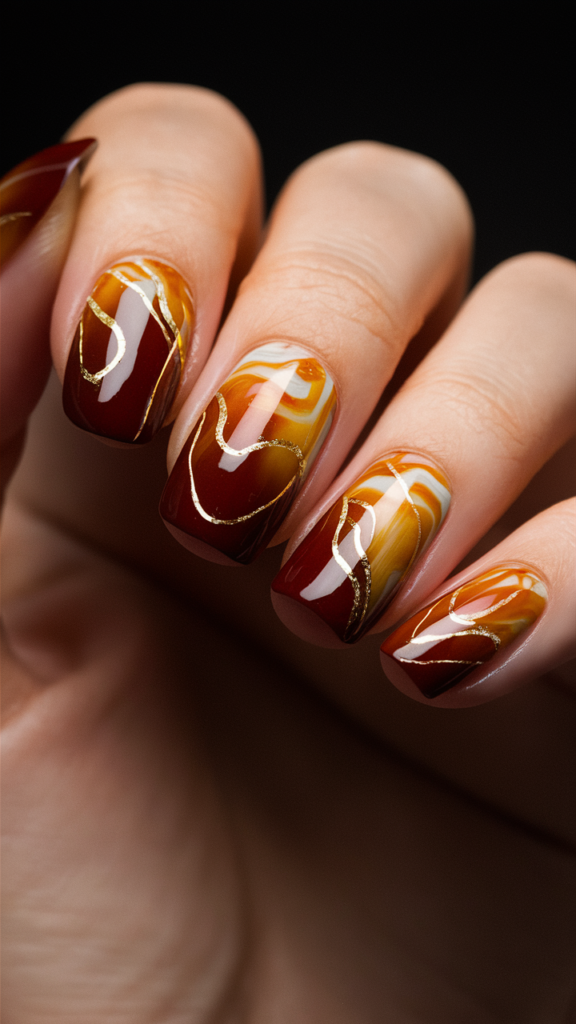
Amber Waves nails are a stunning representation of the flowing, organic beauty of fall.
This design features a marbled wave design in amber tones, blending seamlessly from dark amber to lighter honey shades.
It’s a creative and elegant way to embrace the warmth and richness of the season.
Step-by-Step Guide to Amber Waves Nails
1. Apply a Dark Amber Base
- Start with a dark amber polish as your base color. This warm shade sets the tone for the marbled effect.
- Let the base coat dry completely.
2. Create the Marbled Waves
- Use a fine brush or toothpick to swirl lighter amber and honey shades into the base.
- The swirls should be fluid and organic, mimicking the look of flowing waves.
Pro Tip: Work quickly to prevent the polish from drying before you finish the swirls.
3. Seal the Design
- Apply a glossy top coat to smooth out the design and enhance the marbled effect.
- The glossy finish adds depth and richness to the colors.
Creative Variations
- Matte Finish: Use a matte top coat for a softer, more muted look.
- Gold Veins: Add subtle gold veins running through the waves for extra luxury.
- Ombre Effect: Blend the amber base into a lighter honey shade at the tips for a gradient effect.
Why It Works
Amber Waves nails are a creative and elegant way to celebrate the warmth of fall.
The marbled wave design captures the organic beauty of the season in a unique and artistic way.
It’s perfect for anyone who wants to make a statement with their manicure.
30. Midnight Forest Nail Art
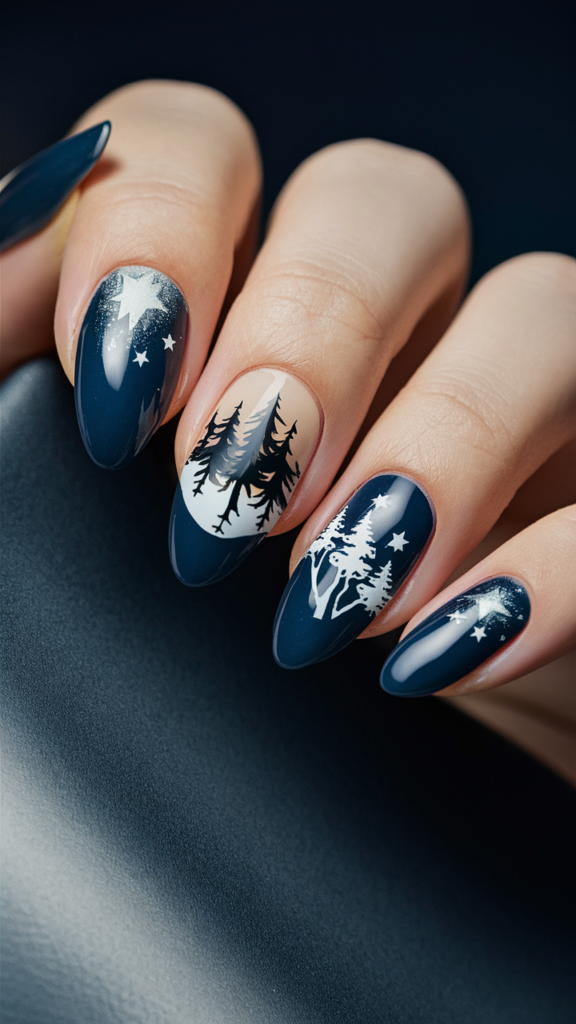
Midnight Forest nails are a mysterious and enchanting choice for fall.
This design features a dark navy blue base with silhouettes of trees and stars, creating a serene nighttime forest scene.
It’s a dramatic and elegant way to embrace the beauty of fall evenings.
Step-by-Step Guide to Midnight Forest Nails
1. Apply a Dark Navy Base
- Start with a dark navy blue polish as your base color. This deep shade sets the tone for the nighttime theme.
- Let the base coat dry completely.
2. Paint Tree and Star Silhouettes
- Use a fine brush or nail art pen to create silhouettes of trees and stars on one or two accent nails.
- The designs should be intricate and detailed, mimicking a serene forest scene.
Pro Tip: Use white or silver polish for the silhouettes to create a striking contrast against the navy base.
3. Seal the Design
- Apply a glossy top coat to smooth out the design and enhance the colors.
- The glossy finish adds a polished and elegant touch to the overall look.
Creative Variations
- Glitter Stars: Add gold or silver glitter to the stars for extra sparkle.
- Matte Finish: Use a matte top coat for a softer, more understated look.
- Moon Accent: Include a crescent moon design alongside the trees and stars.
Why It Works
Midnight Forest nails are a dramatic and elegant way to celebrate the beauty of fall evenings.
The combination of dark navy blue and intricate silhouettes creates a serene and enchanting design.
It’s perfect for anyone who wants to embrace the mystery and magic of the season.
31. Spiced Cider Nail Art
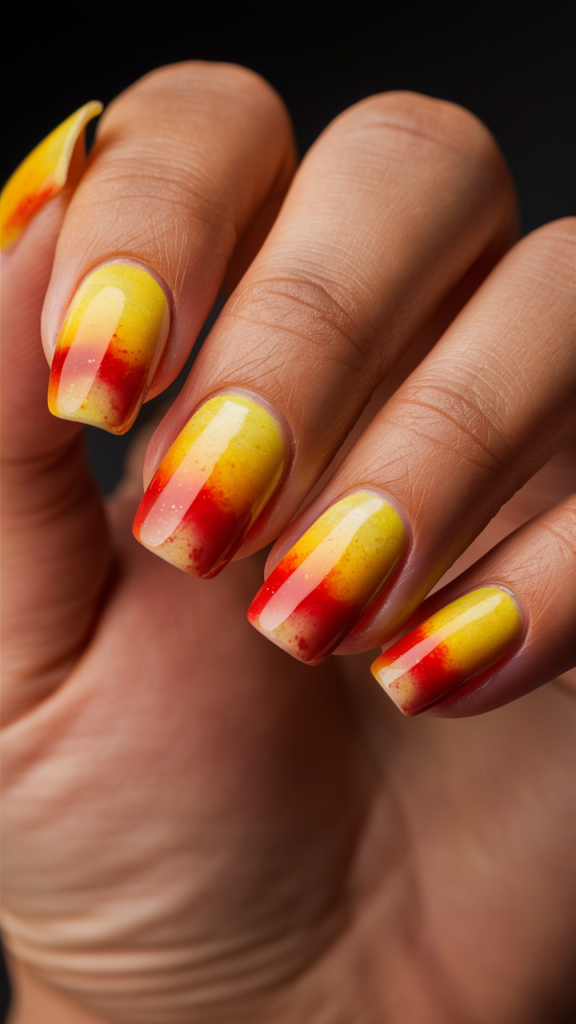
Spiced Cider nails are a warm and comforting choice for fall.
This design features a warm brown base with hyperrealistic apple and cinnamon stick accents, evoking the cozy flavors of spiced cider.
It’s a festive and creative way to celebrate the comforting aromas of the season.
Step-by-Step Guide to Spiced Cider Nails
1. Apply a Warm Brown Base
- Start with a warm brown polish as your base color. This cozy shade mimics the tones of spiced cider.
- Let the base coat dry completely.
2. Paint Apple and Cinnamon Accents
- Use a fine brush to create tiny, hyperrealistic designs of apples and cinnamon sticks on one or two accent nails.
- Add details like highlights and shadows to make the designs look lifelike.
Pro Tip: Use shades of red, green, and brown to add depth and realism to the accents.
3. Seal the Design
- Apply a glossy top coat to smooth out the design and enhance the colors.
- The glossy finish makes the apples and cinnamon sticks appear even more vibrant.
Creative Variations
- Glitter Accents: Add gold or copper glitter to the apples for extra sparkle.
- Matte Finish: Use a matte top coat for a softer, more muted look.
- Mixed Textures: Combine matte and glossy finishes for added dimension.
Why It Works
Spiced Cider nails are a warm and comforting way to celebrate the flavors of fall.
The hyperrealistic accents and warm brown base create a festive and creative design.
It’s perfect for anyone who wants to embrace the cozy vibes of the season.
32. Moody Mauve Nail Art
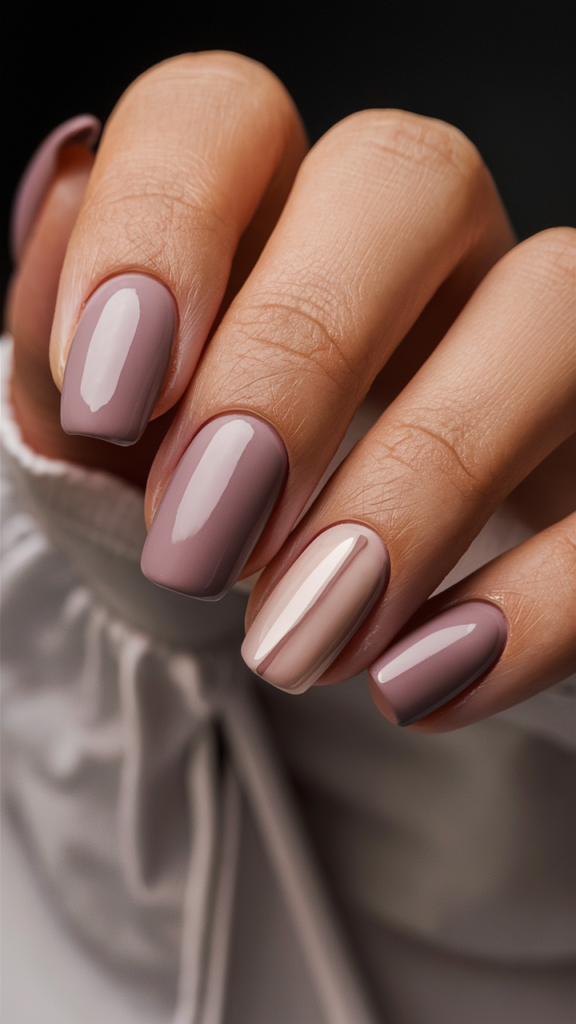
Moody Mauve nails are a chic and understated choice for fall.
This design features a matte mauve base with subtle glossy accents, creating a minimalist yet stylish look.
It’s perfect for those who prefer a sleek and sophisticated manicure that still captures the essence of the season.
Step-by-Step Guide to Moody Mauve Nails
1. Apply a Matte Mauve Base
- Start with a matte mauve polish as your base color. This muted shade provides a soft and elegant tone.
- Let the base coat dry completely.
2. Add Glossy Accents
- Use a glossy top coat to create subtle accents on one or two nails.
- Options include a single stripe, dots, or a geometric design.
Pro Tip: Keep the accents minimal and clean for a modern, minimalist look.
3. Seal the Design
- Apply a matte top coat to the remaining nails to maintain the understated elegance of the design.
- The combination of matte and glossy finishes adds a sophisticated touch.
Creative Variations
- Glitter Accents: Add gold or silver glitter to the glossy accents for extra sparkle.
- Colorful Lines: Swap the glossy accents for other fall colors like burgundy or olive green.
- Mixed Textures: Combine matte and glossy finishes for added dimension.
Why It Works
Moody Mauve nails are a modern and versatile choice for fall.
The combination of matte mauve and glossy accents creates a chic and understated look.
It’s perfect for anyone who wants a stylish yet subtle manicure that complements the season.
33. Autumn Harvest Nail Art
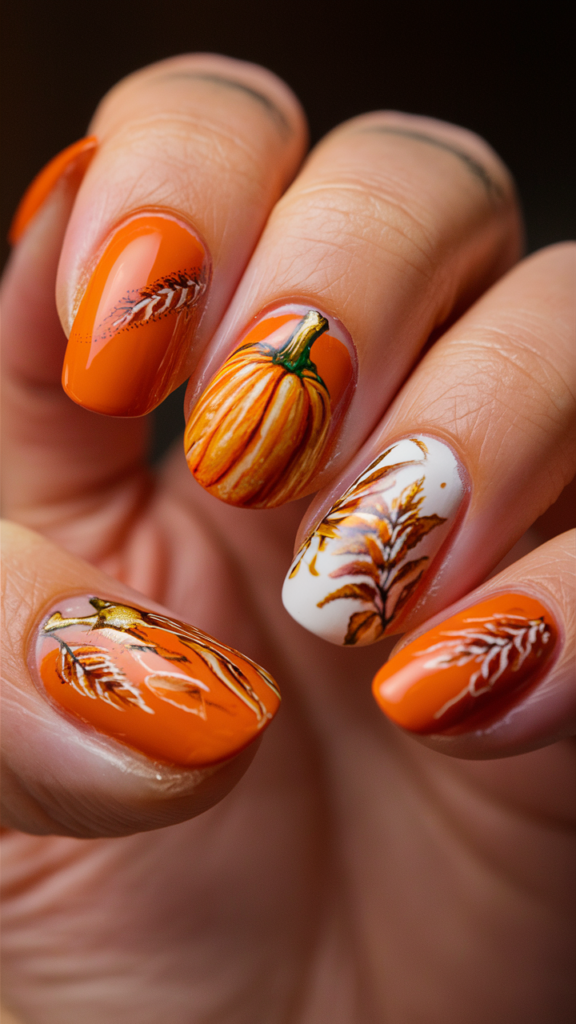
Autumn Harvest nails are a vibrant and festive way to celebrate the bounty of fall.
This design features a warm orange base with detailed accents of pumpkins, leaves, and wheat, creating a lively and creative look.
It’s perfect for anyone who wants to embrace the richness and abundance of the season.
Step-by-Step Guide to Autumn Harvest Nails
1. Apply a Warm Orange Base
- Start with a warm orange polish as your base color. This vibrant shade sets the tone for the harvest theme.
- Let the base coat dry completely.
2. Paint Harvest Accents
- Use a fine brush to create detailed designs of pumpkins, leaves, and wheat on one or two accent nails.
- Add highlights and shadows to make the designs look lifelike.
Pro Tip: Use shades of red, yellow, and brown to add depth and realism to the accents.
3. Seal the Design
- Apply a glossy top coat to smooth out the design and enhance the colors.
- The glossy finish makes the harvest accents appear even more vibrant.
Creative Variations
- Glitter Accents: Add gold or copper glitter to the pumpkins for extra sparkle.
- Matte Finish: Use a matte top coat for a softer, more muted look.
- Mixed Textures: Combine matte and glossy finishes for added dimension.
Why It Works
Autumn Harvest nails are a vibrant and festive way to celebrate the bounty of fall.
The detailed accents and warm orange base create a lively and creative design.
It’s perfect for anyone who wants to embrace the richness and abundance of the season.
34. Vineyard Vibes Nail Art

Vineyard Vibes nails are a rich and rustic choice for fall.
This design features a deep purple base with hyperrealistic grape and vine accents, evoking the beauty of a vineyard during harvest season.
It’s a luxurious and elegant way to celebrate the richness of autumn.
Step-by-Step Guide to Vineyard Vibes Nails
1. Apply a Deep Purple Base
- Start with a deep purple polish as your base color. This rich shade sets the tone for the vineyard theme.
- Let the base coat dry completely.
2. Paint Grape and Vine Accents
- Use a fine brush to create tiny, hyperrealistic designs of grapes and vines on one or two accent nails.
- Add details like shading and highlights to make the grapes look juicy and lifelike.
Pro Tip: Use shades of green and white to add depth and realism to the vines and grapes.
3. Seal the Design
- Apply a glossy top coat to smooth out the design and enhance the colors.
- The glossy finish makes the grapes and vines appear even more vibrant.
Creative Variations
- Glitter Accents: Add gold or silver glitter to the grapes for extra sparkle.
- Matte Finish: Use a matte top coat for a softer, more rustic look.
- Mixed Textures: Combine matte and glossy finishes for added dimension.
Why It Works
Vineyard Vibes nails are a luxurious and elegant way to celebrate the richness of fall.
The combination of deep purple and hyperrealistic accents creates a stunning and sophisticated design.
It’s perfect for anyone who wants to embrace the beauty of autumn in a unique and creative way.
35. Smoky Quartz Nail Art
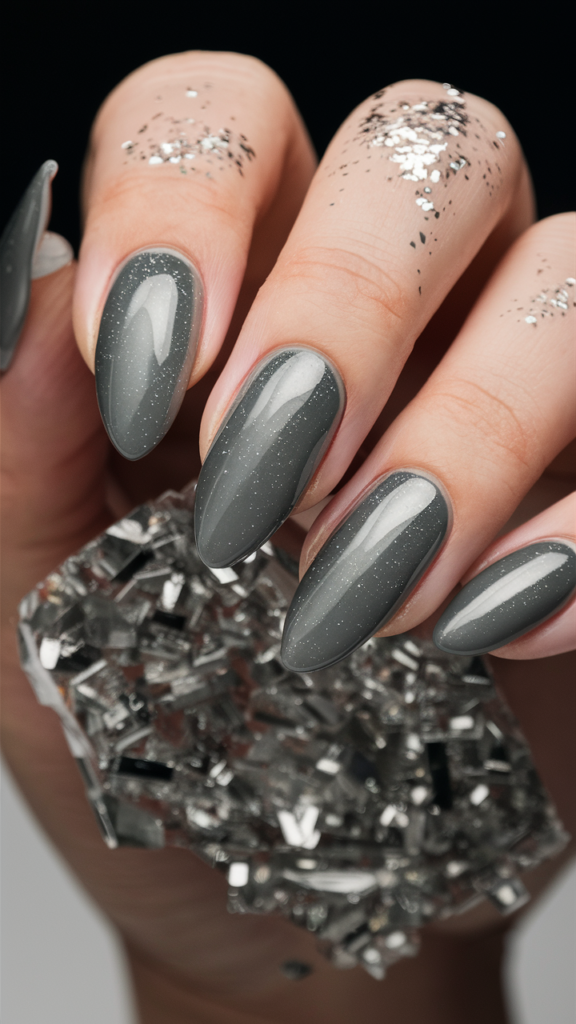
Smoky Quartz nails are a mysterious and enchanting choice for fall.
This design features a smoky gray base with subtle silver glitter accents, mimicking the natural patterns of quartz crystals.
It’s a sophisticated and elegant way to embrace the darker tones of the season.
Step-by-Step Guide to Smoky Quartz Nails
1. Apply a Smoky Gray Base
- Start with a smoky gray polish as your base color. This deep shade sets the tone for the quartz-inspired design.
- Let the base coat dry completely.
2. Add Silver Glitter Accents
- Use a fine brush or sponge to apply subtle silver glitter in random patches across your nails.
- The glitter should mimic the natural patterns found in quartz crystals.
Pro Tip: Use a makeup sponge to dab the glitter for a more even and controlled application.
3. Seal the Design
- Apply a glossy top coat to smooth out the design and enhance the sparkle of the glitter.
- The glossy finish adds a polished and elegant touch to the overall look.
Creative Variations
- Matte Finish: Use a matte top coat for a softer, more muted look.
- Gold Glitter: Swap the silver glitter for gold for a warmer, more luxurious effect.
- Geometric Accents: Add small geometric shapes in silver or gold to complement the quartz-inspired design.
Why It Works
Smoky Quartz nails are a sophisticated and elegant way to celebrate the darker tones of fall.
The combination of smoky gray and silver glitter creates a mysterious and enchanting design.
It’s perfect for anyone who wants to embrace the season with a touch of glamour and intrigue.
Conclusion
Fall is a season of transformation, not just for the landscape but for your style as well.
With these 35 stunning nail designs, you have a wide array of choices to suit your mood, outfit, or occasion.
From the deep, luxurious shades of burgundy and berry to playful pumpkin patches and sophisticated metallics, each design captures a unique aspect of autumn’s charm.
Whether you’re looking to make a bold statement or keep things subtle and chic, these designs will ensure your nails are ready to welcome the season in style.
Embrace the beauty of fall and let your nails become a canvas for its colors and creativity.

1 thought on “35 Stunning Fall Nail Art Ideas to Inspire Your Next Manicure”