Halloween is the perfect time to let your creativity shine, and what better way to embrace the spooky season than with some eye-catching nail art?
Whether you’re attending a Halloween party, trick-or-treating, or simply getting into the festive spirit, your nails can be the ultimate accessory to complete your look.
From creepy clowns to haunted graveyards, the possibilities for Halloween nail designs are endless.
In this blog, we’ll explore 35 unique and mesmerizing Halloween nail designs that are sure to inspire you and get you into the Halloween mood.
Each design is crafted with attention to detail, combining classic Halloween elements with modern nail art techniques.
So, grab your polish and get ready to transform your nails into a canvas of spooktacular art!
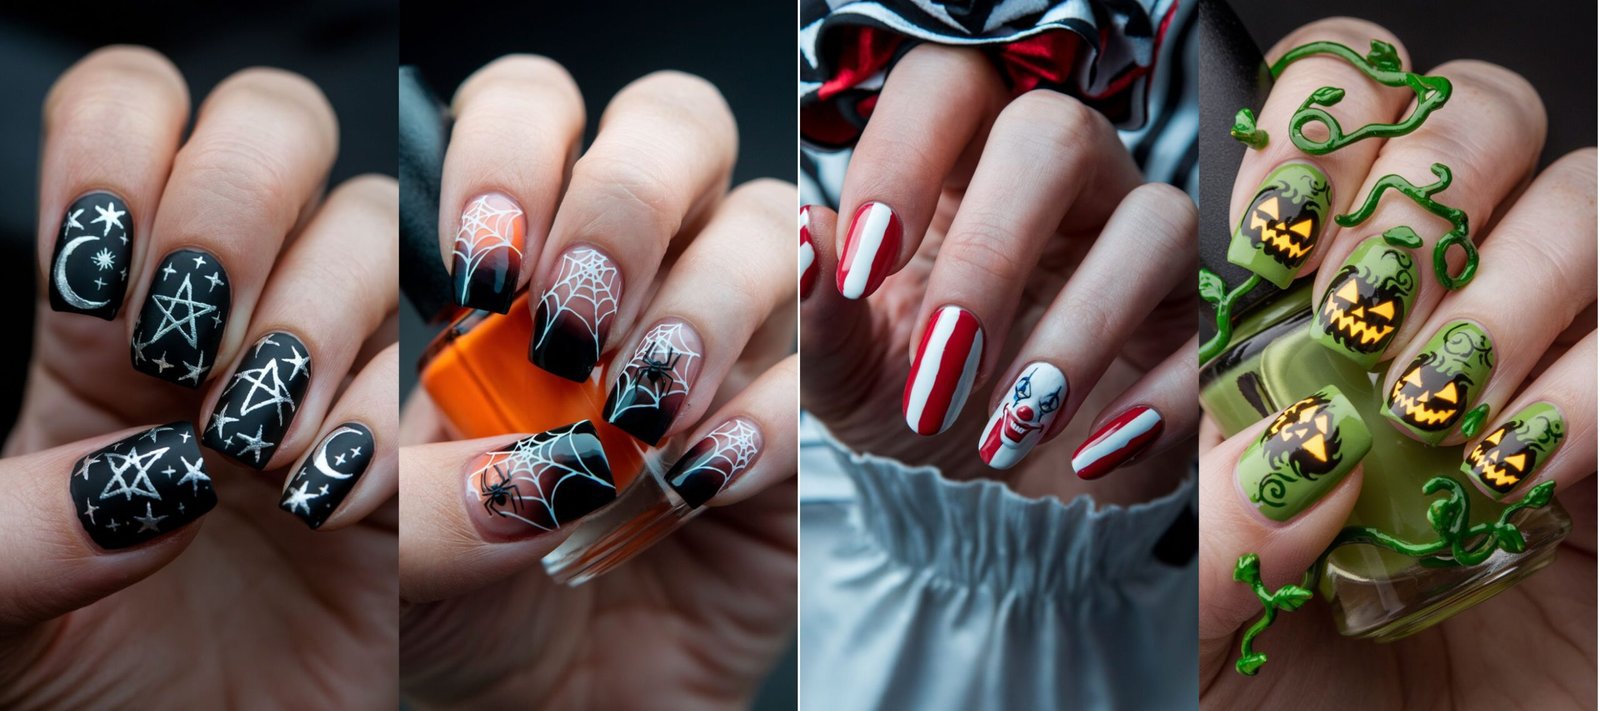
1.Creepy Clown Nail Art

Creepy Clown nails bring an eerie twist to the playful spirit of Halloween. The bold red and white stripes are eye-catching and instantly evoke the atmosphere of a circus tent — but with a dark, unsettling vibe.
The sharp contrast between these colors draws attention and serves as the perfect backdrop for the accent nails, which feature the chilling faces of clowns.
These classic stripes symbolize the fun and fear that clowns often embody, creating a unique balance of whimsy and menace.
Step-By-Step To Create Creepy Clown Faces on Accent Nails
To achieve the spooky clown look, start by choosing one or two accent nails on each hand to showcase the detailed clown faces.
- Outline the Clown Face
- Begin by outlining the shape of the clown’s face with white polish, ensuring the face covers most of the nail. The outline should be bold and clean to make the clown stand out.
- Exaggerate the Features
- Add exaggerated features typical of creepy clowns, such as large red lips, hollow black eyes, and an oversized nose.
- Use black for the eyes and add small details like thin black lines around the mouth or face to enhance the eerie effect.
- Create the Malevolent Expression
- The goal is to make the clown look both playful and sinister. Focus on making the eyes hollow and the smile unnaturally wide to capture a sense of discomfort and unease.
Adding Extra Details: Gloss or Matte Finish?
Once the clown faces and stripes are complete, you can add a top coat to elevate the design:
- Glossy Finish: Apply a glossy top coat to make the colors pop and give the design a shiny, polished appearance. This finish is perfect for making the stripes and clown faces stand out vibrantly.
- Matte Finish: For a more eerie and subdued effect, swap for a matte top coat. This will give your nails a soft, fabric-like texture, enhancing the creepy, face-paint feel and adding an extra layer of horror to the design.
Why It Works
Creepy Clown nails blend the playful nostalgia of a circus with the unsettling nature of a horror film. The bold red and white stripes paired with sinister clown faces create a memorable Halloween look that is both fun and frightful.
2. Vampire Lips and Black Bat Silhouettes Nail Art

Dracula’s Kiss nails are the perfect way to channel a dark and seductive vibe for Halloween. The deep, dark red base, with its subtle hint of crimson, symbolizes the blood vampires crave and the alluring danger of Dracula himself.
This mysterious backdrop sets the tone for the entire design, making it versatile enough to complement Halloween costumes ranging from vampires to gothic queens.
Step-By-Step To Create Perfect Black Bat Silhouettes
Outline the Bat Shapes
- Begin by using a fine nail art brush to outline small bat shapes across your nails.
- Position the bats to appear as if they’re flying from the base toward the tips for a dynamic effect.
Fill in the Details
- Fill the outlined bats with black polish, ensuring sharp, clean edges.
- Make the wings pointed and bodies slightly curved to give the bats a realistic yet stylized look.
Final Touches
- Allow the polish to dry completely and seal the design with a top coat to prevent smudging and add shine.
The key to this step is precision—taking your time with the outlines and filling ensures the bats appear lifelike and crisp.
Creating the Ultimate Vampire Lips for a Bold Accent
Outline the Lips
- Choose an accent nail and outline a bold lip shape using black polish. Make the lips full and slightly exaggerated for dramatic effect.
Add the Signature Red
- Fill in the lips with a deep red polish, achieving a glossy, blood-red finish that’s both seductive and striking.
Detail the Fangs and Blood
- Paint sharp fangs extending from the top and bottom lips. Add a tiny drop of blood dripping from one fang for a realistic touch.
Finish with a Top Coat
- Seal the design with a glossy top coat to enhance the rich colors and intricate details.
This bold accent captures the essence of Dracula’s kiss, blending danger with allure for a truly unforgettable Halloween nail design.
Why It Works
Dracula’s Kiss nails seamlessly combine mystery and elegance, making them a standout choice for Halloween.
The dark red base evokes the allure of vampires, while the intricate bat and lip details add layers of intrigue and creativity.
Together, they create a hauntingly beautiful look that embodies the spirit of Halloween.
3. Neon Skull Nail Art: Bright and Spooky Vibes

Neon Skull Nail Art combines the vibrant allure of neon colors with the spooky charm of Halloween.
This eye-catching design features neon hues like pink, green, and blue that stand out brilliantly against a matte black base, making it perfect for those who want a fun yet frightful twist on traditional Halloween nails.
How to Create Neon-Colored Skulls on a Black Base
Step 1: Prepare the Base
- Start with a matte black polish applied evenly across all your nails. Let it dry completely for a smooth canvas.
Step 2: Outline the Skulls
- Using a fine nail art brush, outline skull shapes on each nail in your chosen neon colors.
- Include hollow eyes, a triangular nose, and a wide grinning mouth to capture classic skull features.
Step 3: Fill in the Neon Colors
- Carefully fill in the skull outlines with neon polish, ensuring the color is vibrant and even.
- Consider using neon polishes with shimmer or glow-in-the-dark effects for added drama.
Step 4: Seal the Design
- Finish with a clear top coat to protect the design. Opt for glossy for a vibrant shine or matte for a sleek, edgy look.
Best Neon Color Combinations for Maximum Impact
- Pink and Blue: Combine neon pink skulls with electric blue accents for a playful yet striking design.
- Green and Purple: Pair neon green skulls with bold purple details for a spooky yet stylish vibe.
- Mixed Colors: Use a mix of neon shades on different nails for an eclectic, party-ready effect.
The key is to select high-contrast combinations that maintain the bold, cohesive appeal of the neon effect.
Why It Works
Neon Skull Nail Art perfectly blends bright, modern trends with traditional Halloween spookiness.
The striking contrast between the neon colors and the black base ensures your nails grab attention, whether under daylight or dim, party lighting.
This bold design is perfect for those who want their Halloween nails to glow with personality and style.
4. Spider Charm Elegance Nail Art

Spider Charm Elegance Nail Art is a stunning combination of sophistication and spookiness, perfect for a standout Halloween look.
With a matte black base, 3D spider charms, and delicate web designs, this nail art exudes mystery and elegance, making it a captivating choice for the season.
How to Apply 3D Spider Charms and Detailed Web Designs
Step 1: Prepare the Matte Black Base
- Begin by applying a matte black polish to all your nails, ensuring even coverage.
- Allow it to dry completely for a smooth and velvety finish.
Step 2: Place the 3D Spider Charms
- Attach 3D spider charms to one or two accent nails using nail glue.
- Position the spider’s body near the cuticle, with its legs extending toward the nail tips for a dramatic and realistic effect.
Step 3: Paint the Web Designs
- Using a fine nail art brush and white or metallic polish, paint intricate spider webs on the remaining nails.
- Create thin, delicate lines that stretch across the nail surface to add texture and depth.
Step 4: Add Finishing Touches
- Seal the design with a matte top coat on the base nails and a glossy top coat on the spider charms.
- This contrast enhances the overall design and makes the spider charms stand out.
Adding a Regal Touch to Your Spider Charm Elegance Nails
- Metallic Accents: Highlight parts of the web or spider charms with gold or silver polish for a luxurious touch.
- Jewel Details: Use metallic polish to create small dots or lines that resemble jewels, adding sophistication to the design.
- Glossy Finish for Spiders: Apply a glossy top coat to the 3D spider charms to enhance their lifelike appearance and contrast beautifully with the matte base.
Why It Works
Spider Charm Elegance Nail Art balances eerie and sophisticated elements flawlessly.
The matte black base exudes elegance, while the intricate webs and lifelike spider charms bring a creepy, detailed twist.
Metallic accents add a luxurious touch, making this design bold, eye-catching, and perfect for Halloween.
5. Witch’s Cauldron: A Potion of Color and Magic

Witch’s Cauldron nails bring color and magic to life with swirling green and purple effects that mimic the enchanting look of a bubbling potion.
This spellbinding design is perfect for Halloween and is sure to captivate with its mystical charm.
Creating Swirling Green and Purple Effects on Your Nails
Step 1: Apply the Base Colors
- Start by applying a green polish to your nails as the base.
- Follow with a layer of purple polish over the green while it is still wet.
Step 2: Create the Swirling Effect
- Use a toothpick or a small brush to gently swirl the two colors together.
- Focus on creating random, organic patterns, allowing some areas to show more green and others more purple.
Step 3: Let It Dry
- Allow the marbled design to dry completely before moving on to the next step.
This technique creates a dynamic, magical effect reminiscent of a bubbling cauldron.
Adding Cauldron Art That Bubbles with Creativity
Step 1: Outline the Cauldron
- On one or two accent nails, paint the outline of a cauldron in black polish.
- Make the cauldron large enough to cover most of the nail for impact.
Step 2: Fill in the Cauldron
- Use a dark, metallic polish to fill in the cauldron, giving it a realistic cast-iron appearance.
Step 3: Add Bubbling Effects
- Paint small bubbles rising from the top of the cauldron using a lighter shade of green or purple.
- Place the bubbles randomly, overlapping some to create depth and movement.
This detail brings the design to life, making the cauldron appear as though it’s brewing a magical concoction.
Finishing Touches: Stars and Other Magical Elements
Add Stars and Sparkles
- Use a fine brush to paint tiny stars in silver or gold polish around the cauldron or across the other nails.
- Scatter the stars for a twinkling, magical effect.
Use Glitter or Holographic Polish
- Apply a glitter polish or a holographic top coat to give the nails a shimmering, iridescent finish.
- This enhances the mystical vibe and mimics the glow of a potion under the light.
The finishing touches elevate the Witch’s Cauldron nails, adding sparkle and completing the magical aesthetic.
Why It Works
Witch’s Cauldron nails perfectly capture the enchanting spirit of Halloween.
The swirling green and purple effects create a dynamic and magical base, while the detailed cauldron art adds creativity and depth.
The addition of stars and shimmer completes the design, making it an unforgettable choice for the season.
6. Eyeball Frenzy Nail Art

Eyeball Frenzy nails are a striking and eerie design, featuring realistic, bloodshot eyeballs that are sure to grab attention and spark conversation.
This bold nail art is perfect for Halloween or any occasion where a creepy yet captivating look is the goal.
Creating Realistic, Bloodshot Eyeballs
Step 1: Apply the Base Color
Start by applying a white polish to all of your nails as the base. Ensure the base is smooth and fully dry before moving to the next step.
Step 2: Paint the Eyeball Outline
Using a thin nail art brush, paint the outline of the eyeballs in a light blue or green shade. Center each eyeball on the nail, leaving space around the edges for bloodshot vein details.
Step 3: Fill in the Irises
Fill the irises with your chosen color—blue, green, or brown work well for a realistic effect. Leave a small white dot within the iris to represent light reflection, adding to the lifelike appearance.
Step 4: Add Bloodshot Details
Use a thin brush dipped in red polish to paint small, jagged veins extending from the edges of the eyeballs toward the center. Keep the veins random and varied for a natural, unsettling look.
Choosing Colors for a Creepy and Captivating Design
When selecting colors, aim for vibrancy and realism:
- For Irises: Blue, green, or brown shades mimic natural human eye colors while maintaining a striking contrast against the white base.
- For Veins: A bright red polish creates the perfect bloodshot effect. The uneven, jagged strokes enhance the creepy vibe.
The interplay of realistic colors and intricate vein details makes the eyeballs both convincing and chilling.
Adding the Perfect Glossy Finish
Step 1: Apply a Glossy Top Coat
Once the design is complete, seal it with a glossy top coat. This adds a shiny, wet look that enhances the lifelike quality of the eyeballs.
Step 2: Enhance with a 3D Effect
For extra realism, apply a second layer of gloss over the eyeballs to create a slight bulging effect. This subtle 3D touch makes the design even more striking and unsettling.
The glossy finish not only protects your artwork but also amplifies its creepy, captivating charm.
Why It Works
Eyeball Frenzy nails combine bold creativity with intricate details to create a design that’s both unsettling and mesmerizing.
The bloodshot veins and realistic irises draw the eye (pun intended!), while the glossy finish adds depth and lifelike charm.
Perfect for Halloween or themed events, this nail art is a surefire way to make a bold statement.
7. Jack Skellington Nail Art

Jack Skellington nails offer a timeless tribute to a Halloween classic, blending bold black and white stripes with the haunting charm of Jack’s unmistakable face.
This design is perfect for capturing the spooky spirit of the season with a touch of artistic flair.
Creating the Black and White Stripe Pattern
Step 1: Apply the Base Color
Start by painting all nails with a white polish, allowing it to dry completely.
Step 2: Paint the Black Stripes
Once the base is dry, use a thin nail art brush to carefully paint black vertical stripes across the nails.
Ensure the stripes are evenly spaced and perfectly straight for a bold, graphic effect.
Step 3: Perfect the Pattern
Take your time with each stripe, as precision is key. Any mistakes will stand out against the stark contrast of black and white, so patience is essential for a flawless finish.
Bringing Jack Skellington’s Face to Life
Step 1: Outline Jack’s Head
Select one or two accent nails to paint Jack Skellington’s face. Begin by outlining the shape of Jack’s round head in white polish, making sure it’s slightly larger than the nail itself.
Step 2: Add Facial Features
Using black polish, carefully paint Jack’s signature hollow eyes, small nostrils, and wide, stitched mouth.
The eyes should be large and almond-shaped, giving Jack his iconic, eerie expression. The mouth should be a simple curved line, with tiny stitches extending from it, capturing the spooky charm of his character.
Step 3: Finishing the Face
Focus on ensuring that the eyes and mouth maintain a symmetrical, precise look. The goal is to evoke both creepiness and charm, staying true to Jack’s spooky yet endearing personality.
Combining Classic and Modern Techniques
Step 1: Add a Glossy or Matte Top Coat
To enhance the design, apply a glossy top coat over the stripes for a sleek, polished finish. Alternatively, a matte top coat can create a more subdued, modern look.
Step 2: Experiment with Textures
For extra dimension, consider giving Jack’s face a velvet finish to make it pop against the stark stripes.
Step 3: Add Decorative Elements
Consider embellishing the design with small rhinestones or studs, highlighting key elements like the stitches on Jack’s face or the edges of the stripes for an extra touch of style.
Why It Works
Jack Skellington Nail Art captures the eerie elegance of Halloween through a perfect blend of classic stripes and whimsical character details.
The sharp black-and-white contrast in the stripes provides a graphic, attention-grabbing look, while the hand-painted face of Jack brings a personalized, iconic touch to each nail.
By combining traditional techniques with modern twists, this design becomes both timeless and fresh, making it the perfect choice for those who want their nails to stand out this Halloween season.
8. Ghoulish Glow Nail Art

Ghoulish Glow nails are a hauntingly perfect way to light up the night this Halloween, with their eerie glow-in-the-dark effect that adds an extra layer of spooky magic to your look.
Achieving the Glow-In-The-Dark Effect
Step 1: Apply the Base Color
Begin by applying a white or light-colored base coat to all of your nails. This will help the glow-in-the-dark polish stand out more vibrantly.
Step 2: Apply Glow-In-The-Dark Polish
Once the base coat is dry, apply a layer of glow-in-the-dark polish to each nail, ensuring that you cover the entire surface.
Step 3: Build Up the Glow
For a stronger glow, apply multiple coats of the glow-in-the-dark polish. Make sure each layer is evenly spread for a consistent luminous effect.
Step 4: Let It Absorb Light
The key to making your nails glow is to let them absorb light during the day. The more light they absorb, the brighter they will glow in the dark.
Painting Ghost and Skull Designs That Pop
Step 1: Outline the Designs
To enhance the Ghoulish Glow nails, start by outlining spooky ghost and skull shapes with black polish. Use a thin, precise nail art brush for clean lines.
Step 2: Create the Ghost Faces
For the ghosts, paint round, hollow eyes and open mouths for a surprised, eerie look. Keep the lines clean to ensure they will stand out when they glow.
Step 3: Paint the Skull Details
For the skulls, focus on creating sunken eyes, noses, and grinning mouths. Make the outlines bold and well-defined for maximum impact.
Step 4: Fill In with White Polish
Once the outlines are complete, fill in the ghosts and skulls with white polish, making sure they are fully opaque. These designs will absorb light throughout the day and glow brightly in the dark.
Making Your Nails the Centerpiece of Your Halloween Look
Step 1: Pair With a Themed Costume
The Ghoulish Glow nails will truly shine as the centerpiece of your Halloween look. Pair them with a ghost or skeleton costume to create a cohesive and spooky vibe.
Step 2: Enhance the Glow Effect
Consider adding glow-in-the-dark jewelry or face paint to complement your nails and enhance the eerie atmosphere.
Step 3: Let Your Nails Take Center Stage
The goal is to make your Ghoulish Glow nails the star of your Halloween outfit, ensuring they stand out in the dark and add a playful yet spooky touch to the festivities.
Why It Works
Ghoulish Glow Nail Art takes the spooky factor to the next level with its glowing, otherworldly effect.
The glow-in-the-dark polish gives these nails an eerie charm that is perfect for Halloween, while the ghost and skull designs add personality and a playful touch.
Pairing this design with a Halloween costume and accessories allows the nails to become the star of your spooky look, ensuring your nails light up the night and leave a lasting impression.
9. Pumpkin Spice Nail Art

Pumpkin Spice nails beautifully capture the warmth and coziness of fall, merging the beloved flavors of pumpkin spice with festive Halloween flair.
This design offers the perfect balance of autumnal charm and spooky fun.
Incorporating Pumpkin Spice Latte Art into Your Nail Design
Step 1: Apply the Base Color
Start by applying a warm, orange polish to all of your nails, creating a cozy base that evokes the rich, inviting tones of a pumpkin spice latte.
Step 2: Paint Latte Art on Accent Nails
Once the base is dry, use a thin nail art brush to paint small, detailed pumpkin spice latte art on one or two accent nails.
For an authentic touch, paint tiny cups of coffee with swirls of whipped cream and a sprinkle of cinnamon on top.
Step 3: Capture the Cozy Vibe
The key to this design is to evoke the comforting flavors of pumpkin spice, using warm, rich shades that mirror the essence of fall and autumn beverages.
Techniques for Painting Tiny, Realistic Pumpkins
Step 1: Outline the Pumpkins
On the remaining nails, use a thin brush to outline small pumpkins with a darker shade of orange or brown.
The pumpkins should have a round, slightly flattened shape, mimicking the natural form of a real pumpkin.
Step 2: Add Contours and Depth
Next, add small, curved lines to mimic the ridges and contours of the pumpkins. Use darker shades to create depth and shading, giving the pumpkins a three-dimensional appearance.
Step 3: Paint the Stems and Leaves
Finish by painting small green stems at the top of each pumpkin, adding tiny leaves extending from the stems to complete the design.
Adding Warm, Autumnal Colors for a Cozy Halloween Vibe
Step 1: Accent with Autumnal Shades
To further enhance the cozy fall vibe, add accents in warm shades of brown, gold, and deep red.
These colors can be used for small dots, lines, or swirls, complementing the pumpkin spice latte art and pumpkin designs.
Step 2: Add Metallic Shimmer
For an extra touch of autumn magic, use a metallic polish to add shimmer, evoking the glow of fallen leaves or the warmth of a crackling fire.
Why It Works
Pumpkin Spice Nail Art blends the comforting flavors of fall with the festive spirit of Halloween.
The warm orange base immediately evokes the coziness of pumpkin spice lattes, while the delicate latte art and realistic pumpkins bring the design to life.
The addition of autumnal accents and metallic touches enhances the overall vibe, making this design a perfect choice for anyone looking to celebrate both the season and the spooky spirit of Halloween.
10. Frankenstein’s Bride Nail Art

Frankenstein’s Bride nails are the ultimate monster mashup, blending the iconic features of Frankenstein and his bride into a spooky, stylish design.
This nail art brings together both the eerie charm of Frankenstein’s stitched skin and the electrifying elegance of his bride’s hair.
Creating a Frankenstein Stitch Effect on Your Nails
Step 1: Apply the Base Color
Start by painting all of your nails with a muted, greyish green polish to create the base color. This shade should remind you of Frankenstein’s iconic skin tone, setting a perfect backdrop for the stitch effect.
Step 2: Add the Stitches
Once the base is dry, use a thin nail art brush to paint black, jagged stitches across your nails.
The stitches can run vertically or diagonally, but the key is to make them appear rough and uneven—just like they were hastily sewn together.
Step 3: Enhance the Stitch Effect
The rough, jagged lines will add to the “stitched-together” vibe, making the design both creepy and eye-catching.
Mimicking the Bride of Frankenstein’s Iconic Hair Pattern
Step 1: Apply Black to Accent Nails
On one or two accent nails, apply a bold black polish to create a stark contrast with the green base.
Step 2: Paint the Zigzag Hair Pattern
Next, use a thin brush to paint white zigzag lines across the black nails, mimicking the bride’s electrified hair.
The zigzags should be sharp and uneven, with some lines thicker than others, for a bold, graphic look that is instantly recognizable.
Step 3: Complete the Hair Pattern
The combination of the black-and-white zigzags on the accent nails, paired with the Frankenstein stitch effect, makes for a dynamic, monster-inspired look.
Adding Elements to Make Your Nails Look Stitched Together
Step 1: Add Metal Studs or Rhinestones
For a 3D effect, consider adding tiny metal studs or rhinestones at the intersections of the stitches. These accents mimic metal staples, enhancing the stitched-together look.
Step 2: Apply a Matte Top Coat
Use a matte top coat to give the nails a slightly rough, worn texture, enhancing the feeling that the nails have been “stitched” together.
Why It Works
Frankenstein’s Bride Nail Art is the perfect mix of spooky and stylish.
The muted green base and jagged stitches capture the unsettling charm of Frankenstein’s monster, while the bold black-and-white zigzag hair pattern adds a touch of electrifying glamour.
Adding textured elements, such as rhinestones or a matte finish, further enhances the stitched-together aesthetic, creating a design that is both creepy and sophisticated—ideal for Halloween or any monster-inspired celebration.
11. Vampire Bite Nail Art

Vampire Bite nails embrace a dark, mysterious, and dangerous aesthetic, making them the perfect choice for a bold Halloween look.
This design blends seductive gradient shades with realistic fang marks and blood drips, creating a captivating and eerie effect.
Perfecting the Red and Black Gradient for a Vampy Look
Step 1: Apply the Base Colors
Begin by applying black polish to the tips of your nails, fading gradually into a deep, rich red towards the base.
This dark-to-light gradient should be smooth and seamless, evoking a vampy, seductive vibe.
Step 2: Blend the Colors Using a Sponge
To achieve a flawless gradient, use a makeup sponge to gently dab the black and red polishes onto your nails in thin layers.
This technique will help blend the two colors together, creating a smooth transition for a sophisticated and eerie effect.
Step 3: Perfect the Gradient Effect
The gradient effect will serve as the foundation of your Vampire Bite design, setting a dramatic and mysterious tone for the rest of the elements.
How to Paint Realistic Fang Marks and Blood Drips
Step 1: Paint the Fang Marks
Using a thin nail art brush, paint small, sharp fang marks near your cuticles.
Space the marks evenly apart and curve them slightly to mimic the shape of real vampire fangs.
Step 2: Add the Blood Drips
Once the fang marks are dry, use a deep red polish to paint small drops of blood dripping from each fang mark.
The blood drops should be slightly raised and glossy, giving them a lifelike 3D appearance.
Step 3: Create the Fresh Blood Effect
The goal is to make the blood look fresh and slightly thick, as if it has just been drawn from the bite, enhancing the eerie realism of the design.
Making Your Vampire Bite Nails Look Ultra-Realistic
Step 1: Add a Glossy Top Coat
To enhance the realism of the fang marks and blood drips, apply a glossy top coat.
The glossy finish will give the blood a shiny, wet appearance, making it look even more lifelike.
Step 2: Add Subtle Details
For extra depth, use a small brush to add tiny highlights and shadows to the blood drops.
These details will create dimension, making the design appear even more realistic.
Step 3: Use Translucent Red for Fresh Blood
For an added touch of authenticity, use a slightly translucent red polish for the blood drips. This will give the effect of fresh, flowing blood that looks as though it’s still warm from the bite.
Why It Works
Vampire Bite Nail Art is the ultimate combination of dark sophistication and danger.
The seamless red and black gradient creates a seductive backdrop, while the fang marks and glossy blood drips add a bold, dramatic touch.
The ultra-realistic details, such as the highlights on the blood drops, elevate the design, giving it depth and making it look as though it’s just been bitten into.
This nail art is perfect for anyone looking to make a striking statement with their Halloween look.
12. Candy Corn Cute Nail Art

Candy Corn Cute nails are the perfect way to add a festive, fun touch to your Halloween look.
This design features the iconic tri-colored stripes of candy corn, making it a sweet and simple choice that’s easy to achieve and instantly recognizable.
Step-by-Step to Achieve the Tri-Colored Candy Corn Effect
Step 1: Apply the White Polish
Begin by applying a white polish to the tips of your nails. This will create the first stripe of your candy corn design.
Step 2: Add the Orange Stripe
Next, apply an orange polish in the middle of your nails. Make sure the orange stripe is evenly spaced and covers the area from the middle of your nail to just above the white tip.
Step 3: Finish with the Yellow Base
Complete the design by applying a yellow polish at the base of your nails. This final stripe will round out the iconic candy corn look.
Step 4: Ensure Clean, Straight Stripes
The key to this design is precision. Use tape or a nail art brush to create clean, straight lines between the colors. This will help you achieve the classic, tri-colored candy corn effect.
Choosing the Right Shades for a Glossy Finish
Step 1: Select the Perfect Shades
For an authentic candy corn look, choose bright, bold shades of white, orange, and yellow. The colors should be smooth, slightly glossy, and vibrant without appearing too neon.
Step 2: Apply a Glossy Top Coat
Once the stripes are dry, apply a glossy top coat to enhance the colors and add a candy-like shine. This will make the stripes pop, giving your nails a polished and playful finish.
Adding a Bit of Sparkle to Enhance the Sweetness
Step 1: Apply Glitter Polish
For an added festive touch, apply a fine glitter polish over the stripes. The glitter should be subtle but shimmering, adding a sweet sparkle that enhances the candy corn effect.
Step 2: Add Rhinestones or Studs
For extra sweetness, consider placing small rhinestones or studs at the tips of your nails. These can mimic sugar crystals, adding texture and a playful detail to the design.
Why It Works
Candy Corn Cute Nail Art is the epitome of Halloween sweetness.
The vibrant, tri-colored stripes create a visually striking design that is both fun and festive.
The glossy finish gives the nails a candy-like shine, while the subtle sparkle from glitter and rhinestones enhances the overall sweetness of the look.
This design is perfect for those seeking a simple yet festive Halloween nail art that is sure to grab attention.
13. Witchy Symbols Nail Art

Witchy Symbols nails embody the mystical and magical elements of Halloween, featuring crescent moons, stars, and pentagrams to create an enchanting look.
This design combines elegance and mystery, making it perfect for those seeking a bewitching touch for their nails.
Designing Crescent Moons, Stars, and Pentagrams
Step 1: Apply a Matte Black Base
Start by applying a matte black polish to all of your nails. This dark backdrop provides the perfect canvas for the mystical symbols to shine. The matte finish creates a soft, velvety texture, adding an air of mystery to the design.
Step 2: Paint the Crescent Moons
Using a fine nail art brush, paint small crescent moons near the tips of the nails. The moons should have thin, sharp edges to give them a delicate and elegant appearance.
Step 3: Add Stars and Pentagrams
Next, scatter stars and pentagrams across the surface of the nails. Use a metallic silver or gold polish to paint the symbols, making sure they are small and precise. The pentagrams should be intricately designed, with fine lines that give them a sharp, mystical look.
Step 4: Ensure Balance and Delicacy
The key to this design is the delicate placement of the symbols. The crescent moons, stars, and pentagrams should be evenly spaced across the nails, creating a balanced and harmonious design. These symbols should look as though they are floating in the night sky, adding an enchanting quality to the overall look.
The Allure of Matte Black for a Witchy Base
Step 1: Matte Black Finish
The matte black base is an essential element of the Witchy Symbols nails. It creates a soft, velvety appearance that contrasts beautifully with the shiny metallic symbols. The matte texture also adds to the mysterious and witchy vibe, making the design feel both otherworldly and sophisticated.
Step 2: Deep, Mysterious Effect
Matte black is symbolic of the night and the unknown, making it an ideal base for this magical design. The lack of shine enhances the ethereal quality of the symbols, making them stand out even more.
Combining Mystical Symbols for an Enchanting Look
Step 1: Add Subtle Accents
To complete the Witchy Symbols nails, consider adding small dots or lines around the symbols to create a starry, celestial effect. These accents can be painted in the same metallic polish as the symbols or in a contrasting color to add depth and dimension.
Step 2: Experiment with Size and Placement
You can experiment with different sizes and placements of the symbols to create a more dynamic, yet cohesive design. The goal is to create a design that feels like a larger, mystical world, with each nail telling a different story.
Why It Works
Witchy Symbols Nail Art combines elegance with mysticism, using a matte black base and delicate, metallic symbols to create a design that feels both enchanting and sophisticated.
The crescent moons, stars, and pentagrams add a sense of magic and mystery, while the matte finish enhances the overall otherworldly vibe.
This design captures the essence of witchcraft and Halloween in a beautifully understated way, making it the perfect choice for anyone looking for a mystical, magical nail art design.
14. Haunted Forest Nail Art

Haunted Forest nails evoke the eerie sensation of walking through a dark, mist-covered forest on a chilly Halloween night.
With their spooky tree silhouettes, flying bats, and full moons, these nails capture the perfect blend of mystery and fear, making them an ideal choice for the season.
Painting Spooky Tree Silhouettes Against a Dark Green Background
Step 1: Apply a Dark Green Base
Start by applying a rich, dark green polish to all of the nails. This base color should resemble the dense, shadowy atmosphere of a haunted forest. It sets the tone for the design, giving the nails a deep, atmospheric foundation.
Step 2: Create the Tree Silhouettes
Once the green base is dry, use a thin nail art brush and black polish to paint the silhouettes of twisted trees. These trees should be tall, gnarled, and feature long, reaching branches. The branches can stretch across the nails in a way that suggests they are swaying in a mysterious wind.
Step 3: Add Movement and Depth
The key to this design is to create a sense of depth, so make sure the trees are layered in various ways. Some trees should be placed in the background with lighter lines, while others should be more defined in the foreground with thicker, darker strokes. The twisted nature of the trees will evoke the chilling feeling of a forest full of secrets.
Adding Flying Bats and Full Moons for Extra Fright
Step 1: Paint the Bats
To enhance the spooky forest scene, add flying bats. Use a black polish to paint small bats with pointed wings and curved bodies. Position them near the tops of the trees as though they are flying out of the forest. This adds movement and height to the design.
Step 2: Create the Full Moons
Next, add a full moon behind the trees. Use light grey or white polish to paint the moon, ensuring the edges are slightly blurred for a glowing effect. The moon should be placed towards the top of the nail, nestled between the branches of the trees, to add atmospheric depth.
Step 3: Add a Glowing Effect
To create the appearance of a glowing moon, you can lightly blend the moon’s edge using a small sponge, creating a soft halo effect. This will give the scene a more ethereal, spooky vibe.
Tips for Creating a Layered, Realistic Forest Scene
Step 1: Layering the Forest Design
To create a more realistic forest scene, consider using a layering technique. Start with a lighter shade of green or brown to paint distant trees, adding depth by making these trees less defined. Then, add a darker black shade for the trees in the foreground, allowing them to stand out and create the illusion of a multi-layered scene.
Step 2: Adding Fog for Mystery
For a foggy, misty effect, use a small sponge to lightly dab white or grey polish around the trees, creating the look of fog creeping across the forest floor. This softens the design and adds an extra layer of eeriness.
Step 3: Final Touches
Once all elements are in place, you can finish off the design with a glossy top coat to enhance the details of the bats, trees, and moon, giving the nails a polished, finished appearance.
Why It Works
The Haunted Forest nails combine dark, moody colors with spooky elements that capture the essence of Halloween.
The combination of gnarled trees, flying bats, and a glowing moon evokes a chilling atmosphere that draws the viewer in. The layered design adds depth, while the misty effect enhances the eerie, haunted feel.
These nails will undoubtedly create a spine-tingling effect, perfect for anyone looking to add a dramatic and atmospheric touch to their Halloween look.
15. Zombie Apocalypse Nail Art

Zombie Apocalypse nails capture the chilling essence of the undead with a grungy, decaying effect that’s both eerie and stylish.
Perfect for Halloween or any occasion where you want to unleash your inner zombie, this design offers a gory and grungy aesthetic with unsettling details that will keep everyone on edge.
Creating a Grungy, Decaying Effect
Step 1: Apply the Base Color
Start by applying a muted, greenish-grey polish to all of your nails as the base color.
This shade should look worn and dirty, mimicking the color of decaying flesh.
Step 2: Create the Grungy Texture
Once the base color is dry, take a sponge and dab on a darker green or brown polish.
Focus on creating a mottled, uneven texture, which gives the nails a rough and aged appearance—just like flesh that’s been rotting for some time.
Step 3: Let It Dry
Allow the textured base to dry completely.
This step will ensure the nails have a weathered and grungy look, setting the stage for the next creepy details.
Painting Zombie Hands Reaching Out
Step 1: Outline the Zombie Hands
To intensify the undead theme, use a thin nail art brush to paint the outline of zombie hands reaching from your cuticles.
Use dark green or brown polish for the outlines, making sure the hands appear thin, bony, and horrifyingly decayed.
Step 2: Add Details
Add fine details like veins, cuts, and wrinkles to enhance the realism of the zombie hands.
The hands should look like they are emerging from the nails, giving off a creepy, crawling sensation.
Step 3: Refine the Design
Make sure the hands look distressed and menacing, with long, sharp nails, to further heighten the eerie vibe of the design.
Adding Brains and Blood for a Truly Terrifying Look
Step 1: Paint the Brains
For an even more gruesome touch, use a light pink or grey polish to paint small brains near the tips of the nails.
Add curves and small lines to mimic the folds and wrinkles of real brains.
Step 2: Add the Blood
Use a deep red polish to create small drops and drips of blood across the nails.
Make the blood slightly raised for a 3D effect, adding to the realism of the design.
Step 3: Let It Set
Once the blood has dried, you can finish the design with a shiny top coat to lock in the look and add an extra layer of gloss to the blood.
Why It Works
Zombie Apocalypse Nail Art channels the full horror of the undead with its eerie details and gruesome effects.
The base color creates a decayed, weathered look, while the zombie hands give the design depth and a sense of motion, making it appear as though the undead are coming to life right from your nails.
The addition of brains and blood brings the horror to a new level, enhancing the terrifying realism.
This design is perfect for those who want to embrace Halloween in a bold, gruesome style.
16.Ghostly Glam Nail Art

Ghostly Glam nails strike the perfect balance between elegance and eeriness, blending sheer white tones with holographic stickers for a sophisticated yet spooky Halloween look.
With their soft, ethereal glow and subtle shimmer, these nails will add an otherworldly touch to your Halloween style.
Creating a Ghostly Effect with Sheer White and Holographic Stickers
Step 1: Apply the Sheer White Base
Start by applying a sheer white polish to all of your nails as the base color.
The shade should be light and slightly translucent, creating a soft, ghostly glow that will serve as the perfect backdrop for the holographic accents.
Step 2: Add Holographic Ghost Stickers
Using a small brush or tweezers, carefully place holographic ghost stickers on your nails.
The holographic effect should be subtle yet captivating, adding an iridescent glow that catches the light from every angle.
Step 3: Adjust Placement
Ensure the ghosts are evenly spaced, with no overlapping or distortion. The goal is to create a balanced, ethereal design that feels both haunting and graceful.
Applying Holographic Elements for a Smooth Finish
Step 1: Cut the Stickers to Fit
Before applying the holographic stickers, cut them to match the shape of your nails.
Make sure the stickers are slightly smaller than the nails to leave a small gap around the edges. This will ensure the stickers lay flat, preventing wrinkles or bubbles from forming.
Step 2: Smooth the Stickers
After placing the stickers, use a small brush to gently smooth out any edges or creases.
This will help the holographic effect appear even and consistent across your nails.
Step 3: Apply a Top Coat
Finish by applying a glossy top coat over the stickers to seal them in place.
This not only secures the stickers but also enhances the shimmering, ghostly effect, giving the nails a polished, smooth finish.
Adding Subtle Details for a Balanced Look
Step 1: Add Delicate Accents
To enhance the ghostly theme without overpowering the design, consider adding tiny rhinestones or studs at the tips of your nails.
These accents will resemble twinkling stars in the night sky, adding a touch of sparkle and dimension to the overall look.
Step 2: Experiment with Different Finishes
To create a balance between glam and spooky, play with different finishes.
You can add a matte top coat to the sheer white base for a soft, velvety effect or use a glossy finish on the holographic stickers to make them shimmer even more.
Step 3: Fine-Tune the Look
The goal is to maintain a harmonious design that is both elegant and eerie, with just the right amount of sparkle to enhance the ghostly glow.
Why It Works
Ghostly Glam Nail Art brings a sophisticated and haunting touch to your Halloween nails with its delicate balance of sheer white polish and holographic ghost accents.
The sheer white base creates an ethereal glow, while the holographic stickers provide an iridescent shimmer that catches the light.
The addition of subtle rhinestones and experimenting with finishes helps to elevate the design, making it both glamorous and spooky.
This look is perfect for anyone wanting a chic yet eerie Halloween manicure that captures the spirit of the season.
17. Holographic Bats Nail Art

Holographic Bats nails put a high-tech spin on classic Halloween nail art, fusing the timeless imagery of bats with the futuristic allure of holographic effects.
This dynamic design offers a striking contrast between matte black and iridescent bats, creating a look that is both modern and spooky, perfect for the Halloween season.
Creating the Holographic Bat Effect
Step 1: Apply the Matte Black Base
Start by applying a matte black polish to all of your nails as the base color.
The matte black shade provides a sleek, dark backdrop that makes the holographic elements pop, ensuring they stand out with maximum impact.
Step 2: Add Holographic Bat Stickers or Polish
Using holographic stickers or a holographic polish, place bat shapes strategically across your nails.
The holographic effect should be vibrant, creating a rainbow-like reflection that changes with the light. This will give your design an eye-catching, dynamic quality.
Step 3: Ensure Even Placement
Make sure the bats are spaced evenly across the nails, creating a balanced and harmonious look. The key is to allow the holographic shine to shine through without overcrowding the design.
Painting Detailed Bat Cutouts That Shimmer
Step 1: Outline the Bat Design
To add extra dimension, use a fine nail art brush to carefully outline small bat cutouts in a holographic polish.
The lines should be thin and precise, ensuring that the bats appear delicate and realistic.
Step 2: Fill in the Bat Cutouts
Once the outlines are complete, fill in the bats with the same holographic polish, ensuring an even and smooth finish.
The holographic polish will make the bats shimmer and change colors as they catch the light, creating a high-tech effect that adds an otherworldly vibe to your nails.
Step 3: Let the Design Set
Allow the bats to fully dry before proceeding to the next step to avoid smudging the design.
Best Practices for Applying Holographic Designs
Step 1: Apply a Base Coat
Start by applying a base coat to protect your nails and create a smooth surface for the polish.
A base coat also helps ensure that the holographic effect applies evenly without streaks.
Step 2: Apply the Holographic Polish in Layers
Use a thin brush or a small sponge to apply the holographic polish, building up the color in thin layers.
The key is to make the holographic effect even and consistent across all nails, avoiding streaks or patches that can diminish the shimmer.
Step 3: Finish with a Glossy Top Coat
Once your design is complete, add a glossy top coat to seal in the holographic effect and enhance the shimmer.
The top coat also helps protect the design, ensuring that the holographic bats remain vibrant for longer.
Why It Works
Holographic Bats Nail Art takes the traditional spooky bat design and elevates it with a modern, high-tech twist.
The matte black base provides a bold contrast that lets the holographic bats shine, while the iridescent reflections add a dynamic, almost magical quality to the design.
The detailed bat cutouts add an extra layer of sophistication, ensuring the look is both spooky and chic.
This design is perfect for those looking for a bold, futuristic Halloween manicure with a touch of spooky elegance.
18. Witch’s Hat Nail Art

Witch’s Hat nails are the perfect way to wear your magic on your fingertips this Halloween, featuring a deep purple base and enchanting witch hat designs.
This whimsical and bewitching look will elevate your Halloween style with a blend of bold colors and delicate details.
Perfecting the Deep Purple Base for a Magical Look
Step 1: Apply the Deep Purple Base
Start by applying a rich, deep purple polish to all of your nails as the base color.
The shade should be dark and mysterious, with a hint of shimmer or a metallic finish to enhance the magical vibe.
Step 2: Ensure Even Coverage
The deep purple base creates a smooth and luxurious backdrop for the witch hat designs, ensuring they stand out boldly against the dark backdrop.
Step 3: Let It Dry
Allow the purple base to dry completely before moving on to the next step to avoid smudging the design.
Painting Detailed Witch Hats with Tiny Gold Stars
Step 1: Outline the Witch Hats
Use a thin nail art brush to outline small witch hats with black polish.
The hats should have a slightly curved brim and a pointed top, capturing the classic silhouette of a witch’s hat.
Step 2: Add Metallic Details
Next, add small details like a buckle or ribbon around the base of the hat using metallic gold or silver polish.
Step 3: Add Tiny Gold Stars
Using a fine brush or dotting tool, paint tiny gold stars around the hats to enhance the magical, whimsical feel.
The stars should be small and delicate, adding just the right amount of sparkle without overwhelming the design.
Adding Texture and Dimension to Your Witchy Nails
Step 1: Add Rhinestones or Studs
To bring extra dimension to your Witch’s Hat nails, consider adding small rhinestones or studs around the hats or along the edges of the nails.
These three-dimensional elements will give the design more depth and draw attention to the intricate details.
Step 2: Experiment with Different Finishes
You can experiment with finishes to further elevate the design. For instance, add a matte top coat to the deep purple base for a soft, velvety look or opt for a glossy finish on the hats to make them stand out.
Step 3: Complete the Design
The key is to create a dynamic design with texture and depth, ensuring each element—whether it’s the rhinestones, the stars, or the hats—adds to the overall magical effect.
Why It Works
Witch’s Hat Nail Art creates a perfect balance of mystery and enchantment.
The deep purple base sets the stage for the detailed witch hat designs, with the metallic accents and tiny gold stars adding just the right touch of whimsy and sparkle.
The addition of rhinestones or studs gives the design a textured, three-dimensional quality, making it feel truly magical.
This look is ideal for anyone wanting to showcase their Halloween spirit with a touch of witchy elegance.
19. Cemetery Scene Nail Art

Cemetery Scene nails transform your fingertips into a mini graveyard, featuring eerie tombstones, crosses, and ghostly figures that create a spooky, atmospheric Halloween design.
This haunting look will make a statement, combining the allure of the supernatural with intricate details.
Step-by-Step Guide to Painting Tombstones and Crosses
Step 1: Apply the Grey Base
Begin by applying a muted grey polish to all of your nails.
This shade should resemble the color of weathered stone, setting the foundation for your haunted graveyard design. A slightly worn, aged effect will enhance the spooky, eerie vibe of the look.
Step 2: Outline Tombstones and Crosses
Using a thin nail art brush, outline the tombstones and crosses in black polish.
The tombstones should have irregular, jagged edges and small cracks to give them a timeworn, weathered appearance. The crosses should be simple but slightly worn, enhancing the overall haunted theme.
Step 3: Add Details for Realism
Add tiny cracks or chipped edges to the tombstones to make them look as realistic as possible, capturing the essence of an old graveyard.
The crosses should be subtly aged, with soft lines to reflect their weathered state.
Adding Ghostly Figures and a Full Moon for Atmosphere
Step 1: Paint Ghostly Figures
Use white polish to paint small ghost figures near the tops of the tombstones, with hollow eyes and open mouths for an ethereal effect.
The ghosts should look as though they are rising from the graves, adding to the haunted atmosphere of the design.
Step 2: Create a Full Moon
Next, paint a full moon using light grey or white polish. The moon should have a slightly blurred edge to give the appearance of a glowing aura.
Place the moon in the background, allowing it to add depth and atmosphere to the graveyard scene. The glow from the moon will make the design more dramatic and mysterious.
Creating a Foggy, Eerie Background for the Perfect Effect
Step 1: Apply the Foggy Background
To complete the Cemetery Scene nails, use a small sponge to dab light grey or white polish onto the background of the nails.
This will create a soft, foggy effect, as if mist is drifting across the graveyard. Make sure the fog is slightly transparent so that the tombstones and crosses are still visible.
Step 2: Enhance the Mystery
The fog should add an air of mystery and suspense, as if the graveyard is shrouded in a thick, eerie mist.
This final touch will give your design depth, making it look even more atmospheric and lifelike.
Why It Works
Cemetery Scene Nail Art captures the essence of a spooky graveyard, with detailed tombstones, crosses, and ghostly figures that create a haunting, atmospheric effect.
The deep grey base mimics the color of weathered stone, while the black outlines of the tombstones and crosses provide striking contrast.
The addition of ghosts and a glowing moon adds a supernatural touch, making the design feel alive with Halloween spirit.
The foggy background amplifies the eerie vibe, turning your nails into a chilling scene that is perfect for Halloween.
20. Scarecrow Chic Nail Art

Scarecrow Chic nails bring a rustic and spooky flair to your Halloween style, blending warm autumnal colors with charming scarecrow faces and textured accents.
This cozy, festive design captures the spirit of fall while adding an eerie, whimsical touch to your nails.
Designing Rustic Orange and Brown Nails with Scarecrow Faces
Step 1: Apply the Base Color
Start by applying a rustic orange or brown polish to all of your nails.
The shade should be warm, muted, and reminiscent of fall leaves and harvest fields. A slightly weathered, earthy tone will set the stage for a rustic scarecrow look.
Step 2: Paint the Scarecrow Faces
Using a thin nail art brush, carefully paint the outlines of the scarecrow faces in a darker brown or black polish.
The faces should have exaggerated features, including wide stitched smiles and small, button-like eyes. These whimsical, quirky faces will add character to the design.
Step 3: Add Final Details
The goal is to create a design that feels homemade and worn, capturing the essence of a scarecrow.
By adding irregular, slightly faded details, you’ll give your nails a rustic, vintage look, making them perfect for Halloween.
Adding Straw Accents for a Textured, 3D Effect
Step 1: Apply Straw Accents
To add depth and texture to your Scarecrow Chic nails, consider incorporating small straw accents.
You can use pieces of string or thin strips of paper, gluing them around the edges of the nails to mimic straw sticking out from the scarecrow’s head. The straw should look uneven and frayed, adding to the rustic effect.
Step 2: Create a Full Straw-Filled Head
Use a small brush to paint additional straw accents around the edges of the scarecrow faces. This will give the design a fuller, more dynamic look, as if the scarecrow’s head is brimming with straw.
Step 3: Ensure a Textured, 3D Finish
The key here is to make the straw look natural and slightly uneven, adding a three-dimensional quality that enhances the overall rustic, spooky vibe.
How to Make Your Scarecrow Nails Look Worn and Weathered
Step 1: Layer for Depth
To make your Scarecrow Chic nails look even more worn and weathered, use a layering technique to add depth.
Start by dabbing a lighter shade of orange or brown polish onto the nails with a sponge. This will create a mottled, uneven effect, mimicking the wear and tear of time.
Step 2: Add Cracks and Scratches
Use a thin nail art brush to add fine, jagged lines around the scarecrow faces, mimicking cracks or scratches in the scarecrow’s burlap skin.
Step 3: Create a Rustic, Timeworn Effect
The goal is to make the nails look as if they’ve been exposed to the elements, much like a scarecrow standing in the fields for years. By adding these weathered details, you’ll amplify the rustic charm of the design.
Why It Works
Scarecrow Chic Nail Art captures the essence of rustic Halloween fun with its warm, autumnal colors and detailed scarecrow faces.
The combination of orange and brown shades gives the design a cozy, harvest-inspired vibe, while the straw accents and weathered details make the nails look textured and dynamic.
The straw adds a realistic, 3D quality, bringing the scarecrow design to life, while the mottled layering technique gives the nails a well-worn, timeworn effect, just like a scarecrow left standing in the fields for years.
This look is perfect for anyone wanting to celebrate the spooky side of fall with a fun, rustic twist.
21. Blood Splatter Nail Art

Blood Splatter nails are the ultimate design for anyone daring enough to embrace the gruesome, horror-filled side of Halloween.
With realistic blood splatters that appear fresh and dripping, this bold, dramatic design is sure to leave a chilling impression.
Techniques for Creating Realistic Blood Splatter
Step 1: Apply the Base Color
Start by applying a white or light-colored polish to all of the nails.
This clean, smooth base will provide a sharp contrast to the dark, messy blood splatters, making them stand out more dramatically.
Step 2: Create the Blood Splatter Effect
Use a small brush or an old toothbrush to flick red polish onto the nails, creating random, uneven splatters.
The key is to vary the size and placement of the splatters to make them look more natural. Try to keep the splatters uneven and unpredictable, as if they were splashed across the nails in a rush.
Step 3: Add Gloss for a 3D Effect
To make the splatters look more realistic, allow them to dry slightly, and then apply a glossy top coat.
The raised texture of the splatters combined with the shine will give the blood a 3D, fresh appearance, making it look as though the blood is still wet and fresh.
Choosing the Right Shades of Red for Authenticity
Step 1: Select the Right Reds
To make the blood splatter look as authentic as possible, choose a deep, rich red polish for the main splatters.
This should resemble the color of fresh blood, with a glossy finish that reflects light and adds depth.
Step 2: Add Darker Reds for Depth
Experiment with darker shades of red, such as blackened reds, to add texture and realism to the design.
These darker tones can be applied to the edges of the splatters, mimicking the appearance of dried or coagulated blood, giving the design more dimension and depth.
Step 3: Focus on Messy Yet Controlled Splatter
The key to this design is to balance chaos with control. Each splatter should look messy but still intentional, contributing to the gruesome, horror-filled look.
By layering different shades and textures, you’ll create a blood splatter that feels dynamic and real.
Adding Texture to Make the Blood Appear Fresh and Dripping
Step 1: Create Dripping Blood Effects
For an extra touch of realism, add texture to the blood splatter by creating dripping blood effects.
Use a small brush to add additional drops of red polish to the tips of your nails, making them look like they’re dripping from the cuticles.
Step 2: Apply Gloss for a Dripping Look
Ensure the blood drops are slightly raised and glossy to mimic the smooth, wet appearance of fresh blood dripping.
The raised texture will make the blood look like it’s still actively flowing down your nails.
Step 3: Add Blood Trails
Use a toothpick or a fine brush to draw thin, jagged lines across the nails, simulating blood trails. These can extend from the splatters, adding to the dripping effect and enhancing the 3D, messy nature of the design.
The key is to make the blood look fresh, dripping, and realistic, as though it’s just been splattered across your nails.
Why It Works
Blood Splatter Nail Art captures the gruesome thrill of Halloween with its realistic, dripping blood effect.
The stark contrast between the clean base and the messy splatters creates a striking, dramatic look. The combination of deep, glossy reds with darker hues gives the blood a fresh yet aged appearance, while the texture adds an extra layer of realism.
With dripping blood trails and a 3D effect, these nails are designed to send chills down your spine, making them perfect for anyone who loves the darker side of Halloween.
22. Spider Web Ombre Nail Art

Spider Web Ombre nails combine elegance with spookiness, featuring a smooth gradient from black to orange, enhanced with intricate spider webs and tiny spiders for the perfect Halloween look.v
Creating a Smooth Gradient from Black to Orange
Step 1: Apply the Base Colors
Begin by applying a black polish to the tips of your nails.
Next, gradually fade the color into a bright orange towards the base of the nails. The black should remain dominant at the tips, creating the feel of a setting sun or glowing jack-o’-lantern.
Step 2: Blend the Gradient
To achieve a smooth, seamless gradient, use a makeup sponge to dab the orange over the black, blending the colors together.
Apply thin layers, building the gradient gradually for the smoothest transition. The goal is to make the transition from black to orange as natural as possible, creating a striking ombre effect that sets the stage for the spider web design.
Painting Delicate Spider Webs that Stretch Across Your Nails
Step 1: Outline the Webs
Once the gradient is dry, use a thin nail art brush to paint delicate white spider webs across the nails.
Start by outlining the webs with thin, curved lines, creating a spider web pattern that stretches across the entire nail.
The webs should look slightly irregular, mimicking the natural, imperfect shapes that real spider webs often take.
Step 2: Add Details for Depth
After outlining the webs, use a fine brush to add more lines and details, creating a layered, intricate effect.
These additional details will add depth and dimension to the web design, giving it a more lifelike, 3D appearance.
Step 3: Glossy Finish for Dimension
Once the webs are complete, apply a glossy top coat over the entire design. This will not only protect the artwork but also enhance the raised texture of the webs, making them appear more dynamic and lifelike.
Tips for Adding Small Spiders for an Extra Creepy Effect
Step 1: Paint Tiny Spiders
To take the design a step further, add small spiders crawling across the webs.
Use a fine nail art brush to paint tiny black spiders, paying attention to their thin, delicate legs and rounded bodies. Position the spiders near the center of the webs or crawling along the lines to create a sense of movement.
Step 2: Vary the Size and Placement
Vary the size of the spiders to add depth to the design. You can place some spiders larger or closer to the cuticles and others smaller or near the tips of the nails. This creates a more natural, dimensional effect.
Step 3: Add Texture for Realism
For an added touch of realism, use a matte or glossy top coat on the spiders to give them either a smooth or textured look, depending on your preference.
Why It Works
The Spider Web Ombre nails are a stunning fusion of eerie sophistication and intricate detailing.
The gradient from black to orange creates a visually striking backdrop that enhances the contrast of the white spider webs.
The spiders add the perfect amount of creepiness, while the delicate design ensures the overall look is both elegant and spooky.
The combination of smooth gradients and raised, glossy webs creates a dynamic, 3D effect that captures the spirit of Halloween beautifully.
23. Mummy Wrap Nail Art

Mummy Wrap nails combine spooky and fun, with textured wraps and quirky googly eyes that add a playful twist to this classic Halloween design.
How to Create Realistic Mummy Wraps Using White and Black Stripes
Step 1: Apply the Base Color
Start by applying a nude or light beige polish to all of your nails. This color should resemble the shade of aged bandages, providing the perfect neutral base for the mummy wraps.
Step 2: Paint the Mummy Wraps
Next, use a thin nail art brush to paint overlapping stripes of white and black polish across your nails. These stripes should be irregular and uneven, mimicking the look of torn, wrapped bandages.
The black stripes can be thin and subtle, while the white stripes will create more contrast against the base color. The key is to make the wraps look tightly wound around the nails, with areas where the base color peeks through for added depth and authenticity.
Step 3: Add a Touch of Movement
To enhance the dynamic feel of the design, vary the width of the stripes slightly and leave gaps between some of the wraps. This adds movement and a sense of wear to the bandages, making them look like they’ve been wrapped around for centuries.
Adding Small Details Like Googly Eyes for a Playful Twist
Step 1: Paint the Googly Eyes
For a fun and playful twist, add small googly eyes to your Mummy Wrap nails. Using black polish and a fine brush, create small round shapes for the eyes, leaving tiny white pupils for a classic googly effect.
Step 2: Position the Eyes
Place the eyes near the center of the wraps, giving the impression that the mummy is peeking out from behind the bandages. You can experiment with different placements, such as placing one eye higher and the other lower, to create a quirky, animated look.
Step 3: Customize the Eye Sizes
Consider varying the size of the eyes to add some whimsy to the design. Larger eyes will give the nails a cartoonish feel, while smaller eyes will create a more subtle but still playful effect.
Layering Effects to Make the Wraps Look Authentic
Step 1: Apply a Matte Top Coat
To make the Mummy Wraps look even more authentic, start by applying a matte top coat over the base color. This creates a rough, aged texture that gives the illusion of old, weathered bandages.
Step 2: Use a Sponge for Additional Layers
Take a small sponge and dab on additional layers of white and black polish, creating a mottled, uneven effect. This will make the wraps appear more layered and textured, as if they’ve been wrapped tightly around the nails over time.
Step 3: Add Cracks and Tears\
For a truly worn and weathered look, use a fine brush to add tiny cracks and tears to the mummy wraps. Jagged lines and irregular edges will make the wraps appear older and more authentic.
Why It Works
The Mummy Wrap nails are a perfect mix of spooky and fun. The combination of textured wraps, playful googly eyes, and layering techniques adds depth, dimension, and whimsy to the design.
The use of contrasting colors (white and black) against the neutral base creates visual interest and the illusion of movement, while the googly eyes inject humor and personality into the design.
Whether you’re looking for something spooky, quirky, or both, these nails are sure to capture attention and spread Halloween cheer!
24. Black Cat Nail Art

Black Cat nails offer a sleek, mysterious look for Halloween, featuring a glossy black base with detailed cat eyes and whiskers that exude elegance and intrigue.
Achieving a Glossy Black Base for a Sleek Look
Step 1: Apply the Base Color
Begin by applying a rich, glossy black polish to all your nails. This deep, dark shade should have a smooth, even finish that provides a sophisticated backdrop for the rest of the design.
Step 2: Ensure a Polished Look
The glossy black base is key to this look, creating a sleek, luxurious finish that enhances the cat eyes and whiskers. Opt for a black polish that is both bold and shiny, perfect for a polished and mysterious vibe.
The smooth, glossy backdrop will allow the detailed elements of the design to stand out, creating a captivating effect that’s both chic and Halloween-ready.
Painting Detailed Cat Eyes and Whiskers
Step 1: Outline the Cat Eyes
Using a fine nail art brush, paint small, almond-shaped eyes with a bright green or yellow polish. The sharp, pointed edges should resemble the distinct look of a cat’s eyes, adding an element of mystery.
Step 2: Add the Whiskers
Next, use the fine brush to create thin, delicate whiskers extending from the sides of each eye. These whiskers should have a slight curve to them, adding fluidity and elegance to the design.
The combination of the glossy base with the sharp, bright eyes and graceful whiskers brings the Black Cat look to life with bold sophistication.
Adding Small Details to Enhance the Feline Theme
Step 1: Embellish with Rhinestones or Studs
To elevate the feline theme, consider adding tiny rhinestones or studs near the corners of the eyes. This creates the illusion of sparkling cat-like pupils, enhancing the overall design with subtle sparkle.
Step 2: Experiment with Finishes
For added depth, try using a matte top coat on the whiskers while keeping the eyes glossy. This contrast adds dimension and makes the cat eyes pop even more against the sleek black base.
The key is to keep the design balanced—each detail should add to the overall sleek and mysterious effect without overwhelming the theme.
Why It Works
Black Cat Nail Art captures the sleek, mysterious allure of Halloween with its glossy black base and precise, feline-inspired details.
The bold cat eyes with their sharp, almond shapes draw attention, while the delicate whiskers add a touch of elegance. The additional accents, like rhinestones, enhance the feline theme without detracting from the overall sophisticated look.
Perfect for Halloween or any occasion when you want to add a little feline magic, this design is sure to turn heads and bring a touch of mystery to your nails.
25. Poison Apple Nail Art

Poison Apple nails offer a bold, dramatic look for Halloween, featuring a shiny red base paired with detailed dripping poison designs that exude a toxic allure.
Creating a Shiny Red Base That Mimics a Poisoned Apple
Step 1: Apply the Base Color
Start by applying a vibrant, glossy red polish to all your nails. This rich, bold shade should have a smooth, even finish, mimicking the tempting, shiny appearance of a poisoned apple.
Step 2: Achieve a Polished Look
The glossy red base provides a luxurious backdrop for the dripping poison effects, making them stand out with striking contrast. Choose a red polish that is both bold and shiny to create a polished, tempting look that’s perfect for Halloween.
This shiny base sets the tone for the dramatic poison design, offering a sleek yet striking foundation that captures attention.
Painting Detailed Dripping Poison for a Toxic Effect
Step 1: Outline the Poison Drips
Using a fine nail art brush, paint the outlines of the drips with bright green or yellow polish. The drips should be small, irregular, and slightly curved, extending from the tips of the nails toward the base.
Step 2: Fill in the Drips
Fill in the outlined poison drips with the same green or yellow polish, ensuring the lines are smooth and even. This creates a seamless, flowing effect that enhances the toxic feel of the design.
Step 3: Add Dimension
To make the poison appear more realistic, use a slightly raised and glossy finish. This 3D effect adds depth to the design, making the poison look as though it’s truly dripping off your nails, creating a dramatic and bold Halloween effect.
Adding Bubbles and Additional Drips to Enhance the Realism
Step 1: Add Small Bubbles
For extra realism, use a small dotting tool or toothpick to create tiny bubbles along the edges of the poison drips. Dip the tool in polish and carefully place small dots, ensuring they’re slightly raised and glossy for a 3D effect.
Step 2: Create More Drips
Use a thin nail art brush to add additional drips of poison. Paint small, thin lines that extend from the tips of the nails, gradually getting larger as they reach the base. These extra drips help enhance the overall toxic theme of the design.
Step 3: Refine the Toxic Look
The goal is to make the design look as realistic as possible, so focus on making the bubbles and drips appear fluid and natural. Each element should contribute to the bold, toxic effect of the Poison Apple nails.
Why It Works
Poison Apple Nail Art is the perfect combination of boldness and realism. The glossy red base provides a striking, tempting backdrop, while the detailed dripping poison creates a visually stunning, toxic effect.
The addition of bubbles and extra drips enhances the realism, making the design come alive with a 3D effect.
Whether you’re aiming for a bold, dramatic statement or a realistically eerie vibe, these nails capture the essence of Halloween and will certainly turn heads at any spooky gathering.
26. Ghosts & Chains Nail Art

Ghosts & Chains nails offer a spooky and dramatic Halloween look, combining ethereal floating ghosts with detailed silver chains for a haunted, bound effect.
Designing Floating White Ghosts on a Black Base
Step 1: Apply the Base Color
Begin by applying a rich, glossy black polish to all your nails. This dark, deep shade should provide a smooth, even finish that enhances the overall haunted vibe of the design.
Step 2: Paint the Ghost Outlines
Using a thin nail art brush, paint the outlines of small, slightly irregular ghosts in bright white polish. The ghosts should have thin, curved lines, extending from the tips of the nails down toward the base.
Step 3: Create a Floating Effect
Ensure the ghosts appear light and ethereal by giving them irregular shapes. The goal is to create a haunting, ghostly feel with the design, as though the spirits are floating across your nails in an elegant, spooky way.
Adding Small Silver Chains for a Spooky, Bound Effect
Step 1: Paint the Chains
Use metallic silver polish and a thin nail art brush to paint small, delicate chain links across your nails. The chains should be slightly irregular, creating a dynamic, bound effect that complements the ghostly figures.
Step 2: Vary the Placement
Experiment with different sizes and placements of the chain links, allowing some areas of the base color to peek through. This creates a more textured, layered look that adds depth to the design.
Step 3: Add Drama and Intensity
The chains should not only enhance the haunted theme but also add a touch of intensity and drama to the overall design, making the Ghosts & Chains nails bold and captivating.
Combining Ghosts and Chains for a Cohesive Theme
Step 1: Add Subtle Accents
To make the design feel more cohesive, consider adding small rhinestones or studs to the chains. This will give the design more texture and depth, creating a sense of visual interest.
Step 2: Experiment with Finishes
Try applying a matte top coat over the ghosts for a soft, ghostly effect, while keeping the chains glossy for contrast. This combination of finishes enhances the eerie, dramatic feel of the design.
Step 3: Refine the Haunted Theme
Focus on ensuring each element of the design—whether the floating ghosts or the delicate chains—contributes to the spooky, bound theme, keeping the look both elegant and bold.
Why It Works
Ghosts & Chains Nail Art is a perfect blend of spooky elegance and dramatic intensity. The glossy black base provides a striking backdrop for the floating white ghosts, creating a haunting visual effect.
The silver chains enhance the eerie theme with their delicate yet dramatic appearance, adding depth and a sense of tension to the design. Small accents like rhinestones or varying finishes refine the look, making it both captivating and hauntingly beautiful.
This design is ideal for anyone looking for a bold, spooky statement with a touch of elegance and drama for Halloween.
27. Skeleton Hands Nail Art
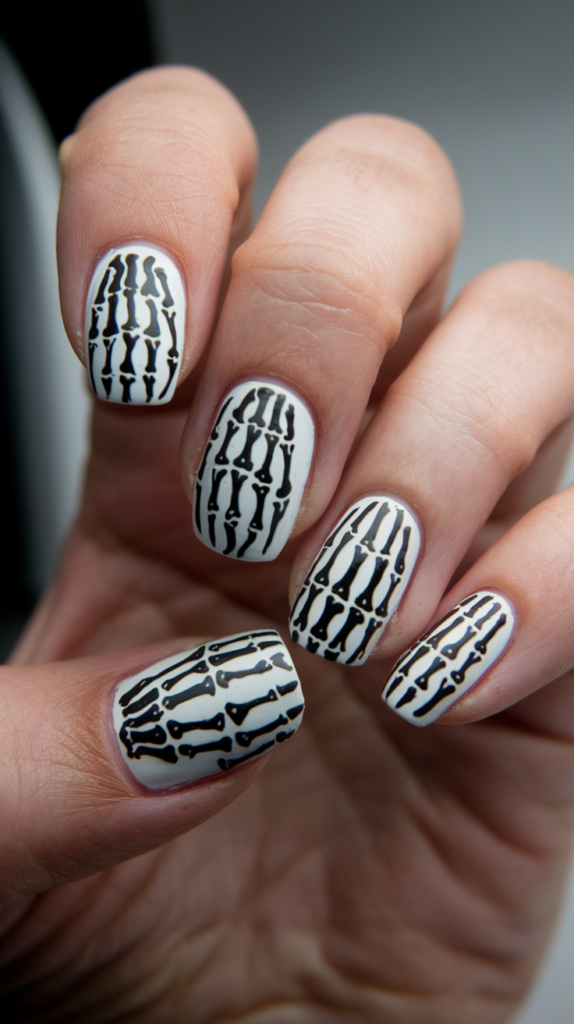
Skeleton Hands nails are a bold and dramatic way to celebrate Halloween, featuring intricate handprints that reach out from the darkness in a spooky, haunting effect.
How to Paint Detailed Skeleton Handprints on a White Base
Step 1: Apply the Base Color
Start by applying a rich, glossy white polish to all your nails. This bright, smooth base will provide a striking contrast against the dark skeleton handprints, setting the stage for a dramatic design.
Step 2: Outline the Handprints
Use a thin nail art brush to paint the outlines of the skeleton hands with black polish. The handprints should be slightly irregular and uneven, with thin, curved lines that mimic the contours of real bones.
Step 3: Create Depth and Movement
To make the handprints appear like they are reaching out from the darkness, focus on creating depth. The fingers should look elongated and bony, with uneven curves that add to the lifelike effect.
The combination of the clean white base and detailed black handprints will create a bold, spooky design that captures the eerie essence of Halloween.
Techniques for Making the Handprints Look 3D
Step 1: Apply a Matte Top Coat
For added texture, begin by applying a matte top coat to the white base. This creates a slightly rough surface, adding a worn, aged look that complements the haunting theme.
Step 2: Layer Black Polish for Texture
Using a small sponge, dab additional layers of black polish onto the handprints. This will create a mottled, uneven texture, making the handprints look like they’ve been reaching out from the darkness for centuries.
Step 3: Add Cracks and Scratches
To further enhance the texture, use a fine brush to add small cracks and jagged lines to the handprints. These imperfections will make the hands look weathered and ancient, adding realism and depth.
Adding Texture to Enhance the Bony, Skeletal Look
Step 1: Add Highlights and Shadows
Use a fine brush to add tiny highlights and shadows to the skeleton handprints. This will create the illusion of light and shadow playing across the bones, adding a realistic, three-dimensional effect.
Step 2: Experiment with Different Finishes\
Consider using a matte top coat on the handprints to enhance the bony, rough texture, while keeping the white base color glossy for contrast. This will create a dynamic look that enhances the eerie, skeletal theme.
Step 3: Refine the Design
Ensure the design remains textured and dynamic by adding small touches that contribute to the overall bony effect. The key is to make the handprints look like they’ve been etched into time, adding to the overall haunting theme of the design.
Why It Works
Skeleton Hands Nail Art combines bold, dramatic elements with intricate detail. The bright white base serves as a striking backdrop, allowing the black handprints to stand out with eerie prominence.
The layering techniques and textured finishes give the handprints depth and a worn, aged appearance, making them look as though they are reaching out from the shadows. The additional accents, such as highlights, shadows, and cracks, enhance the bony, skeletal effect, making the design both realistic and spooky.
Perfect for anyone wanting a bold, dramatic Halloween look, this design is sure to captivate with its haunted, three-dimensional appeal.
28. Fright Night Nail Art

Fright Night nails are a bold and dramatic way to celebrate Halloween, featuring a haunting dark blue night sky filled with glowing haunted houses and atmospheric details.
Painting a Dark Blue Night Sky with Glowing Haunted Houses
Step 1: Apply the Base Color
Start by applying a rich, deep blue polish to all your nails as the base color. This deep shade should resemble a night sky, smooth and even, creating a dark backdrop that sets the stage for the spooky details to come.
Step 2: Outline the Haunted Houses
Using a thin nail art brush, paint the outlines of the haunted houses in black polish. The houses should be small and slightly irregular, with curved and jagged lines that give the appearance of old, eerie buildings.
Step 3: Add Glowing Effects
For the glowing effect, fill in the outlines of the houses with a bright yellow or green polish. This will mimic the look of eerie lights flickering through the windows, creating a haunting, ethereal glow against the dark sky.
The combination of the dark blue base and glowing haunted houses adds a spooky atmosphere perfect for Halloween.
Adding Small Stars and Clouds for Atmosphere
Step 1: Paint Tiny Stars
Enhance the night sky by painting small stars in metallic silver or white polish. Use a dotting tool or toothpick to create delicate, tiny dots scattered across the nails, adding a magical touch to the design.
Step 2: Add Clouds
For added atmosphere, paint irregular clouds using thin, curved lines of white or gray polish. The clouds should be soft and uneven, drifting across the nails like wisps in the night sky.
Step 3: Experiment with Placement
Feel free to experiment with different sizes of stars and clouds, placing them around the haunted houses to create a whimsical, yet spooky effect.
The stars and clouds contribute to the overall dramatic look, enhancing the eerie, haunted feel of the design.
Making the Haunted Houses Look Worn and Eerie
Step 1: Apply a Matte Top Coat
To give the haunted houses an aged, worn appearance, start by applying a matte top coat over the dark blue base. This creates a slightly rough texture, making the design feel older and more abandoned.
Step 2: Layer Black Polish for Depth
Using a small sponge, dab additional layers of black polish over the haunted houses. This technique adds a mottled, uneven effect, making the houses appear weathered and forgotten, as though they’ve been standing for years in the dark.
Step 3: Add Cracks and Scratches
To enhance the eerie effect, use a fine brush to add tiny cracks and jagged lines to the houses. These imperfections will make the houses look abandoned and haunted, contributing to the overall spooky vibe.
Why It Works
Fright Night Nail Art brings a dynamic, spooky atmosphere to life with its dark blue base and glowing haunted houses. The contrast between the dark sky and the glowing houses creates a captivating, ethereal effect that draws attention.
The addition of stars and clouds provides a touch of whimsy while maintaining the eerie vibe, creating a balance between drama and elegance.
The textured, worn appearance of the haunted houses further enhances the ghostly feel, making this design perfect for anyone wanting to celebrate Halloween in a bold, eye-catching way.
29. Witch’s Broomstick Nail Art

Witch’s Broomstick nails are a playful and whimsical way to celebrate Halloween, featuring broomstick designs and a magical nighttime atmosphere.
Creating a Brown Base That Mimics a Wooden Broomstick
Step 1: Apply the Base Color
Start by applying a rich, deep brown polish to all your nails. This shade should be dark and even, resembling the texture and color of a wooden broomstick. The smooth finish sets the perfect stage for the broomstick design.
Step 2: Paint the Broomstick Designs
Using a thin nail art brush, paint the broomsticks in a lighter shade of brown or tan polish. These broomsticks should be slightly irregular in shape, with curved lines that mimic the look of real wooden sticks. Make sure to vary the size and placement of the broomsticks for a more playful and dynamic design.
The combination of the deep brown base and the lighter broomstick outlines creates a fun and festive Halloween look that’s perfect for the season.
Painting Detailed Broomsticks with Straw Bristles
Step 1: Add the Straw Bristles
To give the broomsticks more texture and depth, use a fine brush to paint tiny lines at the end of each broomstick that mimic the look of straw bristles. These lines should be irregular and uneven, adding a realistic touch to the design.
Step 2: Vary the Bristle Sizes
Feel free to experiment with different sizes and placements of the bristles. Some broomsticks may have longer, more dramatic bristles, while others can have shorter, stubbier ones. This will create an organic, whimsical effect.
The textured bristles add an extra layer of detail, making the Witch’s Broomstick nails feel more intricate and playful.
Adding Small Stars for a Magical, Nighttime Effect
Step 1: Paint Tiny Stars、
To enhance the magical nighttime atmosphere, use a small dotting tool or a toothpick to add tiny stars to the nails. You can use metallic silver or gold polish for these stars, creating a subtle yet enchanting effect.
Step 2: Vary the Star Sizes and Placement
For a fun, whimsical effect, vary the size and placement of the stars. Some can be larger, while others are tiny and delicate. Place them around the broomsticks or scattered across the nails to create a sense of movement and magic.
Step 3: Add Accents
You can also add small crescent moons or glitter to further enhance the mystical feel. Experiment with the placement of these elements to achieve a dynamic, magical look.
The stars contribute a dreamy, nighttime quality that complements the broomsticks, creating an overall sense of enchantment.
Why It Works
The Witch’s Broomstick nails bring together fun, festive design elements with a touch of magical whimsy.
The combination of the wooden broomsticks and straw bristles adds texture and realism, while the tiny stars enhance the overall theme of nighttime magic.
This design is perfect for those who want a bold, eye-catching, and playful Halloween look!
30. Graveyard Shift Nail Art

Graveyard Shift nails bring a hauntingly beautiful atmosphere to your Halloween celebrations, featuring spooky graveyard scenes on a dark, dramatic backdrop.
Designing a Black Base with Detailed Graveyard Scenes
Step 1: Apply the Base Color
Start by applying a rich, deep black polish to all your nails. This black base should be smooth and even, mimicking the feel of a midnight stroll through a quiet graveyard. The key is to create a dark canvas that will make the graveyard details stand out.
Step 2: Paint the Graveyard Scenes
Using a thin nail art brush, paint the outlines of the graveyard scenes in white or grey polish. You can include silhouettes of tombstones, crosses, or other eerie elements like trees or fences. The lines should be delicate and slightly irregular, capturing the imperfect, haunted feel of a graveyard at night.
The black base provides a perfect contrast for the ghostly, glowing scenes, giving the nails a mysterious, ethereal look.
Painting Tombstones, Crosses, and Ghostly Figures
Step 1: Add Tombstones and Crosses
To enhance the graveyard effect, start by painting small, eerie tombstones and crosses. Use light grey or white polish to paint these elements in irregular shapes, adding details like cracks or tilting stones to make them look more worn and ancient.
Step 2: Paint Ghostly Figures
For an extra spooky touch, paint ghostly figures floating around the graveyard. Use a small dotting tool or a fine brush to create wispy, irregular figures in metallic silver or white polish. The ghosts should appear soft and ethereal, almost like they’re floating in the mist of the graveyard.
Step 3: Add Additional Atmospheric Details
You can add other details like cobwebs, bats, or even creeping vines to make the scene feel more dynamic and layered. The combination of the tombstones, crosses, and ghostly figures will create a hauntingly elegant effect on your nails.
Adding a Full Moon for an Extra Spooky Touch
Step 1: Paint the Full Moon
To elevate the eerie atmosphere of the Graveyard Shift nails, consider adding a full moon. Use a small dotting tool or toothpick to paint a slightly irregular, glowing moon in light grey or white polish.
Step 2: Position the Moon
Place the full moon near the top of the nails, as if it’s casting an otherworldly glow over the graveyard scene. You can experiment with different sizes and placements for the moon, creating a more dramatic or subtle effect depending on your preference.
Step 3: Add Shadows and Highlights
For added depth, you can also use a darker grey or black polish to paint shadows around the moon. This will make the moon appear to glow against the black sky, adding to the overall spooky vibe.
Why It Works
The Graveyard Shift nails combine dark, dramatic elements with intricate, spooky details.
The black base serves as a perfect backdrop for the white and grey graveyard scenes, while the full moon adds an extra layer of mystery.
Whether you’re a fan of haunted cemeteries or just looking for a bold Halloween look, these nails offer a spooky, elegant design that’s sure to catch attention.
31. Voodoo Doll Nail Art

Voodoo Doll nails offer a bold and eerie way to embrace Halloween, featuring creepy stitched faces, button eyes, and cursed pins on a fabric-like beige base.
Creating a Beige Base That Resembles Fabric
Step 1: Apply the Base Color
Start by applying a rich, deep beige polish to all your nails as the base color. This shade should have a slightly muted, worn look that mimics the appearance of aged fabric—perfect for a voodoo-inspired design.
Step 2: Paint the Stitched Faces
Next, using a thin nail art brush, paint the outline of the voodoo doll faces in a darker shade of brown or black polish. The faces should be irregular and uneven, with thin, curved lines to represent the stitching.
The key to this design is to create depth and texture, making the faces look like they’re sewn into the fabric, giving the nails a creepy, cursed appearance.
Painting Stitched-Up Voodoo Doll Faces with Button Eyes
Step 1: Add Button Eyes
To add a touch of texture, paint the button eyes in a contrasting color like black or red, using a small brush to form small, round shapes. The buttons should be centered on the faces, with tiny, curved lines radiating outward to mimic the appearance of stitched seams.
Step 2: Create Additional Details
Consider adding small cracks or tears to the faces to make them appear more worn. Use a fine brush to paint jagged lines along the faces to add depth and dimension.
The combination of the stitched-up faces and button eyes creates a haunting, textured design that brings the voodoo doll theme to life.
Adding Small Pins for a Cursed, 3D Effect
Step 1: Create the Pins
To make the Voodoo Doll nails even more eerie, consider adding small, realistic-looking pins. You can use small pieces of wire or thin strips of metal to mimic the appearance of pins stuck through the fabric.
Step 2: Position the Pins
The pins should be glued to the tips of the nails, sticking out slightly to create a 3D effect. For added realism, use uneven placements and slightly frayed pins, which add to the overall cursed, worn look.
Step 3: Experiment with Placement and Size
You can play around with different sizes of pins and their placement on the nails, adding a quirky, yet spooky effect.
Why It Works
The Voodoo Doll nails are a dramatic and eerie way to channel the creepy vibe of Halloween.
The combination of the fabric-like beige base, the stitched faces, and the button eyes brings the design to life, while the small pins create a 3D, cursed effect.
This nail art design is perfect for those who want a spooky, bold look that stands out.
32. Creepy Crawlers Nail Art

Creepy Crawlers nails are the ultimate Halloween design, featuring black spiders, centipedes, and other creepy insects crawling across a transparent base for a spine-chilling effect.
Using a Transparent Base to Highlight Black Spiders and Centipedes
Step 1: Apply a Transparent Base Color
Start by applying a clear or slightly tinted polish to all the nails as the base color. This will provide a smooth, even surface that contrasts beautifully with the dark, detailed bugs to come.
Step 2: Paint the Insects
Using a thin nail art brush, paint black spiders and centipedes on the nails. The bugs should be small and irregular, with thin, curved lines that resemble the delicate legs and bodies of real insects.
The key is to create a sense of movement, with the bugs appearing as if they’re crawling across the surface of the nails. This transparent backdrop enhances the creepy, lifelike effect, making the insects stand out even more.
Painting Detailed Bugs That Appear to Be Crawling Across Your Nails
Step 1: Add Legs and Antennae
To bring the bugs to life, use a small brush to add tiny legs and antennae. These should be slightly curved, uneven, and delicate, with some areas showing more of the base color beneath them to enhance the movement effect.
Step 2: Experiment with Size and Placement
You can play around with different sizes and placements of the bugs. Some bugs can be larger and more prominent, while others are smaller, giving a dynamic, layered effect as if the insects are crawling in all directions.
Step 3: Creating Depth
To make the bugs appear as though they’re truly crawling across the nails, carefully place them in various positions, some closer to the tips of the nails and others toward the cuticles. This will add visual interest and make the design feel more interactive.
Adding a Glossy Finish to Make the Bugs Look Lifelike
Step 1: Apply a Glossy Top Coat
To make the bugs appear even more lifelike, apply a clear, glossy top coat over the design. This glossy finish will give the bugs a shiny, exoskeleton-like effect that mimics the appearance of real insects.
Step 2: Experiment with Textures
For added contrast, consider experimenting with different textures. You can apply a matte top coat to the base color to make the background subtle and focus attention on the glossy bugs. The combination of glossy and matte will create a more dynamic, realistic look.
Why It Works
The Creepy Crawlers nails are a spine-tingling Halloween design with a playful twist.
The transparent base creates an eerie, almost ghostly effect, while the detailed black spiders, centipedes, and other insects add a bold, crawling vibe.
The combination of textures and movement makes this design both spooky and eye-catching, perfect for a dramatic Halloween manicure.
33. Spellbound Nail Art

Spellbound nails are a magical and enchanting way to celebrate Halloween, featuring deep purple hues, detailed spellbook art, and mystical potion designs that evoke a sense of mystery and magic.
Designing Deep Purple Nails with Spellbook Art and Potions
Step 1: Apply a Deep Purple Base Color
Start by applying a rich, deep purple polish to all of your nails. This color should be dark and velvety, reminiscent of a midnight sky, providing a perfect canvas for the spellbook art and potions to stand out.
Step 2: Paint Spellbook Art and Potion Bottles
Using a thin nail art brush, paint intricate spellbook art and potion bottles in either black or white polish. These elements should be small, slightly irregular, and filled with mystical details such as curved lines and symbols that mimic the look of real spellbooks and potion bottles.
The key is to create a design that feels like it’s glowing in the dark, with the contrast between the deep purple base and the intricate details adding a magical allure.
Painting Glowing Symbols and Potion Bottles
Step 1: Add Glowing Symbols
Enhance the design by painting small glowing symbols such as runes or alchemical signs. Use metallic colors like gold or silver for a mystical, shimmering effect. The symbols should be delicately placed, perhaps near the base or tips of the nails to guide the eye.
Step 2: Paint Potion Bottles
Add small potion bottles on your nails, with irregular shapes and delicate curves to make them appear as though they hold magical elixirs. You can also add small details like cracks or scratches on the bottles to make them look old and enchanted. Use thin, curved lines to bring the bottles to life.
The combination of glowing symbols and potion bottles will elevate the look, making it appear as if magic is truly brewing on your nails.
Creating a Magical, Enchanting Effect with Your Nail Art
Step 1: Add Stars and Moons
For a more enchanting, ethereal touch, paint tiny stars and moons scattered across the nails. These symbols will create the illusion of a starry night sky, making the design feel even more magical.
Step 2: Experiment with Finishes
To further enhance the mystical feel, you can experiment with different textures and finishes. Consider adding a matte top coat to the deep purple base to create a smooth, velvety finish, while using a glossy top coat on the potion bottles and symbols to make them shine like they’re glowing in the moonlight.
Step 3: Layering for Depth
Layering different elements—such as combining matte and glossy finishes—will add depth and complexity to the design, enhancing the overall magical effect.
Why It Works
Spellbound nails perfectly capture the essence of Halloween magic with their deep purple base and detailed mystical designs.
The intricate spellbook art, glowing symbols, and potion bottles create a bewitching and textured effect that seems to bring magic to life.
This design is both dramatic and enchanting, ideal for those looking to create a standout, mystical Halloween manicure.
34. Pumpkin Patch Nail Art

Pumpkin Patch nails are a festive and cheerful way to celebrate Halloween, featuring small jack-o’-lanterns, glowing eyes, jagged mouths, and garden-inspired elements.
This design is perfect for those looking to capture the playful, spooky essence of Halloween.
Painting Small Jack-O’-Lanterns with Glowing Eyes and Jagged Mouths
Step 1: Apply an Orange Base Color
Start by applying a rich, vibrant orange polish to all your nails. This base color should be smooth and even, resembling the bright, lively hue of pumpkins in a patch.
Step 2: Paint the Jack-O’-Lantern Faces
Using a thin nail art brush, paint small jack-o’-lantern faces in black polish. The faces should be slightly irregular with thin, curved lines to mimic real carved pumpkins.
- Eyes: Paint the eyes using bright yellow or white polish to give them a glowing effect.
- Mouth: For the mouth, create jagged, uneven lines to enhance the spooky, playful vibe of the design.
The key to making this design pop is to ensure the jack-o’-lantern faces appear like they’re glowing, with contrast between the dark lines of the face and the glowing eyes and mouth.
Adding Green Vines and Leaves for a Garden-Like Effect
Step 1: Paint Vines
Next, enhance the Pumpkin Patch nails by painting small vines in a contrasting green or brown color. Use a small brush to create curved, winding lines that mimic the look of real pumpkin vines.
Step 2: Add Leaves
Paint small, irregular leaves that stretch across the nails. The leaves should be uneven, with some areas showing the base color underneath. To make them feel more realistic, add small cracks or scratches using a fine brush to create jagged edges.
- Placement: Vines and leaves should be placed in various directions to give the design a whimsical, garden-like quality.
Making Your Nails Look Like a Mini Pumpkin Patch
Step 1: Add Tiny Pumpkins
To create a truly festive look, paint tiny pumpkins across your nails, making it feel as though you have a mini pumpkin patch. These pumpkins should vary slightly in size and shape, with some showing more of the base color underneath for texture.
Step 2: Experiment with Different Textures
To create depth in the design, you can experiment with different textures:
- Add a matte top coat to the orange base color for a rustic, pumpkin-like finish.
- Use a glossy finish on the pumpkins for a shiny, fresh appearance.
Step 3: Layering for Depth
The key to a dynamic Pumpkin Patch design is layering the vines, pumpkins, and faces to add texture and movement across the nails. This will create a multi-dimensional, garden-like theme.
Why It Works
Pumpkin Patch nails combine the vibrant, festive spirit of Halloween with whimsical, garden-inspired elements.
The combination of glowing jack-o’-lantern faces, intricate vines, and small pumpkins gives the design a lively, seasonal feel.
These nails are perfect for anyone looking to embrace the spooky season with a touch of cheer and creativity.
35. Bloody Rose Nail Art

Bloody Rose nails offer a striking, romantic twist on Halloween nail designs, featuring dark roses against a bold black backdrop.
This dramatic design balances elegance with a hint of gore, perfect for those who want to showcase both beauty and mystery.
Creating a Black Base with Detailed Red Roses
Step 1: Apply a Black Base Color
Begin by applying a rich, deep black polish to all of your nails. This base color should be smooth and even, mimicking the deep, dark essence of a midnight sky. The black provides a striking contrast to the red roses, making them stand out dramatically.
Step 2: Paint the Roses
Using a thin nail art brush, paint small, irregular red roses on your nails. The petals should be delicately shaped, with thin, curved lines that resemble real roses.
- Depth: Add a slight 3D effect by raising the petals slightly with the red polish, allowing them to catch the light for a glossy finish.
Step 3: Add Highlights and Shadows
For a more realistic look, add subtle highlights and shadows to the petals. Use a small brush to apply tiny dashes of white or lighter red polish on the raised portions of the petals. This will give the roses a depth that mimics the curvature of real flowers.
Adding Dripping Blood for a Gory, Yet Romantic Look
Step 1: Paint Drips of Blood
To add to the gothic allure of this design, paint small drops or streaks of blood dripping from the roses using a deep red or black polish.
- Drip Details: Use a fine brush to create small, uneven drops that appear as though they’re flowing from the petals, adding to the gory, yet romantic feel of the design.
Step 2: Make the Blood Lifelike
For a more realistic appearance, add a glossy top coat over the blood drips, giving them a slightly raised, wet look. This will enhance the effect, making the blood look as though it’s fresh.
Combining Dark and Light Elements for a Dramatic Effect
Step 1: Play with Light and Shadow
To intensify the design, consider adding tiny shadows around the edges of the roses or under the drips of blood. This will create a sense of depth and drama, giving the design a more dynamic and lifelike appearance.
- Light Effects: Use a small dotting tool to add subtle highlights to the upper parts of the roses, creating the illusion of light hitting the petals.
Step 2: Experiment with Finishes
For an additional layer of drama, mix matte and glossy finishes. Apply a matte top coat over the black base to create contrast, while using a glossy finish for the roses and blood for a more vivid, standout look.
Why It Works
The Bloody Rose nails beautifully blend elegance and horror, combining the romantic allure of roses with the intensity of dark, gothic elements.
The contrast of deep red against black gives this design a mysterious, captivating effect.
The addition of blood drops and the interplay of light and shadow make this nail art ideal for anyone seeking a bold, dramatic Halloween design with a touch of romance.
Conclusion
As Halloween approaches, there’s no better way to showcase your festive spirit than with a set of stunning Halloween-themed nails.
From the eerie glow of Ghoulish Glow nails to the intricate details of Skeleton Hands, these 35 designs offer something for everyone, whether you’re looking for something creepy, cute, or downright spooky.
Each design allows you to express your personal style while embracing the fun and fright of Halloween.
So why not try out one (or a few) of these designs and make your nails the talk of the season? With a little creativity and the right tools, you can achieve salon-worthy Halloween nails that will leave everyone in awe.
Happy Halloween, and may your nails be as spooky and spectacular as the night itself!