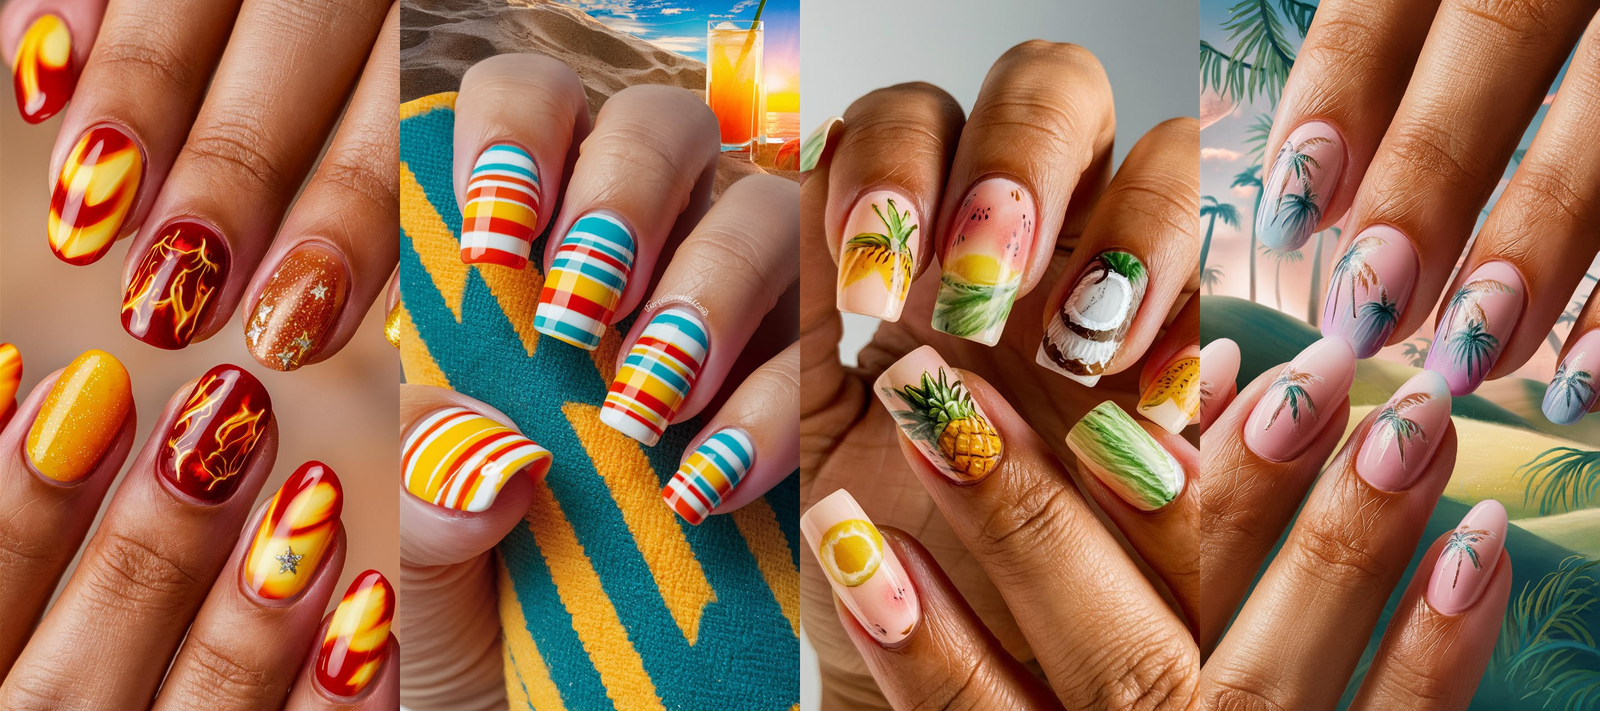
Summer is synonymous with sun-kissed skin, sandy beaches, and endless days by the water.
As the temperatures rise, it’s the perfect time to let your nails reflect the vibrant energy of the season.
Whether you’re planning a tropical getaway, a weekend beach escape, or simply want to bring a touch of the ocean into your everyday life, your nails can be the ultimate accessory.
From playful and colorful designs to subtle, sophisticated looks, there’s a beach-inspired nail design for everyone.
In this blog, we’ll explore 35 stunning nail designs that capture the essence of summer, offering you endless inspiration for your next manicure.
Get ready to dive into a world of vibrant colors, intricate patterns, and beachy vibes that will have you dreaming of the shore with every glance at your hands.
Quick Navigation
1. Ocean Waves Ombre Nails
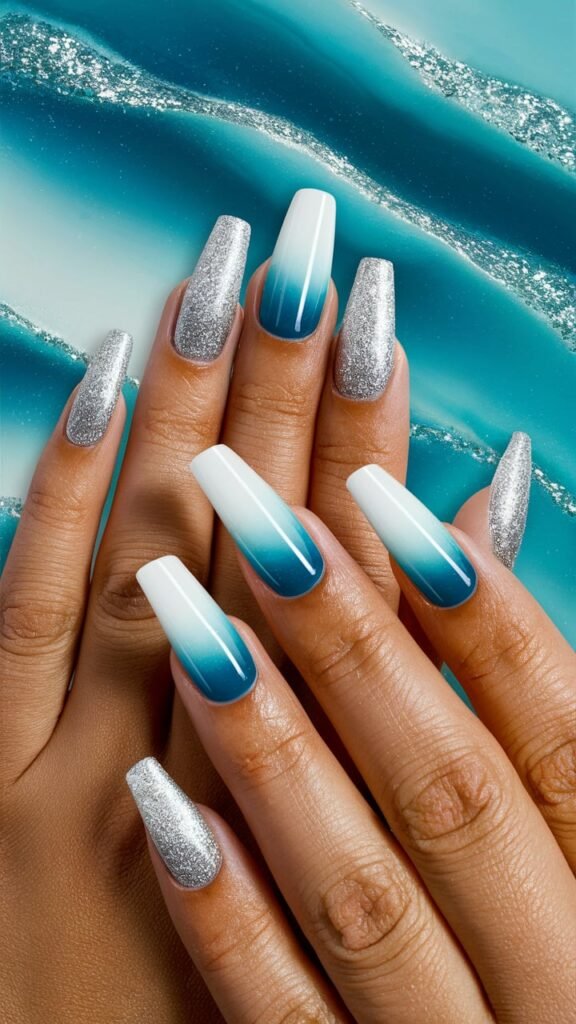
Transform your nails into a stunning ocean-inspired masterpiece with this elegant design.
Follow these three simple steps to recreate the beauty of ocean waves, from a seamless gradient base to realistic wave patterns and a shimmering finish.
Creating the Gradient Base: Capturing Ocean Depths
Start by mimicking the depth and allure of the sea with a gradient technique. This involves blending shades of blue to create a seamless transition from a soft sky blue near the cuticle to a deep ocean blue at the tips.
- Preparation: Begin with a light blue base coat to ensure vibrant colors.
- Blending: Use a sponge or gradient brush to layer darker shades over the lighter ones, gently blending them together for a smooth ombre effect.
- Pro Tip: Practice gentle dabbing motions with your sponge for better control and a polished result.
This gradient foundation serves as the perfect canvas for your wave patterns.
Adding Realistic Wave Patterns
Bring your ocean design to life with delicate wave patterns that mimic rolling waves.
- Painting Waves: Use a fine brush and white nail polish to paint gentle curves and swirls on the tips of your nails, resembling cresting waves.
- Adding Depth: Incorporate varying shades of blue and white into the waves to add dimension and create a dynamic, flowing look.
- Foam Details: Add tiny dots or streaks of white at the edges of the waves to mimic seafoam, enhancing the realism of your design.
These details ensure that your waves feel lively and true to nature.
Enhancing the Design with Silver Glitter
For a finishing touch, add a subtle sparkle to represent sunlight reflecting off the water.
- Glitter Placement: Focus the glitter on the tips of the waves and the highest points of your nails to highlight the design.
- Application Tip: Use a fine glitter polish or a small brush to apply a light dusting—less is more to keep the design elegant and balanced.
- Seal It In: Finish with a glossy top coat to seal the design and create a water-like shine.
The glitter adds a touch of magic, making your Ocean Waves Ombre Nails truly mesmerizing.
2. Sunset Silhouettes Nail Art
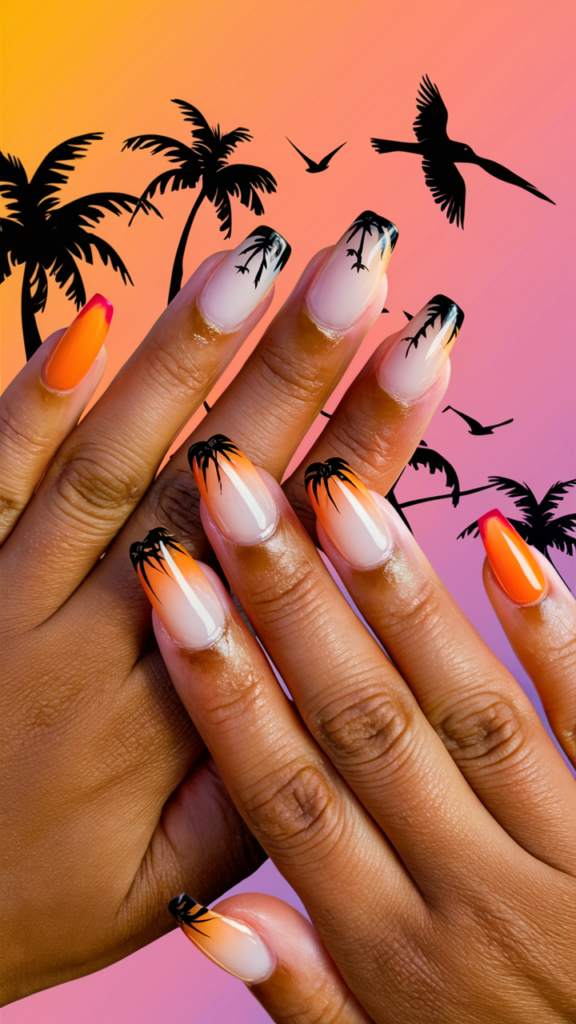
Transform your nails into a canvas that reflects the serene beauty of a tropical sunset.
With warm ombre gradients and striking silhouettes, this design evokes calm and tranquility, perfect for any occasion. Follow these steps to create your own stunning Sunset Silhouette Nails.
Creating the Ombre Gradient: A Tropical Evening Sky
Lay the foundation of your sunset-inspired design with a flawless ombre gradient that mirrors the vibrant colors of a tropical sky.
- Color Palette: Use vibrant orange for the tips and soft pink for the base to represent the fading light of the sun.
- Blending Technique: Start by applying the lightest shade (pink) at the base of the nail. Gradually blend darker hues (orange) towards the tips using a makeup sponge or gradient brush.
- Pro Tip: Dab gently with the sponge to ensure seamless blending and a smooth transition of colors.
The result should be a glowing gradient that captures the warmth and beauty of a tropical sunset.
Adding Silhouettes: Palm Trees and Birds
Bring your sunset scene to life with detailed black silhouettes that evoke a tropical vibe.
- Palm Tree Silhouettes: Using black nail polish and a fine detailing brush, paint tall, slender palm trees with delicate fronds swaying gently in the breeze.
- Bird Silhouettes: Add small, simple shapes of birds flying across the sky for a sense of movement.
- Placement: Focus the silhouettes on one or two accent nails to make them the centerpiece of your design.
The contrast between the dark silhouettes and the vibrant sunset gradient creates a striking visual effect. Ensure the lines are sharp and defined to enhance the overall impact.
Tips for a Serene Tropical Look
Balance is key to achieving a serene, tropical aesthetic. Here’s how to elevate your Sunset Silhouette Nails:
- Subtle Shimmer: Add a delicate shimmer to the gradient to mimic the last rays of sunlight reflecting on water.
- Magical Touch: Apply a small amount of glitter to the silhouettes for a twilight sparkle.
- Top Coat: Finish with a high-gloss top coat to seal the design, enhance the colors, and give your nails a polished, professional look.
Let the gradient and silhouettes work together to create harmony, ensuring neither overpowers the other.
With its warm hues and serene details, the Sunset Silhouette Nail design is perfect for transporting you to a peaceful evening by the beach.
Whether you’re heading to a tropical getaway or simply want to bring a touch of paradise to your style, this manicure is sure to make a statement!
3. Tropical Paradise Nail Art
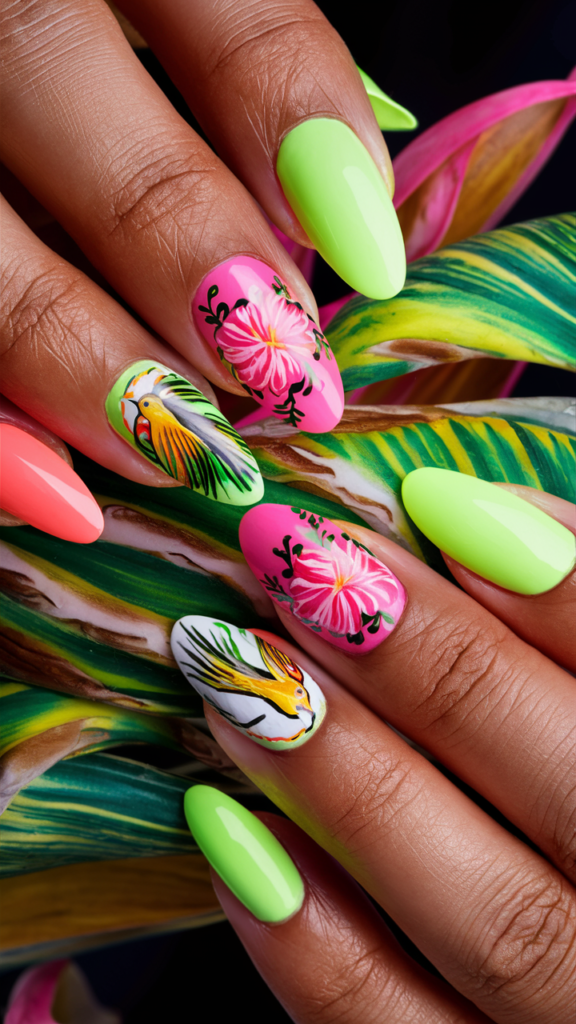
Transport yourself to a tropical getaway with this stunning nail art featuring bold colors and intricate details.
The design combines vivid greens, pinks, and corals with detailed illustrations of tropical flowers and a vibrant parrot, capturing the essence of an island paradise.
Key Design Elements
- Vivid Base Colors:
- Bright lime green and neon pink create the perfect tropical backdrop.
- These lively shades evoke the lush greenery and vibrant blooms of a tropical setting.
- Intricate Floral Details:
- The hibiscus flower is beautifully hand-painted on the accent nails, symbolizing the tropical vibe.
- Black detailing around the petals enhances the contrast, making the flower pop against the bold base colors.
- Exotic Parrot Illustration:
- A beautifully detailed parrot illustration takes center stage on one nail, with rich shades of yellow, orange, and green.
- The bird’s flowing feathers and bright colors complement the tropical theme, adding movement and vibrancy to the overall look.
How to Achieve This Look
- Prepare the Base: Start with a neon green and pink polish for a bold base. Apply two coats for a smooth and opaque finish.
- Paint the Details:
- Use a fine detailing brush to create the hibiscus flower with pink petals and yellow centers.
- For the parrot, outline the shape with black polish, then fill in with vibrant colors, adding feather-like strokes for texture.
- Add Accents: Use thin black strokes around the floral design for depth and definition.
- Seal the Design: Finish with a high-gloss top coat to lock in the artwork and add a polished shine.
Why This Design Stands Out
The combination of vibrant colors, exotic motifs, and intricate artistry makes this design a true showstopper.
Whether you’re heading to a tropical vacation or simply want to channel island vibes, this nail art is sure to turn heads and spark conversations.
4. Seashell Art Nail Art
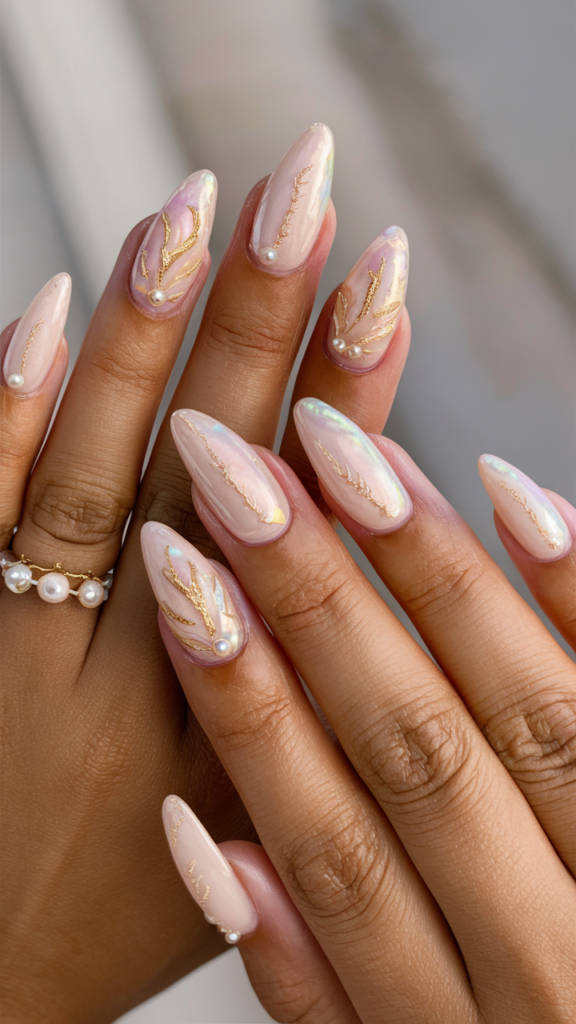
This nail art captures the essence of timeless elegance with its soft pearlescent base, delicate golden accents, and a touch of opulent charm.
Perfect for weddings, formal events, or whenever you want your nails to exude sophistication, this design strikes a harmonious balance between minimalism and luxury.
Design Breakdown
- Soft Pearlescent Base:
- The base color is a subtle, luminous pearl finish that shifts between hues of cream, pink, and lavender when catching the light.
- This dreamy effect provides a neutral yet captivating backdrop for the intricate details.
- Golden Branch Accents:
- Gold foil and fine detailing create delicate branch-like designs that extend gracefully along the nails.
- The metallic tones contrast beautifully against the soft base, adding a regal touch.
- Pearl Embellishments:
- Small, perfectly placed pearl accents enhance the design’s luxurious aesthetic.
- These pearls sit at the base of the golden branches, acting as subtle focal points that add texture and dimension.
- Shimmering Highlights:
- Tiny iridescent touches enhance the reflective quality of the design, mimicking the light-catching allure of natural pearls and precious metals.
How to Recreate This Look
- Apply the Base: Start with a pearlescent polish, layering two coats for an even, smooth finish. Allow each coat to dry fully.
- Create the Gold Branches: Use gold foil or a fine detailing brush with metallic polish to craft delicate branch-like shapes on each nail.
- Place the Pearls: Use nail glue to carefully attach small pearls at strategic points along the branches for a cohesive, elegant design.
- Seal the Design: Finish with a high-gloss top coat to lock in the details and enhance the reflective quality of the pearlescent base.
Why This Design Stands Out
The combination of soft, iridescent tones with bold gold accents and pearl embellishments makes this nail design a true statement of elegance.
It’s ideal for occasions that call for sophistication and works beautifully with a variety of outfits, from bridal gowns to evening wear.
Let your nails shine like a timeless treasure with this Pearlescent Elegance design!
5. Mermaid Scales Nail Art
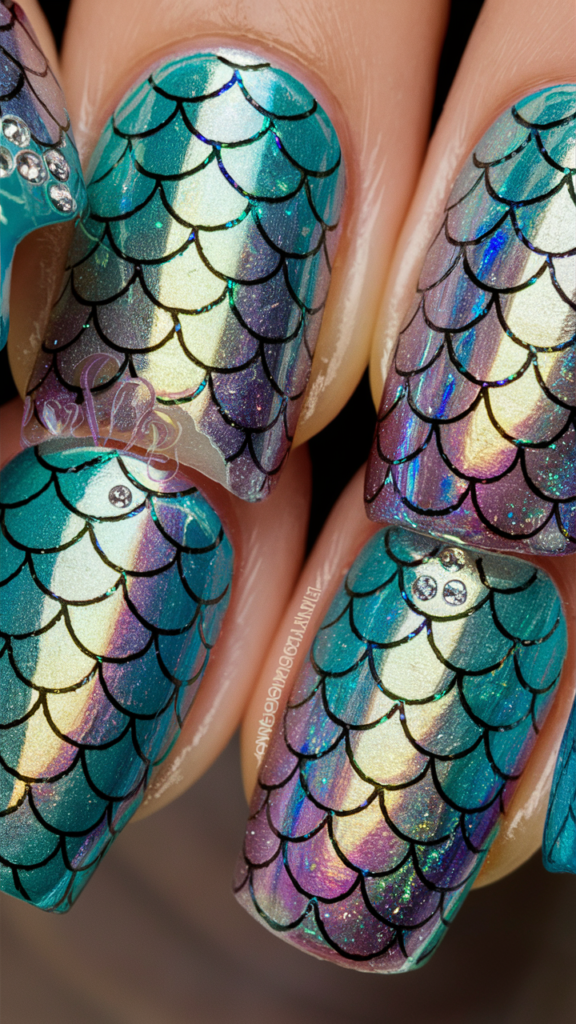
Dive into the enchanting world of mermaids with this iridescent nail art design inspired by shimmering underwater scales.
Perfect for a magical or oceanic theme, this look blends holographic hues and intricate details to create a mesmerizing effect.
Design Highlights
- Holographic Scale Pattern:
- The base features a stunning holographic gradient, shifting between teal, purple, gold, and blue tones that mimic the reflective beauty of mermaid scales.
- Delicate black scale patterns overlay the base, adding structure and a captivating contrast to the shimmering background.
- Sparkling Rhinestone Accents:
- Tiny rhinestones placed strategically add a touch of luxury and mimic water droplets or precious ocean treasures.
- The rhinestones catch the light, further enhancing the magical allure of the design.
- Glossy Finish:
- The high-shine top coat not only protects the intricate design but also enhances the holographic and glittery elements, giving the nails a wet, underwater appearance.
How to Create This Look
- Apply the Base: Start with a holographic polish in a gradient of teal, purple, and gold for a multidimensional effect. Allow each layer to dry completely.
- Add the Scale Design: Use a black nail art stamping plate or a fine detailing brush to create the scale patterns across the nails. Ensure the lines are clean and evenly spaced.
- Place the Rhinestones: Use nail glue or a top coat to secure small rhinestones at the corners of the scales or as focal points on selected nails.
- Seal with a Top Coat: Apply a clear, glossy top coat to lock in the design, enhance the shine, and protect the rhinestone details.
Why This Design Stands Out
This Mermaid Scales Nail Art captures the shimmering beauty of the ocean with its holographic hues and intricate detailing.
The contrast between the black scale patterns and the vibrant base creates a bold yet ethereal look.
Perfect for themed parties, festivals, or simply expressing your inner mermaid, this design is guaranteed to make waves!
Let your nails transport you to an underwater fantasy with this dazzling and elegant design.
6. Nautical Stripes: Classic Sailor-Inspired Nails
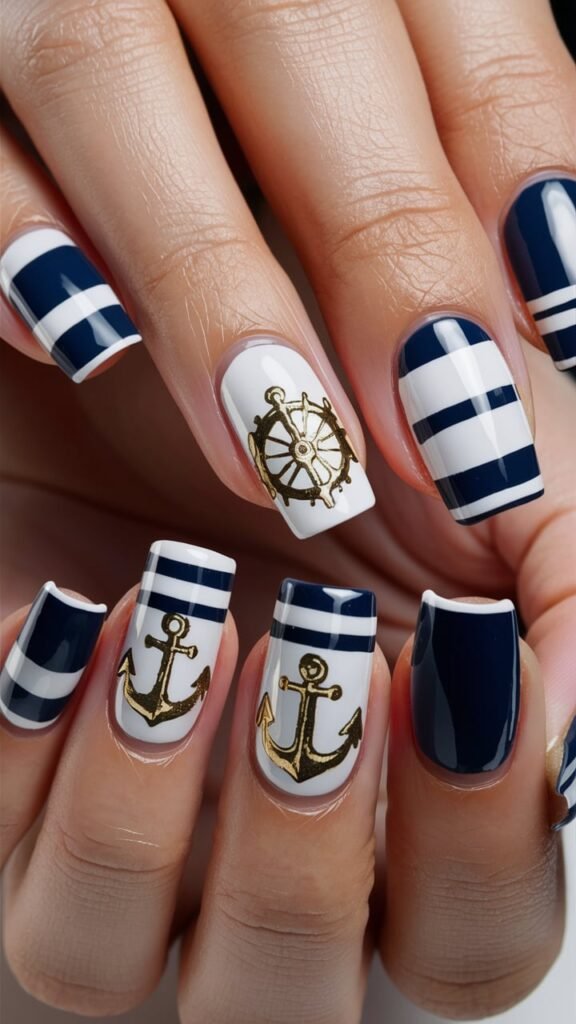
Set sail with this bold and elegant nautical nail art design.
Featuring classic navy and white stripes paired with gold accents, this manicure brings timeless maritime vibes to your fingertips.
Perfect for summer getaways, beach parties, or simply expressing your love for the sea, this design is as chic as it is versatile.
Design Features
- Navy and White Stripes:
- Alternating horizontal navy and white stripes dominate the design, capturing the classic nautical aesthetic.
- Clean and sharp lines add a polished, crisp appearance.
- Golden Anchors:
- Gold metallic anchors on accent nails create a striking contrast against the navy and white background.
- These anchors symbolize strength and the adventurous spirit of sailing.
- Ship Wheel Accent:
- A gold ship wheel adds an extra layer of detail and charm, tying the entire theme together.
- The wheel is centered on a crisp white background, enhancing its intricate design.
- Glossy Finish:
- A high-gloss top coat seals the design, ensuring a professional look while adding shine and durability.
How to Recreate This Look
- Prepare the Base: Start with a white base polish on all nails. Let it dry completely.
- Create the Stripes: Use nail striping tape or a fine brush to paint horizontal navy stripes on selected nails. Ensure the lines are even and sharp.
- Add Gold Accents:
- Use metallic gold polish or nail stickers to create the anchor and ship wheel designs on accent nails.
- For added precision, use a stamping plate or fine detailing brush.
- Finish with a Top Coat: Apply a clear, glossy top coat to protect the design and give your nails a polished shine.
Why This Design Stands Out
The combination of bold navy and white stripes with luxurious gold accents makes this nautical nail art a true statement piece.
Whether you’re heading to a seaside adventure or simply want a stylish, summer-inspired look, this manicure embodies sophistication and maritime charm.
Sail into style and let your nails make waves with this timeless nautical design!
7. Beach Sand Texture Nail Art
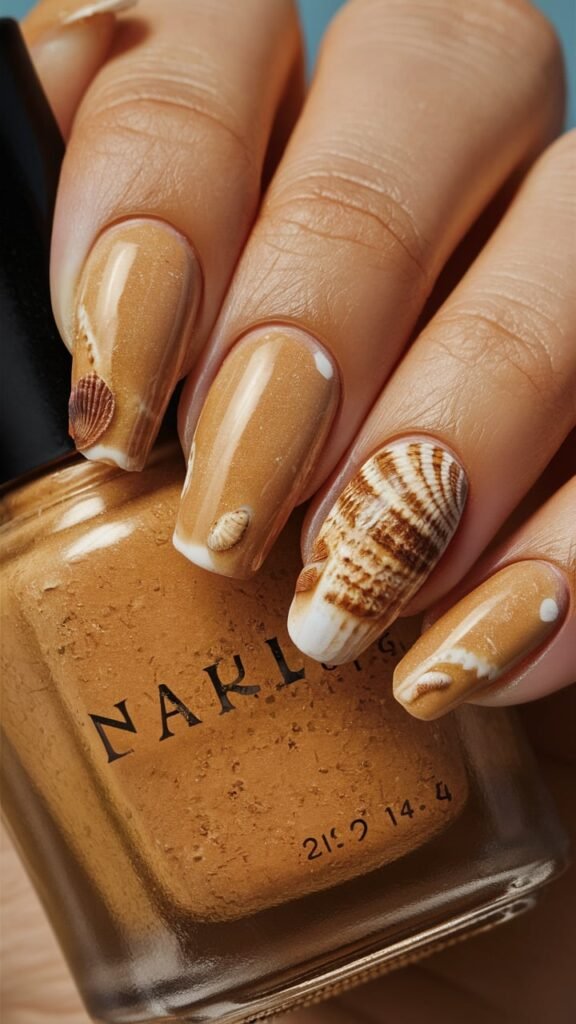
Seashell-Inspired Nail Art: Bring the Beach to Your Fingertips
Celebrate the beauty of the seaside with this stunning seashell-inspired nail design. Featuring sandy beige tones and intricate shell details, this manicure captures the essence of a relaxing day by the shore. Perfect for summer vacations or anyone longing for a beachy vibe, this look combines natural textures with elegance.
Design Features
- Sandy Beige Base:
- The nails are coated in a warm, sandy beige polish, creating the perfect backdrop for the beach-inspired design.
- The neutral tone reflects the natural beauty of sand dunes and complements the shell embellishments.
- Realistic Seashell Accents:
- Tiny 3D shell embellishments are carefully placed on the nails, adding texture and a realistic touch.
- The intricate designs of the shells, including ridges and patterns, bring a lifelike quality to the manicure.
- French Tip Twist:
- A soft, gradient white French tip is incorporated into some nails, mimicking the frothy waves gently washing over the shore.
- This subtle addition adds depth and enhances the beach theme.
- Glossy Finish:
- A high-gloss top coat seals the design, giving the nails a polished, wet-sand effect while ensuring durability.
How to Achieve This Look
- Prepare the Base: Apply a sandy beige polish to all nails, layering two coats for an opaque and even finish.
- Add the French Tip: Use a soft white polish to create a gradient French tip on some nails, blending it gently with the beige base for a seamless transition.
- Attach the Seashells: Carefully place 3D seashell embellishments using nail glue on accent nails. Position them to create a natural, beachy composition.
- Finish with a Top Coat: Seal the entire design with a glossy top coat to protect the shells and enhance the shine.
Why This Design Stands Out
This Seashell-Inspired Nail Art brings the serenity of the beach to your nails.
The combination of natural hues, intricate 3D details, and a polished finish creates a design that’s both stylish and tranquil.
Ideal for sunny beach days or as a reminder of your favorite seaside memories, this manicure is sure to make waves!
Let your nails become a canvas for the ocean’s treasures with this unique and sophisticated beach-themed design.
8. Starfish Charming Nail Art
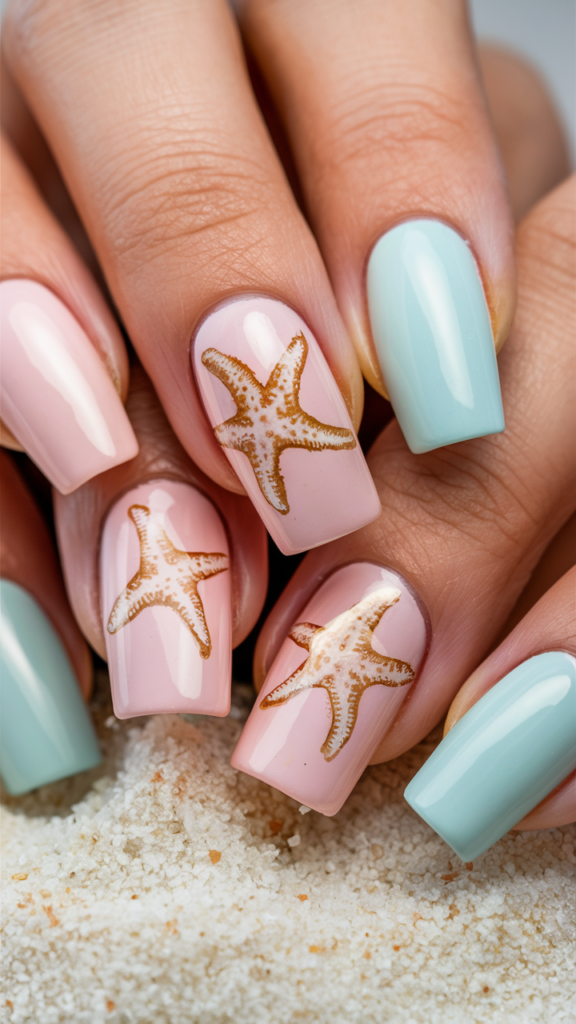
Bring the serene beauty of the ocean to your nails with this pastel starfish-inspired design.
Featuring soft pink and baby blue tones with detailed starfish accents, this look is perfect for anyone who loves coastal vibes.
Whether you’re planning a beach getaway or simply want a touch of summer on your fingertips, this manicure exudes charm and elegance.
Design Highlights
- Pastel Base Colors:
- The nails alternate between soft pink and baby blue shades, creating a calming and breezy coastal palette.
- These muted tones perfectly complement the intricate starfish details.
- Realistic Starfish Accents:
- The accent nails feature beautifully detailed golden starfish, hand-painted or applied as decals.
- The fine textures and natural tones of the starfish add a touch of realism to the design.
- Glossy Finish:
- A glossy top coat enhances the pastel colors and makes the starfish details stand out, giving the nails a polished and professional look.
How to Recreate This Look
- Apply the Base Colors:
- Alternate between pastel pink and baby blue polishes on each nail. Apply two coats for an even, opaque finish.
- Add the Starfish Details:
- For accent nails, either hand-paint starfish using gold polish and a fine detailing brush or apply pre-made starfish decals.
- Ensure the details are centered and allow the polish to dry completely before proceeding.
- Seal with a Top Coat:
- Use a high-gloss top coat to protect the design and enhance its shine. This step also ensures the starfish details stay in place.
Why This Design Stands Out
This Starfish-Inspired Nail Art captures the soothing and whimsical essence of the beach. The pastel tones create a soft, dreamy vibe, while the golden starfish add an elegant, nautical touch. Perfect for summer occasions or as a reminder of your favorite seaside memories, this design is both stylish and timeless.
Let your nails reflect the beauty of the ocean with this charming coastal-inspired manicure!
9. Coral Reef Nail Art
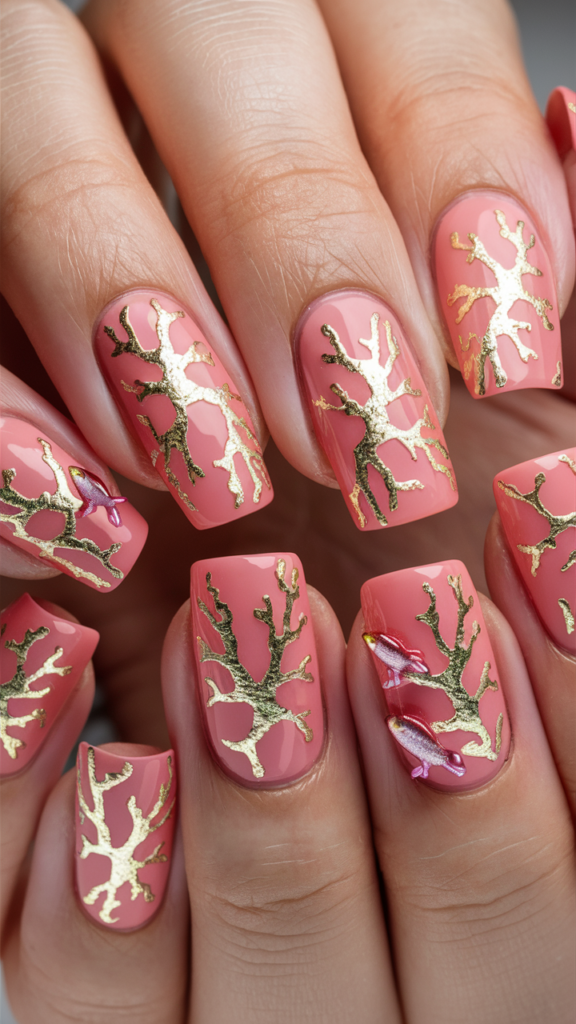
Transform your nails into a vibrant coral reef with this stunning and luxurious design.
Featuring a rich coral base color, intricate gold coral accents, and 3D elements, this manicure evokes the beauty and elegance of marine life.
Perfect for summer parties or any occasion where you want to make a statement, this look is a true work of art.
Design Features
- Vibrant Coral Base:
- A warm coral shade is used as the foundation for this design, echoing the lively hues of underwater coral reefs.
- The glossy finish ensures the color looks rich and vibrant.
- Golden Coral Patterns:
- Delicate gold foil or hand-painted coral patterns span across each nail, creating a luxurious and intricate look.
- The shimmering metallic accents mimic the sunlight reflecting off underwater coral structures.
- 3D Marine Details:
- Some nails include 3D embellishments, like tiny, pearlized sea creatures or shells, adding texture and dimension.
- These subtle additions make the design feel lifelike and immersive.
- Glossy Finish:
- A high-shine top coat enhances the gold accents and seals the design for a polished, professional appearance.
How to Recreate This Look
- Apply the Coral Base:
- Start by applying two coats of a warm coral nail polish for a smooth, even finish. Allow each layer to dry completely.
- Add the Gold Coral Patterns:
- Use gold nail foil or a fine detailing brush with metallic polish to create coral-like branching patterns on each nail.
- Ensure the designs are delicate and extend across the nails for a cohesive look.
- Attach 3D Details:
- Use nail glue to attach small embellishments, like tiny sea creatures or shells, on a few accent nails.
- Seal with a Glossy Top Coat:
- Apply a clear top coat to protect the design and enhance the shine of both the base color and the metallic accents.
Why This Design Stands Out
This Coral Reef Nail Art perfectly balances elegance and creativity, bringing the beauty of the underwater world to your fingertips.
The combination of a vibrant base, shimmering gold accents, and intricate details creates a luxurious and eye-catching manicure. Whether you’re channeling summer vibes or showcasing your love for marine beauty, this design is sure to make a lasting impression.
Dive into sophistication and let your nails shine like a coral reef with this stunning aquatic-inspired design!
10. Underwater Wonderland Nail Art
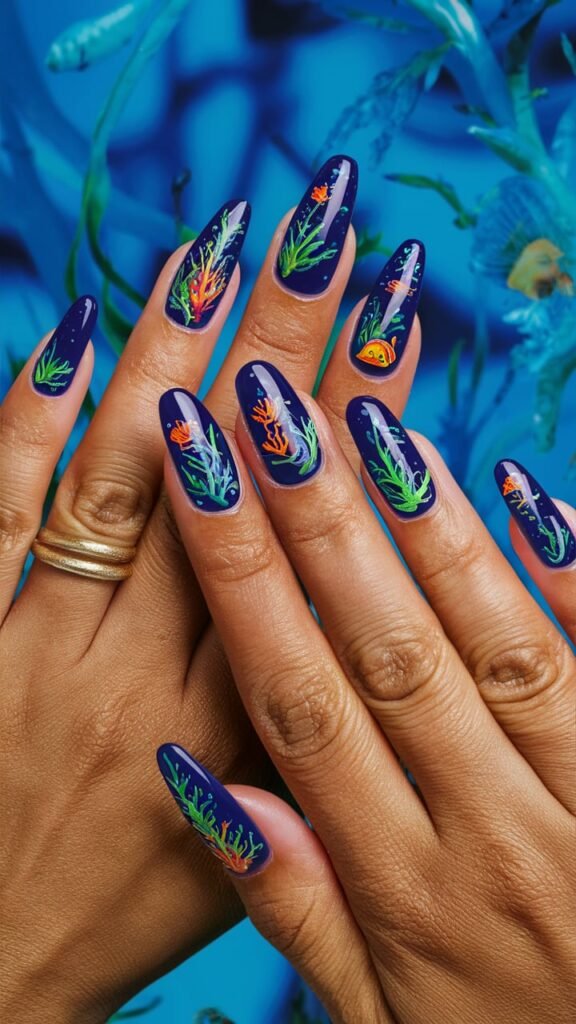
Take your nails on an underwater adventure with this breathtaking marine-inspired nail design.
Featuring a deep blue base, intricate coral reefs, and colorful marine life, this manicure encapsulates the beauty of the ocean floor.
Perfect for ocean lovers or anyone wanting a bold and vibrant design, this look is a showstopper.
Design Features
- Deep Blue Base:
- A rich, dark blue polish serves as the backdrop, mimicking the depths of the ocean.
- The glossy finish creates a reflective, water-like effect, enhancing the marine theme.
- Coral and Seaweed Details:
- Delicate coral branches and seaweed are painted in vibrant shades of green, orange, and red.
- These intricate elements create a lifelike underwater ecosystem on each nail.
- Marine Life Accents:
- Tiny, colorful fish and other sea creatures add charm and liveliness to the design.
- The combination of bright hues contrasts beautifully with the dark blue base, making the elements pop.
- Glossy Finish:
- A high-shine top coat seals the design, ensuring durability while enhancing the vibrant colors and intricate details.
How to Recreate This Look
- Apply the Deep Blue Base:
- Start with two coats of a dark blue polish for a rich and even finish. Let each coat dry completely.
- Paint the Coral and Seaweed:
- Use a fine detailing brush to paint coral and seaweed in shades of green, red, and orange on each nail.
- Allow the designs to dry before moving on to the next step.
- Add Marine Life:
- Add tiny fish and other sea creatures using a detailing brush or nail decals. Position them creatively across your nails.
- Seal the Design:
- Finish with a clear, glossy top coat to lock in the details and give your nails a water-like shine.
Why This Design Stands Out
This Underwater Wonderland Nail Art captures the magic and beauty of marine life with its vivid colors and intricate details.
The combination of a deep blue backdrop and vibrant accents creates a bold and eye-catching design that’s perfect for making a statement.
Whether you’re dreaming of the ocean or showcasing your love for marine life, this manicure is guaranteed to turn heads.
Dive into elegance and let your nails reflect the wonders of the sea with this stunning underwater-inspired design!
11. Minimalist Beach: Simple Yet Striking Nail Art
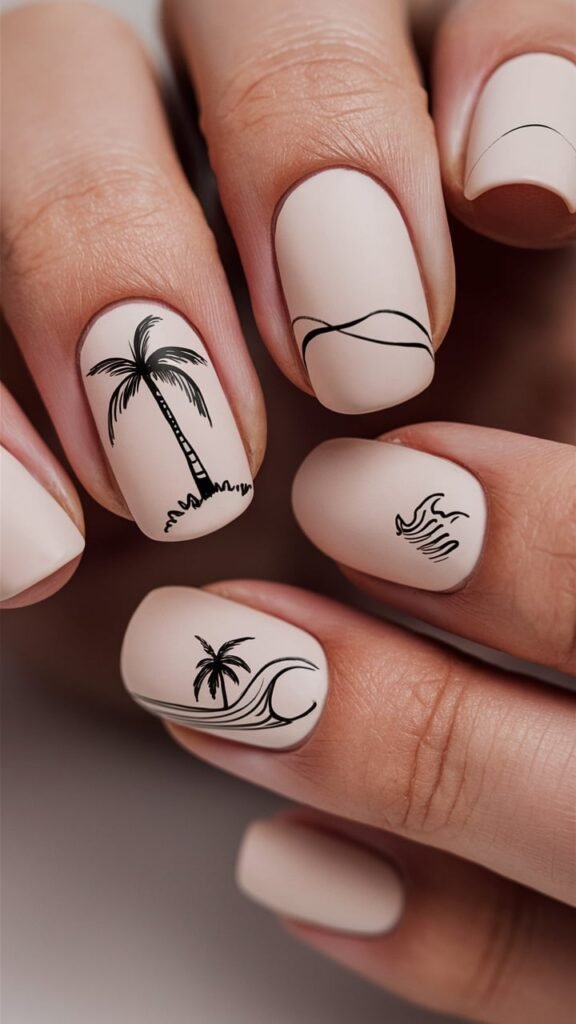
This minimalist beach-inspired nail art design is perfect for those who love simplicity with a touch of elegance.
Featuring a soft nude matte base and delicate black line art, this look captures the essence of serene coastal vibes.
Ideal for a chic, understated summer look, this manicure is both modern and timeless.
Design Features
- Matte Nude Base:
- A soft, matte nude polish creates the perfect minimalist canvas for this design.
- The neutral tone enhances the delicate line art while maintaining a subtle and sophisticated aesthetic.
- Black Line Art Accents:
- Minimalist black line art showcases coastal elements, including palm trees, ocean waves, and abstract horizon lines.
- The clean, precise lines add a contemporary and artistic feel to the design.
- Focus on Simplicity:
- Each nail features a unique yet cohesive design, with one or two focal elements like a wave or palm tree.
- The simplicity of the art ensures the design remains elegant and uncluttered.
How to Recreate This Look
- Apply the Matte Nude Base:
- Start with two coats of matte nude nail polish for an even, smooth finish. Let each coat dry completely.
- Create the Line Art:
- Use a fine detailing brush or nail art pen with black polish to draw simple beach-inspired elements such as palm trees, waves, and horizon lines.
- Keep the lines thin and precise for a clean, minimalist effect.
- Seal with a Matte Top Coat:
- Apply a matte top coat to protect the design while maintaining the soft, modern finish.
Why This Design Stands Out
This Minimalist Beach Nail Art captures the beauty of coastal life with its clean lines and understated elegance.
The nude matte base paired with black line art creates a versatile look that can be worn with any outfit, from beachwear to evening attire.
Perfect for those who appreciate modern minimalism, this design is both stylish and easy to achieve.
Let your nails reflect a serene beachside escape with this effortlessly chic manicure!
12. Radiant Sunburst Nail Art
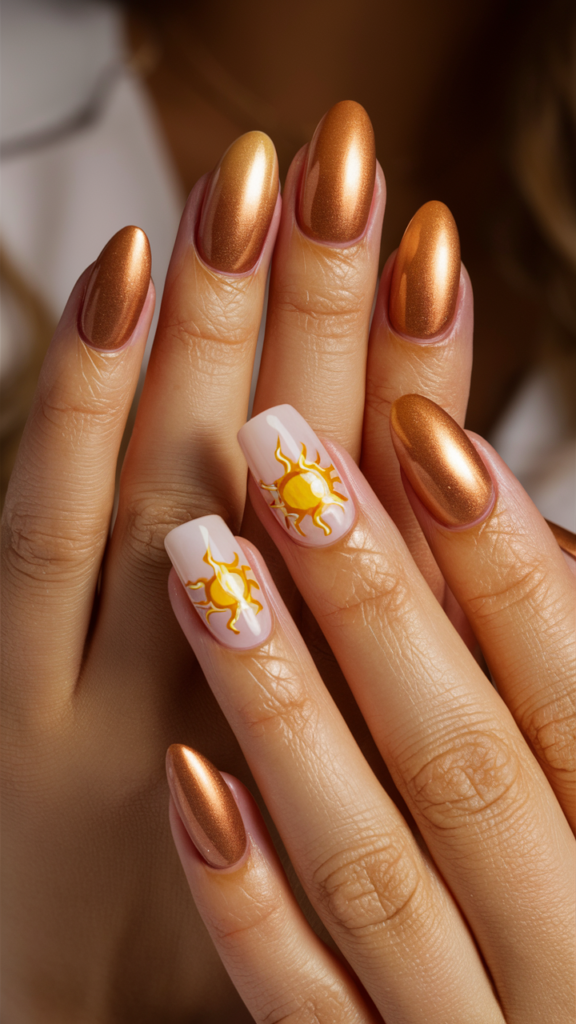
Channel the warmth and brilliance of the sun with this radiant nail art design.
Featuring shimmering golden tones and intricate sun illustrations, this manicure exudes elegance and positivity.
Perfect for summer or adding a touch of brightness to your look, this design is both bold and refined.
Design Features
- Metallic Gold Base:
- Most nails are coated in a stunning metallic gold polish, creating a luminous, radiant finish.
- The reflective surface mimics the golden rays of the sun, adding a touch of luxury to the look.
- Sunburst Accent Nails:
- Two accent nails feature a soft, nude-pink base with a vibrant golden-yellow sunburst design at the center.
- The intricate details of the sun, including wavy and pointed rays, add a playful yet elegant touch.
- Glossy Finish:
- A high-shine top coat enhances the metallic effect and ensures the accent details pop, giving the nails a polished, professional look.
How to Recreate This Look
- Apply the Metallic Gold Base:
- Paint most nails with a metallic gold polish, applying two coats for a rich, opaque finish. Allow each layer to dry completely.
- Create the Accent Nails:
- For the accent nails, use a soft nude or milky pink polish as the base. Once dry, use a detailing brush and yellow and gold polishes to paint the sunburst design. Start with a round center and add wavy and pointed rays extending outward.
- Seal with a Glossy Top Coat:
- Finish with a clear top coat to lock in the design and enhance the shine of both the metallic and detailed elements.
Why This Design Stands Out
This Radiant Sunburst Nail Art captures the essence of sunny days with its glowing metallic base and cheerful sun illustrations.
The combination of bold gold tones and soft, detailed accents creates a versatile manicure that works for both casual outings and elegant events.
Let your nails shine like the sun and brighten up your style with this dazzling golden design!
13. Ocean Glitter Nail Art
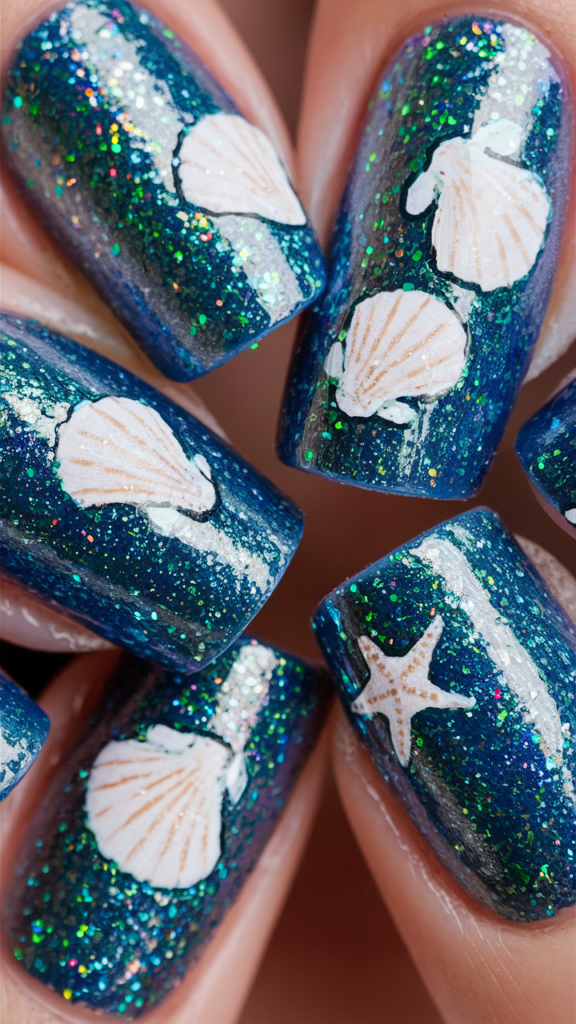
Dive into the magical depths of the ocean with this stunning glitter nail art.
Featuring a deep blue base, sparkling holographic glitters, and charming seashell and starfish designs, this manicure perfectly captures the allure of the underwater world.
Ideal for beach vacations or adding a touch of marine beauty to your style, this design is vibrant and captivating.
Design Features
- Glittering Deep Blue Base:
- A rich, deep blue polish creates the backdrop, resembling the depths of the ocean.
- Multicolored holographic glitter mimics sunlight dancing on the water, adding a dynamic, shimmering effect.
- Seashell and Starfish Accents:
- Delicate white seashells and starfish are hand-painted or applied as decals for a whimsical touch.
- Subtle detailing on the shells and starfish enhances the realism and adds texture to the design.
- Luminous Highlights:
- Fine white and silver highlights around the accents give the design a glowing, ethereal feel, as if lit by moonlight underwater.
- Glossy Finish:
- A high-shine top coat locks in the glitter and art, giving the nails a glass-like, polished finish that ensures durability.
How to Recreate This Look
- Apply the Glitter Base:
- Paint your nails with a deep blue polish and layer a holographic glitter top coat over it for maximum sparkle. Let each coat dry completely.
- Add the Seashell and Starfish Accents:
- Use a fine brush or nail art decals to create white seashell and starfish designs. Position them creatively across the nails for a balanced look.
- Enhance with Highlights:
- Use a fine detailing brush with silver or white polish to add highlights around the accents, enhancing their three-dimensional effect.
- Seal the Design:
- Apply a clear, glossy top coat to protect the nail art and amplify the sparkle and shine.
Why This Design Stands Out
This Ocean Glitter Nail Art brings the enchantment of the sea to your fingertips.
The combination of a sparkling blue base and intricately detailed marine elements creates a visually stunning and unique manicure.
Perfect for summer or anytime you want to capture the magic of the ocean, this design is sure to turn heads.
Let your nails shimmer like underwater treasures with this dazzling and sophisticated ocean-inspired design!
14. Beach Ball Striped Nail Art
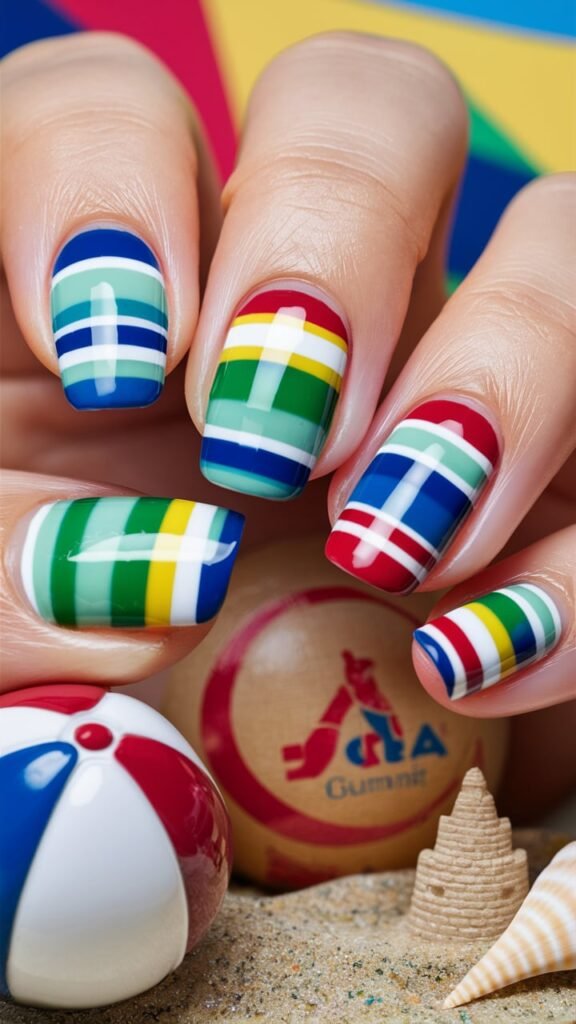
Channel the fun and energy of a day at the beach with this playful striped nail art inspired by colorful beach balls.
Featuring bold primary colors and clean, striking lines, this manicure is perfect for summer outings, vacations, or simply brightening your mood with a vibrant pop of color.
Design Features
- Bright, Primary Color Palette:
- The design uses vibrant shades of red, blue, green, yellow, and white, creating a cheerful and eye-catching color scheme.
- These colors reflect the classic patterns of beach balls and evoke summer fun.
- Crisp Horizontal Stripes:
- Each nail showcases a combination of horizontal stripes in varying colors, maintaining a clean and cohesive design.
- The balance between bold and thin lines ensures a polished, modern look.
- High-Gloss Finish:
- A shiny top coat enhances the vivid colors and clean lines, giving the nails a professional and glossy finish.
How to Recreate This Look
- Apply the Base Colors:
- Paint each nail with a bold base color (red, blue, green, or yellow) to match the beach ball theme. Let it dry completely.
- Create the Stripes:
- Use striping tape or a fine brush to paint crisp white and colorful horizontal lines across each nail. Alternate the stripe thickness for added interest.
- Ensure each stripe is evenly spaced and aligned for a clean look.
- Seal with a Glossy Top Coat:
- Finish with a clear, high-shine top coat to protect the design and amplify the vibrant colors.
Why This Design Stands Out
This Beach Ball Striped Nail Art is the perfect blend of fun and sophistication.
The bold colors and clean lines create a lively, summery vibe, while the precise execution gives the design a polished, high-fashion feel.
Ideal for sunny days, poolside parties, or adding a splash of color to your style, this manicure is guaranteed to make a statement.
Bring summer fun to your fingertips with this playful and vibrant design!
15. Tropical Fruit Nail Art
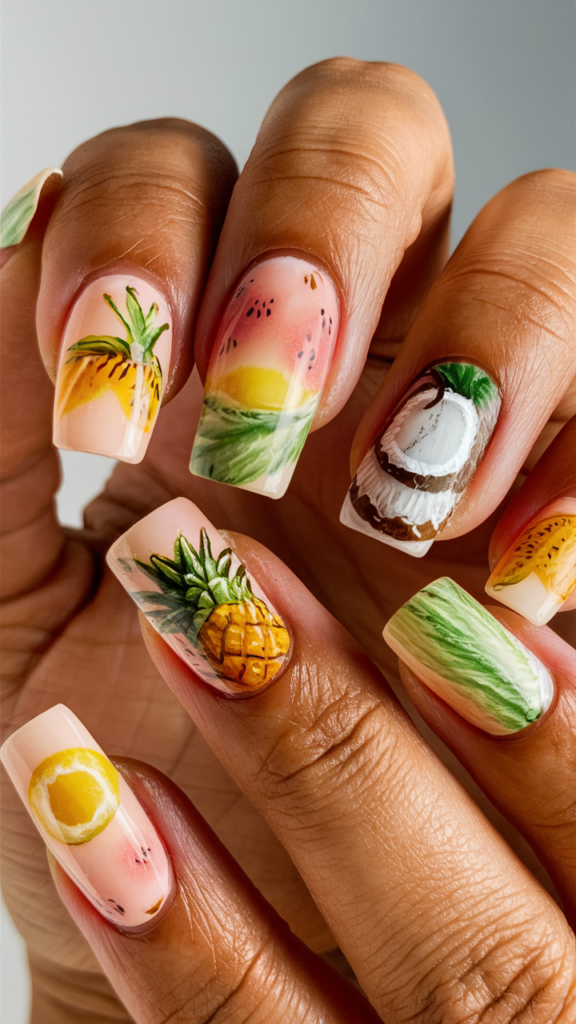
Transport yourself to a tropical paradise with this vibrant and fruity nail art design.
Featuring hand-painted pineapples, coconuts, watermelons, bananas, and citrus slices, this manicure bursts with color and summery vibes.
Perfect for vacations, beach parties, or adding a splash of fun to your look, this design is fresh, playful, and full of charm.
Design Features
- Neutral Base with Hand-Painted Fruits:
- A soft nude or peach-toned base provides the perfect canvas for the intricate hand-painted fruit designs.
- Each nail showcases a different tropical fruit, including watermelons, pineapples, coconuts, bananas, and citrus slices, creating a unique and cohesive theme.
- Realistic Details:
- Fine brush strokes and shading bring the fruits to life with realistic textures and vibrant colors.
- Small accents, like watermelon seeds and pineapple leaves, enhance the intricate details.
- Glossy Finish:
- A clear top coat adds a glossy, juicy finish to the design, mimicking the fresh, natural look of tropical fruits.
How to Recreate This Look
- Apply the Base Color:
- Start with a nude or soft peach polish to create a clean and neutral background for the fruit designs. Allow the polish to dry completely.
- Paint the Fruits:
- Use a fine detailing brush and a variety of polishes in yellow, green, pink, white, and brown to paint each fruit.
- Add shading and highlights to give the fruits dimension and make them look realistic.
- Enhance with Details:
- Use a dotting tool or fine brush to add small details, like seeds, leaf textures, and fruit rinds.
- Seal with a Glossy Top Coat:
- Apply a clear, glossy top coat to protect the design and give the nails a fresh, polished appearance.
Why This Design Stands Out
This Tropical Fruit Nail Art captures the fun and freshness of summer with its bold colors and lifelike details.
The variety of fruits adds a playful twist, while the meticulous artwork ensures the design feels elegant and high-quality.
Whether you’re lounging by the pool or heading to a summer event, this manicure is sure to turn heads and spark conversations.
Celebrate the vibrant essence of summer with this juicy, fruit-filled design!
16. Underwater Wildlife Nail Art
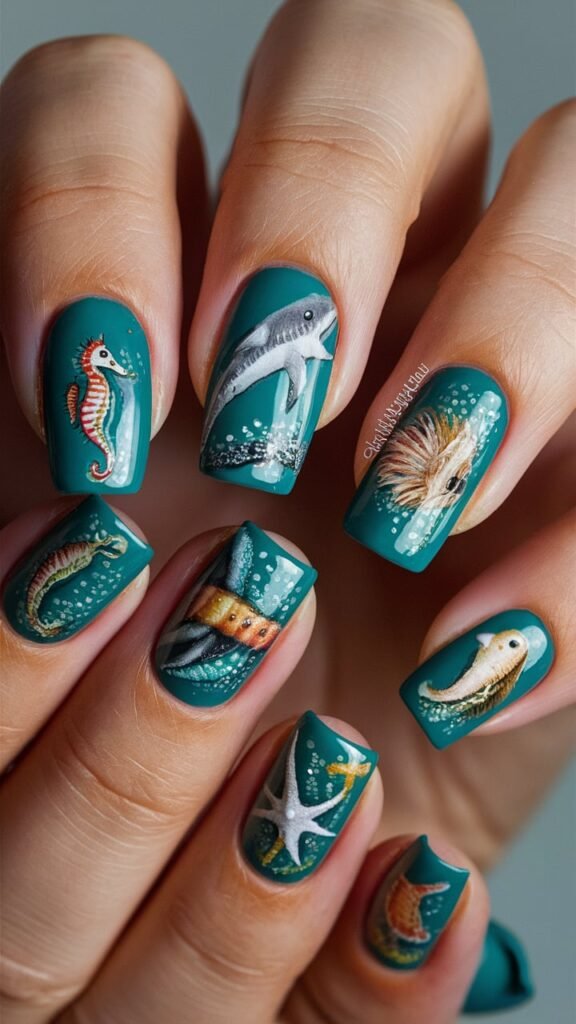
Explore the fascinating underwater world with this exquisite nail art featuring intricately painted marine creatures.
From seahorses and dolphins to starfish and exotic fish, this design captures the charm and diversity of ocean life.
Perfect for ocean enthusiasts or anyone looking for an artistic and bold manicure, this look is both mesmerizing and unique.
Design Features
- Deep Teal Base:
- A rich teal base coat provides the perfect backdrop, resembling the deep ocean waters.
- This vibrant yet calming color enhances the detailed marine illustrations.
- Intricate Marine Life Illustrations:
- Each nail showcases a hand-painted underwater creature, including seahorses, dolphins, starfish, and exotic fish.
- The fine detailing, realistic textures, and vibrant colors bring these sea creatures to life.
- Bubble and Water Effects:
- Tiny white bubbles and subtle gradients add depth and realism, mimicking the motion of water.
- These details make the design feel dynamic and immersive.
- Glossy Finish:
- A glossy top coat seals the design, enhancing the vivid colors and adding a polished, water-like shine.
How to Recreate This Look
- Apply the Teal Base:
- Paint all nails with a deep teal polish, applying two coats for an even, opaque finish. Allow to dry completely.
- Paint the Marine Creatures:
- Use fine detailing brushes and a variety of colors to hand-paint the marine animals. Start with the base shapes, then layer on details like scales, fins, and facial features.
- Add Water Effects:
- Use a dotting tool or fine brush to create white bubbles and subtle water lines around the marine creatures.
- Seal with a Glossy Top Coat:
- Finish with a clear top coat to protect the artwork and give the nails a shiny, polished appearance.
Why This Design Stands Out
This Underwater Wildlife Nail Art is a stunning celebration of marine life, blending artistry and creativity into a single design.
The intricate illustrations and attention to detail make it a standout manicure that’s perfect for special occasions or showcasing your love for the ocean.
Immerse yourself in the beauty of the underwater world with this breathtaking and artistic nail design!
17.Iridescent Bubble Nail Art
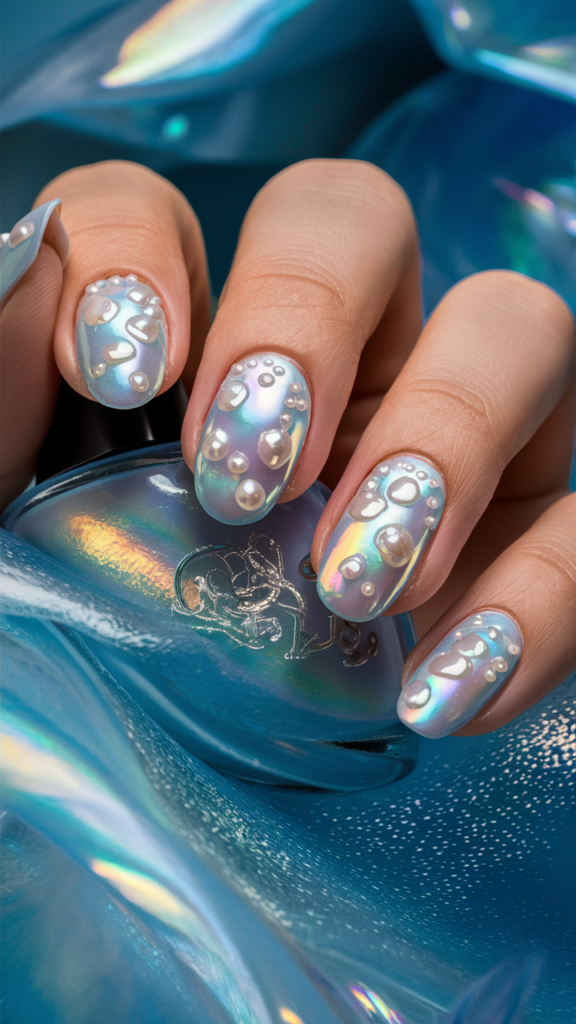
Elevate your manicure with this ethereal Iridescent Bubble Nail Art.
Featuring a holographic base and 3D pearl-like accents, this design captures the magic of underwater bubbles shimmering in the light.
Perfect for a statement look at parties, weddings, or anytime you want your nails to exude elegance, this manicure is both trendy and sophisticated.
Design Features
- Iridescent Holographic Base:
- A radiant, light-reflecting base shifts between soft blue, lavender, and silver hues, creating a dreamy and futuristic effect.
- This luminescent backdrop mimics the surface of water illuminated by sunlight.
- 3D Bubble Accents:
- Raised bubble-like droplets are strategically placed across each nail, adding texture and dimension.
- These accents are complemented by delicate pearl embellishments, enhancing the underwater-inspired theme.
- Glossy Finish:
- A glossy top coat amplifies the holographic base and gives the nails a sleek, glassy appearance, reminiscent of water.
How to Recreate This Look
- Apply the Holographic Base:
- Start with a silver or light blue holographic polish, applying two coats for a smooth, even finish. Let it dry completely.
- Add the Bubble Accents:
- Use clear gel polish to create raised droplets on each nail, allowing them to cure under a UV/LED lamp for a bubble effect.
- Incorporate small pearl embellishments using nail glue for added dimension and elegance.
- Seal with a Glossy Top Coat:
- Apply a clear, high-shine top coat to lock in the design and enhance the holographic and 3D elements.
Why This Design Stands Out
This Iridescent Bubble Nail Art combines modern holographic trends with timeless elegance.
The interplay of light and texture creates a unique and captivating effect, making your nails look like a magical underwater scene.
Ideal for anyone who loves bold, artistic manicures, this design is both mesmerizing and wearable.
Dive into the enchanting glow of iridescence with this stunning bubble-inspired nail design! 🌊✨
18. Vintage Apothecary Nail Art
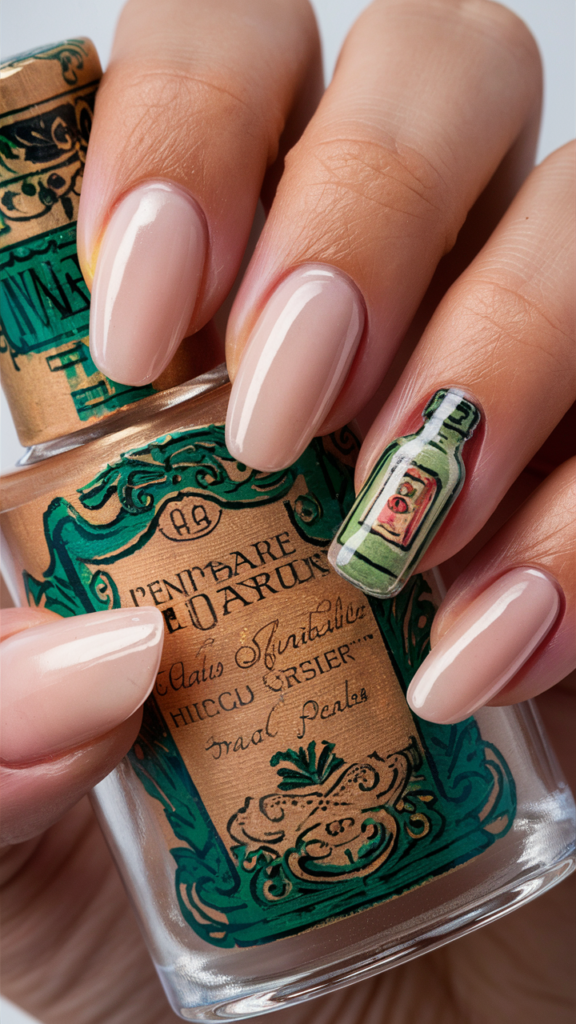
This unique nail art design brings vintage apothecary charm to your fingertips.
Featuring a soft nude base and a delicately painted retro bottle accent, this manicure exudes sophistication and nostalgia.
Perfect for those who love timeless aesthetics with a modern twist, this design pairs understated elegance with artistic detail.
Design Features
- Soft Nude Base:
- The neutral nude base creates a clean, polished foundation that emphasizes simplicity and elegance.
- This soft shade complements the intricate details of the accent nail without overpowering the design.
- Vintage Bottle Accent:
- One nail features a beautifully detailed apothecary-style bottle with retro typography and embellishments.
- The hand-painted design captures a classic, old-world charm reminiscent of antique packaging.
- Glossy Finish:
- A high-shine top coat seals the design, enhancing the soft base and intricate artwork with a refined finish.
How to Recreate This Look
- Apply the Nude Base:
- Start with two coats of a neutral nude polish for a smooth, even finish. Let it dry completely.
- Paint the Bottle Accent:
- Use a fine detailing brush and polish in green, beige, and red tones to recreate the vintage apothecary bottle. Add tiny details like labels and decorative elements for authenticity.
- Alternatively, use a pre-made decal for ease and precision.
- Seal with a Glossy Top Coat:
- Apply a clear top coat to protect the design and add a polished, professional shine.
Why This Design Stands Out
This Vintage Apothecary Nail Art combines minimalism with artistic flair, creating a look that’s both subtle and striking.
The neutral base makes it suitable for everyday wear, while the detailed accent nail adds a unique, eye-catching element.
Perfect for lovers of vintage aesthetics, this design is a testament to the beauty of understated elegance.
Let your nails tell a story of timeless charm with this beautifully nostalgic design!
19. Vibrant Summer Vibes
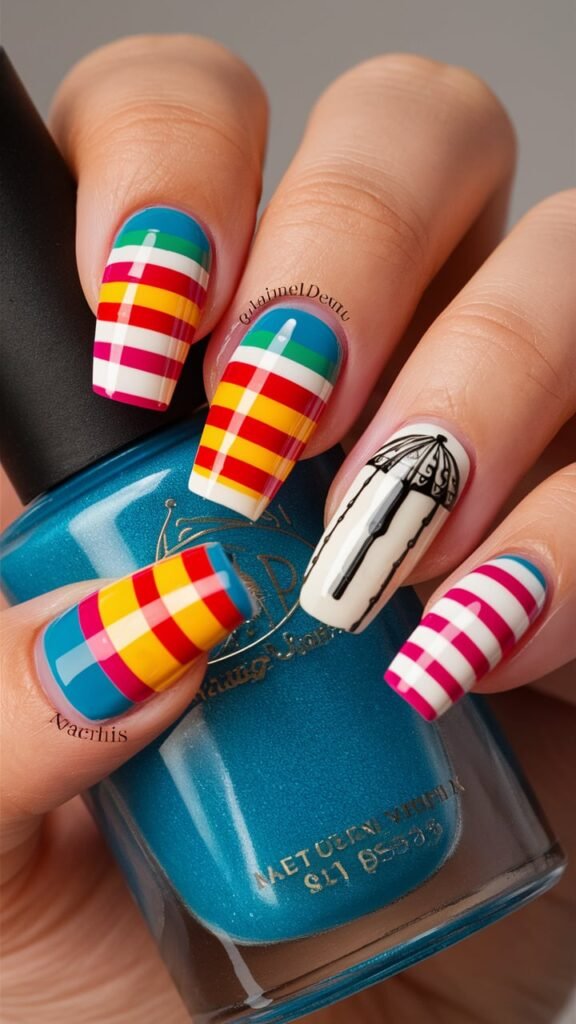
Capture the essence of a sunny day at the beach with this playful Beach Cabana Stripe Nail Art.
Featuring bold, colorful stripes inspired by beach towels and umbrellas, this design is perfect for adding a cheerful summer touch to your look.
The hand-painted umbrella accent adds a unique flair, making this manicure fun and stylish.
Design Features
- Colorful Striped Nails:
- Bold horizontal stripes in vibrant colors like red, yellow, blue, pink, and green dominate the design.
- The bright, beach-inspired palette creates a fun and eye-catching look.
- Umbrella Accent Nail:
- A single accent nail features a hand-painted beach umbrella in black and white, adding contrast and character.
- The umbrella’s intricate detailing enhances the overall playful theme.
- Glossy Finish:
- A shiny top coat seals the design, making the colors pop and giving the nails a polished finish.
How to Recreate This Look
- Apply the Base Colors:
- Start with a bright blue base on all nails except the accent nail, which should be painted white. Allow the polish to dry.
- Paint the Stripes:
- Use striping tape or a fine nail art brush to create even horizontal stripes in vibrant colors on the blue-based nails. Alternate colors to mimic the look of beach towels or cabana stripes.
- Create the Umbrella Accent:
- On the white nail, use a fine detailing brush to paint a black and white striped beach umbrella. Add thin lines for the umbrella’s ribs for a realistic effect.
- Seal with a Glossy Top Coat:
- Apply a clear top coat to protect the design and enhance the shine of the vibrant colors and intricate details.
Why This Design Stands Out
This Beach Cabana Stripe Nail Art combines bold colors with a playful summer theme, making it perfect for vacations, beach parties, or simply embracing sunny vibes.
The striped nails bring energy and brightness, while the umbrella accent adds a charming and whimsical touch.
Bring the fun of the beach to your fingertips with this vibrant and cheerful design!
20. Flamingo Paradise Nail Art
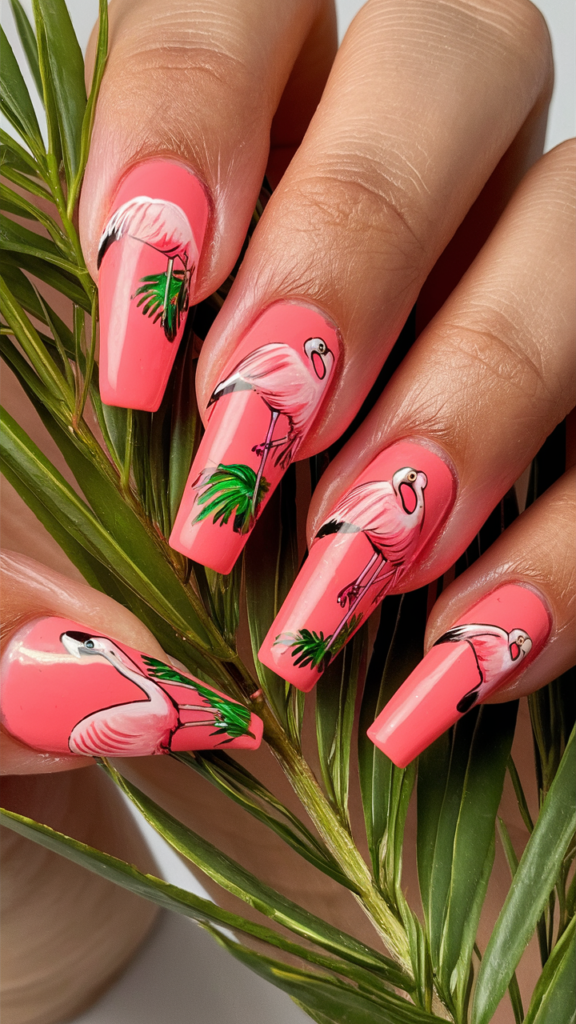
Bring a touch of tropical paradise to your fingertips with this vibrant Flamingo Nail Art.
Featuring hand-painted pink flamingos and lush green palm leaves on a bright coral base, this design captures the essence of a sunny, exotic getaway.
Perfect for summer outings, vacations, or when you want to channel warm tropical vibes, this manicure is bold, elegant, and full of personality.
Design Features
- Bright Coral Base:
- The nails are painted in a bold coral shade, creating a vibrant and cheerful foundation.
- This warm color complements the tropical flamingo theme perfectly.
- Detailed Flamingo Art:
- Hand-painted pink flamingos take center stage, with each bird meticulously crafted to include graceful curves, feathers, and small facial details.
- The flamingos are painted in different poses for variety and dynamic appeal.
- Green Palm Leaves:
- Lush green palm leaf accents add a touch of natural beauty, enhancing the tropical aesthetic.
- The contrast between the green leaves and coral base amplifies the vibrancy of the design.
- Glossy Finish:
- A glossy top coat seals the design, adding a sleek and polished finish while protecting the artwork.
How to Recreate This Look
- Apply the Coral Base:
- Start with two coats of a bright coral nail polish for an even and opaque finish. Allow each coat to dry completely.
- Paint the Flamingos:
- Use a fine detailing brush and pink, white, and black nail polishes to hand-paint flamingos on each nail. Begin with the body shape, then layer details like wings, legs, and facial features.
- Add Palm Leaf Accents:
- With a thin nail art brush and green polish, paint small, curved palm leaves around the flamingos for a cohesive, tropical look.
- Seal with a Glossy Top Coat:
- Apply a clear top coat to lock in the design and give your nails a shiny, professional appearance.
Why This Design Stands Out
This Flamingo Paradise Nail Art is a striking celebration of tropical elegance.
The combination of vibrant colors, lifelike flamingo details, and lush greenery creates a fun yet sophisticated look that’s perfect for summer.
Whether lounging by the pool or attending a tropical-themed party, this manicure is guaranteed to turn heads and spark compliments.
Transport yourself to a sun-soaked paradise with this playful and chic design!
21. Vibrant Beach Towel Nail Art
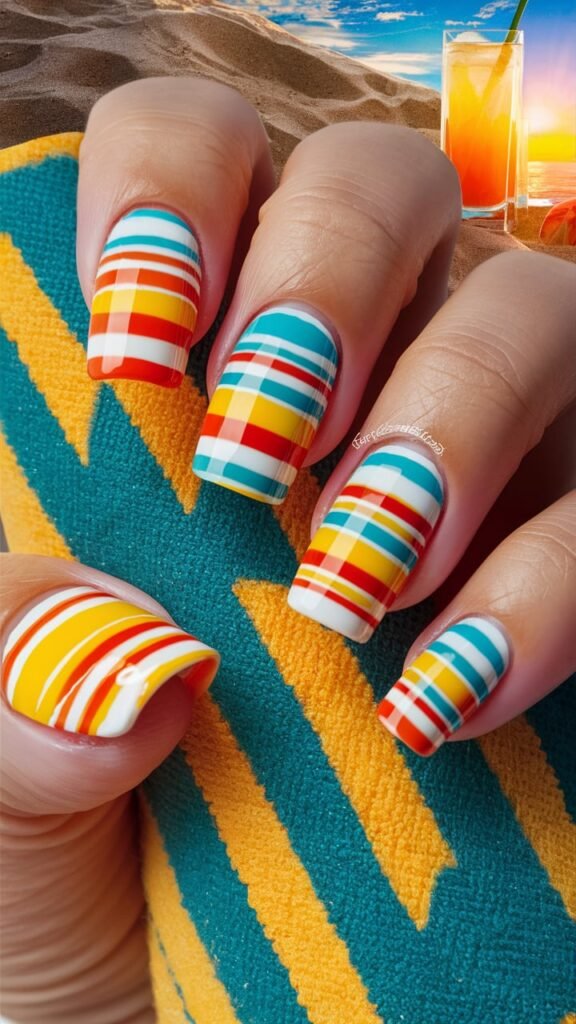
Embrace the carefree joy of summer with this colorful Beach Towel Nail Art.
Featuring bold, horizontal stripes inspired by classic beach towel patterns, this design bursts with cheerful vibes and sunny energy.
Ideal for beach days, pool parties, or adding a splash of fun to your look, this manicure perfectly captures the essence of summer.
Design Features
- Bright Striped Pattern:
- The nails showcase horizontal stripes in a lively color palette of yellow, red, orange, blue, and white.
- The playful, alternating thickness of the stripes mimics the look of vibrant beach towels.
- Summer Color Palette:
- The design features bold and bright summer shades that evoke feelings of sunshine, sand, and surf.
- The warm tones (yellow, red, orange) and cool tones (blue, white) create a harmonious and dynamic contrast.
- Glossy Finish:
- A glossy top coat enhances the vibrant colors and gives the nails a polished, smooth finish.
How to Recreate This Look
- Apply the White Base Coat:
- Start with a bright white base to make the colors pop. Allow it to dry completely.
- Create the Stripes:
- Use striping tape or a thin nail art brush to paint horizontal stripes in alternating colors (yellow, red, orange, blue) across each nail.
- Vary the thickness of the stripes for added visual interest.
- Seal with a Glossy Top Coat:
- Apply a clear top coat to protect the design and give the nails a shiny, polished appearance.
Why This Design Stands Out
This Beach Towel Nail Art is a lively celebration of summer, blending bold colors with a simple yet striking striped pattern. The bright hues and clean lines create a cheerful look that’s perfect for warm-weather fun. Whether you’re lounging by the pool or heading to a beach getaway, this design will keep your nails on-trend and full of summer spirit.
Let your nails channel sunny vibes with this vibrant and playful design!
22. Elegant Seashell French Nail Art
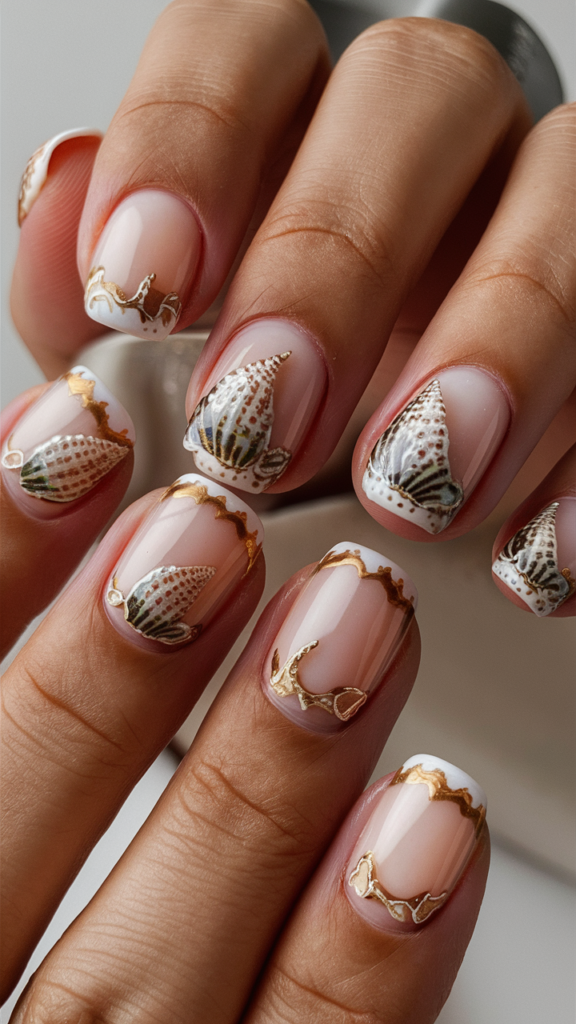
This stunning Seashell French Nail Art takes the classic French manicure to a whole new level with intricate seashell designs and golden accents.
Featuring a soft nude base, delicate shells, and shimmering gold details, this manicure is perfect for a chic coastal-inspired look.
Whether you’re at the beach or attending a summer soirée, this design combines sophistication with a touch of marine beauty.
Design Features
- Soft Nude Base:
- A translucent nude base gives the nails a polished and clean foundation while allowing the intricate designs to stand out.
- Seashell Accents:
- Hand-painted seashells in earthy tones are artfully placed on select nails, adding a coastal charm to the design.
- The detailed patterns on the shells bring a realistic and artistic element.
- Golden French Tips:
- The tips of the nails feature a classic French manicure with a modern twist, edged in metallic gold for added elegance.
- Wavy gold lines mimic the look of sand or waves, enhancing the coastal theme.
- Glossy Finish:
- A glossy top coat seals the design, adding a smooth, glassy finish that highlights the shimmering gold and intricate details.
How to Recreate This Look
- Apply the Nude Base:
- Start with two thin coats of a sheer nude polish to create a soft and natural base. Allow each coat to dry.
- Create the French Tips:
- Use a fine nail art brush to paint white tips with a slight curve, then edge the tips with metallic gold polish for a luxe finish.
- Add Seashell Designs:
- Hand-paint or use decals for the seashell designs, focusing on a few statement nails. Use earthy tones with fine details to mimic natural shell patterns.
- Seal with a Glossy Top Coat:
- Finish with a clear, high-shine top coat to lock in the design and give the nails a professional, polished appearance.
Why This Design Stands Out
This Elegant Seashell French Nail Art is a perfect blend of timeless and modern styles.
The soft nude base and classic French tips exude sophistication, while the seashell details and gold accents add a unique, luxurious touch.
Ideal for beach weddings, summer events, or simply elevating your everyday look, this manicure is both graceful and striking.
Bring a touch of coastal elegance to your style with this chic and artistic nail design!
23. Tropical Paradise Nail Art
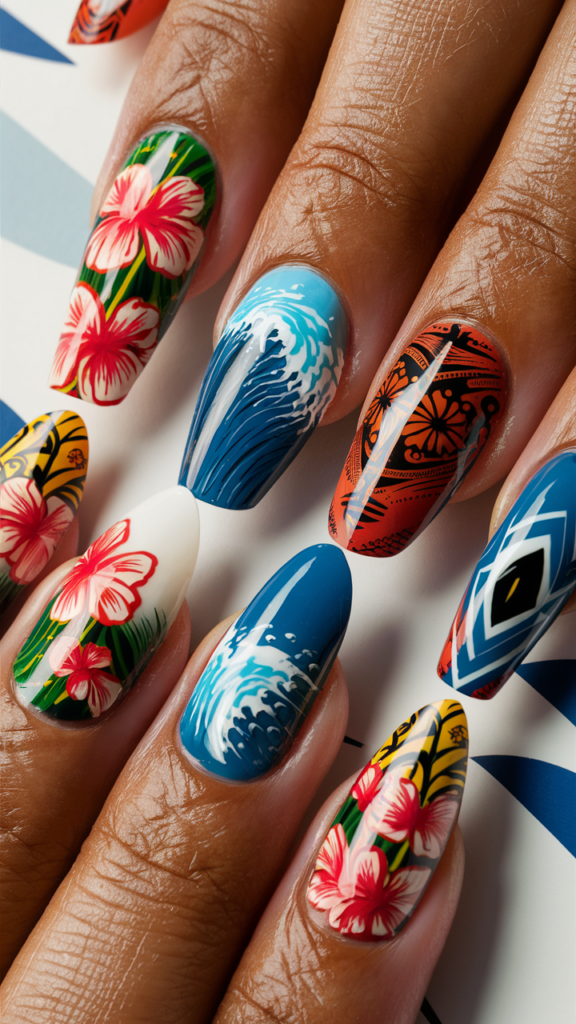
Transform your nails into a stunning tropical getaway with this vibrant Tropical Paradise Nail Art.
Featuring vivid hibiscus flowers, dynamic ocean waves, and intricate tribal patterns, this design is perfect for anyone looking to showcase bold and exotic summer vibes.
Each nail tells its own unique story, combining floral elegance, oceanic motion, and cultural artistry.
Design Features
- Vivid Hibiscus Florals:
- Several nails are adorned with hand-painted red and pink hibiscus flowers and lush green leaves, bringing a burst of tropical vibrancy.
- The realistic shading and intricate petal details add depth and charm.
- Ocean Wave Masterpiece:
- A central nail features a dynamic crashing wave design inspired by classic Japanese art, combining rich blue hues with white foam accents.
- The motion of the wave brings an energizing focal point to the manicure.
- Intricate Tribal Patterns:
- Tribal-inspired geometric patterns in bold orange, black, and blue tones adorn a few nails, adding a cultural and artistic edge.
- The sharp lines and symmetrical shapes balance the softness of the floral and oceanic elements.
- Glossy Finish:
- A high-shine top coat amplifies the vivid colors and intricate details, giving the nails a sleek and polished look.
How to Recreate This Look
- Apply the Base Colors:
- Use a combination of bold blue, white, and vibrant coral as base colors across your nails. Ensure a smooth and opaque finish.
- Paint the Hibiscus Flowers:
- Use a fine detailing brush and polishes in red, pink, and green to create the hibiscus designs. Add shading for realistic petals and leaves.
- Create the Ocean Wave:
- On one nail, use rich blue polish for the base and layer white polish with a fine brush to paint the wave’s foam and motion. Add tiny bubble details for an extra touch.
- Add Tribal Patterns:
- Use a striping brush and contrasting colors like orange, black, and blue to create bold geometric designs on accent nails.
- Seal with a Glossy Top Coat:
- Finish with a clear top coat to protect the artwork and give the design a professional, glassy finish.
Why This Design Stands Out
This Tropical Paradise Nail Art is a celebration of summer’s bold and lively energy.
The mix of floral, oceanic, and tribal elements creates a visually striking and cohesive theme, making it perfect for vacations, summer parties, or simply showcasing your love for tropical aesthetics.
Let your nails transport you to a sunny island escape with this captivating and artistic design! 🌺🌊✨
24. Delicate Nature-Inspired Nail Art
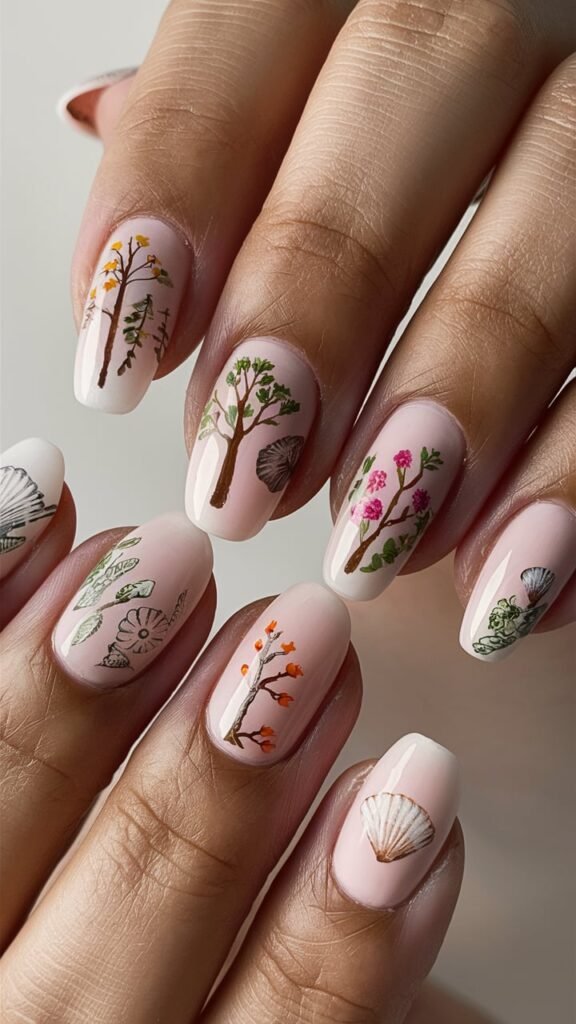
This elegant Nature-Inspired Nail Art captures the essence of the natural world with delicate hand-painted trees, flowers, and seashells.
Featuring a soft, translucent nude base and intricate designs, this manicure brings a serene and timeless beauty to your fingertips.
Ideal for nature lovers or those seeking a subtle yet artistic look, this design exudes grace and tranquility.
Design Features
- Soft Nude Base:
- A sheer, translucent nude polish creates a clean and minimalist backdrop that highlights the intricate nature designs.
- Hand-Painted Botanical Elements:
- Each nail showcases a unique motif, including detailed trees with blooming flowers, vibrant leaves, and colorful blossoms.
- The designs range from spring-inspired greens to autumnal oranges and yellows, celebrating the changing seasons.
- Seashell Accents:
- Subtle seashells and natural textures are added to select nails, enhancing the coastal and earthy vibe of the manicure.
- Glossy Finish:
- A clear, glossy top coat seals the design, adding shine while preserving the delicacy of the artwork.
How to Recreate This Look
- Apply the Nude Base:
- Start with two thin coats of a translucent nude polish for a soft, even base. Let each layer dry completely.
- Paint the Botanical Designs:
- Use a fine detailing brush and a mix of earthy colors (greens, browns, oranges, and yellows) to create trees, leaves, and blossoms. Add shading and fine lines for a realistic effect.
- Add Seashells and Details:
- On a few nails, paint seashell designs in neutral tones like beige and white. Use thin gold or brown lines to highlight texture and depth.
- Seal with a Glossy Top Coat:
- Finish with a clear top coat to enhance the shine and protect the intricate artwork.
Why This Design Stands Out
This Delicate Nature-Inspired Nail Art perfectly balances minimalism and artistry.
The soft nude base complements the detailed botanical and seashell motifs, making the manicure versatile for everyday wear or special occasions.
Its serene aesthetic is a reminder of the beauty of nature, reflected in every intricate detail.
Celebrate the seasons and the natural world with this graceful and understated nail design!
25. Soaring Elegance Nail Art
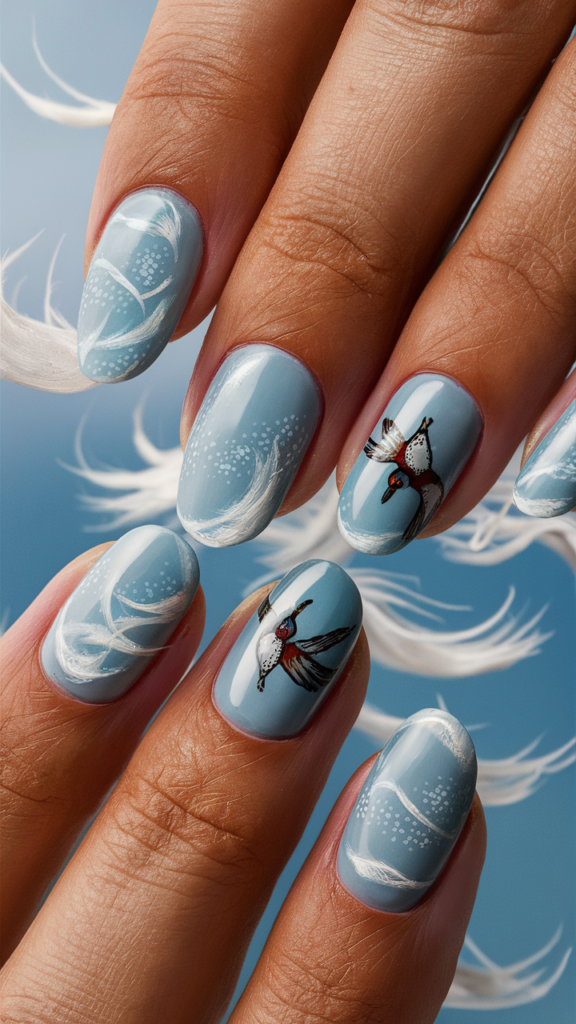
This breathtaking Soaring Elegance Nail Art features soft sky-blue hues, delicate feather designs, and hand-painted birds in flight.
Evoking a sense of freedom and serenity, this manicure captures the tranquil beauty of the open sky.
Ideal for those who appreciate subtle artistry and graceful motifs, this design is perfect for any occasion that calls for understated elegance.
Design Features
- Sky-Blue Base:
- The nails are painted in a serene sky-blue shade, providing a soothing and airy backdrop.
- Feather Details:
- Delicate white feather patterns float across several nails, blending seamlessly with the blue base to create a soft and ethereal effect.
- Tiny dotted accents mimic the look of drifting particles, adding depth and texture.
- Hand-Painted Birds:
- Two accent nails feature intricately painted birds in mid-flight, capturing their grace and movement.
- The birds are rendered in lifelike colors with fine detailing, making them the focal point of the design.
- Glossy Finish:
- A glossy top coat enhances the design’s vibrant colors and delicate details, giving the nails a polished, professional look.
How to Recreate This Look
- Apply the Base Coat:
- Start with two coats of a soft sky-blue polish to create a smooth and even base. Allow each coat to dry completely.
- Paint the Feather Details:
- Use a fine detailing brush and white nail polish to paint curved feather patterns on select nails. Add thin, wispy lines to enhance the feather-like effect.
- Use a dotting tool to create small, scattered dots around the feathers for a drifting effect.
- Add the Birds in Flight:
- On the accent nails, paint small, detailed birds using fine brushes. Begin with a base silhouette, then add layers of color and intricate feather details.
- Seal with a Glossy Top Coat:
- Finish with a clear top coat to lock in the design and add a high-shine finish.
Why This Design Stands Out
The Soaring Elegance Nail Art is a harmonious blend of tranquility and artistry.
The sky-blue base and floating feather motifs exude serenity, while the hand-painted birds add a touch of dynamic beauty.
This design is perfect for nature lovers or anyone seeking a manicure that embodies freedom, grace, and sophistication.
Let your nails take flight with this serene and elegant design!
26. Majestic Ocean Wave Nail Art
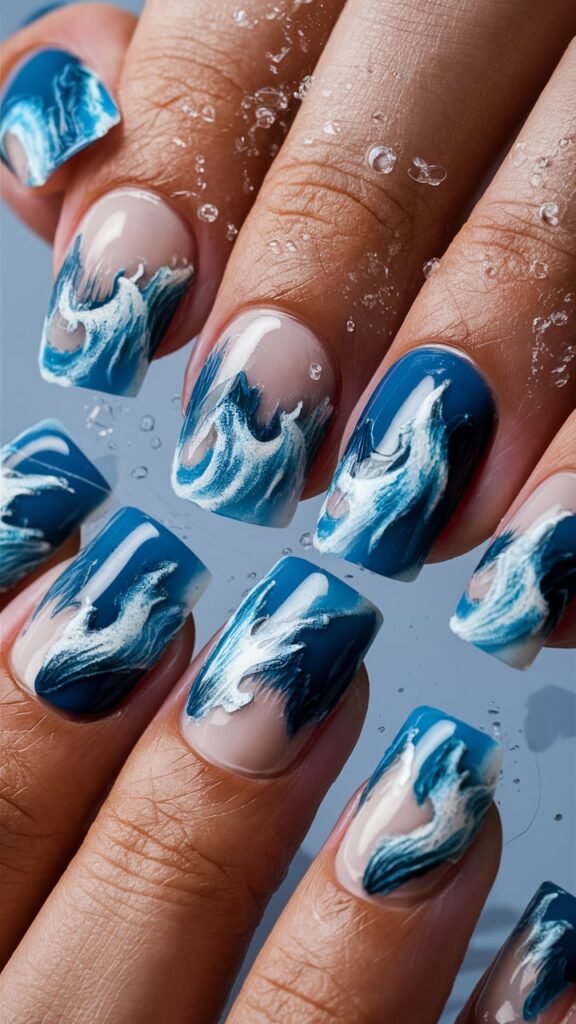
Channel the power and beauty of the ocean with this Majestic Ocean Wave Nail Art.
Featuring dramatic wave designs in bold blue and white tones, this manicure evokes the energy of crashing waves against a serene nude backdrop.
Perfect for ocean lovers and those who appreciate artistic, statement nails, this design is as bold as it is elegant.
Design Features
- Nude and Deep Blue Base:
- A translucent nude base creates a soft, natural background, while deep blue dominates the tips, serving as the foundation for the wave designs.
- Dynamic Wave Patterns:
- Intricately hand-painted white waves cascade across the nails, mimicking the flow and motion of ocean surf.
- Subtle brushstroke textures add depth and realism, enhancing the fluidity of the design.
- Realistic Water Effect:
- The wave details are carefully layered to capture the foam and movement of water, making the design come alive.
- Glossy Finish:
- A glossy top coat provides a water-like sheen, completing the look with a polished, professional appearance.
How to Recreate This Look
- Apply the Base Colors:
- Begin with a translucent nude polish as the base, and paint the tips with a bold, rich blue polish to form the backdrop for the waves.
- Create the Wave Design:
- Use a thin detailing brush and white polish to paint wave patterns on each nail. Start with bold, curved strokes and layer thinner lines to mimic the frothy texture of breaking waves.
- Add a touch of light blue to soften transitions between the wave crests and the blue base.
- Layer for Depth:
- To add dimension, use fine brushstrokes to create overlapping foam details. Ensure some areas remain translucent to highlight the natural motion of the waves.
- Seal with a Glossy Top Coat:
- Apply a high-shine top coat to lock in the design and give the nails a smooth, water-like finish.
Why This Design Stands Out
The Majestic Ocean Wave Nail Art is a perfect blend of bold and graceful, capturing the raw energy of the ocean in a wearable form.
The contrast between the nude base and dynamic wave patterns creates a stunning visual balance, making this design ideal for beach vacations, summer events, or simply showcasing your love for the sea.
Let your nails ride the waves with this striking and artistic look!
27. Pastel Seashell Nail Art
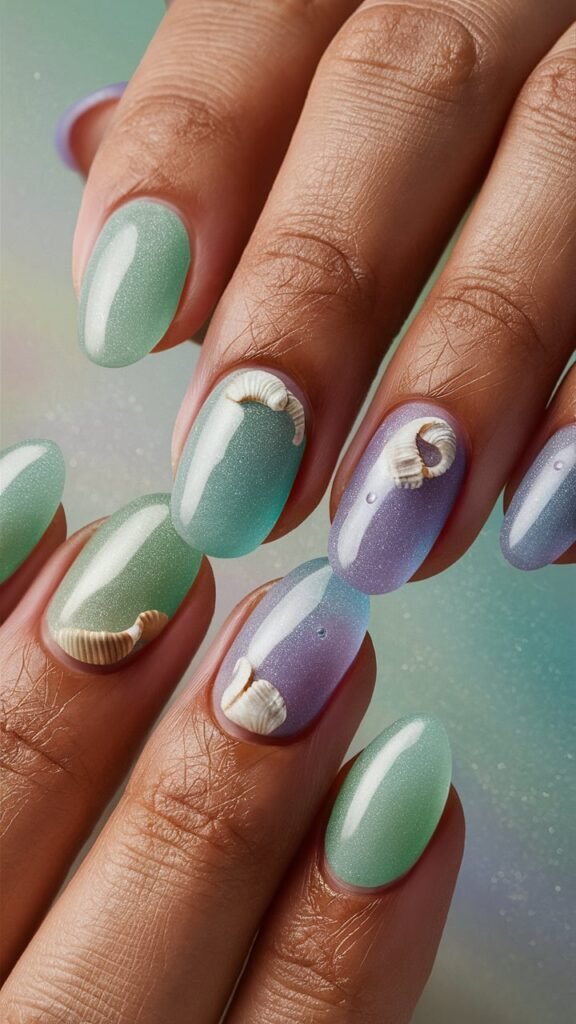
Embrace the calming allure of the sea with this Pastel Seashell Nail Art.
Featuring a gradient of soft pastel shades and dainty seashell embellishments, this design exudes elegance and tranquility.
Perfect for beach lovers or anyone seeking a subtle yet sophisticated manicure, this look is ideal for sunny getaways or relaxing summer days.
Design Features
- Pastel Gradient Base:
- Each nail features a dreamy gradient of pastel shades, including mint green, soft lavender, and shimmering aqua.
- The smooth transition between colors creates a calming, ocean-inspired effect.
- 3D Seashell Accents:
- Delicately placed 3D seashell embellishments bring a touch of coastal charm to the design.
- The shells add texture and realism, making the nails look like tiny beach treasures.
- Subtle Shimmer Finish:
- A fine shimmer overlay enhances the pastel base, mimicking the sparkle of sunlight on water.
- Glossy Top Coat:
- A high-shine top coat seals the design, adding depth and a polished finish to the nails.
How to Recreate This Look
- Apply the Gradient Base:
- Use a makeup sponge to blend pastel shades (mint green, lavender, and aqua) across the nails, creating a seamless ombre effect.
- Apply two to three layers for vibrant color payoff, allowing each layer to dry before adding the next.
- Attach Seashell Embellishments:
- Carefully place small seashell accents on one or two nails using nail glue or clear gel polish.
- Press gently to ensure they adhere securely.
- Add a Shimmer Overlay:
- Apply a thin layer of fine shimmer polish over the gradient base to enhance the design with a soft sparkle.
- Seal with a Glossy Top Coat:
- Finish with a clear, glossy top coat to protect the design and give the nails a smooth, glassy finish.
Why This Design Stands Out
The Pastel Seashell Nail Art is a perfect blend of softness and sophistication.
The serene pastel tones and shimmering finish evoke the peaceful beauty of the coast, while the seashell accents add a unique and artistic touch.
This design is versatile enough for both casual and formal settings, making it a must-try for anyone looking to embrace seaside elegance.
Let your nails shine with this dreamy and tranquil design!
28. Fiery Flame Nail Art
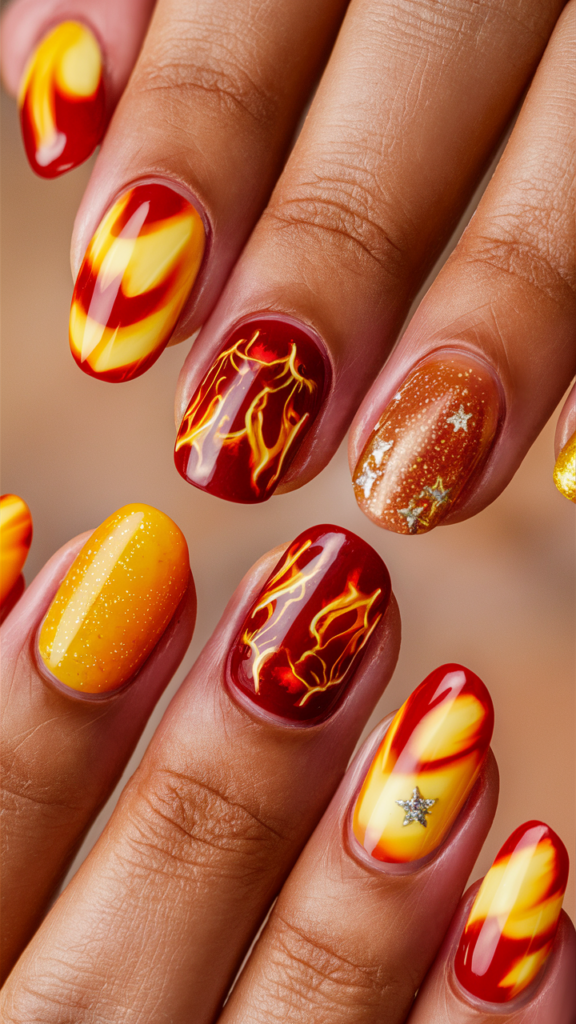
Unleash your bold side with this captivating Fiery Flame Nail Art. Featuring intense reds, vibrant yellows, and dynamic flame patterns, this design radiates heat and energy, perfect for making a striking statement.
Whether you’re embracing a bold look for a special event or simply love fiery aesthetics, these nails will turn heads wherever you go.
Design Features
- Flame Patterns:
- Each nail showcases intricate hand-painted flame designs, transitioning from a fiery red base to vivid yellow tips.
- The flames are detailed with gradient effects to create a realistic, glowing appearance.
- Shimmering Embellishments:
- Subtle glitter and star accents add a touch of sparkle, mimicking glowing embers.
- Gradient Backgrounds:
- The warm color palette smoothly blends red, orange, and yellow tones to create a dynamic ombre effect.
- Glossy Finish:
- A high-shine top coat enhances the vibrant colors and gives the nails a polished, sleek finish.
How to Recreate This Look
- Apply the Base Colors:
- Start with a red or orange base coat on each nail to serve as the fiery foundation.
- Blend yellow polish towards the tips using a sponge for an ombre effect.
- Paint the Flames:
- Use a fine detailing brush and white polish to outline flame shapes.
- Layer with orange and yellow polishes to add depth and a glowing effect.
- Add Embellishments:
- Apply glitter polish sparingly to a few nails for a sparkling ember effect.
- Stick small metallic star accents to selected nails for added drama.
- Seal with a Top Coat:
- Finish with a glossy top coat to lock in the design and create a smooth, radiant finish.
Why This Design Stands Out
The Fiery Flame Nail Art is a perfect representation of passion and boldness.
The vivid colors and intricate details make this design both dynamic and mesmerizing.
With its radiant hues and shimmering accents, this look is ideal for anyone who wants to ignite their style and stand out from the crowd.
Turn up the heat with these striking and energetic nails!
29. Beach Bliss Nail Art
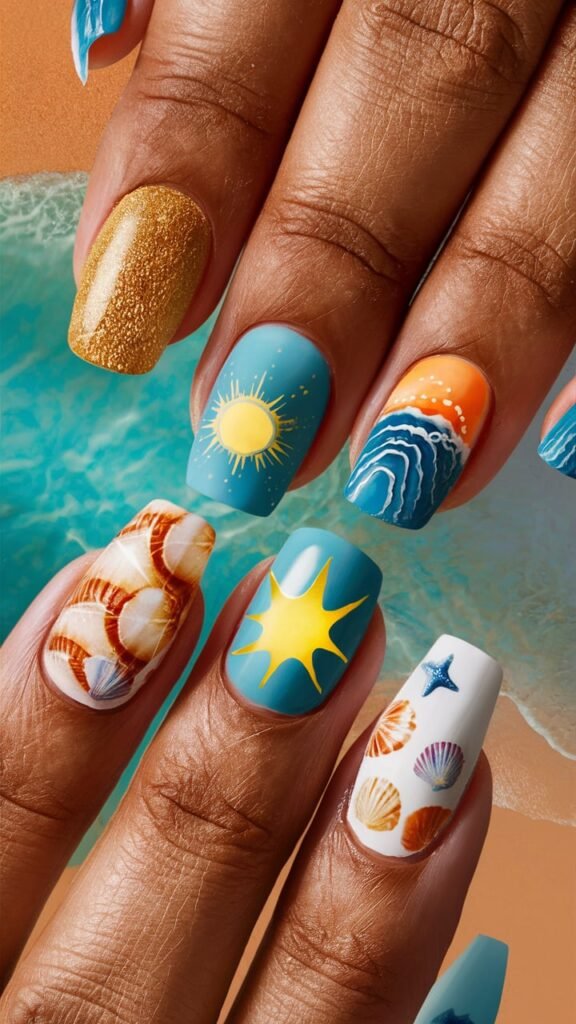
Dive into the tranquil beauty of a seaside escape with this Beach Bliss Nail Art.
Featuring vibrant sun motifs, crashing waves, golden sands, and delicate seashell accents, this design transports you straight to a tropical paradise.
Perfect for summer outings or any time you want to channel the relaxing vibes of the beach.
Design Features
- Golden Sand Texture:
- One nail showcases a shimmering golden polish that mimics the sparkling sands of a beach.
- Sunshine Radiance:
- Bright yellow sun motifs on a soft blue base radiate warmth and positivity.
- Ocean Waves:
- Intricate white and blue wave designs create the illusion of the ocean meeting the shore.
- Seashell Details:
- Realistic seashell patterns and starfish accents are painted on crisp white nails, adding a touch of coastal charm.
- Vibrant Colors:
- The combination of ocean blues, golden hues, and coral tones captures the essence of a sunny beach day.
How to Recreate This Look
- Base Coats:
- Start with a light blue base for most nails and use a white or gold base for accent nails.
- Create the Sun and Waves:
- Use a fine detailing brush to paint the sunburst patterns and wave shapes.
- Blend lighter and darker shades of blue to add depth to the ocean waves.
- Add Textures and Details:
- Apply a glittery gold polish for the sandy texture.
- Use stamps or hand-paint seashell and starfish designs on white accent nails.
- Finish with a Top Coat:
- Seal the design with a glossy top coat to enhance the vibrant colors and protect the artwork.
Why This Design Stands Out
The Beach Bliss Nail Art combines intricate details with vibrant hues to evoke the ultimate tropical escape.
Each element, from the golden sands to the radiant sun, tells a story of sunny days by the shore.
Whether you’re heading to the beach or simply dreaming of it, these nails are sure to brighten your day and turn heads.
Bring the beach to your fingertips and let your nails bask in the glow of coastal perfection!
30. Seashell Serenity Nail Art
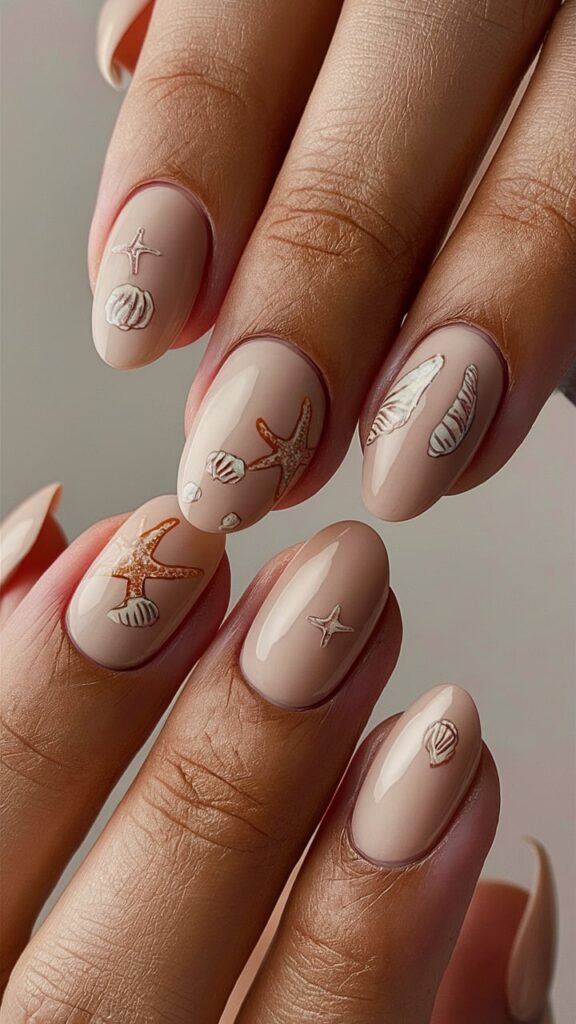
Bring the charm of the ocean to your nails with this Seashell Serenity design.
Featuring delicate starfish and seashell accents on a neutral nude base, this manicure embodies understated elegance with a touch of seaside whimsy.
Perfect for those who love minimalist aesthetics with a nod to nature.
Design Features
- Neutral Base:
- A smooth nude polish creates a refined and versatile canvas for the seashell details.
- Subtle Seashell and Starfish Art:
- Each nail is adorned with intricately painted seashells and starfish in soft white, coral, and sandy hues.
- Delicate Details:
- The minimalist linework and soft shading add depth and realism to the seashell motifs without overpowering the design.
- Glossy Finish:
- A high-shine top coat enhances the natural tones and adds a polished, professional finish.
How to Recreate This Look
- Base Coat Application:
- Start with a clean, buffed nail surface and apply a nude base coat for a smooth, even foundation.
- Painting the Shells and Starfish:
- Use a fine detailing brush to paint tiny seashells and starfish on each nail.
- Choose soft white, coral, and muted sand tones for a natural look.
- Add Dimension:
- Lightly shade the designs to create depth and a realistic effect.
- Outline the edges subtly for a crisp, defined finish.
- Seal with a Top Coat:
- Apply a glossy top coat to protect the design and give it a sleek finish.
Why This Design Stands Out
The Seashell Serenity Nail Art combines simplicity with elegance, making it perfect for any occasion, from beach vacations to everyday wear.
The soft, neutral tones are versatile and complement any outfit, while the delicate details bring a unique touch of coastal beauty.
Let your nails whisper stories of sandy beaches and calm waves with this serene, ocean-inspired look!
31. Nautical Knots Nail Art

Set sail in style with this Nautical Knots nail art design.
Featuring a deep navy base and intricate white knot details, this look is perfect for maritime enthusiasts and anyone who loves a bold yet elegant theme.
The clean lines and contrast make this manicure a standout choice for summer outings or a seaside getaway.
Design Features
- Deep Navy Base:
- The rich navy polish serves as the perfect backdrop, evoking the depth of the ocean.
- White Nautical Knot Patterns:
- Each nail showcases a carefully painted white knot design, inspired by classic maritime ropework.
- Contrast and Precision:
- The crisp white against the dark navy creates a striking visual effect.
- The knots are outlined with subtle details to mimic the texture and movement of real ropes.
How to Recreate This Look
- Apply the Base Color:
- Start by applying two coats of a glossy navy polish for full opacity.
- Paint the Knot Designs:
- Using a fine detailing brush and white nail polish, carefully draw intertwined knot shapes on each nail.
- Focus on symmetry and clean lines for a polished look.
- Add Rope Texture:
- Use a light gray or silver polish to add subtle shading and texture to the knots.
- Finish with a Top Coat:
- Seal the design with a high-shine top coat to ensure durability and enhance the glossy finish.
Why This Design Stands Out
The Nautical Knots Nail Art combines timeless maritime charm with modern sophistication.
It’s perfect for beach vacations, yacht parties, or simply adding a touch of oceanic elegance to your everyday look.
The intricate knot designs symbolize strength and connection, making this manicure as meaningful as it is stylish.
Sail away with confidence and let your nails make waves wherever you go!
32. Tropical Palm Leaf Nail Art
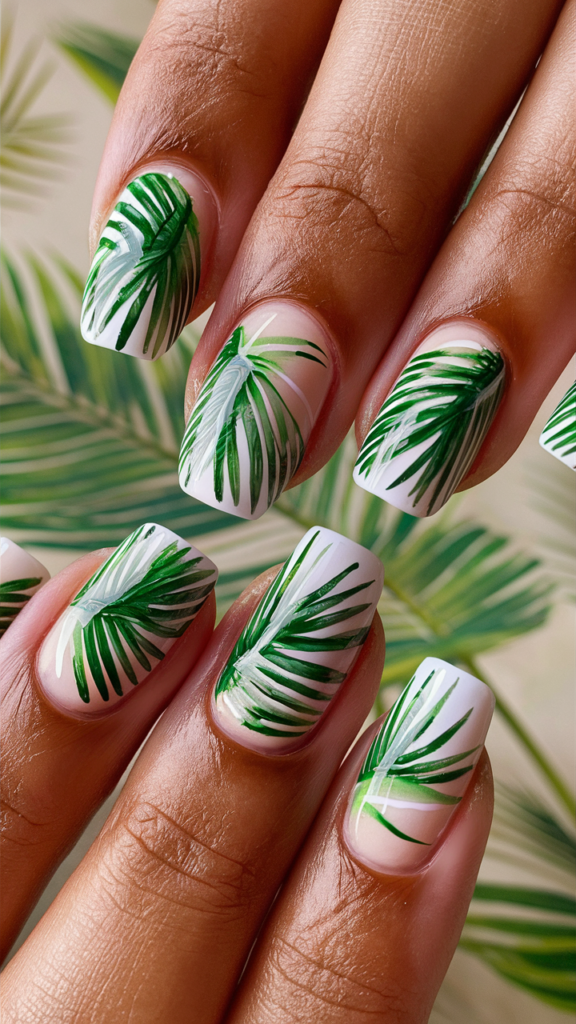
Bring the tropics to your fingertips with this fresh and vibrant Tropical Palm Leaf nail art design.
Featuring delicate green palm fronds on a clean white base, this look is perfect for summer days, beach vacations, or adding a touch of nature to your everyday style.
Design Features
- Crisp White Base:
- The white base creates a clean canvas, making the green palm leaf details pop.
- Realistic Palm Leaves:
- Each nail showcases hand-painted green palm fronds with intricate shading for a lifelike appearance.
- Minimalist Elegance:
- The simplicity of the white and green combination keeps the design chic and versatile.
How to Recreate This Look
- Apply the Base Coat:
- Start with a smooth layer of white nail polish for a pristine backdrop.
- Paint the Palm Leaves:
- Using a fine detailing brush and green polish, draw slender fronds radiating from the center of the nail.
- Add darker and lighter green shades for depth and dimension.
- Seal with a Top Coat:
- Use a glossy top coat to protect the design and add a polished finish.
Why This Design Stands Out
The Tropical Palm Leaf Nail Art is a timeless choice for anyone looking to embrace nature-inspired elegance.
Its clean and crisp look complements any outfit, while the intricate palm fronds add a hint of lush greenery to your style.
Whether you’re soaking up the sun or longing for a tropical escape, this nail design will transport you to paradise! 🌿🌴
33. Marble Elegance Nail Art
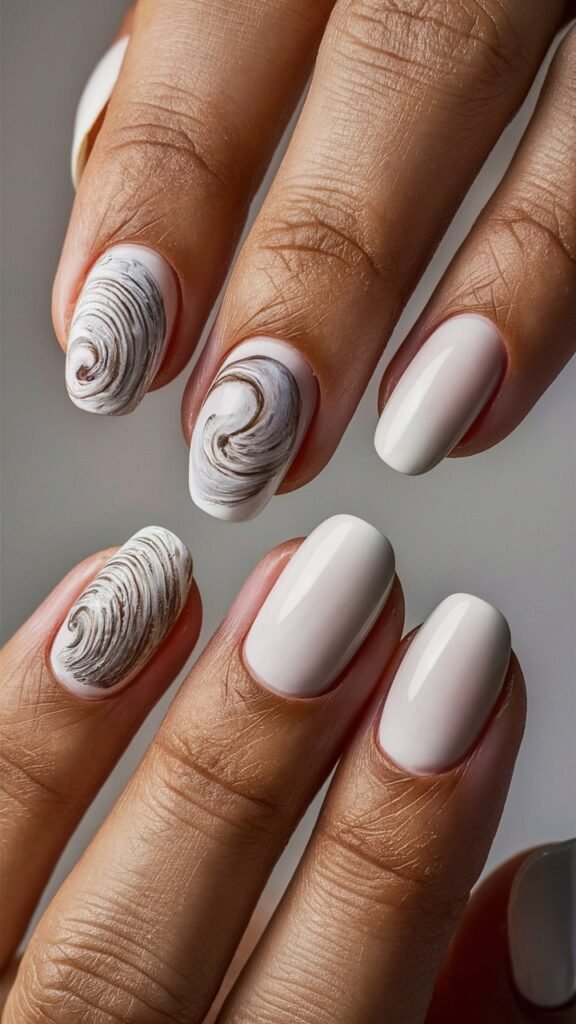
This Marble Elegance Nail Art design combines the simplicity of a white base with the intricate texture of marble patterns.
It’s the perfect blend of minimalism and luxury, making it an excellent choice for anyone seeking understated sophistication.
Design Features
- Crisp White Base:
- A clean, opaque white polish forms the foundation of this elegant design.
- Marble Accents:
- Swirling marble patterns in soft gray and taupe tones create a realistic and textured effect on selected nails.
- Glossy Finish:
- A high-shine top coat enhances the marble texture, adding depth and a polished appearance.
How to Achieve This Look
- Prepare Your Nails:
- File and shape your nails to a classic round or almond style and apply a clear base coat to protect the nails.
- Apply the White Base:
- Paint all nails with a crisp white polish, using two coats for an even, opaque finish.
- Create the Marble Effect:
- Use a thin brush or a fine nail art tool to draw delicate gray swirls on selected nails.
- Blend the swirls with a small sponge or brush for a natural marble effect.
- Seal with Gloss:
- Finish with a clear, glossy top coat to lock in the design and add a smooth, shiny surface.
Why Choose This Design
The Marble Elegance Nail Art is ideal for those who love subtle yet eye-catching details.
The clean white base paired with realistic marble accents makes it versatile for professional, formal, or casual settings. It’s a timeless design that pairs beautifully with any outfit!
34. Sunset Palm Nail Art
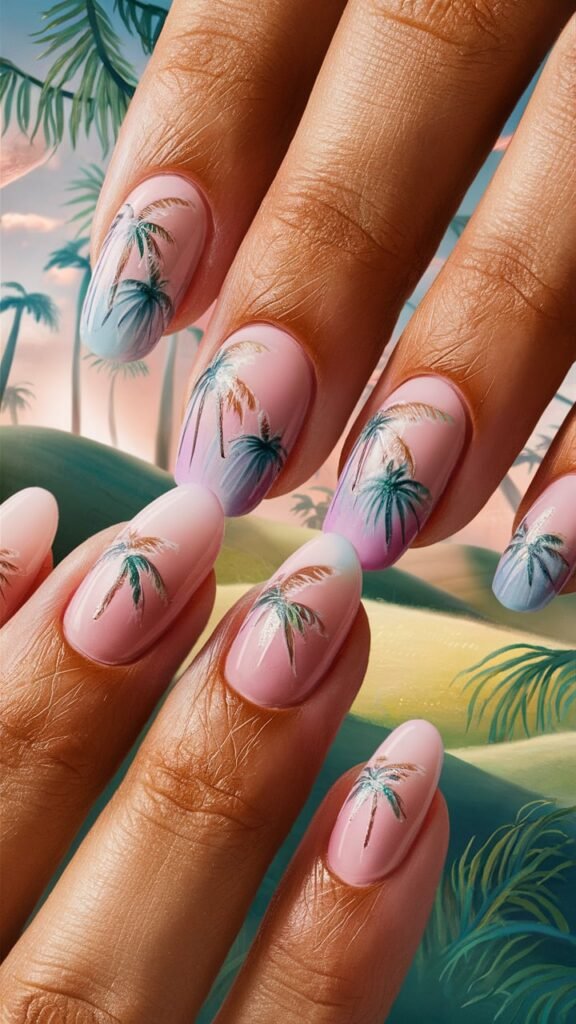
Capture the essence of a serene tropical evening with the Sunset Palm nail art design.
Featuring pastel gradients of pink, purple, and blue paired with delicate palm tree silhouettes, this look is a perfect nod to sunset hues and beachy tranquility.
Design Features
- Gradient Sunset Base:
- A seamless blend of pink, lavender, and sky blue creates a dreamy, sunset-inspired backdrop.
- Palm Tree Silhouettes:
- Fine black and green palm trees are painted across the nails, evoking tropical beach scenery.
- Minimalistic Elegance:
- The soft pastel tones and intricate palm details make this design both subtle and striking.
How to Recreate This Look
- Create the Gradient Base:
- Use a sponge to blend pastel pink, lavender, and blue nail polish onto the nails for a smooth gradient effect.
- Add the Palm Trees:
- With a thin nail art brush, paint fine palm tree silhouettes using black or dark green polish. Focus on realistic details such as slender trunks and curved leaves.
- Seal and Shine:
- Finish with a glossy top coat to enhance the colors and protect the design.
Why This Design Stands Out
The Sunset Palm Nail Art combines the soothing colors of a tropical sunset with the iconic imagery of palm trees, making it a top choice for vacation-ready nails.
Its elegant gradient transitions and delicate details transport you straight to a beachside paradise.
Perfect for those who love soft, scenic designs with a touch of whimsy!
35. Subtle Elegance Glitter Nail Art
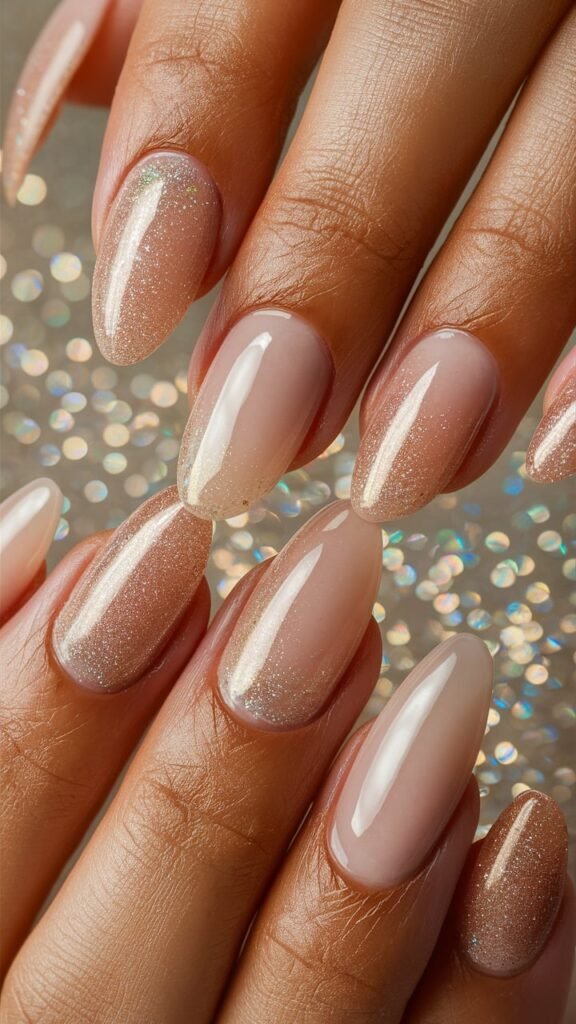
For those who love understated beauty with a hint of sparkle, this Subtle Elegance Glitter Nail Art design is your go-to choice.
Combining soft nude tones with a delicate shimmer, this look exudes sophistication and is ideal for any occasion.
Design Features
- Soft Nude Base:
- A smooth nude polish serves as the foundation, creating a natural yet polished appearance.
- Fine Glitter Gradient:
- A touch of subtle glitter is applied near the tips, blending seamlessly with the base for a refined sparkle effect.
- Minimalistic Shine:
- The glossy finish adds a luxurious touch while maintaining the design’s simplicity.
How to Achieve This Look
- Prepare Your Nails:
- Shape your nails into your desired style (oval or almond shapes enhance the elegant vibe) and apply a clear base coat.
- Apply the Nude Base:
- Use a sheer or creamy nude polish for the foundation, ensuring an even finish with two coats.
- Create the Glitter Gradient:
- Gently dab fine glitter polish onto the tips, blending it down towards the center for a gradient effect.
- Seal the Look:
- Finish with a high-shine top coat to lock in the design and add a glossy, smooth finish.
Why This Design Shines
This nail art balances simplicity and elegance, making it perfect for both everyday wear and special occasions.
Its delicate shimmer catches the light without overwhelming, making it a versatile and timeless choice.
Perfect for weddings, professional settings, or a casual glam-up moment!
Conclusion
Your nails are a canvas, and with these 35 beach-inspired designs, you have a plethora of options to express your love for the ocean, the sun, and everything that makes summer magical.
From the shimmering beauty of mermaid scales to the fiery glow of a beach bonfire, each design brings a unique aspect of the beach to life.
Whether you prefer the bold and bright or the soft and subtle, these designs ensure your nails will be a perfect complement to your summer style.
So, grab your favorite polish and let your creativity flow.
With these ideas in hand, you’re just a brushstroke away from the perfect beach-ready nails that will carry the spirit of summer with you wherever you go.
