Introduction
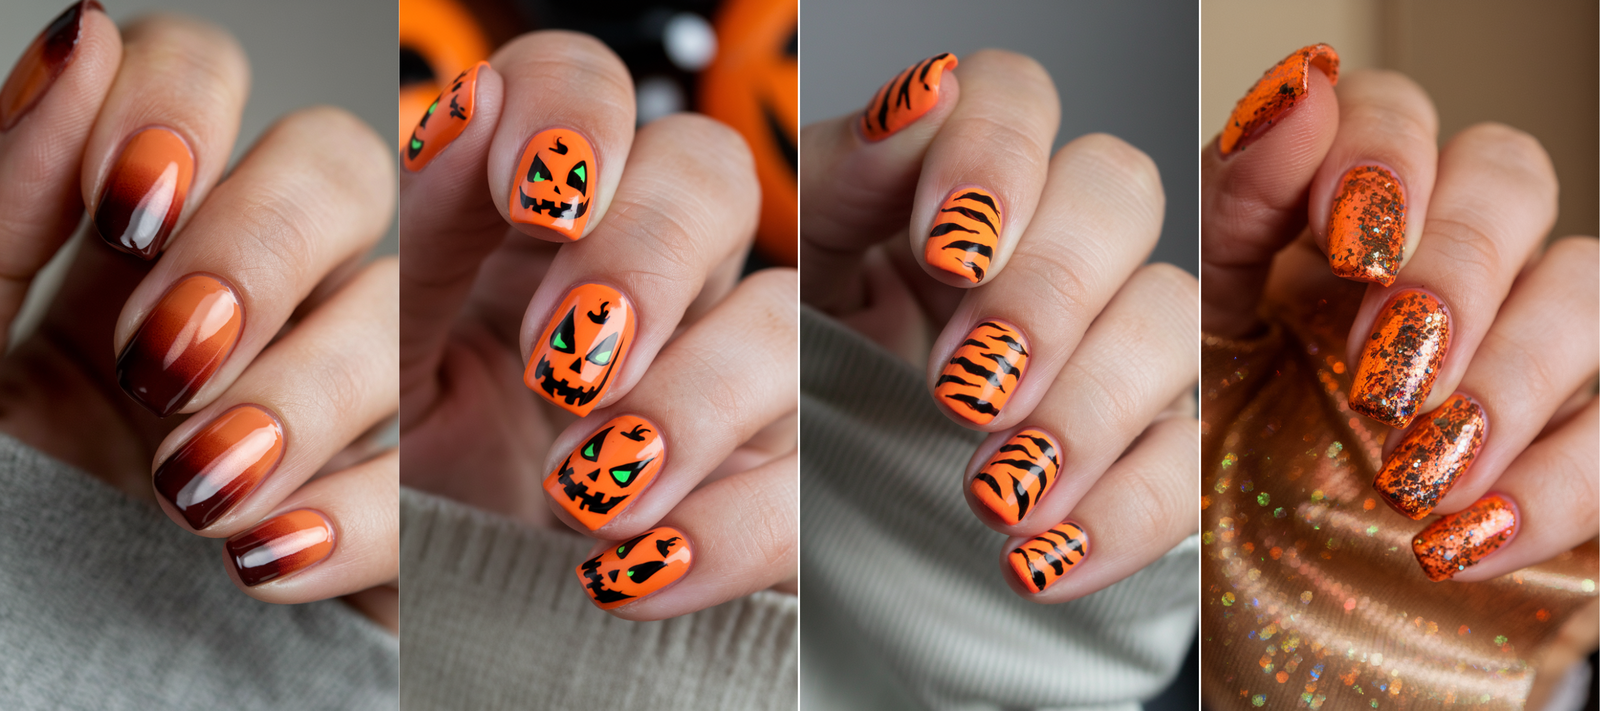
Orange nail art has become a vibrant trend, capturing attention with its bold, sunny tones that evoke warmth, creativity, and personality.
From playful citrus-inspired designs to sophisticated ombré gradients and glamorous glitter accents, orange nails offer endless possibilities for style and self-expression.
This color, often associated with energy and positivity, brings a unique pop to any look, making it perfect for those who want their nails to stand out.
In this blog, we’ve curated 35 stunning orange nail art designs that inspire and excite, each suited for a variety of occasions, seasons, and personal styles.
Whether you’re seeking a fresh, summer-inspired look with tropical hues or a cozy, autumnal design featuring deep rusty tones, these ideas provide everything you need to make your nails the ultimate accessory.
For those who love intricate details, we’ve included designs with delicate floral patterns, abstract art, and edgy animal prints, while also featuring minimalist styles for a sleek, modern appeal.
Dive into these 35 orange nail art ideas and discover the perfect look to elevate your next manicure.
Sunset Ombre: Capturing The Dreamy Glow Of Sunset On Your Nails
Description Of Colors And Techniques To Create A Warm Sunset Gradient
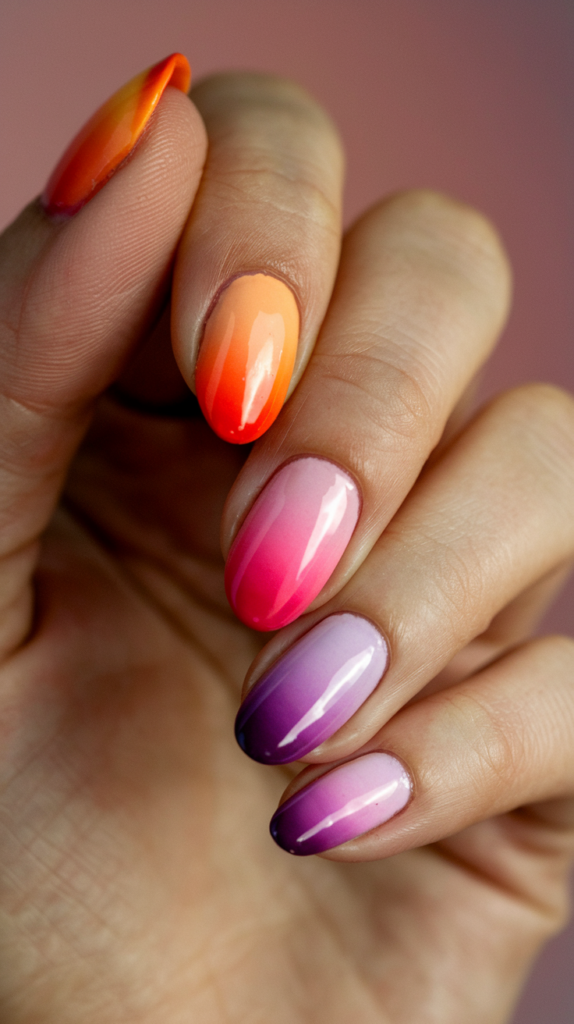
The Sunset Ombre design brings the warmth and beauty of a sunset right onto your fingertips.
To create this look, start with a base coat in a light pink shade, representing the softest part of the sunset near the horizon.
Gradually blend into a warm orange, transitioning seamlessly into a deeper purple at the tip of each nail.
For a dreamy effect, ensure each color flows naturally, with no harsh lines.
Using a makeup sponge can help blend the colors smoothly, pressing gently to transfer the gradient from sponge to nail.
This technique captures the essence of sunset colors, giving nails a warm and inviting appeal.
Tips For A Smooth Ombre Transition And Best Finishes For A Dreamy Effect
Achieving a perfect gradient effect requires careful blending.
After applying each color layer, let it dry slightly before proceeding to the next, minimizing overlap lines.
Once the ombre is complete, apply a high-gloss topcoat to add a soft shine and create a glassy, dreamy effect.
For extra depth, consider a touch of shimmer at the tips to mimic the sparkle of the setting sun.
Neon Splash: Electrifying Orange With Bold White Accents
How To Achieve The Perfect Neon Orange Shade
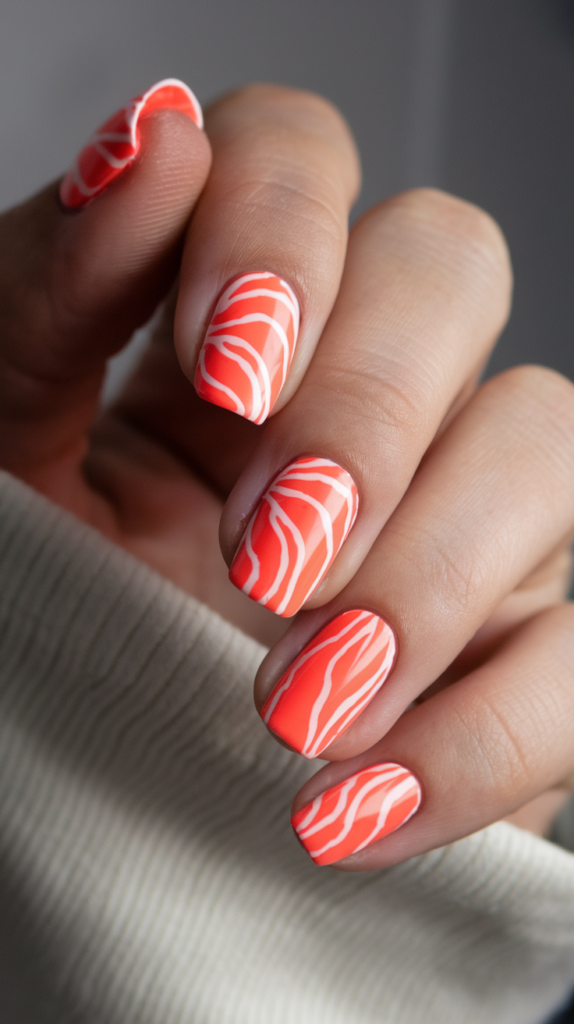
Neon orange is a bold choice, providing an electric and eye-catching effect.
Begin with a white base coat, as this amplifies the brightness of neon colors.
Follow with a vibrant neon orange polish, ensuring full coverage and a smooth application.
The bright orange color instantly catches attention, embodying a sense of modern energy and style.
Ideas For Accent Lines And Patterns For A Modern Look
Once the neon orange base is dry, add sharp white accent lines or abstract patterns on each nail to enhance the design.
Thin white lines can create a geometric, edgy look, while thicker, bolder lines evoke a contemporary feel.
Complete the look with a glossy topcoat, enhancing the polish’s brightness and sealing in the design.
Tangerine Tips: A Twist On The Classic French Manicure
Steps To Achieve Crisp, Bright Orange Tips
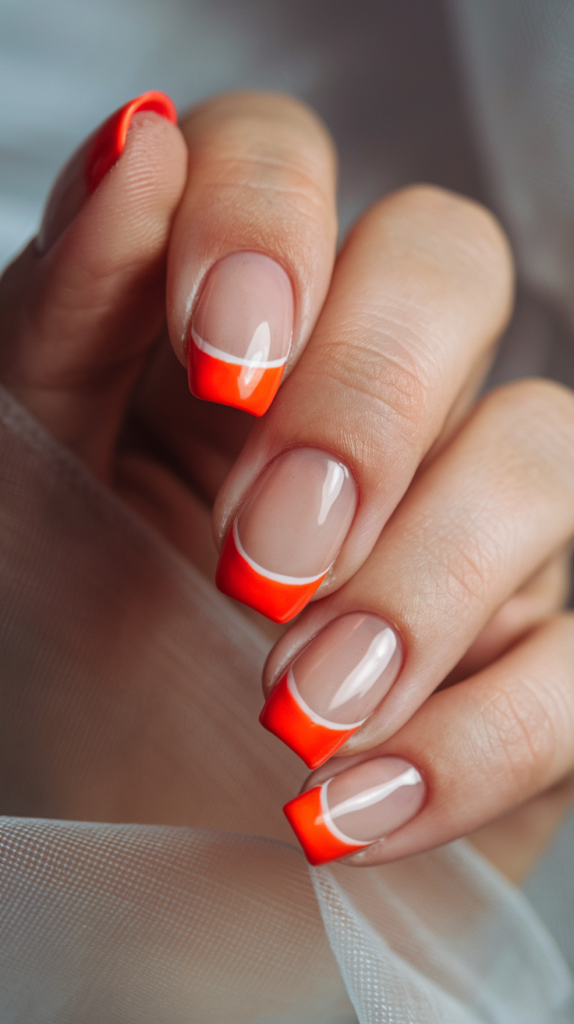
The Tangerine Tips look is a vibrant take on the classic French manicure.
Begin with a sheer or nude base coat, allowing the bright orange tips to stand out.
Use a thin nail tape or stencil to create a clean line between the tip and the base, applying the orange polish with precision for a sharp, defined edge.
This twist on French tips gives nails a fresh and playful vibe.
Style Variations For Playful And Sophisticated Looks
For a more playful look, vary the thickness of the orange tips, or add a fine line of glitter along the edge.
Alternatively, for a sophisticated finish, opt for a glossy topcoat, or experiment with a matte finish to give the nails an understated yet chic appearance.
Orange Citrus Slice: Fresh And Fruity Nail Art
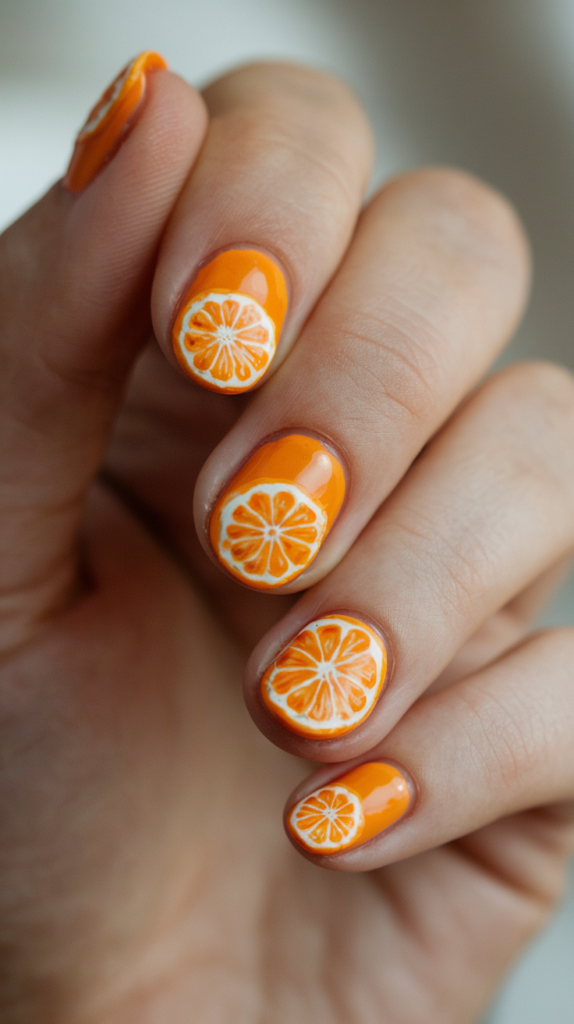
Detailed Design Ideas For Citrus Slice Accents
Orange Citrus Slice nails are perfect for a refreshing and fruity style.
Start with a base of bright orange polish, choosing a few accent nails for the citrus slice design.
Use a white polish to create thin, radial lines extending from a central point, resembling the inside of a citrus slice.
Small details like seeds can be added for an extra realistic effect.
Tips For Making The Tiny Orange Slices Look Hyperrealistic
To enhance the realism, add subtle shading near the edges of each slice with a slightly darker orange shade, creating depth and dimension.
A glossy topcoat will make the slices look juicy and fresh, capturing the essence of a real orange.
Burnt Orange Matte: Elegant And Understated Style
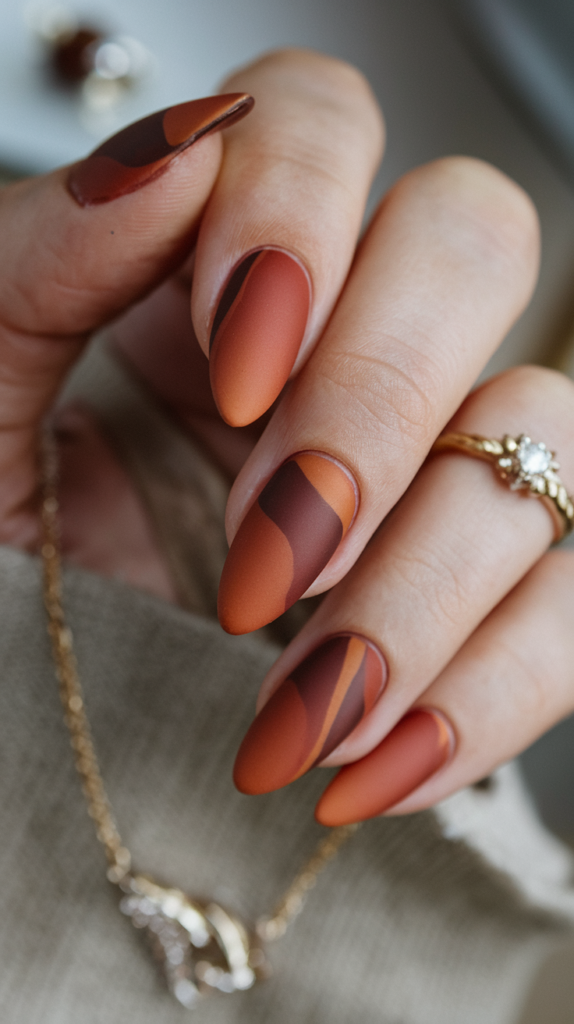
The Appeal Of Matte Finishes And Why Burnt Orange Works
The Burnt Orange Matte design is perfect for a sophisticated, understated look.
Burnt orange has a rich, warm tone that flatters all skin tones and adds a cozy, fall-inspired feel.
When paired with a matte finish, it transforms into a soft, velvety look, making it an excellent choice for a chic and elegant style.
Tips For Maintaining A Smooth Matte Look
Matte polish can sometimes look uneven, so ensure each layer dries completely before applying the next.
Consider a matte topcoat to seal in the color and give a flawless finish.
Avoid touching your nails during the drying process to maintain a smooth, velvety texture.
Orange Glitter Glam: Adding Sparkle And Sophistication
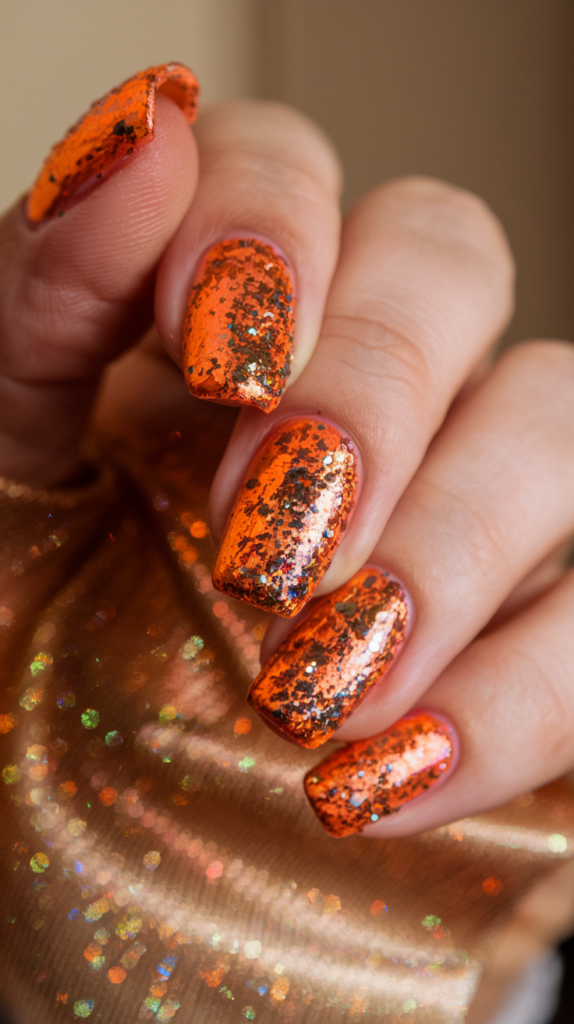
Choosing The Right Glitter For A Glamorous Orange Effect
To create an Orange Glitter Glam look, select a fine glitter polish with gold or holographic elements, enhancing the base orange color with a hint of sparkle.
A chunky glitter option also works well for an eye-catching, glamorous effect, adding depth and dimension to each nail.
Best Practices For Applying And Sealing Glitter Polish
For a long-lasting glitter look, start with a base coat of orange polish, followed by a layer of glitter.
Using a dabbing motion, carefully apply the glitter polish to ensure even distribution, concentrating on areas where you want more shine.
Finish with a clear topcoat to smooth and seal the glitter, enhancing its shine and durability.
Autumn Leaves: Bringing Fall Foliage To Your Fingertips
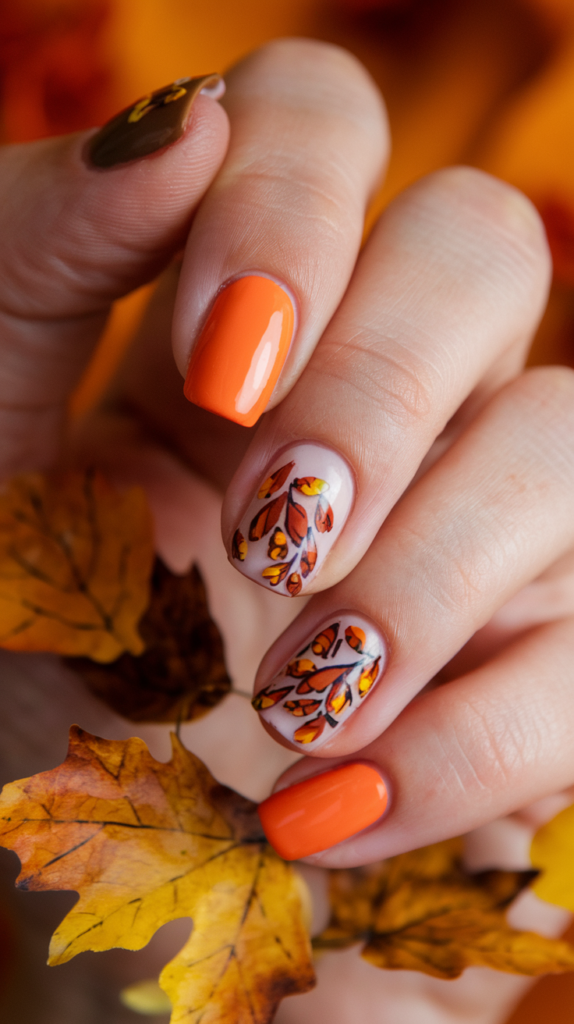
Step-By-Step For Leaf Patterns In Autumn Colors
The Autumn Leaves design brings the colors of fall to life with warm orange, yellow, and brown hues.
Start with an orange base, using a fine nail art brush to create delicate leaf patterns in shades of yellow and brown on a few accent nails.
Techniques For Adding Realistic Leaf Texture
To achieve a realistic effect, add subtle veins and shading to each leaf, giving it a textured look.
Use a thin brush to add brown detailing along the edges of each leaf, then apply a glossy topcoat to give the nails a polished, natural appearance.
Tiger Stripes: Fierce And Fashionable Animal Print Nails
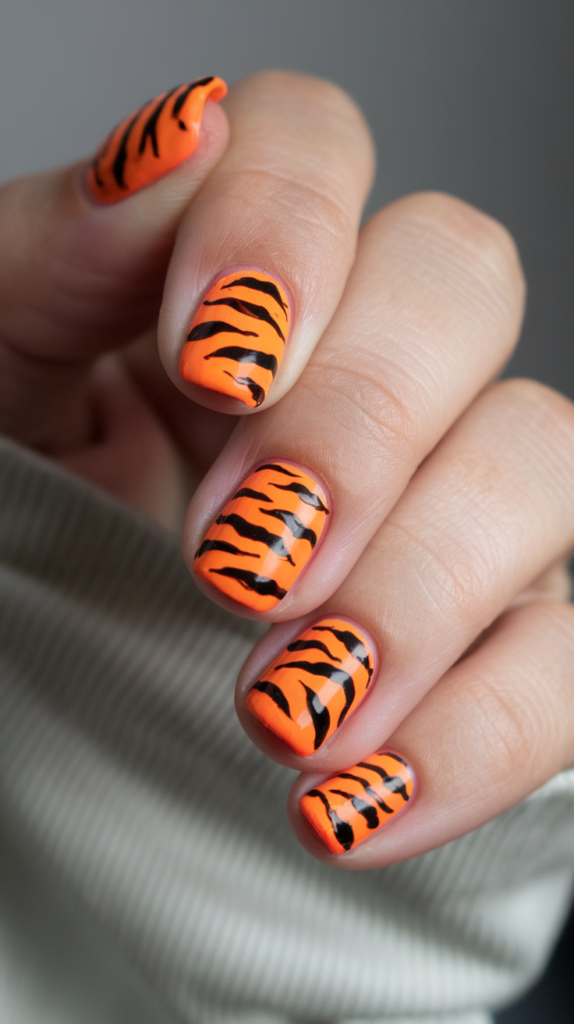
Creating Bold Tiger Stripes Over An Orange Base
Tiger Stripes are a bold statement, featuring black stripes over a bright orange base for a wild, edgy look.
Start with a solid orange base, allowing it to dry completely before adding the stripes.
Use a fine brush or nail art pen to create jagged, irregular lines that resemble tiger stripes.
Tips For A Professional-Looking Animal Print Effect
For a more natural look, vary the thickness and length of each stripe.
To make the stripes stand out, apply a glossy topcoat, enhancing the contrast between the orange and black for a high-impact, professional finish.
Orange Chrome: Futuristic Shine With A Metallic Finish
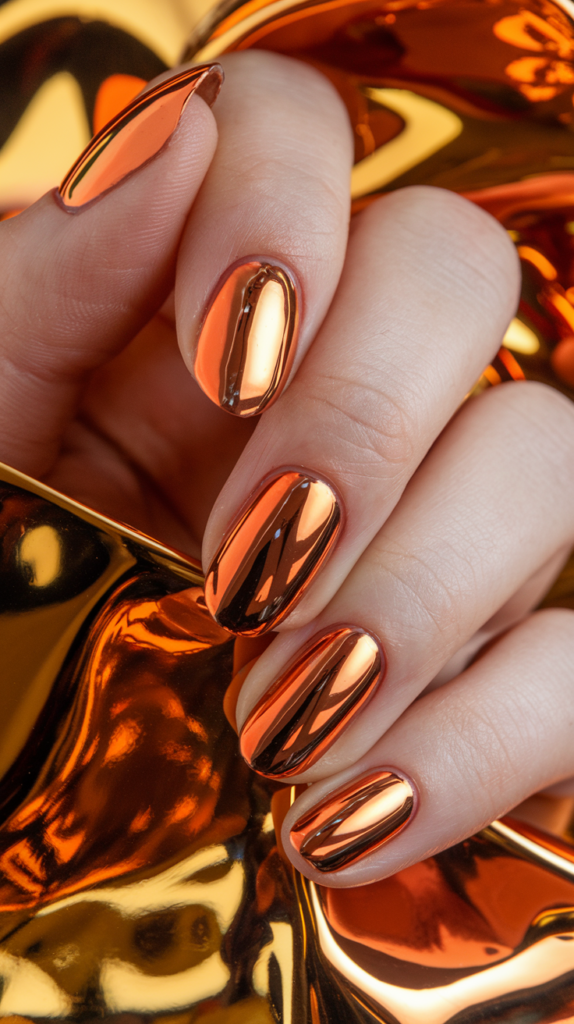
How To Achieve A Reflective, Orange Chrome Look
Orange Chrome nails create a stunning, reflective effect with a futuristic vibe.
Apply a chrome powder or polish over a layer of gel polish, buffing the powder until the metallic finish is smooth and even.
A chrome effect amplifies the orange’s intensity, adding depth and dimension to each nail.
Tips For Long-Lasting Chrome Manicures
To ensure the chrome effect lasts, apply a topcoat designed specifically for chrome or metallic nails, as this will protect the reflective surface without dulling the shine.
Avoid using harsh products on your hands, as they can damage the chrome finish.
Sunflower Accent: Adding Nature’s Radiance To Orange Nails
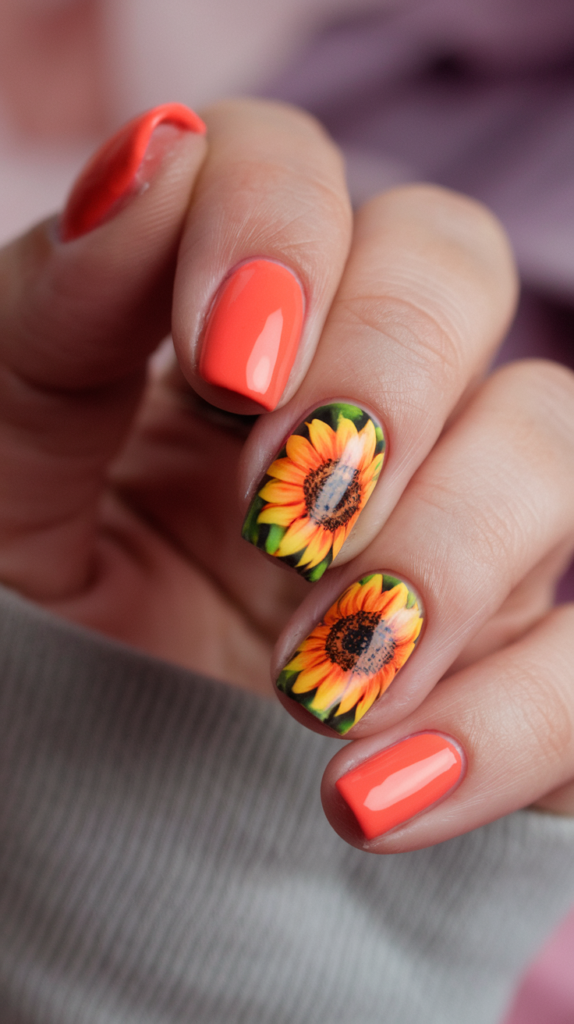
Creating A Sunflower Accent Nail With Hyperrealistic Details
The Sunflower Accent design is perfect for those looking to add a natural, radiant touch to their orange nails.
Begin by applying a vibrant orange base coat.
Select one or two nails to serve as accent nails, and on these, use a detailed brush to paint a bright yellow sunflower.
Start with the petals, carefully adding individual strokes to create realistic petal shapes.
Paint a dark brown or black center with tiny dots around the edges to mimic the sunflower’s texture.
Ideas For Complementary Colors And Finishes
Complementary colors like green or white on the non-accent nails can enhance the sunflower’s brightness.
For a softer look, a matte finish brings out the warmth of the sunflower and orange base, while a glossy topcoat will make the sunflower’s details appear more vivid and dimensional.
Tropical Sunset: Vacation Vibes With Palm Silhouettes
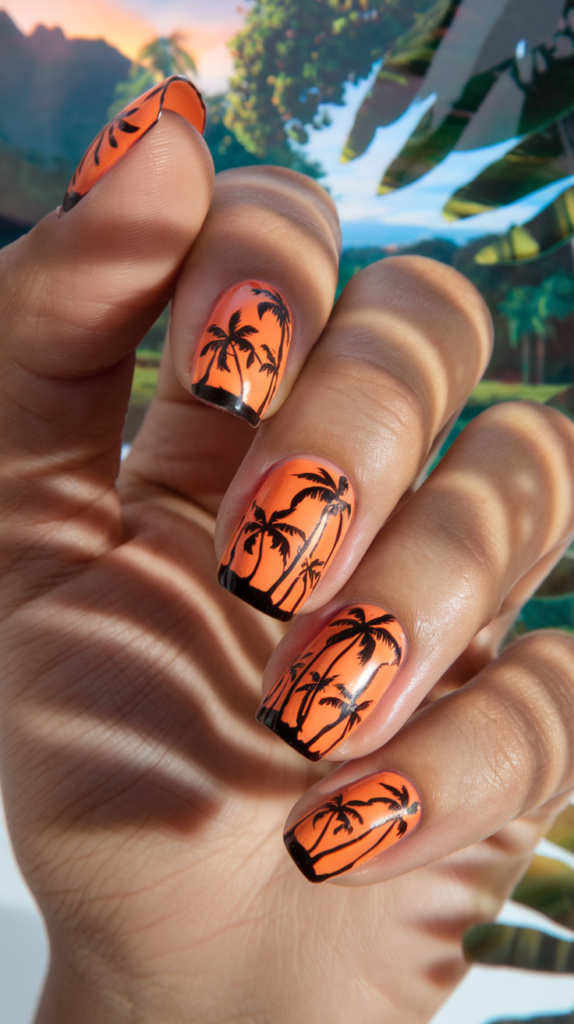
Steps For A Tropical Sunset Effect With Palm Tree Details
Capture the essence of a tropical beach vacation with a sunset-inspired nail design.
Begin with an orange gradient that fades from a soft yellow near the cuticle to a deep orange or coral near the tips.
Use a fine brush to paint tiny black palm tree silhouettes on a few nails, ensuring the lines are precise and thin to give a realistic effect.
Focus on detailing the tree trunk and adding fronds that spread out gracefully.
Tips For Smooth Gradients And Realistic Silhouettes
To perfect the gradient, use a sponge to blend the colors seamlessly, creating a soft transition.
Apply a glossy topcoat to seal in the design and add a smooth, polished look that brings out the tropical sunset effect.
The palm silhouettes should be carefully painted to avoid smudging; a quick-drying topcoat can help to lock in the details quickly.
Coral Marble: Swirling Patterns Of Orange, White, And Gold
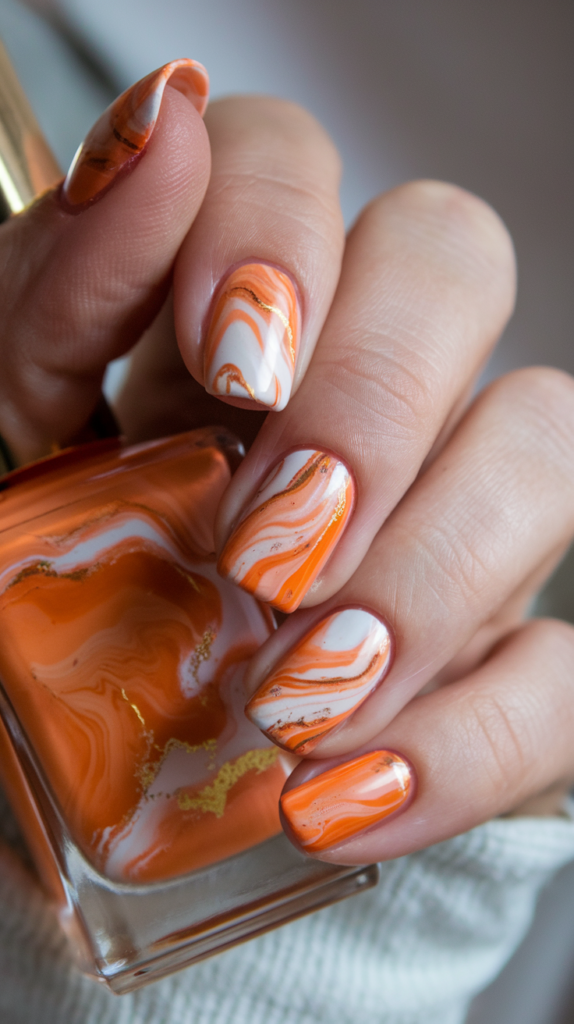
Marble Nail Technique For Intricate Coral Effects
The Coral Marble design combines the warmth of orange with the sophistication of marble.
Begin with an orange or coral base, then add drops of white and gold polish while the base coat is still wet.
Use a fine nail brush or toothpick to swirl the colors together, creating intricate marble patterns.
Be careful not to over-mix, as the colors should retain distinct swirls for a true marble effect.
Choosing The Right Colors For A Warm, Coral-Inspired Look
Opt for shades that harmonize with the base color, such as soft coral pinks, metallic gold, or even a hint of white.
For added depth, a glittery gold can enhance the marbled effect.
A glossy topcoat will highlight the marbling and give the nails a smooth, polished finish.
Checkerboard Charm: Trendy And Timeless Orange Patterns
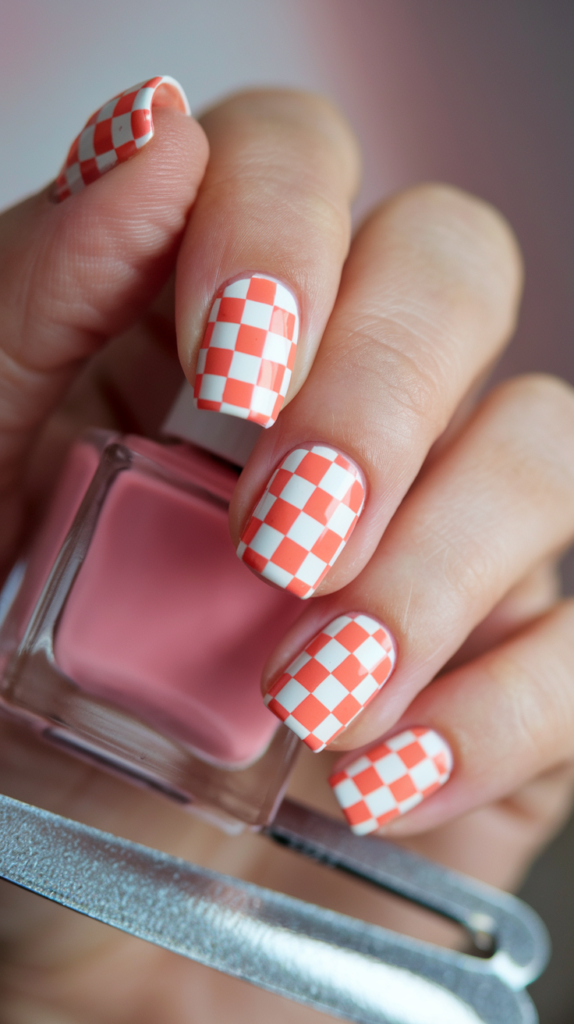
How To Create A Checkerboard Pattern With Orange And White
A Checkerboard Charm nail design combines a playful pattern with a bright orange hue.
Start with a white or orange base, and use thin nail tape or a fine brush to create a checkerboard grid.
Fill alternating squares with the contrasting color, carefully painting within each square to ensure clean lines.
Tips For Precise Lines And Trendy Combinations
For a more vibrant design, alternate the shades of orange used in the checkerboard pattern.
High-gloss or matte finishes both work beautifully with this style, adding a modern touch to a classic pattern.
A glossy topcoat can help smooth out any uneven edges, making the design appear seamless and polished.
Orange Flames: A Fiery, Edgy Look For Bold Personalities
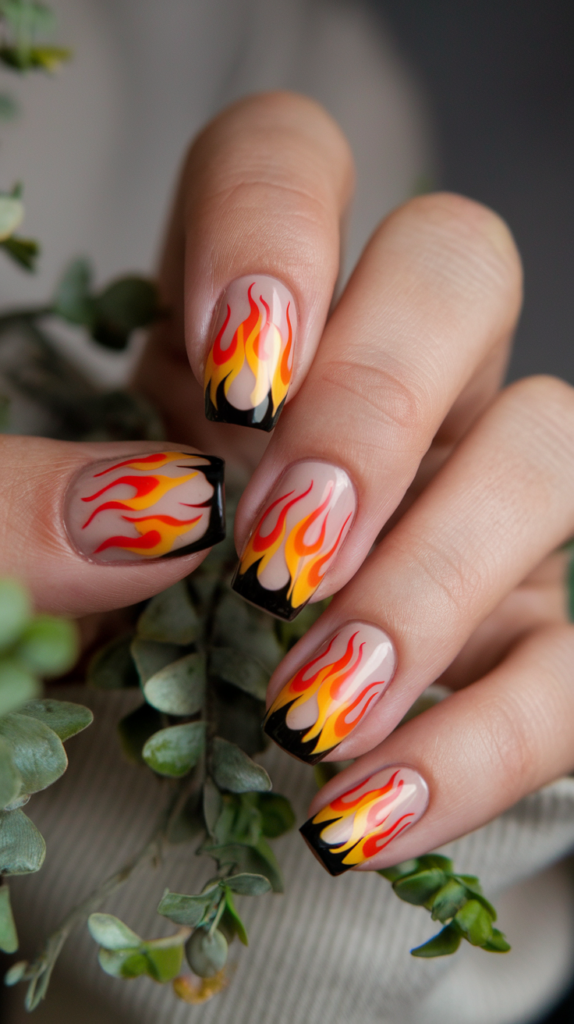
Steps For Painting Realistic Orange Flames
The Orange Flames design brings a bold, edgy aesthetic to your nails, perfect for those who want to make a statement.
Begin with a neutral or black base, then use a fine brush to paint flames in bright orange, starting from the cuticle and flicking outward.
Gradually lighten the orange as you reach the tips of the flames, creating a natural, fiery gradient.
Ideas For Base Colors That Make The Flames Pop
A black base provides high contrast, making the flames stand out vividly.
A clear or nude base offers a more subtle background, allowing the flames to appear as though they’re floating.
Finish with a glossy topcoat to enhance the fiery effect and add depth to the flames.
Abstract Orange Splatters: Artsy And Playful Nail Art
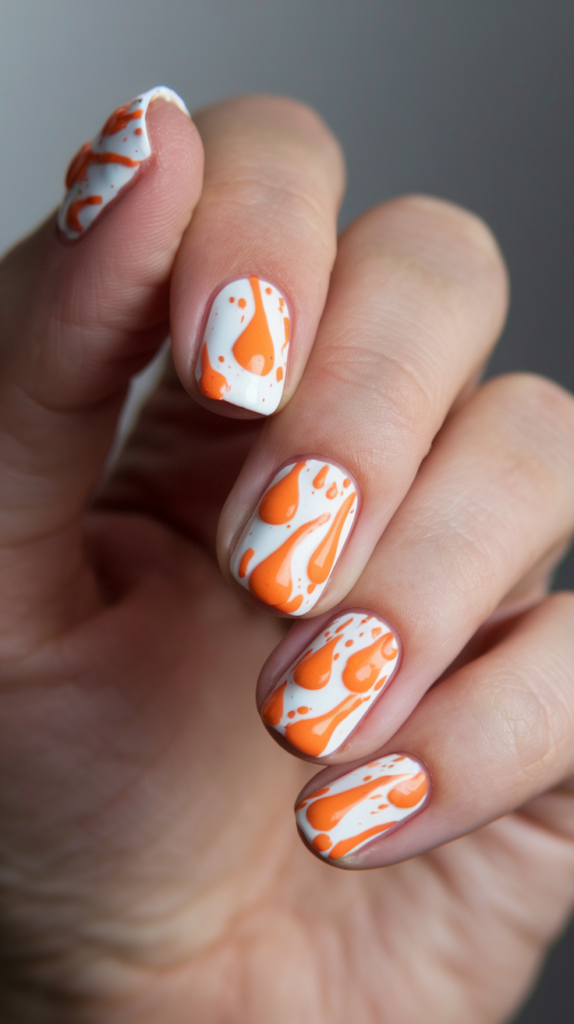
Techniques For Creating Splatter Patterns With Orange Paint
Abstract Orange Splatters give nails a playful, artsy vibe.
Start with a white base, then use a toothbrush or nail brush dipped in orange polish to flick paint onto the nails.
Vary the amount of polish on the brush to create different splatter sizes, adding an organic, unique touch to each nail.
Ideas For Background Colors And Finishes
A white or nude base lets the orange splatters stand out, while a glossy topcoat will enhance the splatter’s texture.
For a bolder look, try layering multiple shades of orange or adding gold accents to the splatters for a luxurious effect.
Pumpkin Spice: Embracing Fall With Tiny Pumpkin Illustrations
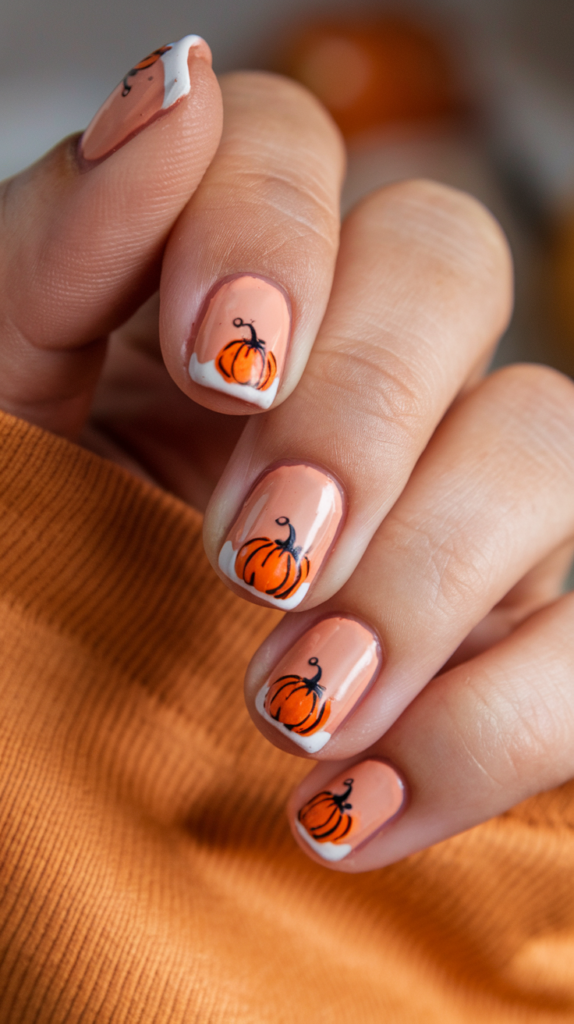
Designing Autumn-Inspired Pumpkin Nails In Orange Tones
The Pumpkin Spice nail design embraces the fall season with tiny, hand-painted pumpkins.
Start with a warm, burnt orange base, then use a fine brush to paint small pumpkins on a few accent nails.
Outline each pumpkin in a slightly darker orange shade, adding lines to create the pumpkin’s ribbed effect.
Tips For Adding Realistic Pumpkin Details And Shading
To make the pumpkins look more realistic, add highlights with a lighter shade of orange or even a hint of white.
A thin line of brown at the top of each pumpkin can serve as a stem, completing the look.
A matte topcoat will give this design a cozy, autumnal feel.
Golden Orange Glitter Gradient: Glamorous Nails With A Festive Flair
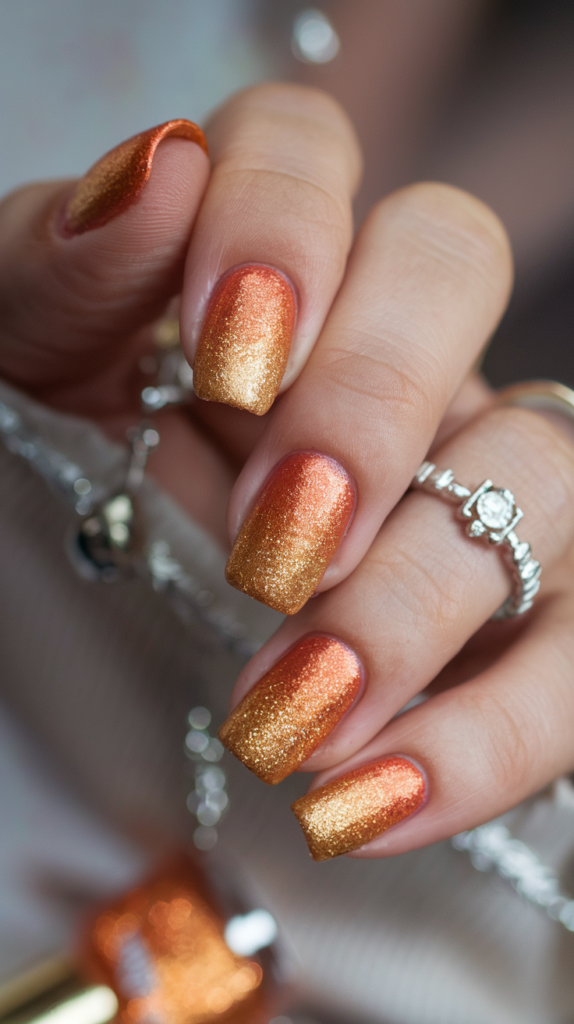
Creating A Gradient Effect From Orange To Gold Glitter
For a glamorous look, the Golden Orange Glitter Gradient features a stunning fade from orange to gold glitter at the tips.
Start with an orange base, applying glitter polish at the tips of each nail and gradually thinning out as you move toward the cuticle.
The result is a smooth transition that creates a sparkling, elegant effect.
Best Practices For Even Glitter Application
To avoid clumping, apply the glitter polish using a sponge, gently dabbing it onto the tips of each nail.
This technique concentrates the glitter, giving a more even application.
Seal with a glossy topcoat to smooth out the glitter, enhancing the sparkle and adding a polished finish.
Sunburst Mandala: Boho-Inspired Patterns In Bright Orange
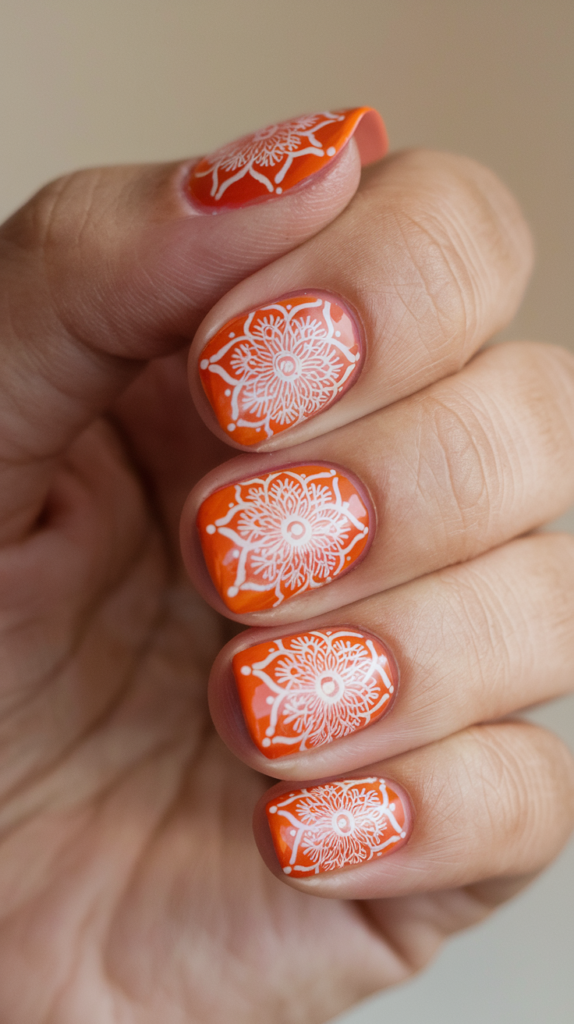
Steps For Intricate Mandala Designs On An Orange Base
The Sunburst Mandala design captures a bohemian essence with intricate mandala patterns.
Start with a bright orange base, then use a fine brush to paint mandala shapes in white, gold, or yellow.
Begin from the center and work outward, creating symmetrical patterns with dots, lines, and tiny shapes for a detailed look.
Tips For Achieving Symmetrical, Bohemian-Style Patterns
Use a thin brush for precise lines and a steady hand to ensure symmetry.
A glossy topcoat will enhance the fine details, giving the nails a cohesive, polished finish.
For a more layered effect, consider adding a hint of glitter or metallic accents within the mandala.
Orange French Fade: A Unique Twist On French Manicure Style
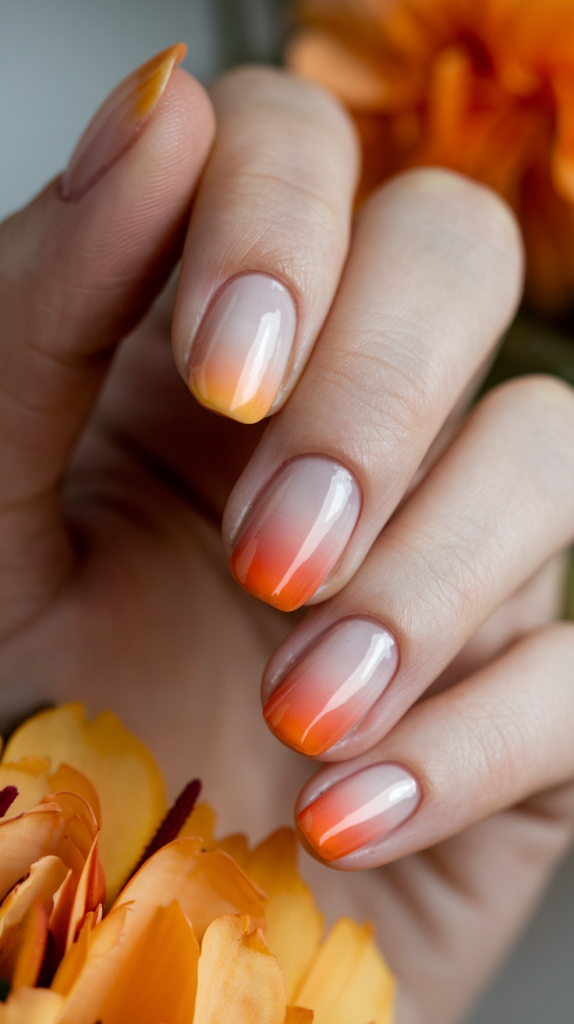
Techniques For Creating An Orange Gradient French Fade
The Orange French Fade is a modern take on the classic French manicure, using a gradient effect instead of a solid color.
Begin with a light peach or nude base, then use a makeup sponge to blend a gradient from the tip to the middle of each nail, transitioning from a soft orange to a deeper shade.
Suggested Color Tones For A Soft And Subtle Look
Opt for pastel oranges or muted peach tones for a subtle, sophisticated look.
For added warmth, a high-gloss topcoat will make the gradient blend smoothly, adding a touch of elegance to the design.
Peachy Polka Dots: Retro Vibes With Contrasting Dots
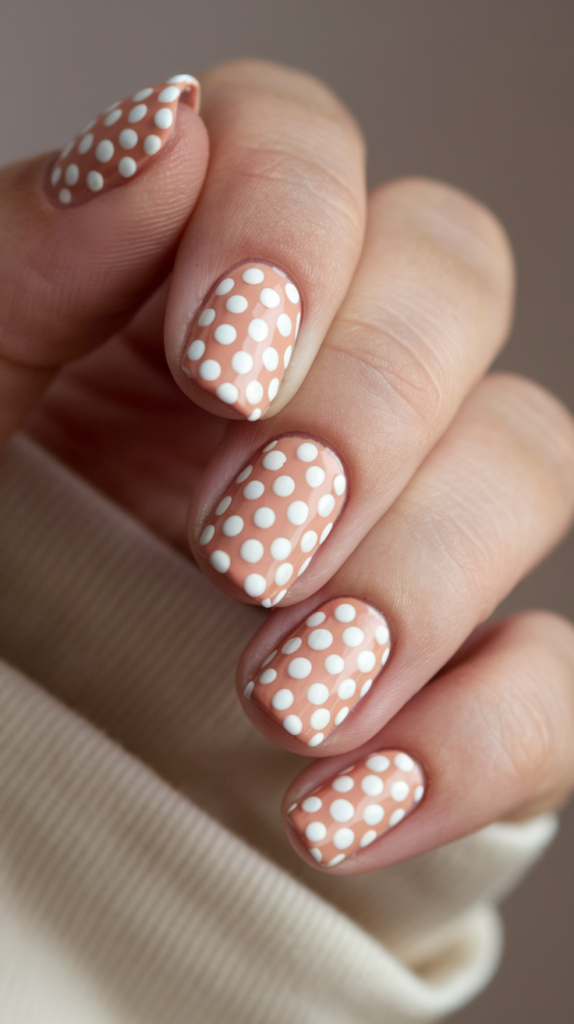
Designing Playful Peach-Orange Nails With White Polka Dots
Peachy Polka Dots bring a retro charm to orange nails.
Start with a peach or pastel orange base, then use a dotting tool or fine brush to add evenly spaced white polka dots.
Each dot should be round and uniform in size, giving the nails a playful, retro-inspired look.
Tips For Perfectly Spaced, Evenly Sized Dots
To maintain consistency, use a dotting tool dipped in white polish and press lightly on the nail.
Space the dots evenly across each nail for a clean, organized look.
A glossy topcoat can enhance the retro feel, adding a polished shine that completes the look.
Leopard Print Accent: Wild And Stylish Patterns On Orange Nails
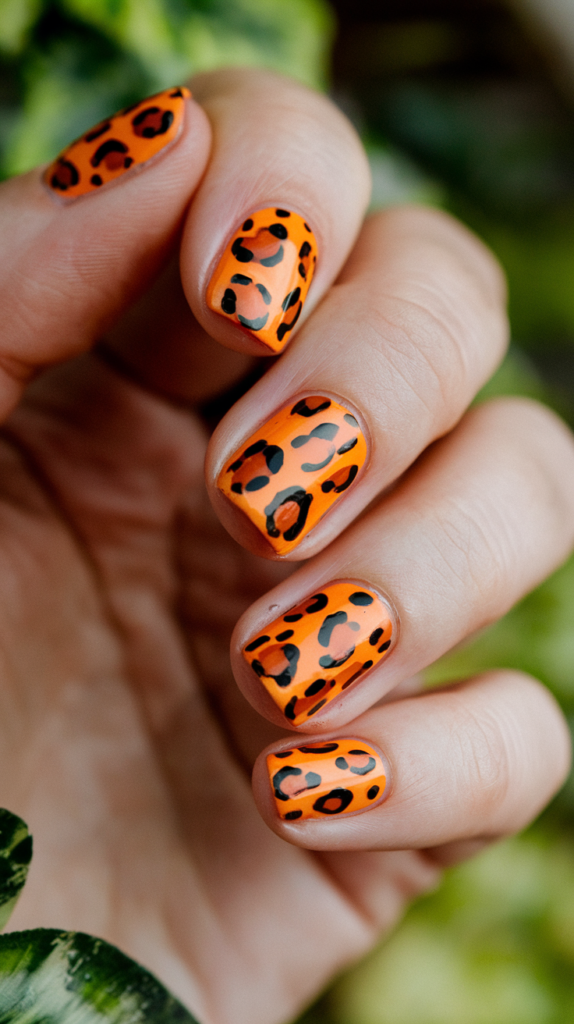
How To Create Leopard Print Over An Orange Base
The Leopard Print Accent combines the vibrancy of orange with the boldness of animal print.
Start by applying a bright orange base coat and allowing it to dry completely.
On one or two accent nails, use a fine brush to create small, uneven spots in black or dark brown, resembling the irregular pattern of leopard spots.
Leave space between each spot, and add smaller dots or irregular shapes around them to mimic a natural leopard print.
Accent Nail Ideas And Complementary Colors
To make the leopard print stand out, keep the remaining nails in a solid orange or a muted nude shade, allowing the accent nails to capture attention.
A glossy finish will enhance the pattern’s depth, while a matte topcoat provides a soft, velvety texture for a modern touch.
If you want extra dimension, use metallic or glitter polish for the spots, adding a bit of shimmer to the wild design.
Halloween Vibe: Festive Nail Art With Bats, Webs, And Pumpkins
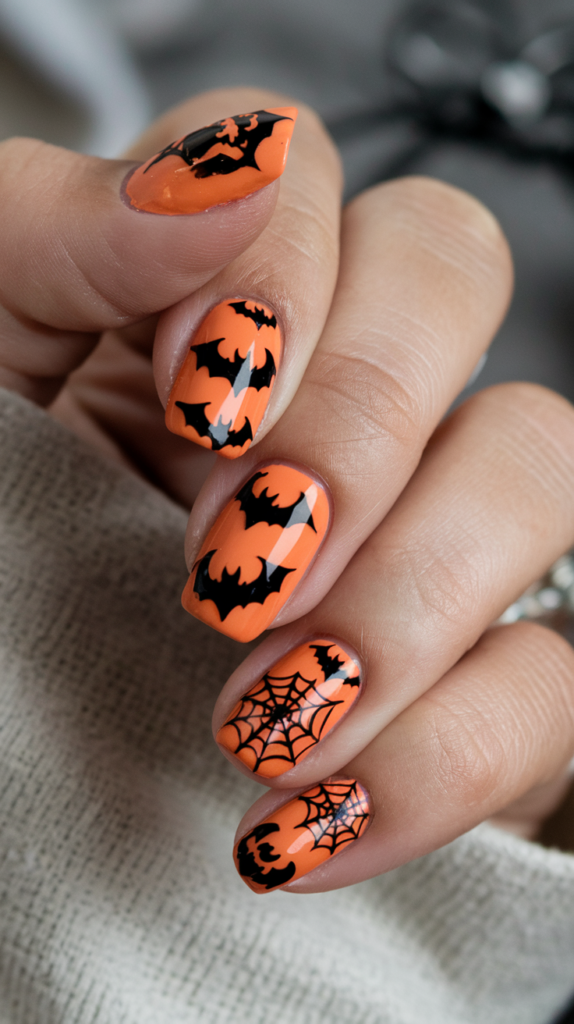
Halloween-Inspired Patterns To Add To Orange Nails
For a Halloween Vibe, bring festive flair to your orange nails with spooky yet fun designs.
Begin with a vibrant orange base, symbolizing the classic Halloween pumpkin.
On each nail, paint simple black silhouettes, like bats, spider webs, or tiny pumpkin faces.
For the spider webs, use a thin nail art brush to draw delicate, intersecting lines that spread across the nail.
Bats can be painted in small, rounded shapes with tiny wings, while pumpkin faces can feature classic jack-o’-lantern expressions.
Tips For Making Seasonal Designs Look Bold And Fun
To add a playful touch, vary the designs on each nail, creating a mix of Halloween symbols.
Adding a layer of glitter on a few nails will make the designs pop and give them a festive, shimmering effect.
A glossy topcoat will keep the designs looking sharp and polished, while a matte finish can add a spooky, mysterious edge to the Halloween look.
Pastel Orange And White Swirls: Soft, Retro-Inspired Patterns
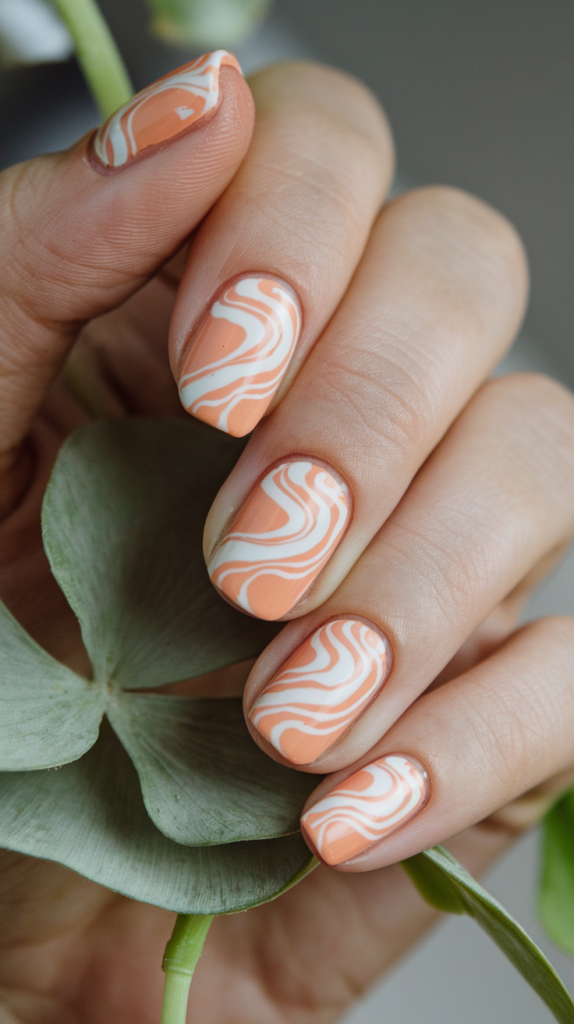
Techniques For Creating Pastel Swirls In Orange And White
Pastel Orange and White Swirls bring a soft, retro-inspired feel to your nails.
Begin with a base coat in pastel orange, then use a fine brush to create swirling white lines across each nail, mimicking the flowy, organic shapes of vintage designs.
Work in gentle curves and loops, keeping the lines smooth and continuous for a relaxing, soft aesthetic.
Tips For A Smooth, Glossy Finish
For a glossy, even finish, apply a clear topcoat once the swirls are dry.
This will enhance the pastel tones, giving them a polished shine that completes the retro look.
If you want a more subtle effect, keep the swirls thin, adding only one or two per nail to maintain a minimalist design.
Gingham Pattern: Picnic-Ready Orange And White Checkered Nails
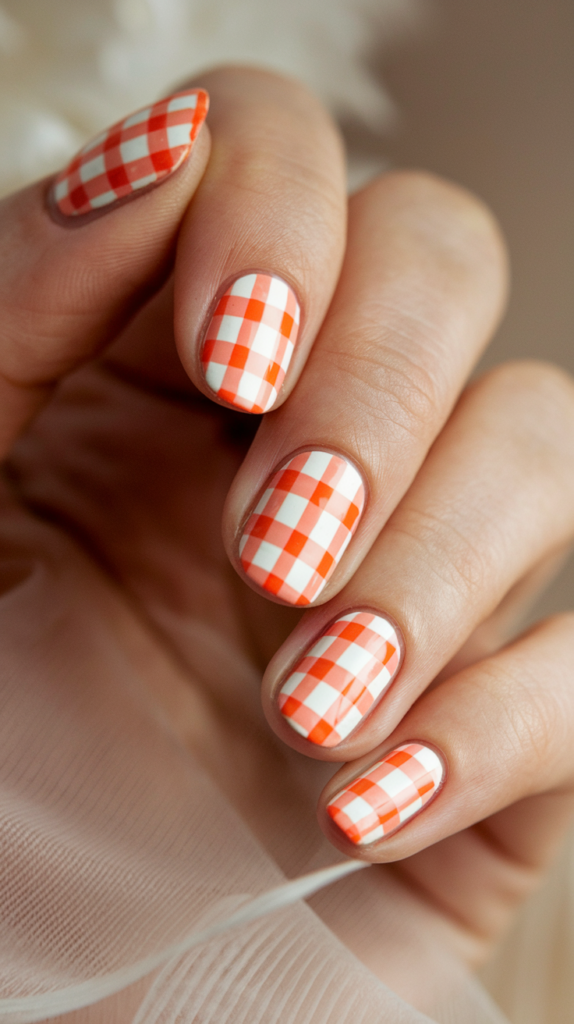
Creating A Gingham Pattern For A Cute, Stylish Look
The Gingham Pattern nail art channels a cute, picnic-ready vibe with its checkered orange and white design.
Start with a white base coat and use thin nail tape to create a grid across each nail.
Paint over the tape with a bright orange polish, then carefully remove the tape to reveal a perfect gingham pattern.
Each square should be evenly spaced, forming a crisp, clean checkered design.
Best Color Combinations And Layout Tips For Perfect Squares
If you want a softer look, opt for a pastel orange instead of a bright shade.
For added contrast, consider painting a few squares with a gold or metallic orange accent.
Seal the design with a glossy topcoat to highlight the pattern’s detail, or choose a matte finish to give the gingham design a soft, fabric-like texture.
Orange Floral Delight: Delicate And Fresh Floral Nail Art
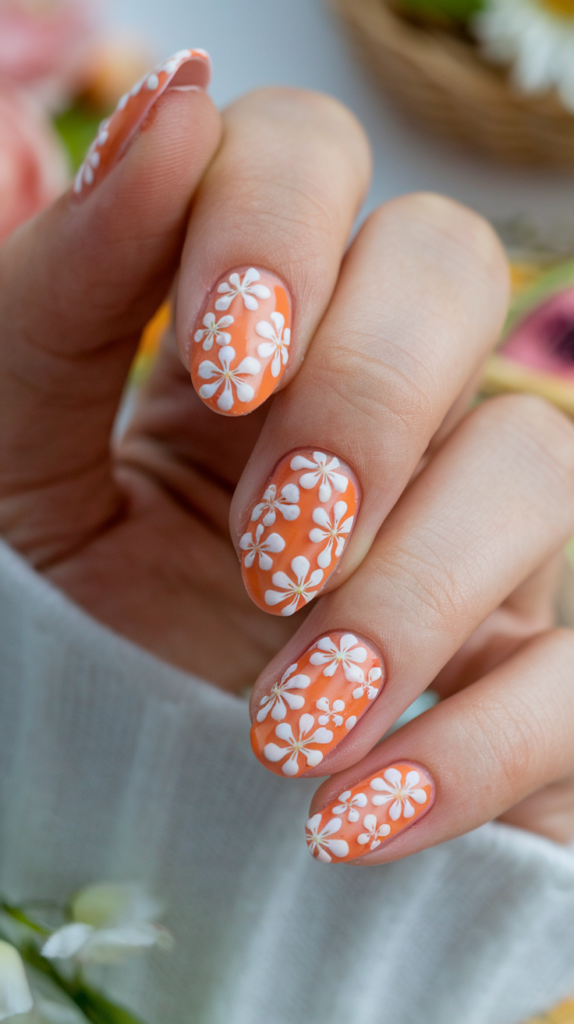
Painting Detailed White Flowers Over An Orange Background
Orange Floral Delight combines the warmth of orange with the delicacy of floral patterns.
Begin with a bold orange base, then use a fine brush to paint tiny white flowers on each nail or select a few as accent nails.
Start with a dot in the center of each flower and add small, rounded petals around it, keeping the design dainty and detailed.
Tips For Achieving A Natural, Spring-Inspired Look
To add a touch of realism, use a lighter shade of orange for subtle shading on each petal.
For a more intricate design, add tiny green leaves around the flowers, giving them a fresh, spring-inspired look.
A glossy topcoat will bring out the color vibrancy, while a matte finish offers a soft, garden-inspired aesthetic.
Coral Reef Fantasy: Ocean-Inspired Orange Nails With Seashell Accents
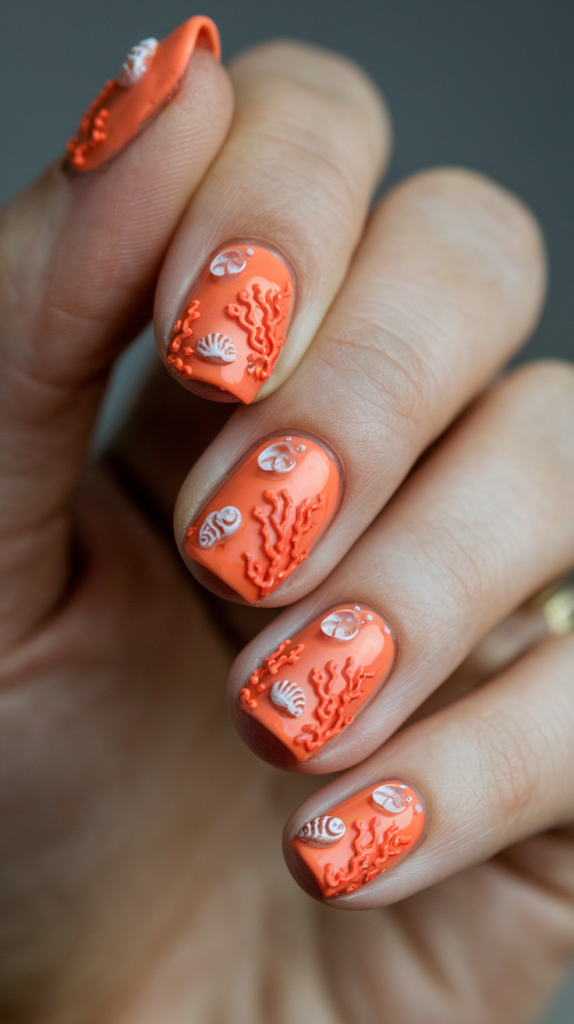
How To Create Coral-Inspired Nails With Sea Elements
Coral Reef Fantasy nails bring an oceanic twist to your nail art with sea-inspired designs in warm orange tones.
Start with a coral-orange base to evoke a tropical reef, and add tiny seashell or starfish accents using a fine brush.
You can also incorporate tiny bubble-like dots in white or light blue to resemble underwater textures.
Adding 3D Seashells And Bubbles For A Realistic Effect
For added realism, consider using small, 3D seashell stickers or rhinestones.
Place these on a few accent nails, creating a multi-dimensional, undersea effect.
Apply a glossy topcoat to mimic the look of wet, underwater elements, making the design feel as if it’s fresh from the ocean.
Orange Ombré With Rhinestones: Adding Sparkle To Soft Gradients
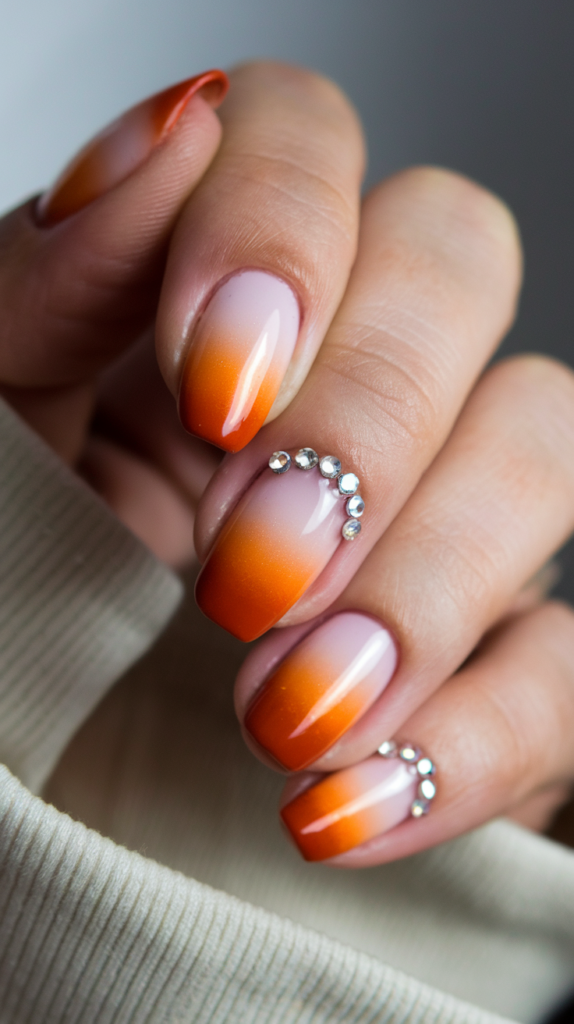
Steps For Creating A Smooth Orange Ombré Effect
The Orange Ombré with Rhinestones design is both elegant and eye-catching.
Begin with a light peach base, using a makeup sponge to blend from a light orange near the cuticle to a deep, rich orange at the tips.
This ombré effect adds depth and sophistication, with colors flowing seamlessly.
Tips For Placing Rhinestones In Eye-Catching Patterns
Once the ombré is complete, add rhinestones near the cuticle or along the ombré line.
For a simple look, place one small rhinestone at the base of each nail.
For more glamour, arrange rhinestones in a crescent shape or scatter them across one or two accent nails.
Finish with a clear topcoat to secure the rhinestones and give the nails a lasting shine.
Candy Corn: Sweet And Festive Tri-Color Design For Fall
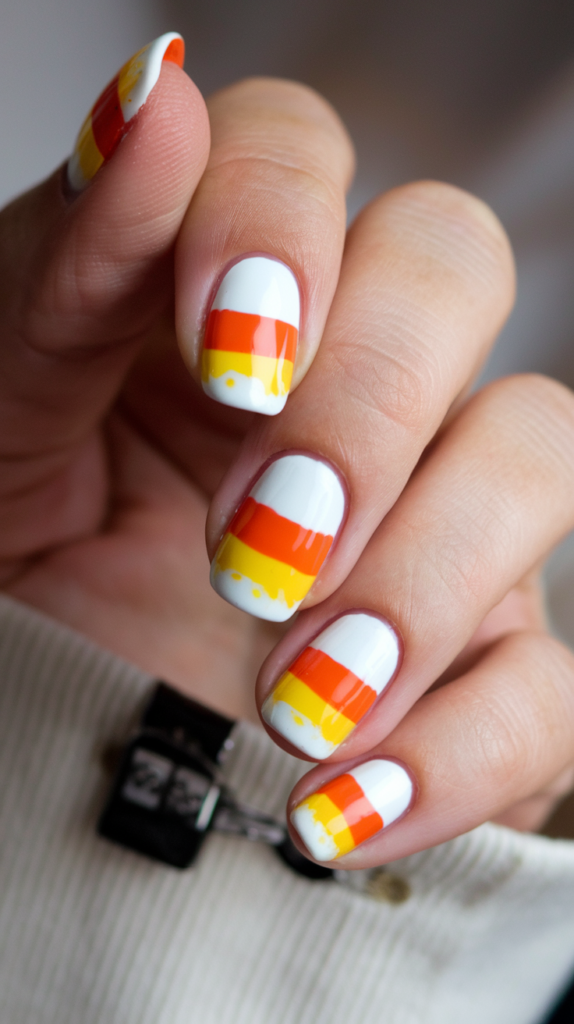
Painting Orange, White, And Yellow For A Candy Corn Effect
The Candy Corn design is a sweet, festive look ideal for fall.
Begin with a white base, applying orange and yellow in layered bands to mimic the colors of candy corn.
Start with yellow at the tip, followed by orange in the middle, and white near the cuticle.
Each band should be even and distinct, capturing the candy’s iconic tri-color design.
Tips For Sharp Lines And A Shiny Finish
To create sharp, clean lines between colors, use nail tape as a guide.
A glossy topcoat will make the colors pop, adding a smooth, candy-like shine that enhances the festive theme.
For added detail, consider adding a thin line of gold or glitter polish between each color band, giving the design a touch of sparkle.
Minimalist Orange Dots: Subtle And Stylish Pops Of Orange
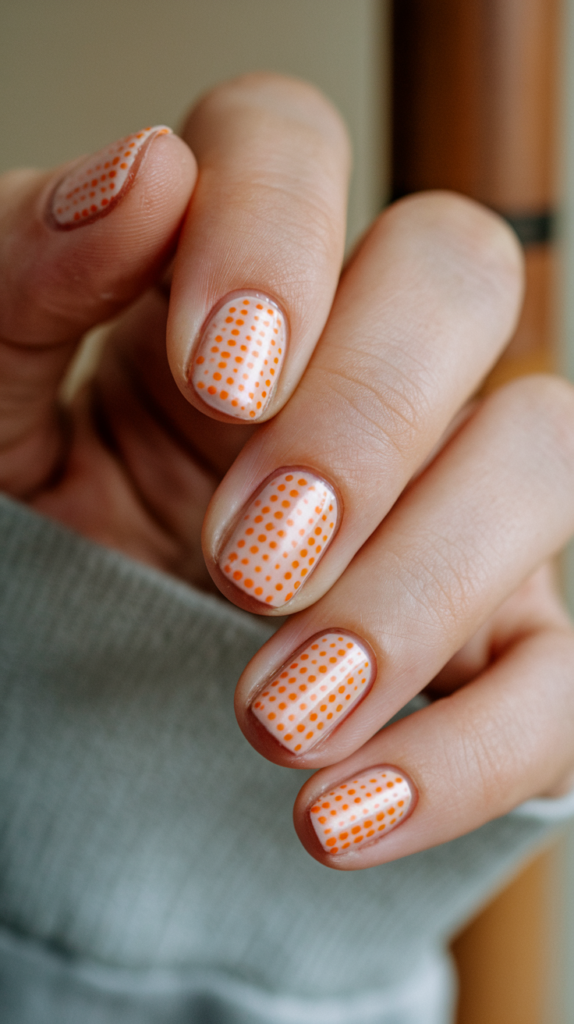
Designing Minimalist Dots On A Nude Base
Minimalist Orange Dots add a subtle yet stylish touch to nude nails.
Start with a clear or nude base and use a dotting tool to apply small orange dots near the cuticle or randomly across the nails.
The simplicity of the design keeps it modern and chic, allowing the orange to pop against the nude background.
Ideas For Arranging Dots For A Modern, Sleek Look
For a sophisticated look, arrange the dots in a straight line down the center of each nail or cluster them near the cuticle.
A matte topcoat can give the design a soft, minimal look, while a glossy topcoat adds polish and shine, making the orange dots stand out.
Geometric Orange: Sharp Lines And Graphic Patterns
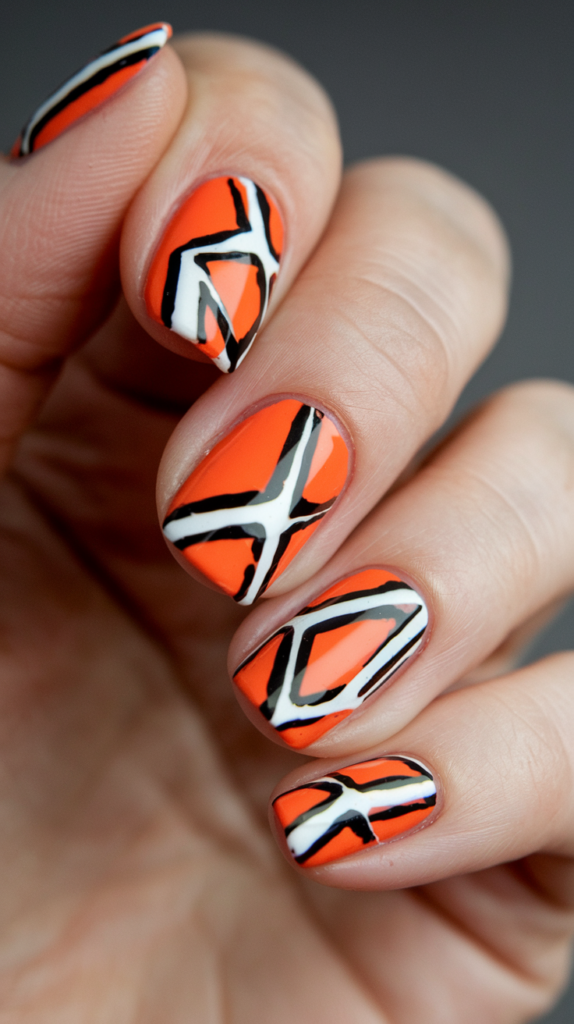
Creating Bold Geometric Patterns With Orange
Geometric Orange nails feature bold shapes and sharp lines for a graphic, modern style.
Begin with a solid orange base, using tape to create triangular, rectangular, or diagonal sections.
Paint each section in a contrasting color, like white or black, for high contrast.
Remove the tape carefully to reveal clean, precise lines.
Tips For Precision And Color Pairing Ideas
For an edgy look, use metallic silver or gold as accent colors within the geometric sections.
A glossy topcoat will give the design a polished, professional finish, while a matte finish offers a trendy, understated vibe.
Keep lines as sharp as possible to maintain the graphic effect, and ensure the colors complement each other for a cohesive look.
Orange And Nude Wave: Flowing, Organic Patterns For A Soft Look
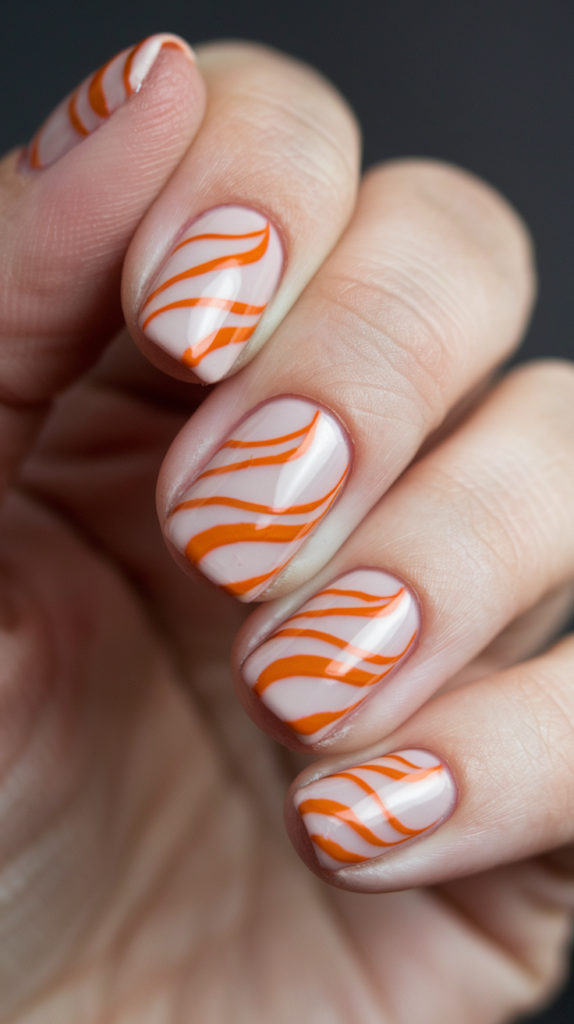
Steps For Creating Wavy Orange Lines Over A Nude Base
The Orange and Nude Wave design combines a natural, flowing pattern with the vibrancy of orange.
Start with a nude base coat, then use a fine brush to paint organic, wavy lines in various shades of orange across each nail.
The waves should vary in thickness and flow from one side of the nail to the other, creating a soft, relaxed aesthetic.
Ideas For Making The Waves Look Smooth And Seamless
To make the waves look fluid and seamless, use slightly watered-down polish for softer edges.
A matte topcoat enhances the natural, organic feel, while a glossy finish adds a polished shine.
To create dimension, consider using two or three shades of orange within the waves, layering them for a more intricate design.
Half Moon Orange: A Reverse French Manicure For A Chic Touch
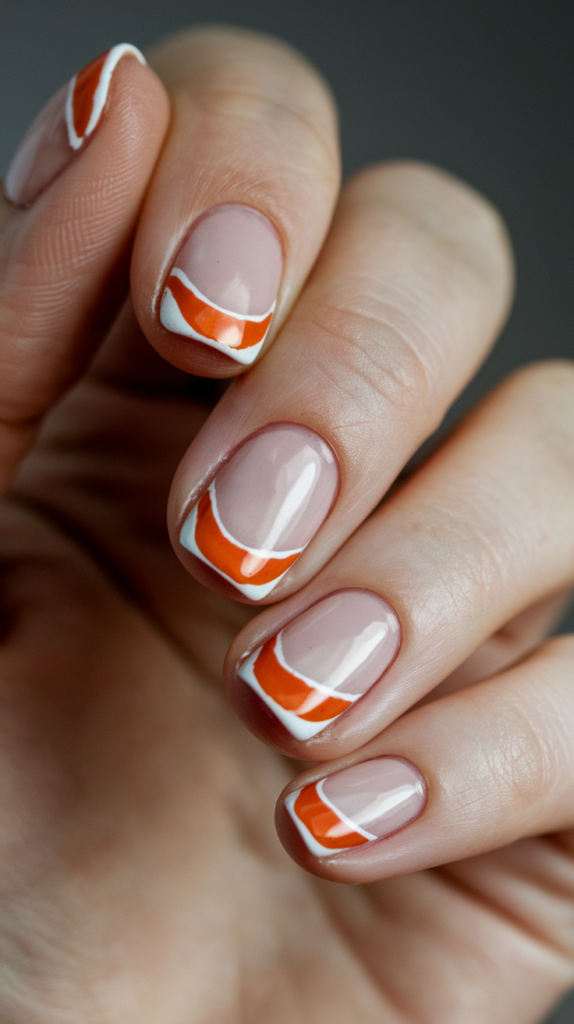
Painting An Orange Half-Moon At The Base Of Each Nail
The Half Moon Orange design is a chic, modern twist on the classic French manicure, with a bold half-moon shape painted near the cuticle.
Start with a nude or sheer base coat, then use a small, rounded brush to paint an orange half-moon at the bottom of each nail.
To achieve a perfectly curved shape, try using a guide sticker to outline the half-moon area.
Tips For Even, Smooth Curves
For a clean look, ensure the half-moon shapes are consistent in size and curve across each nail.
A glossy topcoat will add dimension and enhance the vibrant orange color.
For a touch of elegance, add a thin line of gold or silver polish along the curve of each half-moon, adding a hint of metallic shine.
Halloween Pumpkin Faces: Fun And Festive Orange Nail Art
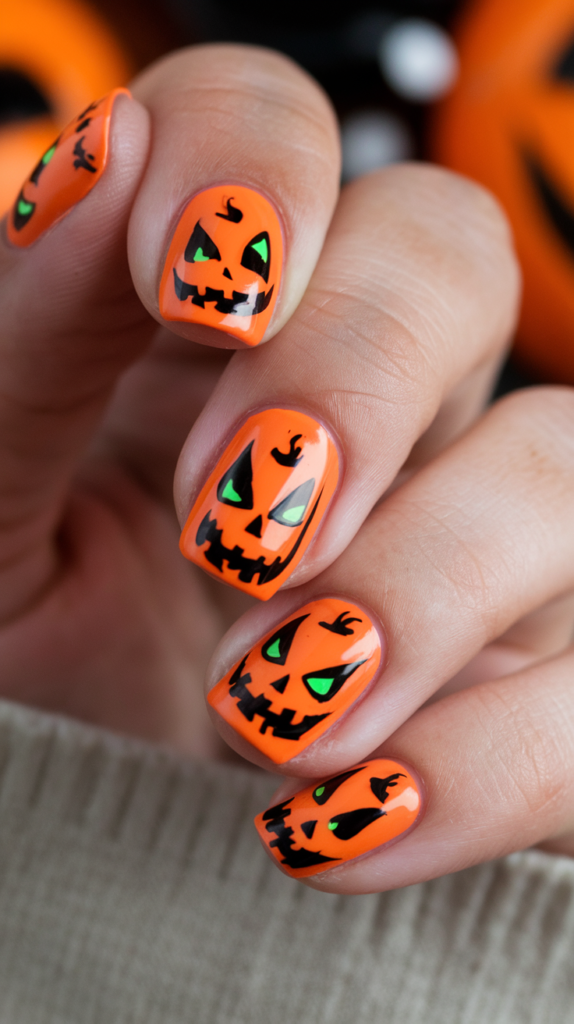
Steps For Creating Jack-O’-Lantern Faces On Orange Nails
The Halloween Pumpkin Faces design brings a festive, playful look to your nails, perfect for the spooky season.
Begin with a bright orange base, and on each nail, use a fine brush or nail art pen to paint small jack-o’-lantern faces.
Start with the eyes in simple triangle shapes, then add a smile or grin with a few jagged lines for a classic pumpkin expression.
Tips For Making The Faces Look Expressive And Vibrant
To add personality, vary the expressions on each nail, giving each jack-o’-lantern a unique look.
Add a glossy topcoat to enhance the bright orange and make the faces look vivid and bold.
If desired, outline the faces with a darker orange or black to give each pumpkin a more defined, expressive look.
Orange Starburst: Radiant Patterns For A Dazzling Look
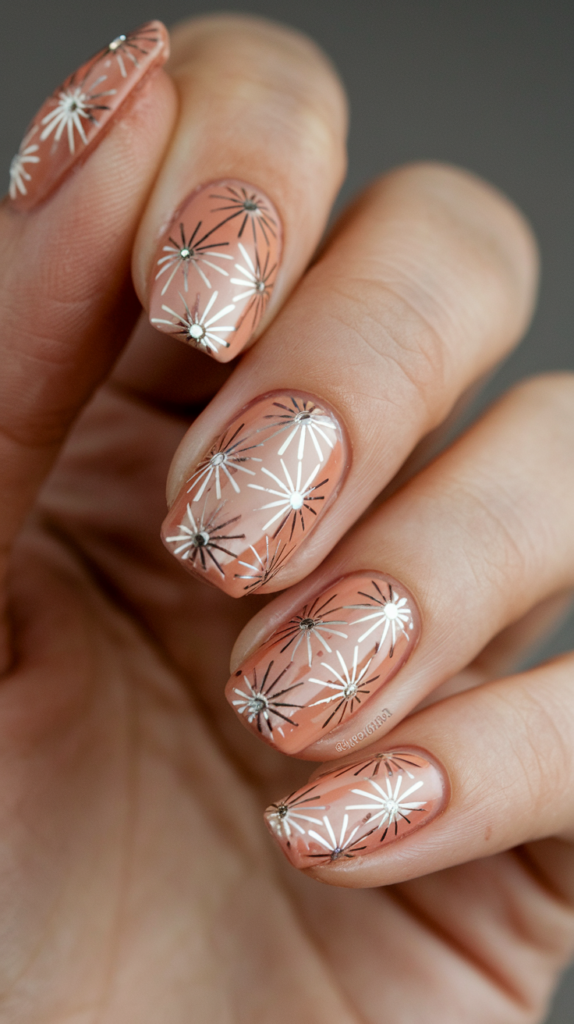
Designing Tiny White Or Silver Starbursts On Orange Nails
Orange Starburst nails combine vibrancy with a hint of sparkle, making them ideal for special occasions.
Start with a bright or deep orange base, then use a fine brush to add small, starburst designs in white or silver on a few accent nails.
Each starburst can start as a small dot with radiating lines extending outward, resembling tiny bursts of light.
Ideas For A Sparkly, Radiant Finish
To add extra sparkle, consider using a glitter polish on top of each starburst.
A high-gloss topcoat will intensify the shine, making the starbursts appear radiant and eye-catching.
For a more dramatic effect, layer small rhinestones or glitter at the center of each starburst to enhance the illusion of light and energy.
Rusty Orange Gradient: Cozy Fall-Inspired Ombré Nails
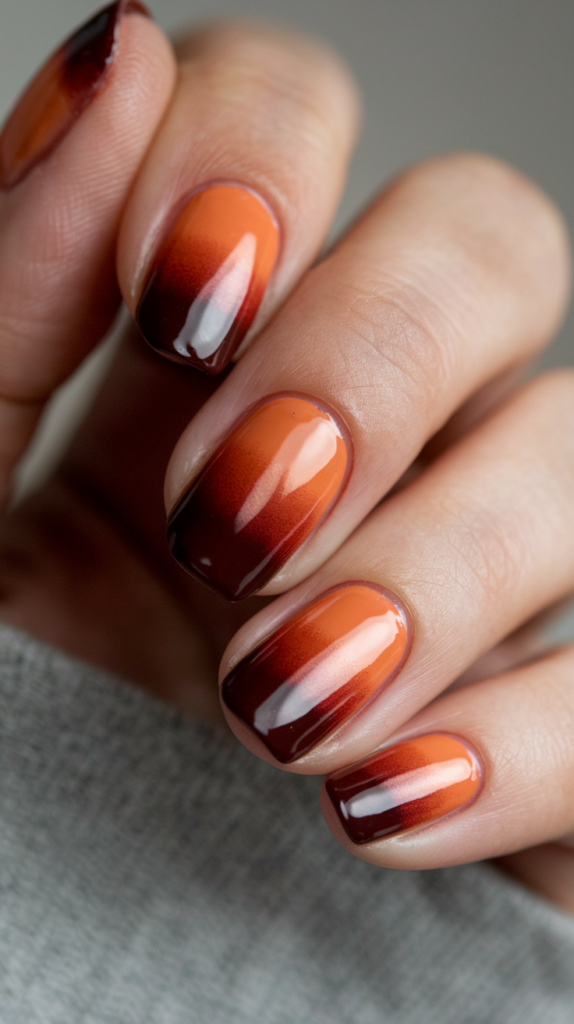
How To Create An Ombré Transition From Burnt Orange To Deep Red
The Rusty Orange Gradient design is perfect for the fall season, featuring warm, earthy tones in an ombré effect.
Begin with a burnt orange base near the cuticle, gradually blending into a deeper rusty red or brown toward the tips.
Use a sponge to blend the colors, creating a seamless transition that reflects autumn’s cozy, warm tones.
Tips For Capturing The Rich, Warm Tones Of Fall
For an extra autumn-inspired look, finish with a matte topcoat to give the gradient a soft, velvety appearance.
Adding a layer of fine gold or bronze glitter along the gradient line can also enhance the fall vibe, giving the design a hint of sparkle that resembles falling leaves in sunlight.
Conclusion
Orange nails are more than just a color choice; they’re a bold statement of style and personality.
The diverse range of designs featured in this blog showcases the versatility of orange, with each idea reflecting a different mood, season, or trend.
From cozy autumn-inspired tones to vibrant summer motifs, orange nails are a perfect canvas for creativity, allowing anyone to explore unique and eye-catching styles.
We hope these 35 orange nail art designs inspire you to experiment with new looks and embrace the warmth and energy of this vibrant shade.
Whether you’re new to nail art or a seasoned enthusiast, these ideas offer something for everyone, from minimalist details to intricate patterns and sparkling finishes.
Next time you’re ready for a manicure, consider one of these orange designs and watch as your nails become a striking accessory that complements any outfit and occasion.
