Animal print nail art is a bold, timeless trend that brings a touch of the wild to your fingertips, offering endless ways to express your style.
Whether you’re drawn to the classic elegance of leopard spots, the fierce energy of tiger stripes, or the exotic shimmer of peacock feathers, these designs are perfect for adding personality to any occasion.
From subtle accents to dramatic patterns, animal-inspired nails can elevate your look with a mix of sophistication and playfulness.
In this guide, we’ll dive into 32 stunning animal print nail art ideas that cater to every taste—whether you’re a beginner or a seasoned nail enthusiast.
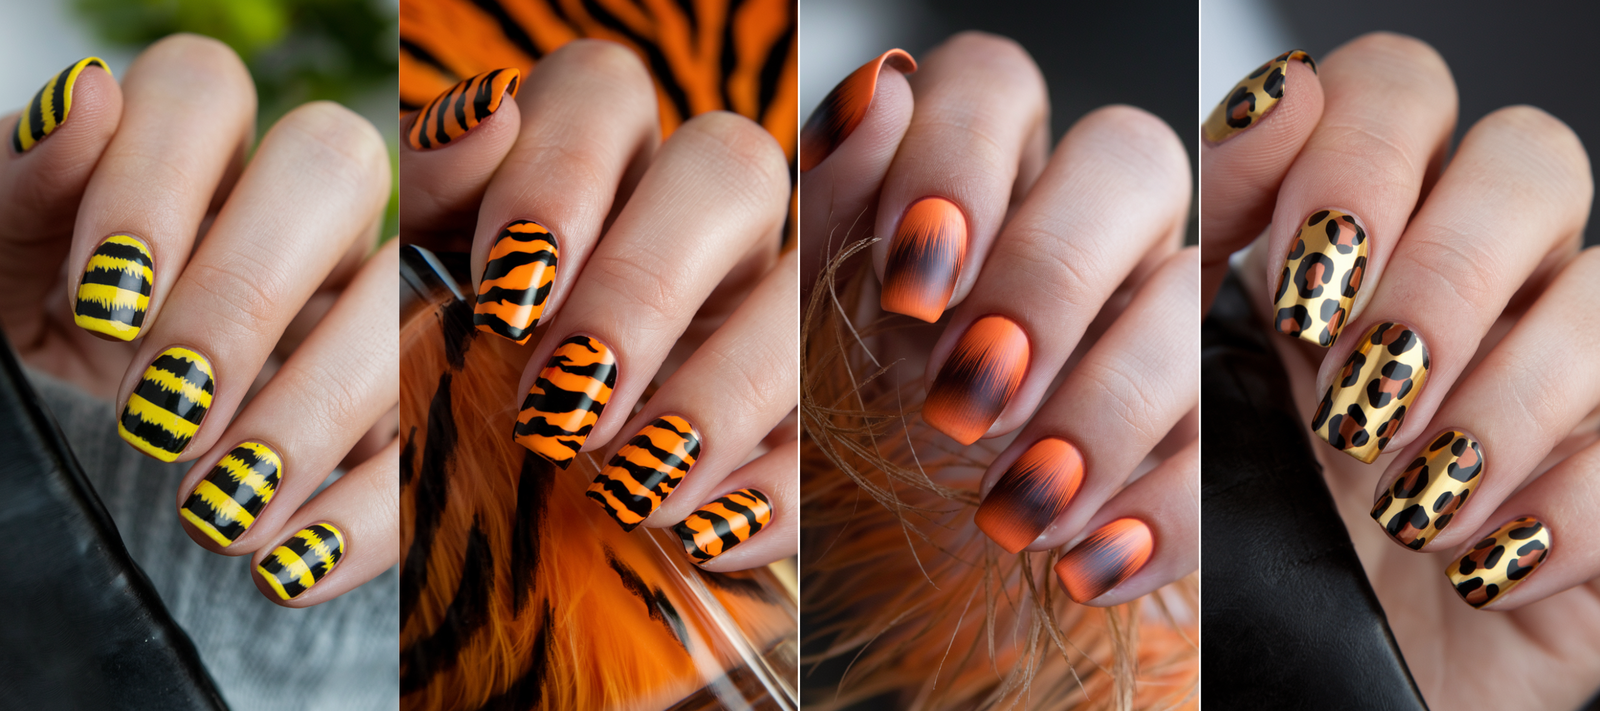
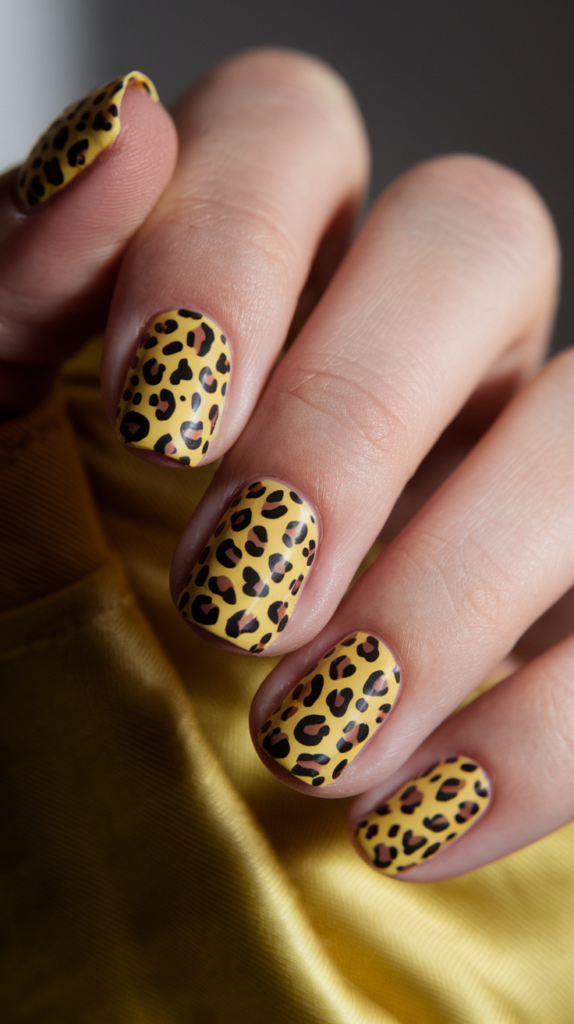
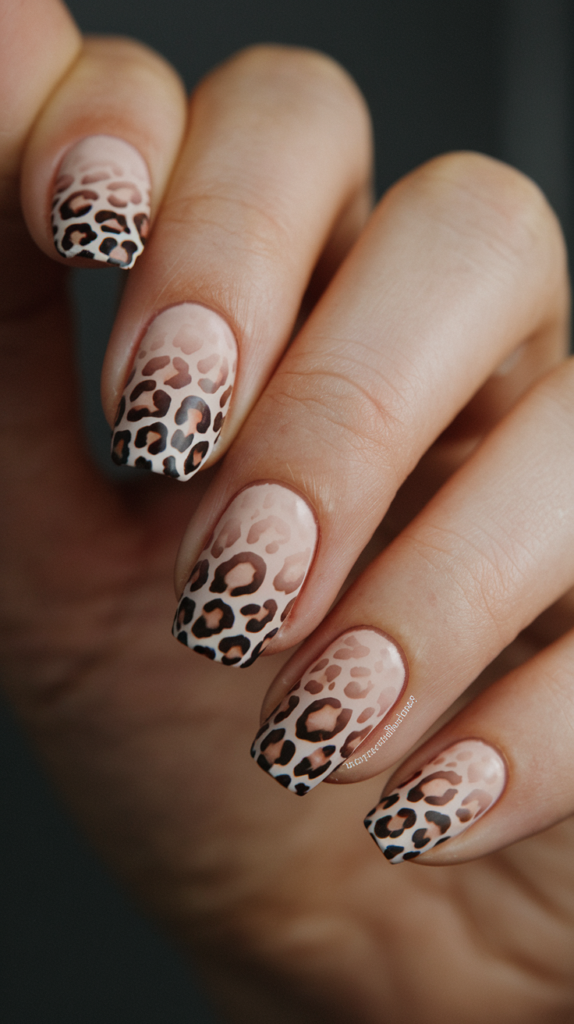
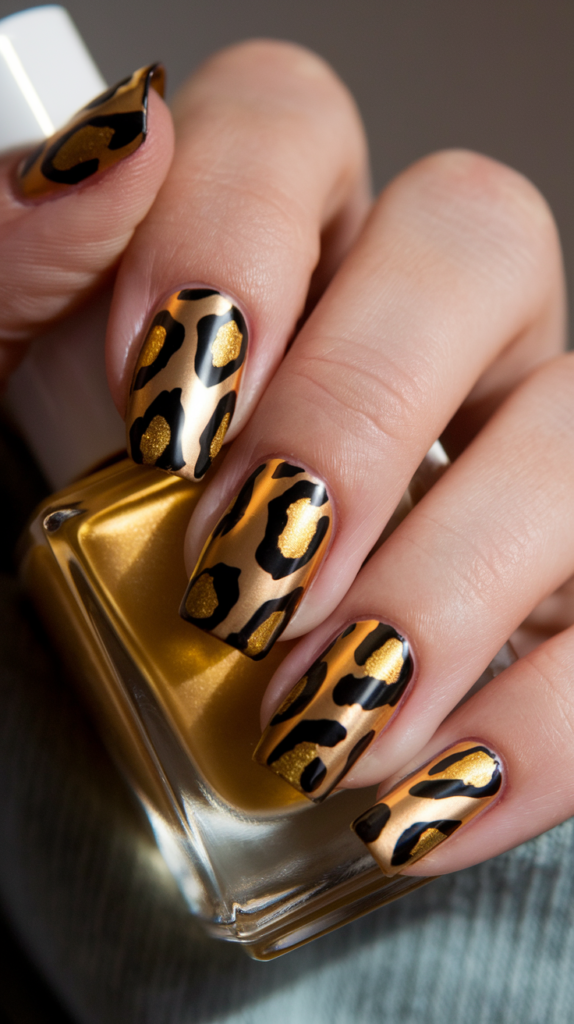
1. Leopard Spots Nail Art
Leopard spots nail art brings an iconic, fierce vibe to your manicure, blending timeless style with a touch of the wild.
This design’s classic brown-and-black pattern is perfect for making a statement without overwhelming your look.
How to Paint Leopard Spots
Step 1: Apply Your Base Color
Start with a nude or light pink polish as your base. Let it dry completely to create a smooth canvas for the spots.
Step 2: Add the Spots
Using a fine-tipped nail art brush or dotting tool, dab irregular brown spots across your nails. Vary the sizes and shapes for a natural look.
Step 3: Outline with Black
Add jagged black outlines around some of the brown spots to mimic the leopard’s distinctive pattern. Keep it random to avoid uniformity.
Step 4: Seal the Design
Finish with a glossy top coat to protect your design and give it a polished, radiant shine.
Best Color Variations for Leopard Spots
The classic brown-and-black combo can be adapted to suit any mood or style with creative color twists.
- Traditional: Stick with nude bases, brown spots, and black outlines for a timeless look.
- Modern: Try a burgundy base with gold spots or a pastel pink with teal accents for a fresh vibe.
These variations let you personalize the design, making it as bold or subtle as you like.
Why Leopard Spots Are a Nail Art Staple
Leopard spots nail art stands out for its versatility and organic appeal.
- The random pattern adds a natural, effortless charm to your nails.
- It’s adaptable for any occasion, from casual outings to glamorous events.
- The design pairs beautifully with solid accent nails or glitter for added flair.
Why It Works
Leopard Spots Nail Art blends bold patterns with elegant simplicity, creating a look that’s both fierce and stylish.
Its adaptability and timeless appeal make it a go-to choice for any nail art lover.
2. Tiger Stripes Nail Art
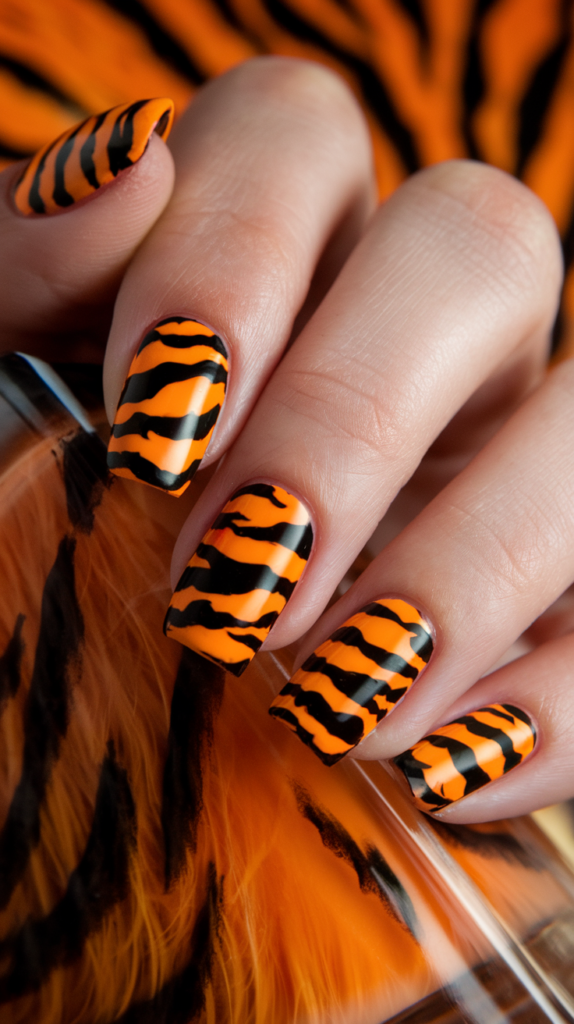
Tiger stripes nail art brings a fierce, dramatic flair to your manicure, perfect for those who love a bold statement.
The vibrant orange and black combo captures the wild essence of the jungle.
How to Paint Tiger Stripes
Step 1: Apply the Base Color
Begin with a bright orange polish as your base. Apply two coats for a solid, vibrant finish, then let it dry fully.
Step 2: Create the Stripes
Use a thin striping brush to paint jagged black stripes across each nail. Angle them diagonally or horizontally for variety.
Step 3: Refine the Lines
Keep the stripes sharp and uneven to mimic a tiger’s natural pattern. Adjust thickness for a dynamic effect.
Step 4: Seal the Design
Apply a glossy top coat to lock in the design and add a striking shine.
Bold Color Twists for Tiger Stripes
Switch up the traditional palette to make your tiger stripes uniquely yours.
- Classic: Orange base with black stripes for an authentic tiger vibe.
- Daring: Neon pink with black or metallic gold over deep purple for a modern edge.
These combos let you tailor the design to your personal flair.
Why Tiger Stripes Roar on Nails
Tiger stripes nail art is all about commanding attention with its striking contrast.
- The bold lines create a powerful, eye-catching look.
- It’s versatile enough for everyday wear or special occasions.
- Pair it with a matte finish or glitter accent for extra drama.
Why It Works
Tiger Stripes Nail Art combines vibrant energy with sleek design, offering a fierce yet chic manicure that’s impossible to ignore.
3. Zebra Print Nail Art

Zebra print nail art delivers a timeless, chic look with its bold black-and-white stripes.
It’s a perfect blend of elegance and edge for any nail art enthusiast.
How to Paint Zebra Stripes
Step 1: Apply the Base Color
Start with a crisp white polish as your base. Let it dry fully for a clean foundation.
Step 2: Draw the Stripes
Use a thin striping brush to create uneven black stripes. Curve them slightly for a natural, flowing effect.
Step 3: Add Variation
Vary the thickness and spacing of the stripes to avoid a rigid look, keeping it organic.
Step 4: Seal the Design
Finish with a glossy or matte top coat, depending on your desired vibe—shiny for flair, matte for understated chic.
Customizing Zebra Print
Elevate this classic pattern with creative tweaks.
- Monochrome: Black and white for a timeless finish.
- Glitzy: Add a glittery silver accent nail or swap black for metallic shades.
These options keep the design versatile and fresh.
Why Zebra Print Stands Out
Zebra print nail art offers a striking yet sophisticated aesthetic.
- The high-contrast stripes create a bold, graphic impact.
- It’s perfect for pairing with minimalist or glam outfits.
- The design’s simplicity makes it easy to execute with stunning results.
Why It Works
Zebra Print Nail Art balances elegance and boldness, delivering a versatile manicure that’s always in style.
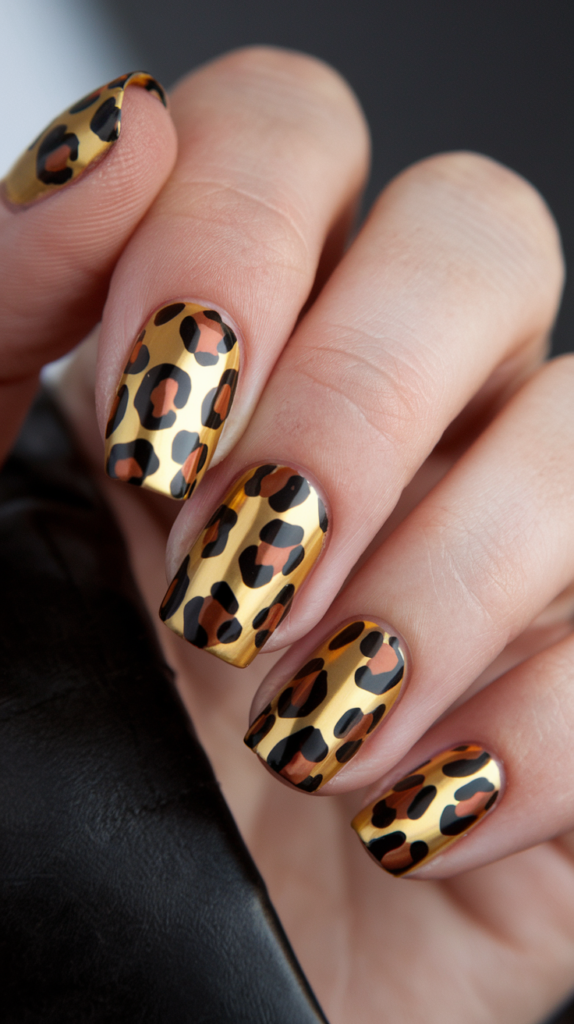
4. Cheetah Print Nail Art
Cheetah print nail art offers a sleek, intricate take on animal patterns, with its tight, small spots adding a fierce yet refined touch.
It’s ideal for those who love subtle wildness.
How to Paint Cheetah Spots
Step 1: Apply the Base Color
Choose a gold or tan polish as your base to echo a cheetah’s fur. Let it dry completely.
Step 2: Add the Spots
Use a dotting tool to create small, irregular black and dark brown spots. Keep them close together for authenticity.
Step 3: Refine the Pattern
Ensure the spots are tighter and smaller than leopard spots, maintaining a delicate balance across the nail.
Step 4: Seal the Design
Apply a glossy top coat to protect the intricate pattern and enhance its shine.
Glamorous Cheetah Variations
Add a twist to this design with metallic flair.
- Classic: Gold base with black and brown spots for a natural look.
- Luxe: Bronze base with gold-accented spots for a glamorous upgrade.
These tweaks elevate the design’s sophistication.
Why Cheetah Print Shines
Cheetah print nail art brings a refined wildness to your fingertips.
- The small, dense spots create a detailed, eye-catching effect.
- It’s versatile for both understated and bold styles.
- The design pairs well with metallic or matte finishes.
Why It Works
Cheetah Print Nail Art offers a sleek, intricate look that’s both fierce and elegant, making it a standout choice for any occasion.
5. Snake Skin Nail Art
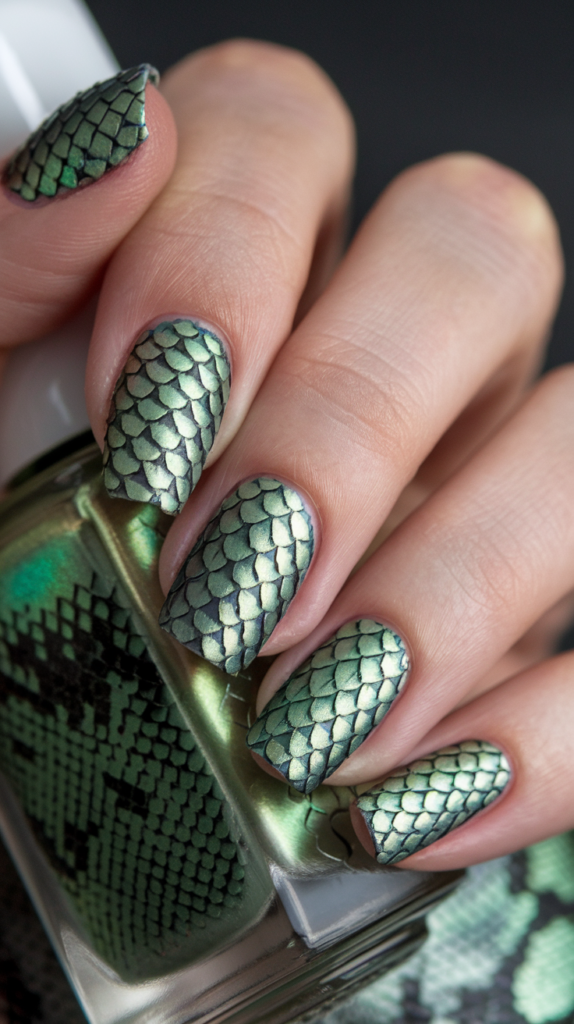
Snake skin nail art delivers an exotic, textured look that’s both bold and glamorous.
Its shimmering scales make it a perfect statement design.
How to Create Snake Skin Texture
Step 1: Apply the Base Color
Start with a metallic green, silver, or gold polish. Let it dry for a solid foundation.
Step 2: Paint the Scales
Use a nail stamp or fine brush to create overlapping, diamond-shaped scales in a darker shade.
Step 3: Add Texture
Apply a matte top coat or raised gel polish to give the scales a 3D, lifelike feel.
Step 4: Seal the Design
Finish with a glossy top coat to enhance the shimmer and protect the texture.
Best Shades for Snake Skin
Metallic hues amplify the design’s exotic appeal.
- Classic: Green with dark scales for a natural snake look.
- Bold: Silver with black or gold with bronze for a luxe twist.
These shades bring out the design’s shimmering depth.
Why Snake Skin Slithers into Style
Snake skin nail art stands out with its intricate, bold texture.
- The scales add a glamorous, three-dimensional flair.
- It’s perfect for bold looks or special occasions.
- The metallic finish catches the light beautifully.
Why It Works
Snake Skin Nail Art combines exotic patterns with a luxurious finish, creating a manicure that’s fierce and unforgettable.
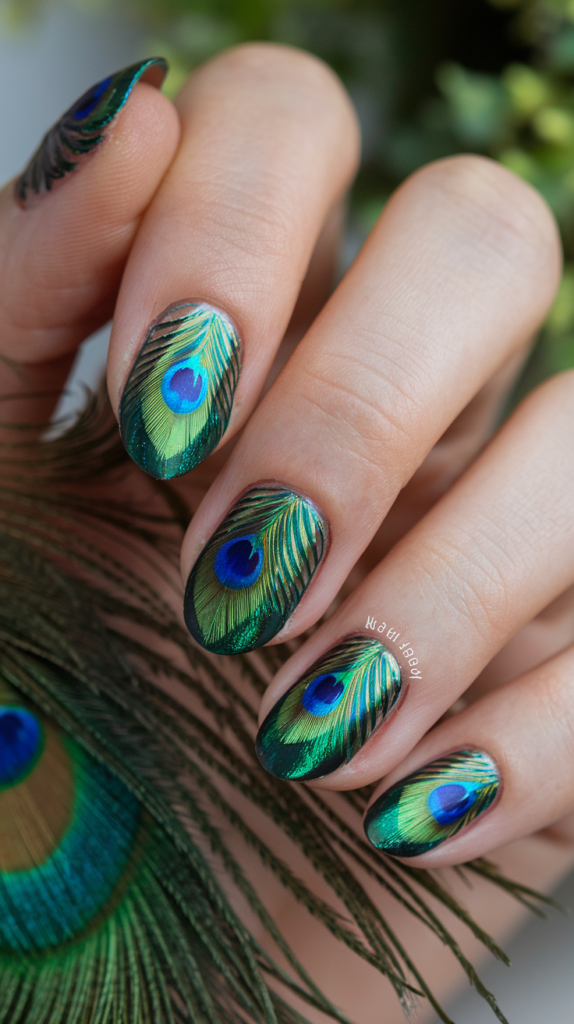
6. Peacock Feathers Nail Art
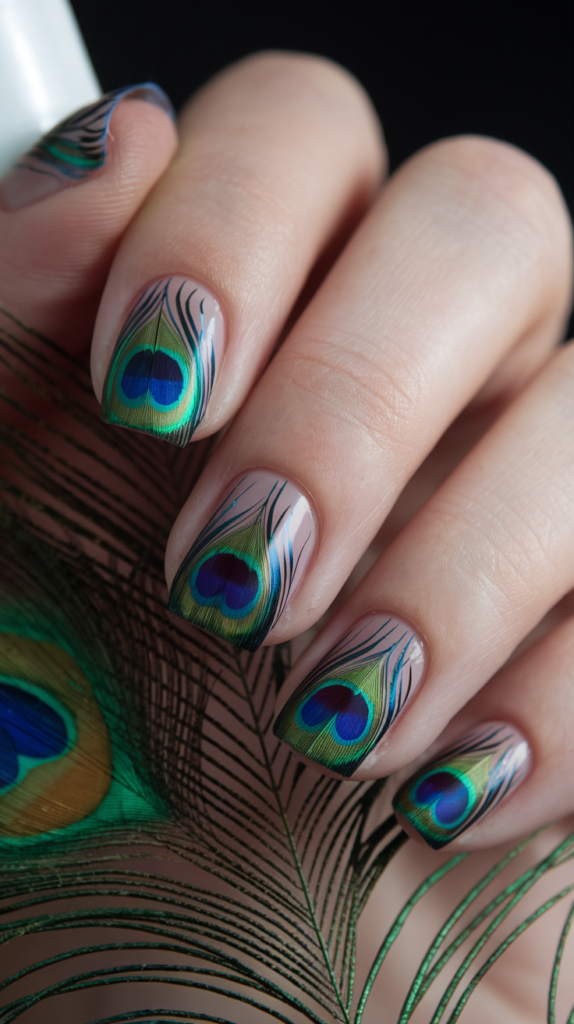
Peacock feathers nail art dazzles with its vibrant colors and intricate details, bringing a touch of elegance and drama to your manicure.
It’s a standout choice for any occasion.
How to Paint Peacock Feathers
Step 1: Apply the Base Color
Begin with a deep blue or emerald green polish. Let it dry fully for a rich backdrop.
Step 2: Create the Feather Pattern
Use a fine brush to paint feather shapes, focusing on the “eye” with teal, gold, and purple layers.
Step 3: Add Details
Enhance with thin, wispy lines in gold or glitter to mimic feather texture and depth.
Step 4: Seal the Design
Finish with a glossy top coat to protect the vibrant details and boost shine.
Best Colors for Peacock Feathers
Bright, layered hues make this design pop.
- Classic: Blue and green with gold and teal accents.
- Dramatic: Purple base with silver and bronze details.
These combos highlight the feather’s stunning intricacy.
Why Peacock Feathers Captivate
Peacock feathers nail art shines with its luxurious appeal.
- The vivid colors create a bold, elegant statement.
- It’s ideal for adding glamour to any look.
- The intricate “eye” detail adds artistic flair.
Why It Works
Peacock Feathers Nail Art blends vibrant hues with detailed elegance, offering a manicure that’s both luxurious and eye-catching.
7. Giraffe Spots Nail Art
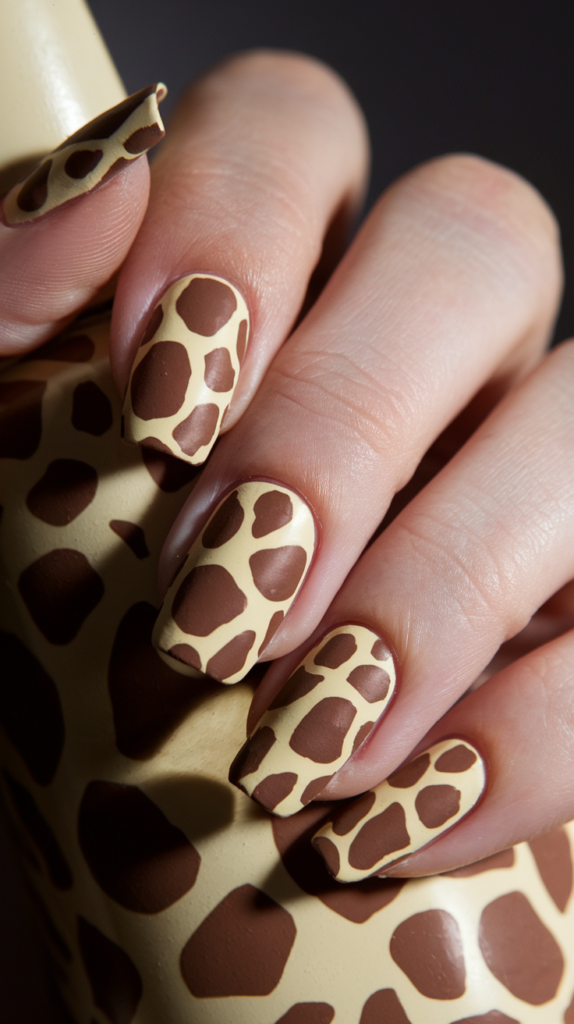
Giraffe spots nail art brings an earthy, unique charm to your manicure with its large, angular spots.
It’s perfect for a natural yet bold look.
How to Paint Giraffe Spots
Step 1: Apply the Base Color
Use a soft cream or beige polish as your base. Let it dry completely.
Step 2: Add the Spots
With a fine brush, paint large, irregular brown spots with angular edges across each nail.
Step 3: Space Them Out
Keep the spots evenly spread but not uniform, mimicking a giraffe’s natural pattern.
Step 4: Seal the Design
Apply a glossy top coat to protect and enhance the earthy design.
Earthy Twists for Giraffe Spots
Add depth with creative color play.
- Classic: Cream base with rich brown spots.
- Playful: Tan base with gold shimmer or multi-shade browns.
These variations keep the design grounded yet stylish.
Why Giraffe Spots Stand Tall
Giraffe spots nail art offers a unique, organic vibe.
- The large spots create a bold yet natural look.
- It’s versatile for casual or earthy-inspired outfits.
- The design’s simplicity makes it effortlessly chic.
Why It Works
Giraffe Spots Nail Art combines earthy tones with a striking pattern, delivering a manicure that’s both wild and refined.
8. Dalmatian Spots Nail Art
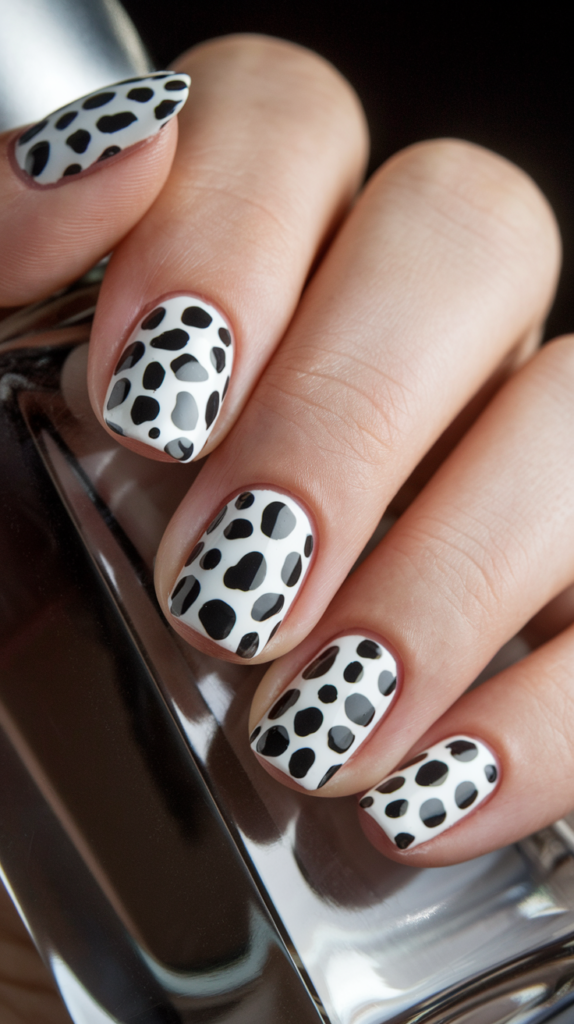
Dalmatian spots nail art adds a playful, high-contrast twist to your manicure with its whimsical black spots.
It’s perfect for a fun, lighthearted vibe.
How to Paint Dalmatian Spots
Step 1: Apply the Base Color
Start with a crisp white or light pink polish. Let it dry fully.
Step 2: Add the Spots
Use a dotting tool to dab irregular black spots across each nail, varying their size.
Step 3: Keep It Random
Scatter the spots unevenly to mimic a Dalmatian’s natural coat—no perfect circles here!
Step 4: Seal the Design
Finish with a glossy top coat for a polished, playful shine.
Playful Dalmatian Twists
Add a fun spin to this classic design.
- Classic: White base with black spots.
- Whimsical: Pink base with hearts or stars mixed in.
These tweaks keep it cute and creative.
Why Dalmatian Spots Delight
Dalmatian spots nail art brings a joyful, graphic charm.
- The random spots add a fun, carefree vibe.
- It’s perfect for casual, playful looks.
- The design’s simplicity makes it a breeze to recreate.
Why It Works
Dalmatian Spots Nail Art combines bold contrast with a whimsical touch, creating a manicure that’s both eye-catching and effortlessly fun.
9. Crocodile Skin Nail Art
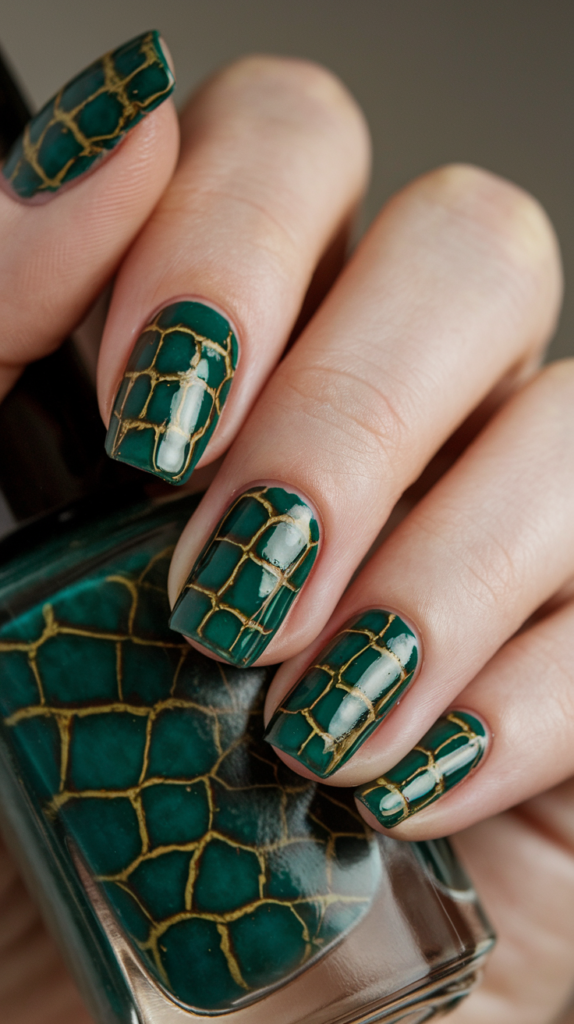
Crocodile skin nail art offers a fierce, textured look with its rugged scales, perfect for a bold and edgy manicure.
It’s a standout choice for the daring.
How to Create Crocodile Skin Texture
Step 1: Apply the Base Color
Start with a dark green or metallic shade. Let it dry completely.
Step 2: Paint the Scales
Use a nail stamp or brush to create raised, rectangular scales in a darker shade.
Step 3: Add Texture
Apply a textured top coat or gel polish to give the scales a 3D effect.
Step 4: Seal the Design
Finish with a glossy top coat to protect and enhance the rugged look.
Fierce Crocodile Variations
Elevate the design with bold twists.
- Classic: Dark green with black scales.
- Luxe: Metallic gold with rhinestone accents.
These options amplify the design’s fierce appeal.
Why Crocodile Skin Bites
Crocodile skin nail art exudes raw, textured power.
- The 3D scales add a bold, tactile edge.
- It’s perfect for making a fierce statement.
- The rugged texture pairs well with glam accents.
Why It Works
Crocodile Skin Nail Art blends fierce texture with bold style, creating a manicure that’s both rugged and refined.
10. Turtle Shell Nail Art
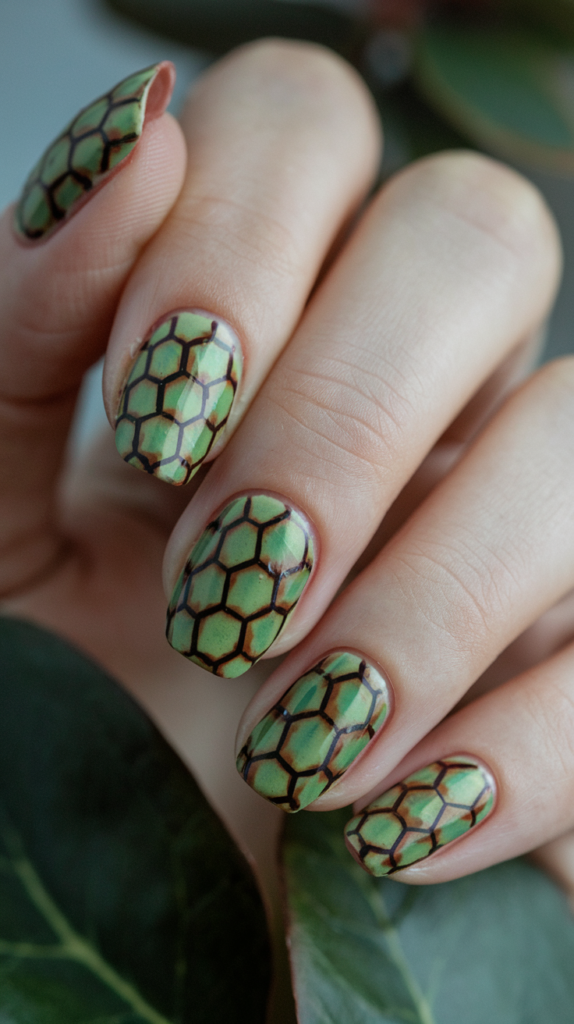
Turtle shell nail art brings an earthy, natural vibe with its hexagonal patterns, ideal for a subtle yet striking manicure.
It’s a nod to nature’s beauty.
How to Paint Turtle Shell Patterns
Step 1: Apply the Base Color
Choose a green or brown polish as your base. Let it dry fully.
Step 2: Draw the Hexagons
Use a fine brush to outline hexagonal shapes across each nail.
Step 3: Add Shading
Fill with lighter shades and outline with darker tones for a layered look.
Step 4: Seal the Design
Apply a glossy top coat to protect and enhance the natural pattern.
Earthy Turtle Shell Shades
Layered tones bring this design to life.
- Classic: Green with brown outlines.
- Subtle: Beige with olive accents and shimmer.
These hues keep it grounded and chic.
Why Turtle Shell Endures
Turtle shell nail art offers a natural, textured charm.
- The hexagonal pattern adds subtle sophistication.
- It’s perfect for earthy, minimalist styles.
- The design’s depth makes it quietly striking.
Why It Works
Turtle Shell Nail Art blends earthy elegance with intricate detail, creating a manicure that’s both timeless and unique.
11. Fish Scales Nail Art
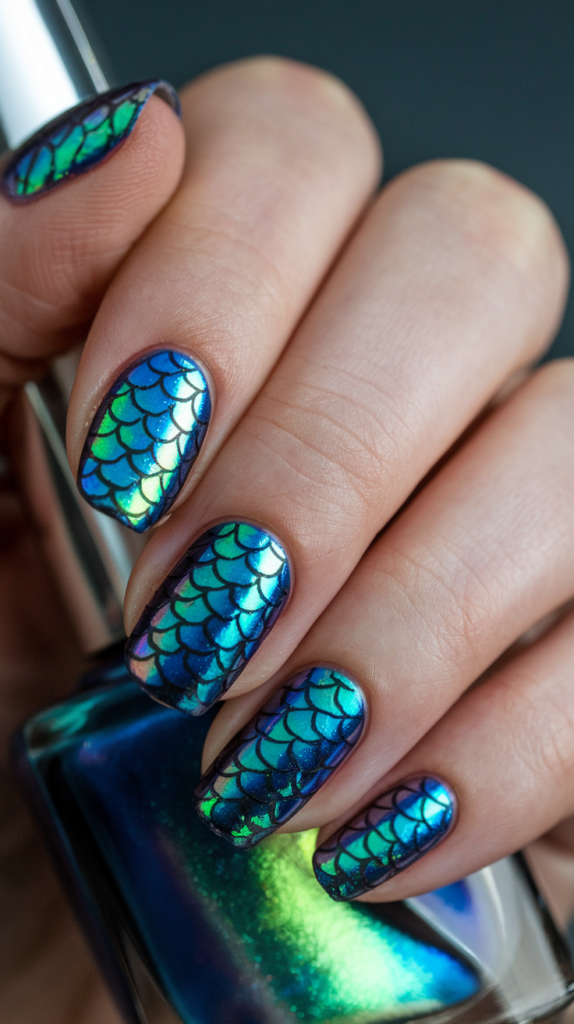
Fish scales nail art shimmers with mermaid-inspired charm, its iridescent scales adding a magical touch to your manicure.
It’s perfect for a dreamy look.
How to Paint Fish Scales
Step 1: Apply the Base Color
Start with a shimmering blue or green polish. Let it dry completely.
Step 2: Create the Scales
Use a nail stamp or brush to paint overlapping, semi-circle scales in a contrasting shade.
Step 3: Add Shimmer
Layer glitter or iridescent polish over the scales for a light-catching effect.
Step 4: Seal the Design
Finish with a glossy top coat to amplify the shimmer and protect the design.
Best Shades for Fish Scales
Iridescent hues make this design enchanting.
- Classic: Blue and green with silver shimmer.
- Dreamy: Purple with gold or silver with holographic accents.
These colors enhance the mermaid vibe.
Why Fish Scales Sparkle
Fish scales nail art dazzles with its ethereal beauty.
- The overlapping scales create a magical, shimmering effect.
- It’s ideal for whimsical, standout looks.
- The iridescence adds a playful, luxurious touch.
Why It Works
Fish Scales Nail Art blends shimmering scales with dreamy hues, offering a manicure that’s both enchanting and elegant.
12. Dragon Scales Nail Art
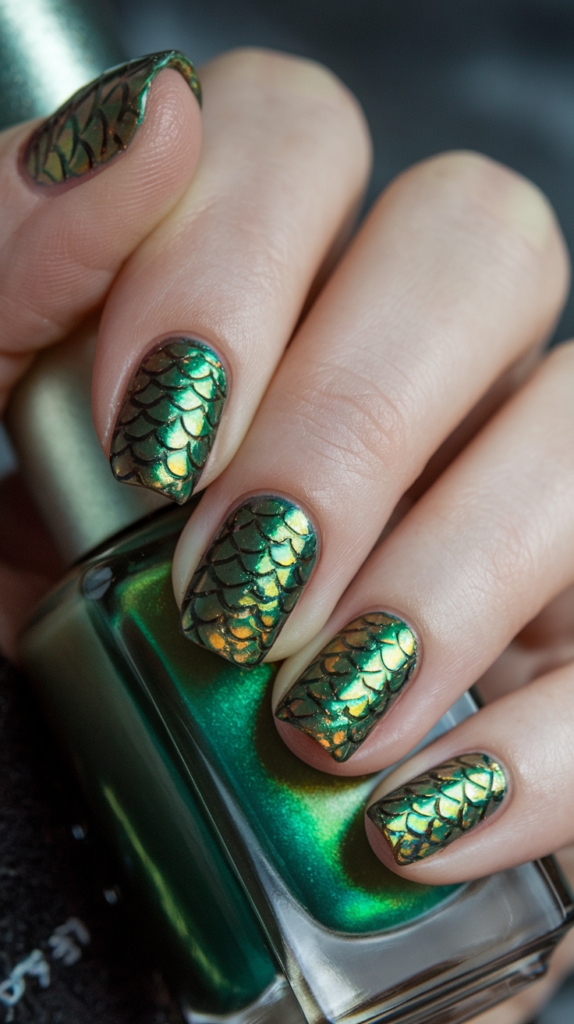
Dragon scales nail art adds a mystical, fierce edge with its textured, glowing scales.
It’s perfect for a bold, fantasy-inspired manicure.
How to Create Dragon Scales
Step 1: Apply the Base Color
Use a metallic green, red, or black polish. Let it dry fully.
Step 2: Paint the Scales
Stamp or brush overlapping, scale-like shapes in a darker shade.
Step 3: Add Texture
Use raised gel or a textured top coat for a 3D, lifelike finish.
Step 4: Seal the Design
Finish with a glossy top coat to enhance the glow and protect the scales.
Mystical Dragon Scale Shades
Bold metallics fuel the fantasy vibe.
- Classic: Green with black scales.
- Fierce: Red with gold or black with holographic shimmer.
These hues amplify the design’s mythical allure.
Why Dragon Scales Enchant
Dragon scales nail art captivates with its bold, textured magic.
- The 3D scales add a fierce, tactile edge.
- It’s perfect for fantasy-inspired bold looks.
- The glowing finish evokes mythical charm.
Why It Works
Dragon Scales Nail Art fuses fierce texture with mystical shimmer, creating a manicure that’s both bold and enchanting.
13. Flamingo Feathers Nail Art
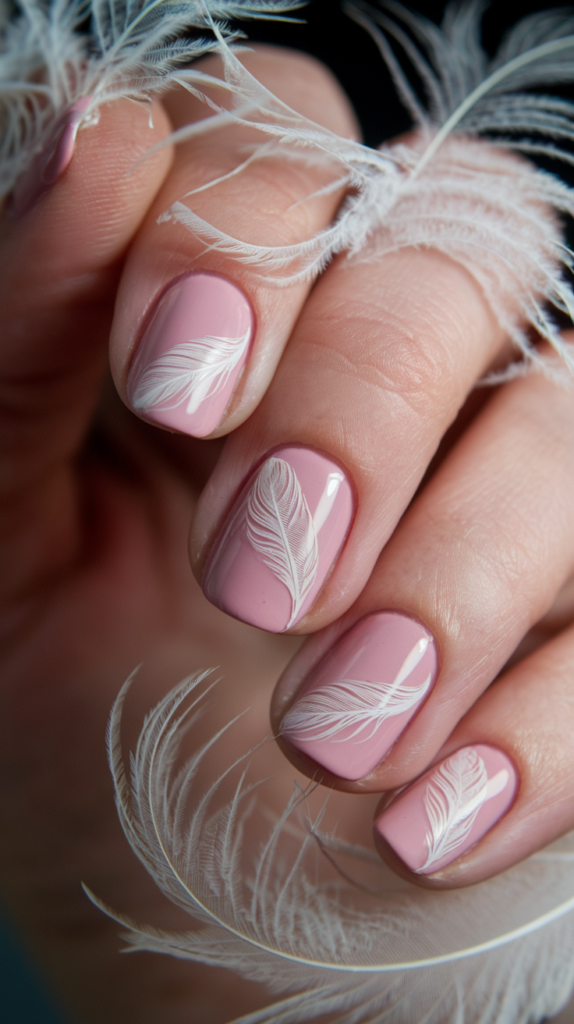
Flamingo feathers nail art offers a soft, delicate touch with its airy feather strokes, perfect for a subtle yet elegant manicure.
It’s a feminine classic.
How to Paint Flamingo Feathers
Step 1: Apply the Base Color
Start with a soft pink polish. Let it dry fully.
Step 2: Draw the Feathers
Use a fine brush to paint light, wispy feather strokes in white or pale pink.
Step 3: Add Details
Keep the strokes airy and soft, adding subtle shimmer for depth if desired.
Step 4: Seal the Design
Finish with a glossy top coat to protect and enhance the delicate look.
Best Shades for Flamingo Feathers
Soft tones keep this design light and lovely.
- Classic: Pink with white feathers.
- Subtle: Peach with gold shimmer accents.
These hues enhance the design’s airy elegance.
Why Flamingo Feathers Charm
Flamingo feathers nail art delights with its gentle beauty.
- The soft feathers add a delicate, feminine touch.
- It’s perfect for subtle, elegant looks.
- The airy design feels light and chic.
Why It Works
Flamingo Feathers Nail Art combines soft hues with delicate details, creating a manicure that’s both understated and stunning.
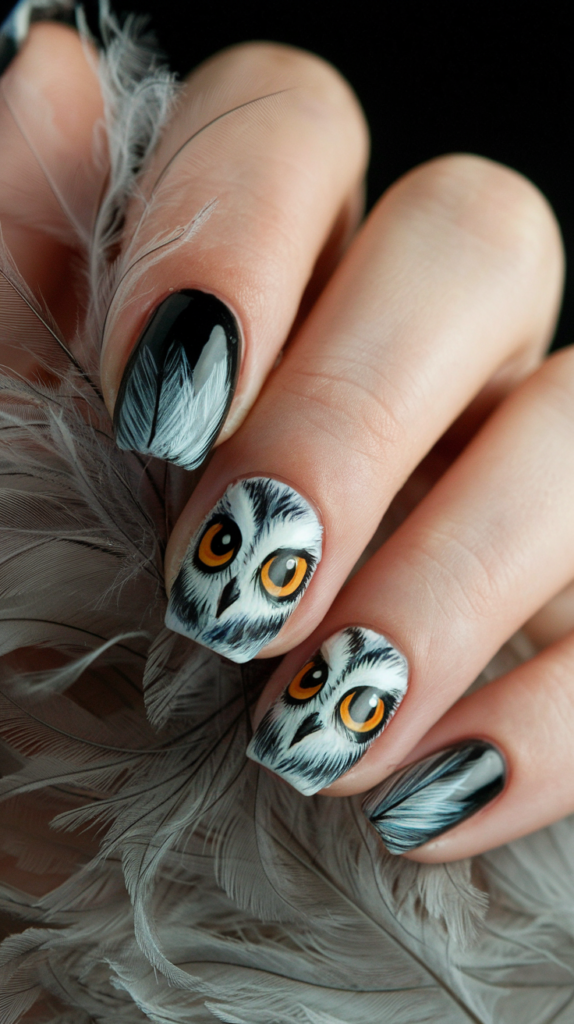
14. Owl Feathers Nail Art
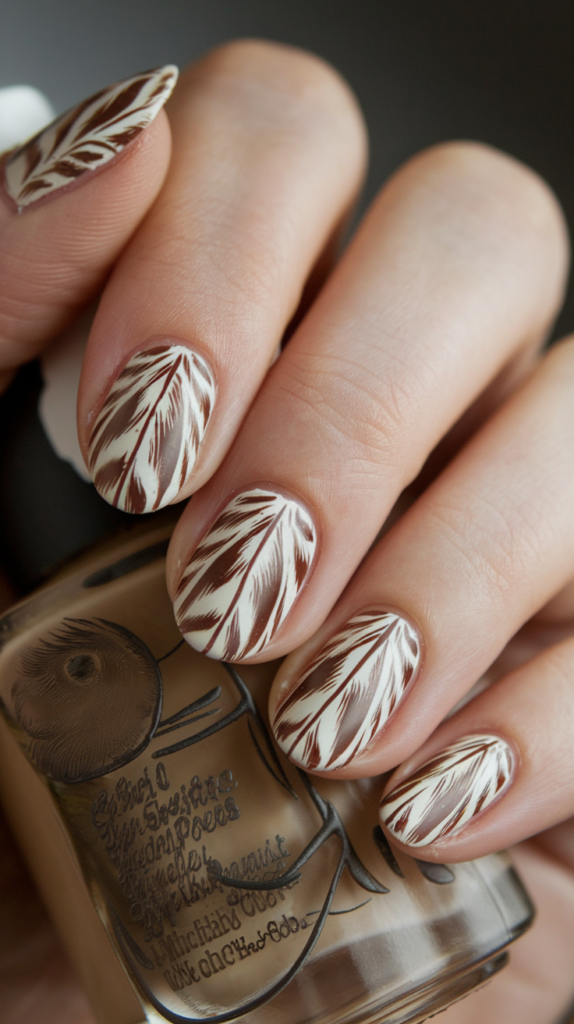
Owl feathers nail art brings a textured, earthy elegance with its detailed feather strokes.
It’s ideal for a nature-inspired, sophisticated look.
How to Paint Owl Feathers
Step 1: Apply the Base Color
Use a neutral brown, beige, or taupe polish. Let it dry fully.
Step 2: Draw the Feathers
Paint intricate feather strokes with a fine brush in darker earthy tones.
Step 3: Add Texture
Use lighter shades for highlights and darker ones for shading to create depth.
Step 4: Seal the Design
Finish with a glossy top coat to protect and refine the texture.
Earthy Owl Feather Shades
Layered tones enhance the natural vibe.
- Classic: Brown with beige highlights.
- Rich: Taupe with bronze shimmer.
These shades keep it grounded and detailed.
Why Owl Feathers Soar
Owl feathers nail art offers a textured, natural charm.
- The detailed feathers add an earthy elegance.
- It’s perfect for subtle, sophisticated styles.
- The shading creates a striking, lifelike effect.
Why It Works
Owl Feathers Nail Art blends intricate texture with earthy tones, delivering a manicure that’s both refined and nature-inspired.
15. Peacock Tail Nail Art
Peacock tail nail art dazzles with its glamorous, intricate details, perfect as an accent for a bold, elegant manicure.
It’s a luxurious showstopper.
How to Paint Peacock Tail Accents
Step 1: Apply the Base Color
Start with a deep blue or green polish on your accent nail. Let it dry fully.
Step 2: Create the Tail
Use a fine brush to paint the “eye” of the tail with gold, teal, and purple layers.
Step 3: Add Glamour
Place rhinestones or glitter around the eye for extra sparkle.
Step 4: Seal the Design
Finish with a glossy top coat to protect and amplify the brilliance.
Best Shades for Peacock Tail
Vivid hues make this accent pop.
- Classic: Blue with gold and teal.
- Luxe: Green with silver and purple rhinestones.
These colors elevate the design’s glamour.
Why Peacock Tail Shines
Peacock tail nail art dazzles with its bold elegance.
- The intricate eye adds a luxurious focal point.
- It’s perfect for pairing with simpler nails.
- The vibrant details create a stunning accent.
Why It Works
Peacock Tail Nail Art combines vibrant intricacy with glamorous flair, offering a manicure that’s both bold and refined.
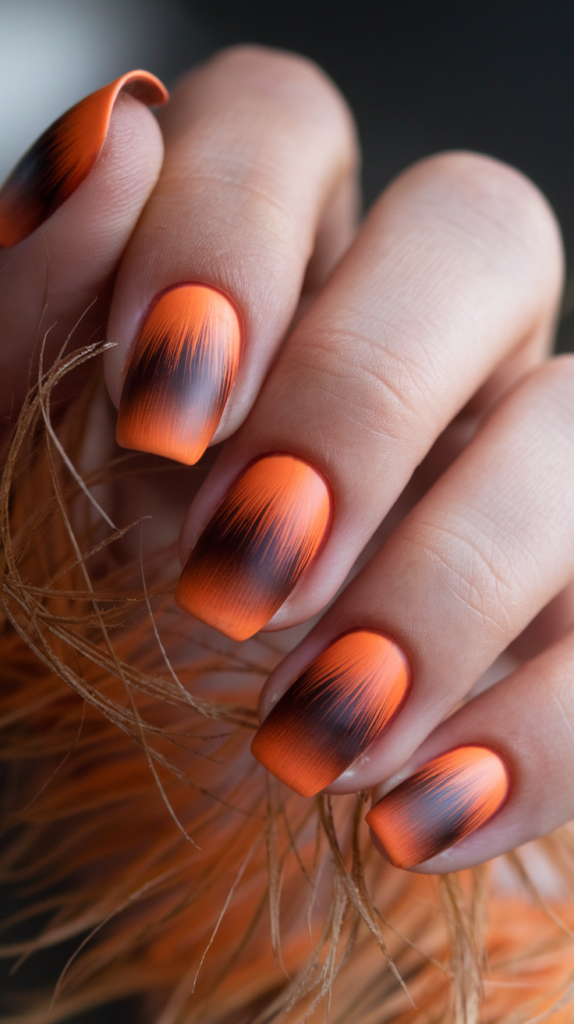
16. Bumblebee Stripes Nail Art
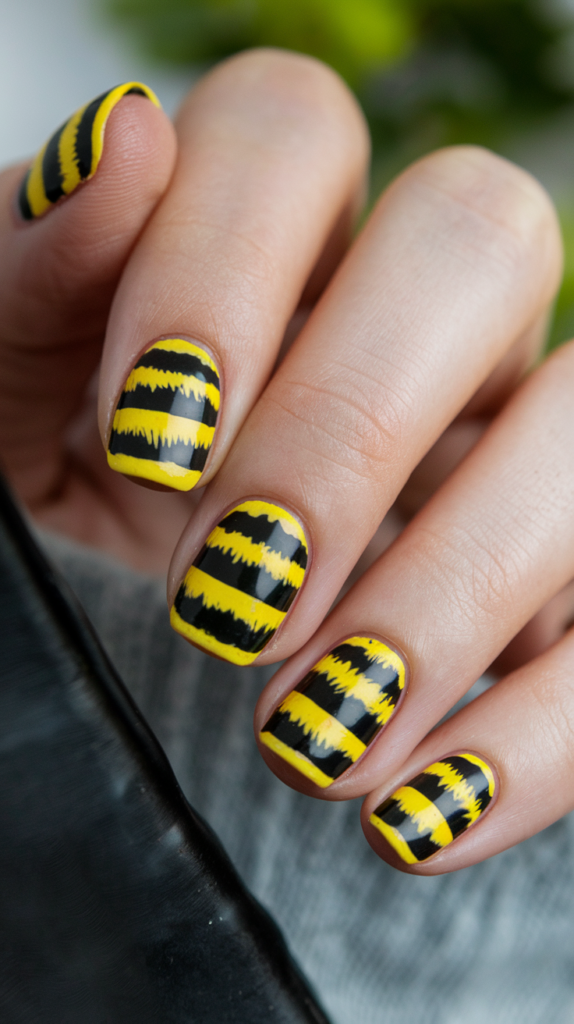
Bumblebee stripes nail art buzzes with playful boldness, its sharp black-and-yellow lines adding a fun, vibrant touch.
It’s perfect for a cheerful look.
How to Paint Bumblebee Stripes
Step 1: Apply the Base Color
Start with a bright yellow polish. Let it dry fully.
Step 2: Add the Stripes
Use a thin striping brush to paint sharp, clean black stripes across each nail.
Step 3: Keep It Crisp
Ensure the lines are even and bold for a true bumblebee effect.
Step 4: Seal the Design
Finish with a glossy top coat to protect and enhance the vibrancy.
Playful Bumblebee Twists
Add a buzz with creative accents.
- Classic: Yellow with black stripes.
- Fun: Add honeycomb patterns or tiny bee decals.
These tweaks keep it lively and cute.
Why Bumblebee Stripes Buzz
Bumblebee stripes nail art brings a bold, playful energy.
- The sharp stripes create a vibrant, graphic look.
- It’s perfect for fun, casual vibes.
- The bright contrast adds a cheerful pop.
Why It Works
Bumblebee Stripes Nail Art combines bold lines with a whimsical twist, delivering a manicure that’s both eye-catching and fun.
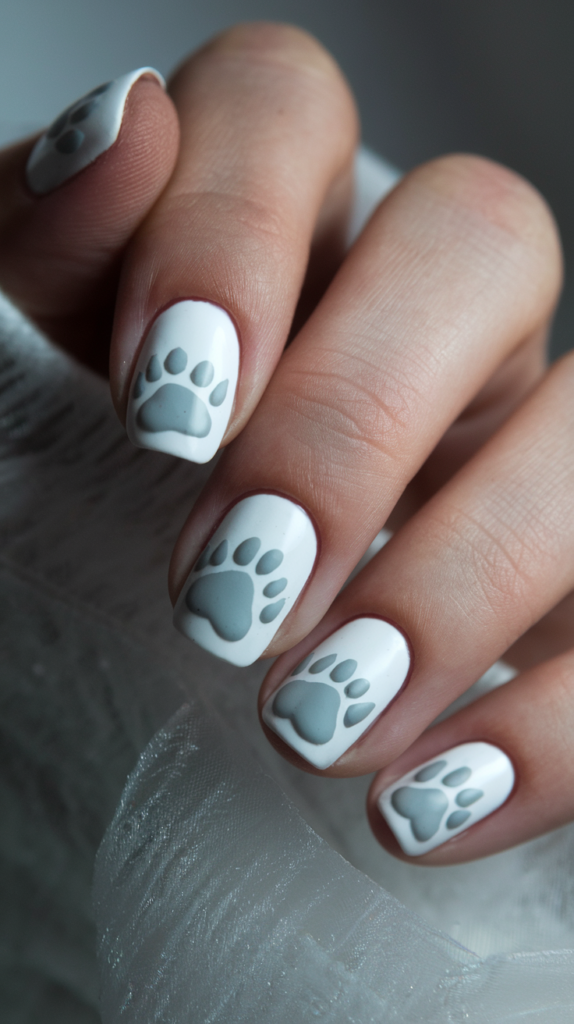
17. Paw Prints Nail Art
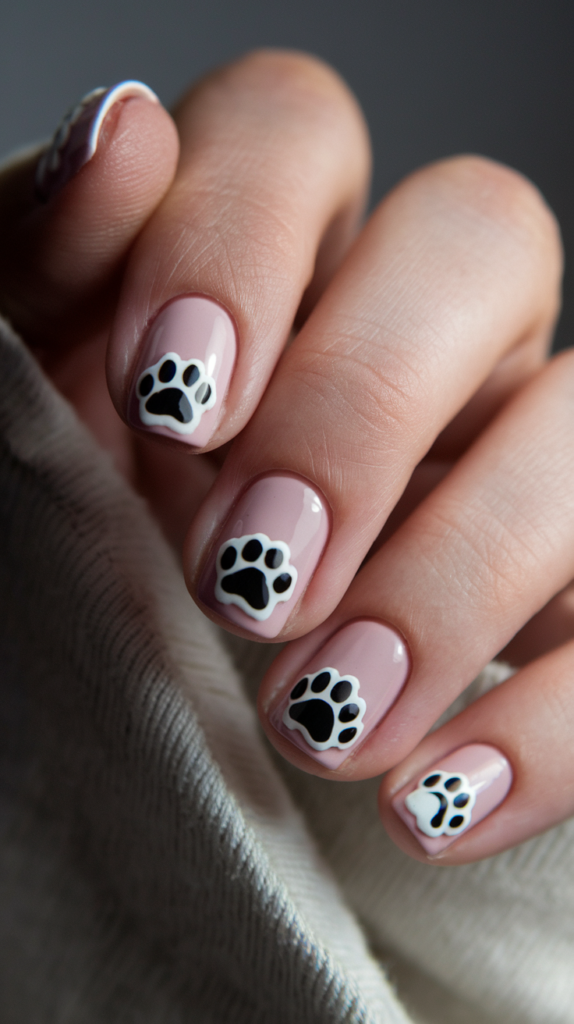
Paw prints nail art adds a simple, playful charm with its scattered prints, perfect for animal lovers craving a cute design.
It’s effortlessly fun.
How to Paint Paw Prints
Step 1: Apply the Base Color
Choose a pastel or neutral polish. Let it dry fully.
Step 2: Add the Prints
Use a dotting tool to create small, rounded black paw prints with tiny toe dots above.
Step 3: Scatter Randomly
Place the prints unevenly across each nail for a natural, playful look.
Step 4: Seal the Design
Finish with a glossy top coat to protect and shine.
Cute Paw Print Variations
Tailor this design with fun twists.
- Classic: Pastel base with black prints.
- Whimsical: Add tiny animal faces or colorful prints.
These tweaks keep it personal and playful.
Why Paw Prints Pounce
Paw prints nail art charms with its simple whimsy.
- The scattered prints add a cute, carefree vibe.
- It’s perfect for animal lovers and casual looks.
- The design’s ease makes it a fun DIY.
Why It Works
Paw Prints Nail Art blends playful simplicity with a touch of charm, creating a manicure that’s both adorable and stylish.
18. Ladybug Spots Nail Art
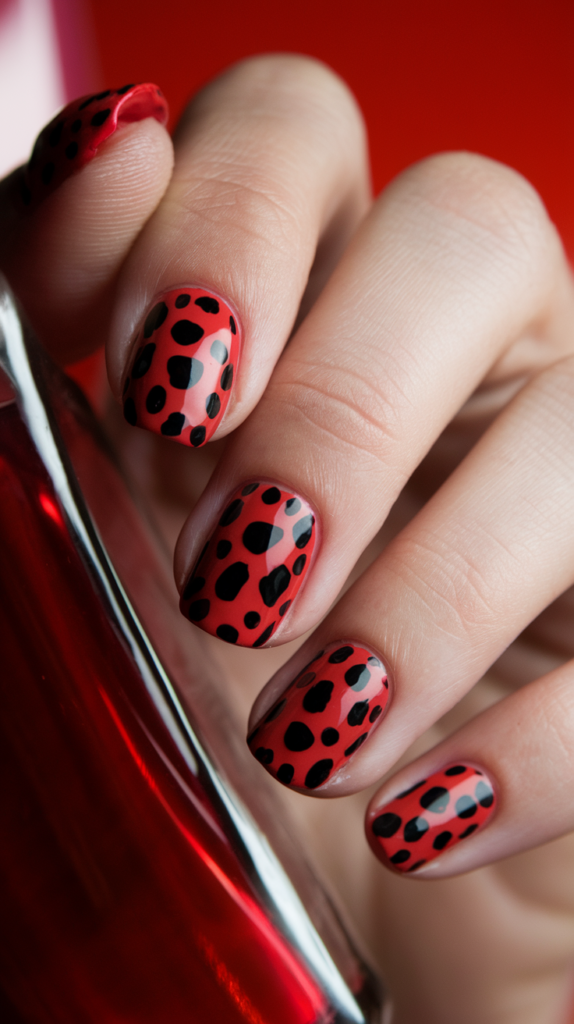
Ladybug spots nail art brings a bold, whimsical charm with its red-and-black pattern, perfect for a playful, nature-inspired manicure.
It’s a cheerful standout.
How to Paint Ladybug Spots
Step 1: Apply the Base Color
Start with a bright red polish. Let it dry fully.
Step 2: Add the Spots
Use a dotting tool to dab large black spots across each nail.
Step 3: Vary the Sizes
Mix large and small spots, spacing them evenly for a ladybug effect.
Step 4: Seal the Design
Finish with a glossy top coat to protect and boost the vibrancy.
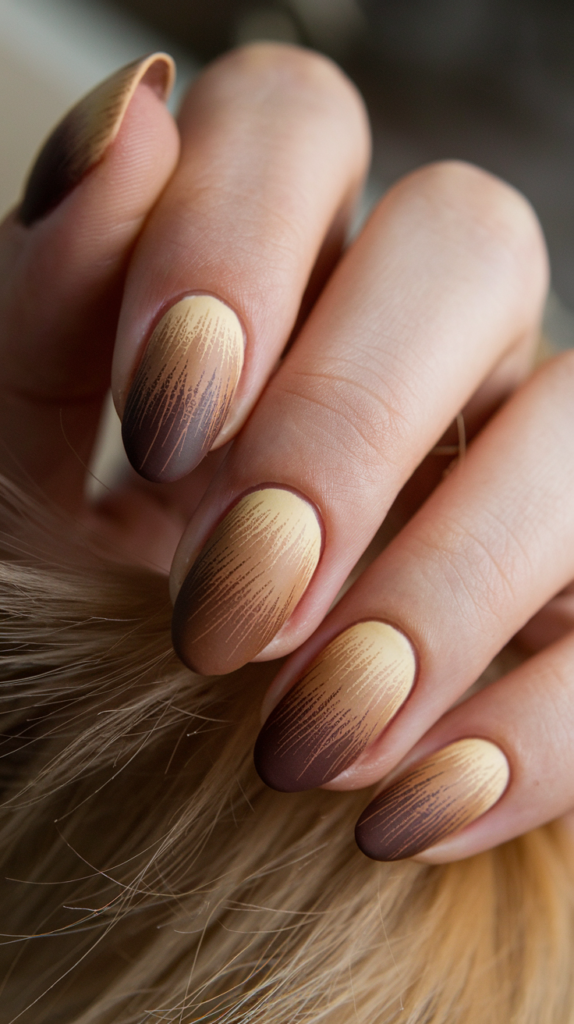
19. Fox Fur Nail Art
Fox fur nail art brings a warm, cozy vibe to your manicure with its soft gradient and feathered texture.
It’s a perfect nod to the fox’s lush coat, ideal for a rich, earthy look.
How to Create Fox Fur Texture
Step 1: Apply the Gradient Base
Use a makeup sponge to blend deep orange into light brown across your nails. Let it dry completely for a smooth base.
Step 2: Add Feathered Strokes
With a fine-tipped nail art brush, paint soft, feathery strokes in darker shades to mimic the texture of fox fur.
Step 3: Highlight the Fur
Add lighter strokes with a subtle shimmer to create depth and a plush, natural effect.
Step 4: Seal the Design
Finish with a glossy top coat to protect your design and give it a radiant, polished shine.
Best Shades for Fox Fur
Warm, earthy tones bring out the design’s cozy charm.
- Classic: Deep orange fading to light brown for an authentic fox look.
- Rich: Amber to golden beige with a hint of metallic shimmer for added luxe.
These combinations enhance the design’s natural warmth and texture.
Why Fox Fur Nails Stand Out
Fox fur nail art captivates with its inviting, plush aesthetic.
- The gradient creates a soft, flowing transition that’s visually soothing.
- It’s ideal for fall or winter-inspired looks, adding a touch of seasonal charm.
- The feathered details offer a tactile, luxurious feel.
Why It Works
Fox Fur Nail Art combines a warm gradient with delicate texture, delivering a manicure that’s both cozy and elegantly wild.
20. Wolf Fur Nail Art
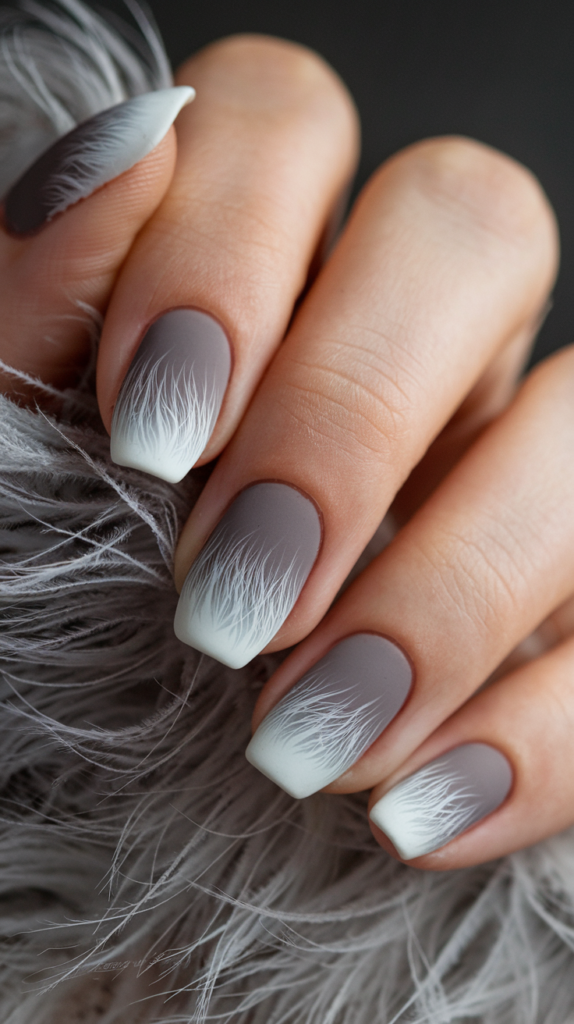
Wolf fur nail art prowls onto your nails with a sleek, cool-toned ombre, its feathery strokes evoking the rugged beauty of a wolf’s coat.
It’s perfect for a minimalist, wild vibe.
How to Paint Wolf Fur Ombre
Step 1: Apply the Gradient Base
Blend gray into white using a sponge, starting darker at the base. Let it dry fully for a seamless fade.
Step 2: Add Feathered Strokes
Use a fine brush to paint thin, feathery strokes in darker gray, mimicking the texture of wolf fur.
Step 3: Enhance the Texture
Add lighter strokes near the tips to create depth and a soft, fur-like finish.
Step 4: Seal the Design
Apply a glossy top coat to protect the design and give it a polished, natural sheen.
Cool Tones for Wolf Fur
Subtle, cool shades enhance the design’s wild elegance.
- Classic: Gray fading to white for a true wolf-inspired look.
- Sleek: Charcoal to silver with a hint of shimmer for a modern twist.
These hues keep the design crisp and stylish.
Why Wolf Fur Nails Howl
Wolf fur nail art stands out with its understated, rugged charm.
- The ombre adds a sleek, natural flow that’s visually striking.
- It’s perfect for minimalist or edgy styles, offering versatility.
- The feathered texture brings a subtle, wild depth.
Why It Works
Wolf Fur Nail Art blends cool gradients with soft texture, creating a manicure that’s both fierce and elegantly understated.
21. Horse Mane Nail Art
Horse mane nail art gallops in with a flowing, earthy gradient, its soft strokes capturing the silky elegance of a horse’s mane.
It’s perfect for a warm, natural look.
How to Paint Horse Mane Gradients
Step 1: Apply the Gradient Base
Blend brown into blonde with a sponge, starting darker at the base. Let it dry for a smooth transition.
Step 2: Add Feathered Strokes
Use a fine brush to paint soft, hair-like strokes in darker shades, mimicking a mane’s texture.
Step 3: Highlight the Flow
Add lighter strokes near the tips for a flowing, layered effect.
Step 4: Seal the Design
Finish with a glossy top coat to protect and add a subtle, radiant sheen.
Best Shades for Horse Mane
Warm, natural tones enhance the design’s earthy flow.
- Classic: Brown fading to blonde for a realistic horse mane look.
- Rich: Chestnut to golden beige with a metallic accent for extra elegance.
These colors keep the design grounded and chic.
Why Horse Mane Nails Shine
Horse mane nail art captivates with its natural, flowing beauty.
- The gradient adds a soft, silky charm that’s visually appealing.
- It’s ideal for warm, earthy-inspired styles.
- The feathered strokes create a luxurious, textured finish.
Why It Works
Horse Mane Nail Art blends earthy gradients with soft texture, delivering a manicure that’s both natural and strikingly elegant.
22. Leopard Gradient Nail Art
Leopard gradient nail art roars with a fierce, dynamic blend of ombre and spots, fading from nude to bold leopard tips.
It’s perfect for a stylish, wild statement.
How to Create Leopard Gradient
Step 1: Apply the Gradient Base
Use a sponge to blend nude into brown, with the darker shade concentrated at the tips. Let it dry completely.
Step 2: Add the Leopard Spots
With a dotting tool, dab irregular black spots near the tips, fading them upward for a natural transition.
Step 3: Refine the Fade
Keep spots sparse near the base and denser at the tips to enhance the gradient effect.
Step 4: Seal the Design
Finish with a glossy top coat to protect your design and give it a radiant shine.
Bold Shades for Leopard Gradient
Rich, contrasting tones make this design pop.
- Classic: Nude to brown with black spots for a timeless leopard look.
- Dramatic: Pink to burgundy with gold spots for a modern, fierce twist.
These variations keep the design versatile and eye-catching.
Why Leopard Gradient Nails Roar
Leopard gradient nail art stands out with its seamless blend of subtle and bold.
- The gradient adds a sleek, modern flow to the classic leopard pattern.
- It’s perfect for a balanced yet striking style.
- The fading spots create a dynamic, wild effect.
Why It Works
Leopard Gradient Nail Art combines smooth ombre with fierce spots, delivering a manicure that’s both trendy and timelessly bold.
23. Bird Claw Marks Nail Art
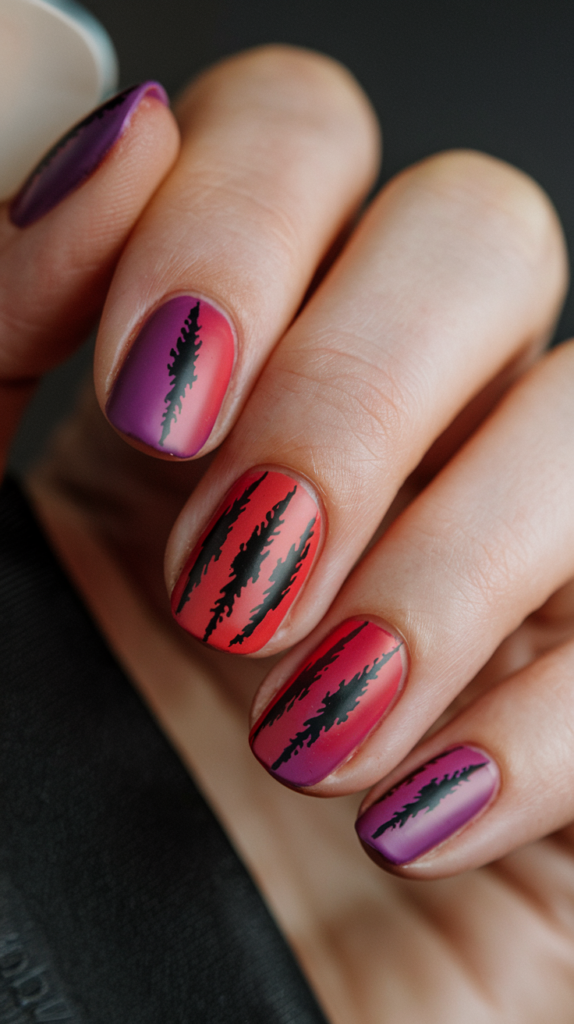
Bird claw marks nail art swoops in with a fierce, edgy vibe, its sharp, talon-like lines adding dramatic flair.
It’s perfect for a bold, untamed look.
How to Paint Bird Claw Marks
Step 1: Apply the Base Color
Start with a bold red, purple, or black polish as your base. Let it dry completely.
Step 2: Add the Claw Marks
Use a thin striping brush to paint sharp, jagged black lines across each nail, mimicking bird talons.
Step 3: Vary the Marks
Adjust the length and angle of the lines for a natural, fierce effect.
Step 4: Seal the Design
Finish with a glossy top coat to protect your design and enhance its striking shine.
Fierce Variations for Claw Marks
Tailor this design to different bird-inspired vibes.
- Classic: Red base with black claw marks for a bold, predatory look.
- Metallic: Gold base with silver marks for an eagle-inspired twist.
These options amplify the design’s fierce edge.
Why Bird Claw Marks Soar
Bird claw marks nail art captivates with its bold, untamed energy.
- The sharp lines add a dramatic, fierce flair.
- It’s perfect for standout, confident styles.
- The design’s intensity creates a powerful impact.
Why It Works
Bird Claw Marks Nail Art blends bold color with fierce lines, delivering a manicure that’s both striking and wildly chic.
24. Floral & Animal Mix Nail Art
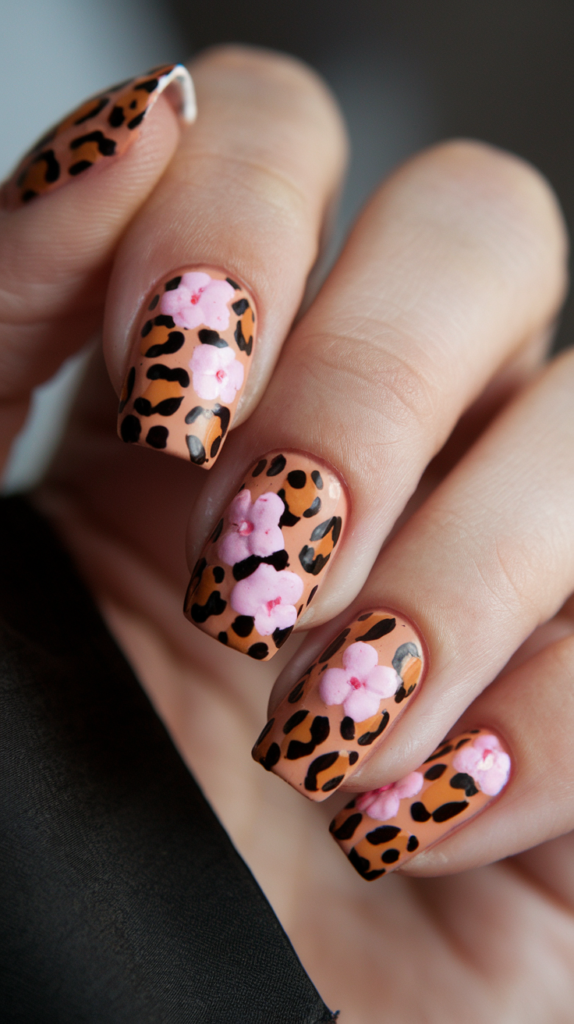
Floral & animal mix nail art blooms with a unique blend of leopard spots and soft flowers, balancing wildness with delicate charm.
It’s perfect for a bold, feminine look.
How to Paint Floral & Leopard Mix
Step 1: Apply the Base Color
Start with a nude or light pink polish as your base. Let it dry fully.
Step 2: Add Leopard Spots
Use a dotting tool to dab irregular brown spots with black outlines across each nail.
Step 3: Paint the Flowers
With a fine brush, add small pink floral accents around the edges of the spots.
Step 4: Seal the Design
Finish with a glossy top coat to protect and unify the look.
Best Combinations for Floral & Leopard
Mix wild and soft tones for a balanced design.
- Classic: Nude base with brown spots and pink flowers.
- Vivid: Teal base with yellow spots and white daisies.
These pairings keep the design fresh and harmonious.
Why Floral & Leopard Mix Blooms
Floral & animal mix nail art shines with its perfect balance.
- The leopard spots add a fierce, wild edge.
- The flowers bring a soft, feminine contrast.
- It’s ideal for versatile, eye-catching styles.
Why It Works
Floral & Animal Mix Nail Art fuses bold leopard patterns with delicate blooms, creating a manicure that’s both fierce and beautifully balanced.
25. Jaguar Print Nail Art
Jaguar print nail art stalks in with bold, angular spots, offering a fierce, graphic take on animal patterns.
It’s perfect for a striking, confident look.
How to Paint Jaguar Spots
Step 1: Apply the Base Color
Start with a golden-hued polish as your base. Let it dry completely.
Step 2: Add the Spots
Use a dotting tool to create angular, irregular black spots across each nail.
Step 3: Define the Edges
Keep the spots sharp and jagged for a true jaguar effect.
Step 4: Seal the Design
Finish with a glossy top coat to protect and enhance the bold design.
Bold Jaguar Variations
Add flair to this fierce pattern.
- Classic: Gold base with black spots for a natural jaguar look.
- Luxe: Silver base with metallic gold spots for a glamorous twist.
These options keep the design wild and chic.
Why Jaguar Print Prowls
Jaguar print nail art stands out with its bold, graphic power.
- The angular spots add a fierce, modern edge.
- It’s perfect for confident, standout styles.
- The design’s sharpness creates a striking impact.
Why It Works
Jaguar Print Nail Art blends bold angles with fierce style, delivering a manicure that’s both graphic and powerfully chic.
26. Deer Antlers Nail Art
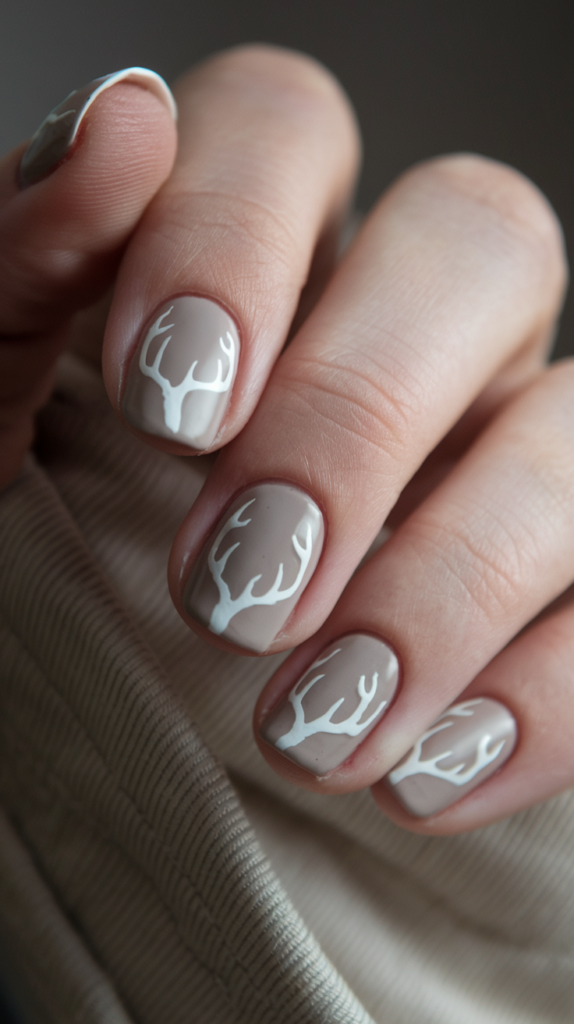
Deer antlers nail art prances in with an elegant, subtle charm, its delicate silhouettes adding a nature-inspired touch.
It’s perfect for a refined, earthy look.
How to Paint Deer Antlers
Step 1: Apply the Base Color
Use a neutral beige, taupe, or light brown polish as your base. Let it dry fully.
Step 2: Draw the Antlers
With a fine brush, paint thin, intricate antler silhouettes in a darker earthy shade.
Step 3: Keep It Delicate
Ensure the lines are fine and elegant for a subtle, natural effect.
Step 4: Seal the Design
Finish with a glossy top coat to protect and enhance the delicate design.
Elegant Antler Variations
Elevate this subtle design with a touch of flair.
- Classic: Beige base with brown antlers for a natural look.
- Luxe: Taupe base with gold antlers or tiny rhinestone accents.
These tweaks add a refined, glamorous edge.
Why Deer Antlers Grace Nails
Deer antlers nail art enchants with its quiet, natural elegance.
- The delicate antlers add a subtle, earthy charm.
- It’s perfect for understated, sophisticated styles.
- The neutral tones create a graceful, timeless effect.
Why It Works
Deer Antlers Nail Art blends intricate silhouettes with earthy elegance, delivering a manicure that’s both subtle and stunningly refined.
27. Polar Bear Print Nail Art
Polar bear print nail art lumbers in with a cool, wintery charm, its tiny paw prints adding a playful touch to a snowy base.
It’s perfect for a frosty, fun vibe.
How to Paint Polar Bear Prints
Step 1: Apply the Base Color
Start with a white or light blue polish to create a snowy backdrop. Let it dry fully.
Step 2: Add the Paw Prints
Use a dotting tool to dab small, rounded gray or black paw prints with tiny toe dots above.
Step 3: Include Winter Details
Add delicate snowflakes or a touch of glitter for a cohesive, frosty finish.
Step 4: Seal the Design
Finish with a glossy top coat to protect and give your nails a radiant, icy shine.
Chilly Variations for Polar Bear Prints
Enhance the wintery charm with these tweaks.
- Classic: White base with gray paw prints for a natural polar bear look.
- Festive: Light blue base with silver snowflakes or shimmer accents.
These options keep the design cool and playful.
Why Polar Bear Prints Chill
Polar bear print nail art delights with its frosty, playful appeal.
- The tiny paw prints add a cute, seasonal touch.
- It’s perfect for winter-inspired, cozy styles.
- The snowy details create a unified, chill vibe.
Why It Works
Polar Bear Print Nail Art blends playful prints with a cool, wintery flair, delivering a manicure that’s both adorable and stylishly frosty.
28. Tiger Face Accent Nail Art
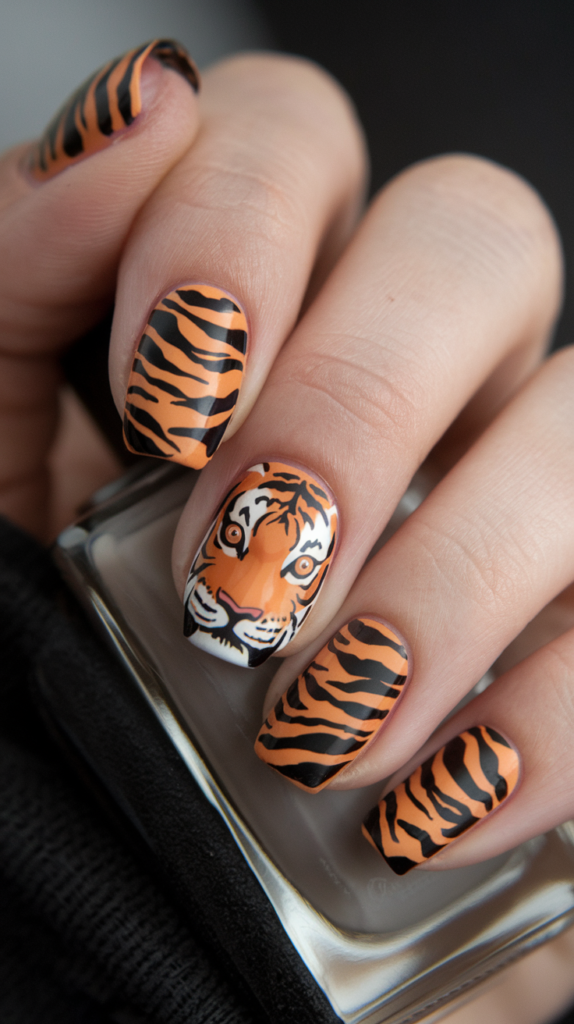
Tiger face accent nail art roars onto your nails with a fierce, detailed focal point, paired with bold stripes for a striking effect.
It’s perfect for a wild, confident statement.
How to Paint a Tiger Face Accent
Step 1: Apply the Base Color
Use a bright orange polish on all nails, reserving one as the accent. Let it dry fully.
Step 2: Paint the Tiger Face
On the accent nail, use a fine brush to create a tiger face with black stripes, white patches, and orange details.
Step 3: Add the Stripes
Paint sharp, jagged black stripes on the remaining nails to complement the face.
Step 4: Seal the Design
Finish with a glossy top coat to protect your design and amplify its bold shine.
Fierce Variations for Tiger Face
Roar louder with these bold twists.
- Classic: Orange base with a black-and-white tiger face for a natural look.
- Dramatic: Matte black base with gold stripes and a golden tiger face.
These options enhance the design’s fierce impact.
Why Tiger Face Nails Roar
Tiger face accent nail art commands attention with its bold, detailed presence.
- The intricate face adds a fierce, eye-catching focal point.
- It’s perfect for pairing with simpler stripes for balance.
- The design’s intensity creates a wild, confident statement.
Why It Works
Tiger Face Accent Nail Art blends detailed artistry with bold stripes, delivering a manicure that’s both fierce and stylishly striking.
29. Owl Eyes Accent Nail Art
Owl eyes accent nail art hoots with an expressive, earthy charm, its big, bold eyes creating a dynamic focal point.
It’s perfect for a unique, nature-inspired look.
How to Paint Owl Eyes Accents
Step 1: Apply the Base Color
Use a neutral brown or beige polish on all nails. Let it dry fully.
Step 2: Paint the Owl Eyes
On an accent nail, use a fine brush to create large, round eyes with yellow-orange irises and black pupils.
Step 3: Add Feather Details
Paint soft feather strokes in earthy tones on the other nails for a cohesive look.
Step 4: Seal the Design
Finish with a glossy top coat to protect and enhance the design’s depth.
Expressive Variations for Owl Eyes
Add depth to this earthy design.
- Classic: Brown base with yellow-orange eyes for a natural owl look.
- Rich: Taupe base with gold eyes and a touch of shimmer.
These tweaks keep the design bold and natural.
Why Owl Eyes Gaze
Owl eyes accent nail art captivates with its striking, earthy presence.
- The big eyes create an expressive, attention-grabbing focal point.
- It’s perfect for unique, nature-inspired styles.
- The feather accents tie it together with subtle elegance.
Why It Works
Owl Eyes Accent Nail Art blends bold, expressive eyes with earthy texture, delivering a manicure that’s both dynamic and naturally chic.
30. Elephant Skin Nail Art
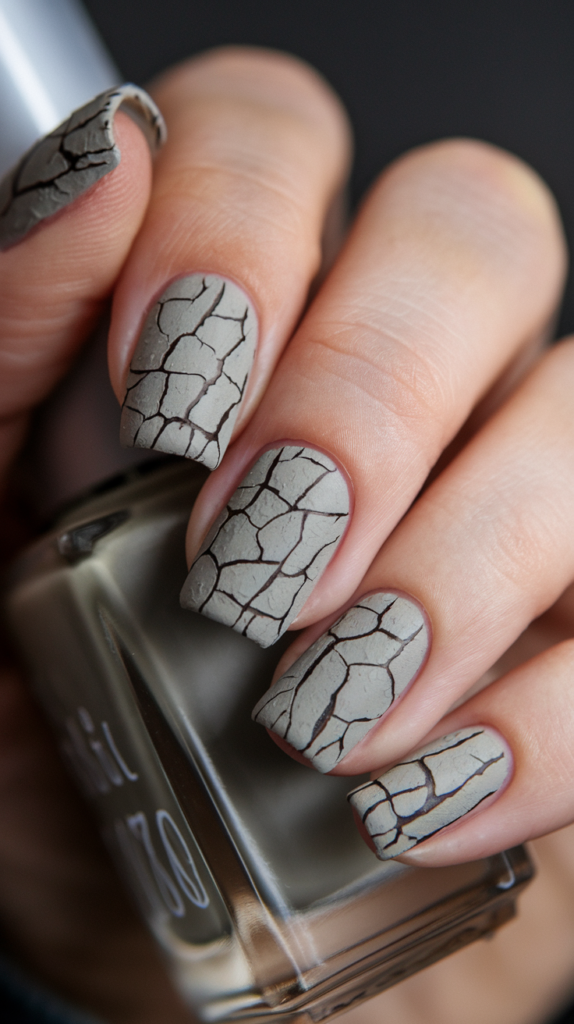
Elephant skin nail art stomps in with a rugged, textured charm, its cracked lines evoking the strength of an elephant’s hide.
It’s perfect for a bold, earthy statement.
How to Create Elephant Skin Texture
Step 1: Apply the Base Color
Start with a gray polish as your base. Let it dry completely.
Step 2: Add the Cracks
Use a fine brush or textured tool to paint irregular, cracked lines in a darker shade across each nail.
Step 3: Layer the Texture
Add lighter gray highlights to create a rugged, dimensional effect.
Step 4: Seal the Design
Finish with a glossy top coat to protect and refine the textured finish.
Rugged Shades for Elephant Skin
Earthy tones enhance the design’s tough, natural vibe.
- Classic: Gray base with dark cracks for an authentic elephant look.
- Rich: Slate base with silver shimmer for a modern twist.
These hues keep the design bold and grounded.
Why Elephant Skin Stands Tall
Elephant skin nail art impresses with its rugged, natural strength.
- The cracked texture adds a bold, tactile edge.
- It’s perfect for earthy, powerful styles.
- The design’s depth creates a striking, organic effect.
Why It Works
Elephant Skin Nail Art blends rugged texture with earthy tones, delivering a manicure that’s both bold and naturally impressive.
31. Butterfly Silhouettes Nail Art
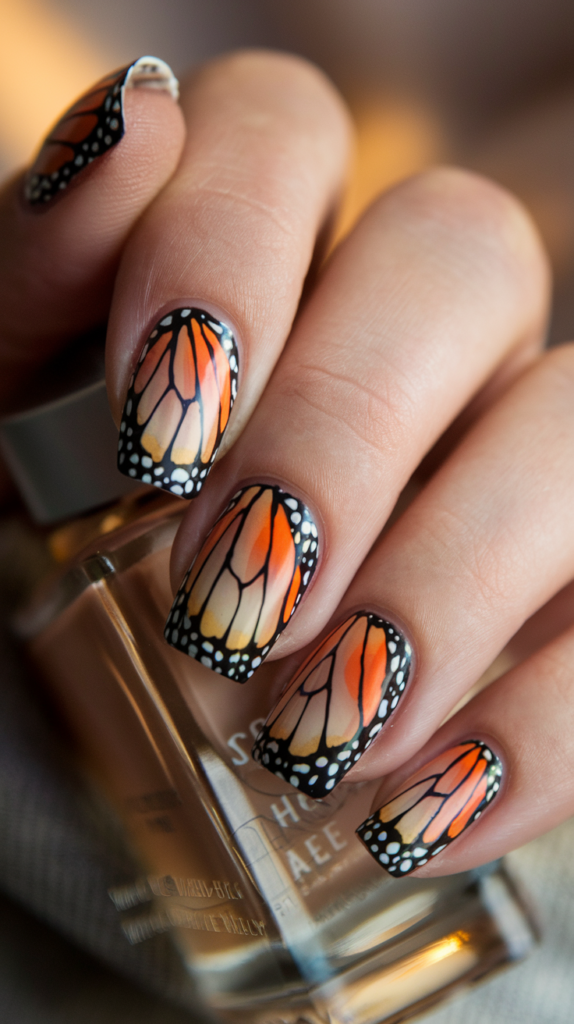
Butterfly silhouettes nail art flutters in with a simple, elegant charm, its delicate outlines adding a whimsical, airy touch.
It’s perfect for a minimalist, graceful look.
How to Paint Butterfly Silhouettes
Step 1: Apply the Base Color
Start with a pastel or nude polish as your base. Let it dry fully.
Step 2: Draw the Silhouettes
Use a fine brush to paint delicate black or white butterfly outlines across each nail.
Step 3: Keep It Minimal
Focus on clean, crisp lines for a simple, elegant effect.
Step 4: Seal the Design
Finish with a glossy top coat to protect and enhance the design’s subtle shine.
Whimsical Variations for Butterfly Silhouettes
Add a flutter of flair to this delicate design.
- Classic: Pastel base with black silhouettes for a minimalist look.
- Glam: Nude base with gold outlines or tiny rhinestone accents.
These tweaks keep the design light and lovely.
Why Butterfly Silhouettes Flutter
Butterfly silhouettes nail art enchants with its delicate, whimsical beauty.
- The simple outlines add an airy, graceful charm.
- It’s perfect for minimalist, elegant styles.
- The design’s subtlety creates a refined, timeless effect.
Why It Works
Butterfly Silhouettes Nail Art blends delicate lines with whimsical elegance, delivering a manicure that’s both simple and stunningly chic.
Conclusion
Animal print nail art unleashes a wild, creative energy, transforming your nails into a canvas of nature’s most stunning patterns.
From the fierce elegance of tiger stripes to the delicate whimsy of butterfly silhouettes, these 32 designs offer endless inspiration for every style and occasion.
Whether you’re new to nail art or a seasoned pro, these ideas are easy to recreate or adapt with your favorite shades and tools.
Dive into bold textures, playful gradients, or intricate accents to craft a manicure that roars, flutters, or slithers with personality.
Grab your polishes and let your nails run wild—the possibilities are as limitless as the animal kingdom itself!