Art Deco, a dazzling style born in the 1920s, is celebrated for its bold geometry, luxurious materials, and glamorous allure.
From towering skyscrapers to glittering jewelry, this movement left an indelible mark on design—and nail art is no exception.
Art Deco-inspired nails combine sharp lines, metallic finishes, and rich colors to create manicures that feel both vintage and modern.
Whether you’re dressing up for a special event or adding sophistication to your everyday look, these 35 Art Deco nail designs offer a wealth of inspiration.
Dive into this collection of opulent patterns and timeless elegance to find your next standout manicure.
1. Gatsby Gold & Black Elegance
Echoing the lavish parties of Gatsby’s era, this design pairs deep black with intricate gold lines for a glamorous Art Deco vibe.
How to Create Gatsby Gold & Black Nails
Step 1: Apply Black Base
Start with a glossy black polish, applying two coats for a smooth, opaque finish. Let it dry completely.
Step 2: Add Gold Patterns
Use a fine nail art brush or striping tape to draw geometric shapes like triangles or crisscrossing lines in gold polish. Ensure lines are crisp for Art Deco precision.
Step 3: Seal the Design
Finish with a high-gloss top coat to protect the design and enhance the black-gold contrast.
Styling Tips for Gatsby Elegance
Ideal for cocktail parties or weddings, pair with a sequined dress or velvet gown and gold jewelry to amplify the Roaring ’20s glamour.
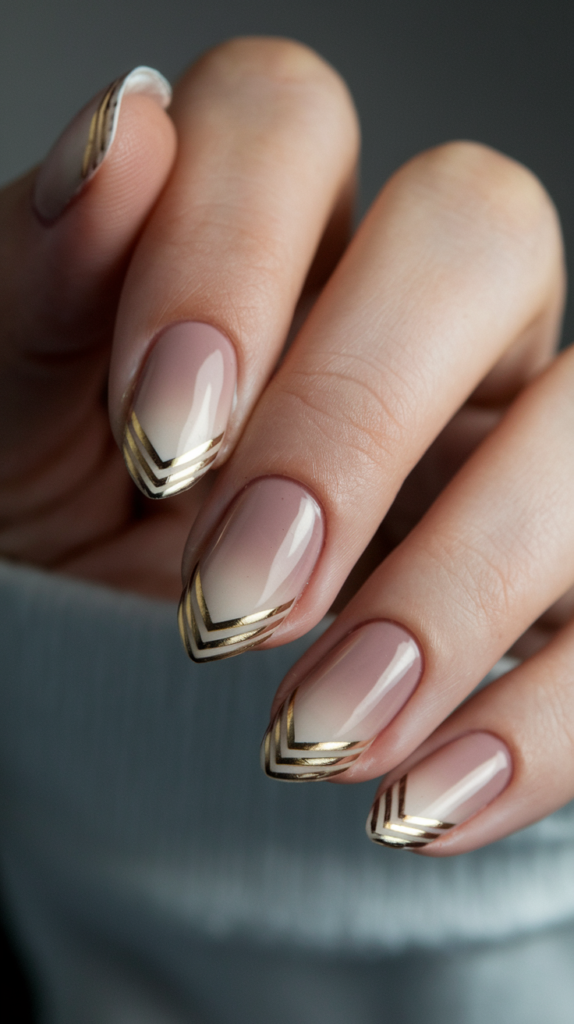
2. Silver Chevron Stripes
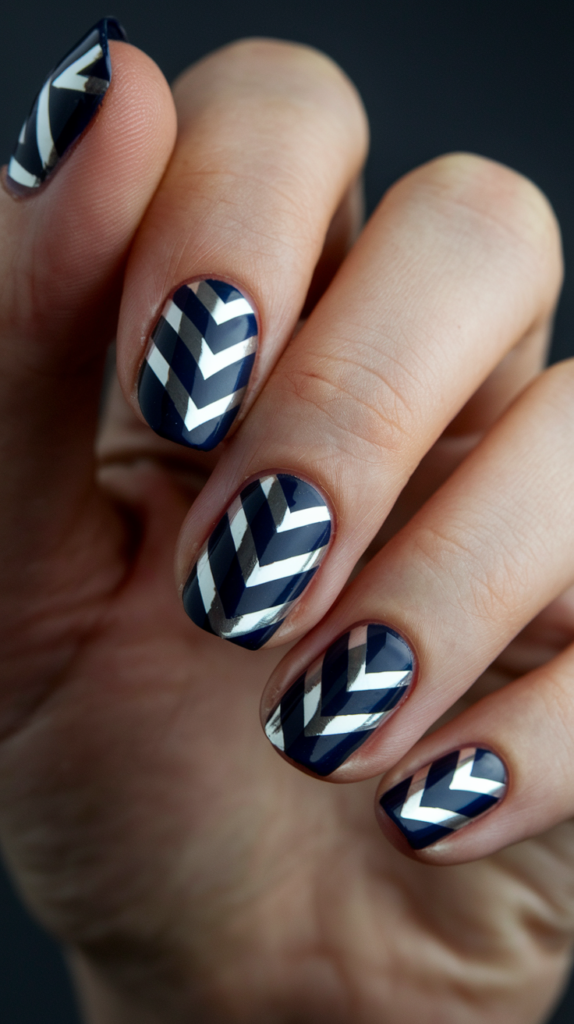
Silver chevron stripes on a navy base blend Art Deco’s metallic obsession with modern boldness, evoking sleek sophistication.
How to Create Silver Chevron Nails
Step 1: Navy Base
Apply deep navy polish in two coats for a rich, even color. Allow it to dry fully.
Step 2: Chevron Stripes
Use striping tape to outline chevron shapes, then fill with metallic silver polish. Remove tape carefully for sharp edges.
Step 3: Seal the Design
Finish with a glossy top coat to enhance the silver’s shine and ensure durability.
Color Variations for Chevron Nails
Try rose gold chevrons on blush for a softer look or gold on black for drama. High contrast is key for Art Deco impact.
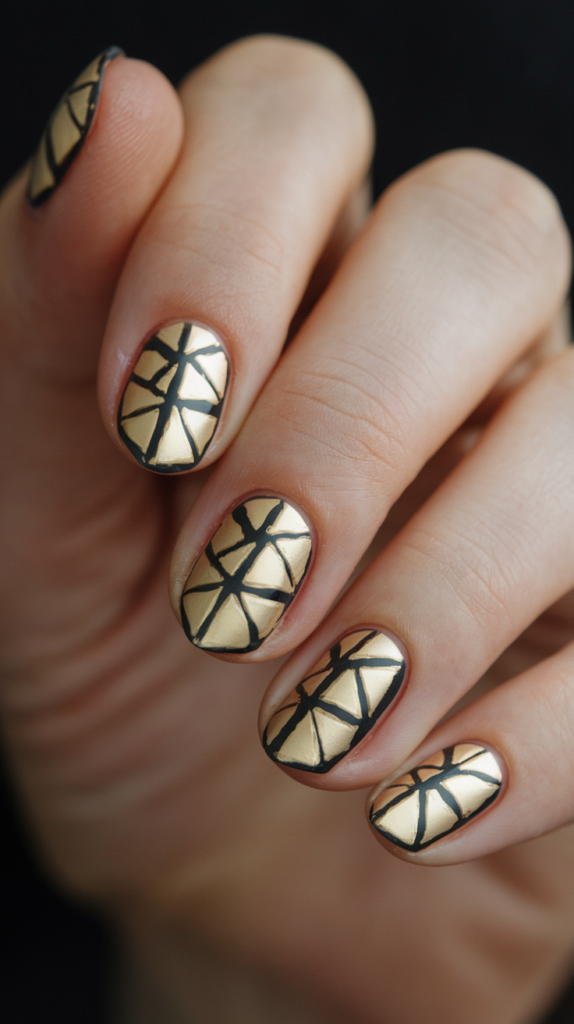
3. Geometric Gold Foil
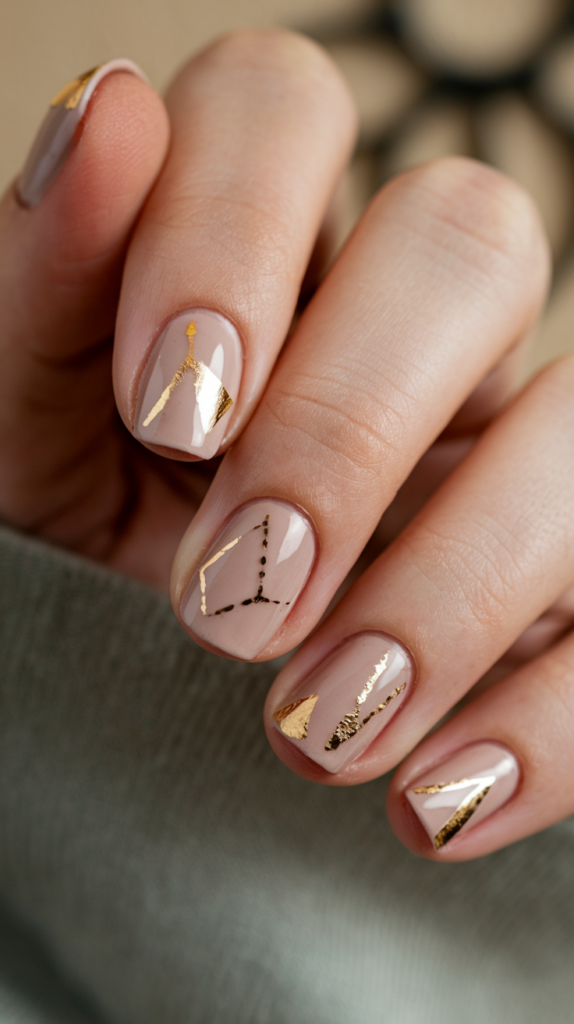
Gold foil accents on a nude base channel Art Deco’s opulent decor, blending minimalism with luxury.
How to Create Geometric Gold Foil Nails
Step 1: Nude Base
Apply nude polish in two coats for a smooth, even finish. Let it dry completely.
Step 2: Apply Gold Foil
Use tweezers to place gold foil pieces in geometric shapes like triangles or stripes. Press gently to adhere.
Step 3: Seal the Design
Finish with a clear top coat to secure the foil and add a glossy shine.
When to Wear Gold Foil Nails
Versatile for daily wear or formal events, pair with neutral outfits and gold accessories for a chic, elegant look.
4. Art Deco Sunburst
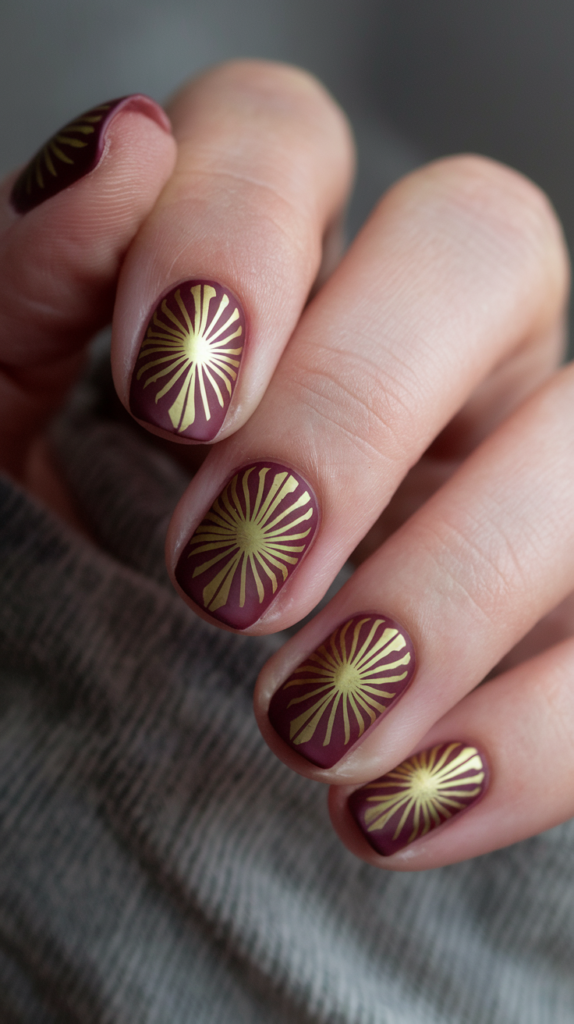
Bold sunburst patterns in gold and black on matte burgundy evoke Art Deco’s radiant architectural motifs.
How to Create Sunburst Nails
Step 1: Burgundy Base
Apply matte burgundy polish in two coats for a deep, rich color. Allow it to dry fully.
Step 2: Sunburst Patterns
Use a thin brush to paint gold and black lines radiating from the nail base, alternating for contrast.
Step 3: Seal the Design
Finish with a matte top coat to maintain the burgundy’s muted elegance and highlight the radiant lines.
Best Nail Length for Sunbursts
Longer nails showcase the intricate sunburst design, but shorter nails can feature smaller bursts for a refined effect.
5. Monochrome Fan Design
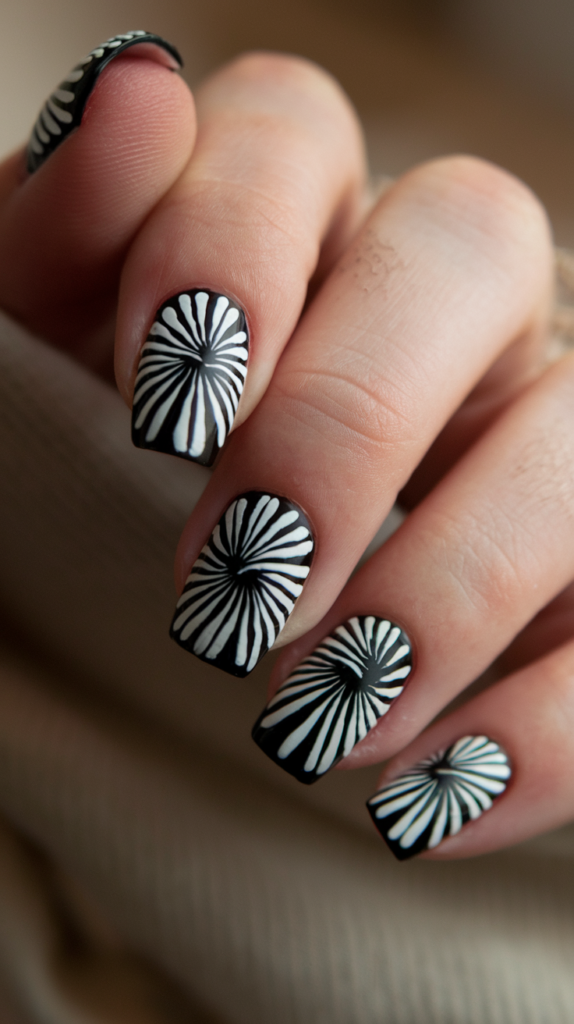
Sharp, angular fan patterns in black and white capture Art Deco’s structured monochrome elegance.
How to Create Monochrome Fan Nails
Step 1: White Base
Apply white polish in two coats for a clean, bright base. Let it dry completely.
Step 2: Black Fans
Use a fine brush to draw angular black fan shapes radiating from a central point. Add silver accents for flair.
Step 3: Seal the Design
Finish with a glossy top coat to protect the design and enhance the high-contrast look.
Mixing Monochrome Patterns
Alternate fans with stripes or dots on other nails for a dynamic, cohesive monochrome manicure, perfect for casual or formal settings.
6. Minimalist Golden Accents
Delicate gold triangle tips on nude nails offer a minimalist yet luxurious Art Deco aesthetic.
How to Create Golden Accent Nails
Step 1: Nude Base
Apply nude polish in two coats for a smooth, natural finish. Allow it to dry fully.
Step 2: Gold Triangles
Use a triangle stencil or striping tape to paint gold polish at the tips, removing tape while wet for clean lines.
Step 3: Seal the Design
Finish with a glossy top coat to secure the gold accents and add shine.
Everyday Minimalist Glam
Perfect for work or casual outings, pair with neutral outfits and gold jewelry for a subtle, elegant style.
7. Black & Gold Half Moons
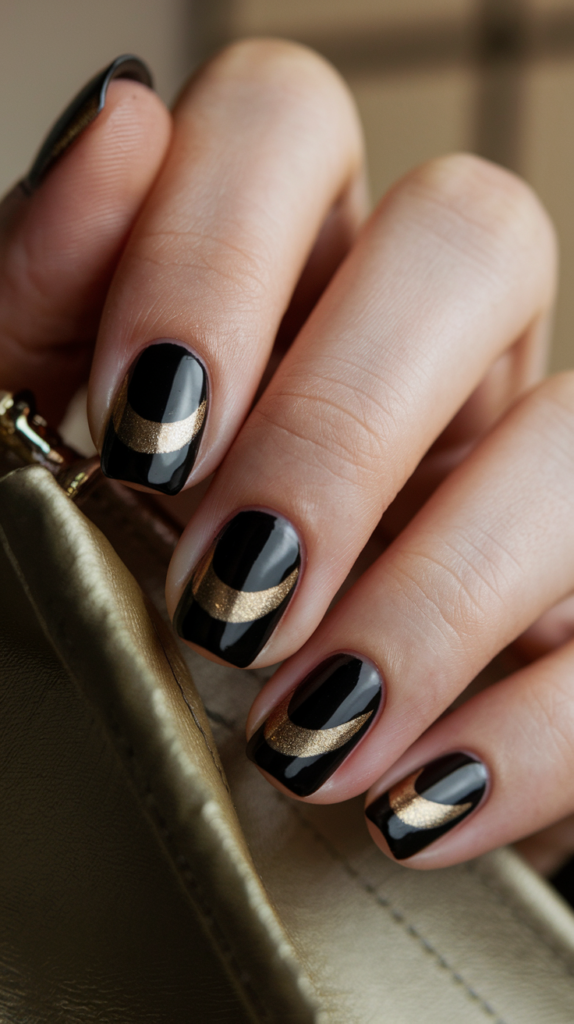
Gold half-moons on a black base evoke timeless Art Deco glamour with geometric precision.
How to Create Half-Moon Nails
Step 1: Black Base
Apply glossy black polish in two coats for a sleek, opaque finish. Let it dry completely.
Step 2: Gold Half-Moons
Use a half-moon stencil to paint gold polish near the cuticle, removing the stencil while wet for sharp edges.
Step 3: Seal the Design
Finish with a glossy top coat to enhance the contrast and ensure durability.
Styling Black & Gold Half-Moons
Ideal for formal events or chic nights out, pair with black dresses and gold accessories for a glamorous, cohesive look.
8. Marble & Metallics
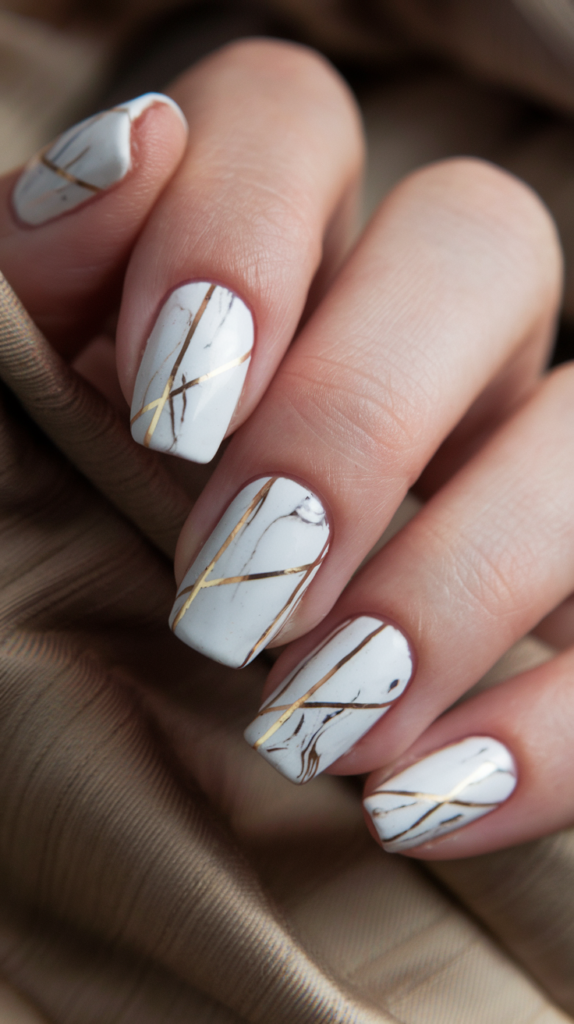
White marble with gold metallic stripes merges Art Deco’s luxurious textures with modern elegance.
How to Create Marble & Metallic Nails
Step 1: Marble Base
Apply white polish, then swirl gray and black polish with a brush for a marble effect. Let it dry fully.
Step 2: Gold Stripes
Use a striping brush to add gold metallic stripes in geometric patterns over the marble base.
Step 3: Seal the Design
Finish with a glossy top coat to enhance the marble texture and metallic shine.
Styling Marble & Metallics
Perfect for upscale dinners or gallery events, pair with minimalist outfits and gold accessories to highlight the luxurious design.
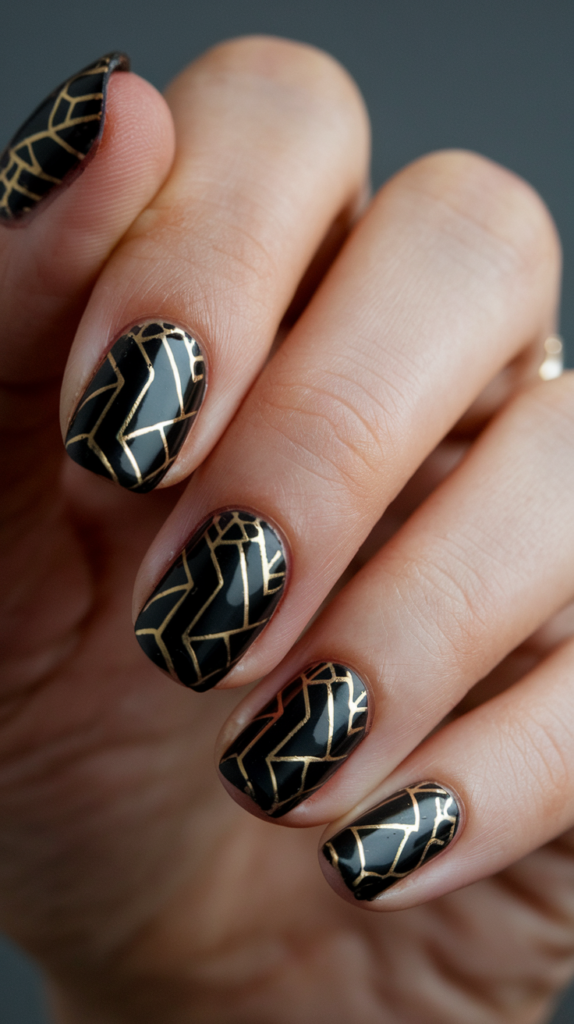
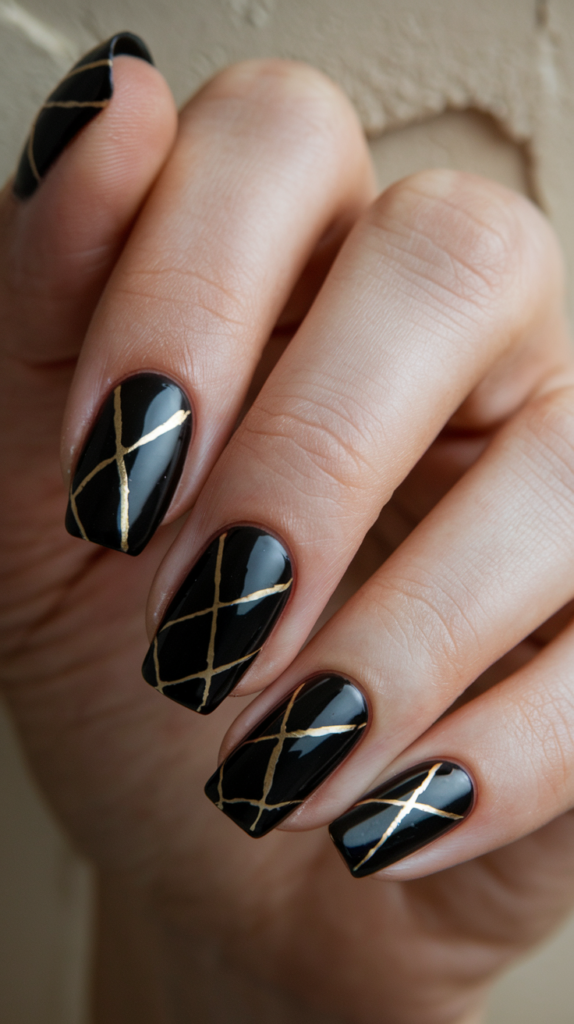
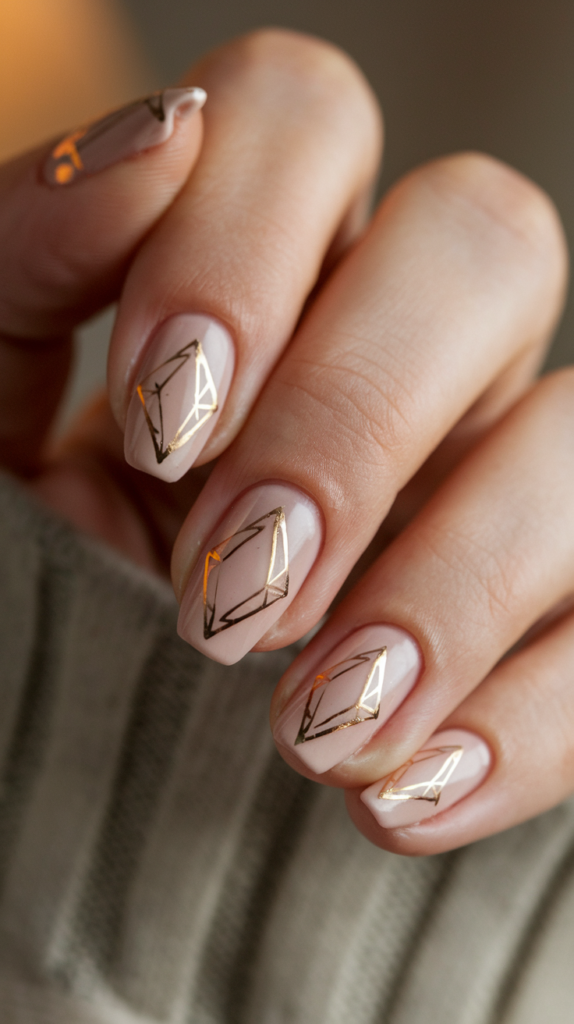
9. Deco Diamonds
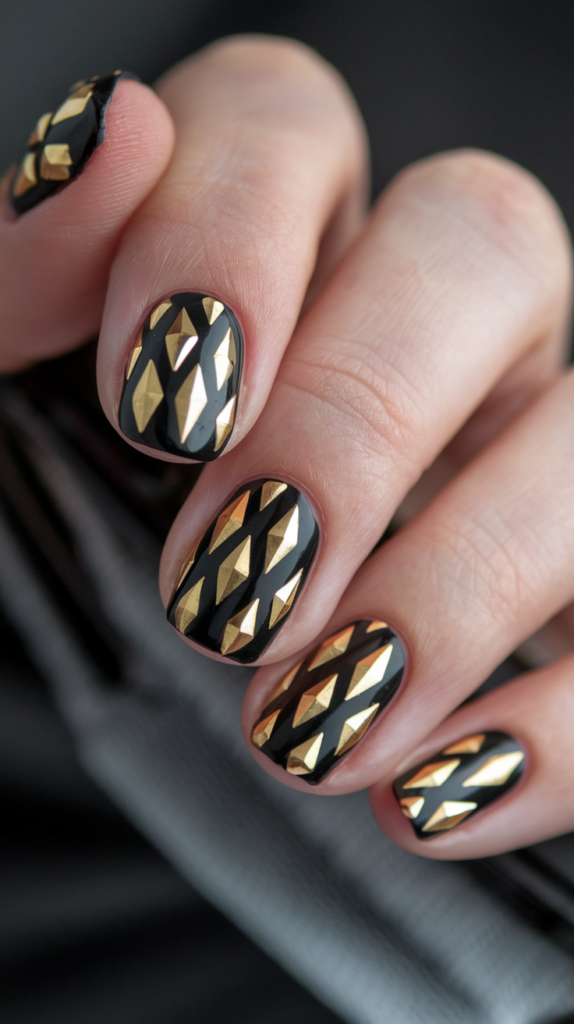
Gold diamond shapes on black nails reflect Art Deco’s opulent gem-inspired designs with sparkling elegance.
How to Create Deco Diamond Nails
Step 1: Black Base
Apply glossy black polish in two coats for a smooth, opaque finish. Let it dry completely.
Step 2: Diamond Shapes
Outline diamond shapes with gold polish using a fine brush, or add rhinestones with nail glue for extra sparkle.
Step 3: Seal the Design
Finish with a clear top coat to secure rhinestones and enhance the design’s shine.
Adding Rhinestone Glam
Place rhinestones in diamond centers for a luxurious touch, ideal for galas or holiday parties with glamorous outfits.
10. Emerald Geometrics
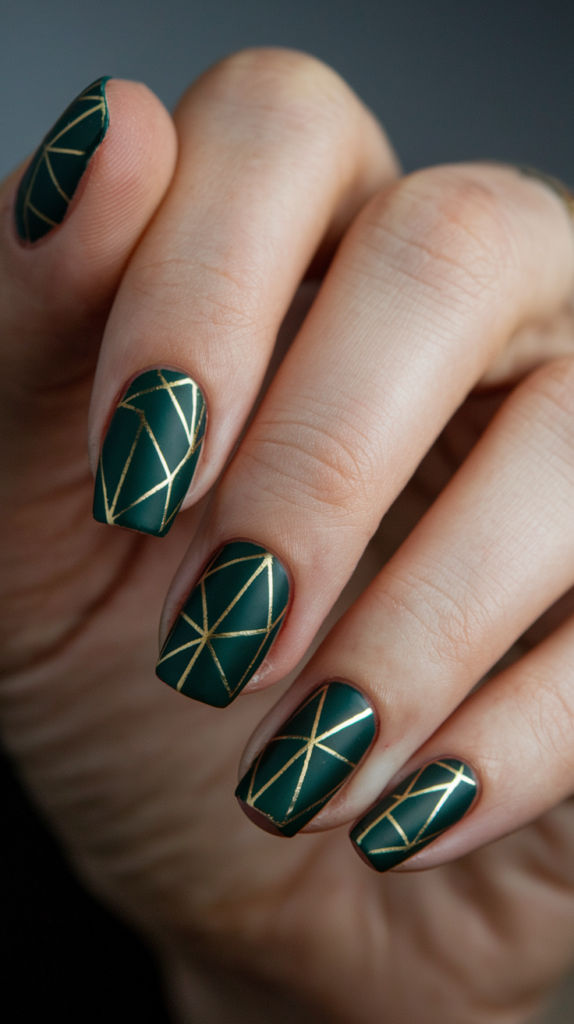
Deep emerald green with sharp gold lines mirrors Art Deco’s lavish jewelry, blending luxury with bold geometry.
How to Create Emerald Geometric Nails
Step 1: Emerald Base
Apply deep emerald polish in two coats for a vibrant, rich color. Allow it to dry fully.
Step 2: Gold Lines
Draw geometric shapes like triangles or diagonals with gold polish using a fine brush or striping tape.
Step 3: Seal the Design
Finish with a glossy top coat to highlight the gold against the emerald base.
Styling for Evening Elegance
Perfect for formal evenings, pair with jewel-toned dresses and gold accessories for a regal, cohesive look.
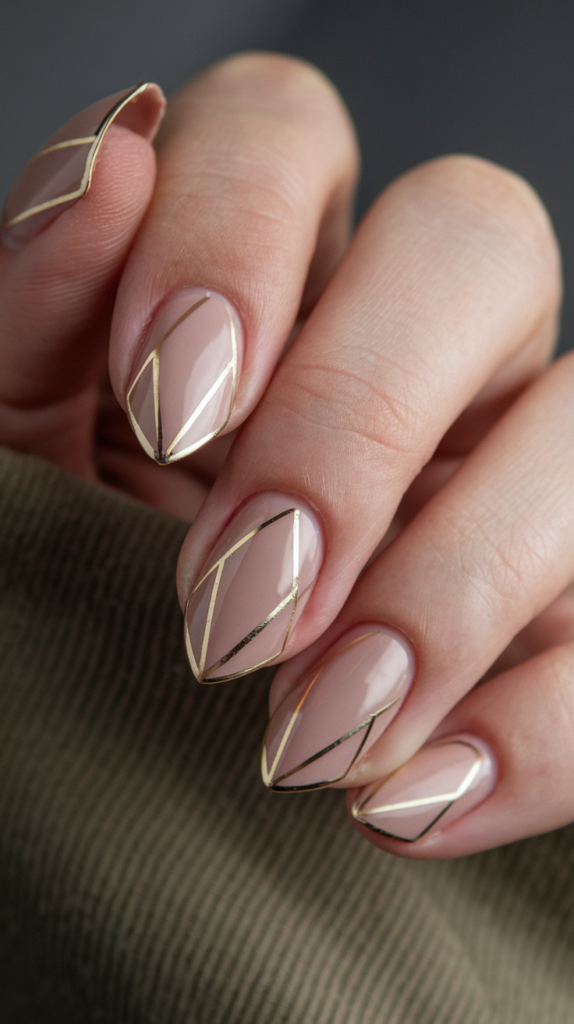
11. Minimalist Deco Lines
Thin black and gold diagonal lines on nude nails offer a subtle, minimalist take on Art Deco’s geometric elegance.
How to Create Minimalist Deco Nails
Step 1: Nude Base
Apply nude polish in two coats for a smooth, natural finish. Let it dry completely.
Step 2: Diagonal Lines
Draw thin black and gold diagonal lines with a fine brush or striping tape, keeping them evenly spaced.
Step 3: Seal the Design
Finish with a glossy top coat for a polished, refined look.
Versatile Minimalist Style
Suitable for office or evening wear, pair with neutral outfits for a chic, understated elegance.
12. Royal Blue Elegance
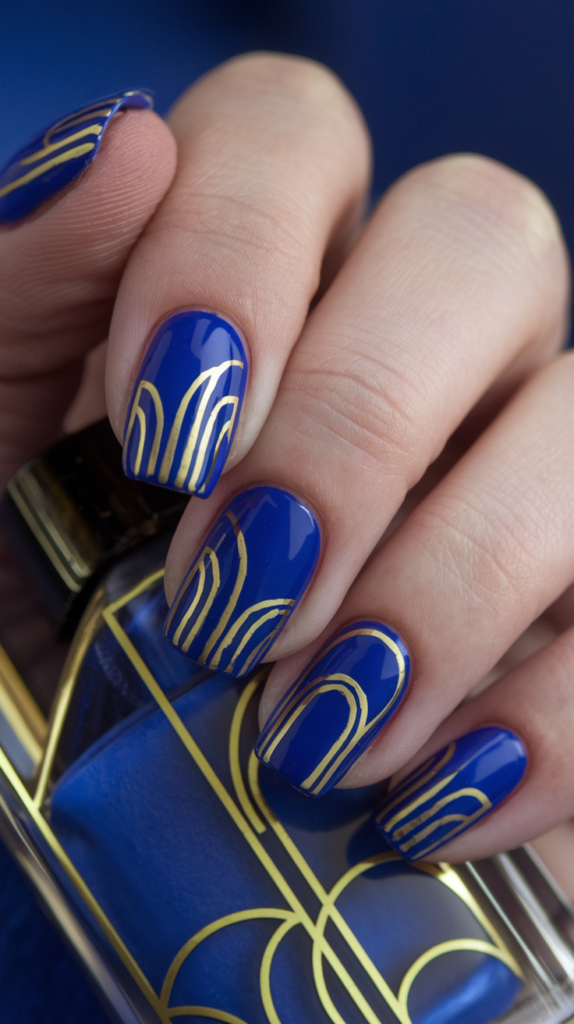
Royal blue with gold arches exudes confidence and luxury, inspired by Art Deco’s regal fashion hues.
How to Create Royal Blue Nails
Step 1: Blue Base
Apply royal blue polish in two coats for a deep, vibrant finish. Allow it to dry fully.
Step 2: Gold Arches
Paint gold arches near the cuticle with a fine brush or stencil, ensuring symmetry.
Step 3: Seal the Design
Finish with a glossy top coat to enhance the blue and gold contrast.
Bold Color Styling
Perfect for formal events or bold daily looks, pair with dark outfits and gold jewelry for a striking statement.
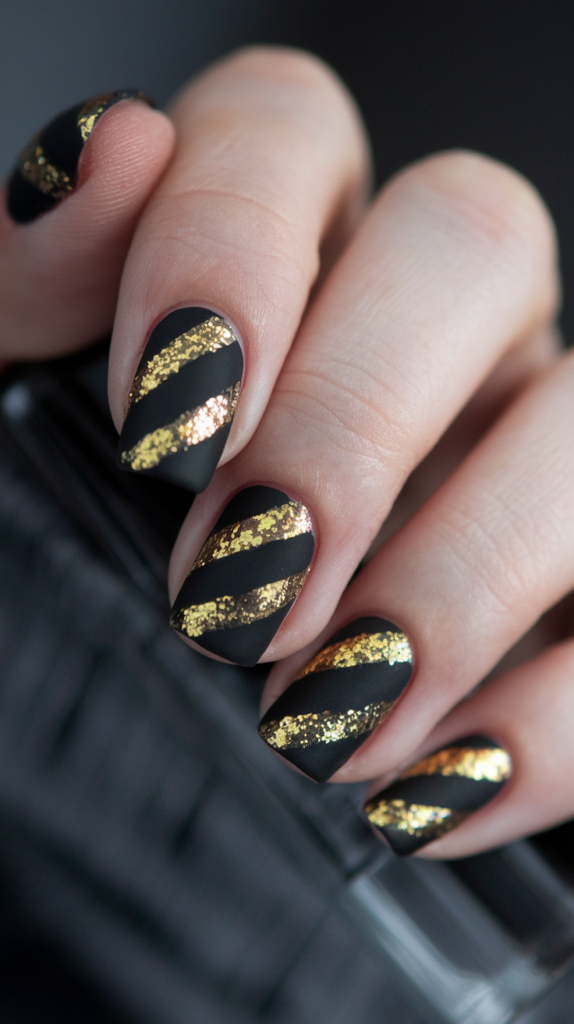
13. Glitter Stripes
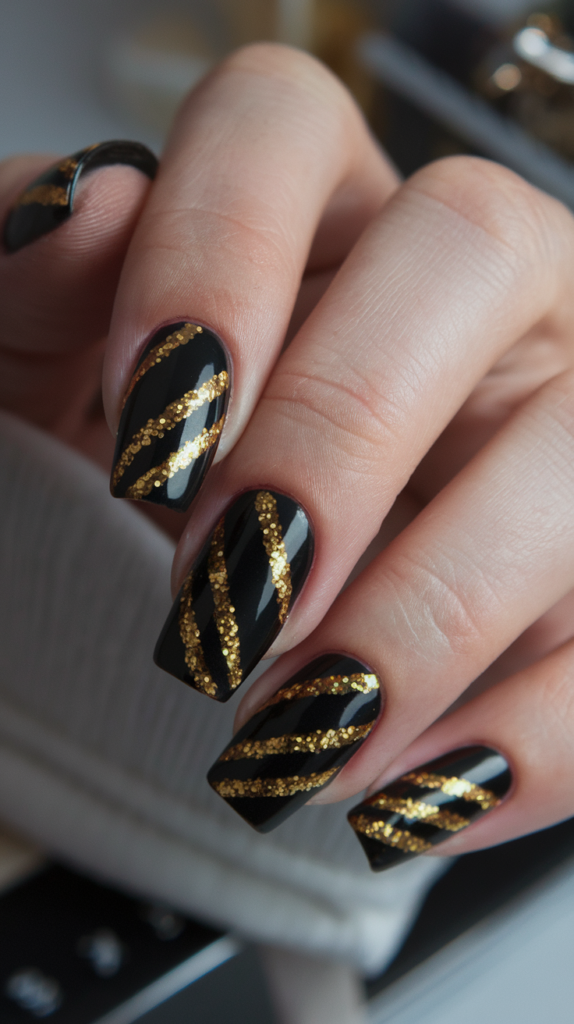
Glittering gold zigzag stripes on black nails capture Art Deco’s glitzy, glamorous spirit.
How to Create Glitter Stripe Nails
Step 1: Black Base
Apply black polish in two coats for a sleek, opaque finish. Let it dry completely.
Step 2: Glitter Stripes
Use a fine brush to apply gold glitter polish in zigzag stripes, keeping lines even and bold.
Step 3: Seal the Design
Finish with a clear top coat to secure the glitter and add a glossy shine.
Festive Occasion Styling
Ideal for parties or New Year’s Eve, pair with metallic dresses or black outfits for a sparkling, festive look.
14. Velvet Matte Gold
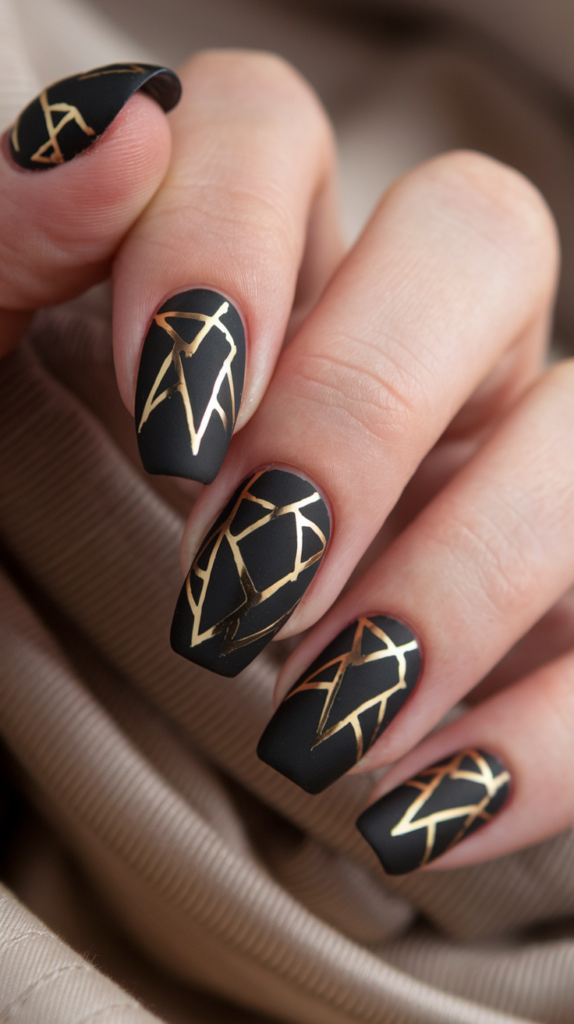
Matte black with shiny gold detailing offers a textured, elegant take on Art Deco’s luxurious finishes.
How to Create Velvet Matte Nails
Step 1: Matte Black Base
Apply matte black polish in two coats for a velvety finish. Let it dry fully.
Step 2: Gold Details
Paint intricate gold patterns with a fine brush over the matte base, focusing on geometric shapes.
Step 3: Seal the Design
Use a matte top coat for the base and a glossy top coat for the gold to preserve the contrasting textures.
Formal Event Styling
Perfect for galas or black-tie events, pair with velvet gowns and gold accessories for a refined, elegant look.
15. Silver Art Deco Arches
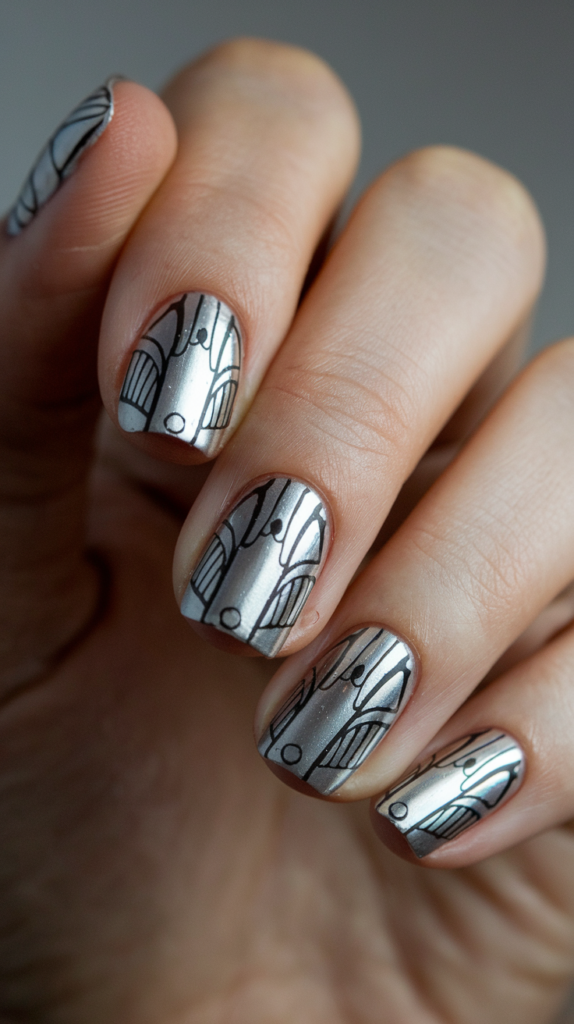
Silver arches on a light base reflect Art Deco’s architectural grandeur with a sleek, modern twist.
How to Create Silver Arch Nails
Step 1: Light Base
Apply a light neutral polish in two coats for a clean canvas. Let it dry completely.
Step 2: Silver Arches
Paint silver arches near the tips with a fine brush or stencil, ensuring smooth, symmetrical curves.
Step 3: Seal the Design
Finish with a glossy top coat to enhance the metallic finish and protect the design.
Mixing Arch Patterns
Combine arches with thin stripes or dots on alternate nails for a dynamic, versatile look suitable for any occasion.
16. Black & Pearl Elegance
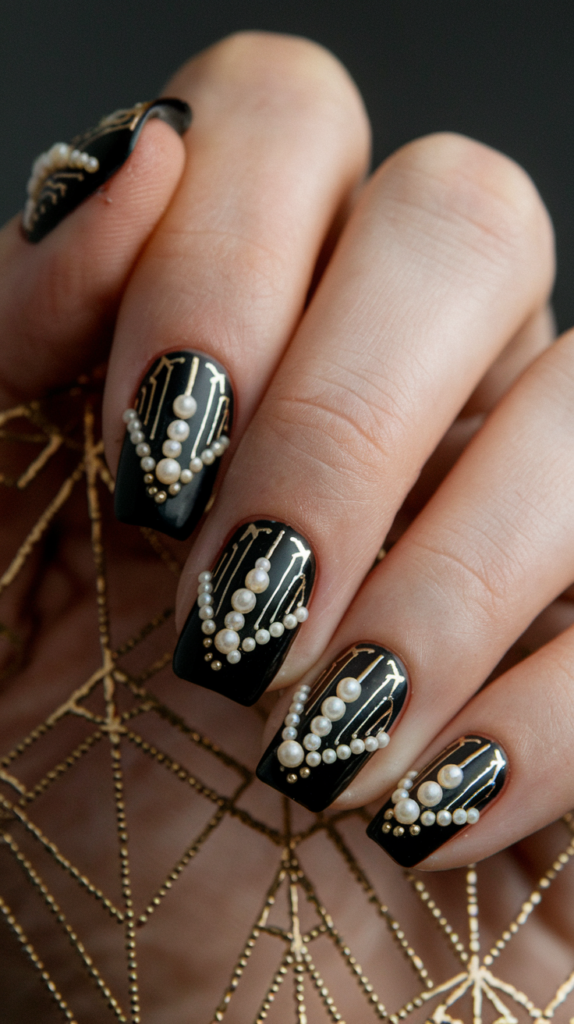
Small pearl dots on black nails evoke 1920s sophistication, blending vintage chic with geometric precision.
How to Create Black & Pearl Nails
Step 1: Black Base
Apply glossy black polish in two coats for a smooth, opaque finish. Let it dry fully.
Step 2: Pearl Accents
Place small pearls in geometric patterns like lines or triangles using nail glue and tweezers for precision.
Step 3: Seal the Design
Finish with a clear top coat to secure the pearls and add a polished shine.
Formal Occasion Styling
Ideal for weddings or upscale dinners, pair with pearl jewelry and black evening wear for timeless elegance.
17. Opulent Jewel Tone
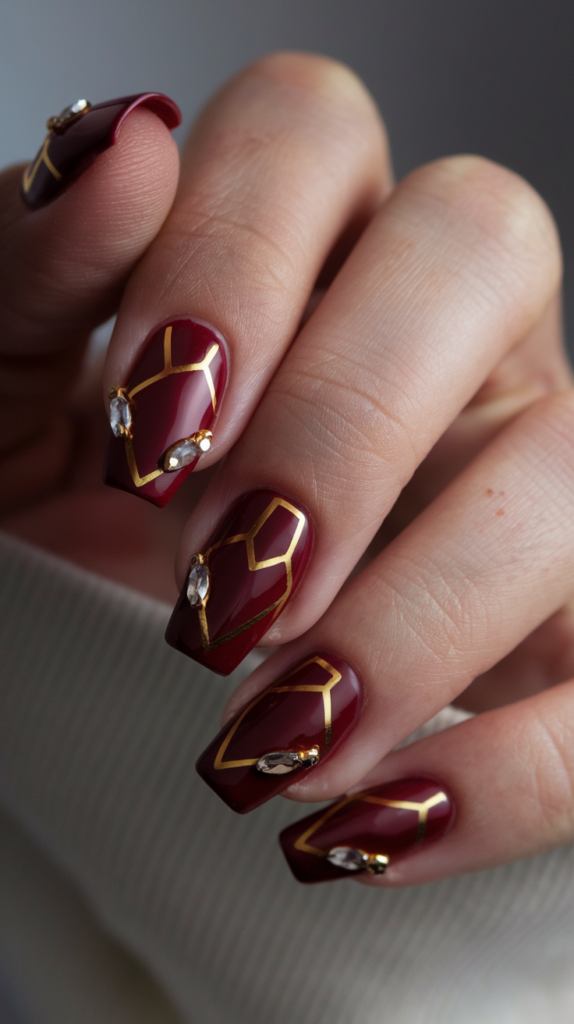
Dark red with gold geometric shapes and rhinestone accents channels Art Deco’s lavish jewel-toned jewelry.
How to Create Jewel Tone Nails
Step 1: Red Base
Apply dark red polish in two coats for a rich, opulent finish. Let it dry fully.
Step 2: Gold & Rhinestones
Paint gold geometric shapes with a fine brush and add rhinestones using nail glue for sparkling accents.
Step 3: Seal the Design
Finish with a glossy top coat to enhance the opulent look and secure the rhinestones.
Bold Statement Styling
Perfect for holiday parties or galas, pair with velvet or satin dresses for a luxurious, eye-catching look.
18. Rose Gold Fans
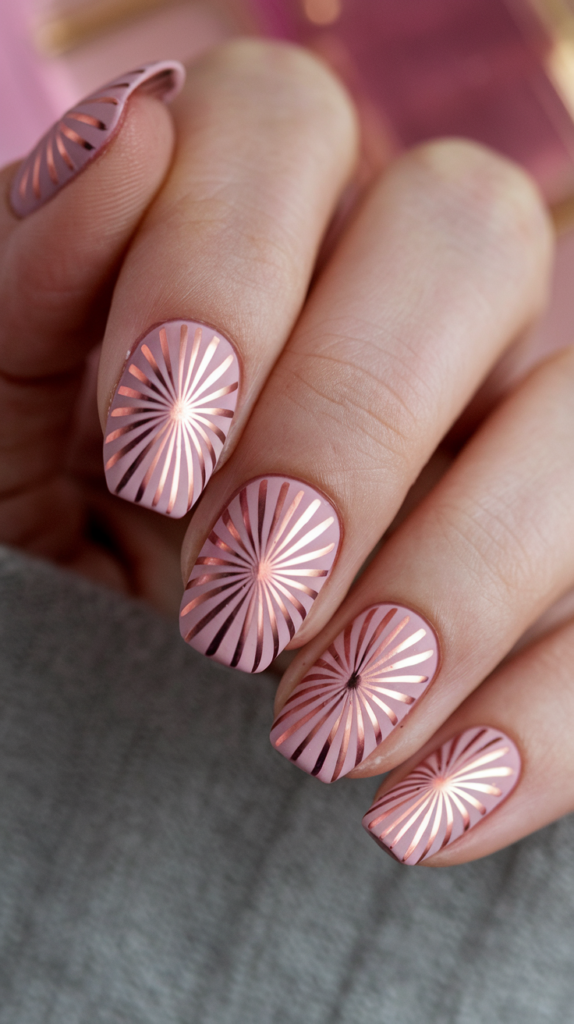
Rose gold fan patterns on matte blush nails offer a soft, feminine twist on Art Deco’s elegant motifs.
How to Create Rose Gold Fan Nails
Step 1: Blush Base
Apply matte blush polish in two coats for a soft, neutral finish. Let it dry fully.
Step 2: Rose Gold Fans
Paint fan shapes with rose gold polish using a fine brush or stencil, radiating from the nail base.
Step 3: Seal the Design
Finish with a glossy top coat to highlight the metallic fans and protect the design.
Daytime Elegance Styling
Ideal for brunches or weddings, pair with pastel outfits and delicate jewelry for a gentle, glamorous look.
19. Bold Black & White
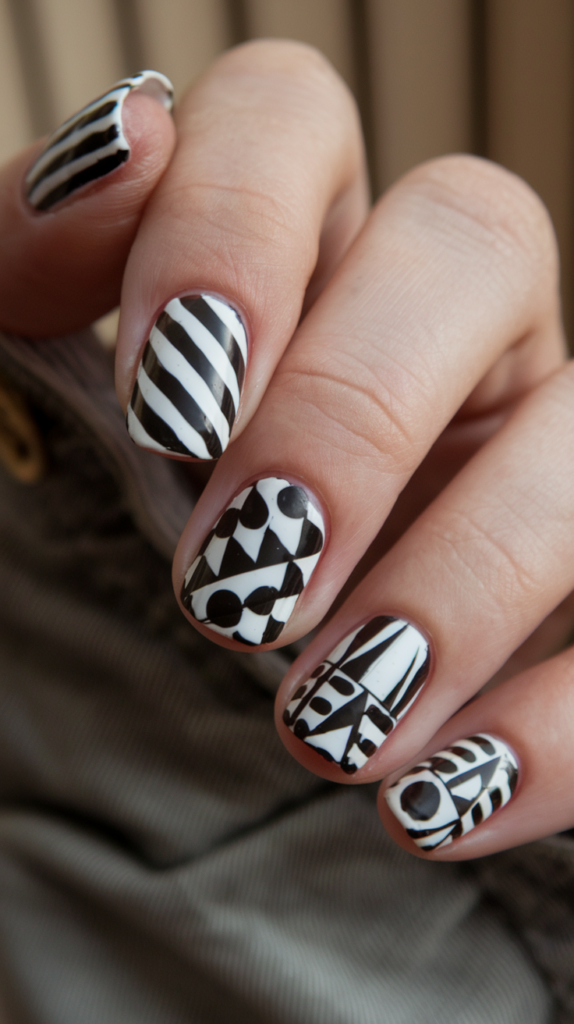
Bold black and white geometric patterns with stripes and triangles embody Art Deco’s high-contrast elegance.
How to Create Black & White Nails
Step 1: Alternate Bases
Apply black and white polish on alternate nails, using two coats for full coverage. Let it dry completely.
Step 2: Geometric Patterns
Add white stripes on black nails and black triangles on white nails with a fine brush or tape.
Step 3: Seal the Design
Finish with a glossy top coat to enhance the contrast and ensure a polished finish.
Monochrome Styling Tips
Versatile for parties or daily wear, pair with monochrome outfits and bold red lips for a striking, sophisticated effect.
20. Muted Glam
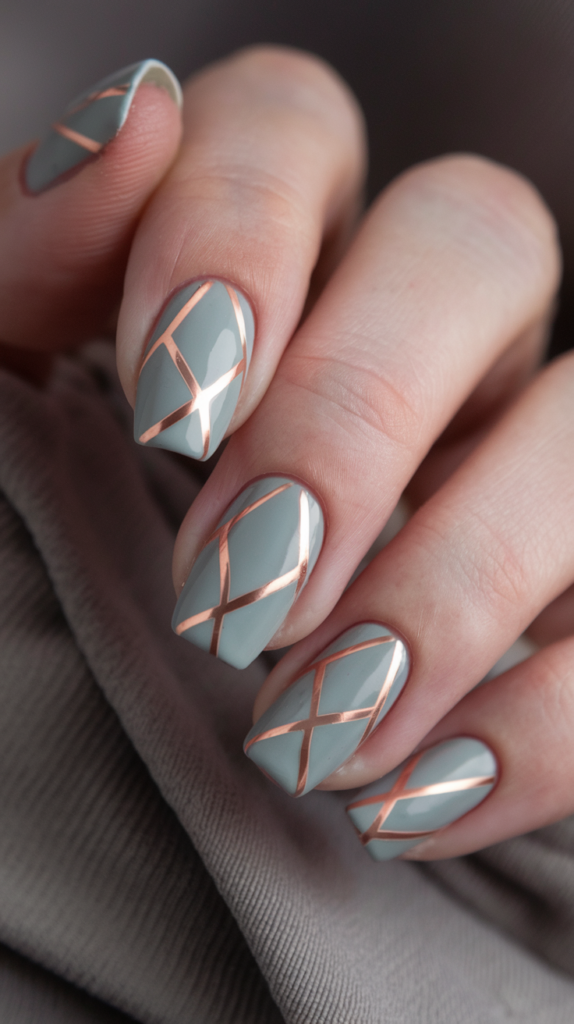
Soft grey with delicate rose gold accents offers a muted, sophisticated take on Art Deco’s luxurious aesthetic.
How to Create Muted Glam Nails
Step 1: Grey Base
Apply soft grey polish in two coats for a smooth, neutral finish. Let it dry fully.
Step 2: Rose Gold Accents
Add delicate rose gold lines or shapes with a fine brush or striping tape for subtle elegance.
Step 3: Seal the Design
Finish with a glossy top coat to highlight the rose gold and protect the design.
Subtle Glam Styling
Perfect for daytime events or work, pair with neutral outfits and minimal jewelry for a refined, understated look.
21. Floral Deco Motif
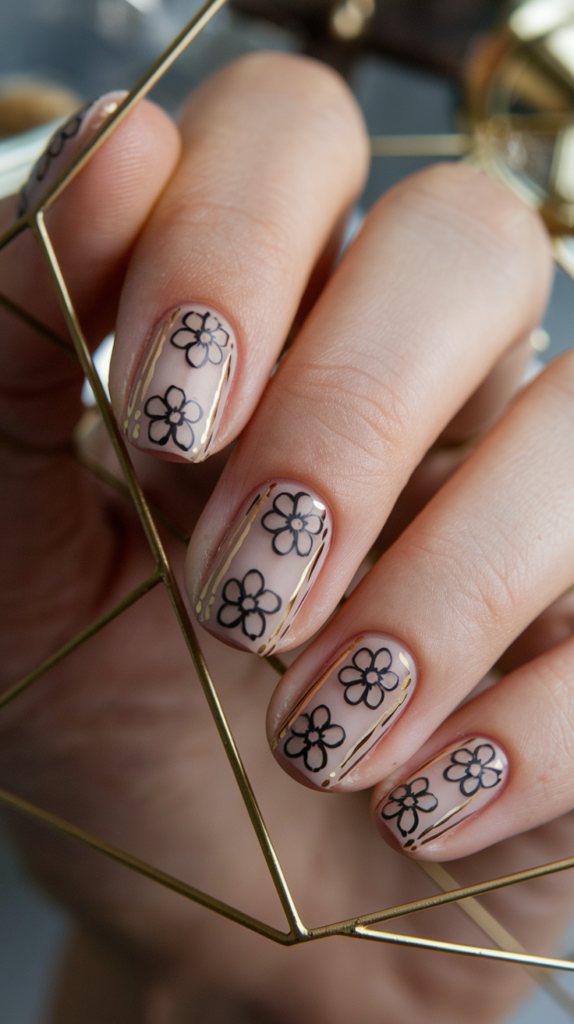
Black floral designs with gold geometric borders blend Art Deco’s structure with nature-inspired whimsy.
How to Create Floral Deco Nails
Step 1: Nude Base
Apply nude polish in two coats for a clean, natural canvas. Let it dry completely.
Step 2: Floral & Borders
Paint simple black floral shapes with a fine brush, then add gold geometric borders like rectangles or triangles.
Step 3: Seal the Design
Finish with a glossy top coat to protect the intricate design and add shine.
Versatile Floral Styling
Suitable for weddings or casual outings, pair with floral accessories and neutral outfits for a balanced, elegant look.
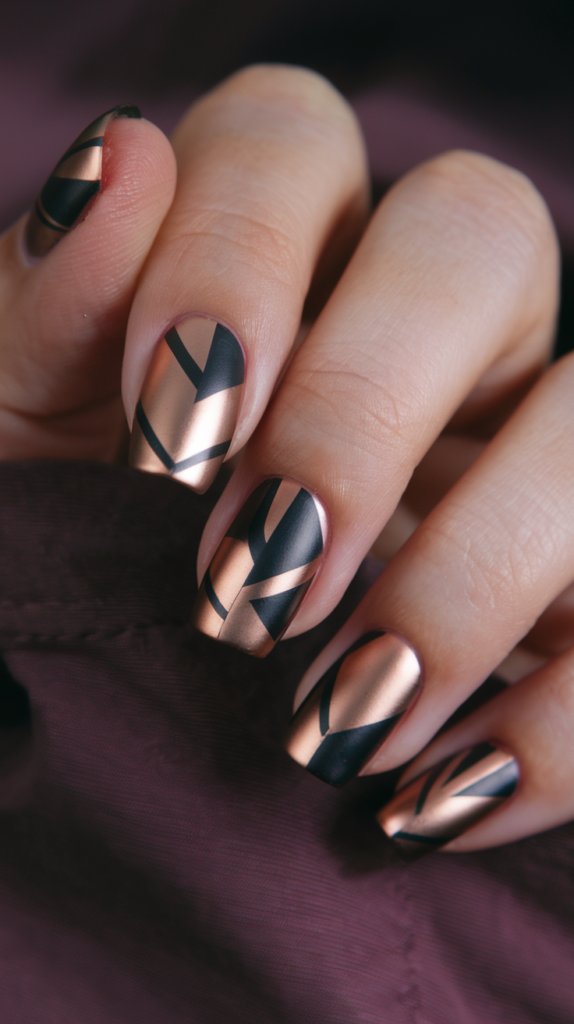
22. Triangular Glam
Bold gold triangles on black nails offer a sharp, chic interpretation of Art Deco’s dynamic geometric shapes.
How to Create Triangular Glam Nails
Step 1: Black Base
Apply black polish in two coats for a sleek, opaque finish. Let it dry completely.
Step 2: Gold Triangles
Paint gold triangles with a stencil or fine brush, varying sizes for visual interest.
Step 3: Seal the Design
Finish with a glossy top coat to enhance the metallic shine and protect the design.
Base Color Variations
Try navy or burgundy bases for drama, or blush with rose gold triangles for a softer look, ideal for parties or work.
23. Glossy Glamour
High-gloss black with thin golden lines captures Art Deco’s reflective elegance and structured design.
How to Create Glossy Glamour Nails
Step 1: Black Base
Apply high-gloss black polish in two coats for a sleek, reflective finish. Let it dry fully.
Step 2: Golden Lines
Draw thin gold lines in geometric patterns like stripes or grids with a fine brush or striping tape.
Step 3: Seal the Design
Finish with a glossy top coat to amplify the shine and protect the design.
Evening Event Styling
Perfect for cocktail parties or galas, pair with a little black dress and gold accessories for a polished, glamorous look.
24. Checkerboard Deco
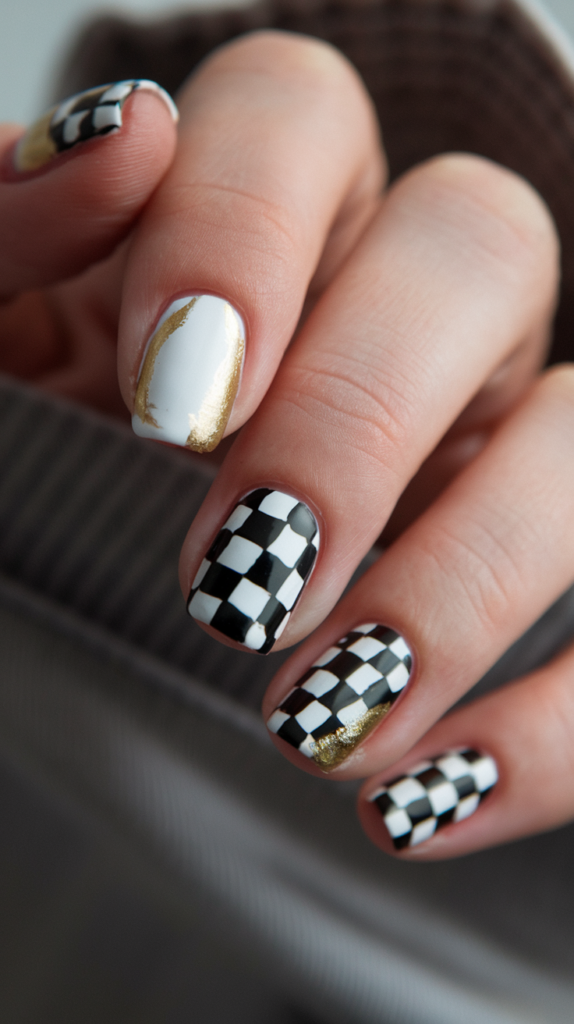
Black and white checkerboard with gold accents reflects Art Deco’s timeless symmetry and balance.
How to Create Checkerboard Deco Nails
Step 1: Checkerboard Base
Paint alternating black and white squares on each nail, using striping tape for precision.
Step 2: Gold Accents
Add small gold dots or lines at square corners with a fine brush for a subtle luxurious touch.
Step 3: Seal the Design
Finish with a glossy top coat to enhance the contrast and ensure a polished finish.
Modern Classic Styling
Versatile for daily wear or parties, pair with monochrome outfits and gold jewelry for a bold, timeless style.
25. Matte & Metallic Mix

Matte black with rose gold geometric patterns blends Art Deco’s textured elegance with modern chic.
How to Create Matte & Metallic Nails
Step 1: Matte Black Base
Apply matte black polish in two coats for a velvety, smooth finish. Let it dry fully.
Step 2: Rose Gold Patterns
Paint rose gold geometric shapes like triangles or lines with a fine brush or striping tape.
Step 3: Seal the Design
Use a matte top coat for the base and a glossy top coat for the rose gold to maintain contrasting textures.
Textured Styling Tips
Perfect for evening events or work, pair with minimalist outfits and rose gold accessories for a chic, sophisticated look.
26. Jewel Accents
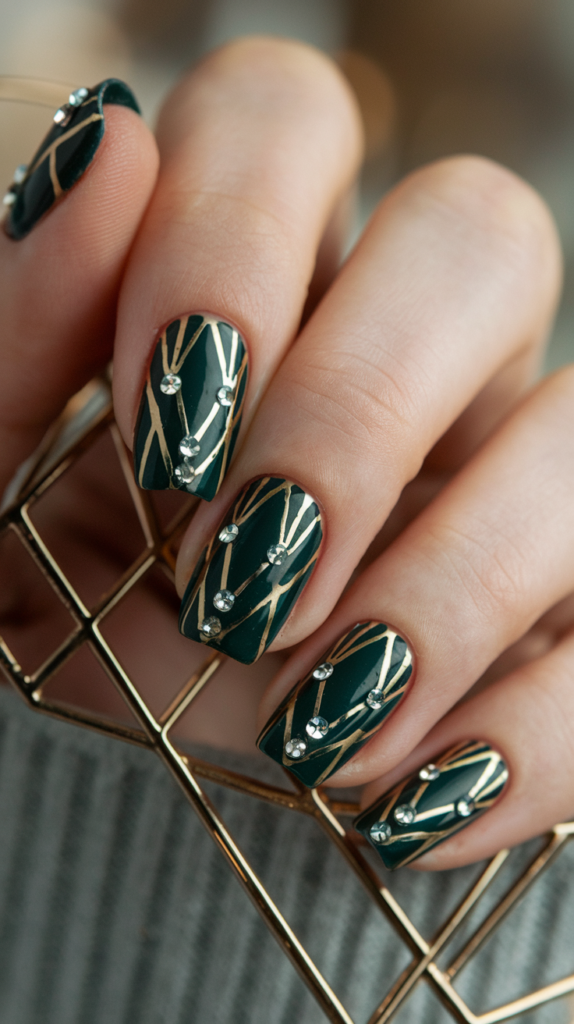
Dark green with gold striping and rhinestone embellishments captures Art Deco’s opulent gemstone-inspired designs.
How to Create Jewel Accent Nails
Step 1: Green Base
Apply dark green polish in two coats for a rich, luxurious finish. Let it dry fully.
Step 2: Gold & Rhinestones
Add gold stripes with a fine brush or tape, then place rhinestones at key points using nail glue.
Step 3: Seal the Design
Finish with a glossy top coat to secure the rhinestones and enhance the opulent shine.
Rhinestone Color Choices
Use clear or gold rhinestones for subtlety, or emerald rhinestones for drama, perfect for galas or festive events.
27. Tuxedo Nails
Playful black and white tuxedo patterns with buttons and bow ties bring Art Deco’s formalwear inspiration to life.
How to Create Tuxedo Nails
Step 1: Black Base
Apply glossy black polish in two coats for a sleek, opaque finish. Let it dry fully.
Step 2: Tuxedo Details
Paint white triangles at the tips for the shirt, adding black buttons and a bow tie with a fine brush or dotting tool.
Step 3: Seal the Design
Finish with a glossy top coat for a polished, formal finish.
Formal Event Styling
Ideal for black-tie events or themed parties, pair with suits or dresses for a playful yet elegant look.
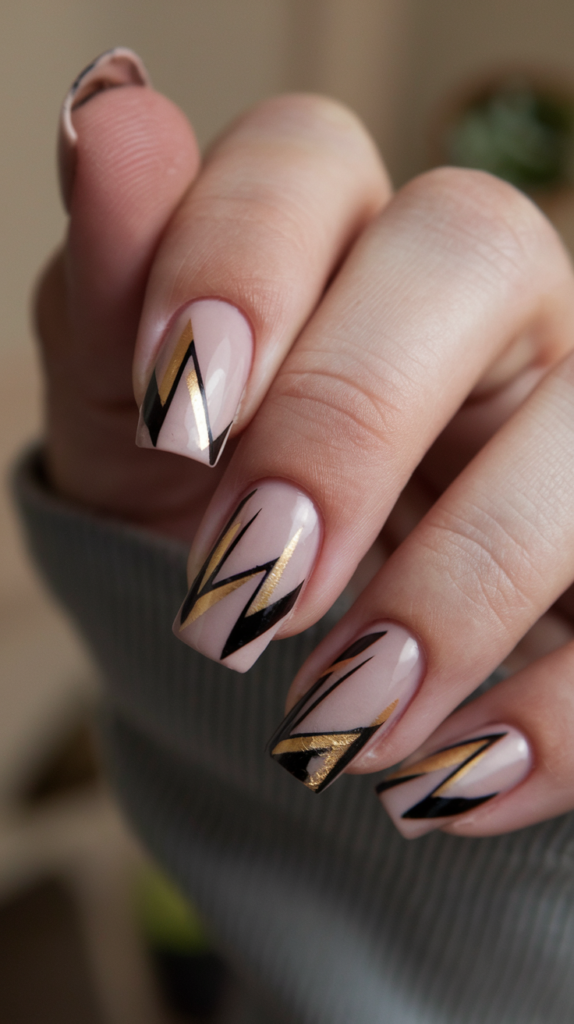
28. Bronze Geometric
Warm bronze and copper patterns on deep plum nails evoke Art Deco’s rich, opulent aesthetic.
How to Create Bronze Geometric Nails
Step 1: Plum Base
Apply deep plum polish in two coats for a rich, luxurious finish. Let it dry fully.
Step 2: Metallic Patterns
Paint bronze and copper geometric shapes like triangles or lines with a fine brush or striping tape.
Step 3: Seal the Design
Finish with a glossy top coat to highlight the metallic warmth and protect the design.
Seasonal Styling Tips
Perfect for fall or winter events, pair with jewel-toned outfits like emerald or sapphire for a luxurious, seasonal look.
29. Diamond Cut Design
Gold-outlined diamond shapes on nude nails reflect Art Deco’s precise, luxurious gem motifs.
How to Create Diamond Cut Nails
Step 1: Nude Base
Apply nude polish in two coats for a clean, natural finish. Let it dry fully.
Step 2: Diamond Outlines
Outline diamond shapes with gold polish using striping tape or a fine brush for sharp, symmetrical lines.
Step 3: Seal the Design
Finish with a glossy top coat for a polished, refined finish.
Polished Styling Tips
Suitable for work or formal events, pair with tailored suits or cocktail dresses for a sophisticated, elegant style.
30. Chevron Ombré
Soft ombré gradients with bold gold chevrons blend Art Deco’s dynamic patterns with modern elegance, creating a vibrant yet refined look.
How to Create Chevron Ombré Nails
Step 1: Nude Base
Apply nude polish in two coats for a smooth, neutral base. Let it dry completely.
Step 2: Ombré Gradient
Use a makeup sponge to apply a gradient from light pink to deep burgundy, blending smoothly across the nail.
Step 3: Gold Chevrons
Paint gold chevron shapes over the gradient using striping tape or a fine brush for sharp, precise lines.
Step 4: Seal the Design
Finish with a glossy top coat to enhance the ombré effect and protect the chevron patterns.
Color Palette Variations
Experiment with blue-to-navy or beige-to-brown gradients with silver chevrons for variety, perfect for evening events or casual wear.
31. Bold Deco Tips
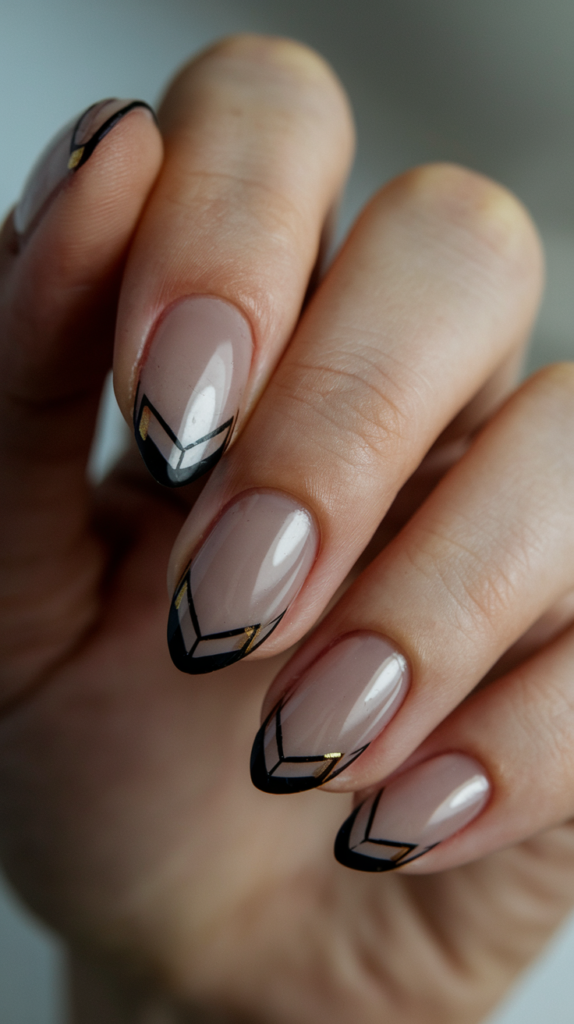
Clear nails with bold black and gold geometric tips create a minimalist, striking Art Deco design that emphasizes sharp contrasts.
How to Create Bold Deco Tip Nails
Step 1: Clear Base
Apply clear polish in two coats for a glossy, transparent base. Let it dry fully.
Step 2: Geometric Tips
Paint black and gold geometric shapes like triangles or chevrons at the nail tips using striping tape or a fine brush.
Step 3: Seal the Design
Finish with a glossy top coat for a glass-like finish that protects the bold tip designs.
Modern Minimalist Styling
Versatile for casual or formal settings, pair with minimalist outfits in neutral or monochrome tones to highlight the striking tips.
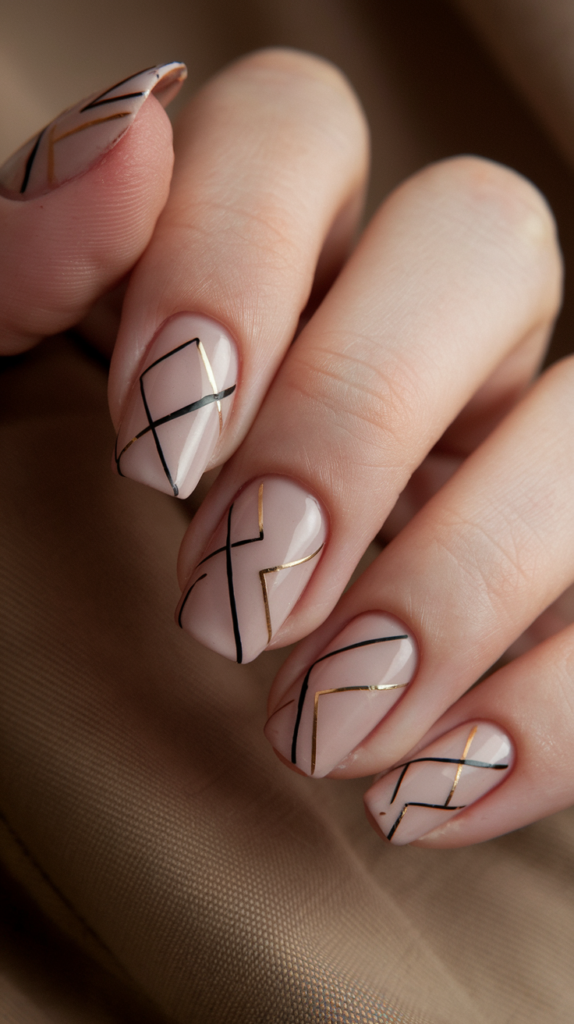
32. Negative Space Deco
Nude nails with black and gold geometric designs and negative space create a clean, modern Art Deco aesthetic.
How to Create Negative Space Deco Nails
Step 1: Nude Base
Apply nude or clear polish in two coats for a natural, transparent base. Let it dry completely.
Step 2: Geometric Shapes
Paint black and gold geometric shapes like triangles or lines with a fine brush, leaving bare areas for negative space.
Step 3: Seal the Design
Finish with a glossy top coat to protect the design and enhance the contrast between painted and bare areas.
Timeless Minimalist Styling
Ideal for any occasion, pair with neutral or bold outfits for a chic, versatile look that emphasizes the negative space elegance.
33. Vintage Glam Stripes
Matte black nails with thin gold glitter stripes offer a chic, vintage-inspired take on Art Deco’s linear elegance.
How to Create Vintage Glam Stripe Nails
Step 1: Matte Black Base
Apply matte black polish in two coats for a velvety, smooth finish. Let it dry fully.
Step 2: Glitter Stripes
Paint thin gold glitter stripes with a fine brush or striping tape, ensuring straight, evenly spaced lines.
Step 3: Seal the Design
Finish with a clear top coat to secure the glitter and maintain the matte finish.
Glam Event Styling
Perfect for parties or galas, pair with gold dresses or black outfits for a sparkling, vintage-inspired look.
34. Luxe Sapphire

Deep sapphire with silver geometric shapes channels Art Deco’s regal jewelry-inspired aesthetic.
Creating Luxe Sapphire Nails
Step 1: Sapphire Base
Apply deep sapphire blue polish, using two coats for a rich, vibrant finish. Allow it to dry completely.
Step 2: Silver Geometrics
Using a fine nail art brush or striping tape, paint silver geometric shapes like triangles or lines across the nails for a structured look.
Step 3: Seal the Design
Finish with a glossy top coat to enhance the metallic shine and protect the bold sapphire hue.
Regal Styling Tips
Perfect for formal events or bold daily wear, pair with silver jewelry and dark or neutral outfits to let the sapphire nails shine as a statement piece.
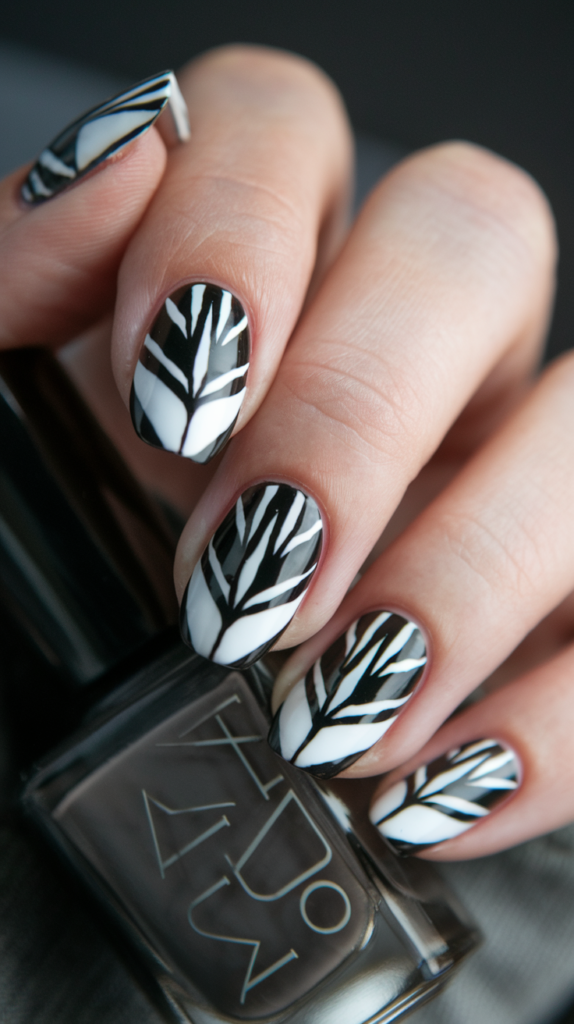
35. Deco Leaf Design
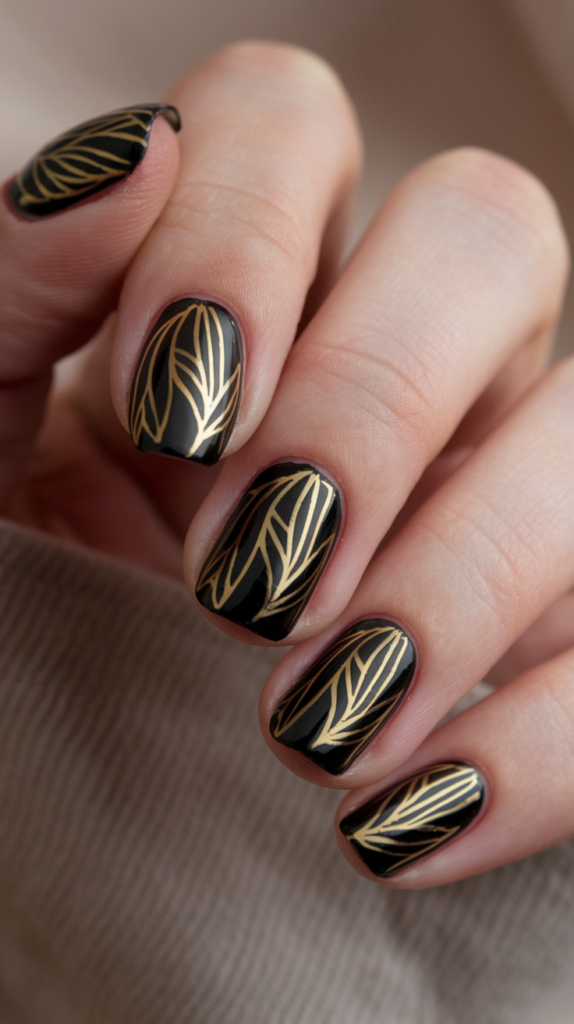
Delicate gold leaf patterns on black nails merge Art Deco’s structured elegance with nature-inspired whimsy.
How to Create Deco Leaf Nails
Step 1: Black Base
Apply glossy black polish, using two coats for a smooth, opaque finish. Let it dry fully.
Step 2: Gold Leaf Patterns
With a fine nail art brush, paint delicate gold leaf shapes, varying sizes for a natural, organic feel.
Step 3: Seal the Design
Finish with a glossy top coat to protect the intricate leaf patterns and add a polished shine.
Nature-Inspired Styling
Versatile for casual outings or formal events, pair with earth-toned outfits or gold jewelry to complement the leaf motifs, ideal for garden parties or dinners.
Conclusion
Art Deco nail art transforms your fingertips into miniature masterpieces, blending the Roaring ’20s’ glamour with modern creativity.
These 35 designs—from bold geometric patterns and shimmering metallics to soft gradients and nature-inspired motifs—offer endless ways to express your unique style.
Whether you gravitate toward the opulent sparkle of jewel tones or the minimalist elegance of negative space, there’s an Art Deco nail design to suit every mood and occasion.
Experiment with these techniques, mix textures and colors, and let your nails become a canvas for timeless sophistication and artistic flair.