Introduction
In the world of nail art, few themes capture elegance and sophistication like royal-inspired designs.
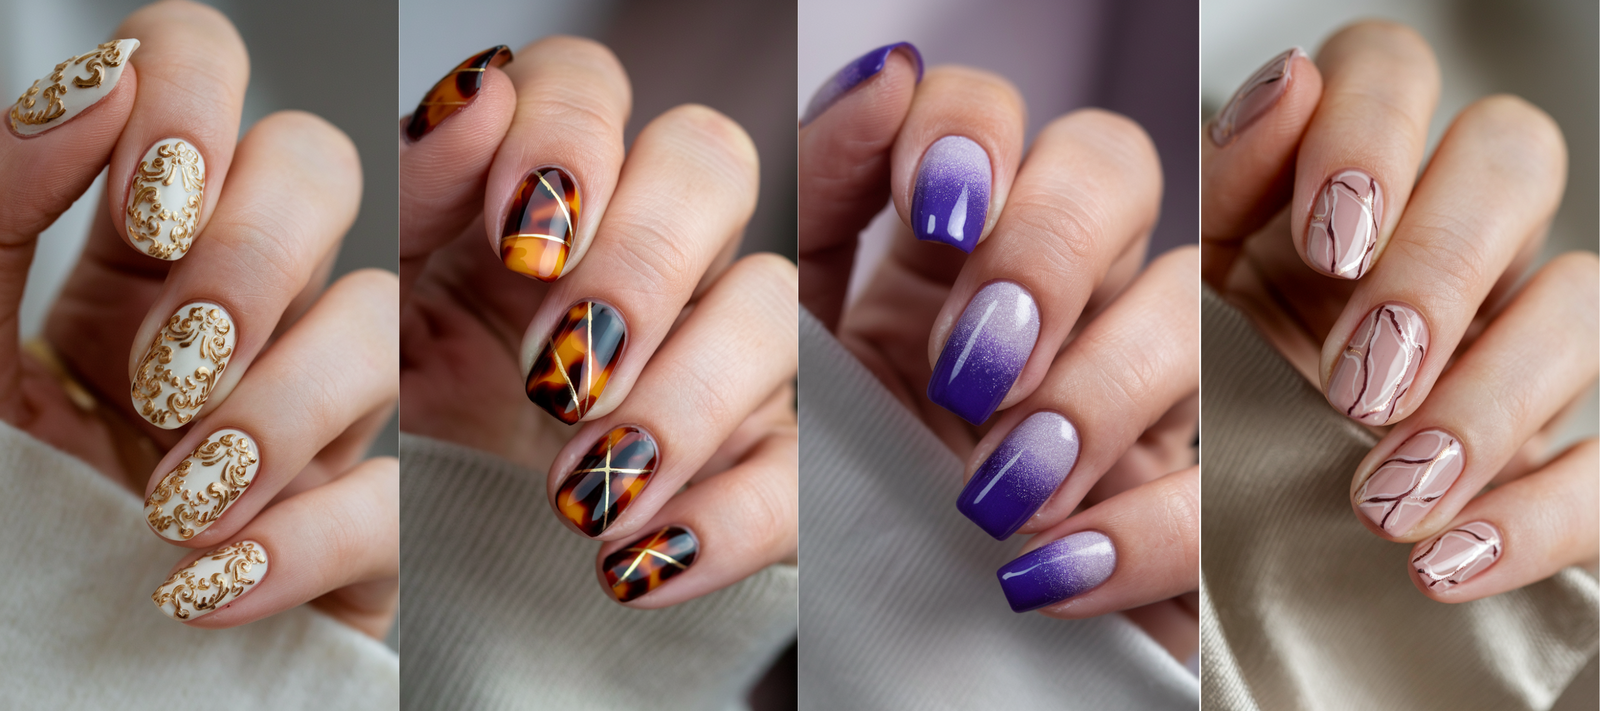
From gilded tips to jewel-encrusted details, “Royal Elegance” nail art is all about luxury, timelessness, and refinement.
Each design in this collection brings a unique interpretation of regality, blending rich colors, intricate patterns, and opulent textures to create nails that are nothing short of majestic.
Whether you’re looking to channel the rich hues of royal sapphires, the sophistication of baroque gold swirls, or the understated beauty of pearl accents, this guide provides a wealth of ideas to inspire your next manicure.
Dive into these 35 unique “Royal Elegance” nail art designs, perfect for those special occasions when only the finest look will do.
Explore techniques, color choices, and tips for each design, and discover how to bring the allure of royalty to your fingertips.
Gold-Tipped French Manicure: Adding A Royal Twist To A Classic Look
The Gilded Tip’s Appeal
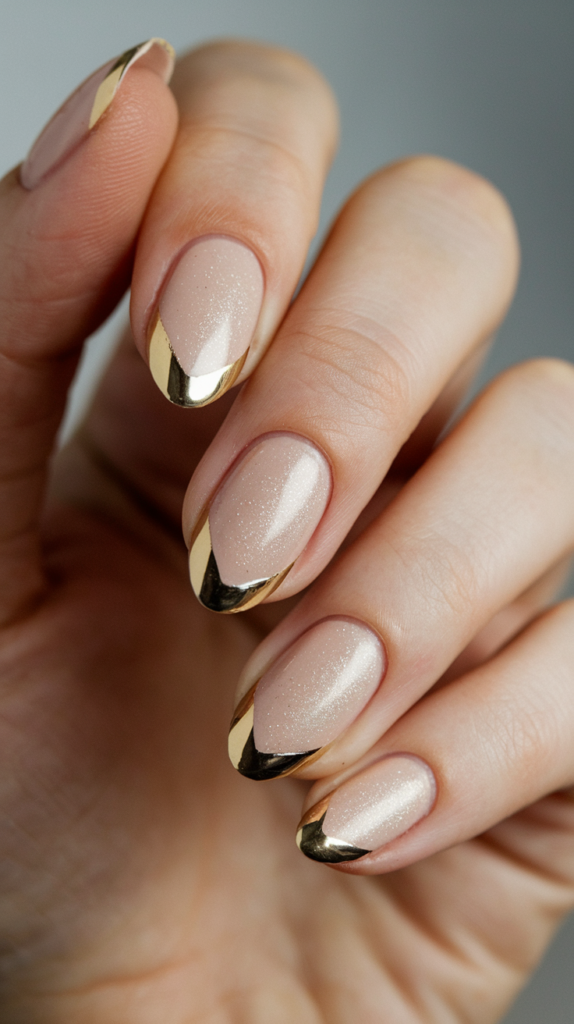
The gold-tipped French manicure offers a timelessly elegant look with a royal twist.
While the traditional French manicure features white tips that exude a clean and classic feel, gold-tipped French nails introduce an element of luxury.
The gilded tips provide a touch of sparkle, making nails appear sophisticated and glamorous.
This design creates a subtle but striking contrast against a neutral or nude base, allowing the gold to stand out without overwhelming the entire look.
For anyone aiming to add a hint of royal elegance to their nails, the gold-tipped French manicure is a perfect option.
Styling Tips For A Modern Yet Royal French Manicure
To achieve a modern yet regal take on the classic French manicure, select a high-quality gold polish or foil for the tips.
Start with a clean, neutral base, such as a sheer pink or nude tone, to allow the gold tips to shine.
Carefully paint or apply foil to the tips in a smooth, even line, ensuring that each tip is well-defined.
For a flawless, polished finish, add a glossy top coat to protect the design.
Alternatively, consider a matte finish for a modern twist, which gives the gold a soft, brushed-metal effect, enhancing the luxurious vibe.
Royal Blue And Gold Marbling: Elevate Your Nails With Regal Colors
Steps For Achieving The Marble Effect
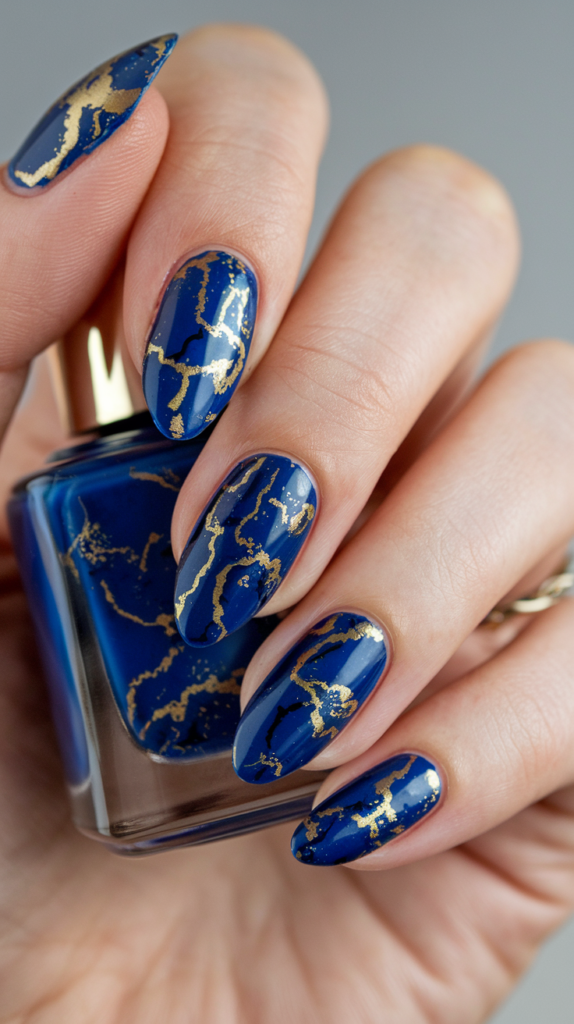
Creating a marble effect with royal blue and gold requires a few essential steps for a polished look.
Begin with a royal blue base that exudes richness and depth.
After the base coat dries, use a thin brush to apply swirling patterns of metallic gold polish over the blue, mimicking the natural veining seen in marble.
To achieve a smooth blend, lightly drag a fine-tipped brush through the gold to spread it subtly into the blue, creating a marbled effect.
Once the design is complete, apply a clear, glossy top coat to seal the look and enhance the depth of the marble.
Why Royal Blue And Gold Symbolize Luxury
Royal blue and gold have long been symbols of power and wealth, often associated with royalty and nobility.
The deep, rich hue of royal blue invokes feelings of stability and depth, while gold represents opulence and grandeur.
Together, these colors create a visually stunning combination that conveys sophistication and timeless elegance.
This pairing works exceptionally well in nail art, transforming ordinary nails into mini canvases of luxury.
Ornate Jewel Embellishments: Jewel-Like Sparkle For Ultimate Glam
Types Of Gemstones To Use For Nail Art
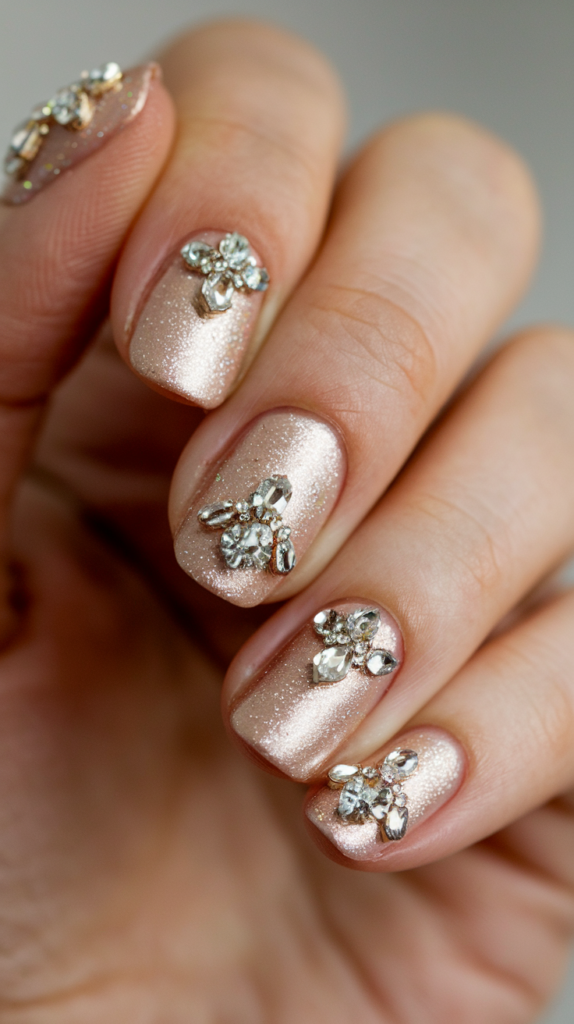
For a truly royal aesthetic, select gemstones that emulate the look of precious jewels, such as sapphires, rubies, emeralds, and diamonds.
These stones can be applied in small, delicate clusters on the nails, adding a touch of extravagance.
Opt for flat-back crystals to ensure they adhere well to the nail surface.
Incorporating different shapes—such as round, teardrop, or oval gems—creates visual interest and allows for more intricate designs.
Positioning Gems For An Opulent Look
When arranging gemstones on the nails, strategic placement is essential to avoid an overcrowded look.
A popular choice is to apply gems at the base of each nail near the cuticle, creating a crown effect.
Alternatively, consider using gemstones as accents on one or two nails per hand, allowing them to serve as focal points.
Adding a single large gemstone surrounded by smaller crystals also produces an opulent and regal feel.
Pearl Accent Nails: Understated Elegance With Pearlescent Polish
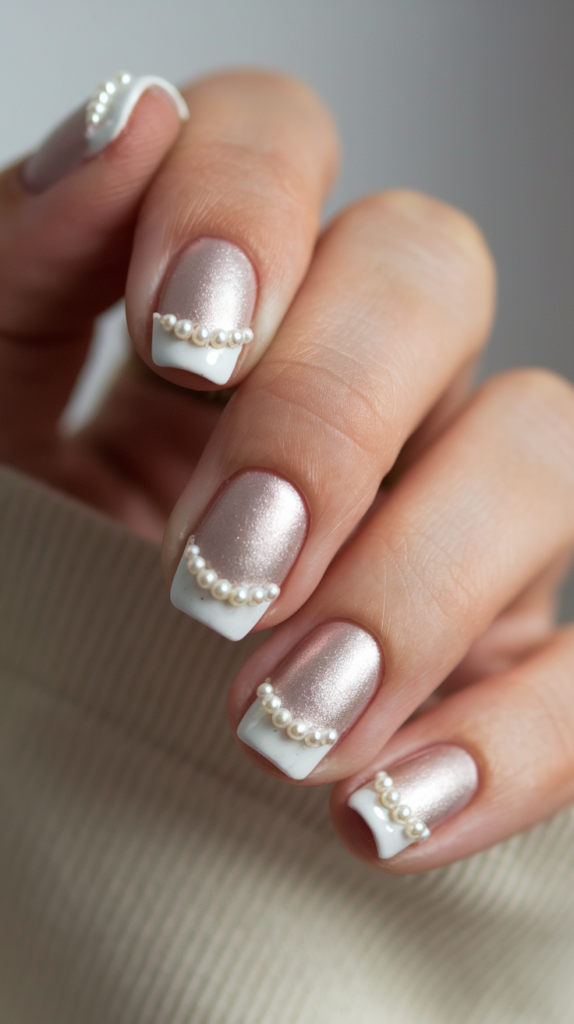
Benefits Of Using Pearls For A Soft, Elegant Look
Pearl accents offer a refined, elegant touch that remains understated yet captivating.
Pearls are often associated with sophistication and femininity, making them a perfect choice for anyone seeking a subtle, luxurious look.
Their soft sheen and gentle glow add dimension to nails, making them appear polished and delicate.
Tips For Creating A Pearlescent Finish
To achieve a pearlescent finish, start with a pale pink or nude base coat to complement the natural glow of pearls.
Apply a thin layer of pearl-effect polish, ensuring it covers the nail smoothly for an even sheen.
Add a small pearl accent to each nail for a cohesive look, or use pearls on a single accent nail for a more minimalistic approach.
Finish with a clear top coat to secure the pearls in place and enhance the pearly shine.
Embroidered Lace Design: The Perfect Royal Wedding Look
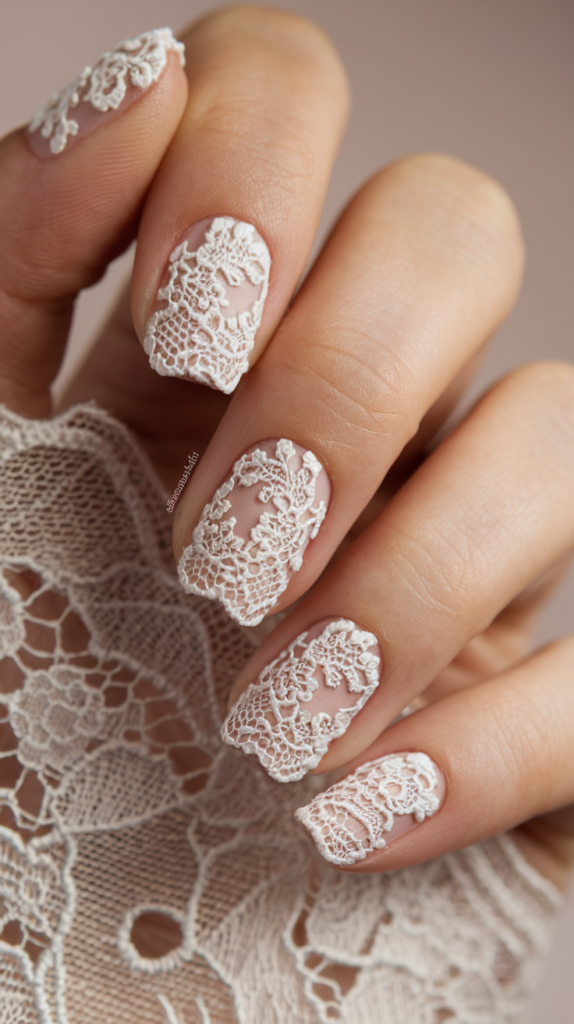
Techniques To Achieve A Lace Pattern
Achieving a lace pattern on nails requires patience and precision, as each detail must be finely executed to capture the delicate essence of lace.
Start by applying a soft pink or nude base color for a classic, bridal-inspired look.
Then, using a fine nail art brush, paint intricate white lace designs, such as floral or filigree patterns, across each nail.
For a 3D effect, consider using a slightly thicker gel polish to give the lace a raised, textured look.
Why Nude And Soft Pink Create A Timeless Look
Nude and soft pink shades have a timeless quality that works beautifully for royal-inspired nail art.
These colors are understated, allowing the intricate lace design to be the focal point.
The combination of lace on a nude or pink background is reminiscent of bridal elegance, making it ideal for special occasions or whenever a refined look is desired.
Crown Jewel Glitter: Dazzling Gradient For A Jewel-Toned Effect
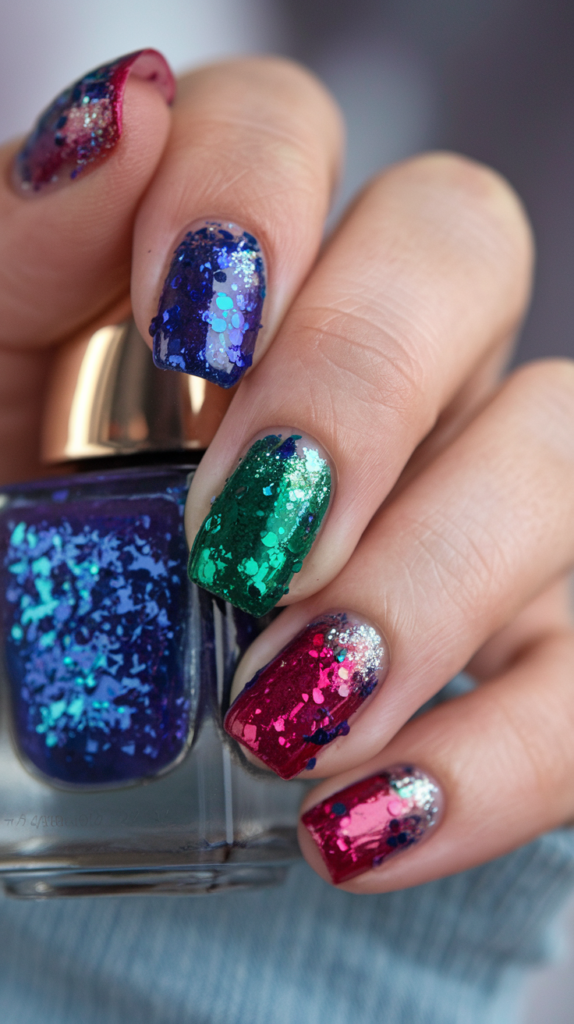
Creating Glitter Gradients With Jewel Tones
To achieve a crown jewel-inspired look, create a glitter gradient using jewel-toned colors like emerald, sapphire, and ruby.
Start with a clear or neutral base and apply a dense layer of glitter near the cuticle, gradually dispersing it towards the tip for a gradient effect.
Layering different shades of glitter adds depth and captures the rich hues of actual jewels, giving each nail a dazzling, luxurious look.
Choosing Colors Inspired By Royal Crowns
Royal crowns often feature a mix of jewel tones and metallics, making colors like emerald green, deep blue, and ruby red ideal for a regal nail design.
Adding hints of gold or silver glitter enhances the jewel-toned effect and creates a multidimensional look reminiscent of actual precious stones in a crown.
Velvet Matte Burgundy: Sophistication In A Rich Matte Finish
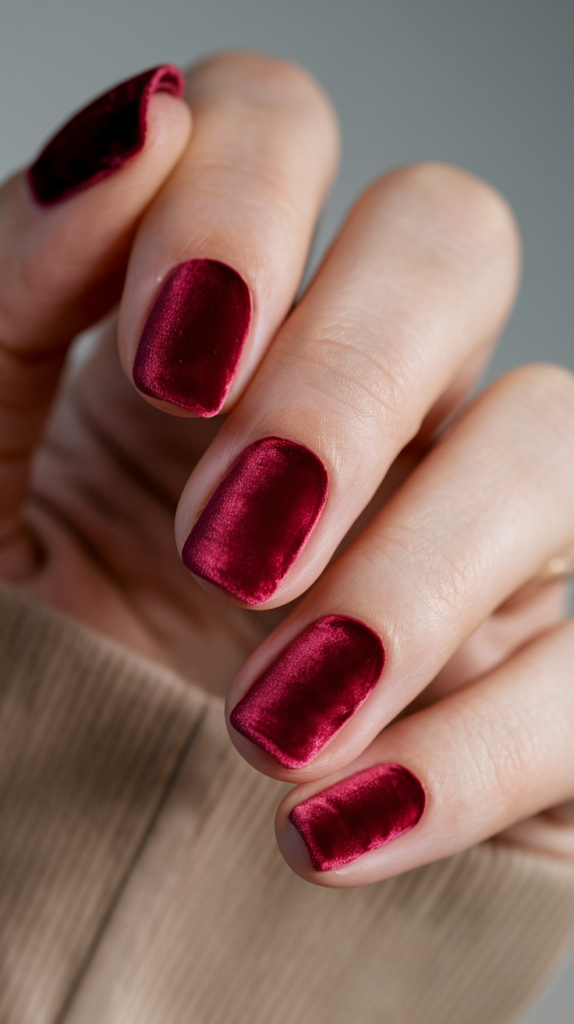
How To Apply And Maintain A Matte Look
For a smooth, matte finish, begin with a rich burgundy base coat, ensuring full coverage for a bold look.
Once the base dries, apply a matte top coat to achieve the velvety texture.
To maintain the matte effect, avoid adding extra layers of glossy top coat, and touch up with matte top coat if any areas begin to lose their finish over time.
Pairing Burgundy With Other Royal Accessories
Burgundy nails pair well with gold and other rich tones, making them a versatile choice for those seeking a royal-inspired look.
Consider wearing gold rings or bracelets to complement the deep, matte burgundy shade, adding an extra touch of elegance to the overall aesthetic.
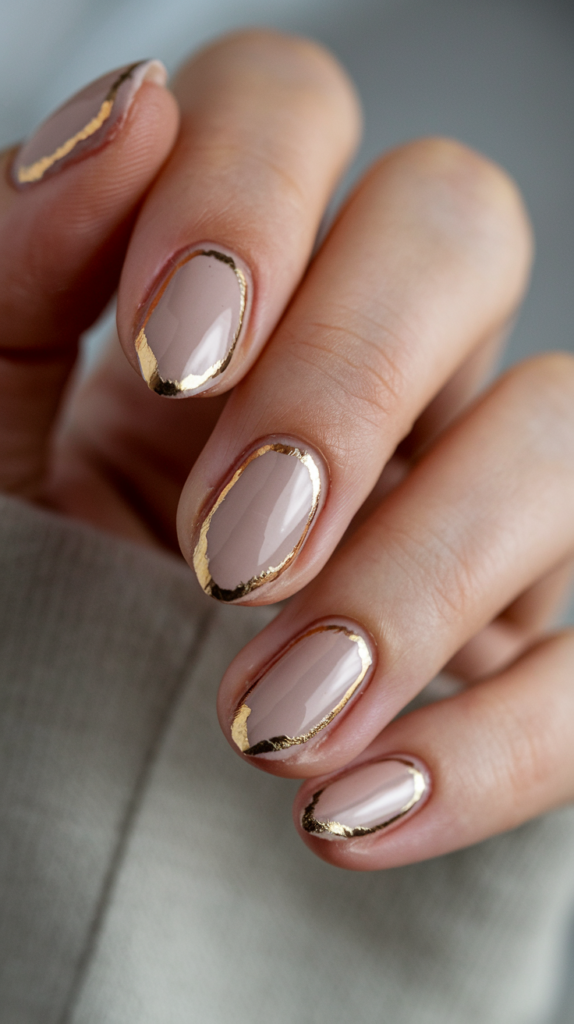
Gold Foil Frames: Framing Nails With Delicate Gold Accents
Tips For Applying Thin Gold Frames
To create a refined look with thin gold frames, start by applying a base color that complements gold, such as a soft nude or pale pink.
Using a fine nail art brush or gold nail tape, outline each nail with a thin border of gold along the edges.
Ensure each line is clean and even for a professional appearance.
A steady hand is crucial, so working slowly and precisely will yield the best results.
Finish with a clear top coat to seal the design, adding longevity and shine.
Pairing Gold Foil With Different Base Colors
Gold frames pair beautifully with various base colors, allowing for versatility in this design.
For a soft, royal look, pair the gold frames with pastels like blush pink or baby blue.
For a more dramatic, modern appearance, consider pairing gold with deep shades such as emerald green or midnight blue.
The contrast between the gold frame and the base color will enhance the overall elegance, creating a striking visual effect that highlights each nail.
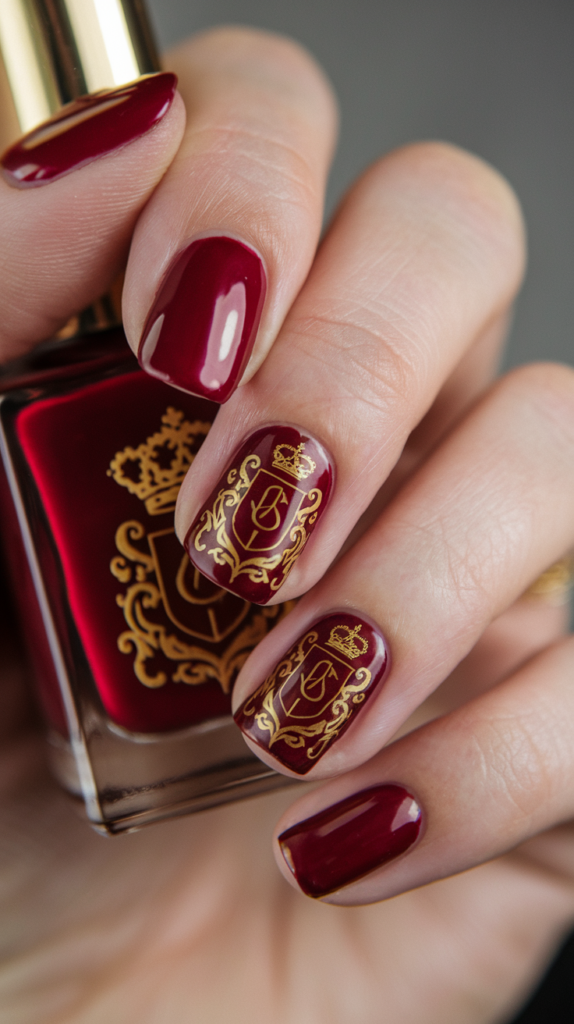
Classic Crest Accent Nail: Adding A Regal Emblem To Your Nails
Ideas For Creating Crest-Inspired Nail Art
Crest-inspired nail art brings a touch of royal heritage to the fingertips, as royal crests often embody symbols of power and lineage.
Begin by choosing one accent nail per hand to display a miniature crest design, using gold or silver for an authentic look.
You can create the crest with small, intricate details like initials, crown motifs, or a combination of regal symbols.
If painting the crest by hand proves challenging, consider using nail stickers or decals to achieve the same effect.
Why Royal Crests Add Timeless Appeal
Royal crests represent tradition, power, and history, making them an elegant addition to any nail design.
By adding a royal crest to an accent nail, you not only create a focal point but also introduce a timeless quality to the look.
Crests are often minimalist yet impactful, giving the design a dignified feel that’s both understated and commanding.
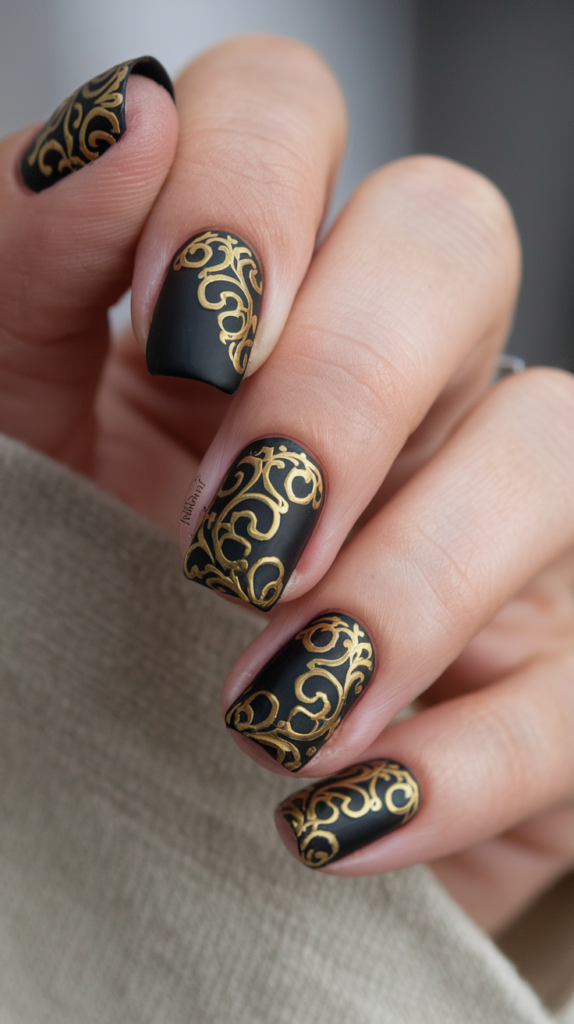
Black And Gold Renaissance: Elegance With Renaissance-Inspired Patterns
How To Achieve Intricate Black Patterns
For a Renaissance-inspired look, start with a base coat of rich gold to symbolize opulence.
Once dry, use a fine-tipped brush to apply intricate black patterns over the gold, mimicking designs from Renaissance decor.
Opt for swirling motifs, flourishes, or even small fleur-de-lis patterns, as these details capture the elegance of the era.
Keep the patterns delicate yet defined for a regal, artful look that embodies the spirit of the Renaissance.
Gold As A Base For A Royal Renaissance Look
Gold is an ideal base for Renaissance-inspired nails, as it represents wealth and splendor—qualities commonly associated with the noble classes of that period.
When paired with black detailing, the contrast between the two colors highlights the intricacies of the design.
Gold brings warmth and luminosity, while black adds depth, creating a balanced yet dramatic effect that elevates the overall appearance.
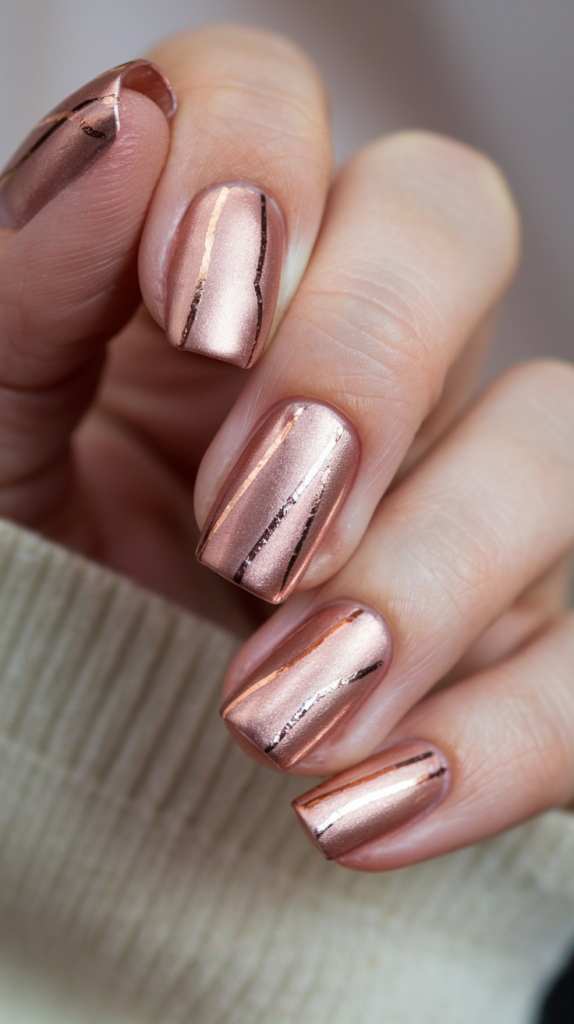
Rose Gold Elegance: Romance With Rose Gold Foiled Accents
Creating Foiled Effects With Rose Gold
To achieve a rose gold foiled effect, apply a soft pink or nude base as a foundation.
Once dry, use a rose gold foil sheet or metallic polish to create random, textured patches on each nail.
This technique adds an abstract, romantic feel, allowing bits of the base color to show through.
Seal with a clear top coat to add shine and protect the foiled accents, giving the nails a luminous finish.
Rose Gold’s Popularity In Regal Fashion
Rose gold has become a popular choice in royal-inspired fashion due to its warm, romantic glow that feels both luxurious and approachable.
The blend of gold with a hint of pink gives rose gold a unique, soft appearance, setting it apart from traditional gold tones.
This shade works beautifully in nail art, creating an elegant look that feels contemporary while still nodding to timeless opulence.
Regal Purple Ombré: Sophisticated Purple Gradient Nails
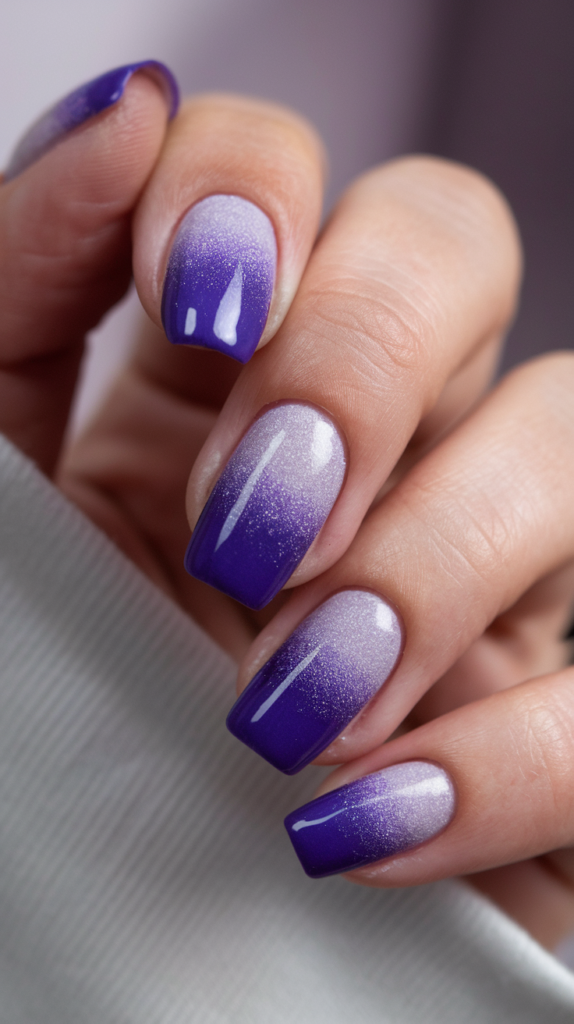
Techniques For A Seamless Purple Ombré
To create a seamless purple ombré, start with a light lavender or lilac at the cuticle and blend into a deep, royal purple toward the tip.
Use a sponge to apply layers gradually, blending each shade into the next for a smooth transition.
Applying a sheer layer of glitter over the gradient can add an extra touch of luxury.
This ombré technique is ideal for achieving a sophisticated, polished look.
The Symbolism Of Purple In Royalty
Historically, purple has been associated with wealth and power due to the rarity of the dye.
Reserved for nobility, the color purple represents elegance, wisdom, and authority.
Incorporating purple into nail art evokes this symbolism, giving nails an inherently regal appearance that celebrates its noble associations.
Royal Sapphire Crystals: Embellishing Nails With Blue Gems
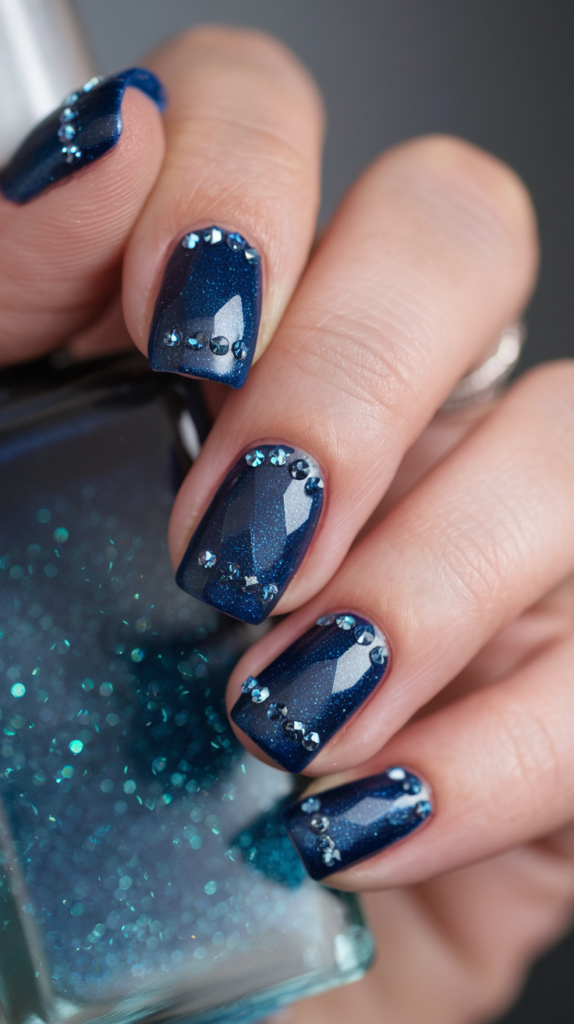
Applying Sapphire-Colored Crystals Strategically
For a balanced, elegant look with sapphire-colored crystals, apply them near the cuticle or along the sides of one or two accent nails.
Start with a dark blue base coat that complements the sapphire hue of the crystals, creating a cohesive color palette.
Use small amounts of clear adhesive to affix the crystals securely, ensuring they lay flat and are evenly spaced.
Finish with a clear top coat to set the crystals in place and enhance their shine.
Complementary Shades For Sapphire Accents
Sapphire-colored crystals pair beautifully with darker hues like navy or royal blue, which intensify the gemstone effect.
For a softer look, consider pairing sapphire accents with pale grays or whites, creating a striking contrast that draws attention to the blue crystals.
Adding a hint of gold or silver alongside the sapphire crystals can also enhance the luxurious feel, creating a refined, royal-inspired aesthetic.
Ivory And Gold Baroque: Baroque Elegance In Swirling Gold Patterns
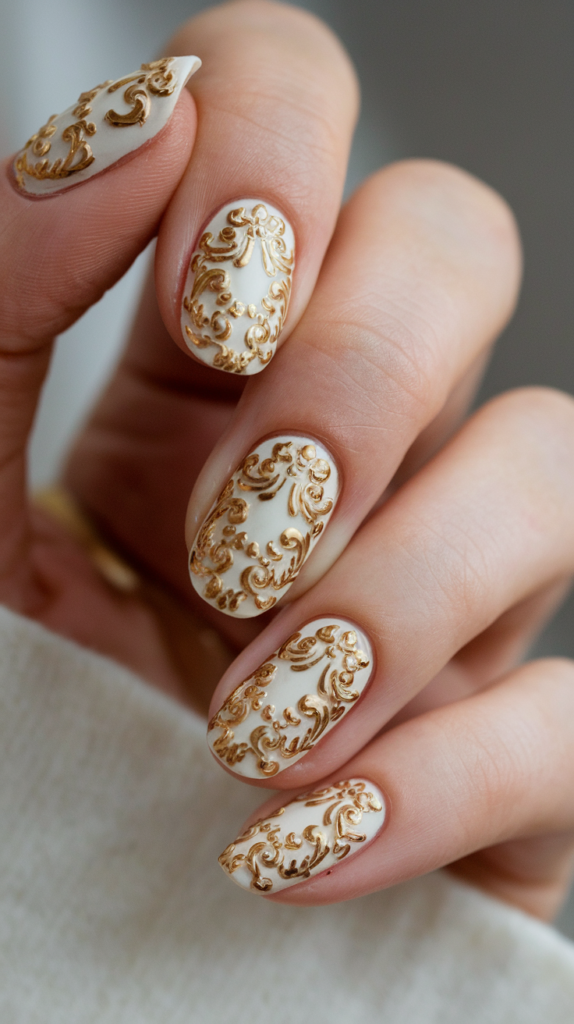
Steps For Creating A Baroque-Inspired Look
To create a baroque-inspired nail design, start with an ivory base coat to serve as a soft, elegant backdrop.
Using a fine brush and metallic gold polish, paint swirling, intricate patterns reminiscent of baroque decor.
Focus on symmetrical, flowing lines, such as leaves and scrolls, to capture the ornate style of the baroque period.
For added dimension, consider using a thicker gel polish for the gold designs, giving the patterns a raised, embossed look.
Ivory And Gold As A Classic Royal Combination
Ivory and gold are timelessly classic colors that represent sophistication and elegance.
The warm, creamy tone of ivory pairs beautifully with the metallic sheen of gold, creating a refined contrast that feels regal and rich.
This combination evokes images of antique furniture and historical decor, adding an air of luxury and tradition to any nail design.
Opulent Red And Gold: Classic Red With Fine Gold Detailing
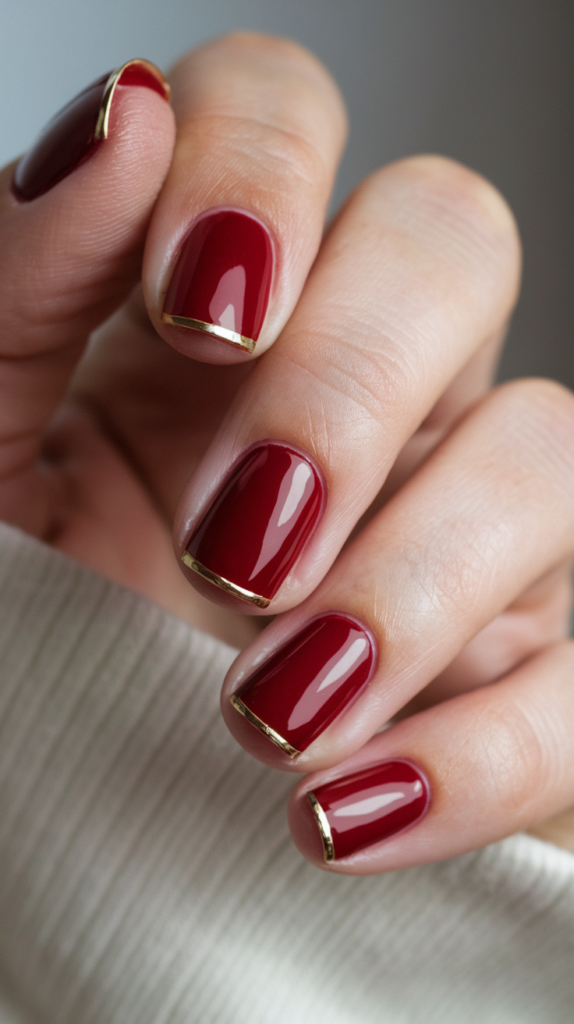
How To Apply Fine Gold Detailing On Red
To achieve a classic red and gold design, start with a deep red base, ensuring it is opaque and vibrant.
Using a thin brush, apply fine gold lines along the edges of each nail or create small details such as dots or scrolls.
Precision is key, so work slowly to maintain clean, elegant lines.
Once the gold detailing is complete, seal with a clear top coat to protect the design and add shine.
Tips For Making This Design Long-Lasting
To ensure the longevity of a red and gold design, apply a base coat before adding color to prevent staining.
Use high-quality, pigmented red polish, as this will require fewer layers and reduce chipping.
A top coat every few days will keep the design looking fresh and glossy, while also protecting the fine gold detailing from wear.
Crystal-Encrusted Half-Moons: Subtle Elegance With Crystals
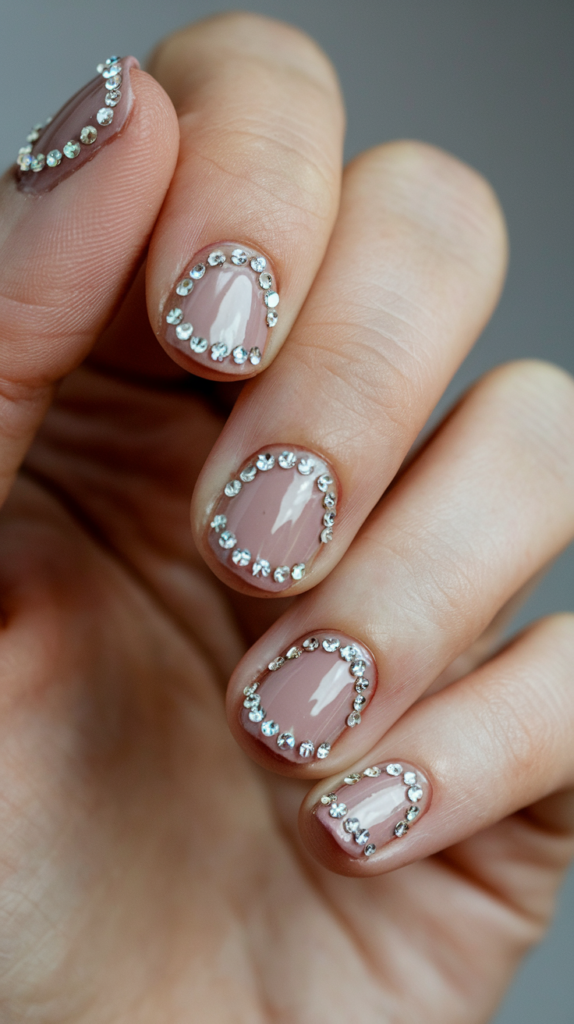
Placing Crystals For A Half-Moon Look
To create a crystal-encrusted half-moon effect, start by painting the nail in a neutral base color.
Apply small crystals along the cuticle area in a semi-circular shape to form the half-moon.
This design creates a subtle yet sophisticated sparkle.
Use a strong nail adhesive to secure the crystals and finish with a clear top coat to protect the design and add a smooth finish.
Best Polish Colors To Pair With Crystals
When pairing crystals with polish, soft shades like pale pink, nude, or ivory work best, as they allow the crystals to shine without overwhelming the overall look.
For a bolder approach, consider a deep blue or emerald green base to contrast with the crystals.
The contrast emphasizes the sparkle of the crystals, adding a layer of glamour that enhances the regal appearance.
Royal Blue Velvet Finish: Luxurious Nails With A Velvet Texture
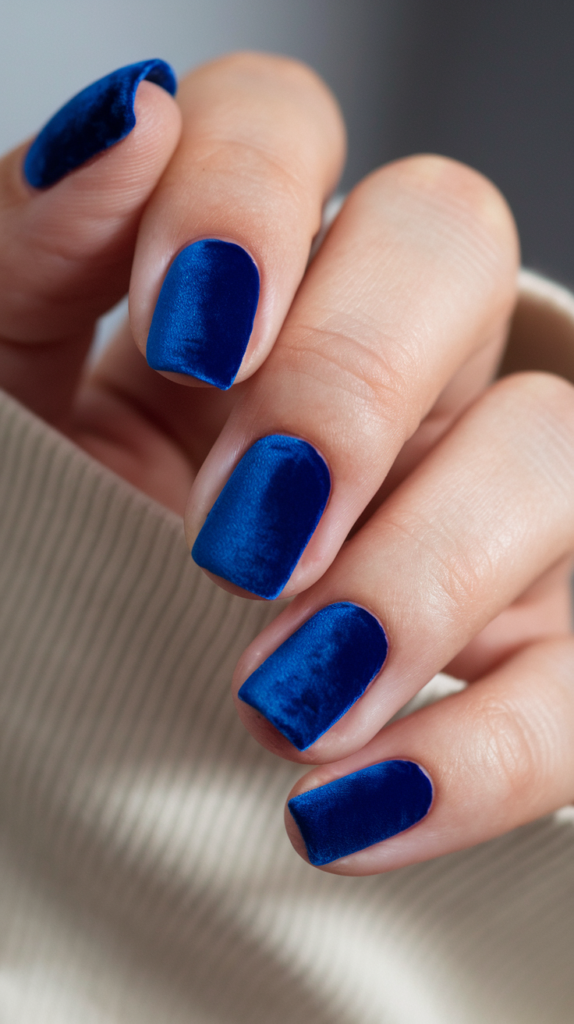
Achieving A Velvety Texture With Polish
To create a velvet texture with royal blue polish, start by applying a deep royal blue base that has a rich, opaque finish.
Once it dries, apply a matte top coat specifically designed to create a velvet effect.
The matte top coat will soften the finish, giving it the illusion of plush, velvety fabric.
For added dimension, you can lightly dust on fine blue powder to enhance the texture.
This step gives nails a touchable, soft appearance that truly elevates the design, making it look as though the nails are wrapped in luxurious velvet.
Why Royal Blue Is Ideal For Regal Nail Art
Royal blue has long been associated with nobility and power, making it an ideal choice for regal nail art.
The depth and richness of royal blue convey a sense of strength and sophistication that few other colors can match.
Paired with a velvet texture, royal blue nails exude elegance and confidence, making this design perfect for occasions that call for a statement look.
This color also pairs beautifully with silver or gold jewelry, further enhancing the luxurious feel of the entire look.
Gold Chain Accents: Modern Chains For A Unique Royal Style

Tips For Laying Gold Chains On Nails
To add gold chain accents to your nails, start with a neutral or solid-colored base.
Use tweezers to carefully place small pieces of fine gold chain onto the nail while the polish is still slightly tacky.
Position the chain along the nail’s edge or across the middle for a bold look.
For a more secure hold, apply a thin layer of nail glue before placing the chain.
Finish with a generous clear top coat to ensure the chain is well-protected and secure.
This design adds a modern edge to a classic look, combining the allure of royal elegance with contemporary style.
Combining Gold Chain Accents With Other Elements
Gold chain accents work beautifully with various design elements, allowing for a versatile and customizable royal look.
Pair the chains with small gemstone accents for added glamour, or combine them with matte finishes for an edgy twist.
Chains can also be used to create patterns or borders on accent nails, adding structure and sophistication.
When combined with a deep base color, the chains bring a three-dimensional element that adds intrigue and elevates the overall appearance of the manicure.
Silk Ribbon Detailing: Adding Soft, Silk-Inspired Lines
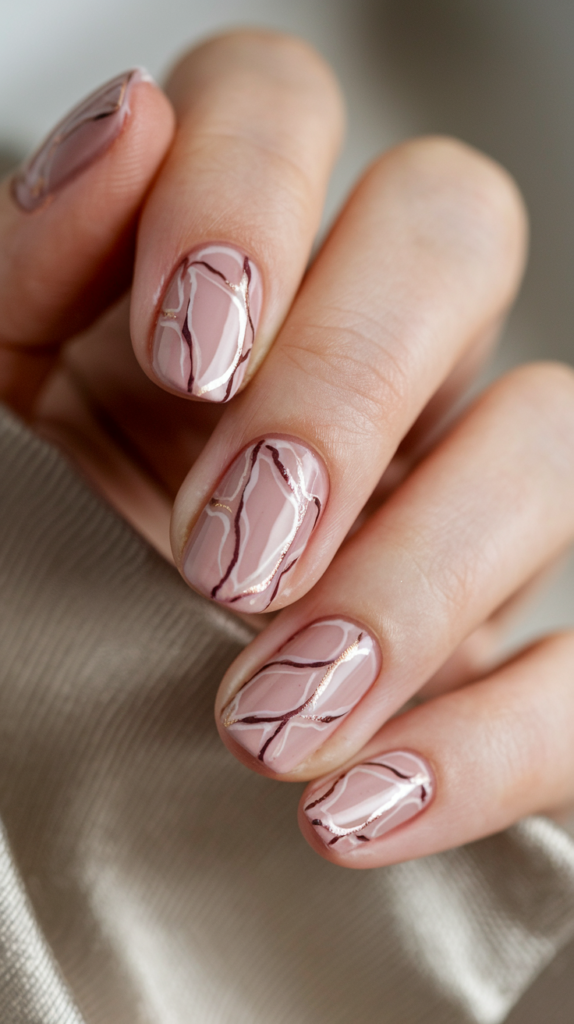
Techniques For Creating Ribbon-Like Lines
To achieve silk ribbon-inspired nail art, start with a soft, pastel base color that will allow the lines to stand out subtly.
Using a thin brush, paint fine, flowing lines across each nail in a contrasting color, such as white, blush, or gold.
The lines should resemble the gentle folds and curves of silk ribbon, giving a delicate and soft effect.
For an even more realistic look, consider layering the lines to create depth, and use a sheer top coat to give the nails a silky, glossy finish.
Perfect Polish Shades For Ribbon Detailing
When it comes to choosing shades for silk ribbon detailing, pastel colors work best for a soft, refined appearance.
Blush pinks, lavender, and soft nudes create an ethereal look, while metallics like silver or gold add a hint of luxury to the design.
For a more striking look, consider using a deep base color, such as emerald green or navy blue, with white or pale pink lines.
The contrasting colors enhance the ribbon effect and create a sophisticated, royal-inspired appearance.
Antique Gold Filigree: Vintage Filigree For A Timeless Look
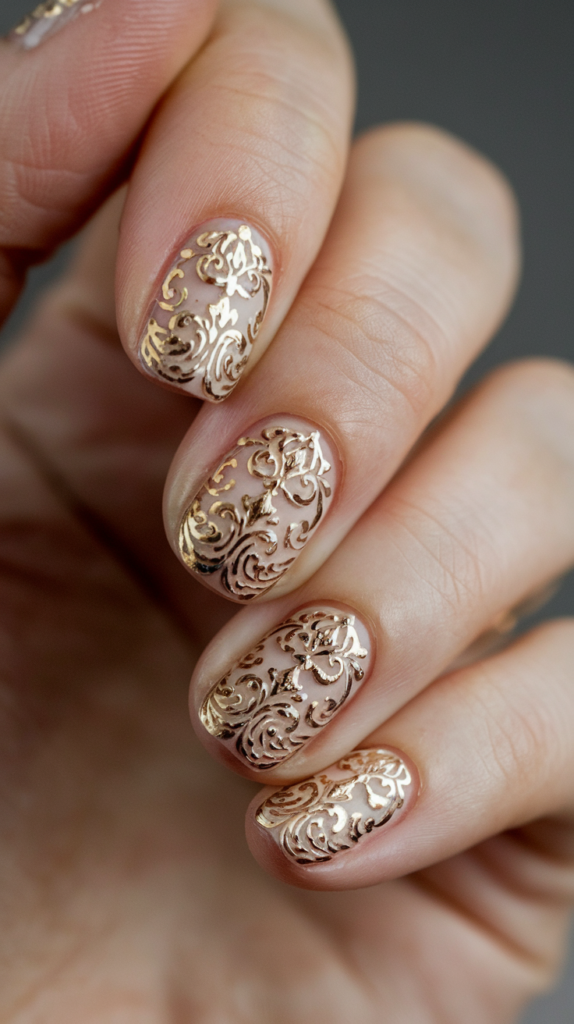
Achieving A Filigree Effect With Gold
Creating an antique gold filigree design requires a steady hand and an eye for detail.
Start with a nude or ivory base coat to act as a backdrop for the gold designs.
Using a thin brush and metallic gold polish, paint intricate, swirling patterns across the nails, inspired by vintage filigree jewelry.
For an authentic, antique look, focus on symmetry and flowing lines.
Finish with a glossy top coat to enhance the gold and make the details stand out.
The final result should look like delicate gold lace across the nails, giving them a timeless, royal appeal.
Combining Filigree With Nude Bases
Nude bases allow the gold filigree to shine without overpowering the overall look.
The soft, neutral background creates a balanced design, allowing the gold detailing to stand out while maintaining an elegant appearance.
Nude shades also complement the vintage, regal feel of filigree, making them ideal for achieving a sophisticated, antique-inspired look.
This combination is perfect for those seeking a refined, understated design that still conveys luxury and intricacy.
Enchanted Emerald Tips: Emerald Tips With A Golden Outline
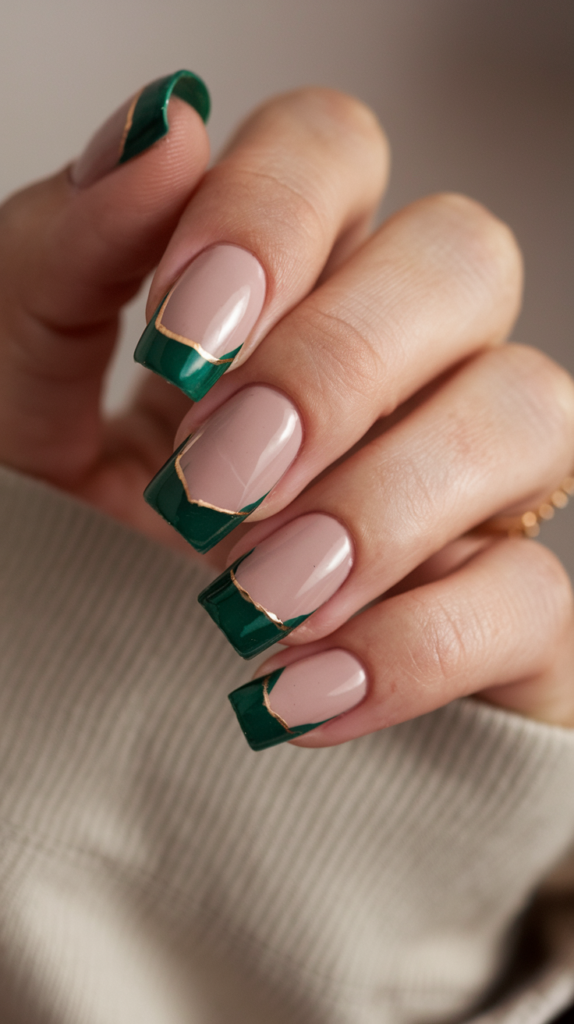
Steps For Creating A French Manicure With Emerald Tips
For an elegant twist on a classic French manicure, start with a nude or sheer pink base coat.
Once it dries, apply a deep emerald green polish to the tips, similar to the traditional French style but with a more regal color.
To add a luxurious touch, outline the emerald tips with a thin line of gold polish, using a fine brush for precision.
This gold accent enhances the emerald color and adds a subtle, elegant frame to each nail.
Seal with a clear top coat for a polished, glossy finish that completes the regal look.
Why Emerald And Gold Symbolize Luxury
Emerald and gold are both rich, luxurious colors often associated with wealth and nobility.
Emerald green represents growth, harmony, and renewal, while gold conveys opulence and grandeur.
Together, they create a visually stunning combination that exudes sophistication.
This color pairing is ideal for those seeking a nail design that is both elegant and bold, capturing the essence of royal elegance with every detail.
White Opal Shimmer: Magical White Opal Effect With Gold
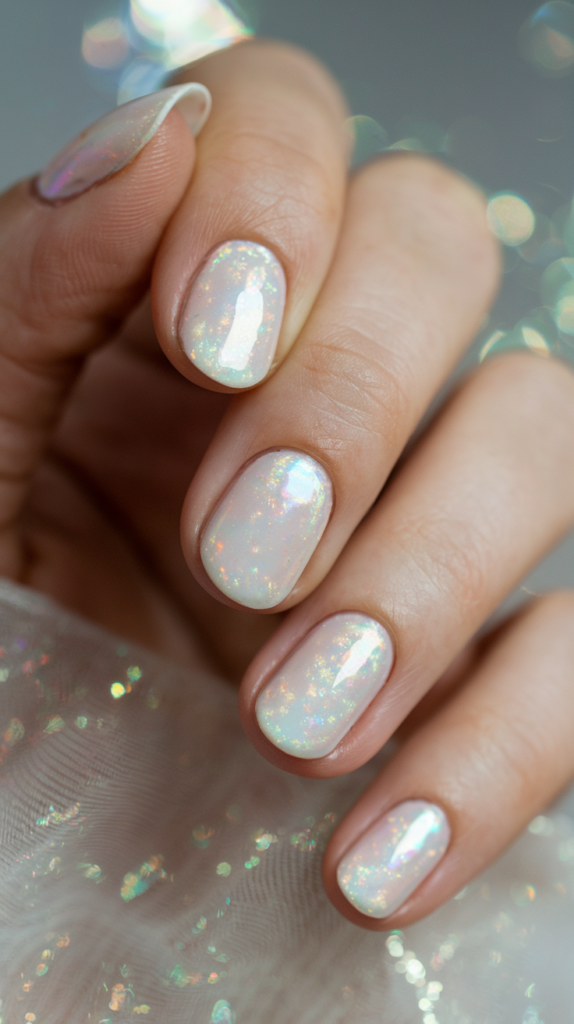
How To Create A White Opal Shimmer
To create a white opal effect, start with a sheer white or pale pink base.
Once dry, apply a layer of shimmer polish with a slight iridescent effect, which will mimic the multi-toned glow of opal.
For added depth, layer the shimmer polish until the desired opalescent effect is achieved.
This design is soft and ethereal, capturing the magical, glowing quality of opal in a nail design that feels both luxurious and understated.
Benefits Of Adding Delicate Gold Accents
Adding fine gold details, such as thin lines or small dots, enhances the opal effect and adds a touch of elegance to the overall look.
The contrast between the soft, shimmering white and the warm, metallic gold creates a balanced design that feels both refined and enchanting.
These gold accents serve as a subtle frame, drawing attention to the opalescent shine of the nails and giving them an ethereal, royal-inspired finish.
Bejeweled Ruby Accents: Vibrant Red Polish With Gemstones
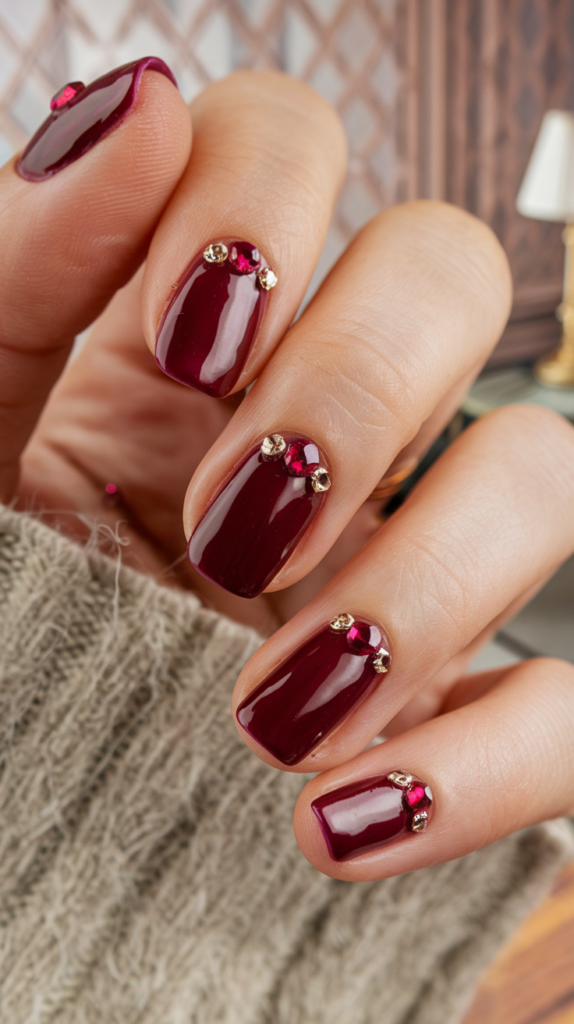
Applying Ruby-Colored Gemstones
To achieve a bejeweled effect, start with a deep red polish that resembles the rich color of rubies.
Once dry, apply small ruby-colored gemstones to one or two accent nails for a sophisticated look.
Arrange the gems in a cluster or scatter them subtly along the cuticle area.
Use nail glue to secure the gems and finish with a clear top coat for added shine.
The result is a glamorous, eye-catching design that evokes the look of precious ruby jewels.
Best Base Shades To Complement Ruby Accents
A deep red base works beautifully to enhance the gemstone accents, as it creates a cohesive, jewel-toned palette.
For a more understated look, consider pairing ruby-colored gems with a black or dark gray base, which provides a striking contrast and makes the gems pop.
Neutral tones, such as nude or soft pink, also work well for a subtler approach, allowing the ruby accents to stand out without overpowering the entire look.
Stained Glass Look: Nails Inspired By Rich Stained Glass
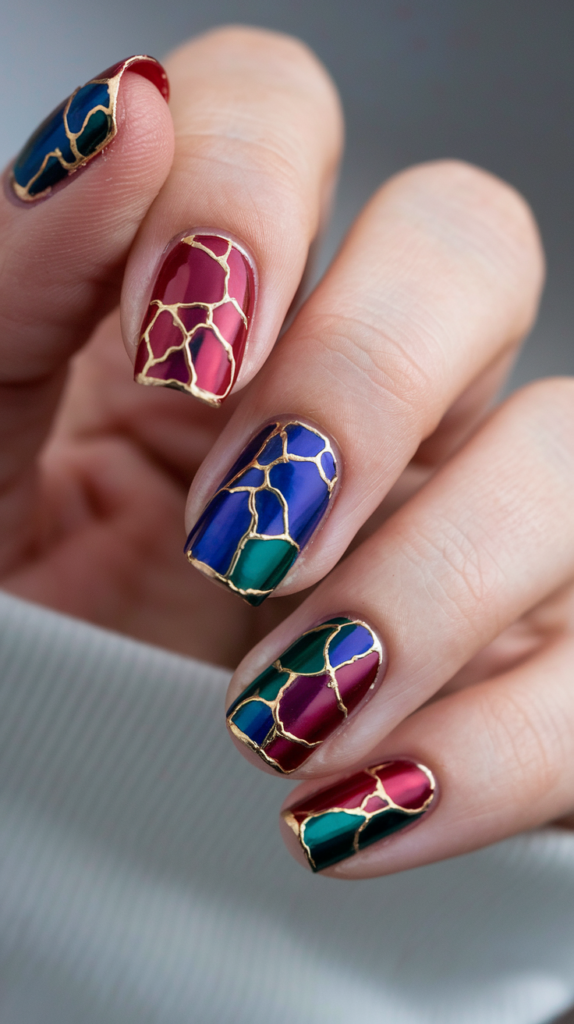
Techniques For Achieving A Stained-Glass Effect
To create a stained-glass effect, start with a sheer or neutral base color.
Use fine nail art brushes to paint sections of vibrant colors—such as red, blue, green, and yellow—in irregular shapes, similar to stained glass.
Outline each section with thin black or dark brown lines to mimic the look of lead used in stained-glass artwork.
Seal with a glossy top coat for a high-shine finish that captures the light, enhancing the vibrancy of the colors and creating a dimensional look.
Color Combinations That Enhance Stained-Glass Nails
Rich, jewel-toned colors are ideal for stained-glass nails, as they create a dramatic and royal-inspired appearance.
Deep blues, emerald greens, and ruby reds work beautifully together, while hints of gold or silver add a touch of luxury.
The contrast between the vibrant colors and the black outlines gives each nail a unique, artistic feel, resembling miniature stained-glass windows that catch the light beautifully.
Metallic Accented Cuticles: Subtle Yet Regal Metallic Cuticles
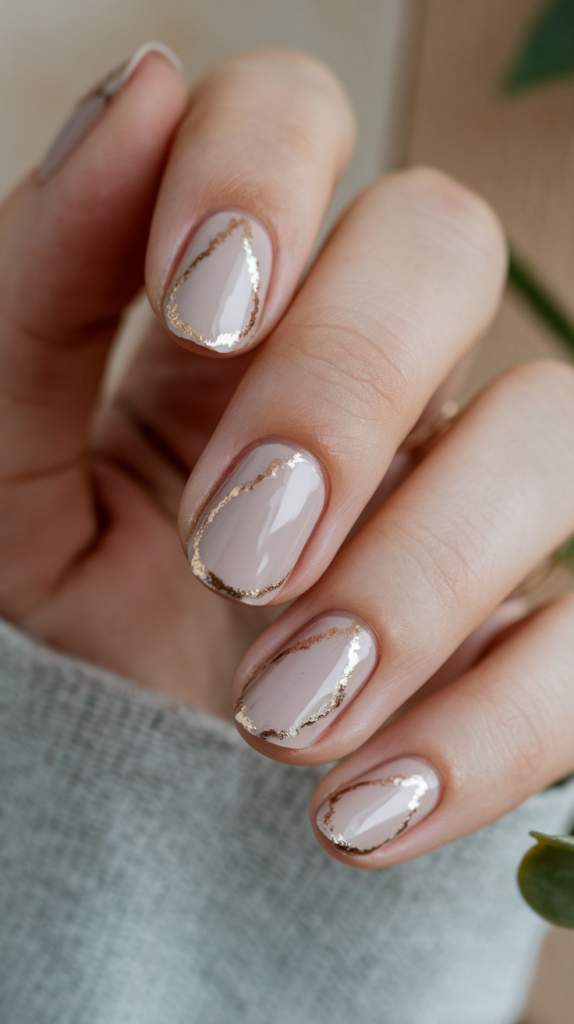
How To Apply Metallic Cuticle Accents
For a subtle yet regal design, begin with a solid base color, such as pale pink or nude.
Apply a thin metallic line along the cuticle area using a fine brush or metallic nail striping tape.
Ensure the line is even and follows the natural curve of the cuticle for a refined look.
Finish with a top coat to seal the metallic accent, providing a smooth and polished finish that enhances the understated elegance of the design.
Gold Vs. Silver For A Royal Touch
Gold and silver both offer distinct looks for cuticle accents.
Gold adds warmth and a classic royal touch, making it ideal for those seeking a traditional regal look.
Silver, on the other hand, offers a cool, modern twist on elegance, perfect for those who prefer a more contemporary approach.
Choosing between gold and silver can depend on personal preference or on matching the metallic with jewelry for a cohesive look.
Pearlescent Gold Veins: Clear Nails With Gold Veining
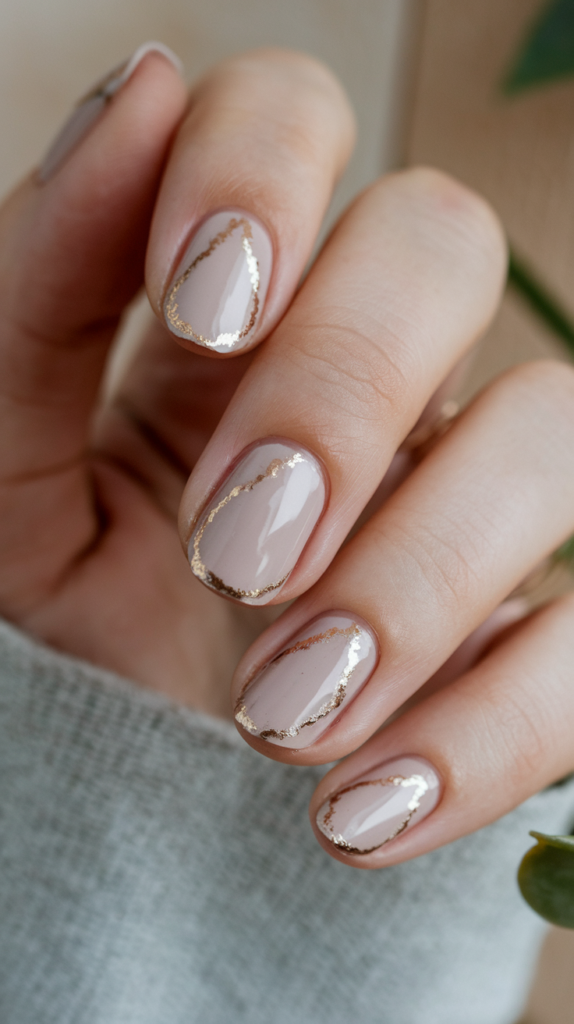
Tips For Creating Gold-Veined, Clear Nails
To create a pearlescent gold vein effect, start with a clear or lightly tinted nude base.
Use a fine brush to paint thin, delicate gold lines across each nail, mimicking the natural veining of marble.
Keep the lines irregular to capture the organic appearance of veining.
Once completed, apply a sheer, pearly top coat to enhance the translucent, shimmering effect.
This gives the nails a luxurious, stone-like appearance that feels refined and sophisticated.
Why Pearly Finishes Are Fit For Royalty
Pearly finishes have a natural, glowing quality that adds an understated elegance to any design.
The pearly shimmer reflects light beautifully, giving the nails a luminous effect that complements the gold veining.
This combination of pearlescence and gold evokes a sense of rarity and luxury, making it perfect for a royal-inspired look that feels both classic and unique.
Embossed Floral Design: Raised Floral Patterns For A 3D Effect
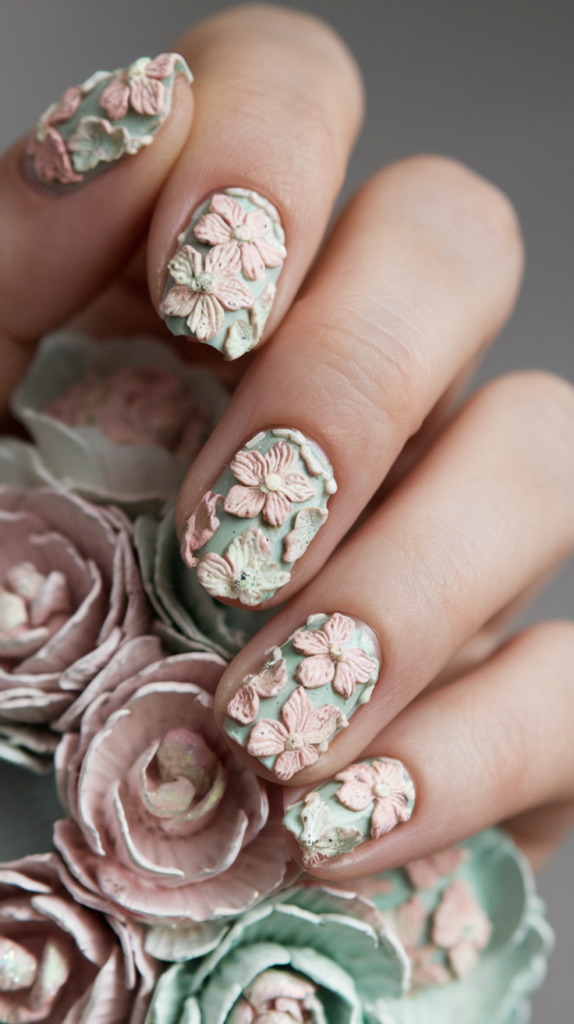
Techniques For Embossing Floral Designs
To create an embossed floral effect, start with a pastel or deep-colored base that provides contrast for the raised floral design.
Using a thicker gel polish or nail sculpting gel, carefully paint floral patterns, such as roses or delicate vines, onto the nail surface.
For a refined, three-dimensional look, focus on layering the polish to build up each petal and leaf, giving the design depth.
After applying the design, cure the gel under an LED lamp if using gel polish, or let it dry thoroughly.
To complete the look, apply a matte or satin top coat, which helps the embossed details stand out.
Best Polish Shades To Enhance 3D Floral Art
Soft, pastel shades like lavender, blush pink, and mint green create an elegant canvas for embossed floral art, as they allow the design to appear soft and feminine.
For a bolder look, use deep hues such as burgundy or navy, which create a dramatic contrast with the floral pattern.
The choice of polish shade can significantly impact the final look, making it either understated or eye-catching.
These color choices allow the embossed effect to look natural yet sophisticated, giving the nails a true royal-inspired feel.
Rich Velvet With Gold Specks: Soft Matte With A Hint Of Gold

Creating A Matte Velvet Finish With Specks
For a luxurious, soft matte look, start with a rich matte polish in a deep color like burgundy, forest green, or midnight blue.
While the polish is still slightly wet, sprinkle tiny gold flecks or specks onto the nails.
This adds a touch of sparkle without overpowering the matte effect.
Let the polish dry completely, then apply a matte top coat to seal in the gold specks and maintain the velvet finish.
This combination of matte texture and gold accents creates a subtle yet sophisticated look.
Achieving A Balanced Look With Gold Specks
To avoid overpowering the matte effect with too much sparkle, aim to keep the gold specks minimal and well-spaced.
A light sprinkling across each nail adds a hint of glamor without taking away from the rich, velvet-like matte finish.
The gold specks should be subtle enough to catch the light gently, making the nails appear luxurious and regal without being overly bold.
This balance creates an elegant, understated look that’s perfect for any royal-inspired aesthetic.
Tortoiseshell With Gold Lines: Sophisticated And Natural Tortoiseshell
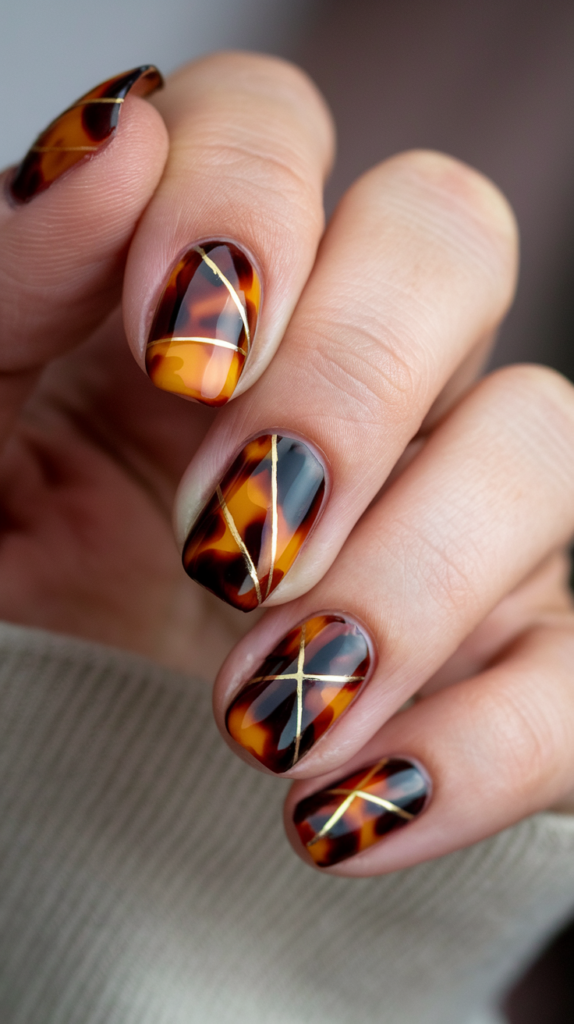
How To Achieve A Tortoiseshell Pattern
For a tortoiseshell effect, start with a caramel or amber-colored base.
Using a darker brown and black polish, create irregular patches and spots over the base to mimic the natural look of tortoiseshell.
Blend the edges of each spot for a softer, more organic effect, layering different shades to add depth and realism.
Once the pattern is complete, apply a clear top coat to add shine and enhance the design.
The final look should resemble the classic, sophisticated style of tortoiseshell, with rich, earthy tones that feel natural yet polished.
Using Fine Gold Lines To Elevate The Design
To give the tortoiseshell nails a regal touch, add fine gold lines to outline select areas of the design.
These gold accents bring a sense of structure and elegance to the organic tortoiseshell pattern, creating a balanced look that feels refined and sophisticated.
The contrast between the warm browns and the gold detailing elevates the design, making it suitable for a luxurious, royal-inspired look.
The gold lines should be delicate to avoid overpowering the tortoiseshell pattern, allowing the natural beauty of the design to shine through.
Royal Red Jewels: Bold Red Base With Small Jewel Details
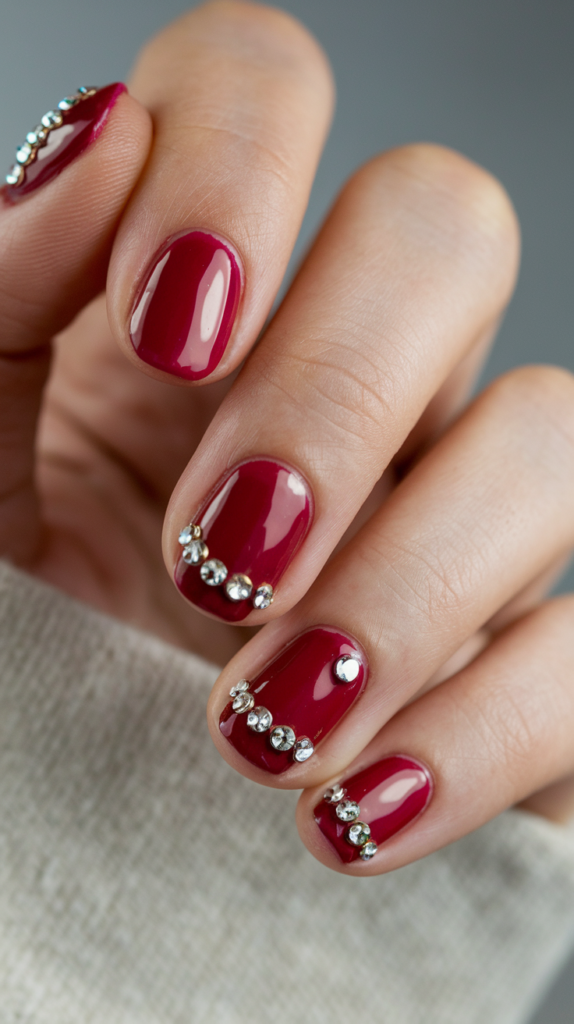
Applying Jewel Details Over Red Polish
Begin with a deep, vibrant red polish that serves as a luxurious base, exuding warmth and opulence.
Once the polish dries, use small adhesive gemstones in red or clear to create accent details on one or two nails per hand.
For a balanced look, place a few small gems near the cuticle or in a linear pattern along the edge of the nail.
The gemstone accents add dimension and sparkle to the red base, creating a bejeweled effect that feels both bold and regal.
Creating A Luxurious Look With Ruby-Like Accents
The combination of a red polish and ruby-like accents captures the essence of royal jewels, providing a rich, luxurious look.
Red is a classic color associated with power and strength, and when paired with gemstone embellishments, it elevates the design to a new level of sophistication.
This style is ideal for special occasions or for anyone looking to make a bold, royal-inspired statement with their nails.
The gemstone accents catch the light, adding a dynamic element to the overall design.
Marbleized Purple And White: Swirling Purple And White Marble
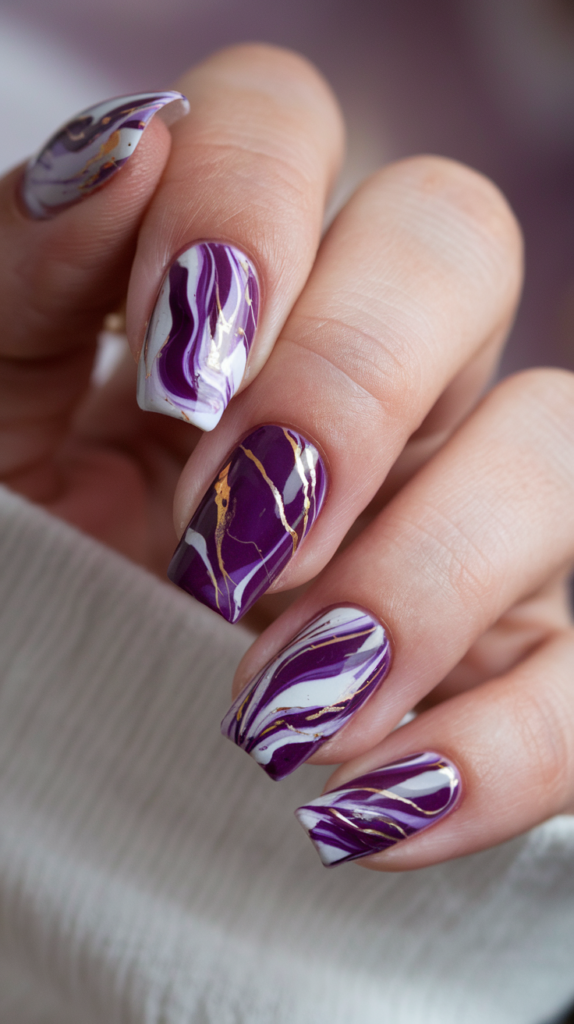
Marbleizing Techniques For A Purple And White Mix
To create a marbleized effect with purple and white, begin with a light purple or lavender base.
While the polish is still slightly wet, add small drops of white polish across the nail, using a fine brush to gently swirl the colors together.
This creates a soft, cloud-like marble effect.
For added depth, layer darker shades of purple into the mix, creating subtle variations in tone.
Finish with a glossy top coat to enhance the marbling and give the nails a smooth, polished look.
Gold As A Complementary Accent For Marble Designs
Adding a touch of gold to the marbleized purple and white design brings a regal quality to the nails.
Use a fine brush to paint thin gold lines within the marble pattern or add small gold flecks across the nail surface.
The gold complements the purple and white, creating a balanced look that combines sophistication with a touch of luxury.
This addition transforms a simple marble design into a royal-inspired masterpiece.
Midnight Sky With Stars: Deep Blue With Tiny Gold Stars
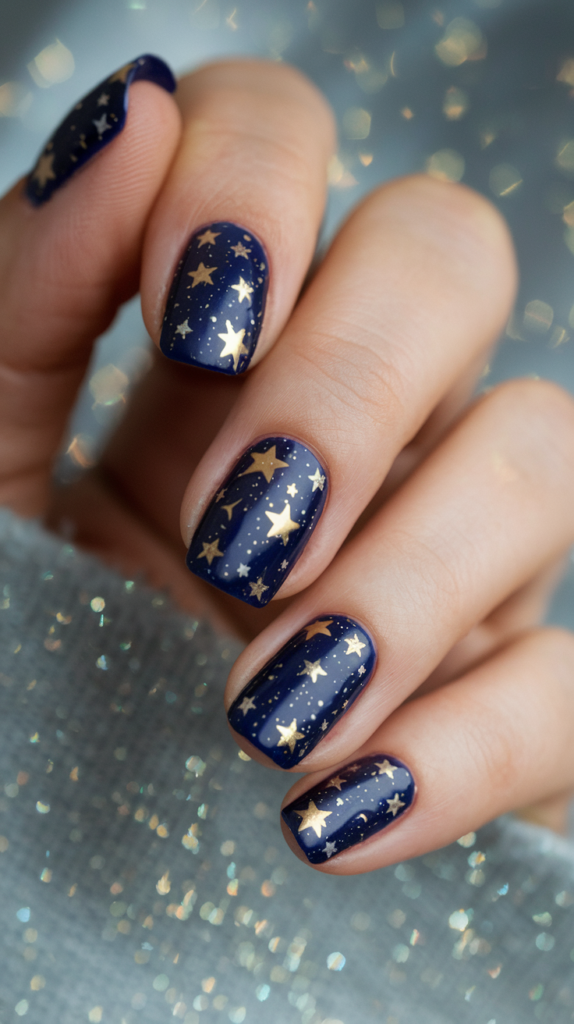
Creating A Starry Sky Effect On Dark Blue Polish
For a celestial-inspired look, start with a dark blue base that resembles the night sky.
Once the base is dry, use a dotting tool to add tiny gold and silver dots across each nail, mimicking the appearance of stars.
To create depth, apply some dots in clusters and others scattered more sparsely.
For an extra touch of magic, consider adding a small crescent moon on one or two accent nails.
Finish with a glossy top coat to make the stars stand out against the dark blue backdrop.
Combining Gold And Silver Stars For A Celestial Look
Using both gold and silver stars creates a multidimensional, sparkling effect that resembles a real starry sky.
The gold stars add warmth, while the silver stars provide a cool contrast, making the design feel balanced and visually dynamic.
This combination captures the beauty of the night sky and adds a sense of wonder and elegance to the nails, making them perfect for those who love celestial themes with a royal twist.
Gold Lace Over Matte Black: Delicate Gold Lace On Black
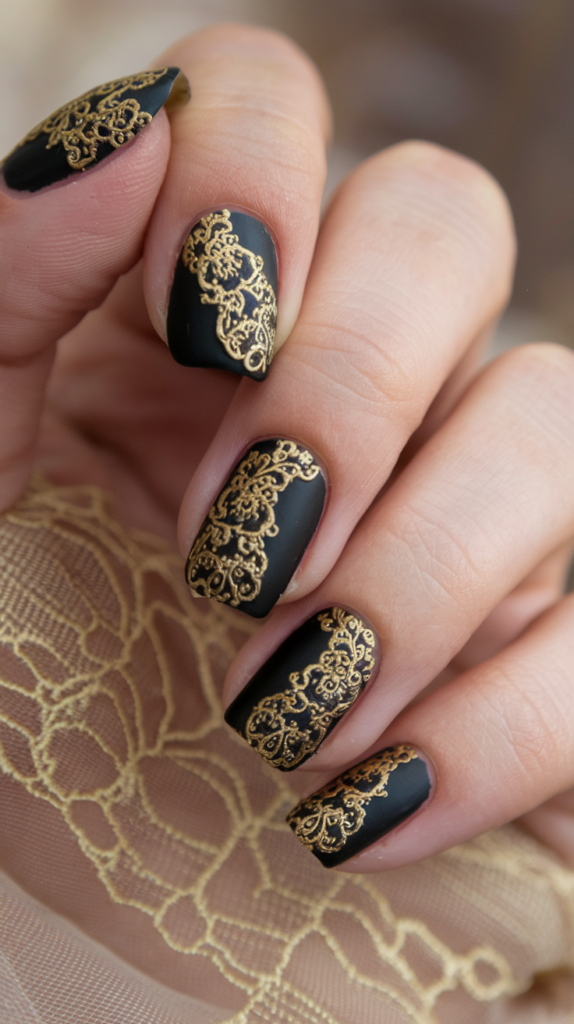
Achieving Intricate Lace-Like Patterns With Gold
To create a lace-inspired design, start with a matte black base to serve as a dramatic background.
Using a fine brush and gold polish, paint delicate, lace-like patterns across each nail.
Focus on symmetrical patterns, such as floral motifs or filigree, to capture the intricacy of real lace.
The contrast between the matte black and the gold creates a striking, elegant look that feels both luxurious and gothic.
This design is ideal for formal events or for adding a touch of drama to a royal-inspired aesthetic.
The Appeal Of Matte Black As A Regal Base
Matte black exudes sophistication and pairs beautifully with gold accents, giving nails a refined, regal appearance.
The matte finish softens the intensity of black, creating a subtle, velvety look that enhances the delicacy of the gold lace pattern.
This combination of matte black and gold adds depth and richness to the nails, making them suitable for anyone seeking a bold yet elegant design with a royal edge.
Imperial White With Crystal Cuticles: Classic White With Crystal Accents
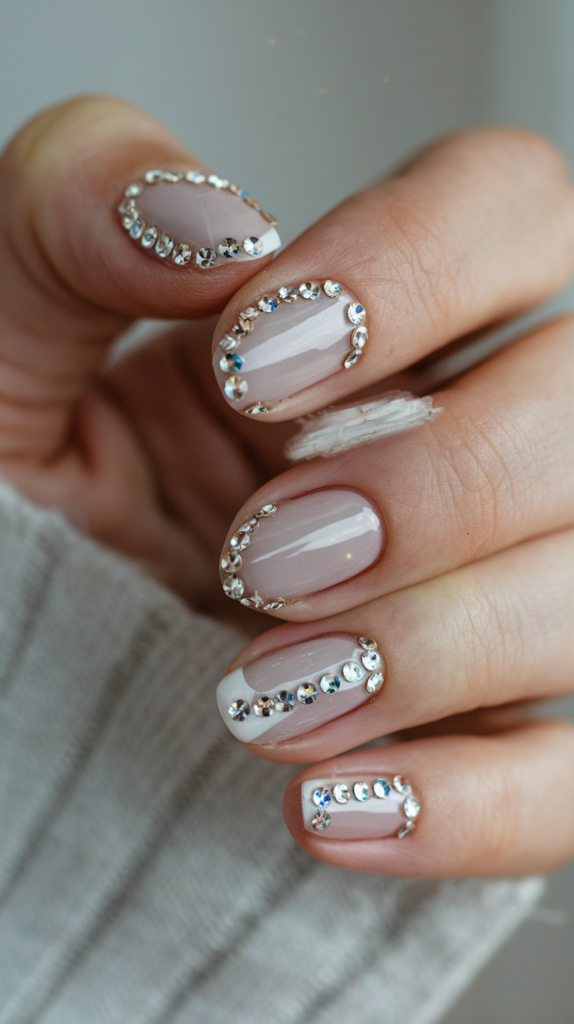
Placing Crystals Along The Cuticle Line
For a simple yet luxurious look, start with a crisp white polish as the base.
Once dry, apply small, clear crystals along the cuticle line on each nail, creating a subtle half-moon effect.
Use a strong adhesive to ensure the crystals stay in place, then seal with a clear top coat for added durability.
The crystal accents provide a gentle sparkle that complements the clean, classic white base, giving the nails a refined and elegant look.
How White Polish Enhances Crystal Details
White polish serves as an ideal backdrop for crystal accents, as its brightness allows the crystals to shine without distraction.
The simplicity of the white base contrasts beautifully with the sparkling crystals, creating a look that is both understated and glamorous.
This design is perfect for weddings, formal occasions, or any event where a touch of royal elegance is desired.
Silk Satin Sheen: Polished Satin Finish For A Regal Look
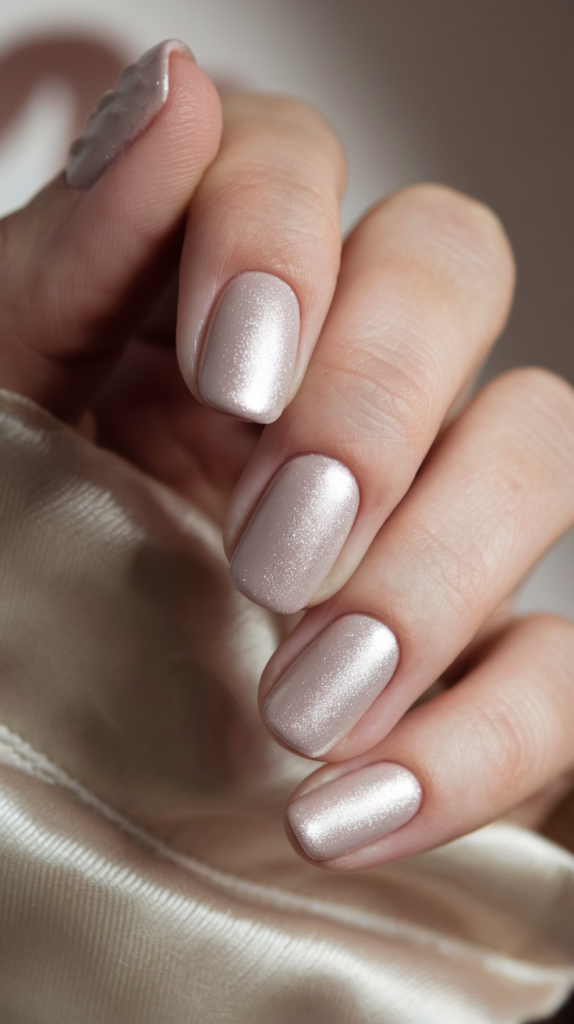
Steps For Achieving A Silk-Satin Effect
To create a silk satin finish, start by applying a base color in a soft shade, such as ivory, blush, or pale blue.
Once dry, use a satin-effect top coat to give the nails a soft, luxurious sheen.
This satin finish captures the texture of fine silk, adding a subtle shine that feels smooth and polished.
If desired, add a small metallic accent on one or two nails for a touch of glamor.
Why Satin Finishes Are Ideal For Elegant Looks
Satin finishes are perfect for elegant, royal-inspired designs as they offer a middle ground between matte and glossy.
The finish has a soft, diffused shine that is less intense than a high-gloss top coat, making it suitable for those who prefer a subtler, more refined look.
This luxurious effect enhances the nails’ appearance without overwhelming the design, making it an excellent choice for creating a look that feels regal, sophisticated, and timeless.
Conclusion
The “Royal Elegance” nail art designs featured here offer a sophisticated range of options for those seeking a touch of nobility and luxury in their manicure.
From the softness of pearl accents to the boldness of jeweled embellishments, these designs embody the perfect balance of elegance and style.
By experimenting with rich hues, gold accents, and refined textures, you can elevate your nails to a level of elegance that commands attention and admiration.
Whether you prefer subtle, understated looks or bold, statement-making designs, there’s a royal-inspired style here for everyone.
Embrace these ideas for your next manicure, and let your nails reflect the timeless beauty and allure of royalty.
With “Royal Elegance” at your fingertips, you’re sure to make a memorable impression, no matter the occasion.
