As the flowers begin to bloom and the air carries the sweet promise of renewal, Easter approaches, bringing with it a sense of joy and celebration.
It is a time for family gatherings, delightful treats, and of course, embracing the vibrant colors and themes of the season.
One wonderfully creative way to express your festive spirit is through nail art, transforming your fingertips into miniature canvases showcasing the charm of Easter.
From playful bunnies and colorful eggs to elegant pastels and sophisticated designs, there is an Easter manicure to suit every style and preference this Spring 2025.
This guide presents thirty-five unique and inspiring Easter nail art ideas, complete with detailed descriptions, application tips, and reasons why each look is a standout choice.
Get ready to find your perfect festive manicure and hop into the season with style.
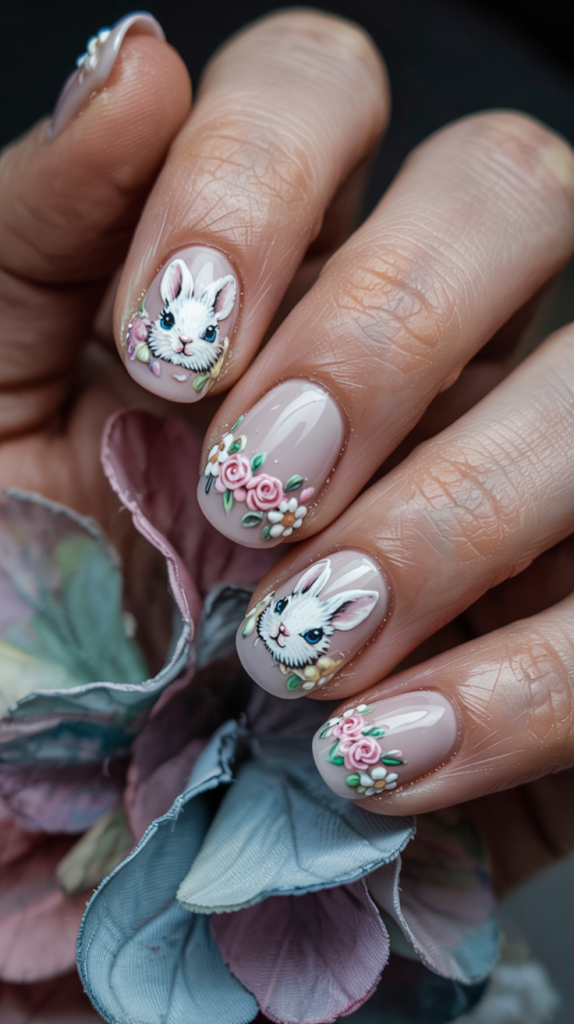
Blooming Bunny Nails
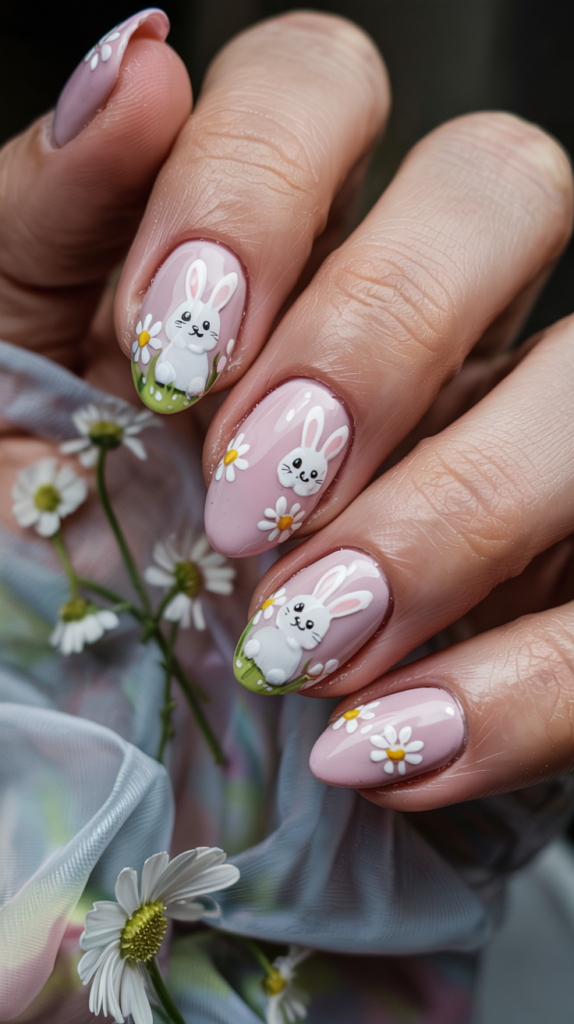
This charming design captures the quintessential sweetness of Easter with its soft color palette and adorable motifs.
It is a look that feels both festive and delicately pretty, perfect for springtime celebrations.
Design Features
The foundation of this look is a classic pastel pink polish, providing a soft and feminine canvas reminiscent of spring blossoms.
Upon this gentle base, tiny white bunnies are meticulously hand-painted, often depicted in simple silhouettes or with minimal detailing for maximum cuteness.
Complementing the bunnies are even tinier daisies, usually dotted with yellow centers, scattered across the nail to enhance the springtime garden feel.
The overall effect is delicate, whimsical, and undeniably tied to the Easter theme.
How To Achieve This Look
Begin by applying a reliable base coat to protect your nails and ensure a smooth surface for the polish.
Follow this with two thin coats of your chosen pastel pink polish, allowing each coat to dry completely for an even finish.
Using a fine-tipped nail art brush and white polish, carefully paint small bunny shapes onto each nail, or select accent nails if you prefer a more subtle look.
Add tiny white dots for daisies, placing a smaller yellow dot in the center of each using a dotting tool, and finish with a glossy top coat to seal the design and add shine.
Why This Stands Out
Blooming Bunny Nails stand out for their classic Easter charm and inherent sweetness, making them an instantly recognizable festive design.
The combination of soft pink, white bunnies, and daisies creates a universally appealing look that evokes feelings of innocence and springtime joy.
This design is versatile enough for various Easter events, from casual family egg hunts to more formal brunches, adding a touch of playful elegance.
Its delicate nature ensures it complements spring fashion choices without overpowering them.
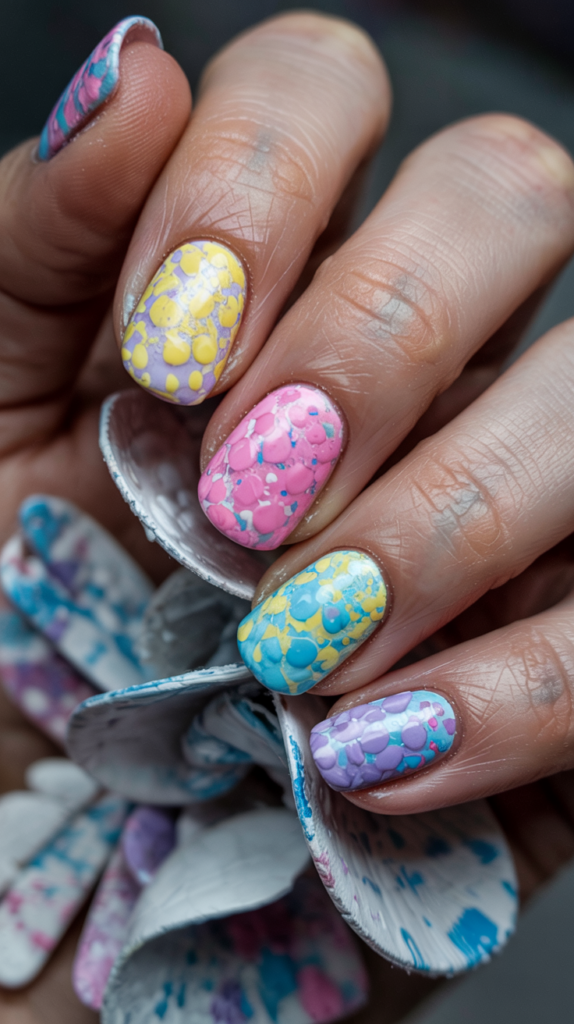
Speckled Egg Chic
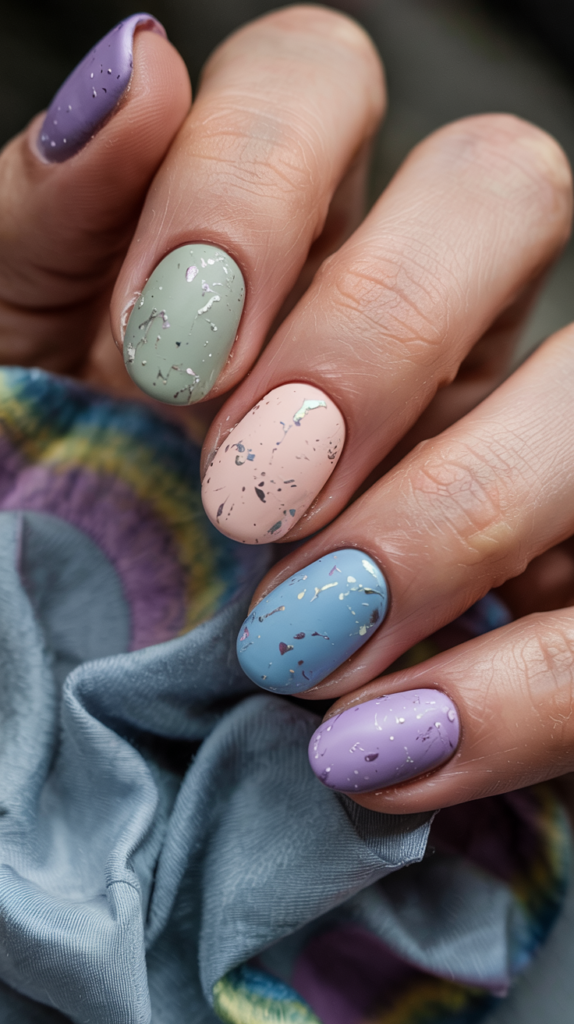
For a more subtle and sophisticated nod to the Easter theme, Speckled Egg Chic offers a modern and artistic approach.
This design mimics the natural beauty of speckled bird eggs using contemporary finishes and muted tones.
Design Features
This look revolves around matte nail polishes in soft, muted shades such as sage green, dusty blush, pale lavender, or robin’s egg blue.
The key feature is the speckled effect, achieved either through specialty polishes containing fine black or brown flecks or by manually splattering contrasting polish.
The matte finish is crucial, lending the design an earthy, organic feel that distinguishes it from typical glossy Easter manicures.
The result is understated yet captivating, resembling delicate eggs nestled in a spring meadow.
How To Achieve This Look
After applying your base coat, paint your nails with two coats of your chosen muted matte polish, ensuring each layer is fully dry.
If using a pre-speckled polish, the effect is achieved automatically as the polish dries.
To create the speckles manually, dip a stiff brush (like an old toothbrush or a fan brush) into black or dark brown polish, wipe off most of the excess, and gently flick the bristles towards your nails from a short distance.
Seal the look with a matte top coat to preserve the finish and protect the design.
Why This Stands Out
Speckled Egg Chic stands out for its unique texture and sophisticated color palette, offering a grown-up take on Easter nail art.
The matte finish and muted tones provide an elegant alternative to brighter, more traditional designs.
This manicure is perfect for those who appreciate minimalist aesthetics or want a festive look that feels grounded and natural.
It pairs beautifully with spring textures like linen and cotton, adding an artistic touch to any outfit.
Hoppy Daze Nails

Inject a burst of vibrant color and playful energy into your Easter celebration with Hoppy Daze Nails.
This design combines the cheerfulness of rainbows with the iconic Easter bunny motif for a look that is pure fun.
Design Features
The defining characteristic of Hoppy Daze Nails is the bright rainbow element, often applied as colorful tips in a French manicure style or as diagonal stripes across the nail.
The colors are typically bold and cheerful, spanning the full spectrum or focusing on a selection of vivid pastels.
Contrasting against the colorful backdrop are small bunny silhouettes, usually painted in black or white for clear visibility.
These bunnies are often depicted mid-hop, adding a dynamic and playful feel to the design.
How To Achieve This Look
Prepare your nails with a base coat, followed by a nude or clear base color if desired, especially if creating rainbow tips.
For the rainbow tips, carefully paint thin stripes of different bright colors across the free edge of each nail using a fine brush, or use striping tape for cleaner lines.
Once the rainbow element is dry, use a fine nail art brush or a stamping plate to add the hopping bunny silhouettes in a contrasting color like black or white.
Apply a glossy top coat to make the colors pop and ensure the longevity of your cheerful design.
Why This Stands Out
Hoppy Daze Nails stand out due to their sheer vibrancy and playful spirit, making them an instant mood booster.
The combination of rainbows and hopping bunnies is undeniably cheerful and perfect for capturing the joyful essence of Easter.
This design is ideal for those who love bold colors and aren’t afraid to make a statement with their nails.
It is particularly well-suited for casual Easter gatherings, outdoor events, and bringing a touch of fun to springtime wardrobes.
Golden Egg Glam
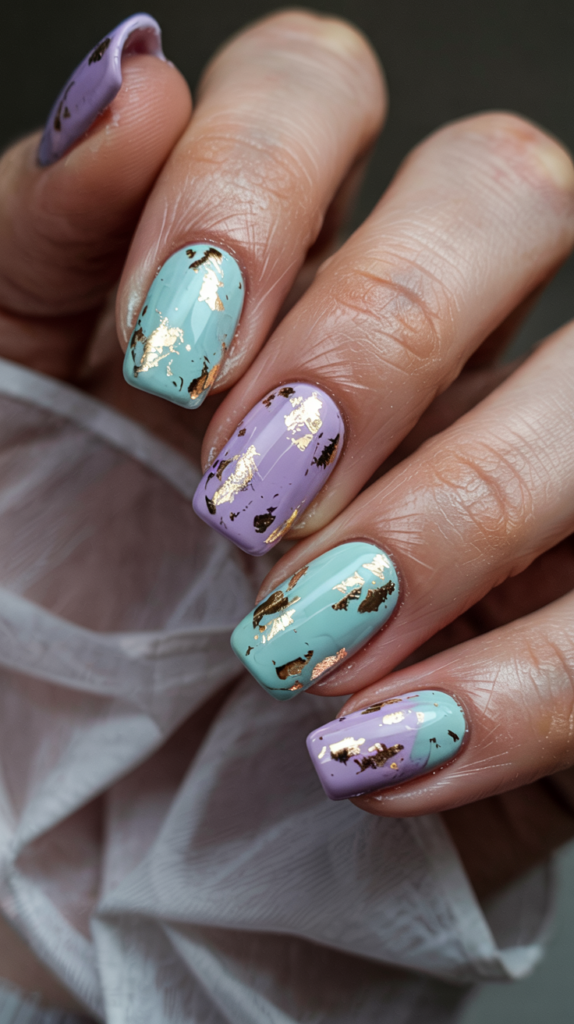
Elevate your Easter manicure with a touch of luxury and sophistication using the Golden Egg Glam design.
This look combines soft pastel gradients with opulent metallic gold for an effect reminiscent of treasured Fabergé eggs.
Design Features
This elegant design typically features a soft ombré effect using pale pastel shades like baby blue, mint green, soft pink, or lilac, blending seamlessly into one another.
The true glamour comes from the application of metallic gold foil flakes or delicate gold leaf accents.
The gold elements are strategically placed over the pastel gradient, often concentrated near the tips or scattered artfully across the nail surface.
The interplay between the soft pastels and the shimmering gold creates a rich, luxurious aesthetic.
How To Achieve This Look
Start with a base coat, then create the pastel ombré effect using a makeup sponge.
Apply stripes of your chosen pastel polishes onto the sponge and dab it gently onto the nail, repeating until the blend is smooth and opaque, cleaning up the surrounding skin afterward.
While the polish is still slightly tacky, or after applying a thin layer of nail foil glue, carefully apply small pieces of gold foil or leaf using tweezers or a silicone tool, pressing them gently onto the nail.
Seal the entire design with a high-shine top coat to enhance the metallic shimmer and protect the delicate foil.
Why This Stands Out
Golden Egg Glam stands out for its luxurious and sophisticated interpretation of the Easter egg theme.
The combination of soft pastels with metallic gold creates a stunning contrast that feels both festive and incredibly chic.
This manicure is perfect for Easter dinners, special events, or anytime you want to add a touch of opulence to your look.
It elevates the traditional pastel palette, making it a glamorous and memorable choice for the holiday.
Pastel Jelly Beans

Capture the sweet, translucent look of your favorite Easter candies with Pastel Jelly Bean nails.
This design uses jelly polishes and glossy finishes to mimic the look and feel of sugary treats.
Design Features
The core of this design lies in the use of jelly nail polishes – polishes with a sheer, translucent finish – in various candy-like pastel colors such as pink, yellow, green, blue, and purple.
Each nail might feature a different color, or a single shade can be used across all nails.
Often, this look is enhanced with a high-shine top coat to maximize the glossy, jelly-like appearance.
For an extra playful touch, a single accent nail might feature a small, 3D jelly bean embellishment crafted from nail acrylic or a pre-made charm.
How To Achieve This Look
Apply a base coat, then layer your chosen pastel jelly polishes.
Due to their sheer nature, you might need three or even four thin coats to build up the desired color saturation while maintaining the translucent quality, allowing each coat to dry in between.
If adding a 3D accent, use nail glue to attach a small jelly bean charm or bead onto one nail before applying the top coat, or sculpt one using colored acrylic powder if you have the skill.
Finish all nails with an ultra-glossy top coat to achieve that irresistible candy-coated shine.
Why This Stands Out
Pastel Jelly Bean nails stand out for their fun, youthful vibe and unique translucent finish that perfectly mimics Easter candy.
The glossy texture and sweet pastel shades are playful and appetizingly cute.
This design is ideal for those who love novelty nail art and want a look that is sweet, colorful, and directly inspired by Easter treats.
The potential 3D element adds an extra layer of playful interaction and visual interest.
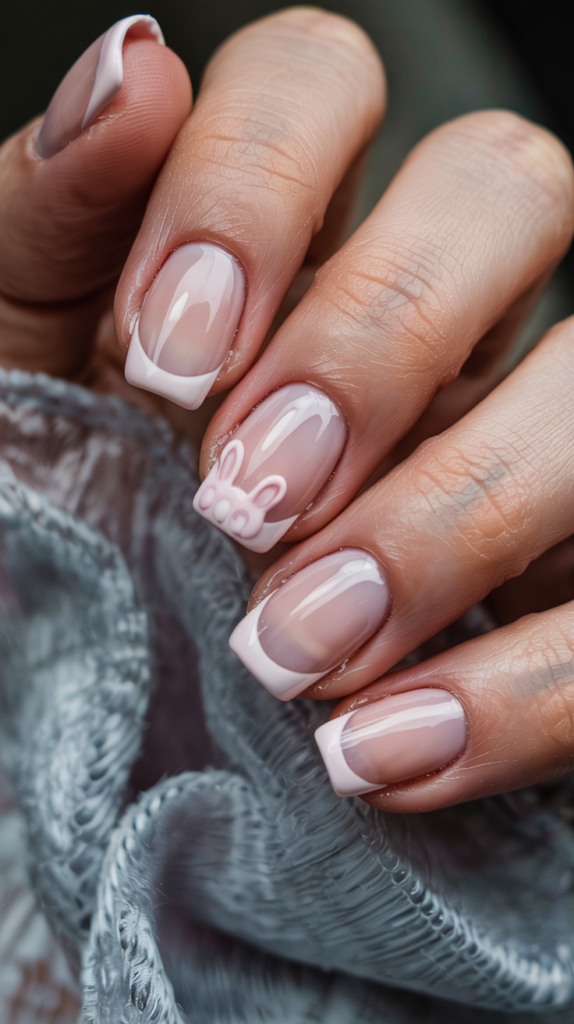
Bunny French Tips
Put a festive twist on a timeless classic with Bunny French Tips.
This design cleverly incorporates adorable bunny features into the traditional French manicure structure for a subtle yet charming Easter look.
Design Features
This look starts with a classic French manicure base, typically a sheer pink or nude polish on the nail bed.
The innovation comes at the tip: instead of the standard white arc, the tip is shaped or decorated to resemble bunny ears and sometimes a tiny nose.
The bunny ears are usually created by extending two small points upward from the white tip, while a tiny pink dot can be added below to suggest a nose.
The result is a clever integration of the Easter motif into a sophisticated and well-loved nail style.
How To Achieve This Look
Begin by applying your base coat and the sheer pink or nude polish for the nail bed, letting it dry completely.
Using a fine brush and white polish, create the French tip, but instead of a smooth curve, paint two small, elongated U-shapes extending upwards to form the bunny ears.
Optionally, use a dotting tool and a light pink polish to add a tiny dot just below the center of the ears for the nose.
Finish with a clear top coat to protect the design and add a classic shine to your reimagined French manicure.
Why This Stands Out
Bunny French Tips stand out for their clever and subtle integration of a festive theme into a classic, elegant nail design.
It offers a way to celebrate Easter with nail art that remains chic and office-appropriate.
This design is perfect for those who prefer understated nail art or love the timeless look of a French manicure but want to add a small, playful nod to the holiday.
It is sophisticated with a delightful hidden detail.
Carrot Patch Cuties

Celebrate the Easter bunny’s favorite snack with Carrot Patch Cuties, a playful and earthy design.
This look features adorable miniature carrots against a fresh green background, evoking a spring garden scene.
Design Features
The base color for this design is typically a vibrant mint green or a softer sage green, representing the leafy tops of carrots or a spring meadow.
The main attraction is the hand-painted miniature carrots, complete with bright orange bodies and tiny green stems.
Often, subtle earth-toned accents like specks of brown or beige are added to suggest soil, enhancing the garden patch theme.
The overall aesthetic is cute, slightly rustic, and whimsically charming.
How To Achieve This Look
After applying a base coat, paint your nails with two coats of your chosen green polish and let it dry thoroughly.
Using a thin nail art brush and bright orange polish, paint small, elongated triangular shapes for the carrots on each nail or select accent nails.
Once the orange is dry, use the same brush and a darker green polish to add tiny strokes at the wider end of the orange shape for the carrot tops.
You can add brown speckles using a dotting tool or sponge, then seal the entire garden scene with a glossy top coat.
Why This Stands Out
Carrot Patch Cuties stand out for their unique and playful theme, shifting the focus from bunnies and eggs to another beloved Easter symbol.
The combination of mint green and bright orange is fresh and eye-catching.
This design is perfect for those looking for a less conventional Easter manicure that is still fun, festive, and full of personality.
It has a charming, slightly quirky appeal that is sure to garner compliments.
Watercolor Egg Art

Capture the delicate beauty of hand-dyed Easter eggs with the Watercolor Egg Art manicure.
This design uses soft, blended colors to create an ethereal, artistic effect on your nails.
Design Features
This look mimics the effect of watercolor paints bleeding into one another on paper, using soft pastel shades like pink, blue, yellow, and lavender.
The colors are applied in soft, swirling patterns with blurred edges, creating a dreamy, translucent appearance.
There are no harsh lines; the focus is on the gentle blending and layering of colors to replicate the way dyes disperse on an eggshell.
The finish is typically glossy to enhance the watery, light effect.
How To Achieve This Look
Start with a base coat and apply a light, neutral base color like white or pale nude to make the pastel watercolors pop.
Once dry, take your chosen pastel polishes and dilute them slightly with a clear polish or acetone on a palette.
Using a small brush, dab the diluted colors onto the nail, allowing them to blend and bleed into each other naturally.
Layer the colors gently until you achieve the desired soft, swirled effect, then finish with a glossy top coat to enhance the watercolor illusion.
Why This Stands Out
Watercolor Egg Art stands out for its artistic and ethereal quality, offering a sophisticated and delicate interpretation of the Easter egg theme.
The soft, blended colors create a dreamy and unique look on each nail.
This design is ideal for those who appreciate artistic nail techniques and prefer a softer, more abstract representation of the holiday.
It is elegant, versatile, and captures the delicate beauty of springtime pastels.
Lavender Fields Forever

Transport yourself to serene, blooming fields with the Lavender Fields Forever nail design.
This manicure combines the calming hue of lavender with charming Easter motifs for a picturesque look.
Design Features
The primary color focus is lavender, used either as a solid base or in gradient effects.
The design incorporates delicate illustrations of lavender blooms, often depicted as small sprigs or clusters.
Adding to the Easter theme, tiny woven Easter baskets, perhaps filled with miniature eggs, and soft, fluffy white clouds might be painted onto accent nails.
The overall feel is peaceful, romantic, and perfectly captures the essence of a spring landscape.
How To Achieve This Look
Apply your base coat and then two coats of a beautiful lavender polish.
For added depth, you could create a subtle lavender ombré effect using a sponge before adding details.
Using fine nail art brushes, paint delicate lavender sprigs with green stems.
On accent nails, paint small brown baskets with tiny colorful dots for eggs, and add soft white cloud shapes against the lavender sky, finishing with a glossy top coat.
Why This Stands Out
Lavender Fields Forever stands out for its calming color palette and picturesque imagery, creating a serene and romantic Easter manicure.
The combination of florals and subtle Easter elements is both elegant and thematic.
This design is perfect for those who love floral nail art and want a sophisticated yet festive look.
The lavender shade is trendy yet timeless, offering a peaceful and beautiful tribute to spring.
Chick Flick Nails

Bring a dose of adorable charm to your fingertips with Chick Flick Nails.
This bright and cheerful design features cute cartoon baby chicks, celebrating one of Easter’s most beloved symbols of new life.
Design Features
The star of this design is the bright, sunny yellow polish used as the base color, instantly evoking the fuzzy fluff of a baby chick.
Onto this cheerful background, cartoon chick faces are painted, complete with tiny eyes, orange beaks, and sometimes little tufts of feathers.
To enhance the theme, some nails might feature cracked white eggshell designs, perhaps near the cuticle or tip, as if the chick has just hatched.
The overall look is playful, cute, and bursting with springtime energy.
How To Achieve This Look
Start with a base coat followed by two to three coats of a vibrant yellow polish until opaque.
Allow the yellow base to dry completely before adding the details.
Using a fine brush and black polish, paint small dots or lines for the eyes.
Use orange polish and a small brush or dotting tool to create tiny triangular or diamond shapes for the beaks, and add white details for cracked eggshells on accent nails, finishing with a glossy top coat.
Why This Stands Out
Chick Flick Nails stand out for their undeniable cuteness and bright, happy color scheme.
The cartoon chick faces are instantly recognizable and bring a smile, perfectly capturing the joyful spirit of Easter and spring.
This design is ideal for those who love cute, character-based nail art and want a bold, cheerful manicure.
It is fun, youthful, and a perfect conversation starter at any Easter gathering.
Pastel Plaid Parade
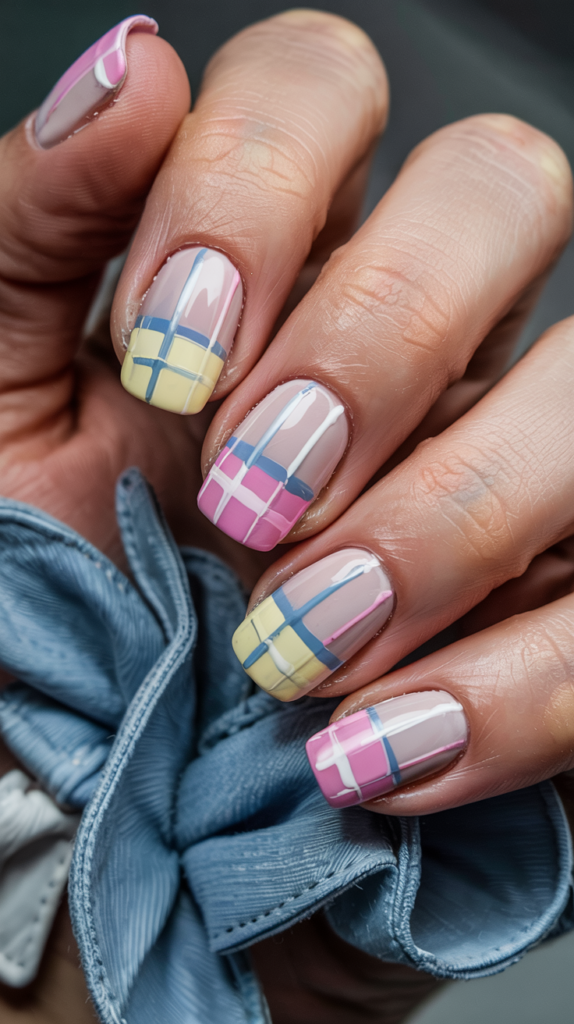
Combine the softness of spring pastels with the timeless pattern of plaid for a chic and festive manicure.
The Pastel Plaid Parade offers a sophisticated yet seasonally appropriate nail design.
Design Features
This design features a classic plaid pattern rendered in soft, Easter-appropriate pastel shades like baby blue, pale pink, lilac, and light yellow or mint green.
The lines of the plaid are typically thin and crisscross over a lighter pastel base.
Often, this look is given a matte finish, which enhances the softness of the colors and gives the plaid pattern a cozy, fabric-like appearance.
The result is preppy, polished, and subtly festive.
How To Achieve This Look
Apply your base coat and paint your nails with the lightest pastel shade chosen for your plaid design, applying two coats for opacity.
Once completely dry, use thin nail art brushes or striping tape to create the plaid pattern.
Paint thin, straight lines horizontally and vertically using your other chosen pastel colors, layering them carefully to create the interwoven plaid effect.
Finish with a matte top coat to achieve the soft, sophisticated look.
Why This Stands Out
Pastel Plaid Parade stands out for its chic and unexpected combination of a classic pattern with a seasonal color palette.
It is a sophisticated way to wear pastels and nod to the Easter season without using overt motifs.
This design is perfect for those who appreciate classic patterns and want a polished, put-together look that is suitable for both casual and more formal Easter occasions.
The matte finish adds a modern, trendy touch.
Daffodil Dreams
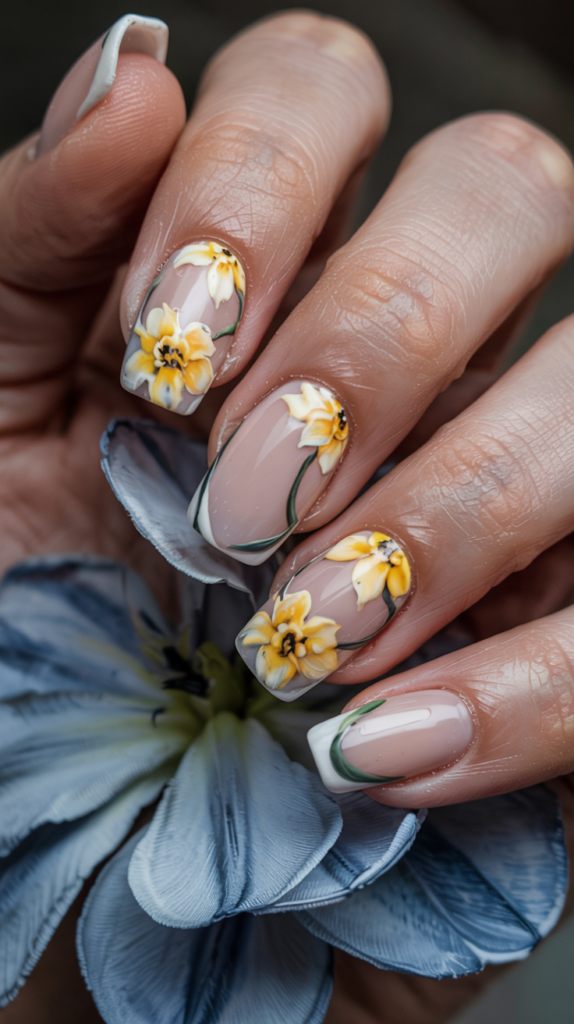
Welcome the arrival of spring with Daffodil Dreams, a nail design that celebrates one of the season’s first and brightest blooms.
This look is fresh, cheerful, and elegantly floral.
Design Features
This design typically features a clean white or pale nude base, allowing the bright yellow daffodils to take center stage.
The daffodils are hand-drawn, showcasing their distinct trumpet shape and vibrant yellow petals, often accompanied by green stems and leaves.
Sometimes, delicate green floral vines are added, winding across the nail to connect the blooms or frame the design.
The overall aesthetic is bright, optimistic, and reminiscent of a spring garden awakening.
How To Achieve This Look
After your base coat, apply two coats of a crisp white or soft nude polish and let it dry thoroughly.
Using a fine nail art brush and bright yellow polish, paint the daffodil shapes, focusing on the central trumpet and surrounding petals.
Use green polish to add stems and long, slender leaves, and potentially thin, winding vines for extra detail.
Seal your floral artwork with a glossy top coat to protect the design and give it a fresh, dewy finish.
Why This Stands Out
Daffodil Dreams stands out for its celebration of a specific spring flower, offering a beautiful and elegant floral alternative to more common Easter motifs.
The contrast between the bright yellow blooms and the clean base is striking and cheerful.
This design is perfect for flower lovers and those seeking a sophisticated, nature-inspired manicure for Easter and the entire spring season.
It feels fresh, optimistic, and beautifully detailed.
Pastel Chrome Magic
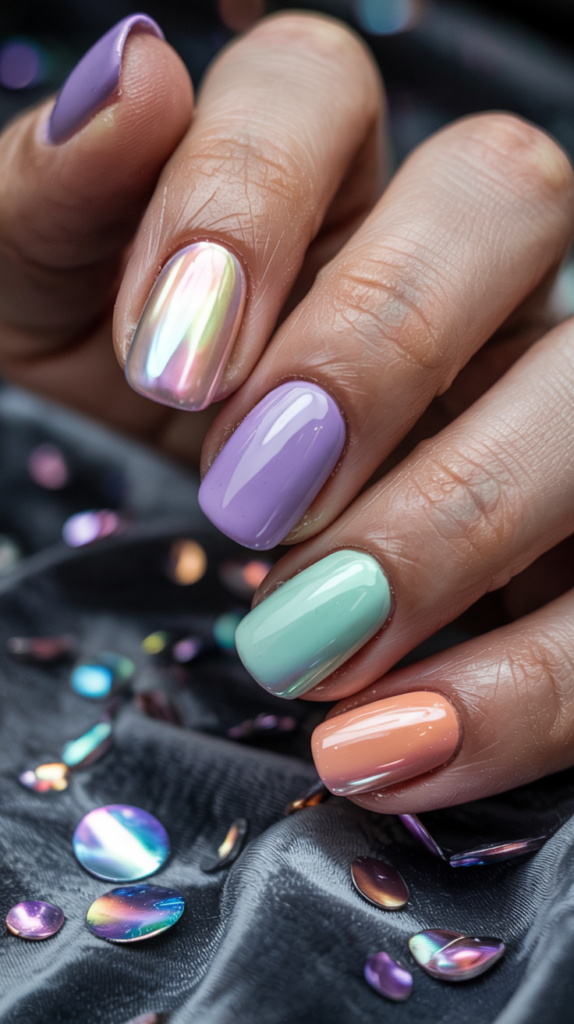
Combine the soft allure of pastels with the high-impact shine of chrome for a truly magical and modern Easter manicure.
Pastel Chrome Magic offers a futuristic yet seasonally appropriate look.
Design Features
This design showcases mirror-like chrome finishes in delicate pastel tones such as iridescent pink, shimmering lilac, baby blue with a metallic sheen, or soft mint green chrome.
The effect can cover the entire nail or be used in designs like chrome French tips or ombré.
The key feature is the intense, reflective shine of the chrome powder applied over the pastel base.
The result is eye-catching, ethereal, and gives a futuristic twist to the traditional Easter color palette.
How To Achieve This Look
Achieving a true chrome finish typically requires gel polish.
Apply a base coat and cure, followed by your chosen pastel gel color coat(s), curing each layer.
Apply a no-wipe gel top coat and cure it.
While the top coat is still warm, firmly rub pastel chrome powder onto the nail surface using a sponge applicator until the mirror effect is achieved.
Dust off any excess powder carefully and seal the look with another layer of no-wipe top coat, curing thoroughly.
Why This Stands Out
Pastel Chrome Magic stands out for its mesmerizing, high-shine finish combined with soft, dreamy colors.
It merges the trendiness of chrome nails with the classic Easter pastel palette for a look that is both modern and festive.
This design is perfect for trendsetters and those who love a high-impact manicure.
The ethereal, shifting colors of the chrome add a touch of magic and sophistication to the Easter celebration.
Easter Confetti Tips
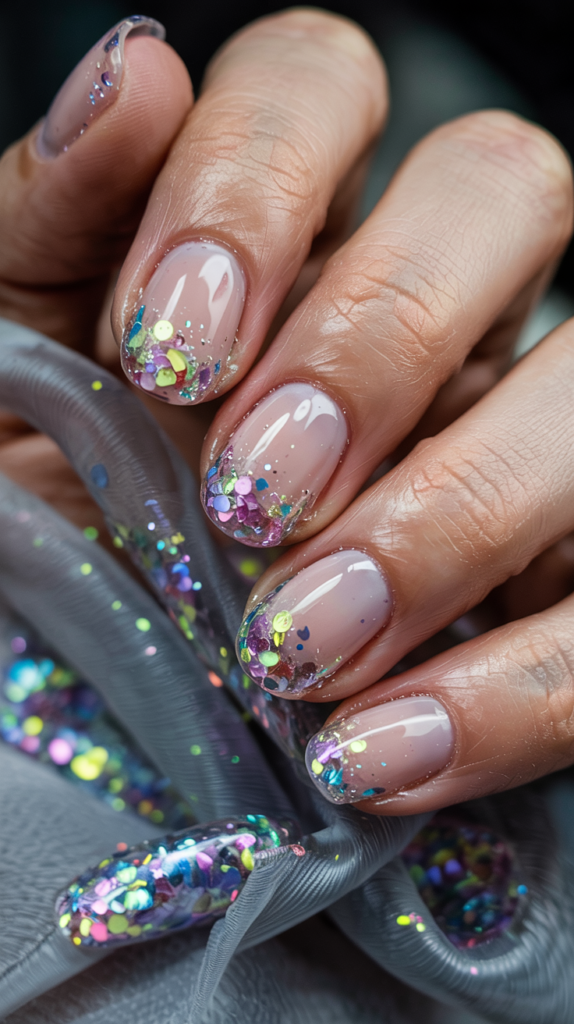
Get ready to party with Easter Confetti Tips, a fun and festive design that brings a celebratory sparkle to your nails.
This look is easy to achieve and customize with your favorite Easter colors.
Design Features
This design usually starts with a clear, nude, or pale pastel base coat, keeping the focus on the tips.
The defining feature is the colorful confetti glitter concentrated at the tips of the nails, fading softly as it moves towards the cuticle.
The confetti glitter typically includes pastel shades like pink, blue, yellow, lavender, and green, sometimes mixed with iridescent or holographic flecks for extra sparkle.
The effect is like dipping your nails in a bowl of festive confetti.
How To Achieve This Look
Apply your base coat and chosen base color (or leave nails clear/nude) and let it dry.
Using a sponge or a brush, apply a glitter polish containing Easter-colored confetti to the tips of your nails.
Build up the glitter density at the very tip, dabbing more lightly as you move towards the middle of the nail to create a gradient effect.
Finish with one or two layers of a glossy top coat to smooth out the glitter texture and add shine.
Why This Stands Out
Easter Confetti Tips stand out for their sheer fun and celebratory feel, instantly evoking a party atmosphere.
The glitter gradient is eye-catching and playful, offering an easy way to incorporate multiple Easter colors.
This design is perfect for those who love glitter and want a festive, low-effort manicure.
It is versatile, works on any nail length, and adds a touch of sparkle to any Easter outfit.
Polka Dot Bunny Hop
Combine classic polka dots with cute bunny elements for a playful and retro-inspired Easter manicure.
The Polka Dot Bunny Hop is charming, cheerful, and full of character.
Design Features
This design features a base color, often a pastel or white, covered in multicolored polka dots in classic Easter shades.
The dots can vary in size and density, creating a fun, bubbly background.
Interspersed among the dots, or featured on accent nails, are cute bunny details.
These could be tiny bunny footprints (three small dots and one larger one), simple bunny ear outlines, or even full bunny silhouettes hopping across the dotted landscape.
How To Achieve This Look
After applying your base coat and base color, use dotting tools of various sizes to create the polka dot pattern with your chosen pastel polishes.
Allow the dots to dry completely.
Using a fine brush or a smaller dotting tool, add the bunny footprints or ear outlines in white or a contrasting color.
If painting silhouettes, use a fine brush, then seal the entire playful design with a glossy top coat.
Why This Stands Out
Polka Dot Bunny Hop stands out for its whimsical combination of two fun elements – polka dots and bunnies.
It has a retro charm while feeling fresh and perfectly suited for Easter celebrations.
This design is ideal for those who love playful patterns and cute motifs.
It is cheerful, customizable with different color combinations, and adds a touch of lighthearted fun to the holiday.
Cross And Light Nails
For those seeking a manicure that reflects the spiritual significance of Easter, Cross and Light Nails offer an elegant and meaningful option.
This design incorporates religious symbols in a subtle and beautiful way.
Design Features
This design typically features a soft pastel base color, such as pale blue, lilac, or soft pink.
The central motif is a subtle cross, often painted in white, silver, or gold, positioned delicately on one or more nails.
Enhancing the spiritual theme, soft halo effects or beams of light might be depicted radiating from the cross, often achieved using lighter shades, shimmer polish, or glitter.
The overall aesthetic is serene, elegant, and reverent.
How To Achieve This Look
Apply your base coat and chosen pastel base color.
Once dry, use a very fine nail art brush or striping tape to create a clean, simple cross shape using white, metallic, or glitter polish.
To create the light effects, use a slightly lighter shade than the base or a sheer shimmer polish, painting soft lines radiating outwards from the cross, or a soft circle around the top like a halo.
Finish with a glossy or subtly shimmery top coat to complete the ethereal look.
Why This Stands Out
Cross and Light Nails stand out for their focus on the religious aspect of Easter, offering a design that is both beautiful and meaningful.
The execution is typically subtle and elegant, making it a respectful expression of faith.
This design is perfect for individuals who wish to acknowledge the spiritual significance of the holiday through their manicure.
It is serene, sophisticated, and carries a deeper meaning beyond the typical springtime motifs.
Peeps Parade
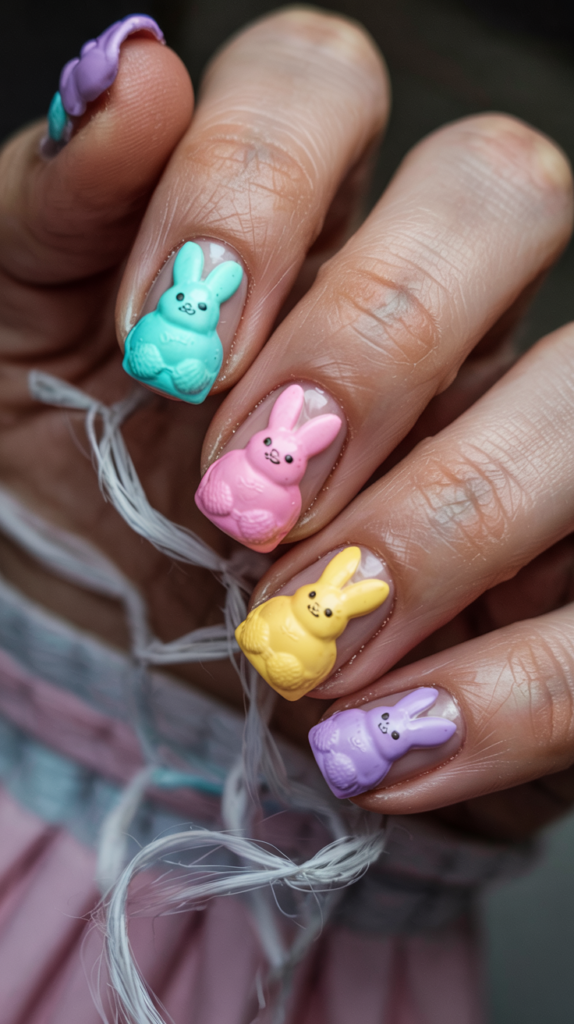
Pay homage to a classic Easter candy favorite with the Peeps Parade nail design.
This look features the iconic marshmallow treats in all their colorful glory for a fun and instantly recognizable manicure.
Design Features
This playful design showcases illustrations of Peeps marshmallow candies across the nails.
The Peeps are typically depicted in their classic chick or bunny shapes and rendered in their signature bright colors: pink, purple, yellow, blue, and sometimes green.
The background can be a simple nude, white, or a contrasting pastel shade.
Sometimes a touch of fine sugar-like glitter is added to mimic the texture of the actual candy.
How To Achieve This Look
Start with your base coat and chosen background color.
Using nail art brushes and polishes in bright Peeps colors, carefully paint the outline of the chick or bunny shapes.
Fill in the shapes with the corresponding colors.
Once dry, use a fine dotting tool or brush to add small black or brown dots for the eyes, and potentially sprinkle ultra-fine iridescent glitter over the tacky polish or use a sugar-effect top coat before finishing with a regular top coat.
Why This Stands Out
Peeps Parade stands out for its direct and playful reference to an iconic Easter candy, making it instantly recognizable and fun.
The bright colors and cute shapes create a cheerful and nostalgic manicure.
This design is ideal for those with a sweet tooth and a love for novelty nail art.
It is bold, colorful, and a guaranteed conversation starter during Easter festivities.
Rainbow Egg Hunt
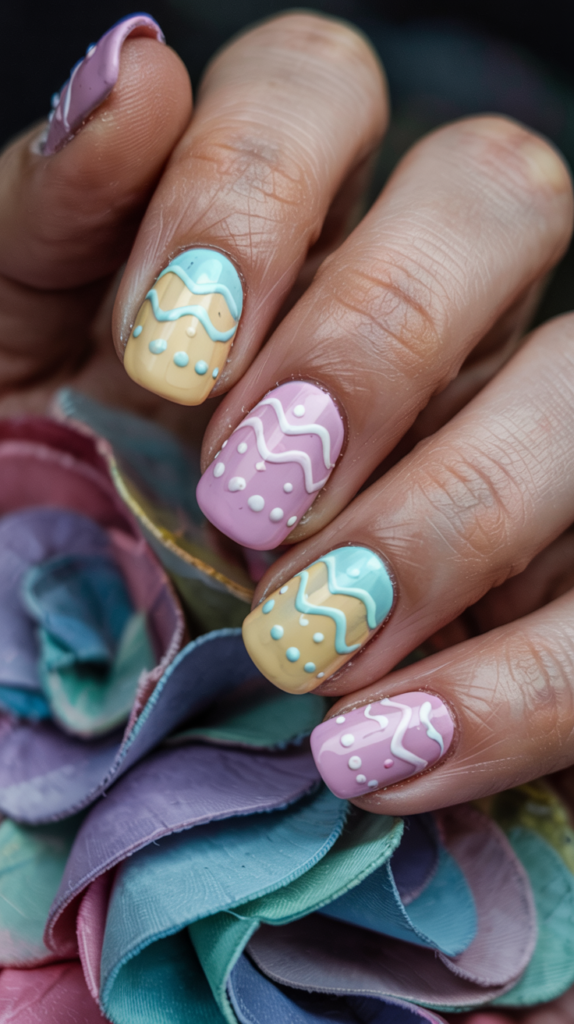
Capture the excitement and vibrant colors of an Easter egg hunt with the Rainbow Egg Hunt design.
Each nail transforms into a uniquely decorated egg, creating a varied and colorful manicure.
Design Features
This design treats each nail as an individual Easter egg, decorated with its own distinct pattern.
The base colors are typically bright or pastel rainbow shades, with each nail potentially featuring a different base hue.
Over the base colors, various egg-decorating patterns are applied, such as stripes (straight, wavy, zigzag), polka dots, squiggles, floral motifs, or geometric shapes.
The patterns are usually done in contrasting colors to mimic the look of hand-dyed and decorated eggs.
How To Achieve This Look
Apply a base coat, then paint each nail with a different bright or pastel base color, applying two coats for opacity.
Let the base colors dry completely.
Using fine nail art brushes, dotting tools, and various contrasting polish colors, decorate each nail with different patterns – stripes on one, dots on another, squiggles on a third, and so on.
Seal each unique “egg” design with a glossy top coat.
Why This Stands Out
Rainbow Egg Hunt stands out for its variety and maximalist approach to the Easter egg theme, offering a burst of color and pattern.
Having each nail designed differently makes for a visually dynamic and exciting manicure.
This design is perfect for those who love color, pattern, and want a bold, expressive Easter look.
It fully embraces the creativity and fun associated with decorating Easter eggs.
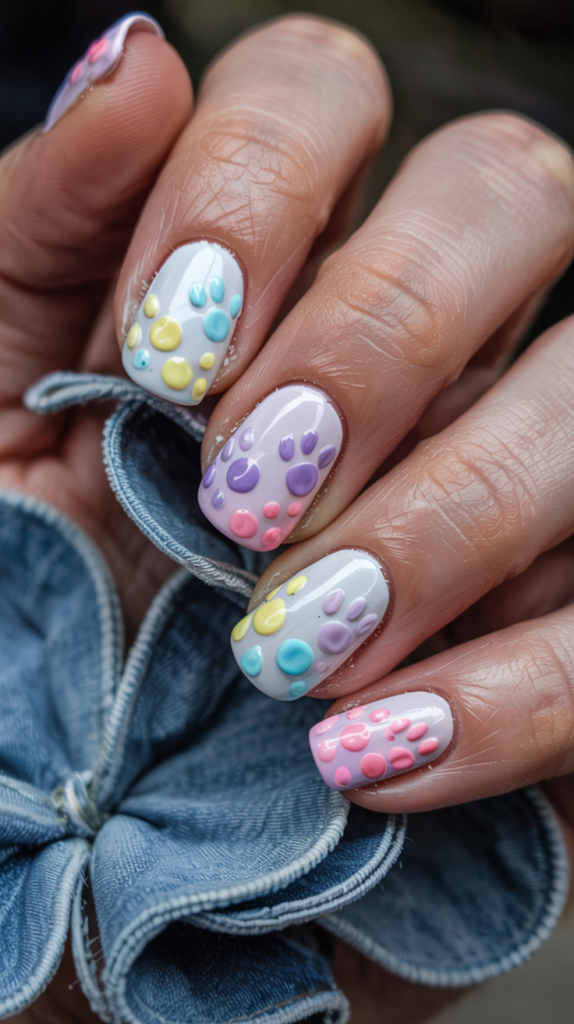
Candy Shell Swirls
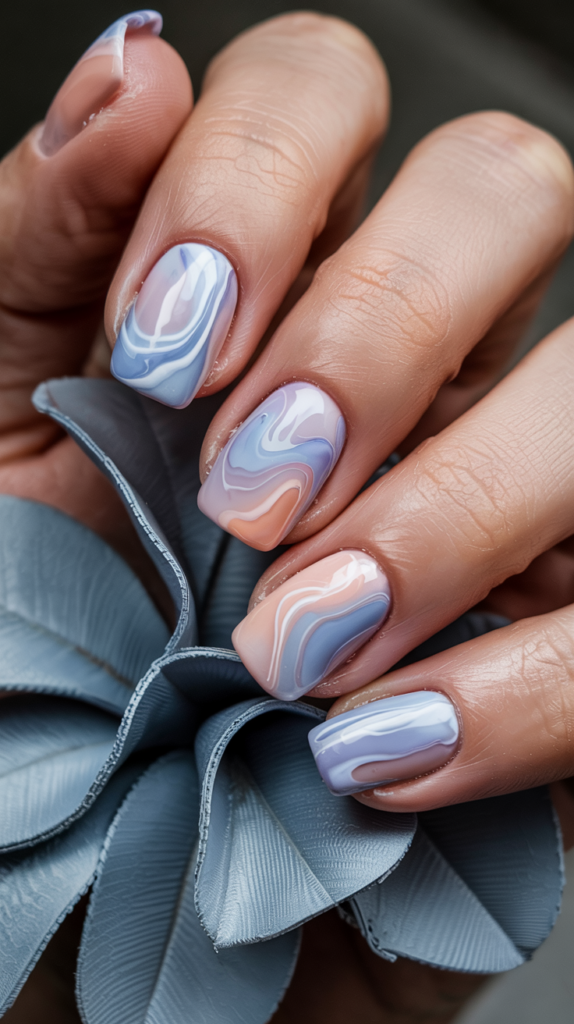
Mimic the beautiful marbled patterns found on some Easter candies or dyed eggs with Candy Shell Swirls.
This design uses soft, blended colors to create an elegant and appetizing look.
Design Features
This design features soft, marbled or swirled patterns created using multiple pastel colors, such as pink, blue, yellow, and white.
The colors gently blend and twist into each other, resembling the patterns on candy coatings or softly marbled chocolate eggs.
There are no harsh lines, just smooth transitions and organic swirling shapes.
The finish is usually glossy, enhancing the smooth, candy-like appearance of the swirls.
How To Achieve This Look
Apply a base coat and a light base color, often white or a pale pastel, to help the swirls stand out.
While the base color is still wet, place small dots of other pastel polishes onto the nail.
Use a thin tool like a toothpick, needle, or fine brush to gently drag through the dots of wet polish, creating swirls and marbled patterns.
Be careful not to over-mix, then allow it to dry and finish with a glossy top coat to smooth and enhance the design.
Why This Stands Out
Candy Shell Swirls stand out for their elegant and soft marbled effect, offering a sophisticated yet sweet interpretation of Easter treats.
The gentle blending of pastel colors is visually appealing and calming.
This design is ideal for those who appreciate abstract patterns and want a pretty, subtle nod to Easter candies without literal depictions.
It is versatile and works well on different nail shapes and lengths.
Mini Bunny Tails
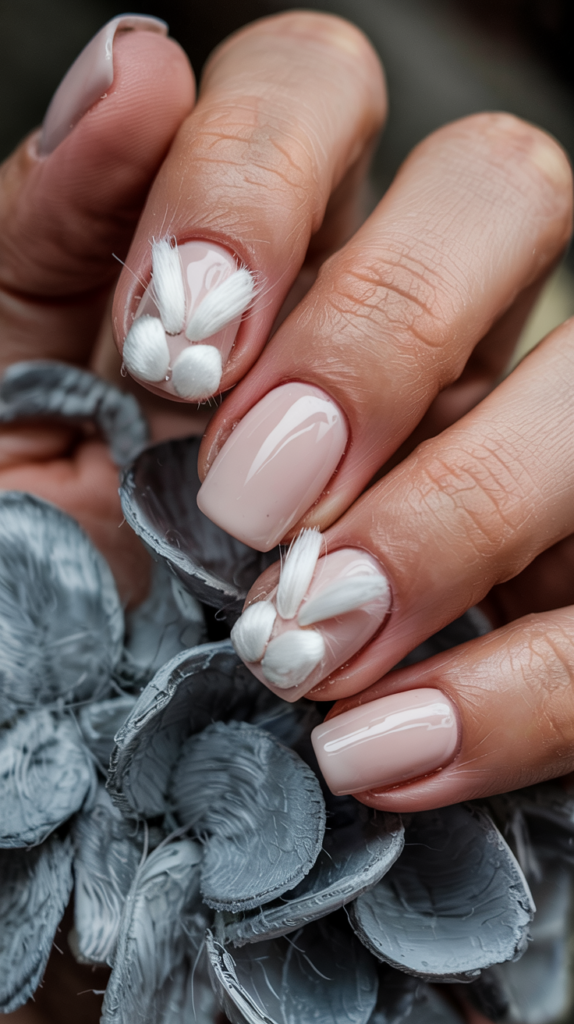
Add a touch of texture and unexpected whimsy to your Easter manicure with Mini Bunny Tails.
This cute and tactile design features adorable fuzzy accents on a clean background.
Design Features
This look typically starts with a simple, clean base, often a nude, pale pink, or white polish, to keep the focus on the accent.
The standout feature is a small, fuzzy white pom-pom attached to one or more nails, usually near the cuticle or center, representing a fluffy bunny tail.
The pom-pom is usually made from soft flocking powder, velvet texture polish, or a tiny pre-made craft pom-pom.
The contrast between the smooth nail polish and the soft, fuzzy tail creates a delightful textural and visual surprise.
How To Achieve This Look
Apply your base coat and chosen nude or pastel base color, letting it dry completely.
Decide where you want to place the bunny tail accent.
If using flocking powder or velvet texture, apply a dot of wet polish or nail glue in that spot and dip the nail into the powder, or sprinkle it over the spot, gently pressing it down.
If using a pre-made mini pom-pom, attach it securely with a strong nail glue, then apply top coat carefully around the pom-pom, not over it, to maintain its texture.
Why This Stands Out
Mini Bunny Tails stand out due to their unique 3D texture and playful concept.
The unexpected fuzzy element adds a tactile dimension that is both cute and surprising, making the manicure interactive.
This design is perfect for those who love incorporating unique textures and 3D elements into their nail art.
It is a minimalist yet highly effective way to represent the Easter bunny theme in a charming and memorable way.
Floral Bunny Crowns
Combine the sweetness of bunnies with the beauty of spring blooms in the Floral Bunny Crowns design.
This romantic and whimsical look features adorable bunnies adorned with delicate flower crowns.
Design Features
This design usually features a soft pastel gradient or a solid pastel background, creating a dreamy canvas.
The main element is the depiction of cute bunny heads, often just simple outlines or silhouettes.
Adorning the bunnies’ heads are tiny, intricate floral crowns composed of miniature flowers and leaves, painted in contrasting pastel or bright colors.
The overall effect is incredibly sweet, romantic, and perfectly captures the essence of spring fantasy.
How To Achieve This Look
Create your pastel gradient background using a sponge, or apply your chosen solid pastel base color after the base coat.
Once dry, use a fine nail art brush to paint the bunny head outlines or silhouettes in white or a light color.
Using very fine brushes and various colors, meticulously paint tiny dots and strokes above the bunny heads to form the floral crowns, adding small green leaves for detail.
Seal this intricate and charming design with a glossy top coat.
Why This Stands Out
Floral Bunny Crowns stand out for their enchanting combination of two beloved spring themes – bunnies and flowers – in a uniquely artistic way.
The delicate floral crowns add a touch of intricate beauty and whimsy to the cute bunny motif.
This design is perfect for those who love detailed, romantic nail art and want a look that feels magical and celebratory of spring’s beauty.
It is feminine, sweet, and showcases artistic skill.
Cotton Candy Clouds
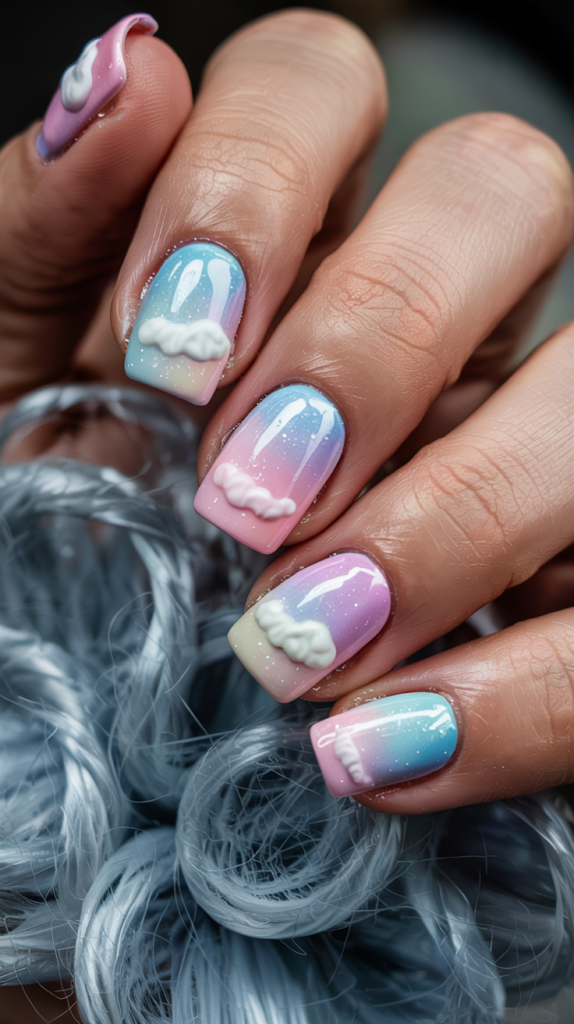
Float away on a dreamy cloud of sweetness with the Cotton Candy Clouds nail design.
This ethereal look blends soft pastels and subtle sparkle for a manicure that is light, airy, and magical.
Design Features
The base of this design is a soft, blended ombré effect using classic cotton candy colors – pastel pink and baby blue, sometimes with touches of lilac or white.
The blending is seamless and cloud-like, creating a soft, airy background.
Subtle sparkle is often incorporated through a sheer glitter top coat or by mixing fine iridescent glitter into the pastel polishes.
Additionally, soft, fluffy white cloud shapes may be delicately painted over the gradient background to enhance the dreamy sky aesthetic.
How To Achieve This Look
Apply a base coat, then use a makeup sponge to create the soft pink and blue ombré gradient, dabbing gently until the colors blend seamlessly.
Allow this to dry fully.
If desired, apply a thin layer of sheer iridescent glitter polish over the gradient.
Use a fine brush or sponge and white polish to create soft, fluffy cloud shapes, blending the edges slightly for a more natural look, then finish with a glossy top coat.
Why This Stands Out
Cotton Candy Clouds stand out for their dreamy, ethereal quality and beautiful soft color blend.
The subtle sparkle and cloud art enhance the magical, airy feel, making it a truly enchanting spring manicure.
This design is ideal for those who love soft pastels, gradient effects, and a touch of subtle magic in their nail art.
It is calming, pretty, and versatile enough to wear throughout the spring season.
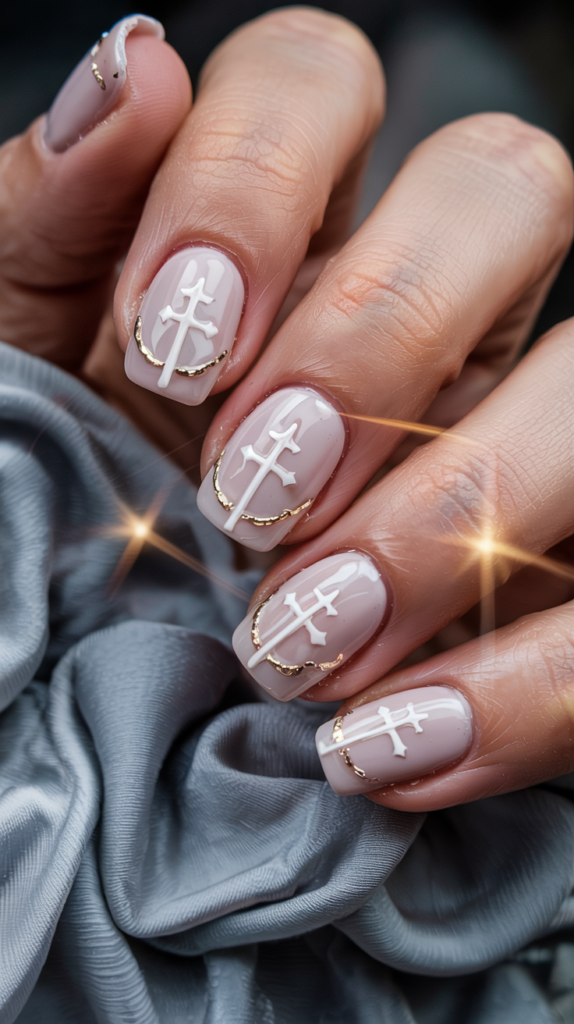
Holy Grail Gold Tips

For an Easter manicure that is both spiritually significant and exceptionally glamorous, consider Holy Grail Gold Tips.
This design combines religious symbolism with luxurious metallic accents on a clear base.
Design Features
This striking design typically features a clear or very sheer nude base, creating a modern, ‘negative space’ look.
The main focus is on ornate golden crosses, meticulously painted or applied as decals or charms, often near the tips or center of the nail.
Tiny gold rhinestones or studs may be added near the crosses or along the tip line for extra sparkle and opulence.
The use of gold against the clear base creates a look that feels both sacred and highly luxurious, reminiscent of holy artifacts.
How To Achieve This Look
Apply a clear base coat and potentially a very sheer nude polish for a clean foundation.
Using a fine brush and metallic gold polish or gold striping tape, carefully create ornate cross shapes on each nail or select accent nails.
Alternatively, apply gold cross nail charms or decals using nail glue or a sticky base coat.
Add tiny gold rhinestones near the crosses using nail glue and a wax pencil for precise placement, then seal everything carefully with a glossy top coat.
Why This Stands Out
Holy Grail Gold Tips stand out for their bold combination of religious symbolism and high-fashion glamour.
The use of ornate gold elements on a clear base creates a striking, luxurious, and meaningful statement.
This design is perfect for those wanting to express their faith during Easter in a sophisticated and glamorous way.
It merges spiritual significance with a modern, opulent aesthetic beautifully.
Spring Meadow Magic
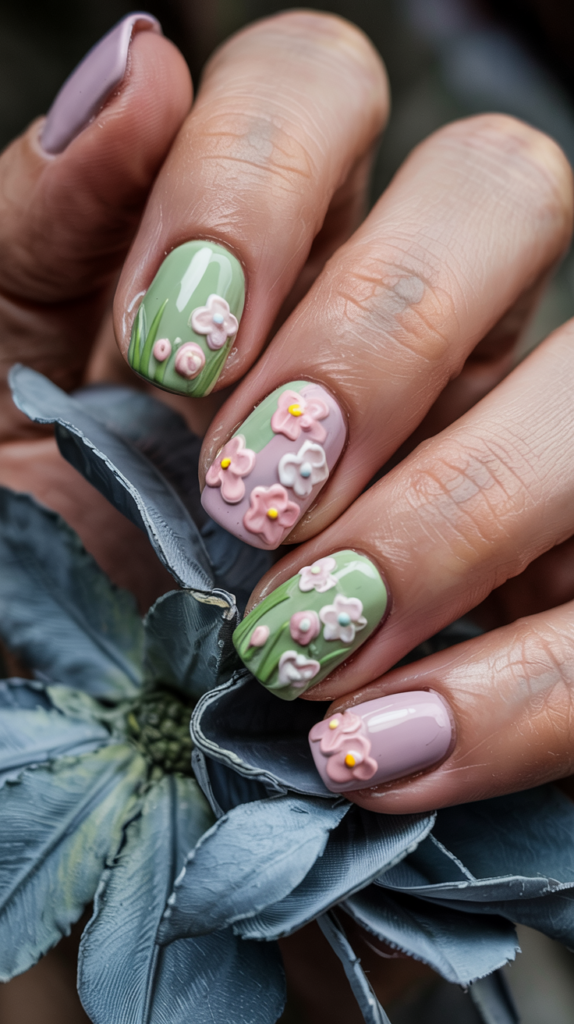
Capture the vibrant life of a spring meadow bursting into bloom with this enchanting nail design.
Spring Meadow Magic is filled with tiny details that evoke the freshness and hidden wonders of the season.
Design Features
The base of this design is typically a bright spring green or a sky blue, representing grass or the sky.
The nails are adorned with miniature wildflowers in various colors – pink, yellow, purple, white – painted as tiny dots or simple petal shapes.
Thin blades of grass are often painted rising from the cuticle or scattered across the nail.
Adding to the Easter theme, tiny speckled eggs might be hidden amongst the grass and flowers, creating a miniature egg hunt scene on your fingertips.
How To Achieve This Look
Apply your base coat and chosen green or blue background color.
Using fine dotting tools and brushes, paint tiny colorful dots or simple flower shapes across the nails.
Use a fine brush and a darker green to paint thin, upward strokes for blades of grass.
Add tiny oval shapes in pastel colors with brown or black speckles for the hidden eggs, then seal the detailed meadow scene with a glossy top coat.
Why This Stands Out
Spring Meadow Magic stands out for its intricate detail and celebration of burgeoning spring life.
The combination of wildflowers, grass, and hidden eggs creates a vibrant and playful miniature landscape on the nails.
This design is perfect for nature lovers and those who appreciate detailed nail art.
It beautifully captures the essence of spring renewal and the fun of Easter egg hunts in a charming, artistic way.
Holographic Easter Delight
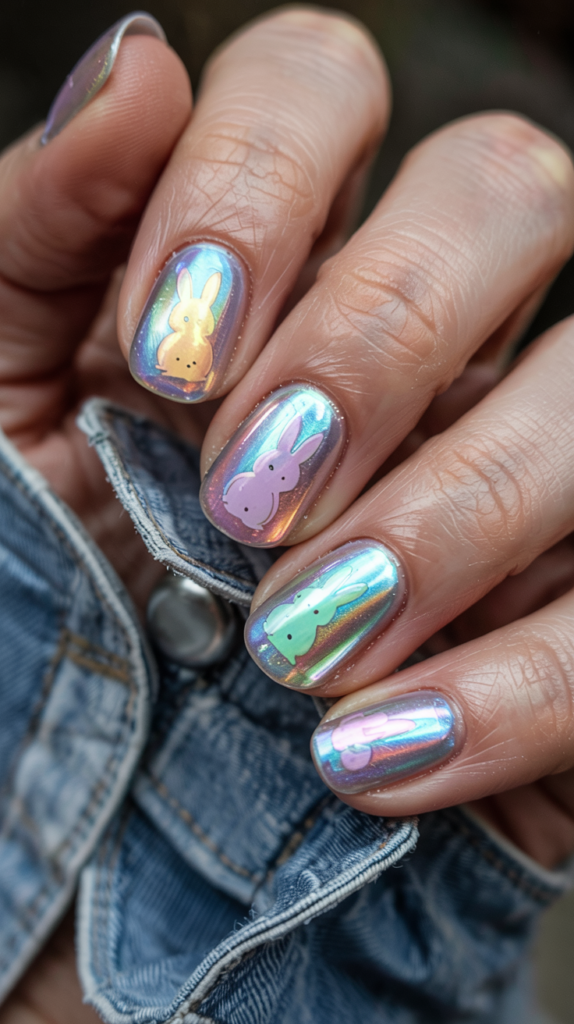
Combine the futuristic shimmer of holographic polish with delicate Easter motifs for a truly delightful and eye-catching manicure.
Holographic Easter Delight is both trendy and festive.
Design Features
The foundation of this look is a stunning rainbow holographic nail polish, which shifts and reflects a spectrum of colors under light.
This mesmerizing base provides a magical backdrop for the Easter elements.
Over the holographic polish, delicate Easter-themed nail stickers or decals are applied.
These could include small white bunnies, tiny chicks, pastel eggs, or simple spring flowers, creating a subtle contrast against the dazzling background.
How To Achieve This Look
Apply a base coat, followed by two to three coats of your chosen holographic nail polish, ensuring each coat is dry for maximum holographic effect.
A peel-off base coat can be helpful as holographic polishes can sometimes be difficult to remove.
Once the holographic polish is completely dry, carefully apply small, delicate Easter-themed nail stickers using tweezers.
Gently press the stickers down to ensure they adhere smoothly, then seal the entire design with a glossy top coat, applying it carefully over the stickers.
Why This Stands Out
Holographic Easter Delight stands out for its dazzling, color-shifting base combined with cute, subtle Easter details.
It merges the high-impact trend of holographic nails with the sweetness of the holiday theme for a unique and modern look.
This design is perfect for those who love holographic finishes and want a festive manicure that feels contemporary and magical.
The contrast between the flashy base and delicate stickers is captivating.
Bunny Balloon Nails

Let your Easter spirit soar with Bunny Balloon Nails, a whimsical and imaginative design.
This look features adorable bunny-shaped balloons floating against a dreamy sky background.
Design Features
The background for this design is typically a soft sky blue, possibly with subtle white clouds painted on.
The main feature is illustrations of bunny-shaped balloons, often in white or soft pastel colors like pink or grey.
Thin strings are shown trailing down from the balloons, giving the illusion that they are floating upwards.
The overall effect is lighthearted, dreamy, and full of playful imagination.
How To Achieve This Look
Apply your base coat and two coats of a soft sky blue polish.
You can add soft white cloud shapes using a sponge or brush while the blue is slightly wet, or after it dries.
Using a fine brush and white or pastel polish, paint the outlines of bunny heads for the balloons.
Fill them in, then use a very fine brush and black or grey polish to draw thin lines trailing down from the base of each bunny balloon, finishing with a glossy top coat.
Why This Stands Out
Bunny Balloon Nails stand out for their unique and imaginative concept, transforming the familiar bunny motif into something whimsical and airy.
The visual of floating balloons creates a sense of lightness and childlike wonder.
This design is perfect for those who enjoy creative, storybook-style nail art and want a look that is both cute and unconventional for Easter.
It is playful, dreamy, and sure to capture attention.
Marshmallow Matte Nails

Embrace the soft, powdery texture of marshmallows with this sweet and tactile Easter manicure.
Marshmallow Matte Nails combine gentle pastels with cute bunny art for a truly adorable finish.
Design Features
This design features nail polish in soft pastel shades – think marshmallow pink, baby blue, pale yellow, and mint green – finished with a velvety matte top coat.
The matte finish gives the nails a soft, almost edible appearance, reminiscent of sugary treats.
Adding to the cuteness, mini bunny face art is often included on accent nails.
This typically involves simple black dots for eyes, a tiny pink nose, and perhaps subtle white whiskers, complementing the soft matte texture.
How To Achieve This Look
Apply your base coat and two coats of your chosen soft pastel polish.
Allow the color coats to dry completely.
Using a fine dotting tool or brush, add the mini bunny face details on one or two accent nails per hand.
Once the details are dry, apply a matte top coat over all nails to achieve the signature soft, non-glossy finish.
Why This Stands Out
Marshmallow Matte Nails stand out for their appealing soft matte texture combined with classic Easter pastels and cute bunny faces.
The matte finish offers a sophisticated twist on sweet colors and motifs.
This design is ideal for those who love pastel colors but prefer a matte finish over high shine.
It feels soft, modern, and irresistibly cute, perfectly capturing a gentle Easter aesthetic.
Crystal Egg Accents

Add a touch of dazzling glamour to your Easter manicure with Crystal Egg Accents.
This design uses 3D rhinestones to create sparkling, jewel-encrusted egg shapes on your nails.
Design Features
This luxurious look often features a base of glossy solid color polish (like a pastel or a metallic chrome) or a more intricate background like an ombré.
The main attraction is an accent nail decorated to resemble a Fabergé egg using 3D rhinestones or crystals.
Small, colorful rhinestones are meticulously arranged in an oval egg shape, sometimes with intricate patterns or borders created using smaller crystals or metallic striping tape.
The result is a highly glamorous and dimensional Easter statement.
How To Achieve This Look
Apply your base coat and chosen background polish (glossy or chrome works well) and let it dry completely.
On your chosen accent nail, apply nail glue or a thick gel top coat in an oval egg shape.
Using a wax pencil or rhinestone picker tool, carefully place small, colorful rhinestones onto the glue or gel, arranging them in your desired pattern within the egg shape.
Cure if using gel, let glue dry, then carefully apply a top coat around the edges of the rhinestone egg to secure it without dulling the sparkle.
Why This Stands Out
Crystal Egg Accents stand out for their sheer glamour and luxurious 3D detail.
The sparkling rhinestones create a dazzling focal point that elevates the Easter egg theme to a high-fashion statement.
This design is perfect for special Easter events or for anyone who loves bling and wants a truly show-stopping manicure.
It is opulent, intricate, and transforms the nail into a miniature work of art.
Bunnies And Bows
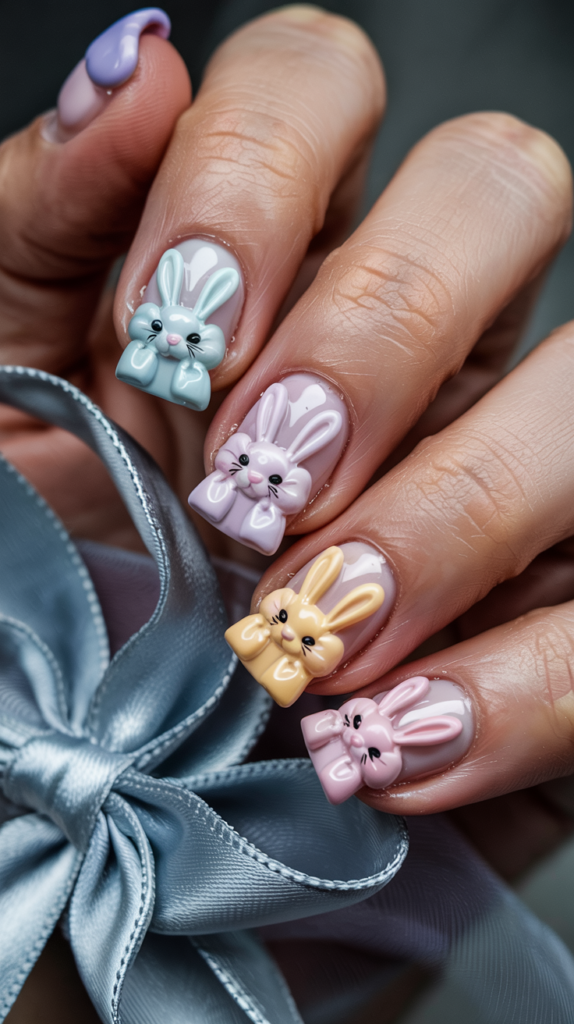
Tie your Easter look together with the adorable Bunnies and Bows nail design.
This ultra-feminine manicure combines cute bunny faces with sweet bow accents for a charmingly coordinated look.
Design Features
This design features a mix of cute bunny faces, similar to those in the Marshmallow Matte or Chick Flick styles, often painted on a pastel background.
Complementing the bunnies are illustrations of small, delicate bows, typically in coordinating pastel colors like pink, blue, or lavender.
To literally “tie” the look together, thin lines representing ribbons might be painted across the nails using polish or metallic striping tape, sometimes appearing to connect the bunnies and bows.
The overall aesthetic is sweet, girly, and cohesively themed.
How To Achieve This Look
Apply your base coat and pastel background color.
Paint simple bunny faces on some nails using fine brushes and dotting tools.
On other nails, paint small bow shapes.
Use striping tape or a fine brush to add thin “ribbon” lines across the nails if desired, connecting or framing the elements, then finish with a glossy top coat for a polished look.
Why This Stands Out
Bunnies and Bows stands out for its overtly feminine and coordinated charm, combining two universally cute motifs.
The addition of ribbon-like lines enhances the cohesive, gift-wrapped feel of the design.
This manicure is perfect for those who love girly aesthetics and want a sweet, detailed, and undeniably adorable Easter look.
It is playful, pretty, and full of charming details.
Storybook Easter

Bring the magic of classic children’s Easter stories to your fingertips with this whimsical nail design.
Storybook Easter features hand-drawn illustrations reminiscent of vintage picture books.
Design Features
This artistic design transforms nails into miniature pages from a beloved Easter storybook.
It features hand-drawn illustrations of classic Easter characters like bunnies in waistcoats, chicks in bonnets, lambs, or decorated eggs, rendered in a soft, vintage style.
The backgrounds might be simple pastels or feature subtle details like grassy knolls or floral borders, typical of classic illustrations.
The lines may be slightly soft or sketch-like, enhancing the storybook feel.
How To Achieve This Look
This look requires significant artistic skill or the use of detailed nail stickers or water decals mimicking storybook illustrations.
If hand-painting, start with a base coat and a soft background color.
Using very fine brushes and multiple colors, carefully paint the chosen storybook characters and scenes, paying attention to vintage illustration styles (soft lines, muted colors).
Seal the detailed artwork with a top coat, perhaps opting for a satin or matte finish to enhance the vintage paper feel.
Why This Stands Out
Storybook Easter stands out for its unique artistic style and nostalgic charm, evoking the warmth and magic of childhood Easter memories.
The detailed, hand-drawn look makes it feel personal and special.
This design is perfect for those who appreciate intricate artistry and want a truly unique, conversation-starting manicure with a touch of vintage whimsy.
It is imaginative, detailed, and deeply nostalgic.
Pastel Negative Space Nails
Combine modern minimalism with soft spring colors in the Pastel Negative Space nail design.
This chic look uses geometric cutouts and delicate accents for a contemporary Easter feel.
Design Features
This design utilizes negative space – areas of the bare nail left intentionally unpolished – as a key element.
Geometric shapes, stripes, or cutouts are created using nail vinyls or freehand painting, revealing the natural nail underneath.
The polished areas feature soft pastel shades, often used in color-blocking or geometric patterns.
Delicate accents like small pieces of metallic foil flakes (gold or silver) or tiny dots might be added within the pastel sections or along the edges of the negative space for a touch of subtle detail.
How To Achieve This Look
Apply a clear base coat.
Use thin nail art tape or vinyls to mask off the areas you want to remain as negative space, creating geometric shapes or cutouts.
Paint over the exposed areas with your chosen pastel polishes, applying two coats for opacity.
While the polish is still slightly wet, carefully remove the tape or vinyls to reveal the clean negative space lines, then add foil flakes or dots if desired, finishing with a glossy top coat.
Why This Stands Out
Pastel Negative Space Nails stand out for their modern, minimalist aesthetic combined with soft seasonal colors.
The use of negative space creates a chic, airy look that feels contemporary and sophisticated.
This design is perfect for those who prefer minimalist nail art but still want to incorporate Easter pastels.
It is elegant, understated, and offers a trendy way to celebrate the season.
Choco Bunny Nails
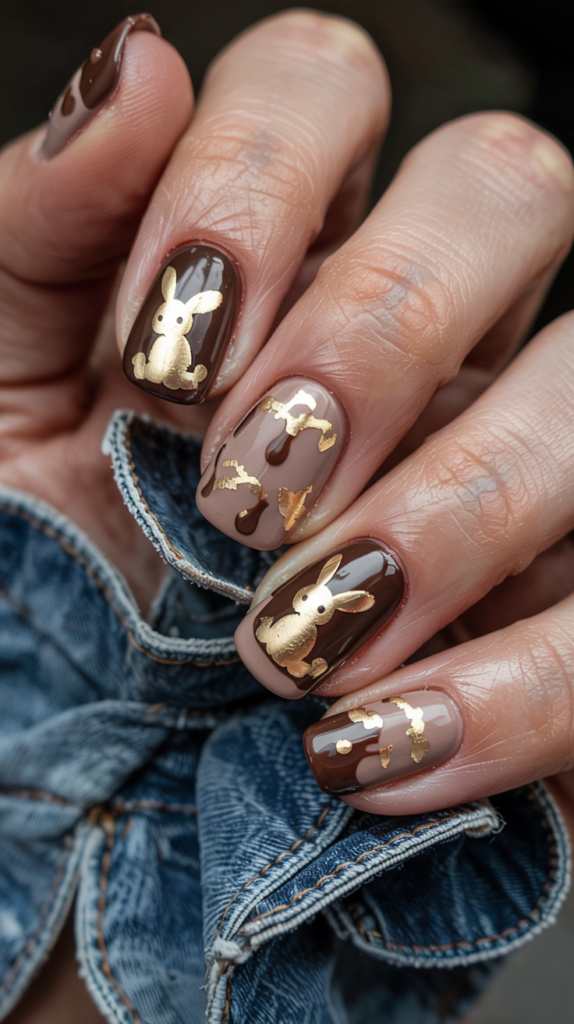
Indulge your sweet tooth with Choco Bunny Nails, a delicious-looking design inspired by chocolate Easter bunnies.
This manicure uses rich brown tones and metallic accents for a unique and tempting look.
Design Features
The base color for this design is a rich chocolate brown polish, mimicking the appearance of milk or dark chocolate.
The key motif is the silhouette of an Easter bunny, often painted or stamped in a contrasting color like white, pink, or metallic gold.
To enhance the “chocolate bunny wrapped in foil” effect, accents of metallic gold foil are often added, perhaps just at the tips, around the bunny silhouette, or covering an entire accent nail.
The finish is typically glossy to give the “chocolate” a luscious shine.
How To Achieve This Look
Apply a base coat followed by two coats of a rich chocolate brown polish.
Let it dry completely.
Using a fine brush, stamping plate, or nail sticker, add the bunny silhouette in your chosen contrasting color (gold looks particularly effective).
Apply small pieces of gold foil onto slightly tacky polish or using foil glue, concentrating them strategically, then seal with a high-shine top coat.
Why This Stands Out
Choco Bunny Nails stand out for their unique and appetizing theme, cleverly translating a favorite Easter treat into nail art.
The combination of rich brown and metallic gold is luxurious and unexpected for an Easter manicure.
This design is perfect for chocolate lovers and those looking for a non-pastel Easter theme that still feels festive and indulgent.
It is sophisticated, unique, and looks good enough to eat.
Mini Egg Mosaic
Recreate the iconic look of Cadbury Mini Eggs with this detailed and colorful mosaic nail design.
Mini Egg Mosaic uses dotting techniques to mimic the speckled candy shells.
Design Features
This design features a base color resembling the shell of a Mini Egg, often a pale pastel like pink, blue, yellow, or lilac.
The key feature is the mosaic or speckled effect created using small dots of contrasting colors, particularly brown or black, scattered randomly over the base.
Each nail can feature a different pastel base color, or they can all be uniform.
The dots are applied unevenly in size and placement to perfectly replicate the distinctive look of the popular Easter candy.
How To Achieve This Look
Apply your base coat and chosen pastel base color(s), using two coats for opacity.
Once dry, use a small dotting tool or the tip of a toothpick dipped in dark brown or black polish.
Carefully apply small, irregular dots and specks over the pastel base, varying the size and pressure to mimic the natural speckling of Mini Eggs.
Finish with a glossy top coat to seal the design and give it a candy-like shine.
Why This Stands Out
Mini Egg Mosaic stands out for its incredibly accurate and charming replication of a beloved Easter candy.
The detailed speckled effect is instantly recognizable and visually interesting.
This design is perfect for fans of Mini Eggs and those who appreciate detailed, novelty nail art.
It is colorful, playful, and a sweet tribute to a classic Easter treat.
Bunny Ears Peekaboo
Add a subtle and playful hint of Easter to your manicure with the Bunny Ears Peekaboo design.
This look features cute bunny ears subtly emerging from the edges of the nail.
Design Features
This minimalist design often uses a simple base color, such as nude, pale pink, or even a clear coat.
The charming detail lies in small white bunny ears “peeking” out from the base or the sides of the nail.
The ears are typically just simple white outlines or solid shapes, positioned near the cuticle or along one side edge.
The effect is subtle, cute, and feels like a little Easter surprise hiding on your nails.
How To Achieve This Look
Apply your base coat and chosen base color (or just the base coat for a clear look).
Let it dry completely.
Using a fine nail art brush and white polish, carefully paint two small, elongated U-shapes peeking up from the cuticle line or emerging from one side of the nail bed on each nail or select accent nails.
Keep the design minimal and finish with a clear top coat.
Why This Stands Out
Bunny Ears Peekaboo stands out for its subtlety and minimalist charm, offering a very understated way to incorporate an Easter motif.
The peekaboo effect is playful and adds a touch of unexpected cuteness.
This design is perfect for those who prefer minimal nail art or need a work-appropriate manicure that still has a touch of festive spirit.
It is simple, sweet, and cleverly designed.
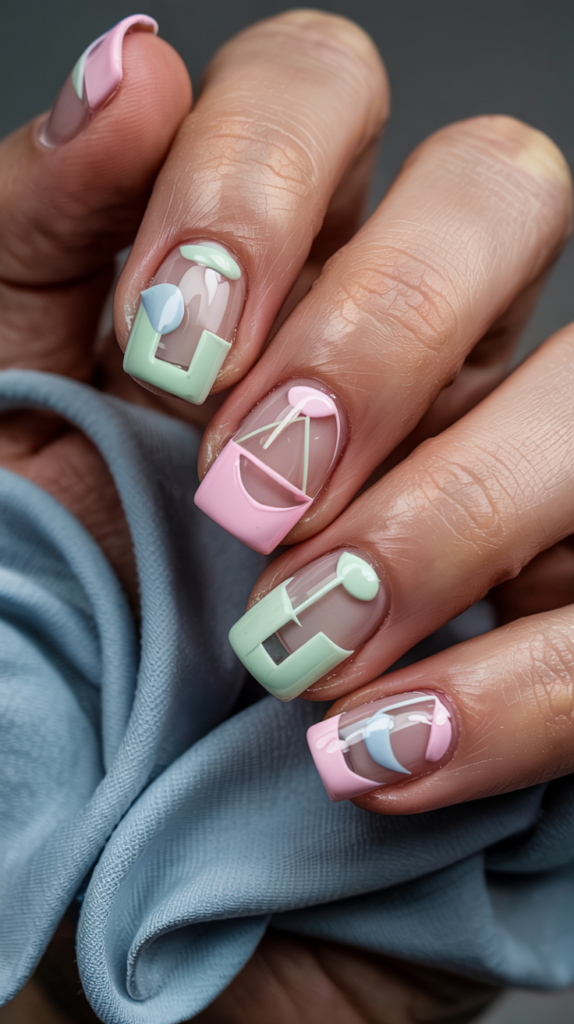
Easter Brunch Nails

Celebrate the culinary delights of the holiday with Easter Brunch Nails, a quirky and adorable design featuring breakfast motifs.
This look is fun, unique, and perfect for foodie celebrations.
Design Features
This imaginative design showcases miniature illustrations of popular brunch items, often with a pastel Easter twist.
Motifs can include tiny stacks of pancakes with syrup, fried eggs (sunny-side up!), waffles, pastel-colored coffee mugs, or even tiny croissants.
These cute food illustrations are typically painted over a simple white, nude, or pastel background.
The overall aesthetic is quirky, playful, and adorably appetizing.
How To Achieve This Look
Apply your base coat and chosen background color.
Using fine nail art brushes and various polish colors (yellow for eggs, brown for pancakes/waffles/coffee, pastels for mugs), carefully paint the miniature brunch motifs on each nail or as accents.
Add details like white for egg whites, dark brown for syrup or coffee, and perhaps tiny fruit accents.
This design requires patience and some artistic skill, or you could use pre-made brunch-themed nail stickers, then seal with a glossy top coat.
Why This Stands Out
Easter Brunch Nails stand out for their highly unique and quirky theme, celebrating the social and culinary aspects of the holiday.
The miniature food illustrations are unexpected, adorable, and full of personality.
This design is perfect for foodies, those with a quirky sense of humor, and anyone looking for a truly unconventional and conversation-starting Easter manicure.
It is fun, creative, and deliciously cute.
Conclusion
As we conclude this extensive journey through thirty-five diverse and delightful Easter nail art ideas, it is clear that the possibilities for festive fingertips are nearly endless.
There is a design to match every personality, style preference, and occasion this spring season.
From the timeless charm of Blooming Bunny Nails and the sophisticated Speckled Egg Chic to the vibrant Hoppy Daze Nails and the luxurious Golden Egg Glam, each concept offers a unique way to celebrate.
Whether you prefer playful characters, elegant patterns, modern finishes, or meaningful symbols, you can find inspiration to express your Easter spirit through your manicure.
We hope this guide has sparked your creativity and encouraged you to try one of these beautiful designs, or perhaps mix and match elements to create your very own unique Easter look.
May your nails be as bright and cheerful as the season itself.
Wishing you a very Happy Easter filled with joy, color, and beautifully manicured hands to welcome the spring of 2025!