Introduction
The holiday season is the perfect time to get creative with your nail art and embrace the festive spirit.
Whether you prefer classic red and gold designs, playful themes like candy canes and Santa suits, or elegant options inspired by winter wonderlands, there’s something for everyone to love.
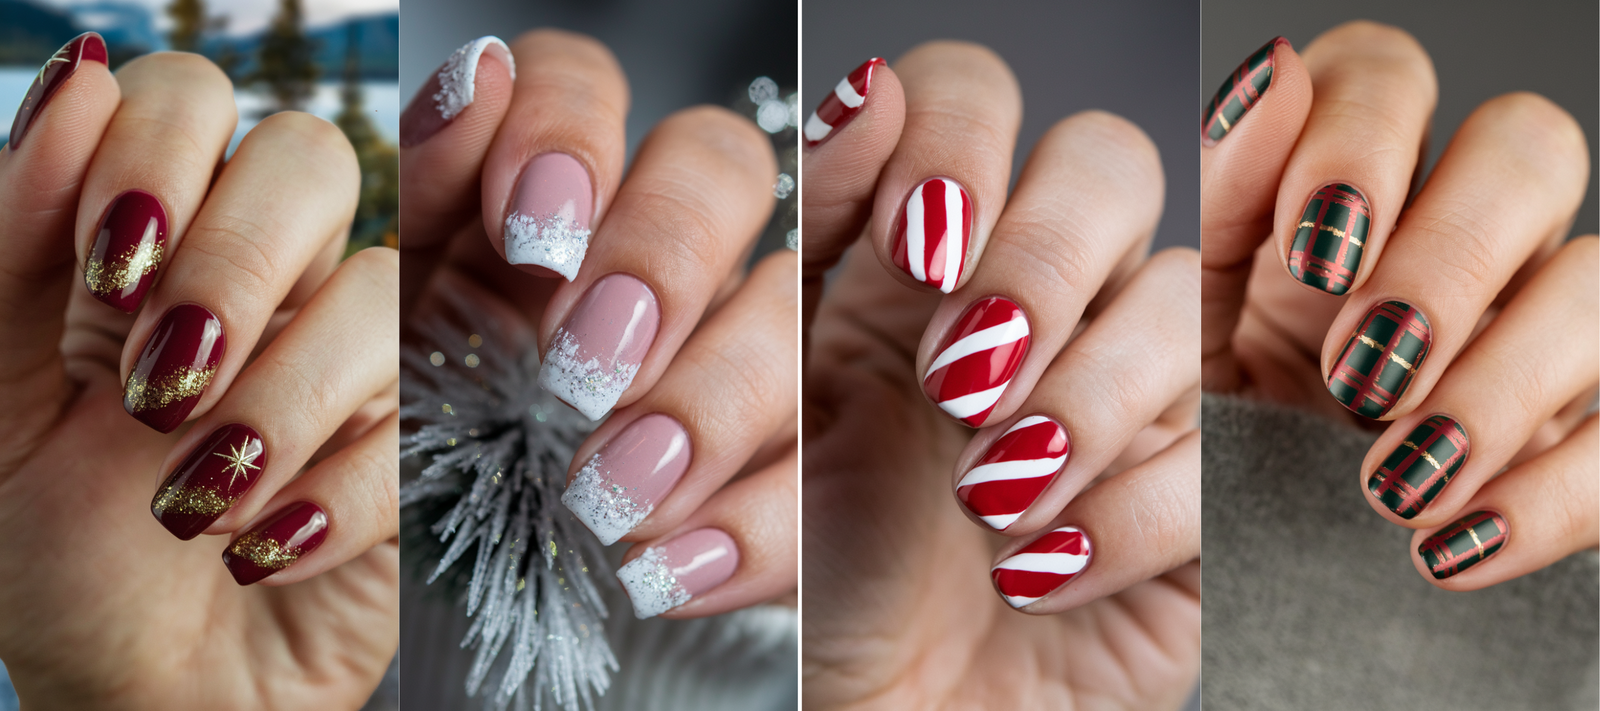
In this blog post, we’ll explore 35 stunning Christmas nail art ideas that are sure to inspire you and make your nails the highlight of every holiday celebration.
From intricate snowflake patterns to luxurious, gold-accented looks, get ready to elevate your holiday manicure game with these detailed and eye-catching designs.
Classic Red And Gold Nail Art
Why Red And Gold Are Timeless Holiday Colors
Red and gold have become synonymous with the holiday season, symbolizing warmth, joy, and festive cheer.
Red embodies passion, energy, and the classic holiday spirit, reminiscent of Santa’s suit and warm, crackling fires.
Gold, on the other hand, exudes luxury, prosperity, and the sparkle of Christmas decorations.
Together, they create a timeless palette that captures the magic of the holidays.
These colors have deep cultural significance, transcending generations as a go-to combination for holiday decor, fashion, and nail art.
Red and gold nails instantly elevate any holiday outfit, adding sophistication and festive flair.
How To Achieve The Perfect Gold Glitter Gradient
Achieving the perfect gold glitter gradient requires precision and the right tools.
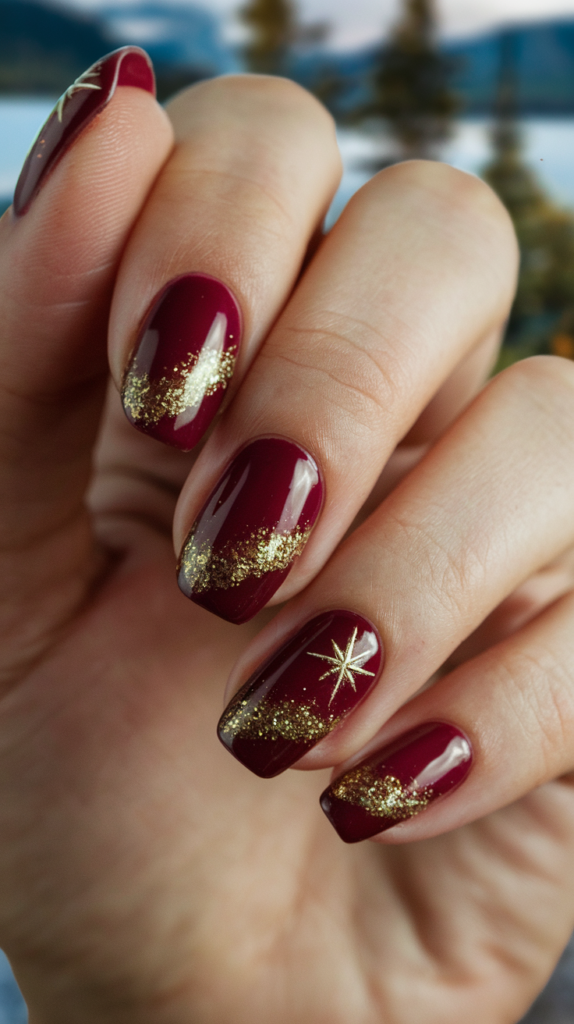
Start with a rich, glossy red base.
Apply two coats, allowing each to dry thoroughly.
To create the gradient, use a dense gold glitter polish and a makeup sponge.
Dab the glitter onto the nail tips, gradually building up intensity.
The key is to make the transition smooth, so the glitter fades subtly from the tip to the middle of the nail.
Finish with a high-gloss topcoat to lock in the design and add extra shine, ensuring the gradient sparkles in every light.
Adding Tiny Gold Stars For A Festive Touch
To complete the classic red and gold design, add tiny gold stars for a festive touch.
Use a fine detailing brush or nail art stickers to apply the stars near the base or tip of each nail.
Place them strategically, ensuring they catch the light without overwhelming the overall look.
The stars should contrast beautifully against the red base and complement the glitter gradient.
Seal the design with a clear topcoat, which will not only enhance the shine but also protect the tiny star accents from chipping or fading.
Snowflake Sparkle Nails
Choosing The Right Base Color: Light Blue Vs. White
Choosing between light blue and white as a base color depends on the look you want to achieve.
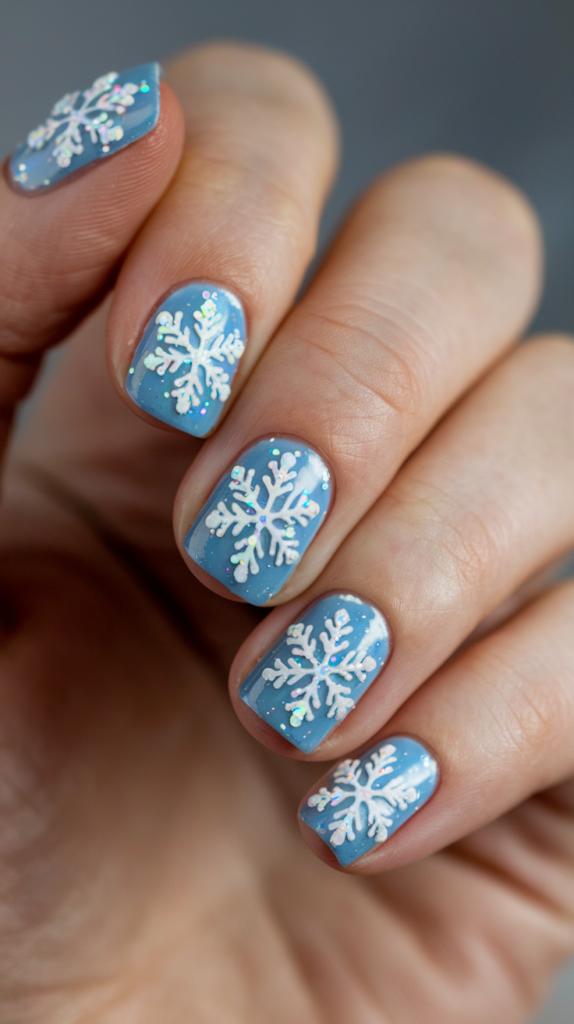
Light blue creates a dreamy, icy effect, reminiscent of clear winter skies.
It pairs beautifully with white snowflakes and iridescent glitter, giving a soft and ethereal vibe.
White, on the other hand, offers a crisp, clean canvas, allowing intricate snowflake designs to stand out boldly.
A white base creates a classic winter wonderland look, perfect for a more traditional holiday feel.
Both options are stunning, but consider your skin tone and desired effect when making your choice.
Tips For Painting Intricate Snowflakes
Painting intricate snowflakes requires a steady hand and attention to detail.
Start with a thin nail art brush or a fine-tipped dotting tool.
Use white nail polish for snowflakes on a blue base or a contrasting color if you’ve chosen a white base.
Begin by creating a central dot, then draw straight lines radiating outward to form the snowflake’s main structure.
Add small V-shaped branches along each line, mimicking the delicate structure of real snowflakes.
Practice on a piece of paper if needed, and don’t be afraid to experiment with different snowflake patterns for variety.
Using Iridescent Glitter For A Magical Snowy Effect
Iridescent glitter adds a magical, snowy effect to your nail design.
Lightly sprinkle the glitter over the entire nail or focus on the tips for a frosted look.
The glitter should shimmer and change colors in different lighting, resembling the sparkle of fresh snow.
Apply the glitter while the base polish is still wet, pressing it gently into place.
Once dry, seal the design with a topcoat to ensure the glitter stays put and to create a smooth, glossy finish.
The iridescent touch will make your snowflake design come alive, perfect for holiday parties or cozy winter nights.
Candy Cane Stripes Nail Design
Getting Clean, Crisp Red And White Stripes
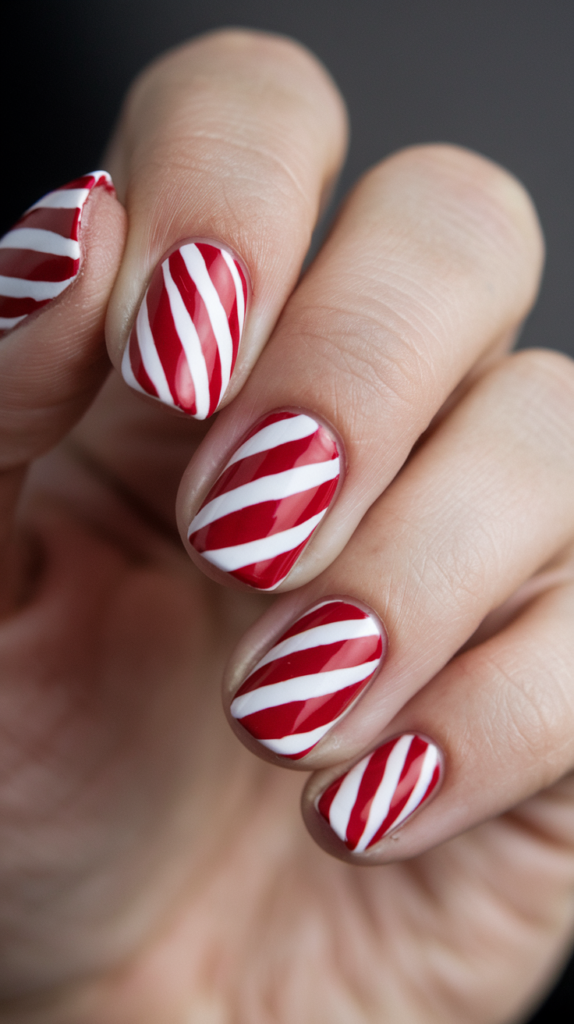
Candy cane stripes are all about precision.
Start with a bright white base, applying two coats for full opacity.
Allow the polish to dry completely before adding the red stripes.
Use striping tape or a thin nail art brush to create even, diagonal lines across each nail.
The key is to maintain equal spacing between each stripe for a uniform look.
Once you’ve painted the red lines, carefully remove the tape while the polish is still wet.
This ensures crisp, clean edges.
Finish with a glossy topcoat to smooth out the surface and add shine.
Tools And Techniques For Perfect Stripes
Using the right tools is crucial for achieving perfect candy cane stripes.
Striping tape is a game-changer, helping to guide your lines and prevent smudging.
If you prefer freehand painting, invest in a high-quality, fine-tipped nail art brush.
Steady your hand by resting your arm on a flat surface, and use short, controlled strokes.
Practice makes perfect, so don’t get discouraged if your first attempt isn’t flawless.
A nail art corrector pen can help clean up any mistakes.
Finally, patience is key—allow each layer to dry before moving on to the next.
Variations To Try With Candy Cane Patterns
While classic red and white stripes are a holiday favorite, there are many variations you can try to mix things up.
Experiment with metallic gold or silver stripes for a more luxurious look.
Add a touch of glitter to the red polish for extra sparkle, or incorporate green stripes for a traditional holiday color scheme.
You can also create an accent nail with a candy cane design, while the rest feature solid colors or subtle glitter.
The possibilities are endless, allowing you to customize your candy cane nail art to match your holiday outfit or mood.
Santa Suit Nail Art
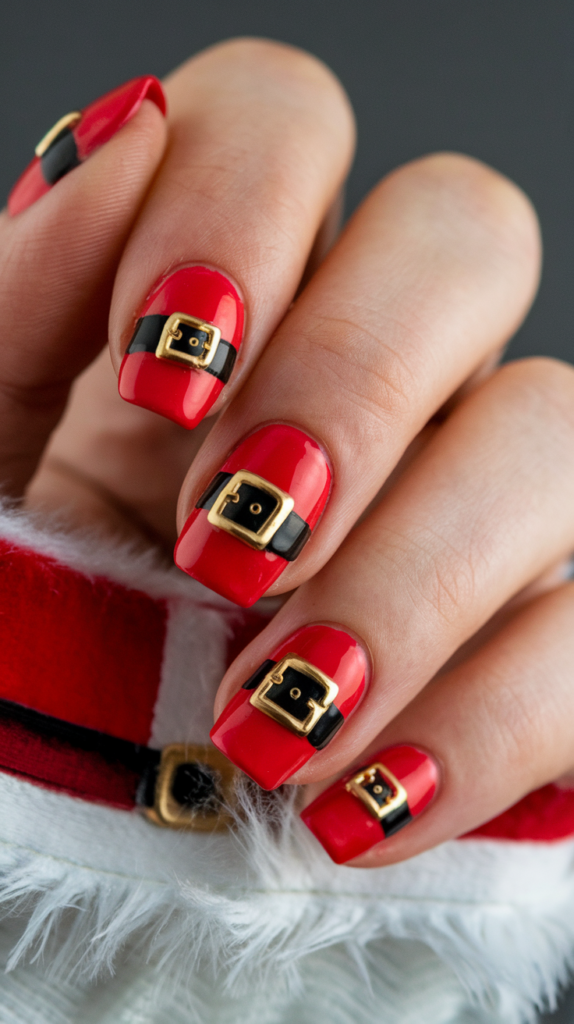
Creating A Bold Red Base
The foundation of Santa suit nail art is a bold red base.
Choose a rich, festive red polish with a glossy finish for maximum impact.
Apply two even coats, allowing each to dry thoroughly.
The color should be vibrant and opaque, capturing the essence of Santa’s iconic suit.
If you prefer a more textured look, consider using a red polish with subtle shimmer or metallic undertones.
The key is to make the red pop, as it serves as the backdrop for the rest of your Santa suit design.
Designing The Black Belt With A Gold Buckle
Santa’s belt is a crucial element of the design.
Use black nail polish to create a horizontal stripe across the middle of each nail, representing the belt.
A striping brush will help you achieve a straight, even line.
For the gold buckle, use a metallic gold polish and a fine detailing brush to paint a small, square outline in the center of the belt.
The buckle should be neat and symmetrical, adding a touch of holiday sparkle.
Once dry, seal the design with a topcoat to keep the colors vivid and prevent chipping.
Adding Fluffy White Trim For Extra Detail
To complete the Santa suit look, add fluffy white trim to the tips or base of each nail.
Use a white textured polish or a dotting tool to create the illusion of fur.
The trim should be slightly raised, giving the design a 3D effect.
If you’re feeling adventurous, add small, fluffy pom-poms on an accent nail to mimic Santa’s hat.
The white trim adds a playful touch and makes the design instantly recognizable.
Finish with a glossy or matte topcoat, depending on your preference, to protect the details and add the final polish.
Plaid Christmas Nails
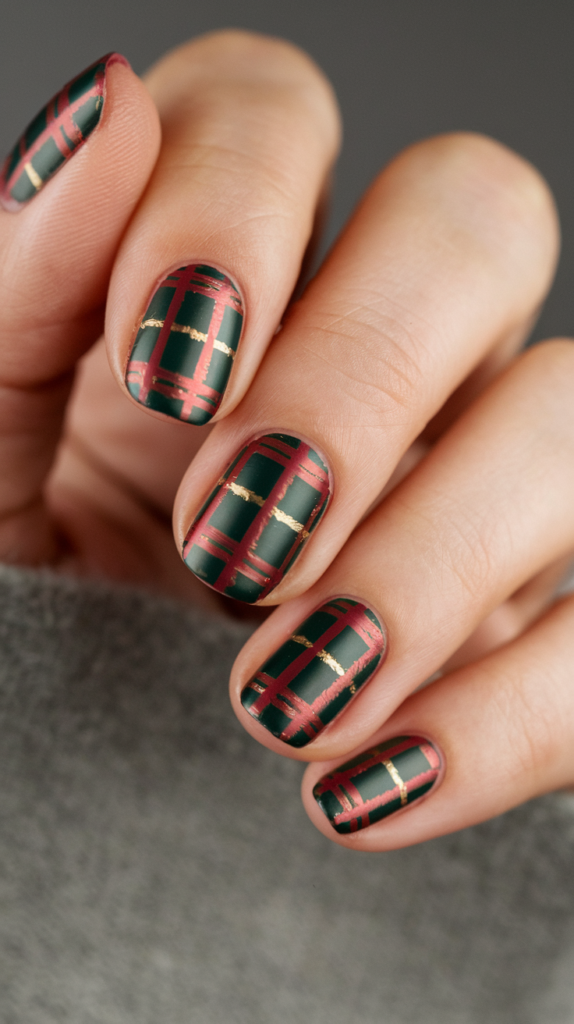
Choosing The Perfect Holiday Plaid Colors
Holiday plaid nails are all about the right color palette.
Classic combinations include dark green, deep red, and hints of gold or white.
Choose a base color that complements your skin tone and allows the plaid pattern to stand out.
Dark green is a popular choice, evoking the feeling of pine trees, while deep red adds warmth and festivity.
Gold accents provide a touch of elegance and holiday sparkle.
Consider using matte or glossy finishes to customize the look, and don’t be afraid to experiment with different color pairings.
Painting Plaid Patterns With Precision
Painting plaid patterns requires patience and precision.
Start with your chosen base color and allow it to dry completely.
Use striping tape or a thin nail art brush to create straight, even lines.
Begin with the horizontal lines, spacing them evenly across the nail, and then add the vertical lines to form a plaid pattern.
Use contrasting colors, such as white or gold, to make the lines pop.
The key is to keep the lines crisp and clean, so work slowly and carefully.
Seal the design with a topcoat to smooth out any ridges and add shine.
Enhancing Plaid With Gold Accent Lines
Gold accent lines can elevate your plaid nail art, adding a touch of holiday luxury.
Use a fine detailing brush and metallic gold polish to outline or intersect some of the plaid lines.
The gold accents should be subtle yet striking, catching the light and adding dimension to the design.
You can also use gold glitter polish for a more festive effect.
These accents will make your plaid pattern stand out and give your nails a sophisticated, holiday-ready look.
Finish with a topcoat to protect the design and add a glossy finish.
Gingerbread House Nail Design
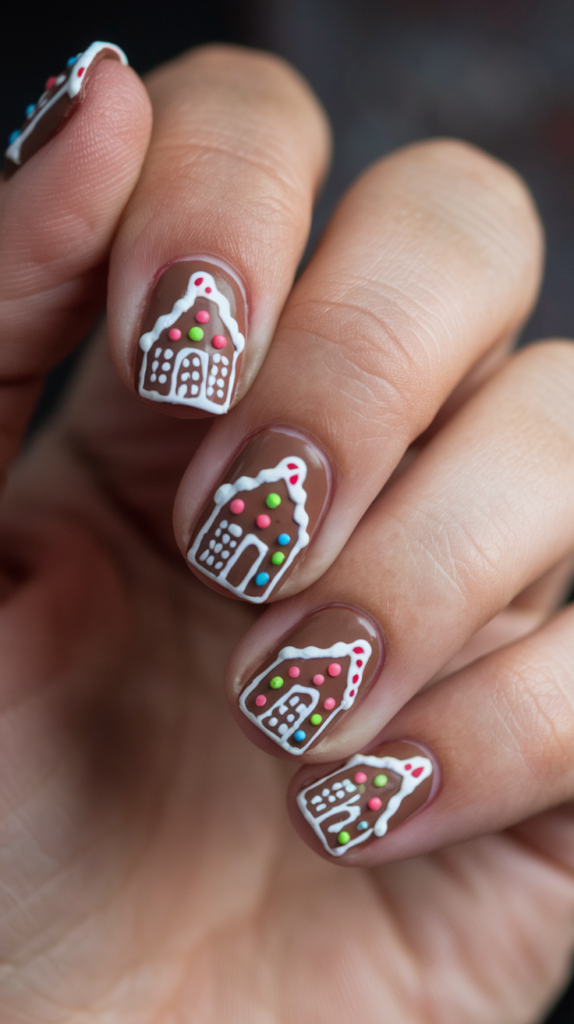
Using Brown As A Base For Gingerbread Art
A warm, rich brown base serves as the perfect foundation for gingerbread house nail art.
Choose a medium to dark brown polish that resembles the color of freshly baked gingerbread.
Apply two coats, making sure the finish is even and opaque.
This base will create the illusion of real gingerbread, setting the stage for intricate holiday decorations.
If you want to add depth, consider using a matte topcoat to give the base a more realistic, baked appearance.
Let the polish dry completely before moving on to the next steps of decorating.
Decorating With Candy Cane And Gumdrop Details
Once the brown base is dry, it’s time to bring your gingerbread house to life with candy cane and gumdrop details.
Use a fine detailing brush or dotting tool to paint white icing patterns along the edges of each nail.
These designs can include swirls, zigzags, or scalloped borders to mimic the look of piped frosting.
Add red and white stripes to create miniature candy canes, and use colorful dots of polish to represent gumdrops.
Each candy detail should be bright and glossy, contrasting beautifully with the brown background.
This step adds a playful and festive vibe to your nails.
Adding Icing Effects For Realism
To make your gingerbread house nails look more realistic, focus on the icing effects.
Use a white textured polish or 3D nail art gel to create raised lines that resemble real frosting.
Apply the icing along the edges of your designs, making sure the lines are smooth and even.
For an extra festive touch, sprinkle fine iridescent glitter over the wet icing to give it a sugary sparkle.
This detail will make your gingerbread house nails look even more magical and holiday-ready.
Seal the design with a high-gloss topcoat to add shine and protect the 3D elements from chipping.
Holly Berries Nail Art
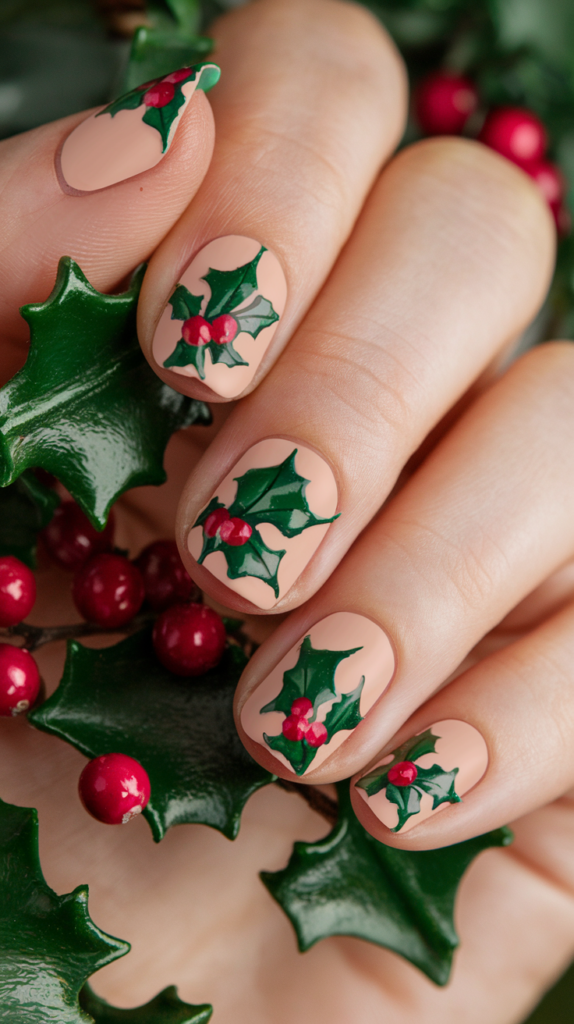
Using Nude Or White As A Base
The base color for holly berries nail art should be soft and elegant, allowing the detailed designs to stand out.
A nude or white base works beautifully, providing a neutral canvas that highlights the vibrant green and red elements.
For a sophisticated look, choose a creamy white or a soft beige nude polish.
Apply two coats, ensuring the finish is smooth and even.
A glossy or matte topcoat can be used, depending on your preference.
The neutral base adds a touch of understated elegance, making the holly berry accents the focal point of the design.
Painting Realistic Green Holly Leaves
Painting realistic holly leaves requires a steady hand and a bit of practice.
Use a fine nail art brush and a deep green polish to outline the shape of each leaf.
Holly leaves typically have pointed edges, so create small, sharp curves along the sides to mimic their natural appearance.
Once the outline is complete, fill in the leaves with the same green polish.
To add depth, use a lighter green shade to paint subtle veins in the leaves, giving them a lifelike texture.
The result should be lush, vibrant greenery that captures the essence of the holiday season.
Adding Glossy Red Berries For A Pop Of Color
No holly design is complete without glossy red berries.
Use a dotting tool or the tip of a bobby pin to apply small, round dots of bright red polish near the base of each holly leaf.
The berries should be shiny and slightly raised, adding dimension to the design.
For an extra pop of color, you can add a tiny highlight on each berry using a dot of white polish.
This will make the berries look even more realistic and give them a three-dimensional effect.
Finish with a topcoat to protect your design and add a beautiful, glossy finish.
Glitter Gradient Nail Design
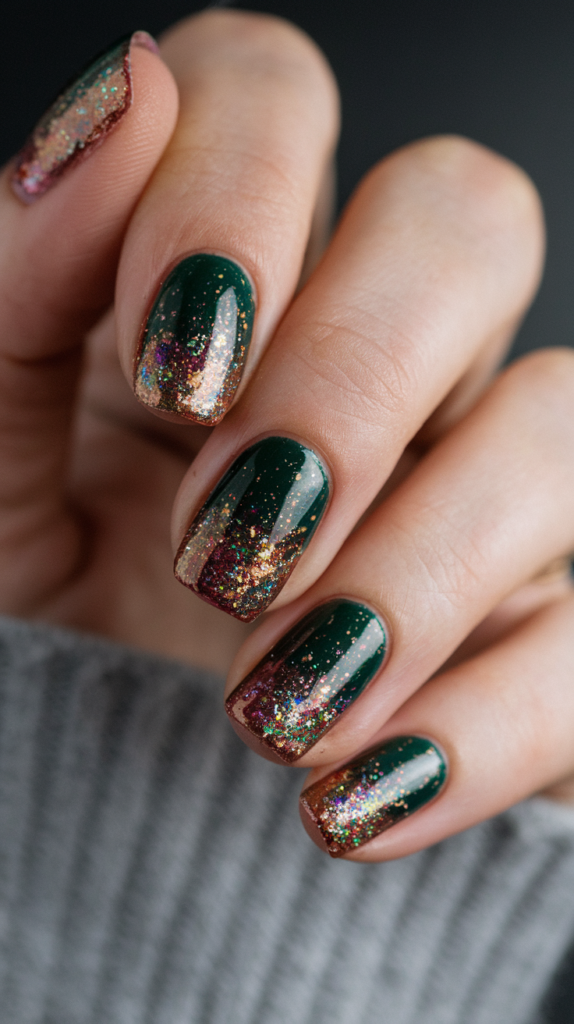
Creating The Perfect Ombre Effect
A glitter gradient nail design is all about creating a seamless ombre effect.
Start with a solid base color, such as a deep red, emerald green, or classic silver.
Apply two coats and let them dry completely.
Using a makeup sponge, dab glitter polish onto the tips of your nails, gradually working your way down toward the middle.
The glitter should be most concentrated at the tips and fade out as it reaches the center of the nail.
Use a dabbing motion to build up the glitter, ensuring a smooth transition.
The result should be a stunning ombre effect that sparkles with every movement.
Choosing Glitter Colors For A Festive Look
Choosing the right glitter colors is essential for a festive holiday look.
Gold and silver glitter are classic choices, adding elegance and sparkle to any base color.
For a more playful vibe, consider using multi-colored glitter or a combination of red and green glitter for a traditional Christmas theme.
If you want a wintery effect, opt for iridescent or holographic glitter that reflects light in all directions.
The glitter should be fine and dense, creating a dazzling effect without looking chunky.
Experiment with different color combinations to find the perfect festive look.
Tips For A Smooth, Seamless Gradient
Achieving a smooth, seamless gradient requires a bit of patience and the right technique.
When dabbing glitter onto your nails, make sure to blend the edges well to avoid harsh lines.
Use a light hand and gradually build up the glitter, layering it until you reach your desired intensity.
If the glitter looks uneven, use a clean makeup sponge to gently pat it into place.
A clear topcoat will help smooth out the surface and add a glossy finish, making the gradient look flawless.
This final step also ensures your glitter design stays in place and lasts longer.
Santa’s Hat Nail Design
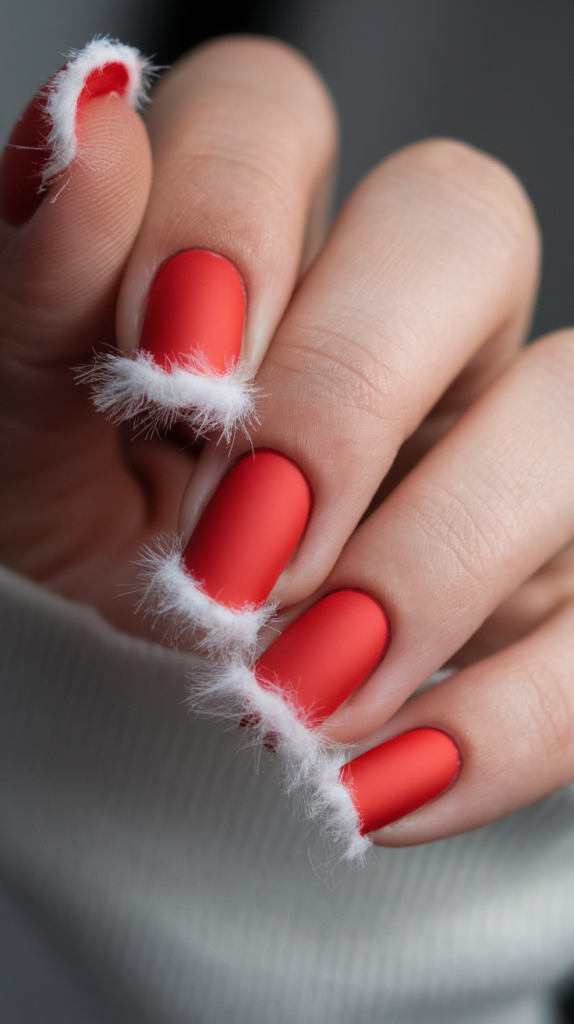
Painting Bright Red Nails With White Fluffy Tips
Santa’s hat nail design starts with a bright red base that captures the festive holiday spirit.
Apply two coats of a vibrant red polish, making sure the color is even and fully opaque.
Allow the polish to dry completely before adding the white tips.
To create the fluffy trim of Santa’s hat, use a white textured polish or a dotting tool to apply small, uneven dots along the edge of each nail.
The dots should be slightly raised, giving the illusion of soft, fluffy fur.
This step adds a playful and realistic touch to your holiday nails.
Adding Texture To Resemble Santa’s Hat Trim
To make the hat trim look even more realistic, focus on adding texture.
Use a white 3D nail art gel or a thick, textured polish to create raised, fluffy lines.
The trim should be uneven and slightly messy, just like the real fur on Santa’s hat.
You can also sprinkle fine white glitter over the wet polish to give the trim a snowy effect.
This added texture will make your design stand out and give it a festive, holiday feel.
Seal with a topcoat to protect the texture and add a glossy finish.
Variations And Accent Ideas For Santa’s Hat Design
There are many ways to customize your Santa’s hat nail design.
For a fun variation, add a small white pom-pom at the tip of each nail, mimicking the fluffy ball on Santa’s hat.
You can also create an accent nail with a full Santa face, complete with rosy cheeks and a jolly smile.
Another option is to add tiny rhinestones or glitter along the white trim for extra sparkle.
These variations add a unique twist to the classic Santa’s hat design, allowing you to express your holiday spirit in creative ways.
Reindeer Prints Nail Art
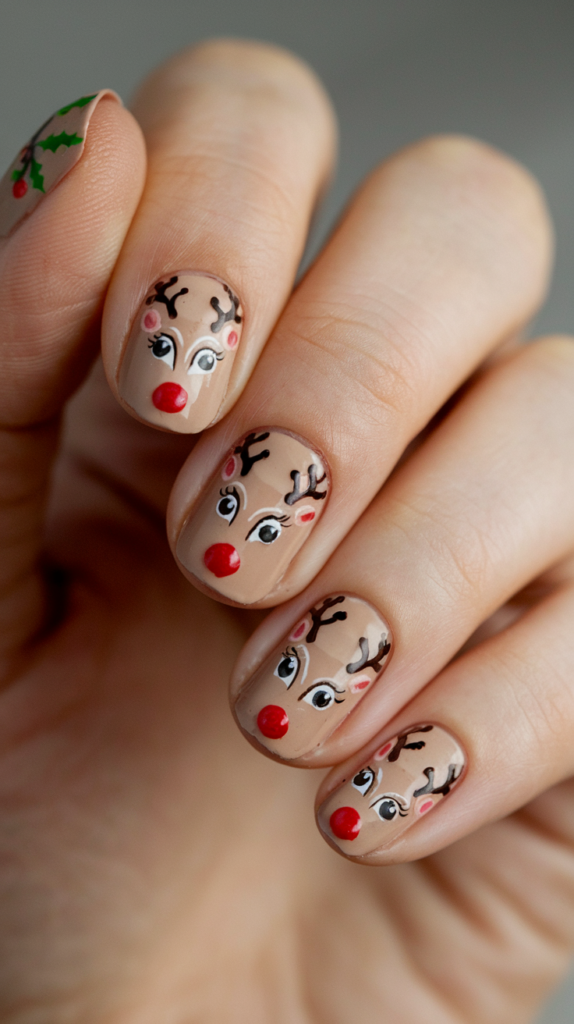
Choosing Brown And Nude Shades
Reindeer prints nail art begins with selecting the right brown and nude shades.
A soft, nude base creates a natural, wintry backdrop for the design, while a warm brown polish is perfect for painting the reindeer faces.
Apply two coats of nude polish to each nail, making sure the finish is smooth and even.
The brown shade should be rich and earthy, providing a strong contrast against the lighter base.
This color combination evokes the feeling of cozy winter evenings, making it ideal for holiday nail art.
Designing Cute Reindeer Faces With Antlers
To create the reindeer faces, use a dotting tool or a small nail art brush.
Start by painting a round or oval shape near the tip of each nail with the brown polish.
This will serve as the reindeer’s head.
Add two small dots for the eyes, using black polish for a striking look.
For the antlers, use a fine detailing brush and a lighter brown or white polish to paint delicate, branching lines above the reindeer’s head.
The antlers should be symmetrical and whimsical, giving the reindeer a cute and playful appearance.
Adding A Signature Red Nose For Rudolph
No reindeer design is complete without Rudolph’s signature red nose.
Use a small dotting tool to apply a bright red dot at the tip of one reindeer’s face, making it stand out from the rest.
The red nose should be glossy and slightly raised, drawing attention to the adorable detail.
For a touch of sparkle, you can use red glitter polish or a tiny rhinestone instead.
Finish the design with a clear topcoat to protect the artwork and add a beautiful, glossy shine.
This step will ensure your reindeer prints stay vibrant and festive throughout the holiday season.
Christmas Tree Nail Design
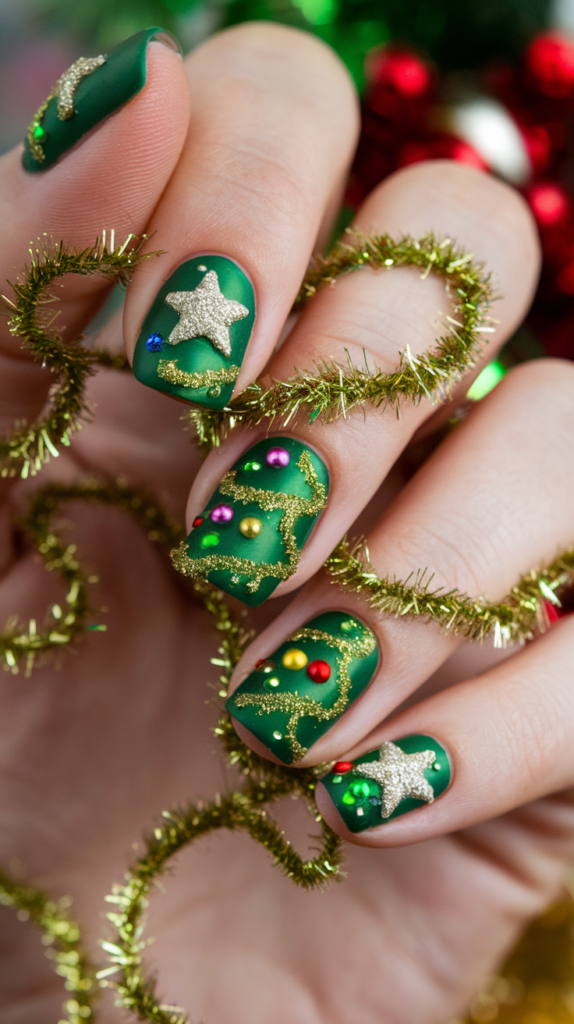
Painting Green Christmas Trees With Depth
Creating a realistic Christmas tree design starts with a deep green base color.
Use a nail art brush to paint triangular shapes, starting narrow at the top and widening toward the bottom.
To add depth, use different shades of green, layering lighter and darker colors to give the trees a three-dimensional look.
You can also add thin, wavy lines to represent the branches and give the design more texture.
The result should resemble a lush, full Christmas tree, ready to be decorated with holiday ornaments and tinsel.
Decorating With Gold Tinsel And Ornaments
Once your Christmas trees are painted, it’s time to decorate them.
Use a fine detailing brush and metallic gold polish to paint tinsel, winding it around the tree in a spiral pattern.
The gold should shimmer and catch the light, adding a festive touch to your design.
For the ornaments, use colorful dotting tools to apply small dots of red, blue, and silver polish.
Each ornament should be evenly spaced and have a glossy finish.
These details make your Christmas tree design come to life, adding holiday cheer to your nails.
Adding A Star On Top For A Finishing Touch
The final step is to add a star on top of each Christmas tree.
Use a tiny nail art brush and gold or yellow polish to paint a small, shining star at the tip of each tree.
The star should be bright and eye-catching, completing the festive look.
If you want to add extra sparkle, use a glittery gold polish or a small rhinestone instead.
Finish the design with a clear topcoat to protect your artwork and give your nails a glossy, polished finish.
This step ensures your Christmas tree nails are ready to shine at any holiday gathering.
Frosted Tips Nail Art
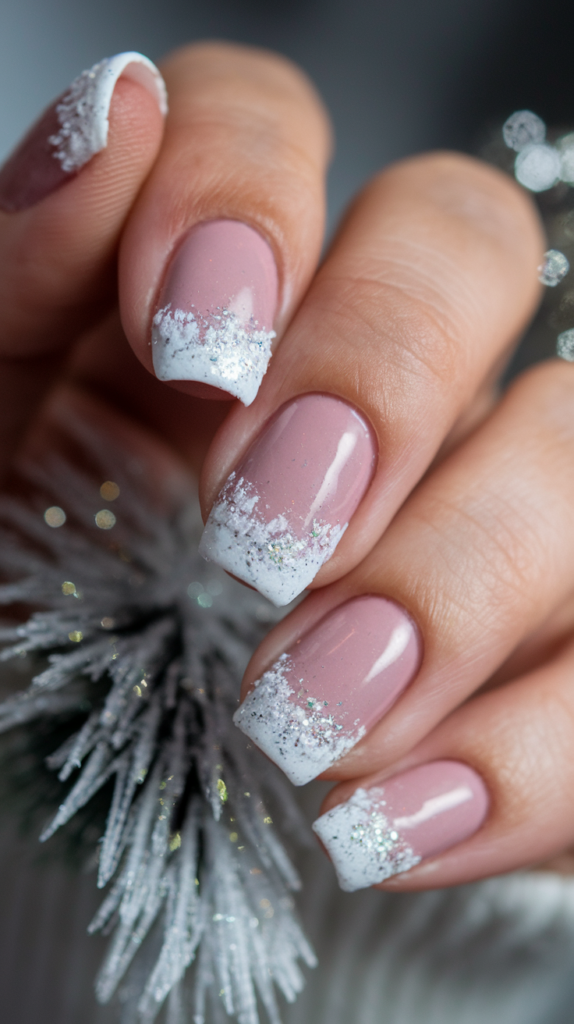
Creating A Snow-Dusted French Tip Manicure
A snow-dusted French tip manicure is a chic yet festive way to celebrate the holiday season.
Start by painting your nails with a sheer, nude base coat to create a natural and elegant backdrop.
Once dry, use a white polish to create the French tips.
Instead of drawing a clean, straight line, dab the white polish onto the tips with a makeup sponge to achieve a soft, frosted effect.
This technique creates a look that mimics freshly fallen snow, giving your nails a whimsical, wintry feel.
The key is to blend the white polish seamlessly into the nude base for a subtle and sophisticated gradient.
Using Textured White Polish For Realism
To add realism to your frosted tips, consider using a textured white polish or a 3D snow effect.
Apply the textured polish to the tips, focusing on making the snowy effect look fluffy and uneven.
This added texture will make the snow appear more lifelike, as if it’s freshly piled on your nails.
If you don’t have a textured polish, you can use white glitter or a dotting tool to create a similar effect.
The texture not only adds dimension but also enhances the overall frosty look, making your nails stand out in a crowd.
Adding Fine Glitter For A Frosty Effect
For a final touch of holiday magic, sprinkle fine, iridescent glitter over the white tips while the polish is still wet.
The glitter should be delicate, catching the light and giving your nails a shimmering, frosty appearance.
You can also use a glitter topcoat to seal the design and add extra sparkle.
The combination of textured white polish and glitter will make your frosted tips look enchanting and ethereal, perfect for a winter wonderland theme.
Finish with a high-shine topcoat to lock in the design and give your nails a glossy, polished look.
Pine Cone Patterns Nail Design
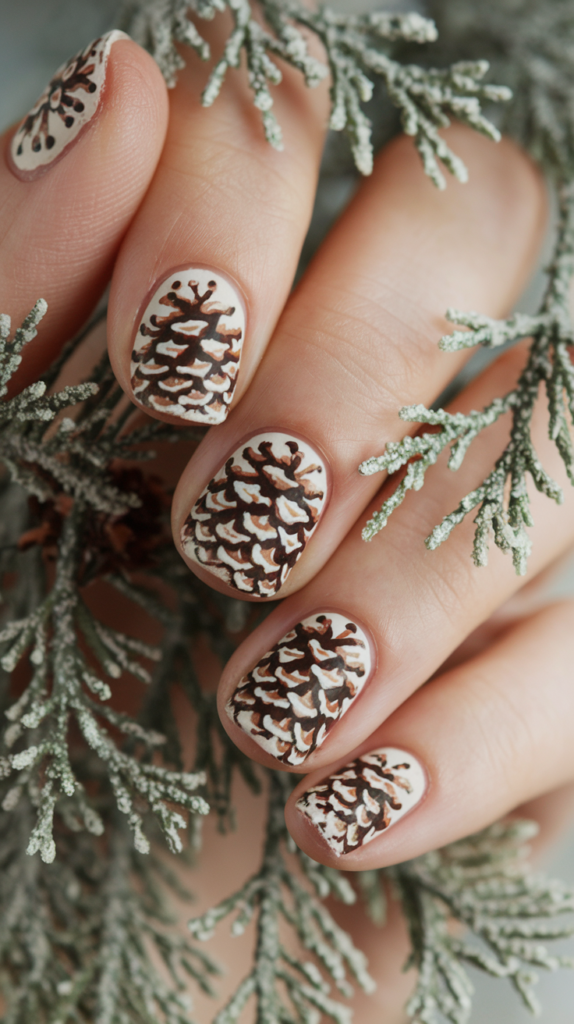
Earthy Tones For A Rustic Holiday Look
Pine cone nail art is all about embracing earthy tones for a rustic holiday feel.
Start with a warm, neutral base color, such as a soft taupe or a muted olive green.
These shades evoke the coziness of a forest in winter and provide the perfect canvas for pine cone patterns.
Apply two coats of your chosen base color, ensuring a smooth and even finish.
The earthy tones create a natural, understated look that pairs beautifully with the detailed pine cone designs.
This color palette is perfect for those who love a subtle yet festive nail art style.
Painting Detailed Pine Cones And Branches
To paint realistic pine cones, use a fine nail art brush and a rich brown polish.
Start by outlining the shape of the pine cone, which should be an elongated oval.
Then, fill in the shape with small, curved lines that overlap slightly, mimicking the scales of a real pine cone.
Add highlights using a lighter brown or beige polish to give the design depth and dimension.
For the pine branches, use a thin brush and a dark green polish to paint slender, wispy lines that extend from the sides of the pine cone.
The branches should be delicate, with tiny needles painted along the edges for added texture.
Adding A Matte Topcoat For A Cozy Finish
A matte topcoat is the perfect way to finish your pine cone nail art, giving it a rustic and cozy feel.
The matte finish softens the overall look, making the earthy tones and detailed patterns appear more natural.
If you prefer a bit of shimmer, you can add a touch of gold glitter to the pine branches or use a glossy topcoat on just one accent nail for contrast.
The combination of matte and glossy textures adds visual interest to your design, making it perfect for both casual and holiday events.
The final look is warm, inviting, and reminiscent of a walk through a snowy forest.
Ugly Christmas Sweater Nails
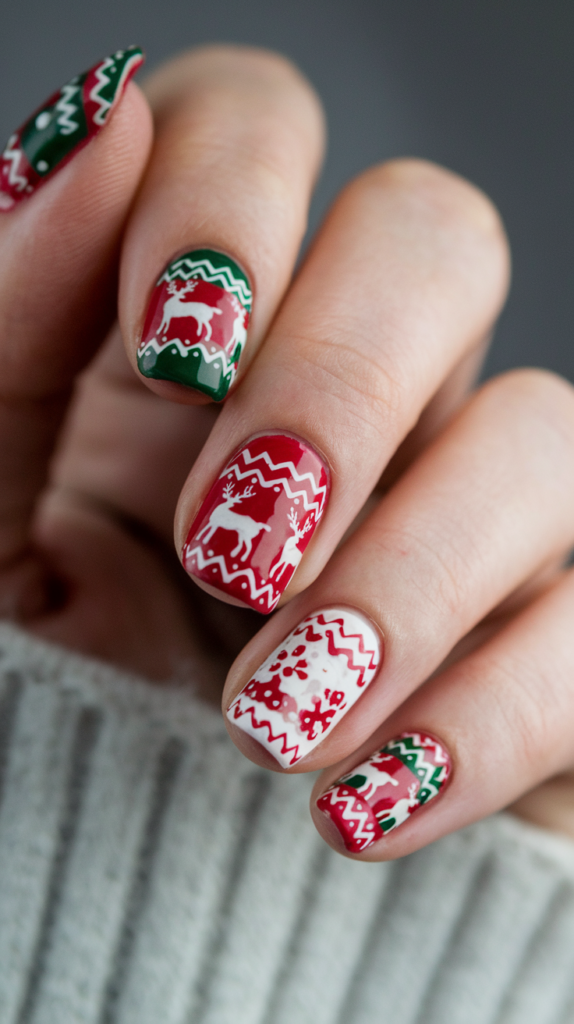
Choosing Classic Sweater Patterns And Colors
Ugly Christmas sweater nails are all about embracing the fun and festive patterns associated with holiday sweaters.
Start by choosing classic holiday colors, such as red, green, and white.
These colors instantly evoke the spirit of Christmas and provide a cheerful base for your designs.
Apply two coats of your chosen base color, making sure the finish is smooth and vibrant.
For a playful twist, you can alternate colors on different nails, creating a mix-and-match effect that resembles a patchwork sweater.
The key is to use bold and contrasting colors to make the sweater patterns stand out.
Creating Textured Designs For A 3D Effect
To achieve the iconic ugly sweater look, focus on adding texture to your nail art.
Use a thick white nail art gel or a 3D polish to create raised designs, such as reindeer, snowflakes, and zigzag lines.
These textured elements give the nails a cozy, knitted appearance, just like a real holiday sweater.
Use a dotting tool or a fine brush to carefully paint the patterns, making sure each design is evenly spaced.
The 3D effect adds a playful and tactile dimension to your nails, making them look and feel like a miniature version of your favorite holiday sweater.
Ideas For Playful And Festive Sweater Patterns
There are endless possibilities when it comes to designing your ugly Christmas sweater nails.
Consider painting classic holiday motifs, such as snowflakes, Christmas trees, and candy canes.
You can also add playful elements, like gingerbread men, Santa hats, or tiny presents.
For a more whimsical look, mix and match different patterns on each nail, or create an accent nail with a large, detailed design.
The goal is to have fun and embrace the over-the-top holiday spirit, so don’t be afraid to get creative.
Finish with a matte or glossy topcoat, depending on the overall look you want to achieve.
Nutcracker Nails
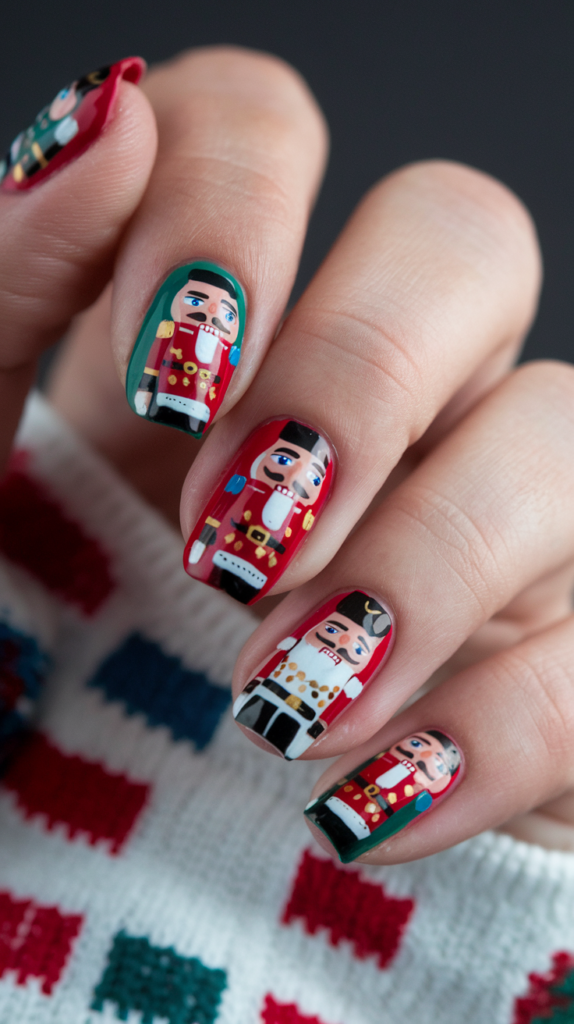
Painting Miniature Nutcracker Soldiers
Nutcracker nail art is a delightful way to celebrate the holiday season with intricate and regal designs.
Start by painting a solid base color, such as red or navy blue, to set the stage for your miniature nutcracker soldiers.
Use a fine nail art brush to outline the nutcracker’s face and uniform, dividing the nail into sections for the hat, face, and body.
The hat should be bold and detailed, complete with a gold trim and a tiny feather if possible.
The face should have expressive eyes, a mustache, and rosy cheeks, capturing the charm of a traditional nutcracker.
The uniform can be decorated with buttons, epaulets, and intricate gold details.
Using Red, Blue, And Gold For A Regal Look
The color scheme for nutcracker nails should be rich and regal, featuring shades of red, blue, and gold.
These colors are reminiscent of classic holiday decor and give your design a luxurious feel.
Use metallic gold polish to highlight the uniform details, such as the buttons and trim.
Red and blue should be bold and vibrant, creating a striking contrast against the gold accents.
For added dimension, you can use a glittery topcoat on select areas, like the hat or shoulders, to make your nutcracker soldiers sparkle.
The result is a festive and elegant nail art design that pays homage to the holiday season.
Adding Tiny Details To Complete The Design
The beauty of nutcracker nail art lies in the tiny, intricate details.
Use a dotting tool or a small brush to add features like the nutcracker’s belt, boots, and facial expressions.
You can also paint decorative elements, such as holly leaves or snowflakes, around the nutcracker for a festive touch.
Each detail should be carefully placed, ensuring the design looks polished and cohesive.
Finish with a high-shine topcoat to protect the artwork and give your nails a glossy, professional finish.
These tiny details make your nutcracker nails truly stand out and capture the magic of the holiday season.
Snow Globe Accent Nail
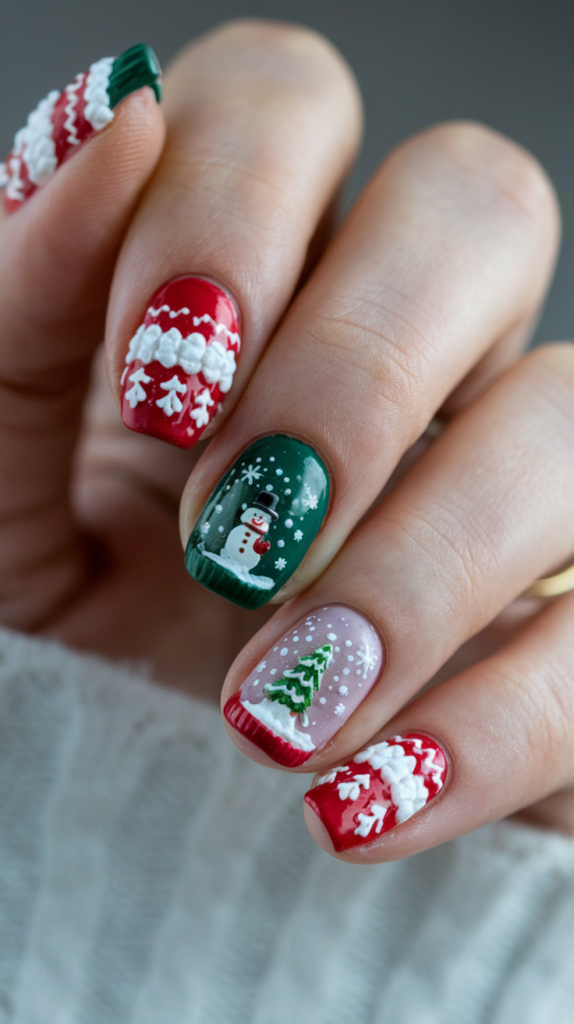
Designing Clear Nails With Snow Globe Effects
Snow globe accent nails are a whimsical and eye-catching addition to your holiday nail art.
Start with a clear or light blue base to create the illusion of glass.
Use a fine detailing brush to paint tiny winter scenes inside the “globe,” such as snow-covered houses, evergreen trees, or a snowman.
The key is to keep the designs small and detailed, as if you’re looking into a miniature snow globe.
To enhance the effect, use a sheer, iridescent glitter polish to add sparkle, mimicking the look of swirling snow inside the globe.
This step creates a magical, wintry vibe that is perfect for the holiday season.
Painting Tiny Snowflakes And Holiday Scenes
Painting tiny snowflakes and holiday scenes requires precision and a steady hand.
Use a fine nail art brush and white polish to create delicate snowflakes, varying the size and shape of each one for a realistic effect.
For holiday scenes, use a mix of colors to paint details like a red-roofed cabin, green pine trees, or a cheerful snowman with a scarf.
You can also add small touches of glitter to represent twinkling lights or shimmering snow.
These intricate details make the design come to life, turning your nails into a festive, wintery wonderland.
Using Domed Polish For A 3D Snow Globe Look
To achieve a true snow globe effect, use a domed, clear polish or a gel topcoat to create a 3D finish.
Apply the domed polish over the holiday scene, allowing it to form a raised, rounded shape that resembles the glass of a real snow globe.
This 3D element adds depth and realism to your design, making it look like the scene is encased in glass.
For an extra touch of magic, you can add loose glitter or tiny sequins inside the dome to mimic falling snow.
Seal the entire design with a glossy topcoat to lock in the details and give your snow globe nail a polished, finished look.
Frosty The Snowman Nail Art
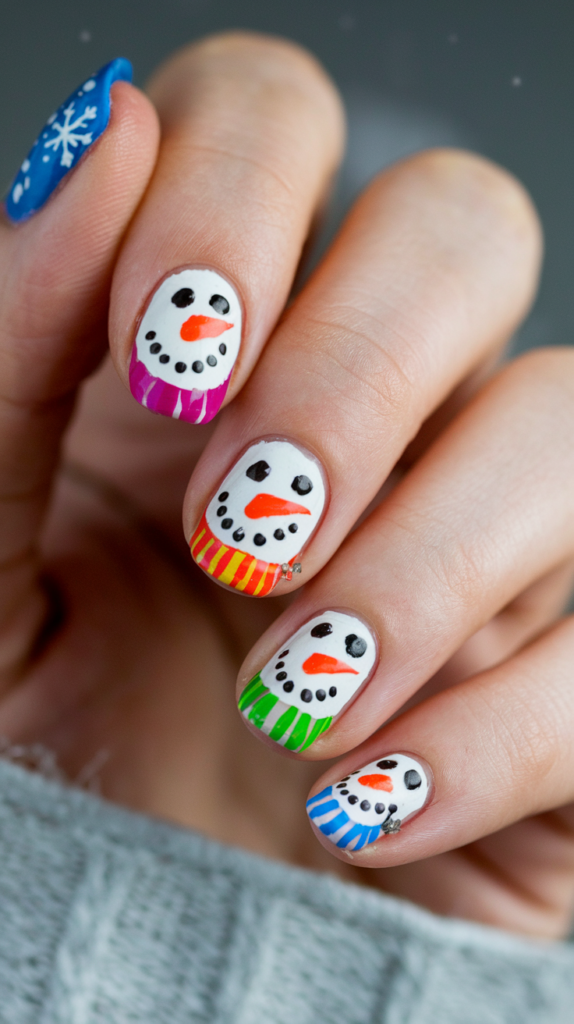
Creating Cute Snowman Faces With Scarves
Frosty the Snowman nail art is all about capturing the adorable and cheerful spirit of the holiday season.
Begin with a clean white base to represent the snow.
Once the base coat is completely dry, use a small dotting tool or a fine nail art brush to create round snowman faces at the tips of each nail.
For the eyes, use black polish to add two small dots, and draw a cheerful smile using the same black shade.
For the signature carrot nose, use bright orange polish to create a small, triangular shape in the center of the snowman’s face.
To add a playful element, paint colorful scarves around the base of each snowman’s head, using shades like red, green, or blue.
The scarves should look cozy and detailed, with small fringe lines for added texture.
Using White Polish For A Snowy Base
The snowy base is crucial for this design to look wintery and festive.
Choose a high-quality, opaque white polish and apply two coats to ensure full coverage.
If you want to add a subtle shimmer to the base, use a sheer, iridescent topcoat that reflects light and creates a frosty effect.
The white base should be smooth and even, providing the perfect canvas for your snowman art.
This snowy background sets the tone for the entire design, making it look like Frosty and his friends are playing in a winter wonderland.
Adding Details Like Carrot Noses And Coal Eyes
The charm of Frosty the Snowman lies in the small, whimsical details.
Use a dotting tool or the end of a toothpick to add tiny black dots for coal eyes and buttons on the snowman’s body.
For the nose, choose a bright, vivid orange polish to make the carrot nose pop against the white background.
You can also add rosy cheeks using a soft pink polish for a touch of warmth and cuteness.
To complete the design, paint tiny snowflakes or falling snow around the snowman’s face.
These details bring the snowman to life, making your nail art fun and festive.
Finish with a glossy topcoat to seal the design and give it a polished, shiny finish.
Ornament Accents Nail Design
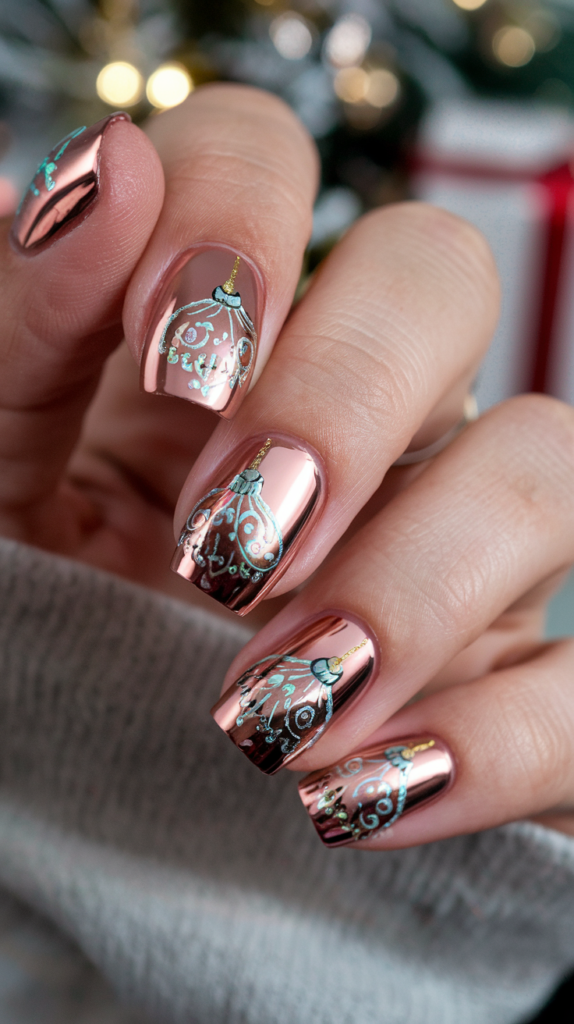
Choosing Metallic Polish For A Reflective Look
Ornament accent nails are perfect for adding a touch of holiday glamour to your nail art.
Start by choosing a metallic polish in shades like gold, silver, or rose gold.
These reflective colors mimic the shiny surface of Christmas ornaments and instantly elevate your design.
Apply two coats of the metallic polish to create a smooth, mirror-like finish.
Metallic polish can be tricky to work with, so make sure to use even strokes and allow each coat to dry completely.
The reflective quality of the polish will make your nails stand out, catching the light with every movement.
Painting Detailed Holiday Ornament Patterns
Once your metallic base is dry, it’s time to add intricate holiday ornament designs.
Use a fine nail art brush and contrasting colors to paint patterns like swirls, snowflakes, or geometric shapes on the metallic surface.
For a classic look, paint thin, delicate lines in white or black to create elegant designs.
You can also add small dots and accents in vibrant colors, like red or green, to make the ornaments more festive.
If you’re feeling adventurous, try painting tiny holly leaves and berries around the ornaments for an extra holiday touch.
The patterns should be precise and detailed, resembling the delicate designs on real Christmas ornaments.
Using Gold And Silver Strings For A Realistic Effect
To make your ornament nail art look even more realistic, add gold or silver strings that appear to hang from the top of your nails.
Use a striping brush and metallic polish to paint thin, vertical lines extending from the cuticle to the ornament.
The strings should be straight and elegant, adding a touch of sophistication to your design.
For added realism, you can paint small bows at the top of each string or use gold or silver foil for a textured effect.
Seal the entire design with a high-shine topcoat to protect your artwork and enhance the metallic finish.
This step will make your ornament accent nails look polished and ready to dazzle at any holiday celebration.
Christmas Lights Nail Art
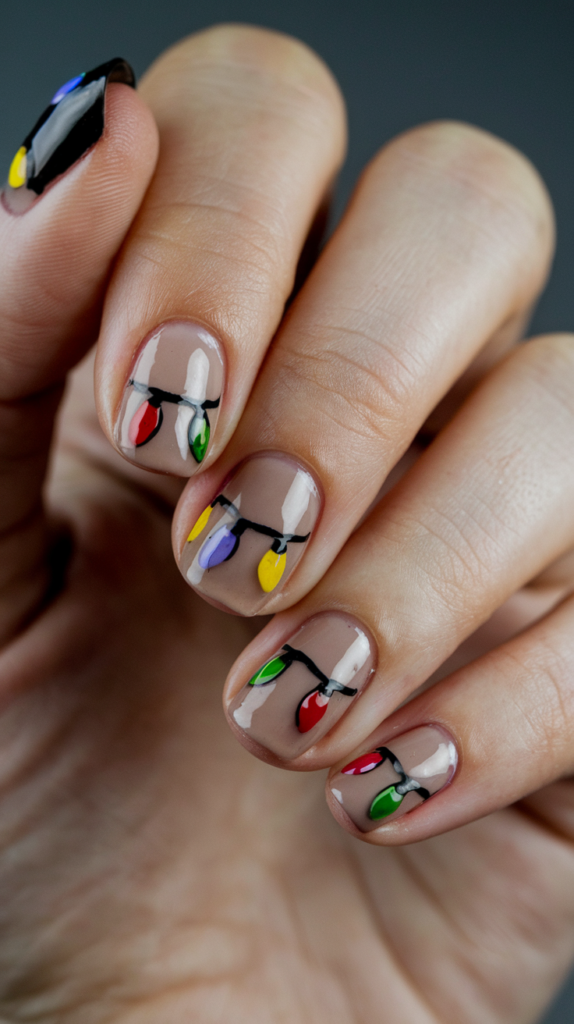
Using Black Or Nude As A Base For Light Strands
The base color for Christmas lights nail art sets the tone for the entire design.
Choose a simple black or nude polish to create a neutral background that allows the colorful lights to stand out.
A black base gives the design a nighttime effect, while a nude base provides a softer, more subtle look.
Apply two coats of your chosen polish, ensuring the finish is smooth and even.
The base should be a solid canvas for the light strands, making the colors pop and giving the design a festive feel.
Painting Colorful, Glowing Holiday Lights
To create the iconic holiday lights, use a thin nail art brush or a dotting tool.
Start by painting a wavy black line across each nail, mimicking the look of tangled light strands.
The line should have a playful, curved shape, winding from one side of the nail to the other.
Next, use bright, vibrant colors like red, green, blue, yellow, and pink to paint small oval shapes along the strand.
These ovals represent the light bulbs and should be evenly spaced.
To make the lights look like they’re glowing, add a thin halo of the same color around each bulb, blending it into the base color for a soft, radiant effect.
This glowing detail gives the lights a magical, festive appearance.
Creating A Shiny, Glossy Finish
A glossy topcoat is essential for making your Christmas lights nail art shine.
The topcoat not only seals the design and prevents chipping but also enhances the glow of the lights, making them look even more realistic.
Apply a generous layer of high-shine topcoat, making sure to cover each light bulb and the black strands.
The glossy finish will reflect light, giving your nails a polished and festive look.
If you want to add an extra touch of sparkle, use a glitter topcoat over the entire design or just on the light bulbs.
This step adds a hint of holiday magic and makes your nails perfect for any festive occasion.
Winter Wonderland Nails
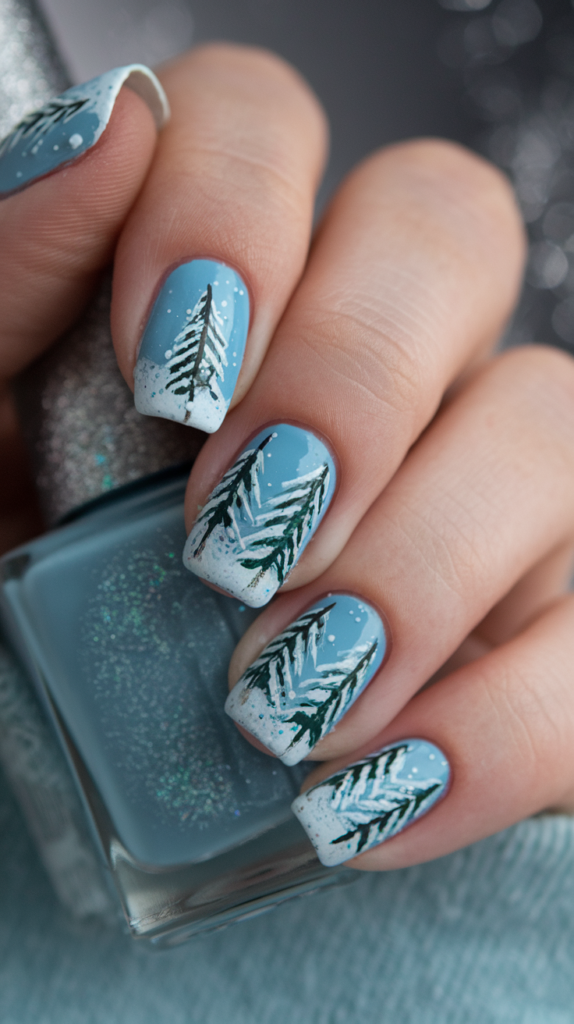
Icy Blue Base With Snow-Covered Pine Trees
Winter Wonderland nails capture the serene beauty of a snowy landscape.
Begin by painting your nails with an icy blue polish, using two coats for full opacity.
This cool, frosty shade sets the scene for your wintry design.
Once the base is dry, use a thin nail art brush and white polish to paint snow-covered pine trees.
Start at the base of the nail and work your way upward, creating a triangular shape for each tree.
The branches should be painted in a layered, zigzag pattern, with the white polish giving the illusion of snow resting on each branch.
The result is a serene, snow-covered forest that looks like it belongs in a holiday snow globe.
Using Glitter To Mimic Fresh Snow
To make your Winter Wonderland nails sparkle, use fine, iridescent glitter to mimic the look of fresh snow.
Apply the glitter over the white trees and around the base of each nail, focusing on areas where snow would naturally accumulate.
The glitter should be subtle but shimmery, catching the light and adding a magical touch to your design.
For a more dramatic effect, you can use chunky glitter or holographic flakes to create the illusion of snowflakes falling from the sky.
The glitter adds depth and dimension to your design, making it look like a true winter wonderland.
Adding Snowdrifts And Wintery Details
Complete your Winter Wonderland nails by adding snowdrifts and other wintery details.
Use a small brush or a dotting tool to paint mounds of snow at the base of each nail, blending the edges into the blue background.
You can also add tiny snowflakes or falling snow using white polish, varying the size and shape of each flake for a realistic effect.
If you want to add more detail, paint a small log cabin or a snowman nestled among the trees.
These extra elements bring your winter scene to life, making your nails a true work of art.
Finish with a glossy or matte topcoat, depending on your preference, to protect the design and give it a polished finish.
Grinch-Inspired Nail Design
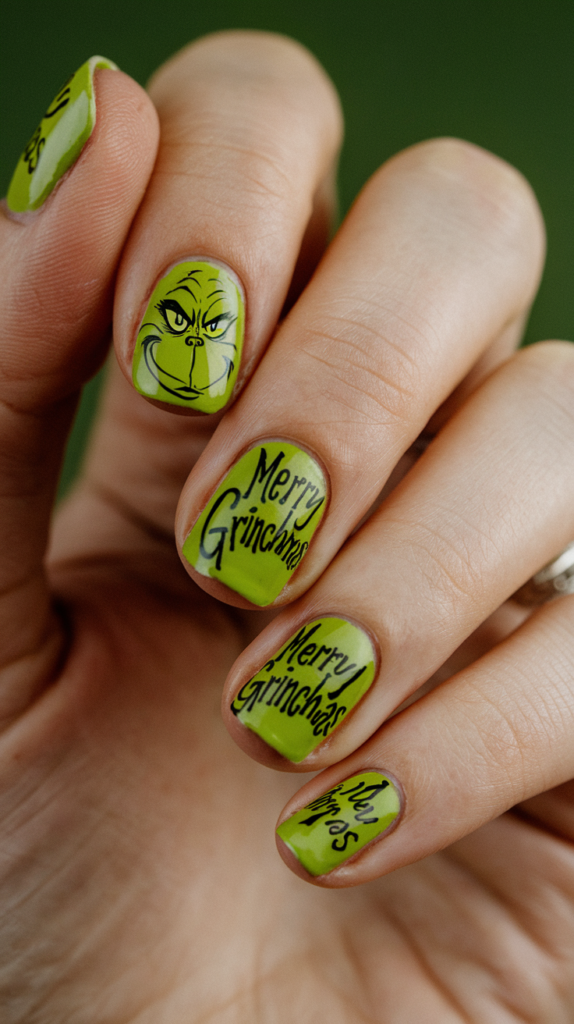
Painting The Grinch’s Face With Mischievous Features
A Grinch-inspired nail design is perfect for adding a playful and mischievous touch to your holiday look.
Start with a bright green base to represent the Grinch’s iconic skin tone.
Apply two coats of polish, making sure the color is vibrant and smooth.
Once the base is dry, use a fine nail art brush and black polish to outline the Grinch’s face.
Draw his distinctive features, including his sharp, arched eyebrows, mischievous grin, and piercing yellow eyes.
The facial expression should capture the Grinch’s signature scowl, with his smile curving upward in a devious way.
Adding small details, like wrinkles around the eyes and mouth, will make the design look more lifelike and expressive.
Using Green Polish For A Bold Statement
The bright green polish is the star of this design, making a bold and festive statement.
Choose a neon or lime green shade that stands out, capturing the essence of the Grinch’s quirky character.
If you want to add depth, use a darker green polish to create shadows and contours on the Grinch’s face.
This technique adds dimension to the design, making it look more three-dimensional and dynamic.
The green polish should be eye-catching and fun, reflecting the playful theme of the design.
Don’t forget to seal the base color with a clear topcoat before adding the facial details, ensuring a smooth and even surface for your artwork.
Adding “Merry Grinchmas” Text For Fun
To complete your Grinch-inspired nails, add the phrase “Merry Grinchmas” in playful lettering.
Use a fine detailing brush and white or black polish to write the text on one or two accent nails.
The letters should be whimsical and slightly crooked, matching the Grinch’s mischievous personality.
You can also add small holiday details, like red and white striped candy canes or tiny, sparkling ornaments, to tie the design together.
Finish with a glossy topcoat to protect the artwork and give your nails a polished, festive look.
This Grinch-inspired nail art is sure to make a statement and bring a smile to everyone’s face during the holiday season.
Poinsettia Blooms Nail Art
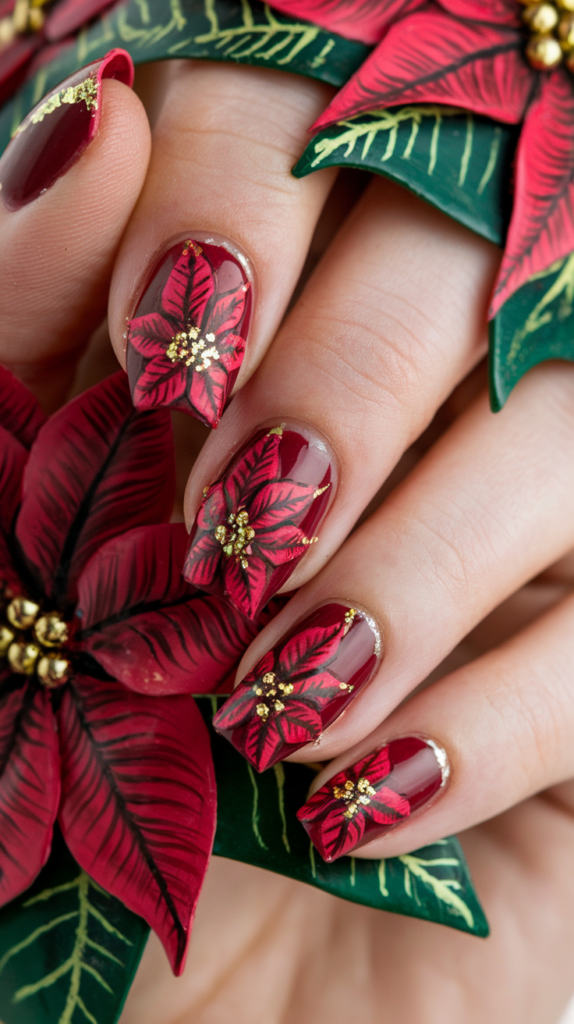
Deep Red Base With Hand-Painted Poinsettias
Poinsettia blooms are a classic symbol of the holiday season, and they make for a stunning nail art design.
Start with a deep red base to match the vibrant color of poinsettia petals.
Apply two coats, ensuring the finish is smooth and opaque.
Once the base is dry, use a fine nail art brush and white or gold polish to paint the poinsettia blooms.
Each bloom should have multiple layers of pointed petals, radiating outward from a central point.
The petals can be shaded with lighter or darker red polish to add depth and dimension.
The result should be a bold, elegant design that captures the beauty of this festive flower.
Using Gold Centers For Extra Shine
To make your poinsettia blooms pop, add gold centers to each flower.
Use a small dotting tool or the tip of a fine brush to apply metallic gold polish to the center of each bloom.
The gold should shimmer and catch the light, adding a touch of luxury to your design.
If you want to make the centers more detailed, you can add tiny gold beads or glitter for extra texture.
The gold accents contrast beautifully with the deep red base, making the poinsettia blooms look even more vibrant and festive.
Adding Green Leaves For Contrast
Complete your poinsettia nail art by adding green leaves around each bloom.
Use a dark green polish and a fine brush to paint the leaves, making sure they are pointed and slightly curved to resemble real poinsettia leaves.
You can also add subtle veins to the leaves using a lighter green shade for a more realistic effect.
The green leaves provide a striking contrast to the red blooms, creating a balanced and harmonious design.
Finish with a high-shine topcoat to seal the artwork and give your nails a glossy, festive finish.
This poinsettia nail art is perfect for holiday parties and adds an elegant touch to any festive outfit.
Mistletoe Magic Nail Design
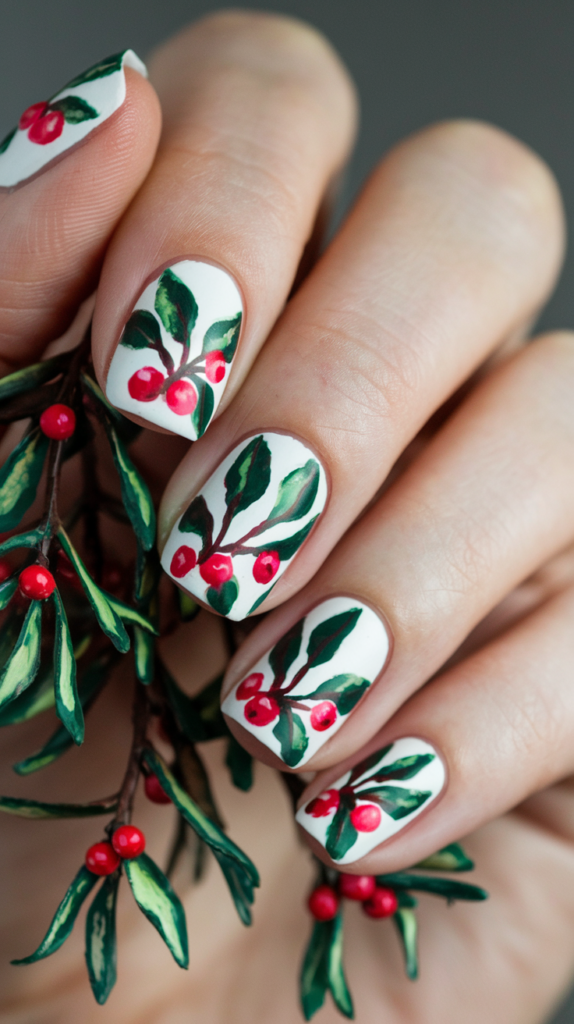
White Base With Mistletoe Sprigs
Mistletoe nail art is a sophisticated and festive way to embrace the holiday season.
Begin by applying two coats of crisp white polish to create a smooth and elegant base.
The white background serves as a clean canvas, making the mistletoe details stand out beautifully.
The goal is to keep the base sleek and simple, allowing the vibrant green and red of the mistletoe to pop.
Make sure the white polish is fully dry before moving on to the detailed artwork.
Painting Tiny Green Leaves And Red Berries
To paint realistic mistletoe sprigs, use a fine nail art brush and a deep green polish.
Start by drawing thin, curved lines to form the mistletoe stems, and then add small, teardrop-shaped leaves on either side of each stem.
The leaves should be dainty and slightly pointed, giving them a natural look.
For the berries, use a dotting tool to apply small, round dots of bright red polish at the base of each sprig.
The berries should be glossy and vibrant, adding a cheerful touch to the design.
For a more dynamic look, vary the size of the leaves and berries, and add a few extra leaves to make the sprigs look lush and full.
Using A Matte Finish For A Sophisticated Look
A matte topcoat can give your mistletoe nail art a sophisticated and modern finish.
The matte texture softens the overall look and adds a touch of elegance to the design.
Once the mistletoe sprigs are dry, apply a matte topcoat evenly over each nail, making sure to cover all the artwork.
The result is a velvety, smooth finish that contrasts beautifully with the vibrant green and red details.
If you prefer a bit of shimmer, you can add a touch of iridescent glitter to the berries or the leaves before applying the topcoat.
The subtle sparkle will catch the light and add a festive twist to the matte design.
North Pole Nail Art
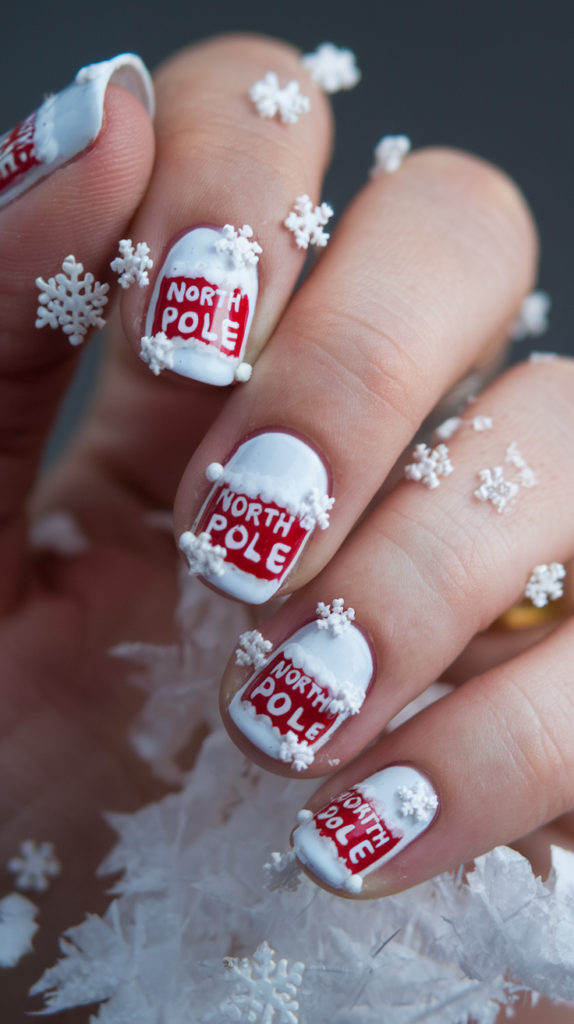
Painting A Red And White North Pole Sign
North Pole nail art is a playful and charming design that brings the magic of the holiday season to your fingertips.
Start by painting your nails with a snowy white base, using two coats for full coverage.
Once the base is dry, use a fine nail art brush and bright red polish to paint a classic North Pole sign on one or two accent nails.
The sign should be shaped like a vertical candy cane, with red and white stripes spiraling up the pole.
At the top of the pole, paint a small rectangular sign with the words “North Pole” in black or white letters.
Make sure the letters are crisp and evenly spaced, adding a whimsical touch to the design.
Adding Snowy Accents And Tiny Snowflakes
To make the North Pole scene more festive, add snowy accents and tiny snowflakes around the sign.
Use white polish and a small dotting tool to create fluffy mounds of snow at the base of the pole and along the edges of the nail.
For the snowflakes, use a fine brush to paint delicate, six-pointed designs, varying the size and placement of each flake.
You can also add small dots of white polish to represent falling snow, giving the design a wintery, magical feel.
If you want to add extra sparkle, sprinkle fine glitter over the snowflakes while the polish is still wet.
Creating A Frosty, Wintery Background
A frosty, wintery background will complete the North Pole nail art.
Use a light blue polish to create a gradient effect from the cuticle to the middle of the nail, blending it into the white base.
The gradient should be soft and seamless, resembling a cold, clear winter sky.
To enhance the frosty look, use a glitter topcoat or a holographic shimmer to add a touch of icy sparkle.
The result is a dreamy, snow-covered landscape that perfectly complements the North Pole sign and snowy details.
Seal the entire design with a glossy topcoat to protect the artwork and give it a polished finish.
Wrapped Gift Nails
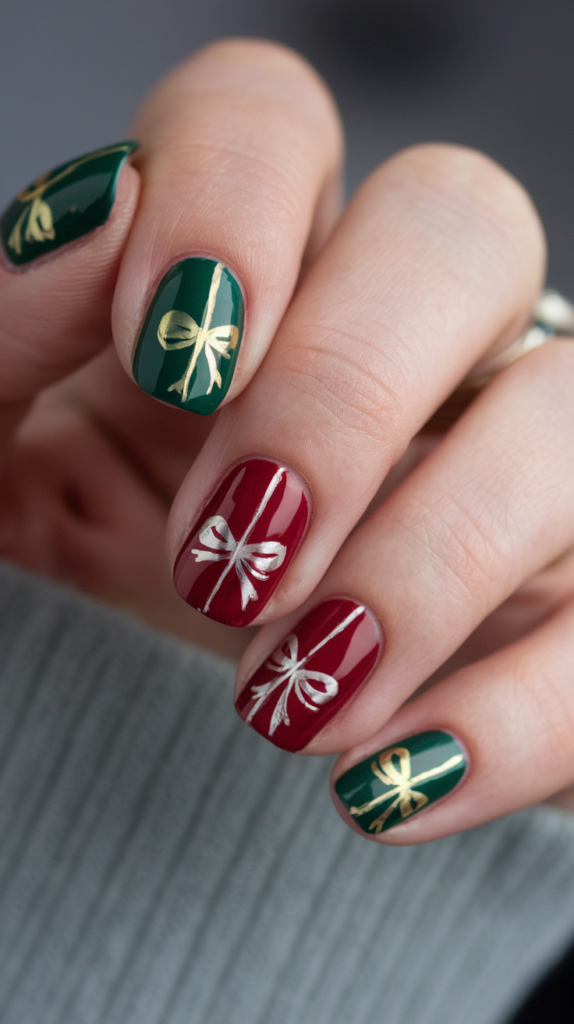
Solid Color Base With Ribbon And Bow Designs
Wrapped gift nails are a fun and festive way to mimic the look of beautifully wrapped holiday presents.
Start with a solid base color in a classic holiday shade, such as emerald green, ruby red, or metallic gold.
Apply two coats for a rich, opaque finish.
Once the base is dry, use a striping brush and white or gold polish to paint thin ribbon lines across each nail, forming a cross shape.
The ribbons should be clean and crisp, wrapping around the nail as if they were tied around a gift box.
For added detail, paint small bows at the intersection of the ribbons, using a fine brush to create the loops and tails.
Painting Precise Lines For A Gift Wrap Effect
Precision is key when creating the gift wrap effect.
Use a steady hand and a high-quality striping brush to ensure the ribbon lines are straight and even.
If you make a mistake, use a nail art corrector pen to clean up the edges.
The goal is to make the ribbons look as realistic as possible, with sharp lines and defined edges.
For a more festive look, you can use glitter polish for the ribbons or add small, metallic studs to the bows for extra sparkle.
The gift wrap effect should be elegant and eye-catching, making your nails look like miniature holiday presents.
Adding 3D Bows For A Realistic Look
To take your wrapped gift nails to the next level, consider adding 3D bows.
You can use pre-made nail art bows or create your own using 3D gel polish.
Place the bow at the center of the ribbon cross, securing it with nail glue or a thick layer of topcoat.
The 3D bow adds a playful and realistic touch, making your nails stand out in a crowd.
If you prefer a more subtle look, use a small dotting tool to paint raised dots in the shape of a bow, giving the design a textured effect.
Finish with a glossy topcoat to lock in the details and give your nails a polished, festive shine.
Polar Bear Love Nail Design
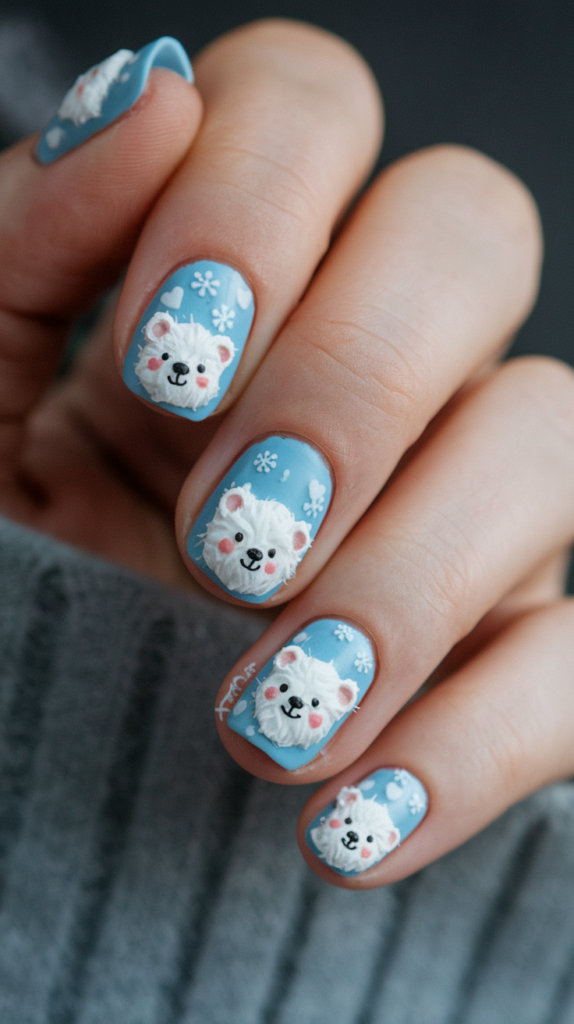
Soft Blue Nails With Polar Bear Faces
Polar Bear Love nail art is an adorable and heartwarming design, perfect for winter.
Start by painting your nails with a soft blue polish, creating a frosty, sky-like background.
Apply two coats for full opacity and let it dry completely.
Next, use a white polish and a dotting tool to create round shapes for the polar bear faces at the base of each nail.
The polar bear faces should be large enough to fill the lower half of the nail, with the rest of the nail showing the soft blue background.
The white polish should be smooth and even, creating a clean canvas for the facial details.
Adding Snowflake And Heart Details
To make the design even more festive, add delicate snowflake and heart details around the polar bear faces.
Use a fine nail art brush and white polish to paint small snowflakes, varying the size and shape of each one.
You can also use a dotting tool to add tiny white dots, resembling falling snow.
For the hearts, use a soft pink or red polish to paint small, symmetrical hearts above the polar bear faces, adding a touch of warmth and love to the design.
These details make the nail art feel whimsical and playful, perfect for spreading holiday cheer.
Using White Fur Texture For Cuteness
To make the polar bears look fluffy and adorable, add a white fur texture around the edges of their faces.
Use a textured white polish or a dotting tool to create small, uneven dots, giving the illusion of soft fur.
For the facial features, use black polish to paint small, round eyes and a tiny, oval-shaped nose.
Add a sweet, gentle smile using a thin brush and black polish.
You can also use a light pink polish to paint rosy cheeks, making the polar bears look even cuter.
Finish with a glossy topcoat to protect the design and add a polished shine.
This Polar Bear Love nail art is sure to melt hearts and spread holiday joy.
Festive French Tips
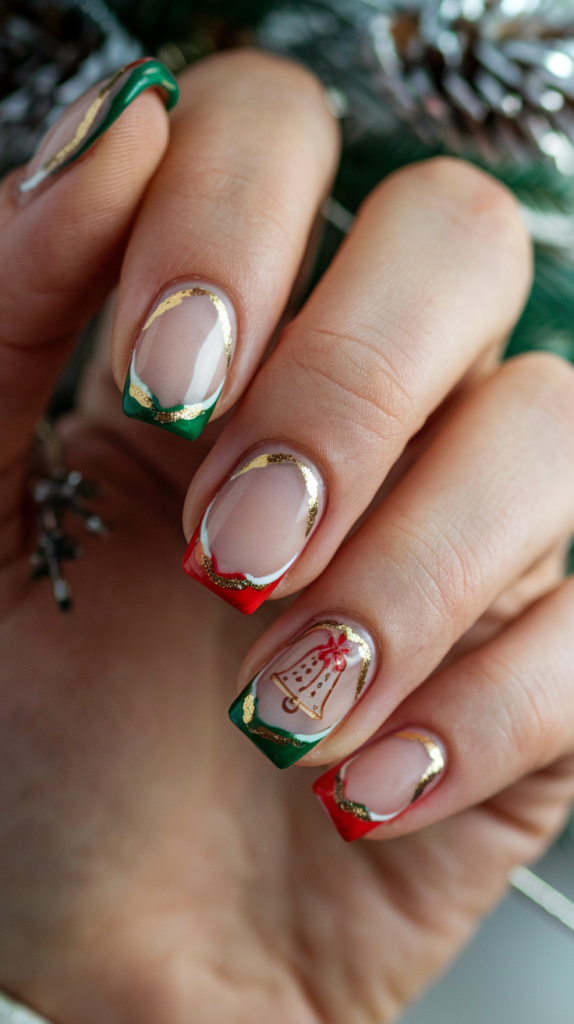
Creating Holiday-Inspired French Tips
Festive French tips are a classy yet playful way to celebrate the holiday season.
Start with a nude or pale pink base, applying two coats for a soft and elegant look.
Once the base is dry, use red, green, or metallic polish to paint the tips of each nail.
Instead of the traditional straight French tip, try adding a holiday twist by curving the line slightly or using a zigzag pattern.
You can also alternate colors on different nails, creating a mix of red and green tips for a more festive feel.
The key is to keep the lines clean and crisp, giving the design a polished and sophisticated finish.
Using Red And Green For A Festive Twist
Red and green are classic holiday colors that instantly make any design feel festive.
Use a thin striping brush to apply the polish to the tips, ensuring even and precise lines.
If you prefer a more subtle look, use metallic or glitter polish for the tips, adding a touch of holiday sparkle.
You can also incorporate white polish for a snowy effect, blending it into the red and green tips to create an ombre look.
The festive twist on the French tip manicure is perfect for holiday parties or family gatherings, adding a touch of elegance to your holiday ensemble.
Adding Holiday Accents Like Holly Or Bells
To elevate your Festive French tips, add small holiday accents like holly leaves or bells.
Use a fine nail art brush and green polish to paint tiny holly leaves near the tips of one or two accent nails.
Add small red dots to represent the holly berries, creating a festive and detailed design.
For the bells, use gold polish to paint small, rounded shapes at the tips, adding a black dot for the bell’s clapper.
These holiday accents add a playful touch to the classic French manicure, making it feel more personalized and festive.
Seal the design with a glossy topcoat to protect the artwork and give your nails a shiny finish.
Twinkling Stars Nail Art
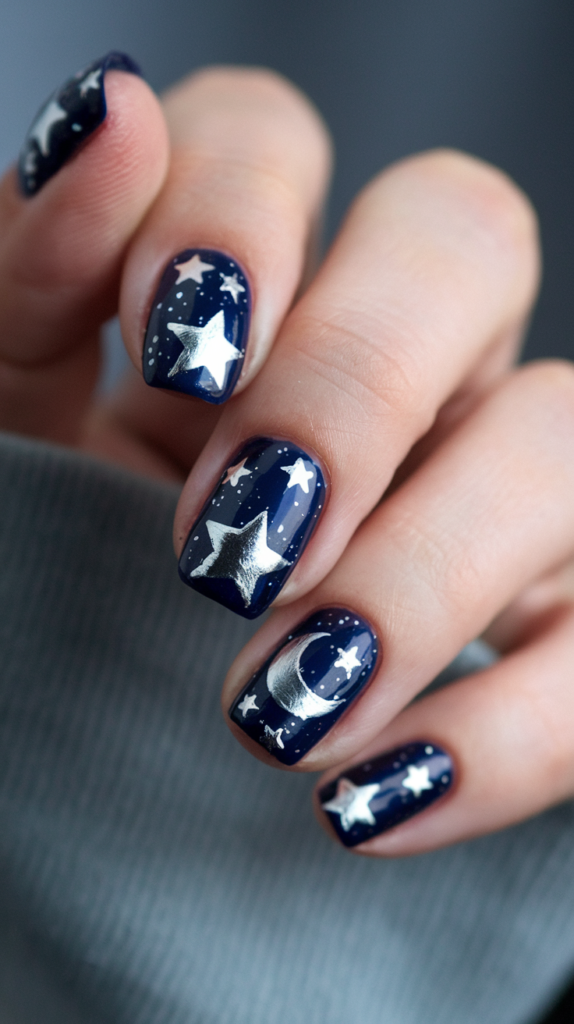
Dark Blue Or Black Base For A Night Sky Effect
Twinkling stars nail art is a stunning way to capture the magic of a starry winter night.
Begin by painting your nails with a deep blue or black polish, using two coats for a rich, opaque finish.
The dark base serves as the perfect backdrop for the twinkling stars, giving the design a celestial and dreamy vibe.
Make sure the polish is fully dry before moving on to the star details.
You can also add a subtle shimmer to the base using a sheer, glittery topcoat, creating the illusion of a sparkling night sky.
Painting Metallic Silver Stars And A Crescent Moon
To create the stars, use a fine nail art brush and metallic silver polish.
Start by painting small, four-pointed stars, with each point extending outward in a cross shape.
Vary the size and placement of the stars to make the design look more dynamic and realistic.
For the crescent moon, use the silver polish to paint a small, curved shape on one or two accent nails.
The moon should have a soft, glowing effect, adding a touch of whimsy to the design.
You can also use holographic or iridescent polish for the stars, giving them a multidimensional shine that changes in different lighting.
Using Glitter For A Starry Sky Finish
Glitter is the key to making your twinkling stars nail art truly magical.
Use a fine, iridescent glitter polish to add tiny dots around the stars and moon, mimicking the look of distant stars in the night sky.
You can also use a glitter topcoat to lightly dust the entire nail, adding a subtle sparkle that enhances the overall design.
The glitter should be evenly distributed, creating a starry effect that catches the light and adds depth to the night sky.
Finish with a glossy topcoat to seal the design and make the stars and moon shine brightly.
This Twinkling Stars nail art is perfect for holiday parties or any winter occasion, adding a touch of celestial beauty to your look.
Cozy Fireplace Nail Design
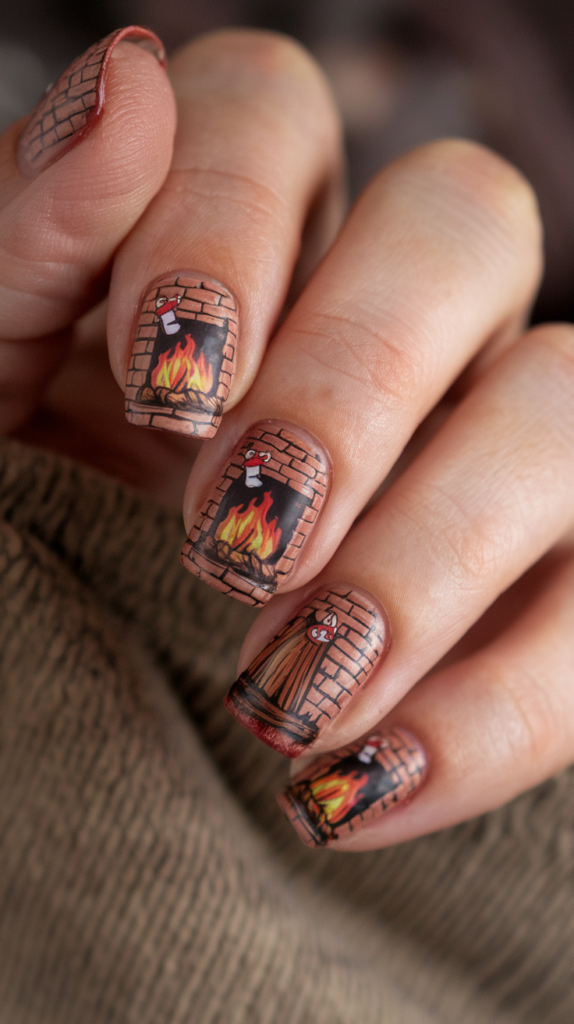
Warm-Toned Base For A Cozy Vibe
A cozy fireplace nail design is all about creating a warm and inviting atmosphere on your nails.
Start by painting your nails with a warm, earthy base color, such as a soft beige, burnt orange, or warm taupe.
These shades mimic the glow of firelight and provide a neutral canvas for the detailed fireplace scene.
Apply two coats to ensure full coverage and a smooth finish.
The base color should feel warm and cozy, evoking the feeling of sitting by a crackling fire on a cold winter night.
Painting A Detailed Fireplace Scene
The key to a realistic fireplace design is in the details.
Use a thin nail art brush and dark brown polish to paint the outline of the fireplace on one or two accent nails.
The fireplace should have a classic shape, with a brick or stone texture to add depth.
Once the outline is complete, fill in the interior of the fireplace with black polish to create the illusion of a deep, shadowy firebox.
Use bright orange, red, and yellow polish to paint the flames, layering the colors to make the fire look dynamic and alive.
Add small, curved lines of white or gold to represent glowing embers and sparks.
For extra detail, paint a mantel above the fireplace and decorate it with tiny stockings or holiday garlands.
Adding Stockings And Firelight For Realism
To make your fireplace scene feel festive and complete, add tiny stockings hanging from the mantel.
Use red and white polish to paint the stockings, and add small details like green holly leaves or candy canes peeking out of the tops.
For the firelight effect, use a sheer, shimmery gold polish to create a subtle glow around the flames, blending it into the warm-toned base color.
This gives the illusion of light radiating from the fire and adds a touch of magic to the design.
Finish with a high-shine topcoat to protect the artwork and make your cozy fireplace nails look polished and ready for the holiday season.
Hot Cocoa Bliss Nail Art
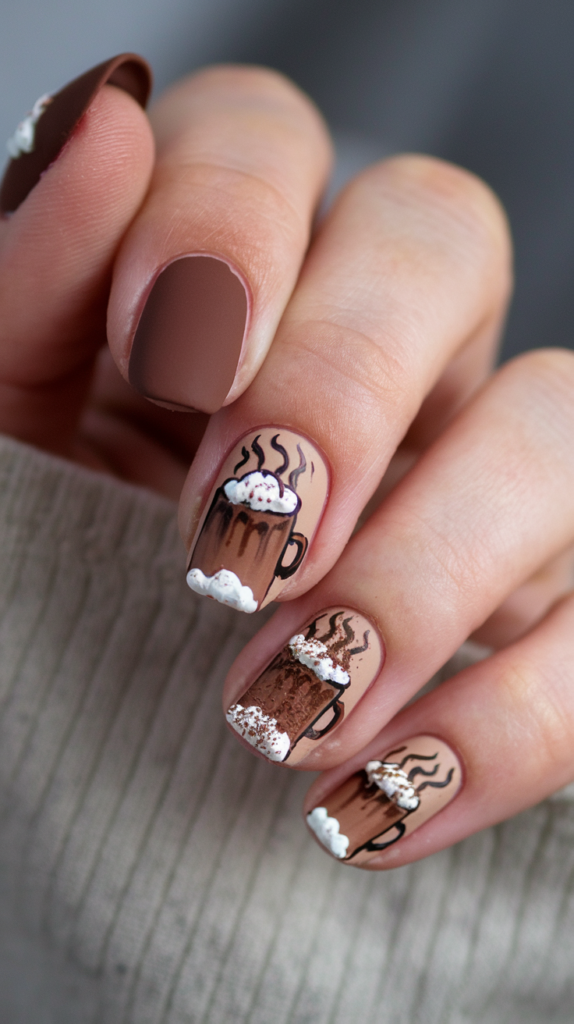
Nude Or Brown Base With Hot Chocolate Designs
Hot cocoa nail art is perfect for adding a warm and comforting touch to your holiday look.
Start with a nude or light brown base to represent the color of creamy hot chocolate.
Apply two coats for a smooth, even finish, and let it dry completely.
This base color sets the tone for the design, evoking the coziness of a steaming mug of cocoa on a chilly winter day.
If you want a richer look, use a dark brown polish to create the illusion of a deep, velvety chocolate.
Painting Marshmallows And Whipped Cream Details
To make the hot cocoa design come to life, add marshmallows and whipped cream accents.
Use a white polish and a dotting tool to paint small, round marshmallow shapes floating on the surface of the cocoa.
The marshmallows should be slightly raised to give them a realistic, fluffy appearance.
For the whipped cream, use a thin nail art brush to create swirled, wavy lines at the edge of the mug or at the base of the nail.
The whipped cream should look soft and billowy, with a touch of shimmer or glitter to make it stand out.
These details add a playful and delicious element to the design, making your nails look good enough to drink!
Adding A Matte Finish For A Cozy Look
A matte topcoat is the perfect way to complete your hot cocoa nail art, giving it a soft and cozy texture.
The matte finish tones down the shine of the polish, making the design feel warm and inviting.
Apply the matte topcoat evenly over each nail, taking care to seal the marshmallow and whipped cream details.
If you want to add a touch of sparkle, use a glittery topcoat on just one accent nail or around the edges of the whipped cream.
This will give your nails a subtle shimmer, adding a festive twist to the cozy design.
The finished look is both playful and comforting, perfect for a holiday night spent sipping cocoa by the fire.
Christmas Bells Nail Design
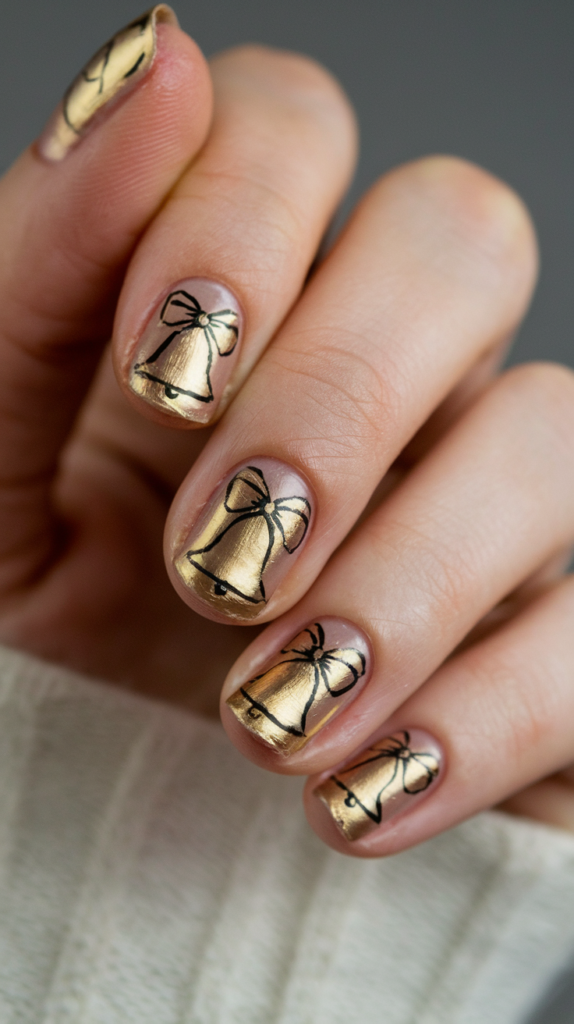
Gold Base With Delicate Bell Patterns
Christmas bells are a timeless holiday motif, and they make for an elegant and festive nail design.
Begin by painting your nails with a metallic gold polish, applying two coats for a rich, reflective finish.
The gold base should look luxurious and festive, reminiscent of holiday decorations and twinkling lights.
Once the base is dry, use a fine nail art brush and a contrasting color, such as white or red, to paint delicate bell patterns on one or two accent nails.
The bells should be round and slightly curved, with a small loop at the top to represent where they hang.
Painting Ribbons And Holly Accents
To make your bell design more festive, add ribbons and holly accents.
Use a bright red polish to paint thin, flowing ribbons attached to the top of each bell.
The ribbons should look elegant and fluid, with small loops and curls for added movement.
For the holly accents, use a dark green polish to paint small, pointed leaves around the bells.
Add red dots to represent holly berries, giving the design a pop of color.
These details make the bells look beautifully decorated and ready for the holiday season.
The combination of gold, red, and green creates a classic holiday color palette that is both festive and refined.
Using Metallic Polish For A Shiny Effect
The metallic gold base is key to making this design shine, but you can enhance the effect even further with a glossy topcoat.
The topcoat will make the gold polish gleam and give the entire design a high-shine, polished look.
If you want to add even more sparkle, use a gold glitter topcoat or apply tiny rhinestones to the center of the bells.
The metallic finish and shiny accents will make your nails stand out, catching the light with every movement.
This Christmas bells nail art is perfect for adding a touch of elegance to your holiday celebrations.
Festive Chevron Nail Art
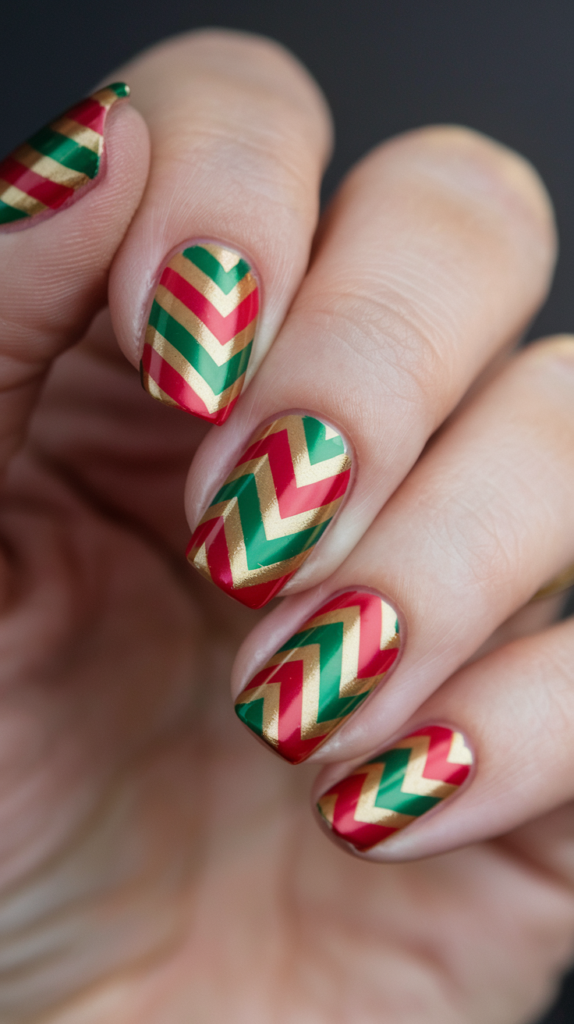
Creating Crisp Green And Red Chevron Stripes
Festive chevron nail art is a bold and modern way to celebrate the holiday season.
Start with a neutral or white base to make the chevron stripes stand out.
Once the base is dry, use striping tape to create clean, even chevron lines on each nail.
Apply a bright red polish to one section and a deep green polish to the other, carefully filling in the chevron pattern.
Remove the tape while the polish is still wet to ensure sharp, crisp lines.
The red and green stripes should be bold and vibrant, creating a striking holiday look.
If you prefer a more subtle design, use metallic or glitter polish for the chevron stripes.
Adding Gold Glitter Lines For Holiday Glam
To elevate your chevron design, add thin lines of gold glitter polish between the red and green stripes.
Use a striping brush to apply the glitter polish precisely, creating a glamorous and festive effect.
The gold glitter adds a touch of holiday magic, making the chevron pattern sparkle and shine.
You can also use holographic or iridescent glitter for a multidimensional look that catches the light beautifully.
The combination of red, green, and gold creates a classic holiday color scheme with a modern twist, perfect for any festive occasion.
Using A Glossy Topcoat To Seal The Design
A glossy topcoat is essential for sealing your festive chevron nail art and giving it a polished finish.
Apply the topcoat generously, making sure to cover the entire design and smooth out any ridges from the striping tape.
The glossy finish will make the colors look even more vibrant and give the gold glitter lines a high-shine effect.
If you want to add extra dimension, use a gel topcoat for a thicker, glass-like finish.
This step not only protects your nail art from chipping but also adds a professional touch, making your chevron nails look sleek and salon-worthy.
Winter Fox Nail Design
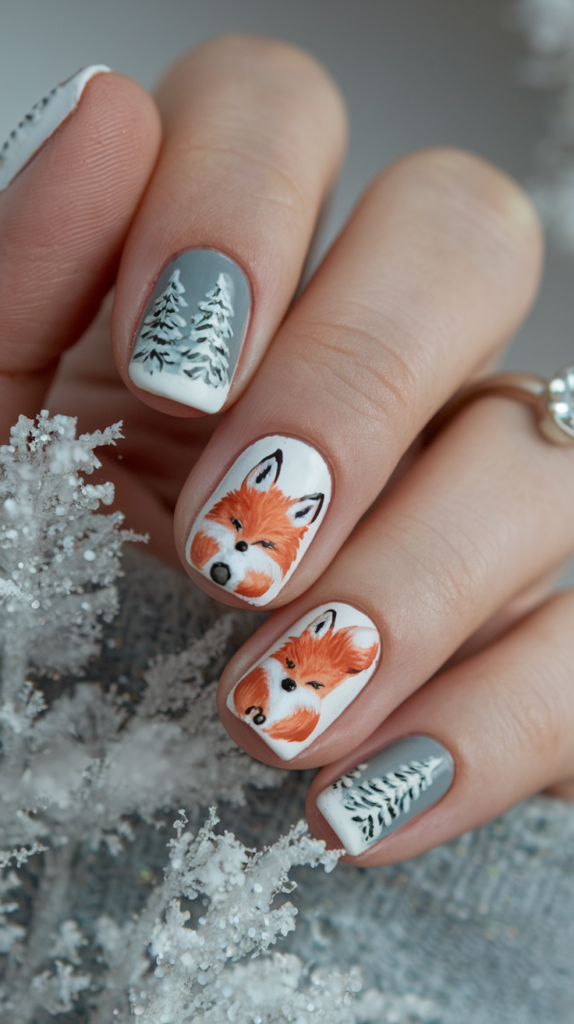
White And Gray Base With A Cute Fox Face
Winter fox nail art is a charming and whimsical design, perfect for the colder months.
Start with a soft white or light gray base to create a wintry, snow-covered background.
Apply two coats for full opacity, and let the polish dry completely.
On one or two accent nails, use a fine nail art brush and a warm orange or rust-colored polish to paint the outline of a fox’s face.
The fox’s face should be round, with pointed ears at the top and a small, triangular nose at the bottom.
Fill in the outline with the orange polish, leaving space for the white details on the fox’s face.
Painting Snowy Trees And Frosty Details
To complete the winter scene, paint small, snow-covered trees on the other nails.
Use a thin brush and white polish to create the tree trunks and branches, adding small dots of white along the branches to represent snow.
You can also use a sponge to dab white polish along the tips of the nails, creating a frosty, snow-dusted effect.
For added detail, paint tiny snowflakes or falling snow around the fox’s face, giving the design a magical, wintry feel.
The combination of the cute fox and the snowy background makes this nail art perfect for the holiday season.
Using A Soft, Glittery Background
A soft, glittery background adds an extra layer of enchantment to your winter fox nail art.
Use a sheer, iridescent glitter polish over the white or gray base to create the illusion of sparkling snow.
The glitter should be subtle but shimmery, catching the light and adding depth to the design.
If you want to make the fox’s face stand out even more, use a matte topcoat on the accent nails and leave the glittery background glossy.
This contrast will give your nail art a unique and eye-catching finish, making it perfect for holiday parties or cozy winter days.
Frozen-Inspired Nail Art
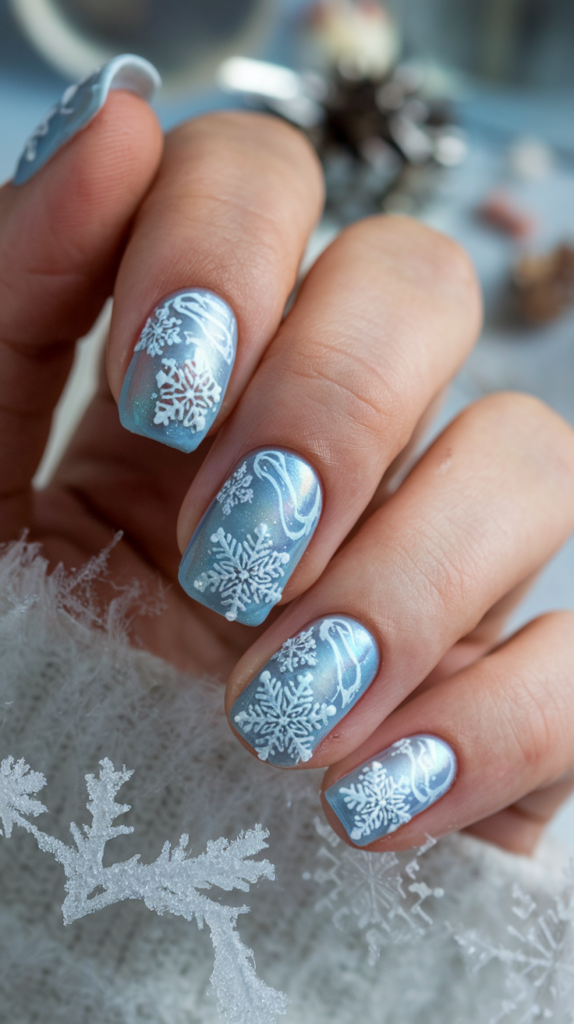
Icy Blue Base With Iridescent Shimmer
Frozen-inspired nail art is all about capturing the magic of a winter wonderland.
Begin by painting your nails with an icy blue polish, applying two coats for a smooth and vibrant finish.
Once the base is dry, use a sheer, iridescent shimmer polish to add a frosty glow to each nail.
The shimmer should reflect light in different colors, creating a multidimensional, ice-like effect.
The icy blue base and shimmering topcoat make your nails look like they’re covered in a layer of sparkling frost, perfect for channeling your inner ice queen.
Painting Swirling Frost Patterns
To create swirling frost patterns, use a thin nail art brush and white polish.
Start at the edges of the nail and paint delicate, wavy lines that twist and curl toward the center.
The lines should be thin and fluid, resembling the intricate patterns formed by frost on a window.
For added detail, use a dotting tool to add small white dots and snowflake shapes around the frost patterns.
You can also use silver or holographic polish to highlight certain areas, giving the design a magical, Frozen-inspired look.
The swirling frost patterns add movement and elegance to your nails, making them look truly enchanting.
Adding Tiny Snowflakes For A Frozen Effect
No Frozen-inspired nail art is complete without tiny, intricate snowflakes.
Use a fine brush or a snowflake stamping plate to add snowflake designs to each nail.
The snowflakes should vary in size and shape, with some overlapping the frost patterns for a layered effect.
You can also add tiny rhinestones or glitter accents to the center of each snowflake, making them sparkle like real ice crystals.
Finish with a high-shine topcoat to protect the design and give your nails a glossy, polished look.
This Frozen-inspired nail art is perfect for holiday celebrations or any winter event, adding a touch of magic and elegance to your style.
Holiday Glam Nail Design
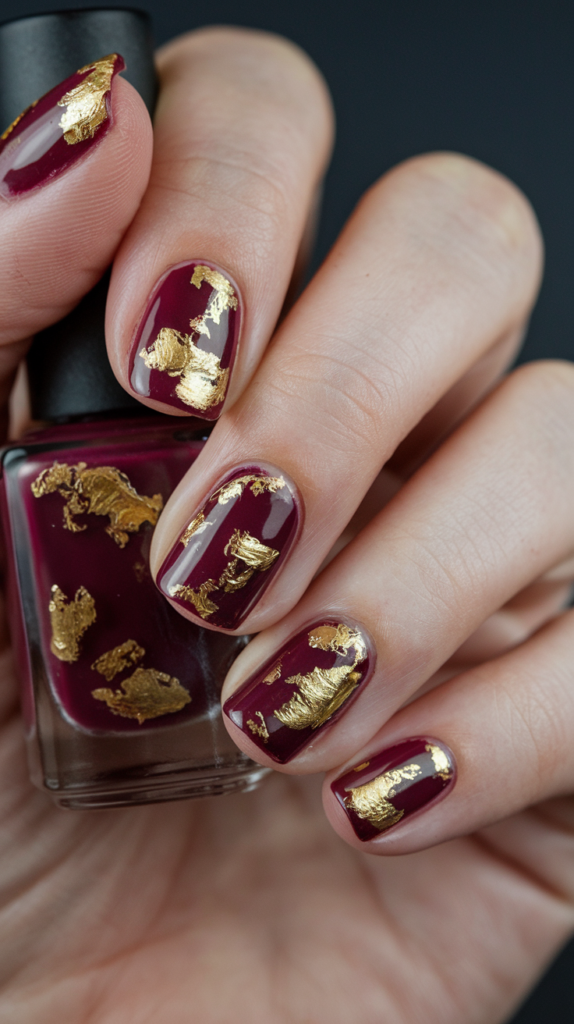
Burgundy Base With Gold Leaf Foil Accents
Holiday glam nail art is all about luxury and sophistication, and a deep burgundy base with gold leaf foil accents is the perfect way to achieve that.
Start by applying two coats of a rich, burgundy polish, making sure the color is even and opaque.
The burgundy shade should be deep and sultry, adding a touch of drama to your look.
Once the base is dry, use a small brush to apply gold leaf foil to one or two accent nails.
The gold foil should be placed in irregular shapes, giving the design a luxurious, marbled effect.
Press the foil gently onto the nail and seal it with a layer of topcoat to keep it in place.
Creating A Luxurious, Marbled Look
To add even more elegance to your holiday glam nails, create a marbled effect using white and gold polish.
Use a thin brush to paint wavy lines of white polish over the burgundy base, blending them slightly to mimic the look of natural marble.
Add small touches of gold polish along the white lines, enhancing the marbled effect and giving it a glamorous, festive feel.
The combination of burgundy, white, and gold creates a stunning contrast, making your nails look sophisticated and chic.
This marbled design is perfect for holiday parties or any special occasion where you want to make a statement.
Using A Glossy Topcoat For Maximum Shine
A glossy topcoat is essential for giving your holiday glam nails a polished, high-shine finish.
The topcoat will make the burgundy base look even more vibrant and enhance the reflective quality of the gold leaf foil.
Apply a generous layer of topcoat, making sure to cover all the foil accents and marbled details.
The glossy finish will make your nails look like they’ve been dipped in liquid gold, adding a touch of opulence to your holiday look.
If you want to add extra sparkle, use a glitter topcoat on just one accent nail or along the edges of the gold foil.
The final result is a glamorous, show-stopping nail design that’s perfect for the holiday season.
Conclusion
As the holiday season approaches, there’s no better way to celebrate than with beautiful and festive nail art.
From playful and whimsical designs to luxurious and elegant looks, these 35 Christmas nail art ideas offer endless inspiration for your holiday manicure.
Whether you’re attending a festive party or spending a cozy night in, your nails will be a dazzling reflection of the holiday cheer.
Don’t be afraid to get creative and make each design your own, and remember to finish with a glossy or matte topcoat to keep your manicure looking fresh and fabulous.
Happy holidays and happy nail painting!
