
Acrylic nails have become a canvas for creative expression, offering endless possibilities for design, style, and personal flair.
Whether you’re looking for something subtle and chic or bold and daring, the versatility of acrylic nails makes them a perfect choice for showcasing your personality through nail art.
From classic designs like French tips with a twist to more adventurous looks like neon flames and holographic finishes, there’s a nail style for every occasion and mood.
In this post, we’ll explore 35 eye-catching acrylic nail designs that will inspire you to try something new, whether you’re looking for elegance, playfulness, or pure glam.
1. Delicate Pink Ombre Nail Art
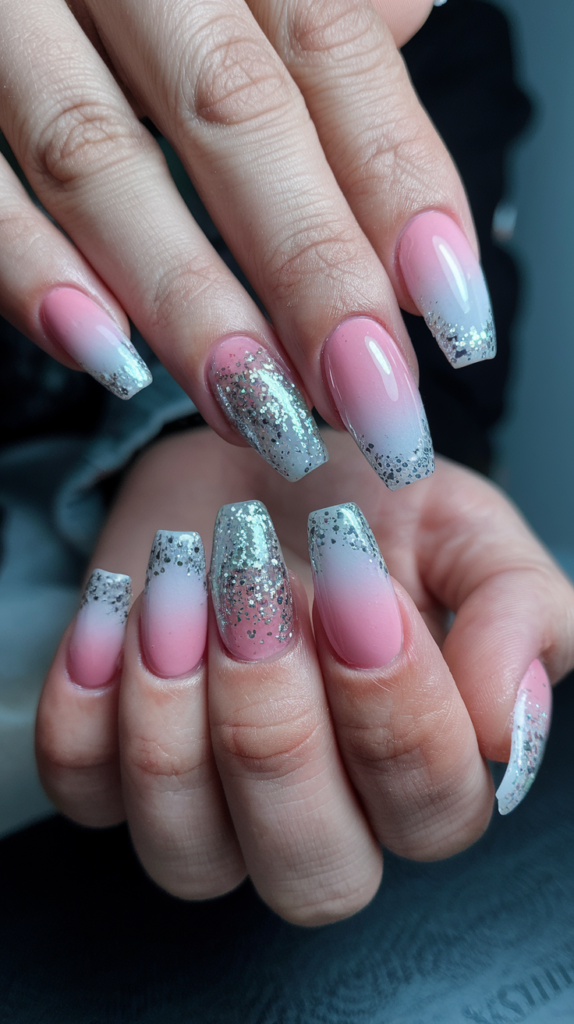
Delicate Pink Ombre nails exude elegance and charm with a soft gradient of pinks, fading seamlessly into a pristine white tip.
The addition of shimmering silver glitter on the tips elevates this design, making it perfect for weddings, romantic evenings, or anytime you want to showcase a polished, chic look.
Creating the Ombre Gradient Effect
Step 1: Apply the Base Color
Begin by applying a light pink polish as the base color for your nails. Make sure the color is evenly distributed and opaque.
Step 2: Create the Ombre Gradient
Using a makeup sponge or gradient tool, gently blend a white polish from the tips of your nails downward, merging it into the pink base. Ensure a smooth transition between the colors for a flawless ombre effect.
Step 3: Let It Dry
Allow the ombre gradient to dry completely before moving on to the next step.
Adding Glitter Tips
Step 1: Apply Glitter to the Tips
While the nails are still slightly tacky, carefully apply silver glitter to the tips of each nail. You can use a fine glitter brush or a sponge to achieve an even, subtle sparkle.
Step 2: Blend the Glitter
Gently press the glitter into the nail, ensuring the transition from glitter to pink ombre is seamless for a dazzling finish.
Step 3: Top Coat
Apply a glossy top coat to seal in the design, ensuring the glitter stays in place and the nails have a smooth, glossy finish.
Finishing Touches: Polishing the Look
Step 1: Clean Up the Edges
Use a nail brush dipped in remover to clean around your cuticles for a polished, professional look.
Step 2: Final Glossy Layer
Finish off with another layer of top coat to enhance the shine and keep your nails looking fresh and glamorous.
Why It Works
Delicate Pink Ombre Nail Art captures a sense of refined beauty with its soft color palette and smooth gradient effect. The glitter tips add an extra layer of sparkle that catches the light, enhancing the overall design’s elegance.
The combination of a gradient ombre with sparkling accents makes this look versatile for a range of occasions, from casual outings to special events, ensuring it never goes out of style.
2. Glamorous Marble Nail Art

Glamorous Marble nails combine the timeless elegance of marble with a touch of luxury. The white base is beautifully veined with golden accents, creating a sophisticated design that’s perfect for any upscale event or whenever you want to feel extra polished.
Creating the Marble Effect
Step 1: Apply the Base Color
Start with a white base coat for each nail, ensuring a smooth and even coverage. Allow this layer to dry completely before proceeding.
Step 2: Add the Veining
Using a fine nail art brush, dip it into a light brown or beige polish and gently create thin, irregular lines across the nail. Focus on adding a natural-looking marble pattern by varying the intensity of the lines.
Step 3: Blur the Lines
To give the marble effect its signature softness, use a small amount of acetone or nail polish remover on a clean brush and lightly blend the lines. This will create the illusion of veins running through the marble.
Step 4: Let It Dry
Allow the veining to dry before moving on to the next step to prevent any smudging.
Adding the Golden Touch
Step 1: Apply Gold Leaf
Once the marble effect has dried, apply small pieces of gold leaf to some of the veins or scattered across the nail for added glamour. Press the gold leaf gently into the nail to ensure it adheres well.
Step 2: Seal with Top Coat
Finish with a glossy top coat to smooth out the design and lock in the gold accents, creating a polished and luxurious finish.
Finishing Touches: Perfecting the Look
Step 1: Clean Up the Edges
Use a brush dipped in remover to clean around your cuticles for a flawless finish.
Step 2: Final Top Coat
Apply another layer of top coat to ensure your design remains smooth and vibrant, enhancing the marble effect with an extra layer of shine.
Why It Works
Glamorous Marble Nail Art is the epitome of luxury and refinement. The striking combination of white marble and golden accents adds a sophisticated and timeless touch to your nails.
The use of gold leaf enhances the design’s richness, while the delicate veining gives it depth and dimension, making it a versatile and eye-catching nail art choice for special occasions or whenever you want to feel chic.
3. Pastel Swirl Nail Art

Pastel Swirl nails are the perfect blend of playful and sophisticated, with gentle swirling colors that create a dreamy, fluid look.
The combination of soft pink, lavender, and mint green creates a calm, soothing design, ideal for spring or any occasion where you want to add a touch of whimsy to your style.
Creating the Swirling Effect
Step 1: Apply the Base Color
Start by applying a light pastel color, such as soft pink or lavender, as the base coat. Let this layer dry completely before adding any additional colors.
Step 2: Add the Swirling Colors
Using a fine nail art brush or a dotting tool, carefully add small amounts of pastel colors, such as mint green and lavender, in random sections of the nail. Create a few soft, curved strokes of each color to mimic a fluid swirl pattern.
Step 3: Blend the Colors
Use a clean brush dipped in acetone or nail polish remover to gently blend the colors together. Focus on creating smooth transitions between the swirls, ensuring that the colors melt into each other naturally without harsh lines.
Step 4: Let It Dry
Allow the design to dry completely before proceeding with any additional steps.
Adding the Finishing Touches
Step 1: Apply a Top Coat
Once the swirl design is dry, apply a glossy top coat to seal in the colors and give the nails a smooth, shiny finish. This will also help prevent the colors from smudging and keep the design intact.
Step 2: Clean Up the Edges
Use a brush dipped in remover to clean up any excess polish around the edges of your nails for a polished look.
Why It Works
Pastel Swirl Nail Art is a stunning and calming design that brings together delicate pastel colors in a playful, artistic way.
The fluid swirl pattern creates a sense of movement and depth, while the soft color palette evokes a serene and fresh vibe.
This design is versatile enough for various occasions, from casual outings to more elegant events, and its light, airy feel makes it perfect for the warmer months.
The smooth blend of colors and glossy finish ensures that your nails are both chic and captivating.
4. Mirror Finish Nail Art
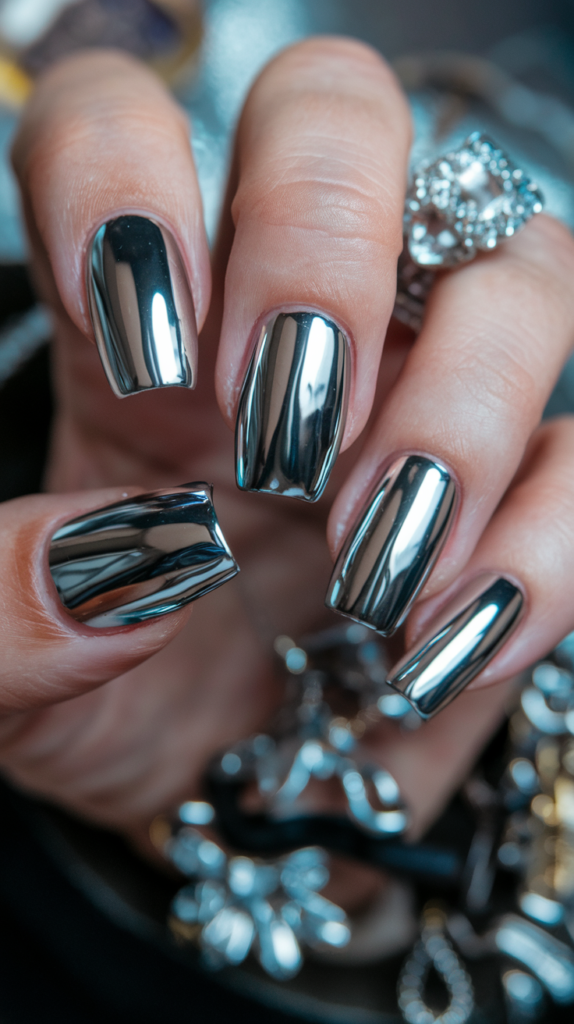
Mirror Finish nails offer a sleek and futuristic design that captures the attention with its reflective, high-shine surface.
The glossy chrome look gives your nails a metallic and sophisticated touch, making it a bold statement perfect for a night out or any event where you want to add a dash of glamour.
Achieving the Mirror-Like Shine
Step 1: Apply the Base Coat
Start with a base coat to ensure the longevity of your manicure and to smooth out any imperfections. Let it dry completely before applying the next layer.
Step 2: Apply Chrome Powder
After the base coat has dried, apply a black or dark base color. This step helps to enhance the mirror finish. Once the base color is dry, gently rub chrome powder over the surface of your nails using a soft applicator or sponge. The powder should be evenly distributed for a smooth, reflective surface.
Step 3: Buff and Polish
Lightly buff the chrome powder into the nail, ensuring the shine is even across the entire nail surface. This process will help create a flawless, glass-like finish.
Step 4: Seal the Design
Apply a gel top coat to seal the chrome finish and give it an extra layer of protection. Cure it under a UV lamp if using a gel top coat to lock in the shine.
Finishing Touches: Perfecting the Look
Step 1: Clean Up the Edges
Use a small brush and acetone to clean up the edges of your nails for a crisp, polished look.
Step 2: Final Glossy Top Coat
Apply a final layer of top coat to ensure that your nails stay smooth and shiny while keeping the chrome effect intact.
Why It Works
Mirror Finish Nail Art creates an eye-catching, sleek look that shines with a futuristic appeal. The metallic chrome effect provides a mirror-like reflection, adding sophistication and glamour to your nails.
This design is perfect for those looking to make a bold statement with their nails. The high-shine finish gives your nails a glossy, polished look, ensuring they are the center of attention at any event or gathering.
5. Chic Black Matte and Gloss Nail Art
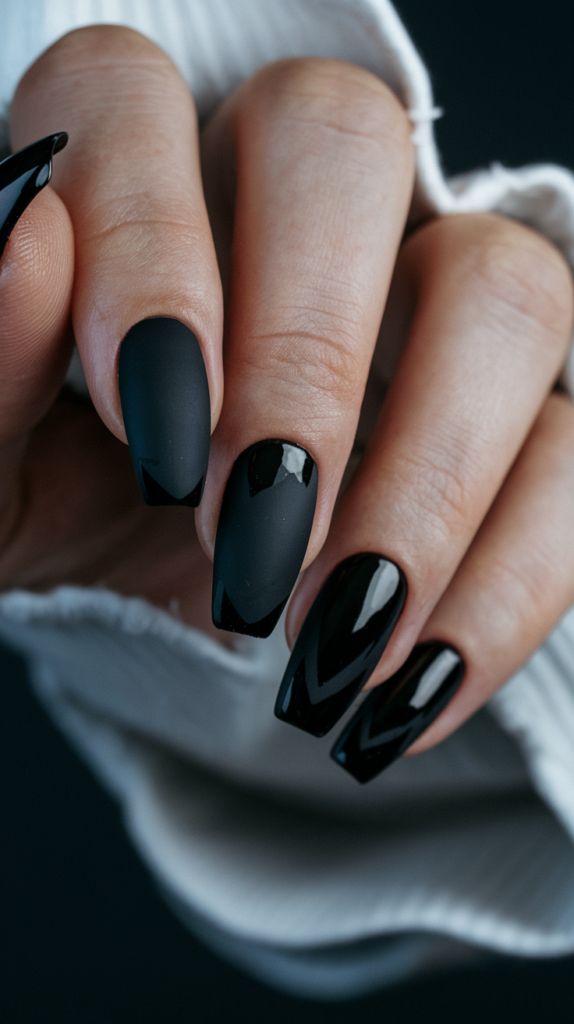
Chic Black Matte and Gloss nails are the epitome of edgy sophistication, offering a stunning contrast between matte and glossy finishes.
The combination of these two textures, paired with sleek black polish, creates a bold yet refined look, perfect for anyone who wants to make a statement with their nails.
Creating the Matte Black Base
Step 1: Apply the Matte Base Coat
Start by applying a matte black nail polish to all your nails. Make sure the color is even and opaque, allowing it to dry thoroughly before moving on to the next step.
Step 2: Let It Dry Completely
Allow the matte black base coat to fully dry to ensure the texture is smooth and set.
Adding Glossy Black Accents
Step 1: Apply Glossy Black Polish
Using a fine nail art brush, carefully apply a glossy black polish in specific patterns or designs, such as stripes, geometric shapes, or V-shaped accents as shown in the image. The contrast between matte and glossy will create a high-fashion effect.
Step 2: Seal the Design
Finish with a top coat to protect both the matte and glossy areas, ensuring the design stays intact and vibrant.
Finishing Touches: Perfecting the Look
Step 1: Clean Up the Edges
Use a small brush with acetone to clean up any excess polish around the cuticles for a sharp, neat finish.
Step 2: Final Top Coat
For extra protection and shine on the glossy accents, apply a clear glossy top coat.
Why It Works
Chic Black Matte and Gloss Nail Art stands out for its sleek, modern aesthetic. The combination of matte and glossy black finishes creates a striking contrast that captures attention without being overpowering.
This design is ideal for those looking to add a touch of sophistication and edge to their nails. It works wonderfully for both casual and formal occasions, making it a versatile and timeless choice for anyone wanting bold yet elegant nail art.
6. 3D Floral Rose Nail Art
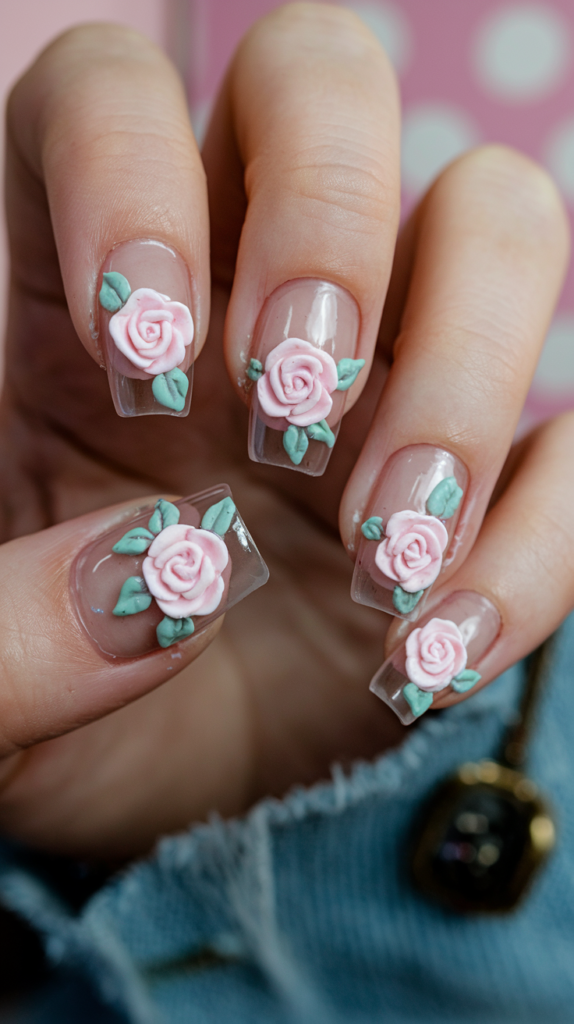
3D Floral Rose nails bring a delicate and romantic touch to your nails, featuring hand-crafted rose designs with soft pink petals and lush green leaves. This charming design is perfect for springtime or any occasion where you want to showcase your love for nature in a sophisticated yet whimsical way.
Creating the 3D Rose Design
Step 1: Apply the Base Coat
Begin by applying a clear base coat to your nails. This will ensure that the design sticks well to your nails and has a smooth surface.
Step 2: Create the Rose Flowers
Use a 3D nail gel or clay to form small rose shapes on your nails. Start by creating the rose petals, gently shaping them with a fine tool to form a realistic look. Add the leaves around the roses in a soft green tone for a balanced, natural feel.
Step 3: Attach the Flowers
Carefully place the roses on the nails where you want them. You can use a nail glue or clear gel to attach the flowers securely. Gently press them down to ensure they adhere properly.
Step 4: Let It Dry
Allow the 3D floral designs to dry completely before continuing with any additional steps.
Adding the Finishing Touches
Step 1: Apply a Top Coat
Once the roses are securely attached and dry, apply a clear top coat over the entire nail to lock in the design and create a smooth finish. This will also protect the 3D floral elements from damage.
Step 2: Clean Up the Edges
Use a small brush and acetone to clean up any excess gel or polish around your cuticles for a clean, polished look.
Why It Works
3D Floral Rose Nail Art brings a beautiful, tactile dimension to your nails with its hand-crafted, lifelike rose designs.
The combination of soft pinks and fresh green leaves evokes the beauty of nature, while the three-dimensional design adds depth and elegance.
This design is perfect for adding a romantic flair to your look, whether for weddings, special occasions, or simply to enjoy the beauty of floral-inspired nails.
Its intricate details and craftsmanship make it a standout design that’s sure to impress.
7. Neon Leopard Print Nail Art
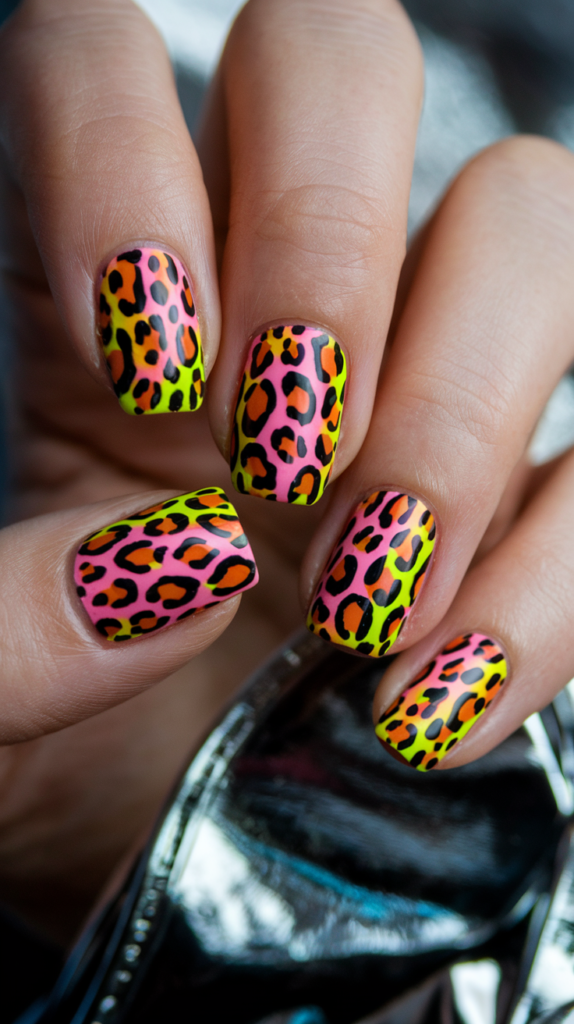
Neon Leopard Print nails make a bold statement with their vibrant mix of neon colors and fierce leopard patterns.
The combination of bright pink, yellow, and green creates an eye-catching, edgy design, perfect for anyone who wants to add a playful yet bold flair to their nails.
Creating the Neon Leopard Print Design
Step 1: Apply the Base Color
Start by applying a neon pink, yellow, or green base color to your nails. Choose the color that will stand out as the background for your leopard print. Ensure the base coat is smooth and evenly applied, and let it dry completely.
Step 2: Create the Leopard Print Pattern
Using a fine nail art brush or dotting tool, paint irregular oval or circular shapes in black or dark brown on top of the neon base. These will form the spots of the leopard print.
Step 3: Add Color Highlights
Inside the black spots, use a smaller brush to add pops of neon yellow, pink, or green for a fun, colorful twist on the classic leopard print. Let each layer dry before adding more details to avoid smudging.
Step 4: Let It Dry
Ensure that all the layers of paint dry completely before moving on to the next step.
Adding the Finishing Touches
Step 1: Apply a Top Coat
To protect your design and enhance its shine, apply a glossy top coat over the entire nail. This will also help smooth the surface and keep the design intact.
Step 2: Clean Up the Edges
Use a small brush dipped in acetone to clean up any excess polish around your cuticles for a crisp, clean look.
Why It Works
Neon Leopard Print Nail Art combines the wild, daring pattern of leopard print with a modern, neon twist. The bold neon colors make the design pop, while the leopard spots add an element of fun and fierce energy.
This nail art is perfect for those looking to stand out and make a statement. Its vibrant hues and edgy pattern make it a great choice for parties, festivals, or any time you want to add an adventurous touch to your style.
8. Galactic Sky Nail Art
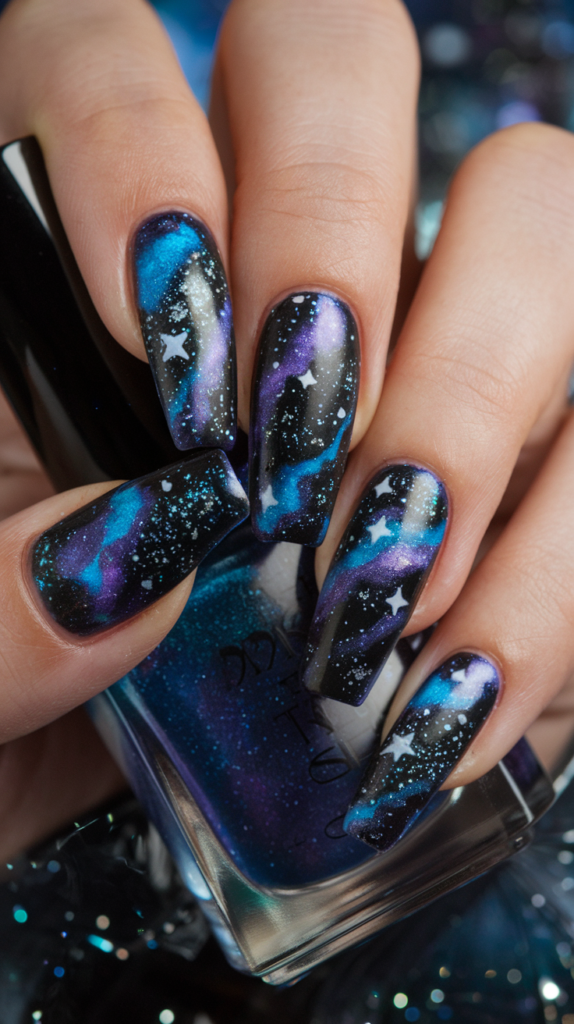
Galactic Sky nails transport you to a cosmic wonderland with its starry night effect, blending deep blues, purples, and blacks into a mesmerizing galaxy design.
The tiny stars and nebulous swirls evoke the magic of the night sky, making this design perfect for those who want to bring the stars a little closer.
Creating the Cosmic Background
Step 1: Apply the Base Coat
Start by applying a black base coat to each nail. This will provide the perfect backdrop for your galaxy design. Let it dry completely before moving on to the next step.
Step 2: Add the Gradient Colors
Using a makeup sponge or sponge applicator, create a gradient effect by gently dabbing on shades of deep purple, blue, and black. Start with the darkest color at the cuticle area and gradually blend lighter shades towards the tips of your nails. Be sure to blend the colors together to avoid harsh lines and create a smooth transition.
Step 3: Blend for a Nebulous Effect
After applying the gradient, lightly dab a small amount of white or light blue polish onto the sponge and gently press it on the nails to create a nebula-like effect. This adds depth and dimension to your galaxy.
Step 4: Let It Dry
Allow the gradient design to dry completely before moving on to the next steps.
Adding Stars and Glowing Details
Step 1: Create the Stars
To add stars to your design, use a fine brush or a toothpick dipped in white polish. Gently dot the white polish onto the nails in random areas, varying the size to create a starry look. You can also use a dotting tool to create larger stars and small dots for a sparkling effect.
Step 2: Add Extra Glowing Elements
For a little extra magic, you can apply glitter or holographic top coat to add shimmer and shine, mimicking the glistening effect of stars in the sky.
Step 3: Apply a Top Coat
Finish with a glossy top coat to seal in the design and enhance the shine, making your galactic nails even more vibrant.
Why It Works
Galactic Sky Nail Art beautifully captures the mesmerizing allure of the cosmos with its vibrant swirls of color and twinkling stars.
The gradient effect creates depth, while the stars and shimmering elements add a magical, otherworldly touch.
This design is perfect for those who love bold, creative nail art that stands out. Whether you’re heading to a special event or simply want to make a statement, these galactic nails will keep you shining brightly.
9. Geometric Black and Nude Nail Art
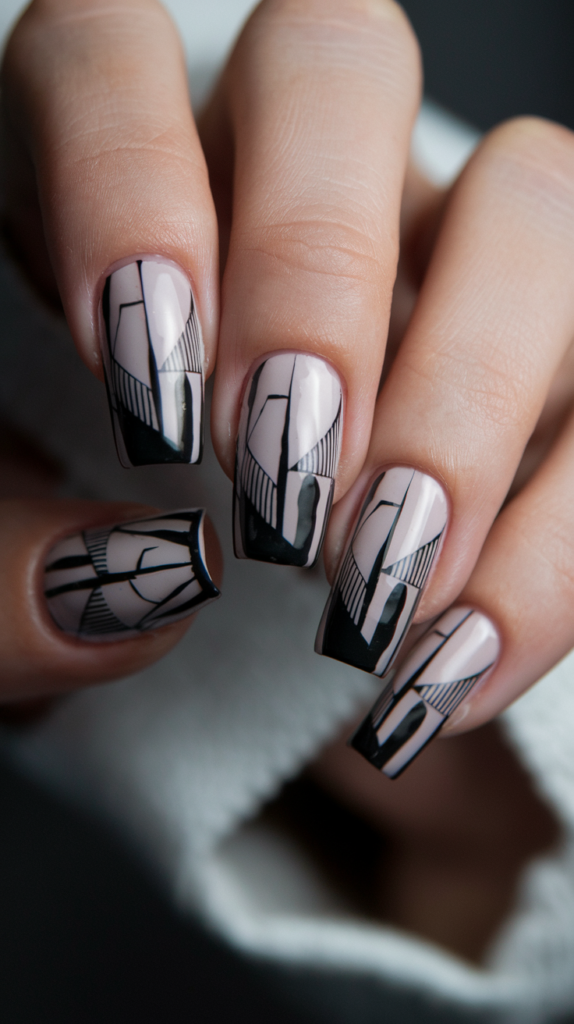
Geometric Black and Nude nails offer a modern, sophisticated design featuring sharp lines and bold contrasts.
The combination of a nude base with black geometric patterns creates a chic, minimalist look with a touch of elegance, making it perfect for both professional and casual occasions.
Creating the Nude Base
Step 1: Apply the Base Coat
Start by applying a nude or beige base coat to each nail. Make sure the base color is smooth and evenly applied for a flawless foundation. Allow it to dry completely before adding the geometric elements.
Adding the Black Geometric Design
Step 1: Draw the Geometric Shapes
Using a fine nail art brush or striping tape, carefully create sharp, angular lines across the nails. Focus on creating geometric patterns like triangles, rectangles, and straight lines. Start with the black polish to form the bold shapes.
Step 2: Fill in the Shapes
Once the basic shapes are outlined, fill in some of the sections with black polish to add depth and contrast. Leave some areas blank to create a balanced, open design.
Step 3: Add Details with Thin Lines
To complete the look, use a fine nail art brush to add thin, precise black lines within the geometric sections, creating a dynamic and structured design.
Step 4: Let It Dry
Allow the design to dry completely before moving on to the next step to avoid smudging.
Finishing Touches
Step 1: Apply a Top Coat
Once the design has dried, apply a glossy top coat to protect the design and give your nails a sleek, smooth finish. This will also add shine and enhance the overall appearance.
Step 2: Clean Up the Edges
Use a small brush and acetone to clean up any excess polish around the edges of your nails for a crisp and polished look.
Why It Works
Geometric Black and Nude Nail Art is a striking and modern design that creates a bold yet sophisticated look. The nude base softens the sharp, angular black lines, making it wearable for a variety of occasions.
This design is perfect for those who want to make a fashion-forward statement with their nails while keeping things sleek and elegant.
The clean lines and minimalist style ensure that this design remains timeless and chic.
10. Glamorous Jewel-Encrusted Nail Art
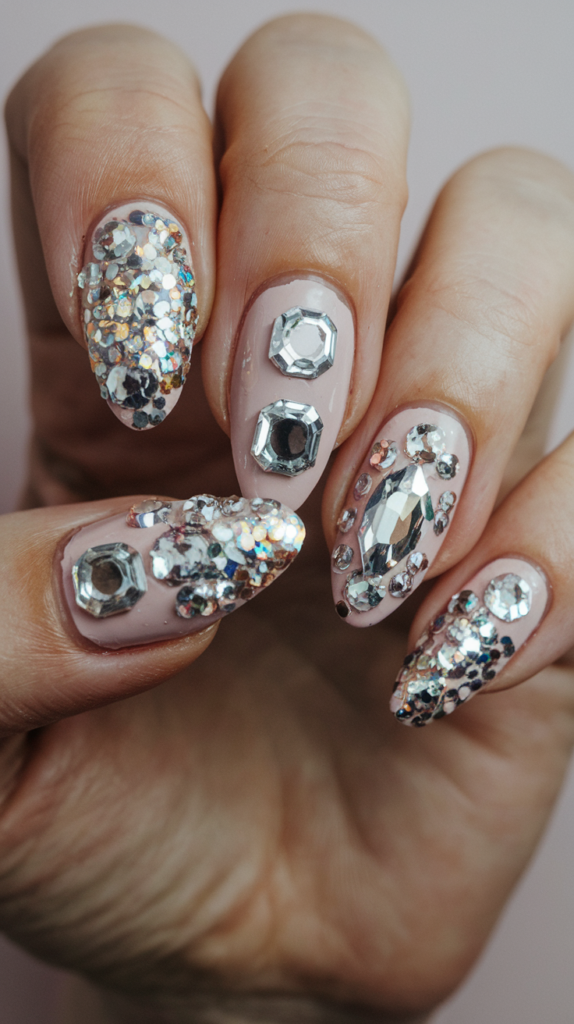
Glamorous Jewel-Encrusted nails are a dazzling display of luxury and elegance, featuring a beautiful mix of sparkling rhinestones and glitter.
The soft nude base provides the perfect backdrop for the eye-catching gems, making this design ideal for anyone looking to add a touch of opulence to their nails.
Creating the Nude Base
Step 1: Apply the Base Coat
Begin by applying a nude or neutral polish as the base color for each nail. Ensure that the base color is smooth and even, and allow it to dry completely before moving on to the next steps.
Adding the Rhinestones and Glitter
Step 1: Apply a Layer of Nail Glue
Using a small brush, apply a thin layer of nail glue to the area of the nail where you want to place the rhinestones. Focus on one nail at a time to ensure the glue doesn’t dry before you apply the gems.
Step 2: Place the Rhinestones
Using a dotting tool or tweezers, carefully place the rhinestones on the glue. Mix various sizes and shapes, such as round, oval, or rectangular stones, for a luxurious and varied effect. Arrange the rhinestones in clusters or patterns that suit your preference.
Step 3: Add the Glitter
While the rhinestones are still in place, add some glitter around the gems to create a sparkling effect. You can apply the glitter along the sides of the nails or as a backdrop to the stones, enhancing the overall design.
Step 4: Let It Dry
Allow the rhinestones and glitter to set in place and dry completely before moving on to the next step.
Sealing the Design
Step 1: Apply a Top Coat
Once the rhinestones and glitter have fully dried, apply a thick layer of top coat over the entire nail to seal in the design. Be careful not to move the rhinestones as you coat them with the top coat. This will also give the gems a glossy finish and ensure they stay securely in place.
Step 2: Clean Up the Edges
Use a small brush dipped in acetone to clean up any excess glue or polish around your cuticles for a crisp and neat finish.
Why It Works
Glamorous Jewel-Encrusted Nail Art is the epitome of luxury, combining soft, elegant nude polish with sparkling rhinestones and glitter to create a stunning, opulent effect.
The rhinestones add depth and dimension, while the glitter brings an extra layer of shine and sparkle.
This design is perfect for weddings, parties, or any occasion where you want your nails to shine and sparkle with the brilliance of jewels. It’s a luxurious, high-impact look that will certainly turn heads.
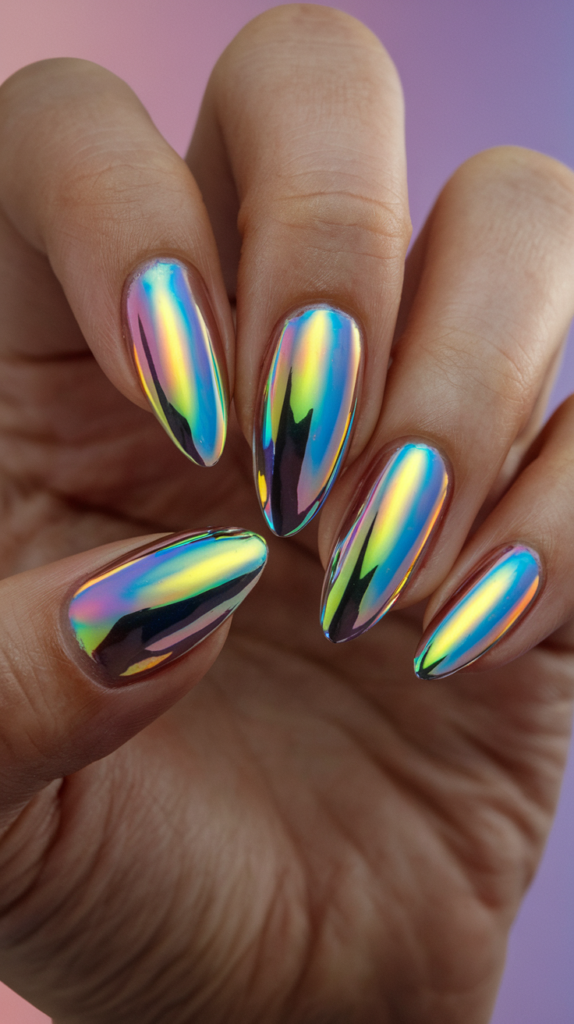
11. Holographic Chrome Nail Art
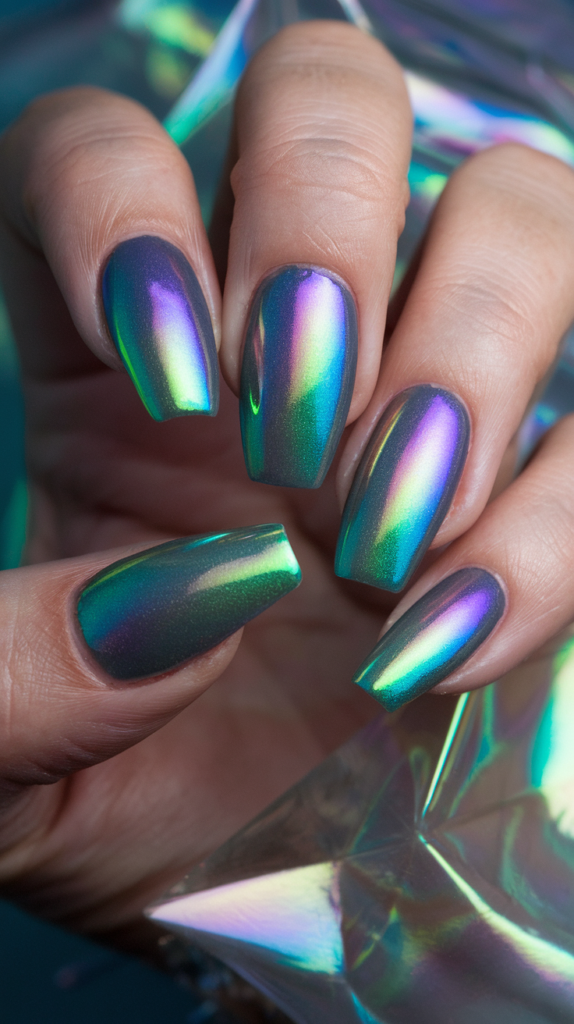
Holographic Chrome nails are an eye-catching, futuristic design featuring a stunning, reflective finish that changes colors in the light.
With a beautiful blend of purple, green, and blue tones, this design will make your nails stand out with a striking iridescent shine, perfect for anyone who loves bold, unique looks.
Creating the Chrome Base
Step 1: Apply a Base Color
Start with a smooth, black or dark-colored base coat. The dark base color will help to enhance the chrome effect, making the colors pop and shimmer. Allow the base coat to dry completely before moving on to the next step.
Applying the Holographic Chrome Effect
Step 1: Apply the Chrome Powder
Using a soft applicator or sponge, gently rub the holographic chrome powder onto the nails. The powder should be applied in circular motions, ensuring that the entire nail surface is covered for a consistent, iridescent finish.
Step 2: Buff the Chrome Powder
After applying the chrome powder, use a soft cloth or buffer to gently buff the surface. This will help the powder adhere better, creating a sleek and smooth reflective finish.
Step 3: Seal with Top Coat
Once you’ve achieved the desired chrome effect, apply a non-wipe top coat to seal in the chrome powder and add shine. This step is essential for maintaining the longevity of the design and ensuring it stays intact.
Finishing Touches
Step 1: Clean Up the Edges
Use a small brush and acetone to clean up any excess chrome powder or polish around your cuticles for a polished, neat finish.
Step 2: Final Glossy Top Coat
To ensure that your holographic chrome nails stay vibrant and glossy, apply a final layer of top coat. This will enhance the color-changing effect and provide extra protection.
Why It Works
Holographic Chrome Nail Art creates a mesmerizing and dynamic effect with its shifting colors that change depending on the angle of light.
The iridescent finish is bold, futuristic, and captivating, making it a perfect choice for anyone wanting to make a statement.
This design is ideal for special events, photoshoots, or whenever you want to add a touch of glam and innovation to your nails.
Its reflective shine and color-changing properties ensure that your nails stay stunning and attention-grabbing.
12. Abstract Red, Black, and White Nail Art
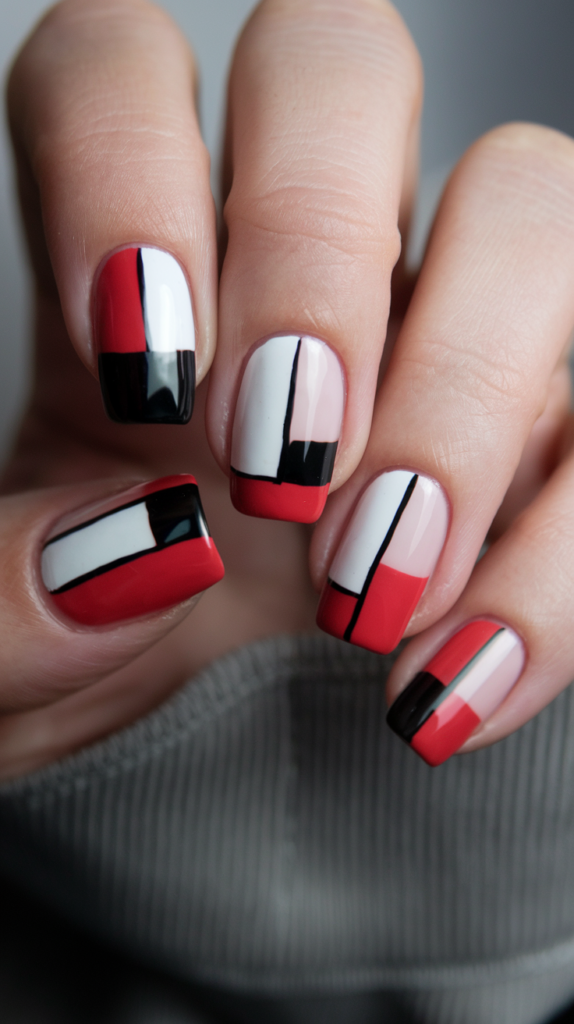
Abstract Red, Black, and White nails make a bold statement with their geometric shapes and contrasting colors.
The clean lines and minimalistic design create a striking visual impact, making this style perfect for anyone who wants to add an edgy and modern twist to their nails.
Creating the Base Colors
Step 1: Apply the Base Coat
Begin by applying a neutral or nude base coat to all nails. This will act as the foundation for the geometric design. Let the base coat dry completely before continuing.
Adding the Geometric Color Blocks
Step 1: Apply the Red Color
Using a striping tape or a fine nail art brush, create a bold red block on one section of each nail. Be sure to make the lines straight and clean for a sharp geometric look.
Step 2: Add the Black Color
Next, use the same technique to apply a black block of color next to the red, ensuring the lines between colors remain crisp. The combination of red and black will provide a high contrast.
Step 3: Apply the White Color
For the final geometric block, use white polish to fill in the remaining space, ensuring each block has distinct edges. The white will help balance out the intense red and black, creating a cohesive design.
Step 4: Let It Dry
Allow the blocks of color to dry completely before moving on to the next step to avoid smudging the design.
Adding the Finishing Touches
Step 1: Clean Up the Edges
Use a small brush and acetone to clean up any excess polish around your cuticles and the edges of the geometric blocks, ensuring a sharp, professional finish.
Step 2: Apply a Top Coat
Finish the design with a clear, glossy top coat to protect your art and give the nails a shiny, smooth finish. This will also help maintain the integrity of the geometric design.
Why It Works
Abstract Red, Black, and White Nail Art is an eye-catching and sophisticated design that combines bold geometric shapes with a striking color palette.
The high contrast between red, black, and white creates a modern, edgy look that’s perfect for anyone looking for a fashion-forward style.
This design works beautifully for both casual and formal occasions, offering a chic, minimalist vibe with maximum visual impact.
The clean lines and color blocking make it a timeless design that will always make a statement.
13. Glitter French Tip Nail Art
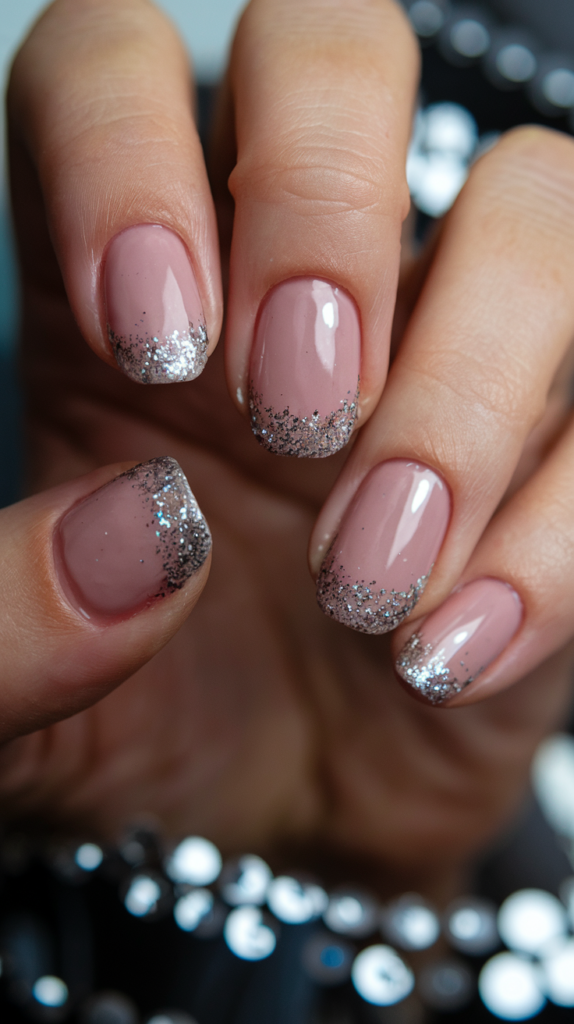
Glitter French Tip nails bring a modern twist to the classic French manicure, with shimmering glitter adorning the tips.
The soft pink base adds a natural, polished feel, while the sparkling tips create a touch of glamour, making it perfect for both casual and special occasions.
Creating the Base
Step 1: Apply the Base Color
Start by applying a soft pink or nude polish to each nail for a smooth, elegant base. This neutral color provides the perfect backdrop for the glitter tips. Allow the base coat to dry completely before proceeding.
Adding the Glitter Tips
Step 1: Apply Glitter at the Tips
Using a small nail art brush or a sponge, gently apply silver glitter to the tips of your nails. You can choose to apply a thick or thin layer of glitter, depending on how bold you want the look to be. Blend the glitter into the nail for a seamless, gradient effect.
Step 2: Gradually Fade the Glitter
To create a gradient effect, lightly press the glitter into the tips of the nails, gradually fading it as you move towards the center of the nail. This will create a soft, elegant look with just the right amount of sparkle.
Step 3: Let It Dry
Allow the glitter tips to dry completely before continuing with any further steps.
Finishing Touches
Step 1: Apply a Top Coat
Once the glitter tips are dry, apply a clear glossy top coat over the entire nail to seal the glitter and provide a smooth, shiny finish. This will also help maintain the longevity of the design.
Step 2: Clean Up the Edges
Use a small brush and acetone to clean up any excess glitter or polish around the edges of your nails for a neat and polished appearance.
Why It Works
Glitter French Tip Nail Art takes the classic French manicure and elevates it with the addition of sparkling glitter.
The soft pink base creates an elegant, neutral foundation, while the glitter adds just the right amount of sparkle for a chic and modern twist.
This design is versatile, making it perfect for a variety of occasions, from weddings to date nights.
The combination of a subtle base with bold, glittering tips ensures your nails look sophisticated yet eye-catching.
14. Shattered Glass Nail Art
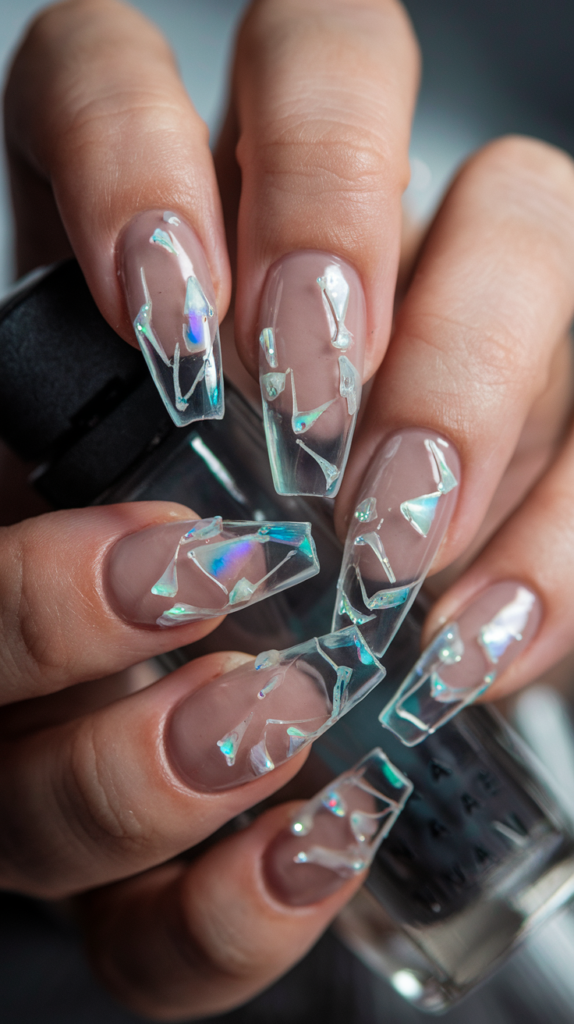
Shattered Glass nails are an edgy and captivating design that mimics the look of cracked glass.
The iridescent shards combined with a neutral base create a modern, sleek look that’s both eye-catching and sophisticated.
This design is perfect for those who love unique, bold nail art with a high-fashion twist.
Creating the Base Color
Step 1: Apply the Base Coat
Start by applying a clear or nude base coat to each nail. This will create a natural foundation for the shattered glass effect. Make sure the base is smooth and evenly applied. Allow it to dry completely before moving on to the next step.
Adding the Shattered Glass Effect
Step 1: Apply the Shards
Using small pieces of holographic or iridescent cellophane or glass-like film, carefully place the shards onto the nails. Start by applying a small amount of nail glue to each area where you want the glass to appear. Use tweezers or a small tool to position the shards in an overlapping, shattered pattern.
Step 2: Arrange the Shards
Arrange the shards in different angles and shapes to mimic the fractured look of broken glass. Be creative with the placement, ensuring that the shards are evenly distributed across the nail. You can leave some areas bare to allow the neutral base to show through for contrast.
Step 3: Let It Dry
Allow the shards to adhere and dry completely before proceeding to the next step.
Finishing Touches
Step 1: Apply a Top Coat
Once the shards are in place and dry, apply a thick top coat to seal the design. This will help smooth out the surface and secure the shards, giving the nails a glossy and protective finish.
Step 2: Clean Up the Edges
Use a small brush dipped in acetone to clean up any excess glue around the cuticles or edges of the nails for a sharp, professional look.
Why It Works
Shattered Glass Nail Art creates a dramatic, fashion-forward design that’s both sleek and edgy. The iridescent shards reflect light, adding a high-shine, multi-dimensional effect that’s sure to capture attention.
This design is ideal for special occasions, photoshoots, or any time you want to make a bold statement with your nails.
The shattered glass effect is sophisticated and contemporary, ensuring your nails will stand out with an undeniable flair.
15. Matte Burgundy and Gold Leaf Nail Art
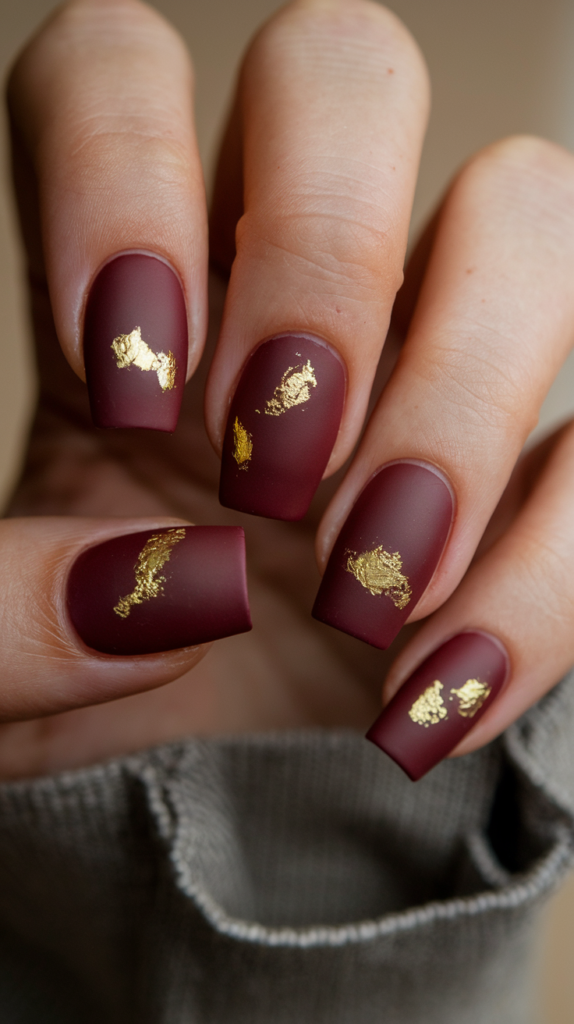
Matte Burgundy and Gold Leaf nails are a luxurious and sophisticated design that combines rich, deep burgundy with shimmering gold accents.
The matte finish adds a modern, understated elegance, while the gold leaf details elevate the look with a touch of opulence, making it perfect for special occasions or whenever you want to add a bit of glam to your nails.
Creating the Base Color
Step 1: Apply the Base Coat
Begin by applying a rich burgundy polish to all nails for a smooth and deep base color. Be sure to apply an even layer, and allow the polish to dry completely before proceeding to the next step.
Step 2: Apply a Matte Top Coat
After the burgundy polish is dry, apply a matte top coat over the entire nail. This will give the nails a sophisticated, velvet-like finish that contrasts beautifully with the gold accents.
Adding the Gold Leaf Details
Step 1: Apply Gold Leaf Pieces
Using a small piece of gold leaf, gently apply it to the nails by pressing it into the matte surface with your fingers or a tool. You can place the gold leaf in a random pattern, focusing on small patches or larger chunks depending on your desired look.
Step 2: Secure the Gold Leaf
Once the gold leaf is placed where you want it, use a clear top coat to secure the pieces, ensuring they stay in place. Gently press down to smooth out the edges of the gold leaf without disturbing the matte base.
Step 3: Let It Dry
Allow the design to dry completely before moving on to the final step to ensure the gold leaf stays intact.
Finishing Touches
Step 1: Clean Up the Edges
Use a small brush with acetone to clean up any excess polish around your cuticles or edges of the nails for a neat, professional finish.
Step 2: Apply a Final Matte Top Coat
For added protection, apply a final layer of matte top coat to seal in the gold leaf and keep the nails looking flawless.
Why It Works
Matte Burgundy and Gold Leaf Nail Art combines two timeless elements: rich, deep burgundy and luxurious gold.
The matte finish adds a modern edge, while the gold leaf provides just the right amount of shimmer and texture.
This design is perfect for adding a touch of luxury to any occasion. The contrast between the bold matte burgundy and delicate gold leaf creates an elegant, refined look that will never go out of style.
16. Watercolor Floral Nail Art
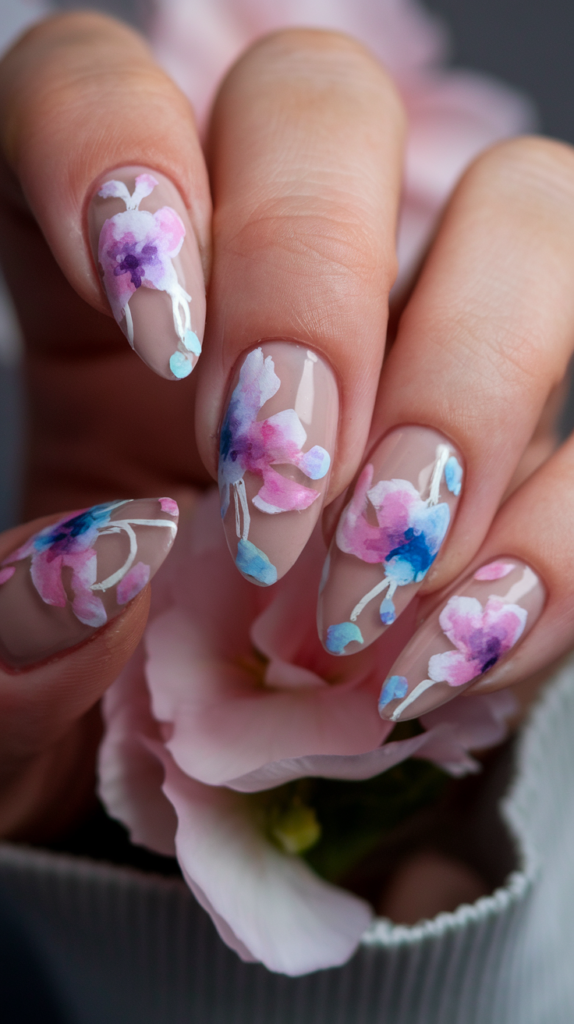
Watercolor Floral nails combine soft, flowing watercolor effects with delicate flower details, creating an elegant and dreamy design.
The subtle blend of pastel colors brings the flowers to life, making it perfect for spring or any occasion where you want to add a touch of femininity and beauty to your nails.
Creating the Base Color
Step 1: Apply the Base Coat
Start with a clear or nude base coat to create a soft, natural foundation. This will provide a smooth surface for the watercolor effect and give a neutral backdrop to the flowers.
Step 2: Let It Dry
Ensure that the base coat is completely dry before continuing with the watercolor painting.
Creating the Watercolor Flowers
Step 1: Mix the Watercolor Effect
Using a watercolor nail polish or acrylic paint, dilute the paint with a bit of water to achieve a soft, translucent effect. This will create the watercolor-like appearance on the nails.
Step 2: Apply the Flowers
Using a fine brush, apply soft, blooming flower shapes in shades of pink, purple, and blue across the nails. Start with the lighter colors and gradually build up the petals using slightly darker shades. Allow the colors to blend into one another for a seamless, soft effect.
Step 3: Add Details
Once the flowers are dry, use a thin brush and white polish to add fine details to the flowers, such as the stems or small accent lines to define the petals and bring the design to life.
Finishing Touches
Step 1: Apply a Top Coat
Once the watercolor flowers are dry, apply a clear glossy top coat to seal the design and give the nails a smooth, shiny finish. This will also protect the delicate watercolor effect from smudging.
Step 2: Clean Up the Edges
Use a small brush and acetone to clean up any excess polish around your cuticles for a neat and polished look.
Why It Works
Watercolor Floral Nail Art creates a soft, dreamy look with its gentle blending of colors and delicate floral details.
The watercolor effect gives the flowers an ethereal, painted-on quality that’s both elegant and artistic.
This design is perfect for those who love a delicate, feminine look with a creative flair. Whether it’s for a special event or just to add some beauty to your everyday style, this design will make your nails a work of art.
17. Holographic Chrome Nail Art
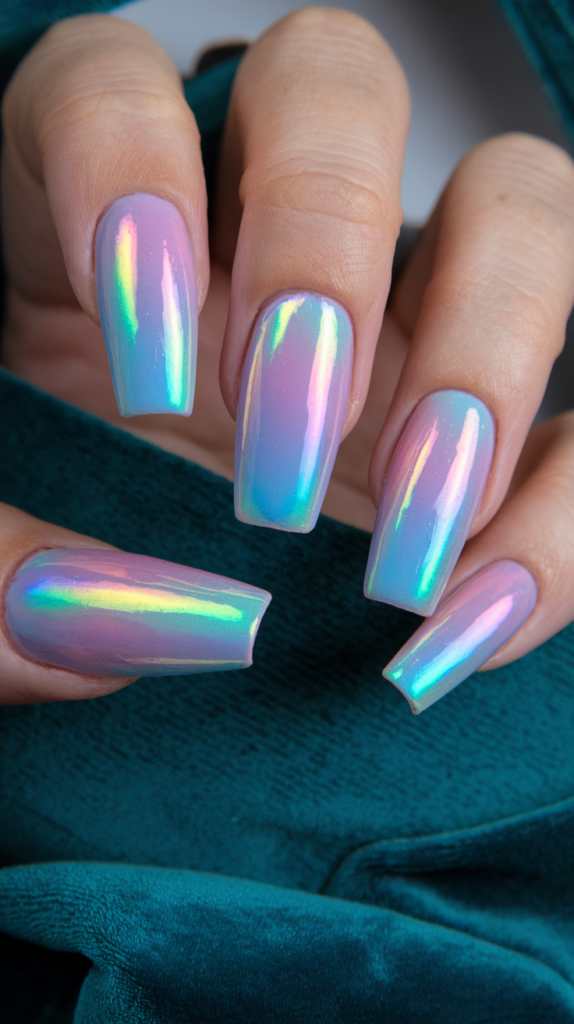
Holographic Chrome nails are a mesmerizing design that combines futuristic chrome effects with stunning iridescence.
The shifting colors of purple, blue, and green give your nails a prismatic glow, making this design a perfect statement piece for anyone looking to add a touch of shine and dimension to their nails.
Creating the Base Color
Step 1: Apply a Base Coat
Begin by applying a smooth, light pastel polish to each nail. A soft lavender or light pink base color works well to complement the chrome effect. Allow the base coat to dry completely before proceeding.
Applying the Holographic Chrome Effect
Step 1: Apply the Chrome Powder
Using a soft sponge or applicator, gently rub holographic chrome powder onto the nail’s surface. Work in small sections, applying the powder in circular motions to ensure even coverage. This will give your nails a shiny, reflective finish.
Step 2: Buff for Smoothness
Once the chrome powder is applied, use a clean cloth or nail buffer to lightly buff the nail, ensuring a smooth and even iridescent effect. The colors should shift as you move your nails in the light, creating a stunning prismatic look.
Step 3: Seal with a Top Coat
To lock in the chrome effect and protect your design, apply a glossy, non-wipe top coat over the entire nail. This will also enhance the shine and bring out the multi-dimensional colors of the holographic chrome.
Finishing Touches
Step 1: Clean Up the Edges
Use a small brush with acetone to clean up any excess chrome powder or polish around the cuticles, giving the nails a neat, crisp finish.
Step 2: Final Top Coat
Apply one final layer of top coat to seal and add extra protection, ensuring that the design remains flawless and vibrant for longer.
Why It Works
Holographic Chrome Nail Art creates a dynamic, eye-catching design that plays with light and color.
The shifting hues of purple, blue, and green give the nails a unique, almost otherworldly appearance, while the smooth, reflective chrome finish adds a touch of sophistication and shine.
This design is perfect for those who want to make a bold statement with their nails.
Its futuristic, prismatic effect makes it ideal for special occasions, photoshoots, or whenever you want your nails to steal the spotlight.
18. Pressed Flower Nail Art
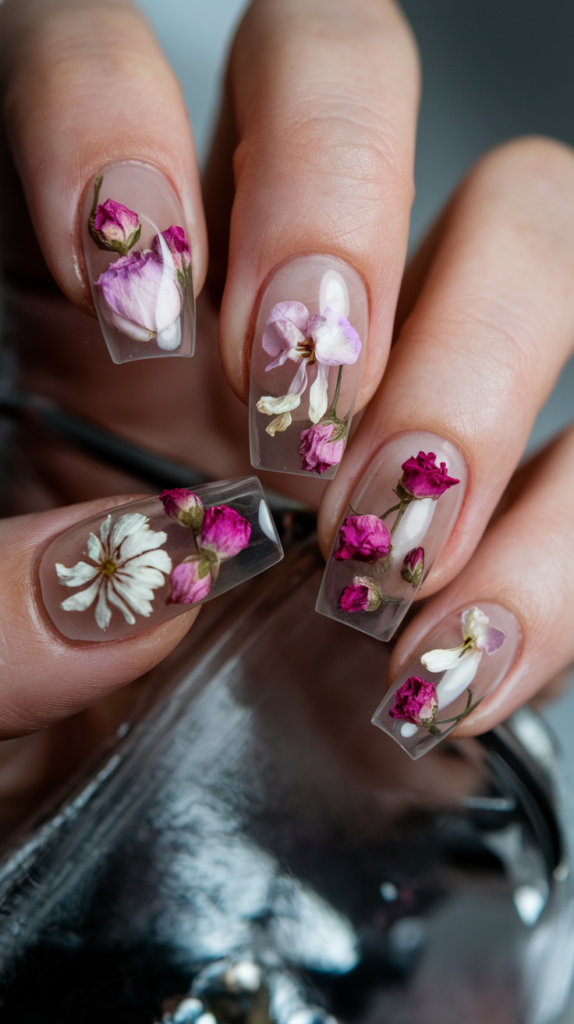
Pressed Flower nails are a beautifully delicate design that incorporates real flowers into the nail art for a natural, botanical effect.
The clear background allows the intricate flowers to take center stage, creating an elegant and whimsical look that’s perfect for spring or any occasion where you want to showcase a touch of nature.
Creating the Base
Step 1: Apply the Base Coat
Start with a clear base coat to create a smooth surface for the pressed flowers. This will also help the flowers adhere better and prevent them from lifting. Allow it to dry completely before moving on.
Step 2: Apply a Nude or Clear Polish
Once the base coat is dry, apply a nude or clear polish to each nail. This will provide a soft, neutral backdrop for the pressed flowers, allowing their natural beauty to stand out.
Adding the Pressed Flowers
Step 1: Choose Your Flowers
Select small, delicate dried flowers. For a more natural effect, mix a variety of flower types and colors, such as pink, white, and purple flowers, as seen in the design. Make sure they are fully dried before use to prevent any moisture from damaging the design.
Step 2: Apply the Flowers
Using a pair of tweezers, carefully place the pressed flowers onto your nails. Position them as desired, whether scattered across the nail or grouped together. You can also cut the flowers to better fit the shape of your nails.
Step 3: Seal the Design
Once the flowers are in place, apply a clear gel or regular top coat to seal them in. Be gentle to avoid disturbing the delicate flowers. Apply one or two layers to ensure the flowers stay intact and the design is smooth.
Finishing Touches
Step 1: Apply a Final Top Coat
To protect the flowers and enhance the design’s longevity, apply a thick, glossy top coat. This will create a smooth, shiny finish and help preserve the intricate details of the flowers.
Step 2: Clean Up the Edges
Use a small brush and acetone to clean up any excess polish around the cuticles for a neat and tidy appearance.
Why It Works
Pressed Flower Nail Art is a stunning and natural design that brings the beauty of flowers into your nails. The clear base color allows the flowers to shine, creating a minimalist yet elegant look.
This design is perfect for nature lovers and those who want to add a soft, romantic touch to their nails.
The delicate flowers and the clear background give a serene and whimsical feel, making this design ideal for special occasions or everyday elegance.
19. Geometric Red, Black, and White Nail Art

Geometric Red, Black, and White nails are a bold and modern design that blends clean lines with striking color contrasts.
This design uses a combination of geometric shapes and sharp angles to create a sophisticated, high-fashion look, perfect for anyone who wants to add a contemporary edge to their style.
Creating the Base Color
Step 1: Apply the Base Coat
Start with a clear or nude base coat to create a clean and smooth foundation for the geometric design. Allow the base coat to dry completely before continuing.
Adding the Geometric Shapes
Step 1: Draw the Black Outlines
Using a fine nail art brush or a striping tape, begin by outlining geometric shapes in black polish. Focus on creating squares, rectangles, or triangles, and use the black lines to form the framework of the design.
Step 2: Fill in with Red and White
Once the black outline is dry, use a small brush to fill in the geometric shapes with bold red and white colors. You can alternate between the two colors for each shape, or create a pattern where some sections are red, and others are white.
Step 3: Let the Design Dry
Allow the colors to dry completely before proceeding with the next step to ensure the design doesn’t smudge.
Finishing Touches
Step 1: Apply a Top Coat
Once the geometric shapes have dried, apply a clear top coat to protect your design and add a glossy finish. This will ensure the lines stay crisp and the colors remain vibrant.
Step 2: Clean Up the Edges
Use a small brush and acetone to clean up any excess polish around the edges of your nails for a neat and sharp look.
Why It Works
Geometric Red, Black, and White Nail Art is a striking and visually dynamic design that plays with bold contrasts and sharp lines.
The combination of black, red, and white creates a modern, sophisticated look that’s both edgy and elegant.
This design is ideal for those who want to make a statement with their nails. Whether for work or a night out, the geometric shapes and clean lines make this a versatile and timeless design that will always be in style.
20. Ombre French Tip with Rhinestone Accent Nail Art
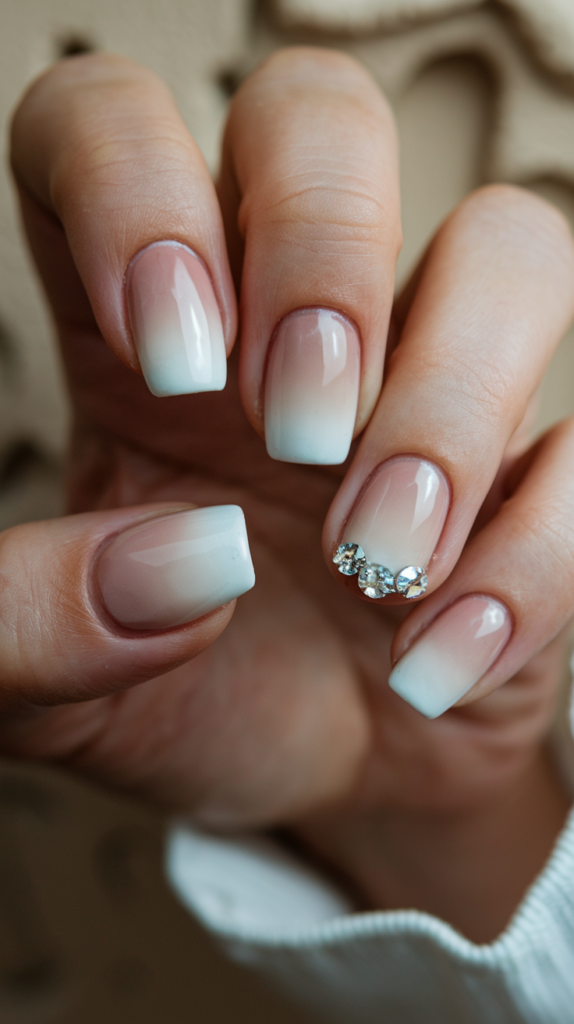
Ombre French Tip nails with rhinestone accents are an elegant twist on the classic French manicure.
The soft ombre gradient from nude to white creates a fresh and modern look, while the rhinestone embellishment on one accent nail adds just the right amount of glamour and sophistication.
Creating the Ombre Gradient
Step 1: Apply the Base Coat
Start by applying a clear or nude base coat to all your nails. This will provide a smooth surface for the gradient effect and help the ombre colors blend seamlessly.
Step 2: Create the Ombre Gradient
Using a makeup sponge or sponge applicator, apply white polish to the tips of your nails, blending it downward into the nude base. Dab the sponge gently, moving it back and forth to create a smooth gradient effect. Ensure that the white fades evenly into the nude color, and build up the layers for a soft ombre effect.
Step 3: Let the Design Dry
Allow the ombre design to dry completely before proceeding to the next step.
Adding the Rhinestone Accent
Step 1: Apply the Rhinestones
On your accent nail (usually the ring finger), apply a thin layer of nail glue in the area where you want the rhinestones to go. Use tweezers to carefully place the rhinestones in a small cluster along the cuticle line or across the tip of the nail, creating a sparkling accent. You can use a few rhinestones or create a larger design, depending on your preference.
Step 2: Let It Dry
Allow the rhinestones to set and dry completely before proceeding with the top coat.
Finishing Touches
Step 1: Apply a Top Coat
Once the ombre gradient is dry and the rhinestones are securely in place, apply a top coat to seal in the design and rhinestones. This will ensure the rhinestones stay in place and give the nails a smooth, glossy finish.
Step 2: Clean Up the Edges
Use a small brush and acetone to clean up any excess polish around your cuticles for a crisp and neat look.
Why It Works
Ombre French Tip Nail Art with rhinestone accents creates a sophisticated and modern manicure that combines classic elegance with a touch of glamour.
The ombre gradient provides a soft and seamless transition between colors, while the rhinestones add an eye-catching sparkle that’s perfect for special occasions.
This design is perfect for brides, formal events, or any time you want to showcase a timeless yet trendy look.
The combination of soft ombre with the bold rhinestone accent makes these nails elegant and attention-grabbing.
21. Rose Gold Mirror Finish Nail Art

Rose Gold Mirror Finish nails combine elegance and modern sophistication with their sleek, reflective chrome finish in a stunning rose gold hue.
This high-shine design exudes luxury and style, making it perfect for those who want to make a bold yet classy statement with their nails.
Creating the Base Color
Step 1: Apply a Base Coat
Start by applying a smooth, clear base coat to all nails. This will help the chrome effect adhere better and provide a smooth foundation for the design. Allow the base coat to dry completely before proceeding.
Step 2: Apply a Base Color (Optional)
If you want to enhance the chrome effect, you can apply a light-colored polish (such as nude or light pink) to the nails before the chrome powder. This will give the rose gold a vibrant undertone, making it stand out even more.
Applying the Rose Gold Chrome Effect
Step 1: Apply the Chrome Powder
Using a soft sponge or applicator, apply rose gold chrome powder to your nails. Gently rub the powder into the nail, starting from the base and working toward the tip. Use small circular motions to ensure an even and smooth application, creating a flawless reflective finish.
Step 2: Buff for Smoothness
Once the chrome powder is applied, lightly buff the surface of the nails with a clean cloth or buffer to smooth out any uneven spots and ensure a glossy, reflective finish.
Step 3: Seal with a Top Coat
To lock in the chrome effect and protect the design, apply a non-wipe glossy top coat over the nails. This step is essential to ensure the chrome effect remains intact and doesn’t smudge. The top coat will also provide a high-shine finish that enhances the reflective quality of the nails.
Finishing Touches
Step 1: Clean Up the Edges
Use a small brush with acetone to clean up any excess chrome powder around the cuticles for a neat, polished look.
Step 2: Final Top Coat
Apply a final layer of top coat to ensure the nails are smooth, glossy, and protected. This will also help maintain the longevity of the mirror finish.
Why It Works
Rose Gold Mirror Finish Nail Art combines the elegance of rose gold with the sleekness of chrome to create a stunning, high-impact design.
The mirror-like reflective finish creates a futuristic yet chic look that’s both bold and sophisticated.
This design is perfect for any occasion where you want to add a touch of glamour to your nails. Whether it’s for a night out, a special event, or just to make a fashionable statement, these nails are sure to steal the show.
22. Tortoiseshell Nail Art
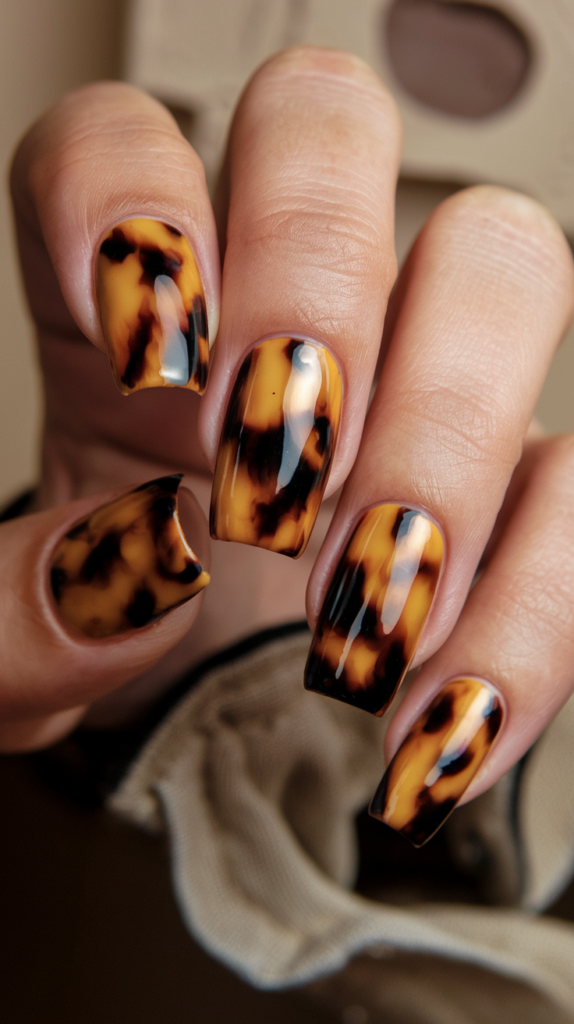
Tortoiseshell nails are a chic and timeless design that combines rich brown, amber, and black tones to create the look of a classic tortoiseshell pattern.
The glossy finish gives this design a sophisticated and polished feel, making it perfect for any occasion where you want your nails to stand out with an elegant yet bold style.
Creating the Base
Step 1: Apply a Base Coat
Start by applying a clear base coat to each nail. This provides a smooth foundation and helps the colors adhere better. Allow it to dry completely before moving to the next step.
Step 2: Apply the Amber and Brown Base Colors
Use a warm amber or golden-brown polish to apply a base color to each nail. This will mimic the rich undertones of the tortoiseshell pattern. Apply an even layer and let it dry completely.
Creating the Tortoiseshell Effect
Step 1: Add Black and Brown Patterns
Using a fine nail art brush or a dotting tool, apply black and dark brown polish in irregular, organic shapes over the amber base. The shapes should vary in size and be scattered across the nail to create a natural-looking tortoiseshell effect.
Step 2: Blend the Colors
To create a more seamless effect, use a sponge or a clean brush to gently blend the dark brown and black designs into the amber base. The key is to avoid harsh lines, so the colors gradually transition into each other, mimicking the veined look of tortoiseshell.
Step 3: Let It Dry
Allow the design to dry completely before proceeding to the next step to avoid smudging the intricate pattern.
Finishing Touches
Step 1: Apply a Top Coat
Once the design is dry, apply a glossy top coat to seal the tortoiseshell pattern and enhance its shine. The glossy finish will give the nails a polished and smooth appearance while helping the colors pop.
Step 2: Clean Up the Edges
Use a small brush and acetone to clean up any excess polish around your cuticles for a neat and professional look.
Why It Works
Tortoiseshell Nail Art is a sophisticated design that combines depth and dimension with its organic, flowing pattern.
The rich amber, brown, and black tones work together to create a beautiful and timeless look, making it perfect for any season or occasion.
This design is ideal for those who appreciate classic beauty with a touch of modern elegance. Whether it’s for work, a night out, or a special event, tortoiseshell nails are sure to make a stylish and refined statement.
23. Matte Black and Silver Chain Nail Art

Matte Black and Silver Chain nails offer an edgy yet chic design that combines the boldness of matte black polish with the sleek sophistication of metallic silver chains.
This design creates a statement look that is both modern and rebellious, making it perfect for fashion-forward individuals who want to add a bit of attitude to their nails.
Creating the Base Color
Step 1: Apply the Matte Base Coat
Start by applying a black matte polish to all nails. Ensure that the polish is applied evenly for a smooth, matte finish. Let the base coat dry completely to achieve that sleek, matte look.
Adding the Silver Chains
Step 1: Prepare the Silver Chain
Using a small piece of fine silver chain, carefully measure and cut it to fit across your nails. You can create a simple horizontal line or place the chain diagonally or in different sections for a more dynamic effect.
Step 2: Apply Nail Glue
Using a fine-tipped brush or dotting tool, apply a small amount of nail glue to the area of the nail where you want the chain to be placed. Make sure the glue is applied evenly to avoid any lumps or bumps under the chain.
Step 3: Place the Chain
Using tweezers or a dotting tool, gently place the silver chain on top of the glue. Press it down lightly to ensure it adheres to the nail. Repeat the process for each nail, making sure the chain is positioned exactly where you want it.
Step 4: Let It Dry
Allow the glue to dry completely before proceeding to the next step to ensure the chain stays in place.
Finishing Touches
Step 1: Apply a Top Coat
Once the silver chain is secure, apply a thin layer of clear top coat to seal in the design and protect the chain. This will also give the nails a smooth finish, while the matte black base remains intact.
Step 2: Clean Up the Edges
Use a small brush with acetone to clean up any excess polish or glue around your cuticles for a crisp, neat finish.
Why It Works
Matte Black and Silver Chain Nail Art combines the boldness of matte black with the elegance of silver chain accents, creating a modern, fashionable design that makes a statement.
The matte finish adds depth and sophistication, while the metallic chain brings a touch of glamour and texture.
This design is ideal for anyone looking to add a bit of edge to their look, whether for everyday wear or special occasions.
The combination of matte black and silver gives these nails a chic, rock-inspired vibe that is sure to turn heads.
24. Holographic Chrome Nail Art
Holographic Chrome nails are a bold, high-shine design that showcases a stunning, color-shifting effect.
With a blend of metallic hues and iridescent shine, these nails bring a futuristic and sleek look that catches the light from every angle, creating a prismatic effect. Perfect for making a statement at any event or photoshoot.
Creating the Base Color
Step 1: Apply the Base Coat
Start by applying a clear base coat to all nails to create a smooth surface. This ensures the chrome powder adheres properly and helps the design last longer. Allow the base coat to dry completely.
Step 2: Apply a Base Color (Optional)
While the chrome effect works best on a light base, you can apply a soft, neutral color or a sheer base polish if you prefer a more natural undertone beneath the chrome. This step is optional, as the chrome powder can also be applied directly over the clear base coat.
Applying the Holographic Chrome Effect
Step 1: Apply the Chrome Powder
Once the base is dry, apply holographic chrome powder onto your nails. Using a soft applicator or sponge, gently rub the powder onto each nail, starting from the base and working towards the tips. Rub the powder in small circular motions to ensure an even, flawless application.
Step 2: Buff for a Smooth Finish
After applying the chrome powder, lightly buff the surface using a clean cloth or nail buffer to smooth out any inconsistencies, ensuring the nails have a flawless mirror-like finish.
Step 3: Seal with a Top Coat
Apply a non-wipe top coat over the nails to lock in the chrome effect and add a high-shine finish. This will also protect the design and prevent it from chipping.
Finishing Touches
Step 1: Clean Up the Edges
Use a small brush and acetone to clean up any excess chrome powder or polish around the cuticles for a neat and crisp finish.
Step 2: Final Top Coat
Apply a final layer of glossy top coat to ensure the nails stay protected and the holographic effect remains vibrant.
Why It Works
Holographic Chrome Nail Art creates a dynamic, eye-catching look with its ever-changing colors and mirror-like shine.
The holographic effect reflects different hues, creating a futuristic, metallic shine that elevates the look of any outfit.
This design is perfect for those looking to make a statement with their nails, adding a sleek, high-fashion element to your style.
Whether it’s for a night out, special events, or just to elevate your everyday look, these nails will be a showstopper.
25. Geometric Gold and Black Foil Nail Art
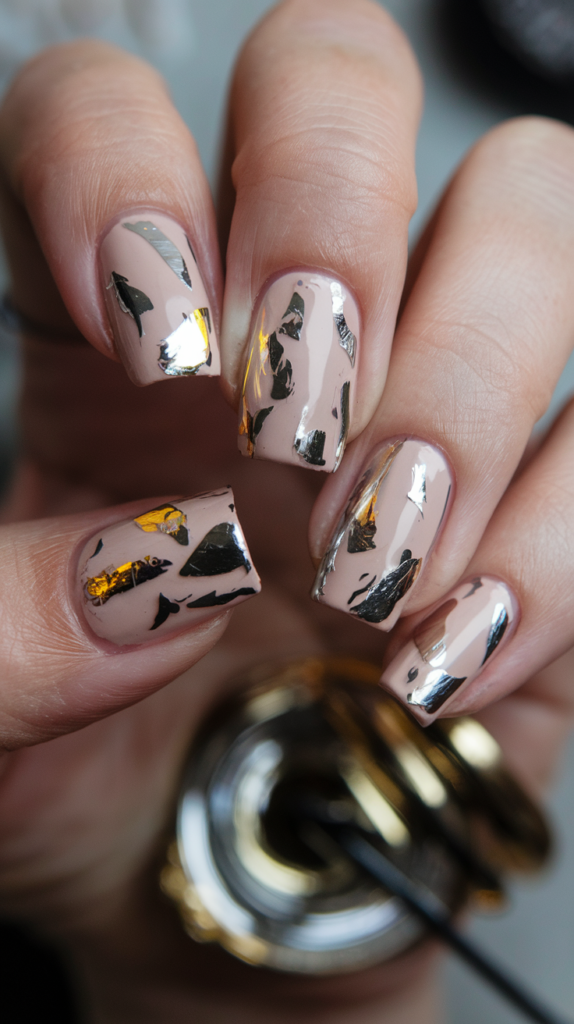
Geometric Gold and Black Foil nails combine bold geometric shapes with a touch of metallic gold for a striking design that exudes sophistication and modern flair.
The mix of neutral base colors with shiny black and gold foil pieces creates a chic and polished look perfect for any occasion.
Creating the Base Color
Step 1: Apply the Base Coat
Start with a nude or light pink base color. This neutral color creates a clean backdrop for the bold foil accents. Ensure that the base coat is evenly applied and dry before moving to the next step.
Adding the Geometric Foil Design
Step 1: Apply the Foil Pieces
Using a small brush or tweezers, apply the black and gold foil pieces onto your nails. These pieces should be placed sporadically across the nails to create a broken, abstract pattern. Make sure to leave some areas of the base color visible for contrast.
Step 2: Secure the Foil
Once the foil is applied, use a top coat to secure it in place. This will ensure the foil stays intact and give the nails a glossy finish. You can also apply a matte top coat if you want a more textured, understated look.
Step 3: Let It Dry
Allow the design to dry completely before applying any further top coats or finishing touches.
Finishing Touches
Step 1: Apply a Glossy Top Coat
Once the design has dried, apply a glossy top coat to seal in the foil and give the nails a smooth, shiny finish. This will also protect the design from chipping and enhance the metallic shine of the gold foil.
Step 2: Clean Up the Edges
Use a small brush with acetone to clean up any excess polish around your cuticles for a neat, professional finish.
Why It Works
Geometric Gold and Black Foil Nail Art combines the sophistication of a neutral base with the boldness of black and gold foil accents.
The abstract geometric pattern creates an eye-catching design, while the shiny metallic foil adds a touch of luxury and shine.
This design is perfect for those who want a chic and modern manicure with a little extra flair.
Whether for a special event or just to add a pop of style to your everyday look, these nails will undoubtedly make a statement.
26. Pink Marble Nail Art with Gold Veins
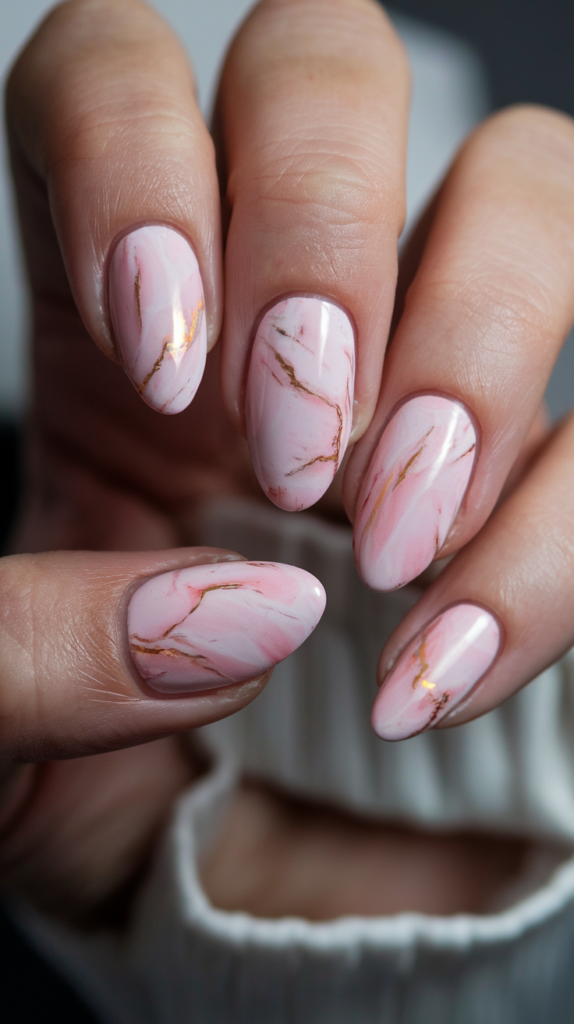
Pink Marble Nail Art with Gold Veins combines soft pastel pink tones with elegant gold accents, creating a sophisticated and luxurious marble effect.
The rich, warm gold veins running through the pink marble create a striking contrast, perfect for anyone who loves a chic and polished look with a touch of glam.
Creating the Base Color
Step 1: Apply the Base Coat
Start by applying a clear base coat to all nails to ensure a smooth surface and help the marble effect adhere better. Let the base coat dry completely.
Step 2: Apply the Pink Base
Once the base coat is dry, apply a light pink polish as the base color for your nails. This soft, pastel pink serves as the perfect canvas for the marble design. Allow the pink polish to dry before proceeding to the next step.
Creating the Marble Effect
Step 1: Create the Marble Veins
Using a thin nail art brush, apply white and gold nail polish in random, irregular strokes to mimic the look of marble veins. Focus on creating a few delicate veins with the gold polish, while also blending some white veins into the pink background for a soft, marble-like effect.
Step 2: Blend the Colors
To achieve the natural marble look, use a small makeup sponge or a piece of plastic wrap to gently blend the gold and white veins into the pink base. This will create a soft transition between the colors and enhance the marble effect. Don’t overdo the blending to maintain the random, elegant vein patterns.
Step 3: Let It Dry
Allow the marble design to dry completely before proceeding to the next step.
Finishing Touches
Step 1: Apply a Top Coat
Once the marble design has dried, apply a glossy top coat to seal the design and give it a shiny finish. This will also protect the marble design from chipping and help it last longer.
Step 2: Clean Up the Edges
Use a small brush dipped in acetone to clean up any excess polish around the cuticles for a crisp, polished finish.
Why It Works
Pink Marble Nail Art with Gold Veins is a beautifully elegant design that combines the softness of pink with the luxurious sheen of gold.
The marbling effect adds texture and depth to the nails, while the gold veins bring a sense of refinement and luxury.
This design is perfect for anyone looking for a sophisticated yet eye-catching look.
Whether for a wedding, special event, or a fashionable everyday style, this marble design will always make your nails look polished and glamorous.
27. Geometric Lines Nail Art
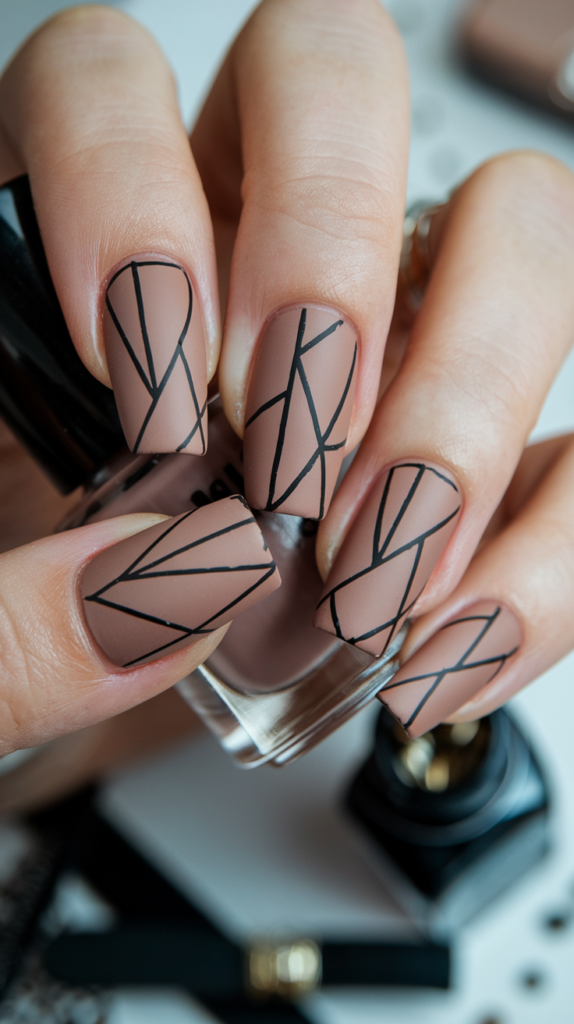
Geometric Lines Nail Art combines the simplicity of clean lines with a sophisticated, minimalistic design.
The matte nude base serves as a neutral canvas for bold black lines, creating a sleek and modern look. This design is perfect for those who appreciate elegance with a contemporary twist.
Creating the Base Color
Step 1: Apply the Base Coat
Start by applying a clear base coat to each nail to ensure a smooth, even surface. This step helps the polish adhere better and extends the longevity of your design. Allow it to dry completely.
Step 2: Apply the Nude Base Color
Once the base coat is dry, apply a matte nude or beige polish as the base color. This neutral tone creates a sophisticated and subtle foundation for the geometric lines. Allow it to dry fully before continuing with the design.
Adding the Geometric Lines
Step 1: Draw the Black Geometric Lines
Using a fine nail art brush or striping tape, carefully apply black polish to create angular geometric shapes across each nail. You can design a variety of intersecting triangles, rectangles, or lines for a modern, abstract look. Keep the lines sharp and precise to achieve a clean, structured appearance.
Step 2: Let the Design Dry
Allow the black geometric lines to dry completely before proceeding to the next step.
Finishing Touches
Step 1: Apply a Top Coat
Once the design is fully dry, apply a matte top coat to seal the design and give the nails a smooth, velvety finish. This will help the geometric lines stay intact while maintaining the matte effect.
Step 2: Clean Up the Edges
Use a small brush dipped in acetone to clean up any excess polish around your cuticles or edges for a crisp and neat look.
Why It Works
Geometric Lines Nail Art creates a modern and sleek look with its bold black lines and neutral matte base. The simplicity of the design makes it both striking and versatile, perfect for any occasion.
This design is ideal for those who enjoy minimalist nail art with a touch of sophistication.
Whether it’s for everyday wear or a chic evening out, these nails make a statement with their clean lines and modern aesthetic.
28. Flame Nail Art
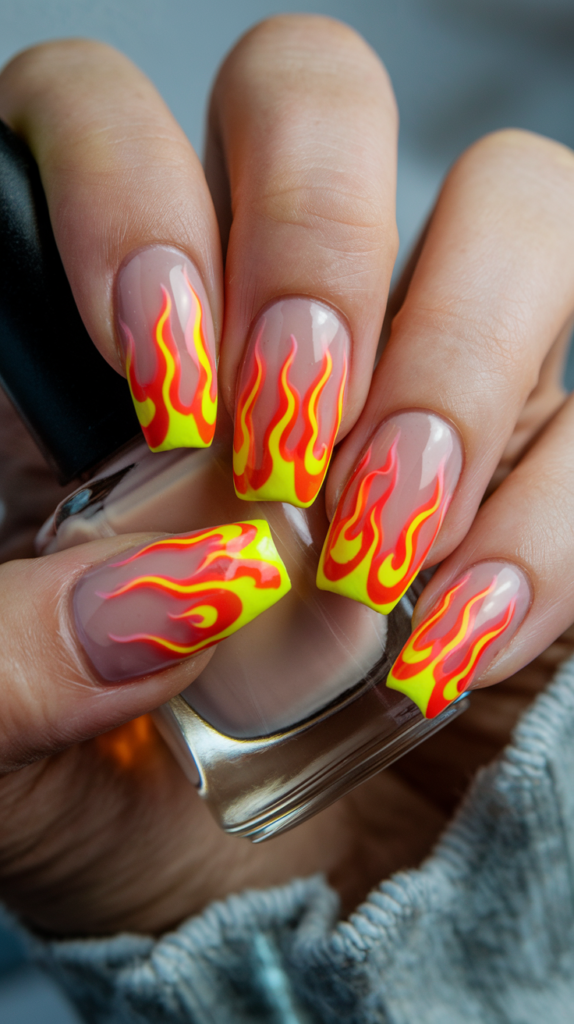
Flame Nail Art combines vibrant colors with a bold design, creating an eye-catching effect that’s perfect for those who want to add some fiery energy to their nails.
The gradient flames in bright yellow and orange at the tips of the nails give this design an electrifying look that’s full of personality.
Creating the Base Color
Step 1: Apply the Base Coat
Start by applying a clear base coat to each nail to ensure smooth application and to protect the natural nail. Allow the base coat to dry completely.
Step 2: Apply the Neutral Base Color
Next, apply a neutral or nude base polish. This acts as the backdrop for the vibrant flame design. Allow it to dry completely before adding the flame details.
Adding the Flame Design
Step 1: Create the Flame Shape
Using a fine nail art brush, carefully draw the shape of the flames at the tips of each nail. Start with the yellow color, creating a jagged, upward-pointing flame design. Be sure to keep the tips of the flames sharp for a more dynamic look.
Step 2: Add the Orange Details
Once the yellow flame is dry, add orange tips to the yellow design for depth. Layer the orange slightly over the yellow, following the shape of the flames. Blend the colors together slightly to give the flames a fiery, fluid look.
Step 3: Add Red Highlights
If you want to intensify the look, add small red highlights around the inner areas of the flames to give them a more glowing effect. This step is optional but will add depth and contrast to the design.
Step 4: Let It Dry
Allow the flames to dry completely before moving on to the next step.
Finishing Touches
Step 1: Apply a Top Coat
Once the flame design is dry, apply a glossy top coat to seal the design. This will give your nails a smooth finish and add a glossy shine, making the colors pop even more.
Step 2: Clean Up the Edges
Use a small brush and acetone to clean up any excess polish around the edges or cuticles for a crisp, sharp finish.
Why It Works
Flame Nail Art is bold and energetic, combining fiery hues of yellow, orange, and red for a stunning visual effect.
The color contrast and dynamic shapes make it a standout design, while the neutral base helps to keep the look grounded and sophisticated.
This design is perfect for those who want to add a dramatic touch to their nails or for themed events like Halloween or festivals.
The bright, warm flames create an exciting, powerful look that will get attention wherever you go.
29. Chrome Silver Nail Art with Rhinestone Accent
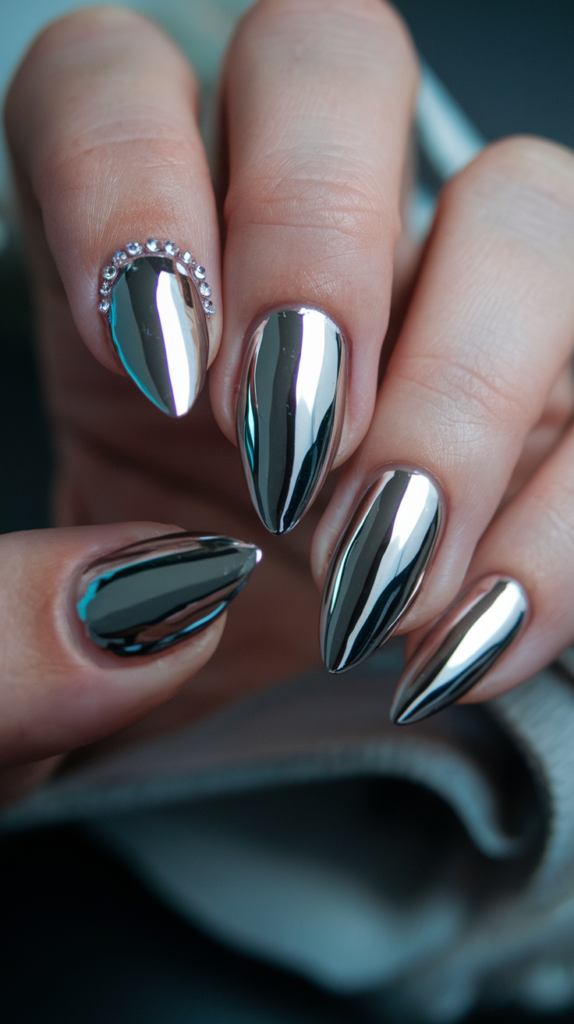
Chrome Silver Nail Art with Rhinestone Accent combines a bold metallic finish with a touch of glamour.
The reflective silver chrome gives the nails a sleek, futuristic look, while the rhinestone embellishments add elegance and sparkle, making this design perfect for any special occasion or high-fashion statement.
Creating the Chrome Base
Step 1: Apply a Base Coat
Start by applying a clear base coat to each nail to create a smooth foundation. This ensures the chrome effect adheres properly and lasts longer.
Step 2: Apply a Black or Neutral Base Color (Optional)
For maximum shine and vibrancy, apply a black or neutral base polish. This step enhances the reflective quality of the chrome powder, especially when working with metallic finishes.
Applying the Chrome Effect
Step 1: Apply Chrome Powder
Using a soft applicator or sponge, rub silver chrome powder onto the nails. Work in circular motions to create an even and flawless reflective finish. Focus on achieving a smooth, mirror-like surface.
Step 2: Buff for Perfection
Lightly buff the nails with a clean cloth to enhance the chrome shine and ensure there are no streaks or uneven patches.
Step 3: Seal with a Non-Wipe Top Coat
Apply a non-wipe top coat to lock in the chrome powder and protect the reflective finish. Let it cure under a UV or LED lamp if using gel polish, or allow it to air dry if using regular polish.
Adding the Rhinestone Accent
Step 1: Place the Rhinestones
Choose one accent nail (commonly the ring finger or thumb) and apply a small amount of nail glue or top coat where you want to place the rhinestones. Using tweezers or a dotting tool, carefully position the rhinestones in a semi-circle pattern near the cuticle or in a design of your choice.
Step 2: Secure the Rhinestones
Gently press the rhinestones into place to ensure they adhere firmly. Let the glue dry completely.
Step 3: Apply a Protective Top Coat
Carefully apply a clear top coat around the rhinestones to secure them without dulling their sparkle.
Finishing Touches
Step 1: Clean Up the Edges
Use a small brush dipped in acetone to clean up any excess polish around the cuticles for a crisp and professional look.
Step 2: Final Inspection
Check that all rhinestones are secure and the chrome finish is smooth and reflective. Make any adjustments as needed.
Why It Works
Chrome Silver Nail Art with Rhinestone Accent is a striking combination of modern and glamorous styles.
The high-shine metallic chrome creates a bold statement, while the rhinestone embellishment adds a touch of elegance and sophistication.
This design is perfect for formal events, weddings, or when you want to make an unforgettable impression.
The mix of bold chrome and delicate rhinestones ensures these nails are both eye-catching and timelessly chic.
30. Pastel Marble Nail Art
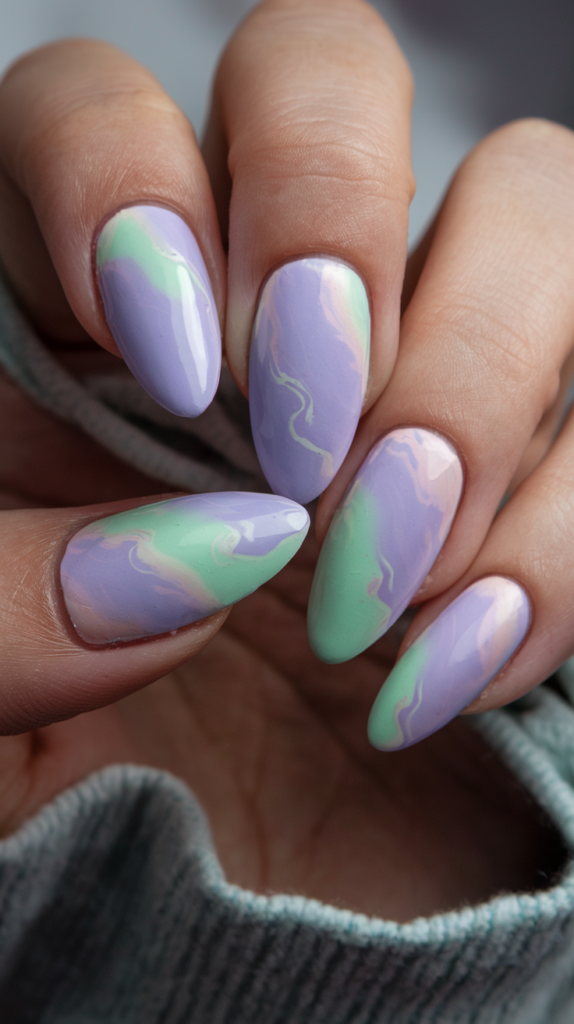
Pastel Marble Nail Art brings a soft, dreamy look with swirls of lavender, mint green, and pale pink.
The marbled design offers a delicate and artistic touch to your nails, perfect for those who love subtle yet beautiful nail art with a calming vibe.
Creating the Base Color
Step 1: Apply the Base Coat
Start by applying a clear base coat to each nail to protect your natural nails and provide a smooth foundation for the design. Allow the base coat to dry completely.
Step 2: Apply the Base Colors
Apply a pastel lavender polish to most of your nails, ensuring it covers the entire surface evenly. For a soft contrast, use a pastel mint green or pale pink on a few accent nails. Allow the base color to dry completely before proceeding to the marbling step.
Creating the Marble Design
Step 1: Mix the Marble Colors
Using a small brush or a nail art sponge, apply a bit of pastel lavender, mint green, and pale pink onto your nails. The colors should be applied in irregular sections. You want to create some variation in color without any harsh lines. Let the colors naturally blend into each other.
Step 2: Marble the Design
Once the base colors are applied, use a fine brush or a dotting tool to swirl the colors together, creating a marble effect. Be sure to gently mix the colors together, allowing them to merge without becoming too blended, to preserve the soft marble look.
Step 3: Let It Dry
Allow the marble design to dry completely before applying the top coat to avoid smudging the design.
Finishing Touches
Step 1: Apply a Top Coat
Once the marble design is dry, apply a glossy top coat to seal in the colors and add a smooth, shiny finish. This will also protect the marble design from chipping and maintain its beauty.
Step 2: Clean Up the Edges
Use a small brush dipped in acetone to clean up any excess polish around your cuticles for a neat, clean finish.
Why It Works
Pastel Marble Nail Art combines gentle pastel shades with fluid marble patterns to create a look that’s both artistic and soothing. The light color palette enhances the soft swirls, giving it a feminine and elegant appearance.
This design is perfect for spring, weddings, or any time you want a delicate, dreamy look on your nails. The marble effect adds sophistication while the pastel colors keep it fresh and modern.
31. Romantic Floral French Tip Nail Art
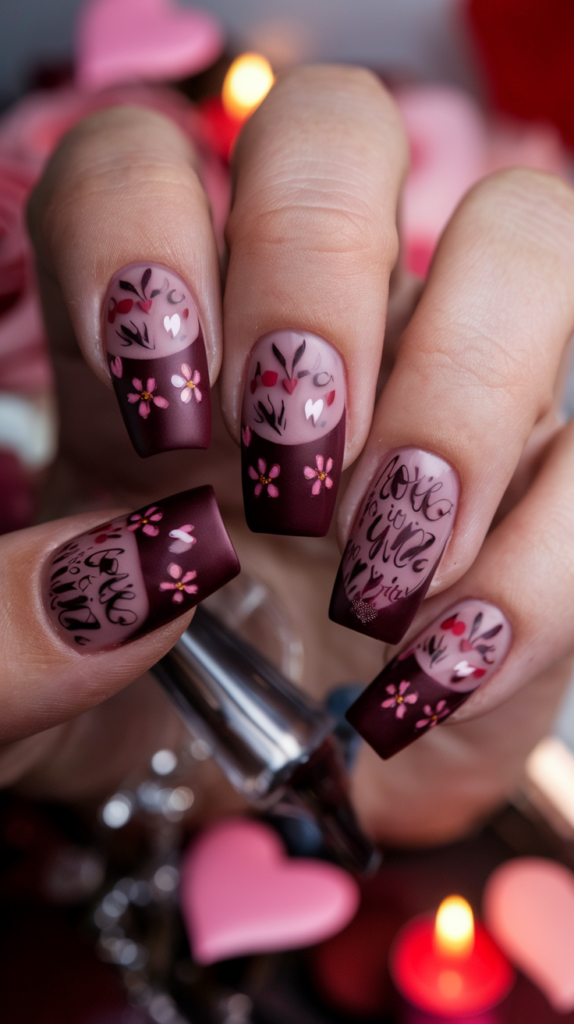
Romantic Floral French Tip Nail Art adds a charming twist to the classic French manicure with deep burgundy tips, delicate flowers, and love-themed designs.
The playful mix of floral elements and handwritten words of affection brings a sophisticated yet sweet touch, perfect for romantic occasions like Valentine’s Day or date nights.
Creating the Base Color
Step 1: Apply the Base Coat
Start by applying a clear base coat to each nail. This ensures a smooth surface and protects the natural nails. Allow it to dry completely before proceeding to the next step.
Step 2: Apply the Nude or Light Pink Base Color
Once the base coat is dry, apply a nude or soft pink polish as the base color for your nails. This light color will contrast beautifully with the deeper burgundy tips, giving the nails a fresh and elegant look.
Creating the French Tips
Step 1: Apply the Burgundy Tip Color
Use a burgundy or dark red polish to apply the French tips. Create clean, curved tips that are uniform across each nail. For a more precise application, you can use French tip guides or tape to ensure sharp, straight lines. Allow the burgundy tips to dry completely before moving on.
Adding the Floral and Love Design
Step 1: Add the Flower Details
Using a fine nail art brush, carefully paint small flowers on the tip of each nail, around the burgundy tips. You can use shades of pink, white, or light purple to create soft, pastel-like flowers. Position the flowers in a scattered manner to achieve a delicate, feminine look.
Step 2: Incorporate Handwritten Love Words
For an added romantic touch, use a fine brush to write small, love-inspired words like “Love” or “Be Mine” on the nude base color. Keep the handwriting small and elegant, allowing the floral design to be the focal point.
Step 3: Let It Dry
Allow the design to dry completely before moving on to the next step to prevent smudging.
Finishing Touches
Step 1: Apply a Top Coat
Once the design is dry, apply a glossy top coat to seal the artwork and add a smooth, shiny finish. This will also help protect the delicate floral and lettering designs.
Step 2: Clean Up the Edges
Use a small brush and acetone to clean up any excess polish around the cuticles for a crisp, polished look.
Why It Works
Romantic Floral French Tip Nail Art combines timeless elegance with romantic flair.
The burgundy tips offer a deep, sophisticated base, while the delicate flowers and handwritten words infuse a personal and heartfelt touch.
This design is perfect for expressing love, whether for a special occasion or a personal treat.
Ideal for romantic celebrations like Valentine’s Day or engagements, this nail art elevates the French tip manicure with a fresh, modern twist that will make anyone fall in love with its charm.
32. Classic Red with Diamond Accent Nail Art
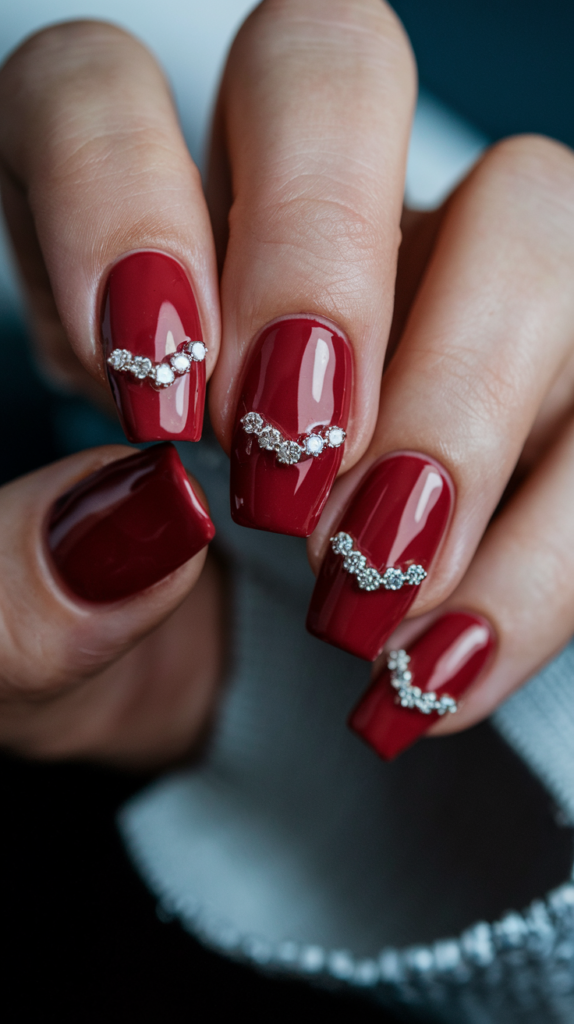
Classic Red with Diamond Accent Nail Art offers a timeless, sophisticated look with deep red nails and delicate diamond embellishments.
The bold red polish creates a statement, while the diamond accents bring an element of luxury and refinement.
This design is perfect for elegant occasions or whenever you want your nails to shine with grace.
Creating the Base Color
Step 1: Apply the Base Coat
Start with a clear base coat to protect your natural nails and ensure smooth application. Allow it to dry completely before applying any color.
Step 2: Apply the Red Base Color
Once the base coat is dry, apply a rich, deep red polish to all nails. Make sure the color is evenly applied and smooth. Allow it to dry completely before moving on to the next step.
Adding the Diamond Accents
Step 1: Place the Diamond Accents
Using a small dotting tool or tweezers, carefully place the diamond rhinestones in a curved line across the center of each nail. You can choose to place the diamonds closer to the cuticle or nearer to the tips, depending on your preference. A few diamonds per nail is enough for a chic, elegant look.
Step 2: Secure the Diamonds
Apply a small amount of nail glue or a strong top coat over the rhinestones to secure them in place. Press each rhinestone gently to ensure it sticks to the nail.
Step 3: Let It Dry
Allow the diamonds to dry and set in place completely before moving on to the next step.
Finishing Touches
Step 1: Apply a Top Coat
Once the diamonds are securely in place, apply a glossy top coat to the entire nail, including over the rhinestones. This will smooth out the surface and give your nails a shiny, polished finish while protecting the stones from coming loose.
Step 2: Clean Up the Edges
Use a small brush with acetone to clean up any excess polish or glue around the cuticles for a crisp, refined finish.
Why It Works
Classic Red with Diamond Accent Nail Art is the perfect combination of bold color and delicate luxury.
The rich red adds a powerful, timeless elegance, while the diamond rhinestones elevate the design with their sparkle and sophistication.
This nail art is ideal for formal events, romantic occasions, or simply for anyone who enjoys a chic, glamorous look. It’s a classic design that will never go out of style, making it a go-to choice for elegance and shine.
33. Lace-Inspired French Tip Nail Art
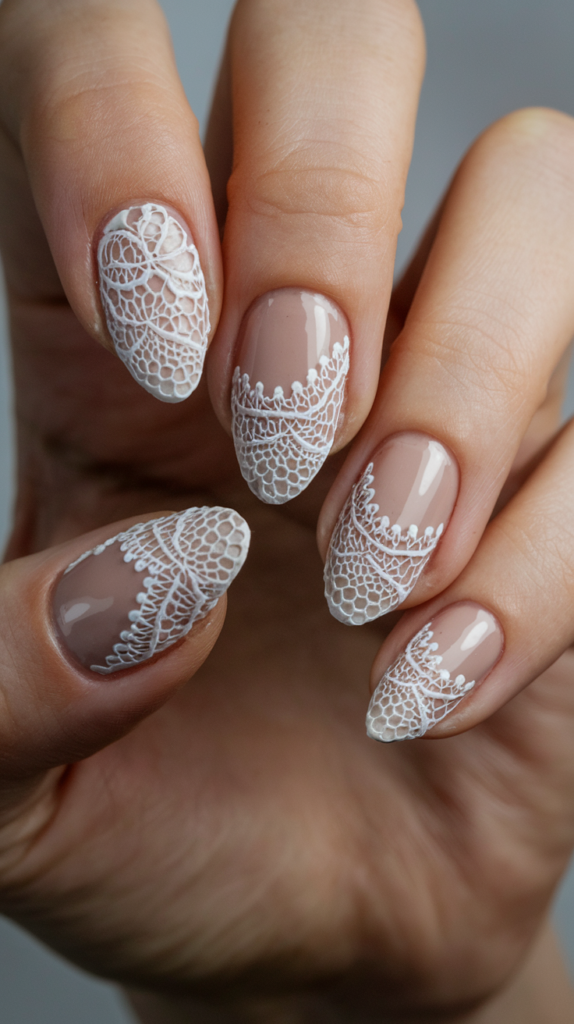
Lace-Inspired French Tip Nail Art combines the elegance of lace with the classic French tip, creating a refined and romantic look.
The delicate white lace design over a soft nude base is both timeless and sophisticated, making it perfect for formal events, weddings, or any occasion where you want your nails to look chic and feminine.
Creating the Base Color
Step 1: Apply the Base Coat
Start by applying a clear base coat to each nail. This will protect your natural nails and provide a smooth surface for the polish. Let it dry completely before moving on.
Step 2: Apply the Nude Base Color
Once the base coat is dry, apply a soft nude or beige polish to the entire nail. This neutral color serves as a delicate backdrop that enhances the lace design. Allow the base color to dry fully before proceeding to the lace details.
Adding the Lace Design
Step 1: Draw the Lace Pattern
Using a fine nail art brush, carefully paint intricate lace designs along the tips of each nail. Focus on delicate, swirling patterns that resemble lacework, with curves and loops that mirror the elegance of lace fabric. Be sure to use white polish for a clean, crisp contrast against the nude base.
Step 2: Ensure Precision
Take your time with the lace design, ensuring the lines are clean and sharp. You can use a dotting tool or a detail brush for added control when creating the finer details. The lace pattern should have a soft, flowing appearance, with a few elegant flourishes at the edges of the nails.
Step 3: Let It Dry
Allow the lace design to dry completely before applying any additional layers to avoid smudging.
Finishing Touches
Step 1: Apply a Top Coat
Once the lace design is fully dry, apply a glossy top coat to seal the design and give your nails a smooth, shiny finish. This will also protect the intricate lace details and help your manicure last longer.
Step 2: Clean Up the Edges
Use a small brush dipped in acetone to clean up any excess polish around your cuticles or the sides of the nails for a polished, precise look.
Why It Works
Lace-Inspired French Tip Nail Art combines the elegance of lace with the simplicity of the classic French tip, creating a design that’s both chic and delicate.
The soft nude base allows the white lace details to pop, giving the design a feminine and refined appearance.
This nail art is perfect for special occasions, weddings, or any time you want your nails to look elegant and sophisticated.
The lace detailing adds a touch of romance, making it a timeless and beautiful choice for any nail art enthusiast.
34. Iridescent Pearl Nail Art
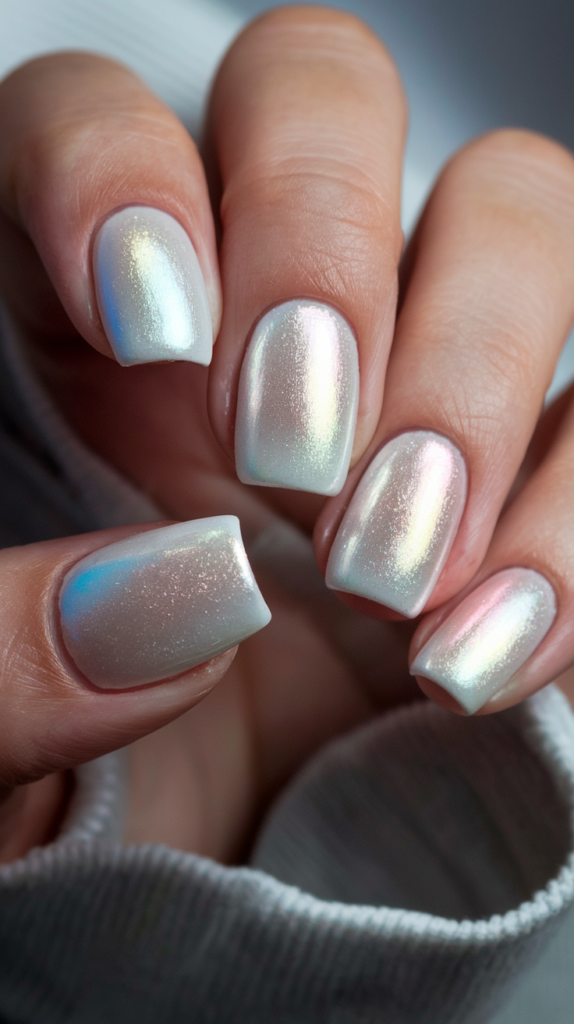
Iridescent Pearl Nail Art captures the elegance of a soft, luminous finish with a subtle shift of colors, reminiscent of pearls glimmering in light.
The reflective, holographic effect gives the nails an ethereal and modern feel, perfect for anyone who wants a sophisticated, yet dreamy look.
Creating the Base Color
Step 1: Apply the Base Coat
Start with a clear base coat to ensure smooth application and to protect your natural nails. Let it dry completely before applying the color.
Step 2: Apply the Base Color
For this design, choose a soft, pearl-like white polish with a hint of shimmer. Apply it evenly across all nails, ensuring that the color is smooth and consistent. Allow it to dry fully before moving on to the next step.
Adding the Iridescent Effect
Step 1: Apply the Iridescent Top Coat
Once the base color is completely dry, apply an iridescent top coat that shifts between colors. The holographic or iridescent top coat should have a delicate, pearlescent shine that changes color as it catches the light. Apply it evenly, covering the entire nail for a seamless, smooth finish.
Step 2: Allow It to Dry
Let the iridescent top coat dry completely. The finish should now have a soft, colorful sheen that shifts between shades of blue, pink, and green depending on the light.
Finishing Touches
Step 1: Apply a Glossy Top Coat
For a final touch of shine and to lock in the iridescent effect, apply a glossy top coat. This will give your nails a smooth and shiny finish while enhancing the holographic effect.
Step 2: Clean Up the Edges
If necessary, use a small brush dipped in acetone to clean any excess polish around the cuticles for a neat and polished look.
Why It Works
Iridescent Pearl Nail Art combines the elegance of pearl-inspired tones with a modern holographic effect, making it perfect for a refined, chic style.
The subtle shift of color creates a captivating and unique look, while the soft, glowing finish adds sophistication.
This design is versatile, fitting for both casual and formal occasions. Its delicate shimmer and elegant shine make it perfect for weddings, galas, or even a special night out.
The iridescent effect ensures your nails will capture attention without being overly flashy.
35. Elegant Burgundy and Silver French Tip Nail Art

Elegant Burgundy and Silver French Tip Nail Art combines the timeless appeal of a French manicure with rich burgundy tips and sparkling silver accents.
This design exudes sophistication with a bold pop of color, ideal for any formal event or special occasion when you want your nails to stand out.
Creating the Base Color
Step 1: Apply the Base Coat
Start by applying a clear base coat to each nail to protect your natural nails and provide a smooth surface for the polish. Let it dry fully before applying color.
Step 2: Apply the Nude or Soft Pink Base Color
Once the base coat is dry, apply a soft nude or light pink polish to the entire nail. This neutral shade will complement the bold burgundy tips and silver details, providing a subtle contrast. Let the base color dry completely.
Creating the Burgundy Tips
Step 1: Apply the Burgundy Tip Color
Using a burgundy or deep red polish, apply the tips of the nails, creating the classic French manicure shape. You can use a French tip guide or freehand for more precision. Allow the burgundy tips to dry completely before proceeding.
Adding the Silver Accents
Step 1: Add Silver Glitter to the Tips
Once the burgundy tips are dry, use a fine brush or a glitter polish to apply silver glitter along the edge of the burgundy line. This creates a sparkling effect that adds depth and glamour to the tips. The glitter should form a crescent shape along the edge of the tips.
Step 2: Let It Dry
Allow the silver glitter accents to dry thoroughly to avoid smudging the design.
Finishing Touches
Step 1: Apply a Top Coat
To seal the design and add a smooth, glossy finish, apply a clear top coat over the entire nail, including the silver accents. This will enhance the shine and protect the design.
Step 2: Clean Up the Edges
Use a small brush and acetone to clean up any excess polish around the cuticles for a crisp and refined look.
Why It Works
Elegant Burgundy and Silver French Tip Nail Art takes the classic French manicure to a whole new level with the addition of burgundy tips and sparkling silver accents.
The rich burgundy brings boldness and warmth, while the silver glitter adds a touch of luxury and sophistication.
This design is perfect for anyone looking for an elevated, yet timeless look. Whether it’s for a wedding, a formal event, or a special night out, this nail art is sure to turn heads and complement any ensemble.
Conclusion
Acrylic nails provide the perfect opportunity to experiment with different designs, textures, and finishes, allowing you to create a look that’s uniquely yours.
Whether you’re drawn to the timeless elegance of red nails with diamond studs or the playful energy of neon animal prints, there’s no limit to what you can achieve with acrylics.
These 35 designs showcase the best of current trends while also leaving room for your personal touch, making each manicure a true work of art.
So, go ahead and let your creativity shine, and don’t be afraid to try something new—the right set of acrylic nails can make any outfit or occasion feel even more special.