
Welcome to the world of sophisticated nail art where simplicity meets creativity.
Black nail designs have evolved from a classic fashion statement to an expansive canvas for artistic expression.
This blog post delves into the myriad ways you can elevate the classic black manicure to new heights of style and elegance.
Whether you’re a fan of the understated matte look or you crave something more dazzling, like a glitter ombre or intricate lace designs, there’s something here to inspire every nail art enthusiast.
Let’s explore how these timeless black nail designs can be adapted to fit any mood, occasion, or personality, turning your nails into a masterpiece of expression.
1. Classic Matte Black Nail Art
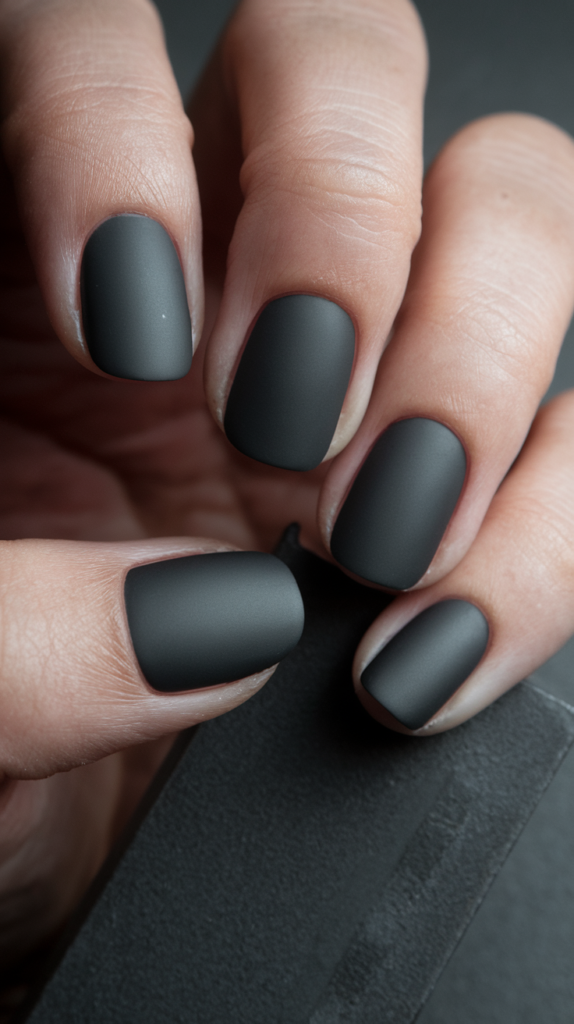
Classic matte black nails deliver a bold yet understated elegance, making them a go-to choice for any occasion.
Their velvety, non-reflective finish adds a sophisticated edge to your look, creating a timeless style that never goes out of fashion.
What Are Matte Black Nails?
Matte black nails feature a sleek, non-glossy finish that offers a contemporary twist on traditional nail art.
The absence of shine enhances the depth and texture of the black polish, giving your nails a smooth, velvety appearance. This minimalist yet striking design works perfectly with casual outfits or formal ensembles.
Achieving the Perfect Matte Black Look
Step 1: Prep Your Nails
Begin by shaping your nails and pushing back the cuticles. Smooth the nail surface with a buffing block to ensure an even polish application.
Step 2: Apply a Base Coat
Use a clear base coat to protect your nails and help the polish adhere better.
Step 3: Layer on Black Polish
Apply two thin coats of black nail polish, allowing each layer to dry completely. This ensures an even and opaque finish.
Step 4: Seal with a Matte Top Coat
Finish with a matte top coat to transform the glossy black polish into a sleek, non-reflective finish.
Step 5: Touch Up as Needed
Clean up any edges or smudges for a professional look. Reapply the matte top coat every few days to maintain the finish.
Styling Matte Black Nails
- Add Minimalist Accents: Pair matte black with a thin metallic stripe or a single rhinestone for subtle glam.
- Try Matte French Tips: Combine glossy black tips with a matte black base for a modern twist on the classic French manicure.
- Incorporate Textured Details: Experiment with matte and glossy patterns to add depth and visual interest.
Why It Works
Matte Black Nail Art stands out with its timeless appeal and understated elegance.
The velvety finish adds a modern edge, elevating the classic black manicure to new levels of sophistication.
Its versatility makes it ideal for any occasion, whether you’re aiming for a polished daily look or a statement style for an event.
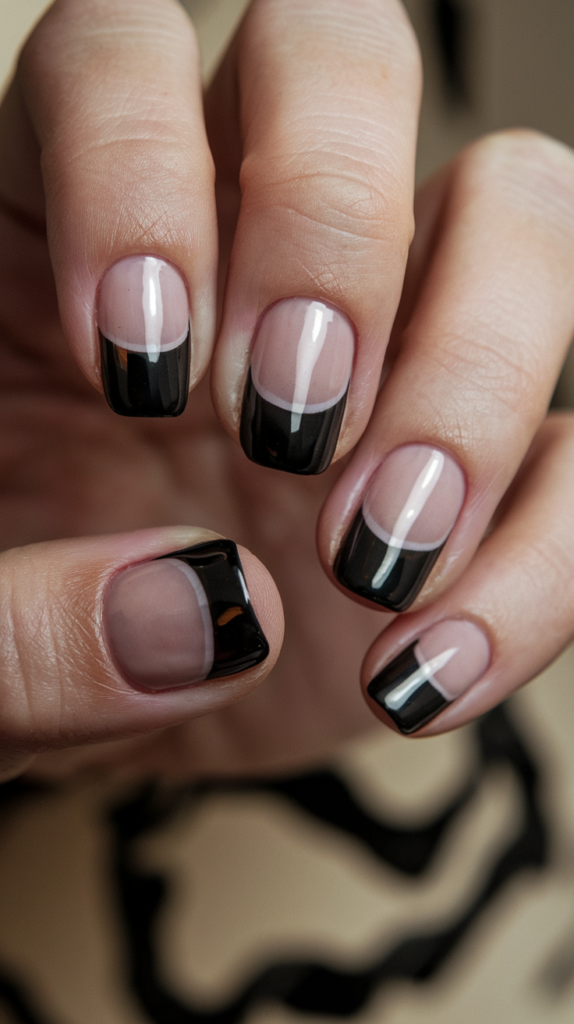
2. Glossy Black French Tips
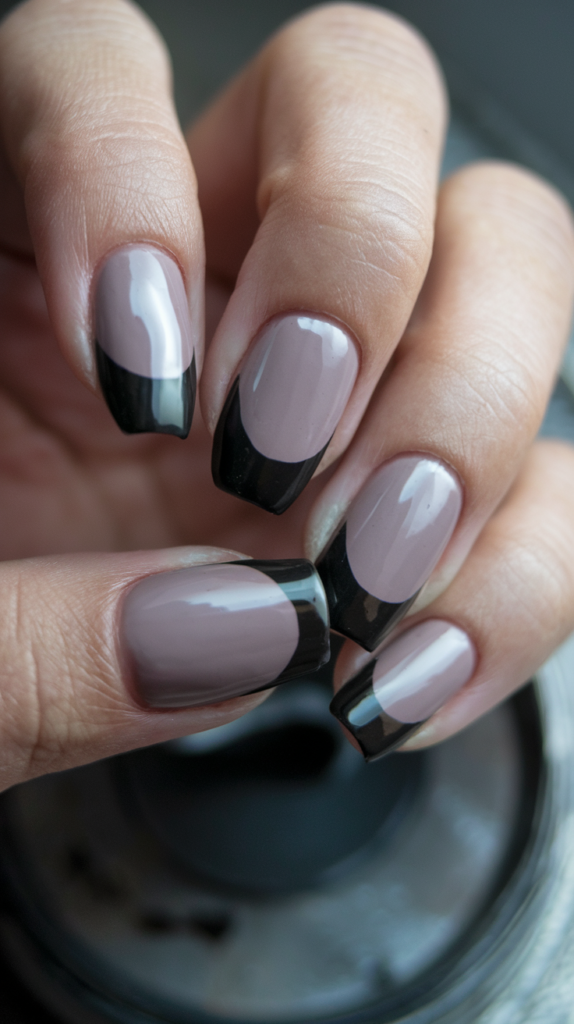
Glossy black French tips add a modern, sophisticated edge to the classic French manicure. This timeless design combines a soft, neutral base with striking black accents for a polished and refined look.
What Are Glossy Black French Tips?
This design features glossy black polish applied to the tips of the nails, creating a bold contrast against a nude or neutral base.
The glossy finish adds a touch of elegance, making it perfect for formal events, evening outings, or anyone looking to elevate their nail game.
Creating Perfect Glossy Black French Tips
Step 1: Prep Your Nails
Shape your nails to the desired length and style, then push back the cuticles and buff the nail surface.
Step 2: Apply a Neutral Base Coat
Start with a soft beige, pale pink, or clear polish as the base color. Let it dry completely.
Step 3: Paint the Black Tips
Using a striping brush or French manicure guide stickers, carefully paint the tips with glossy black polish.
Ensure the tips are even and symmetrical for a clean, professional look.
Step 4: Add a Top Coat
Seal the design with a clear top coat to enhance the gloss and protect the manicure from chipping.
Step 5: Clean Up Edges
Use a small brush dipped in nail polish remover to clean up any imperfections around the edges.
Styling Ideas for Glossy Black French Tips
- Accent Nails: Add a glitter or metallic accent nail to complement the black tips.
- Geometric Details: Incorporate minimalist geometric lines or patterns for a modern twist.
- Matte and Glossy Combo: Pair matte nude bases with glossy black tips for added contrast.
Why It Works
Glossy Black French Tips offer a chic and contemporary update to the classic French manicure.
The bold black accents paired with a neutral base create a versatile design that suits any outfit or occasion.
The glossy finish adds a luxurious touch, ensuring your nails always look polished and elegant.
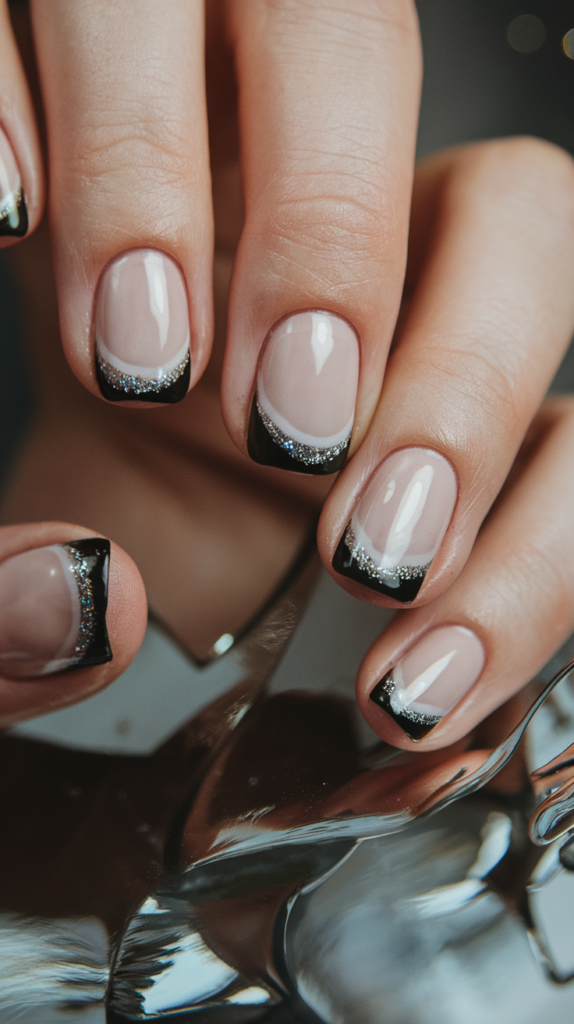
3. Glitter-Tipped Black French Nails
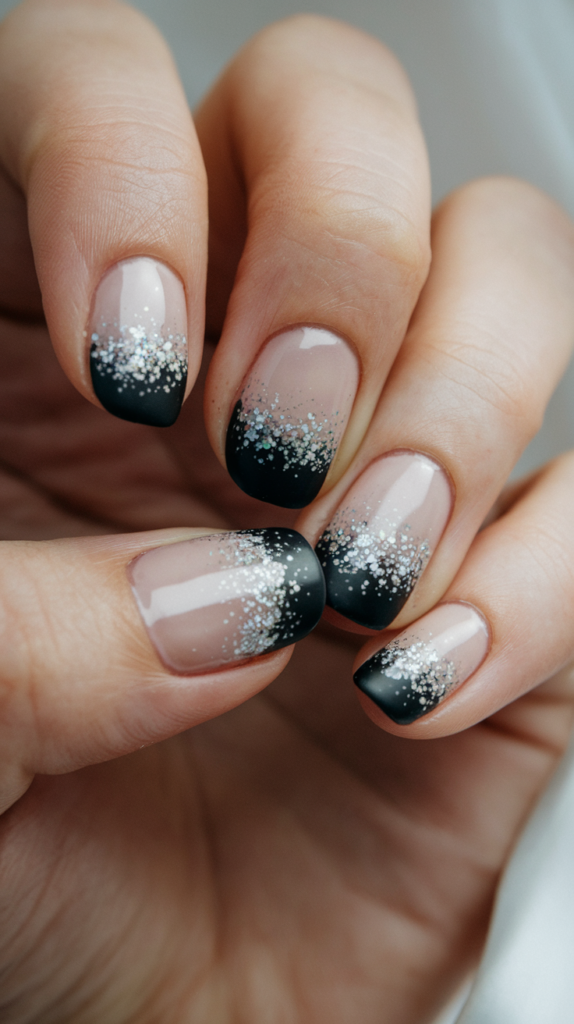
Glitter-tipped black French nails combine the bold elegance of black tips with a touch of sparkling glamour. This stunning design is perfect for special occasions or adding a bit of dazzle to your everyday style.
What Are Glitter-Tipped Black French Nails?
This design features classic black French tips enhanced with a sprinkling of glitter at the edges. The sparkle creates a gradient effect that softens the boldness of the black tips, giving the nails a sophisticated and festive finish.
How to Create Glitter-Tipped Black French Nails
Step 1: Prep Your Nails
Shape your nails and buff the surface to create a smooth base. Push back the cuticles for a clean and polished look.
Step 2: Apply a Neutral Base Color
Start with a sheer or light nude polish to create a subtle background that enhances the black and glitter accents.
Step 3: Paint the Black Tips
Use a striping brush or French manicure guides to apply glossy black polish to the tips of your nails. Let the polish dry completely.
Step 4: Add Glitter Accents
Using a fine glitter polish or loose glitter, gently dab the glitter along the edges of the black tips. Blend slightly upwards towards the center of the nail for a gradient effect.
Step 5: Seal with a Top Coat
Apply a clear top coat to secure the glitter and give your nails a smooth, glossy finish.
Styling Tips for Glitter-Tipped Black French Nails
- Silver or Gold Glitter: Pair black tips with silver glitter for a cool-toned look or gold glitter for a warmer, luxurious feel.
- Accent Nails: Add glitter to the entire nail of one or two accent fingers for extra sparkle.
- Matte Base Option: Use a matte nude base for a modern contrast against the glossy black tips and glitter.
Why It Works
Glitter-Tipped Black French Nails strike the perfect balance between boldness and elegance.
The classic black tips provide a timeless foundation, while the glitter adds a touch of playfulness and glamour.
This versatile design is ideal for parties, weddings, or simply elevating your everyday manicure with a bit of sparkle.
4. Chic Polka Dot Nail Art
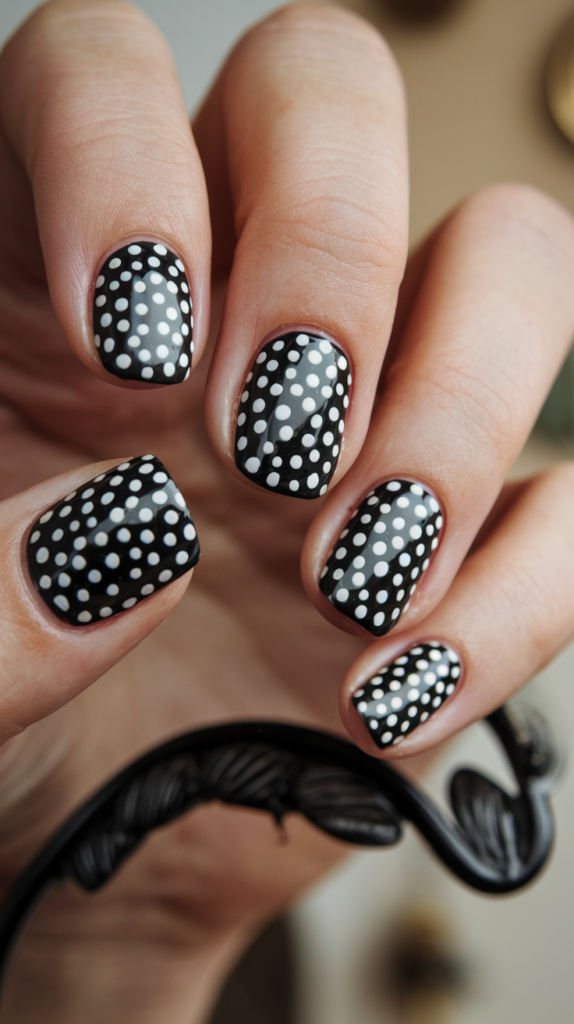
Chic polka dot nail art combines playful patterns with timeless black-and-white elegance. This classic design adds a touch of whimsy to your manicure while keeping it sophisticated and versatile.
What Are Polka Dot Nails?
Polka dot nails feature evenly spaced dots painted onto a base color, creating a cheerful and stylish pattern.
In this variation, a sleek black base is paired with crisp white dots for a striking monochromatic look. This design is ideal for casual outings, themed events, or anytime you want to add a touch of fun to your nails.
How to Create Chic Polka Dot Nails
Step 1: Prep Your Nails
Start with clean, shaped nails. Push back cuticles and buff the nail surface to ensure smooth application.
Step 2: Apply the Base Coat
Paint your nails with a glossy black polish as the base color. Allow it to dry completely.
Step 3: Create the Polka Dots
Using a dotting tool or the tip of a bobby pin, dip it into white nail polish and create evenly spaced dots across the nail.
For a uniform look, aim to keep the dots the same size and evenly spaced.
Step 4: Let It Dry
Allow the polka dots to dry fully to prevent smudging.
Step 5: Seal with a Top Coat
Finish with a clear, glossy top coat to protect the design and enhance its shine.
Styling Tips for Polka Dot Nails
- Accent Nails: Add a glitter accent nail or create polka dots in a gradient pattern for a creative twist.
- Color Variations: Swap the black-and-white theme for other complementary color combinations to suit your outfit or mood.
- Add a Modern Edge: Incorporate metallic dots or alternate the base color for a trendy update.
Why It Works
Chic Polka Dot Nail Art offers a playful yet elegant style that suits any occasion.
The bold contrast of black and white creates a visually appealing pattern, while the timeless polka dot design adds a touch of whimsy.
This manicure is both easy to create and versatile, making it a favorite for those who love classic yet fun nail art.
5. Luxe Striped Black and Gold Nail Art
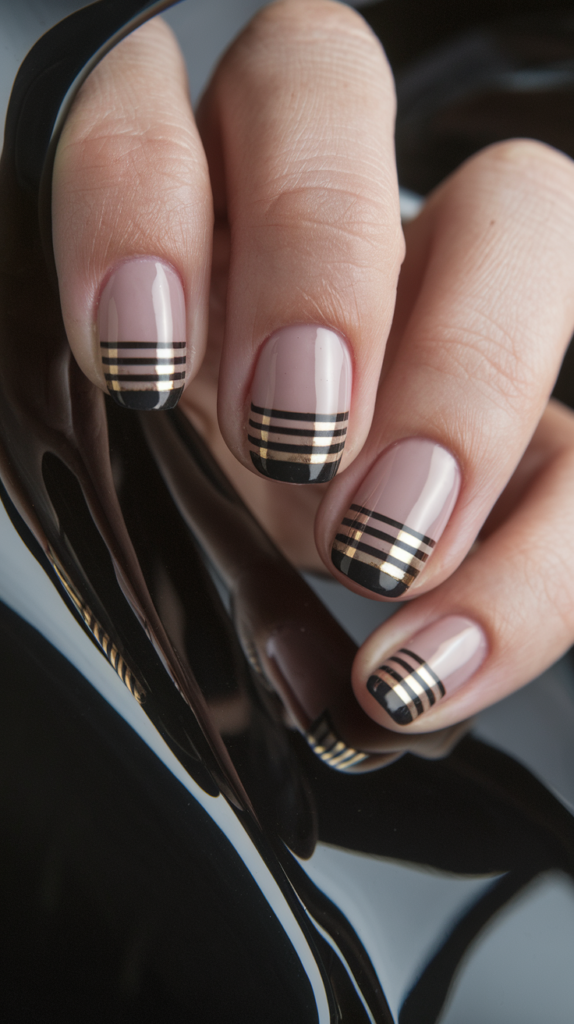
Luxe striped black and gold nail art brings a touch of glamour and sophistication to your manicure. This design combines sleek black tips with elegant gold accents for a high-fashion look.
What Is Luxe Striped Nail Art?
This chic design pairs bold black tips with thin gold stripes, creating a modern and luxurious aesthetic.
The neutral base complements the striking contrast of black and gold, making it perfect for evening events, parties, or whenever you want to make a statement.
How to Create Luxe Striped Black and Gold Nails
Step 1: Prep Your Nails
Shape your nails and clean the surface. Push back cuticles and buff your nails to ensure a smooth application.
Step 2: Apply a Neutral Base Coat
Start with a sheer nude or soft pink polish as the base to enhance the black and gold accents. Allow it to dry completely.
Step 3: Add Black Tips
Use a striping brush or French manicure guides to create sleek black tips. Ensure the tips are even and allow the polish to dry.
Step 4: Add Gold Stripes
Using metallic gold nail striping tape or a fine brush, apply thin horizontal stripes across the black tips. Place the stripes evenly for a polished, symmetrical effect.
Step 5: Seal the Design
Finish with a high-shine clear top coat to secure the stripes and add a glossy finish.
Styling Ideas for Luxe Striped Nails
- Double Gold Accents: Add an extra gold stripe above the black tip for more dimension.
- Matte and Glossy Mix: Combine a matte nude base with glossy black tips and metallic gold stripes for added texture.
- Custom Color Pairings: Experiment with silver or rose gold accents for a fresh twist on the design.
Why It Works
Luxe Striped Black and Gold Nail Art is the epitome of elegance, combining bold contrasts with metallic sophistication.
The black tips add depth and drama, while the gold accents provide a luxurious touch that elevates the entire look.
This manicure is versatile, pairing perfectly with formal attire or as a statement piece for special occasions.
6. Elegant Black Lace Nail Art

Elegant black lace nail art brings a touch of vintage charm and sophistication to your manicure.
This intricate design mimics the delicate beauty of lace, making it ideal for weddings, formal events, or when you want to feel effortlessly chic.
What Is Lace Nail Art?
Lace nail art features delicate black patterns that resemble intricate lacework, applied over a sheer or neutral base.
This design combines classic elegance with modern nail art techniques, resulting in a timeless look that is both feminine and bold.
How to Create Elegant Black Lace Nails
Step 1: Prep Your Nails
Shape and buff your nails, ensuring a clean and smooth surface. Push back the cuticles for a neat appearance.
Step 2: Apply a Sheer Base Coat
Start with a light nude or sheer pink polish as the base. Let it dry completely to create a soft background for the lace design.
Step 3: Create the Lace Pattern
Using a fine nail art brush or lace nail stickers, carefully apply intricate black lace patterns to each nail.
If using stickers, press them gently onto the nail surface to avoid creases or bubbles.
Step 4: Add Detailing
Enhance the design with tiny black dots or floral accents to replicate the texture of lace.
Step 5: Seal the Design
Apply a clear top coat to protect the lace details and give your nails a glossy finish.
Styling Ideas for Black Lace Nails
- Accent Nails: Highlight one or two nails with lace while keeping the others plain or with a simple nude polish.
- Matte Finish: Try a matte top coat for a soft, vintage-inspired effect.
- Color Variations: Experiment with white lace over dark bases for a reverse design.
Why It Works
Elegant Black Lace Nail Art captures the beauty of vintage-inspired lacework, adding a touch of sophistication to your nails.
The intricate patterns stand out against the neutral base, creating a delicate yet bold look.
This versatile design complements formal attire and special occasions, offering a perfect balance of elegance and creativity.
7. Monochrome Marble Nail Art
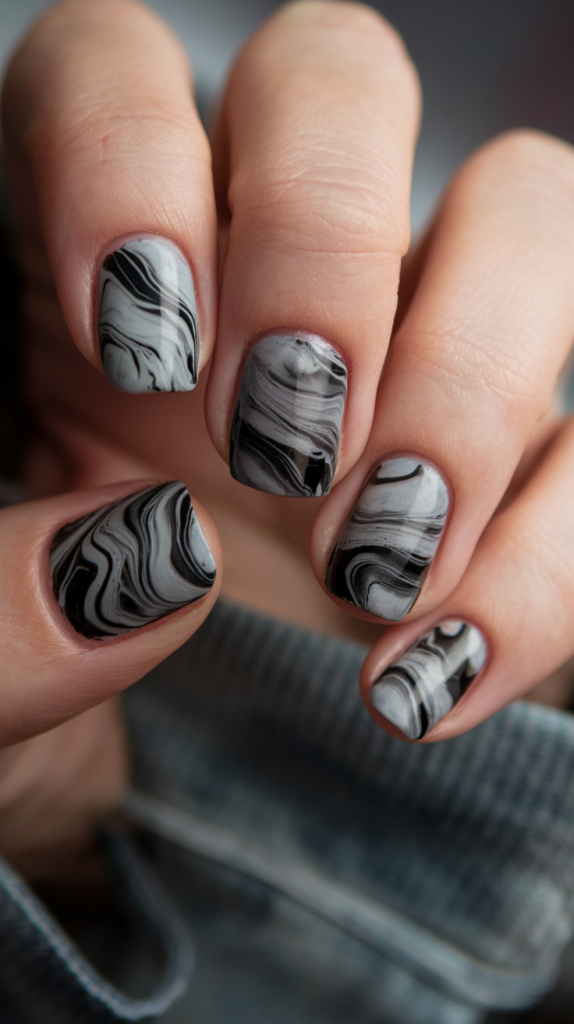
Monochrome marble nail art blends black, white, and gray into stunning, swirling patterns that mimic the elegance of natural marble. This chic design is perfect for those who love modern, minimalist aesthetics with a touch of sophistication.
What Is Marble Nail Art?
Marble nail art recreates the organic, flowing patterns of marble stone on your nails.
In this monochrome version, black, white, and gray polishes are swirled together to achieve a striking yet neutral look that complements any outfit or occasion.
How to Create Monochrome Marble Nails
Step 1: Prep Your Nails
Shape and buff your nails for a smooth base. Push back the cuticles for a clean canvas.
Step 2: Apply a Base Color
Start with a light gray or white polish as the base to enhance the marble effect. Allow it to dry completely.
Step 3: Create the Marble Design
- Drop small amounts of black, white, and gray polishes onto a disposable surface, such as a piece of foil.
- Use a thin nail art brush or a toothpick to gently swirl the colors together to create a marble effect.
- Dip a small sponge or brush into the swirled polish and apply it to the nail in dabbing motions.
Step 4: Refine the Pattern
Use a fine brush to adjust the swirls, creating delicate, flowing lines for a realistic marble effect.
Step 5: Seal with a Top Coat
Apply a clear top coat to smooth out the design and add a glossy finish.
Styling Ideas for Monochrome Marble Nails
- Accent Nails: Pair marble patterns with solid black or gray nails for a balanced look.
- Matte Finish: Use a matte top coat for a soft, velvety texture.
- Metallic Accents: Add subtle gold or silver lines to enhance the marble effect.
Why It Works
Monochrome Marble Nail Art combines the timeless beauty of marble with a modern, minimalist palette.
The swirling black, white, and gray patterns create a sophisticated look that is both versatile and eye-catching.
This design works seamlessly for everyday wear or special occasions, making it a favorite for those who appreciate understated elegance.
8. Neon Splash Nail Art
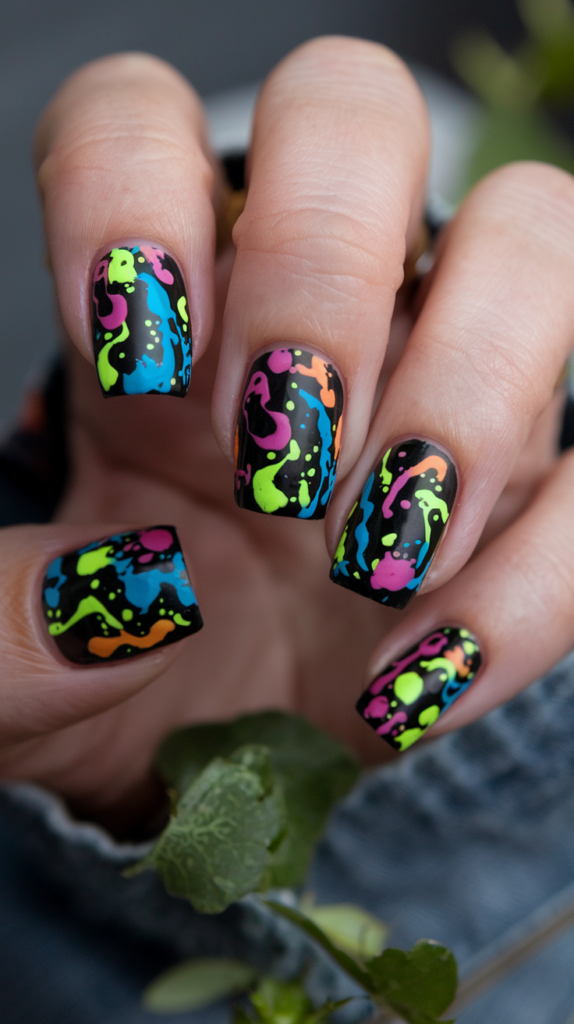
Neon splash nail art is bold, vibrant, and undeniably fun.
Featuring bright neon splatters over a sleek black base, this design brings a playful, artistic flair to your nails—perfect for parties, festivals, or making a statement.
What Is Neon Splash Nail Art?
Neon splash nail art creates the effect of colorful paint splatters on your nails. The contrast between the matte black background and neon colors like pink, green, orange, and blue makes the design pop, giving it a dynamic and energetic look.
How to Create Neon Splash Nails
Step 1: Prep Your Nails
Shape your nails to your preferred style and buff the surface. Push back cuticles for a clean base.
Step 2: Apply the Base Color
Paint your nails with a black matte or glossy polish. Let it dry completely.
Step 3: Add Neon Splashes
- Dip a small nail art brush or toothpick into neon polish and flick it across the nails to create splash patterns.
- Use different colors like neon pink, green, blue, and orange for a layered, multicolored effect.
- Alternatively, use a splatter stamping plate for a precise, consistent design.
Step 4: Clean Up the Edges
Remove any stray splashes around the cuticles using a small brush dipped in nail polish remover.
Step 5: Seal the Design
Finish with a clear top coat to protect the design and enhance the vibrancy of the neon colors.
Styling Tips for Neon Splash Nails
- Matte Finish: Opt for a matte top coat to soften the look and create a modern, edgy vibe.
- Accent Nails: Highlight one or two nails with solid neon colors or glitter to complement the splatter effect.
- Add Details: Incorporate tiny dots or streaks for added texture and depth.
Why It Works
Neon Splash Nail Art is a bold and energetic design that captures attention instantly.
The high-contrast combination of neon colors and a black base creates a striking visual impact, making it perfect for fun events or showcasing your artistic side.
This playful, creative style is an excellent way to express individuality and stand out with vibrant, statement nails.
9. Glossy Black Tip Elegance
Glossy black tip nails bring a modern, refined twist to the traditional French manicure. Featuring a clear or nude base with sleek black tips, this minimalist design is ideal for those who love understated yet striking nails.
What Is Glossy Black Tip Nail Art?
Glossy black tip nail art combines a neutral base with bold, glossy black tips for a chic and polished look.
This contemporary version of the French manicure is versatile, making it perfect for both casual and formal occasions.
How to Create Glossy Black Tip Nails
Step 1: Prep Your Nails
Shape your nails to your desired style, such as square, round, or almond. Buff the surface and push back cuticles for a clean base.
Step 2: Apply a Base Coat
Start with a clear or light nude base coat to create a smooth, natural-looking foundation. Allow it to dry completely.
Step 3: Paint the Black Tips
- Use a striping brush or French manicure guide stickers to paint glossy black polish onto the tips.
- Keep the edges clean and symmetrical for a professional finish.
Step 4: Refine the Lines
Touch up any uneven edges with a small brush dipped in nail polish remover.
Step 5: Seal with a Top Coat
Apply a high-shine clear top coat to protect the design and enhance the glossy finish.
Styling Ideas for Glossy Black Tips
- Double Line Accents: Add a thin metallic line above the black tips for an extra touch of elegance.
- Matte Base: Use a matte nude or clear base to contrast with the glossy black tips.
- Geometric Variations: Experiment with angled or asymmetrical black tips for a modern twist.
Why It Works
Glossy Black Tip Elegance redefines the classic French manicure with a bold, contemporary edge.
The high-shine black tips create a clean, sophisticated look that complements any outfit or occasion.
This design strikes the perfect balance between minimalism and drama, making it a timeless choice for chic, effortless nails.
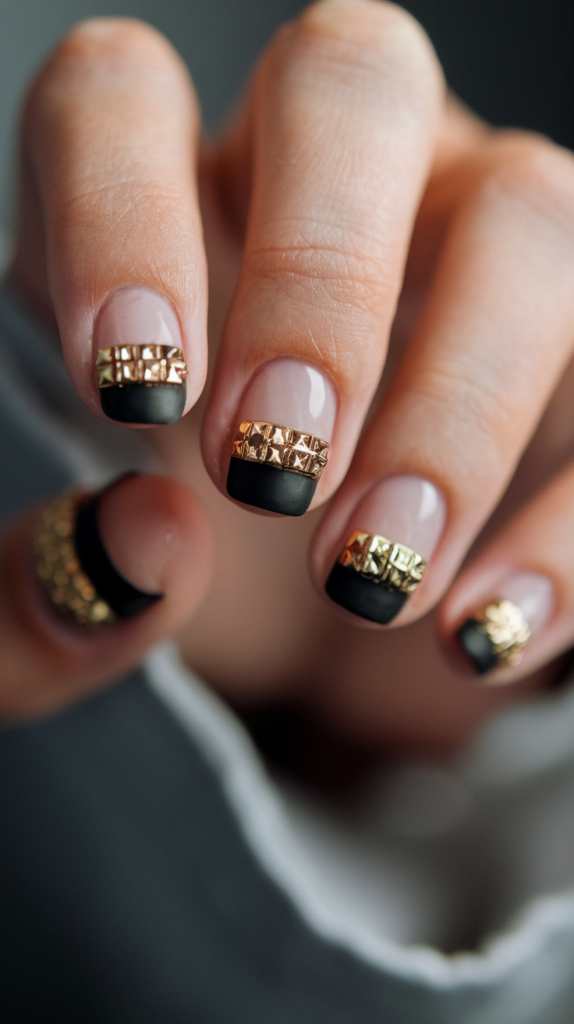
10. Glamorous Embellished Black Tips
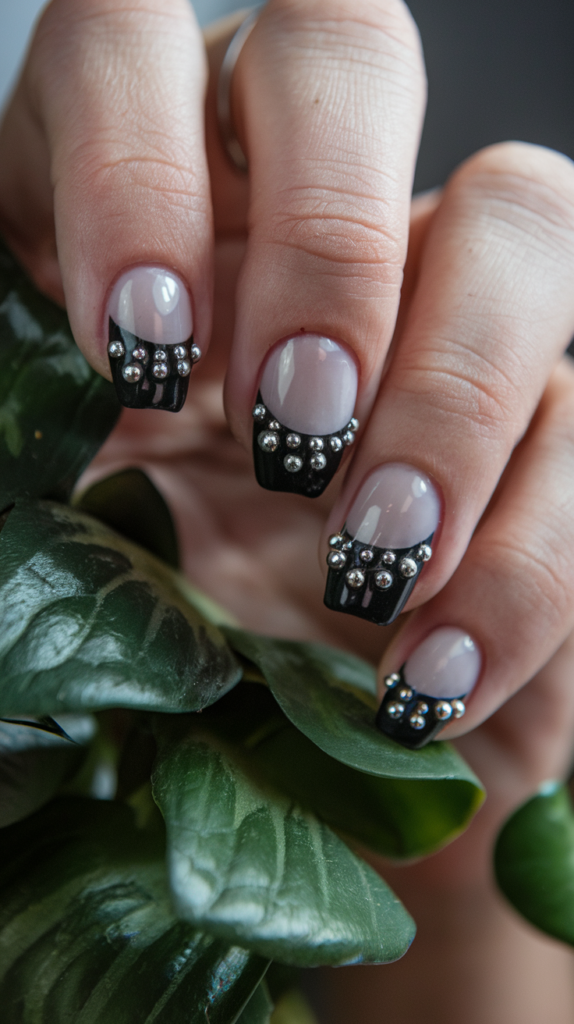
Glamorous embellished black tips combine bold glossy black accents with sparkling rhinestones for a dramatic and luxurious manicure.
This design is perfect for special occasions, parties, or when you want to add a touch of glamour to your look.
What Is Embellished Black Tip Nail Art?
This design features glossy black French tips enhanced with rhinestones or metallic studs. The embellishments add depth, texture, and a high-fashion feel, creating a bold statement manicure.
How to Create Glamorous Embellished Black Tips
Step 1: Prep Your Nails
Shape your nails to your preferred style, ensuring a smooth surface. Push back the cuticles for a clean base.
Step 2: Apply a Base Coat
Use a clear or nude base coat to create a natural-looking foundation. Let it dry completely.
Step 3: Paint the Black Tips
- Use a striping brush or French manicure guides to apply glossy black polish to the tips.
- Ensure the lines are crisp and even for a polished look.
Step 4: Add Rhinestone Embellishments
- Use a small dot of nail glue to secure rhinestones or metallic studs along the line where the black tip meets the nude base.
- Arrange the embellishments symmetrically for a balanced and elegant appearance.
Step 5: Seal the Design
Finish with a thick layer of clear top coat to secure the rhinestones and add a glossy finish.
Styling Ideas for Embellished Black Tips
- Silver and Gold Accents: Mix metallic studs with rhinestones for added dimension.
- Matte and Glossy Combo: Use a matte base to contrast with the glossy black tips and sparkling embellishments.
- Alternate Designs: Embellish only a few nails for a subtle yet impactful look.
Why It Works
Glamorous Embellished Black Tips elevate the classic French manicure with bold black tips and sparkling details.
The rhinestones add a touch of luxury, making the design perfect for formal events or when you want your nails to be the centerpiece of your look.
This combination of bold black and shimmering accents creates a striking, high-end style that is both versatile and unforgettable.
11. Futuristic Shine with Black and Chrome Nails
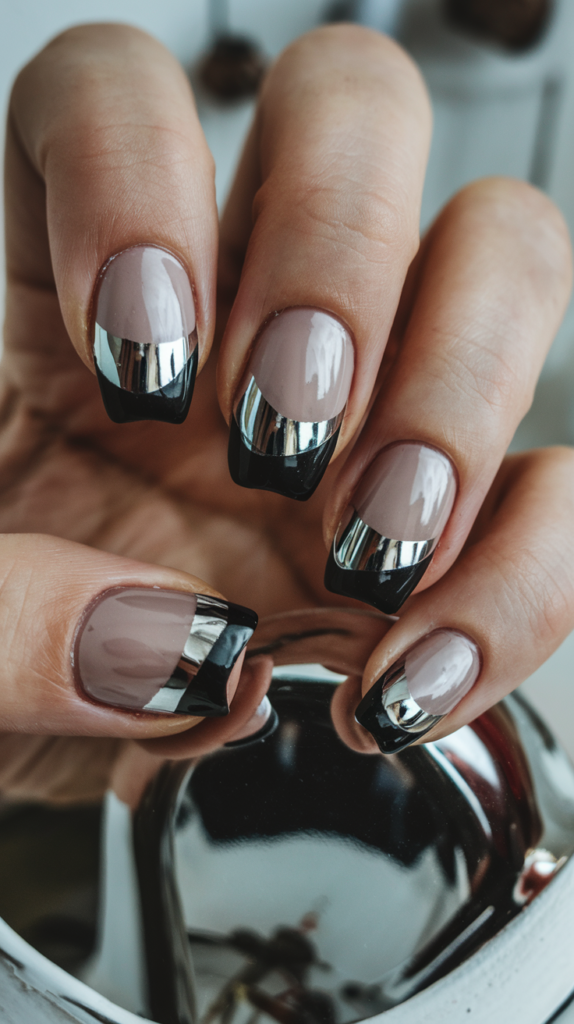
Black and chrome nails bring a sleek, modern edge to your manicure with their mirror-like finish and bold contrast.
Perfect for those who love futuristic, high-fashion looks, this design is both eye-catching and sophisticated.
What Are Black and Chrome Nails?
Black and chrome nails combine a glossy black base with reflective chrome tips.
The chrome finish adds a metallic sheen that reflects light beautifully, giving your nails a high-tech, futuristic appearance.
How to Achieve Black and Chrome Nails
Step 1: Prep Your Nails
Shape your nails and buff the surface to create a smooth canvas. Push back cuticles for a clean finish.
Step 2: Apply a Black Base Coat
Start with a glossy black polish as the base. Apply two thin coats for an even, opaque finish and allow it to dry completely.
Step 3: Add Chrome Powder
- Using a sponge applicator or a soft brush, gently rub chrome powder onto the tips of your black nails.
- Blend the powder slightly towards the center for a gradient effect, or keep it concentrated on the tips for a clean, defined look.
Step 4: Apply a Special Top Coat
Seal the chrome powder with a no-wipe gel top coat. This step enhances the reflective quality and prevents the powder from smudging or dulling.
Step 5: Cure Under a UV Lamp
Place your nails under a UV or LED lamp to cure the top coat, ensuring the chrome powder stays in place.
Styling Ideas for Black and Chrome Nails
- Full Chrome Accents: Turn one or two nails completely chrome for added drama.
- Matte and Chrome Combo: Use a matte black base to contrast with the shiny chrome tips.
- Geometric Patterns: Create sharp angles or lines with the chrome powder for a modern twist.
Why It Works
Futuristic Shine with Black and Chrome Nails creates a bold, contemporary look that stands out.
The mirror-like chrome finish adds a futuristic touch, while the black base provides a sleek and dramatic contrast.
This versatile design is perfect for high-end events, evening outings, or making a striking fashion statement.
12. Intricate Floral Black and White Nail Art
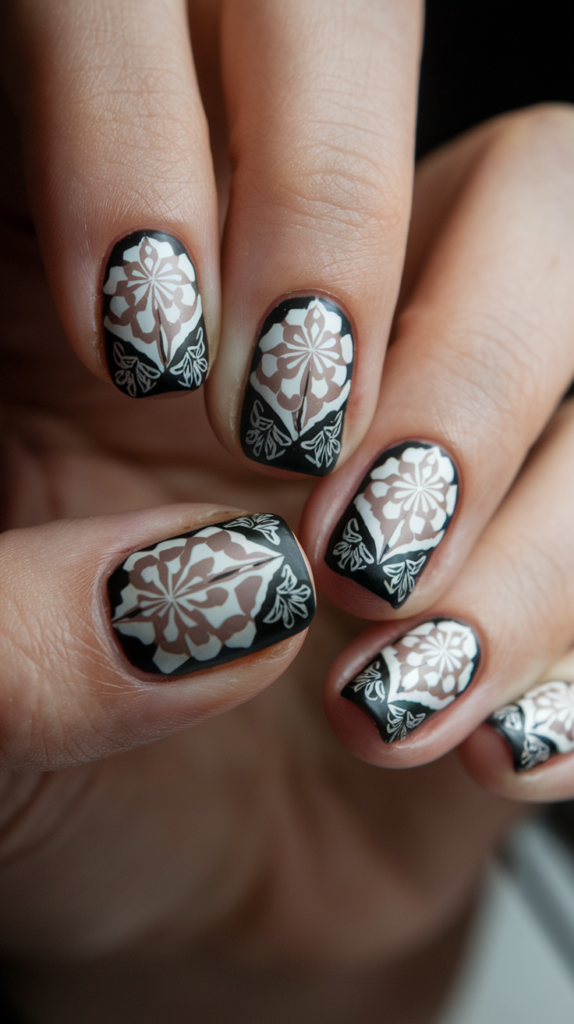
Intricate floral black and white nail art combines delicate floral patterns with bold contrasting shades for a timeless, elegant look.
Perfect for formal events or everyday sophistication, this design is a stunning display of artistry and precision.
What Is Floral Black and White Nail Art?
This design features intricate white floral patterns set against a glossy black background.
The high-contrast combination highlights the detailed floral elements, creating a visually captivating manicure that is both classic and modern.
How to Create Intricate Floral Black and White Nails
Step 1: Prep Your Nails
Shape your nails and buff the surface to create a smooth base. Push back the cuticles for a clean foundation.
Step 2: Apply a Black Base Coat
Start with a glossy black polish for the base. Apply two thin coats for an even and opaque finish, allowing each layer to dry.
Step 3: Add the Floral Patterns
- Use a fine nail art brush or stamping plate to create intricate floral designs with white polish.
- Focus on symmetrical patterns for a clean, professional look.
- If using a stamping plate, press the design onto the nail carefully to avoid smudging.
Step 4: Detail the Design
Enhance the floral patterns with tiny dots, lines, or leaves using a fine brush for added intricacy.
Step 5: Seal with a Top Coat
Apply a clear top coat to protect the design and give your nails a glossy finish.
Styling Ideas for Floral Black and White Nails
- Accent Nails: Highlight one or two nails with floral designs while keeping the rest plain black.
- Matte Finish: Use a matte top coat to create a soft, velvety effect.
- Gold Detailing: Add subtle gold accents to the floral design for a luxurious touch.
Why It Works
Intricate Floral Black and White Nail Art is a perfect blend of elegance and boldness.
The floral patterns bring a feminine charm, while the black base adds depth and sophistication.
This versatile design complements both formal and casual looks, making it a must-try for anyone who loves detailed, artistic nails.
13. Fiery Gothic Flame Nail Art
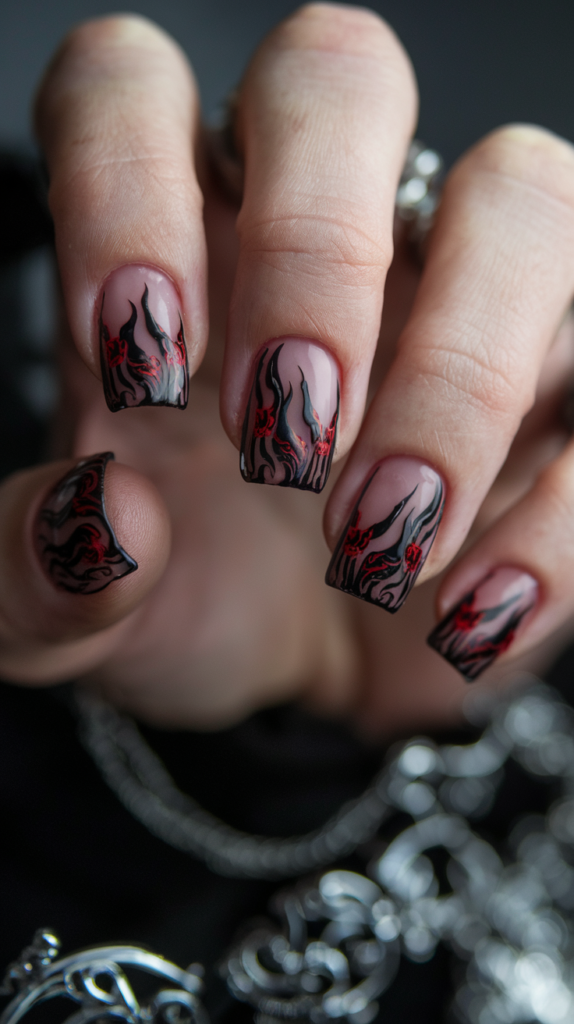
Fiery Gothic flame nail art is a bold and dramatic design that combines deep black flames with striking red accents over a sheer or neutral base.
This edgy and rebellious look is perfect for those who love statement nails with a touch of gothic flair.
What Is Fiery Gothic Flame Nail Art?
This design features sharp, flowing flame patterns in black and red hues that mimic the intensity of fire.
The sheer or nude base creates a striking contrast, making the flames appear even more vivid and dramatic.
How to Create Fiery Gothic Flame Nails
Step 1: Prep Your Nails
Shape and buff your nails to your desired style. Push back the cuticles and clean the surface for smooth application.
Step 2: Apply a Base Coat
Start with a sheer or nude base coat to enhance the contrast with the flame design. Allow it to dry completely.
Step 3: Paint the Flame Base
- Use a fine nail art brush to paint sharp flame shapes in black polish starting at the tips and extending toward the center of the nail.
- Let the flames taper off for a sleek, flowing effect.
Step 4: Add Red Accents
- Highlight the flames with red polish to create depth and mimic the look of glowing embers.
- Use a thin brush to layer red polish within the black flames for a fiery gradient effect.
Step 5: Seal with a Top Coat
Finish with a glossy top coat to enhance the design’s intensity and protect it from chipping.
Styling Ideas for Fiery Gothic Flame Nails
- Metallic Accents: Add gold or silver highlights within the flames for an extra touch of drama.
- Matte Base: Use a matte base coat to create a contrasting texture with the glossy flames.
- Glitter Embers: Incorporate subtle red or orange glitter for a sparkling ember effect.
Why It Works
Fiery Gothic Flame Nail Art is the ultimate choice for those who want to channel boldness and power through their nails.
The sharp, flowing flames combined with the rich black and red hues create a striking and rebellious look.
This design is perfect for adding edge to your style, whether for a night out, a themed event, or simply to showcase your fierce personality.
14. Glossy Black Perfection
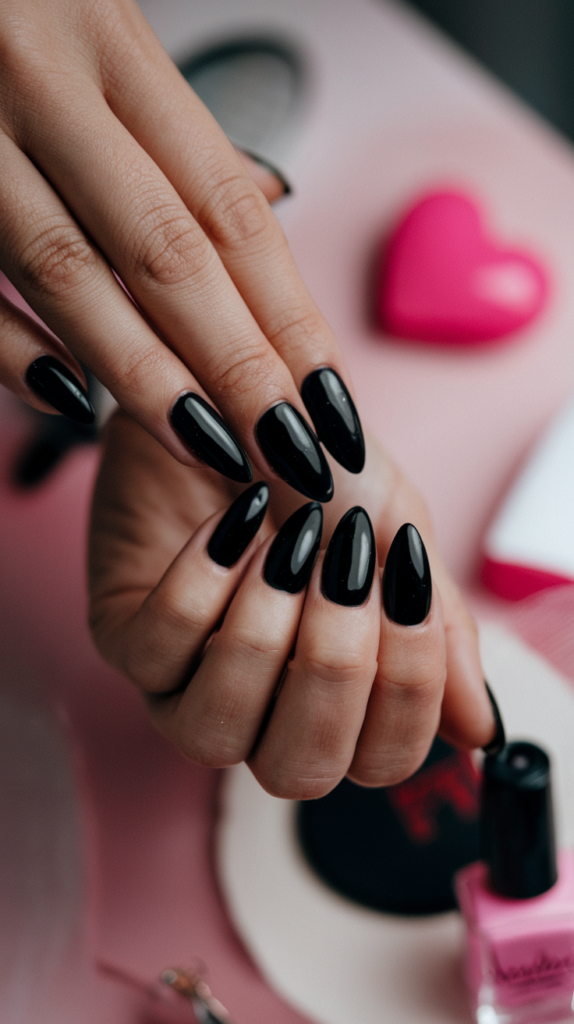
Glossy black nails are a classic, sophisticated choice that exude elegance and confidence. With their sleek and mirror-like finish, they’re a timeless option for any occasion, from formal events to everyday glam.
What Are Glossy Black Nails?
Glossy black nails feature a deep, rich black polish with a high-shine finish.
The smooth and reflective surface creates a polished and luxurious look, making this style a go-to for anyone who loves chic and minimalistic designs.
How to Achieve Glossy Black Perfection
Step 1: Prep Your Nails
Shape your nails into your preferred style, such as almond, stiletto, or square. Buff the surface and clean thoroughly.
Step 2: Apply a Base Coat
Start with a clear base coat to protect your nails and ensure smooth application of the black polish.
Step 3: Paint with Black Polish
- Apply two thin coats of high-quality black nail polish for a rich and even color.
- Allow each coat to dry fully to avoid smudging or streaks.
Step 4: Seal with a Glossy Top Coat
Finish with a high-shine top coat to enhance the reflective quality and provide long-lasting protection.
Step 5: Maintain the Shine
Reapply the top coat every few days to maintain the glossy finish and extend the life of your manicure.
Styling Ideas for Glossy Black Nails
- Rhinestone Accents: Add a single rhinestone to one or two nails for a subtle touch of glam.
- Metallic Details: Pair with metallic gold or silver accents for a luxe look.
- Matte Contrast: Use a matte black base with glossy black tips for a unique twist.
Why It Works
Glossy Black Perfection embodies timeless elegance with its sleek and polished finish.
The rich black color makes a bold statement, while the high-shine effect adds a touch of luxury.
This versatile design complements any outfit, making it an essential choice for both everyday wear and special occasions.
15. Wild Leopard Print Nail Art
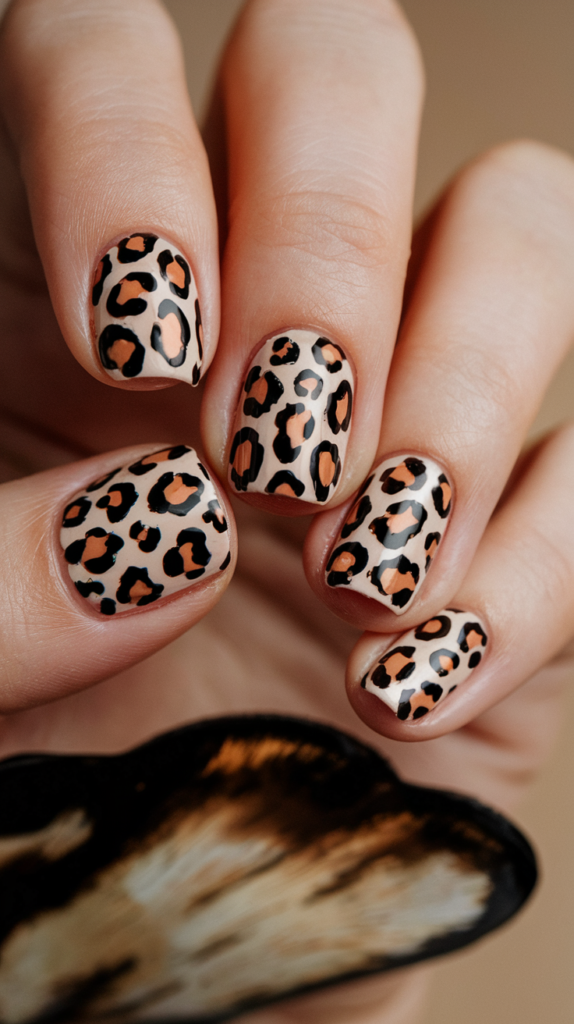
Leopard print nail art brings a fierce, stylish edge to your manicure with its bold patterns and earthy tones. This classic animal print design is a perfect way to showcase your adventurous and fashion-forward side.
What Is Leopard Print Nail Art?
Leopard print nail art features a mix of irregular black spots and golden-brown accents over a neutral or tan base.
This wild and playful design is versatile, making it a great choice for casual outings, themed events, or bold everyday looks.
How to Create Wild Leopard Print Nails
Step 1: Prep Your Nails
Shape and buff your nails for a smooth base. Push back the cuticles to ensure a clean finish.
Step 2: Apply a Base Coat
Start with a beige or nude polish as the base to enhance the leopard pattern. Allow it to dry completely.
Step 3: Add the Golden Spots
- Use a small dotting tool or brush to create uneven spots of golden or caramel-colored polish on each nail.
- Space the spots randomly for a natural look.
Step 4: Outline the Spots
- Using a fine nail art brush or black polish, outline each golden spot irregularly.
- Add a few smaller black dots and lines to fill in the empty spaces for a more dynamic effect.
Step 5: Seal with a Top Coat
Apply a clear, glossy top coat to protect the design and give it a polished finish.
Styling Ideas for Leopard Print Nails
- Accent Nails: Pair leopard prints with solid black or gold nails for added sophistication.
- Matte Finish: Opt for a matte top coat for a modern and edgy look.
- Color Variations: Experiment with neon, pastel, or metallic colors for a unique twist on the traditional leopard pattern.
Why It Works
Wild Leopard Print Nail Art combines bold patterns with earthy tones for a striking yet wearable design.
The mix of irregular shapes and natural colors adds a playful, creative vibe while remaining chic and timeless.
This versatile look is perfect for anyone who loves to embrace their wild side with stylish, statement-making nails.
16. Pastel Blossom Nail Art

Pastel blossom nail art captures the delicate beauty of spring with its soft, floral patterns and airy pastel hues.
This charming and feminine design is perfect for adding a touch of elegance and playfulness to your nails.
What Is Pastel Blossom Nail Art?
Pastel blossom nail art features dainty floral designs in soft pastel shades like pink, blue, and lavender over a neutral or sheer base.
The combination of light colors and intricate details creates a fresh, romantic look reminiscent of blooming gardens.
How to Create Pastel Blossom Nails
Step 1: Prep Your Nails
Shape your nails and buff the surface to ensure smooth application. Push back the cuticles for a neat canvas.
Step 2: Apply a Base Coat
Use a sheer or light nude polish as the base to provide a subtle background for the floral design. Let it dry completely.
Step 3: Create the Flowers
- Use a small dotting tool or fine brush to paint petals in pastel colors like pink, lavender, and blue.
- Arrange the flowers randomly across each nail, leaving some space between them for a natural look.
Step 4: Add Details
- Use black or dark gray polish to add stems, leaves, or small accents to the flowers.
- Add tiny white dots to the center of the blossoms for a polished finish.
Step 5: Seal with a Top Coat
Finish with a clear, glossy top coat to protect the design and give it a smooth, radiant shine.
Styling Ideas for Pastel Blossom Nails
- Accent Nails: Highlight one or two nails with a more intricate floral arrangement or a solid pastel color.
- Matte Finish: Opt for a matte top coat to give the design a soft, velvety appearance.
- Glitter Details: Add subtle glitter to the flowers for a touch of sparkle and whimsy.
Why It Works
Pastel Blossom Nail Art is the epitome of fresh and feminine style.
The soft pastel colors evoke the charm of springtime, while the delicate floral patterns add elegance and detail.
This design is versatile enough for casual outings, weddings, or anytime you want to showcase your romantic side with beautifully adorned nails.
17. Luxe Gold Foil Nail Art
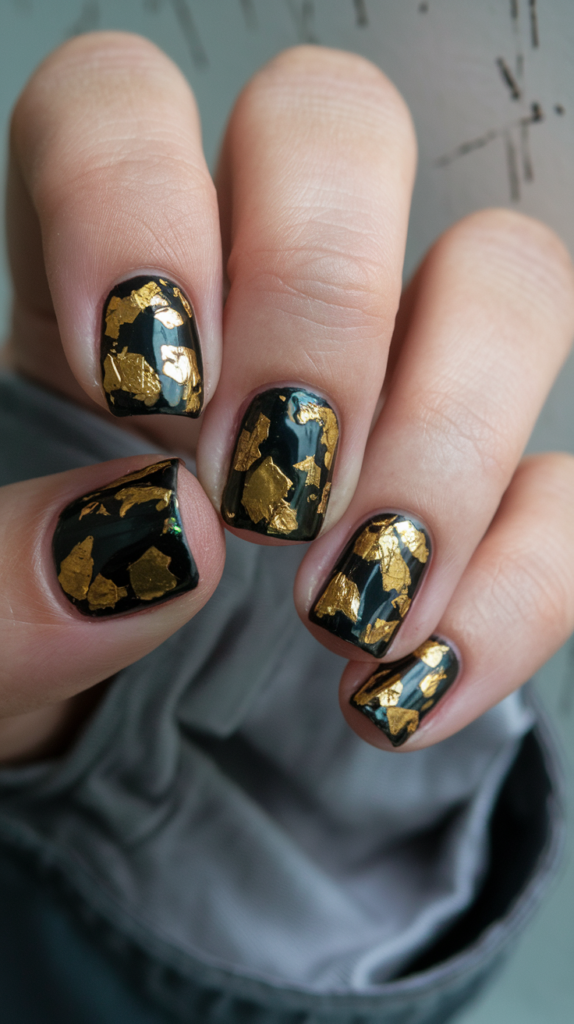
Luxe gold foil nail art combines a sleek black base with scattered gold accents for a glamorous and luxurious look.
Perfect for formal occasions or when you want to add a touch of elegance to your style, this design is effortlessly chic.
What Is Gold Foil Nail Art?
Gold foil nail art uses delicate metallic gold flakes applied over a contrasting background.
In this design, a deep black base enhances the reflective quality of the gold, creating a striking and sophisticated finish.
How to Create Luxe Gold Foil Nails
Step 1: Prep Your Nails
Shape your nails and buff the surface to create a smooth canvas. Push back cuticles for a clean foundation.
Step 2: Apply a Black Base Coat
Start with a glossy black polish to create a bold and rich background for the gold foil. Let it dry completely.
Step 3: Add Gold Foil Accents
- Use tweezers to pick up small pieces of gold foil and place them randomly on your nails.
- Gently press the foil onto the nail surface, ensuring it adheres to the polish.
Step 4: Adjust the Placement
Use a thin brush to arrange the foil pieces for a balanced and artistic look. Leave some negative space to enhance the contrast.
Step 5: Seal with a Top Coat
Finish with a thick, clear top coat to secure the gold foil and create a smooth, glossy surface.
Styling Ideas for Gold Foil Nails
- Accent Nails: Add gold foil only to one or two nails for a subtle yet eye-catching detail.
- Matte and Glossy Mix: Use a matte top coat on the black base for contrast with the shiny gold foil.
- Additional Embellishments: Combine gold foil with rhinestones or glitter for an ultra-glamorous look.
Why It Works
Luxe Gold Foil Nail Art is a stunning combination of bold contrasts and opulent details.
The rich black base enhances the shine of the gold foil, creating a striking and elegant manicure.
This versatile design is ideal for making a statement at formal events or elevating your everyday look with a touch of luxury.
18. Burnt Copper Marble Nail Art
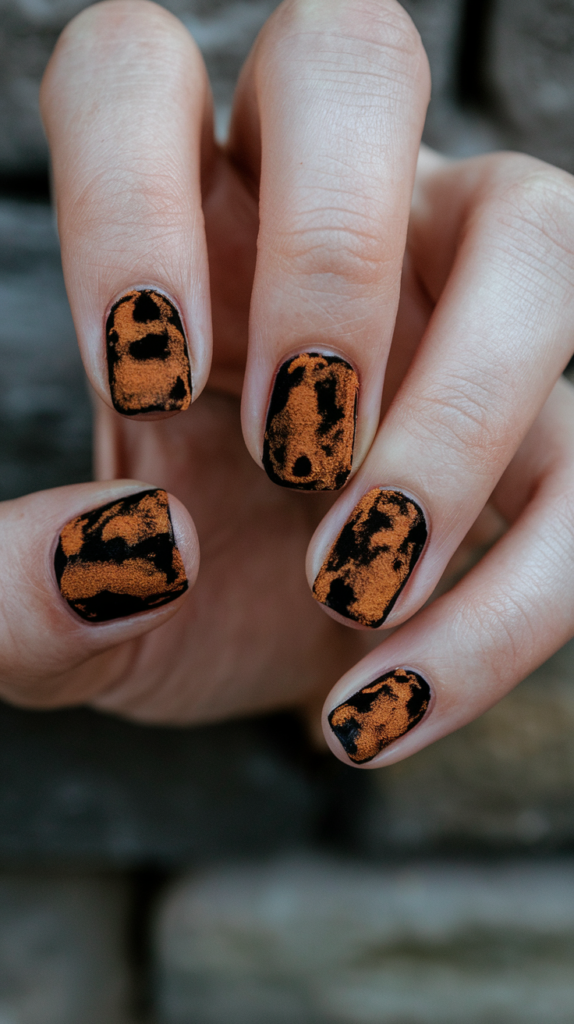
Burnt copper marble nail art is a bold and unique design that blends rich black and metallic copper tones for a rustic yet elegant effect.
This striking look is perfect for fall or when you want to add a dramatic flair to your manicure.
What Is Burnt Copper Marble Nail Art?
This design features swirling patterns of metallic copper and deep black that mimic the texture of weathered marble.
The contrast between the shimmering copper and dark base creates a warm, eye-catching effect.
How to Create Burnt Copper Marble Nails
Step 1: Prep Your Nails
Shape your nails and buff the surface to create a smooth canvas. Push back the cuticles for a neat look.
Step 2: Apply a Black Base Coat
Start with a glossy black polish as the base for a bold and dramatic background. Allow it to dry completely.
Step 3: Add Copper Marble Effect
- Dab metallic copper polish onto a makeup sponge or brush and lightly press it onto your nails to create irregular patterns.
- Blend the edges of the copper with a thin nail art brush or sponge for a soft, marbled look.
Step 4: Refine the Design
- Add depth by layering additional copper or black polish as needed.
- Focus on creating organic, flowing patterns for a natural marble effect.
Step 5: Seal with a Top Coat
Finish with a glossy or matte top coat to protect the design and enhance its texture.
Styling Ideas for Burnt Copper Marble Nails
- Matte Finish: Use a matte top coat for a rustic, velvety texture.
- Accent Nails: Pair the marble design with solid copper or black nails for a balanced look.
- Add Gold Details: Incorporate subtle gold lines or flecks for an extra touch of luxury.
Why It Works
Burnt Copper Marble Nail Art combines the warmth of copper with the drama of black for a rustic yet refined design.
The organic patterns add depth and texture, while the metallic copper brings a touch of elegance.
This versatile style is perfect for seasonal transitions or making a bold statement with unique, artistic nails.
19. Holographic Galaxy Nail Art
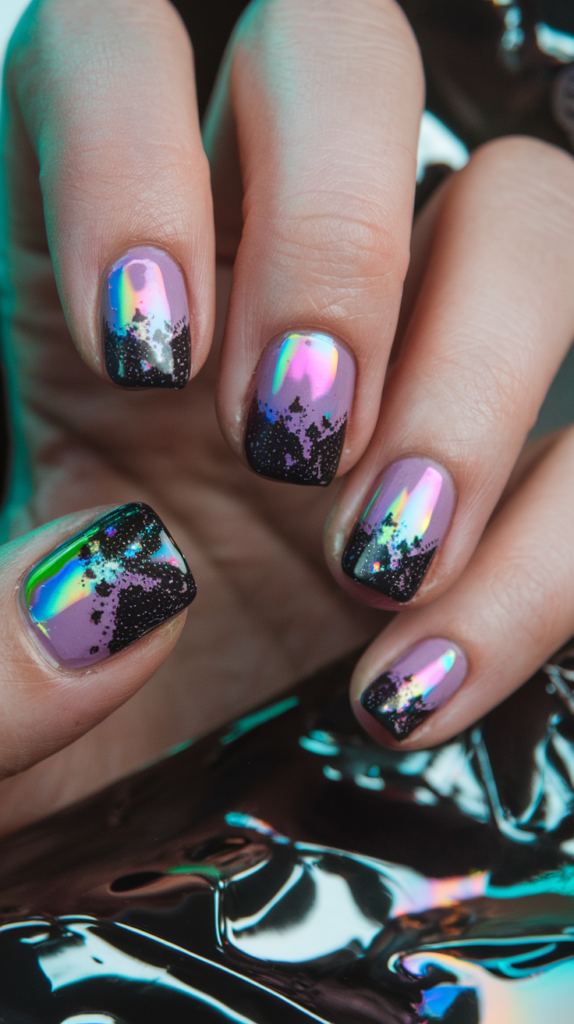
Holographic galaxy nail art creates a mesmerizing, otherworldly effect with its vibrant colors, iridescent shine, and cosmic details. This stunning design is perfect for making a bold statement and channeling your inner stargazer.
What Is Holographic Galaxy Nail Art?
This design combines holographic finishes with dark gradients and glittery accents to mimic the beauty of a galaxy.
The multicolored shimmer and reflective surfaces add depth and dimension, making your nails look like miniature cosmic masterpieces.
How to Create Holographic Galaxy Nails
Step 1: Prep Your Nails
Shape your nails and buff the surface to ensure smooth application. Push back cuticles for a clean foundation.
Step 2: Apply a Base Color
Start with a light lavender or pastel pink polish as the base to enhance the holographic effect. Let it dry completely.
Step 3: Add Holographic Powder
- Using a sponge applicator, gently rub holographic powder over the base color.
- Blend the powder evenly across the nails to create a radiant, reflective surface.
Step 4: Add Black Galaxy Details
- Dab black polish onto the tips of the nails using a sponge for a gradient effect.
- Blend the black polish upward for a seamless transition from the holographic base.
Step 5: Add Glitter Accents
- Apply fine glitter or tiny specks of silver and gold polish to mimic stars.
- Scatter the glitter randomly across the gradient for a celestial look.
Step 6: Seal with a Top Coat
Finish with a glossy top coat to protect the design and amplify the holographic shine.
Styling Ideas for Holographic Galaxy Nails
- Accent Nails: Add star decals or constellations on one or two nails for a celestial theme.
- Matte Option: Use a matte top coat over the black gradient for a unique twist.
- Metallic Detailing: Incorporate thin metallic lines to resemble shooting stars.
Why It Works
Holographic Galaxy Nail Art captures the enchanting beauty of the cosmos with its reflective, multicolored hues and glittering accents.
The combination of holographic finishes and dark gradients creates depth and intrigue, making this design a standout for parties, festivals, or simply expressing your unique style.
This cosmic-inspired look is perfect for anyone who loves bold, futuristic, and mesmerizing nail art.
20. Sultry Black and Red Ombre Nail Art
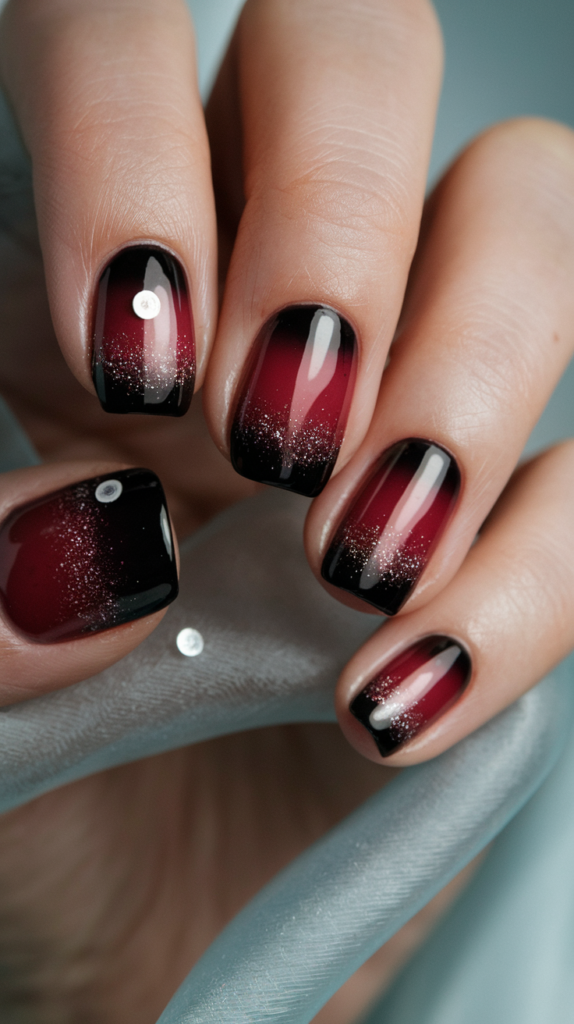
Sultry black and red ombre nail art exudes elegance and mystery with its smooth gradient and rich, bold tones. This design is perfect for evening events, romantic occasions, or anyone who loves dramatic, luxurious nails.
What Is Black and Red Ombre Nail Art?
This design features a seamless gradient that transitions from deep black to vibrant red, creating a striking, smoky effect.
The addition of subtle glitter enhances the look, giving it a glamorous and sophisticated touch.
How to Create Sultry Black and Red Ombre Nails
Step 1: Prep Your Nails
Shape your nails and buff the surface for a smooth base. Push back the cuticles for a polished look.
Step 2: Apply a Base Coat
Start with a clear or light red base coat to protect your nails and ensure even application.
Step 3: Create the Ombre Gradient
- Use a makeup sponge to apply black polish at the tips and red polish at the base of each nail.
- Dab the sponge lightly on your nails, blending the colors together to create a smooth gradient.
- Repeat the process for a more intense ombre effect.
Step 4: Add Glitter Accents
- Apply fine glitter polish to the tips or lightly scatter glitter across the gradient for a subtle sparkle.
- Focus on the black tips for a dramatic, shimmering effect.
Step 5: Seal with a Top Coat
Finish with a glossy top coat to protect the design and enhance the smooth, blended look.
Styling Ideas for Black and Red Ombre Nails
- Matte Finish: Use a matte top coat for a velvety, modern twist.
- Accent Nails: Add rhinestones or metallic details to one or two nails for extra glamour.
- Glitter Gradient: Experiment with gold or silver glitter for a striking contrast.
Why It Works
Sultry Black and Red Ombre Nail Art captures the allure of bold and mysterious tones with a sleek, blended gradient.
The transition from rich red to deep black adds depth and drama, while the glitter accents provide a touch of elegance.
This design is versatile yet captivating, making it ideal for occasions that call for sophistication and style.
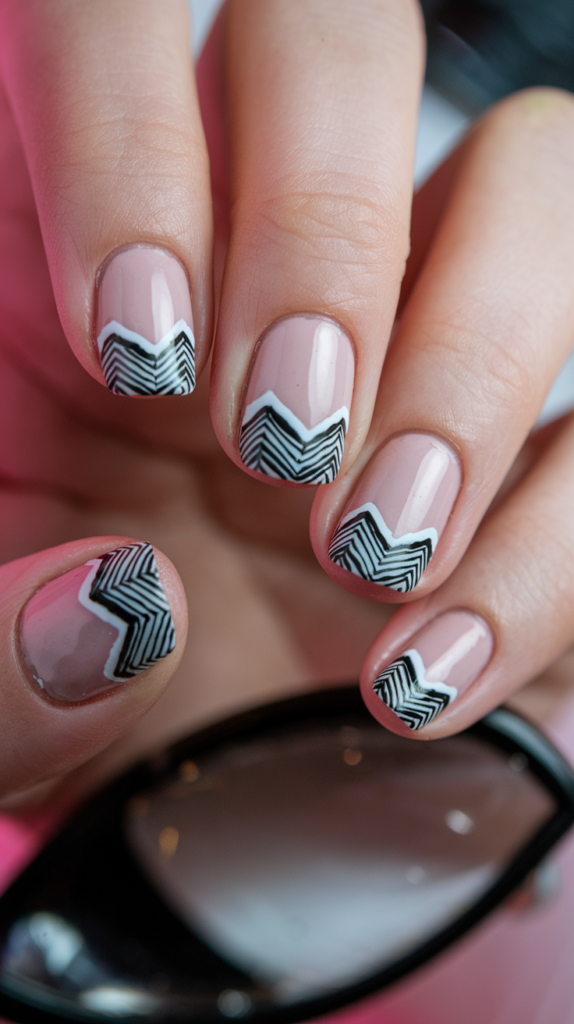
21. Chic Chevron Nail Art
Chic chevron nail art features bold, angular patterns that combine modern style with timeless sophistication. Perfect for a polished yet playful look, this design is ideal for workdays, casual outings, or adding a stylish twist to your nails.
What Is Chevron Nail Art?
Chevron nail art involves V-shaped patterns or zigzags, often in contrasting colors, to create a striking geometric design.
In this variation, black and white chevron tips on a nude base provide a sleek and contemporary aesthetic.
How to Create Chic Chevron Nails
Step 1: Prep Your Nails
Shape your nails and buff the surface for a smooth finish. Push back cuticles for a clean foundation.
Step 2: Apply a Base Coat
Start with a sheer or nude polish as the base to create a neutral background for the chevron design. Let it dry completely.
Step 3: Create the Chevron Tips
- Use chevron nail stickers or tape to create clean V-shaped sections on the tips of your nails.
- Paint the tips black, ensuring the lines are crisp and even.
- Add a white outline along the edges of the black chevron using a fine nail art brush or striping polish.
Step 4: Add Details
- Enhance the design with thin black lines inside the chevron tips for a modern and detailed look.
- Let each layer dry before adding additional lines or details.
Step 5: Seal with a Top Coat
Finish with a glossy top coat to protect the design and give your nails a polished shine.
Styling Ideas for Chevron Nails
- Monochrome Elegance: Use shades of gray and white for a minimalist look.
- Pop of Color: Add a bright accent color like pink or gold to one or two nails for contrast.
- Matte Finish: Opt for a matte top coat to give the chevron design a trendy, velvety texture.
Why It Works
Chic Chevron Nail Art combines clean geometric patterns with classic colors for a look that’s both sophisticated and playful.
The sharp, angular chevron tips add visual interest, while the neutral base keeps the design versatile and wearable.
This design is perfect for showcasing modern elegance with a creative edge.
22. Starry Night Gradient Nail Art
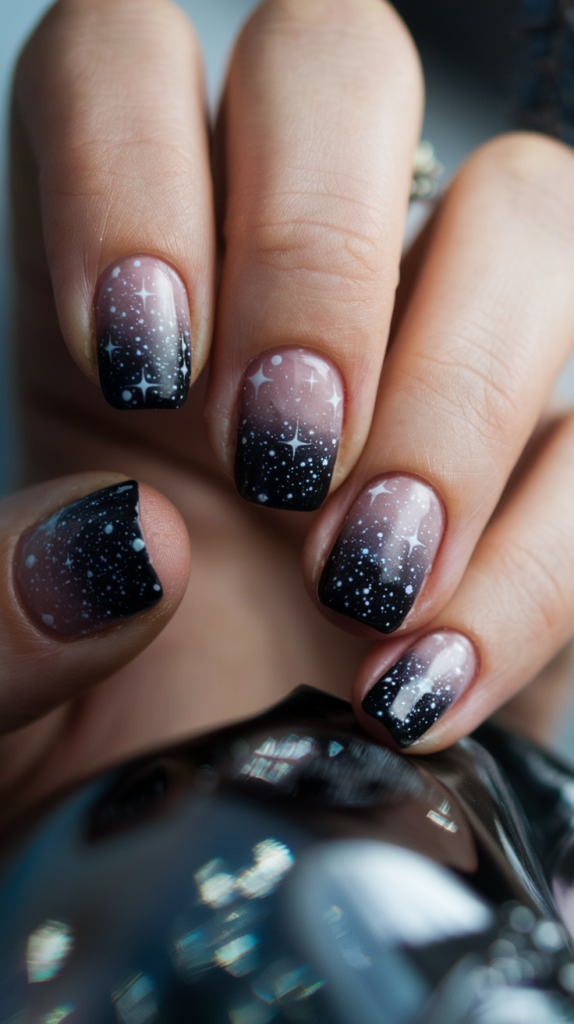
Starry night gradient nail art combines the elegance of a black-to-nude ombre with delicate starry details for a celestial and dreamy look. This design is perfect for those who love understated glam with a touch of magic.
What Is Starry Night Gradient Nail Art?
This design features a gradient effect transitioning from a sheer nude base to deep black tips, adorned with specks of glitter and star-like details.
The sparkling accents mimic the beauty of a starlit sky, creating an enchanting manicure.
How to Create Starry Night Gradient Nails
Step 1: Prep Your Nails
Shape your nails and buff the surface to ensure a smooth base. Push back cuticles for a neat look.
Step 2: Apply a Base Coat
Start with a sheer or light nude polish as the base. Let it dry completely.
Step 3: Create the Gradient Effect
- Using a makeup sponge, apply black polish to the tips and blend it into the nude base.
- Dab the sponge lightly on each nail to create a smooth gradient. Repeat for more opacity.
Step 4: Add Glitter and Starry Details
- Use a fine glitter polish to add sparkle to the gradient, focusing on the black tips.
- Use a thin brush or dotting tool to paint tiny white dots and stars across the nails.
Step 5: Seal with a Top Coat
Finish with a glossy top coat to protect the design and give it a polished, smooth finish.
Styling Ideas for Starry Night Gradient Nails
- Matte Finish: Use a matte top coat for a soft, velvety effect.
- Accent Nails: Add larger star or moon decals to one or two nails for extra celestial charm.
- Color Variation: Experiment with a navy or midnight blue gradient for a unique twist.
Why It Works
Starry Night Gradient Nail Art captures the dreamy allure of a night sky with its delicate ombre and sparkling accents.
The subtle transition from nude to black adds depth and sophistication, while the glitter and stars bring a whimsical, magical touch.
This versatile design is perfect for evening events, romantic dates, or anytime you want your nails to shine like the stars.
23. Metallic Flame Nail Art
Metallic flame nail art combines bold, edgy shapes with a shimmering gradient of fiery tones, making it a perfect choice for those who want a striking, high-impact manicure.
The blend of metallic golds, reds, and purples creates a mesmerizing, dynamic effect.
What Is Metallic Flame Nail Art?
This design features sharp, flame-like shapes painted in metallic hues over a dark base, creating the illusion of glowing embers or molten metal.
The reflective finish adds depth and dimension, making this design captivating and unique.
How to Create Metallic Flame Nails
Step 1: Prep Your Nails
Shape your nails and buff the surface to create a smooth canvas. Push back the cuticles for a clean foundation.
Step 2: Apply a Base Coat
Start with a sheer or nude base coat to create a subtle background. Let it dry completely.
Step 3: Paint the Flames
- Using a thin nail art brush, paint flame shapes starting from the tips of the nails and extending downward.
- Use metallic gel or chrome powders in hues like gold, copper, and purple to create a gradient effect within the flames.
- Blend the colors seamlessly for a molten, glowing look.
Step 4: Add Details
- Outline the flames with a black or dark polish to enhance their shape and make them pop.
- Add subtle glitter to emphasize the fiery, glowing effect.
Step 5: Seal with a Top Coat
Apply a glossy top coat to protect the design and enhance the metallic shine.
Styling Ideas for Metallic Flame Nails
- Gradient Base: Use a dark-to-light ombre base to add extra depth to the flames.
- Matte and Glossy Combo: Opt for a matte base with glossy metallic flames for a modern twist.
- Embellishments: Add rhinestones or studs for an ultra-glamorous finish.
Why It Works
Metallic Flame Nail Art creates a bold and dynamic look with its sharp, glowing shapes and reflective finishes.
The combination of metallic hues and flame patterns evokes a sense of energy and drama, making this design perfect for evening events or showcasing your fierce, adventurous side.
This eye-catching manicure is ideal for anyone who loves bold, artistic nail designs that stand out.
24. Antique Gold Distressed Nail Art
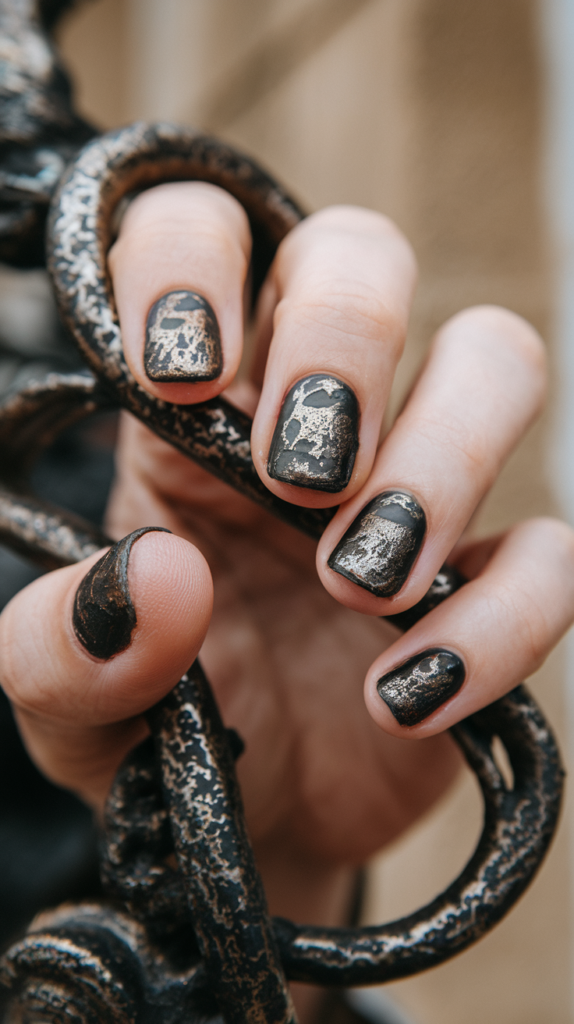
Antique gold distressed nail art captures the essence of vintage glamour with its textured, weathered metallic effect. This design is perfect for those who love edgy yet elegant styles that evoke a sense of history and sophistication.
What Is Antique Gold Distressed Nail Art?
This design features a dark, matte or glossy base with layers of gold applied in a distressed pattern.
The uneven, aged texture mimics the look of antique metal, creating a rustic yet luxurious appearance.
How to Create Antique Gold Distressed Nails
Step 1: Prep Your Nails
Shape your nails and buff the surface to ensure smooth application. Push back the cuticles for a clean look.
Step 2: Apply a Base Coat
Start with a matte or glossy black polish as the base. Let it dry completely.
Step 3: Add Gold Details
- Using a sponge, dab metallic gold polish randomly over the nails.
- Focus on creating an uneven, worn look by varying the intensity of the gold application.
Step 4: Enhance the Distressed Effect
- Lightly buff the edges of the gold areas with a nail file or fine sponge to create a subtle, weathered texture.
- Add thin streaks or lines with a gold nail art brush for more dimension.
Step 5: Seal with a Top Coat
Finish with a matte top coat for a soft, velvety finish or a glossy top coat for a polished, refined look.
Styling Ideas for Antique Gold Nails
- Matte Base: Opt for a matte black base for a more dramatic, aged effect.
- Accent Nails: Highlight one or two nails with solid gold polish for added contrast.
- Add Rhinestones: Incorporate small metallic embellishments to enhance the vintage vibe.
Why It Works
Antique Gold Distressed Nail Art blends vintage charm with modern edginess, creating a look that is both bold and elegant.
The distressed gold overlay adds depth and texture, while the dark base provides a striking contrast.
This design is perfect for evening events, themed parties, or when you want to make a sophisticated statement with your nails.
25. Abstract Glam Nail Art
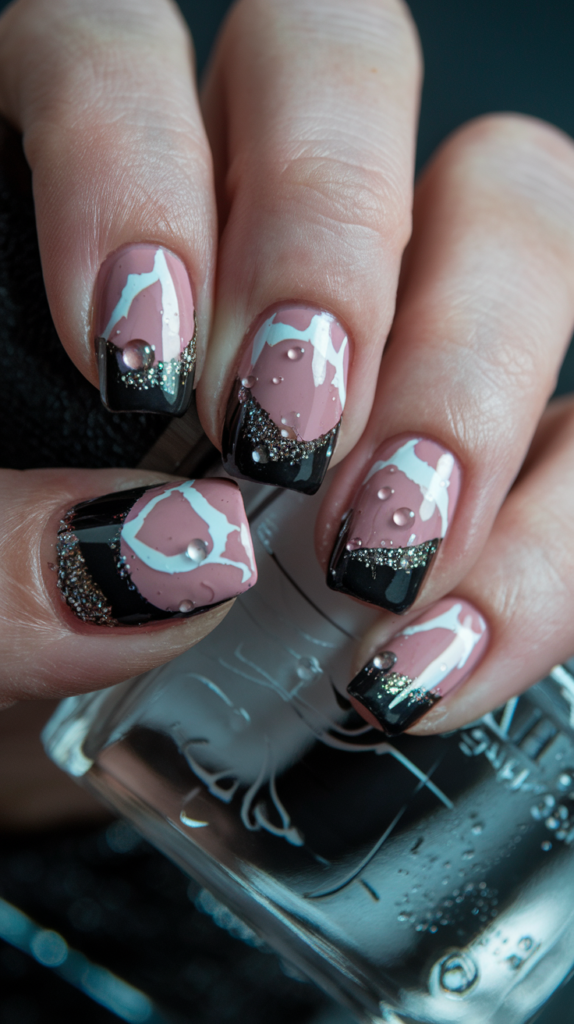
Abstract glam nail art combines bold geometric designs with glitter and pearl embellishments for a contemporary, high-fashion look.
This design is perfect for those who want to make a stylish and unique statement.
What Is Abstract Glam Nail Art?
This design features a mix of abstract shapes, clean lines, and sparkling accents.
The combination of neutral tones, black edges, and glittery highlights creates a balance between elegance and modern artistry.
How to Create Abstract Glam Nails
Step 1: Prep Your Nails
Shape your nails and buff the surface for a smooth application. Push back the cuticles for a polished appearance.
Step 2: Apply a Base Color
Start with a nude or soft pink polish as the base. Let it dry completely.
Step 3: Add Abstract Patterns
- Use a fine nail art brush to create irregular white shapes across each nail.
- Add black sections to the tips or corners of the nails for contrast.
- Incorporate glitter polish along the edges of the black sections for a glamorous finish.
Step 4: Embellish with Pearls
- Attach small pearl accents or rhinestones to the center of the abstract shapes using nail glue.
- Focus on one or two nails for a chic accent effect.
Step 5: Seal with a Top Coat
Apply a glossy top coat to protect the design and enhance its shine.
Styling Ideas for Abstract Glam Nails
- Matte Finish: Use a matte top coat for a modern, muted effect.
- Gold Accents: Add metallic gold details for a luxurious touch.
- Minimalist Variation: Keep the patterns simple with fewer embellishments for a more subtle look.
Why It Works
Abstract Glam Nail Art stands out with its bold shapes, intricate details, and sparkling accents.
The blend of neutral tones with black and glitter creates a sophisticated and artistic design that works for both casual outings and special events.
This versatile look is perfect for showcasing creativity while maintaining elegance.
26. Fiery Flame Nail Art
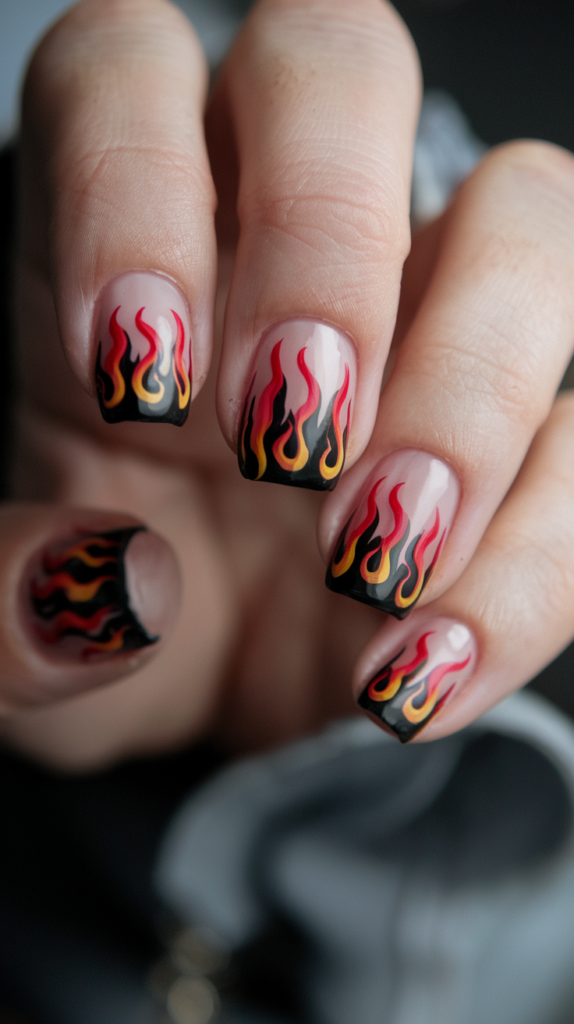
Fiery flame nail art brings boldness and energy to your manicure with vibrant red, orange, and yellow flames over a smoky black base.
This dramatic design is ideal for making a statement and showcasing your daring, adventurous side.
What Is Fiery Flame Nail Art?
This design features hand-painted flames that rise from black tips, transitioning from bright yellow to orange and red.
The combination of vivid colors and sharp flame shapes creates a dynamic and edgy look.
How to Create Fiery Flame Nails
Step 1: Prep Your Nails
Shape your nails and buff the surface to ensure smooth application. Push back the cuticles for a clean base.
Step 2: Apply a Base Coat
Use a sheer or nude polish as the base to allow the flames to stand out. Let it dry completely.
Step 3: Paint the Flames
- Start at the tips of your nails and use a fine nail art brush to paint the outline of the flames with black polish.
- Fill the flames with yellow polish at the base, transitioning to orange and then red towards the top for a fiery gradient effect.
Step 4: Define the Flames
- Go over the edges of the flames with black polish to sharpen the shapes and add contrast.
- Use thin, curved lines to mimic the natural movement of fire.
Step 5: Seal with a Top Coat
Apply a glossy top coat to protect the design and give your nails a polished, vibrant finish.
Styling Ideas for Fiery Flame Nails
- Matte Base: Use a matte nude base for a modern and edgy contrast with the flames.
- Accent Nails: Highlight one or two nails with solid black or glitter for variety.
- Glow-in-the-Dark Effect: Add glow-in-the-dark top coat to make the flames stand out even in the dark.
Why It Works
Fiery Flame Nail Art is a bold and captivating design that combines vibrant colors with dramatic patterns.
The sharp, flowing flames create a sense of movement and energy, while the gradient effect adds depth and dimension.
This design is perfect for those who want to turn heads and showcase their fiery personality with artistic, statement-making nails.
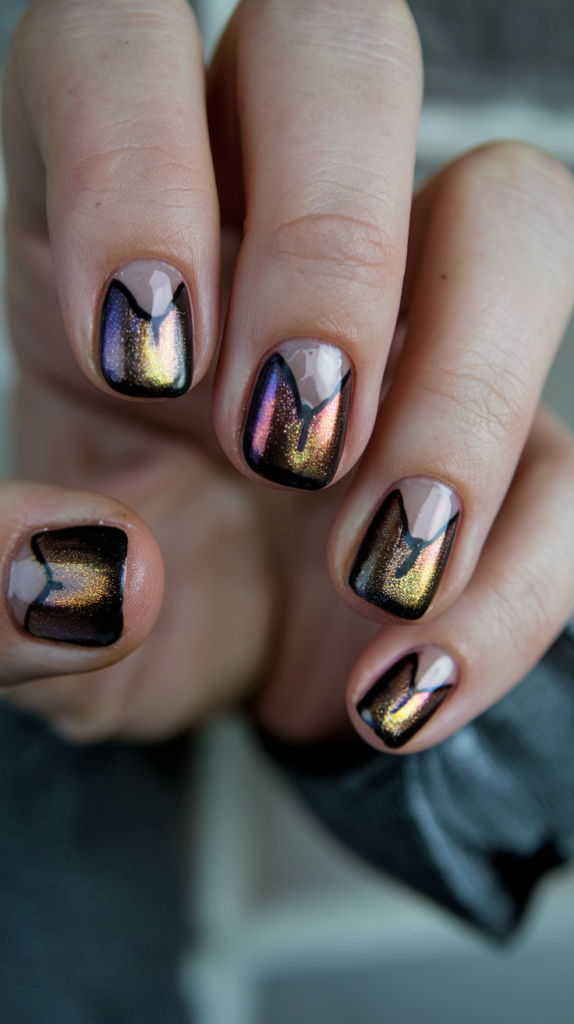
27. Iridescent Wave Nail Art
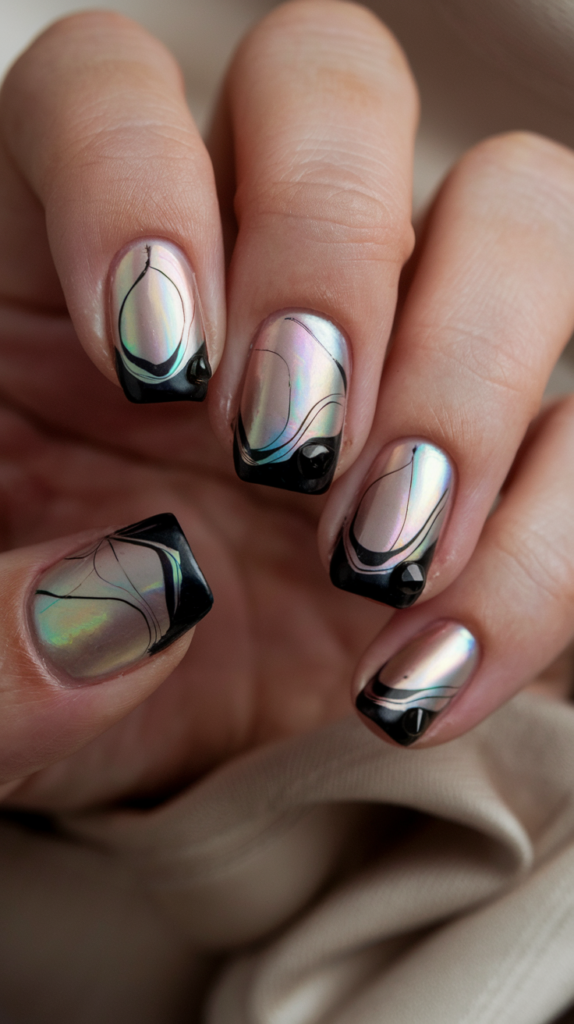
Iridescent wave nail art features a futuristic, reflective design paired with flowing black lines and abstract shapes. This chic and modern manicure combines elegance with a touch of edgy sophistication.
What Is Iridescent Wave Nail Art?
This design showcases a luminous, holographic base layered with sleek black wave patterns and accent tips.
The combination of reflective iridescence and sharp black details creates a dynamic and captivating effect.
How to Create Iridescent Wave Nails
Step 1: Prep Your Nails
Shape your nails and buff the surface for a smooth foundation. Push back the cuticles for a clean base.
Step 2: Apply a Holographic Base Coat
Start with a chrome or iridescent polish as the base. Apply two thin coats for a vibrant, reflective finish.
Step 3: Add Black Wave Patterns
- Use a thin nail art brush to paint flowing black lines and abstract shapes across the nails.
- Focus on creating organic, wave-like movements for a natural yet modern design.
Step 4: Enhance the Tips
- Paint the tips of the nails in a sleek black for added contrast.
- Consider adding small black dots or curved shapes to complement the wave patterns.
Step 5: Seal with a Top Coat
Apply a glossy top coat to protect the design and amplify the iridescent shine.
Styling Ideas for Iridescent Wave Nails
- Matte Variation: Use a matte top coat over the black details for a dual-texture effect.
- Add Rhinestones: Incorporate tiny iridescent or black rhinestones for extra sparkle.
- Color Shift: Experiment with different chrome base colors like pink, green, or blue for a personalized look.
Why It Works
Iridescent Wave Nail Art combines futuristic elegance with artistic fluidity, making it a standout design for any occasion.
The reflective base adds a dazzling, high-fashion touch, while the black wave patterns create depth and contrast.
This versatile manicure is perfect for parties, formal events, or when you want to make a bold yet sophisticated statement with your nails.
28. Minimalist Pink and Black Line Art Nails
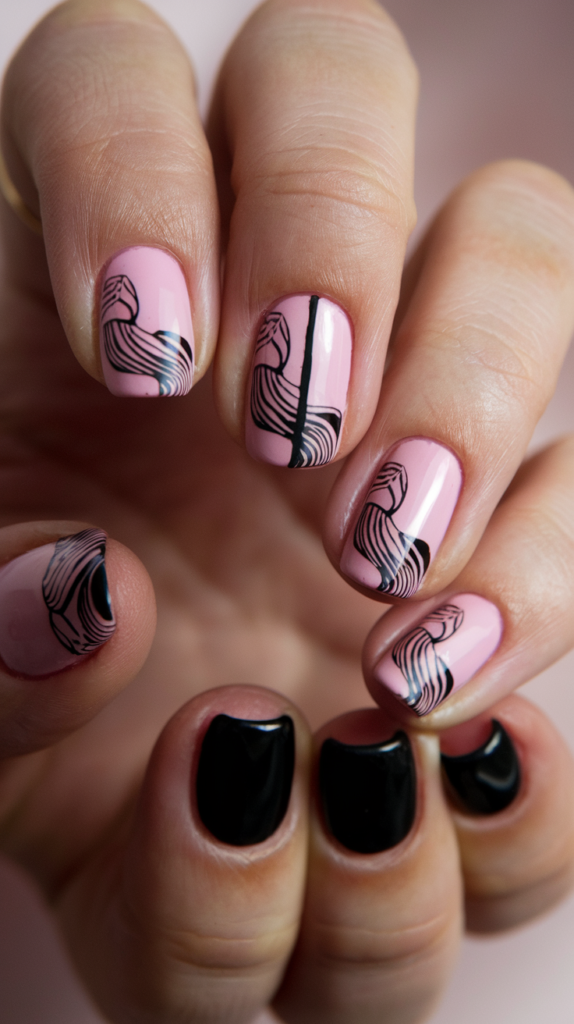
Minimalist pink and black line art nails offer a chic and modern take on abstract nail designs. With clean lines and a soft pink base, this manicure is perfect for everyday elegance or understated sophistication.
What Is Minimalist Pink and Black Line Art Nail Design?
This design features a pastel pink base enhanced by fine black line patterns and solid black accent nails.
The combination of soft and bold elements creates a striking balance, ideal for minimalist yet artistic nail art.
How to Create Minimalist Pink and Black Line Art Nails
Step 1: Prep Your Nails
Shape and buff your nails to create a smooth surface. Push back the cuticles for a clean look.
Step 2: Apply a Pink Base Coat
Paint most nails with a light pink polish, leaving a few for black accents. Allow the polish to dry completely.
Step 3: Create the Line Art
- Use a fine nail art brush or stamping tool to draw abstract black lines on the pink nails.
- Focus on fluid, curved shapes or geometric patterns for a modern design.
Step 4: Paint Accent Nails
- Apply solid black polish to one or two nails on each hand to create contrast.
- For added dimension, consider a glossy or matte finish for the black nails.
Step 5: Seal with a Top Coat
Use a glossy top coat to protect the design and give the nails a polished look.
Styling Ideas for Minimalist Pink and Black Nails
- Matte Finish: Opt for a matte top coat over both colors for a trendy, velvety texture.
- Metallic Details: Add a thin silver or gold line within the design for a touch of glamour.
- Negative Space: Incorporate negative space by leaving parts of the nail unpainted for an edgier look.
Why It Works
Minimalist Pink and Black Line Art Nails combine soft femininity with bold, graphic details, creating a versatile and sophisticated design.
The clean lines and contrasting colors make this manicure perfect for anyone who loves minimalist aesthetics with a creative twist.
Ideal for both casual wear and professional settings, this look is effortlessly stylish and modern.
29. Metallic Zebra Nail Art
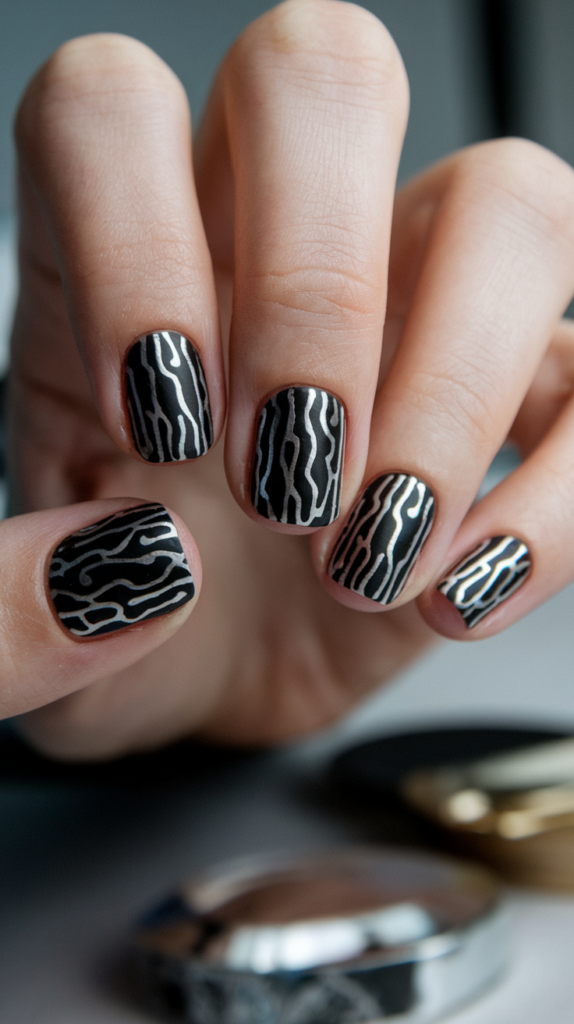
Metallic zebra nail art blends edgy animal print with a sleek metallic twist, creating a bold yet sophisticated look.
This design is perfect for those who want to showcase their wild side with a modern and polished finish.
What Is Metallic Zebra Nail Art?
This design features a black base adorned with metallic silver zebra stripes, offering a glamorous update to the classic animal print.
The reflective silver details elevate the look, making it ideal for both casual and formal occasions.
How to Create Metallic Zebra Nails
Step 1: Prep Your Nails
Shape your nails and buff the surface to ensure smooth application. Push back the cuticles for a clean foundation.
Step 2: Apply a Black Base Coat
Paint your nails with a glossy black polish to create a bold background for the zebra stripes. Let it dry completely.
Step 3: Add Metallic Zebra Stripes
- Use a fine nail art brush or striping tool to draw irregular metallic silver lines across each nail.
- Mimic the organic flow of zebra stripes by varying the thickness and direction of the lines.
Step 4: Refine the Design
- Add small details or additional thin stripes to enhance the pattern.
- Focus on creating a balanced and cohesive look across all nails.
Step 5: Seal with a Top Coat
Finish with a glossy top coat to protect the design and enhance the metallic shine.
Styling Ideas for Metallic Zebra Nails
- Matte Base: Use a matte black base for a bold contrast with the metallic stripes.
- Accent Nails: Add solid metallic nails or rhinestones on one or two nails for a glamorous touch.
- Gold Variation: Swap silver for gold stripes to create a warm, luxurious effect.
Why It Works
Metallic Zebra Nail Art combines the timeless appeal of animal prints with the glamour of metallic accents, creating a striking and versatile design.
The reflective silver stripes add depth and dimension, while the bold black base ensures a sleek and modern finish.
This edgy yet chic manicure is perfect for making a statement at parties, events, or whenever you want to elevate your style.
30. Elegant Swirl Nail Art
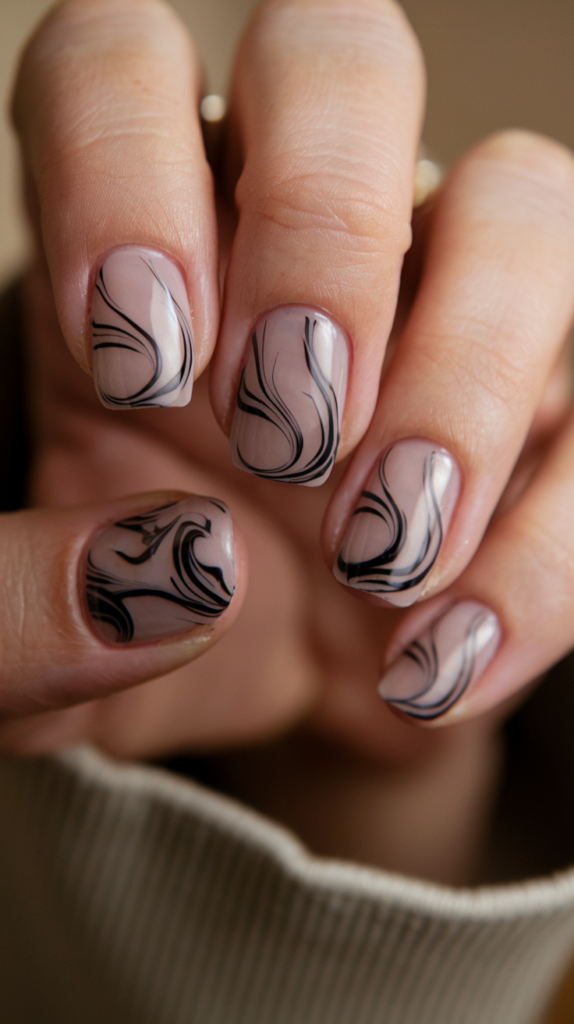
Elegant swirl nail art features delicate, flowing black lines on a soft nude base, creating a sophisticated and minimalist design.
This look is perfect for those who appreciate understated elegance with a touch of artistry.
What Is Elegant Swirl Nail Art?
This design combines a clean nude base with intricate black swirls, mimicking the fluidity of natural curves.
The result is a graceful and timeless manicure suitable for any occasion.
How to Create Elegant Swirl Nails
Step 1: Prep Your Nails
Shape your nails and buff the surface to create a smooth canvas. Push back the cuticles for a clean foundation.
Step 2: Apply a Nude Base Coat
Start with a sheer or nude polish to create a neutral background. Allow it to dry completely.
Step 3: Paint the Swirls
- Use a fine nail art brush or detailing pen to draw black swirls across the nails.
- Focus on creating organic, flowing lines with varying thicknesses for a natural look.
Step 4: Refine the Design
- Add subtle curves or small accents to enhance the overall flow of the swirls.
- Ensure the lines are clean and balanced for a polished appearance.
Step 5: Seal with a Top Coat
Finish with a glossy top coat to protect the design and give the nails a sleek finish.
Styling Ideas for Elegant Swirl Nails
- Matte Variation: Use a matte top coat for a modern and understated look.
- Metallic Swirls: Swap black for gold or silver lines to add a touch of luxury.
- Accent Swirls: Focus the swirl design on one or two nails, leaving the rest plain for a minimalist vibe.
Why It Works
Elegant Swirl Nail Art blends simplicity with intricate detail, making it a versatile and timeless design.
The flowing black lines add a sense of movement and sophistication, while the neutral base keeps the look refined and wearable.
This manicure is perfect for weddings, professional settings, or anytime you want to exude subtle elegance.
31. Glamorous Glitter French Tips
Glamorous glitter French tips elevate the classic manicure with a modern twist by adding sparkling accents to sleek black tips. This design is perfect for a sophisticated and festive look.
What Is Glamorous Glitter French Tip Nail Art?
This manicure features a nude base with bold black French tips outlined in glitter for a touch of sparkle and elegance.
The combination of bold color and shimmering details makes it ideal for formal events or special occasions.
How to Create Glamorous Glitter French Tips
Step 1: Prep Your Nails
Shape your nails and buff the surface for a smooth base. Push back the cuticles for a polished appearance.
Step 2: Apply a Nude Base Coat
Start with a soft nude or sheer pink polish to create a neutral foundation. Let it dry completely.
Step 3: Paint the Black French Tips
- Use a French tip nail guide or freehand a neat black tip at the edge of each nail.
- Ensure the black polish is evenly applied for a sleek look.
Step 4: Add Glitter Accents
- Using a fine nail art brush or glitter polish, trace a thin line of glitter just below the black tip.
- Focus on creating an even, shimmering border to enhance the design.
Step 5: Seal with a Top Coat
Apply a glossy top coat to protect the design and add a high-shine finish.
Styling Ideas for Glamorous Glitter French Tips
- Matte Base: Use a matte nude base for a trendy contrast with the glitter.
- Colored Glitter: Experiment with gold, silver, or holographic glitter for different effects.
- Accent Nails: Add a full glitter nail to one or two fingers for added glam.
Why It Works
Glamorous Glitter French Tips offer a chic update to a timeless design by combining bold black tips with dazzling glitter.
The nude base keeps the look balanced and elegant, while the sparkling accents add a festive flair.
This manicure is perfect for weddings, parties, or anytime you want to add a touch of glamour to your nails.
32. Sparkling Glitter Gradient Nails
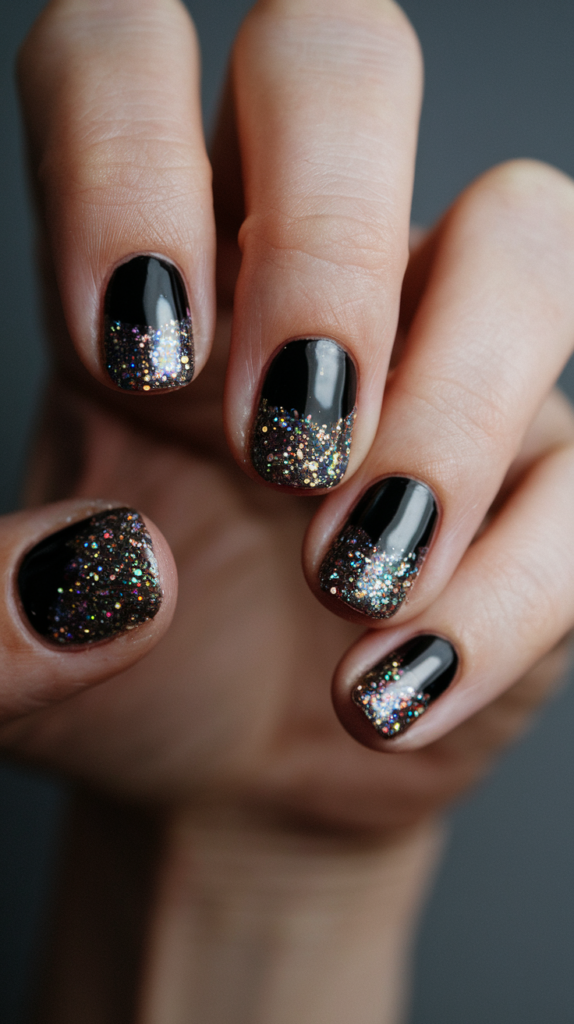
Sparkling glitter gradient nails bring a touch of glamour and elegance to any look.
With a seamless blend of glitter over a glossy black base, this design is perfect for special occasions or a night out.
What Is Sparkling Glitter Gradient Nail Art?
This design combines a bold black base with a cascading glitter gradient, creating a dazzling ombré effect.
The shimmering glitter elevates the classic black manicure, making it both chic and eye-catching.
How to Create Sparkling Glitter Gradient Nails
Step 1: Prep Your Nails
Shape your nails and buff the surface for a smooth finish. Push back the cuticles for a polished foundation.
Step 2: Apply a Black Base Coat
Paint your nails with a glossy black polish to create a bold and dramatic base. Allow it to dry completely.
Step 3: Add the Glitter Gradient
- Use a makeup sponge to dab glitter polish onto the tips of your nails, gradually fading it downward.
- Focus on creating a seamless transition from heavy glitter at the tips to a subtle sparkle towards the center of the nail.
Step 4: Refine the Gradient
- Add extra glitter to the tips for more intensity if needed.
- Blend carefully to avoid harsh lines between the glitter and the black base.
Step 5: Seal with a Top Coat
Apply a clear, glossy top coat to lock in the design and enhance the shine.
Styling Ideas for Sparkling Glitter Gradient Nails
- Multi-Colored Glitter: Use holographic or multi-colored glitter for a vibrant, festive look.
- Matte Base: Opt for a matte black base to contrast with the glitter’s sparkle.
- Accent Nails: Add a fully glittered nail for extra drama.
Why It Works
Sparkling Glitter Gradient Nails strike the perfect balance between bold and glamorous, making them a versatile choice for any occasion.
The glitter adds depth and dimension to the design, while the gradient effect creates a sophisticated, seamless look.
This manicure is ideal for parties, celebrations, or simply adding a touch of sparkle to your everyday style.
33. Modern Metallic Striped Nail Art
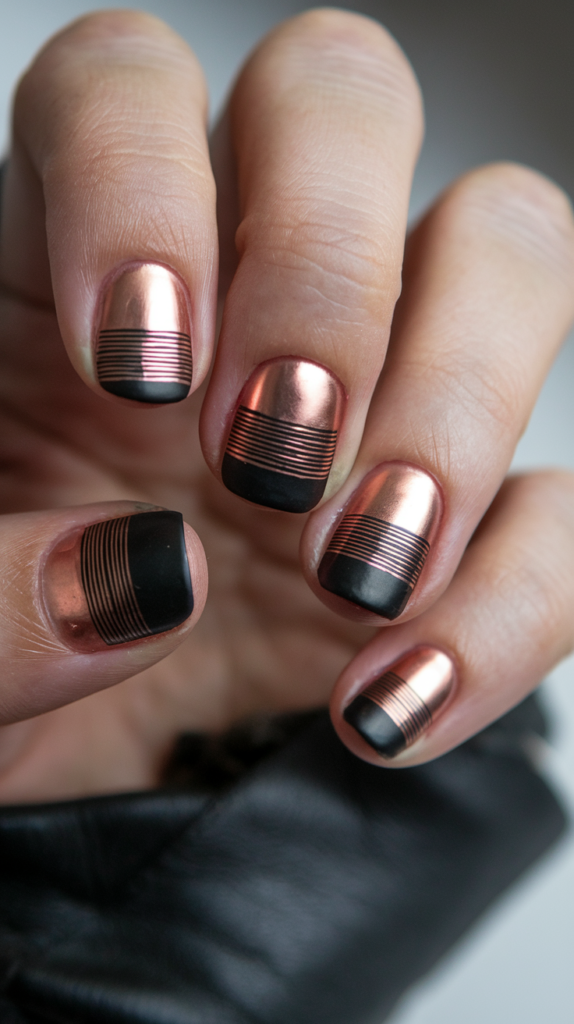
Modern metallic striped nail art combines the luxe shine of rose gold with bold black accents and fine line detailing. This chic design is perfect for those who love contemporary, edgy nail styles.
What Is Modern Metallic Striped Nail Art?
This manicure features a reflective rose gold base, accented with sleek black tips and horizontal stripe details for a striking contrast.
The combination of metallic and matte textures adds depth and a futuristic vibe to the design.
How to Create Modern Metallic Striped Nails
Step 1: Prep Your Nails
Shape your nails and buff the surface to ensure a smooth base. Push back the cuticles for a clean finish.
Step 2: Apply a Metallic Base Coat
Paint your nails with a rose gold metallic polish, applying two thin layers for an even and reflective finish. Let it dry completely.
Step 3: Add Black Tips
- Use tape or a French tip guide to create clean black tips on each nail.
- Paint the tips with a matte black polish for a sharp contrast with the metallic base.
Step 4: Incorporate Striped Details
- Use a thin striping brush or a nail art pen to draw horizontal black lines just below the tips.
- Ensure the lines are evenly spaced for a sleek and uniform appearance.
Step 5: Seal with a Top Coat
Apply a glossy or matte top coat, depending on your preferred finish, to protect the design.
Styling Ideas for Modern Metallic Striped Nails
- Full Metallic Accent Nail: Leave one nail completely rose gold for a bold statement.
- Gold and Silver Combo: Swap the rose gold base for silver or alternate between the two for a multi-metallic look.
- Matte Base Variation: Use a matte rose gold base for a more subtle and modern effect.
Why It Works
Modern Metallic Striped Nail Art merges luxurious metallic hues with sleek, contemporary details, creating a manicure that’s both bold and elegant.
The contrast between the reflective base and the matte black accents adds depth, while the fine stripes lend a modern, minimalist edge.
This versatile design works beautifully for professional settings, evening events, or anytime you want to showcase stylish sophistication.
34. Abstract Feathered Nail Art
Abstract feathered nail art features delicate, wispy black strokes over a soft nude base, creating a light and airy design. This elegant look is perfect for anyone who appreciates subtle artistic details on their nails.
What Is Abstract Feathered Nail Art?
This design showcases flowing, feather-like black lines that appear to dance across a neutral base.
The abstract style offers a balance of simplicity and sophistication, making it suitable for both casual and formal occasions.
How to Create Abstract Feathered Nails
Step 1: Prep Your Nails
Shape your nails and buff the surface for smooth application. Push back the cuticles for a clean finish.
Step 2: Apply a Nude Base Coat
Paint your nails with a sheer or nude polish to create a neutral background. Let it dry completely.
Step 3: Add Feathered Details
- Use a fine nail art brush or a striping tool to draw soft, wispy black strokes across each nail.
- Focus on varying the direction and thickness of the strokes to create a natural, feathered effect.
Step 4: Refine the Design
- Add small, tapering lines to enhance the delicate look of the feathers.
- Ensure each nail has a cohesive yet unique pattern for an artistic touch.
Step 5: Seal with a Top Coat
Finish with a glossy top coat to protect the design and give it a polished look.
Styling Ideas for Abstract Feathered Nails
- Matte Finish: Opt for a matte top coat to give the design a soft, velvety texture.
- Metallic Accents: Incorporate subtle gold or silver strokes to add a touch of glamour.
- Accent Nails: Highlight one or two nails with a bolder or colored feather design for contrast.
Why It Works
Abstract Feathered Nail Art captures the beauty of delicate, flowing patterns in a minimalist design, offering a unique blend of simplicity and elegance.
The soft, natural strokes add an artistic flair, while the neutral base keeps the look versatile and wearable.
This manicure is ideal for weddings, professional settings, or anytime you want to exude understated sophistication.
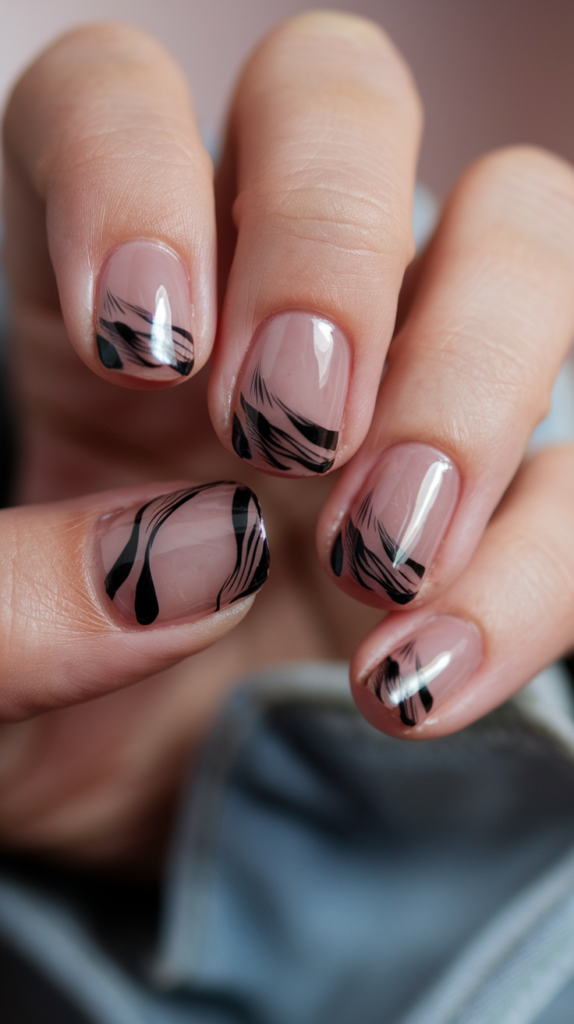
35. Fluid Abstract Nail Art
Fluid abstract nail art features dynamic black strokes and droplets that flow naturally across a nude base. This design captures movement and creativity, perfect for showcasing an artistic flair.
What Is Fluid Abstract Nail Art?
This manicure focuses on bold, flowing black patterns that resemble liquid movement on a neutral background.
The organic shapes and glossy finish make it modern and visually captivating.
How to Create Fluid Abstract Nails
Step 1: Prep Your Nails
Shape your nails and buff the surface to create a smooth base. Push back the cuticles for a neat look.
Step 2: Apply a Nude Base Coat
Start with a soft nude or sheer polish to create an understated foundation. Allow it to dry completely.
Step 3: Add Fluid Black Designs
- Use a fine nail art brush or a detailing pen to draw flowing black lines and teardrop shapes on each nail.
- Vary the thickness and direction of the strokes to add depth and visual interest.
Step 4: Refine the Details
- Incorporate smaller accent lines or shapes for balance.
- Ensure each nail has a cohesive yet unique abstract design.
Step 5: Seal with a Top Coat
Finish with a glossy top coat to enhance the design and protect it from chipping.
Styling Ideas for Fluid Abstract Nails
- Matte Top Coat: Use a matte finish for a sophisticated, modern effect.
- Colored Accents: Add metallic or pastel accents alongside the black for a pop of color.
- Negative Space: Leave sections of the nail bare for a minimalist twist.
Why It Works
Fluid Abstract Nail Art combines artistic creativity with a neutral palette, making it both bold and versatile.
The flowing black patterns create a sense of motion and elegance, perfect for adding a unique touch to your manicure.
This look is ideal for art enthusiasts, creative events, or anytime you want your nails to stand out with style.
Conclusion
We’ve journeyed through a vast landscape of black nail designs, each offering its unique twist on this versatile color.
From the minimalist allure of matte black to the dynamic contrast of black with neon splashes, these styles not only enhance the beauty of your hands but also express your personal style and creativity.
As we’ve seen, the possibilities with black nail art are nearly endless, blending classic elegance with modern trends.
So next time you consider a manicure, think beyond the conventional and let these black nail designs inspire you to experiment with your look.
Whether at a casual gathering or a formal event, your nails can be the perfect accessory that never goes unnoticed.