Gold nail art designs embody luxury, elegance, and timeless sophistication, offering a versatile palette for any occasion.
Whether you prefer a subtle accent or a bold statement, gold transforms your manicure into a masterpiece.
Explore these 35 stunning gold nail designs, ranging from delicate elegance to intricate patterns, to find the perfect style for your mood and season.
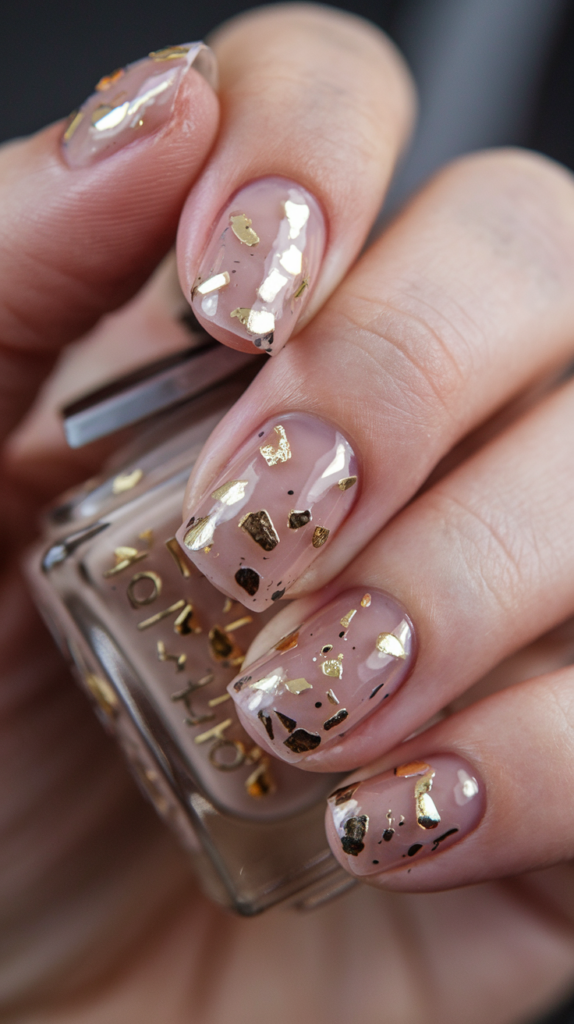
01. Delicate Gold Leaf Elegance

Creating the Design
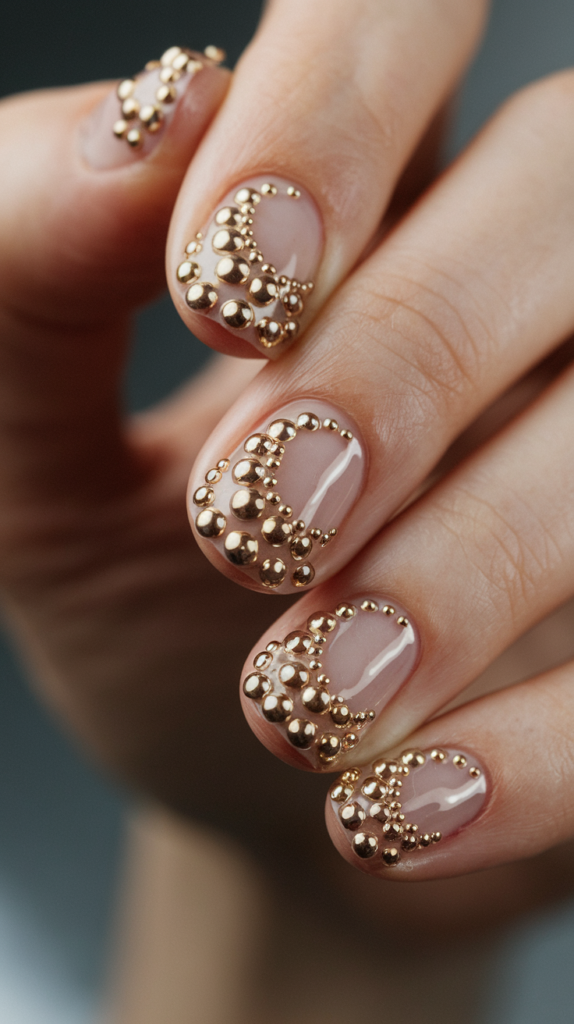
Delicate gold leaf elegance brings a refined and sophisticated touch with its nude base and subtle gold accents. This style is perfect for everyday wear or special occasions like weddings and spring events.
Step 1: Prepare the Base Start with a clear or nude polish as the base, applying two even coats and letting them dry completely for a smooth canvas.
Step 2: Apply the Gold Leaf Using tweezers, carefully place small, irregular pieces of gold leaf onto the nails, pressing gently to adhere them to the tacky polish surface.
Step 3: Seal the Design Finish with a glossy top coat to lock in the gold leaf and enhance the shine, ensuring a polished and long-lasting look.
Finishing Touches
Step 1: Accent Placement Focus the gold leaf on one or two accent nails for a minimalist vibe, leaving others with just the nude base for balance.
Step 2: Refine Details Add subtle microdots of gold polish around the leaf for extra flair.
Step 3: Maintain the Shape File nails into a rounded or almond shape to complement the delicate design.
Why It Works
Delicate gold leaf elegance blends simplicity with luxury, making it suitable for any setting.
The nude base provides a versatile backdrop, while the shimmering gold leaf adds a touch of elegance and depth. This creates a timeless, understated charm that stands out effortlessly.
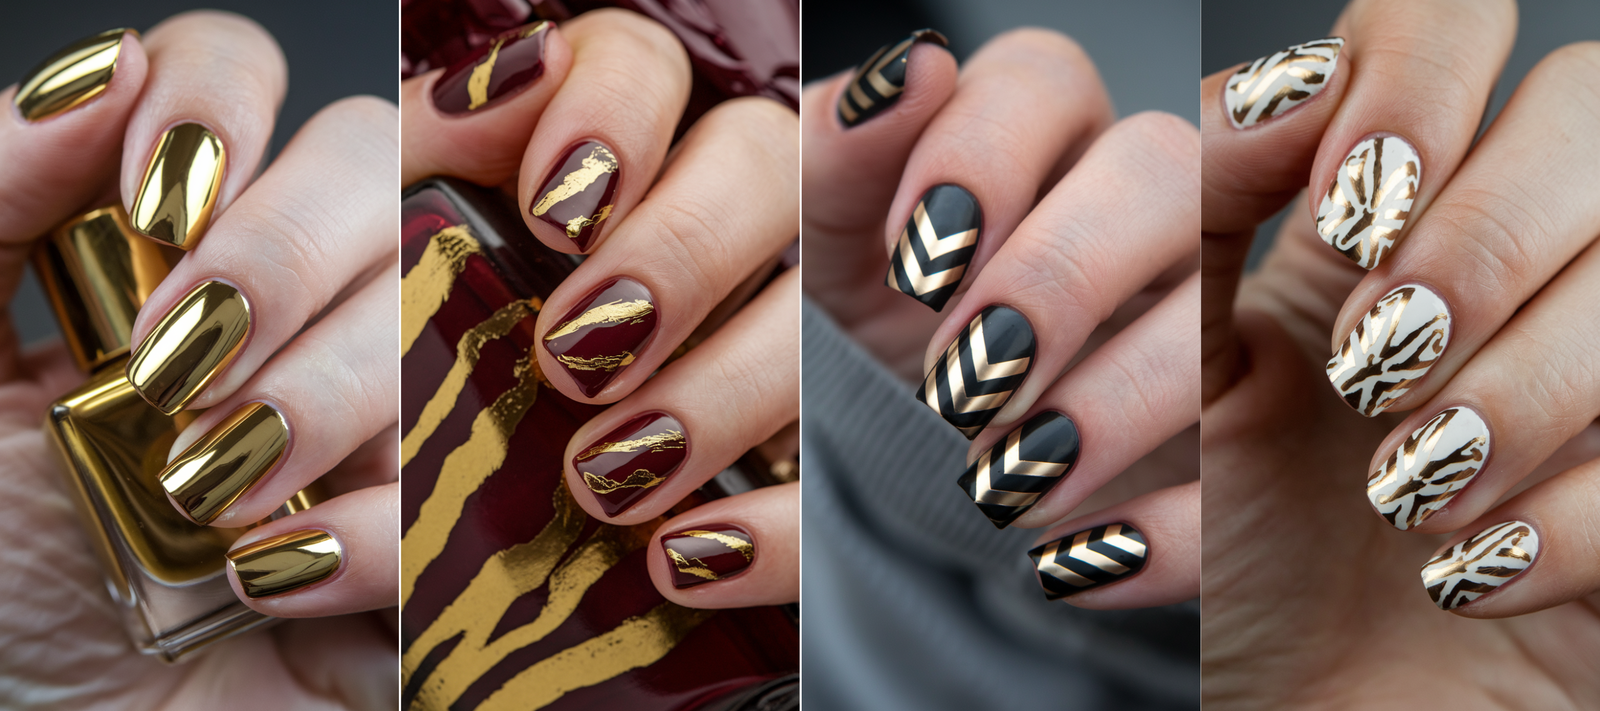
02. Bold Gold Chrome Glamour
Creating the Design
Bold gold chrome glamour exudes confidence and luxury with its mirror-like metallic finish. This style is ideal for special occasions or adding a touch of glamour to your daily look.
Step 1: Prepare the Base Apply a base coat followed by a black or nude polish, ensuring a smooth surface, and let it dry completely.
Step 2: Apply the Chrome Powder Rub gold chrome powder gently over the base using a sponge applicator, creating an even, reflective finish.
Step 3: Seal the Design Finish with a clear top coat to enhance shine and protect the chrome effect.
Finishing Touches
Step 1: Accentuate with Details Add small gold studs or glitter on one nail for a unique twist.
Step 2: Maintain Shine Reapply topcoat every two to three days to prevent dulling.
Step 3: Protect During Chores Wear gloves to preserve the mirror-like effect during household tasks.
Why It Works
The high-shine chrome finish catches light beautifully, offering an edgy yet sophisticated vibe.
The gold hue elevates the design, making it a standout choice for those craving bold elegance. This look is perfect for making a statement.
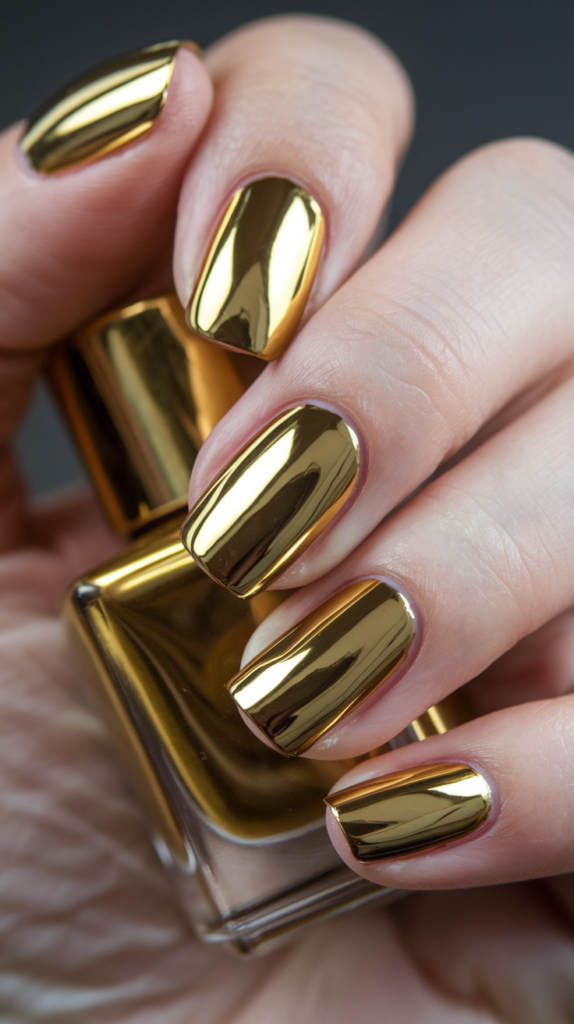
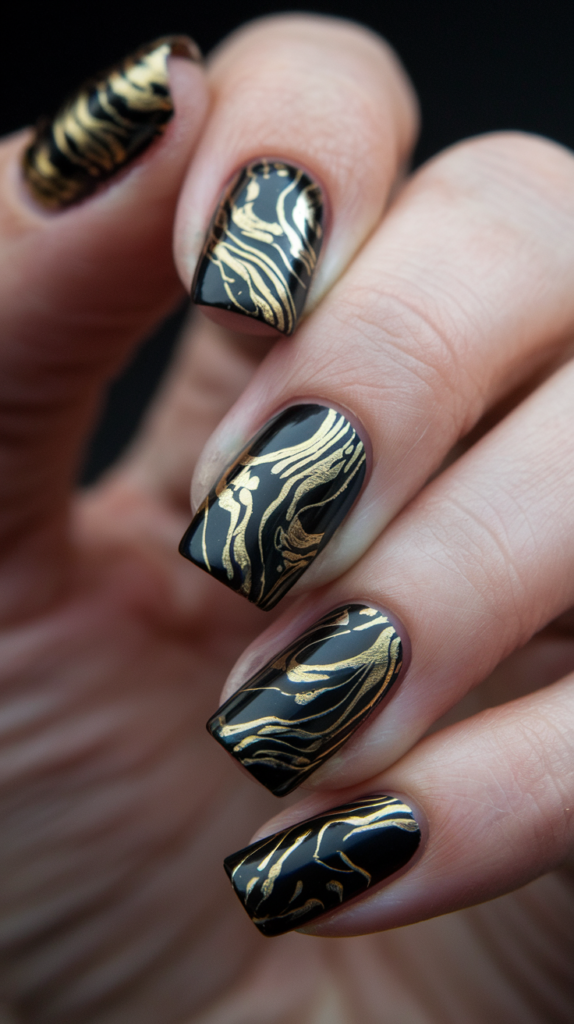
03. Dramatic Black and Gold Marble Masterpiece
Creating the Design
Dramatic black and gold marble masterpiece combines a sleek black base with shimmering gold veins. This opulent design is perfect for formal events or a gothic-inspired aesthetic.
Step 1: Prepare the Base Start with a glossy jet-black polish, applying two coats and letting it dry completely.
Step 2: Paint the Veins Use a fine brush with metallic gold polish to create thin, random veins, mimicking natural marble.
Step 3: Blend for Depth Lightly smudge the edges with a makeup sponge before drying for a faded, marble-like effect, then seal with a glossy top coat.
Finishing Touches
Step 1: Accentuate the Look Focus the marble effect on all nails or select one or two for a bolder statement.
Step 2: Clean Edges Use a precision brush with remover to tidy up any stray polish.
Step 3: Enhance Durability Apply a glossy top coat to enhance the shine and protect the design.
Why It Works
The striking contrast between black and gold creates a luxurious, eye-catching effect.
The marble technique adds artistic depth, blending elegance with a bold statement. This makes it a standout choice for special occasions.
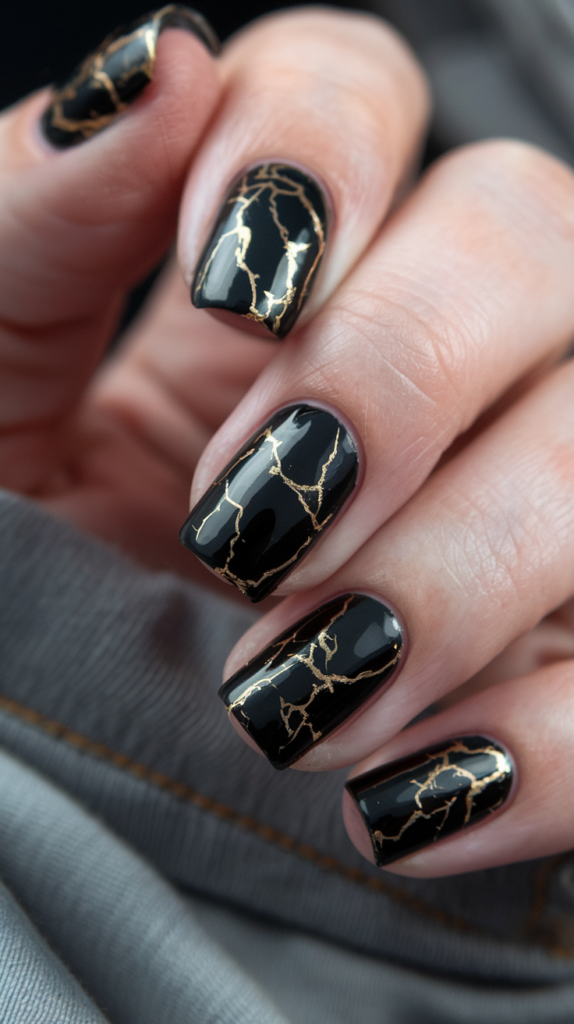
04. Dazzling Gold Glitter Ombre Glow
Creating the Design
Dazzling gold glitter ombre glow offers a stunning transition from a nude base to sparkling gold tips. This style is ideal for adding glamour to casual or festive occasions.
Step 1: Prepare the Base Start with a nude or clear base coat, applying two coats and letting it dry completely.
Step 2: Apply the Gradient Use a sponge to dab gold glitter polish at the tips, blending it toward the middle for a seamless fade.
Step 3: Layer for Intensity Apply multiple glitter layers for extra sparkle, ensuring even blending, and seal with a glossy top coat.
Finishing Touches
Step 1: Enhance the Tips Add a touch of holographic glitter for multidimensional sparkle.
Step 2: Seal the Design Finish with a glossy top coat to lock in the glitter and enhance shine.
Step 3: Ensure Longevity Reapply topcoat every few days to prevent chipping.
Why It Works
The gradual glitter fade adds a playful yet elegant touch to the design.
The nude base keeps it balanced, while the sparkle elevates it for a glamorous, versatile look. This makes it perfect for any celebration.
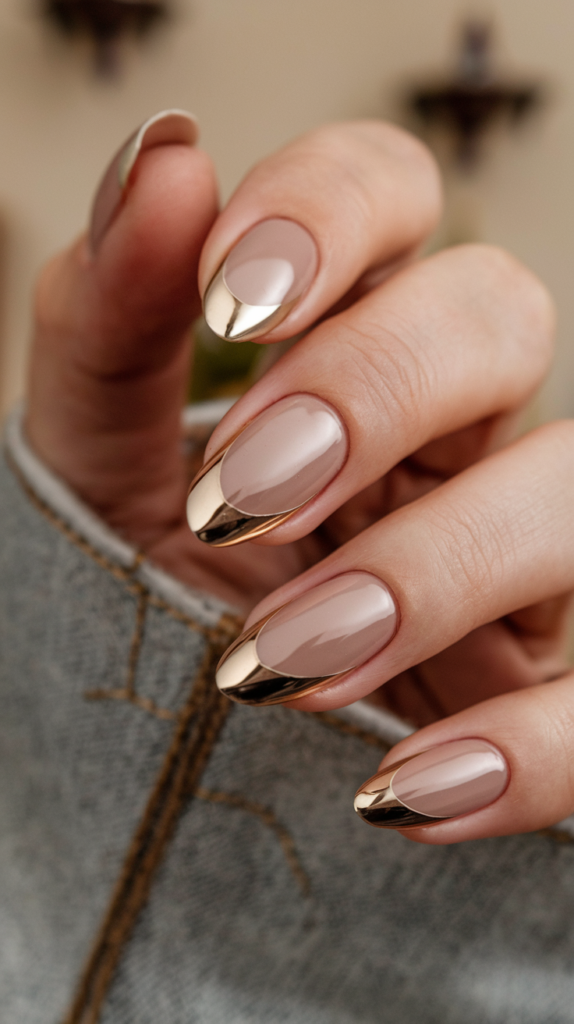
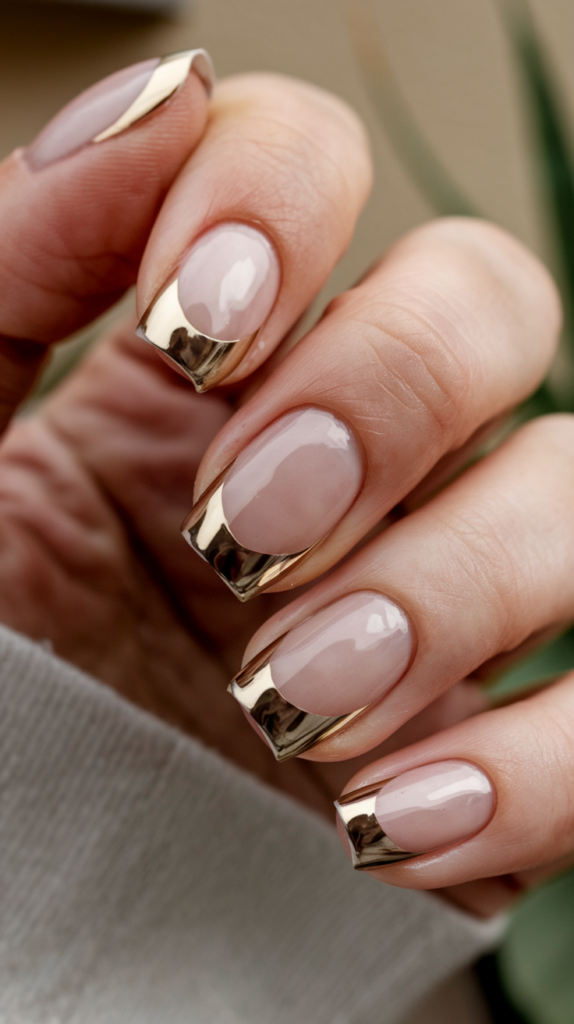
05. Elegant Gold French Tip Sophistication

Creating the Design
Elegant gold French tip sophistication reimagines the classic manicure with metallic gold edges. This chic update is perfect for any occasion, from casual outings to formal events.
Step 1: Prepare the Base Apply a sheer pink or nude base coat, letting it dry completely.
Step 2: Paint the Tips Use a thin brush or nail guide to apply metallic gold polish to the tips, ensuring crisp lines.
Step 3: Seal the Design Finish with a clear top coat to enhance shine and protect the tips.
Finishing Touches
Step 1: Refine Edges Clean up any uneven lines with a precision brush and remover for a polished look.
Step 2: Add Subtle Glitter Brush a fine glitter top coat over the tips for extra sparkle.
Step 3: Shape the Nails Opt for almond or square shapes to complement the elegant tips.
Why It Works
The gold twist modernizes the classic French manicure with sophistication.
Its metallic finish adds a luxurious touch, making it versatile for both casual and formal settings. This design is a timeless favorite.
06. Edgy Matte Black with Gold Foil Accents

Creating the Design
Edgy matte black with gold foil accents combines a modern edge with luxurious contrast. This bold style is perfect for night outs or formal events.
Step 1: Prepare the Base Paint nails with matte black polish, applying two coats and letting it dry completely.
Step 2: Apply the Gold Foil Use tweezers to place small gold foil pieces randomly, pressing gently to adhere.
Step 3: Seal the Design Finish with a matte top coat to maintain the black finish while securing the foil.
Finishing Touches
Step 1: Vary Placement Scatter foil along tips or edges for a structured look, or randomly for an abstract effect.
Step 2: Protect the Design Wear gloves during chores to prevent foil lifting.
Step 3: Add Subtle Shine Optionally, add a glossy top coat over foil accents for a hybrid finish.
Why It Works
The matte black backdrop highlights the gold foil’s shimmer with striking contrast.
This edgy-luxury blend is ideal for those seeking a modern, bold statement. It adds a unique flair to any outfit.
07. Stylish Gold Chevron Tip Design
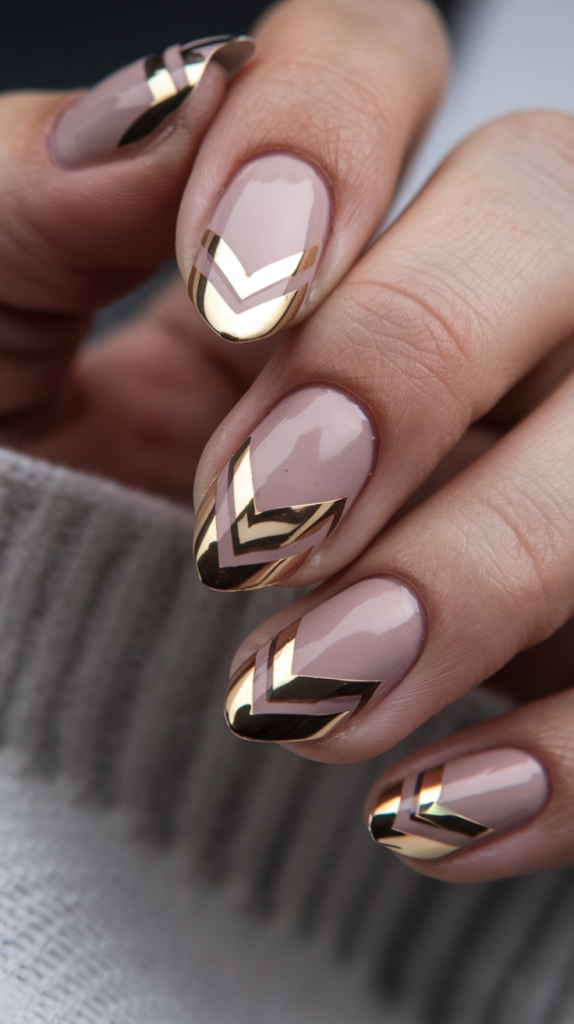
Creating the Design
Stylish gold chevron tip design offers a sharp, geometric look with metallic gold patterns. This trendy style suits any season and adds a modern touch to your nails.
Step 1: Prepare the Base Start with a nude or pale pink base coat, applying two coats and letting it dry completely.
Step 2: Create the Pattern Use striping tape or guides to form chevron shapes at the tips, painting with gold polish.
Step 3: Remove Tape Remove tape before the polish dries to avoid smudging, then seal with a glossy top coat.
Finishing Touches
Step 1: Add Texture Incorporate dots or studs along chevron edges for added dimension.
Step 2: Seal the Design Apply a glossy top coat to enhance shine and durability.
Step 3: Shape the Nails Opt for almond or stiletto shapes to accentuate the geometric lines.
Why It Works
The sharp chevron pattern paired with gold’s metallic sheen creates a bold, modern aesthetic.
Its versatility makes it a standout choice for fashion-forward individuals. This design is both stylish and timeless.
08. Glamorous Gold and White Stripe Elegance
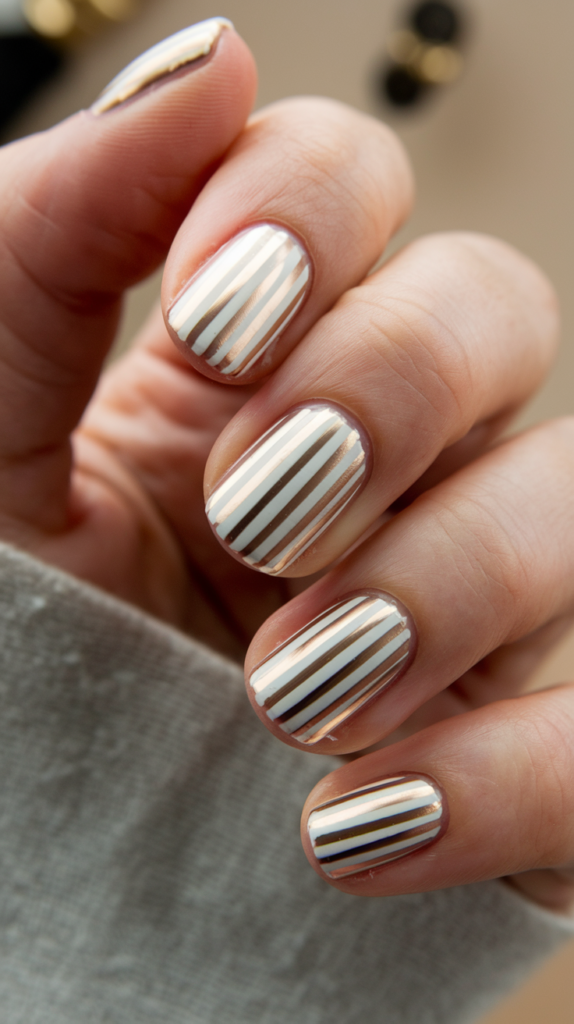
Creating the Design
Glamorous gold and white stripe elegance combines clean lines with metallic glamour. This minimalist yet elegant design is perfect for everyday wear or special events.
Step 1: Prepare the Base Paint nails with a white or pastel base coat, applying two coats and letting it dry completely.
Step 2: Create the Stripes Use striping tape to form even lines, filling them with metallic gold polish.
Step 3: Remove Tape Remove tape before drying, then seal with a glossy top coat.
Finishing Touches
Step 1: Vary Patterns Alternate thick and thin stripes or create diagonal lines for a dynamic look.
Step 2: Add Accents Incorporate small gold studs for extra texture.
Step 3: Maintain Shine Reapply topcoat every few days to preserve the design.
Why It Works
The clean contrast of white and gold stripes offers a refined, glamorous appearance.
This minimalist design shines with sophistication, making it suitable for any occasion. Its simplicity is its strength.
09. Daring Gold Studded Brilliance

Creating the Design
Daring gold studded brilliance adds a bold 3D element with metallic studs. This luxurious design is ideal for parties or statement-making styles.
Step 1: Prepare the Base Start with a base coat of your choice, applying two coats and letting it dry completely.
Step 2: Place the Studs Use tweezers to position gold studs on tacky polish, securing with nail glue if needed.
Step 3: Seal the Design Apply a clear top coat around stud edges to prevent lifting.
Finishing Touches
Step 1: Vary Placement Scatter studs randomly or align them along the tips for structure.
Step 2: Combine Elements Pair with foil or glitter for a mixed-media effect.
Step 3: Shape the Nails Opt for longer shapes like stiletto or coffin to showcase the studs.
Why It Works
The 3D studs add texture and boldness, enhanced by gold’s luxury.
This design stands out, making it perfect for those craving dramatic glamour. It’s a showstopper for any event.
10. Shimmering Gold Chrome and Glitter Fusion
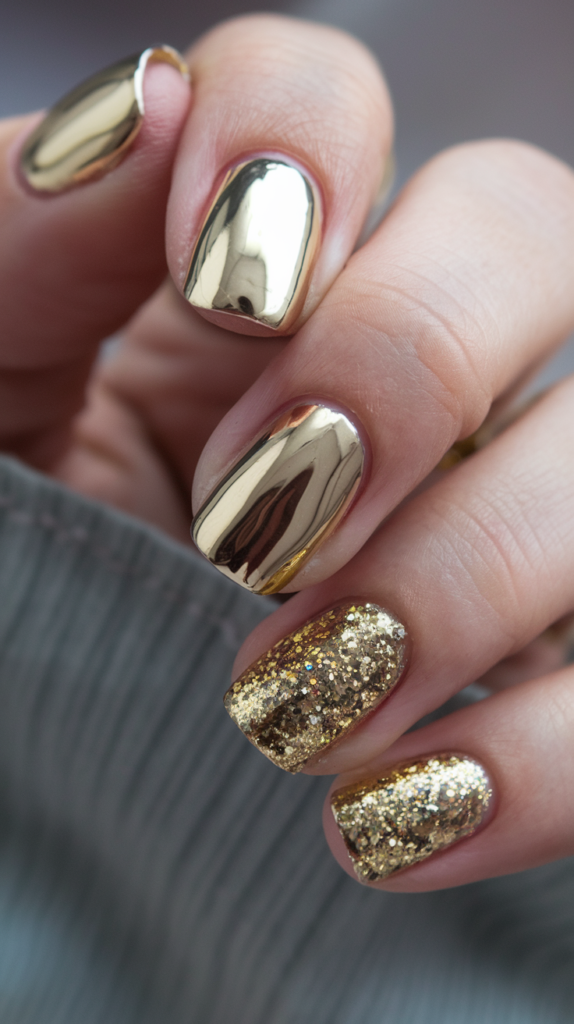
Creating the Design
Shimmering gold chrome and glitter fusion blends reflective chrome with sparkling glitter. This dynamic design is perfect for festive or special occasions.
Step 1: Prepare the Base Paint some nails with a black base for chrome and others with nude for glitter, letting them dry completely.
Step 2: Apply Chrome and Glitter Rub gold chrome powder on black bases and layer gold glitter on nude bases.
Step 3: Seal the Design Finish with a clear top coat to enhance shine and durability.
Finishing Touches
Step 1: Alternate Finishes Mix chrome and glitter across nails for balance, such as using chrome on the thumb and pinky.
Step 2: Add Accents Incorporate small studs or foil for extra flair.
Step 3: Maintain Shine Reapply topcoat every few days to preserve the effect.
Why It Works
The combination of chrome’s mirror-like shine and glitter’s sparkle creates a captivating, multidimensional look.
This versatile design shines for any bold occasion, adding a touch of magic to your style. It’s a perfect festive choice.
11. Feminine Rose Gold Gradient Glow
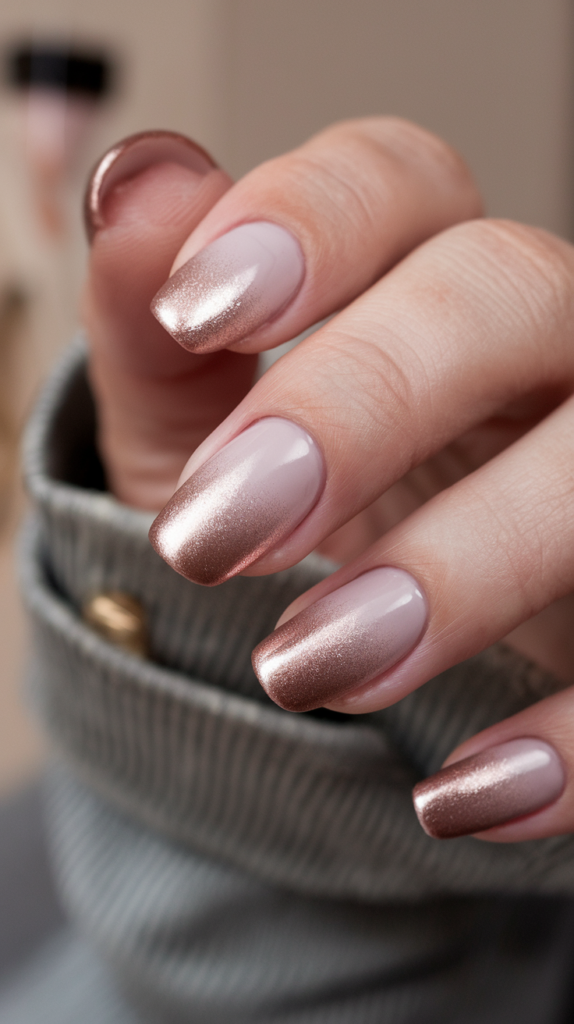
Creating the Design
Feminine rose gold gradient glow offers a soft, feminine fade with metallic shimmer. This subtle yet glamorous style is ideal for adding elegance to your everyday look.
Step 1: Prepare the Base Start with a nude or soft pink base coat, applying two coats and letting it dry completely.
Step 2: Blend the Gradient Use a sponge to apply rose gold polish at the tips, fading it toward the middle.
Step 3: Layer for Intensity Add layers for a richer gradient, then seal with a glossy top coat.
Finishing Touches
Step 1: Add Highlights Incorporate fine glitter for extra dimension.
Step 2: Refine Edges Clean up with a precision brush and remover.
Step 3: Maintain Longevity Reapply topcoat every few days to prevent fading.
Why It Works
Rose gold’s soft metallic hue complements a wide range of skin tones.
It offers a feminine yet luxurious fade, making this design perfect for versatile, elegant styling. This look is both delicate and striking.
12. Playful Gold Confetti Sparkle
Creating the Design
Playful gold confetti sparkle brings a fun yet luxurious vibe with scattered gold pieces. This design is ideal for festive occasions or a lighthearted style.
Step 1: Prepare the Base Start with a clear or nude base coat, applying two coats and letting it dry completely.
Step 2: Apply the Confetti Use a brush or dotting tool to place gold confetti pieces randomly.
Step 3: Seal the Design Finish with a clear top coat to secure the confetti.
Finishing Touches
Step 1: Vary Placement Scatter confetti across all nails or use it as an accent on one or two.
Step 2: Combine Elements Pair with glitter or foil for texture.
Step 3: Maintain Freshness Reapply topcoat every few days to prevent peeling.
Why It Works
The random confetti effect adds a playful luxury to the nails.
This chic design suits any fun occasion, bringing a touch of whimsy to your look. It’s perfect for a carefree vibe.
13. Artistic Gold Foil Swirl Fantasy
Creating the Design
Artistic gold foil swirl fantasy offers a flowing design with metallic elegance. This unique style is perfect for those seeking a luxurious, creative look.
Step 1: Prepare the Base Start with a black or deep burgundy base, applying two coats and letting it dry completely.
Step 2: Apply the Swirls Use tweezers to place gold foil in organic, swirling patterns.
Step 3: Seal the Design Finish with a clear top coat to protect the foil.
Finishing Touches
Step 1: Vary Swirl Sizes Combine bold and delicate swirls for dynamism.
Step 2: Experiment with Bases Try nude or metallic bases for different effects.
Step 3: Maintain Durability Reapply topcoat to prevent foil lifting.
Why It Works
The fluid swirls add an artistic flair, enhanced by gold’s luxury.
Against contrasting bases, this design is ideal for creative expression. It brings a touch of artistry to your nails.
14. Unique Gold Cuticle Detail Charm

Creating the Design
Unique gold cuticle detail charm offers a modern twist by highlighting the cuticle area. This minimalist yet glamorous style is perfect for trendsetters looking to stand out.
Step 1: Prepare the Base Start with a nude or clear base coat, applying two coats and letting it dry completely.
Step 2: Paint the Cuticle Use a thin brush to apply gold polish along the cuticle in a thin line.
Step 3: Seal the Design Finish with a clear top coat to enhance shine.
Finishing Touches
Step 1: Extend Design Create a half-moon shape for a bolder effect.
Step 2: Combine Styles Pair with French tips or glitter for texture.
Step 3: Maintain Clean Lines Reapply topcoat to keep edges crisp.
Why It Works
The inverted focus on the cuticle adds a fresh, glamorous twist.
This trendsetting design stands out with subtle elegance, appealing to innovative nail art lovers. It’s a unique conversation starter.
15. Minimalist Matte Nude with Gold Tip Grace
Creating the Design
Minimalist matte nude with gold tip grace blends soft minimalism with bold metallic accents. This chic style is perfect for everyday wear with a touch of glamour.
Step 1: Prepare the Base Paint nails with matte nude polish, applying two coats and letting it dry completely.
Step 2: Apply the Tips Use a thin brush to apply gold polish to the tips, ensuring sharp lines.
Step 3: Seal the Design Finish with a matte top coat, preserving the nude finish while protecting the gold.
Finishing Touches
Step 1: Refine Edges Clean up with a precision brush and remover.
Step 2: Add Shine Optionally, use a glossy top coat over gold tips.
Step 3: Shape the Nails Opt for almond or coffin shapes to highlight the tips.
Why It Works
The matte-nude contrast with shiny gold tips creates a modern, elegant balance.
This design suits those seeking subtle glamour, offering a refined yet striking appearance. It’s ideal for daily sophistication.
16. Intricate Gold Lace Overlay Magic

Creating the Design
Intricate gold lace overlay magic brings a delicate, detailed pattern with metallic elegance. This style is ideal for formal events or weddings, adding a touch of sophistication.
Step 1: Prepare the Base Start with a clear or pale pink base, applying two coats and letting it dry completely.
Step 2: Paint the Lace Use a thin brush to create detailed lace patterns with gold polish.
Step 3: Seal the Design Finish with a glossy top coat to enhance shine.
Finishing Touches
Step 1: Vary Patterns Use lace on all nails or as an accent for balance.
Step 2: Add Shading Incorporate soft gray for depth.
Step 3: Maintain Detail Reapply topcoat to preserve the lace.
Why It Works
The delicate gold lace adds sophistication against a soft base.
This intricate design excels for elegant, standout occasions, offering a refined allure. It’s a perfect choice for special moments.
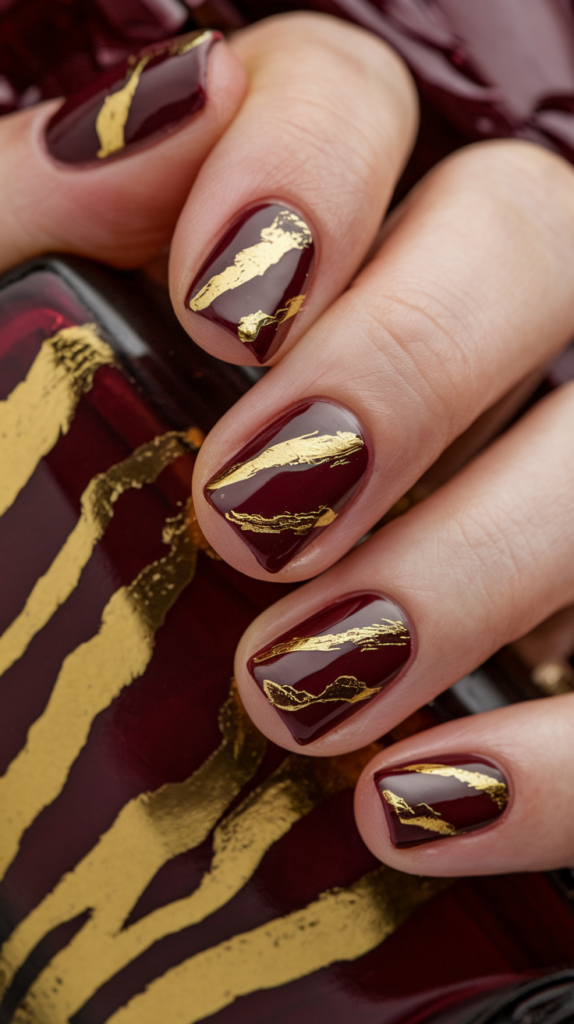
17. Opulent Gold and Burgundy Luxe Glow
Creating the Design
Opulent gold and burgundy luxe glow combines rich tones with metallic accents. This design is perfect for fall, winter, or formal events, exuding warmth and elegance.
Step 1: Prepare the Base Start with a deep burgundy polish, applying two coats and letting it dry completely.
Step 2: Add Gold Detailing Use a thin brush to paint gold stripes or dots.
Step 3: Seal the Design Finish with a glossy top coat to enhance shine.
Finishing Touches
Step 1: Add Accents Incorporate gold foil or glitter on accent nails.
Step 2: Refine Edges Clean up with a precision brush.
Step 3: Shape the Nails Opt for almond or coffin shapes for elegance.
Why It Works
The rich burgundy enhances gold’s luxury with a sophisticated warmth.
This design shines for special occasions, offering a regal and opulent vibe. It’s a perfect match for festive attire.
18. Ethereal Clear with Gold Flake Dream

Creating the Design
Ethereal clear with gold flake dream offers a minimalist, airy design with subtle luxury. This modern style is perfect for an understated, elegant look.
Step 1: Prepare the Base Start with a clear base coat, applying two coats and letting it dry completely.
Step 2: Apply the Flakes Use tweezers to place gold flakes randomly.
Step 3: Seal the Design Finish with a clear top coat to protect the flakes.
Finishing Touches
Step 1: Vary Placement Keep flakes sparse for subtlety.
Step 2: Add Highlights Incorporate fine glitter for extra sparkle.
Step 3: Maintain Shine Reapply topcoat every few days.
Why It Works
The clear base highlights the gold flakes’ delicate luxury.
This modern design offers a subtle, elegant statement, perfect for a refined aesthetic. It evokes a dreamy, ethereal charm.
19. Shiny Gold Chrome French Manicure Chic
Creating the Design
Shiny gold chrome French manicure chic reimagines the classic style with a mirror-like gold tip. This futuristic, elegant look is perfect for those who love a modern twist.
Step 1: Prepare the Base Start with a clear or nude base, applying two coats and letting it dry completely.
Step 2: Apply the Chrome Tips Use a brush to apply gold chrome polish to the tips.
Step 3: Seal the Design Finish with a clear top coat to enhance shine.
Finishing Touches
Step 1: Refine Edges Clean up with a precision brush.
Step 2: Add Accents Incorporate studs for texture.
Step 3: Shape the Nails Opt for almond or coffin shapes.
Why It Works
The chrome finish adds a futuristic edge to the classic French style.
This design is perfect for bold, modern elegance, offering a sleek and stylish appearance. It’s a fresh take on tradition.
20. Minimalist Gold and Nude Half-Moon Grace
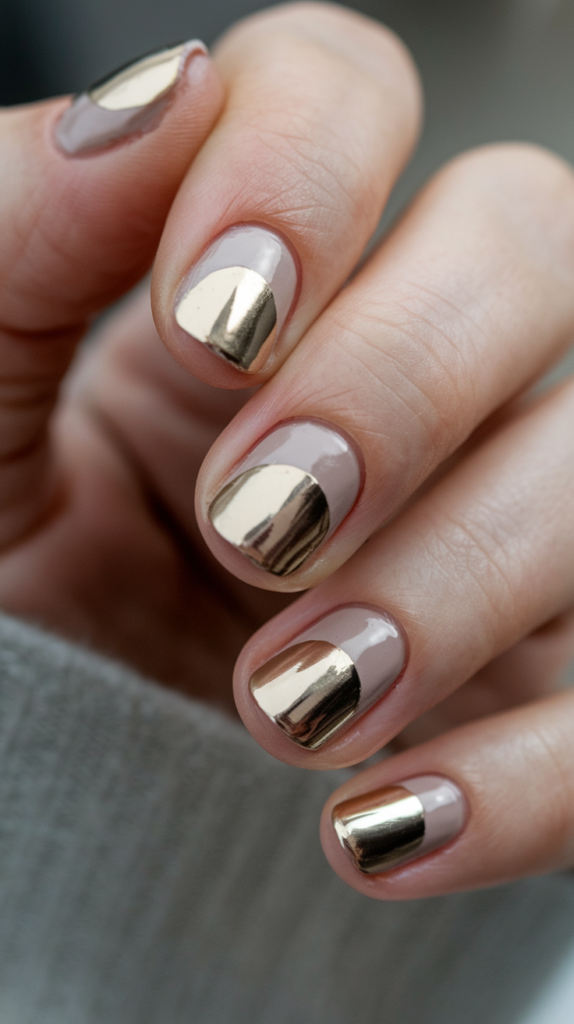
Creating the Design
Minimalist gold and nude half-moon grace blends subtle charm with metallic glamour. This chic look is ideal for a refined, understated style.
Step 1: Prepare the Base Start with a nude base, applying two coats and letting it dry completely.
Step 2: Paint the Half-Moon Use a guide to apply gold polish at the cuticle in a crescent shape.
Step 3: Seal the Design Finish with a clear top coat to enhance shine.
Finishing Touches
Step 1: Vary Design Extend the crescent for a bolder effect.
Step 2: Add Accents Incorporate glitter for sparkle.
Step 3: Maintain Longevity Reapply topcoat every few days.
Why It Works
The nude-gold contrast delivers minimalist glamour.
This versatile design fits both casual and formal settings, offering a sleek and elegant finish. It’s a subtle yet striking choice.
21. Sparkling Gold Glitter Accents on Matte White Brilliance
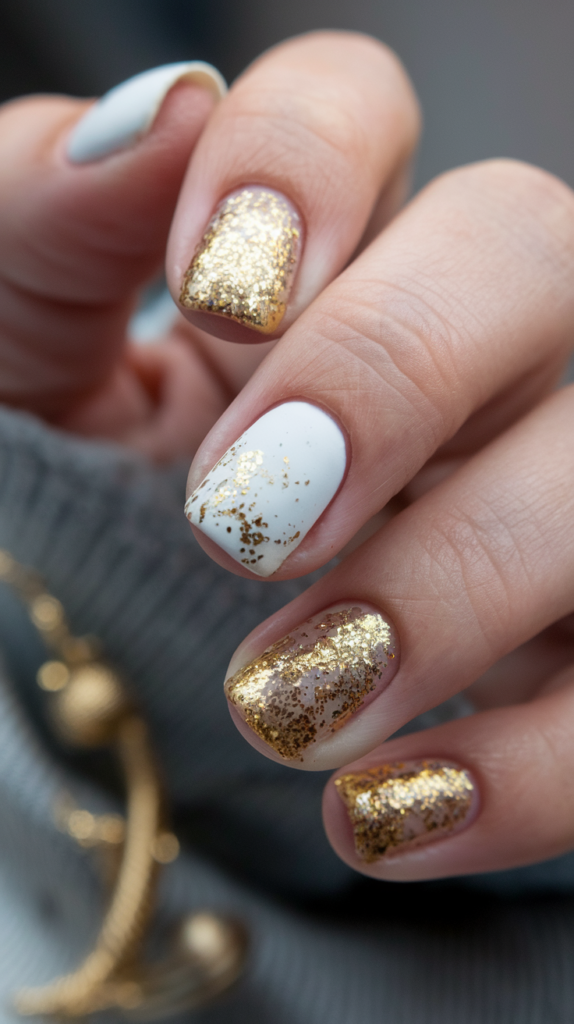
Creating the Design
Sparkling gold glitter accents on matte white brilliance add a subtle sparkle to a clean base. This modern, elegant style is perfect for any occasion.
Step 1: Prepare the Base Paint nails with matte white polish, applying two coats and letting it dry completely.
Step 2: Apply the Glitter Use a brush to apply gold glitter in clusters on tacky polish.
Step 3: Seal the Design Finish with a matte top coat to preserve the finish.
Finishing Touches
Step 1: Vary Placement Scatter glitter randomly or focus on tips.
Step 2: Add Texture Incorporate studs for dimension.
Step 3: Maintain Finish Reapply topcoat to prevent smudging.
Why It Works
The matte white base enhances the gold glitter’s pop.
This design offers a modern, elegant contrast, making it a versatile choice for any event. It’s both subtle and eye-catching.
22. Striking Geometric Gold and Black Edge
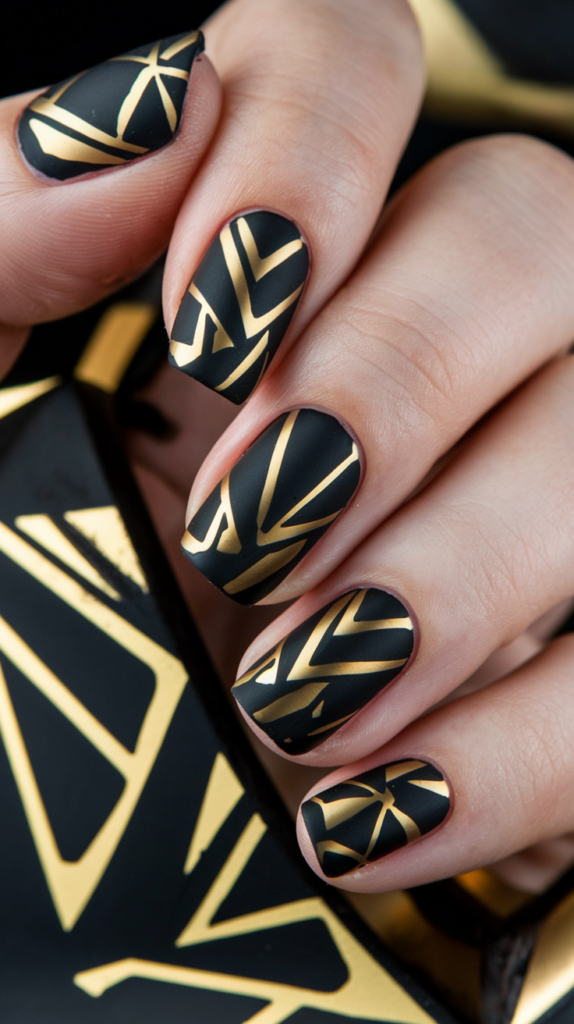
Creating the Design
Striking geometric gold and black edge features sharp patterns with metallic accents. This bold, modern design is ideal for making a statement.
Step 1: Prepare the Base Paint nails with a black base, applying two coats and letting it dry completely.
Step 2: Add Patterns Use striping tape to create geometric shapes, filling them with gold polish.
Step 3: Seal the Design Finish with a clear top coat to enhance shine.
Finishing Touches
Step 1: Vary Patterns Mix triangles and lines for dynamism.
Step 2: Refine Edges Clean up with a precision brush.
Step 3: Shape the Nails Opt for square or stiletto shapes.
Why It Works
The black-gold contrast delivers a striking, modern appearance.
This bold design appeals to fashion-forward individuals, offering a sharp and stylish edge. It’s perfect for bold statements.
23. Celestial Gold Studded Crescent Moon Magic
Creating the Design
Celestial gold studded crescent moon magic offers a whimsical design with 3D studs. This elegant style is perfect for nature-inspired occasions or a touch of fantasy.
Step 1: Prepare the Base Start with a clear or nude base, applying two coats and letting it dry completely.
Step 2: Place the Studs Use tweezers to form a crescent with gold studs at the cuticle.
Step 3: Seal the Design Finish with a clear top coat to secure the studs.
Finishing Touches
Step 1: Add Accents Incorporate star decals for a themed effect.
Step 2: Balance Design Keep some nails simple for harmony.
Step 3: Maintain Structure Reapply topcoat to prevent lifting.
Why It Works
The celestial theme with gold studs adds whimsy and elegance.
This design is perfect for nature-inspired occasions, bringing a magical touch to your nails. It’s a celestial delight.
24. Romantic Gold and Pink Ombre Romance

Creating the Design
Romantic gold and pink ombre romance blends soft femininity with metallic glamour. This elegant look is ideal for romantic occasions or a touch of charm.
Step 1: Prepare the Base Start with a soft pink base, applying two coats and letting it dry completely.
Step 2: Blend the Gradient Use a sponge to apply gold glitter at the tips, fading toward the middle.
Step 3: Seal the Design Finish with a glossy top coat to enhance shine.
Finishing Touches
Step 1: Add Highlights Incorporate fine glitter for extra sparkle.
Step 2: Refine Edges Clean up with a precision brush.
Step 3: Maintain Longevity Reapply topcoat every few days.
Why It Works
The pink-gold fade delivers feminine glamour with versatility.
This design suits both casual and formal settings, adding a romantic touch to your style. It’s a lovely, versatile option.
25. Wild Gold Animal Print Adventure
Creating the Design
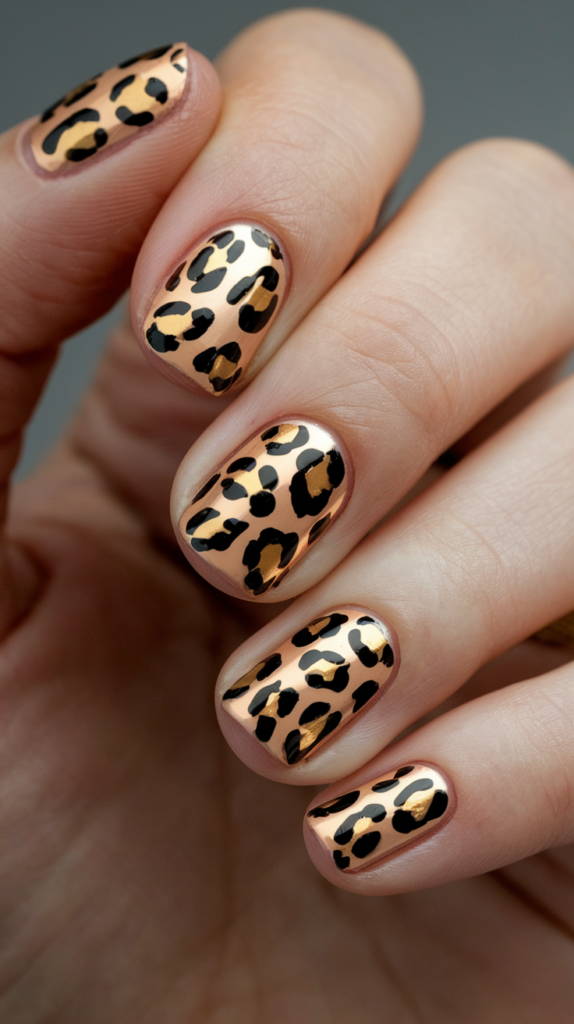
Wild gold animal print adventure brings a bold, luxurious vibe with leopard or snake patterns. This fashionable style is perfect for those who love to make a striking statement.
Step 1: Prepare the Base Start with a nude or matte black base, applying two coats and letting it dry completely.
Step 2: Paint the Patterns Use a brush to create gold spots or scales, outlining with black for depth.
Step 3: Seal the Design Finish with a glossy top coat to enhance shine.
Finishing Touches
Step 1: Vary Patterns Mix leopard and snake prints for variety.
Step 2: Add Accents Incorporate glitter for texture.
Step 3: Shape the Nails Opt for stiletto or coffin shapes to enhance the bold look.
Why It Works
The gold animal print adds wild luxury to any outfit.
This bold design appeals to fashion enthusiasts, offering a fierce and stylish edge. It’s a perfect choice for adventurous styles.
26. Edgy Gold Leaf on Matte Black Drama
Creating the Design
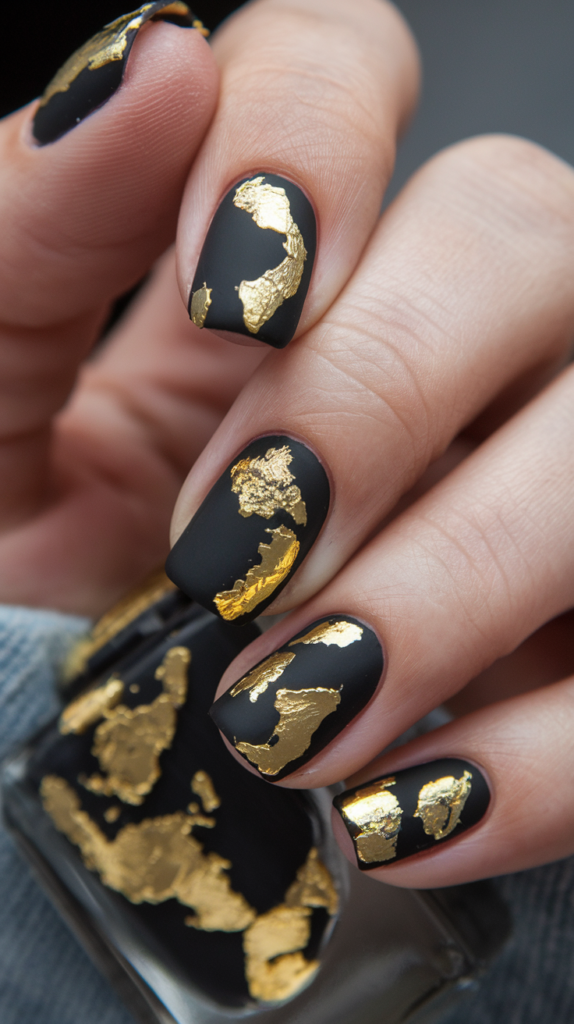
Edgy gold leaf on matte black drama combines a striking contrast with luxurious accents. This bold style is ideal for special occasions or making a modern statement.
Step 1: Prepare the Base Paint nails with matte black polish, applying two coats and letting it dry completely.
Step 2: Apply the Gold Leaf Use tweezers to place gold leaf pieces randomly.
Step 3: Seal the Design Finish with a clear top coat to protect the leaf.
Finishing Touches
Step 1: Vary Placement Scatter leaf along tips or edges for variety.
Step 2: Press Evenly Use a brush to press the leaf evenly.
Step 3: Maintain Durability Reapply topcoat to prevent lifting.
Why It Works
The matte black enhances gold leaf’s luxury with edgy contrast.
This modern design shines for standout occasions, offering a dramatic and luxurious finish. It’s a bold expression of style.
27. Fiery Gold Foil Flame Passion
Creating the Design
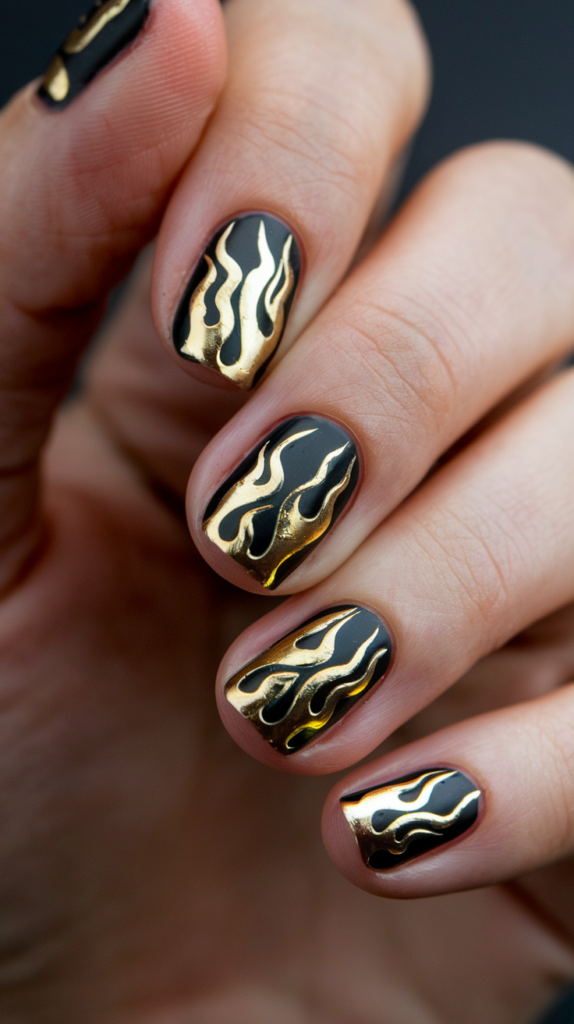
Fiery gold foil flame passion offers an artistic design with metallic elegance. This bold look is perfect for special events or those who love a dramatic flair.
Step 1: Prepare the Base Start with a black or dark base, applying two coats and letting it dry completely.
Step 2: Apply the Flames Use tweezers to place gold foil in flame shapes.
Step 3: Seal the Design Finish with a clear top coat to protect the foil.
Finishing Touches
Step 1: Vary Flame Sizes Mix bold and delicate flames for dynamism.
Step 2: Experiment with Bases Try burgundy or navy for variety.
Step 3: Maintain Shine Reapply topcoat every few days.
Why It Works
The fiery gold flames add drama and glamour to the design.
This bold look is ideal for making a statement, bringing passion and elegance to your nails. It’s a fiery masterpiece.
28. Sleek Clear with Gold Wire Artistry
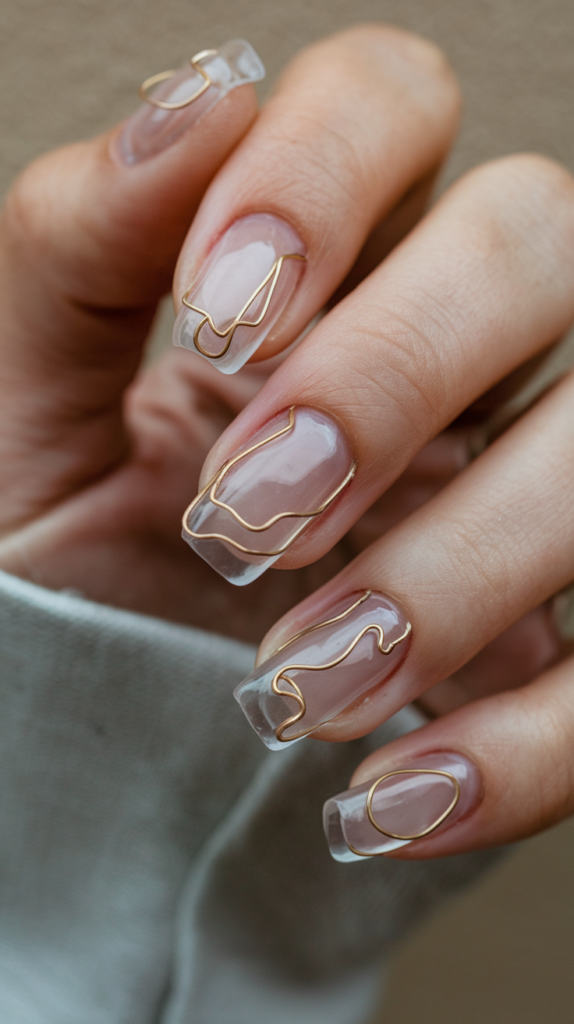
Creating the Design
Sleek clear with gold wire artistry offers a minimalist design with luxurious detail. This modern look is perfect for those who appreciate a clean, artistic style.
Step 1: Prepare the Base Start with a clear base coat, applying two coats and letting it dry completely.
Step 2: Apply the Wire Use tweezers to place gold wire in lines or shapes.
Step 3: Seal the Design Finish with a clear top coat to protect the wire.
Finishing Touches
Step 1: Vary Patterns Create geometric or flowing lines for variety.
Step 2: Add Accents Incorporate fine glitter for sparkle.
Step 3: Maintain Structure Reapply topcoat to prevent snagging.
Why It Works
The clear base enhances the gold wire’s artistic appeal.
This minimalist design suits a modern, elegant style, offering a sleek and sophisticated finish. It’s a subtle art form.
29. Bold Gold Drip Extravaganza
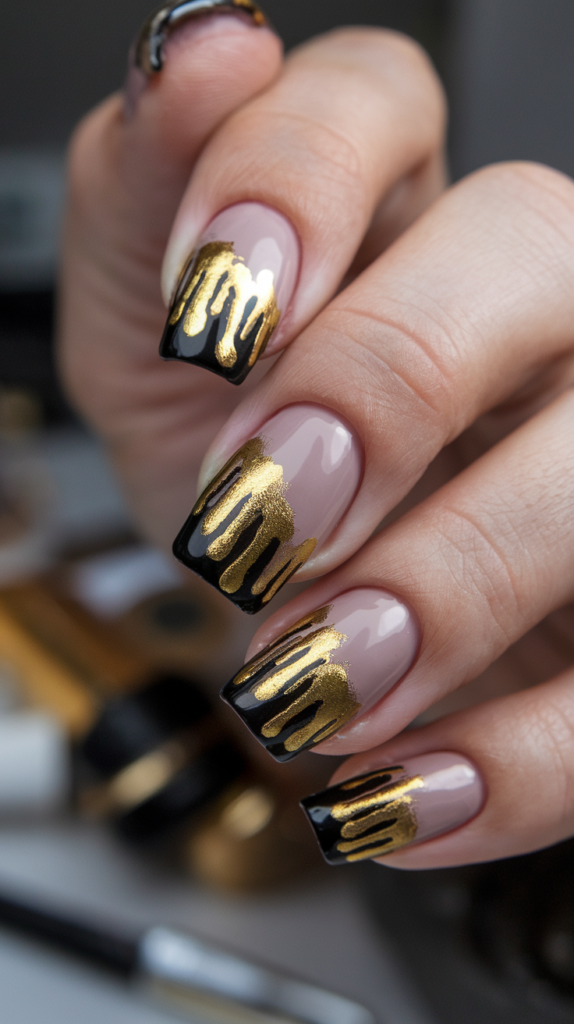
Creating the Design
Bold gold drip extravaganza features a liquid gold effect for a striking look. This artistic design is perfect for special occasions or those who love luxury.
Step 1: Prepare the Base Start with a nude or black base, applying two coats and letting it dry completely.
Step 2: Paint the Drips Use a brush to apply gold polish in random drip patterns at the tips.
Step 3: Seal the Design Finish with a glossy top coat to enhance shine.
Finishing Touches
Step 1: Vary Drip Lengths Extend drips for a dramatic effect.
Step 2: Add Accents Incorporate glitter for extra sparkle.
Step 3: Maintain Durability Reapply topcoat every few days.
Why It Works
The liquid gold effect adds bold artistry and luxury.
This design is perfect for making a striking statement, offering a lavish and eye-catching finish. It’s a true extravaganza.
30. Regal Gold and Navy Royal Charm
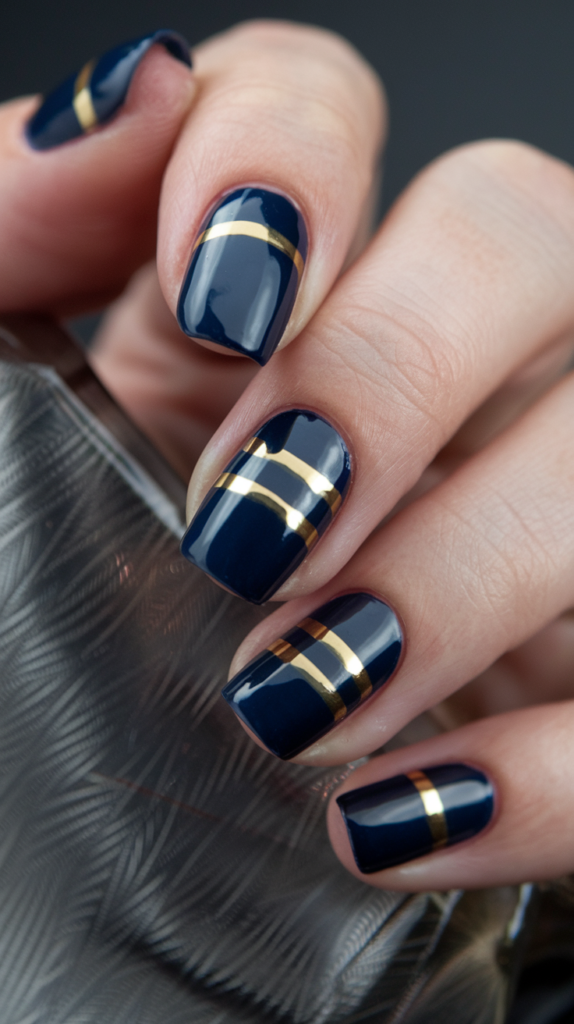
Creating the Design
Regal gold and navy royal charm blends rich tones with metallic accents. This sophisticated design is perfect for winter styling or formal events.
Step 1: Prepare the Base Start with a navy blue polish, applying two coats and letting it dry completely.
Step 2: Add Gold Detailing Use a thin brush to paint gold stripes or geometric shapes.
Step 3: Seal the Design Finish with a glossy top coat to enhance shine.
Finishing Touches
Step 1: Add Accents Incorporate gold foil or glitter on accent nails.
Step 2: Refine Edges Clean up with a precision brush.
Step 3: Shape the Nails Opt for almond or coffin shapes for elegance.
Why It Works
The navy base enhances gold’s regal luxury with sophistication.
This design is ideal for formal occasions, offering a royal and polished vibe. It’s a perfect match for elegant attire.
31. Subtle Gold Speckled Tip Charm

Creating the Design
Subtle gold speckled tip charm adds a delicate shimmer to a classic design. This elegant style is perfect for everyday wear or light event styling.
Step 1: Prepare the Base Start with a nude or clear base, applying two coats and letting it dry completely.
Step 2: Apply the Speckles Use a brush to apply tiny gold glitter speckles at the tips.
Step 3: Seal the Design Finish with a glossy top coat to enhance shine.
Finishing Touches
Step 1: Vary Density Adjust speckle concentration for a balanced look.
Step 2: Add Accents Incorporate fine studs for texture.
Step 3: Maintain Shine Reapply topcoat every few days.
Why It Works
The speckled tips add a chic shimmer with understated glamour.
This design is versatile for everyday wear, offering a subtle yet elegant finish. It’s a perfect daily luxury.
32. Sharp Matte Black with Gold Chevron Stripe Edge

Creating the Design
Sharp matte black with gold chevron stripe edge offers a bold, trendy design. This on-trend look is perfect for those who love a striking contrast.
Step 1: Prepare the Base Paint nails with matte black polish, applying two coats and letting it dry completely.
Step 2: Apply the Stripes Use striping tape to form chevron patterns, filling them with gold polish.
Step 3: Seal the Design Finish with a matte top coat to preserve the finish.
Finishing Touches
Step 1: Vary Patterns Mix chevron sizes for dynamism.
Step 2: Refine Edges Clean up with a precision brush.
Step 3: Shape the Nails Opt for square or stiletto shapes.
Why It Works
The matte black-gold contrast creates a striking, modern look.
This bold design is perfect for trendsetters, offering a sharp and stylish edge. It’s a must-have for bold fashion statements.
33. Reverse Gold Glitter Cuticle Glam
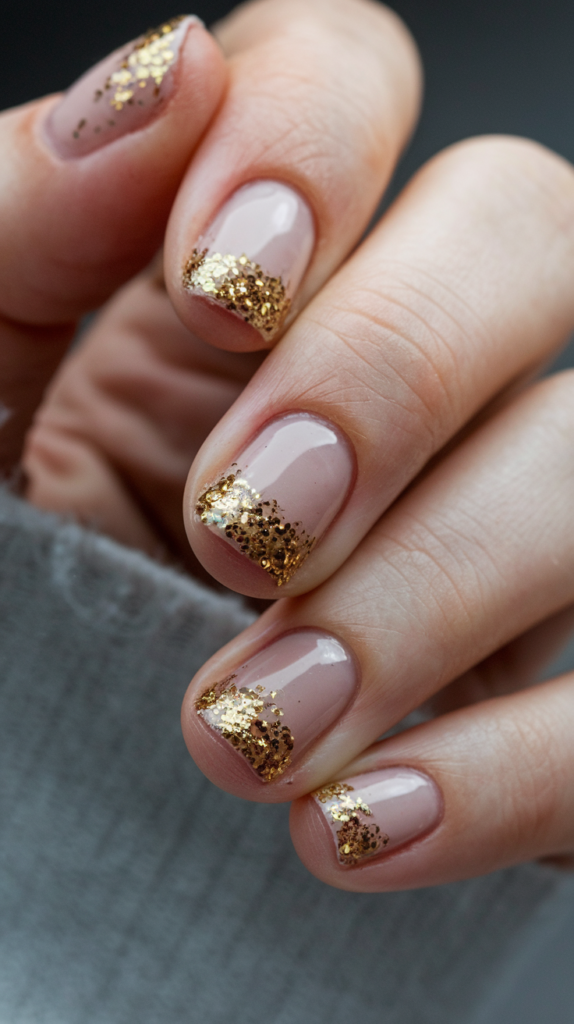
Creating the Design
Reverse gold glitter cuticle glam offers a unique twist with glitter focused around the cuticles. This elegant style is perfect for those seeking a standout look.
Step 1: Prepare the Base Start with a nude or clear base, applying two coats and letting it dry completely.
Step 2: Apply the Glitter Use a brush to apply gold glitter at the cuticles.
Step 3: Seal the Design Finish with a glossy top coat to enhance shine.
Finishing Touches
Step 1: Vary Intensity Adjust glitter concentration for balance.
Step 2: Add Accents Incorporate studs for texture.
Step 3: Maintain Shine Reapply topcoat every few days.
Why It Works
The reverse glitter focus adds a fresh, glamorous twist.
This unique design is perfect for standout styling, offering a bold yet elegant finish. It’s a creative highlight.
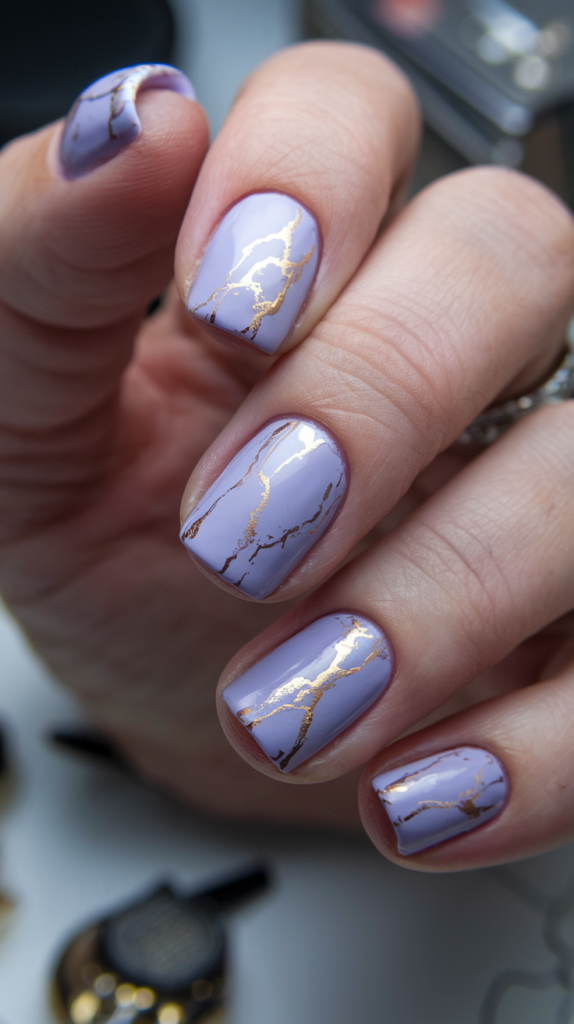
34. Soft Gold and Lavender Marble Serenity
Creating the Design
Soft gold and lavender marble serenity blends gentle tones with metallic veins. This luxurious design is perfect for spring or elegant events.
Step 1: Prepare the Base Start with a lavender base, applying two coats and letting it dry completely.
Step 2: Add Veins Use a brush to paint gold veins in random patterns.
Step 3: Seal the Design Finish with a glossy top coat to enhance shine.
Finishing Touches
Step 1: Vary Vein Size Mix bold and delicate veins for depth.
Step 2: Add Accents Incorporate glitter for sparkle.
Step 3: Maintain Detail Reapply topcoat to preserve the marble effect.
Why It Works
The lavender-gold combination offers soft luxury with glam.
This design is perfect for elegant, seasonal styling, providing a serene and luxurious finish. It’s a gentle masterpiece.
35. Bold Gold Tribal Pattern Power

Creating the Design
Bold gold tribal pattern power features striking geometric designs with metallic accents. This eye-catching style is perfect for making a bold fashion statement.
Step 1: Prepare the Base Start with a white or clear base, applying two coats and letting it dry completely.
Step 2: Add Patterns Use a brush to paint gold tribal designs like triangles or zigzags.
Step 3: Seal the Design Finish with a glossy top coat to enhance shine.
Finishing Touches
Step 1: Vary Patterns Mix shapes for a dynamic effect.
Step 2: Add Accents Incorporate studs for texture.
Step 3: Shape the Nails Opt for stiletto or square shapes.
Why It Works
The bold tribal patterns with gold add a striking, cultural flair.
This design is perfect for making a bold fashion statement, offering a powerful and stylish finish. It’s a cultural celebration on your nails.
Conclusion
Gold nail art is a versatile and sophisticated choice that enhances any style or occasion.
From delicate gold leaf designs to bold chrome finishes, these 35 creations offer endless inspiration. Experiment with these stunning looks to let your nails sparkle with golden brilliance!