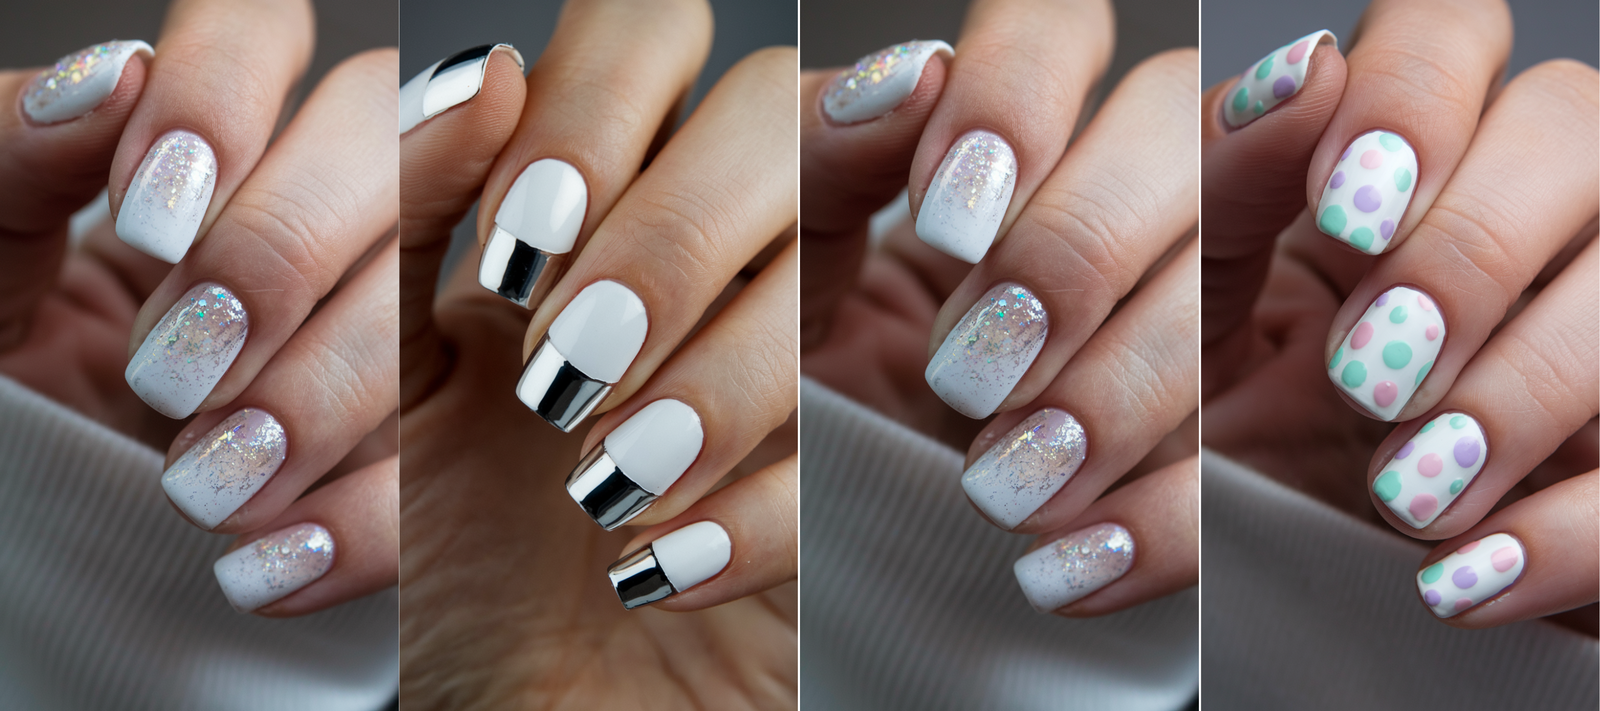
White nail art designs have long been celebrated in the beauty world for their versatility, offering a clean and sophisticated foundation that effortlessly transitions from minimalist elegance to bold, artistic statements.
Whether you prefer the subtle charm of soft stripes or the luxurious shimmer of marble and gold, white nails serve as the ultimate canvas for creativity.
In this blog, we’ll dive into 35 stunning white nail art designs, showcasing a range of techniques and inspirations to elevate your next manicure.
From sleek geometric shapes to delicate lace patterns and playful polka dots, these designs cater to every style and occasion, ensuring your nails make a lasting impression.
1. Subtle Stripes Nail Art

Elevate your nails with the refined simplicity of Subtle Stripes Nail Art.
This design blends a soft neutral base with minimalist white stripes, offering a timeless look that exudes understated elegance.
Perfect for everyday wear or special occasions, it’s a chic choice for those who value sophistication without the fuss.
Creating the Striped Effect
Step 1: Apply the Base Color
Begin with a soft neutral polish like pale pink or beige as your base. Let it dry fully to create a smooth foundation.
Step 2: Add Thin White Stripes
Use a fine nail art brush or striping tape to apply thin white stripes over the base. Space them evenly for a polished, cohesive look.
Step 3: Vary the Stripe Width
For a dynamic twist, alternate stripe widths—wider on some nails, thinner on others—to add subtle visual interest.
Step 4: Let It Dry
Allow the design to dry completely before sealing it with a top coat.
Finishing Touches: Glossy Shine
Step 1: Apply a Top Coat
Finish with a high-gloss top coat to protect the stripes and lend your nails a shiny, polished finish that lasts.
Why It Works
Subtle Stripes Nail Art offers a modern take on classic elegance with its clean lines and neutral palette.
The variation in stripe widths keeps the design engaging yet understated, while the glossy top coat ties it all together, making it versatile for any occasion.
2. Glittering French Tip Nail Art
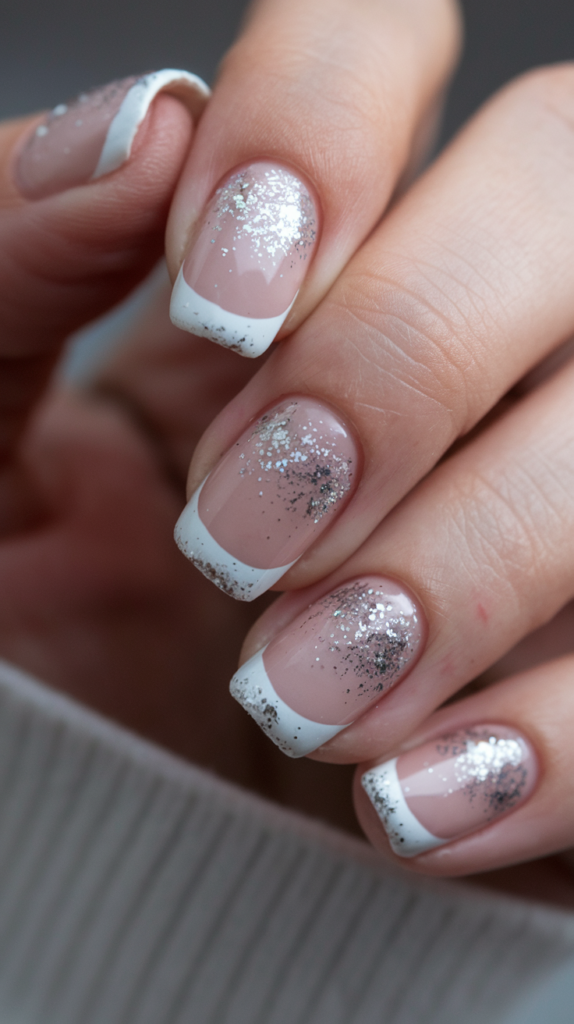
Reimagine the classic French manicure with Glittering French Tip Nail Art, adding a touch of glamour to a timeless favorite.
The sleek white tips paired with a soft pink base and sparkling silver glitter create a sophisticated yet dazzling look.
Ideal for formal events or daily elegance, this design brings a subtle shimmer to your fingertips.
Creating the Glittered French Tips
Step 1: Apply the Base Color
Start with a nude or soft pink polish for a clean, natural base that complements the white tips.
Step 2: Create the French Tips
Using white polish, paint the tips of your nails with a smooth, neat line for that classic French effect.
Step 3: Add Silver Glitter
While the white tips are still wet, lightly apply fine silver glitter along the edges for a sparkling finish.
Step 4: Let It Dry
Allow the design to dry fully to avoid smudging the glitter.
Finishing Touches: Glossy Seal
Step 1: Apply a Top Coat
Seal the design with a glossy top coat to protect the glitter and enhance the shine.
Why It Works
Glittering French Tip Nail Art elevates the traditional French manicure with a chic sparkle.
The soft pink base and white tips offer timeless elegance, while the silver glitter adds just the right amount of glamour, making it perfect for any sophisticated setting.
3. Modern Geometric Nail Art
Modern Geometric Nail Art brings a bold, contemporary edge to your nails with sharp shapes and striking contrasts.
The crisp white base paired with black geometric patterns creates a minimalist yet edgy design that’s perfect for art lovers.
This look is ideal for those seeking a sleek, modern style with a creative twist.
Creating Bold Geometric Shapes
Step 1: Apply the Base Color
Start with a clean white polish as your base to make the black patterns pop.
Step 2: Outline the Geometric Shapes
Use a fine nail art brush or striping tape to draw shapes like triangles and lines across each nail.
Step 3: Fill in the Shapes
Fill the outlined shapes with black polish, keeping the lines sharp for a bold contrast.
Step 4: Let It Dry
Allow the design to dry completely to maintain crisp lines.
Finishing Touches: Polished Shine
Step 1: Apply a Top Coat
Finish with a glossy top coat to seal the design and add a shiny, polished look.
Why It Works
Modern Geometric Nail Art stands out with its striking black-and-white contrast and artistic edge.
The geometric patterns offer a fresh, creative vibe, while the glossy finish ensures a sleek, sophisticated result.
4. Marble and Gold Nail Art
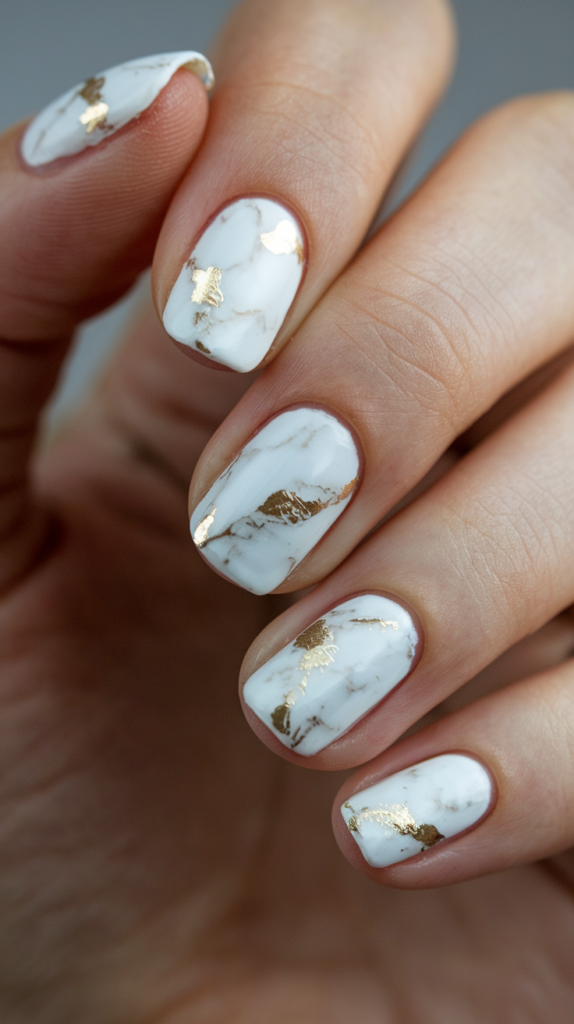
Marble and Gold Nail Art combines the timeless elegance of marble with the opulent shine of gold accents.
The soft white marble base and scattered gold foil create a chic, luxurious look perfect for formal events or everyday sophistication.
Creating the Marble Effect
Step 1: Apply the Base Color
Begin with a white polish as your base for the marble effect.
Step 2: Create the Marble Swirls
While the white is wet, swirl in gray or beige polish with a fine brush to mimic natural marble veins.
Step 3: Let It Dry
Allow the marble design to dry fully before adding accents.
Adding Gold Accents
Step 1: Apply Gold Foil
Place small pieces of gold foil delicately around the marble veins or in random spots for a luxe touch.
Step 2: Seal the Design
Apply a top coat to secure the gold and smooth the finish.
Why It Works
Marble and Gold Nail Art offers a refined, luxurious aesthetic with its organic marble patterns and radiant gold accents.
The white base and gold foil create a striking yet elegant contrast, perfect for a timeless, chic manicure.
5. Silver Glitter Ombre Nail Art
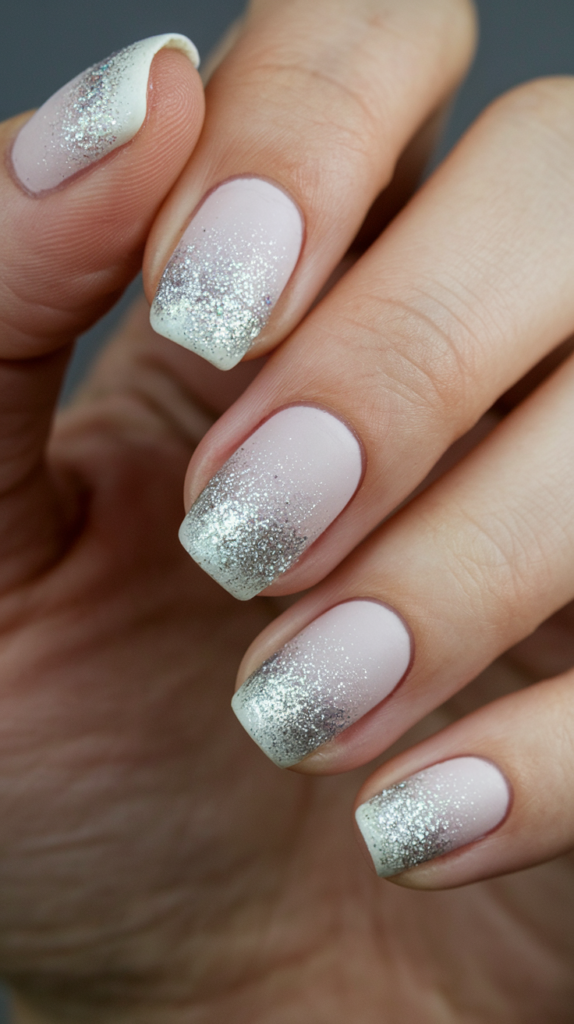
Silver Glitter Ombre Nail Art blends subtle nude tones with a shimmering silver gradient for a delicate, elegant finish.
This chic design is perfect for any occasion where you want a touch of sparkle with sophistication.
Creating the Silver Ombre Effect
Step 1: Apply the Base Color
Start with a nude or light pink polish for a natural, polished base.
Step 2: Create the Ombre Gradient
Using a makeup sponge, dab silver glitter polish onto the tips, blending downward for a seamless transition.
Step 3: Let It Dry
Allow the ombre to dry completely to preserve the gradient.
Finishing Touches: Glossy Shine
Step 1: Apply a Top Coat
Seal with a clear top coat to enhance the sparkle and ensure a smooth finish.
Why It Works
Silver Glitter Ombre Nail Art merges understated elegance with dazzling glitter.
The soft gradient and sparkling tips create a chic, eye-catching look that’s subtle yet glamorous.
6. Lace Floral Nail Art

Lace Floral Nail Art offers a romantic, delicate design with intricate white lace over a nude base.
Perfect for weddings or romantic occasions, this elegant look blends sophistication with charm.
Creating the Lace Floral Pattern
Step 1: Apply the Base Color
Begin with a nude or light pink polish as a neutral backdrop.
Step 2: Create the Lace Design
Using a fine brush, paint white lace patterns like floral vines along the edges.
Step 3: Let It Dry
Allow the lace to dry fully to avoid smudging.
Finishing Touches: Glossy Seal
Step 1: Apply a Top Coat
Seal with a clear top coat to protect the intricate pattern and add shine.
Why It Works
Lace Floral Nail Art combines timeless lace with a soft base for a graceful, feminine look.
The delicate floral details shine against the nude backdrop, enhanced by a glossy finish.
7. Pearl-Encrusted Nail Art
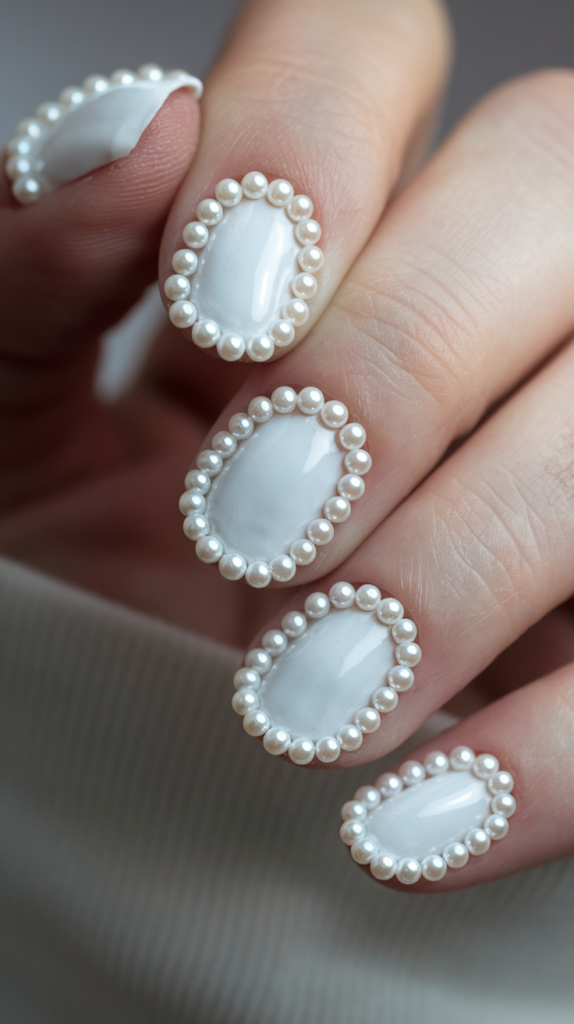
Pearl-Encrusted Nail Art merges smooth white polish with the luxurious shimmer of pearls.
Ideal for special occasions, this refined design adds a sophisticated sparkle to your nails.
Creating the Pearl-Encrusted Look
Step 1: Apply the Base Color
Start with a glossy white polish for a chic foundation.
Step 2: Outline the Oval Shapes
Outline oval shapes on each nail with a fine brush.
Step 3: Attach the Pearls
Place small pearls along the outlines while the base is tacky.
Step 4: Let It Dry
Allow the design to dry fully to secure the pearls.
Finishing Touches: Glossy Seal
Step 1: Apply a Top Coat
Seal with a clear top coat to protect the pearls and add shine.
Why It Works
Pearl-Encrusted Nail Art exudes luxury with its white base and glossy pearls.
The oval arrangement adds a soft, feminine touch, perfect for elegant occasions.
8. Polka Dot Delight Nail Art
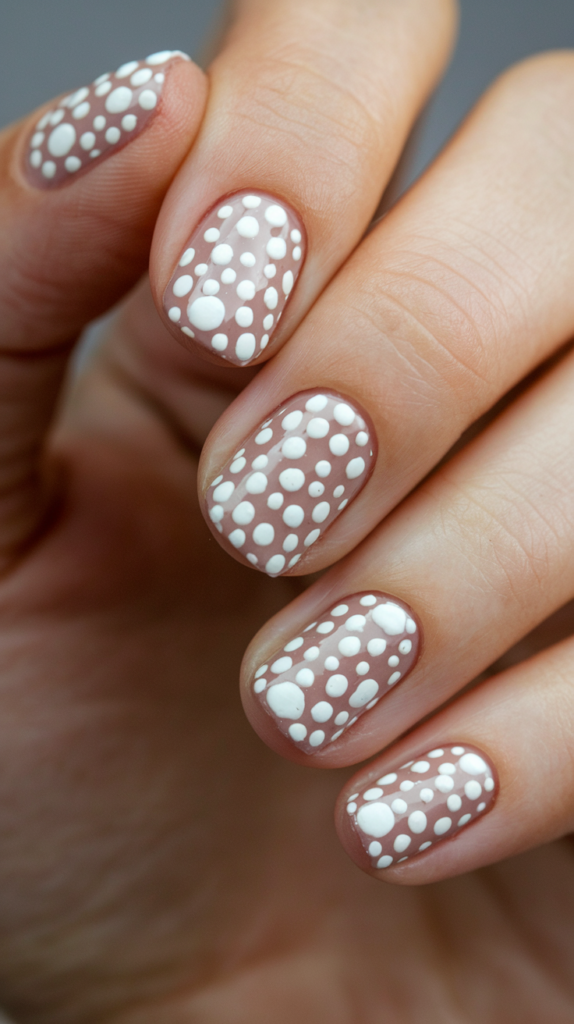
Polka Dot Delight Nail Art brings a fun, fresh vibe with white dots over a neutral base.
This whimsical design is perfect for those who love cheerful, minimalist patterns.
Creating the Polka Dot Design
Step 1: Apply the Base Color
Start with a light beige or nude polish as your base.
Step 2: Create the Polka Dots
Use a dotting tool to place white dots of varying sizes across the nails.
Step 3: Let It Dry
Allow the dots to dry fully to avoid smudging.
Finishing Touches: Glossy Shine
Step 1: Apply a Top Coat
Seal with a clear top coat for a glossy, lasting finish.
Why It Works
Polka Dot Delight Nail Art adds playful charm with its bold white dots on a soft base.
The glossy finish keeps it fresh and trendy, ideal for a lighthearted manicure.
9. Geometric Chevron Nail Art
Geometric Chevron Nail Art offers a stylish, modern look with sharp white chevron stripes over a neutral base.
This design is perfect for those who love minimalistic yet trendy nail art.
Creating the Chevron Design
Step 1: Apply the Base Color
Start with a soft neutral or mauve polish as your base.
Step 2: Draw the Chevron Stripes
Use a fine brush to draw white chevron stripes from the edges toward the center.
Step 3: Add More Layers
Apply additional layers of white polish to the stripes, letting each dry for a bold effect.
Step 4: Let It Dry
Allow the design to dry fully for crisp lines.
Finishing Touches: Glossy Seal
Step 1: Apply a Top Coat
Seal with a clear top coat for a glossy, smooth finish.
Why It Works
Geometric Chevron Nail Art blends modern style with minimalist elegance.
The clean chevron lines and glossy finish create a sleek, sophisticated look.
10. Chrome French Tip Nail Art
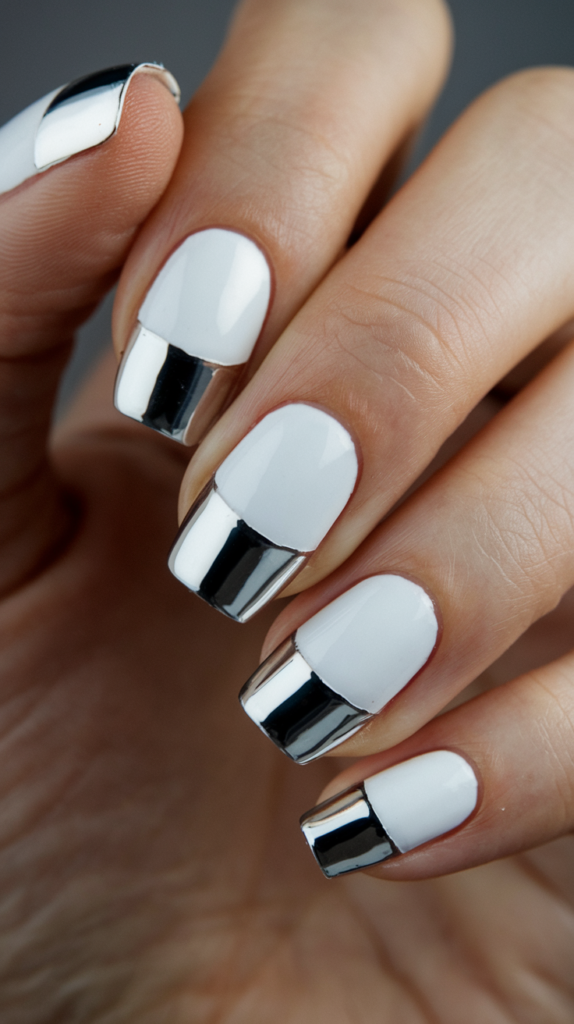
Chrome French Tip Nail Art adds a futuristic twist to the classic French manicure with sleek chrome tips.
The white base and reflective chrome create a bold, luxurious look for any occasion.
Creating the Chrome Tip Design
Step 1: Apply the Base Color
Start with a clean white polish as your base.
Step 2: Create the French Tips
Paint the tips with shiny chrome polish for a smooth, modern finish.
Step 3: Let It Dry
Allow the chrome tips to dry fully to avoid smudging.
Finishing Touches: Glossy Shine
Step 1: Apply a Top Coat
Seal with a glossy top coat to protect the chrome and enhance the shine.
Why It Works
Chrome French Tip Nail Art fuses timeless elegance with a modern edge.
The white base and chrome tips create a trendy, high-fashion look with a glossy finish.
11. Glitter Ombre French Tip Nail Art
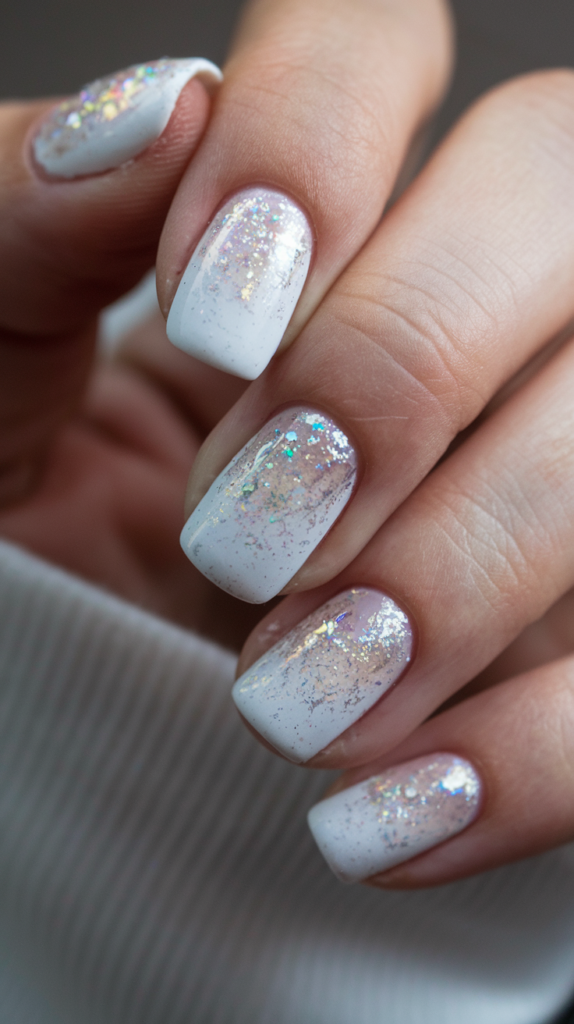
Glitter Ombre French Tip Nail Art offers a stunning twist on the French manicure with a sparkling ombre effect.
The white tips fade into glitter, creating an ethereal look perfect for glamour without excess.
Creating the Glitter Ombre Effect
Step 1: Apply the Base Color
Begin with a clean white polish as your base.
Step 2: Apply the Glitter
Use a sponge to dab fine glitter onto the tips, blending it into the white base.
Step 3: Let It Dry
Allow the ombre to dry fully to maintain the gradient.
Finishing Touches: Glossy Seal
Step 1: Apply a Top Coat
Seal with a clear top coat to secure the glitter and add shine.
Why It Works
Glitter Ombre French Tip Nail Art adds chic sparkle to a classic style.
The gradient glitter offers a fresh, modern look with a glossy finish, ideal for any event.
12. Zebra Stripes Nail Art
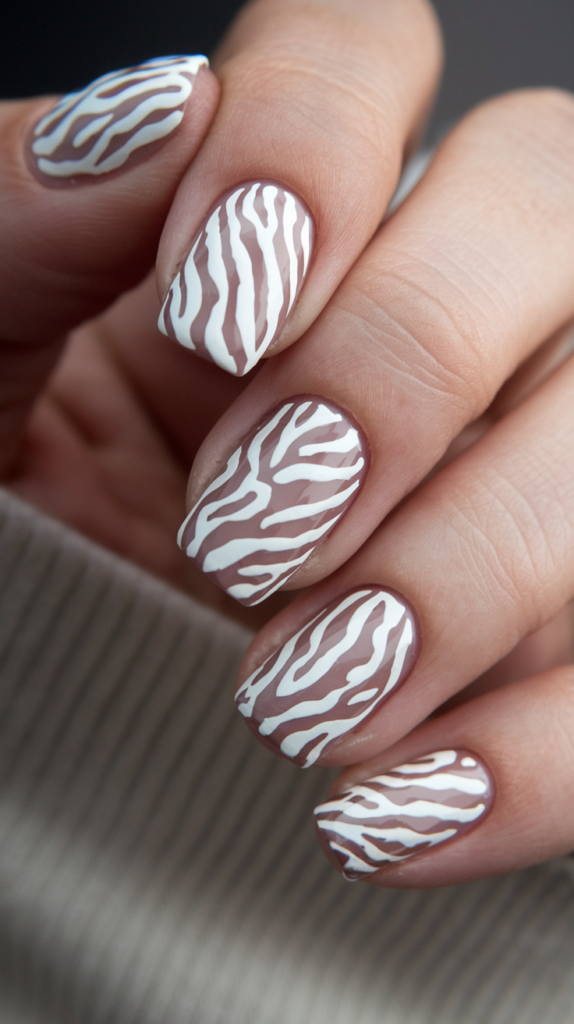
Zebra Stripes Nail Art brings a bold, wild elegance with contrasting white and brown stripes.
This stylish design mimics the iconic zebra pattern, perfect for making a statement.
Creating the Zebra Stripe Design
Step 1: Apply the Base Color
Start with a neutral brown polish as your base.
Step 2: Add the White Stripes
Paint irregular white stripes over the brown with a fine brush.
Step 3: Let It Dry
Allow the stripes to dry fully before sealing.
Finishing Touches: Glossy Shine
Step 1: Apply a Top Coat
Seal with a glossy top coat to enhance the shine and protect the design.
Why It Works
Zebra Stripes Nail Art stands out with its bold contrast and natural, edgy vibe.
The glossy finish adds a polished touch to the wild design.
13. Swirling Marble Nail Art
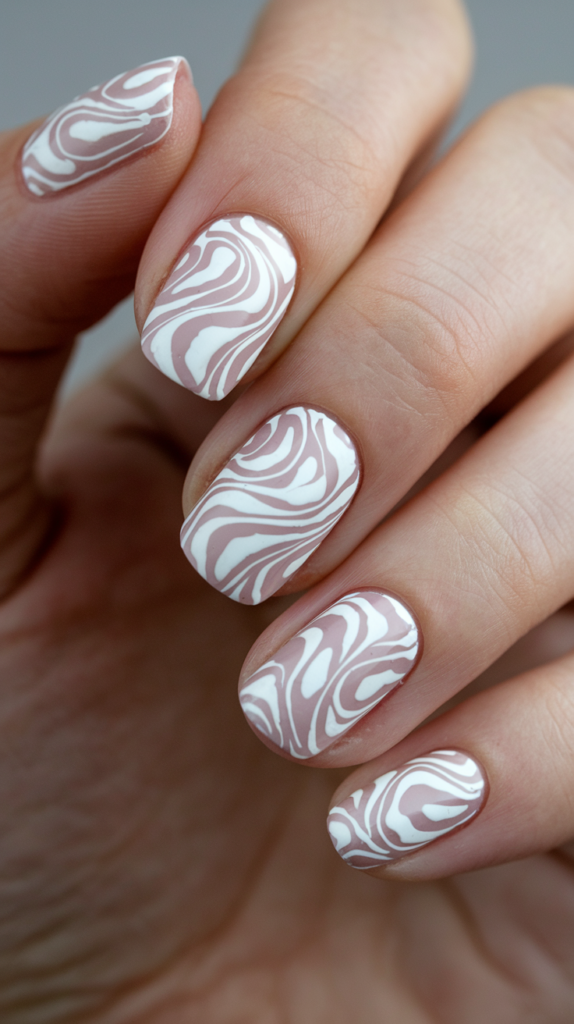
Swirling Marble Nail Art offers an elegant marble effect with white and light brown swirls.
This timeless design brings calm sophistication to any occasion.
Creating the Swirling Marble Effect
Step 1: Apply the Base Color
Start with a neutral beige or light brown polish.
Step 2: Create the Swirls
Swirl white polish into the wet base with a fine brush.
Step 3: Blend the Swirls
Gently blend the colors for a smooth marble effect.
Step 4: Let It Dry
Allow the design to dry fully.
Finishing Touches: Glossy Shine
Step 1: Apply a Top Coat
Seal with a glossy top coat for a radiant finish.
Why It Works
Swirling Marble Nail Art combines elegant hues with flowing lines for a refined look.
The glossy finish enhances the marble texture, making it versatile and chic.
14. Rose Gold Geometric Nail Art
Rose Gold Geometric Nail Art pairs white with luxurious rose gold for a modern, stylish design.
This chic look is perfect for those who love metallic elegance.
Creating the Rose Gold Geometric Design
Step 1: Apply the Base Color
Start with a clean white polish as your base.
Step 2: Add Geometric Shapes
Use a fine brush to paint rose gold geometric shapes like lines or triangles.
Step 3: Let It Dry
Allow the design to dry fully.
Finishing Touches: Glossy Shine
Step 1: Apply a Top Coat
Seal with a glossy top coat for a polished finish.
Why It Works
Rose Gold Geometric Nail Art blends sophistication with a trendy metallic touch.
The white base and rose gold shapes create a striking, elegant contrast.
15. Checkerboard Nail Art

Checkerboard Nail Art transforms your nails into a chic, playful masterpiece with a timeless twist.
The bold white and brown squares form a perfect grid, blending fun with structure for a versatile look.
Ideal for casual outings or trendy events, this design’s neutral tones and modernized classic pattern offer a refined yet youthful vibe.
Creating the Checkerboard Design
Step 1: Apply the Base Color
Begin with a light brown or beige polish as your base. Apply it evenly across all nails and let it dry completely.
Step 2: Draw the Checkerboard Pattern
Using a fine nail art brush or striping tape, paint white squares over the base. Start with horizontal or vertical lines, then fill in alternating squares to form the checkerboard.
Step 3: Perfect the Edges
Use a small brush to refine the edges, ensuring each square is crisp and uniform for a clean, symmetrical finish.
Step 4: Let It Dry
Allow the design to dry fully before sealing it with a top coat.
Finishing Touches: Glossy Shine
Step 1: Apply a Top Coat
Finish with a glossy top coat to protect the checkerboard pattern and add a sleek, shiny finish.
Why It Works
Checkerboard Nail Art shines with its bold geometric contrast, blending white and brown for a trendy yet timeless appeal.
The structured grid adds a playful sophistication, while the glossy top coat enhances durability and shine, making it a standout choice for any occasion.
16. Winter Wonderland Snowflake Nail Art
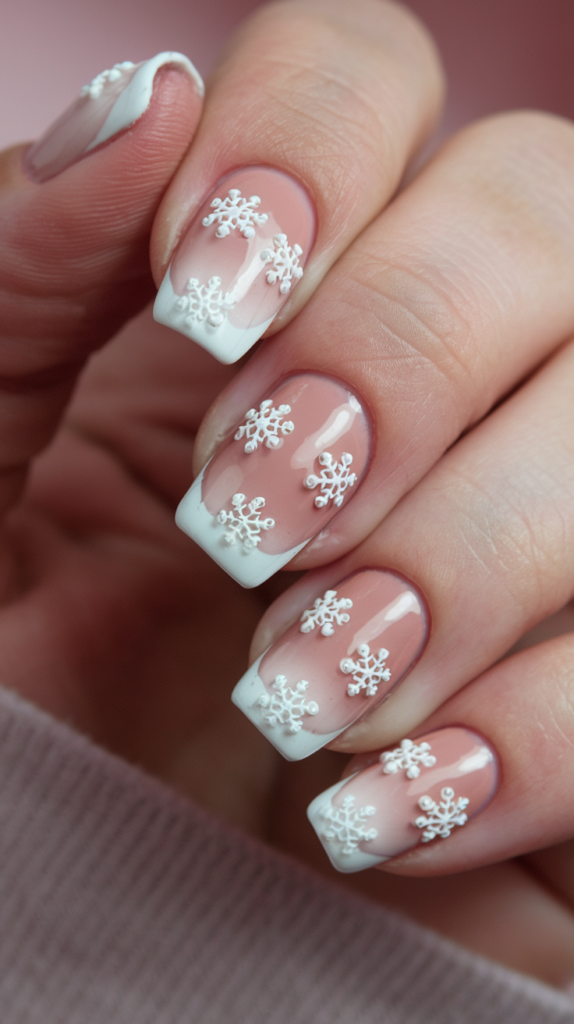
Winter Wonderland Snowflake Nail Art captures the serene magic of a snowy day with delicate white snowflakes on a frosty base.
This design brings the charm of winter to your fingertips, perfect for holiday festivities or any cold-weather occasion.
The soft palette and intricate snowflake details evoke coziness and elegance, adding a whimsical touch to your style.
Creating the Snowflake Design
Step 1: Apply the Base Color
Start with a pale blue or soft white polish as your base. Apply two coats for even coverage and let it dry fully.
Step 2: Draw the Snowflakes
Using a fine nail art brush, paint delicate white snowflakes. Begin with the main arms, then add smaller branches for a lacy effect.
Step 3: Add Sparkles
Enhance the design with small glitter or holographic accents around the snowflakes to mimic glistening snow.
Step 4: Let It Dry
Allow the snowflakes and accents to dry completely before sealing.
Finishing Touches: Glossy Shine
Step 1: Apply a Top Coat
Finish with a glossy top coat to protect the delicate snowflakes and boost the sparkle.
Why It Works
Winter Wonderland Snowflake Nail Art enchants with its intricate snowflakes set against a soft, wintry base.
The cool tones and glitter accents create a magical, festive vibe, while the glossy finish ensures a polished, lasting look perfect for winter celebrations.
17. Chic Cut-Out White Nail Art

Chic Cut-Out White Nail Art delivers a minimalist yet striking design with a modern edge.
The clean white base paired with angular cut-out patterns creates a sophisticated, eye-catching look.
Perfect for those who love contemporary style with a hint of elegance, this design offers a fresh twist on classic white nails.
Creating the Cut-Out Design
Step 1: Apply the Base Color
Begin with a smooth coat of white polish across all nails. Ensure it’s even and opaque, then let it dry fully.
Step 2: Draw the Cut-Out Shapes
Use a fine nail art brush or striping tape to create angular, asymmetrical cut-out shapes on each nail, such as triangles or curves.
Step 3: Fill in the Cut-Out Areas
Leave the cut-out sections bare or apply a subtle nude polish for contrast, highlighting the shapes.
Step 4: Let It Dry
Allow the design to dry completely before finishing.
Finishing Touches: Glossy Shine
Step 1: Apply a Top Coat
Seal with a glossy top coat for a smooth, polished finish that enhances the design’s sophistication.
Why It Works
Chic Cut-Out White Nail Art blends minimalist elegance with bold, modern shapes.
The white base keeps it timeless, while the cut-out details add a contemporary flair, finished with a glossy shine for a sleek, lasting look.
18. Crystal Elegance Nail Art

Crystal Elegance Nail Art elevates your nails with a blend of timeless French tips and dazzling rhinestone accents.
The crisp white tips and strategically placed crystals create a glamorous, sophisticated look ideal for special occasions or chic daily wear.
This design merges classic style with modern sparkle, offering a refined yet striking aesthetic.
Creating the Crystal Elegance Design
Step 1: Apply the Base Color
Start with a clear or nude polish as your base for a clean, natural canvas.
Step 2: Add the French Tip
Paint white polish along the tips, ensuring a neat, even curve. Let it dry fully.
Step 3: Apply the Rhinestones
Using a dotting tool, place rhinestones along the French tip edges in a crescent pattern, varying sizes for dimension.
Step 4: Secure the Rhinestones
Apply a clear top coat over the rhinestones to lock them in place.
Finishing Touches: Glossy Shine
Step 1: Apply a Final Top Coat
Finish with a glossy top coat across all nails for a smooth, radiant finish.
Why It Works
Crystal Elegance Nail Art balances timeless French tips with luxurious rhinestone sparkle.
The nude base and white tips offer understated elegance, while the crystals add glamour, sealed with a glossy finish for a polished, standout look.
19. Sparkling French Tip Nail Art
Sparkling French Tip Nail Art reimagines the classic French manicure with vibrant, glittery tips.
The nude base paired with shimmering rainbow glitter creates an elegant yet playful design perfect for glamorous occasions.
This look adds a touch of magic and radiance, making your nails a sparkling focal point.
Creating the Sparkling French Tip Design
Step 1: Apply the Base Color
Begin with a soft nude polish, applying an even coat and letting it dry completely.
Step 2: Apply the Glitter to the Tips
Use a fine brush or glitter polish to apply a thin layer of rainbow glitter to the nail tips, creating a gradient effect.
Step 3: Blend the Glitter
Gently tap the glittered tips with a brush to blend into the nude base for a smooth ombré transition.
Step 4: Let It Dry
Allow the glitter to dry fully to avoid smudging.
Finishing Touches: Glossy Shine
Step 1: Apply a Top Coat
Seal with a glossy top coat to smooth the glitter and enhance the shine.
Why It Works
Sparkling French Tip Nail Art fuses classic elegance with a playful glitter twist.
The nude base maintains sophistication, while the rainbow glitter adds a fun, radiant pop, finished with a glossy coat for a sleek, lasting design.
20. Modern French Tip Nail Art
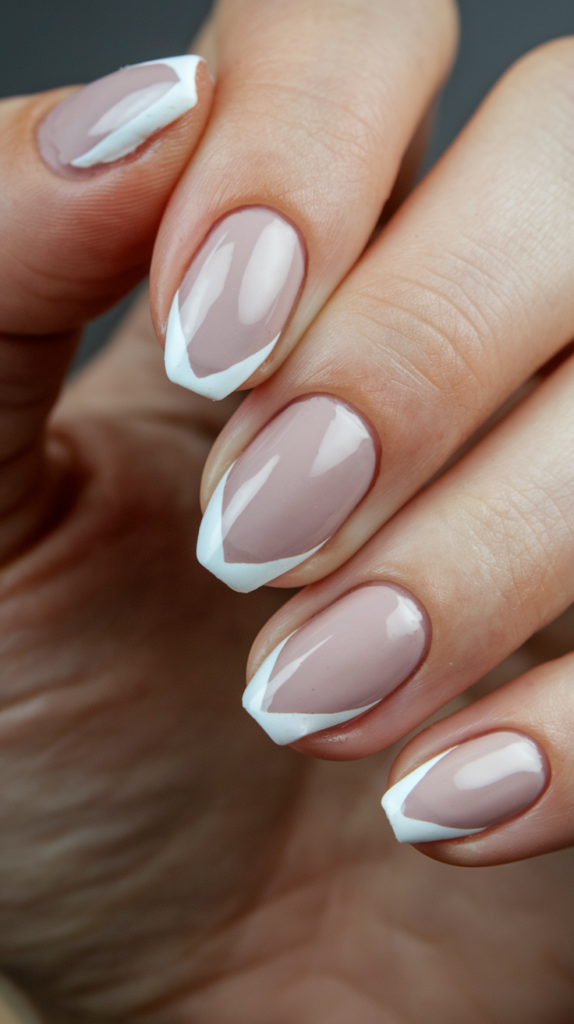
Modern French Tip Nail Art refreshes the traditional French manicure with sharp, angular white tips.
The soft nude base and geometric lines create a bold yet sophisticated look for those seeking a contemporary edge.
This design offers a chic, fashionable take on a classic style.
Creating the Modern French Tip Design
Step 1: Apply the Base Color
Start with a neutral beige or nude polish, ensuring a smooth, opaque coat that dries fully.
Step 2: Create the Angular Tips
Using a fine brush, paint white polish on the tips in sharp, geometric shapes like triangles or angled curves.
Step 3: Perfect the Edges
Refine the lines with a small brush for crisp, symmetrical angles.
Step 4: Let It Dry
Allow the design to dry completely before sealing.
Finishing Touches: Glossy Shine
Step 1: Apply a Top Coat
Finish with a glossy top coat for a sleek, polished look that protects the design.
Why It Works
Modern French Tip Nail Art redefines a classic with its bold, angular tips.
The nude base keeps it elegant, while the geometric white tips add a modern flair, enhanced by a glossy finish for a chic, lasting style.
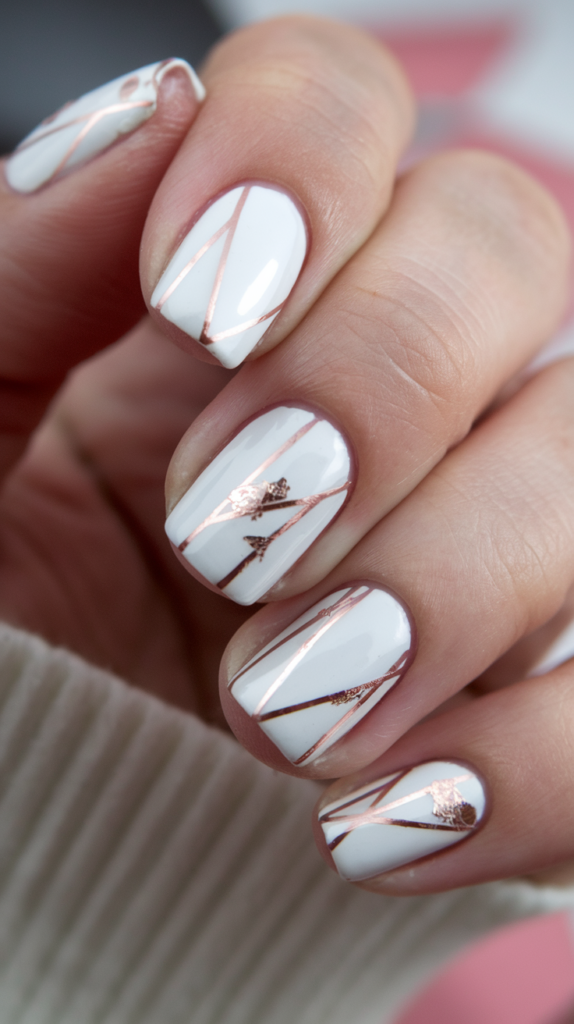
21. Golden Stripes Nail Art
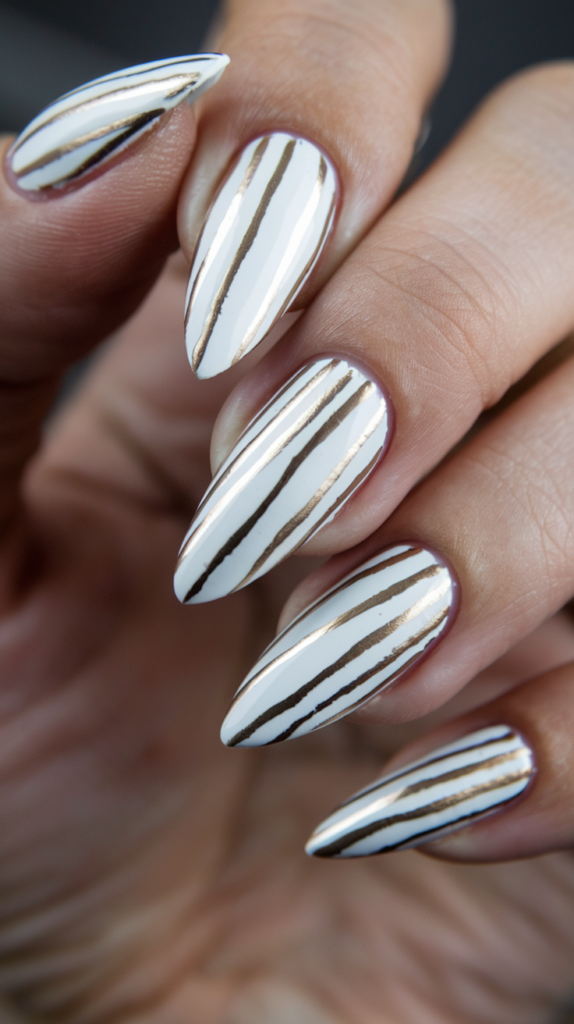
Golden Stripes Nail Art pairs sleek white nails with bold, metallic gold stripes for a sophisticated, high-fashion look.
Ideal for almond-shaped nails, this design blends elegance with an edgy twist, perfect for special occasions or statement-making moments.
The contrast of gold against white creates a striking, luxurious effect.
Creating the Golden Stripes Design
Step 1: Apply the Base Color
Begin with a smooth, opaque white polish across all nails, letting it dry fully.
Step 2: Draw the Gold Stripes
Use a fine brush or gold striping tape to paint thin, crisp gold stripes—parallel, diagonal, or crisscrossed—across the nails.
Step 3: Let It Dry
Allow the gold stripes to dry completely to avoid smudging.
Finishing Touches: Glossy Shine
Step 1: Apply a Top Coat
Seal with a glossy top coat to protect the stripes and enhance the metallic shine.
Why It Works
Golden Stripes Nail Art dazzles with its elegant white base and luxurious gold accents.
The bold stripes create a high-impact, glamorous design, while the glossy finish ensures a polished, durable look perfect for standing out.
22. Pastel Polka Dot Nail Art
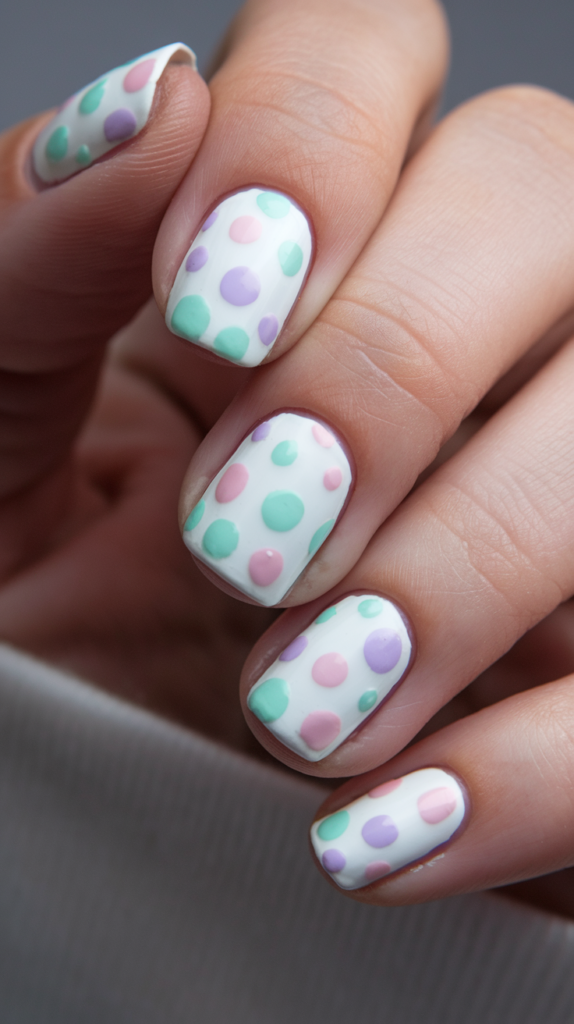
Pastel Polka Dot Nail Art brings a cheerful, playful vibe with soft pastel dots on a crisp white base.
Perfect for spring or summer, this whimsical design adds a subtle pop of color in a stylish, lighthearted way.
The mix of mint, lavender, and pink dots creates a trendy, gentle aesthetic.
Creating the Pastel Polka Dot Design
Step 1: Apply the Base Color
Start with a clean white polish, applying an even coat and letting it dry fully.
Step 2: Add the Polka Dots
Use a dotting tool or bobby pin to create large polka dots in pastel shades like mint, lavender, and pink, spacing them evenly.
Step 3: Vary the Size of the Dots
Add dots of different sizes for a dynamic, playful effect, avoiding overcrowding.
Step 4: Let It Dry
Allow the dots to dry completely before sealing.
Finishing Touches: Glossy Shine
Step 1: Apply a Top Coat
Finish with a glossy top coat to seal the dots and add a shiny, smooth finish.
Why It Works
Pastel Polka Dot Nail Art delights with its soft colors and fun pattern.
The white base highlights the pastel dots, creating a fresh, vibrant look, while the glossy finish ensures a polished, lasting design perfect for brightening any day.
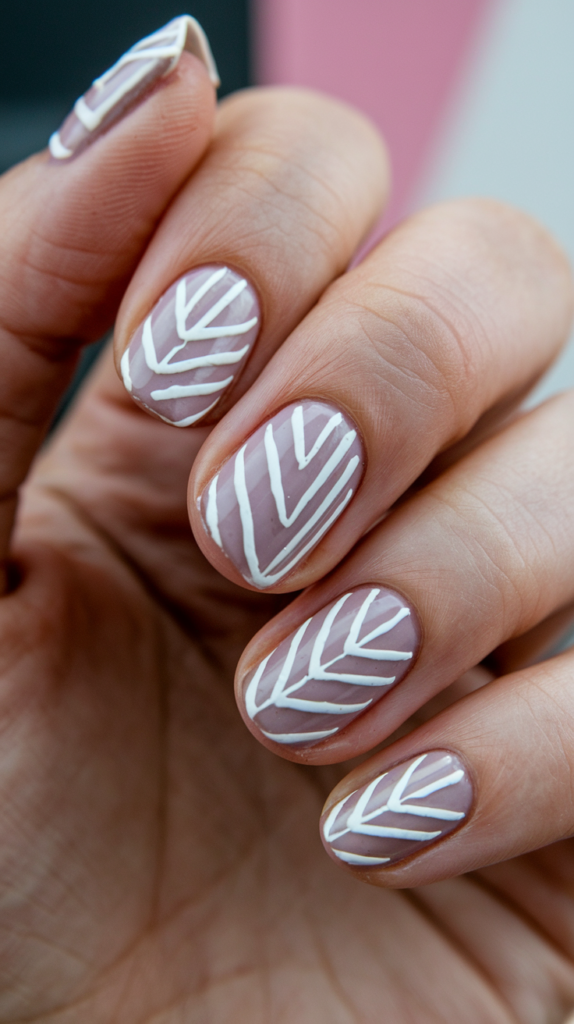
23. Leafy White Line Nail Art
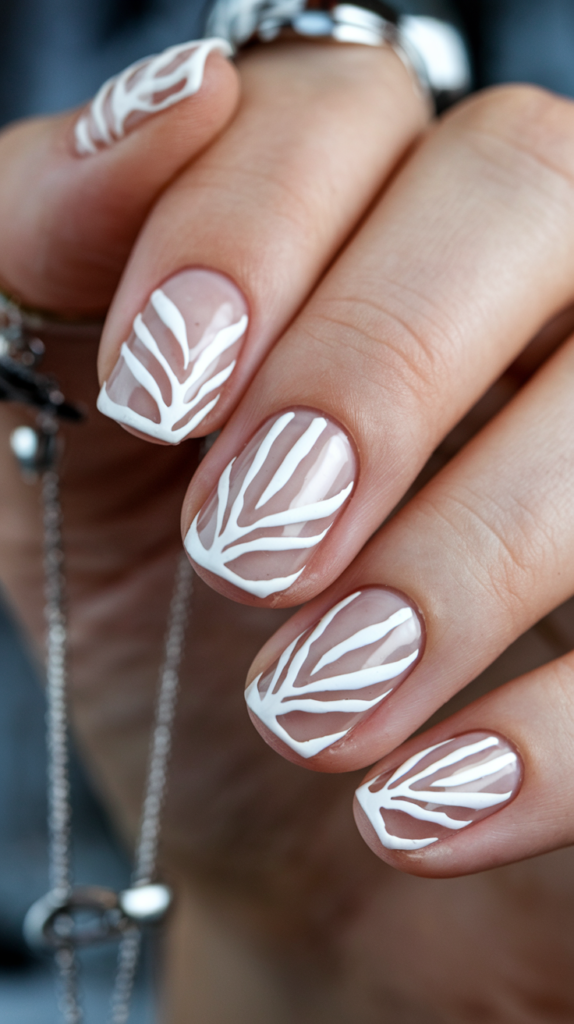
Leafy White Line Nail Art offers a sleek, botanical design with minimalist white leaf patterns on a nude base.
This sophisticated, nature-inspired look is perfect for those seeking a modern, airy style.
The delicate white leaves create a fresh, calming vibe suitable for any occasion.
Creating the Leafy White Line Design
Step 1: Apply the Base Color
Begin with a neutral beige or nude polish, applying an even coat and letting it dry fully.
Step 2: Draw the Leaf Shapes
Use a fine brush to paint white leaf shapes, starting with a central vein and adding branching lines.
Step 3: Vary the Leaf Sizes
Create leaves of different sizes and angles for a dynamic, natural effect.
Step 4: Let It Dry
Allow the design to dry completely before sealing.
Finishing Touches: Glossy Shine
Step 1: Apply a Top Coat
Finish with a glossy top coat to protect the leaves and add a shiny, smooth finish.
Why It Works
Leafy White Line Nail Art excels with its clean lines and subtle botanical charm.
The nude base offers a calming backdrop, while the white leaves add elegant simplicity, enhanced by a glossy finish for a chic, timeless look.
24. Pearlescent French Tip Nail Art
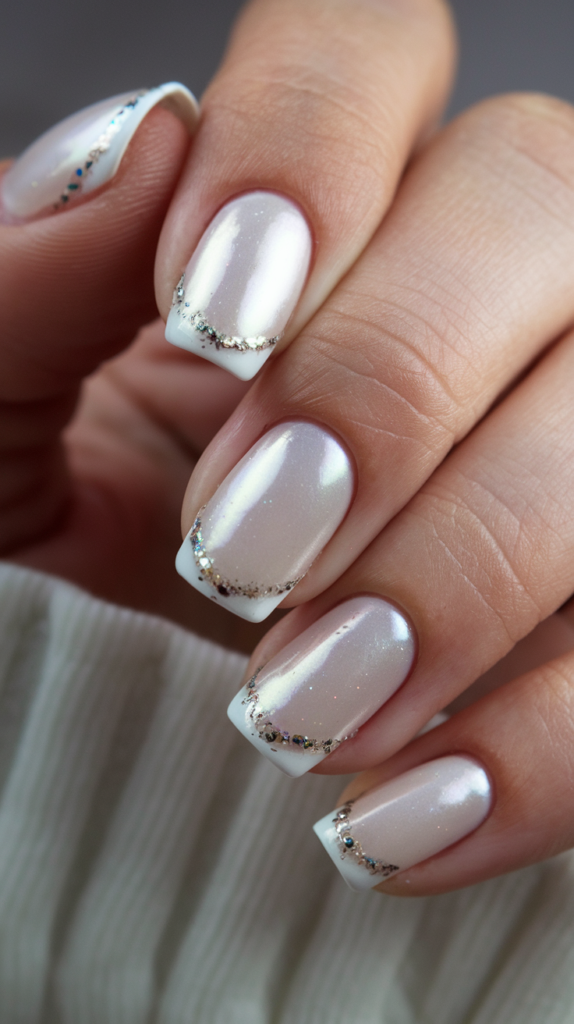
Pearlescent French Tip Nail Art elevates the classic French manicure with a luxurious pearly base and subtle glitter accents.
This ethereal design blends sophistication with sparkle, ideal for formal events or special occasions.
The shimmering tips add a refined, glamorous touch to a timeless style.
Creating the Pearlescent French Tip Design
Step 1: Apply the Base Color
Start with a sheer, pearlescent white polish, applying it evenly and letting it dry for a glowing effect.
Step 2: Create the French Tips
Paint white polish on the tips with a neat, curved line, keeping them narrow to let the pearl base shine.
Step 3: Add the Sparkle
Use a fine brush to apply tiny crystals or glitter along the tip edges in a gentle gradient.
Step 4: Let It Dry
Allow the design to dry fully to avoid smudging the accents.
Finishing Touches: Glossy Shine
Step 1: Apply a Top Coat
Seal with a glossy top coat to enhance the pearlescent shine and protect the design.
Why It Works
Pearlescent French Tip Nail Art merges classic elegance with modern shimmer.
The iridescent base and glitter accents create a luxurious, radiant look, finished with a glossy coat for a sophisticated, lasting design.
25. Studded White Nail Art

Studded White Nail Art blends a chic matte white base with edgy metallic studs for a bold, stylish statement.
This design merges toughness with elegance, making it perfect for those who love modern nail art with a refined twist.
The contrast between the soft white polish and sharp studs creates a striking, trendy look.
Creating the Studded White Design
Step 1: Apply the Base Color
Start with a matte white polish, applying a smooth, opaque coat across all nails and letting it dry fully.
Step 2: Place the Metallic Studs
Using a dotting tool or rhinestone picker, position small metallic studs along the nail edges in a uniform or slightly irregular pattern.
Step 3: Secure the Studs
Apply a clear top coat over the studs to lock them in place and ensure a smooth finish.
Step 4: Let It Dry
Allow the design to dry completely before adding the final touches.
Finishing Touches: Glossy Shine
Step 1: Apply a Final Top Coat
Finish with a glossy top coat to enhance the shine and protect the studs, amplifying their visual impact.
Why It Works
Studded White Nail Art excels by blending minimalism with bold accents.
The matte white base offers a timeless, sophisticated vibe, while the metallic studs add a modern edge, sealed with a glossy finish for a polished, durable look.
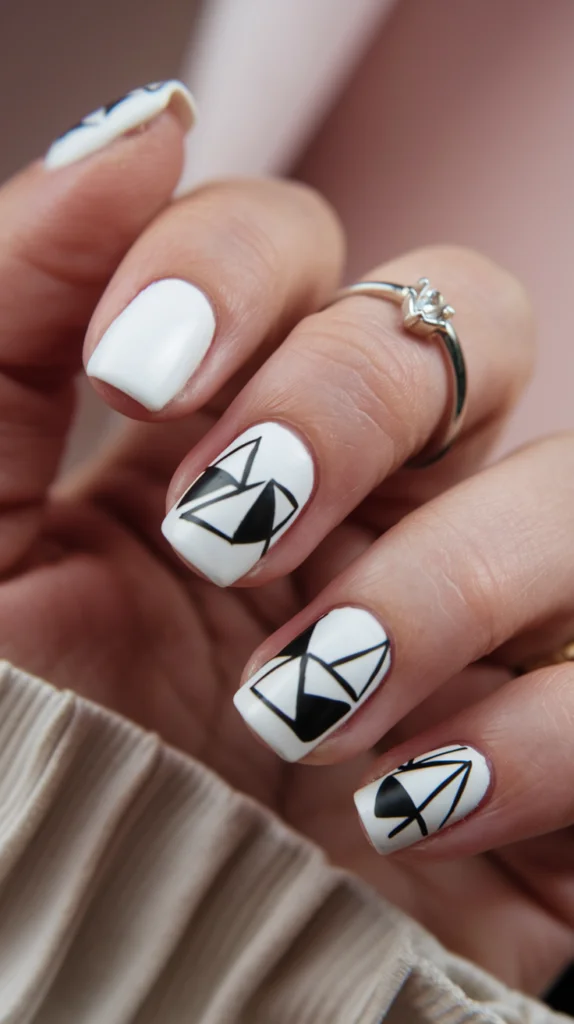
26. Abstract Black and White Nail Art
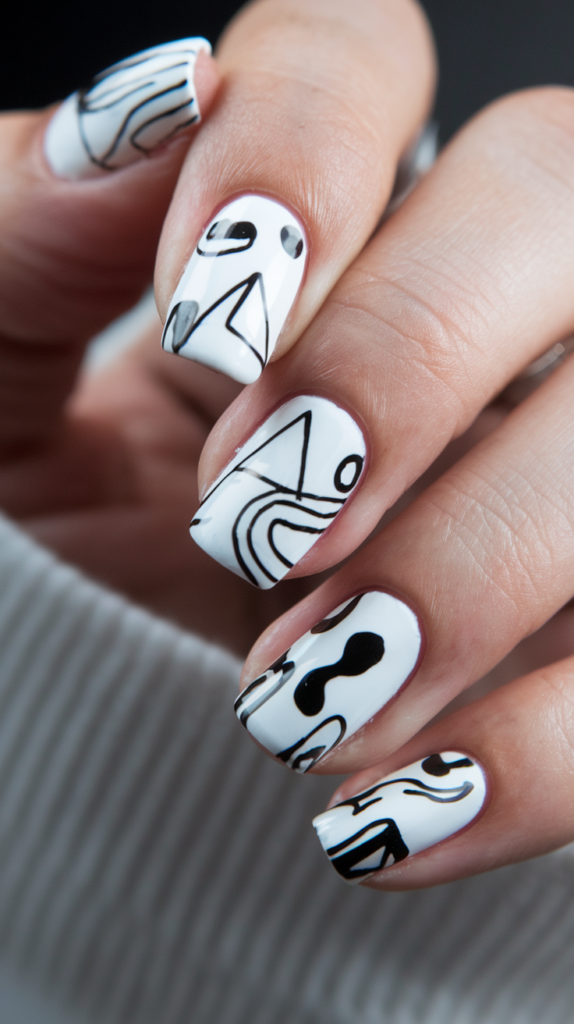
Abstract Black and White Nail Art delivers a creative, minimalist design with bold black lines over a smooth white base.
This playful yet sophisticated look features geometric shapes and fluid patterns, ideal for lovers of contemporary art.
The stark black-and-white contrast turns each nail into a striking mini canvas.
Creating the Abstract Design
Step 1: Apply the Base Color
Begin with a clean white polish, applying two coats for an even, opaque finish and letting it dry fully.
Step 2: Add the Abstract Lines
Use a fine nail art brush to paint black lines and shapes—curves, angles, or circles—varying thickness for a dynamic effect.
Step 3: Experiment with Shapes
Incorporate circles, triangles, or wavy lines, overlapping some for depth and interest.
Step 4: Let It Dry
Allow the design to dry completely before sealing to preserve the patterns.
Finishing Touches: Glossy Shine
Step 1: Apply a Top Coat
Finish with a glossy top coat to seal the lines and add a smooth, shiny finish.
Why It Works
Abstract Black and White Nail Art captivates with its bold simplicity and artistic flair.
The timeless black-and-white contrast paired with abstract shapes creates a modern, creative look, enhanced by a glossy finish for a sleek, lasting design.
27. Delicate White Floral Nail Art
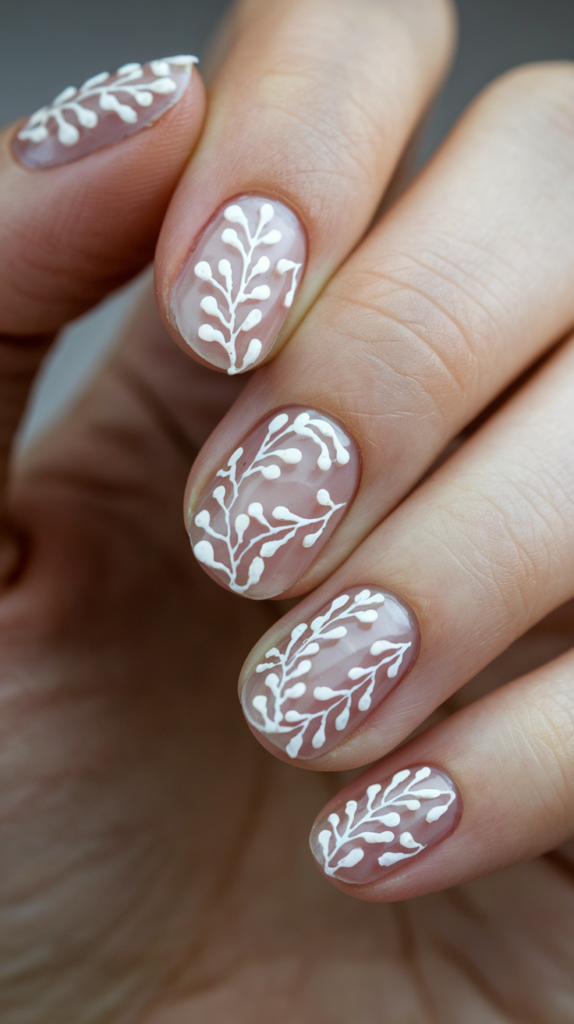
Delicate White Floral Nail Art brings a soft, nature-inspired elegance with white floral patterns over a nude base.
This subtle yet sophisticated design is perfect for casual or formal occasions, offering a feminine, airy touch.
The crisp white flowers and vines create a fresh, timeless beauty.
Creating the White Floral Design
Step 1: Apply the Base Color
Start with a neutral nude or beige polish, applying a smooth coat and letting it dry fully.
Step 2: Draw the Floral Pattern
Use a fine brush or dotting tool to paint thin white vines and small flowers, starting with stems and adding petals.
Step 3: Add Detail
Enhance with small dots in flower centers or along vines for texture and depth.
Step 4: Let It Dry
Allow the floral design to dry completely before sealing.
Finishing Touches: Glossy Shine
Step 1: Apply a Top Coat
Finish with a glossy top coat to protect the florals and add a radiant, smooth finish.
Why It Works
Delicate White Floral Nail Art shines with its simple, natural elegance.
The nude base highlights the white floral patterns for a graceful look, while the glossy finish ensures a polished, eye-catching design.
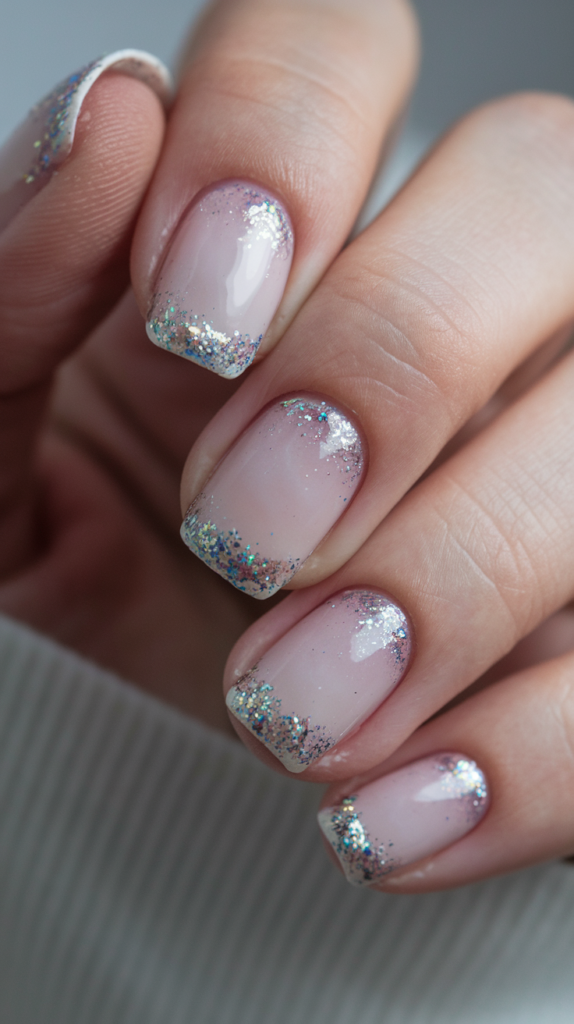
28. Silver Ombre French Tip Nail Art
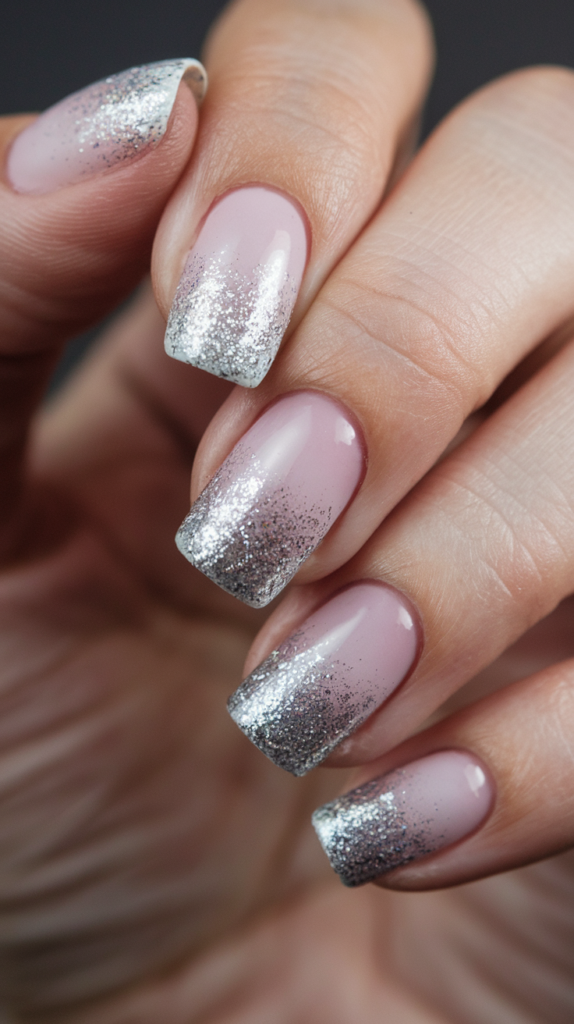
Silver Ombre French Tip Nail Art enhances the classic French manicure with a stunning silver glitter gradient.
This sophisticated design blends neutral tones with sparkling tips, perfect for both everyday wear and special events.
The seamless ombre effect adds an elegant, eye-catching flair.
Creating the Silver Ombre French Tip Design
Step 1: Apply the Base Color
Begin with a nude or soft pink polish, applying an even coat and letting it dry fully.
Step 2: Create the Ombre Gradient
Use a makeup sponge or fine brush to dab silver glitter polish onto the tips, blending downward for a smooth transition.
Step 3: Let It Dry
Allow the ombre design to dry completely to maintain the gradient.
Finishing Touches: Glossy Shine
Step 1: Apply a Top Coat
Seal with a glossy top coat to enhance the sparkle and smooth the finish.
Why It Works
Silver Ombre French Tip Nail Art dazzles with its elegant sparkle.
The nude base provides a subtle foundation, while the silver gradient adds glamour, finished with a glossy coat for a chic, lasting look.
29. Lace and Rhinestone French Tip Nail Art

Lace and Rhinestone French Tip Nail Art combines the classic French manicure with intricate white lace and sparkling rhinestones.
This romantic, glamorous design is ideal for weddings or any occasion calling for a luxurious, refined look.
The delicate lace and glimmering rhinestones create a stunning, elegant contrast.
Creating the Lace and Rhinestone Design
Step 1: Apply the Base Color
Start with a soft pink or nude polish, applying a smooth coat and letting it dry fully.
Step 2: Add the French Tips
Paint white polish on the tips, keeping them narrow and neat for a refined look.
Step 3: Paint the Lace Design
Use a fine brush to paint white lace patterns—swirls and florals—along the tip edges for a light, airy effect.
Step 4: Add Rhinestones
Place small rhinestones sparingly along the lace or tip edges for subtle sparkle.
Step 5: Let It Dry
Allow the design to dry completely before sealing.
Finishing Touches: Glossy Shine
Step 1: Apply a Top Coat
Finish with a glossy top coat to protect the lace and rhinestones, adding a shiny, polished finish.
Why It Works
Lace and Rhinestone French Tip Nail Art enchants with its romantic elegance and subtle glamour.
The nude base and white lace offer a timeless feel, while the rhinestones add luxury, sealed with a glossy finish for a sophisticated, lasting design.
30. Brushed French Tip Nail Art
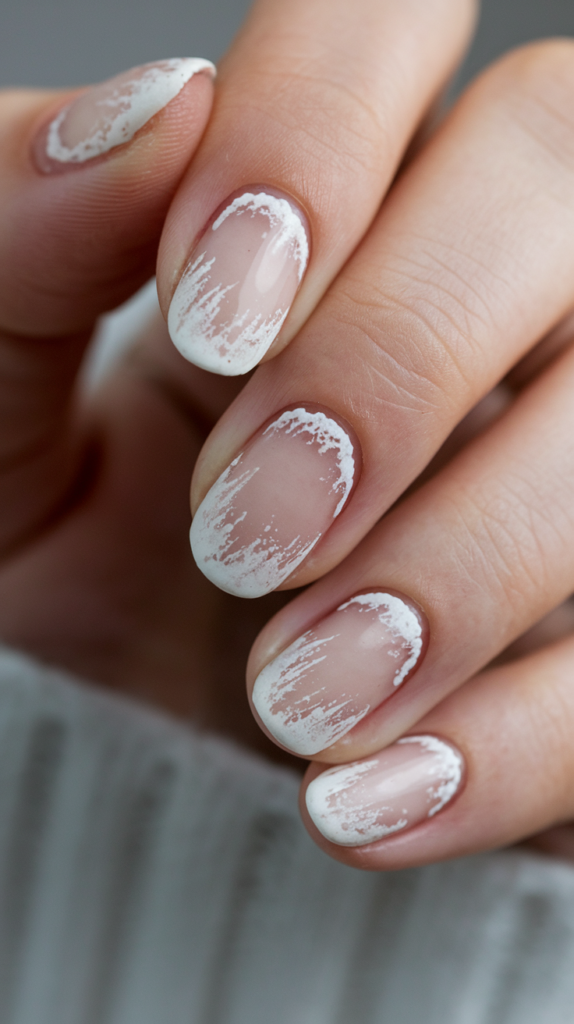
Brushed French Tip Nail Art offers a modern, artistic twist on the classic French manicure with textured, brushed white tips.
The soft, faded tips blend into a nude base, creating a sophisticated yet unique design perfect for those seeking a subtle edge.
This brushed effect adds a creative flair to a timeless style.
Creating the Brushed French Tip Design
Step 1: Apply the Base Color
Begin with a neutral beige or nude polish, applying an even coat and letting it dry fully.
Step 2: Create the Brushed Tips
Use a fine brush or sponge to apply white polish to the tips with light, textured strokes, fading into the base for an organic look.
Step 3: Let It Dry
Allow the brushed tips to dry completely to preserve the texture.
Finishing Touches: Glossy Shine
Step 1: Apply a Top Coat
Seal with a glossy top coat to protect the design and add a sleek, shiny finish.
Why It Works
Brushed French Tip Nail Art blends classic and modern elements with its textured, subtle tips.
The nude base and soft white brushing create a gentle, chic look, enhanced by a glossy finish for a contemporary, polished design.
31. Gold Foil French Tip Nail Art
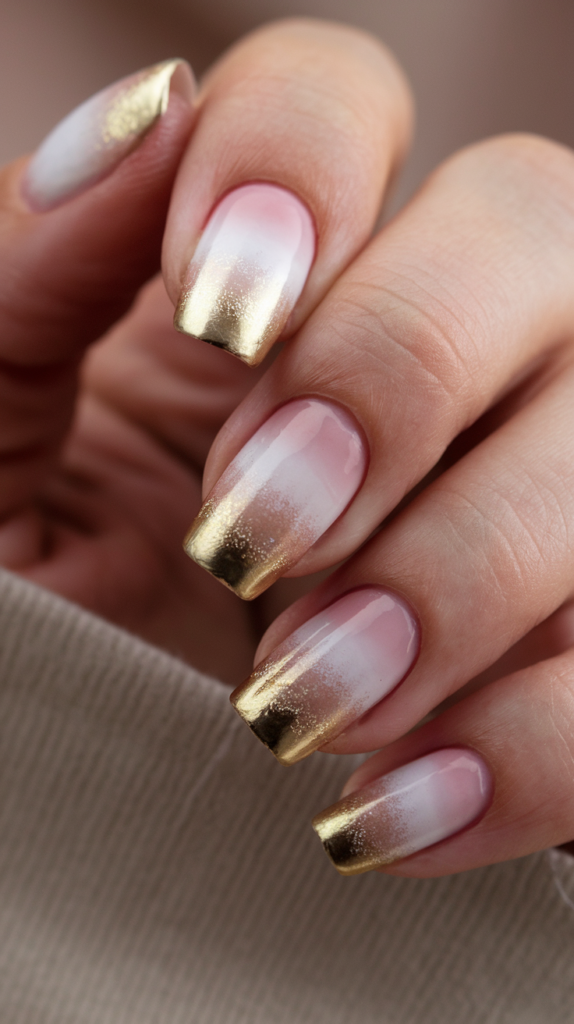
Gold Foil French Tip Nail Art elevates the classic French manicure with a luxurious twist of gold foil at the tips.
The soft nude base transitions into a white gradient, accented with radiant gold foil, creating a chic and glamorous look perfect for special occasions or everyday elegance.
This design blends timeless simplicity with a modern metallic shine.
Creating the Gold Foil French Tip Design
Step 1: Apply the Base Color
Start with a soft nude or pale pink polish, applying an even coat across all nails and letting it dry fully.
Step 2: Create the Gradient Tips
Use a fine brush or sponge to gently apply white polish to the tips, blending it into the nude base for a smooth ombre effect.
Step 3: Apply the Gold Foil
While the white is still tacky, gently press small pieces of gold foil onto the tips, letting it fade into the gradient.
Step 4: Let It Dry
Allow the design to dry completely before sealing.
Finishing Touches: Glossy Shine
Step 1: Apply a Top Coat
Finish with a glossy top coat to secure the foil and add a smooth, polished finish.
Why It Works
Gold Foil French Tip Nail Art shines with its blend of classic elegance and modern luxury.
The nude-to-white gradient offers a subtle sophistication, while the gold foil adds a radiant, high-end touch, sealed with a glossy finish for a stunning, durable look.
32. Chevron Stripe Nail Art
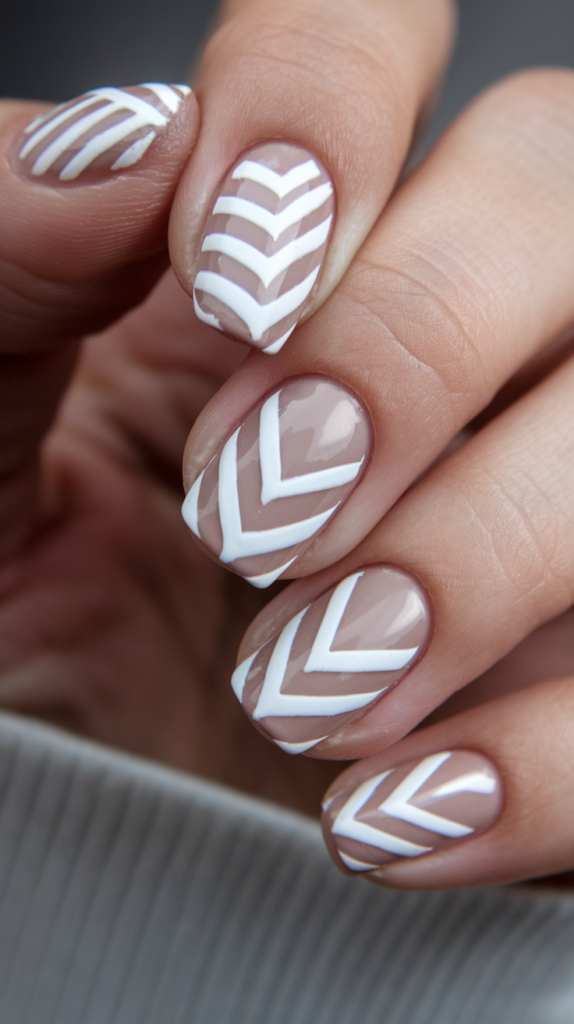
Chevron Stripe Nail Art brings a bold, geometric flair with sharp white chevron stripes over a neutral nude base.
This modern, edgy design is perfect for those who love graphic, statement-making nail art that balances sophistication with visual impact.
The precise lines create a striking yet versatile look suitable for any occasion.
Creating the Chevron Stripe Design
Step 1: Apply the Base Color
Begin with a smooth nude or beige polish, applying an even coat and letting it dry fully.
Step 2: Create the Chevron Stripes
Use a fine nail art brush to paint crisp white chevron stripes, pointing toward the tips, ensuring symmetry and sharpness.
Step 3: Add More Chevron Layers
Layer additional chevrons, slightly overlapping, varying sizes for a dynamic effect without overcrowding.
Step 4: Let It Dry
Allow the stripes to dry completely before sealing.
Finishing Touches: Glossy Shine
Step 1: Apply a Top Coat
Finish with a glossy top coat to protect the stripes and add a sleek, shiny finish.
Why It Works
Chevron Stripe Nail Art stands out with its bold, geometric precision.
The white chevrons contrast sharply with the nude base, creating a modern, chic look, while the glossy finish ensures a polished, lasting design.
33. Geometric Brown and White Nail Art
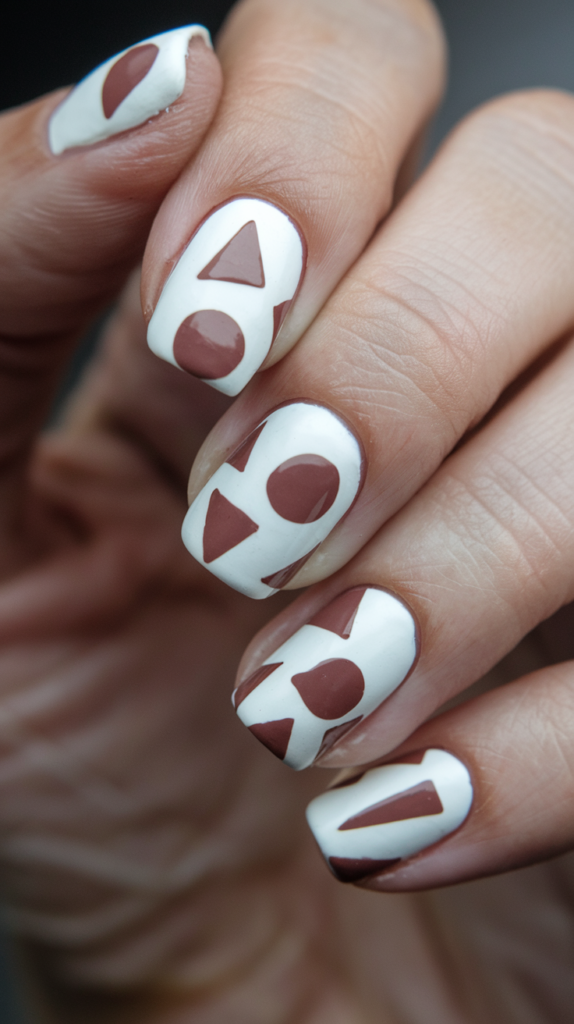
Geometric Brown and White Nail Art combines sleek white nails with bold brown geometric shapes for a contemporary, striking design.
Perfect for minimalists who love a modern twist, this look contrasts a soft white base with rich brown accents for a sophisticated, eye-catching effect.
The geometric patterns add a creative, artistic flair.
Creating the Geometric Brown and White Design
Step 1: Apply the Base Color
Start with a clean white polish, applying an even, opaque coat and letting it dry fully.
Step 2: Create the Geometric Shapes
Use a fine brush to paint brown geometric shapes—triangles, circles, or half-circles—varying sizes and angles for balance.
Step 3: Add Details
Outline some shapes with thin white lines or add smaller shapes inside for added depth.
Step 4: Let It Dry
Allow the design to dry completely before sealing.
Finishing Touches: Glossy Shine
Step 1: Apply a Top Coat
Finish with a glossy top coat to enhance the shapes’ sharpness and add a smooth, shiny finish.
Why It Works
Geometric Brown and White Nail Art blends simplicity with bold design.
The white base serves as a clean canvas, letting the brown shapes pop, while the glossy finish adds a polished, vibrant touch perfect for a modern style.
34. Neon Scribble Nail Art
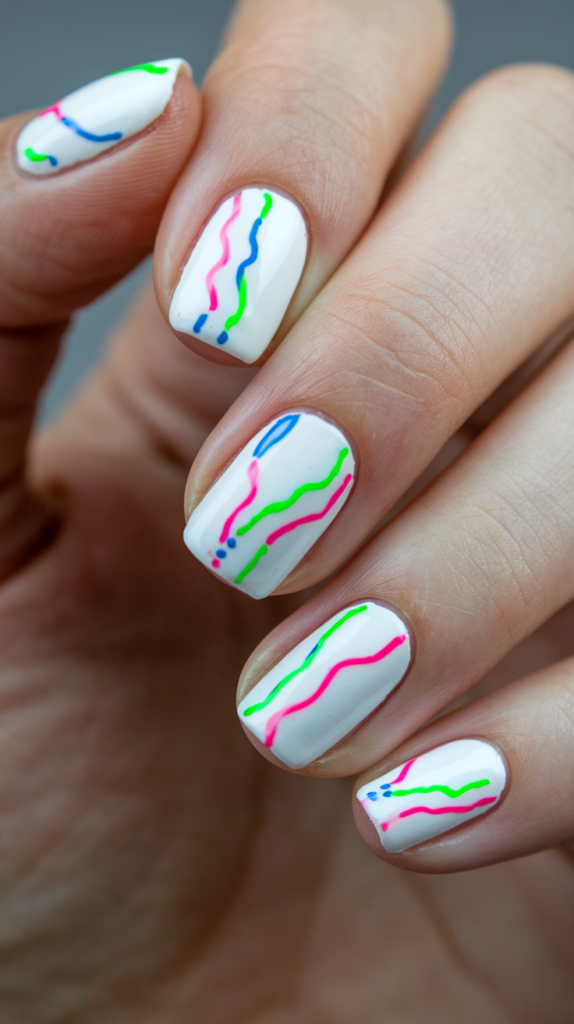
Neon Scribble Nail Art infuses vibrant energy with playful neon pink, green, and blue squiggles over a crisp white base.
This graffiti-inspired design is perfect for those who love bold, unique nail art with a fun, artistic vibe.
The bright neon hues create a lively, standout look against the clean white backdrop.
Creating the Neon Scribble Design
Step 1: Apply the Base Color
Begin with a clean white polish, applying a smooth, even coat and letting it dry fully.
Step 2: Draw the Neon Scribbles
Use a fine brush to draw abstract, squiggly lines in neon pink, green, and blue, varying thickness and crossing some lines for a dynamic effect.
Step 3: Let It Dry
Allow the neon scribbles to dry completely to avoid smudging.
Finishing Touches: Glossy Shine
Step 1: Apply a Top Coat
Finish with a glossy top coat to seal the colors and add a smooth, shiny finish.
Why It Works
Neon Scribble Nail Art bursts with playful, artistic energy.
The white base enhances the neon colors’ vibrancy, creating a bold, modern look, while the glossy finish ensures a sleek, lasting design perfect for expressive style.
35. Cloudy Sky Nail Art
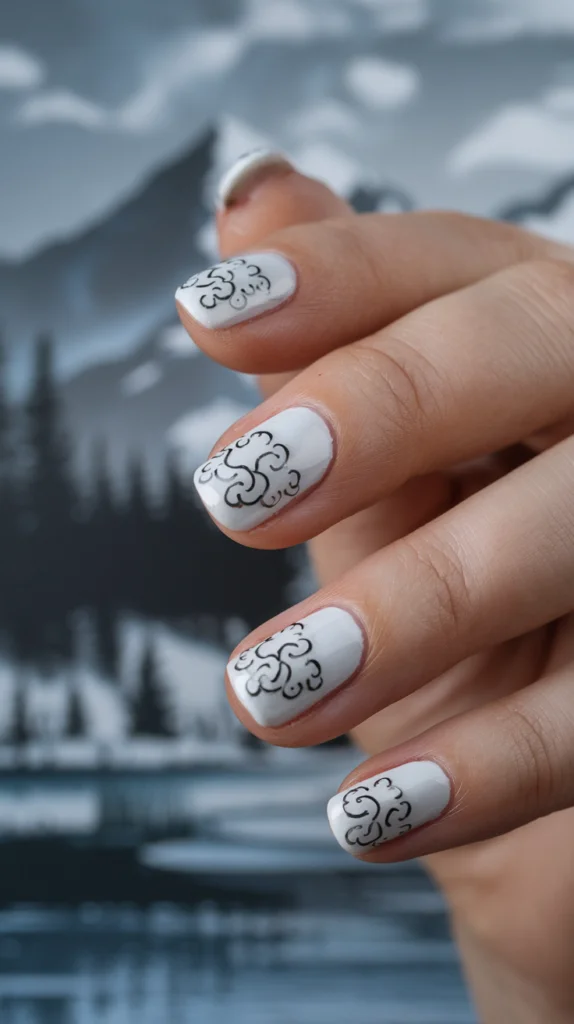
Cloudy Sky Nail Art offers a serene, minimalist design with delicate black-outlined clouds swirling over a smooth white base.
Perfect for those who love nature-inspired art, this elegant, airy look suits both casual and formal settings with its calming aesthetic.
The gentle cloud curves create a peaceful, dreamy vibe.
Creating the Cloudy Sky Design
Step 1: Apply the Base Color
Start with a smooth white polish, applying an even, opaque coat and letting it dry fully.
Step 2: Draw the Clouds
Use a fine brush or dotting tool to paint small, whimsical clouds with soft, swirling curves and a delicate black outline.
Step 3: Add More Clouds
Layer additional clouds, varying sizes and overlapping some for depth, keeping the design light and balanced.
Step 4: Let It Dry
Allow the clouds to dry completely before sealing.
Finishing Touches: Glossy Shine
Step 1: Apply a Top Coat
Finish with a glossy top coat to protect the clouds and add a shiny, smooth finish.
Why It Works
Cloudy Sky Nail Art enchants with its serene simplicity.
The white base highlights the delicate black clouds, creating a tranquil, elegant look, while the glossy finish ensures a polished, lasting design perfect for a minimalist vibe.
Conclusion
White nail art provides a versatile canvas for boundless creativity, from subtle elegance to striking statements.
These 35 designs—from soft watercolor effects and delicate lace to bold geometric patterns and neon accents—demonstrate white’s adaptability as a base for stunning manicures.
Whether you’re drawn to minimalist chic, luxurious glamour, or playful vibrancy, there’s a white nail art style here to match any mood or occasion.
With detailed techniques and endless inspiration, you can craft a look that’s uniquely yours.
Embrace the timeless charm of white nails and let your next manicure shine with personality and flair.