January is a month of fresh beginnings, cozy vibes, and a touch of winter magic.
It’s the perfect time to experiment with nail designs that capture the beauty of the season and celebrate the New Year.
From frosty blues and shimmering glitter to cozy sweater-inspired textures and bold, modern styles, January nail art offers endless possibilities for creativity and self-expression.
Whether you’re looking to embrace the icy elegance of winter, celebrate the sparkle of New Year’s festivities, or keep things minimalist and sophisticated, this guide is packed with inspiration.
These nail designs are crafted to suit every mood, occasion, and aesthetic preference, helping you start 2025 with style.
Quick Navigation
- Icy Blue Snowflake Design
- Gradient Glitter Winter Wonderland
- Crystal-Embedded Snow Scene
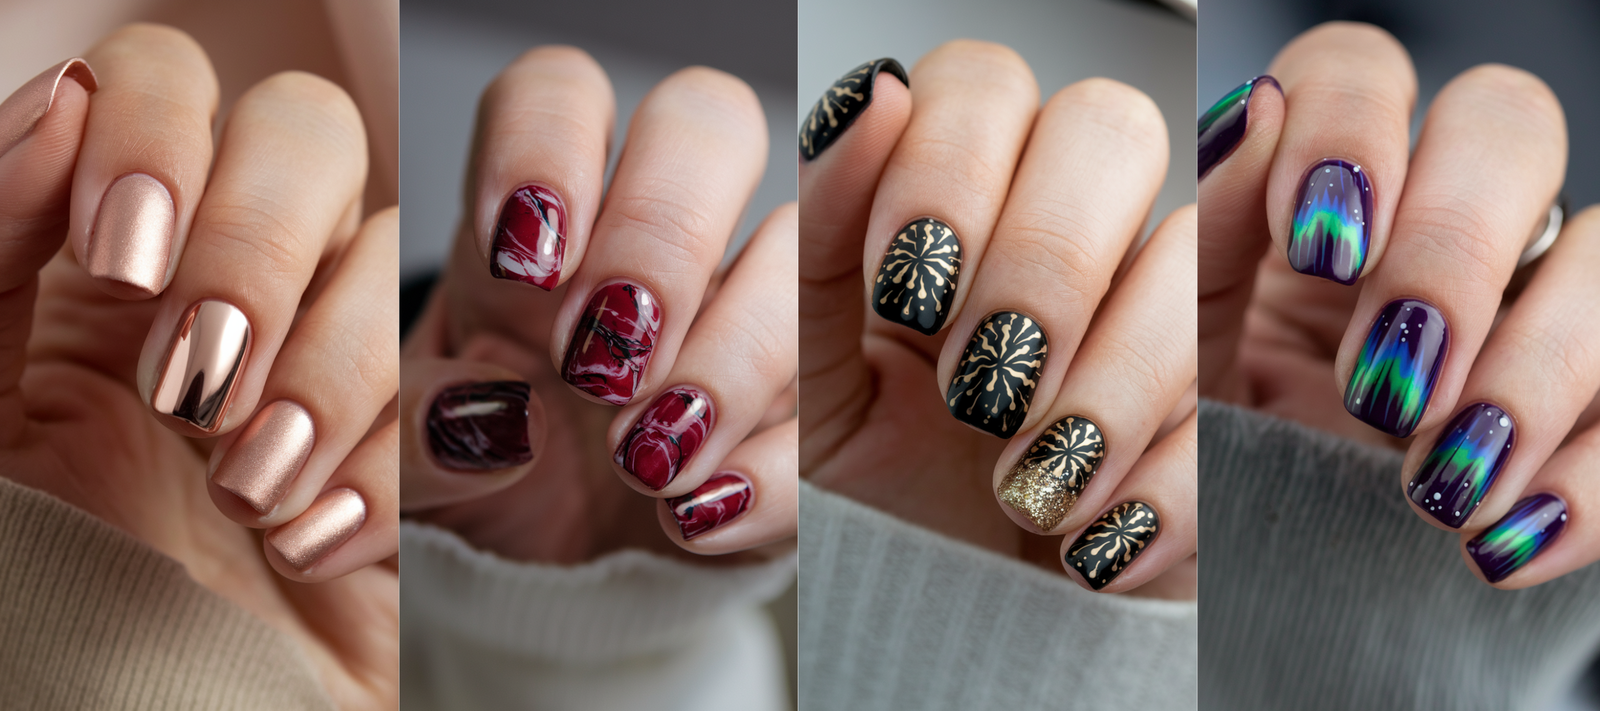
- Golden Fireworks Celebration
- Champagne Confetti Glam
- Midnight Countdown Nails
- Textured Cable Knit Pattern
- Neutral Sweater Set
- Matte Gray Winter Warmth
- Garnet Marbled Effect
- Jewel-Encrusted Accents
- Minimalist Gem Design
- Metalic Line Art
- Negative Space Snowflakes
- Tiny Silver Starbursts
- Northern Lights Gradient
- Galaxy Meets Aurora
- Magnetic Aurora Magic
- Iridescent Ice Crystals
- Frozen Crown Accents
- Chrome Icy Elegance
- Winter Blossom Minimalism
- Frosted Flower Garden
- Soft Mint Floral Tips
- Checkerboard Chic
- Abstract Monochrome
- Grayscale Geometric Design
- Rose Gold with Matte Finish
- Gunmetal Glam
- Bronze and Black Elegance
- Icicle French Tips
- Velvet Finish Snow Scene
- Pearlescent Winter Glow
- Opal Stone Nails
- Classic French with a Twist
Frosty Blue Winter Glam
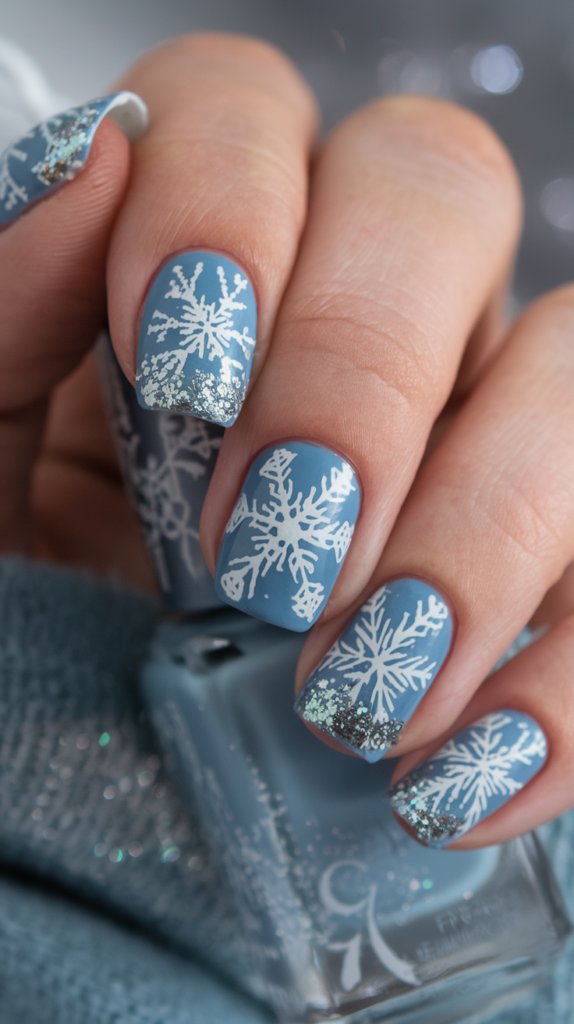
Icy Blue Snowflake Nails: A Frosty Winter Classic
Design Features
Icy blue snowflake nails evoke the essence of a chilly January morning, where frost blankets the windows.
The frosty blue base creates the perfect canvas for intricate white snowflake patterns, each flake uniquely detailed to resemble nature’s artistry.
The addition of shimmering silver glitter on the tips gives these nails a frosted effect, making them glisten like freshly fallen snow under sunlight.
This design strikes a balance between elegance and wintery charm, ideal for the season.
How To Achieve This Look
Start by applying a frosty blue nail polish as the base, ensuring smooth and even coverage.
Use a fine detail brush to carefully paint white snowflakes on each nail, varying the designs to mimic natural variation.
To add the frosty touch, dab silver glitter polish lightly onto the tips, creating a gradient effect.
Seal the design with a glossy topcoat to protect the artwork and enhance its shimmer.
Why This Stands Out
This design stands out because of its intricate detailing and seasonal appeal.
The combination of frosty blue and shimmering silver captures the beauty of winter, making it a timeless choice for January nails.
Gradient Glitter Winter Wonderland: Sparkling Elegance For January

Design Features
Gradient glitter nails bring a subtle yet sparkling touch to January’s frosty aesthetic.
The design transitions smoothly from an icy white base near the cuticle to a frosty blue tip, mimicking the natural gradient of frost on a windowpane.
Holographic glitter adds dimension, catching light at every angle and creating a magical snowy effect.
This combination of soft hues and sparkle makes it a perfect choice for winter events or everyday wear.
How To Achieve This Look
Begin with an icy white polish applied near the cuticle, blending it seamlessly into frosty blue at the tips using a sponge technique.
Once the gradient is set, apply a thin layer of holographic glitter polish over the entire nail for a uniform sparkle.
Finish the design with a glossy topcoat to seal the glitter and enhance its shine.
For best results, work quickly to blend colors before the polish dries.
Why This Stands Out
The smooth transition of colors combined with holographic sparkle creates a dreamy and ethereal look.
It is versatile enough to be both subtle and eye-catching, making it a favorite for those who love understated elegance.
Crystal-Embedded Snow Scene: Glamorous Winter Accents

Design Features
The crystal-embedded snow scene design brings a luxurious touch to winter nails.
A glossy frosty blue base serves as the backdrop for tiny clear crystals arranged to depict a snowy landscape.
Miniature snowflake charms on accent nails add a playful yet elegant detail.
The design’s combination of sparkle and texture makes it truly mesmerizing.
How To Achieve This Look
Apply a glossy frosty blue polish as the base and let it dry completely.
Use nail glue to attach tiny clear crystals in a scattered pattern, concentrating them towards the tips to mimic a snow-covered effect.
On accent nails, add miniature snowflake charms using nail adhesive, ensuring they are centered and secure.
Finish with a glossy topcoat to lock everything in place and add an extra layer of shine.
Why This Stands Out
This design is a perfect blend of luxury and creativity, making it a standout choice for January.
The 3D effect of the crystals paired with the intricate snowflake details creates a look that is both festive and elegant.
New Year Sparkle
Golden Fireworks Celebration: Dazzling New Year Nail Designs

Design Features
Golden fireworks nails capture the excitement and sparkle of New Year celebrations.
A bold black base provides a dramatic contrast to intricate gold fireworks patterns painted with fine detail.
The addition of a sparkling gold glitter accent nail enhances the festive vibe, making this design perfect for ringing in the new year.
How To Achieve This Look
Start with a black base coat, ensuring it is completely opaque.
Use a fine-tipped brush or nail art pen to draw gold fireworks patterns radiating from a central point on each nail.
On one accent nail, apply a gold glitter polish to make it stand out.
Complete the look with a glossy topcoat to protect the design and give it a high-shine finish.
Why This Stands Out
This design captures the energy and glamour of New Year’s Eve, making it a perfect choice for celebrations.
The combination of bold contrasts and sparkling accents ensures it leaves a lasting impression.
Champagne Confetti Glam: Celebrate In Style

Design Features
Champagne confetti nails bring a touch of celebration to January.
A nude base creates a clean and elegant canvas for tiny dots of gold, silver, and champagne hues, arranged to mimic scattered confetti.
The delicate design balances subtlety with festivity, making it versatile for both casual and formal events.
How To Achieve This Look
Apply a nude polish as the base and let it dry completely.
Use a dotting tool to carefully add small dots of gold, silver, and champagne polish in a scattered pattern across each nail.
Focus on creating a random but balanced arrangement, varying the sizes of the dots for a more realistic confetti effect.
Seal with a glossy topcoat for a smooth finish.
Why This Stands Out
This design is sophisticated yet celebratory, making it a perfect fit for January’s festive atmosphere.
The mix of metallic tones adds depth and dimension without overwhelming the overall look.
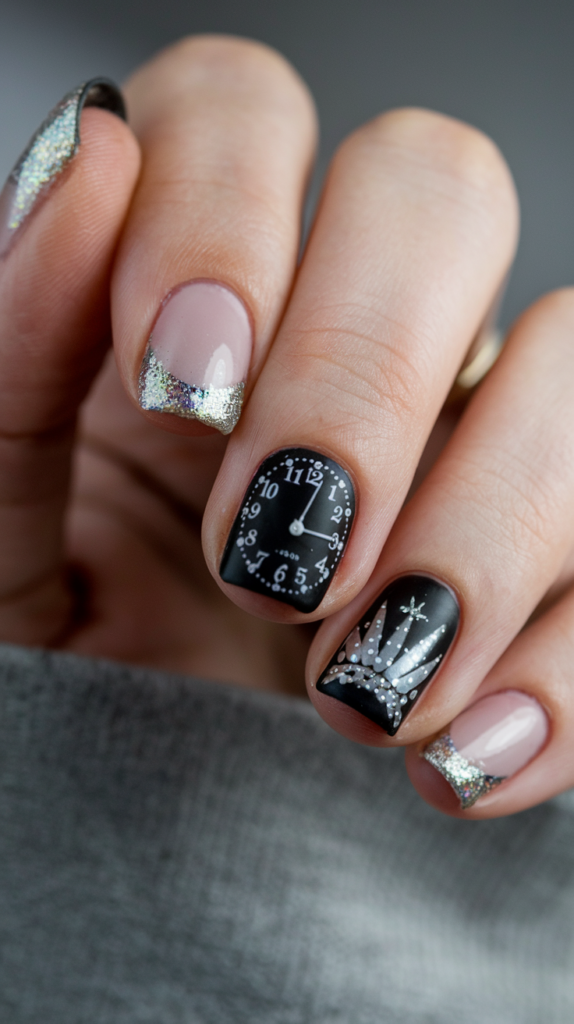
Midnight Countdown Nails: A Timeless New Year Look
Design Features
Midnight countdown nails are a captivating way to celebrate the New Year.
The design features a deep black base symbolizing the night sky, complemented by a shimmering silver clock motif on the ring finger.
Glittery silver tips on the remaining nails tie the design together, creating a cohesive yet striking look that embodies the excitement of the countdown to midnight.
How To Achieve This Look
Begin by applying a deep black polish to all nails and allow it to dry thoroughly.
On the ring finger, use a fine detail brush to paint a silver clock face, adding Roman numerals or dashes for a realistic look.
For the other nails, create glittery silver tips using a fine-tipped nail brush or tape for precision.
Seal the design with a glossy topcoat to enhance its shine and longevity.
Why This Stands Out
This design uniquely captures the essence of New Year’s Eve, blending sophistication with festive charm.
The clock motif adds a personalized touch, making it perfect for celebrating the start of 2025.
Cozy Knitted Sweater Nails
Textured Cable Knit Pattern: Cozy And Chic Winter Nails

Design Features
The textured cable knit pattern mimics the look of a cozy winter sweater, bringing warmth and charm to your nails.
A matte dusty pink base enhances the design’s soft and inviting feel.
The raised cable-knit patterns on accent nails add dimension, creating a realistic texture that sets this design apart.
It’s a perfect choice for embracing the cozy vibes of January.
How To Achieve This Look
Start by applying a matte dusty pink polish to all nails and let it dry completely.
Using a fine brush or nail art gel, create raised cable-knit patterns on two or three nails, such as braids and twists.
Cure the gel designs under a UV lamp if using gel polish, and finish with a matte topcoat to retain the soft texture.
The result is a design that feels as cozy as it looks.
Why This Stands Out
This design combines texture and warmth, making it a favorite for winter nail art enthusiasts.
Its unique 3D effect draws attention and complements cozy winter outfits.
Neutral Sweater Set: A Warm And Versatile Look

Design Features
The neutral sweater set offers a variety of textured knit patterns across a soft beige base, giving each nail a distinct look.
Patterns like braids, cables, and cross-stitches mimic classic sweater designs.
This versatile and understated design suits all occasions, making it ideal for January’s cozy yet sophisticated aesthetic.
How To Achieve This Look
Begin with a soft beige polish as the base and allow it to dry.
Use nail art tools or brushes to create different knit patterns on each nail, alternating between braids, twists, and cross-stitch designs.
For a cohesive look, keep the patterns consistent in style and size.
Finish with a matte topcoat to enhance the sweater-like effect.
Why This Stands Out
This design stands out for its creativity and versatility, offering a variety of knit patterns on a neutral base.
It’s perfect for those who love detailed nail art without overwhelming their overall look.
Matte Gray Winter Warmth: Subtle Seasonal Sophistication

Design Features
Matte gray winter warmth nails feature a soft gray finish paired with delicate white knit patterns on two accent nails.
This design balances simplicity with intricate detailing, making it a subtle yet sophisticated choice for winter.
The addition of a small snowflake design on one accent nail adds a seasonal touch, perfect for January.
How To Achieve This Look
Apply a matte gray polish to all nails and let it dry completely.
On two accent nails, use a fine brush to paint delicate white knit patterns, such as cables or braids, ensuring the design remains subtle and elegant.
On one of the accent nails, add a small snowflake using white polish and a fine detail brush.
Finish with a matte topcoat to maintain the soft texture and protect the design.
Why This Stands Out
This design’s understated elegance and seasonal charm make it a standout choice.
The combination of matte gray and intricate white detailing creates a timeless and versatile winter look.
Gemstone Nails For January
Garnet Marbled Effect: Honoring January’s Birthstone

Design Features
The garnet marbled effect nails pay homage to January’s birthstone with a deep red base featuring marbled veins of black and white.
The glossy finish enhances the design’s luxurious appeal, making it ideal for the season.
This bold and sophisticated design highlights the richness and depth of the garnet gemstone, perfect for winter fashion.
How To Achieve This Look
Start with a deep garnet red base and let it dry completely.
Use a thin nail art brush to create random marbled veins of black and white polish, blending them slightly for a natural effect.
Once the marbled design is set, apply a high-gloss topcoat to enhance the stone-like appearance and add dimension.
Why This Stands Out
This design combines bold color with intricate marbling, making it a luxurious and statement-worthy choice.
It’s perfect for those looking to showcase their January birthstone in a creative way.
Jewel-Encrusted Accents: Regal Red With Garnet Inspiration

Design Features
Jewel-encrusted nails feature a deep red base with one accent nail adorned with tiny garnet-colored rhinestones.
Delicate gold lines frame the rhinestones, adding a regal touch to the design.
This combination of rich red tones and sparkling accents exudes elegance, making it perfect for formal occasions.
How To Achieve This Look
Apply a deep red polish as the base for all nails.
On one accent nail, use nail glue to attach garnet-colored rhinestones in a symmetrical arrangement, and frame them with fine gold lines using a nail art pen.
Seal the design with a glossy topcoat to secure the embellishments and enhance their shine.
Why This Stands Out
This design stands out for its luxurious and regal appearance.
The jewel-like accents paired with rich red tones create a look that is both bold and elegant, perfect for January celebrations.
Minimalist Gem Design: A Subtle And Elegant Garnet Touch

Design Features
Minimalist gem nails offer a simple yet elegant take on January’s birthstone.
A nude base sets the tone for sophistication, with a single garnet-red gem painted near the cuticle of each nail.
Delicate gold metallic dots surround the gem, enhancing its presence without overwhelming the minimalist aesthetic.
This design is perfect for those who prefer understated yet luxurious nail art.
How To Achieve This Look
Apply a nude polish as the base and let it dry thoroughly.
Use a dotting tool or fine brush to create a small garnet-red gem near the cuticle on each nail, ensuring consistent size and placement.
Surround the gem with tiny gold metallic dots using a fine-tipped nail art brush.
Finish with a glossy topcoat to protect the design and add a polished shine.
Why This Stands Out
The minimalist approach combined with a focus on the garnet gemstone creates a timeless and elegant design.
Its simplicity makes it versatile for everyday wear while still honoring January’s birthstone in a refined way.
Minimalist Winter Elegance
Metallic Line Art: A Modern Twist On Winter Nails

Design Features
Metallic line art nails feature a clear or nude base with delicate silver lines forming geometric patterns.
The design is modern and sleek, perfect for those who enjoy subtle yet artistic nail art.
The use of metallic silver adds a wintery touch, reflecting the season’s crisp and clean aesthetic.
How To Achieve This Look
Begin with a clear or nude base coat and let it dry completely.
Using a fine metallic silver nail art pen, draw thin geometric patterns, such as triangles, lines, or intersecting shapes, on each nail.
Keep the design minimal and clean, focusing on precision.
Seal with a glossy topcoat to protect the artwork and enhance its shine.
Why This Stands Out
This design’s modern and understated appeal makes it suitable for various occasions.
The metallic lines add a hint of seasonal shimmer, creating a chic and versatile look.
Negative Space Snowflakes: Minimalist Snowy Magic

Design Features
Negative space snowflake nails take a creative approach to winter nail art.
A clear base highlights intricately detailed snowflakes outlined in white, leaving the inside of the snowflakes unpainted.
This unique design combines the beauty of snowflakes with the simplicity of negative space, making it a standout choice for January.
How To Achieve This Look
Apply a clear base coat and let it dry thoroughly.
Use a fine detail brush or nail art pen to carefully outline snowflakes on each nail, ensuring the design remains delicate and symmetrical.
Leave the interior of the snowflakes unpainted to create the negative space effect.
Finish with a glossy topcoat to enhance the clarity and shine of the design.
Why This Stands Out
The negative space technique adds a modern twist to traditional snowflake nail art.
Its clean and creative design makes it a favorite for those seeking subtle yet eye-catching nails.
Tiny Silver Starbursts: Understated Winter Sparkle

Design Features
Tiny silver starburst nails bring a touch of understated sparkle to January.
A sheer gray base provides a soft background for small, hyperrealistic silver starbursts scattered across the nails.
The design’s minimalism and shimmer make it a versatile option for both casual and formal occasions.
How To Achieve This Look
Apply a sheer gray polish as the base and let it dry completely.
Use a fine-tipped nail art brush or pen to draw tiny silver starbursts on each nail, varying their size and placement for a natural effect.
Seal the design with a glossy topcoat to protect the artwork and add a subtle shine.
Why This Stands Out
This design’s simplicity and elegance make it a perfect choice for those who prefer understated nail art.
The tiny starbursts add a hint of sparkle without overwhelming the overall look.
Aurora Borealis Nails
Northern Lights Gradient: Capturing The Magic Of The Skies

Design Features
Northern lights gradient nails recreate the beauty of the aurora borealis.
A black base serves as the night sky, while green, purple, and blue shimmers create a wavy aurora pattern.
The glossy finish adds depth and dimension, making the design truly magical.
How To Achieve This Look
Start with a black polish as the base and let it dry thoroughly.
Use a sponge to blend green, purple, and blue shimmer polishes in a wavy pattern across the nails, mimicking the movement of the aurora borealis.
Apply a glossy topcoat to enhance the shimmer and bring the design to life.
For added effect, include tiny white dots to resemble stars.
Why This Stands Out
This design captures the mesmerizing beauty of the northern lights, making it a perfect choice for winter nights.
The combination of bold colors and shimmer creates a striking and unforgettable look.
Galaxy Meets Aurora: A Celestial Winter Fantasy

Design Features
Galaxy meets aurora nails combine celestial elements with the beauty of the northern lights.
A deep purple base is adorned with streaks of green and blue aurora patterns, accented by tiny white dots representing stars.
This design merges the mystery of the galaxy with the magic of winter, creating a truly unique aesthetic.
How To Achieve This Look
Apply a deep purple polish as the base and allow it to dry completely.
Use a sponge or fine brush to blend streaks of green and blue shimmer polishes, creating an aurora-like effect.
Add tiny white dots using a fine-tipped brush to represent stars, and finish with a glossy topcoat for a luminous finish.
Why This Stands Out
The combination of galaxy and aurora themes makes this design both creative and captivating.
Its unique blend of colors and celestial details ensures it stands out in a crowd.
Magnetic Aurora Magic: Shimmering 3D Aurora Designs

Design Features
Magnetic aurora nails use a special magnetic polish to create a three-dimensional shimmer effect.
A black base sets the stage for green and purple magnetic polish, forming dynamic patterns reminiscent of the aurora borealis.
This design’s movement and depth make it an innovative and eye-catching option for winter.
How To Achieve This Look
Apply a black polish as the base and let it dry thoroughly.
Use green and purple magnetic polishes, applying them one at a time and holding a magnet over the wet polish to create a 3D shimmer effect.
Work quickly to ensure the magnetic effect sets properly before the polish dries.
Finish with a glossy topcoat to enhance the shine and protect the design.
Why This Stands Out
The use of magnetic polish adds a dynamic and interactive element to the design.
Its unique 3D effect captures the magic of the aurora borealis, making it a standout choice for January nail art.
Ice Queen Nail Art
Iridescent Ice Crystals: Frosty Elegance With A Regal Touch

Design Features
Iridescent ice crystal nails evoke the ethereal beauty of a frozen winter morning.
A sheer pastel blue base sets the stage for large, intricately painted ice crystal patterns in white and silver.
Tiny rhinestones accentuate the design, adding dimension and sparkle that catches the light, making this look truly regal.
How To Achieve This Look
Begin with a sheer pastel blue polish applied evenly to all nails.
Use a fine detail brush to paint delicate ice crystal patterns in white and silver, ensuring symmetry and intricate detailing.
Attach small rhinestones at key points of the design using nail glue, and seal the entire look with a glossy topcoat to enhance the shimmer and secure the embellishments.
Why This Stands Out
This design stands out because of its intricate craftsmanship and luxurious finish.
The combination of delicate patterns and shimmering accents makes it ideal for formal events or winter celebrations.
Frozen Crown Accents: Winter Royalty At Your Fingertips

Design Features
Frozen crown nails channel the essence of winter royalty with their glossy white base and metallic silver crown accents.
Small blue gemstones further enhance the regal theme, creating a look that is both bold and elegant.
This design is perfect for making a statement at winter gatherings or simply adding a touch of glamour to your everyday look.
How To Achieve This Look
Apply a glossy white polish to all nails and let it dry thoroughly.
Use a fine nail art brush or stencil to paint silver crown designs on two or three accent nails.
Attach small blue gemstones at the center or edges of the crowns using nail glue, and finish with a glossy topcoat to lock in the design and add shine.
Why This Stands Out
The combination of regal crowns and shimmering accents elevates this design to a level of sophistication.
It’s a perfect choice for anyone looking to feel like royalty during the winter season.
Chrome Icy Elegance: Sleek And Stylish Winter Nails

Design Features
Chrome icy elegance nails feature a soft blue chrome finish that radiates sophistication.
One accent nail is adorned with a raised, 3D snowflake design in metallic silver, adding a textured focal point.
The sleek chrome finish combined with the intricate 3D accent creates a modern and stylish winter look.
How To Achieve This Look
Apply a chrome powder over a soft blue gel polish base to create a mirror-like finish on all nails.
For the accent nail, use a fine brush and metallic silver gel polish to paint a raised snowflake design, curing it under a UV lamp for durability.
Seal the entire look with a high-gloss topcoat to enhance the chrome effect and secure the snowflake accent.
Why This Stands Out
This design is a perfect blend of modern style and seasonal charm.
The sleek chrome finish paired with the 3D snowflake detail creates a look that is both trendy and winter-appropriate.
Fresh Start Florals
Winter Blossom Minimalism: Soft And Refreshing January Nails

Design Features
Winter blossom nails combine the simplicity of minimalism with the freshness of florals.
A matte lavender base provides a soft and serene backdrop for tiny, hand-painted white flowers.
The flowers are placed on the tips of two accent nails, keeping the design understated yet elegant.
How To Achieve This Look
Apply a matte lavender polish to all nails and let it dry thoroughly.
Using a fine nail art brush, paint small white flowers on the tips of two accent nails, focusing on creating clean and delicate lines.
Add tiny yellow or silver dots at the center of the flowers for added detail, and finish with a matte topcoat to preserve the soft texture.
Why This Stands Out
This design’s understated elegance makes it a versatile choice for January.
The combination of soft colors and minimalist florals creates a refreshing and sophisticated look.
Frosted Flower Garden: A Wintery Take On Floral Nail Art

Design Features
Frosted flower garden nails blend delicate florals with a wintery aesthetic.
A nude base highlights frosted green leaves and white flowers, hand-painted on the ring and middle nails for a subtle yet eye-catching effect.
The design’s soft color palette and intricate detailing make it perfect for transitioning from winter to spring.
How To Achieve This Look
Begin with a nude polish as the base and let it dry completely.
Use a fine brush to paint frosted green leaves and white flowers on the ring and middle nails, focusing on creating a natural and delicate look.
Add subtle silver accents to the leaves for a frosted effect, and seal the design with a glossy topcoat to enhance its shine and durability.
Why This Stands Out
This design’s blend of floral elegance and wintery charm makes it unique and versatile.
It’s perfect for those who love intricate details and soft, neutral tones.
Soft Mint Floral Tips: Fresh Hues For The New Year

Design Features
Soft mint floral tips bring a refreshing pop of color to January nails.
A nude base contrasts beautifully with mint green French tips adorned with miniature white flower details.
Fine silver glitter accents add a touch of sparkle, making the design playful yet elegant.
How To Achieve This Look
Apply a nude polish as the base and let it dry thoroughly.
Create mint green French tips using a fine-tipped brush or nail guides for precision.
Paint tiny white flowers along the edges of the tips using a fine detail brush, and add a thin line of silver glitter along the smile line for extra sparkle.
Finish with a glossy topcoat to lock in the design and enhance its shine.
Why This Stands Out
This design’s refreshing color palette and playful details make it a standout choice for January.
It’s perfect for those looking to brighten up their winter nails with a hint of spring inspiration.
Monochromatic Magic
Checkerboard Chic: Bold Black-And-White Patterns

Design Features
Checkerboard chic nails combine bold black-and-white patterns with a modern aesthetic.
The design alternates between solid matte black nails and glossy white checkerboard patterns for a striking contrast.
The bold yet simple design makes it versatile for various styles and occasions.
How To Achieve This Look
Apply matte black polish to half of the nails and glossy white polish to the other half.
Use a fine detail brush or nail art stencil to create checkerboard patterns on the white nails, ensuring clean and even lines.
Seal the design with a glossy topcoat for the checkerboard nails, leaving the black nails matte for contrast.
Why This Stands Out
The bold contrast of black and white creates a timeless and eye-catching design.
Its clean lines and modern aesthetic make it a perfect choice for those who love graphic nail art.
Abstract Monochrome: Modern Art For Your Nails

Design Features
Abstract monochrome nails feature a glossy white base adorned with bold black line art, creating a modern and artistic aesthetic.
The design often includes geometric shapes, curves, and intersecting lines for a unique and edgy look.
This monochrome style is versatile and pairs well with various outfits, making it an excellent choice for a minimalist yet creative winter manicure.
How To Achieve This Look
Start with a glossy white polish applied evenly across all nails.
Allow the base to dry thoroughly before using a fine nail art brush or nail pen to draw abstract black patterns.
Incorporate a mix of geometric shapes, flowing lines, and intersecting angles to create a unique design for each nail.
Seal the look with a high-gloss topcoat to enhance its shine and protect the artwork.
Why This Stands Out
The bold contrast of black and white combined with abstract patterns makes this design a modern standout.
Its artistic vibe appeals to those who want to showcase creativity through minimalist nail art.
Grayscale Geometric Design: A Sophisticated Winter Palette

Design Features
Grayscale geometric nails use a gradient of gray tones, ranging from light to dark, paired with white and black geometric accents.
This design exudes sophistication and is ideal for winter due to its neutral and versatile color palette.
The clean, sharp lines of the geometric patterns add a touch of modern elegance to the design.
How To Achieve This Look
Apply different shades of gray polish to each nail, creating a gradient effect from light to dark.
Once the base is dry, use a fine brush or tape to create crisp geometric patterns, such as triangles, lines, or chevrons, in black and white polish.
Finish with a glossy topcoat to give the design a polished and refined appearance.
Why This Stands Out
This design’s use of grayscale tones and sharp geometric patterns creates a sophisticated and modern winter look.
It’s a versatile option for those seeking understated elegance.
Matte Metallics
Rose Gold With Matte Finish: A Soft Metallic Touch

Design Features
Rose gold nails with a matte finish bring a luxurious and subtle shine to your manicure.
The design features a soft rose gold base, with one accent nail highlighted by a shiny metallic stripe down the center for contrast.
This combination of matte and metallic finishes creates a chic and understated elegance perfect for winter.
How To Achieve This Look
Apply a matte rose gold polish to all nails and let it dry completely.
On one accent nail, use a striping brush or tape to create a straight line of shiny metallic rose gold polish down the center.
Seal the entire design with a matte topcoat, ensuring the accent stripe retains its glossy contrast.
Why This Stands Out
The mix of matte and metallic finishes gives this design a unique and modern twist.
Its soft, warm tone is perfect for winter and pairs beautifully with cozy or formal outfits.
Gunmetal Glam: A Bold And Edgy Winter Look

Design Features
Gunmetal glam nails feature a matte gunmetal base with scattered, small metallic silver speckles that resemble a starry winter night sky.
The design’s bold color and subtle sparkle create a striking and edgy look.
This combination of dark tones and shimmer makes it an excellent choice for winter evenings or formal events.
How To Achieve This Look
Start with a matte gunmetal polish as the base and let it dry completely.
Use a fine brush or sponge to dab small silver speckles across each nail, concentrating them toward the tips for a gradient effect.
Finish with a matte topcoat to maintain the muted effect while ensuring the design is long-lasting.
Why This Stands Out
This design’s bold color and subtle sparkle make it a perfect winter statement.
The edgy yet sophisticated vibe appeals to those who want a modern and dramatic manicure.
Bronze And Black Elegance: Sleek And Stylish Winter Tones

Design Features
Bronze and black nails combine the warmth of metallic bronze with the sleekness of matte black.
The design features a matte bronze finish on most nails, with one accent nail showcasing a black geometric pattern over the bronze background.
This stylish contrast of textures and colors creates a unique and luxurious winter look.
How To Achieve This Look
Apply a matte bronze polish to all nails, leaving one accent nail bare.
On the accent nail, paint a bronze base and let it dry before adding a black geometric pattern using a fine detail brush or tape.
Seal the design with a matte topcoat to maintain the soft texture and sleek appearance.
Why This Stands Out
The contrast between warm bronze and bold black makes this design visually striking.
Its combination of textures and colors creates a modern yet timeless aesthetic, perfect for winter.
Bonus Winter Nail Ideas
Icicle French Tips: A Frosty Twist On A Classic Look

Design Features
Icicle French tips bring a frosty, winter-inspired twist to the traditional French manicure.
A clear base highlights the frosty, glittery silver tips, mimicking the look of icicles hanging from rooftops.
This subtle yet glamorous design is perfect for winter events or everyday wear.
How To Achieve This Look
Apply a clear polish as the base and let it dry completely.
Use a silver glitter polish to create French tips, ensuring a smooth and even application along the smile line.
For added frostiness, use a sponge to dab extra glitter at the tips.
Seal with a glossy topcoat to enhance the sparkle and protect the design.
Why This Stands Out
The frosty tips add a seasonal charm to a classic design, making it a timeless choice for winter.
Its subtle elegance ensures it pairs well with any outfit or occasion.
Velvet Finish Snow Scene: Soft And Cozy Winter Glam

Design Features
Velvet finish snow scene nails feature a soft blue velvet-effect polish paired with painted white snowflakes.
Shimmering glitter accents enhance the design, giving it a cozy yet glamorous feel.
The velvet texture adds a unique element to the design, making it stand out from traditional glossy finishes.
How To Achieve This Look
Apply a soft blue velvet-effect polish to all nails and let it dry thoroughly.
Use a fine detail brush to paint delicate white snowflakes on one or two accent nails, adding small glitter accents for extra sparkle.
Seal the design with a matte topcoat to preserve the velvet texture and protect the artwork.
Why This Stands Out
This design’s combination of soft textures and shimmering details creates a cozy and luxurious winter look.
Its unique finish adds a tactile element, making it a favorite for the season.
Pearlescent Winter Glow: Subtle Iridescence For January

Design Features
Pearlescent winter glow nails feature a milky white base with a subtle pink shift, creating an ethereal and glowing effect.
Delicate hand-painted snowflake outlines in silver add a seasonal touch without overpowering the design.
This soft and dreamy look is perfect for those who love understated elegance.
How To Achieve This Look
Apply a milky white polish as the base and let it dry completely.
Use a fine brush to paint snowflake outlines in silver on two accent nails, keeping the lines delicate and precise.
Finish with a pearlescent topcoat to add the subtle pink shift and an overall glowing effect.
Why This Stands Out
The pearlescent finish and delicate snowflake details make this design a dreamy and sophisticated choice for January.
Its soft iridescence adds a touch of magic to winter nails.
Opal Stone Nails: Dreamy And Unique Winter Art

Design Features
Opal stone nails mimic the look of the shimmering gemstone with a milky white base and swirls of blue and pink.
The high-gloss finish adds depth, making the nails look like polished opals.
This design’s unique and artistic approach makes it a standout option for winter nail art.
How To Achieve This Look
Apply a milky white polish as the base and let it dry thoroughly.
Use a fine brush to swirl light blue and pink polishes onto each nail, blending them gently to mimic the look of an opal.
Finish with a high-gloss topcoat to enhance the gemstone effect and add depth.
Why This Stands Out
This design’s opalescent finish and artistic swirls create a one-of-a-kind winter look.
Its unique approach to nail art makes it a conversation starter and a favorite for January.
Classic French With A Twist: Elegance Meets Frosty Hues

Design Features
Classic French nails take on a frosty twist with a nude base and soft, frosty blue tips.
A fine line of silver glitter along the smile line adds a touch of sparkle, elevating the traditional look.
This design blends timeless elegance with a seasonal twist, making it perfect for winter.
How To Achieve This Look
Apply a nude polish as the base and let it dry completely.
Use a frosty blue polish to create French tips, ensuring precise application along the smile line.
Add a thin line of silver glitter polish where the blue and nude meet, and finish with a glossy topcoat to enhance the design.
Why This Stands Out
The frosty blue tips and glitter accents give the classic French manicure a modern and seasonal update.
Its elegance and versatility make it suitable for any occasion during winter.
Conclusion
As January unfolds, it brings an opportunity to refresh your style and embrace the magic of the season through nail art.
These designs capture the essence of winter, blending timeless elegance with modern trends.
From frosty blues and glittering accents to cozy textures and bold geometrics, each design offers something unique to make your nails stand out.
Let these ideas inspire you to experiment, get creative, and make your nails a reflection of your personality and the beauty of the season.
Whether you’re stepping into the New Year with shimmering glamour or cozying up with sweater-inspired textures, these designs ensure your nails will be nothing short of stunning.
Start 2025 with nails that are as captivating as the season itself!