Blue nail art designs have become a major trend in the world of beauty, offering a wide range of possibilities that cater to different styles, personalities, and seasons.
From soft and subtle shades to bold and vibrant hues, blue nails can be both calming and eye-catching, making them a favorite choice for many.
Whether you’re looking to create an elegant, sophisticated look with ombre and rhinestones or add a playful twist with tie-dye and butterfly accents, blue nail art offers something for everyone.
In this blog, we’ll explore 35 stunning blue nail art designs, complete with detailed techniques and inspiration to help you achieve the perfect manicure for any occasion.
1. Marbled Elegance Nail Art
Transform your nails into a masterpiece of sophisticated beauty with marbled elegance.
This design combines a soothing sky-blue base with delicate gold accents, creating a perfect balance of serenity and luxury.
Whether you’re looking to add a touch of class to your daily look or want a refined design for special occasions, these marbled nails are sure to captivate.
Creating the Marbled Effect
Step 1: Apply the Base Color
Start by applying a smooth layer of sky-blue nail polish as the base. Allow it to dry completely before moving to the next step.
Step 2: Create the Marble Effect
Using a fine brush or a dotting tool, gently add streaks of black and white polish onto the nails.
While the colors are still wet, use a small brush to swirl the colors together, creating a marbled effect that flows naturally across the nail.
Step 3: Add Gold Details
Once the marbled design has dried, add fine gold lines using gold striper polish or a gold leaf. Focus on creating delicate, organic veins to elevate the overall design.
Allow the design to dry before sealing it with a top coat.
Adding the Finishing Touch
Step 1: Apply a Glossy Top Coat
Finish the design by applying a high-shine top coat. This will not only add an extra layer of gloss but also protect the intricate design, ensuring it lasts longer.
Why It Works
Marbled Elegance Nail Art blends the tranquility of soft blues with the opulence of gold, creating a sophisticated design perfect for any occasion.
The swirls of color capture the beauty of natural stone, while the gold veins add an elevated, luxurious touch that catches the eye.
This design is timeless, bringing elegance to your nails without overwhelming the overall look.
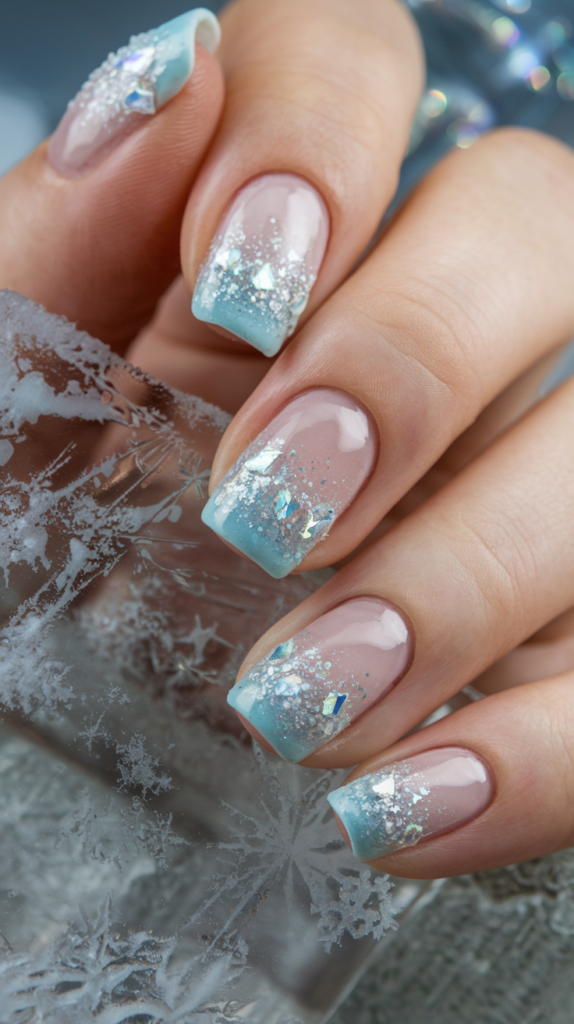
2. Frosted Snowfall Nail Art
Capture the serene beauty of a winter wonderland with Frosted Snowfall Nail Art. The soft blue base, complemented by a shimmering silver gradient, brings the magic of fresh snowfall right to your fingertips.
Perfect for the holiday season or any time you’re seeking an elegant and frosty design, this look adds a touch of sparkle to your style.
Creating the Frosted Gradient Effect
Step 1: Apply the Base Color
Begin by applying a soft sky-blue nail polish to all of your nails. Allow the polish to dry completely to ensure a smooth foundation.
Step 2: Create the Gradient Effect
Using a sponge or makeup sponge, gently apply silver glitter polish starting from the tip of each nail, blending it downward toward the base.
Step 3: Blend the Gradient
Lightly press the sponge onto the nails to blend the silver glitter into the blue base. The glitter should fade out as you move toward the nail’s base, creating a smooth ombre effect.
Step 4: Let It Dry
Allow the design to dry fully before moving to the next step.
Adding Sparkling Snowflakes
Step 1: Apply Snowflakes
Using a fine brush or stamping tool, paint small snowflakes near the tips of a few nails, or place them across the entire nail for a more whimsical effect.
Step 2: Top Off with a Shiny Coat
Once the snowflakes are in place, apply a glossy top coat to seal in the design and give your nails a brilliant shine.
Why It Works
Frosted Snowfall Nail Art combines the gentle beauty of soft blue with the dazzling shimmer of silver glitter, making it a perfect winter-inspired design.
The gradient effect mimics the gradual settling of snowflakes, while the glitter adds a festive and magical touch.
With the addition of delicate snowflakes and a glossy finish, this design radiates the beauty and charm of winter, making it ideal for seasonal celebrations or whenever you want to evoke a sense of frosty elegance.
3. Modern Moonlit French Tip Nail Art

Embrace the timeless beauty of French tips with a contemporary twist through the Modern Moonlit French Tip Nail Art.
This design fuses classic elegance with bold, sharp lines, offering a sophisticated and eye-catching look.
The soft nude base with striking blue and white accents creates a clean yet modern design that’s perfect for any occasion.
Creating the Moonlit French Tips
Step 1: Apply the Nude Base Color
Start by applying a neutral nude or beige base coat to all of your nails. Let it dry completely for a smooth foundation.
Step 2: Outline with Bold Blue
Using a fine brush or striper, outline the tips of your nails with a deep, rich blue polish. Focus on creating clean, sharp curves around the edges for a dramatic effect.
Step 3: Add White Curves
Above the blue tips, add a thin white crescent-shaped curve along the edge. This adds a playful contrast to the bold blue and enhances the geometric beauty of the design.
Step 4: Let It Dry
Allow the design to dry thoroughly before proceeding to the final step.
Finishing with a Matte Top Coat
Step 1: Apply a Matte Top Coat
Once your design is dry, apply a matte top coat to give the nails a sleek, modern finish. This will also help set the design and give it a velvety texture.
Why It Works
Modern Moonlit French Tip Nail Art combines the elegance of classic French tips with bold blue and white accents, creating a striking and contemporary design.
The smooth nude base provides a sophisticated backdrop for the vibrant blue tips, while the white curves add a fresh twist.
The matte finish elevates the entire look, making it modern, chic, and perfect for anyone who wants a minimalist yet fashion-forward nail design.
4. Geometric Blue and Lavender Nail Art
Elevate your nail game with Geometric Blue and Lavender Nail Art, where vibrant blue and soft lavender create a bold yet graceful contrast.
This design features clean lines, smooth curves, and a touch of artistry that will make your nails stand out with sophisticated flair.
Perfect for those who love modern and minimalist designs with a playful twist, this style is ideal for both everyday elegance and special occasions.
Creating the Geometric Blue and Lavender Design
Step 1: Apply the Lavender Base Color
Start by applying a soft lavender nail polish to all your nails. Ensure the base color is even and smooth, then let it dry completely.
Step 2: Outline with Bold Blue
Using a fine nail art brush or striper, outline the tips of your nails with a deep blue polish, creating sharp, clean lines. Focus on making the lines neat and precise.
Step 3: Add the White Geometric Shapes
Next, use white polish to draw smooth geometric curves or loops connecting the blue tips. These shapes should add contrast and create a visually interesting pattern that flows across the nails.
Step 4: Let It Dry
Allow the design to dry fully before applying a top coat for a sleek finish.
Adding the Finishing Touch
Step 1: Apply a Glossy Top Coat
Once the design is completely dry, apply a glossy top coat to seal the design and give it a shiny, smooth finish. This will also help protect the intricate geometric lines.
Why It Works
Geometric Blue and Lavender Nail Art brings together the calm elegance of lavender with the boldness of blue and the crispness of white.
The balance of soft and bold colors makes the design visually striking yet sophisticated, perfect for anyone who loves a modern, graphic-inspired nail look.
The combination of sharp lines and smooth curves adds a creative, artistic element, while the glossy finish ensures the design remains sleek and vibrant.
Got it! I’ll proceed with creating the blog section based on the image you uploaded. Here’s how the section could be framed:
5. Nautical Chic Nail Art
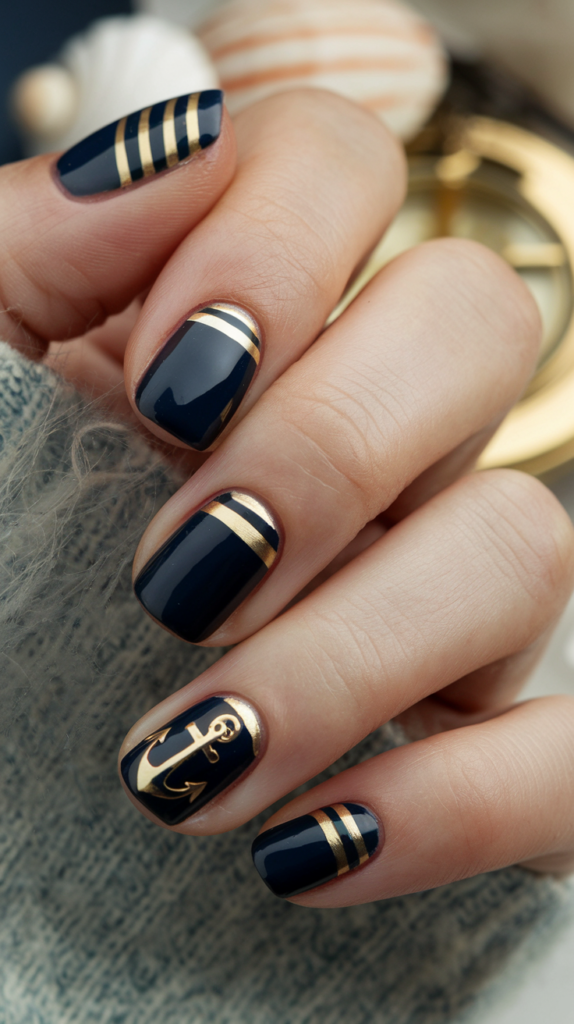
This Nautical Chic Nail Art combines elegant navy blue with gold accents to create a sophisticated maritime design, perfect for those who love a touch of nautical charm with a refined twist.
With the anchor symbol at its heart, this design is both stylish and timeless.
Creating the Nautical Base
Step 1: Apply a Navy Blue Base
Start by applying a navy blue nail polish to all your nails for a deep, sleek base color.
Step 2: Add Gold Accents
Using a fine brush, add gold lines across the nails. You can place them at the tips, across the center, or on the base of the nail. Keep the lines thin and neat for a modern, streamlined look.
Step 3: Let It Dry
Allow the gold lines to dry completely before proceeding with the next step.
Adding the Anchor Detail
Step 1: Paint the Anchor
On your accent nails (typically the ring or middle fingers), carefully paint an anchor design using gold polish. The anchor should be centered on the nail, making it the focal point of your design.
Step 2: Define the Anchor
Outline the anchor with a slightly thinner line of gold polish for sharp definition, ensuring it stands out against the navy background.
Step 3: Let It Dry
Allow the anchor design to dry thoroughly before sealing it with a top coat.
Finishing Touches: Gold Tips and Lines
Step 1: Add a Gold Tip
On a couple of nails, add a thin gold line at the tips for a French manicure-inspired look.
Step 2: Apply a Glossy Top Coat
Finish with a glossy top coat to seal in the design and give it a shiny, polished look.
Nautical Chic Nail Art combines a bold yet simple color palette with sophisticated details, making it the ideal design for those who appreciate classic style with a modern flair.
The navy blue base provides a calm, deep tone that enhances the gold accents, while the anchor detail adds a playful yet elegant touch.
The gold lines across the nails offer visual interest and elevate the overall design, making it perfect for nautical-themed events or casual outings with a chic vibe.
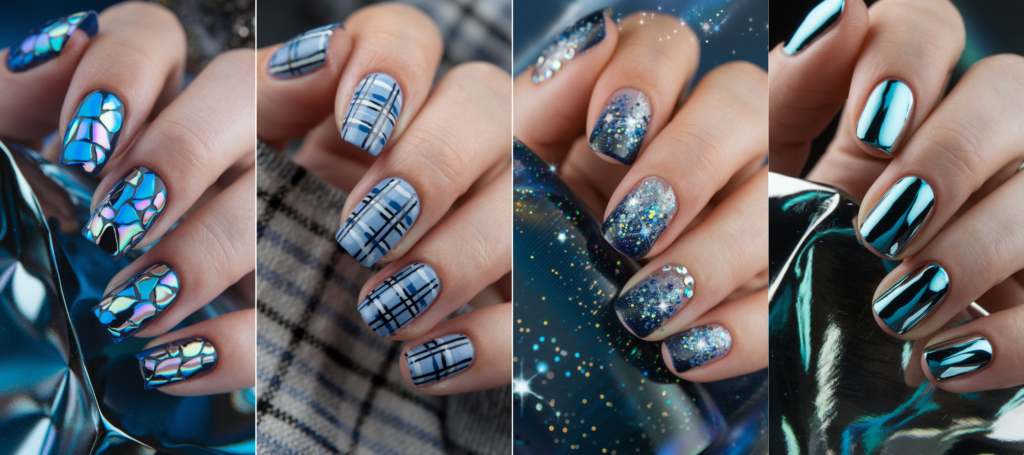
6. Galactic Dream Nail Art
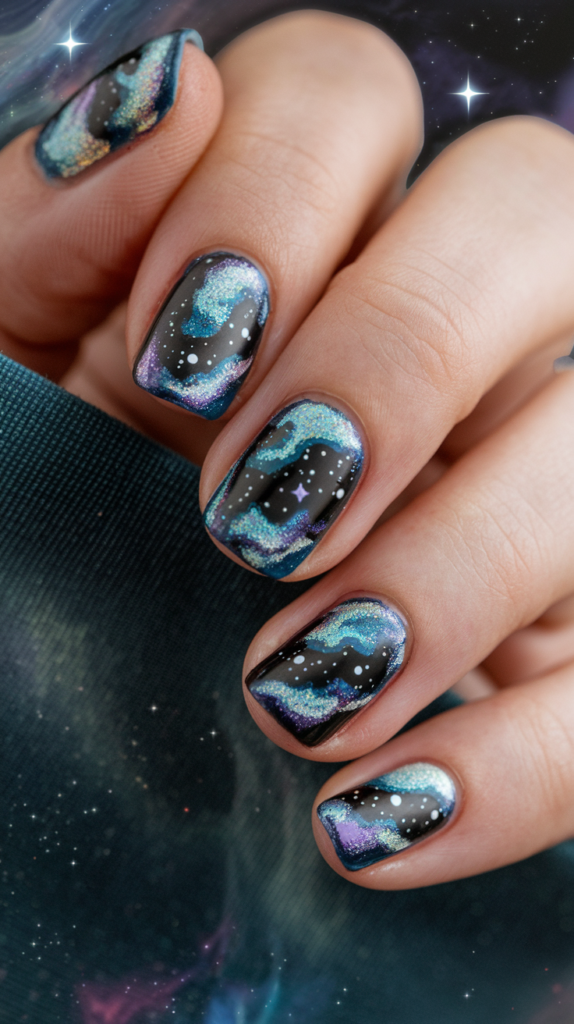
Galactic Dream Nail Art transports you to the cosmos with stunning swirls of vibrant colors set against a deep black base, creating a mesmerizing, starry night effect.
Perfect for those who love cosmic beauty with an ethereal twist.
Creating the Cosmic Swirl Effect
Step 1: Apply a Black Base
Start by applying a black nail polish to all your nails. This will serve as the deep space backdrop for your cosmic design.
Step 2: Layer on the Colors
Use a sponge to apply iridescent and holographic polishes in shades of blue, purple, and teal. Dab the sponge gently on the nail to create swirling, cloud-like effects that resemble distant galaxies.
Step 3: Blend the Colors
Gently blend the edges of the colored areas for a seamless transition between the shades. Focus on making the color patches look ethereal and fluid, just like a nebula.
Step 4: Let It Dry
Allow the colors to dry completely before moving on to the next step.
Adding Starry Details
Step 1: Dot the Stars
Use a fine dotting tool to add small, white dots across the nails, mimicking stars scattered throughout the galaxy. Make the stars larger in some areas to create the illusion of depth and dimension.
Step 2: Add Sparkles
For extra shine, apply a glitter top coat over the galaxy swirls to enhance the cosmic effect.
Step 3: Let It Dry
Allow the design to dry fully before applying a final glossy top coat to seal in the look.
Why It Works
Galactic Dream Nail Art captures the wonder and mystery of outer space with its vibrant swirling colors and starry details.
The combination of blues, purples, and teal creates a dynamic and visually striking effect, while the white stars add a touch of magic, making the nails look like a window to the stars.
The glittery top coat amplifies the cosmic feel, giving the design a glowing, celestial finish that is sure to stand out.
07. Golden Touch Nail Art
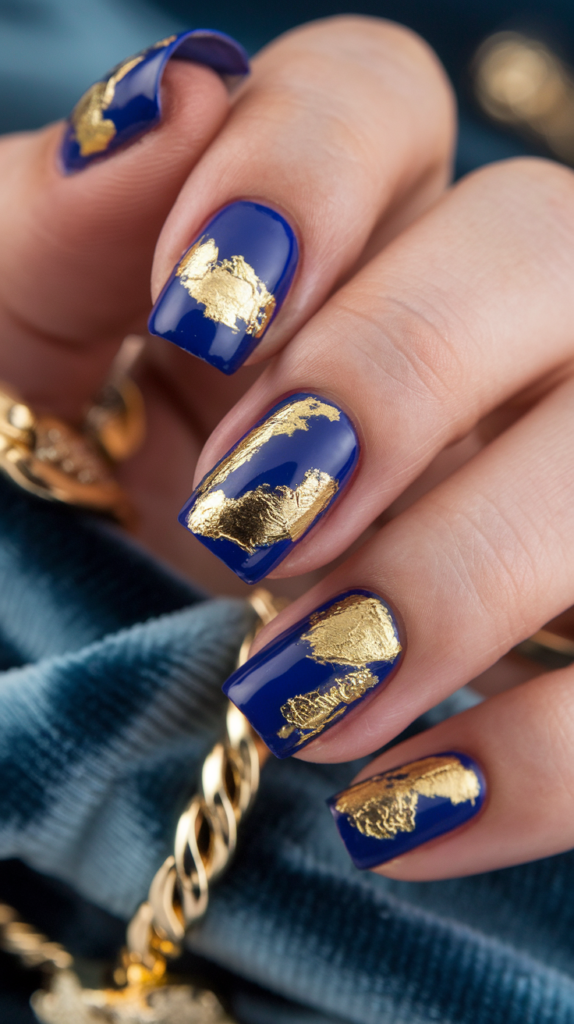
Golden Touch Nail Art is a stunning combination of bold blue hues and elegant gold accents. This design is perfect for making a statement, adding an element of luxury and sophistication to your nails.
The contrast between the deep blue and rich gold foil creates a look that is both modern and glamorous, ideal for evening events, parties, or any occasion that calls for a touch of opulence.
Creating the Bold Blue and Gold Foil Effect
Step 1: Apply the Base Color
Start by applying a deep, rich blue polish to your nails. This will act as the foundation of your design, providing a bold backdrop for the gold foil.
Ensure the base coat is smooth and fully dry before proceeding.
Step 2: Add Gold Foil Pieces
Once your blue polish is dry, carefully apply small pieces of gold foil to the nails.
Use tweezers or a fine brush to place the foil in irregular patterns, making sure some areas are heavily covered while others have a more subtle, scattered look.
Step 3: Seal the Design
After applying the gold foil, apply a top coat to seal the design.
This will ensure the foil stays in place and your nails maintain a sleek, glossy finish.
Finishing Touches: Elegant Shine
Step 1: Apply a Top Coat
To enhance the shine and keep the design looking fresh, apply a clear top coat over the entire nail.
This step adds an extra layer of protection and gives the nails a glossy, polished finish.
Step 2: Let It Dry Completely
Allow the top coat to dry thoroughly to prevent smudging the delicate foil detail.
Why It Works
Golden Touch Nail Art captures the perfect blend of bold and elegant. The deep blue serves as a striking canvas, while the gold foil adds a high-end, luxe feel.
The irregular patterns of the gold foil create a sense of uniqueness and artistry, giving each nail a one-of-a-kind look.
This design stands out with its simplicity and sophistication, making it ideal for anyone looking to add a touch of glamour to their look.
8. Cloudy Sky Nail Art

Cloudy Sky Nail Art brings the serene beauty of a clear, open sky to your fingertips.
The soft, pastel blue background with delicate cloud designs evokes a feeling of peace and calm, making this design perfect for those who appreciate the soothing elements of nature.
Ideal for spring or any season that calls for light, airy vibes, this design adds a whimsical touch to your look.
Creating the Soft Cloudy Effect
Step 1: Apply the Sky Blue Base
Start by applying a smooth layer of pastel blue polish to your nails.
Make sure the base is even and covers the entire nail to provide a clear sky effect.
Step 2: Add the Cloud Designs
Using white polish and a small brush, carefully paint cloud shapes onto each nail.
Vary the sizes of the clouds for a more dynamic look, and leave some areas of the blue base visible for contrast.
Step 3: Outline the Clouds
For a more defined effect, use black polish to outline the edges of the clouds.
This creates a crisp, eye-catching contrast with the soft blue and white tones.
Final Touches: Adding Gloss and Shine
Step 1: Apply a Top Coat
Finish your design by applying a clear, glossy top coat.
This step will seal the cloud art in place and provide a smooth, shiny finish that enhances the overall appearance.
Step 2: Let It Dry Completely
Allow the design to dry fully to avoid smudging the intricate cloud details.
Why It Works
Cloudy Sky Nail Art captures the peaceful essence of a clear sky, combining soft pastel blue and white cloud shapes for a whimsical look.
The outlined clouds stand out beautifully against the light blue background, creating a striking yet calming effect.
This design is perfect for anyone seeking a cute, minimalist nail art style with a touch of nature-inspired beauty.
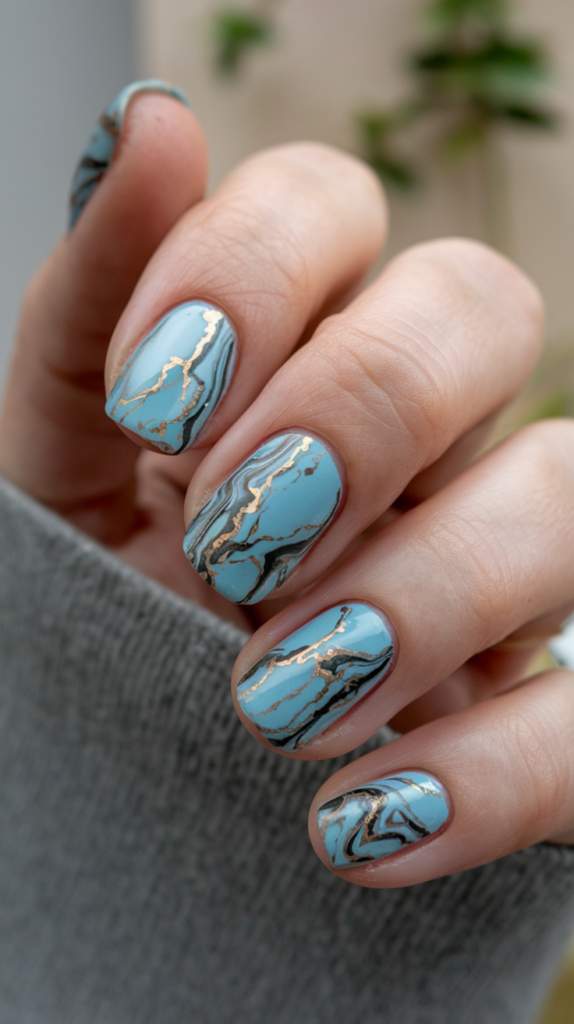
9. Turquoise Marble Nail Art
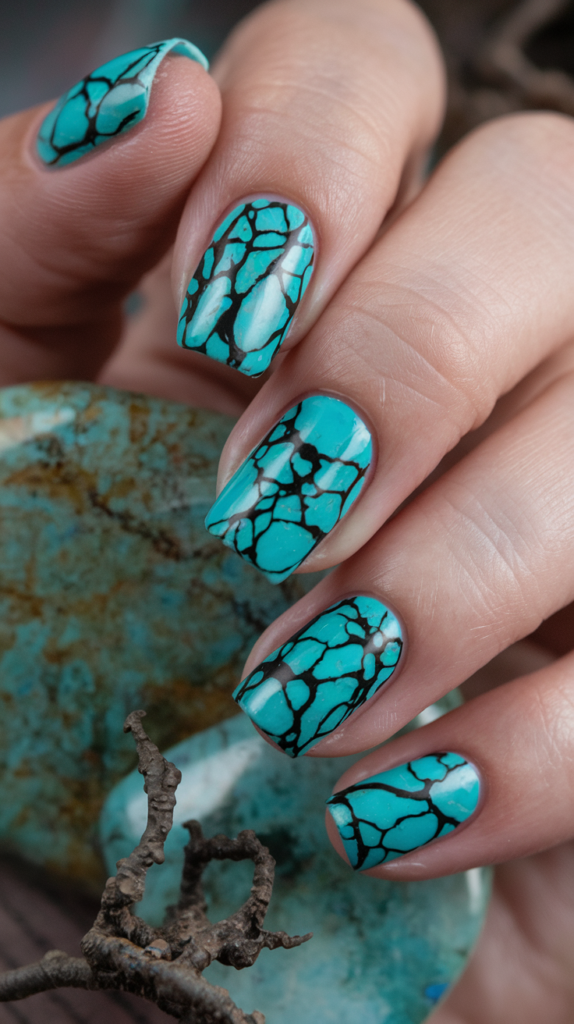
Turquoise Marble Nail Art offers a stunning and unique design inspired by the vibrant hues of turquoise stone. The intricate marbling effect, paired with bold black veins, creates a look that is both sophisticated and edgy.
This design is perfect for anyone who loves the natural beauty of stone textures combined with a modern, artistic flair.
Creating the Turquoise and Black Marble Effect
Step 1: Apply the Turquoise Base
Begin by applying a rich turquoise polish to your nails.
Ensure an even coat for a smooth, vibrant base, allowing it to dry fully before moving on to the next step.
Step 2: Create the Marbled Effect
Once the base color is dry, use a black nail art brush or a fine liner to draw thin veins across your nails.
Make the lines irregular, mimicking the natural cracks found in turquoise stone.
Step 3: Add Depth with White Highlights
For added dimension, use white polish to lightly add highlights where the black veins cross.
This will give the marbled effect a more realistic look, similar to the veins of natural stone.
Sealing the Design with Gloss
Step 1: Apply a Top Coat
Seal the design with a clear, glossy top coat to protect the marbled effect.
This step will add shine and ensure the design lasts longer.
Step 2: Let It Dry Completely
Allow the nails to dry fully to avoid smudging the delicate marble detail.
Why It Works
Turquoise Marble Nail Art combines the natural allure of turquoise with bold, artistic black veins for a stunning and unique design.
The marbled effect creates a visually appealing texture, while the white highlights add depth and realism.
This design is perfect for anyone looking to add a touch of sophistication and creativity to their nails with a nature-inspired theme.
10. Blue Chic French Tip Nail Art

Blue Chic French Tip Nail Art offers a modern twist on the classic French manicure, combining bold blue tips with a touch of sparkle for a fresh and elegant look. The vibrant blue creates a striking contrast with the natural base, while the glitter adds a glamorous finish, perfect for both casual and formal events.
This design is ideal for those seeking a stylish, understated yet eye-catching nail art style.
Creating the Blue French Tips with Glitter Accents
Step 1: Apply the Base Color
Start with a neutral or nude polish as your base color to give the nails a clean and natural appearance.
Allow the base coat to dry completely before moving to the next step.
Step 2: Create the Bold Blue Tips
Using a bright blue polish, carefully paint a bold French tip at the end of each nail.
Ensure the blue line is clean and even, creating a smooth, crisp edge.
Step 3: Add Glitter Accents
On a few nails, add a light dusting of fine silver or holographic glitter around the blue tips.
This will create a subtle sparkling effect, adding an extra layer of elegance to the design.
Sealing the Design with a Glossy Finish
Step 1: Apply a Top Coat
Finish the look by applying a glossy, clear top coat to the entire nail.
This will ensure that the glitter stays in place and adds a smooth, shiny finish to your nails.
Step 2: Let It Dry Completely
Allow the nails to dry fully to avoid smudging the intricate glitter accents.
Why It Works
Blue Chic French Tip Nail Art gives the timeless French manicure a bold and fresh update with vibrant blue tips.
The combination of the chic blue tips and the sparkly glitter adds a sophisticated and playful contrast.
This design is a perfect balance of classic elegance and modern flair, making it ideal for anyone looking to elevate their nail game with a touch of color and shine.
11. Butterfly Dreams Nail Art
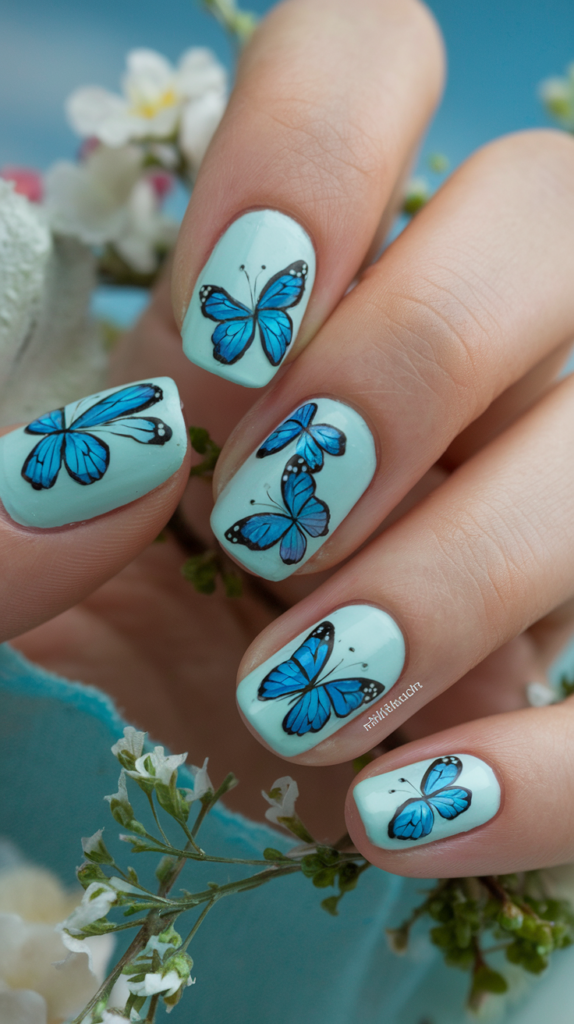
Butterfly Dreams Nail Art brings the beauty of delicate butterflies to your nails with a soft pastel blue backdrop.
The detailed butterfly designs, with their striking blue wings, evoke a sense of freedom and transformation, making this design both elegant and whimsical.
Perfect for spring or any occasion that celebrates nature’s beauty, this design adds a light and airy feel to your look.
Creating the Butterfly Design
Step 1: Apply the Soft Blue Base
Start by applying a soft pastel blue polish to your nails.
This will serve as the serene background for the butterfly designs. Make sure the base coat is smooth and completely dry before moving on.
Step 2: Paint the Butterfly Designs
Using black and blue polish, paint butterfly shapes on each nail.
Vary the size and orientation of the butterflies for a dynamic and natural look.
For added depth, use a slightly darker shade of blue to add highlights and shadow to the wings.
Step 3: Add Fine Details
Using a fine brush or nail art pen, outline the butterflies with black polish and add small dots for extra detailing on the wings.
This will enhance the design and give it a more realistic, intricate appearance.
Sealing the Design with a Top Coat
Step 1: Apply a Clear Top Coat
Seal the butterfly designs in place by applying a clear top coat.
This will help preserve the delicate details and give your nails a glossy, polished finish.
Step 2: Let It Dry Completely
Allow the top coat to dry thoroughly before using your hands to avoid smudging the delicate butterfly art.
Why It Works
Butterfly Dreams Nail Art captures the elegance and beauty of butterflies with soft pastel blue and intricate detailing.
The contrast between the soft background and the bold butterflies creates a stunning visual effect.
This design is perfect for anyone who loves nature-inspired nail art with a delicate, dreamy aesthetic.
12. Abstract Waves Nail Art
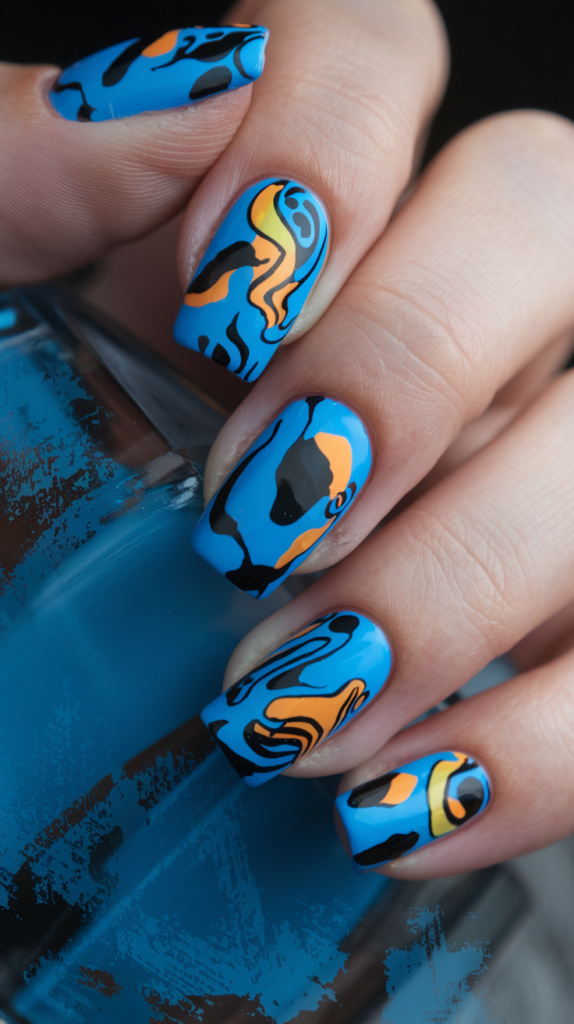
Abstract Waves Nail Art brings a bold, artistic flair to your nails with vibrant blue, black, and orange swirls.
This design draws inspiration from abstract art, featuring fluid, wavy patterns that create an eye-catching, modern look.
The combination of colors and shapes offers a fresh and edgy take on nail art.
Perfect for those who enjoy unique and expressive designs, this nail art adds a touch of creativity to any occasion.
Creating the Abstract Wave Design
Step 1: Apply the Base Color
Begin by applying a vibrant blue polish to your nails.
Make sure the base coat is smooth and even for a consistent background.
Step 2: Add the Bold Swirls
Using black and orange nail polish, paint abstract, flowing lines across the nails.
Focus on creating smooth curves and waves that cross over each other in an organic, unpredictable way.
Step 3: Add Accents and Details
Once the swirls are dry, you can add smaller accents in contrasting colors, such as yellow or white, to enhance the design.
These highlights can be used to define certain areas and add depth to the overall look.
Sealing the Design with a Top Coat
Step 1: Apply a Glossy Top Coat
Finish your design by applying a clear top coat.
This will not only seal the colors in place but also give the nails a glossy, polished finish.
Step 2: Let It Dry Completely
Allow the top coat to dry fully before touching the nails to avoid smudging any of the intricate details.
Why It Works
Abstract Waves Nail Art offers a dynamic and artistic look, blending vibrant blue with bold black and orange swirls.
The fluid, wavy patterns create an interesting contrast against the solid background, while the use of accents enhances the design’s depth and complexity.
This design is perfect for anyone looking to express their creativity with a modern, artistic nail art style.
13. Reflective Chrome Nail Art
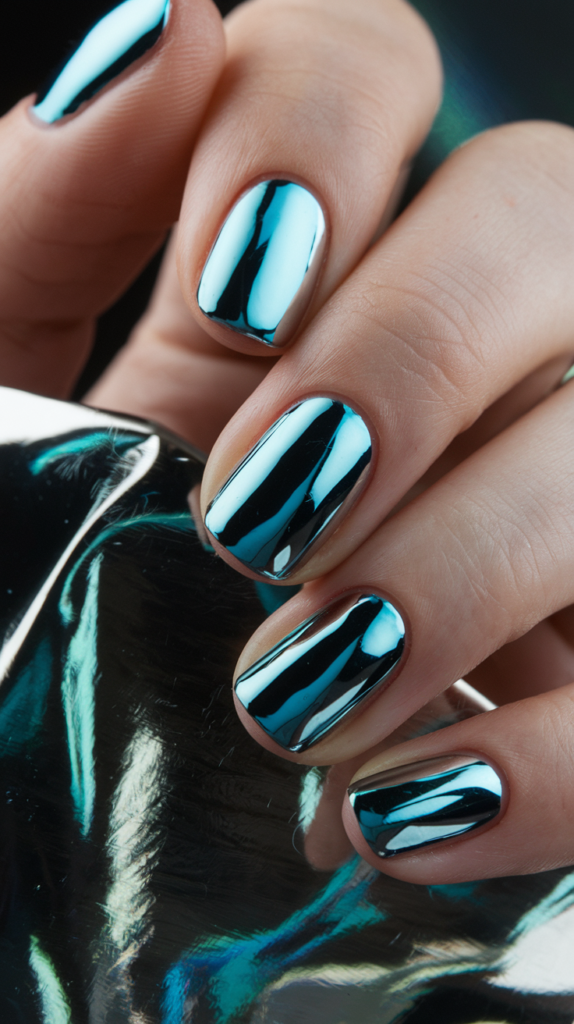
Add a futuristic twist to your nails with sleek, reflective chrome finishes that capture light and attention with every angle.
This design is perfect for those who enjoy bold, high-impact looks, making it ideal for special occasions, or anyone who wants to make a statement with their nails.
Creating a Mirror-Like Finish
Step 1: Apply a Base Color
Start by applying a smooth, glossy black or deep base coat to your nails. This creates a strong foundation for the chrome powder to adhere to, enhancing the reflective effect.
Step 2: Apply the Chrome Powder
Once the base coat is dry, use a sponge applicator or your fingertip to gently rub a chrome powder onto your nails. Work in small sections, ensuring even coverage for a sleek, shiny finish.
Step 3: Buff for Perfection
Buff the chrome powder into the nails, ensuring no uneven patches remain. The more you buff, the more reflective the finish becomes, resembling a polished metal surface.
Adding the Finishing Touches
Step 1: Seal the Design
Apply a thin layer of top coat to seal the chrome design. Be sure to use a gel-based or no-wipe top coat to preserve the mirror-like effect.
Step 2: Allow the Nails to Cure
If using a gel top coat, cure your nails under a UV lamp for the recommended time. This ensures the design is long-lasting and durable.
Why It Works
Reflective Chrome Nail Art stands out with its eye-catching mirror-like finish, giving your nails a sleek, modern look that catches the light from every angle.
The deep, dark base enhances the chrome’s reflective properties, creating a high-contrast and striking design. The smooth, metallic shine adds a futuristic flair, perfect for anyone looking to add a bold, polished touch to their nail style.
14. Sophisticated Midnight Blue Nail Art

Embrace the allure of timeless elegance with this sophisticated midnight blue nail design.
The deep, glossy shade exudes a sense of mystery and luxury, making it the perfect choice for any chic occasion or evening out.
Achieving the Glossy Midnight Look
Step 1: Apply the Base Color
Begin by applying a high-quality navy or midnight blue polish as the base coat. Ensure that the application is smooth and even to create a flawless backdrop.
Step 2: Create the Glossy Finish
For that high-shine finish, apply a layer of top coat that enhances the depth of the blue, making it look sleek and glass-like. This will also help the color to last longer without chipping.
Step 3: Dry and Seal
Allow the nails to dry completely before applying a final sealing layer of top coat to lock in the glossy effect. This step ensures your nails remain smooth and durable, preserving the rich color.
Why It Works
The midnight blue color creates a striking visual contrast against your skin, while the glossy finish adds a sophisticated touch that catches the light.
This design works well for both casual and formal events, offering versatility and elegance.
The smooth, shiny surface of the nails not only highlights the depth of the blue but also ensures a refined, polished appearance that is sure to turn heads.
15. Holographic French Tip Nail Art
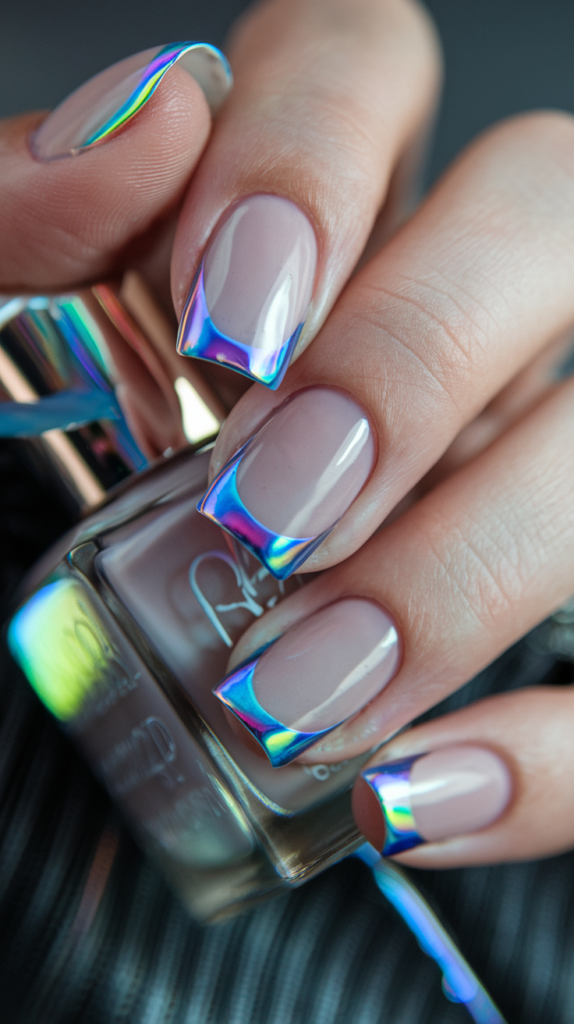
Add a futuristic twist to the classic French tip with this mesmerizing holographic design.
The iridescent, color-shifting tips stand out beautifully against a soft nude base, creating a chic and eye-catching look. Perfect for those who want a subtle yet glamorous style, this nail art is sure to impress.
Creating the Holographic French Tips
Step 1: Apply the Base Color
Start by applying a nude or soft pink polish as the base. This neutral shade will allow the holographic tips to take center stage, providing the perfect backdrop.
Step 2: Shape the French Tips
Once the base is dry, use a fine brush or nail tape to carefully paint the tips of your nails with a holographic or iridescent polish. Make sure the lines are clean and smooth for a polished finish.
Step 3: Seal the Design
Once the holographic tips have dried, apply a clear top coat to seal the design. This will enhance the shine and ensure the holographic effect lasts longer.
Why It Works
The soft nude base allows the holographic tips to shine without overwhelming the overall look, offering a sophisticated yet striking contrast.
The iridescent finish brings an element of surprise and glamour, making the design stand out in any light.
This nail art is versatile and perfect for both day-to-day wear and special occasions, ensuring you make a bold statement with every hand gesture.
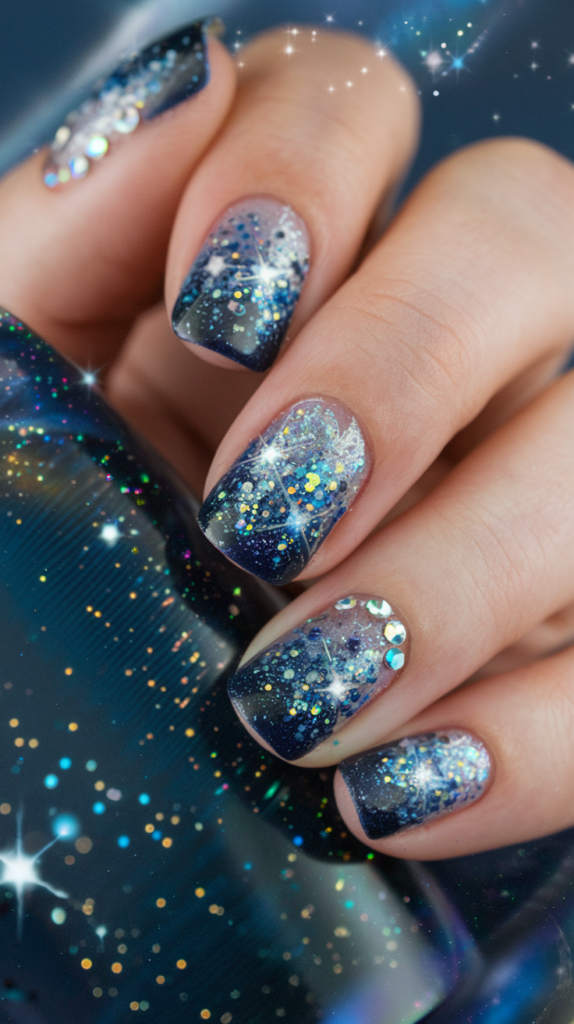
16. Celestial Starry Night Nail Art

Celestial Starry Night nails bring the beauty of the night sky to your fingertips with shimmering stars scattered across a deep, cosmic backdrop.
The dark navy base, complemented by delicate gold star accents, creates a mesmerizing design that evokes a sense of wonder and elegance.
Perfect for evening events, stargazing nights, or whenever you want to add a touch of cosmic charm to your look, these nails will undoubtedly captivate.
Creating the Cosmic Base
Step 1: Apply the Navy Base Color
Start by applying a deep navy blue polish to your nails. This rich color will serve as the perfect backdrop to make the gold stars stand out.
Step 2: Let It Dry
Allow the navy polish to dry completely before moving on to the next step. A well-dried base ensures smooth application for the starry details.
Adding the Gold Star Accents
Step 1: Place the Stars
Using a fine brush or nail art tool, carefully paint small gold stars across each nail. Position the stars randomly to create a scattered effect that mimics a starlit sky.
Step 2: Add Smaller Stars and Dots
Fill in the spaces between the larger stars with smaller gold dots. This adds depth to the design and mimics the twinkling effect of distant stars.
Step 3: Let It Dry
Allow the stars and dots to dry thoroughly to avoid smudging.
Finishing Touches: Top Coat
Step 1: Apply a Matte or Glossy Top Coat
To seal in the design, apply a matte or glossy top coat. A glossy top coat will enhance the shine of the gold stars, while a matte finish will give the design a sophisticated, velvety texture.
Why It Works
Celestial Starry Night Nail Art captures the enchanting beauty of the night sky, combining rich, cosmic navy with gleaming gold stars for a timeless and elegant design.
The placement of the gold stars, along with the twinkling dots, creates a sense of depth and movement, mimicking the vastness of the universe.
The final touch of a top coat ensures that your stargazing nails remain flawless and radiant, whether you choose a glossy or matte finish.
17. Holographic Shattered Glass Nail Art
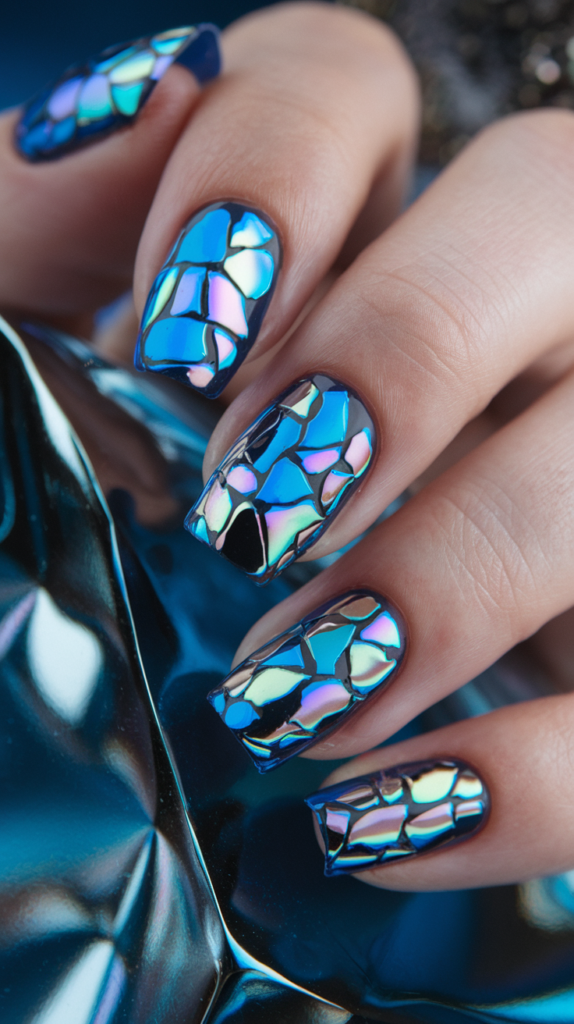
Holographic Shattered Glass nails offer a futuristic and stunning design that captures light in mesmerizing ways.
The iridescent, angular pieces mirror the look of shattered glass, creating a multi-dimensional effect that is both bold and sophisticated.
Ideal for parties, evening events, or whenever you want your nails to sparkle with a unique touch, these nails are guaranteed to make a statement.
Creating the Shattered Glass Effect
Step 1: Apply the Base Color
Begin by applying a rich blue or deep metallic polish as the base. The base color will create a vibrant backdrop for the holographic shards, enhancing the effect.
Step 2: Let It Dry
Allow the base color to dry completely before proceeding. A smooth, dry base is essential for placing the glass pieces accurately.
Applying the Holographic Glass Shards
Step 1: Cut the Holographic Film
Using holographic nail film or special nail art shards, cut them into irregular pieces, mimicking the shape of broken glass.
Step 2: Apply the Shards
Carefully place the shards onto your nails in a random pattern, ensuring some overlap to achieve the shattered effect. Press each shard gently to ensure it sticks securely to the nail.
Step 3: Seal the Design
Once you’ve placed the shards, apply a thin layer of clear top coat over the nails. This will seal the shards and give the design a smooth, glossy finish.
Finishing Touches: Top Coat for Shine
Step 1: Apply a Glossy Top Coat
For an extra shine, apply a glossy top coat to seal the entire design. This will enhance the holographic shine and give your nails a sleek, smooth finish.
Why It Works
Holographic Shattered Glass Nail Art creates a stunning contrast between the deep base color and the reflective shards, giving the nails an almost ethereal, glowing effect.
The irregular placement of the shards adds a sense of spontaneity and visual intrigue, while the holographic finish ensures that the design catches the light from every angle.
With its dynamic, high-shine look, this design is perfect for those who want a bold, attention-grabbing manicure that is truly one-of-a-kind.
18. Delicate Blossom Nail Art

Delicate Blossom nails capture the soft beauty of spring with elegant hand-painted flowers that dance across a serene pastel blue backdrop.
The light, airy design is perfect for adding a touch of femininity and grace to your look, with soft blooms complemented by subtle leaves.
Ideal for weddings, springtime gatherings, or whenever you want a polished and delicate nail design, this look is both timeless and refreshing.
Creating the Soft Blue Base
Step 1: Apply the Soft Blue Base Color
Begin by applying a pastel blue polish to your nails. This soothing shade sets a calm and elegant foundation for the floral art.
Step 2: Let It Dry
Allow the blue polish to dry completely before moving forward. This ensures the base is smooth and even, providing a perfect canvas for the flowers.
Painting the Floral Design
Step 1: Outline the Flowers
Using a thin nail art brush and white polish, carefully outline the petals of each flower on your nails. Create soft, rounded petals with slight curves to mimic delicate blossoms.
Step 2: Add the Petal Details
Fill in the flowers with a slightly darker shade of white or off-white to give the petals depth. Add small strokes near the edges of each petal to create texture.
Step 3: Paint the Leaves
Using a green polish, paint slender leaves around the flowers. Ensure the leaves have a light, fluid appearance, mimicking natural foliage.
Step 4: Let It Dry
Allow the floral art to dry completely before moving to the final step. This will ensure no smudging occurs during the top coat application.
Finishing Touches: Top Coat
Step 1: Apply a Clear Top Coat
To seal the design, apply a clear top coat to protect the artwork and give your nails a smooth, shiny finish.
Why It Works
Delicate Blossom Nail Art captures the soft elegance of nature with its simple yet beautiful floral design.
The combination of pastel blue and hand-painted flowers creates a serene, calming effect, perfect for anyone seeking a gentle yet sophisticated manicure.
The intricate floral details add a touch of artistic flair, while the delicate leaves bring balance to the design, making it ideal for spring or special occasions.
The clear top coat ensures the design remains vibrant and protected, offering a glossy finish that enhances the overall delicate look.
19. Midnight Sparkle Nail Art

Midnight Sparkle nails combine the deep richness of navy with dazzling silver accents, creating a design that’s both elegant and festive.
The contrast of dark blue with sparkling silver stripes adds a sophisticated touch that makes it perfect for night events, parties, or whenever you want your nails to shine with effortless glamour.
Creating the Deep Blue Base
Step 1: Apply the Navy Base Color
Start by applying a rich navy blue polish to your nails. This deep, striking color will provide a bold backdrop for the shimmering silver details.
Step 2: Let It Dry
Allow the base color to dry completely before moving on. This ensures the blue remains smooth and even for a flawless application of the accent details.
Adding the Sparkling Silver Stripes
Step 1: Apply a Striping Tape
Use striping tape to create precise diagonal lines on your nails. Position the tape across the nails in a crisscross pattern, making sure the lines are even.
Step 2: Add Silver Glitter
Carefully apply a silver glitter polish over the tape, ensuring that it fully covers the exposed areas. The glitter should be dense enough to create a striking contrast with the navy base.
Step 3: Remove the Tape
Once the glitter has dried slightly, gently peel off the striping tape to reveal clean, sharp lines. The silver glitter will leave behind bold, sparkling stripes on your nails.
Step 4: Let It Dry
Allow the design to dry completely to prevent smudging.
Finishing Touches: Top Coat
Step 1: Apply a Clear Top Coat
To seal in the design and give your nails a glossy finish, apply a clear top coat over the entire nail. This will smooth out the glitter and provide a sleek, polished appearance.
Why It Works
Midnight Sparkle Nail Art creates an irresistible contrast between the deep blue base and shimmering silver accents, making it perfect for a refined yet eye-catching look.
The diagonal stripes of glitter add a modern, dynamic feel to the design, while the sleek finish ensures the nails stay smooth and polished.
Whether you’re heading to a formal event or a night out, these nails will add a touch of sparkle and sophistication to your look.
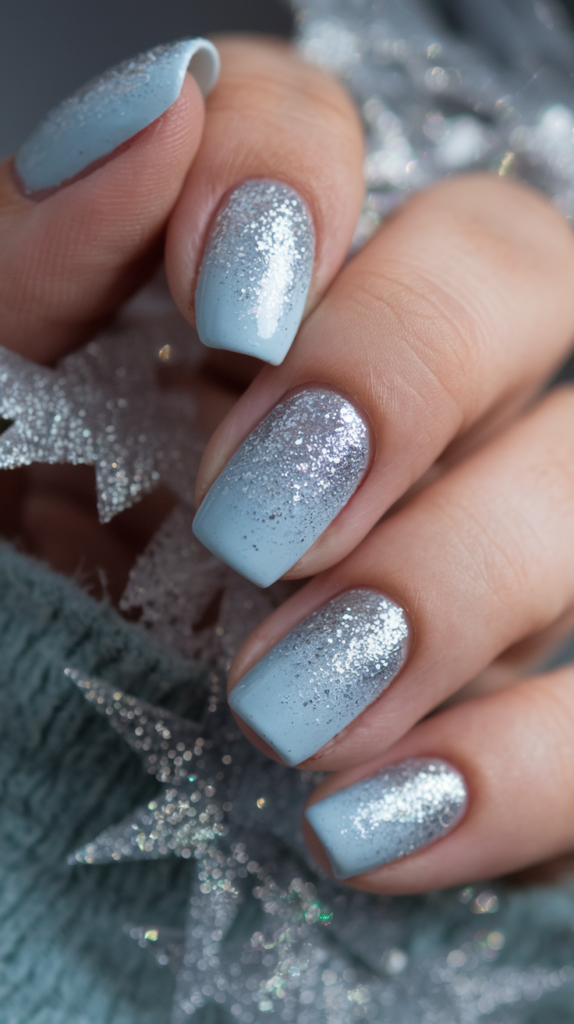
20. Glittering Ice Blue Nail Art
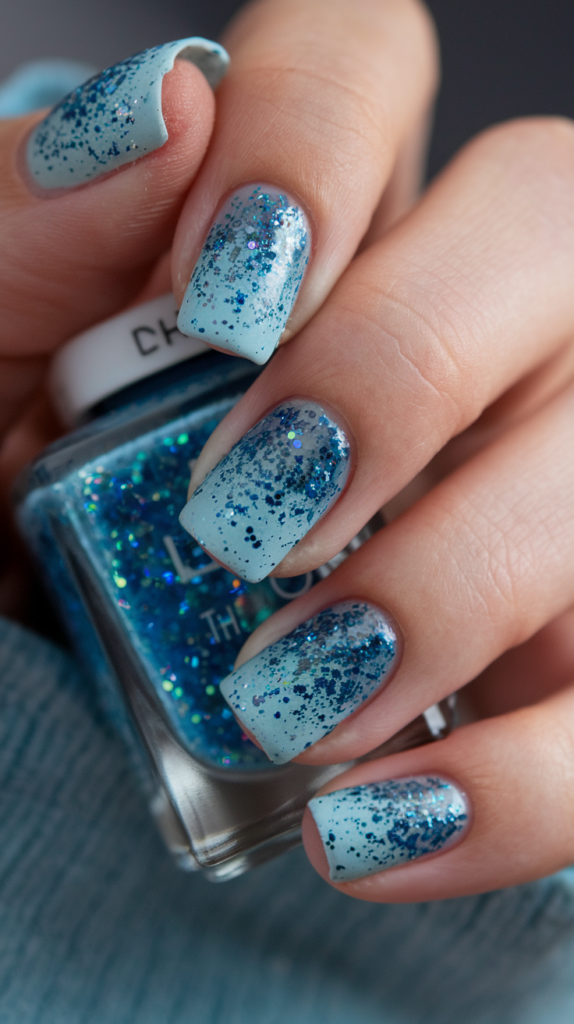
Glittering Ice Blue nails offer a sparkling, cool-toned design that combines frosty blue hues with eye-catching glitter.
The gradient effect from soft blue to glittery blue tips evokes the freshness of a winter wonderland, making it perfect for festive occasions or whenever you want your nails to shimmer like ice.
Ideal for winter parties, New Year’s Eve, or adding a touch of sparkle to your everyday look, these nails will create a dazzling effect that catches the light from every angle.
Creating the Ice Blue Base
Step 1: Apply the Soft Blue Base Color
Start by applying a soft, icy blue polish to your nails. This cool, serene shade creates a calming foundation for the glitter to stand out.
Step 2: Let It Dry
Allow the base color to dry completely before adding the glitter. A dry base will ensure the glitter adheres smoothly without clumping.
Adding the Glitter Gradient
Step 1: Apply the Glitter to the Tips
Using a fine glitter polish or loose glitter, carefully apply the glitter to the tips of your nails. Focus on building up the glitter concentration near the tips, gradually fading it down toward the base of the nails.
Step 2: Blend the Glitter
Using a makeup sponge or small brush, gently blend the glitter into the blue base for a smooth gradient effect. This will give your nails a flowing transition from solid color to sparkling tips.
Step 3: Let It Dry
Allow the design to dry thoroughly before moving to the next step to avoid smudging the glitter.
Finishing Touches: Top Coat
Step 1: Apply a Clear Top Coat
To seal in the glitter and ensure it stays in place, apply a clear top coat. This will also give your nails a smooth, glossy finish and enhance the shimmer of the glitter.
Why It Works
Glittering Ice Blue Nail Art captures the essence of a winter wonderland with its icy blue gradient and sparkling glitter details.
The smooth gradient effect creates a soft, elegant transition from the base to the tips, making it ideal for any occasion that requires a touch of festive glamour.
The glitter adds dimension and depth to the design, making your nails shimmer like ice in the light. With the addition of a top coat, your nails remain sealed and glossy, ensuring a long-lasting, dazzling finish.
21. Golden Edge Nail Art
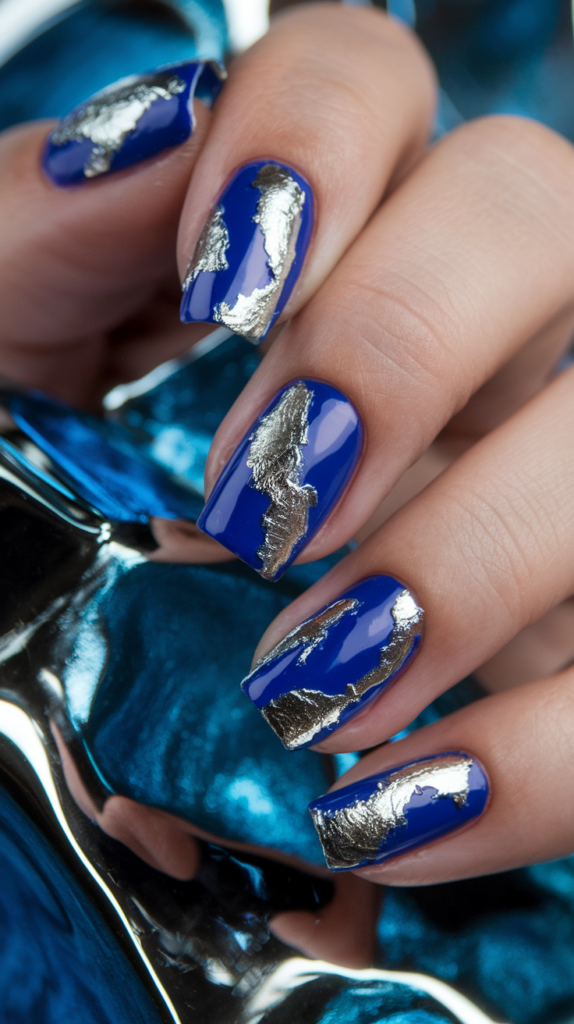
Golden Edge nails are a stunning combination of vibrant royal blue and luxurious gold accents, creating a bold, modern design that exudes elegance.
The contrast between the deep blue base and striking gold foil adds a sophisticated touch, making this design perfect for upscale events, evenings out, or whenever you want to elevate your look.
Creating the Bold Blue Base
Step 1: Apply the Royal Blue Base Color
Start by applying a rich royal blue polish to your nails. This deep, vivid color will serve as the perfect base to contrast with the gold accents.
Step 2: Let It Dry
Allow the royal blue polish to dry completely before moving on to the next step to ensure smooth and even application of the gold foil.
Adding the Golden Foil Details
Step 1: Apply a Thin Layer of Top Coat
Apply a thin layer of clear top coat where you want to place the gold foil. Make sure the layer is not too thick, as it should be just enough to adhere the foil.
Step 2: Apply the Gold Foil
Carefully apply pieces of gold foil to the top coat. Gently press the foil onto the nails with your fingers or a soft brush, ensuring that the foil sticks in an irregular, abstract pattern, leaving some areas of the blue base exposed.
Step 3: Let It Dry
Allow the foil to set and dry completely before proceeding to the final step.
Finishing Touches: Top Coat for a Glossy Finish
Step 1: Apply a Clear Top Coat
To seal in the design and ensure it lasts, apply a clear top coat over the entire nail. This will smooth out the gold foil and provide a shiny, polished finish.
Why It Works
Golden Edge Nail Art combines the richness of royal blue with the luxurious shine of gold foil to create a look that is bold and sophisticated.
The abstract placement of the gold foil adds a creative, artistic touch to the design, while the glossy top coat ensures a sleek, flawless finish.
Whether for a formal event or a night out, these nails will provide an elegant and unique statement with a touch of glamour.
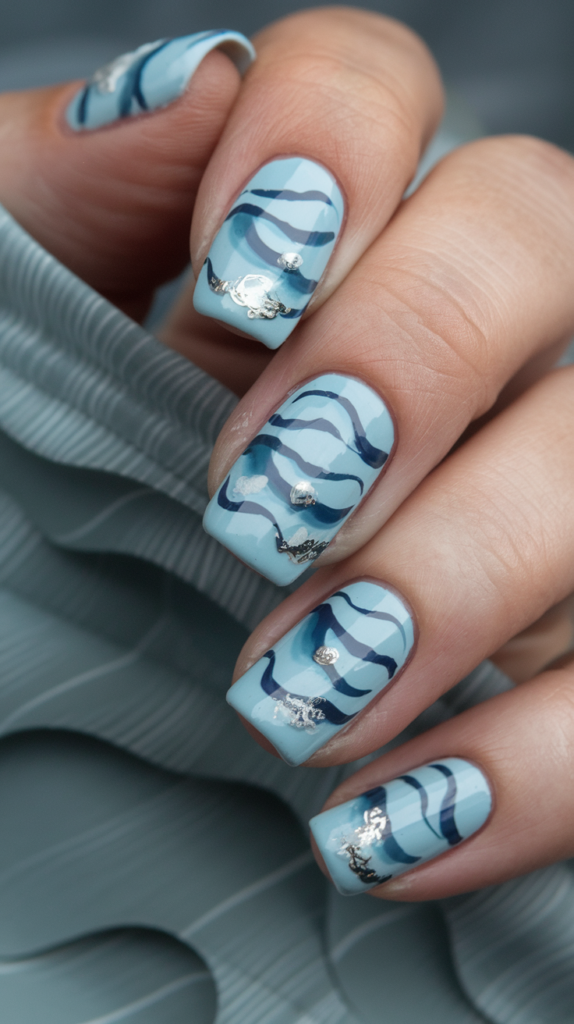
22. Ocean Wave Nail Art
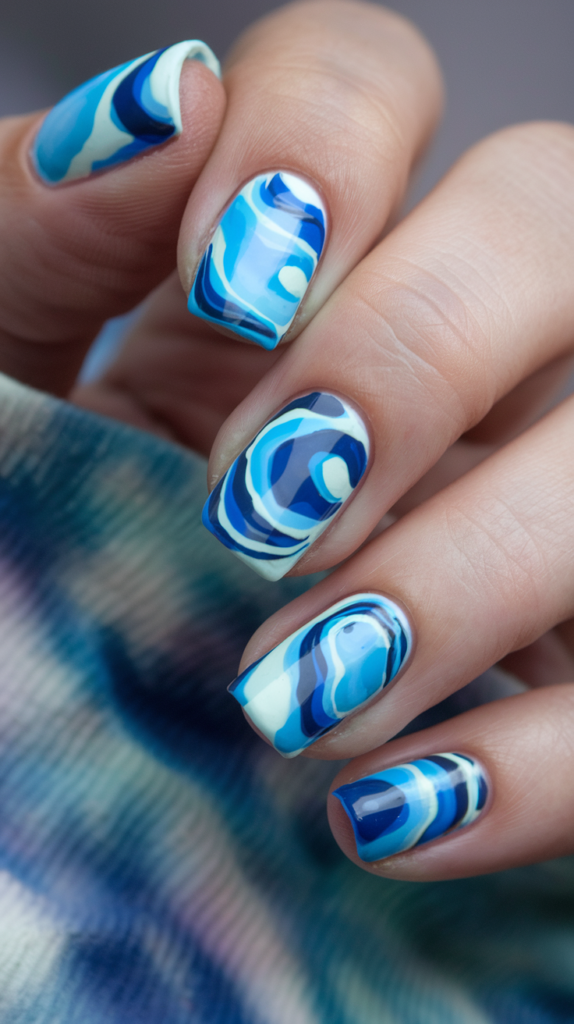
Ocean Wave nails bring the refreshing energy of the sea to your fingertips with fluid, swirling patterns in various shades of blue. This mesmerizing design mimics the motion of ocean waves, combining deep blues, light blues, and soft whites for a cool, dynamic effect that feels both calming and vibrant.
Perfect for summer, beach outings, or whenever you want to capture the tranquil beauty of the sea, these nails will make you feel like you’re riding the waves.
Creating the Fluid Blue Base
Step 1: Apply the Base Color
Start by applying a light blue or pastel base color to your nails. This color will serve as the backdrop for the swirling waves, giving them space to flow naturally.
Step 2: Let It Dry
Allow the base color to dry completely before moving on to the next step. This ensures a smooth, even surface for the subsequent colors.
Painting the Ocean Waves
Step 1: Apply the First Wave Color
Using a medium blue polish, apply small curved strokes along the top and sides of the nail to create the first wave. These curves should look fluid, mimicking the natural movement of water.
Step 2: Add the Second Wave Color
Next, add a darker blue color to some of the areas where you want the waves to have depth. Focus on adding shadows and highlights along the edges of the first wave to give it dimension.
Step 3: Add Soft White Details
Use a white polish to add soft highlights to the top of the waves, mimicking the foam or crest of ocean waves. These small accents will bring the design to life.
Step 4: Let It Dry
Allow the design to dry thoroughly to prevent smudging the delicate wave details.
Finishing Touches: Top Coat for Shine
Step 1: Apply a Clear Top Coat
To seal the design and add a glossy finish, apply a clear top coat over the entire nail. This will smooth the texture and ensure the colors remain vibrant and protected.
Why It Works
Ocean Wave Nail Art captures the free-flowing nature of water with its fluid, curved strokes of blue and white.
The varying shades of blue give the design depth, while the white accents add realism, mimicking the natural movement of waves in the ocean.
The final glossy top coat enhances the design, giving it a smooth, polished look that adds an extra touch of shine to your wave-inspired nails.
This design is perfect for anyone who wants to bring the calming yet dynamic energy of the sea to their manicure.
23. Celestial Constellation Nail Art

Celestial Constellation nails bring the wonder of the night sky to your fingertips with intricate white star patterns that form constellations against a rich navy backdrop.
The detailed lines and dots of the stars create a mystical, dream-like design that transports you into the cosmos, perfect for stargazers and lovers of celestial beauty.
Ideal for evening events, astronomy lovers, or anyone looking to add a touch of the universe to their look, this design will have you feeling connected to the stars.
Creating the Deep Blue Base
Step 1: Apply the Navy Base Color
Start by applying a deep navy blue polish to your nails. This rich color creates the perfect canvas for the bright white stars, making them stand out beautifully.
Step 2: Let It Dry
Allow the navy base to dry completely before adding the constellations. This ensures a smooth, even surface for the starry details.
Painting the Constellations
Step 1: Outline the Constellations
Using a fine nail art brush and white polish, carefully outline the constellations you want to feature on your nails. These should look like delicate lines connecting the stars in the night sky.
Step 2: Add the Stars
Dot small white stars along the outlined constellation lines. You can vary the size of the dots to give the design more depth and dimension.
Step 3: Add Extra Stars and Dots
Scatter a few additional stars around the constellations, focusing on creating an effect of a twinkling, starry sky.
Step 4: Let It Dry
Allow the design to dry completely to avoid smudging the delicate star patterns.
Finishing Touches: Top Coat
Step 1: Apply a Clear Top Coat
To seal the design and add a glossy finish, apply a clear top coat over the entire nail. This will enhance the shine of the stars and give your nails a smooth, finished look.
Why It Works
Celestial Constellation Nail Art captures the beauty and magic of the night sky. The deep blue base evokes the vastness of the universe, while the bright white constellations bring the cosmos to life on your nails.
The varying sizes of stars and the delicate lines create a sense of depth, while the additional scattered stars add a whimsical, twinkling effect. The top coat adds a glossy, flawless finish that enhances the overall celestial feel of the design.
24. Blue Waves French Tip Nail Art

Blue Waves French Tip nails offer a chic twist on the classic French manicure, combining neutral nude tones with striking blue wave accents.
This design incorporates a modern, fluid wave effect that adds dimension and sophistication, making it a perfect choice for those seeking an elegant yet bold look.
Ideal for both professional settings and social gatherings, this design will elevate your nails with a refreshing pop of color and style.
Creating the Neutral Base
Step 1: Apply the Nude Base Color
Start by applying a soft nude or beige polish to your nails. This neutral base will provide a smooth, clean canvas for the blue wave accents and will complement the boldness of the waves.
Step 2: Let It Dry
Allow the nude base to dry completely before adding the wave accents. This ensures that the base color remains even and undisturbed during the application of the design.
Adding the Blue Waves
Step 1: Apply the First Blue Wave
Using a fine nail art brush and a vibrant blue polish, carefully paint a wavy line along the tips of your nails. The wave should be smooth and flowing, giving the tips a sleek, fluid look.
Step 2: Add Additional Waves
Continue to paint a second, slightly smaller wave beneath the first. This layering effect will create a sense of movement and depth, as if the waves are crashing gently against the tips.
Step 3: Let It Dry
Allow the design to dry completely before moving to the final step to avoid smudging the delicate wave details.
Finishing Touches: Top Coat
Step 1: Apply a Clear Top Coat
To protect the design and give it a glossy, polished finish, apply a clear top coat over the entire nail. This step will smooth out the waves and enhance the shine, ensuring a long-lasting, flawless look.
Why It Works
Blue Waves French Tip Nail Art combines the timeless elegance of the French manicure with modern, flowing blue waves that bring an artistic touch to your nails.
The neutral nude base color creates a subtle background that allows the vibrant blue waves to take center stage, making this design both bold and sophisticated.
The top coat seals in the design and ensures a glossy finish, perfect for any occasion that calls for a stylish, refined look.
25. Frozen Winter Wonderland Nail Art
Frozen Winter Wonderland nails capture the frosty beauty of winter with a delicate gradient of icy blues and shimmery accents that evoke the sparkle of fresh snow.
The design combines soft, cool tones with glittering details, perfect for anyone looking to bring the magic of winter to their fingertips.
Ideal for holiday events, winter parties, or whenever you want your nails to glisten like snowflakes, this design will leave you feeling enchanted by the cold, sparkling beauty of the season.
Creating the Frosty Blue Base
Step 1: Apply the Soft Nude Base Color
Start by applying a nude or light pink polish to your nails. This neutral base will create a soft foundation for the icy blue gradient and enhance the shimmer of the accent details.
Step 2: Let It Dry
Allow the nude base to dry completely before moving on to ensure a smooth and even surface for the gradient.
Adding the Icy Blue Gradient
Step 1: Apply the Blue Gradient
Using a light blue polish, apply the color to the tips of your nails, creating a subtle gradient that fades as it moves down the nail. Blend the blue towards the middle of the nail, leaving the base color exposed.
Step 2: Add Shimmering Glitter
While the blue is still wet, sprinkle a fine glitter over the tips and gradient area to create the look of frosty snow. This will add a sparkling, snow-like texture to your design.
Step 3: Add Iridescent Sequins
Place a few iridescent sequins or small gems near the tips or scattered around the nail for extra shine and dimension. These accents will give your nails a frosty, magical look reminiscent of ice crystals.
Step 4: Let It Dry
Allow the design to dry completely before proceeding to the final step to ensure no smudging of the delicate accents.
Finishing Touches: Top Coat
Step 1: Apply a Clear Top Coat
To seal the design and ensure long-lasting wear, apply a clear top coat over the entire nail. This will enhance the glitter and give your nails a smooth, glossy finish.
Why It Works
Frozen Winter Wonderland Nail Art captures the enchantment of winter with its gradient of soft blues, shimmering glitter, and iridescent accents. The cool-toned gradient evokes the serene beauty of icy landscapes, while the sparkling glitter and sequins mimic the glimmer of snowflakes in the winter light.
The top coat ensures a glossy, smooth finish, locking in the frosty look and providing a radiant shine that will catch the light with every movement.
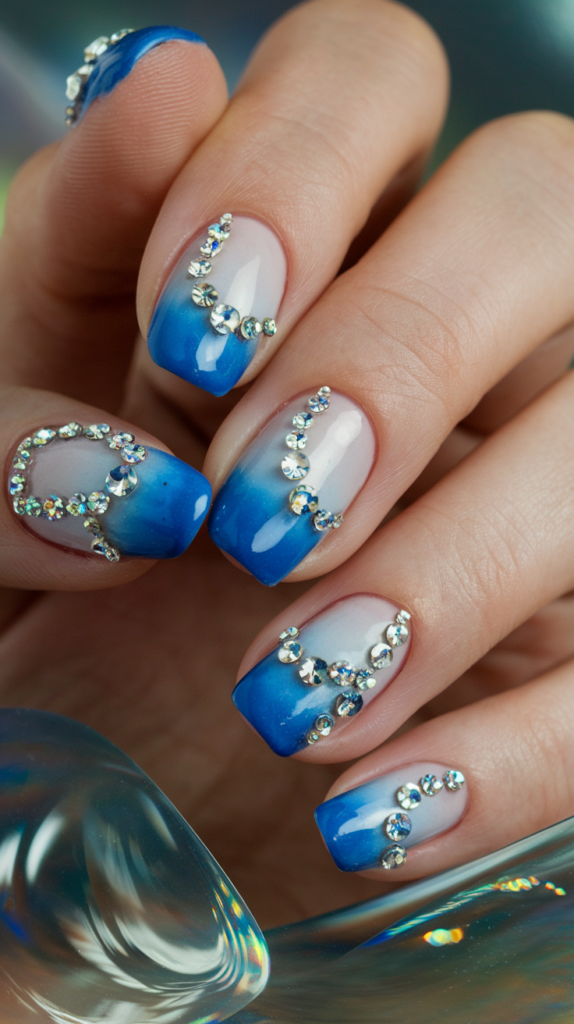
26. Matte Blue Elegance Nail Art

Matte Blue Elegance nails combine deep matte blue with sparkling rhinestone accents to create a refined and luxurious design.
The smooth matte finish enhances the brilliance of the rhinestones, making this a perfect choice for those seeking a sophisticated, eye-catching manicure that is both bold and elegant.
Perfect for formal events, evening wear, or whenever you want to add a touch of class to your look, this design brings an element of glamour with its minimalist yet striking details.
Creating the Matte Blue Base
Step 1: Apply the Matte Blue Base Color
Start by applying a rich matte blue polish to your nails. This deep, velvety color sets the tone for the design, offering a sleek, modern look that enhances the sparkle of the rhinestones.
Step 2: Let It Dry
Allow the matte blue base to dry completely before moving to the next step. The matte finish needs to set properly for a smooth and even surface to adhere the rhinestones.
Adding the Rhinestone Accents
Step 1: Apply Rhinestone Adhesive
Using a small dot of rhinestone glue, apply it to the nail in a curved line or any desired pattern. Make sure to apply the glue in small amounts to prevent excess from spreading.
Step 2: Place the Rhinestones
Carefully place the rhinestones along the glued lines, starting from one end and working your way to the other. Arrange them in a pattern that’s pleasing to the eye, using larger rhinestones near the center and smaller ones toward the edges.
Step 3: Let It Dry
Allow the rhinestones and adhesive to dry completely, ensuring they are securely attached to the nail.
Finishing Touches: Top Coat
Step 1: Apply a Clear Top Coat (Optional)
If desired, you can apply a clear matte top coat over the entire nail to protect the rhinestones and keep the matte effect intact. However, avoid using a glossy top coat, as it can diminish the matte appearance of the blue base.
Why It Works
Matte Blue Elegance Nail Art combines the chic sophistication of matte blue with the dazzling brilliance of rhinestones to create a design that is both understated and luxurious.
The contrast between the smooth matte finish and the sparkle of the rhinestones creates a modern and elegant aesthetic, while the strategic placement of the gems draws attention to the nail’s curves and contours.
The top coat helps preserve the design while ensuring the rhinestones stay securely in place for a long-lasting, flawless finish.
27. Denim Stripe Nail Art

Denim Stripe nails bring the timeless charm of denim to your fingertips with a modern twist.
The design mimics the texture and pattern of denim fabric, combining rich blue shades with subtle white lines to create a sophisticated and textured look. This design is perfect for those who love casual yet stylish nail art.
Ideal for everyday wear, weekend outings, or when you want your nails to evoke the comfort and versatility of denim, this design adds a chic, wearable touch to any look.
Creating the Denim Base
Step 1: Apply the Denim Blue Base Color
Start by applying a rich denim blue polish to your nails. This deep blue color creates the perfect background, setting the stage for the textured stripe details to shine.
Step 2: Let It Dry
Allow the blue base to dry completely before adding the stripe details. This will ensure that the base is smooth and even, creating a clean canvas for the next step.
Adding the Stripes
Step 1: Use a Thin Brush for Stripes
Using a white polish and a fine nail art brush, carefully draw vertical stripes across each nail. These stripes should be uneven in width, mimicking the texture of denim fabric. Varying the stripe width will give the design a more authentic, handcrafted look.
Step 2: Add Depth to the Stripes
Once the white stripes have dried, use a slightly darker blue shade to add thin lines along the edges of the stripes to create depth and dimension. This will make the stripes appear more like the fabric threads in denim.
Step 3: Let It Dry
Allow the stripes and additional details to dry completely before proceeding to the next step to prevent smudging.
Finishing Touches: Top Coat
Step 1: Apply a Clear Top Coat
To protect the design and give it a smooth finish, apply a clear top coat over the entire nail. This will add a glossy shine to the denim look and help to seal in the stripes.
Why It Works
Denim Stripe Nail Art beautifully captures the classic essence of denim fabric with its rich blue base and textured, contrasting stripes.
The varying stripe thicknesses create a handcrafted feel, while the addition of darker blue details gives the design depth and authenticity.
The top coat adds a sleek, glossy finish that ensures the design lasts while maintaining the textured appearance of the denim fabric.
28. Polka Dot Pop Nail Art
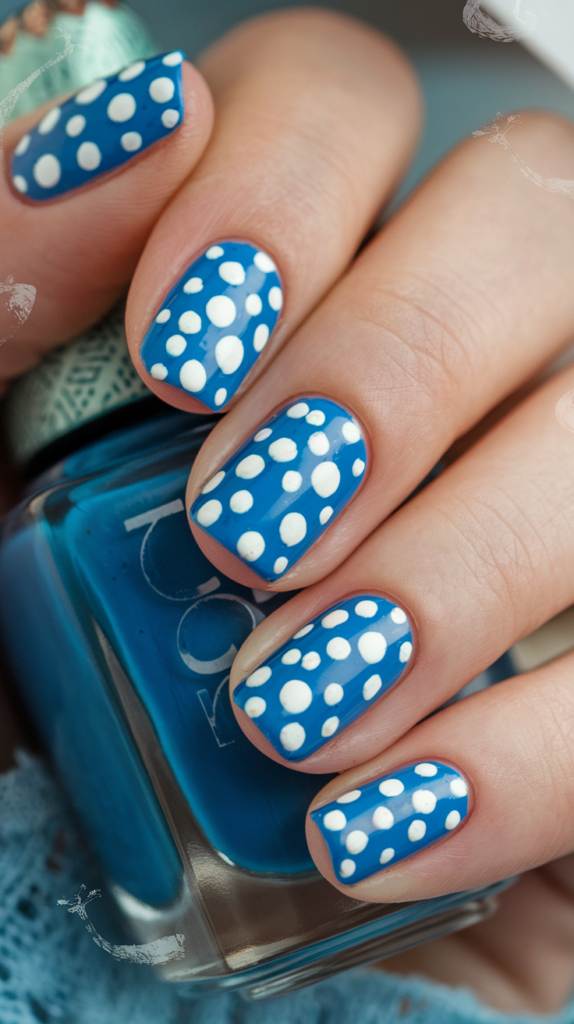
Polka Dot Pop nails bring a playful and vibrant twist to your manicure with bold blue and white polka dots. The design’s fun, retro feel makes it perfect for anyone who loves whimsical, eye-catching nail art. The striking contrast between the blue base and the bright white dots creates a dynamic look that’s both chic and cheerful.
Ideal for summer, casual outings, or whenever you want to add a touch of playful charm to your look, this design is sure to stand out.
Creating the Bold Blue Base
Step 1: Apply the Bright Blue Base Color
Start by applying a vibrant blue polish to your nails. This bold color will serve as a perfect backdrop for the white polka dots, creating a striking contrast that makes the design pop.
Step 2: Let It Dry
Allow the blue polish to dry completely before moving to the next step to ensure the base is smooth and even for the dot application.
Adding the White Polka Dots
Step 1: Apply the Dots
Using a dotting tool or a fine nail art brush, dip it into white polish and carefully create small, evenly spaced dots on each nail. Make sure the dots are not too close together, leaving enough room between them for a balanced look.
Step 2: Vary the Dot Sizes
For added interest, vary the size of the dots on each nail. This creates a fun, dynamic effect and ensures the design remains playful and visually engaging.
Step 3: Let It Dry
Allow the white dots to dry completely to avoid smudging the design.
Finishing Touches: Top Coat
Step 1: Apply a Clear Top Coat
To protect the design and ensure it lasts, apply a clear top coat over the entire nail. This will give your nails a glossy, smooth finish and enhance the vibrancy of the blue and white combination.
Why It Works
Polka Dot Pop Nail Art brings a lively, vintage-inspired look with its bold blue base and playful white dots.
The contrast between the colors creates a modern, yet retro feel that catches the eye and adds a touch of fun to any outfit.
The varying sizes of the dots and the smooth top coat add depth and shine, ensuring a long-lasting, polished finish.
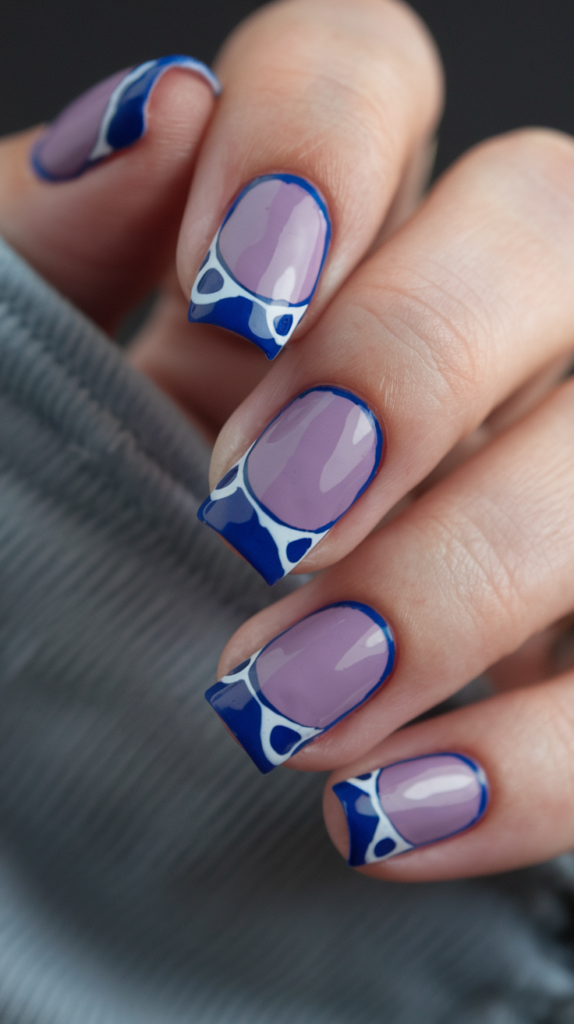
29. Modern French Tip Nail Art
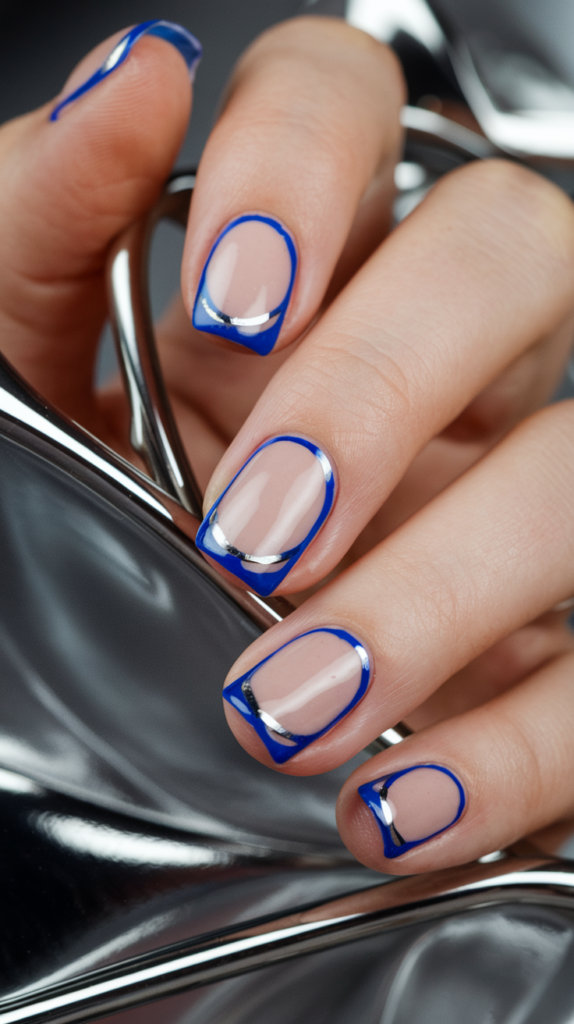
Modern French Tip nails offer a chic twist on the classic French manicure, combining clear, natural tones with bold, contrasting blue tips and a clean silver accent.
This design delivers a sophisticated yet fresh look, ideal for those looking for a refined, contemporary manicure with a touch of elegance.
Perfect for professional settings, evening events, or whenever you want your nails to exude polished sophistication, this design adds a modern flair to a timeless classic.
Creating the Clear Base
Step 1: Apply a Clear Base Coat
Start by applying a clear or neutral base coat to your nails. This will help to create a smooth canvas and protect your natural nails, providing a polished, clean backdrop for the design.
Step 2: Let It Dry
Allow the clear base coat to dry completely before proceeding to ensure a flawless finish and smooth application of the colored tips.
Adding the Bold Blue Tips
Step 1: Create the Blue Tips
Using a vibrant blue polish and a fine nail art brush, carefully paint the tips of your nails in a curved line. The blue should be bold and clean, following the natural shape of your nail for a classic French tip appearance.
Step 2: Apply a Silver Accent
Once the blue tips are dry, apply a thin silver line just below the blue, following the curve of the tip. This metallic accent adds a modern, sleek touch that enhances the overall design.
Step 3: Let It Dry
Allow the blue and silver accents to dry completely to avoid smudging or ruining the delicate lines.
Finishing Touches: Top Coat
Step 1: Apply a Clear Top Coat
To seal the design and add a glossy finish, apply a clear top coat over the entire nail. This will smooth out the design, enhance the shine, and ensure a long-lasting, polished look.
Why It Works
Modern French Tip Nail Art takes the timeless French manicure and gives it a bold, contemporary twist with vibrant blue tips and a sleek silver accent.
The clean lines and contrasting colors create a striking yet elegant effect, making this design perfect for anyone looking to add a fresh, stylish touch to a classic look.
The clear base and top coat ensure that the design remains sleek and shiny, giving the nails a sophisticated, high-end finish that lasts.
30. Ocean Breeze Nail Art
Ocean Breeze nails bring the tranquil beauty of the ocean to your fingertips with soft, flowing waves in shades of blue.
The design features a calming gradient effect, paired with subtle silver accents and intricate detailing, making it perfect for anyone looking to capture the essence of the sea in a sophisticated way.
Ideal for summer, beach vacations, or whenever you want to feel connected to the ocean, this design offers a serene and stylish look that will have you dreaming of coastal breezes.
Creating the Soft Blue Base
Step 1: Apply the Light Blue Base Color
Start by applying a soft, light blue polish to your nails. This creates a calm and airy foundation for the wavy design and helps set the mood for the ocean-inspired theme.
Step 2: Let It Dry
Allow the light blue base to dry completely before moving to the next step. This will ensure a smooth and even canvas for your wave designs.
Creating the Ocean Waves
Step 1: Apply the Darker Blue Waves
Using a dark blue or navy polish, paint soft, curved wave lines across the nails. The waves should vary in size and position to mimic the natural ebb and flow of the ocean, giving the design a sense of movement.
Step 2: Add Lighter Blue Waves
With a lighter blue shade, apply additional wavy lines that overlap the dark blue waves. This layering effect will create depth, making the waves appear more dynamic and fluid.
Step 3: Add Silver Accents
Using a fine brush or nail art tool, apply small silver accents at the base of the waves. These metallic details resemble the shimmer of the ocean’s surface when it catches the light, adding a touch of elegance and sparkle.
Step 4: Let It Dry
Allow the waves and silver accents to dry completely to avoid smudging.
Finishing Touches: Top Coat
Step 1: Apply a Clear Top Coat
To seal in the design and add shine, apply a clear top coat over the entire nail. This will smooth the waves and metallic accents, enhancing the overall glossy finish and ensuring that the design lasts.
Why It Works
Ocean Breeze Nail Art captures the peaceful beauty of the sea with its flowing waves in various shades of blue.
The combination of dark and light blues creates a harmonious design that mimics the ebb and flow of the ocean, while the silver accents add a shimmering effect that catches the light.
The top coat ensures a smooth, glossy finish that enhances the depth and elegance of the design, making it perfect for any occasion that calls for a sophisticated yet serene look.
31. Frosted Snowflake Nail Art

Frosted Snowflake nails bring the serene beauty of winter to your fingertips with delicate white snowflakes set against a smooth gradient of icy blue. This design captures the magic of winter, making it perfect for the holiday season or whenever you want to add a touch of frosty elegance to your nails.
Ideal for winter events, festive gatherings, or a chic winter look, this design will evoke the quiet charm of a snowy wonderland.
Creating the Frosty Blue Gradient
Step 1: Apply the Base Color
Start by applying a light, neutral base coat to your nails to create a smooth foundation. This step will help the gradient blend seamlessly and give a clean background for the snowflakes.
Step 2: Create the Gradient Effect
Using a makeup sponge, apply a gradient of light blue at the tips of the nails, gradually fading toward the cuticle area. The gradient should be soft and blended for a frosty, wintry look.
Step 3: Let It Dry
Allow the gradient to dry completely before moving on to the next step to ensure the colors blend smoothly without smudging.
Adding the Snowflakes
Step 1: Paint the Snowflakes
Using a fine nail art brush and white polish, paint snowflakes on the tips of your nails, where the blue gradient is the darkest. You can vary the size and shape of the snowflakes, but make sure they are well-defined and detailed to mimic the intricate nature of real snowflakes.
Step 2: Add Smaller Snowflake Details
Add small dots and details around the snowflakes to mimic falling snow or additional flurries. These small accents add depth and dimension to the design.
Step 3: Let It Dry
Allow the snowflakes and details to dry completely to prevent smudging or smearing the delicate artwork.
Finishing Touches: Top Coat
Step 1: Apply a Clear Top Coat
To seal the design and add a glossy finish, apply a clear top coat over the entire nail. This will smooth out the design, enhance the shimmer of the snowflakes, and ensure your manicure lasts longer.
Why It Works
Frosted Snowflake Nail Art captures the serene and magical beauty of winter with its delicate snowflakes and icy blue gradient.
The combination of the white snowflakes with the gradient design evokes the feeling of a fresh snowfall, while the top coat ensures a smooth and glossy finish that enhances the overall elegance of the design.
32. Plaid Perfection Nail Art

Plaid Perfection nails bring the timeless pattern of plaid to your fingertips with a modern twist.
The soft blue tones and sleek black accents combine for a chic, yet casual design that’s perfect for anyone who loves stylish, geometric nail art.
The clean lines and layers of color create a sophisticated look with a cozy, fashionable vibe.
Perfect for fall, winter, or whenever you want your nails to reflect a sense of warmth and sophistication, this design adds a stylish flair to any outfit.
Creating the Blue Base
Step 1: Apply the Base Color
Start by applying a soft blue polish to your nails. This color will serve as the foundation of your plaid design, providing a serene backdrop that complements the darker accents.
Step 2: Let It Dry
Allow the blue base to dry completely before moving on. A dry base ensures that the plaid lines go on smoothly and don’t smudge the blue background.
Creating the Plaid Pattern
Step 1: Add Vertical Lines
Using a fine nail art brush and black polish, carefully draw thin vertical lines across each nail. Space them evenly to form the structure of the plaid design.
Step 2: Add Horizontal Lines
Next, use the black polish to create thin horizontal lines that intersect the vertical lines. The intersection of these lines will form the classic plaid pattern. Feel free to vary the spacing slightly for a more dynamic effect.
Step 3: Add a Silver Accent Line
For an added touch of elegance, use a metallic silver polish to add a thin accent line where the vertical and horizontal lines meet. This will give the design a subtle shimmer and depth.
Step 4: Let It Dry
Allow the design to dry thoroughly to avoid smudging the plaid details.
Finishing Touches: Top Coat
Step 1: Apply a Clear Top Coat
To protect your design and ensure a long-lasting, shiny finish, apply a clear top coat over the entire nail. This will also smooth out any imperfections and give the design a glossy, polished look.
Why It Works
Plaid Perfection Nail Art captures the cozy and stylish aesthetic of plaid with its clean lines and subtle color combination.
The soft blue base creates a calming backdrop, while the black and silver accents add contrast and sophistication to the design.
The silver accent lines elevate the look, making it perfect for both casual and more formal occasions. The clear top coat ensures a glossy, smooth finish that enhances the overall plaid design.
33. Oceanic Crystal Nail Art
Oceanic Crystal nails capture the enchanting beauty of the sea with gradient blue shades and sparkling crystal accents.
The design mimics the gentle waves of the ocean, adding depth with its seamless ombre effect and a touch of luxury with the addition of rhinestones that shimmer like water droplets in the sunlight.
Perfect for beach days, tropical vacations, or any occasion where you want your nails to reflect the beauty and elegance of the ocean, this design brings a chic, calming vibe to your look.
Creating the Gradient Ocean Base
Step 1: Apply the Base Color
Start by applying a neutral or clear base coat to your nails. This helps create a smooth canvas and provides protection for your nails before applying the colored layers.
Step 2: Create the Ombre Gradient
Using a sponge or makeup sponge, apply a medium blue polish to the tips of your nails, gently blending the color down toward the cuticle. Next, use a lighter blue polish to blend the medium blue into the natural nail, creating a smooth, gradient effect that mimics the transition from the deep ocean to the sky.
Step 3: Let It Dry
Allow the gradient to dry completely before adding the rhinestones to prevent smudging the design.
Adding the Rhinestone Accents
Step 1: Apply Rhinestone Glue
Using a small dot of rhinestone glue, apply it along the curves of your nails, focusing on the area where the gradient ends. This will give the rhinestones a base to stick to.
Step 2: Place the Rhinestones
Carefully place the rhinestones in a pattern along the glue lines, arranging them in a curving shape to mirror the natural flow of the waves. Mix in various sizes for added dimension and visual interest.
Step 3: Let It Dry
Allow the rhinestones and glue to set completely to ensure they stay in place.
Finishing Touches: Top Coat
Step 1: Apply a Clear Top Coat
Seal the design with a clear top coat, applying it gently over the entire nail to smooth out the gradient and rhinestones. This will give the design a glossy finish and ensure its longevity.
Why It Works
Oceanic Crystal Nail Art beautifully captures the serene beauty of the sea with its smooth ombre gradient and luxurious rhinestone accents. The blue shades evoke the calmness of the ocean, while the sparkling rhinestones add a touch of glamour and elegance, reminiscent of glistening water droplets.
The top coat ensures a glossy finish, while the rhinestones stay securely in place, adding dimension and texture to the overall design.
34. Navy Pearl Elegance Nail Art
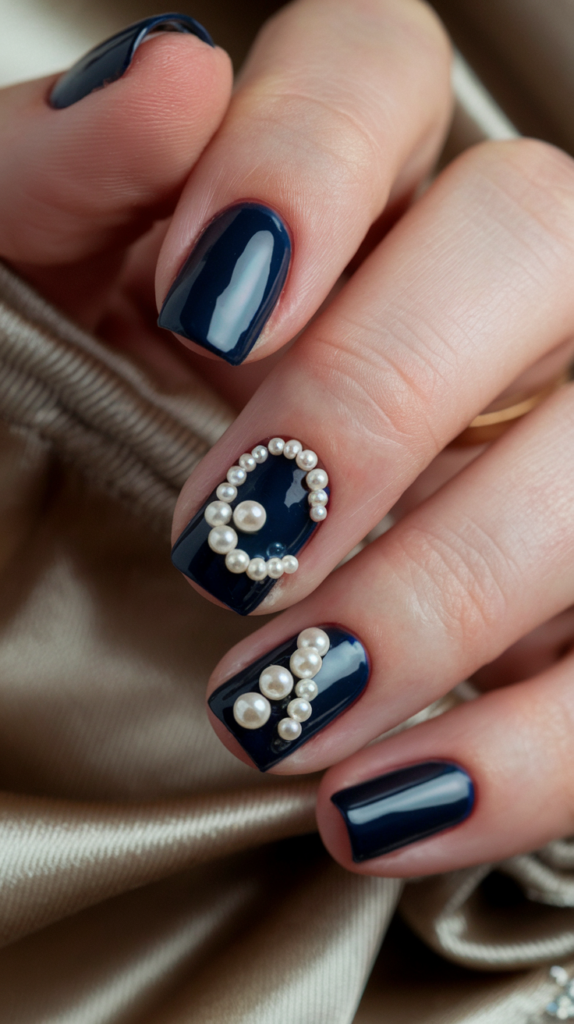
Navy Pearl Elegance nails combine the deep, luxurious hue of navy with the timeless sophistication of pearls.
This design brings a sense of refined glamour to your nails, with carefully placed pearls that create a stunning visual effect.
It’s the perfect balance of bold color and delicate embellishment, ideal for those looking to elevate their look with a touch of class.
Perfect for formal occasions, upscale events, or whenever you want your nails to make a statement, this design exudes sophistication and elegance.
Creating the Deep Navy Base
Step 1: Apply the Navy Base Color
Start by applying a rich navy blue polish to your nails. This dark, glossy color will serve as a luxurious backdrop, making the pearls stand out beautifully.
Step 2: Let It Dry
Allow the navy base to dry completely before moving on to ensure a smooth and even surface for the pearl embellishments.
Adding the Pearls
Step 1: Apply Pearl Glue
Using a small dot of pearl adhesive or rhinestone glue, carefully apply it to the areas where you want the pearls to be placed. A gentle curve or geometric pattern works well for this design, as shown in the image.
Step 2: Place the Pearls
Using a dotting tool or tweezers, place the pearls onto the glue in your desired pattern. You can use a mix of small and medium pearls to create a dimensional effect. The pearls should follow a flowing shape that complements the natural curvature of the nail.
Step 3: Let It Dry
Allow the pearls and glue to dry thoroughly to ensure they stay securely in place.
Finishing Touches: Top Coat
Step 1: Apply a Clear Top Coat
To seal the design and give it a shiny, polished finish, apply a clear top coat over the entire nail. This will also help protect the pearls, ensuring they stay in place and the nails remain smooth.
Why It Works
Navy Pearl Elegance Nail Art combines the deep richness of navy blue with the timeless beauty of pearls.
The dark base color creates a sophisticated backdrop that allows the pearls to take center stage, making this design ideal for those seeking a refined, glamorous look.
The pearls add texture and luxury to the design, giving the nails a high-end finish. The top coat ensures the design stays polished and intact, maintaining its elegance throughout the day.
35. Navy and Pearls Nail Art
Navy and Pearls nails exude luxury and elegance, combining the deep richness of navy blue with the timeless beauty of pearls.
The delicate placement of pearls in intricate patterns creates a sophisticated look that is perfect for formal events or when you want to elevate your style with a touch of refinement.
Ideal for evening events, upscale occasions, or whenever you want your nails to feel opulent and polished, this design brings a touch of glamour to your fingertips.
Creating the Navy Base
Step 1: Apply the Navy Base Color
Start by applying a rich navy blue polish to your nails. This deep color provides a bold, sleek foundation that perfectly contrasts with the soft, elegant pearls.
Step 2: Let It Dry
Allow the navy base to dry completely before adding the pearls. A well-dried base ensures that the pearls will stick securely and the design remains smooth.
Adding the Pearls
Step 1: Apply Pearl Glue
Using a small dot of pearl adhesive or rhinestone glue, apply it in the shape of a curving line or any design you prefer. The pearls can form gentle curves, spirals, or geometric shapes.
Step 2: Place the Pearls
Using a dotting tool or tweezers, carefully place pearls of varying sizes along the glue lines. Position larger pearls in the center and smaller ones around the edges to create a balanced and luxurious design.
Step 3: Let It Dry
Allow the pearls and glue to dry thoroughly to ensure they stay securely in place.
Finishing Touches: Top Coat
Step 1: Apply a Clear Top Coat
To protect the design and give it a glossy, smooth finish, apply a clear top coat over the entire nail. This will seal the pearls in place while enhancing the overall shine of the navy base.
Why It Works
Navy and Pearls Nail Art offers a striking contrast between the dark, glossy blue base and the elegant, radiant pearls.
The pearls add a sophisticated touch that elevates the entire design, making it perfect for anyone who loves classic, timeless beauty.
The smooth, shiny top coat ensures a long-lasting, polished look, and the pearls stay securely in place, adding texture and dimension to the design.
Conclusion
Blue nail art designs offer endless possibilities for creativity and expression, whether you’re going for a subtle, sophisticated look or a bold, vibrant statement.
From the icy elegance of glitter fades to the playful charm of blue plaid or the cosmic allure of a starry night, there’s a design to suit every taste and occasion.
With the detailed techniques and ideas shared in this blog, you can easily experiment with different shades of blue, textures, and embellishments to create stunning nail art that truly stands out.
No matter your style, blue nails are the perfect way to add a touch of elegance, fun, and creativity to your overall look.
1 thought on “35 Stunning Blue Nail Art Designs for Your Next Manicure: Inspiring Ideas and Trends”