Nail art has always been a powerful form of self-expression, allowing individuals to showcase their creativity, style, and personality through intricate designs and vibrant colors.
Among the myriad of nail trends, glitter nails stand out for their ability to add a touch of glamour and sparkle to any look.
Whether you’re preparing for a special occasion or simply want to elevate your everyday manicure, glitter nail designs offer endless possibilities for creating eye-catching and stunning effects.
In this blog, we’ll explore 35 different glitter nail designs, each one uniquely crafted to inspire and dazzle.
From elegant rose gold tips to bold geometric patterns, these designs will ensure your nails are always on point, shining brightly in any setting.
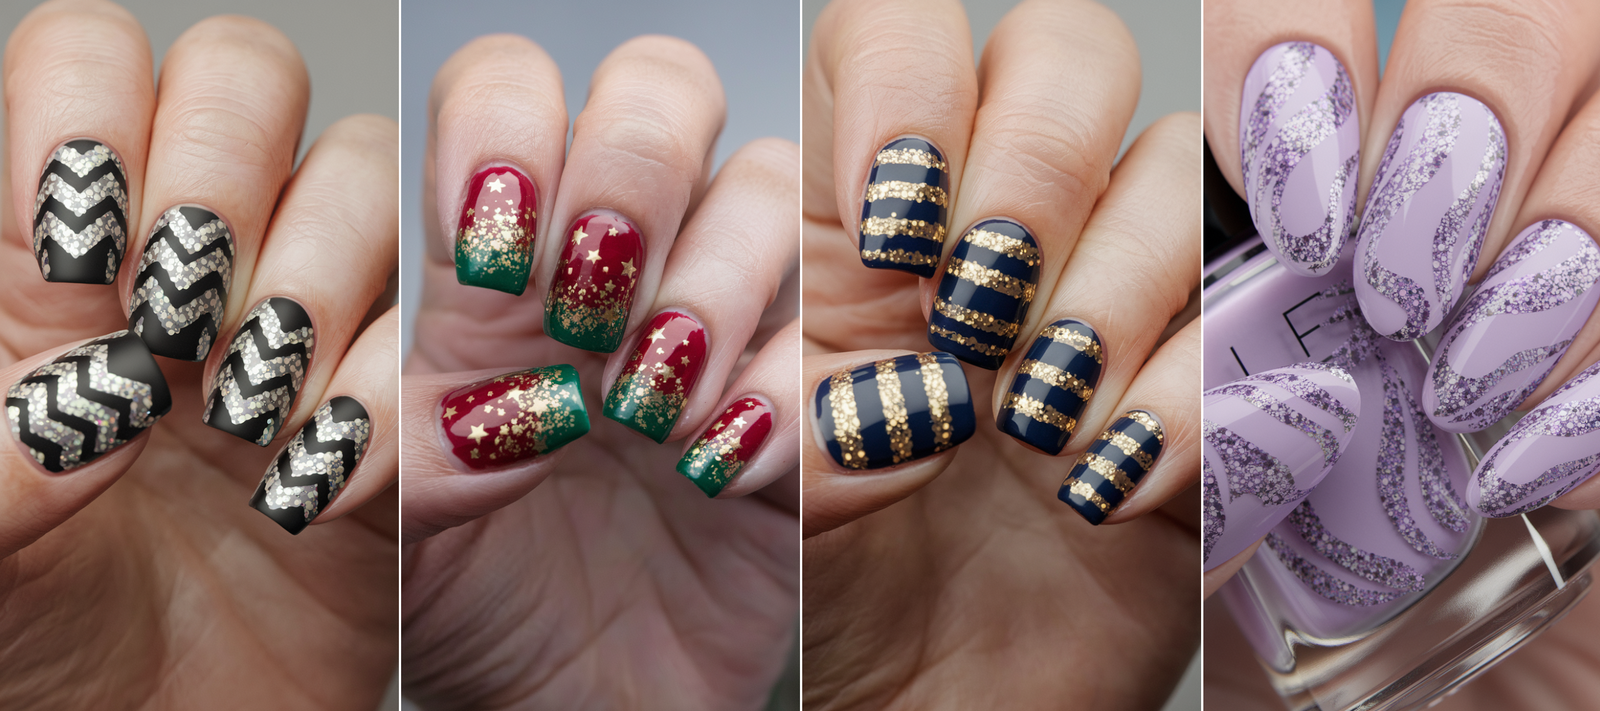
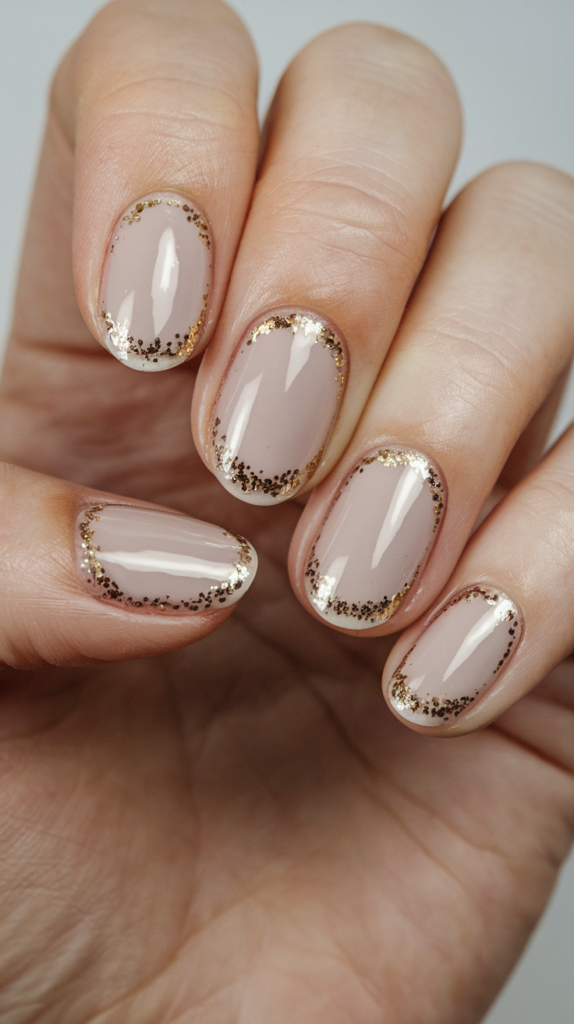
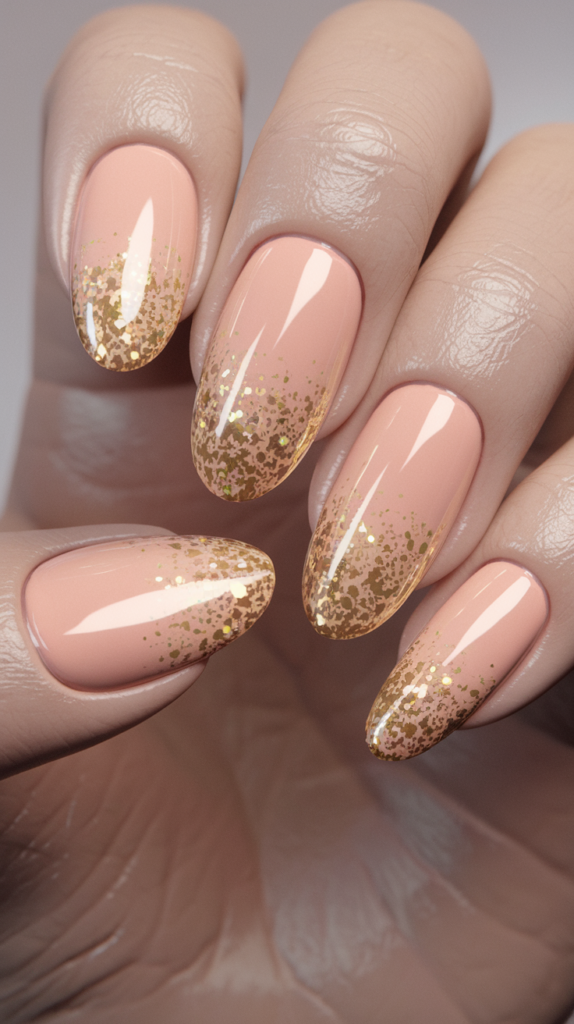
1. Rose Gold Glitter Tips
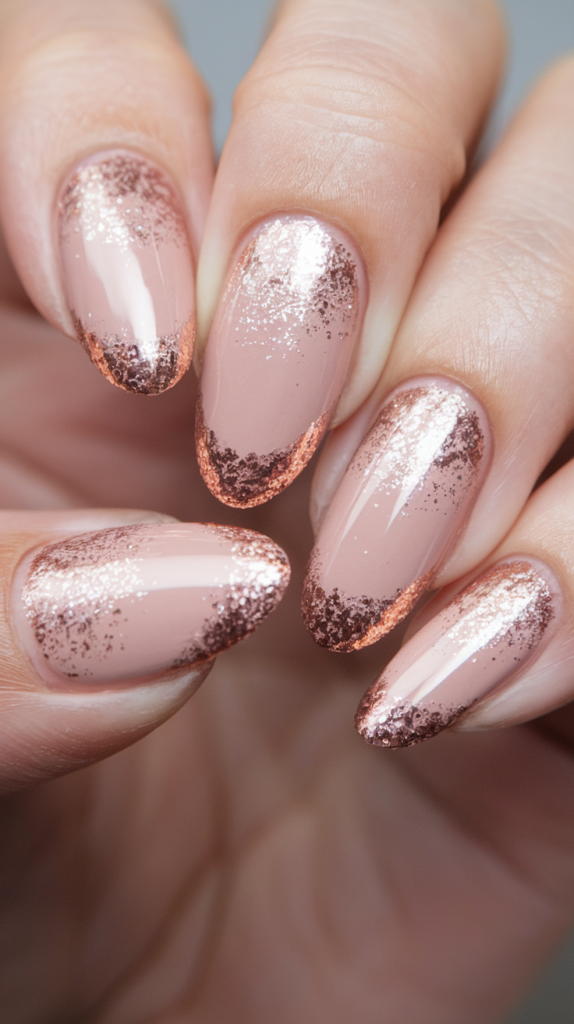
Rose gold glitter tips bring a touch of elegance and glamour to your manicure, offering a timeless yet eye-catching design perfect for any occasion.
This luxurious style combines the warmth of gold with the softness of pink, creating a sophisticated sparkle that complements a variety of looks.
The Allure of Rose Gold Glitter
Rose gold is a beloved shade in fashion and beauty due to its romantic and versatile appeal.
Its combination of gold’s richness and pink’s softness makes it ideal for nail art that is both chic and glamorous.
Rose gold glitter tips strike the perfect balance between subtlety and sparkle, making them suitable for everyday elegance or special events.
Paired with nude or blush base tones, the warm shimmer of rose gold becomes even more striking, creating a manicure that is effortlessly sophisticated.
Achieving the Perfect Rose Gold Glitter Tips
Step 1: Prepare the Base Color
Select a base color that complements rose gold glitter, such as nude or pale blush.
Apply two coats of the chosen polish, letting each layer dry completely.
Step 2: Apply the Rose Gold Glitter
Use a rose gold glitter polish and start with a thin layer on the tips of your nails.
For a smooth gradient effect, dab glitter onto the nail tips with a makeup sponge, concentrating at the ends and fading it toward the middle.
This ombre technique ensures a seamless transition between the base color and glitter, adding a touch of glamour without overpowering the design.
Step 3: Seal and Shine
Finish with a high-shine topcoat to enhance the glitter’s brilliance and protect the manicure.
This step ensures your rose gold tips remain dazzling and long-lasting.
Choosing the Best Nail Shapes for Rose Gold Glitter Tips
The shape of your nails can elevate the overall effect of your rose gold glitter tips.
Almond-shaped nails accentuate the gradient design, drawing attention to the tips with their graceful, elongated silhouette.
Coffin or ballerina-shaped nails provide a wide surface area for the glitter to shine, making them perfect for a bold and modern look.
For a more understated style, round or oval nails offer a classic elegance that keeps the glitter as the centerpiece of your manicure.
Why It Works
Rose Gold Glitter Tips combine the timeless allure of rose gold with the playful sparkle of glitter, creating a design that suits any occasion.
The ombre effect adds depth and sophistication, while the choice of nail shapes enhances the overall elegance and individuality of the manicure.
This versatile style is a favorite for those seeking a refined yet glamorous look, making it a must-try for anyone wanting to elevate their nail game.
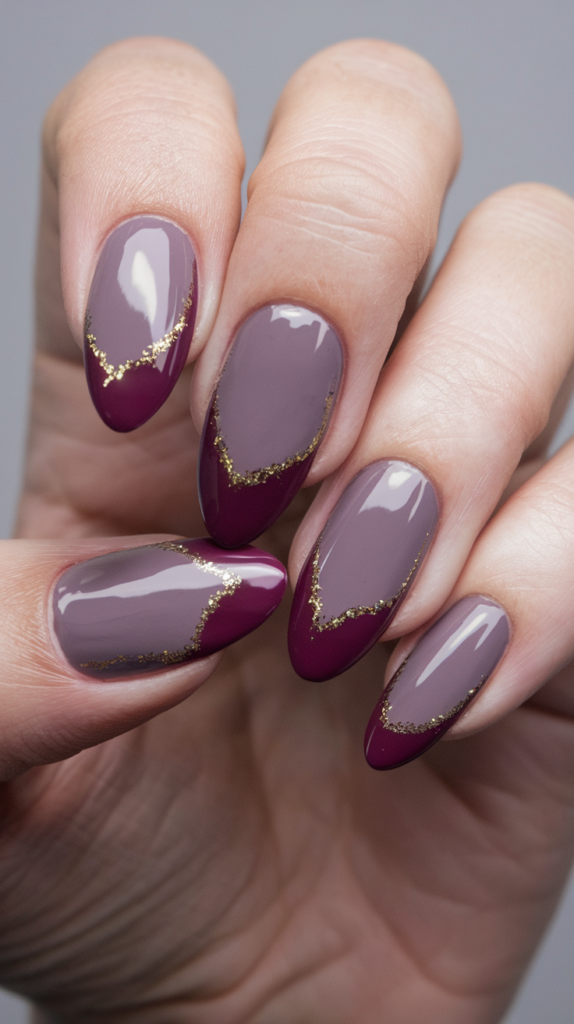
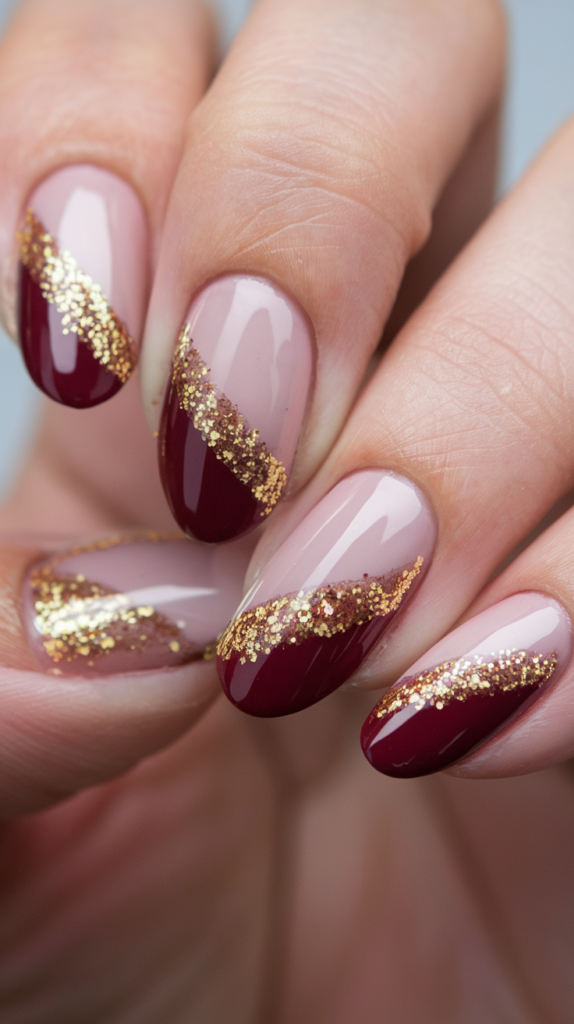
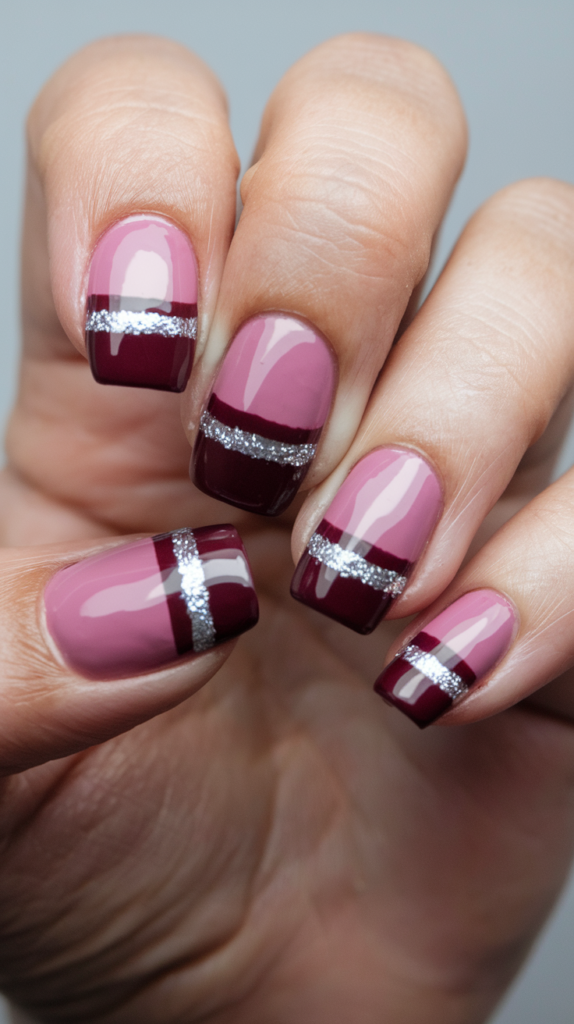
2. Glitter Moon Manicure
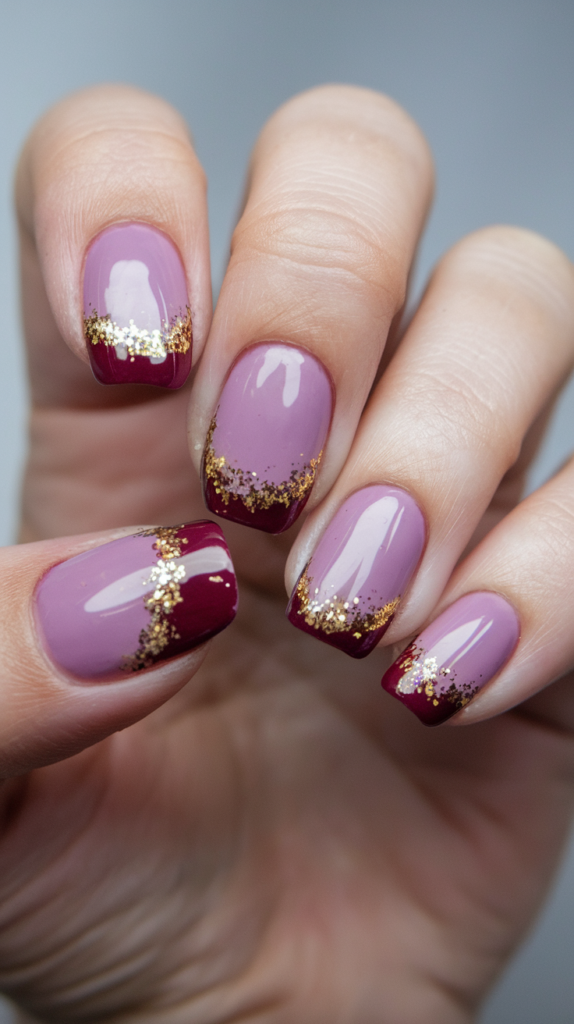
The glitter moon manicure offers a modern and sophisticated twist on nail art, transforming the classic French manicure into a dazzling, reverse-inspired trend.
What Is a Glitter Moon Manicure?
A glitter moon manicure highlights the half-moon area near the cuticle instead of the tips, making it a fresh and stylish take on traditional nail designs.
The half-moon can be outlined or filled with glitter, creating a striking contrast against the base color.
This versatile design allows for endless creativity, whether you opt for monochromatic elegance or bold, colorful combinations.
Perfect for any occasion, the glitter moon manicure combines sparkle with sophistication, ensuring your nails always stand out.
Step-by-Step Guide to a Glitter Moon Manicure
Step 1: Choose Your Colors
Select a base color and glitter polish. Classic combinations include nude or pale pink with gold or silver glitter.
For a bold look, try pairing deep burgundy or black with contrasting glitter shades like gold or holographic silver.
Step 2: Apply the Base Color
Apply two coats of your chosen base polish, ensuring each layer dries completely.
Step 3: Create the Half-Moon Design
Use a small round sticker or nail guide placed near the cuticle for precision, or freehand the design if confident.
Apply the glitter polish to the half-moon area, either filling it entirely or outlining the edge for a more delicate effect.
For a softer look, lightly dab glitter onto the half-moon, allowing the base color to peek through.
Step 4: Final Touches
Carefully remove the sticker or guide, if used, and let the glitter polish dry.
Seal the design with a glossy topcoat to protect your manicure and enhance its shine.
The result is a chic and glittery half-moon manicure that exudes both modernity and elegance.
Choosing the Perfect Color Combinations
Neutral Base with Classic Glitter
Nude, blush, and soft pinks pair beautifully with gold, silver, or rose gold glitter for a subtle and refined look.
Dark and Dramatic Combinations
Black, navy, or burgundy bases with contrasting glitter create a bold and luxurious effect.
Playful and Vibrant Styles
Bright base colors like teal, purple, or coral combined with holographic or multicolored glitter add a fun, eye-catching touch.
Why It Works
The Glitter Moon Manicure elevates the traditional French style with its reverse placement and glittery accents.
The half-moon design adds a unique twist, while the combination of base colors and glitter offers endless possibilities for personalization.
Whether subtle or bold, this design seamlessly blends elegance and creativity, making it perfect for those seeking a standout manicure.
3. Glitter Chevron Nails
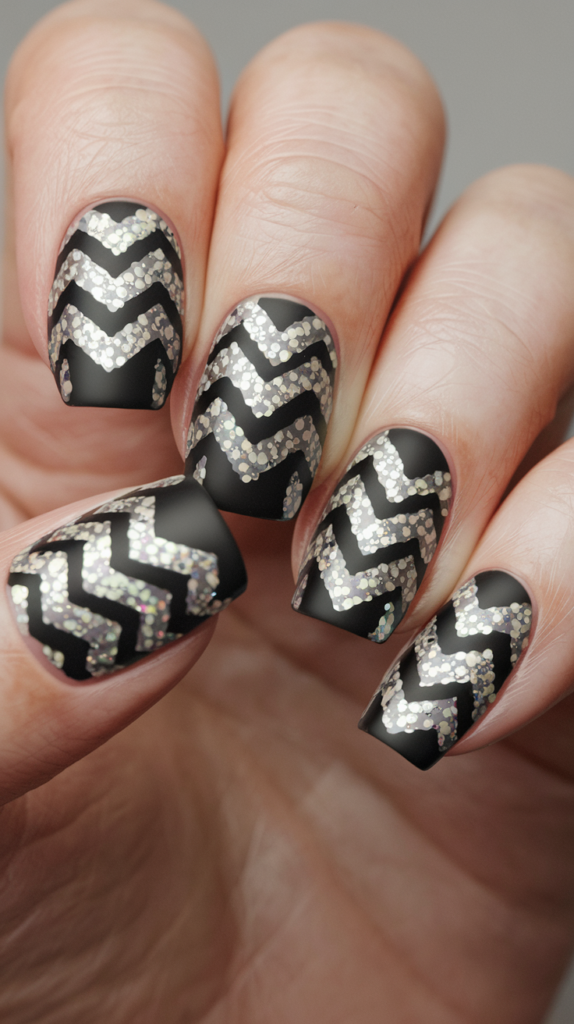
Glitter Chevron Nails bring bold geometric patterns to life, combining the sharp elegance of chevrons with the glamour of glitter for a striking and dynamic manicure.
Why Chevron Patterns Work Perfectly with Glitter
Chevron patterns are a timeless choice in nail art, celebrated for their bold, angular design.
When paired with glitter, the repetitive V-shaped lines create a stunning contrast, blending geometric precision with sparkling allure.
This combination offers endless possibilities for creativity, from using glitter exclusively for the chevron lines to mixing it with solid colors for added depth.
The result is a manicure that is sophisticated, modern, and perfect for making a statement.
How to Create Sharp and Eye-Catching Chevron Nails
Step 1: Choose Your Colors
Select a base color and a glitter polish that complement each other.
For a bold design, try dark base shades like black or navy with silver or gold glitter.
For a softer look, pastel base colors paired with rose gold or champagne glitter are ideal.
Step 2: Apply the Base Color
Paint your nails with two coats of the base polish, allowing each layer to dry completely.
Step 3: Create the Chevron Pattern
Use nail striping tape to form a V-shaped chevron pattern on each nail, leaving the sections you want to fill with glitter exposed.
Step 4: Add the Glitter
Apply glitter polish over the exposed areas, ensuring even coverage.
Carefully remove the tape while the glitter polish is still wet to reveal clean, sharp chevron lines.
Step 5: Seal the Design
Allow the glitter to dry before finishing with a clear topcoat to protect the design and enhance its shine.
This process results in a bold, intricate manicure that highlights the contrast between glitter and geometric shapes.
Best Color Combinations for Chevron Glitter Nails
Classic Elegance
- Black and gold for a timeless, sophisticated look.
- Navy and silver for a chic, modern vibe.
Playful and Vibrant
- Coral and gold glitter for a lively, tropical feel.
- Turquoise and silver glitter for a fresh, bold statement.
Soft and Feminine
- Mint or lavender paired with rose gold glitter for a dreamy, delicate design.
Why It Works
Glitter Chevron Nails combine bold geometric lines with shimmering glitter, creating a design that is both eye-catching and versatile.
The sharp chevron pattern adds structure and elegance, while the glitter infuses the look with glamour and sophistication.
With endless color combinations to suit every style, this design is a perfect choice for those looking to elevate their nail art with a creative and polished finish.
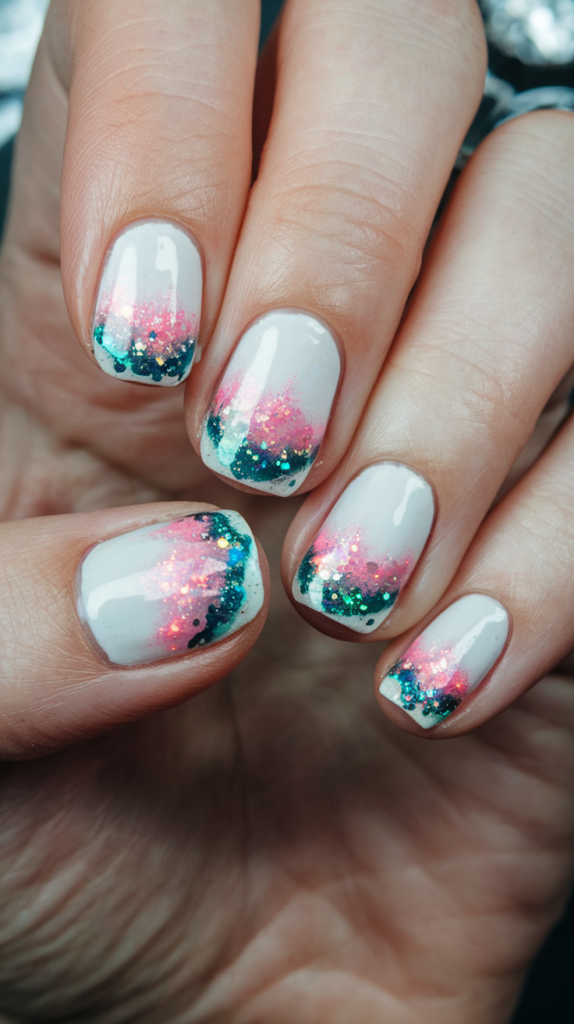
4. Galaxy Glitter Nails
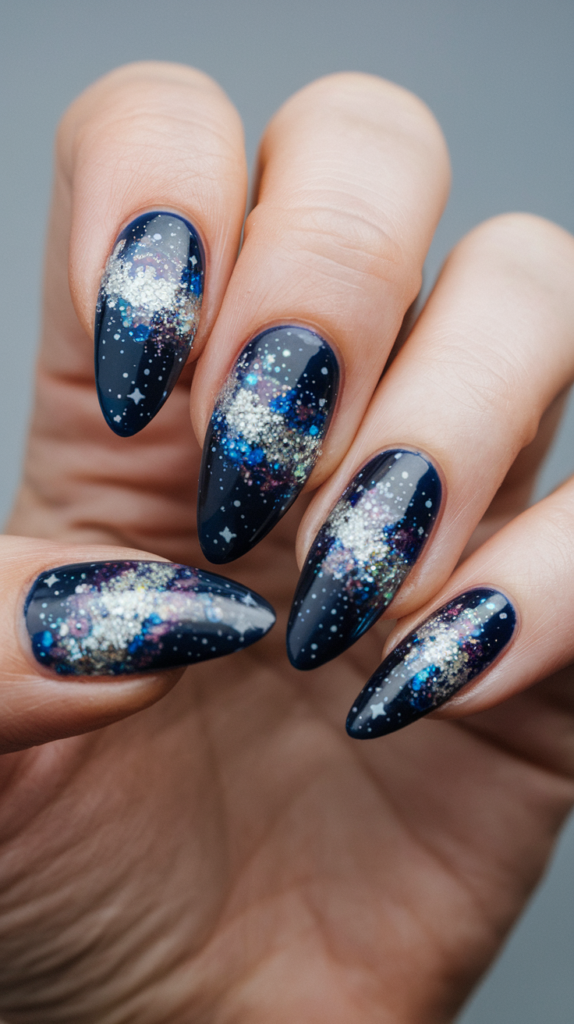
Galaxy Glitter Nails transform your manicure into a cosmic masterpiece, capturing the beauty and mystery of the universe with swirling colors and sparkling glitter.
Exploring the Popularity of Galaxy Nails
Galaxy nails have become a sensation in the nail art world, celebrated for their mesmerizing, cosmic-inspired designs.
This trend draws inspiration from the swirling beauty of space, combining dark, moody tones with glitter that mimics the shimmer of distant stars and nebulae.
The appeal of galaxy nails lies in their versatility, offering endless opportunities to experiment with colors and glitter to match your personal style.
Whether you prefer deep, celestial hues or vibrant, colorful interpretations, galaxy glitter nails provide a canvas for creativity that’s truly out of this world.
Materials and Techniques for Galaxy Glitter Nails
Step 1: Gather Your Materials
You’ll need dark nail polishes like black, navy, deep purple, and dark blue, along with a white polish, glitter polishes in various shades, and a makeup sponge for blending.
Step 2: Apply the Base Color
Start with a base coat of black or navy polish to set a dark, cosmic background.
Step 3: Create the Nebulous Effect
Use a makeup sponge to dab small amounts of white polish onto your nails, creating soft, cloudy shapes that resemble nebulae.
Blend dark purple and blue polishes into the white, layering the colors to add depth and dimension.
Step 4: Add the Glitter
Apply a fine glitter polish in silver, blue, or purple over the entire nail or to specific areas for a starry effect.
For extra sparkle, incorporate holographic or chunky glitter to mimic the brilliance of stars and distant galaxies.
Step 5: Seal the Design
Finish with a clear topcoat to enhance the colors, protect the design, and give your nails a glossy, cosmic shine.
The result is a dazzling set of galaxy glitter nails that bring the wonders of space to your fingertips.
Inspiring Ideas for Galaxy-Inspired Color Schemes
Classic Galaxy
Dark, moody shades like black, navy, and deep purple paired with silver and holographic glitter create a dramatic and ethereal design.
Bright and Playful
Teal, turquoise, and bright pink polishes combined with iridescent glitter offer a vibrant, colorful take on the galaxy trend.
Minimalist and Sophisticated
Monochromatic tones in grey, silver, and white create a subdued yet striking galaxy design, perfect for a modern and understated look.
Why It Works
Galaxy Glitter Nails capture the magic and mystery of the cosmos through their dynamic blend of colors and shimmering glitter.
The swirling layers of polish evoke the depth of space, while the glitter adds a starry brilliance that makes each nail a tiny, celestial masterpiece.
This trend offers limitless possibilities for personalization, making it an ideal choice for those who love bold, creative, and eye-catching nail art.
5. Glitter Ombre Fade

The Glitter Ombre Fade combines the soft elegance of gradient transitions with the sparkling allure of glitter, creating a nail design that is both subtle and eye-catching.
Understanding the Ombre Technique for Nails
The ombre technique, celebrated in beauty trends for its seamless gradients, has become a favorite in nail art.
Ombre nails feature a smooth transition between colors, creating a soft, blended effect that is versatile and sophisticated.
When glitter is added, the ombre design transforms into a dazzling display of light and sparkle, enhancing the gradient’s appeal.
This technique works beautifully with a variety of colors, from delicate pastels to bold, vibrant shades, making it adaptable to any style or occasion.
Tips for Creating a Seamless Glitter Ombre Fade
Step 1: Select Your Colors
Choose a base color and glitter polish that complement each other.
For a subtle look, opt for pale pink or nude with silver or gold glitter. For a bolder design, try deep burgundy or navy paired with contrasting glitter shades.
Step 2: Apply the Base Color
Start by applying two coats of your base polish, ensuring each layer dries completely before proceeding.
Step 3: Create the Glitter Ombre Effect
Use a makeup sponge to dab glitter polish onto the tips of your nails.
Concentrate the glitter at the tips, gradually fading it toward the middle of the nail.
For a more pronounced gradient, layer the glitter polish, starting sparsely at the tips and building up coverage as you move toward the middle.
The key to a seamless fade is blending the glitter into the base color for a soft, smooth transition.
Step 4: Seal the Design
Finish with a clear topcoat to protect the ombre design and enhance the glitter’s shine.
The result is a stunning set of nails that combines subtle elegance with a touch of sparkle, perfect for any occasion.
Recommended Glitter Shades for Ombre Designs
Classic Elegance
Silver or gold glitter is timeless and pairs well with a variety of base colors, creating a sophisticated and glamorous look.
Romantic Tones
Rose gold or champagne glitter adds a warm, feminine touch, making it ideal for weddings, date nights, or special events.
Playful and Vibrant
Teal, purple, or bright pink glitter creates a bold, fun effect that is perfect for summer outings or festival season.
Why It Works
The Glitter Ombre Fade blends the soft, seamless beauty of gradients with the dazzling effect of glitter, resulting in a design that is both elegant and versatile.
The smooth transition between the base color and glitter creates depth and dimension, while the choice of glitter shades allows for endless customization.
This design is perfect for those who want a manicure that is subtle yet stunning, offering a touch of sparkle for any occasion.
6. Mermaid Glitter Nails
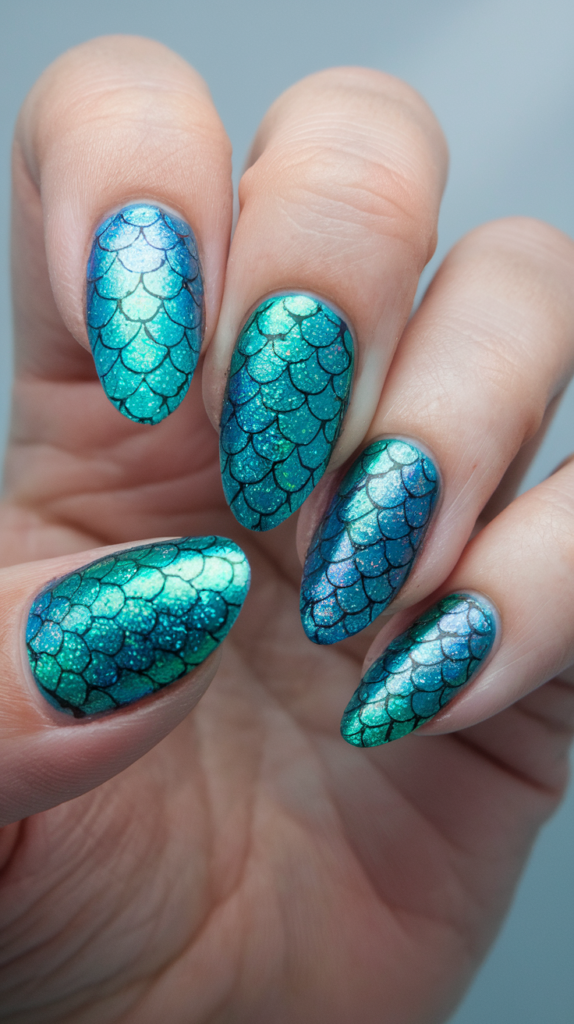
Mermaid Glitter Nails bring the enchanting magic of the sea to your fingertips, combining shimmering scales and iridescent hues for a bold and mystical design.
The Inspiration Behind Mermaid Glitter Nails
Mermaid glitter nails draw inspiration from the fantasy world of mermaids, capturing the shimmering beauty of their scales and the magical hues of ocean waves.
The design features a palette of teal, blue, and green shades enhanced with iridescent or holographic glitter, creating a mesmerizing, underwater-inspired effect.
This look has become a favorite among lovers of fantasy and adventure, offering a touch of whimsy and elegance to any manicure.
Step-by-Step Instructions for Mermaid Glitter Nails
Step 1: Choose Your Colors and Tools
Gather teal, blue, and green nail polishes along with an iridescent or holographic glitter polish.
You’ll also need a fine detail brush for creating scale-like patterns.
Step 2: Apply the Base Color
Start with a base coat of teal or blue polish on all nails.
Let the base color dry completely before moving on to the next step.
Step 3: Create the Scale Patterns
Using a fine detail brush and a lighter shade of blue or green, paint overlapping scale-like patterns on each nail.
The scales should resemble those of a mermaid’s tail, adding texture and depth to the design.
Step 4: Add the Glitter
Apply a layer of iridescent or holographic glitter polish over the entire nail, ensuring the scale patterns remain visible beneath the shimmer.
The glitter adds a reflective, magical quality, mimicking the way light dances on underwater surfaces.
Step 5: Seal the Design
Finish with a clear topcoat to protect your design and add a glossy finish.
This step enhances the iridescent effect, making your mermaid nails truly captivating.
Top Colors and Finishes for Mermaid Nails
Oceanic Hues
Teal, blue, and green are essential for recreating the colors of the ocean and a mermaid’s shimmering tail.
Blend these shades to create gradients that add dimension to your design.
Iridescent and Holographic Glitter
Incorporate glitter with color-shifting properties to capture the dynamic and reflective quality of mermaid scales.
The glitter transforms the nails into tiny, underwater-inspired masterpieces.
Pastel Elegance
For a softer, more delicate look, use pastel shades of blue, green, or lavender paired with fine iridescent glitter.
This creates a subtle, ethereal effect while maintaining the enchanting mermaid aesthetic.
Why It Works
Mermaid Glitter Nails combine the allure of oceanic hues with the magic of shimmering scales, resulting in a design that feels both bold and whimsical.
The use of iridescent glitter enhances the underwater effect, while the scale patterns add texture and depth to the design.
This versatile manicure can be customized for a bold, vibrant look or a soft, pastel take, making it a favorite for those who love the mystical beauty of the sea.
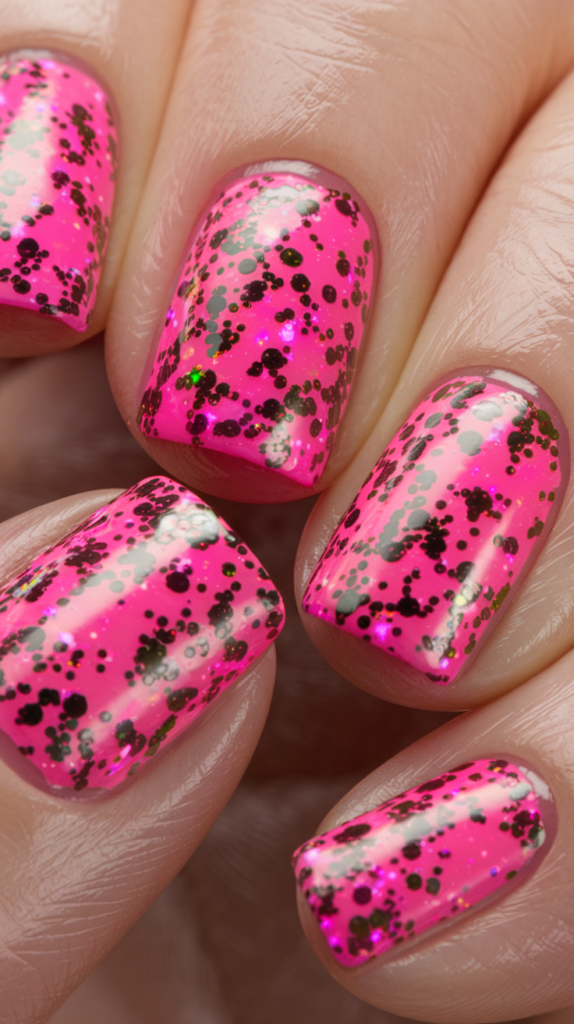
7. Glitter Confetti Nails

Glitter Confetti Nails bring a burst of playful energy to your manicure, combining bold colors and random patterns for a design that’s vibrant and fun.
What Makes Confetti Nails Unique?
Confetti nails stand out for their lively, spontaneous appeal, offering a playful twist on traditional glitter nail art.
Instead of uniform glitter placement, confetti nails feature a scattered application of multicolored glitter pieces, creating a look that’s as dynamic as a celebration.
The charm of this design lies in its unpredictability—each nail is unique, with glitter pieces varying in size, shape, and color.
This randomness makes glitter confetti nails a perfect choice for anyone looking to showcase their bold personality and love for fun, eye-catching designs.
How to Apply Multicolored Glitter Confetti Nails
Step 1: Select a Base Color
Choose a clear or neutral base color like nude, pale pink, or white to let the glitter stand out.
For a playful twist, opt for a bright or pastel base color that complements the glitter.
Step 2: Apply the Base Color
Paint your nails with two coats of the base polish, letting each layer dry completely.
Step 3: Add the Glitter Confetti
Use a multicolored glitter polish or manually apply individual glitter pieces using a small brush or toothpick.
Dab the glitter onto the nails in a random pattern, ensuring each nail has a unique arrangement of glitter pieces.
You can concentrate the glitter in specific areas for a gradient effect or spread it evenly across the nail for a vibrant, full-coverage look.
Step 4: Seal the Design
Finish with a clear topcoat to protect the design and add a glossy finish.
The result is a lively, confetti-inspired manicure perfect for parties or any occasion where you want to shine.
Best Base Colors to Complement Confetti Glitter
Neutral Tones
Nude, pale pink, or white create a clean, understated backdrop that highlights the multicolored glitter, ensuring it becomes the focal point of the design.
Playful Pastels
Pastel shades like blue, lavender, or mint pair beautifully with multicolored glitter for a whimsical and lighthearted look.
Bold Brights
Bright coral, yellow, or turquoise bases add an extra layer of energy to the design, making it even more eye-catching and fun.
Why It Works
Glitter Confetti Nails are all about embracing bold, playful energy and creativity.
The scattered glitter arrangement gives each nail a unique personality, while the choice of base colors allows the design to be tailored to any mood or occasion.
This vibrant and celebratory style is perfect for those who want their nails to stand out and bring a touch of joy to their look.
8. Starry Night Glitter Nails
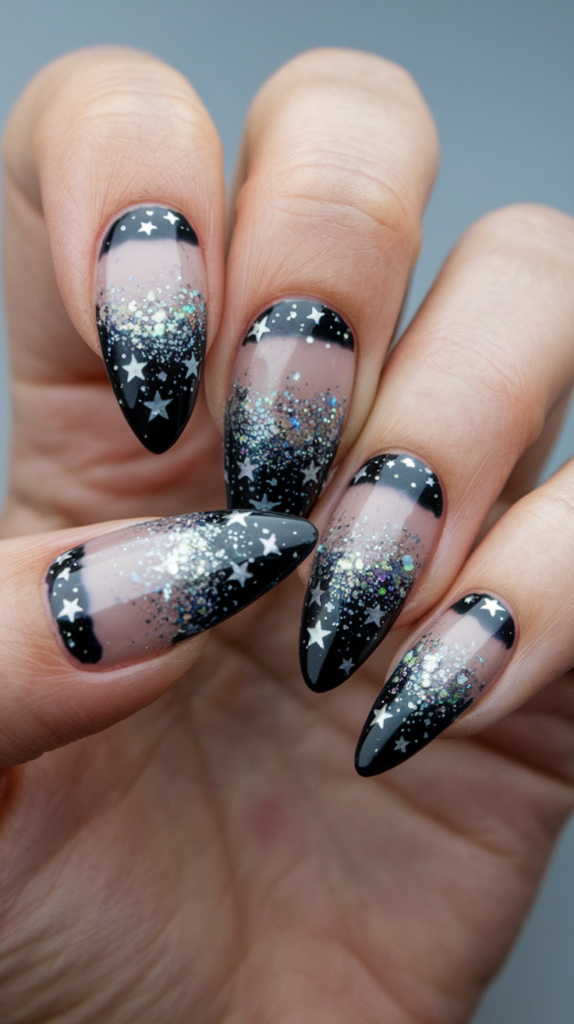
Starry Night Glitter Nails bring the magic of a starlit sky to your fingertips, combining shimmering glitter and elegant details for a breathtaking design.
Creating a Starry Night Effect with Glitter
Starry night nails capture the enchanting beauty of the night sky with a dark base and sparkling accents.
Begin with a base color such as black or navy to mimic the depth of the night sky.
Layer a fine silver or holographic glitter polish over the nails, concentrating more glitter at the tips for a gradient effect.
To enhance the starry effect, use a dotting tool or toothpick to apply tiny white dots across the nails, resembling distant stars.
For added detail, incorporate star-shaped decals or stamps to create defined star patterns.
Seal the design with a clear topcoat to protect the layers and add a glossy finish, resulting in an ethereal manicure that truly shines.
Techniques for Layering Glitter for Depth and Dimension
Step 1: Start with a Base Color
Apply a smooth, even layer of a dark polish, such as black or navy, as the foundation.
Step 2: Build the First Glitter Layer
Use a fine glitter polish to create a light, even coat across the entire nail, forming the first layer of stars.
Step 3: Add a Second Glitter Layer
Apply a denser coat of glitter to specific areas, such as the tips or middle of the nails, to create a gradient effect that mimics varying star brightness.
Step 4: Incorporate Larger Elements
Add a few larger glitter pieces or star-shaped decals for texture and added dimension.
Step 5: Apply a Final Shimmer Layer
Finish with a very fine glitter or shimmer polish, applied sparingly over the nails for a subtle twinkling effect.
Seal everything with a clear topcoat for a smooth, glossy finish.
Complementary Nail Shapes for Starry Night Designs
Almond-Shaped Nails
The elongated curves of almond-shaped nails echo the graceful lines of the night sky, drawing attention to the glitter gradient.
Stiletto-Shaped Nails
With their sharp, dramatic points, stiletto nails provide a bold backdrop for the shimmering starry design.
Round and Oval Nails
For a softer, more understated look, round or oval nails offer classic elegance while still showcasing the beauty of the starry night design.
Why It Works
Starry Night Glitter Nails capture the ethereal beauty of the night sky through their layered glitter and starry details.
The gradient glitter adds depth and dimension, while the star accents bring a whimsical touch to the design.
Paired with the right nail shape, this manicure is both versatile and captivating, perfect for anyone looking to add a touch of celestial charm to their look.
9. Glitter Cuticle Design
Glitter Cuticle Designs offer a subtle yet sparkling touch to your manicure, framing the nails with a delicate shimmer for a chic and understated look.
The Minimalist Appeal of Glitter Cuticle Designs
Glitter cuticle designs focus on enhancing the area around the cuticle with a fine line or dot of glitter, creating a refined and elegant frame for the nails.
This minimalist approach allows you to incorporate glitter without overwhelming the design, making it ideal for both everyday wear and special occasions.
The simplicity of this style ensures a polished and sophisticated appearance, perfect for those who love subtle glamour.
How to Perfectly Apply Glitter Around the Cuticle
Step 1: Select Your Base Color
Choose a complementary base color, such as nude, blush, or pale pink, to provide a subtle backdrop for the glitter.
Apply two coats of the base polish, allowing each layer to dry completely.
Step 2: Apply the Glitter
Using a fine detail brush or small flat brush, apply a thin line of glitter polish around the cuticle area.
Follow the natural curve of the cuticle to create a seamless frame, or use small dots of glitter for a more delicate effect.
For precision, consider using a striping brush or tape to guide the glitter placement.
Step 3: Seal the Design
Finish with a clear topcoat to protect the glitter and add a glossy shine.
This step ensures the design is smooth and long-lasting, with the glitter catching the light beautifully.
Best Colors for a Chic Glitter Cuticle Look
Neutral Elegance
Neutral tones like nude, blush, and soft pink create a subtle base that allows the glitter to stand out, perfect for a refined and polished look.
Bold Contrasts
Dark base colors such as black, navy, or deep burgundy pair beautifully with gold or silver glitter for a dramatic, high-contrast design.
Playful and Whimsical
Bright or pastel base colors like coral, mint, or lavender combined with holographic or multicolored glitter create a fun and vibrant effect, ideal for summer or festive occasions.
Why It Works
Glitter Cuticle Designs offer a minimalist take on glitter nails, emphasizing elegance and precision.
The focus on the cuticle area adds a unique and sophisticated element to the manicure, while the choice of colors and glitter allows for endless customization.
This subtle yet striking style is perfect for anyone seeking a refined and glamorous touch for their nails.
10. Rainbow Glitter Nails
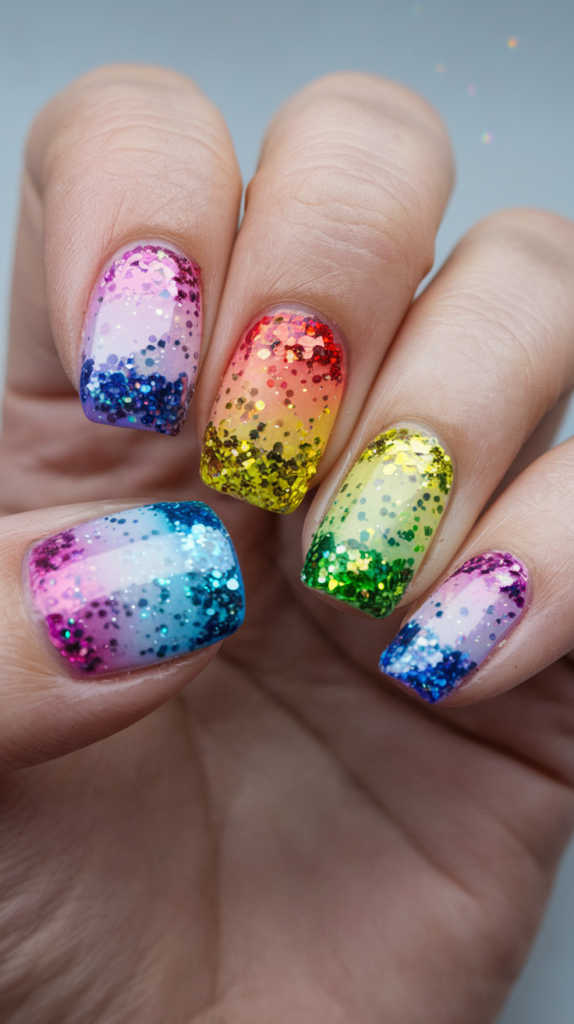
Rainbow Glitter Nails combine vibrant colors with sparkling glitter for a playful and eye-catching design that is perfect for any occasion.
Why Rainbow Nails Are Trending
Rainbow nails have captured the attention of nail art enthusiasts for their bold and colorful appeal.
This design allows you to showcase multiple shades, creating a dynamic and fun look that suits every mood and event.
When glitter is added, rainbow nails achieve a dazzling effect, sparkling like a prism in the light and adding a touch of magic to your manicure.
The versatility of rainbow nails is one of their biggest draws. Whether you opt for a full gradient on each nail or alternate colors across your fingers, the possibilities are endless.
The addition of glitter enhances the vibrancy and shine of the design, ensuring your nails are always a conversation starter.
A Guide to Applying Glitter in Rainbow Patterns
Step 1: Select Your Colors
Choose a range of rainbow shades, such as red, orange, yellow, green, blue, and purple.
Prepare a clear or glitter topcoat to finish the design.
Step 2: Apply the Base Colors
Apply two coats of your chosen base colors, working across the rainbow spectrum.
For a gradient effect, use a makeup sponge to blend the colors on each nail, ensuring a smooth and seamless transition.
Step 3: Add the Glitter
For a subtle sparkle, apply a clear glitter topcoat over the entire nail.
For a more dramatic effect, use a small brush or toothpick to place individual glitter pieces in a rainbow pattern, aligning them with the base colors for a cohesive look.
Step 4: Seal the Design
Finish with a clear topcoat to lock in the glitter and add a glossy shine.
The result is a vibrant, sparkling manicure that radiates energy and fun.
Best Glitter Polishes for a Rainbow Effect
Iridescent and Holographic Glitter
These polishes reflect multiple colors and create a shimmering effect that enhances the rainbow theme.
Clear Glitter Topcoats
A subtle sparkle can be achieved with clear glitter topcoats, perfect for a refined and polished rainbow look.
Chunky Glitter Polishes
For a bold and textured design, opt for chunky glitter polishes that feature larger, multicolored glitter pieces.
These create a dynamic and standout look, making your rainbow nails truly unforgettable.
Why It Works
Rainbow Glitter Nails blend the joy of vibrant colors with the magic of glitter, resulting in a design that is both playful and sophisticated.
The versatility of this style allows for endless creativity, whether you prefer subtle gradients or bold, chunky glitter effects.
Perfect for celebrations or simply brightening your day, this design is a must-try for anyone who loves color and sparkle.
11. Matte and Glitter Combo
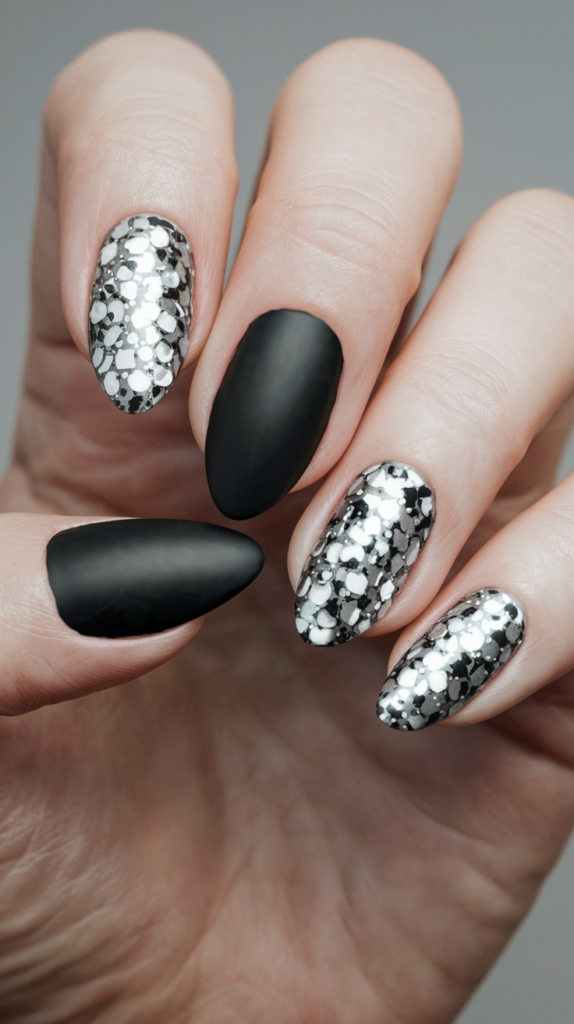
The Matte and Glitter Combo pairs contrasting finishes to create a striking manicure that is both elegant and captivating.
The Beauty of Combining Matte and Glitter Finishes
The combination of matte and glitter finishes offers a unique contrast that elevates any nail design.
Matte finishes provide a smooth, velvety texture with understated elegance, while glitter adds sparkle and shine that catches the light beautifully.
This juxtaposition of textures creates a dynamic and visually intriguing design, perfect for making a statement.
The versatility of this combo allows for endless creative possibilities. Whether you use glitter as an accent on one nail or incorporate it into patterns like stripes or polka dots, this pairing suits a wide range of styles—from subtle and refined to bold and dramatic.
Tips for Achieving a Flawless Matte and Glitter Combo
Step 1: Select Your Colors
Choose a matte base color and a complementary glitter polish.
For a classic look, pair matte black or deep burgundy with gold or silver glitter.
For a softer design, opt for pastel shades like lavender or mint with matching glitter tones.
Step 2: Apply the Matte Base Color
Apply two coats of the matte base polish to all nails, allowing each layer to dry completely.
Seal with a matte topcoat to ensure the finish stays velvety smooth.
Step 3: Add Glitter Accents
Decide how to incorporate the glitter—whether as an accent nail, in patterns like stripes or polka dots, or as a gradient.
Use a fine detail brush or dotting tool for precise glitter placement.
Step 4: Preserve the Contrast
Apply a clear topcoat only over the glitter areas to enhance the sparkle without compromising the matte finish.
The result is a flawless contrast between the muted matte base and the shimmering glitter accents.
Popular Color Pairings for Matte and Glitter Nails
Classic and Timeless
- Matte black with gold glitter exudes sophistication and drama.
- Navy paired with silver glitter creates a modern and chic effect.
Playful and Vibrant
- Bright coral and gold glitter bring energy and warmth to your manicure.
- Turquoise with silver glitter adds a fresh, tropical vibe.
Soft and Feminine
- Pastel shades like mint or lavender combined with rose gold glitter create a delicate, dreamy look.
Why It Works
The Matte and Glitter Combo blends the understated elegance of matte finishes with the eye-catching brilliance of glitter.
This contrast highlights both textures, creating a manicure that feels sophisticated yet playful.
With countless color combinations and design possibilities, this style is versatile enough to suit any occasion, from everyday wear to special events.
12. Glitter French Fade
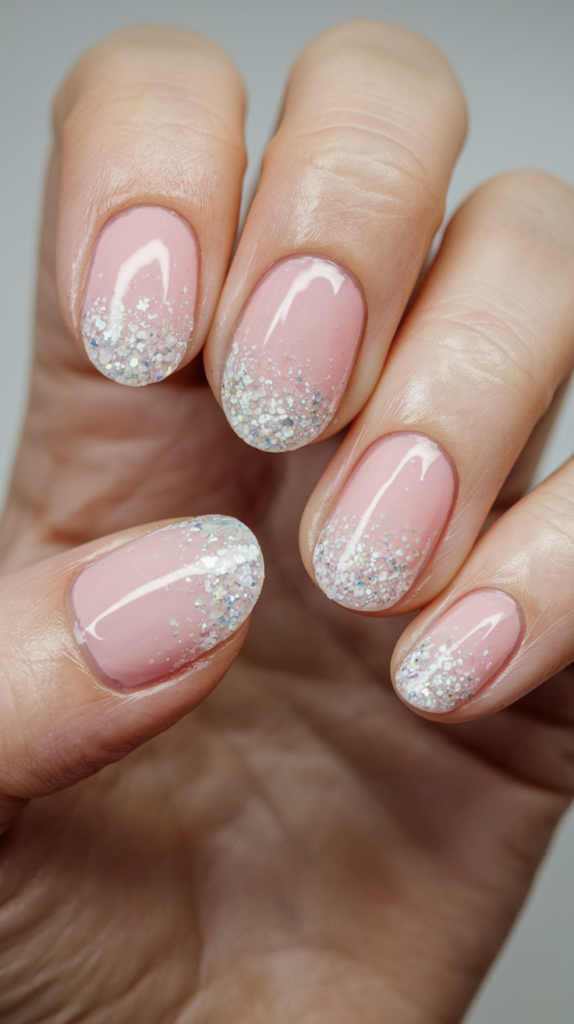
The Glitter French Fade adds a modern and glamorous twist to the timeless French manicure, combining classic elegance with a touch of sparkle.
Redefining the French Manicure with Glitter
The French manicure has long been celebrated for its clean, sophisticated look.
By incorporating glitter in a gradient fade, the classic design transforms into a contemporary masterpiece.
In a glitter French fade, glitter is applied from the tips down toward the middle of the nail, creating a seamless and elegant transition.
This modern take on the French manicure is perfect for special occasions or when you want to add a bit of glamour to your everyday style.
The subtle fade of glitter enhances the timeless appeal of the French manicure, making it both sophisticated and eye-catching.
How to Create a Glitter French Fade at Home
Step 1: Choose Your Colors
Select a base color and glitter polish that complement each other.
For a classic look, opt for a sheer pink or nude base with silver or gold glitter.
Step 2: Apply the Base Color
Begin by applying two coats of the base color to all nails, allowing each layer to dry completely.
Step 3: Create the Glitter Fade
Use a makeup sponge to dab glitter polish onto the tips of your nails.
Concentrate the glitter at the tips and gradually fade it toward the middle of the nail, blending it smoothly into the base color.
For a more pronounced gradient, apply multiple layers of glitter, starting sparsely at the tips and increasing coverage as you move downward.
Step 4: Seal the Design
Finish with a clear topcoat to lock in the glitter and add a glossy finish.
The result is a subtle yet glamorous design with a delicate sparkle that works for any occasion.
Ideal Nail Shapes for a French Fade Look
Almond-Shaped Nails
The elongated shape of almond nails enhances the gradient effect, drawing attention to the tips while maintaining a graceful silhouette.
Coffin or Ballerina-Shaped Nails
These squared-off shapes provide a wide surface area for glitter, creating a bold and modern look that beautifully showcases the fade.
Round and Oval Nails
For a softer, more understated style, round or oval nails offer a classic elegance that keeps the glitter as the focal point.
Why It Works
The Glitter French Fade combines the timeless elegance of the French manicure with the dazzling appeal of glitter.
The gradient fade adds depth and sophistication, while the choice of nail shapes allows for endless customization.
This design is perfect for anyone seeking a manicure that is both subtle and glamorous, offering a modern twist on a beloved classic.
13. Crystal Glitter Nails
Crystal Glitter Nails bring luxury and sparkle to your manicure, making them the ultimate choice for special occasions and glamorous events.
Why Crystal Glitter Nails Are Perfect for Special Occasions
Crystal glitter nails exude elegance and sophistication, perfect for weddings, galas, or any event where you want to make a statement.
The use of iridescent or holographic glitter creates a dazzling, crystal-like effect that reflects light beautifully, making your nails shine like diamonds.
This design is versatile, whether you opt for full glitter coverage or subtle accents, ensuring a stunning finish every time.
The crystal-like sparkle elevates your manicure, providing the perfect complement to formal attire and adding a touch of glamour to any look.
Steps to Achieve a Crystal-Like Glitter Finish
Step 1: Select Your Base Color
Choose a base color that complements the glitter, such as sheer pink or nude, to allow the crystal-like sparkle to stand out.
Step 2: Apply the Base Color
Apply two coats of the base polish to all nails, ensuring each layer dries completely for a smooth foundation.
Step 3: Add the Glitter
Use a fine glitter polish with iridescent or holographic particles and apply it evenly over the entire nail.
For a more intense effect, layer the glitter polish, building up coats until the desired sparkle is achieved.
Step 4: Enhance with Chunky Glitter
Add larger, chunky glitter pieces for texture and dimension, creating a dynamic, crystal-like appearance.
Step 5: Seal with a Topcoat
Finish with a high-shine clear topcoat to lock in the glitter and enhance the overall brilliance of the design.
The result is a luxurious and sparkling manicure, ideal for occasions when you want to shine.
Best Crystal-Inspired Glitter Polishes
Fine Glitter Polishes
Choose polishes with fine iridescent or holographic glitter particles for a refined and realistic crystal effect.
Chunky Glitter Polishes
For added texture and boldness, opt for chunky glitter polishes that feature larger pieces for a dynamic finish.
Top Glitter Brands
Brands like OPI, Essie, and Zoya offer high-quality glitter polishes perfect for creating crystal-inspired nails.
Iridescent and Holographic Options
These glitter types shift colors with light, adding a mesmerizing and luxurious effect to your manicure.
Why It Works
Crystal Glitter Nails combine the dazzling allure of crystals with the elegance of a well-polished manicure.
The iridescent and holographic glitter reflects light beautifully, ensuring your nails catch everyone’s attention.
This design’s versatility makes it perfect for any formal event, providing a luxe and sparkling finish that complements your style effortlessly.
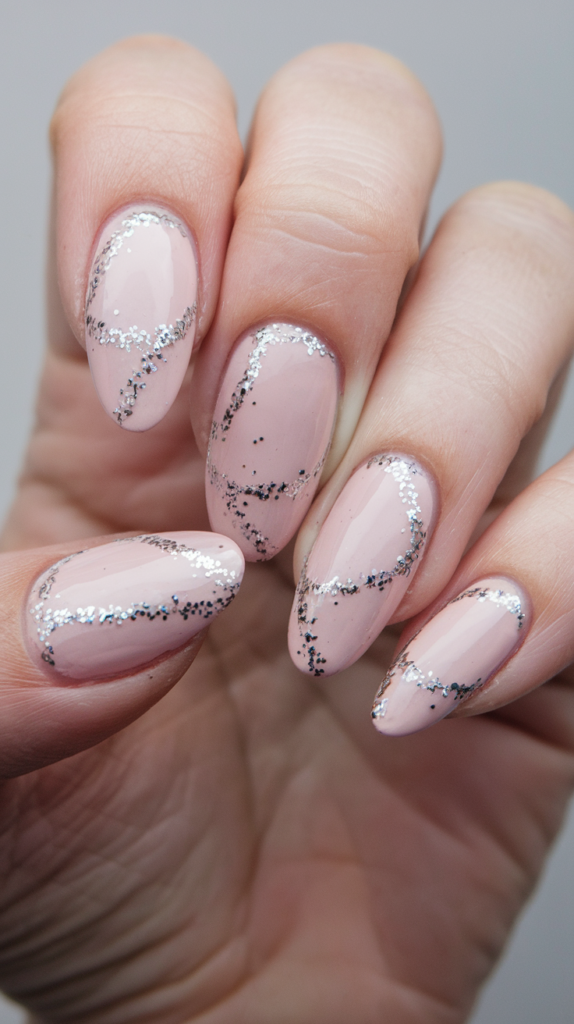
14. Glitter Outline Nails
Glitter Outline Nails combine minimalism with sparkle, offering a chic and sophisticated design that frames the nails with elegance.
The Simplicity and Elegance of Glitter Outlines
Glitter outline nails are a refined way to incorporate glitter into your manicure, focusing on a thin, sparkling line around the edge of each nail.
This subtle framing highlights the nail’s shape and adds a touch of glamour without overwhelming the design.
Perfect for those who prefer an understated style, glitter outline nails strike the ideal balance between minimalism and sparkle.
The clean and polished look makes this design versatile, suitable for everyday wear or special occasions where you want a hint of elegance.
How to Apply Glitter Outlines for Precision
Step 1: Choose Your Base Color
Select a base color that complements the glitter, such as nude, blush, or pale pink for a classic look.
Step 2: Apply the Base Color
Paint your nails with two coats of the base polish, ensuring each layer dries completely.
Step 3: Create the Glitter Outline
Using a fine detail brush or striping brush, apply a thin line of glitter polish around the edge of each nail.
Follow the natural curve of the nail for a continuous line, or create small, individual dots for a more delicate effect.
For precision, use tape or a nail guide to ensure clean and even glitter placement.
Step 4: Seal the Design
Finish with a clear topcoat to lock in the glitter and add a glossy shine.
This final step ensures the design is smooth and long-lasting, with the glitter outline catching the light beautifully.
Top Glitter Colors for Minimalist Nail Designs
Neutral Elegance
Gold, silver, and rose gold glitter add a touch of sophistication and pair perfectly with soft base colors like nude or blush.
High-Contrast Drama
Dark base colors like black, navy, or burgundy paired with silver or gold glitter create a bold and striking effect, perfect for formal occasions.
Playful and Whimsical
Bright or pastel base colors such as coral, mint, or lavender combined with multicolored or holographic glitter add a fun and vibrant twist, ideal for summer or festivals.
Why It Works
Glitter Outline Nails blend the sophistication of minimalism with the glamour of sparkle, resulting in a refined and versatile manicure.
The clean, subtle design highlights the nail’s shape while the glitter adds a hint of elegance and shine.
This minimalist yet striking look is perfect for anyone seeking a polished and modern nail design that transitions seamlessly from day to night.
15. Neon Glitter Nails
Neon Glitter Nails bring bold, bright, and beautiful colors to your fingertips, combining vibrant shades with sparkling glitter for a playful and attention-grabbing design.
The Popularity of Neon Glitter in Nail Art
Neon glitter nails have become a favorite trend in nail art, celebrated for their bold, statement-making style.
This design showcases bright, eye-catching colors enhanced with glitter, creating a fun and lively manicure that suits any occasion.
The combination of neon hues and glitter adds vibrancy and sparkle, making your nails shine like neon lights.
Whether you choose a full neon gradient or alternate colors across your nails, the versatility of this design ensures endless creative possibilities.
Techniques for Applying Neon Glitter Polish
Step 1: Choose Your Colors
Select neon shades such as hot pink, electric blue, lime green, and neon yellow.
Prepare a clear or glitter topcoat to enhance the sparkle.
Step 2: Apply the Neon Base
Paint your nails with two coats of your chosen neon colors, ensuring smooth and even coverage.
For a gradient effect, use a makeup sponge to blend the colors seamlessly on each nail.
Step 3: Add the Glitter
- For subtle sparkle: Apply a clear glitter topcoat over the entire nail.
- For a dramatic effect: Use a small brush or toothpick to place individual glitter pieces in patterns or concentrated areas.
Focus on creating a dynamic design that enhances the vibrancy of the neon shades.
Step 4: Seal the Design
Finish with a clear topcoat to lock in the glitter and add a glossy finish.
The result is a set of nails that are bold, colorful, and full of life—perfect for anyone who loves a striking manicure.
Best Neon Colors for Glitter Nail Art
Bright and Bold
Hot pink, electric blue, neon yellow, and lime green are ideal for creating a vibrant and head-turning look.
These shades pair beautifully with silver or holographic glitter, adding depth and sparkle to the design.
Soft and Sophisticated
For a more subtle take, opt for pastel neon shades like coral, mint, or lavender.
These softer hues maintain the playful energy of neon nails while offering a refined and versatile appearance.
Why It Works
Neon Glitter Nails combine the energy of vibrant neon shades with the glamour of glitter, creating a design that is both bold and playful.
The addition of glitter enhances the brilliance of the colors, ensuring your nails shine brightly in any setting.
This versatile and customizable style is perfect for making a statement, whether at a summer party, festival, or casual day out.
16. Floral Glitter Nails
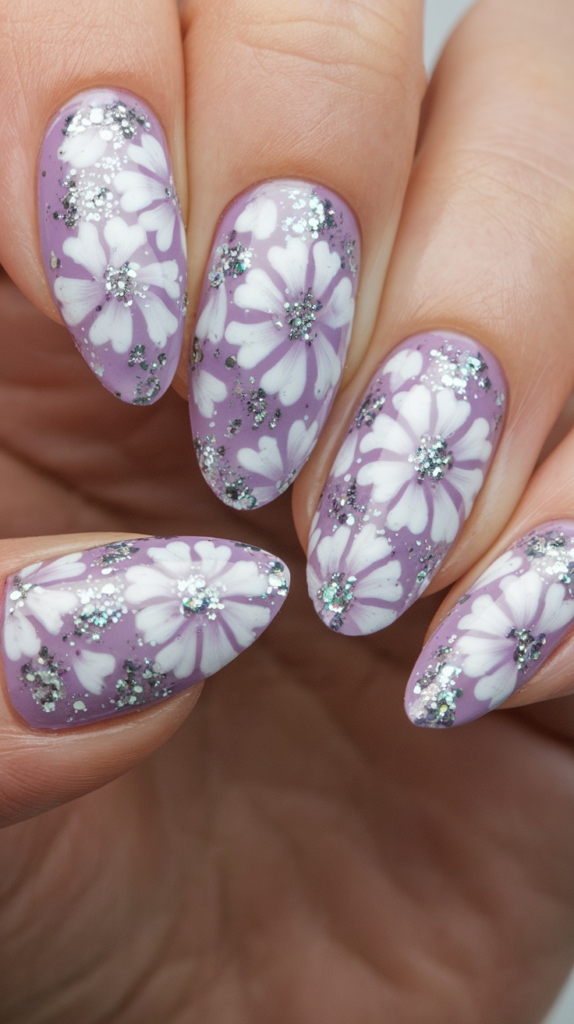
Floral Glitter Nails combine the timeless beauty of floral designs with the dazzling allure of glitter, creating a manicure that is both delicate and glamorous.
Combining Glitter with Floral Nail Art
Floral nail art is a classic choice, celebrated for its elegance and versatility.
Adding glitter to floral designs brings a modern twist, creating a stunning contrast between delicate flowers and sparkling accents.
The key to achieving balance lies in focusing the glitter on specific areas, such as the center of the flowers or along the edges of the petals.
This approach enhances the floral design without overpowering it, resulting in a sophisticated and eye-catching manicure.
How to Place Glitter for a Balanced Floral Design
Step 1: Choose Your Colors
Select a base color and floral design that complement each other.
For a classic look, pair a soft nude or pastel base with white or pink flowers.
For a bolder style, opt for bright or dark base colors with contrasting floral accents.
Step 2: Apply the Base Color
Paint your nails with two coats of the base polish, ensuring each layer dries completely.
Step 3: Create the Floral Design
Use a fine detail brush to paint flowers directly onto your nails, or apply floral decals or stamps for precision.
Step 4: Add Glitter Accents
- Use a small brush or dotting tool to apply glitter sparingly to the floral design.
- Focus on specific areas, such as the flower centers or petal edges, to add subtle sparkle.
Step 5: Seal the Design
Finish with a clear topcoat to protect your artwork and add a glossy finish.
The result is a manicure that is both delicate and dazzling, perfect for occasions where elegance meets glamour.
Ideal Color Combinations for Floral Glitter Nails
Classic Elegance
- Nude and white for a timeless and sophisticated look.
- Soft pinks and pastels for a delicate, feminine touch.
Playful and Vibrant
- Bright coral paired with gold glitter for a lively design.
- Turquoise with silver glitter for a bold, modern look.
Romantic and Dreamy
- Pastel lavender combined with rose gold glitter for a soft, ethereal effect.
Why It Works
Floral Glitter Nails balance the intricacy of floral patterns with the sparkle of glitter, creating a design that feels both fresh and sophisticated.
The subtle glitter accents enhance the beauty of the flowers, while the color combinations allow for endless personalization.
This versatile style suits any occasion, from casual outings to formal events, making it a perfect choice for those who love elegance with a touch of sparkle.
17. Negative Space Glitter Nails

Negative Space Glitter Nails combine modern design with sparkling accents, offering a chic and minimalist manicure that stands out.
Exploring the Negative Space Nail Art Trend
Negative space nail art has gained immense popularity for its clean, contemporary aesthetic.
This trend involves leaving parts of the nail bare, creating striking contrasts between the natural nail and applied polish or glitter.
The result is a unique and sophisticated design that is both eye-catching and versatile.
Adding glitter to negative space designs enhances their visual appeal, making the contrast between the bare nail and the glittered sections sparkle beautifully.
How to Incorporate Glitter into Negative Space Designs
Step 1: Choose Your Colors
Select a base color and glitter polish that complement each other.
For a classic look, pair nude or pale pink with silver or gold glitter. For a bold style, use a dark base color with contrasting glitter.
Step 2: Apply the Base Color
Paint your nails with two coats of the base polish, ensuring each layer dries completely.
Step 3: Create the Negative Space Design
Use tape, stencils, or freehand techniques to leave areas of the nail bare, creating patterns or shapes.
Step 4: Add Glitter
Apply glitter polish to the sections of the nail not left bare.
Ensure even application and clean, precise edges by using a fine brush or tape as a guide.
Step 5: Seal the Design
Finish with a clear topcoat to lock in the design and add a glossy shine.
The result is a modern and chic manicure with sparkling accents that catch the light beautifully.
Top Tips for a Clean Negative Space Look
Smooth Base Application
Apply the base color evenly and smoothly to create a flawless canvas for your design.
Sharp, Well-Defined Edges
Use tape, stencils, or nail guides to ensure sharp and precise edges for the negative space areas.
Even Glitter Application
Take care to apply glitter evenly, avoiding smudges or uneven patches that can detract from the design.
Seal with a Topcoat
A clear topcoat not only protects the design but also adds a polished and glossy finish for a professional look.
Why It Works
Negative Space Glitter Nails combine the minimalism of bare nails with the glamour of glitter, offering a look that is both contemporary and elegant.
The use of negative space adds depth and interest to the design, while the glitter provides a touch of sparkle, making this style versatile enough for any occasion.
This trend is perfect for anyone seeking a modern, chic manicure that is sure to turn heads.
18. Glitter Stripes and Lines
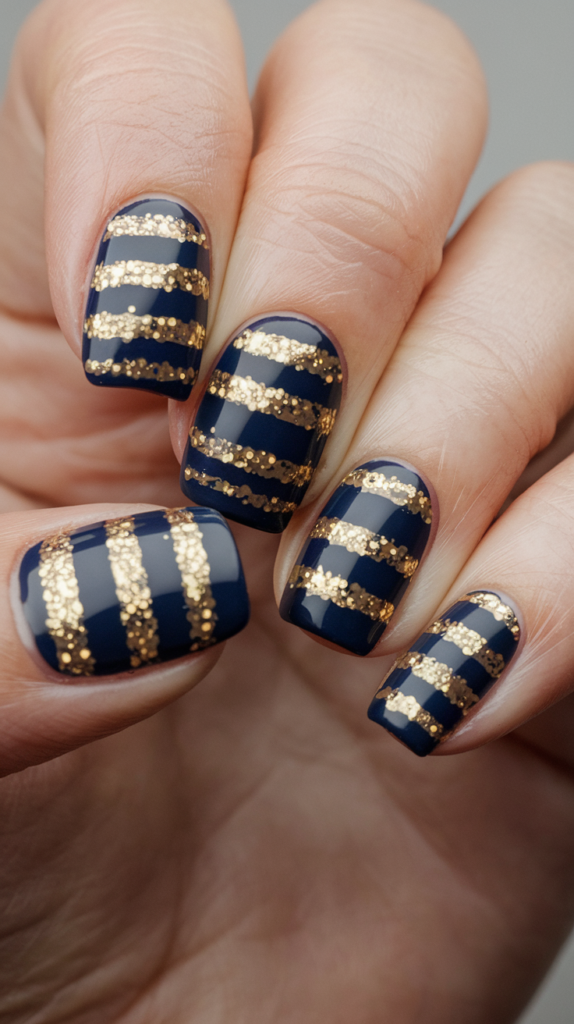
Glitter Stripes and Lines add a touch of sparkle to a classic nail art design, creating a look that is both simple and stunning.
The Appeal of Stripes and Lines in Nail Art
Stripes and lines are timeless elements in nail art, celebrated for their clean and elegant appearance.
When combined with glitter, these designs gain an extra layer of sophistication and shine, making them perfect for adding glamour to your manicure.
The versatility of stripes and lines allows for endless creative possibilities. From bold, graphic patterns to delicate, subtle stripes, glitter enhances the contrast between the lines and the base color for a dynamic and eye-catching effect.
Step-by-Step Guide to Creating Glitter Stripes and Lines
Step 1: Select Your Colors
Choose a base color and glitter polish that complement each other.
For a classic look, pair nude or pale pink with gold or silver glitter. For a bold style, opt for a dark base color with contrasting glitter.
Step 2: Apply the Base Color
Paint your nails with two coats of the base polish, ensuring each layer dries completely.
Step 3: Create the Stripes and Lines
Use tape, stencils, or a striping brush to create your desired pattern.
Ensure the lines are straight and evenly spaced for a polished look.
Step 4: Apply the Glitter
Carefully apply glitter polish to the exposed areas, ensuring even coverage and clean edges.
Remove the tape or stencil while the polish is still wet to reveal sharp, precise lines.
Step 5: Seal the Design
Finish with a clear topcoat to protect the design and add a glossy shine.
The result is a manicure that combines simplicity and sparkle, perfect for any occasion.
Best Base Colors for Striped Glitter Nails
Neutral Elegance
Nude, blush, and soft pink provide a subtle and refined backdrop that lets the glitter stand out beautifully.
Bold and Dramatic
Dark base colors like black, navy, or burgundy paired with gold or silver glitter create a striking, high-contrast design.
Playful and Whimsical
Bright or pastel shades like coral, mint, or lavender combined with multicolored or holographic glitter bring a fun, vibrant energy to your manicure.
Why It Works
Glitter Stripes and Lines blend the classic simplicity of linear designs with the glamour of glitter, creating a look that feels both modern and elegant.
The versatility of this style allows you to customize the design to match your mood or occasion, ensuring your nails always make a statement.
This chic and sparkling trend is perfect for those seeking a manicure that is equal parts subtle and stunning.
19. Two-Tone Glitter Nails
Two-Tone Glitter Nails combine bold color contrasts with sparkling accents, creating a manicure that is both dynamic and balanced.
Understanding the Two-Tone Nail Art Trend
The two-tone nail art trend focuses on pairing two distinct colors on each nail, creating a modern and stylish split design.
When glitter is added, this trend transforms into a dazzling statement, perfect for those who want their nails to stand out.
The versatility of two-tone nails allows for endless creative possibilities, whether you choose diagonal, horizontal, or vertical splits.
The addition of glitter enhances the contrast between the colors, adding depth and sparkle for a bold and balanced look.
How to Perfect the Two-Tone Glitter Nail Look
Step 1: Choose Your Colors and Glitter
Select two contrasting base colors and a matching glitter polish.
For a classic look, pair black and white with silver or gold glitter.
For a bold style, try bright colors like red and blue with a glitter shade that complements both.
Step 2: Apply the First Base Color
Paint one half of each nail with the first color.
Let it dry completely before moving to the next step.
Step 3: Add the Second Base Color
Use tape or a stencil to create a clean, straight line between the two colors.
Apply the second color to the other half of each nail and allow it to dry.
Step 4: Add Glitter for Contrast
Apply glitter polish along the line where the two colors meet.
For a gradient effect, start with a dense application of glitter at the split line and fade it toward the tips or cuticles.
Step 5: Seal the Design
Finish with a clear topcoat to protect the design and add a glossy shine.
The result is a manicure that is bold, balanced, and eye-catching.
Top Glitter Colors for a Striking Two-Tone Design
Classic Elegance
Silver and gold glitter pair beautifully with neutral or monochromatic base colors, adding sophistication to the design.
Bold and Vibrant
Bright glitter shades like red, blue, or purple create a high-contrast look that makes a statement.
Dynamic and Playful
Multicolored or holographic glitter adds a fun and vibrant twist, perfect for casual outings or festive occasions.
Why It Works
Two-Tone Glitter Nails balance the boldness of contrasting colors with the sparkle of glitter, resulting in a dynamic and stylish design.
The clean division between the two colors creates a sharp and modern aesthetic, while the glitter adds depth and glamour.
This versatile manicure can be tailored to suit any mood or occasion, making it a must-try for anyone seeking a chic and dazzling nail design.
20. Polka Dot Glitter Nails
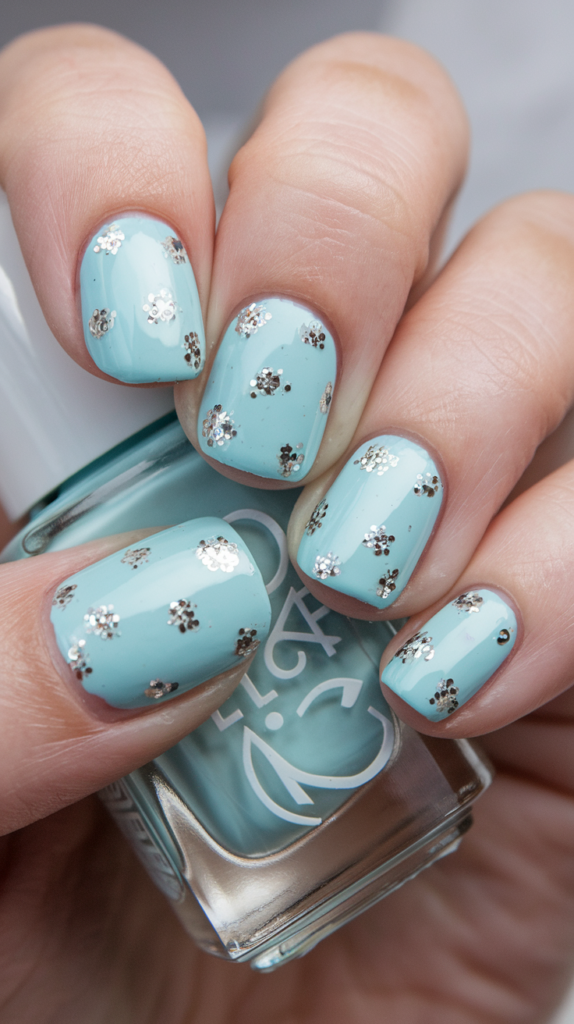
Polka Dot Glitter Nails combine timeless charm with a touch of sparkle, creating a playful and fun manicure that stands out.
The Timeless Appeal of Polka Dot Nails
Polka dot nails have long been a favorite in nail art for their whimsical and cheerful design.
The symmetrical pattern of dots creates a classic and versatile look, suitable for any occasion.
When glitter is added, polka dots transform into sparkling accents, making the design even more eye-catching and unique.
The versatility of polka dot nails allows for endless creativity. From delicate, tiny dots to bold, oversized circles, the addition of glitter enhances the playful and lively nature of the design.
Applying Glitter Polka Dots for a Perfect Finish
Step 1: Select Your Base Color
Choose a base color that complements the glitter.
Neutral shades like nude, blush, or pale pink create a subtle backdrop, while bold or pastel hues add vibrancy.
Step 2: Apply the Base Color
Paint your nails with two coats of the base polish, ensuring each layer dries completely for a smooth foundation.
Step 3: Add the Glitter Polka Dots
Use a dotting tool or a small brush to apply glitter polish in small, circular dots across the nails.
- For a random design, scatter dots of varying sizes across the nails.
- For a structured look, arrange dots in evenly spaced rows or patterns.
Dip the dotting tool into the glitter polish and gently press it onto the nail to create clean, perfectly round dots.
Step 4: Seal the Design
Finish with a clear topcoat to lock in the glitter and add a glossy shine.
The result is a set of nails that are fun, playful, and full of sparkle, perfect for brightening any day.
Best Base Colors for Polka Dot Glitter Nails
Neutral Elegance
Nude, blush, and soft pink provide a subtle base that lets the glitter dots shine, ideal for a polished and refined look.
Bold and Dramatic
Dark base colors like black, navy, or burgundy paired with gold or silver glitter create a striking, high-contrast design.
Playful and Colorful
Bright or pastel shades like coral, mint, or lavender combined with multicolored or holographic glitter add a fun and vibrant twist, perfect for summer or festivals.
Why It Works
Polka Dot Glitter Nails blend the classic charm of polka dots with the dazzling appeal of glitter, creating a design that is both timeless and lively.
The simple yet striking combination of patterns and sparkle ensures your nails will stand out while remaining versatile enough for any mood or occasion.
This joyful and creative manicure is perfect for those who love playful nail art with a touch of elegance.
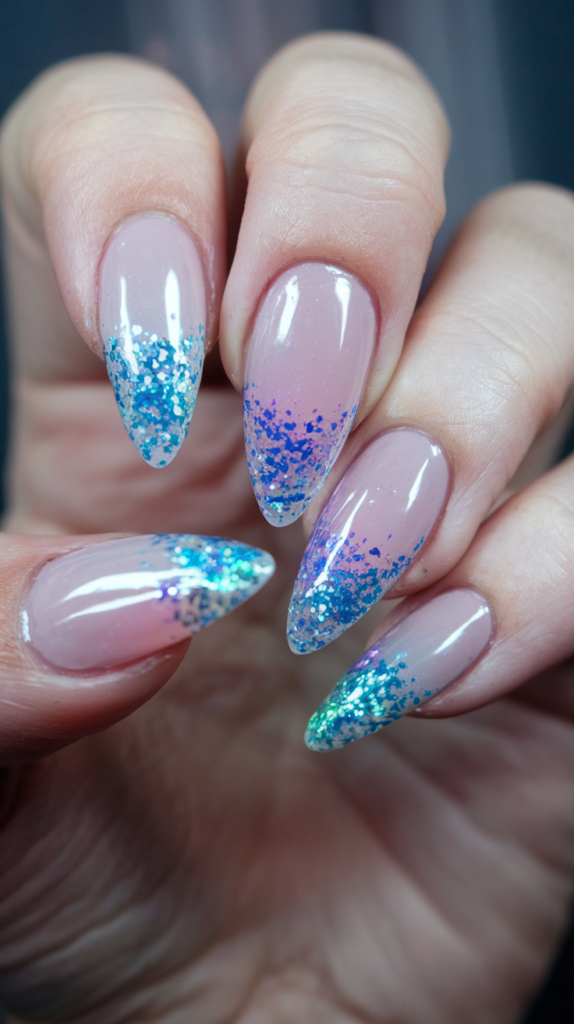
21. Glitter Gradient
Glitter Gradient Nails offer a seamless sparkling transition that combines elegance with glamour, making them a must-try for any nail art enthusiast.
Why Glitter Gradients Are a Go-To Nail Design
Glitter gradients are a favorite in nail art due to their effortless sophistication and versatility.
The smooth transition from one color to another creates a soft, elegant look, while the addition of glitter elevates the design with a touch of sparkle.
This style works beautifully with a range of colors, from soft pastels to bold, vibrant shades, allowing endless customization.
The gradient effect enhanced by glitter catches the light beautifully, making your nails the center of attention.
Techniques for Creating a Smooth Glitter Gradient
Step 1: Choose Your Colors
Select a base color and glitter polish.
For a subtle look, pair pale pink or nude with silver or gold glitter.
For a bold design, use deep burgundy or navy with contrasting glitter.
Step 2: Apply the Base Color
Paint your nails with two coats of the base polish, ensuring each layer dries completely.
Step 3: Create the Glitter Gradient
Use a makeup sponge to dab glitter polish onto the tips of your nails.
Concentrate the glitter at the tips and fade it gradually toward the middle of the nail.
For a more pronounced gradient, build layers of glitter, starting with a light application and increasing coverage toward the tips.
Step 4: Blend for a Seamless Transition
Blend the glitter into the base color for a smooth, soft gradient effect.
Step 5: Seal the Design
Finish with a clear topcoat to lock in the design and add a glossy finish.
The result is a subtle yet stunning manicure with a delicate sparkle, perfect for any occasion.
Color Combinations to Try for Glitter Gradient Nails
Classic and Elegant
- Nude and white create a timeless, sophisticated look.
- Soft pinks and silver glitter add a feminine and refined touch.
Playful and Vibrant
- Bright coral paired with gold glitter brings energy and warmth.
- Turquoise with silver glitter creates a fresh, bold statement.
Romantic and Dreamy
- Pastel lavender combined with rose gold glitter evokes a soft, ethereal vibe.
Why It Works
Glitter Gradient Nails combine the smooth elegance of gradients with the dazzling charm of glitter, creating a design that is versatile and eye-catching.
The seamless transition of color enhanced by sparkling glitter adds depth and dimension, making this manicure perfect for casual outings or formal events alike.
This design’s adaptability ensures there’s a glitter gradient look for every personal style and occasion.
22. Festive Glitter Nails
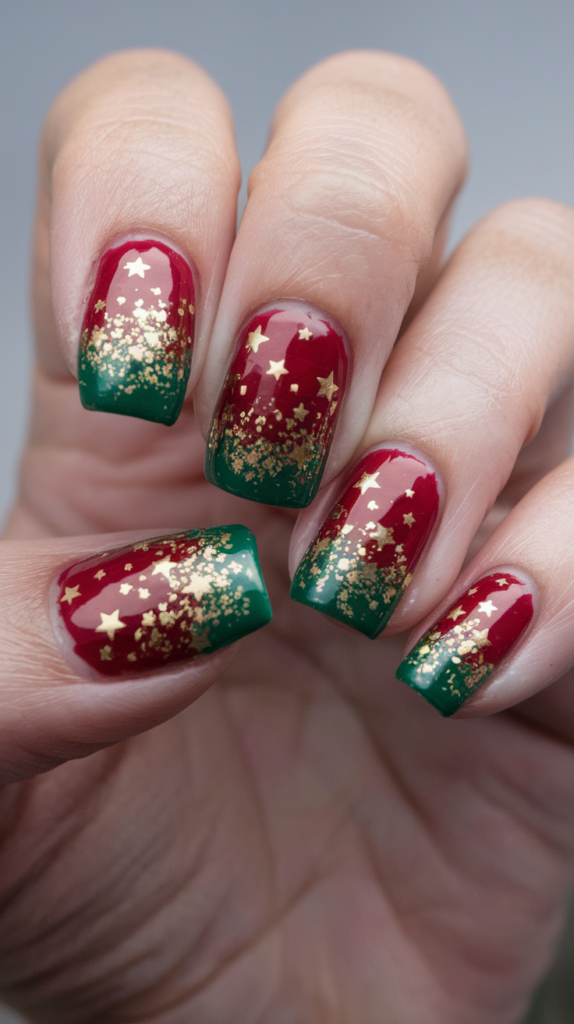
Festive Glitter Nails bring the sparkle of the holidays to your fingertips, making them the perfect accessory for any seasonal celebration.
Creating Holiday-Inspired Glitter Nail Designs
Festive glitter nails capture the magic of the holidays with colors and designs inspired by the season.
For Christmas, red, green, and gold glitter create a classic holiday look. Add extra cheer with festive designs like snowflakes, holly, or candy canes.
For New Year’s Eve, silver or gold glitter paired with black or navy creates a chic and glamorous design, perfect for ringing in the new year.
The versatility of glitter makes it easy to customize your nails for any holiday, ensuring they sparkle just as much as the celebrations.
Step-by-Step Guide to Festive Glitter Nails
Step 1: Choose Your Colors and Glitter
Select a base color and glitter polish that reflect the holiday you’re celebrating.
- For Christmas: Pair deep red or green with gold glitter.
- For New Year’s Eve: Opt for black or navy with silver or gold glitter.
Step 2: Apply the Base Color
Paint your nails with two coats of the base polish, ensuring each layer dries completely.
Step 3: Add Glitter Accents
Apply glitter polish in one of the following ways:
- Accent Nails: Add glitter to just one or two nails for a subtle touch.
- Full Coverage: Cover the entire nail in glitter for a dramatic effect.
Step 4: Incorporate Festive Designs
Use decals, stamps, or freehand techniques to add holiday-themed details like snowflakes, holly, or candy canes.
Highlight parts of the designs with glitter for an extra festive touch.
Step 5: Seal the Design
Finish with a clear topcoat to lock in the design and add a glossy shine.
The result is a set of nails that are both festive and glamorous, perfect for any holiday celebration.
Best Glitter Colors for Festive Occasions
Christmas Classics
- Red, green, and gold glitter capture the warmth and joy of the season.
- These colors pair beautifully with a range of base shades, from deep reds to soft neutrals.
New Year’s Elegance
- Silver and gold glitter bring glamour and sophistication.
- Pair with black or navy for a sleek and refined look.
Playful and Colorful
- Multicolored or holographic glitter adds a dynamic and vibrant twist.
- These glitters shift in color with the light, creating an eye-catching effect perfect for any festive occasion.
Why It Works
Festive Glitter Nails blend seasonal colors and sparkling accents to create a manicure that is both celebratory and elegant.
The versatility of glitter allows for endless creativity, whether you prefer subtle accents or bold, full-coverage designs.
This style is perfect for spreading holiday cheer and making a statement at any celebration.
23. Glitter Animal Print

Glitter Animal Print Nails combine wild, exotic patterns with dazzling sparkle, creating a bold and fabulous manicure that commands attention.
The Bold Statement of Glitter Animal Print Nails
Animal print nails are a timeless favorite for their fierce and unique appeal.
When paired with glitter, these designs elevate to new heights, adding shine and glamour to the wild patterns of leopard, zebra, or other animal prints.
The versatility of glitter animal print nails allows endless creative possibilities, whether you prefer classic designs or bold, colorful twists.
The addition of glitter amplifies the boldness of the design, ensuring your nails sparkle and shine like never before.
How to Create Leopard or Zebra Prints with Glitter
Step 1: Choose Your Colors and Tools
Select a base color and glitter polish to complement the animal print design.
- For leopard print: Nude or beige base with black and gold glitter.
- For zebra print: White base with black and silver glitter.
Step 2: Apply the Base Color
Paint your nails with two coats of the base polish, ensuring each layer dries completely for a smooth finish.
Step 3: Create the Animal Print Design
- Leopard Print:
Use a fine detail brush to create small, irregular spots with black glitter polish.
Fill the center of each spot with gold glitter for a classic leopard print effect. - Zebra Print:
Use the black glitter polish to paint thin, irregular stripes across the nails, mimicking a zebra’s coat.
Step 4: Seal the Design
Finish with a clear topcoat to lock in the glitter and add a glossy shine.
The result is a set of nails that are bold, exotic, and glamorous, perfect for making a statement.
Top Glitter Colors for Animal Print Nails
Classic Elegance
- Black and gold glitter for leopard print nails create a luxurious and timeless look.
- Black and silver glitter for zebra print designs offer a chic, high-contrast effect.
Playful and Colorful
- Bright or pastel bases paired with silver or black glitter add a fun, modern twist to animal print designs.
Dramatic and Exotic
- Red, blue, or purple glitter for leopard or zebra prints creates a bold and eye-catching effect, perfect for those who love to stand out.
Why It Works
Glitter Animal Print Nails combine the timeless allure of animal patterns with the glamour of glitter, creating a manicure that is fierce and fabulous.
The sparkling accents enhance the bold designs, ensuring your nails turn heads and make a statement.
This versatile and striking style is perfect for anyone looking to add a touch of wild sophistication to their nail art.
24. Glitter Drip Nails
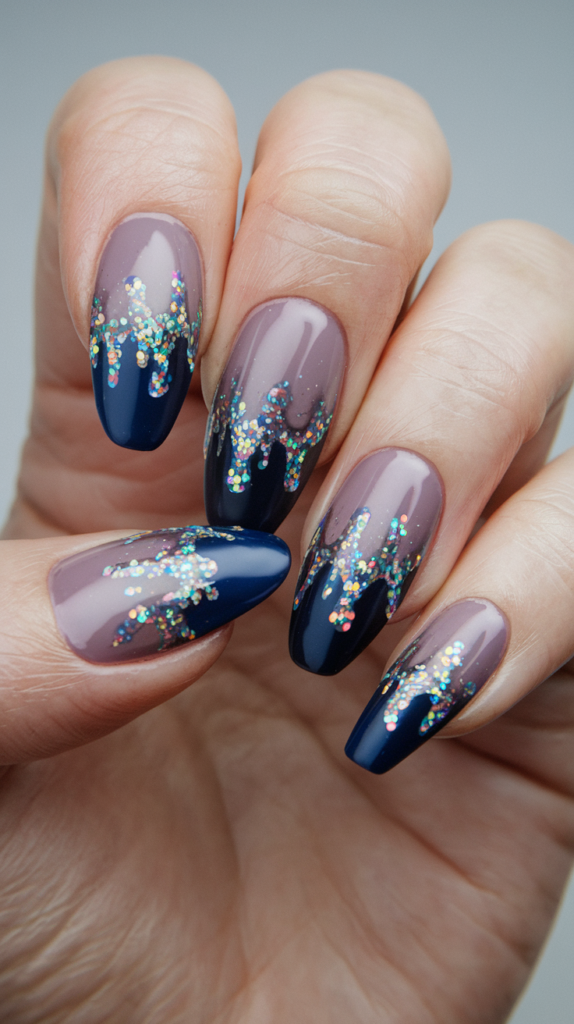
Glitter Drip Nails combine creativity and sparkle to create a bold, artistic manicure that mimics the look of dripping paint.
Understanding the Glitter Drip Nail Art Trend
Glitter drip nails have gained popularity for their dynamic and eye-catching design.
This style involves applying glitter polish in a way that looks like it’s dripping down the nails, adding drama and creativity to your manicure.
The versatility of glitter drip nails makes them perfect for any occasion, whether you prefer a subtle, delicate effect or a bold and dramatic design.
The addition of glitter amplifies the dripping effect, making your nails shimmer and shine with every movement.
How to Achieve the Perfect Drip Effect with Glitter
Step 1: Select Your Colors
Choose a base color and glitter polish that complement each other.
- For a classic look: Use a nude or pale pink base with silver or gold glitter.
- For a bold design: Opt for a dark base color like black or navy with contrasting glitter.
Step 2: Apply the Base Color
Paint your nails with two coats of the base polish, ensuring each layer dries completely.
Step 3: Create the Drip Effect
- Use a fine detail brush to apply glitter polish to the tips of your nails.
- Draw small, irregular drips that extend toward the middle of the nail, mimicking the look of dripping paint.
- For a more dramatic effect, build up the glitter at the tips, gradually fading it as you move down the nail.
Step 4: Seal the Design
Finish with a clear topcoat to lock in the glitter and add a glossy shine.
The result is a set of nails that are artistic, dynamic, and guaranteed to turn heads.
Best Colors for a Glitter Drip Design
Classic Elegance
- Nude, blush, or pale pink base with silver or gold glitter creates a refined and sophisticated look.
Bold and Dramatic
- Dark base colors like black, navy, or burgundy paired with gold or silver glitter offer a high-contrast, striking design.
Playful and Whimsical
- Bright or pastel shades like coral, mint, or lavender combined with multicolored or holographic glitter add a fun, lighthearted vibe, perfect for summer or festivals.
Why It Works
Glitter Drip Nails bring together the boldness of artistic design with the elegance of glitter, creating a manicure that feels both unique and glamorous.
The dripping effect adds depth and movement, while the sparkle enhances the overall impact, making this style ideal for anyone who loves creative and standout nail art.
25. Geometric Glitter Nails
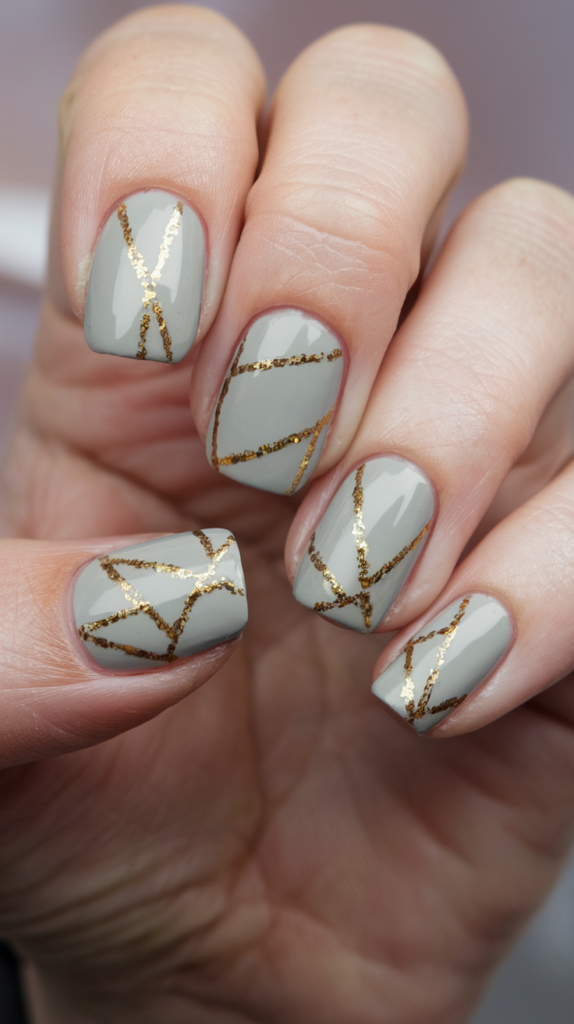
Geometric Glitter Nails combine sharp lines and bold shapes with sparkling accents, creating a modern and chic manicure that stands out.
The Modern Appeal of Geometric Nail Art
Geometric nail art is a favorite trend for its clean lines, bold shapes, and stylish aesthetic.
When paired with glitter, geometric designs take on a new level of sophistication, blending structure with sparkle for a dynamic and eye-catching effect.
This versatile style allows for endless creativity, from simple triangles to intricate patterns and bold, abstract designs.
The addition of glitter enhances the contrast between the shapes and the base color, making this manicure perfect for those who want to make a statement.
Tips for Creating Precise Geometric Glitter Designs
Step 1: Select Your Colors and Tools
Choose a base color and glitter polish that complement each other.
- For an elegant look: Nude or pale pink base with silver or gold glitter.
- For a bold style: Dark base colors like black or navy with contrasting glitter.
Step 2: Apply the Base Color
Paint your nails with two coats of the base polish, ensuring each layer dries completely.
Step 3: Create the Geometric Shapes
- Use tape, stencils, or a striping brush to outline the desired patterns.
- Ensure the lines are straight and the shapes are evenly spaced for a polished result.
Step 4: Add the Glitter
- Apply glitter polish to the areas not covered by the tape or stencil, taking care to keep edges clean and precise.
- Remove the tape or stencil while the polish is still wet to reveal sharp, crisp lines.
Step 5: Seal the Design
Finish with a clear topcoat to protect the design and add a glossy shine.
The result is a striking manicure with sharp geometric patterns and a touch of glittery glamour.
Ideal Base Colors for Geometric Glitter Nails
Neutral Elegance
- Nude, blush, or soft pink provides a subtle background that lets the glitter shapes shine.
Bold and Dramatic
- Dark base colors like black, navy, or burgundy paired with gold or silver glitter create a high-contrast, statement-making design.
Playful and Vibrant
- Bright or pastel shades like coral, mint, or lavender combined with multicolored or holographic glitter add a fun, whimsical vibe, perfect for summer or festivals.
Why It Works
Geometric Glitter Nails combine the clean precision of geometric patterns with the dazzle of glitter, resulting in a manicure that is both modern and glamorous.
The sharp lines and contrasting colors create visual interest, while the glitter adds depth and sparkle, ensuring your nails are as chic as they are striking.
This versatile design is perfect for anyone looking to embrace bold, contemporary nail art with a hint of sparkle.
26. Glitter Dots and Lines
Glitter Dots and Lines offer a minimalist yet elegant approach to nail art, combining clean designs with a touch of sparkle for a polished and sophisticated look.
Minimalist Nail Art with Glitter Dots and Lines
Glitter dots and lines are a simple yet stunning way to incorporate glitter into your manicure.
By focusing on small dots or thin lines of glitter, this design maintains a chic and understated aesthetic that adds subtle sparkle without overwhelming the overall look.
This minimalist approach is perfect for both everyday wear and special occasions, offering versatility and sophistication.
The clean, polished appearance of glitter dots and lines makes this design ideal for anyone who loves a refined and elegant manicure.
How to Apply Glitter Dots and Lines with Precision
Step 1: Choose Your Colors
Select a base color that complements the glitter.
- For a classic look: Use soft nude, blush, or pale pink with gold or silver glitter.
- For a bold style: Opt for dark base colors like black or navy paired with contrasting glitter.
Step 2: Apply the Base Color
Paint your nails with two coats of the base polish, ensuring each layer dries completely.
Step 3: Add Glitter Dots or Lines
- Use a dotting tool or small flat brush to apply glitter in small dots or thin lines.
- For dots: Dip the dotting tool into the glitter polish and gently press it onto the nail to create perfectly round dots.
- For lines: Use a fine brush to draw clean, straight lines across the nails.
Step 4: Maintain Uniformity
Ensure dots and lines are evenly spaced and consistent in size for a polished look.
Step 5: Seal the Design
Finish with a clear topcoat to lock in the glitter and add a glossy shine.
The result is a set of nails that are simple, clean, and elegant, with a subtle sparkle that catches the light beautifully.
Best Glitter Shades for Subtle Nail Art
Neutral Elegance
- Gold, silver, and rose gold glitter create a refined and sophisticated look, perfect for any occasion.
Bold and Dramatic
- Dark base colors like black, navy, or burgundy paired with gold or silver glitter offer a striking, high-contrast design.
Playful and Vibrant
- Bright or pastel base colors like coral, mint, or lavender paired with multicolored or holographic glitter add a fun and whimsical twist, ideal for summer or festivals.
Why It Works
Glitter Dots and Lines combine the simplicity of minimalist designs with the sparkle of glitter, resulting in a manicure that is both elegant and versatile.
The precise placement of dots and lines adds structure and visual interest, while the glitter provides a touch of glamour.
This understated yet eye-catching style is perfect for those seeking a polished and modern nail art design.
27. Holographic Glitter Nails
Holographic Glitter Nails bring a futuristic shine to your manicure, combining bold iridescence with dynamic sparkle for a mesmerizing look.
The Popularity of Holographic Glitter in Nail Art
Holographic glitter nails are a standout trend in nail art, celebrated for their bold and captivating aesthetic.
This design uses iridescent glitter that shifts in color under different lighting, creating a dazzling, prism-like effect.
The versatility of holographic glitter allows endless creativity, whether you opt for a full holographic look or incorporate it into patterns or accents.
This futuristic style is perfect for making a statement, ensuring your nails sparkle like never before.
Techniques for Achieving a Holographic Glitter Finish
Step 1: Choose the Right Glitter Polish
Select a holographic glitter polish with fine, iridescent particles for a realistic, light-reflecting effect.
Step 2: Apply a Base Coat
Paint your nails with a base color that complements the holographic glitter.
- For a subtle look: Use nude, pale pink, or silver.
- For a bold style: Opt for black, navy, or deep burgundy.
Step 3: Apply the Holographic Glitter
- Use a makeup sponge or fine brush to apply the glitter evenly across the nails.
- Build layers of glitter for a more intense holographic effect.
- Add larger, chunky holographic glitter pieces for texture and dimension.
Step 4: Seal the Design
Finish with a clear topcoat to lock in the glitter and enhance the high-shine, holographic effect.
The result is a dazzling, futuristic manicure that shifts and sparkles beautifully in any light.
Top Holographic Glitter Polishes for a Futuristic Look
Fine Glitter Polishes
Polishes with fine, iridescent glitter particles create a smooth and elegant holographic effect.
Chunky Glitter Polishes
Chunky holographic glitter adds texture and dimension, creating a bold and dynamic look.
Recommended Brands
- ILNP: Offers a wide range of holographic polishes with vibrant, shifting effects.
- Color Club: Known for their intense holographic finishes and variety of shades.
- China Glaze: Features long-lasting holographic glitter polishes perfect for bold designs.
Why It Works
Holographic Glitter Nails combine the futuristic allure of iridescent sparkle with the versatility of modern nail art.
The dynamic light-shifting glitter makes your nails stand out, whether you prefer a subtle shimmer or a bold, textured finish.
This design is perfect for anyone looking to add a touch of bold, unique sophistication to their nail art collection.
28. Glitter Accent Stripe
A Glitter Accent Stripe offers a minimalist yet striking detail, adding a touch of sparkle to your manicure while keeping the design clean and sophisticated.
The Appeal of a Single Glitter Accent Stripe
A single glitter accent stripe is a simple but impactful way to elevate your manicure.
By applying a thin line of glitter polish down the center or along one side of the nail, this design highlights the nail’s shape and adds a subtle touch of sparkle.
The minimalist nature of the glitter stripe ensures the look remains polished and refined, perfect for both everyday wear and special occasions.
This chic and understated style is ideal for anyone who loves elegance with a hint of shimmer.
How to Place a Glitter Stripe for Maximum Impact
Step 1: Choose Your Colors
Select a base color and glitter polish that complement each other.
- For a classic look: Nude, blush, or pale pink base paired with gold or silver glitter.
- For a bold design: Dark base colors like black or navy paired with contrasting glitter.
Step 2: Apply the Base Color
Paint your nails with two coats of the base polish, ensuring each layer dries completely.
Step 3: Add the Glitter Accent Stripe
- Use a fine detail or striping brush to apply glitter polish in a thin line.
- Position the stripe down the center or along one side of the nail for a modern, asymmetrical effect.
- For a delicate look, consider creating small dots instead of a continuous line.
Step 4: Ensure Precision
- Use tape or a stencil for sharp, clean edges.
- Apply the glitter evenly to avoid smudging or uneven lines.
Step 5: Seal the Design
Finish with a clear topcoat to lock in the glitter and add a glossy shine.
The result is a set of nails that are both simple and striking, with just enough sparkle to catch the light beautifully.
Best Glitter Colors for Accent Stripes
Neutral Elegance
Gold, silver, and rose gold glitter create a sophisticated and refined look, perfect for any occasion.
Bold and Dramatic
Dark base colors like black, navy, or burgundy paired with gold or silver glitter offer a high-contrast design that is striking and bold.
Playful and Vibrant
Bright or pastel base colors like coral, mint, or lavender combined with multicolored or holographic glitter add a fun, whimsical twist, ideal for summer or festivals.
Why It Works
A Glitter Accent Stripe combines the simplicity of minimalist nail art with the glamour of glitter, resulting in a chic and versatile manicure.
The precise placement of glitter highlights the nail’s shape, creating a refined look that transitions seamlessly from day to night.
This timeless and customizable design is perfect for anyone seeking a polished and elegant manicure with a subtle sparkle.
29. Frosted Glitter Nails
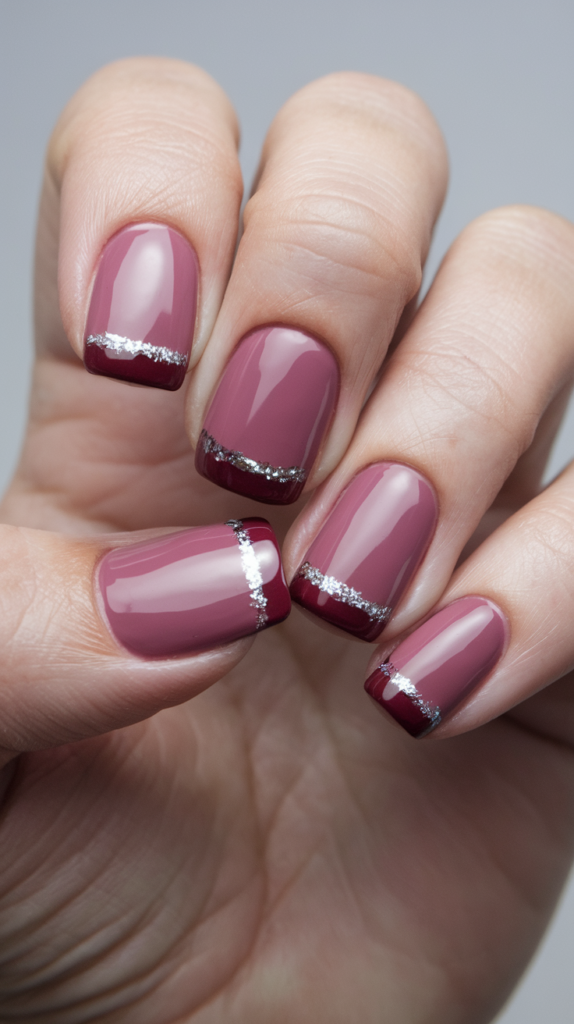
Frosted Glitter Nails combine the soft, icy beauty of frosted finishes with the dazzling sparkle of glitter, creating a manicure that exudes winter wonderland vibes.
The Charm of Frosted and Glitter Nail Combinations
Frosted glitter nails are perfect for capturing the essence of winter on your fingertips.
The frosted finish provides a subtle matte texture, while glitter adds sparkle that mimics the shimmering snow and ice.
This design evokes the magic of a winter wonderland, making it ideal for holiday celebrations or adding a frosty charm to your everyday look.
Whether you opt for soft whites and silvers or bold holiday hues, frosted glitter nails bring an elegant and festive touch to your manicure.
Step-by-Step Guide to Creating Frosted Glitter Nails
Step 1: Select Your Colors and Polishes
Choose a base color and glitter polish that reflect your desired winter theme.
- For a classic frosty look: Sheer white or pale blue base with silver glitter.
- For a festive style: Deep red or green base with gold glitter.
Step 2: Apply the Base Color
Paint your nails with two coats of the base polish, allowing each layer to dry completely.
Step 3: Add the Frosted Effect
- Use a frosted polish or a matte topcoat to create a soft, icy finish.
- Ensure the frosted effect covers the entire nail for a cohesive look.
Step 4: Incorporate Glitter Accents
- Apply glitter to one or two nails for a subtle accent, or cover the entire nail for a bolder look.
- Use fine glitter for a delicate shimmer or chunky glitter for added texture and sparkle.
Step 5: Seal the Design
Finish with a clear topcoat to lock in the frosted and glitter elements, enhancing the overall shine and durability of the manicure.
The result is a frosty, sparkling manicure that’s perfect for winter celebrations or everyday elegance.
Ideal Colors for a Frosty, Glittery Look
Classic Winter Hues
- White, silver, and pale blue create a frosty, icy effect that embodies winter magic.
Festive Holiday Shades
- Deep red, green, and gold reflect the warmth and joy of the holiday season.
- These colors add a bold, festive twist to the frosted glitter design.
Soft and Subtle Pastels
- Lavender, mint, and blush paired with silver or iridescent glitter create a delicate, sophisticated effect perfect for any occasion.
Why It Works
Frosted Glitter Nails combine the understated beauty of frosted finishes with the festive sparkle of glitter, resulting in a manicure that is both elegant and versatile.
The frosted texture adds a unique dimension, while the glitter brings a dazzling, light-catching charm.
This winter-inspired design is perfect for embracing the season’s magic and elevating your nail art to a whole new level.
30. Glitter and Matte Mix
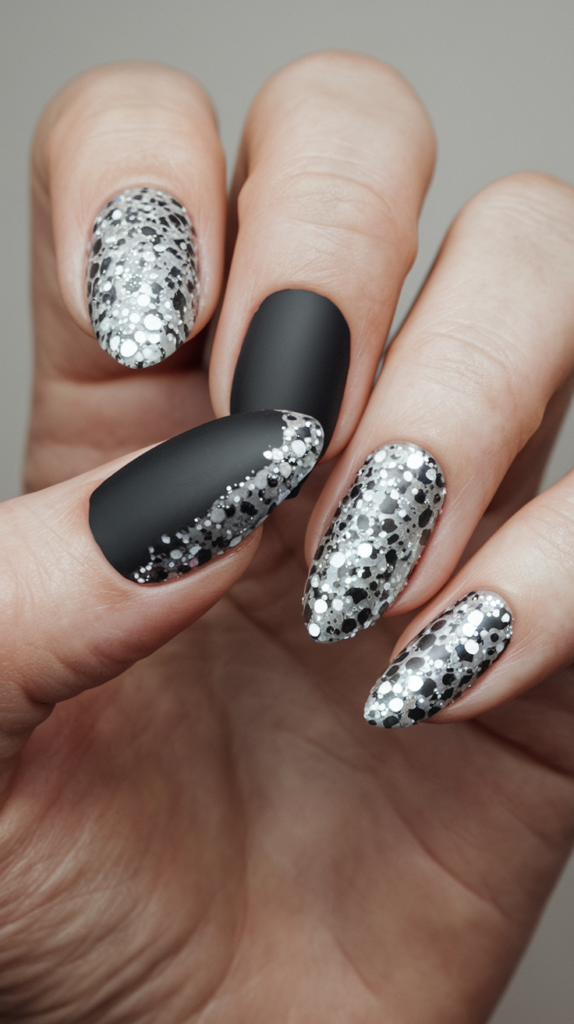
The Glitter and Matte Mix combines contrasting textures to create a sophisticated and dynamic manicure that is both elegant and bold.
Exploring the Contrast Between Matte and Glitter Finishes
The pairing of matte and glitter finishes in nail art creates a stunning juxtaposition that is visually striking.
The matte finish offers a smooth, velvety texture that exudes understated elegance, while the glitter adds sparkle and shine, catching the light beautifully.
This combination of textures brings depth and dimension to your nails, making it perfect for those looking to make a statement.
Whether used as accents or incorporated into specific patterns, the versatility of this mix allows for endless creative possibilities, from refined minimalism to bold, dramatic designs.
How to Achieve a Perfect Matte and Glitter Combo
Step 1: Choose Your Colors
Select a matte base color and glitter polish that complement each other.
- For a classic look: Matte black or deep burgundy with gold or silver glitter.
- For a softer style: Pastel shades like lavender or mint with matching or rose gold glitter.
Step 2: Apply the Matte Base
Paint your nails with two coats of the matte base polish, allowing each layer to dry completely.
Step 3: Add Glitter Accents
- For a subtle design: Apply glitter to just one or two nails as accents.
- For a creative touch: Incorporate glitter into patterns like stripes, polka dots, or geometric shapes.
Step 4: Protect the Matte Finish
Before applying glitter, use a matte topcoat over the base color to ensure the matte areas remain intact.
Step 5: Seal the Glitter Areas
Finish with a clear topcoat over the glittered sections only, maintaining the contrast between the matte and glitter finishes.
The result is a polished and balanced manicure that combines texture and shine in a stunning way.
Best Color Pairings for Matte and Glitter Nails
Timeless Elegance
- Black and gold exude sophistication and glamour.
- Navy and silver offer a chic and modern look.
Playful and Vibrant
- Bright coral paired with gold glitter creates a lively and energetic design.
- Turquoise with silver glitter adds a bold and refreshing twist.
Soft and Feminine
- Mint or lavender combined with rose gold glitter delivers a dreamy and delicate effect.
Why It Works
The Glitter and Matte Mix leverages the beauty of contrast, combining the understated elegance of matte finishes with the dazzling allure of glitter.
This pairing creates a visually engaging design that can be tailored to suit any occasion, mood, or personal style.
Whether you’re aiming for subtle sophistication or a bold, dramatic statement, the versatility of matte and glitter nails makes them a perfect choice for anyone seeking a unique and eye-catching manicure.
31. Glitter and Gem Embellished Nails

Glitter and Gem Embellished Nails combine sparkling glitter with shimmering gems, creating a luxurious and glamorous manicure perfect for special occasions.
The Luxurious Appeal of Glitter and Gem Nail Art
Glitter and gem nails are the ultimate statement of elegance and sophistication.
This design, perfect for weddings, galas, or any formal event, pairs the sparkle of glitter with the shine of gems for a dazzling effect.
The versatility of glitter and gems allows for endless customization—whether you choose a fully adorned nail or use them as subtle accents, the result is always stunning.
The addition of gems adds texture and dimension, making your nails the perfect accessory to complement any formal outfit.
How to Apply Gems with Glitter for a Glamorous Look
Step 1: Choose Your Colors and Materials
Select a base color, glitter polish, and gems that complement each other.
- For a classic look: Nude or pale pink base with silver or gold glitter and clear or iridescent gems.
- For a bold style: Deep red or navy base with contrasting glitter and gems.
Step 2: Apply the Base Color
Paint your nails with two coats of the base polish, allowing each layer to dry completely.
Step 3: Add Glitter
Apply fine glitter polish evenly across the entire nail or focus on specific areas where you plan to place gems.
Step 4: Attach the Gems
- Use nail glue or a clear topcoat to secure the gems to the nail.
- Create patterns, clusters, or random placements depending on your desired look.
- For a dramatic effect, combine gems of different shapes and sizes or use larger gems as focal points.
Step 5: Seal the Design
Finish with a clear topcoat to lock in the glitter and gems, ensuring durability and a glossy finish.
The result is a set of nails that are glamorous, sparkling, and perfect for any special occasion where you want to shine.
Recommended Gem Sizes and Glitter Colors
Elegant and Classic
- Clear or iridescent gems paired with gold or silver glitter create a timeless, sophisticated look.
Bold and Dramatic
- Larger gems in various shapes and sizes combined with deep base colors like burgundy or navy create a striking and luxurious effect.
Playful and Whimsical
- Brightly colored gems paired with multicolored or holographic glitter add a fun and vibrant twist to the design, perfect for playful events or festivals.
Why It Works
Glitter and Gem Embellished Nails combine the sparkle of glitter with the dimensional elegance of gems, resulting in a manicure that is both luxurious and eye-catching.
The combination of textures and finishes ensures your nails will be the perfect finishing touch to any formal or festive look.
This design’s versatility makes it an excellent choice for anyone seeking a glamorous and unforgettable manicure.
32. Glitter Waterfall Nails
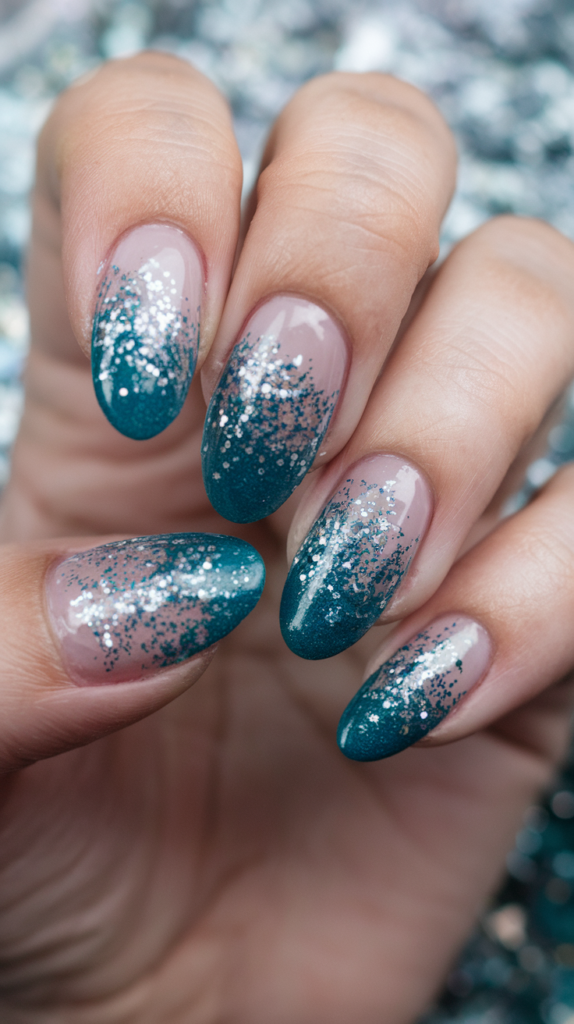
Glitter Waterfall Nails bring cascading sparkles to your manicure, creating a dynamic and elegant design that’s perfect for any occasion.
Creating the Waterfall Effect with Glitter Polish
Glitter waterfall nails are inspired by the graceful movement of cascading water, with glitter polish layered to mimic its fluidity and sparkle.
This technique involves applying glitter in thin, overlapping layers, creating depth and a shimmering transition that catches the light beautifully.
The waterfall effect adds a sense of glamour and movement to your nails, making it ideal for special events or when you want to elevate your everyday look.
Step-by-Step Instructions for Glitter Waterfall Nails
Step 1: Choose Your Colors
Select a base color and glitter polish to complement the waterfall design.
- For a classic look: Sheer white or pale blue base with silver or iridescent glitter.
- For a bold style: Deep blue or navy base paired with holographic glitter.
Step 2: Apply the Base Color
Paint your nails with two coats of the base polish, ensuring each layer dries completely for a smooth foundation.
Step 3: Create the Waterfall Effect
- Use a fine glitter polish and begin applying it in thin, overlapping layers starting at the cuticle.
- Gradually fade the glitter as you move toward the tips, mimicking the natural flow of water.
- For a more pronounced effect, apply multiple layers of glitter, concentrating more at the cuticles for a cascading look.
Step 4: Blend for a Seamless Transition
Ensure the glitter blends smoothly into the base color for a soft, cascading effect.
Step 5: Seal the Design
Finish with a clear topcoat to lock in the glitter and add a glossy shine, enhancing the illusion of flowing sparkles.
The result is an elegant and dynamic manicure with a waterfall effect that sparkles beautifully in the light.
Best Glitter Shades for a Waterfall Design
Classic and Elegant
- Silver and iridescent glitter provide a refined and versatile look, perfect for any occasion.
Bold and Dramatic
- Holographic glitter or larger glitter particles create a textured, eye-catching design.
- Deep blue or navy base colors enhance the cascading water illusion.
Playful and Whimsical
- Bright or pastel base colors paired with multicolored glitter offer a fun and vibrant twist, ideal for summer or festivals.
Why It Works
Glitter Waterfall Nails combine the elegance of cascading sparkles with the versatility of glitter nail art.
The layered glitter effect creates depth and movement, while the shimmering finish ensures your nails stand out.
This stunning design is perfect for anyone looking to add a touch of sophistication and drama to their manicure.
33. Glitter Plaid Nails
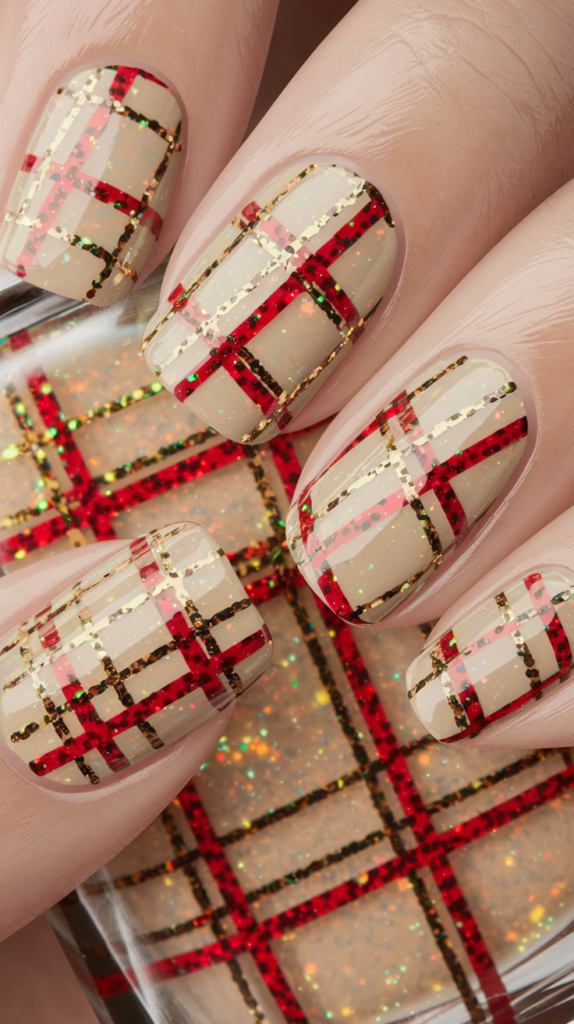
Glitter Plaid Nails bring a sparkling twist to a timeless pattern, combining classic symmetry with eye-catching shine for a chic and polished manicure.
The Timeless Look of Plaid in Nail Art
Plaid nails are a perennial favorite in nail art, celebrated for their clean lines and structured elegance.
The classic pattern offers endless versatility, ranging from traditional tartan designs to modern, abstract interpretations.
When glitter is added, plaid nails take on a whole new level of sophistication, with the shimmering accents enhancing the contrast between lines and the base color.
This combination of structure and sparkle ensures a manicure that is both dynamic and unique.
How to Create a Plaid Pattern with Glitter Polish
Step 1: Choose Your Colors and Tools
Select a base color and glitter polish that complement each other.
- For a classic look: Nude or pale pink base paired with silver or gold glitter.
- For a bold design: Dark base colors like black or navy with contrasting glitter.
Step 2: Apply the Base Color
Paint your nails with two coats of the base polish, ensuring each layer dries completely for a smooth finish.
Step 3: Create the Plaid Pattern
- Use tape, stencils, or a striping brush to outline the plaid design.
- Ensure the lines are straight, evenly spaced, and symmetrical for a polished look.
Step 4: Add Glitter Accents
- Apply glitter polish to selected lines in the plaid pattern for a touch of sparkle.
- Carefully remove the tape or stencil while the polish is still wet to reveal clean, sharp lines.
Step 5: Seal the Design
Finish with a clear topcoat to lock in the glitter and add a glossy shine.
The result is a striking plaid manicure with a sparkling twist, perfect for any occasion.
Ideal Base Colors for Glitter Plaid Nails
Neutral Elegance
- Nude, blush, and soft pink bases offer a subtle backdrop, allowing the glitter plaid pattern to stand out beautifully.
Bold and Dramatic
- Dark base colors like black, navy, or burgundy paired with gold or silver glitter create a high-contrast, statement-making design.
Playful and Whimsical
- Bright or pastel bases like coral, mint, or lavender combined with multicolored or holographic glitter add a fun and modern twist to the classic plaid design.
Why It Works
Glitter Plaid Nails combine the timeless elegance of plaid patterns with the dazzling appeal of glitter, resulting in a manicure that is both classic and contemporary.
The structured design contrasts beautifully with the sparkle, creating a visually engaging look that transitions effortlessly from casual to formal settings.
This versatile style is perfect for anyone seeking a polished, chic manicure with a hint of shimmer.
34. Fireworks Glitter Nails
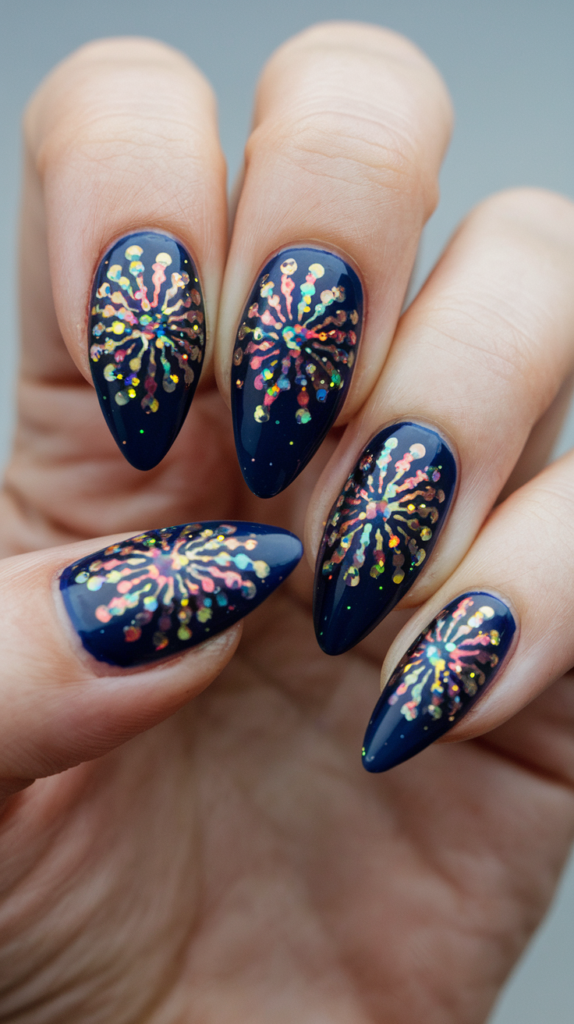
Fireworks Glitter Nails bring the explosive beauty of fireworks to your manicure, creating a bold and sparkling design perfect for celebrations.
Capturing the Explosive Beauty of Fireworks on Nails
Fireworks glitter nails are inspired by the vibrant and dynamic bursts of light in the night sky.
This design uses glitter polish to mimic the look of exploding fireworks, creating a bold and eye-catching effect that is both festive and beautiful.
Perfect for special occasions like New Year’s Eve, Independence Day, or celebratory events, this style lets your nails dazzle with every movement.
Whether you opt for simple, single firework accents or cover your nails with bursts of glitter, this versatile design adds sparkle to any celebration.
Techniques for Creating Firework-Inspired Glitter Designs
Step 1: Choose Your Colors and Tools
Select a base color and glitter polish to complement the firework design.
- For a classic look: Deep blue or navy base with silver or gold glitter.
- For a bold style: Black base paired with multicolored glitter.
Step 2: Apply the Base Color
Paint your nails with two coats of the base polish, ensuring each layer dries completely for a smooth foundation.
Step 3: Create the Firework Design
- Use a fine detail brush or a small, flat brush to draw thin, radiating lines of glitter from a central point on the nail.
- Layer multiple colors to create multi-colored fireworks for added depth and vibrancy.
- Add chunky glitter pieces for texture and a more dramatic effect.
Step 4: Seal the Design
Finish with a clear topcoat to lock in the glitter and enhance the shine, ensuring your firework design lasts.
The result is a dazzling, celebratory manicure that captures the magic of fireworks in every detail.
Best Glitter Colors for a Fireworks Effect
Classic and Elegant
- Silver and gold glitter provide a timeless, sophisticated look that pairs beautifully with dark base colors.
Bold and Dynamic
- Multicolored glitter or larger glitter particles create a textured, eye-catching effect perfect for bold celebrations.
- Deep blues and navies enhance the illusion of a night sky illuminated by fireworks.
Playful and Whimsical
- Bright or pastel base colors paired with holographic glitter add a fun, festive twist, ideal for summer or festivals.
Why It Works
Fireworks Glitter Nails combine the excitement of explosive light bursts with the shimmering beauty of glitter.
The layered glitter design mimics the dynamic movement of fireworks, creating a manicure that is bold, festive, and perfect for making a statement.
This versatile style is ideal for anyone looking to add sparkle and celebration to their nail art.
35. Glitter Swirl Nails
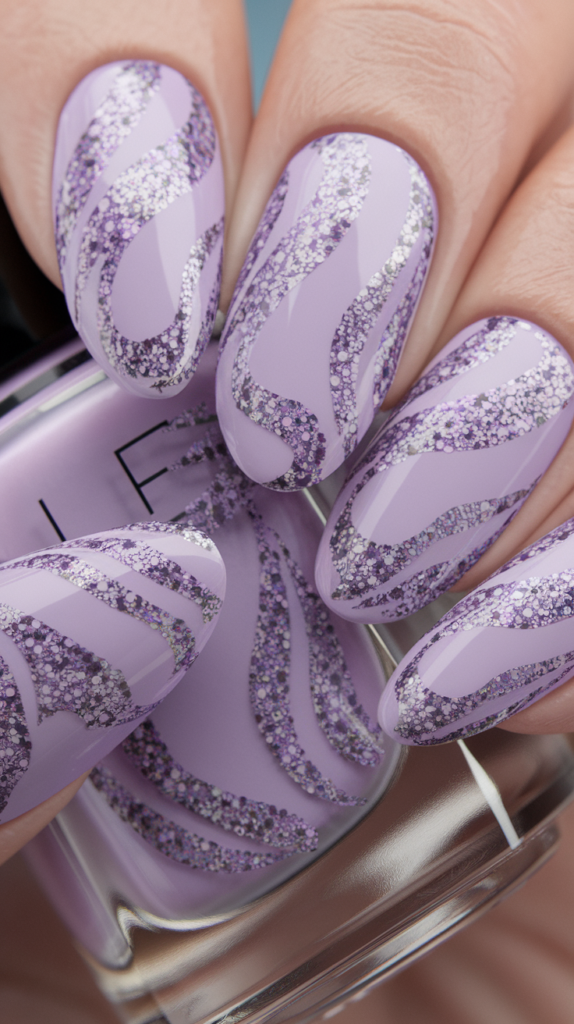
Glitter Swirl Nails bring dynamic and artistic patterns to your manicure, combining flowing designs with sparkling accents for an eye-catching effect.
The Appeal of Swirling Patterns in Nail Art
Glitter swirl nails are celebrated for their fluid, artistic designs that create a sense of movement and visual intrigue.
This design uses swirling patterns to add depth and dynamism, while glitter enhances the look with shimmering highlights.
Whether you opt for subtle, single swirls or bold, full-coverage patterns, glitter swirls provide a versatile canvas for creativity.
The result is a manicure that is both bold and beautiful, perfect for making a statement or elevating your everyday look.
How to Create Perfect Glitter Swirls on Nails
Step 1: Choose Your Colors and Tools
Select a base color and glitter polish that complement your desired style.
- For a classic look: Nude or pale pink base with silver or gold glitter.
- For a bold design: Dark base colors like black or navy paired with contrasting glitter.
Step 2: Apply the Base Color
Paint your nails with two coats of the base polish, allowing each layer to dry completely.
Step 3: Add the Swirling Pattern
- Use a fine detail brush to apply glitter polish in a swirling motion, starting at the cuticle and curving toward the tip.
- For a multi-colored effect, layer different glitter shades, blending them into the swirl for a seamless transition.
- Add chunky glitter pieces to enhance texture and create a more dramatic, luxurious design.
Step 4: Seal the Design
Finish with a clear topcoat to lock in the glitter and add a high-shine finish, ensuring the swirls remain intact and vibrant.
The result is a bold and dynamic manicure that sparkles with every movement.
Recommended Color Combinations for Swirl Designs
Classic and Elegant
- Nude, blush, or soft pink base paired with silver or gold glitter creates a polished and refined appearance.
Bold and Dramatic
- Dark base colors like black, navy, or burgundy paired with gold or silver glitter offer a high-contrast, striking design.
Playful and Whimsical
- Bright or pastel base colors like coral, mint, or lavender combined with multicolored or holographic glitter add a fun, vibrant twist, perfect for summer or festivals.
Why It Works
Glitter Swirl Nails combine the elegance of flowing patterns with the dazzle of glitter, resulting in a design that is both dynamic and captivating.
The swirling patterns create a sense of movement and depth, while the glitter adds a shimmering dimension that ensures your nails stand out.
This versatile style is ideal for anyone seeking a bold, artistic manicure that blends texture, shine, and creativity.
Conclusion
Glitter nail designs are the perfect way to add a touch of sparkle and personality to your manicure, offering a wide range of styles to suit any occasion or mood.
Whether you prefer a subtle, minimalist approach or a bold, statement-making design, there’s a glitter nail look for everyone.
As we’ve explored in this blog, the possibilities are endless—from the timeless elegance of rose gold glitter tips to the playful vibrancy of rainbow glitter nails.
By experimenting with different colors, patterns, and techniques, you can create a unique and dazzling manicure that reflects your individual style.
So, whether you’re preparing for a festive celebration or simply looking to brighten up your everyday look, let these glitter nail designs inspire you to add a little extra shine to your life.