
Nail art has transcended simple color application, evolving into a canvas for personal expression and intricate design.
From the soft whispers of watercolor blooms to the bold statements of pop art, your fingertips can become miniature masterpieces reflecting iconic art movements and techniques.
This exploration delves into thirty-five distinct nail art styles, each drawing inspiration from the vast world of art history and contemporary creativity.
We will examine the unique features of each design, offer insights into achieving the look, and discuss why each style makes a memorable statement.
Watercolor Bloom Nails

Soft brushstroke flowers mimicking watercolor paintings for a delicate artsy touch.
Design Features
This style beautifully captures the ethereal and translucent quality characteristic of traditional watercolor paintings applied directly onto the nail.
It features soft, often pastel, washes of color that blend seamlessly into one another, creating delicate, blurred floral shapes like roses or peonies.
The edges of the colors appear feathered and diffused, intentionally mimicking how pigment bleeds and softens on wet paper.
This lack of sharp definition contributes significantly to the gentle, romantic, and distinctly artistic aesthetic of the design.
Negative space often plays a crucial role, allowing the base color or even the natural nail to peek through parts of the design.
This enhances the light, airy feel, reinforcing the watercolor illusion and preventing the art from feeling too heavy or dense.
The focus remains firmly on capturing the impression and delicate essence of a flower or abstract form rather than precise botanical accuracy.
This results in a look that feels simultaneously spontaneous, sophisticated, and deeply rooted in artistic sensibility.
How To Achieve This Look
Achieving the signature diffused effect often involves using a specialized product known as blooming gel, applied over a cured base color.
Alternatively, one can create a similar medium by significantly diluting regular gel polish with a clear gel base or top coat to achieve a sheer, watery consistency.
Small dots or delicate strokes of this diluted colored polish are then carefully placed onto the uncured layer of blooming gel or the clear mixing medium.
The magic happens as the uncured layer allows the colored polish to gently spread outwards, naturally creating that soft-edged, blended bloom effect.
Precise control over the amount of color applied and its placement is key to guiding the final pattern’s appearance before curing.
A fine nail art brush can be used sparingly to subtly nudge the spreading color or add minute details, like faint veins on a petal, before setting the design under a UV or LED lamp.
For multi-colored blooms, different diluted shades are applied in close proximity, allowing them to mingle softly at the edges as they spread.
The entire creation is sealed with a high-gloss top coat, which not only protects the delicate artwork but also enhances the translucent, watery appearance integral to the style.
Why This Stands Out
Watercolor Bloom Nails stand out primarily for their incredibly soft, romantic, and undeniably artistic visual appeal.
They offer a sophisticated way to incorporate floral motifs into a manicure without the graphic boldness of traditionally painted or stamped flowers.
The technique itself lends an element of uniqueness to each nail, as the blooming effect creates slightly different patterns every time it is executed.
This inherent variation ensures that no two manicures are exactly alike, adding to the personalized charm.
This style resonates particularly well during spring and summer months and is a popular choice for weddings or formal events requiring elegant subtlety.
It appeals strongly to individuals seeking a manicure that feels delicate, dreamy, sophisticated, and effortlessly chic.
It subtly communicates an appreciation for fine art and delicate beauty, making a statement of refined taste.
The gentle blending of colors creates a visual depth and movement that captures attention, making it a beautiful conversation starter.
Abstract Brushstroke Nails

Bold streaks of color in layered patterns like a modern art masterpiece.
Design Features
Abstract Brushstroke Nails are characterized by their dynamic and expressive use of color, applied in bold, visible strokes.
The design often features multiple hues layered upon each other, creating texture and depth reminiscent of impasto painting techniques found in modern art.
Unlike the soft blending of watercolor styles, these brushstrokes are typically distinct and intentional, showcasing the movement of the application tool.
The patterns formed are non-representational, focusing purely on the interplay of color, line, and texture to evoke feeling or energy.
Color palettes can range dramatically from high-contrast combinations of brights and darks to more harmonious analogous schemes.
The key is the visibility of the stroke itself – whether short and choppy, long and sweeping, or applied with a dry-brush technique for added texture.
This style embraces imperfection and spontaneity, much like abstract expressionist canvases where the act of painting is part of the artwork.
The final look is energetic, contemporary, and makes a strong visual impact.
How To Achieve This Look
Creating Abstract Brushstroke Nails begins with selecting a complementary or contrasting base color upon which the strokes will be layered.
Once the base is cured, different colors of polish are applied using various brushes to achieve distinct stroke effects.
A flat brush can create broad sweeps of color, while a fine liner brush allows for thinner, more controlled lines.
Experimenting with the amount of polish on the brush is crucial; a loaded brush gives a solid stroke, whereas a nearly dry brush yields a textured, scratchy effect.
Colors are typically layered, allowing each layer to cure (if using gel) or partially dry (if using regular polish) before applying the next.
This prevents muddying and keeps the strokes distinct, enhancing the layered, painterly appearance.
Consider the direction and length of the strokes to build a dynamic composition across the nails, perhaps varying the pattern slightly from finger to finger.
A matte or glossy top coat can be used to finish the look, with matte often emphasizing the texture and gloss adding vibrancy to the colors.
Why This Stands Out
Abstract Brushstroke Nails stand out for their bold, artistic energy and contemporary flair, directly channeling the spirit of modern painting.
They are visually arresting and serve as a powerful form of self-expression, moving beyond simple color into the realm of texture and movement.
This style is perfect for individuals who appreciate modern art and want a manicure that is both sophisticated and daring.
It’s less about subtlety and more about making a confident, creative statement.
The inherent randomness and layering ensure each manicure is unique, offering a personalized piece of wearable art.
It suits creative environments, gallery openings, or any occasion where showcasing individuality and a bold sense of style is desired.
It feels dynamic and alive, capturing a sense of artistic process and raw creativity directly on the nails.
This connection to the act of painting itself gives the style a unique depth and appeal.
Pop Art Comic Nails
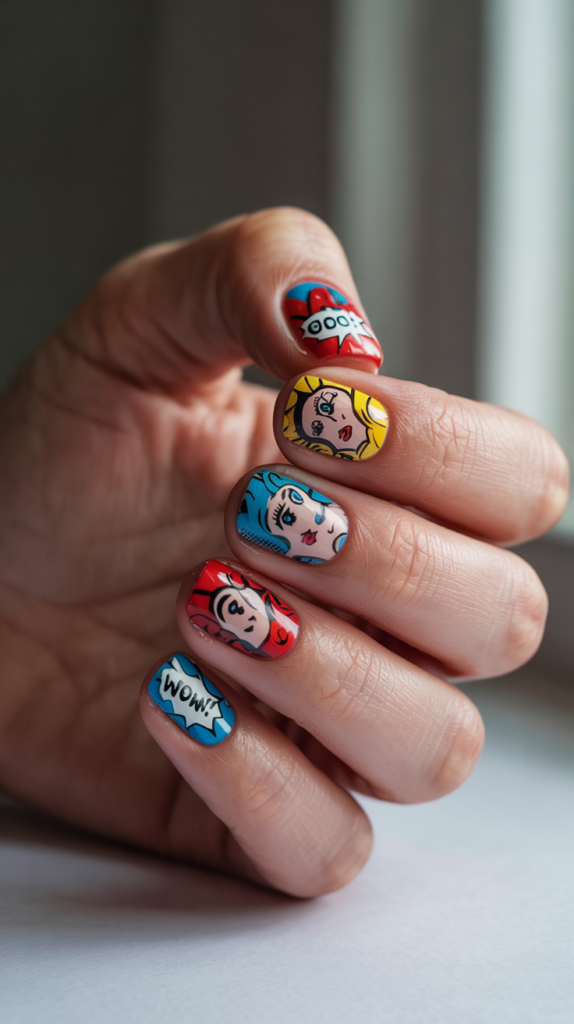
Inspired by Roy Lichtenstein with dots, comic bubbles, and dramatic facial expressions.
Design Features
Pop Art Comic Nails are instantly recognizable, drawing heavy inspiration from the iconic works of artists like Roy Lichtenstein and the visual language of vintage comic books.
Key features include the use of Ben-Day dots, which are small, evenly spaced colored dots used in printing to create shading and secondary colors.
Bold, black outlines are essential, defining shapes, figures, and text elements just like the ink lines in comics.
The color palette is typically bright and primary – think bold reds, yellows, and blues – often used in flat, unblended blocks.
Graphic elements like speech bubbles containing exclamations (“Pow!”, “Zap!”, “Wow!”), sound effects, or fragments of dramatic facial expressions (a crying eye, red lips) are common motifs.
The overall aesthetic is playful, graphic, and highly stylized, capturing the kitschy yet impactful nature of pop art.
Sometimes a matte finish is used to mimic the look of printed paper, further enhancing the comic book illusion.
The design aims for high contrast and immediate visual recognition, celebrating popular culture through a graphic lens.
How To Achieve This Look
Begin with a bright, solid base color typical of the pop art palette, such as a vibrant yellow, blue, or white.
Once the base is fully dry or cured, the intricate details are added, requiring precision and the right tools.
Ben-Day dots are meticulously created using a small dotting tool dipped in a contrasting color, often red or blue, applied in neat rows or patterns.
For the iconic black outlines, a very fine nail art brush or a nail art pen is essential for achieving crisp, clean lines around shapes, letters, and other graphic elements.
Comic book words or sound effects are carefully painted, often using black for the lettering and white or yellow for the speech bubble.
Painting small facial features requires a steady hand and fine brushes for details like eyelashes or tears.
Layering is key; ensure each element (dots, outlines, colors, text) is dry or cured before adding the next to maintain sharpness.
A glossy top coat can make the colors pop, while a matte top coat provides a more authentic printed-paper feel.
Why This Stands Out
Pop Art Comic Nails stand out because they are incredibly fun, vibrant, and instantly nostalgic, tapping into the universally recognized style of comic books and pop art.
They are a bold fashion statement that showcases personality and a playful sense of humor.
This style is eye-catching and guaranteed to be a conversation starter due to its graphic nature and cultural references.
It appeals to those who love retro aesthetics, graphic design, and aren’t afraid to wear something loud and expressive.
The intricate details, like the tiny dots and sharp outlines, demonstrate skill and attention to detail, elevating it beyond a simple novelty look.
It’s a perfect choice for themed parties, casual outings, or anytime you want your nails to shout with personality.
It transforms the nails into miniature graphic narratives, full of energy and character.
This unique blend of art history, pop culture, and meticulous execution makes it a truly standout choice.
Rainbow Drip Nails
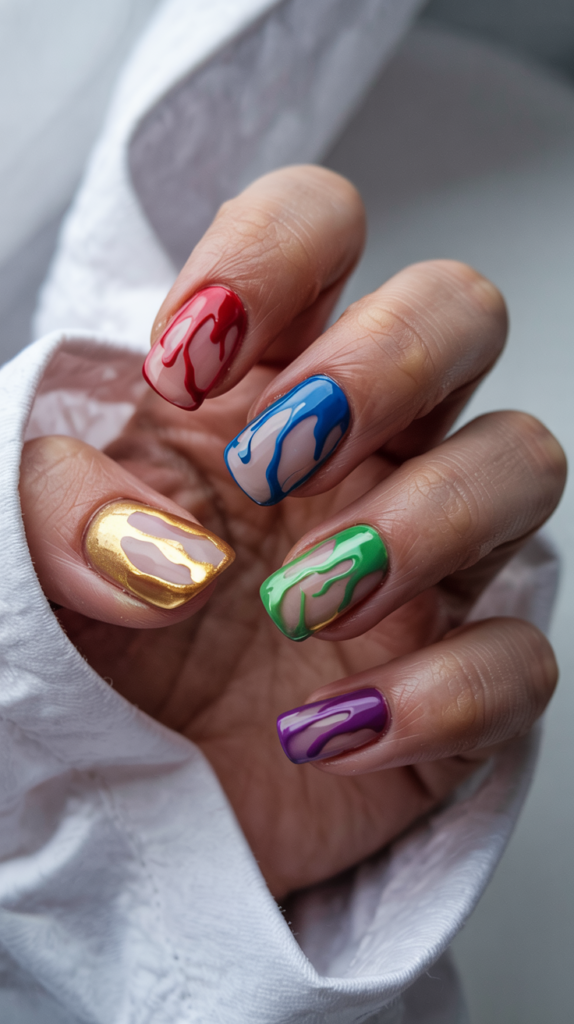
Vibrant paint drip effects that look like wet rainbow paint flowing down the nail.
Design Features
Rainbow Drip Nails create the illusion of thick, wet paint in a spectrum of vibrant colors seemingly dripping down the nail surface.
The key feature is the realistic portrayal of gravity affecting liquid paint, with rounded “drips” originating typically from the cuticle area or the nail tip.
The colors used are bright and cheerful, arranged often in a rainbow sequence (red, orange, yellow, green, blue, violet) or a similarly vibrant, multi-hued combination.
The drips themselves appear dimensional, as if the paint has volume and is still fluid.
The base color beneath the drips is often a neutral shade like white, black, or nude, which makes the vibrant colors of the drips pop dramatically.
Alternatively, the drips might cascade over a clear or glittery base for a different effect.
The edges of the drips are usually smooth and rounded, mimicking the surface tension of viscous liquid.
The overall effect is playful, messy in an artistic way, and full of movement and color.
How To Achieve This Look
Start with a prepared base color, ensuring it is fully dry or cured before adding the drip effect.
For the drips, select several vibrant nail polish colors that will form the rainbow or multicolor sequence.
Using the polish brush itself or a dotting tool, carefully place a bead of the first color near the cuticle line or nail tip where the drip should originate.
Then, gently drag the color downwards in a slightly wavy or uneven line to simulate the path of dripping paint.
Repeat this process with each subsequent color, placing the starting bead slightly overlapping the previous one or right next to it.
Vary the length of the drips for a more natural and dynamic look, ensuring some drips end sooner than others.
To enhance the wet, dimensional look, ensure the polish application for the drips is slightly thicker than a normal coat, or go over the drip shape carefully with a second layer.
Allow the drips to dry thoroughly before applying a glossy top coat to maximize the “wet paint” illusion and protect the design.
Why This Stands Out
Rainbow Drip Nails stand out for their playful energy, vibrant color display, and the clever illusion of wet, flowing paint.
It’s a fun, eye-catching design that feels youthful and creatively messy.
The rainbow aspect adds an element of joy and optimism, making it a cheerful choice for brightening up any look.
The drip effect itself is visually interesting, creating a sense of dynamic movement frozen in time.
This style is perfect for festivals, parties, or simply for anyone who loves bold color and unconventional nail art.
It showcases a fun-loving personality and an appreciation for playful aesthetics.
It’s a departure from more structured or delicate designs, offering a burst of controlled chaos and color.
This unique combination of vibrancy and artistic technique makes it a memorable and appealing choice.
Museum Marble Nails

Elegant swirling marble patterns in beige, gold, and black—like polished art sculptures.
Design Features
Museum Marble Nails emulate the luxurious and sophisticated appearance of polished marble stone, often seen in sculptures and architectural details within museums.
The design typically features a neutral base color, such as soft beige, white, or ivory, providing a canvas for the veining.
The characteristic marble veins are created using contrasting colors, classically black, grey, and often accented with metallic gold or silver lines.
These veins are fluid and organic, swirling and intersecting across the nail in unpredictable patterns, mimicking natural stone formations.
The technique aims for a soft blending where the veins meet the base, avoiding harsh lines to achieve a realistic, polished stone effect.
There’s often a sense of depth created by layering translucent washes or subtly different shades within the base or veins.
A high-gloss top coat is almost always used to finish the look, enhancing the polished, reflective quality associated with luxurious marble surfaces.
The overall aesthetic is one of timeless elegance, sophistication, and understated luxury.
How To Achieve This Look
Begin with a smooth application of the chosen base color, typically a nude, white, or soft grey polish.
While the base coat is still wet (or using a blooming gel technique with cured base for gel), apply fine lines of the veining colors (black, grey, gold) using a very fine nail art brush.
Immediately after applying the veining lines onto the wet base, use a clean, fine brush lightly dipped in acetone or alcohol (or a dry brush for gel blooming techniques) to gently drag across the lines.
This action softly blurs and blends the veins into the base, creating the characteristic soft, swirling marble effect.
Subtlety is key; avoid over-blending, which can muddy the colors.
The goal is to diffuse the edges of the veins while maintaining their definition.
Adding fine metallic gold or silver lines alongside or overlapping the darker veins enhances the luxurious feel.
Once the desired marble pattern is achieved and dry/cured, apply a generous glossy top coat.
This final step is crucial for mimicking the high shine of polished marble and sealing the intricate design.
Why This Stands Out
Museum Marble Nails stand out for their sheer elegance, sophistication, and luxurious appearance.
They mimic a high-end material associated with art and architecture, lending an air of refined taste to the wearer.
Unlike bolder nail art trends, marble nails offer a more subtle yet equally impactful form of artistry.
The neutral palette accented with metallics makes them versatile enough for both professional settings and formal occasions.
The organic, swirling patterns ensure that each nail is unique, mirroring the natural variations found in real marble stone.
This inherent uniqueness adds to the design’s appeal, feeling both natural and intentionally crafted.
This style projects an image of timeless beauty and quiet confidence, making it a popular choice for those who appreciate classic aesthetics.
It’s a sophisticated way to wear nail art that feels both modern and perennially chic.
Impressionist Garden Nails

Monet-inspired floral art with soft dabs of pastel color.
Design Features
Impressionist Garden Nails draw direct inspiration from the Impressionist art movement, particularly the works of Claude Monet, known for his depictions of gardens and nature.
The style is characterized by the use of small, distinct dabs or strokes of color, often in soft pastel shades, to build up floral or landscape imagery.
Rather than sharp details, the focus is on capturing the overall feeling, light, and atmosphere of a garden scene.
Colors are often layered and juxtaposed – placing complementary colors side-by-side – to create vibrancy and the illusion of light, a hallmark of Impressionist painting.
The brushwork is visible but soft, suggesting forms like flowers (water lilies, irises, poppies) and foliage rather than rendering them precisely.
There’s a dreamy, slightly blurred quality to the finished design, inviting the viewer to perceive the whole scene rather than focus on individual elements.
The palette typically includes greens, blues, pinks, purples, and yellows, applied in a way that feels luminous and airy.
The overall effect is painterly, romantic, and evocative of a peaceful stroll through a sun-dappled garden.
How To Achieve This Look
Start with a suitable base color, perhaps a pale blue for sky, a soft green for foliage, or a neutral nude.
Using small nail art brushes or even a dotting tool, begin applying small dabs of various pastel colors to suggest floral shapes and leaves.
Layering is crucial; apply dabs of different shades close together or slightly overlapping to build up color and texture, mimicking the Impressionists’ technique.
Don’t blend the colors smoothly; allow the individual dabs to remain somewhat distinct to capture that characteristic broken color effect.
Focus on the overall composition across the nail, suggesting clusters of flowers, patches of grass, or reflections on water.
Use lighter and darker shades strategically to imply light and shadow, adding depth to the miniature scene.
Patience is required to build up the image dab by dab.
Once the desired garden scene is achieved and dry/cured, seal the design with a top coat – often glossy to enhance the light, though a matte finish can offer a softer, more painterly feel.
Why This Stands Out
Impressionist Garden Nails stand out for their unique painterly quality and their ability to evoke the beauty and atmosphere of famous artworks.
They offer a sophisticated and artistic way to wear floral patterns, moving beyond simple depictions into the realm of art history.
The soft, dreamy aesthetic is inherently romantic and visually pleasing, appealing to those who appreciate beauty, nature, and fine art.
The technique itself, focusing on light and color, results in a luminous and captivating manicure.
This style feels personal and expressive, like wearing a miniature painting on each fingertip.
It’s a conversation starter, particularly for those familiar with the Impressionist movement, showcasing a refined artistic sensibility.
It offers a gentle yet intricate form of nail art, suitable for spring events, garden parties, or simply for anyone wanting a manicure that feels both beautiful and culturally rich.
The connection to beloved artists like Monet adds a layer of depth and appreciation.
Graffiti Tag Nails

Spray paint-inspired textures with bold lettering and street art style.
Design Features
Graffiti Tag Nails capture the raw, vibrant energy of street art, translating urban aesthetics onto the small canvas of the nail.
Key features include elements that mimic spray paint techniques, such as splatter effects, overspray gradients, and textured finishes.
Bold, stylized lettering, reminiscent of graffiti tags or bubble letters, is often a central element.
These letters might spell out short words, initials, or simply exist as abstract forms, typically rendered in high-contrast colors like black, white, or neon hues against a darker or textured background.
The background itself often simulates surfaces found in urban environments, like brick walls (achieved through stamping or freehand painting) or concrete textures (created with sponging techniques or textured polishes).
Dripping paint effects, similar to Rainbow Drip Nails but often more gritty or monochromatic, can also feature.
The overall aesthetic is edgy, bold, expressive, and unapologetically urban.
It embraces a sense of controlled chaos and artistic rebellion, channeling the spirit of graffiti artists.
How To Achieve This Look
Creating a convincing graffiti look often starts with establishing a textured or relevant background.
This could involve painting a simple base color, or using techniques like sponging grey polish for a concrete effect, or carefully drawing brick patterns with a fine brush or stamp.
For spray paint splatters, dip an old toothbrush or a fan brush into polish, then flick the bristles towards the nail (protect surrounding skin) to create fine dots.
For larger splats, use a dotting tool or the polish brush itself to create irregular blobs of color.
Lettering is typically done freehand with a fine nail art brush or a nail art pen, focusing on stylized, bold fonts characteristic of graffiti tags.
Using contrasting colors like black over white, or neon over black, ensures the lettering stands out.
Drip effects are added similarly to the Rainbow Drip style, but might use fewer colors or be placed more randomly to fit the edgy aesthetic.
Layering these different elements – texture, splatters, lettering, drips – builds up the authentic street art vibe before sealing with a top coat (matte often enhances the gritty feel).
Why This Stands Out
Graffiti Tag Nails stand out for their bold, unconventional, and edgy aesthetic, bringing the dynamic world of street art to fingertips.
They make a strong statement about individuality, creativity, and a connection to urban culture.
This style is visually striking and immediately commands attention due to its high contrast, dynamic elements, and often vibrant colors.
It appeals to those who favor alternative fashion, appreciate street art, and want their nails to express a rebellious or non-conformist attitude.
The combination of different techniques (splattering, sponging, freehand lettering) showcases skill and creativity.
It’s a form of wearable art that feels current, energetic, and full of personality.
Perfect for concerts, urban explorations, or anyone looking to break away from traditional nail designs, Graffiti Tag Nails are expressive and undeniably cool.
They capture a specific cultural energy in a unique and artistic way.
Painter’s Palette Nails
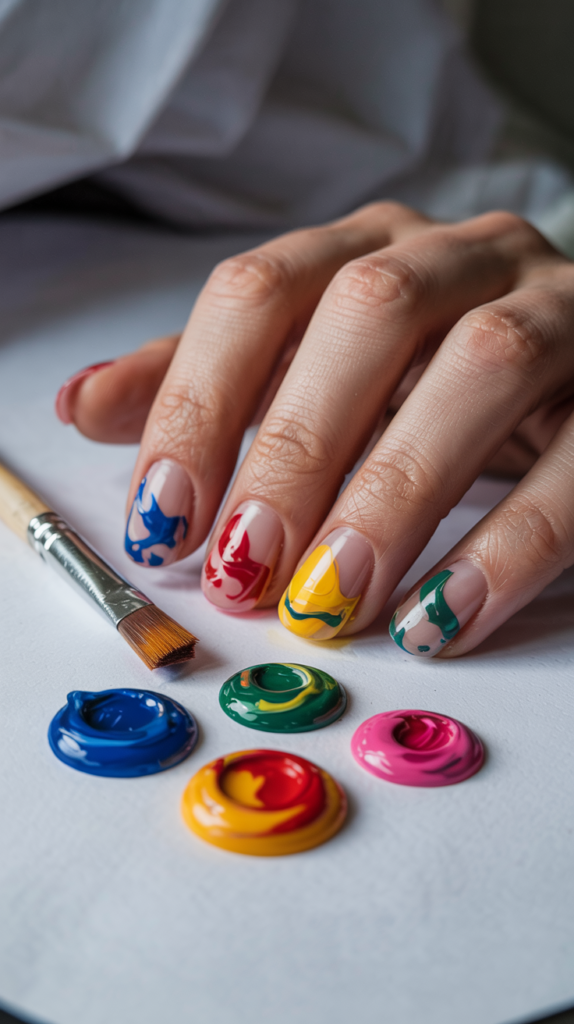
Color splotches arranged like a painter’s messy palette—chaotic but beautiful.
Design Features
Painter’s Palette Nails celebrate the beauty found in the perceived chaos of an artist’s working palette.
The design features seemingly random splotches, smears, and mixes of various colors scattered across the nail, mimicking the surface where a painter blends their paints.
There’s no defined pattern; the appeal lies in the spontaneous arrangement of colors.
Colors might overlap, partially blend, or sit distinctly side-by-side, creating interesting textures and unexpected color combinations.
The base color is often neutral, like white, nude, or black, to allow the colorful splotches to take center stage, resembling paint on a canvas or palette board.
However, the splotches can also be applied over a clear base or even another color.
The shapes of the splotches are irregular and organic, applied with a degree of thickness to suggest dollops of paint.
The overall effect is artistic, abstract, and captures the essence of the creative process itself – messy, vibrant, and full of potential.
How To Achieve This Look
Start with your chosen base color, allowing it to dry or cure completely.
Select several contrasting or complementary polish colors that you want to feature as the “paint” splotches.
Using a dotting tool, the end of a brush handle, or even the nail polish brush itself, apply irregular blobs and smears of the chosen colors onto the nail surface.
Don’t aim for neatness; the goal is to replicate the look of casually mixed paint.
Overlap some of the splotches while they are still slightly wet to achieve a partially blended look where the colors meet, mimicking paint mixing on a palette.
Vary the size and shape of the splotches for a more dynamic and realistic appearance.
Consider adding tiny dots or streaks of black or white amongst the colors to represent base pigments or highlights.
Once satisfied with the arrangement and the polish is dry/cured, apply a top coat; glossy can enhance the “wet paint” look, while matte can give a more dried-palette feel.
Why This Stands Out
Painter’s Palette Nails stand out for their celebration of the artistic process and their uniquely beautiful, chaotic aesthetic.
They transform the concept of a messy workspace into a captivating and intentional design.
This style is perfect for art lovers, creatives, or anyone who appreciates abstract beauty and isn’t afraid of a less structured look.
It’s colorful, expressive, and feels genuinely inspired by the act of creation.
The randomness ensures that every single nail, and indeed every manicure, is completely unique.
It’s a fun way to play with color and texture without the constraints of precise patterns or imagery.
It carries an air of effortless creativity, suggesting a personality that embraces spontaneity and finds beauty in unexpected places.
This artistic authenticity makes it a compelling and attractive choice.
Stained Glass Nails
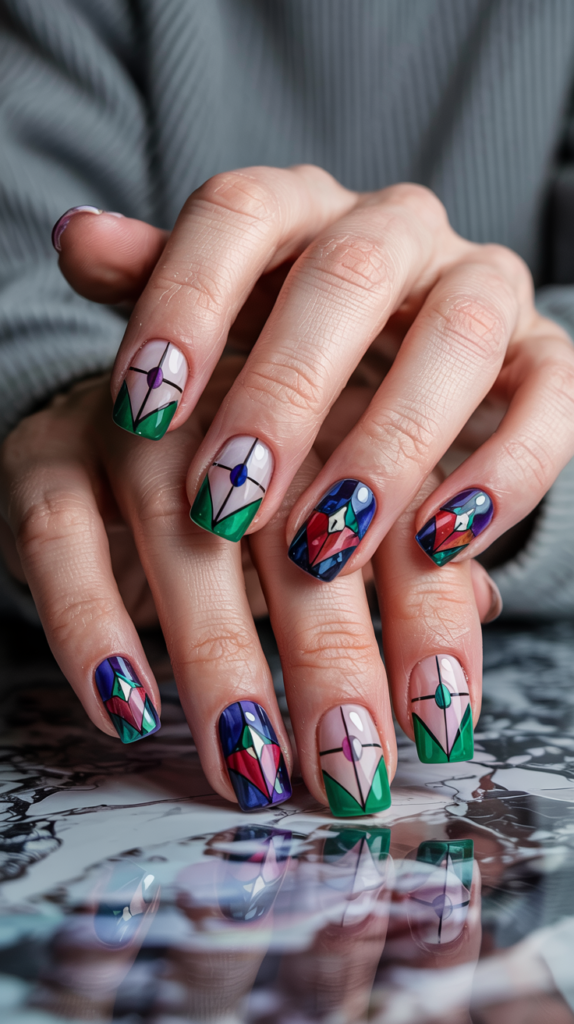
Vivid shards of color outlined in black to mimic cathedral window art.
Design Features
Stained Glass Nails replicate the stunning visual effect of light filtering through colored glass panels, as seen in cathedral windows or Tiffany lamps.
The defining feature is the use of distinct, geometric or irregular “shards” of vivid, often jewel-toned colors (like deep blues, reds, greens, purples, yellows).
Each shard of color is meticulously separated from its neighbors by thin, precise black lines, representing the lead came that holds traditional stained glass together.
These black outlines are crucial for defining the shapes and creating the characteristic segmented appearance.
The colors within the shards are typically vibrant and translucent or jelly-like if possible, enhancing the illusion of light passing through glass.
Sometimes, a subtle shimmer or metallic foil might be incorporated within the color shards for added luminosity.
The shapes can form a specific picture (like a flower or abstract motif) or simply create a mosaic-like pattern across the nail.
The overall effect is intricate, luminous, and reminiscent of historical artistry and craftsmanship.
How To Achieve This Look
Begin with a base coat, which could be clear, a neutral nude, or even black (if you want the outlines to blend in more).
The most common method involves painting the black outlines first, creating the framework for the stained glass design using a very fine nail art brush or striping tape.
Ensure the black lines form closed shapes or “cells” across the nail.
Once the black outlines are completely dry or cured, carefully fill in each cell with the chosen vibrant, translucent, or jelly polish colors using a fine brush.
Precision is key to avoid painting over the black lines.
Apply the color carefully within its designated segment.
Using polishes with a degree of sheerness helps achieve the glassy effect.
Allow the colors to dry/cure fully.
Finish with a high-gloss top coat to maximize the shine and enhance the illusion of polished glass, making the colors appear luminous and the black lines sharp.
Why This Stands Out
Stained Glass Nails stand out for their intricate beauty, vibrant color display, and the skillful illusion of a different medium altogether.
They evoke a sense of historical artistry and craftsmanship, feeling both elegant and visually complex.
The contrast between the bold black outlines and the luminous colors within creates a striking and eye-catching effect.
It’s a design that demonstrates patience and precision, elevating nail art to a form of miniature craft.
This style appeals to those who appreciate detailed work, rich colors, and designs with a touch of historical or architectural inspiration.
It’s suitable for special occasions or for anyone wanting a truly unique and artistic manicure.
The way the design plays with light and color gives it a captivating quality, making the nails look like tiny, precious jewels.
This blend of artistry, technique, and visual richness makes it exceptionally noteworthy.
Ink Splash Nails

High contrast black ink splatters on a white base for a raw artistic vibe.
Design Features
Ink Splash Nails offer a minimalist yet impactful design characterized by high-contrast black splatters against a stark white or very light base.
The style mimics the look of black ink flicked or splashed onto paper, creating a raw, energetic, and slightly uncontrolled aesthetic.
The splatters are typically irregular in shape and size, ranging from fine speckles to larger, more dramatic splashes.
The randomness of the placement is key to the design’s authenticity, suggesting spontaneous artistic action.
Unlike carefully placed dots, these splatters have a sense of movement and velocity, often with smaller satellite dots radiating from larger splashes.
The high contrast between the pure white background and the deep black ink creates a bold, graphic statement.
While black on white is classic, variations might include white splashes on black, or splashes of a single bright color on a neutral base.
The overall vibe remains raw, expressive, and artfully undone.
How To Achieve This Look
Start with a crisp, opaque white base coat, ensuring it is perfectly smooth and fully dry or cured.
Protect the skin around the nails with liquid latex or tape, as this technique can be messy.
Dip a tool like a fan brush, an old toothbrush, or even a drinking straw into black nail polish.
For brushes, gently flick the bristles towards the nail; for a straw, dip one end in polish, aim at the nail, and blow sharply through the other end.
Experiment with the distance and force used to create different sizes and densities of splatters.
Vary the technique across different nails for a more random, authentic look.
Allow the black splatters to dry completely before removing the skin protection.
Finish with a top coat (either matte or glossy) to seal the design and provide a smooth finish over the potentially textured splatters.
Why This Stands Out
Ink Splash Nails stand out for their striking simplicity, high contrast, and raw, artistic energy.
They achieve a bold, graphic look with a technique that embraces randomness and imperfection.
This style appeals to those who appreciate minimalist aesthetics with an edge, or who are drawn to abstract expressionism and process-oriented art.
It feels modern, cool, and effortlessly stylish.
The stark black-and-white palette is timelessly chic, while the splash effect adds a dynamic, contemporary twist.
It’s a statement piece that doesn’t rely on intricate details or multiple colors.
It’s relatively quick to achieve yet looks incredibly impactful, making it a popular choice for a stylish yet low-effort manicure.
The inherent unpredictability ensures each nail is unique, adding to its raw appeal.
Matisse Cutout Nails

Bright, organic shapes layered on soft pastels, just like Matisse’s paper cut art.
Design Features
Matisse Cutout Nails are directly inspired by the iconic “cut-out” artworks Henri Matisse created later in his career.
The design features bold, simplified, and organic shapes – think leaves, algae, abstract forms, or figures – rendered in bright, solid colors.
These vibrant shapes are typically layered over a contrasting background, often a soft pastel shade or a simple white, mimicking the effect of cut paper arranged on a larger sheet.
The edges of the shapes are usually clean and distinct, replicating the crispness of cut paper.
The color palette is characteristically bold and joyful, using primary and secondary colors in unexpected combinations, reflecting Matisse’s masterful use of color.
There’s a sense of flatness and graphic simplicity to the design, focusing on shape and color interaction.
The overall aesthetic is playful, modern, sophisticated, and instantly recognizable to those familiar with Matisse’s work.
It balances artistic reference with a cheerful, decorative quality.
How To Achieve This Look
Begin with a solid base coat in a color that will contrast well with the cutout shapes, often a pastel, white, or even a vibrant primary color if the shapes are white or black.
Allow the base to dry or cure completely.
Using a fine nail art brush and opaque, bright polishes, carefully paint the Matisse-inspired organic shapes onto the nail.
Focus on creating smooth, clean edges to mimic the look of cut paper.
Alternatively, shapes can be created using nail vinyls or stencils if freehand painting is challenging.
Layering is key; some shapes might overlap slightly, creating a sense of depth similar to Matisse’s compositions.
Ensure the shapes are rendered in solid, flat color without shading.
Once the shapes are dry/cured, apply a top coat – glossy often enhances the vibrancy, while matte can give a more paper-like texture.
Why This Stands Out
Matisse Cutout Nails stand out for their direct and stylish homage to a major figure in modern art.
They translate Matisse’s joyful and innovative cut-out technique into wearable art, showcasing an appreciation for art history.
The combination of bright, bold shapes and often softer backgrounds creates a visually appealing contrast that is both playful and sophisticated.
The organic forms feel lively and modern.
This style is instantly recognizable and serves as a chic cultural reference.
It appeals to art lovers and fashion-forward individuals seeking a unique, colorful, and conversation-starting manicure.
It captures the spirit of Matisse’s work – optimistic, decorative, and revolutionary in its simplicity – making it a joyful and stylish choice.
The graphic quality ensures it makes a statement while remaining elegant.
Gold Leaf Accent Nails
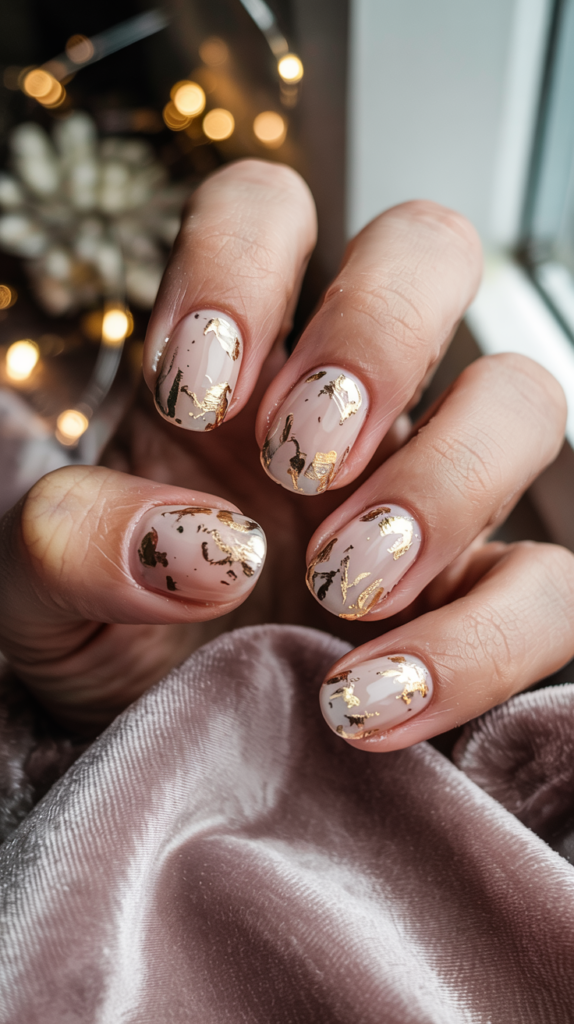
Foil pieces arranged like art gallery frames on matte nude or deep tones.
Design Features
Gold Leaf Accent Nails incorporate delicate flakes or pieces of metallic gold foil into the nail design, often used as a sophisticated accent rather than covering the entire nail.
A popular variation involves using the gold leaf to create borders or frame-like elements around the edges of the nail or specific sections of nail art.
This “framing” technique is often applied over a chic, understated base color, such as a matte nude, deep burgundy, forest green, or classic black.
The contrast between the matte or deep base and the shimmering, textured gold leaf creates a luxurious and elegant effect.
The gold leaf itself can be applied as small, scattered flakes for a distressed look, or in more deliberate lines and shapes for the framing effect.
The texture of the foil adds a dimensional quality that contrasts beautifully with a smooth base.
While gold is classic, silver or copper leaf can also be used for variations.
The overall aesthetic is one of opulence, refinement, and gallery-worthy sophistication, highlighting the nail as a miniature framed canvas.
How To Achieve This Look
Apply the chosen base color, whether a matte nude or a deep tone, and let it dry or cure completely.
For foil application, apply a thin layer of nail foil adhesive or a slightly tacky layer of top coat only to the areas where you want the gold leaf to stick (e.g., around the nail edges for a frame).
Allow the adhesive or top coat to become tacky (follow product instructions).
Carefully press small pieces of gold leaf foil onto the tacky areas using tweezers or a silicone tool, gently burnishing it flat.
The foil will adhere only where the adhesive was applied.
Brush away any excess loose foil flakes gently with a soft brush.
For a scattered effect, apply adhesive randomly and press flakes onto those spots.
Seal the entire nail thoroughly with a top coat (or two) to encapsulate the foil, smooth the surface, and prevent the delicate leaf from chipping or wearing off.
Why This Stands Out
Gold Leaf Accent Nails stand out for their undeniable touch of luxury and sophistication.
The use of real metallic leaf instantly elevates any manicure, adding texture, shine, and a sense of opulence.
The framing technique is particularly chic, turning the nail itself into a piece of art displayed within its own ornate border.
It’s a subtle yet incredibly effective way to add glamour.
This style works beautifully with minimalist aesthetics (nude base) or deep, dramatic colors, making it versatile for various occasions, from elegant evenings to adding a touch of class to everyday wear.
It feels expensive and meticulously crafted.
The contrast between the metallic texture of the foil and the base color/finish (especially matte) is visually intriguing.
It’s a timeless trend that consistently signifies elegance and refined taste.
Surreal Swirl Nails
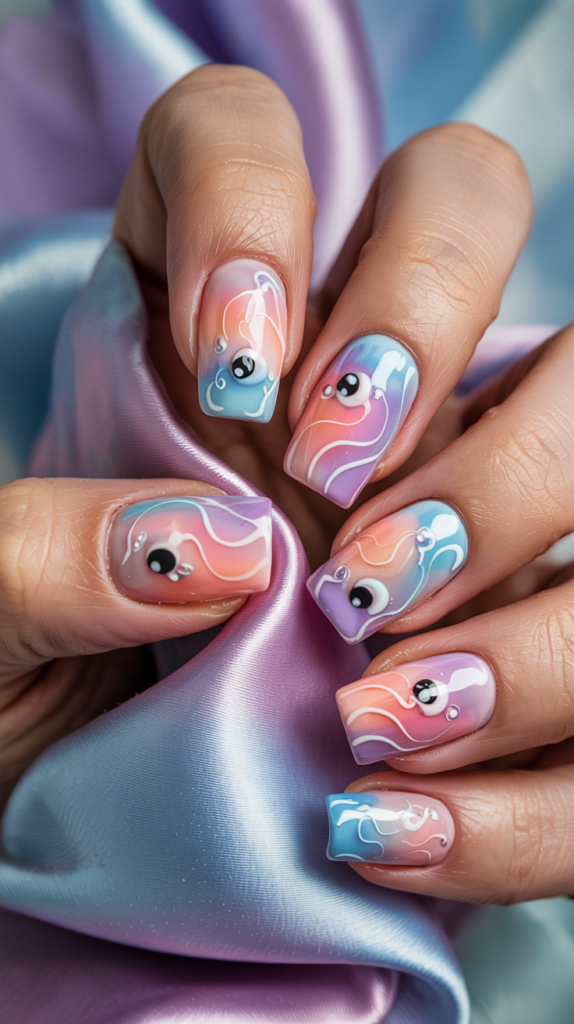
Dreamlike distorted shapes and faces inspired by surrealism.
Design Features
Surreal Swirl Nails draw inspiration from the Surrealist art movement, known for its dreamlike, illogical scenes and distorted representations of reality, famously explored by artists like Salvador Dalí and René Magritte.
The designs often feature fluid, swirling lines that morph into unexpected shapes or fragmented images.
Common motifs might include distorted faces, melting objects (like clocks), eyes in unusual places, or abstract patterns that evoke a subconscious, dreamlike state.
The lines are typically curvy and organic, avoiding sharp angles or rigid geometry.
Color palettes can vary widely, from monochromatic schemes emphasizing line work to bizarre and contrasting color combinations that enhance the otherworldly feel.
There’s often a sense of mystery and ambiguity in the imagery created.
The overall aesthetic is imaginative, thought-provoking, and decidedly unconventional.
It aims to capture the strangeness and intrigue of dreams and the subconscious mind.
How To Achieve This Look
Start with a base color that complements the intended surreal design; this could be anything from a neutral nude to a deep blue or even a gradient background.
Using fine nail art brushes, begin painting the swirling, distorted lines and shapes.
Incorporate recognizable elements like eyes or lips but place them unexpectedly or allow them to merge into abstract swirls.
Use contrasting colors to define shapes or create a sense of depth and shadow within the distorted forms.
Precision is needed for the fine lines, but the overall composition can embrace a degree of fluidity and randomness inherent to the surrealist style.
Think about creating visual illusions or paradoxical images on the small nail canvas.
Layering colors or adding subtle shading can enhance the dreamlike quality.
Finish with a top coat to smooth and protect the intricate, imaginative design.
Why This Stands Out
Surreal Swirl Nails stand out for their unique, imaginative, and intellectually stimulating aesthetic, directly referencing a significant art movement.
They go beyond mere decoration to present intriguing, often bizarre imagery that sparks curiosity.
This style is perfect for individuals who appreciate art history, psychology, or simply enjoy designs that are unconventional and break from the norm.
It showcases creativity and a willingness to embrace the weird and wonderful.
The intricate and often detailed nature of the designs demonstrates artistic skill.
It’s a guaranteed conversation starter, inviting interpretation and discussion about its meaning or inspiration.
It offers a truly unique way to express individuality, transforming the nails into miniature canvases for exploring the subconscious.
This blend of artistry, imagination, and slight strangeness makes it deeply compelling.
Boho Patterned Nails
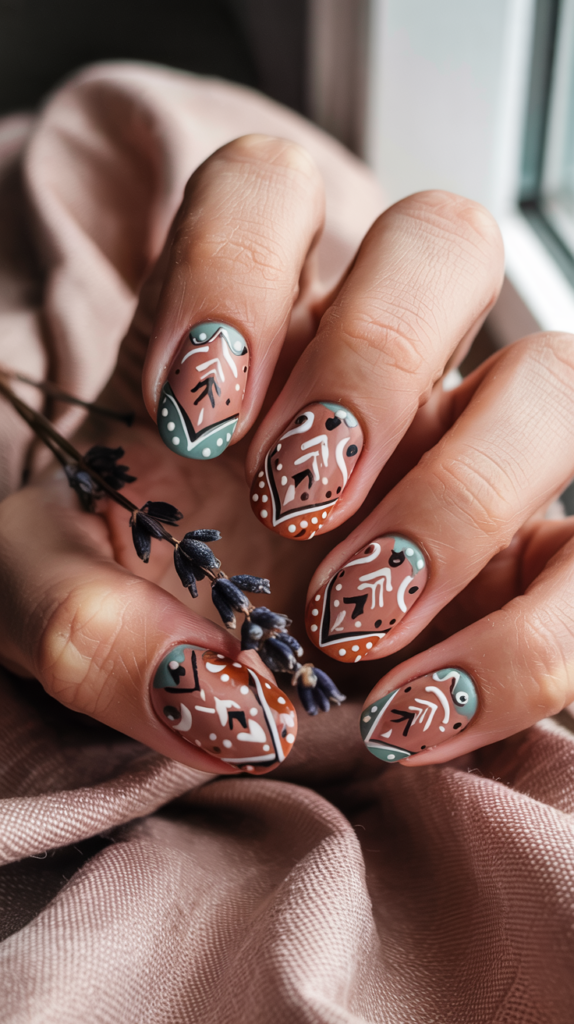
Tribal prints, arrows, and earthy tones arranged in hand-painted detail.
Design Features
Boho Patterned Nails capture the free-spirited, eclectic vibe of bohemian style, often incorporating elements inspired by global textiles, tribal motifs, and nature.
Designs typically feature intricate, hand-painted patterns such as chevrons, arrows, paisley, mandalas, feathers, or geometric shapes reminiscent of woven fabrics.
The color palette leans heavily towards earthy tones: terracotta, mustard yellow, olive green, deep burgundy, cream, and turquoise are common choices.
These colors evoke a connection to nature and traditional crafts.
Patterns are often layered or combined in a mix-and-match fashion across different nails, contributing to the eclectic feel.
Detail is key, with fine lines and small repeating elements creating a rich, textured appearance.
Accents like tiny dots, triangles, or zig-zags fill spaces or border larger motifs.
The overall aesthetic is artistic, grounded, culturally inspired, and expresses a love for travel, nature, and artisanal craftsmanship.
How To Achieve This Look
Begin with a base coat in one of the chosen earthy tones.
Using fine nail art brushes and contrasting boho colors, meticulously paint the desired patterns onto the nails.
Break down complex patterns like mandalas or paisley into smaller, manageable steps.
Use dotting tools for small, uniform dots, and striping brushes for clean lines in chevrons or arrows.
Plan the arrangement across the nails – perhaps one nail features a larger motif while others have smaller repeating patterns or border designs.
Consistency in line weight and pattern scale (where intended) contributes to a polished look, despite the free-spirited theme.
Layering patterns requires patience, allowing each element to dry/cure before adding the next.
Finish with a top coat, often matte to enhance the earthy, textile-like feel, though glossy also works.
Why This Stands Out
Boho Patterned Nails stand out for their intricate detail, earthy color palette, and connection to global cultures and natural elements.
They offer a sophisticated yet relaxed style that feels both artistic and grounded.
This style appeals to individuals with a bohemian fashion sense, a love for travel, or an appreciation for detailed, handcrafted aesthetics.
The intricate patterns showcase skill and patience.
The combination of geometric and organic motifs creates a visually rich and engaging look.
It’s a versatile style that can be adapted from subtle accents to full-nail coverage, suitable for various occasions.
It feels personal and expressive, reflecting a connection to creativity, nature, and diverse cultural inspirations.
This blend of artistry, detail, and meaningful influence makes it a perennially popular and attractive choice.
Doodle Sketch Nails

Tiny pen-like doodles—stars, hearts, swirls—against a white or notebook-style background.
Design Features
Doodle Sketch Nails capture the charming, spontaneous look of hand-drawn doodles, like those scribbled absentmindedly in the margins of a notebook.
The design typically features a collection of small, simple motifs drawn in thin black lines, mimicking pen ink.
Common doodle elements include stars, hearts, smiley faces, clouds, lightning bolts, flowers, swirls, arrows, or random abstract squiggles.
These are usually scattered seemingly randomly across the nail.
The background is often a plain white or off-white, enhancing the “pen on paper” illusion.
Sometimes, faint blue horizontal lines are added to the background to mimic notebook paper, further reinforcing the theme.
While black ink on white is classic, variations might use colored “ink” lines or a different neutral base.
The overall aesthetic is playful, youthful, casual, and effortlessly creative, celebrating the charm of simple sketches.
How To Achieve This Look
Start with a smooth, opaque base coat, typically white or a very light nude.
Allow it to dry or cure completely.
Using a very fine nail art brush or a black nail art pen, begin drawing the tiny doodle motifs onto the nail surface.
Keep the lines thin and relatively simple, embracing slight imperfections for an authentic hand-drawn feel.
Scatter the doodles across the nail – some near the edges, some overlapping slightly, some floating in space.
Vary the types of doodles from nail to nail for a more dynamic look.
If adding notebook lines, use a light blue polish and a very fine striping brush to draw thin horizontal lines across the nail before adding the black doodles.
Let everything dry/cure thoroughly before sealing with a top coat (matte can enhance the paper feel, while glossy gives a clean finish).
Why This Stands Out
Doodle Sketch Nails stand out for their playful charm, relatable aesthetic, and celebration of simple, spontaneous creativity.
They transform casual scribbles into a fun and stylish nail art design.
This style is youthful, lighthearted, and doesn’t take itself too seriously, making it perfect for everyday wear or casual occasions.
It appeals to anyone who enjoys whimsical designs or has a nostalgic connection to doodling.
The contrast between the fine black lines and the clean white background creates a crisp, graphic look that is visually appealing despite its simplicity.
It’s easily customizable with personal favorite doodle shapes.
It feels fresh, fun, and effortlessly cool, offering a unique alternative to more complex or formal nail art.
The “hand-drawn” quality gives it personality and charm.
Modern Minimalist Line Nails
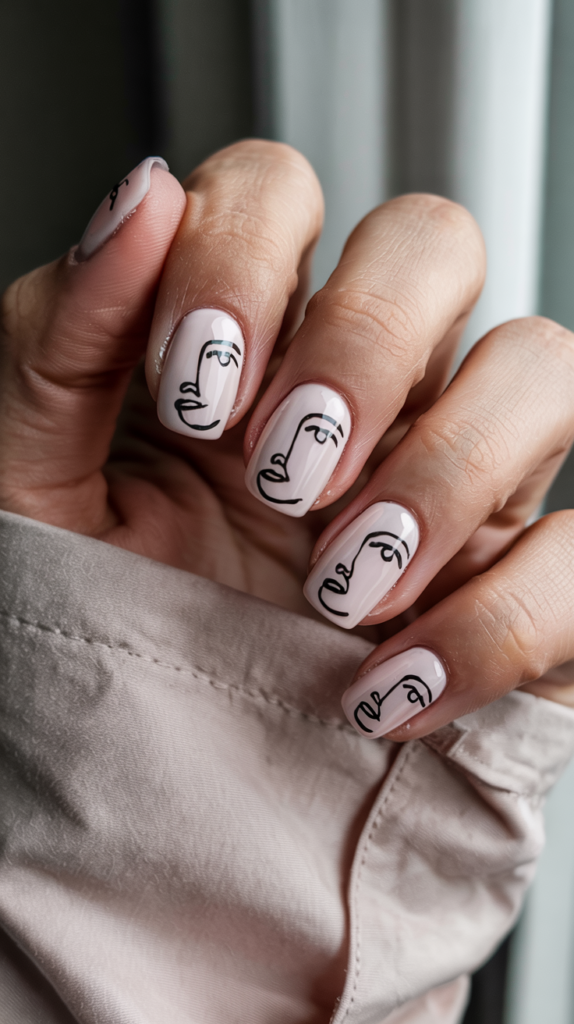
Single continuous lines forming abstract faces or figures, pure elegance.
Design Features
Modern Minimalist Line Nails epitomize chic simplicity, featuring designs created with a single, continuous, fine line.
This line work often forms abstract faces, simplified figures, or flowing organic shapes, drawing inspiration from minimalist line art and contour drawing.
The key characteristic is the unbroken flow of the line – it appears as if drawn without lifting the pen (or brush).
The designs are typically rendered in a single contrasting color, most commonly black or white, against a neutral or sheer base (like nude, pale pink, or clear).
Negative space is crucial, allowing the minimalist line work to stand out and emphasizing the elegance of the form created.
The aesthetic is sophisticated, refined, contemporary, and focuses on the beauty of pure line and form.
There’s an intentional lack of detail or shading; the power lies in the expressive quality of the single line itself.
The overall effect is understated yet highly artistic and effortlessly elegant.
How To Achieve This Look
Begin with a perfectly smooth application of a neutral or sheer base color, allowing it to dry or cure completely.
Choose the color for the line work, typically black or white for maximum contrast and elegance.
Using a very fine, high-quality nail art brush (or a nail art pen with consistent flow), carefully draw the continuous line design.
Plan the path of the line beforehand, aiming for smooth curves and a fluid motion.
Maintain a consistent, thin line weight throughout the design.
Practice the figure or face on paper first to get the flow right before attempting it on the nail.
Embrace the simplicity; resist the urge to add extra details.
Once the line work is dry/cured, apply a top coat (glossy often enhances the sleekness) to protect the delicate design and provide a polished finish.
Why This Stands Out
Modern Minimalist Line Nails stand out for their exceptional elegance, sophistication, and artistic restraint.
They demonstrate that impactful design doesn’t require complexity or bright colors, relying instead on the beauty of pure line.
This style is incredibly chic and contemporary, aligning perfectly with minimalist fashion trends.
It appeals to those who appreciate understated artistry, subtle details, and refined aesthetics.
The abstract faces and figures are intriguing and stylish, adding an element of modern art to the manicure without being overwhelming.
It’s versatile enough for both professional settings and stylish social occasions.
It conveys a sense of confidence and effortless cool, proving that less can indeed be more.
The focus on clean lines and negative space creates a look that is both visually calming and highly sophisticated.
Mosaic Tile Nails
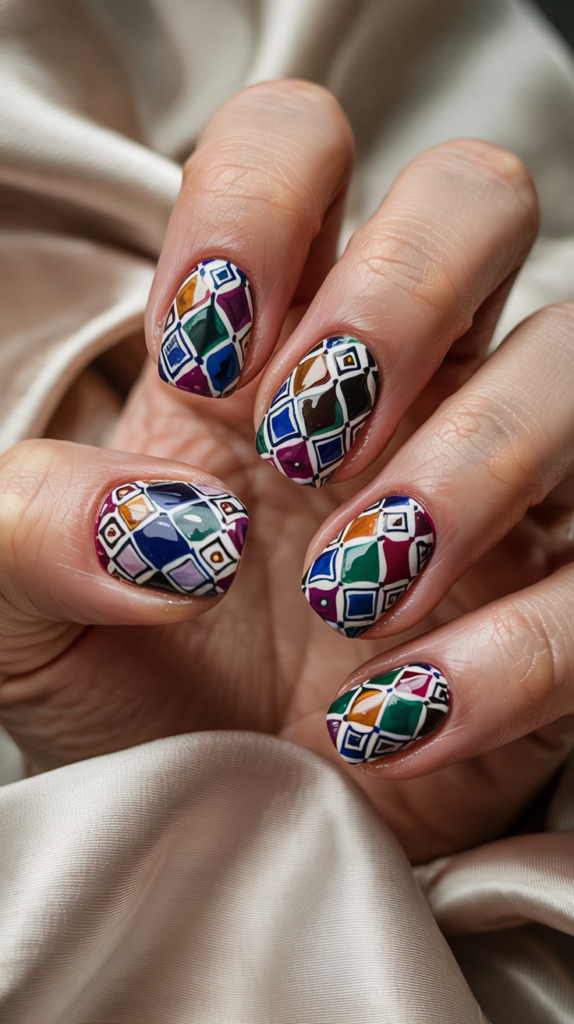
Colorful tiny squares forming intricate tile-inspired art.
Design Features
Mosaic Tile Nails replicate the look of intricate mosaic artwork, where small pieces (tesserae), typically square, are arranged to form a larger pattern or image.
The design features numerous tiny, distinct squares of various colors laid out in a grid-like or patterned fashion across the nail.
These squares can be arranged to create geometric patterns, floral motifs, abstract designs, or even mimic specific historical mosaic styles (like Roman or Byzantine).
The small size of the “tiles” allows for detailed and complex imagery.
Often, a contrasting color (like grey, black, or white) is used to represent the “grout” lines between the tiny squares, further enhancing the tile illusion.
Alternatively, the squares might be placed edge-to-edge with no visible grout.
The color palette can be incredibly varied, from bright and multicolored to more subdued or monochromatic schemes, depending on the desired mosaic effect.
The overall aesthetic is detailed, textured, colorful, and reminiscent of ancient craftsmanship.
How To Achieve This Look
This look requires precision and patience.
Start with a base coat, which could be the color intended for the “grout” lines or a neutral shade if painting grout lines later.
Method 1 (Painting): Use a fine nail art brush to meticulously paint tiny squares in different colors, arranging them in the desired pattern.
Leave thin lines of the base coat showing between squares for grout, or paint grout lines afterwards with a fine brush.
Method 2 (Stamping): Use a nail stamping plate that features a mosaic or small square grid pattern.
Stamp the pattern onto the nail, then use a fine brush to carefully fill in the individual squares with different colors (reverse stamping or leadlight technique).
Method 3 (Glitter/Foil): Use tiny square-shaped glitter pieces or cut metallic foil into small squares and carefully arrange them on a tacky base or with nail glue, then seal thoroughly with top coat.
Whichever method is used, neatness and consistency in the size and placement of the squares are key.
Finish with a top coat to smooth the potentially textured surface and protect the intricate design.
Why This Stands Out
Mosaic Tile Nails stand out for their incredible detail, vibrant potential, and the impressive illusion of a complex, textured art form on a miniature scale.
They evoke images of historical art and architecture, lending a unique, cultured feel.
The intricate nature of the design showcases skill and dedication, making it a true statement piece.
The use of multiple small color blocks creates a visually stimulating and rich effect.
This style offers endless possibilities for customization in terms of patterns and color palettes, from ancient-inspired designs to modern geometric arrangements.
It appeals to those who love detailed work, texture, and culturally rich aesthetics.
It transforms the nails into miniature tiled masterpieces, demonstrating an appreciation for craftsmanship and intricate beauty.
This blend of color, pattern, and historical reference makes it exceptionally captivating.
Galaxy Splatter Nails

A splatter of stars, nebulas, and cosmic dust like an artist’s space canvas.
Design Features
Galaxy Splatter Nails aim to capture the awe-inspiring beauty of outer space, featuring a dark base adorned with elements mimicking stars, distant galaxies, and colorful nebulas.
The base is typically a deep black, navy blue, or dark purple, representing the vastness of space.
Nebula effects are often created by sponging on patches of brighter, contrasting colors like pink, purple, blue, or teal, blending them softly into the dark base to suggest swirling cosmic clouds.
Fine glitter polish is often layered over these areas or the entire nail to represent distant stars and cosmic dust.
Splatter techniques, similar to Ink Splash or Graffiti styles, are used to create clusters of stars.
White or silver polish is flicked onto the nail using a brush or toothbrush to create tiny, dense dots representing star fields.
Larger individual “stars” might be added with a dotting tool.
The overall aesthetic is deep, mysterious, sparkling, and full of depth and wonder.
It combines sponging, layering, and splattering techniques to build a miniature cosmic scene.
How To Achieve This Look
Start with a dark base color (black, navy, deep purple) and let it cure/dry.
Using a makeup sponge, dab small, irregular patches of nebula colors (pinks, blues, purples) onto the nail, slightly overlapping and blending them into the dark base.
Apply a layer of fine glitter polish over the nebula patches or the entire nail to add cosmic shimmer.
Protect the surrounding skin.
Dip a toothbrush or fan brush into white or silver polish and flick it towards the nail to create fine star splatters.
For brighter, individual stars or constellations, use a small dotting tool dipped in white or silver polish to place precise dots.
Allow all layers to dry/cure completely.
Finish with a glossy top coat to enhance the depth and sparkle, making the galaxy truly shine.
Multiple layers of top coat may be needed to smooth out the texture from glitter and splatters.
Why This Stands Out
Galaxy Splatter Nails stand out for their mesmerizing depth, sparkling beauty, and ability to capture the vastness and wonder of the cosmos on a tiny scale.
The combination of dark base, colorful nebulas, and glittering stars creates a visually stunning and ethereal effect.
This style appeals to dreamers, science fiction fans, and anyone captivated by the mysteries of space.
It’s intricate, detailed, and offers a sense of escapism.
The techniques used (sponging, splattering, layering glitter) create a unique and complex texture and depth that is fascinating to look at.
Each nail becomes a miniature portal to another universe.
It’s a consistently popular trend because it is both beautiful and imaginative, offering a darker, more mysterious alternative to brighter nail art styles.
The cosmic theme feels both timeless and futuristic.
Paint Tube Squeeze Nails

Bright curved shapes mimicking fresh paint squeezed from a tube.
Design Features
Paint Tube Squeeze Nails playfully mimic the look of thick, fresh paint being squeezed directly from its tube onto a surface.
The design features bold, curved, and often ribbon-like shapes of vibrant color that appear dimensional and viscous.
These “squeezes” of paint usually start wider at one end and taper slightly, often with a curved or wavy path across the nail, replicating the motion of squeezing a paint tube.
The colors used are typically bright, opaque primaries or secondaries, emphasizing the “pure pigment” look.
The key is creating a sense of volume and thickness in the painted shape, making it look like actual dollops of undiluted paint.
This can be achieved through careful application, layering, or using thicker gel polishes.
The background is often a simple neutral (white, nude) or contrasting color to make the bright “paint squeeze” pop.
The overall aesthetic is fun, graphic, playful, and directly references the tools and materials of painting.
How To Achieve This Look
Apply and cure/dry the chosen background color.
Select the bright color(s) for the paint squeeze effect.
Using a nail art brush or the polish brush itself, apply the color in a thick, curved, ribbon-like shape.
Start with a wider deposit of polish at one end and drag the brush in a curved or wavy motion, allowing the line to taper slightly.
For extra dimension with regular polish, allow the first layer to partially dry, then carefully apply a second layer directly on top, focusing on building height.
With gel polish, use a thicker viscosity gel or build up the shape in layers, curing each one.
Using 3D sculpting gel can also achieve a very convincing dimensional effect.
Ensure the edges of the paint squeeze shape are relatively smooth and rounded to enhance the viscous paint illusion.
Finish with a glossy top coat to maximize the “wet paint” look.
Why This Stands Out
Paint Tube Squeeze Nails stand out for their playful concept, bold graphic style, and clever illusion of dimension and texture.
They are a fun, literal interpretation of painting materials translated into nail art.
This style is cheerful, eye-catching, and perfect for art students, painters, or anyone who loves a pop of bright color and a quirky design.
It’s less about intricate detail and more about bold shapes and a fun idea.
The dimensional quality makes the design visually interesting and tactile.
It’s a unique way to celebrate the tools of the trade for artists.
It feels modern and lighthearted, offering a burst of simple, happy color.
The direct reference to paint tubes is charming and instantly understandable.
Fingerprint Art Nails
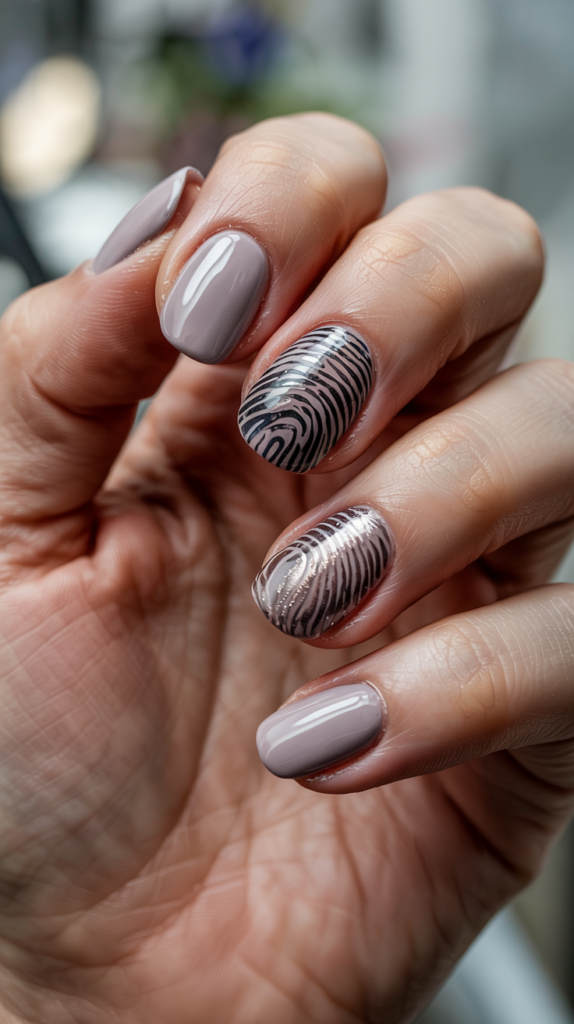
Actual or stylized fingerprints as a unique, personalized artistic stamp.
Design Features
Fingerprint Art Nails incorporate the unique pattern of a fingerprint into the nail design, either using an actual print or a stylized representation.
When using an actual print, the intricate whorls, loops, and arches become the central artistic element.
The fingerprint pattern is typically rendered in a contrasting color against a solid base – classic combinations include black on white, white on black, or a metallic like gold or silver on a dark or nude base.
The fine lines of the fingerprint ridges create a detailed and organic texture.
Stylized versions might simplify the fingerprint pattern, focusing on the general flow of the lines or isolating a specific section.
The design can cover the entire nail or be placed as a smaller accent.
The overall aesthetic is unique, personalized, and intriguingly intimate.
It transforms a biological identifier into a piece of abstract, textural art.
How To Achieve This Look
Method 1 (Actual Print): Apply the base color and let it dry/cure completely.
Apply a very thin, even layer of the contrasting fingerprint color onto a smooth, non-porous surface (like a silicone mat or stamper head).
Gently press the fingertip (clean and dry) into the thin layer of polish, then immediately and carefully press the fingertip onto the nail surface, rolling slightly to transfer the print.
This requires practice for a clear transfer.
Method 2 (Stamping): Use a nail stamping plate that features a fingerprint pattern.
Apply polish to the plate, scrape excess, pick up the pattern with a stamper, and transfer it onto the nail over the chosen base color.
Method 3 (Freehand/Stylized): Use a very fine nail art brush to paint swirling lines that mimic the general flow and pattern of a fingerprint directly onto the base color.
This allows for more artistic interpretation.
Protect the design with a top coat once the fingerprint pattern is dry/cured.
Matte or glossy finishes can create different effects, with matte often emphasizing the texture.
Why This Stands Out
Fingerprint Art Nails stand out for their inherent uniqueness and deeply personal connection.
Using an actual fingerprint makes the manicure literally one-of-a-kind and intimately tied to the individual.
Even stylized versions carry a sense of identity and organic complexity.
The intricate line patterns are visually fascinating, creating texture and detail from a natural source.
This style is a sophisticated and subtle way to wear something deeply personal.
It’s a conversation starter, prompting questions about its origin and meaning.
It feels modern and slightly mysterious, blending biology with art.
The transformation of a functional identifier into an aesthetic element is clever and thought-provoking.
Art Deco Glam Nails

Geometric symmetry, gold accents, and 1920s vintage sophistication.
Design Features
Art Deco Glam Nails capture the luxurious and geometric aesthetic of the Art Deco movement popular in the 1920s and 1930s.
The designs are characterized by strong geometric shapes, symmetry, and stylized forms.
Common motifs include sharp angles, parallel lines, chevrons, sunburst patterns, stepped forms, and elegant curves arranged in symmetrical or repeating patterns.
There is a strong emphasis on linearity and clean, precise execution.
The color palette is often bold and contrasting, frequently featuring black, white, and metallic gold or silver accents.
Deep jewel tones like emerald green, sapphire blue, or ruby red might also be incorporated against these neutrals.
Gold or silver metallic polish or foil is almost always used to add the essential touch of glamour and opulence associated with the era.
The overall aesthetic is sophisticated, glamorous, vintage, and highly stylized, evoking the Roaring Twenties.
How To Achieve This Look
Start with a smooth base color, often black, white, nude, or a deep jewel tone.
Use striping tape or freehand painting with fine brushes to create the sharp geometric lines and shapes characteristic of Art Deco.
Precision is paramount; lines should be clean and angles sharp.
Symmetry is often key, so plan the design carefully, perhaps mirroring patterns on either side of a central axis.
Incorporate metallic gold or silver polish for lines, accents, or filling specific shapes.
Using metallic foil with adhesive can also create sharp, gleaming accents.
Consider layering geometric shapes or creating repeating patterns across the nail.
Finish with a high-gloss top coat to enhance the glamour and polished look typical of the Art Deco style.
Why This Stands Out
Art Deco Glam Nails stand out for their timeless sophistication, geometric precision, and luxurious feel.
They reference a beloved historical design movement known for its elegance and glamour.
The combination of bold geometric patterns and metallic accents creates a visually striking and expensive look.
It’s a style that conveys confidence, taste, and an appreciation for vintage design.
Perfect for formal events, themed parties (like Great Gatsby), or for anyone wanting a manicure that feels both retro and modernly chic.
The clean lines and symmetry are inherently pleasing to the eye.
It’s a form of wearable art that speaks of luxury, craftsmanship, and a specific historical glamour.
This blend of geometry, metallics, and vintage appeal makes it enduringly stylish.
Frida Kahlo Portrait Nails

Miniature portraits or eyebrow + floral motifs inspired by Frida’s iconic look.
Design Features
Frida Kahlo Portrait Nails pay homage to the iconic Mexican artist, known for her powerful self-portraits and distinctive personal style.
Designs can range from detailed miniature portraits of Frida herself to simpler motifs representing her key visual elements.
Common features include her famous unibrow, often paired with bright floral elements (especially in her hair), vibrant traditional Mexican clothing patterns, or symbolic elements from her paintings (like hearts, hummingbirds, or monkeys).
The miniature portraits capture her intense gaze and recognizable features.
Even without a full portrait, the combination of the distinct eyebrow shape and colorful flowers instantly evokes Frida Kahlo.
The color palette is typically vibrant and bold, reflecting the colors of Mexico and her own artwork – deep reds, blues, yellows, pinks, and greens.
The overall aesthetic is artistic, culturally rich, feminist, and deeply personal, celebrating the life and work of a revered artist.
It’s a tribute expressed through symbolic imagery.
How To Achieve This Look
Achieving a miniature portrait requires significant artistic skill and very fine brushes.
Start with a base color, perhaps a skin tone for a portrait or a vibrant color for a more symbolic design.
Sketch the portrait lightly first.
Use fine brushes and various polish colors to carefully build up the facial features, paying close attention to the eyes, lips, and especially the signature unibrow.
Add details like floral hair adornments or earring shapes.
For simpler designs, focus on painting the iconic eyebrow shape prominently on the nail, perhaps arching over a field of brightly colored flowers painted below or around it.
Use dotting tools and fine brushes to create intricate floral details.
Incorporate patterns inspired by Mexican textiles if desired.
This style demands patience and precision.
Seal the detailed artwork carefully with a top coat.
Why This Stands Out
Frida Kahlo Portrait Nails stand out as a powerful tribute to a beloved and influential artist, instantly recognizable and rich with cultural and personal meaning.
They go beyond simple aesthetics to make a statement about art, identity, and resilience.
This style is deeply personal and expressive, resonating strongly with admirers of Frida Kahlo’s life and work.
It showcases artistic skill, particularly if a portrait is attempted.
The combination of the unique facial features and vibrant floral/cultural elements creates a visually arresting and unique design.
It’s a conversation starter that invites discussion about art, feminism, and Mexican culture.
Wearing Frida-inspired nails feels like carrying a piece of her spirit and strength.
This blend of iconic imagery, cultural richness, and artistic tribute makes it exceptionally compelling.
Color Wheel Gradient Nails

Each nail representing a color wheel section, fading from warm to cool hues.
Design Features
Color Wheel Gradient Nails utilize the entire spectrum of the color wheel, typically assigning a different color or gradient section to each nail.
The nails are arranged sequentially to represent the flow of colors around the wheel, often starting with warm colors (reds, oranges, yellows) on one hand and transitioning to cool colors (greens, blues, violets) on the other, or across the fingers of one hand.
Alternatively, each nail might feature a gradient within a specific section of the color wheel (e.g., fading from red to orange, or blue to violet).
The key feature is the smooth transition between colors, creating a harmonious flow across the manicure.
The colors used are typically bright and saturated to clearly represent the primary, secondary, and tertiary hues of the color wheel.
The gradients should be seamless, without harsh lines between the colors.
The overall aesthetic is vibrant, organized, educational (in an artistic sense), and visually satisfying due to the harmonious color transitions.
It’s a celebration of color theory itself.
How To Achieve This Look
Method 1 (Each Nail a Color): Simply paint each nail a different solid color, following the sequence of the color wheel (e.g., Thumb=Red, Index=Orange, Middle=Yellow, Ring=Green, Pinky=Blue, then continue with violet etc.
on the other hand or variations).
Method 2 (Gradient Nails): For each nail, choose two or three adjacent colors from the wheel (e.g., yellow, green, blue).
Apply stripes of these colors side-by-side onto a makeup sponge.
Dab the sponge repeatedly onto the nail, slightly shifting its position with each dab to blend the colors into a smooth gradient.
Clean up the surrounding skin.
Repeat for each nail with the next set of colors in the wheel sequence.
Ensure smooth blending for the gradient effect.
A good glossy top coat can help further smooth the transition and make the colors pop.
Why This Stands Out
Color Wheel Gradient Nails stand out for their vibrant, systematic display of color and their direct connection to fundamental art and design principles.
They are visually striking and demonstrate an understanding and appreciation of color theory.
The harmonious flow of colors across the hands is incredibly satisfying and eye-catching.
It’s a cheerful, optimistic look that incorporates the entire spectrum.
This style is perfect for artists, designers, or anyone who simply loves color and wants a bright, organized, yet playful manicure.
It can be adapted from bold primaries to softer pastels while maintaining the color wheel concept.
It’s both educational and beautiful, transforming a theoretical tool into wearable art.
The smooth gradients (if used) showcase blending skills and add sophistication to the vibrant display.
Black Canvas With Neon Paint Nails

Dark base with electric neon smudges and scribbles like a glowing night gallery.
Design Features
Black Canvas with Neon Paint Nails creates a dramatic contrast between a deep, dark background and bursts of electric neon colors.
The base is typically a matte or glossy black, providing a stark canvas like a darkened room or night sky.
Splashes, smudges, drips, streaks, or fine scribbled lines of intensely bright neon polishes (pink, green, yellow, orange, blue) are applied over the black base.
These neon elements are designed to look like they are glowing against the darkness.
The application of the neon colors is often spontaneous and energetic, mimicking neon signs, light painting photography, or abstract art displayed in a dark gallery setting.
There might be overlapping colors or areas where the neon seems to diffuse slightly against the black.
A matte finish on the black base can enhance the contrast and make the glossy or naturally bright neons pop even more, intensifying the glowing effect.
The overall aesthetic is edgy, futuristic, vibrant, and high-energy.
How To Achieve This Look
Start with a smooth, opaque black base coat, applying two layers if needed for full coverage.
A matte top coat applied over the black base at this stage can enhance the final contrast.
Using bright neon polishes and various tools (fine brushes for scribbles, dotting tools for splats, sponges for smudges, toothpicks for streaks), apply the neon colors energetically over the black background.
Overlap colors slightly or allow them to touch to create visual interest.
Keep the application relatively sparse to maintain the dominance of the black canvas and make the neons appear more isolated and glowing.
If a matte base was used, be careful not to apply a glossy top coat over the entire nail unless desired; you might carefully apply glossy top coat only over the neon elements for maximum contrast.
Alternatively, use naturally glossy neons and no final top coat (or a matte one over everything for a different feel).
Why This Stands Out
Black Canvas with Neon Paint Nails stand out for their electrifying contrast and futuristic, high-energy vibe.
The way the bright neons pop against the deep black background is visually arresting and mimics the effect of actual light.
This style is perfect for nightlife, concerts, festivals, or anyone who loves bold, edgy aesthetics and vibrant colors.
It feels modern, dynamic, and slightly rebellious.
The technique allows for a lot of creative freedom in the application of the neon elements, ensuring each manicure is unique.
It’s a relatively simple concept with a very high visual impact.
It captures the excitement of city nights, digital art, or glow-in-the-dark effects, making it a fun and contemporary choice.
The dramatic contrast is undeniably cool and attention-grabbing.
Tattoo-Inspired Line Art Nails

Sharp black ink-like tattoos as nail art, with skulls, roses, or snakes.
Design Features
Tattoo-Inspired Line Art Nails translate the aesthetic of traditional or fine-line tattoos onto the nail surface.
The defining characteristic is the use of sharp, precise black lines to create iconic tattoo imagery, mimicking the look of black ink on skin.
Common motifs include classic tattoo subjects like roses, skulls, snakes, anchors, daggers, hearts, swallows, or intricate ornamental patterns.
The style often focuses purely on the black line work, omitting color or shading for a graphic, illustrative look.
The lines are typically fine and consistent, requiring precision to achieve the clarity associated with good tattoo work.
The background is often a neutral nude, pale pink, or white, simulating skin tone and allowing the black “ink” lines to stand out clearly.
Negative space is used effectively to define the shapes and keep the design clean and readable.
The overall aesthetic is edgy, artistic, detailed, and carries the cultural weight and coolness associated with tattoo art.
How To Achieve This Look
Begin with a smooth, clean base coat in a nude, white, or pale shade that mimics a skin tone or provides high contrast.
Allow it to dry or cure completely.
Using a high-quality, opaque black nail polish or black acrylic paint and a very fine detailing nail art brush (or a fine-tipped nail art pen), carefully draw the chosen tattoo motif.
Precision and a steady hand are crucial for achieving clean, sharp lines.
Break down complex images like skulls or roses into simpler line elements, building the form gradually.
Maintain a consistent line weight for a cohesive look, or vary it slightly for emphasis if desired (like traditional tattoo techniques).
Keep the design focused on the line work, resisting the urge to fill with color unless aiming for a specific “color tattoo” style (which is less common for this line art interpretation).
Seal the intricate design with a top coat once fully dry/cured.
Why This Stands Out
Tattoo-Inspired Line Art Nails stand out for their edgy coolness, intricate detail, and direct reference to another popular form of body art.
They transfer the aesthetic and cultural significance of tattoos to a temporary medium.
The fine black line work against a neutral base is graphically striking and showcases artistic skill and precision.
It appeals to those who love tattoo culture, illustrative art, or simply want a unique and detailed manicure with an edge.
The choice of classic tattoo motifs adds a layer of symbolism and timeless appeal.
It’s a sophisticated way to incorporate potentially “tougher” imagery into a stylish look.
It feels personal and expressive, allowing wearers to showcase iconic symbols or designs they connect with, just like real tattoos.
This blend of artistry, cultural reference, and detailed execution makes it highly compelling.
Polka Dot Pointillism Nails

Art made entirely of tiny dots—a tribute to pointillist painting techniques.
Design Features
Polka Dot Pointillism Nails draw inspiration from the Pointillist art movement, pioneered by artists like Georges Seurat, where images are formed entirely from small, distinct dots of color.
Instead of lines or solid shapes, the entire nail design is constructed using numerous tiny dots.
These dots are typically applied in various colors, placed closely together.
When viewed from a slight distance, the eye blends the individual dots of color optically, creating the impression of shapes, shading, and intermediate hues, just like in Pointillist paintings.
The dots are usually uniform in size, applied meticulously with a small dotting tool.
The patterns can range from simple arrangements and gradients to more complex images like flowers, landscapes, or abstract designs, all rendered purely through dots.
The color palette can be varied, but often uses complementary colors placed side-by-side to create vibrancy through optical mixing.
The overall aesthetic is textured, detailed, luminous, and directly references a specific, fascinating art technique.
How To Achieve This Look
Start with a base coat, often white or a light color to allow the dots to show clearly.
Select the range of polish colors you will use for the dots.
Using the smallest available dotting tool, dip it into the first color and begin applying tiny, neat dots to the nail surface, forming the intended shape or pattern.
Clean the dotting tool frequently and reload with polish to maintain consistent dot size.
Place dots of different colors close together, allowing the base coat to show slightly between them or overlapping them strategically depending on the desired effect.
Build up the image or pattern dot by dot, considering how the colors will blend optically.
This technique requires significant patience and precision.
Once the entire design is dotted and dry/cured, apply a top coat (usually glossy) to smooth the potentially textured surface and protect the intricate work.
Why This Stands Out
Polka Dot Pointillism Nails stand out for their unique, textured appearance and their clever homage to the Pointillist art technique.
The dedication required to create an entire image from tiny dots is impressive and visually intriguing.
The way the colors interact and blend optically creates a luminous, vibrant effect that is distinct from blended gradients or solid colors.
It has a shimmering, almost pixelated quality that is captivating.
This style appeals to art history enthusiasts, lovers of detailed work, and anyone seeking a truly unique and sophisticated nail art look.
It demonstrates patience, precision, and an understanding of color theory.
It transforms a simple polka dot motif into a complex artistic method, resulting in a manicure that feels both playful and highly sophisticated.
The connection to Seurat and Pointillism adds intellectual depth to its visual appeal.
Kandinsky Circle Nails
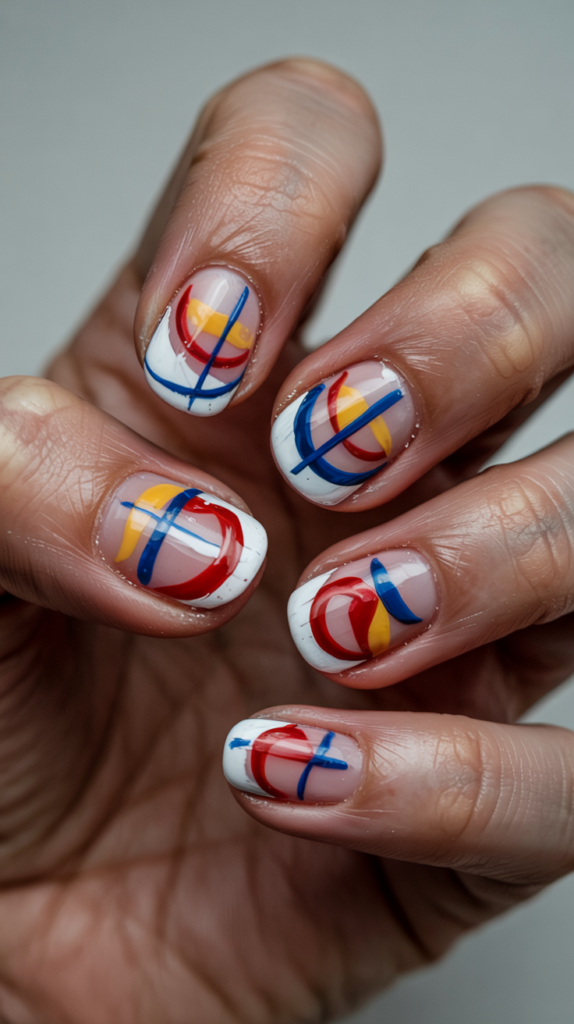
Bold geometric circles layered in playful colors, like Wassily Kandinsky’s art.
Design Features
Kandinsky Circle Nails are inspired by the abstract artworks of Wassily Kandinsky, particularly his famous compositions featuring overlapping and interacting circles and geometric forms.
The design is characterized by the prominent use of circles of various sizes and bold colors.
These circles are often layered upon each other or placed in dynamic arrangements across the nail, exploring the relationships between color and form.
The colors used are typically bright and primary or secondary, reflecting Kandinsky’s theories on the emotional and spiritual properties of color.
While circles are dominant, other geometric shapes like squares, triangles, or bold lines might also be incorporated, echoing Kandinsky’s broader abstract vocabulary.
There’s often a sense of rhythm and musicality in the composition.
The background might be a simple neutral or another block of color.
The overall aesthetic is abstract, geometric, vibrant, playful, and directly references the pioneering work of an abstract art master.
How To Achieve This Look
Start with a base coat in a chosen color, perhaps white, black, or one of the main colors from Kandinsky’s palette.
Using dotting tools of various sizes or the rounded end of brushes, apply circles of different colors onto the nail.
Overlap the circles, allowing some to sit partially on top of others, creating layers and interactions as seen in Kandinsky’s work.
Use bold, opaque colors for maximum impact.
Consider the placement and balance of the circles across the nail to create a dynamic composition.
Introduce other simple geometric shapes or lines with a fine brush if desired, maintaining the abstract style.
Ensure clean edges for the circles and shapes.
Once the design is complete and dry/cured, apply a top coat to seal the artwork and enhance the vibrancy of the colors.
Why This Stands Out
Kandinsky Circle Nails stand out for their bold, abstract design and direct homage to a pivotal figure in modern art history.
They translate Kandinsky’s exploration of color, form, and emotion into vibrant, wearable art.
The playful yet sophisticated arrangement of colorful circles is visually engaging and full of energy.
It appeals to lovers of abstract art, bold colors, and geometric design.
This style makes a confident artistic statement, showcasing an appreciation for art history and avant-garde aesthetics.
It feels both fun and intellectually grounded.
It’s a versatile abstract look that can be adapted with different color palettes while retaining the core Kandinsky-inspired theme.
The focus on pure color and form interaction gives it a timeless modern appeal.
Origami-Inspired Nail Art

Sharp folded line illusions with muted pastel colors.
Design Features
Origami-Inspired Nail Art mimics the appearance of folded paper, translating the precise creases and geometric shapes of origami into a nail design.
Key features include sharp, straight lines that intersect to create facets and panels, suggesting folded planes.
These lines often form geometric shapes like triangles, diamonds, or stylized animal/object forms reminiscent of origami creations (cranes, boats, foxes).
Shading or the use of slightly different tones within adjacent panels helps create the illusion of three-dimensional folds and shadows.
The color palette is often soft and muted, frequently using pastels or desaturated tones, which enhances the delicate, paper-like quality.
However, bolder colors can also be used for a more graphic interpretation.
Precision is crucial, with clean lines and sharp angles defining the folded effect.
The overall aesthetic is geometric, precise, elegant, and subtly complex, suggesting the intricate art of paper folding.
How To Achieve This Look
Begin with a smooth base coat, often in a light pastel or neutral shade.
Use thin striping tape or a fine nail art brush to meticulously create the network of straight lines that define the origami folds and shapes.
Plan the pattern carefully to ensure the lines intersect logically to create facets.
Fill in the resulting panels with the chosen colors.
Use slightly different shades of the same color or contrasting colors in adjacent panels to create the illusion of light hitting folded paper.
Precision in painting within the lines is key to achieving the sharp, crisp look.
Remove striping tape carefully while the polish is still slightly wet (if used).
Alternatively, use geometric nail vinyls or stencils to achieve precise shapes.
Finish with a top coat (matte can enhance the paper feel, while glossy adds polish) to protect the intricate line work.
Why This Stands Out
Origami-Inspired Nail Art stands out for its unique concept, geometric precision, and the clever illusion of folded paper.
It references a traditional craft in a modern, stylish way.
The clean lines and often muted color palette create a look that is sophisticated, elegant, and subtly intriguing.
It appeals to those who appreciate minimalist design, geometric patterns, and fine craftsmanship.
The suggestion of three-dimensionality through line and shading adds depth and complexity to the design.
It showcases patience and precision in its execution.
It offers a unique alternative to floral or purely abstract designs, feeling both artistic and mathematically precise.
This blend of cultural reference, geometry, and delicate execution makes it quietly captivating.
Palette Knife Texture Nails

Chunky paint texture effects that mimic palette knife strokes on canvas.
Design Features
Palette Knife Texture Nails aim to replicate the thick, textural application of paint achieved when using a palette knife on canvas, characteristic of impasto painting techniques.
The key feature is the visible texture and dimension, making the polish look like thick, sculpted paint.
The design features broad, uneven strokes and patches of color with raised edges and visible ridges, mimicking where the edge of a palette knife would lift the paint.
Colors might be applied thickly and allowed to partially mix or sit side-by-side with distinct edges.
There’s a deliberate lack of smoothness; the beauty lies in the tactile, uneven surface.
The colors used can be vibrant and bold or more muted, but the application technique remains the focus.
The base might be visible in some areas or completely covered by the thick “paint” strokes.
The overall aesthetic is highly textural, painterly, expressive, and directly mimics a specific artistic technique.
How To Achieve This Look
This effect is best achieved using thick mediums like heavy gel polish, 3D sculpting gel, or even acrylic paint mixed with a gel medium.
Apply the base color if desired.
Using a small, flat tool (like the flat end of an orangewood stick, a specialized nail art tool, or even a tiny palette knife if working with very thick gel) scoop up a small amount of the thick polish or gel.
Apply it to the nail in short, broad strokes, lifting the tool to create ridges and texture, mimicking palette knife marks.
Layer different colors side-by-side or slightly overlapping, allowing them to mix slightly where they touch for a painterly effect.
Don’t smooth the surface; embrace the unevenness and texture.
Cure thoroughly if using gel.
Due to the thickness, curing times might need to be extended.
A top coat might slightly diminish the texture, so it’s sometimes omitted or applied carefully only around the edges, though a thin top coat is usually needed for durability with polish.
Why This Stands Out
Palette Knife Texture Nails stand out dramatically due to their unique, highly textural surface and direct simulation of the impasto painting technique.
They offer a tactile dimension rarely seen in nail art.
This style is bold, artistic, and makes a strong statement about appreciating the physical process and materials of painting.
It appeals to artists and those who love expressive, textured aesthetics.
The chunky, uneven surface is visually intriguing and breaks away completely from traditional smooth nail finishes.
It feels raw, energetic, and authentically painterly.
It’s a challenging technique to master but results in a truly unique and impressive manicure that looks and feels like a miniature abstract painting.
This commitment to texture makes it exceptional.
Rainbow Splatter French Tips

Classic French manicure dipped in a rainbow splatter of paint.
Design Features
Rainbow Splatter French Tips offer a playful and colorful twist on the classic French manicure.
The design maintains the traditional nude or pale pink base of a French manicure, but replaces the clean white tip with a vibrant splatter of rainbow-colored paint.
Instead of a crisp smile line, the tip area features a seemingly random explosion of tiny dots and splashes in various bright colors (red, orange, yellow, green, blue, violet).
The splatters extend slightly down onto the nail bed, creating a messy-chic border.
The density of the splatter can vary, from a light sprinkling to a denser concentration of color at the very tip.
The contrast between the neat, neutral base and the chaotic, colorful tip is the key element.
The overall aesthetic is fun, youthful, artistic, and provides a surprising pop of color while still retaining a recognizable French manicure structure.
It’s a creative subversion of a classic style.
How To Achieve This Look
Perform a classic French manicure base: apply the sheer pink or nude base color and let it dry/cure completely.
Protect the skin around the nails and the main part of the nail bed, leaving only the tip area exposed where the splatter should go (tape or liquid latex can help define the zone).
Select several bright rainbow-colored polishes.
Using a toothbrush, fan brush, or straw technique (as described for Ink Splash or Graffiti nails), flick small splatters of each rainbow color onto the exposed tip area of the nail.
Layer the colors, allowing them to overlap slightly.
Aim for a random distribution of fine dots and small splashes concentrated at the tip.
Carefully remove the skin and nail protection once the splatters are dry.
Clean up any stray dots.
Finish with a glossy top coat over the entire nail to seal the design and blend the tip area smoothly with the base.
Why This Stands Out
Rainbow Splatter French Tips stand out by cleverly combining the timeless elegance of a French manicure with the fun, vibrant energy of paint splatters.
It’s an unexpected and playful juxtaposition of styles.
This design offers a way to wear bright colors and a trendy technique while maintaining a degree of classic structure.
It appeals to those who like familiar formats but want a creative, youthful twist.
The rainbow colors against the neutral base create a cheerful and eye-catching pop.
It’s perfect for spring, summer, parties, or adding a touch of artistic fun to a polished look.
It subverts expectations in a charming way, showing that even classic styles can be reimagined with artistic flair.
This blend of familiar and unexpected makes it unique and appealing.
Color Block Masterpiece Nails

Contrasting color blocks laid out like Mondrian’s iconic grids.
Design Features
Color Block Masterpiece Nails are inspired by the principles of color blocking in fashion and art, particularly echoing the iconic grid-based abstract paintings of Piet Mondrian.
The design features distinct, geometric blocks of solid color arranged across the nail.
These blocks are typically squares or rectangles, separated by clean, sharp lines, often in a contrasting color like black or white (mimicking Mondrian’s signature style) or sometimes leaving thin lines of the base coat visible.
The shapes are arranged in asymmetric or balanced compositions.
The color palette often focuses on primary colors (red, yellow, blue) along with black and white, directly referencing Mondrian’s Neoplasticism.
However, any combination of contrasting or complementary solid colors can be used for a more general color-blocked look.
Precision is key: the blocks of color should have sharp edges and be filled opaquely.
The overall aesthetic is bold, graphic, modern, architectural, and intellectually artistic, celebrating pure color and geometric form.
How To Achieve This Look
Start with a base coat, which could be white (classic Mondrian) or one of the main colors in your scheme.
Once dry/cured, use thin striping tape or a fine nail art brush to map out the grid lines or the borders of the color blocks.
For a Mondrian look, create a grid of intersecting horizontal and vertical black lines of varying thickness.
Alternatively, simply define the edges of the different color rectangles and squares.
Carefully fill in each designated block with its chosen solid color, using an opaque polish and applying multiple coats if needed for full coverage.
Ensure the color stays neatly within the lines or tape boundaries.
Remove striping tape carefully while the polish is still slightly wet.
If painting lines freehand, ensure they are crisp and straight.
Finish with a glossy top coat to enhance the bold colors and provide a smooth, unified surface.
Why This Stands Out
Color Block Masterpiece Nails stand out for their bold, graphic impact and their direct connection to modern art history and design principles.
The clean lines and contrasting blocks of color create a look that is visually striking and inherently modern.
The Mondrian-inspired variation is particularly sophisticated, showcasing an appreciation for abstract art and iconic design.
It feels both retro (early 20th century) and perennially contemporary.
This style is perfect for those who love geometric patterns, bold color statements, and designs with an architectural or graphic design feel.
It conveys confidence and a strong sense of style.
It’s a versatile concept that can be adapted with various color palettes beyond the primary colors, always resulting in a chic and impactful look.
The focus on pure form and color gives it enduring appeal.
Embroidery Illusion Nails
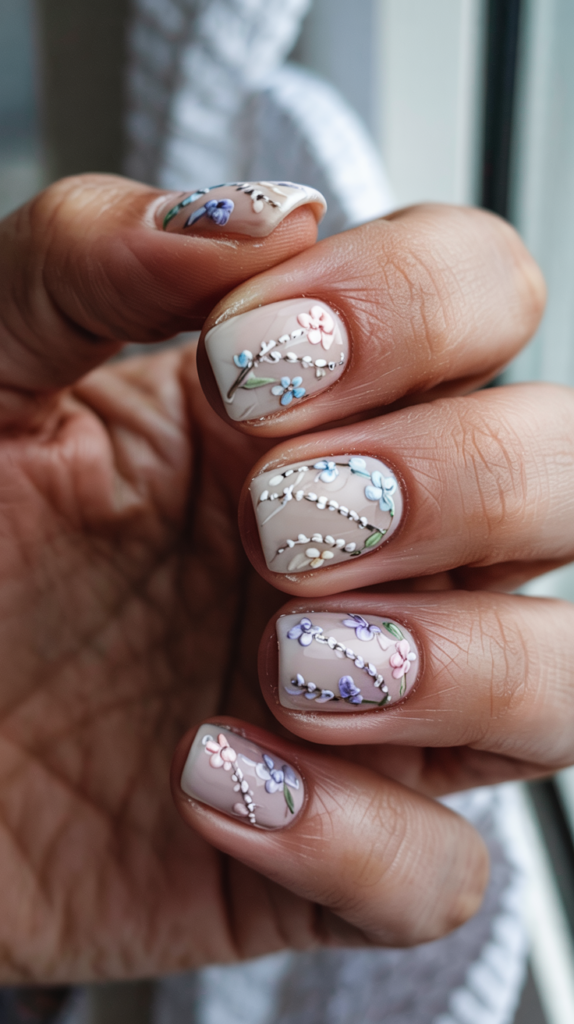
Stitched pattern illusions with ultra-fine details and cozy color palettes.
Design Features
Embroidery Illusion Nails cleverly mimic the look and texture of embroidered fabric, creating patterns that appear to be stitched onto the nail surface.
The design features motifs commonly found in embroidery, such as small flowers, leaves, hearts, geometric borders, or cross-stitch patterns.
The key illusion is created through the use of fine lines that mimic thread texture and tiny details that suggest individual stitches (like tiny ‘V’ shapes for cross-stitch or short dashed lines for running stitch).
Raised details using thicker polish or 3D gel can enhance the textural effect.
The color palette often leans towards softer, cozy, or folk-inspired hues – dusty pinks, muted blues, greens, creams, and reds – reflecting traditional embroidery floss colors.
The background might be a neutral shade or a color suggesting fabric like linen or denim.
A matte top coat is frequently used to enhance the fabric-like illusion and make the “stitches” appear more distinct and less glossy.
The overall aesthetic is charming, detailed, crafty, and evokes a sense of handmade artistry and cozy nostalgia.
How To Achieve This Look
Start with a base color, often neutral or muted, and consider applying a matte top coat at this stage for a fabric-like texture.
Using very fine nail art brushes and chosen polish colors, meticulously paint the embroidery patterns.
For cross-stitch illusions, paint tiny ‘X’ or ‘V’ shapes in a grid formation.
For other stitches, use fine dashed lines or small loops.
Build up floral or other motifs stitch by stitch.
Layering colors carefully can create shading effects similar to embroidery.
Using slightly thicker polish or 3D gel for certain elements (like French knots, represented by raised dots) can add convincing texture.
Patience and a steady hand are essential for the ultra-fine details.
Once the “embroidery” is complete and dry/cured, consider skipping a final top coat if a matte base was used and the details are secure, or apply a matte top coat carefully over the entire design.
Why This Stands Out
Embroidery Illusion Nails stand out for their charming concept, intricate detail, and the skillful illusion of a completely different craft medium.
They transform the nail into a miniature piece of textile art.
This style appeals to those who appreciate handcrafted aesthetics, folk art, and detailed, delicate designs.
It feels cozy, nostalgic, and uniquely artistic.
The fine details and textural illusions showcase considerable skill and patience.
It’s a conversation starter due to its unique premise and charming execution.
It offers a softer, more whimsical alternative to bolder graphic styles, perfect for cottagecore aesthetics or anyone wanting a manicure that feels handmade and heartfelt.
The trompe-l’oeil effect is delightful and impressive.
Canvas Matte White Nails
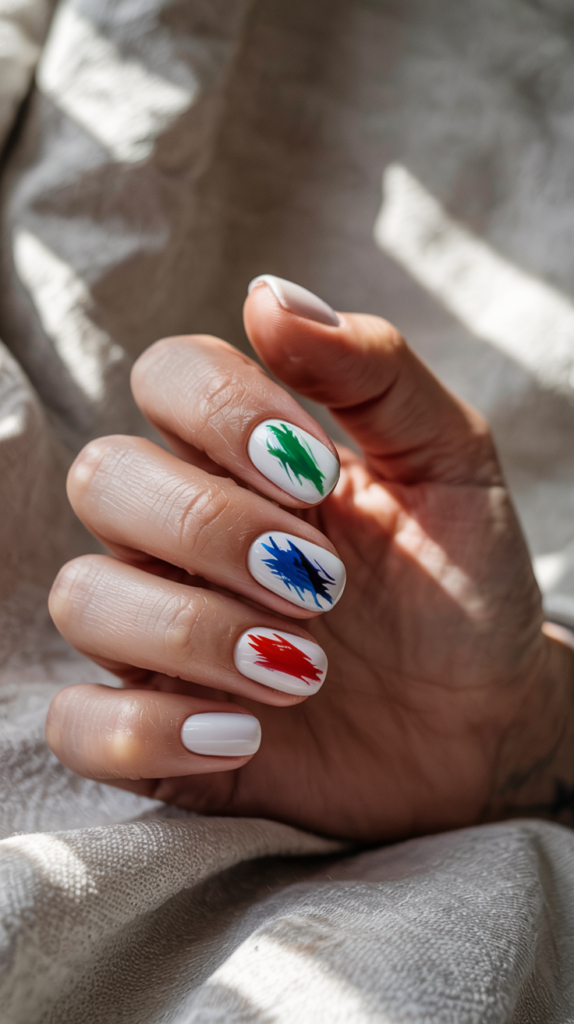
Minimalist white matte nails with a single vivid paintbrush streak on each.
Design Features
Canvas Matte White Nails offer a striking exercise in minimalism and contrast.
The base is a clean, smooth, opaque matte white finish across the entire nail, resembling a blank artist’s canvas.
The defining feature is a single, bold, and often slightly textured streak of vivid color applied across each matte white nail.
This streak is designed to look like a spontaneous swipe of fresh paint from a paintbrush.
The streak might run vertically, horizontally, or diagonally, and its placement can vary slightly from nail to nail for a more dynamic look.
The color of the streak is typically a single, vibrant hue (like electric blue, hot pink, bright orange, or primary red) that contrasts dramatically with the matte white.
The texture of the streak might be slightly raised or show brushstroke marks, enhancing the “fresh paint” illusion.
The overall aesthetic is minimalist, modern, artistic, and focuses on the impact of a single, deliberate mark against a clean background.
How To Achieve This Look
Apply two or three thin coats of an opaque white polish, ensuring a perfectly smooth and even coverage.
Once the white polish is completely dry, apply a high-quality matte top coat over the entire nail and allow it to dry fully.
Choose the vibrant color for the paint streak.
Using a flat nail art brush (or even the regular polish brush, wiped carefully), apply a single, confident streak of the colored polish across the matte white surface.
Apply the streak with enough polish to be opaque in one coat if possible, and allow slight texture or brush marks to remain for authenticity.
Vary the angle or starting point of the streak on different nails if desired.
Let the colored streak dry completely.
Typically, no additional top coat is applied over the streak, allowing it to retain its own finish (usually glossy) and texture, contrasting with the matte white background.
Why This Stands Out
Canvas Matte White Nails stand out for their extreme minimalism combined with a single, bold artistic gesture.
The stark contrast between the pristine matte white canvas and the vibrant paint streak is incredibly impactful and modern.
This style appeals to lovers of minimalist aesthetics who still want a pop of color and an artistic touch.
It feels contemporary, confident, and effortlessly chic.
The design highlights the beauty of the matte white base and elevates a simple streak of color into a deliberate artistic statement.
It’s sophisticated yet simple to execute.
It conveys a sense of clean design sensibilities combined with a flash of creative spontaneity.
This balance of restraint and expression makes it a compelling and stylish choice.
Crayon Scribble Nails

Childlike crayon strokes in messy, vibrant lines for playful, nostalgic art.
Design Features
Crayon Scribble Nails capture the joyful, uninhibited energy of a child’s crayon drawing.
The design features messy, overlapping lines and squiggles in bright, crayon-like colors applied over a base (often white or nude, like paper).
The lines mimic the texture and appearance of wax crayons – they might be slightly uneven in thickness, show some texture, and have a characteristic waxy (often achieved with matte or satin finish) look.
The application is deliberately imperfect and scribbled.
Multiple bright colors are usually used, overlapping and intersecting randomly across the nail, creating a dense tangle of colorful scribbles.
There’s no attempt at forming specific shapes; the focus is on the energetic, uncontrolled linework itself.
The overall aesthetic is playful, nostalgic, vibrant, and intentionally naive.
It celebrates the freedom and raw creativity of childhood art-making.
How To Achieve This Look
Start with a base coat, typically white, off-white, or nude, to resemble paper.
Let it dry/cure completely.
Choose several bright, opaque polishes in crayon-like colors (primary and secondary colors work well).
Using a fine nail art brush (or even a toothpick for a chunkier line), begin drawing messy, scribbled lines across the nail with the first color.
Overlap the lines and let them wander randomly.
Repeat the process with the other chosen colors, layering the scribbles over each other.
Don’t worry about neatness; the messier and more overlapped, the more authentic it looks.
Allow the scribbles to dry thoroughly.
Apply a matte or satin top coat over the entire design to dull the shine and enhance the waxy crayon texture illusion.
Why This Stands Out
Crayon Scribble Nails stand out for their sheer fun, vibrant energy, and nostalgic charm.
They tap into the universal experience of childhood drawing, creating a look that is instantly relatable and cheerful.
This style is perfect for anyone wanting a playful, lighthearted manicure that doesn’t take itself too seriously.
It’s colorful, expressive, and guaranteed to bring a smile.
The intentionally messy and layered look is forgiving and allows for creative freedom.
It celebrates imperfection and spontaneous expression.
It offers a bright and unique alternative to more structured or sophisticated designs, feeling youthful and full of personality.
The connection to childhood creativity gives it a unique emotional resonance.
Frame The Nail Nails
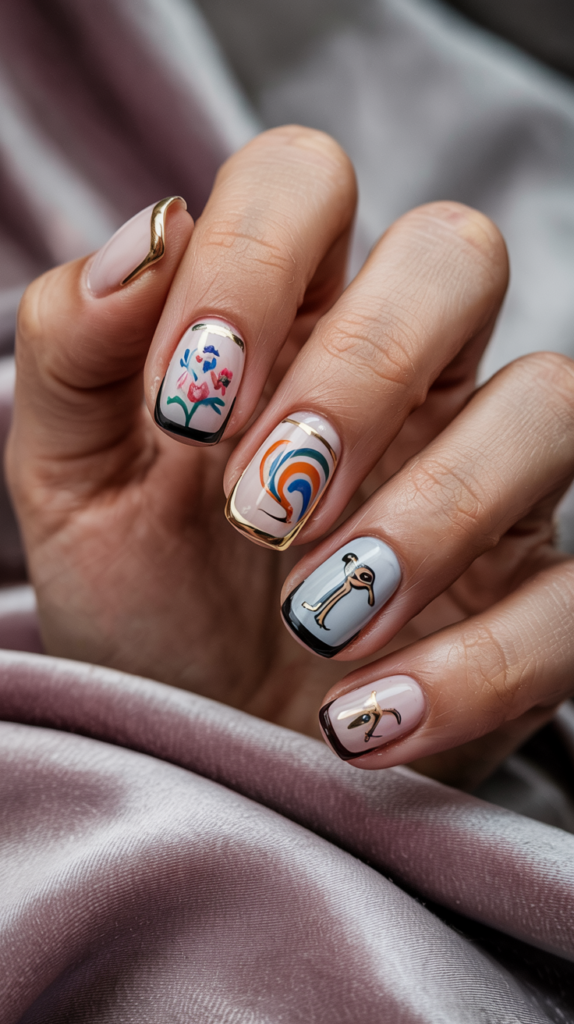
Each nail bordered like a canvas, with a mini artwork framed inside.
Design Features
Frame The Nail Nails treat each individual nail as a miniature canvas, complete with its own painted frame.
The design features a distinct border painted around the perimeter of the nail, mimicking a picture frame.
Inside this frame, a small, detailed piece of nail art is displayed – this could be a tiny landscape, a miniature floral painting, an abstract design, a portrait snippet, or any other intricate motif.
The frame itself can vary in style, from simple solid lines to more ornate, gilded, or wood-grain effects.
The contrast between the frame and the “artwork” inside is key.
The frame defines the space and draws attention to the miniature masterpiece within.
Common frame colors are black, white, gold, silver, or brown for a wood look.
The overall aesthetic is sophisticated, artistic, and cleverly plays with the idea of the nail as a display space.
It highlights the intricacy of the miniature art contained within the frame.
How To Achieve This Look
Apply the base color for the “artwork” area first, or create the miniature artwork directly on the base-coated nail (e.g., paint a tiny floral scene).
Allow this central design to dry/cure completely.
Using striping tape or a fine brush, carefully paint the border around the entire perimeter of the nail to create the frame.
Ensure the lines are clean and connect neatly at the corners.
Choose a frame color and style – a simple black line, a metallic gold, or perhaps attempt a wood grain effect with brown polishes and a dry brush technique within the border area.
Make sure the frame neatly encases the central artwork without overlapping it significantly.
Finish with a top coat to seal both the frame and the miniature art inside.
Why This Stands Out
Frame The Nail Nails stand out for their clever concept and their ability to elevate miniature nail art by presenting it as a formal artwork.
The frame adds a layer of sophistication and intentionality.
This style highlights the skill involved in creating tiny, detailed designs, drawing the eye directly to the artwork within the border.
It appeals to those who appreciate intricate details and artistic presentation.
The frame concept is versatile and can be adapted to suit any type of miniature art, from classic to contemporary.
It feels polished, deliberate, and thoughtfully composed.
It’s a unique way to structure nail art, transforming each finger into a mini gallery display.
Conclusion
This blend of concept, structure, and detailed artistry makes it exceptionally elegant and noteworthy.Nail art is a dynamic and expressive medium, constantly evolving and drawing inspiration from every corner of the creative world.
Whether you prefer the delicate touch of watercolors, the bold energy of abstract expressionism, or the intricate detail of miniature masterpieces, there is an art-inspired nail design to match your personal style and unleash your inner artist.
Embrace your fingertips as tiny canvases and let your creativity shine through.