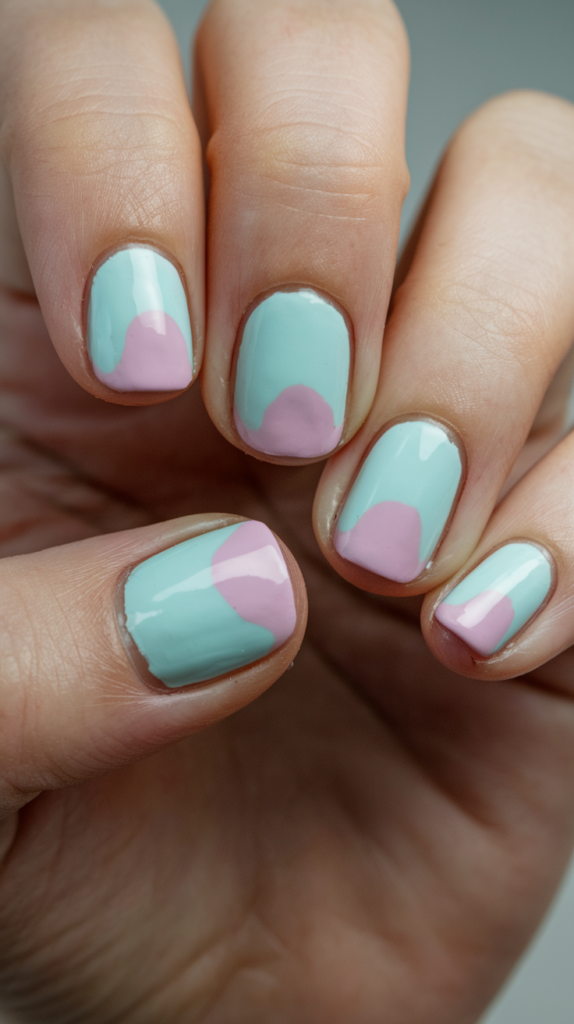
Pastel nail designs are a timeless trend that continues to captivate with their soft, soothing colors and versatility.
Whether you’re looking for a playful design or something more elegant, pastels offer endless possibilities for creativity.
From subtle ombre gradients to whimsical clouds and rainbows, there’s a pastel design for every mood, occasion, and personality.
In this blog post, we’ll explore 35 stunning pastel nail designs that are sure to inspire you, offering detailed techniques, color combinations, and tips to make your nails stand out in the most eye-catching, yet sophisticated way.
Let’s dive into the world of pastel nail art and find the perfect design to brighten up your look!
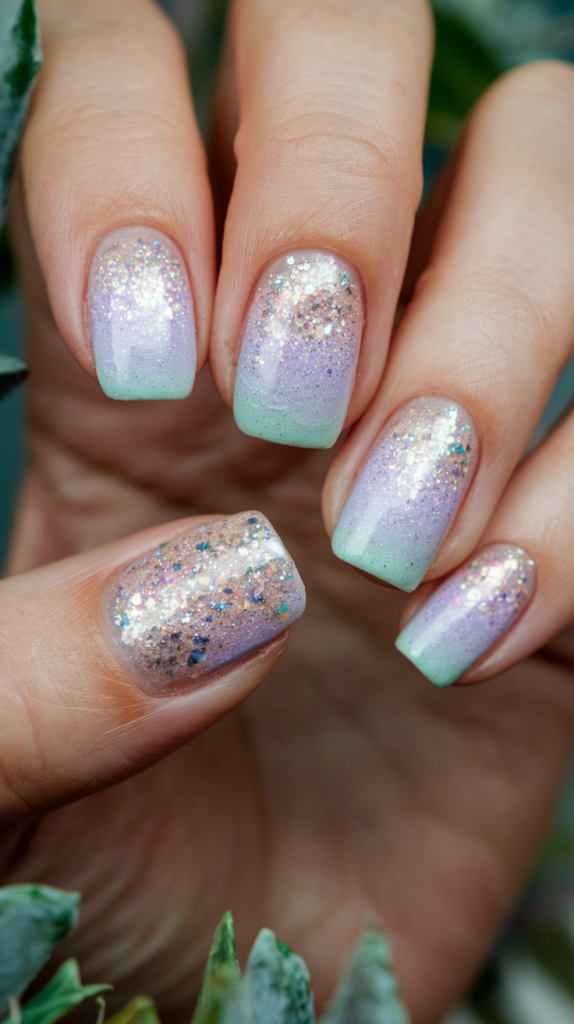
1. Pastel Ombre Gradient Nail Art
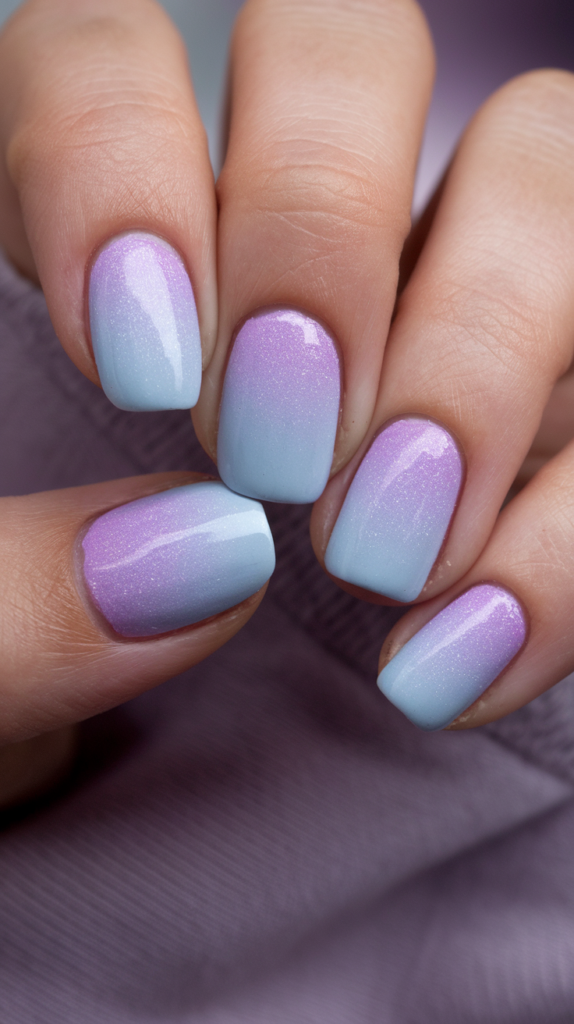
Pastel ombre nails create a dreamy, delicate fade that’s perfect for adding a touch of elegance and playfulness to your look. This soft, gradient design seamlessly blends pastel shades, making it ideal for spring, summer, or any occasion that calls for a light and airy vibe.
What Are Ombre Nail Designs?
Ombre nails are a stylish technique where two or more colors transition seamlessly to form a smooth gradient effect.
The shift from one shade to another can be as subtle or bold as you like, depending on your choice of colors.
With pastel ombre designs, soft hues like pink, lavender, and baby blue are blended to create a gentle, dreamy appearance, adding depth and charm to your nails.
Creating a Soft Pastel Gradient
Step 1: Choose Your Pastel Shades
Pick two or more pastel colors that complement each other, such as pink and lavender or mint green and baby blue.
Step 2: Prepare Your Tools
Use a makeup sponge to achieve a seamless blend across the nail. Ensure the sponge is clean and ready to absorb polish.
Step 3: Apply the Base Colors
Start by painting the lightest shade at the base of the nail and the darkest shade at the tip.
Step 4: Blend with a Sponge
Dab the sponge gently over the nail, blending the colors together with light, tapping motions. This technique creates a smooth, airbrushed finish.
Step 5: Seal the Design
Finish with a clear top coat to enhance the gradient and give your nails a glossy, polished look.
Stunning Pastel Ombre Combinations
- Soft Pink to Lavender: A romantic blend perfect for weddings or special occasions.
- Mint Green to Pale Blue: A refreshing combination reminiscent of a serene spring day.
- Peach to Pastel Yellow: A warm, cheerful gradient ideal for summer.
Experiment with different pairings to match your personal style and mood. Pastel ombre nails are versatile and effortlessly chic, making them a favorite for creating a soft, romantic effect.
Why It Works
Pastel Ombre Gradient Nail Art offers a blend of elegance and playfulness with its seamless color transitions.
The soft, dreamy hues evoke a sense of romance and charm, perfect for complementing seasonal outfits or special events.
The smooth gradient effect adds depth and visual interest to the nails, ensuring they look polished and sophisticated for any occasion.
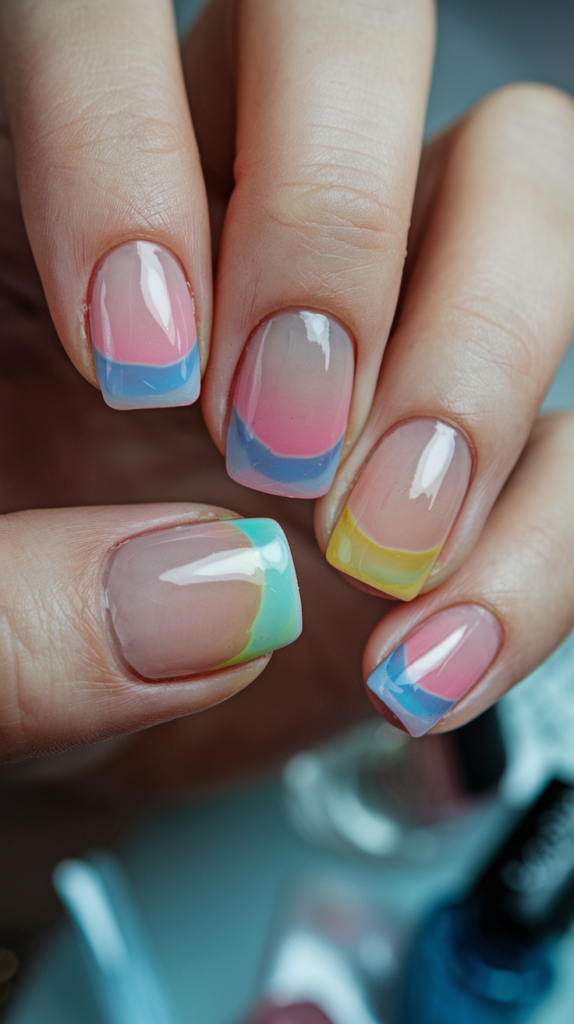
2. Pastel French Tip Nail Art
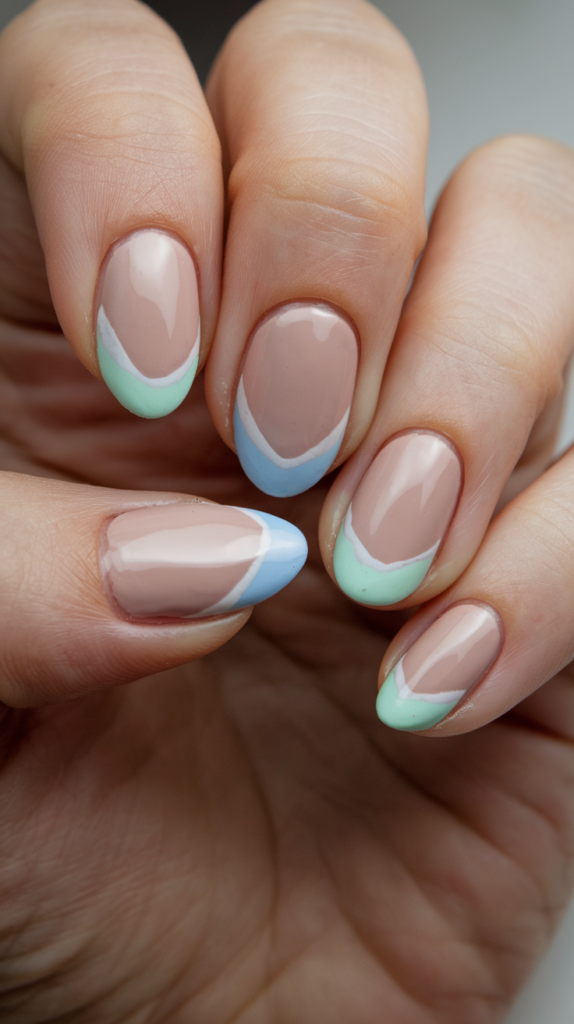
Pastel French tips bring a modern twist to the timeless French manicure. By replacing traditional white tips with soft pastel hues, this chic design balances classic elegance with playful charm, making it perfect for any occasion.
A Fresh Take on French Tips
French tip nails have long been a symbol of sophistication, featuring crisp white tips against a nude or pale pink base.
With a pastel twist, the design becomes both contemporary and vibrant, as classic white is swapped for gentle hues like baby blue, peach, or lavender.
This subtle yet stylish update adds a fresh pop of color while maintaining the clean, polished look of a French manicure.
Choosing the Perfect Pastel Shades
Light and Cool Tones for Serenity
Opt for shades like mint green or soft lilac to create a calming and serene vibe.
Warm and Feminine Hues
Peach and pale pink add a touch of warmth and femininity, perfect for a romantic or classic look.
Playful Combinations
Experiment with alternating pastel shades on each nail or mix colors between hands for a dynamic and fun appearance.
Whether you prefer uniformity or a playful variety, pastel French tips offer endless customization while staying chic and sophisticated.
Styling Pastel French Tips for Any Occasion
For Professional Settings
Stick to neutral pastel tones like blush pink or soft beige for an understated yet elegant look that’s perfect for the office.
For Fun Events
Go bold with brighter pastel shades such as lavender or baby blue, and match them with playful accessories to complete your look.
For Special Occasions
Pair pastel French tips with glitter accents or delicate nail art to elevate the design for weddings, parties, or celebrations.
The versatility of pastel French tips ensures they complement any outfit or event, making them a staple in modern nail design.
Why It Works
Pastel French Tip Nail Art marries timeless elegance with contemporary flair, creating a design that’s both sophisticated and playful.
The soft pastel hues offer a subtle pop of color, making it easy to match with a variety of outfits and occasions.
This updated take on the classic French manicure adds a fresh, modern touch that keeps your nails looking polished and stylish year-round.
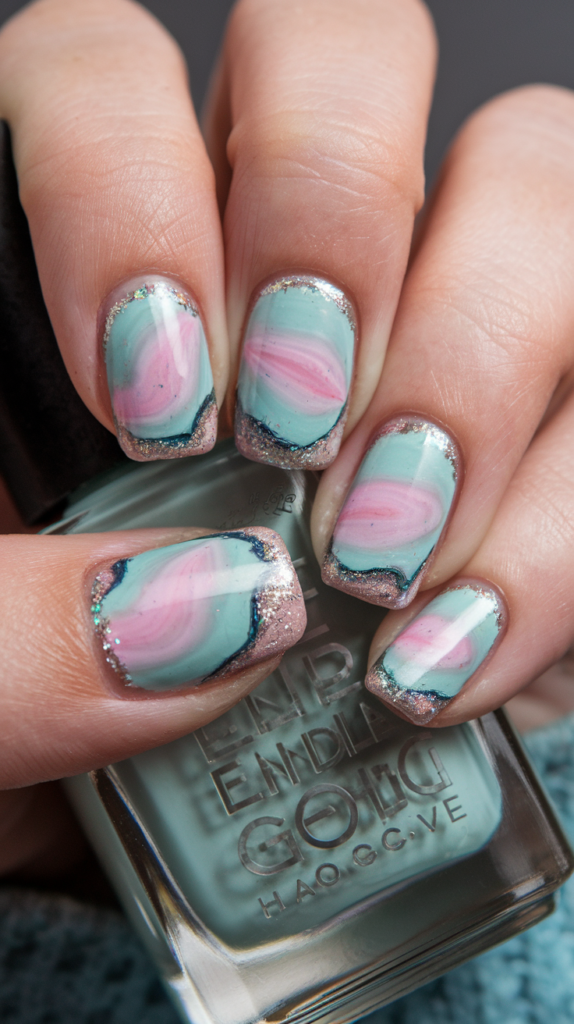
3. Pastel Marble Nail Art
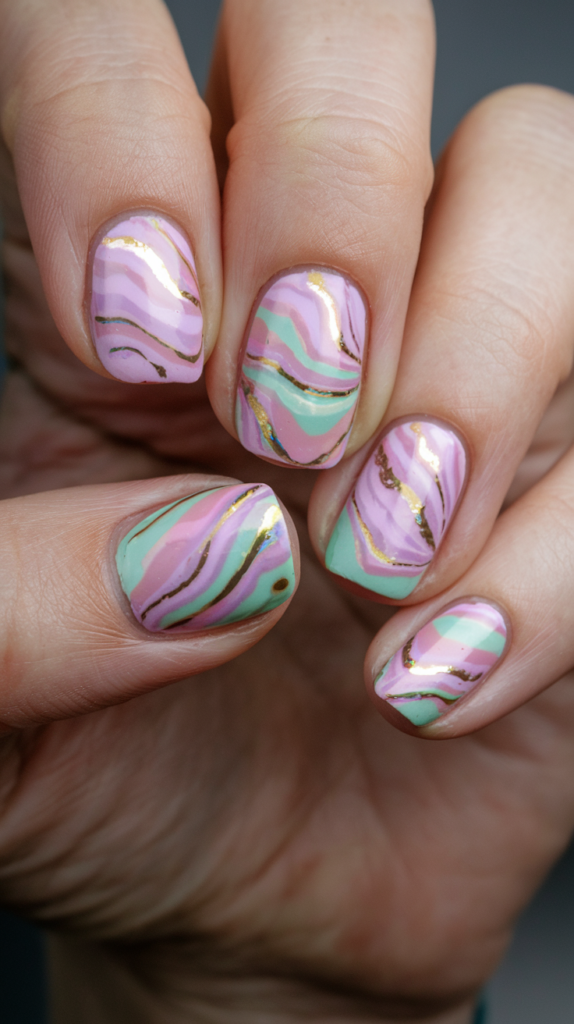
Pastel marble nails bring an elegant and sophisticated touch to your manicure with their soft, swirling patterns that mimic the natural veining of marble stone. This design combines timeless beauty with modern pastel hues, making it perfect for a refined yet trendy look.
Creating the Marble Effect with Pastel Colors
Step 1: Apply a Pastel Base Coat
Start by painting your nails with a light pastel base, such as pale pink or mint green. Allow the base coat to dry completely.
Step 2: Add Drops of Contrast Colors
Place small drops of white or light gray polish randomly across the nail. For added depth, you can include a complementary pastel shade.
Step 3: Swirl the Colors
Use a fine nail art brush or a toothpick to gently swirl the colors together. Work quickly while the polish is still wet to blend the shades seamlessly into a marble-like effect.
Step 4: Let It Dry and Seal
Allow the design to dry fully before finishing with a clear top coat. This step enhances the marbled effect and gives the nails a glossy, polished look.
Perfect Color Combinations for Pastel Marble Nails
- Baby Blue and White: A soft, serene pairing for a fresh, calming effect.
- Blush Pink and Light Gray: Adds a romantic and chic vibe with subtle contrast.
- Lavender and Gold Accents: Perfect for creating a luxurious look with a touch of metallic shimmer.
Experiment with adding metallic swirls or glitter to elevate the design and give your nails a touch of opulence.
Tools and Techniques for Flawless Marble Nails
Precision Tools
Use a thin nail art brush for detailed swirling, allowing better control over the marble patterns.
Abstract Blending
For a more fluid and abstract effect, lightly dab a makeup sponge over the wet polish to blend the colors smoothly.
Seal and Protect
Always finish with a high-gloss clear top coat to seal the design and enhance its polished, professional appearance.
Why It Works
Pastel Marble Nail Art combines the timeless elegance of marble patterns with soft pastel hues for a modern, sophisticated look.
The swirling effect creates depth and visual interest, while the pastel colors add a delicate charm.
With options to include metallic accents or glitter, this design offers versatility and a touch of luxury, making it perfect for both casual and special occasions.
4. Pastel Rainbow Nail Art
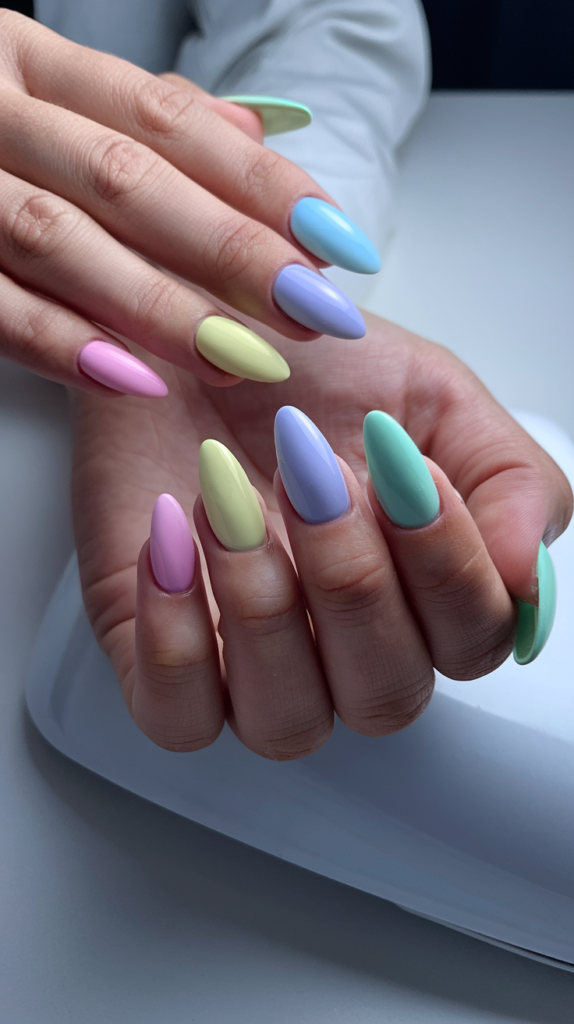
Pastel rainbow nails bring a cheerful and vibrant touch to your manicure, featuring soft hues that create a harmonious gradient across your hands. This playful design is perfect for anyone looking to add a splash of color in a subtle and elegant way.
The Design Breakdown
Pastel rainbow nails are all about painting each nail a different pastel shade, creating a cohesive yet eye-catching spectrum of colors.
Use hues like soft yellow, baby blue, lavender, mint green, and blush pink to achieve a balanced, visually appealing look.
The result is a fun yet refined design that offers a softer take on traditional rainbow nails, making it ideal for any occasion.
Perfect for Summer and Festivals
Pastel rainbow nails are synonymous with summer fun, offering a fresh, airy aesthetic that embodies the carefree energy of the season.
These nails are ideal for outdoor festivals, beach vacations, or casual gatherings, effortlessly complementing floral dresses, denim shorts, or other summer staples.
The light pastel tones are youthful and refreshing, making them a great choice for brightening up your look during sunny days.
Balancing the Colors for a Cohesive Look
Step 1: Choose Your Palette
Select five pastel shades that complement each other, such as pale pink, light yellow, soft blue, lavender, and mint green.
Step 2: Paint Each Nail
Paint each nail a different color to form a soft gradient across your hand.
Step 3: Alternate for Extra Fun
For a playful twist, alternate the color order on your other hand to create a dynamic and whimsical effect.
Step 4: Add a Glossy Finish
Seal your design with a clear, glossy top coat to enhance the colors and give your nails a polished, vibrant look.
Why It Works
Pastel Rainbow Nail Art is a perfect mix of playfulness and sophistication, offering a colorful design without being overwhelming.
The soft, harmonious hues are visually appealing, versatile, and easy to pair with any summer wardrobe.
Whether you’re heading to a festival, beach, or a casual outing, these nails will add a cheerful pop of color and elevate your seasonal style.
5. Matte Pastel Nail Art
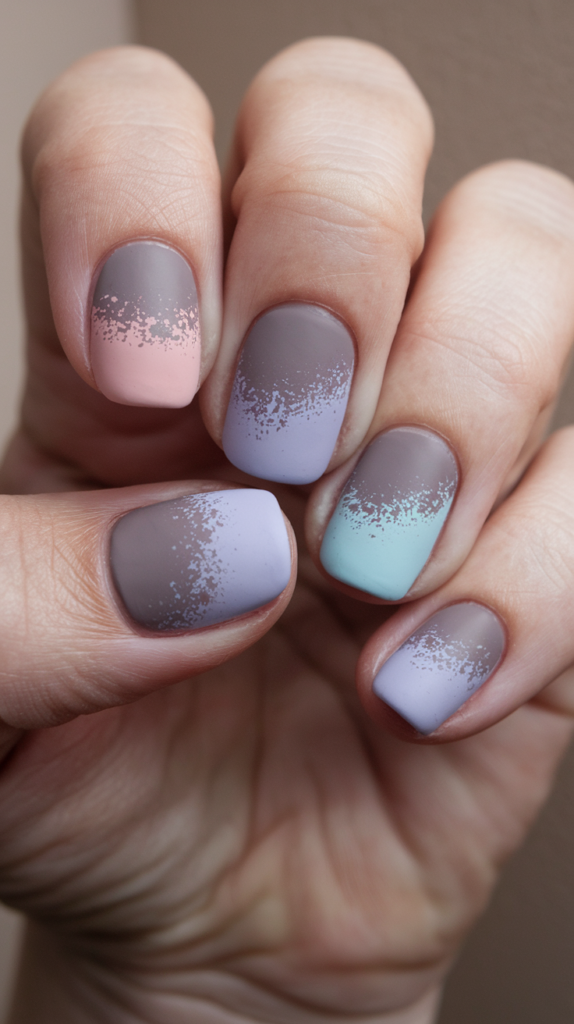
Matte pastel nails combine the softness of pastel colors with the modern sophistication of a matte finish. This velvety look is perfect for those who want a chic yet understated manicure that works for any occasion.
Why Matte Finishes Elevate Pastel Shades
The sleek, non-glossy texture of matte nails offers a contemporary take on traditional pastel manicures.
Pastel shades like blush pink, baby blue, and mint green take on a luxurious, velvety appearance when paired with a matte topcoat, enhancing their soft, sophisticated charm.
The matte effect tones down the shine while preserving the vibrancy of the colors, resulting in an elegant and versatile design.
Best Pastel Colors for a Matte Look
- Soft Lavender: A timeless shade that exudes calmness and elegance.
- Light Peach: A warm, cheerful color perfect for adding a subtle pop to your nails.
- Powder Blue: A cool, serene hue that looks stunning with a muted finish.
These shades strike the perfect balance between vibrancy and subtlety, making them ideal for everyday wear or special occasions.
Steps to Achieve the Perfect Matte Pastel Manicure
Step 1: Apply Your Base Color
Choose a pastel polish and apply it evenly to each nail. Allow it to dry completely.
Step 2: Add the Matte Topcoat
Use a matte topcoat and apply it evenly across each nail. Ensure smooth application for a streak-free, velvety finish.
Step 3: Incorporate Designs for Extra Flair
If desired, add matte pastel accents such as stripes, polka dots, or geometric shapes using a nail art brush or stencil. These details will stand out beautifully against the soft matte background.
Step 4: Seal and Protect
Let the matte topcoat dry completely to lock in the design and ensure a long-lasting finish.
Why It Works
Matte Pastel Nail Art offers a unique blend of modern minimalism and timeless elegance.
The velvety texture of the matte finish enhances the softness of pastel hues, creating a manicure that feels refined and versatile.
Whether you choose a single color or incorporate intricate designs, matte pastel nails are perfect for expressing understated sophistication with a contemporary twist.
6. Pastel Polka Dot Nail Art
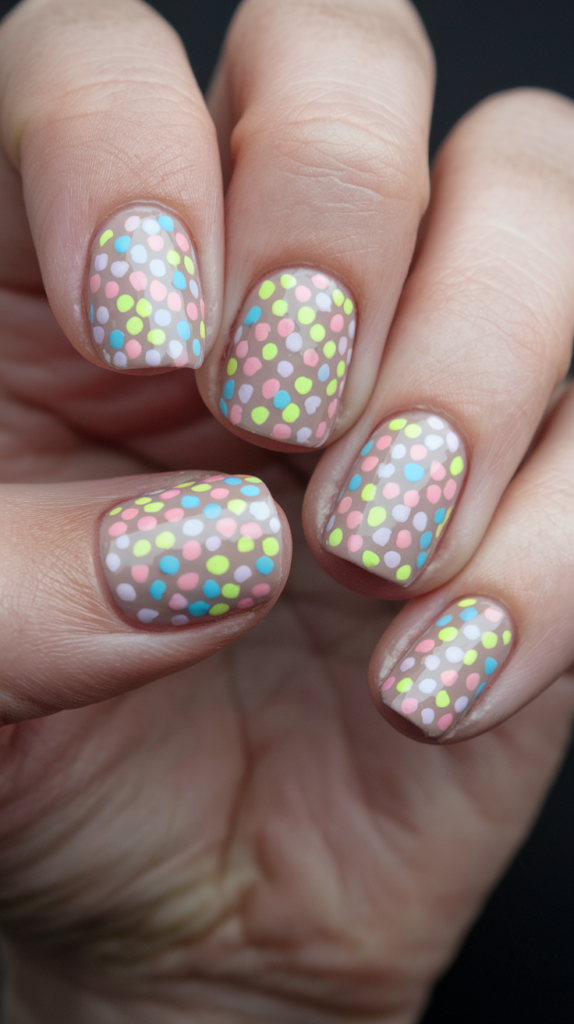
Pastel polka dot nails combine retro charm with a modern twist, creating a playful and stylish manicure. The use of soft pastel hues makes this design versatile, fun, and perfect for any season or occasion.
Creating Polka Dots on a Neutral Base
Start by applying a neutral base color like white, pale beige, or soft pink to provide a clean backdrop for your pastel polka dots.
Use a dotting tool to apply pastel dots in shades such as mint green, lavender, or blush pink.
For a contemporary look, vary the size and placement of the dots to form an organic, random pattern that adds a fresh and artistic touch.
Achieving Evenly Spaced and Precise Dots
Step 1: Use a Dotting Tool
Dip the dotting tool into your pastel polish and press gently onto the nail to create uniform dots.
Step 2: Maintain Consistent Pressure
Apply even pressure to ensure the dots are consistently round and well-formed.
Step 3: Practice Placement
Before applying the design to your nails, practice dot placement on a piece of paper to perfect your technique.
Alternative Tools: If you don’t have a dotting tool, try using a bobby pin, toothpick, or the end of a makeup brush for a similar effect.
Combining Multiple Pastel Shades for a Unique Look
- Gradient Polka Dots: Create a transition of pastel dots from light pink to lavender for a subtle ombre effect.
- Alternating Colors: Use different pastel shades for dots on each nail, alternating colors for a dynamic and vibrant look.
- Clustered Dots: Arrange dots in small clusters for a playful, abstract pattern.
These techniques add depth and dimension to your polka dot design, giving it a unique and personalized feel.
Final Touch: Topcoat for a Polished Finish
Once the polka dots are dry, seal the design with a clear topcoat to protect the pattern and enhance its vibrancy. A glossy finish will give your nails a polished, professional appearance.
Why It Works
Pastel Polka Dot Nail Art combines the timeless appeal of polka dots with the softness of pastel shades, resulting in a design that’s playful yet sophisticated.
The flexibility of this design allows for endless customization, from gradient effects to multi-color combinations.
With its retro-meets-modern aesthetic, this manicure is perfect for adding a pop of charm and creativity to your look.
7. Pastel Glitter Accent Nail Art
Pastel glitter accent nails combine the softness of pastel hues with a touch of sparkle for an elegant yet glamorous design. This subtle addition of glitter enhances the overall look, making it perfect for special occasions or when you want to add a hint of luxury to your manicure.
Why Glitter Accents Elevate Pastel Nails
Glitter accents provide a dazzling contrast to the soft tones of pastel nails, adding sparkle and dimension without overpowering the design.
The shimmering effect draws attention to the nails while maintaining the delicate elegance of pastel shades.
Whether applied to one or two nails for a bold accent or lightly scattered across all nails for a subtle touch, glitter transforms the manicure into a sophisticated and eye-catching look.
How to Create Pastel Glitter Accents
Step 1: Apply a Pastel Base Color
Paint all your nails with your chosen pastel shade, such as blush pink, mint green, or lavender. Let the base coat dry completely.
Step 2: Choose Accent Nails
Select one or two nails to feature the glitter accent. These could be the ring finger and thumb for a balanced look.
Step 3: Apply Glitter Polish
Using a fine glitter polish, carefully apply a thin coat to the selected nails. Focus on:
- The tips or cuticle area for a gradient effect.
- Covering the entire nail for a bold glitter accent.
Step 4: Seal with a Topcoat
Allow the glitter to dry, then finish with a clear topcoat to enhance shine and protect the glitter from chipping. This step ensures a polished and professional look.
Choosing the Perfect Glitter for Pastel Nails
- Classic Metallics: Light gold or silver glitter pairs beautifully with most pastel shades, adding a touch of sophistication.
- Pastel Glitter: Try glitter in shades like pale pink, baby blue, or lavender for a playful and harmonious look.
- Holographic or Iridescent: These options shift colors with the light, creating a magical and dynamic effect that complements the softness of pastels.
Why It Works
Pastel Glitter Accent Nail Art blends the gentle charm of pastel colors with the captivating sparkle of glitter, creating a manicure that is both subtle and glamorous.
The glitter accents catch the light beautifully, drawing attention without overwhelming the softness of the design.
This versatile style is perfect for elevating everyday nails or adding a refined touch to your look for special events.
8. Pastel Floral Nail Art
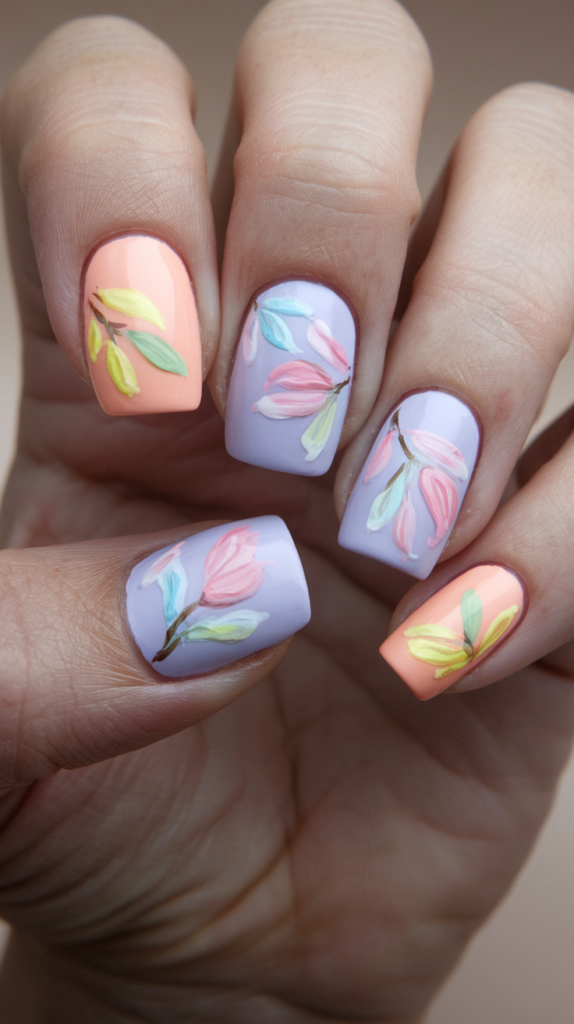
Pastel floral nails bring delicate and feminine charm to your manicure, making them a timeless choice for any season. Whether you prefer minimal designs or intricate arrangements, pastel floral nail art offers endless opportunities to showcase elegance and creativity.
Step-by-Step Guide to Painting Pastel Flowers
Step 1: Apply a Pastel Base Color
Start by painting your nails with a light pastel base, such as blush pink or mint green. Allow the base coat to dry completely.
Step 2: Paint the Flower Centers
Using a fine nail art brush or dotting tool, create small dots in a circular pattern to form the center of each flower. Choose a contrasting pastel shade, such as soft yellow or lavender.
Step 3: Add Petals
Draw petal shapes around the center dots using a fine brush. Keep the petals simple and small for a delicate appearance.
Step 4: Create Floral Arrangements
For a minimalist look, paint one flower on each nail. For a more intricate design, add multiple flowers and include tiny leaves in complementary shades.
Step 5: Seal the Design
Once the floral patterns are dry, finish with a clear, glossy topcoat to protect the design and add a polished finish.
Popular Floral Patterns for Pastel Tones
- Delicate Roses: Soft and romantic, these look stunning in pastel pinks and peaches.
- Daisies: Simple yet charming, daisies in white and yellow are perfect for a cheerful design.
- Cherry Blossoms: Light pink cherry blossoms paired with a pale blue base create a serene and feminine look.
- Abstract Florals: Blend multiple pastel shades for a watercolor-like effect, giving your nails a modern and artistic vibe.
To keep the design balanced, consider painting floral patterns on just a few nails while leaving the rest in a solid pastel shade.
Pairing Floral Accents with Solid Pastel Bases
For a cohesive look, select pastel shades that complement each other.
- A blush pink base pairs beautifully with white or lavender floral accents.
- A pale blue base looks stunning with peach or yellow flowers.
Keep the rest of the nails simple with solid pastel shades to allow the floral designs to stand out. Finish the look with a glossy topcoat to enhance the soft, feminine appeal.
Why It Works
Pastel Floral Nail Art combines the timeless beauty of floral patterns with the gentle charm of pastel hues, creating a design that is elegant and versatile.
The delicate flowers add a touch of romance, while the soft pastel tones keep the overall look light and sophisticated.
Whether for weddings, springtime outings, or everyday wear, this manicure exudes effortless grace and beauty.
9. Pastel Striped Nail Art
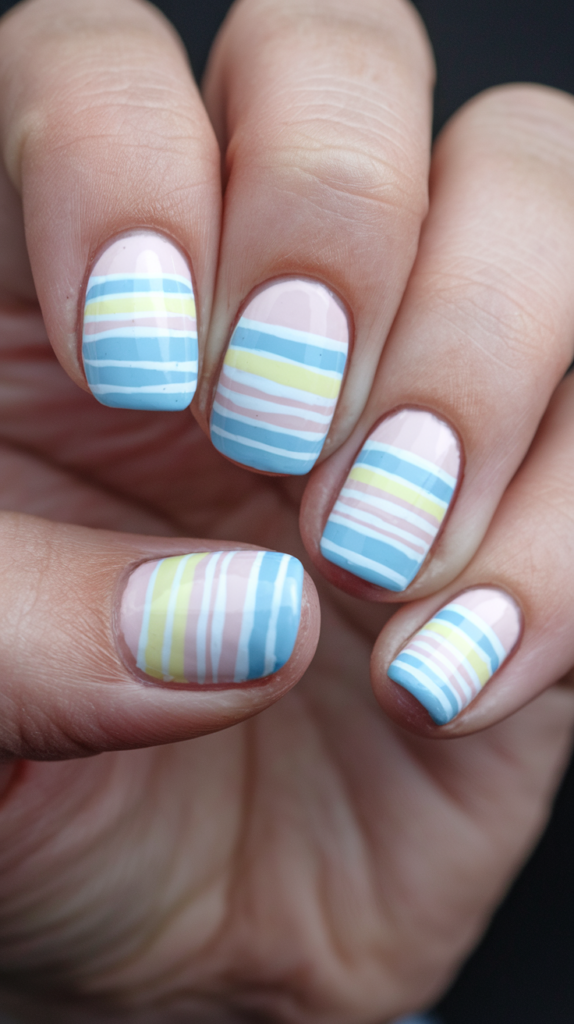
Pastel striped nails combine clean, precise lines with soft, eye-catching hues, creating a design that’s both modern and versatile. Whether you prefer subtle elegance or playful boldness, pastel stripes add a polished touch to any manicure.
Creating Horizontal or Vertical Stripes with Pastel Shades
Step 1: Choose Your Colors
Select two or more pastel shades that complement each other, such as pastel pink and lavender or mint green and pale yellow.
Step 2: Apply the Base Color
Paint a light pastel shade as the base color across all nails. Let it dry completely before proceeding.
Step 3: Use Striping Tape
Place thin striping tape on the nails to outline the areas where you want the stripes. Ensure the tape adheres smoothly to prevent polish from seeping underneath.
Step 4: Add the Stripes
Apply your second pastel color within the taped sections, filling in the lines carefully to maintain clean edges. For diagonal or multicolored stripes, repeat this process for each color.
Step 5: Reveal the Stripes
Once the polish has dried, gently peel off the striping tape to reveal sharp, clean lines. Finish with a clear topcoat to protect the design and add a glossy finish.
Tools for Achieving Perfect Stripes
- Striping Tape: The easiest way to create sharp, even lines. Available in nail art kits or as thin strips of regular tape.
- Fine Nail Art Brush: Ideal for freehand painting thinner lines. Requires a steady hand and patience.
- Topcoat: Essential for sealing the design and adding a polished finish.
Allow each layer of polish to dry fully before moving to the next step to avoid smudging and ensure clean lines.
Best Pastel Color Pairings for Striped Nails
- Soft and Subtle: Pair pastel pink with lavender or mint green for an understated look.
- Playful and Bold: Combine pastel yellow with baby blue or soft peach for a vibrant design.
- Multicolored Stripes: Use three or more pastel shades to create a fun, candy-striped effect. Alternate the colors for added visual interest.
Experiment with horizontal, vertical, or diagonal stripes to customize your design and make it uniquely yours.
Why It Works
Pastel Striped Nail Art balances clean, precise lines with the softness of pastel tones, creating a manicure that is both elegant and versatile.
The customizable nature of stripes allows for endless creativity, from simple two-color combinations to multicolored patterns.
This design is perfect for adding a modern, polished touch to your look, whether you’re heading to a casual outing or a special event.
10. Pastel Swirl Nail Art
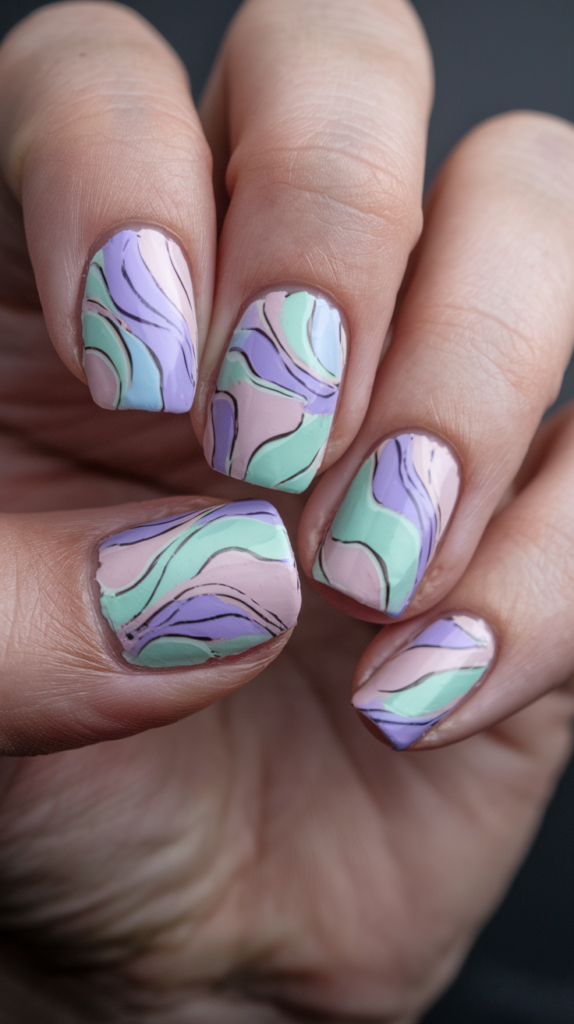
Pastel swirl nails are an artistic and abstract take on nail design, blending soft, flowing lines with gentle pastel shades for a look that’s both playful and sophisticated.
Perfect for any season, this creative design lets you showcase your individuality with a touch of elegance.
How to Create Abstract Pastel Swirls
Step 1: Start with a Pastel Base
Apply a solid pastel base color, such as baby blue or pale pink, to all your nails. Let the base coat dry completely.
Step 2: Add the First Swirl Layer
Using a thin nail art brush, paint curved lines or wave patterns in a contrasting pastel shade, such as lavender or mint green. Ensure the swirls flow smoothly and naturally across the nail.
Step 3: Layer Additional Swirls
Add more swirls in different pastel shades, such as soft yellow or peach, to create depth and dimension. Allow each layer to dry before adding the next to prevent smudging.
Step 4: Seal the Design
Finish with a clear topcoat to protect your design and give the nails a polished, glossy finish.
Mixing and Matching Pastel Shades for Swirls
- Complementary Combos: Pair pastel pinks, blues, and yellows for a harmonious look.
- Dynamic Contrasts: Mix shades like lavender, mint green, and peach for bold yet cohesive swirls.
- Multicolored Magic: Use different pastel combinations on each nail for a vibrant and unique design.
Experiment with layering and overlapping shades to create depth, making the swirls appear more dynamic and visually appealing.
Ideal Occasions for Pastel Swirl Nails
- Spring and Summer Events: These nails are perfect for festivals, beach outings, or casual gatherings, adding a light and playful touch to your look.
- Everyday Wear: The soft pastel palette and abstract design make them subtle enough for daily wear.
- Creative Showcases: Perfect for when you want to express your artistic side with a chic, standout manicure.
Why It Works
Pastel Swirl Nail Art is the perfect balance of fun and sophistication, combining soft colors with artistic, flowing lines for a dynamic and creative look.
The abstract design stands out without being overpowering, making it a versatile choice for any occasion.
With its playful yet refined aesthetic, this manicure is a stylish way to showcase your creativity and embrace the charm of pastel tones.
11. Pastel Heart Nail Art
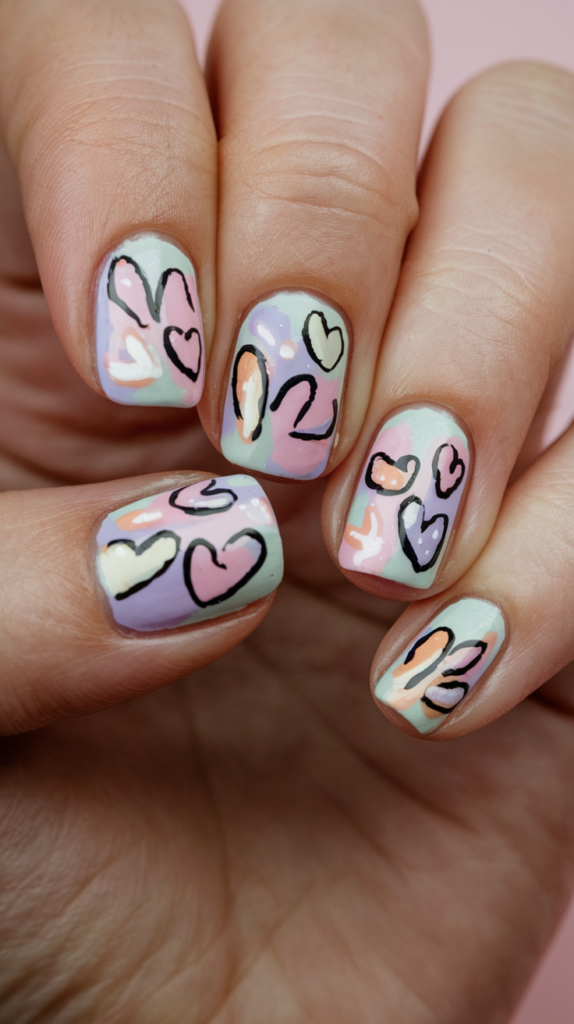
Pastel heart nails are a sweet and simple design that combines the softness of pastel tones with the classic charm of heart shapes. This romantic manicure is perfect for showcasing your playful, creative side while keeping the look elegant and subtle.
Guide to Painting Tiny Pastel Hearts
Step 1: Apply a Pastel Base Color
Start by painting your nails with a light pastel base, such as pale pink or lavender. Allow the base to dry completely.
Step 2: Create the Hearts
Use a fine nail art brush or a dotting tool to paint small hearts in a contrasting pastel shade, such as baby blue or mint green.
- Begin by placing two small dots close together.
- Use the brush to connect the dots at the bottom, forming the point of the heart.
For variety, paint a single heart on each nail or add multiple hearts in different sizes for a playful effect.
Step 3: Finish with a Topcoat
Let the design dry and seal it with a glossy topcoat to protect the hearts and give the nails a polished, smooth finish.
Ideal Base Colors for Showcasing Pastel Hearts
- Blush Pink or Nude: These soft, neutral tones make pastel hearts in shades like baby blue, mint green, or soft yellow stand out beautifully.
- Lavender or Peach: Slightly darker pastel bases allow lighter-colored hearts, such as white or pale pink, to pop for a visually striking effect.
Experiment with contrasting shades to create a balanced and cohesive look that highlights the heart designs.
Tips for Evenly Placing Heart Designs
Plan Your Placement: Use a dotting tool to lightly mark where each heart will go before painting to ensure balanced spacing.
Structured Patterns: Place hearts in a grid-like pattern for a clean, organized design.
Random Placement: Scatter hearts across the nails for a whimsical and fun appearance.
Sealing the design with a topcoat ensures durability and enhances the glossy, professional look of the manicure.
Why It Works
Pastel Heart Nail Art blends timeless romance with soft pastel hues for a design that is both playful and elegant.
The hearts add a touch of sweetness, while the pastel tones keep the look delicate and versatile for any occasion.
This manicure is perfect for celebrating love, adding charm to your everyday style, or elevating your nails for special events.
12. Pastel Geometric Nail Art
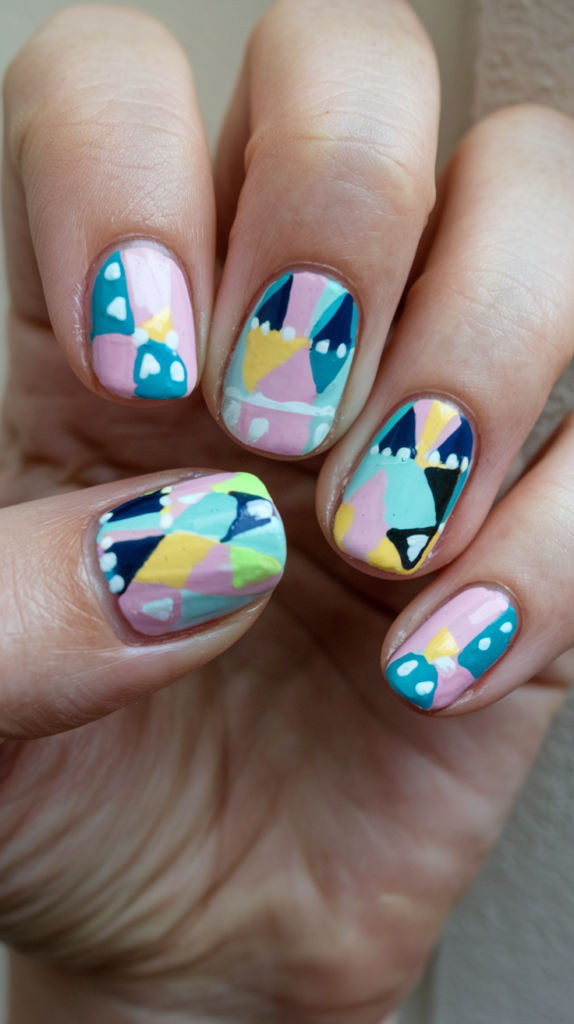
Pastel geometric nails bring a sleek, modern vibe to your manicure with their clean lines and bold shapes. Paired with soft pastel hues, this design strikes the perfect balance between contemporary minimalism and playful elegance.
Introduction to Geometric Designs with Pastels
Geometric nail art features sharp shapes like triangles, squares, and lines, offering a clean, bold look.
Using pastel shades such as baby blue, mint green, or soft peach on a neutral or white base creates a fresh and modern aesthetic.
The combination of pastel colors with geometric shapes results in a stylish, minimalistic manicure that suits any occasion.
Tips for Maintaining Clean Lines in Geometric Shapes
Step 1: Use Striping Tape
Apply striping tape to outline the shapes you want to create, such as triangles or squares. This ensures sharp, precise edges.
Step 2: Fill in the Shapes
Paint your chosen pastel polish within the taped areas, keeping the application smooth and even.
Step 3: Remove the Tape
Carefully peel off the tape while the polish is still wet to reveal crisp, clean lines.
Step 4: Freehand Techniques
For more intricate designs, use a fine nail art brush to paint geometric shapes freehand. Patience and a steady hand are key to achieving precision.
Best Pastel Shades for Geometric Designs
- Baby Blue and Mint Green: Fresh and calming, perfect for a soft, minimalistic look.
- Soft Peach and Lavender: Warm and inviting, ideal for adding a touch of elegance.
- Metallic Accents: Incorporate thin gold or silver lines for an elevated, sophisticated effect.
Pair these shades with a white or nude base to allow the pastel tones and geometric shapes to stand out while keeping the design clean and modern.
Customizing Geometric Designs for Your Style
- Experiment with different shapes, such as overlapping triangles or intersecting lines, to create unique patterns.
- Add a matte topcoat for a velvety finish or a glossy topcoat for a polished, high-shine effect.
- Try incorporating negative space by leaving sections of the nail unpainted for a more contemporary twist.
Why It Works
Pastel Geometric Nail Art combines clean, structured designs with soft pastel hues, creating a look that’s both modern and approachable.
The versatility of geometric patterns allows you to customize the design to fit your personal style, from minimalistic to bold.
With its sleek lines and playful colors, this manicure is perfect for anyone who loves sophisticated nail art with a creative, pastel touch.
13. Pastel Confetti Dot Nail Art
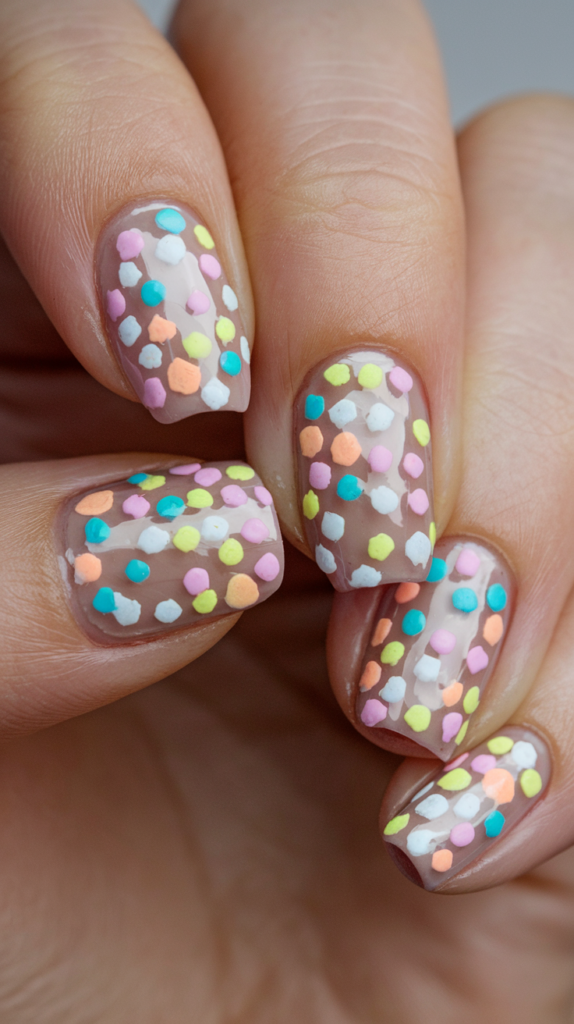
Pastel confetti nails are a fun and festive design, perfect for adding a touch of celebration and whimsy to your manicure. With their scattered, playful dots in a mix of pastel hues, this design is both vibrant and easy to create.
How to Create a Confetti Pattern with Pastel Dots
Step 1: Apply a Pastel Base Color
Start by painting your nails with a light pastel base, such as pale pink or mint green. Let the base coat dry completely.
Step 2: Add the Confetti Dots
Use a dotting tool to apply small dots in various pastel shades, such as lavender, peach, and baby blue.
- Randomly scatter the dots across each nail to create an organic, confetti-like pattern.
- Vary the placement to make the design feel dynamic and playful.
Step 3: Seal the Design
Finish with a clear topcoat to enhance the colors and protect the design, giving your nails a glossy, polished finish.
Using Dot Size Variations for a Unique Effect
- Large Dots: Use a larger dotting tool or the tip of a makeup sponge for bold, prominent dots.
- Small Dots: A smaller dotting tool or toothpick can create delicate, intricate dots.
- Mix Sizes: Combine large and small dots on each nail for a dynamic, multi-dimensional confetti effect.
To add extra flair, include a few shimmering or glittery dots among the pastel colors for a subtle sparkle.
Combining Confetti Dots with Other Designs
- Gradient Base with Confetti: Paint one or two nails with a pastel gradient and scatter confetti dots over the gradient for added depth.
- Geometric Twist: Use confetti dots within outlined geometric shapes, blending playful and structured design elements.
- Accent Nail Design: Add confetti dots to just one or two nails, leaving the others solid pastel for a chic, balanced look.
These combinations make the design versatile, allowing you to personalize it to suit your style and creativity.
Why It Works
Pastel Confetti Dot Nail Art is the perfect blend of fun and elegance, offering a playful yet refined design that’s full of color and movement.
The scattered dots create a dynamic, celebratory effect that’s ideal for parties, festivals, or brightening up your everyday look.
With endless customization options, this manicure is a versatile choice for expressing your creativity while embracing the charm of pastel hues.
14. Pastel Galaxy Nail Art
Pastel galaxy nails offer a mystical and ethereal twist on the popular galaxy nail trend. By blending soft hues like lavender, pale blue, and pink, this design captures the beauty of the cosmos in a delicate and feminine way, perfect for those who want a touch of magic in their manicure.
The Pastel Galaxy Trend Explained
Galaxy nails evoke the wonder of the universe with swirling nebulas and twinkling stars.
Using pastel colors softens the traditional look, replacing dark, bold shades with dreamy tones like baby blue, mint green, and soft pink.
This design is ideal for creating a mystical, otherworldly effect without the intensity of darker hues, making it versatile and wearable.
Step-by-Step Guide to Pastel Galaxy Nails
Step 1: Apply a Pastel Base Color
Start with a light pastel base, such as pale pink or baby blue. Let it dry completely.
Step 2: Create Cloud-Like Patterns
Using a makeup sponge, dab small amounts of white polish onto the nails to form soft, cloudy shapes. This will serve as the base for your galaxy.
Step 3: Add Pastel Nebulas
Layer pastel shades like lavender, mint green, and light yellow over the white. Use the sponge to blend the colors together, creating a smooth, nebula-like effect.
Step 4: Add Stars
Use a fine brush or dotting tool to paint tiny white dots across the nails, mimicking stars. For a cosmic touch, vary the size of the dots.
Step 5: Seal with a Glitter Topcoat
Finish with a glitter topcoat to add shimmer, creating the illusion of a starry night sky. This step enhances the ethereal quality of the design.
Enhancing the Design with Star Decals and Accessories
- Star and Moon Decals: Place celestial decals strategically across the nails for added dimension and detail.
- Rhinestones: Use small rhinestones to represent twinkling stars, adding a luxurious touch to the design.
- Holographic Glitter: Sprinkle holographic glitter to give the nails a magical, dynamic glow that changes with the light.
These accessories bring the pastel galaxy nails to life, making them feel even more enchanting and captivating.
Why It Works
Pastel Galaxy Nail Art combines the wonder of the cosmos with the softness of pastel hues, creating a look that’s both mystical and elegant.
The swirling patterns and shimmering details capture the ethereal beauty of galaxies, while the pastel tones make the design versatile and wearable.
Perfect for special occasions or everyday magic, this manicure is a stylish way to showcase your creativity and love for the universe.
15. Pastel Chevron Nail Art
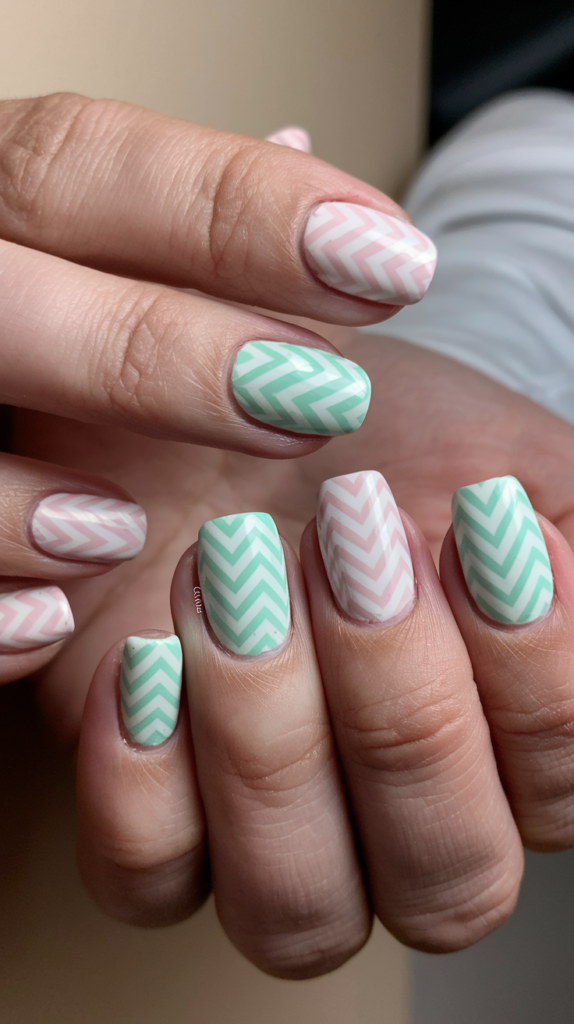
Pastel chevron nails bring a touch of zig-zag elegance to your manicure, blending bold geometric patterns with soft pastel hues.
This chic and stylish design is perfect for showcasing creativity while maintaining a sophisticated look.
How to Create Zig-Zag Chevron Stripes with Pastel Colors
Step 1: Apply a Pastel Base Color
Start with a light pastel base, such as pale pink or mint green. Allow the base coat to dry completely.
Step 2: Outline the Chevron Pattern
Use striping tape or chevron nail stencils to create the zig-zag pattern on each nail. Ensure the tape or stencils are securely adhered for clean, sharp lines.
Step 3: Apply the Second Pastel Color
Paint a contrasting pastel shade, such as lavender or soft peach, within the outlined chevron areas. Use smooth, even strokes to avoid smudging.
Step 4: Reveal the Chevron Stripes
Carefully remove the tape or stencils while the polish is still wet to reveal crisp, precise chevron lines.
Step 5: Seal the Design
Finish with a clear topcoat to enhance the colors and protect the design, giving your nails a polished, professional look.
Why Chevron Patterns Pair Perfectly with Pastels
The bold geometry of chevron stripes is softened by the gentle tones of pastel colors, creating a balanced and harmonious design.
Pastel chevron patterns add a playful yet elegant twist to a classic geometric look, making them suitable for both casual and formal occasions.
The clean, zig-zag lines combined with soft shades create a versatile manicure that pairs well with any outfit or event.
Tips for Perfecting the Chevron Pattern
- Use Stencils or Tape: Chevron nail stencils or striping tape ensure sharp, even lines with minimal effort.
- Work Slowly: Take your time when applying the second color to prevent smudges or uneven edges.
- Freehand Precision: If painting freehand, use a fine nail art brush and outline the zig-zag pattern carefully. Practice on a surface like paper or a practice nail first for the best results.
- Let Each Layer Dry: Ensure each layer of polish is fully dry before applying tape or additional colors to avoid damaging the base.
Why It Works
Pastel Chevron Nail Art combines the boldness of geometric patterns with the softness of pastel tones for a look that is both stylish and approachable.
The sharp zig-zag lines create a dynamic and visually striking effect, while the pastel palette keeps the design elegant and versatile.
Whether for everyday wear or special occasions, this manicure is a fun and sophisticated way to add a pop of pastel charm to your nails.
16. Pastel Watercolor Nail Art

Pastel watercolor nails bring the soft, artistic beauty of watercolor painting to your manicure. This delicate design blends pastel hues seamlessly for a dreamy and abstract effect, perfect for those who love a creative and elegant look.
Steps to Achieve a Watercolor Effect with Pastel Polishes
Step 1: Apply a Base Color
Start with a white or very light pastel base, such as pale pink or mint green, to create a clean canvas. Allow the base to dry completely.
Step 2: Prepare Your Pastel Shades
Choose two or more pastel shades, such as soft pink, lavender, and pale blue. For a translucent effect, mix each polish with a bit of clear topcoat or acetone to thin it out.
Step 3: Dab and Blend the Colors
Use a thin nail art brush or a makeup sponge to lightly dab the pastel colors onto the nail. Blend the colors together while they are still wet, using light tapping motions to create a smooth, fluid effect.
Step 4: Refine the Design
If needed, go back with a clean brush or sponge dipped in clear topcoat to blend any harsh edges and enhance the watercolor effect.
Step 5: Seal the Look
Once the design is dry, finish with a clear topcoat to protect the design and add a glossy finish.
Techniques for Seamless Color Blending
- Use a Makeup Sponge: A sponge allows for gentle blending, creating soft transitions between colors.
- Light Tapping Motions: Avoid pressing too hard; gentle taps help the colors merge naturally.
- Layer and Blend: Apply one color at a time, blending each layer before adding the next to maintain a cohesive look.
Popular Color Combinations for Pastel Watercolor Nails
- Spring Freshness: Soft pink, lavender, mint green, and pale blue.
- Romantic Elegance: Blush pink, peach, and soft yellow.
- Dynamic Abstract: Combine multiple shades, such as pastel purple, aqua, and light coral, for a vibrant, artistic effect.
Experiment with these combinations to create a design that reflects your style and the season.
Why It Works
Pastel Watercolor Nail Art captures the fluid beauty of watercolor painting, blending soft pastel hues into an abstract masterpiece.
The seamless transitions and soft colors make this design both artistic and wearable, perfect for spring, summer, or any occasion that calls for a delicate, creative manicure.
This manicure is a versatile and elegant way to showcase your artistic side while embracing the charm of pastel tones.
17. Pastel French Fade Nail Art
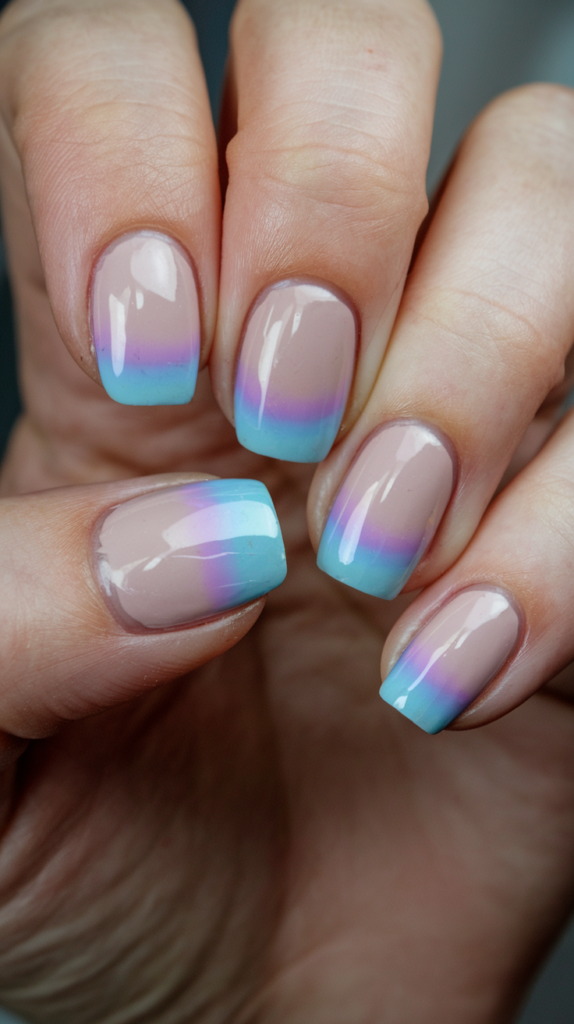
The pastel French fade, also known as the baby boomer manicure, is a contemporary and elegant twist on the classic French tip. With its soft, seamless gradient from base to tip, this design exudes subtle sophistication while incorporating the charm of pastel hues.
How to Create a Soft Gradient French Fade with Pastel Tips
Step 1: Apply the Base Color
Begin by painting your nails with a sheer nude or pale pink base coat to create a clean canvas. Allow it to dry completely.
Step 2: Add the Pastel Gradient
Use a makeup sponge to lightly dab a pastel color, such as baby blue or lavender, onto the tips of your nails. Gradually blend the color downward toward the middle of the nail, ensuring a soft, natural transition.
Step 3: Refine the Fade
If needed, go back with the base color on a clean sponge and lightly blend over the fade to ensure the transition is seamless.
Step 4: Seal the Design
Once the gradient is complete and dry, apply a clear topcoat to enhance the look and protect the design.
Tips for Achieving a Smooth Transition Between Colors
- Use a Makeup Sponge: This tool provides a light, controlled application, making it easier to blend the pastel tips into the base.
- Tapping Motion: Gently dab the pastel color onto the nail in light, tapping motions to avoid harsh lines.
- Layer Gradually: Apply thin layers of polish and blend after each application to create a soft, natural fade.
Patience is key when perfecting this design. Take your time to ensure smooth, flawless transitions.
Best Pastel Shades for a Subtle French Fade
- Baby Pink and Pale Peach: These soft, romantic tones blend beautifully with a nude base for a classic look.
- Light Lavender and Mint Green: Add a modern, fresh twist to the French fade with these calming hues.
- Pale Blue: Perfect for creating a chic, contemporary style while maintaining the subtlety of the gradient.
Customize the design by experimenting with your favorite pastel shades for a personalized and unique manicure.
Why It Works
Pastel French Fade Nail Art combines the timeless elegance of a French manicure with the softness and versatility of pastel hues.
The gradient effect creates a subtle, polished look that’s perfect for any occasion, from casual outings to formal events.
This design is a refined and customizable way to showcase your love for pastel tones while embracing modern nail trends.
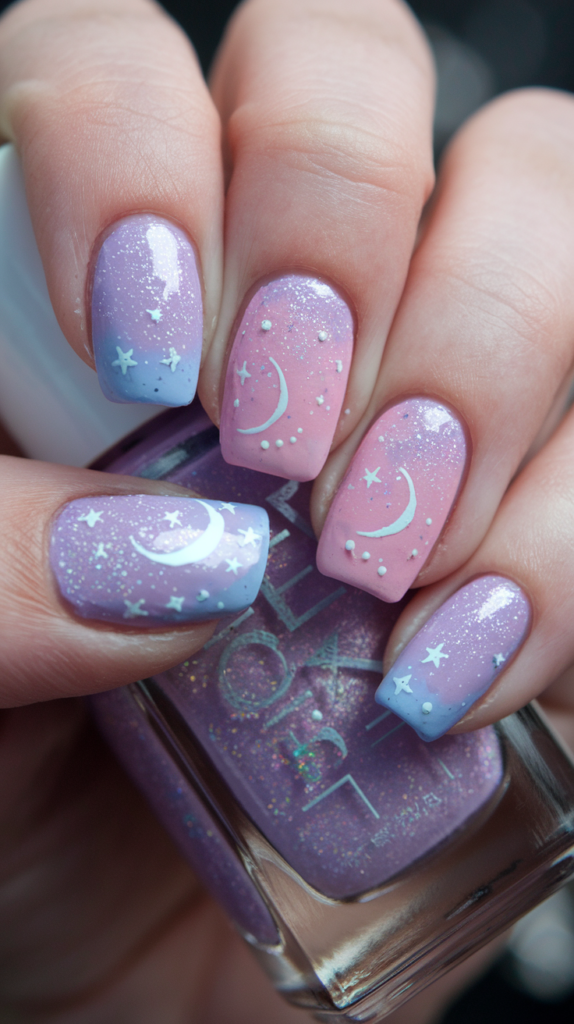
18. Pastel Stars and Moon Nail Art

Pastel stars and moon nails bring celestial magic to your manicure with soft tones and delicate details.
This enchanting design captures the dreamy beauty of the night sky in a whimsical and elegant way, perfect for showcasing your artistic side.
How to Paint Tiny Stars and Moons in Pastel Tones
Step 1: Apply a Pastel Base
Start by painting your nails with a light pastel base, such as baby pink, pale blue, or lavender. Allow the base coat to dry completely.
Step 2: Create the Celestial Shapes
Using a fine nail art brush, carefully paint tiny stars and crescent moons in contrasting pastel shades, such as white, light lavender, or pastel yellow.
- For stars, paint small crosses and add short diagonal lines to form starbursts.
- For crescent moons, outline the curve and fill in the shape for a smooth finish.
Step 3: Add Details and Sparkles
Enhance the design by adding dots and tiny sparkles around the stars and moons to mimic the shimmer of the night sky. A dotting tool is perfect for creating evenly sized dots.
Step 4: Seal the Design
Once the design is complete, apply a clear topcoat to protect the artwork and give the nails a glossy, polished look.
Tips for Achieving Precise Celestial Details
- Use Fine Tools: A fine nail art brush and dotting tool are essential for painting detailed stars and moons.
- Practice First: Try painting the designs on a piece of paper or practice nail tips to perfect your technique before applying them to your nails.
- Consider Decals: If freehand designs feel challenging, use star and moon decals for a precise, effortless look.
Ideal Pastel Base Colors to Complement Celestial Details
- Baby Blue: Evokes the calm of a serene night sky.
- Pale Lavender: Adds a mystical and dreamy feel.
- Soft Pink: Creates a romantic and whimsical background.
For the celestial details, white is a classic choice, but pastel yellow or silver adds a touch of warmth and shimmer, enhancing the overall magical effect.
Why It Works
Pastel Stars and Moon Nail Art combines the delicate beauty of pastel hues with the enchanting allure of celestial details.
The soft, airy tones of the base colors complement the intricate stars and moons, creating a design that is both dreamy and sophisticated.
Perfect for special occasions or adding a magical touch to everyday wear, this manicure is an elegant way to embrace celestial magic.
19. Pastel Checkerboard Nail Art
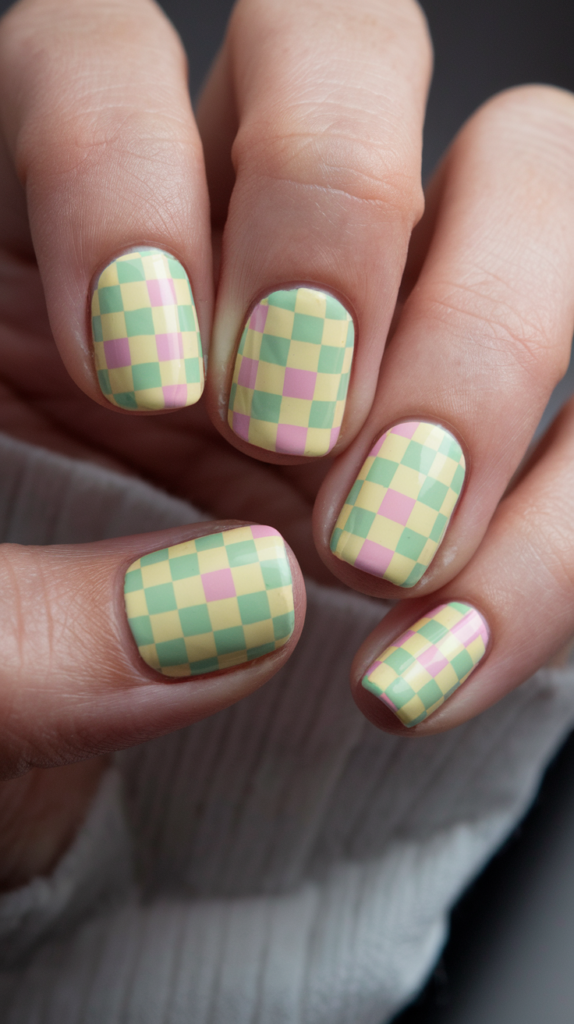
Pastel checkerboard nails combine retro charm with a modern twist, offering a fun and playful design perfect for showcasing your creativity.
With soft pastel tones, this vintage-inspired pattern feels fresh and trendy, making it ideal for any season or occasion.
How to Create a Retro Checkerboard Pattern Using Pastels
Step 1: Apply the Base Color
Start by painting your nails with a light pastel base, such as mint green or blush pink. Allow the base coat to dry completely.
Step 2: Outline the Checkerboard Pattern
Use striping tape or a fine nail art brush to outline small squares across each nail. Precision is key to achieving a neat checkerboard look.
Step 3: Fill in the Squares
Using a contrasting pastel color, such as baby blue or soft yellow, carefully fill in every other square. Keep your strokes clean and even to maintain sharp edges.
Step 4: Seal the Design
Once the pattern is fully dry, finish with a clear topcoat to protect the design and give your nails a glossy, polished finish.
Best Color Pairings for Pastel Checkerboard Nails
- Soft and Subtle: Pair light pink with lavender or pale yellow with baby blue for a delicate, spring-inspired look.
- Bold and Vibrant: Combine pastel green with soft peach or light purple with mint for a more striking yet playful effect.
- Monochromatic Elegance: Use two shades of the same color family, like pale blue and soft teal, for a chic and cohesive design.
Experiment with different pairings to create a design that reflects your personal style while maintaining the retro charm of the checkerboard pattern.
Tips for Painting a Perfect Checkerboard
- Use Striping Tape for Precision: Striping tape helps create clean, evenly spaced squares with minimal effort.
- Work Slowly: Take your time when outlining and filling in the squares to ensure a neat and polished result.
- Freehand Technique: If painting freehand, use a fine brush and practice on a piece of paper or practice nail tips first.
Why It Works
Pastel Checkerboard Nail Art combines the bold geometry of a classic pattern with the softness of pastel tones for a design that feels both vintage and modern.
The playful color combinations and clean lines make this manicure a versatile choice, perfect for casual outings or as a statement piece for special events.
This retro-inspired design is a fun and stylish way to showcase your love for pastel tones and creative nail art.
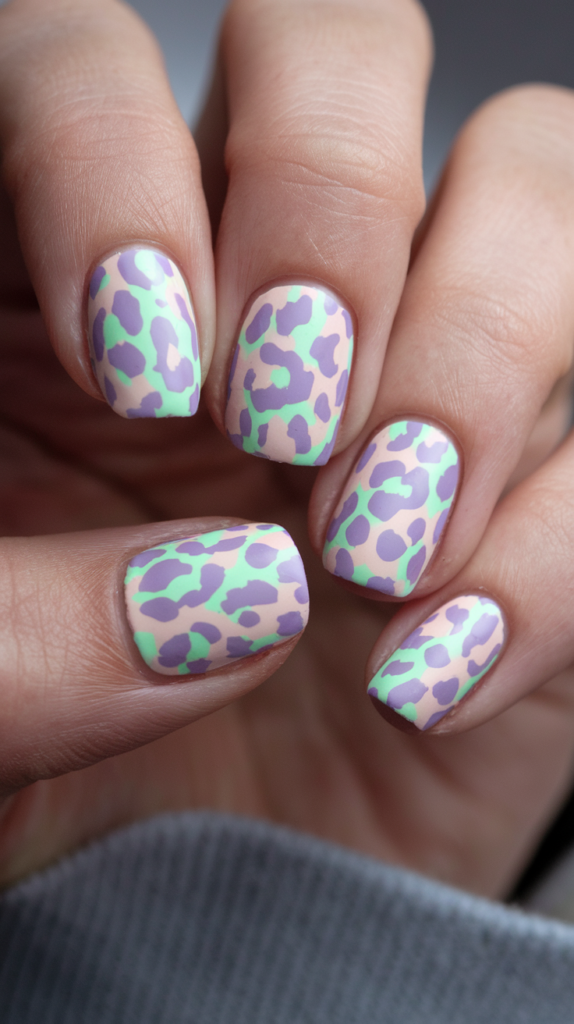
20. Pastel Animal Print Nail Art
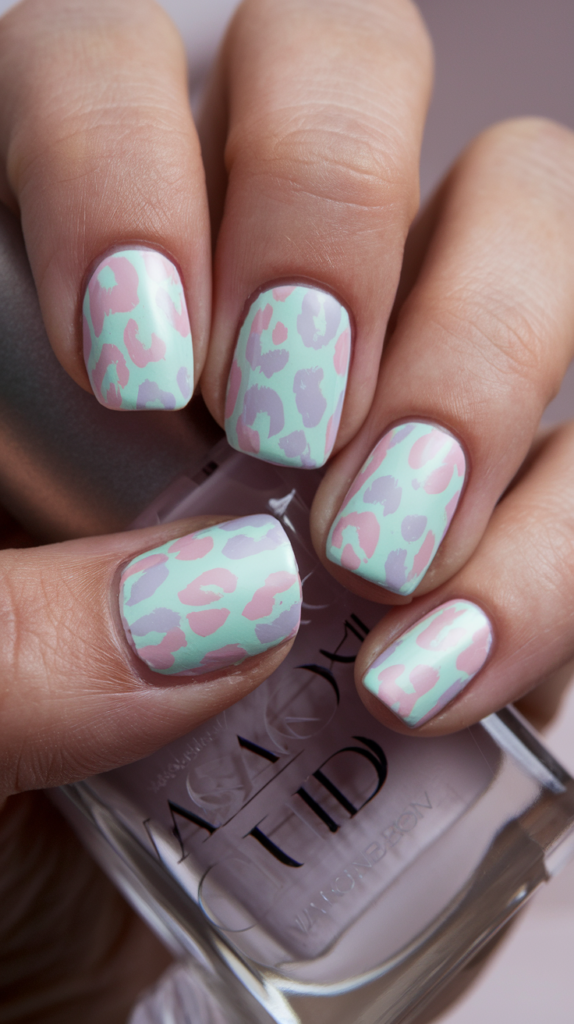
Pastel animal print nails combine the wild charm of leopard or zebra patterns with the soft elegance of pastel colors.
This stylish design is perfect for those who want a bold yet subtle manicure that stands out in a sophisticated way.
How to Create Leopard or Zebra Prints with Pastel Colors
Step 1: Apply a Pastel Base Color
Start with a light pastel base, such as blush pink or pale lavender. Let the base coat dry completely.
Step 2: Paint the Leopard Spots or Zebra Stripes
- Leopard Print:
- Use a fine nail art brush to paint small, irregular spots in a contrasting pastel shade, such as mint green or baby blue.
- Outline each spot with a slightly darker pastel shade to add depth and mimic the natural leopard pattern.
- Zebra Print:
- Paint thin, wavy stripes across the nails using a pastel color like soft yellow or pale lavender.
Step 3: Refine and Balance the Design
Keep the shapes irregular yet evenly distributed for a balanced, natural look.
Step 4: Seal the Design
Finish with a clear topcoat to protect the design and give your nails a polished, glossy finish.
How to Keep the Print Bold While Staying Within the Pastel Palette
- Use Contrasting Shades: Opt for pastel tones that contrast well, such as a light pink base with lavender or yellow spots.
- Add Depth with Outlines: For leopard prints, outlining the spots with a slightly darker pastel shade enhances the boldness without overpowering the design.
- Experiment with Placement: Alternate the density of spots or stripes across nails for added visual interest while maintaining subtlety.
Perfect Base and Print Color Combinations
- Mint Green Base with Blush Pink Spots: A playful, feminine combination that feels fresh and soft.
- Soft Yellow Base with Lavender Stripes: A modern and understated twist on zebra print.
- Peach Base with Baby Blue Spots: Adds a fun, unexpected pop of color while keeping the design cohesive.
- Light Purple Base with Pale Yellow Stripes: Creates a bold yet elegant look with complementary pastel tones.
Experiment with these combinations or mix and match your favorite pastel shades for a personalized take on animal print nails.
Why It Works
Pastel Animal Print Nail Art offers a perfect balance between bold and subtle, combining the dynamic appeal of animal patterns with the softness of pastel colors.
The pastel palette ensures the design remains feminine and approachable, while the irregular patterns bring a touch of wild creativity.
This versatile manicure is perfect for adding a playful yet sophisticated edge to your look, whether for casual outings or special occasions.
21. Pastel Wave Nail Art
Pastel wave nails are the epitome of beachy, relaxed vibes, combining flowing lines with soft, breezy hues. This design is perfect for summer, evoking the tranquil movement of ocean waves and the carefree spirit of sunny days.
Tips for Creating Smooth, Wavy Lines in Pastel Tones
Step 1: Apply a Light Base Color
Start by painting your nails with a soft pastel base, such as pale blue or lavender. Let the base dry completely.
Step 2: Paint the Waves
Using a fine nail art brush, paint wavy lines across the nail in a contrasting pastel shade, such as mint green or peach.
- Use light, sweeping strokes to create smooth, flowing waves.
- Freehand the waves if you feel confident, or use striping tape or nail guides for extra precision.
Step 3: Add Depth
For more dimension, blend two pastel shades within the same wave or add a subtle gradient effect.
Step 4: Seal the Design
Finish with a glossy or shimmer topcoat to enhance the wave effect and protect your manicure.
How to Evoke a Summery, Carefree Look with Pastel Waves
- Subtle Glitter Accents: Add a touch of fine glitter along the curves of the waves to mimic sunlight reflecting off the water.
- Beachy Details: Incorporate small decals, such as seashells or palm trees, to enhance the beach-inspired theme.
- Flowing Patterns: Keep the waves organic and flowing, ensuring they move naturally across the nail for a relaxed, summery feel.
The combination of soft pastel tones and dynamic wave patterns creates a breezy, carefree aesthetic that’s perfect for beach vacations or summer outings.
Complementary Pastel Shades for Wave Patterns
- Soft Blue and Lavender: A calming, ocean-inspired combination that captures the serenity of the sea.
- Peach and Mint Green: A warm, playful pairing that feels fresh and summery.
- Pale Pink and Light Yellow: A cheerful duo that evokes the colors of a beach sunrise.
- Gradient Waves: Blend two pastel shades, such as mint green fading into soft yellow, to add depth and dimension to the waves.
Experiment with these pairings to create a harmonious and visually appealing design that reflects your personal style.
Why It Works
Pastel Wave Nail Art captures the essence of summer with its flowing, organic lines and soft, harmonious colors.
The combination of pastel shades and wavy patterns creates a design that feels effortless and elegant, perfect for adding a touch of beachy charm to your nails.
Whether for a vacation or to bring a summery vibe to your everyday look, this manicure exudes relaxation and style.
22. Pastel Half-Moon Nail Art
The pastel half-moon design is a sleek and stylish twist on a classic nail art technique.
By combining soft pastel shades with the geometric structure of the half-moon, this manicure offers a modern and elegant look perfect for any occasion.
How to Create the Half-Moon Design with Pastel Polishes
Step 1: Apply the Base Color
Start by painting the entire nail with a pastel base color, such as blush pink or pale lavender. Let it dry completely.
Step 2: Outline the Half-Moon Shape
Use a nail art brush or half-moon stencils to carefully mark the bottom portion of each nail near the cuticle.
Step 3: Paint the Half-Moon
Fill in the outlined area with a contrasting pastel shade, such as baby blue or mint green. Apply the polish evenly for a clean, polished look.
Step 4: Seal the Design
Finish with a clear topcoat to protect the manicure and enhance the shine of the pastel colors.
Combining the Half-Moon Trend with Other Nail Art
- Add Pastel Accents: Enhance the design with tiny dots, stripes, or delicate floral patterns above the half-moon.
- Incorporate Glitter: Apply glitter within the half-moon shape for a touch of sparkle and glam.
- Gradient Effect: Blend two pastel shades within the half-moon for a dynamic ombre look.
- Negative Space: Leave the half-moon bare to create a minimalist yet striking design.
These additions allow you to personalize the half-moon manicure while maintaining its sleek and stylish appeal.
Best Color Pairings for a Sleek Pastel Half-Moon Look
- Blush Pink and Baby Blue: A soft and classic combination that feels timeless.
- Lavender and Soft Yellow: A cheerful pairing perfect for spring and summer.
- Mint Green and Peach: A fresh, modern duo that adds a playful touch.
- Pale Purple and Soft Coral: An unexpected yet harmonious combination for a unique look.
Experiment with these pairings or mix and match your favorite pastel shades to create a design that reflects your personal style.
Why It Works
Pastel Half-Moon Nail Art combines the structure of geometric design with the softness of pastel hues, creating a manicure that is both sleek and elegant.
The half-moon shape adds contrast and visual interest, while the pastel palette keeps the design fresh and modern.
Versatile and easy to customize, this manicure is perfect for anyone looking to elevate their nail art with a touch of sophistication.
23. Pastel Clouds and Rainbow Nail Art
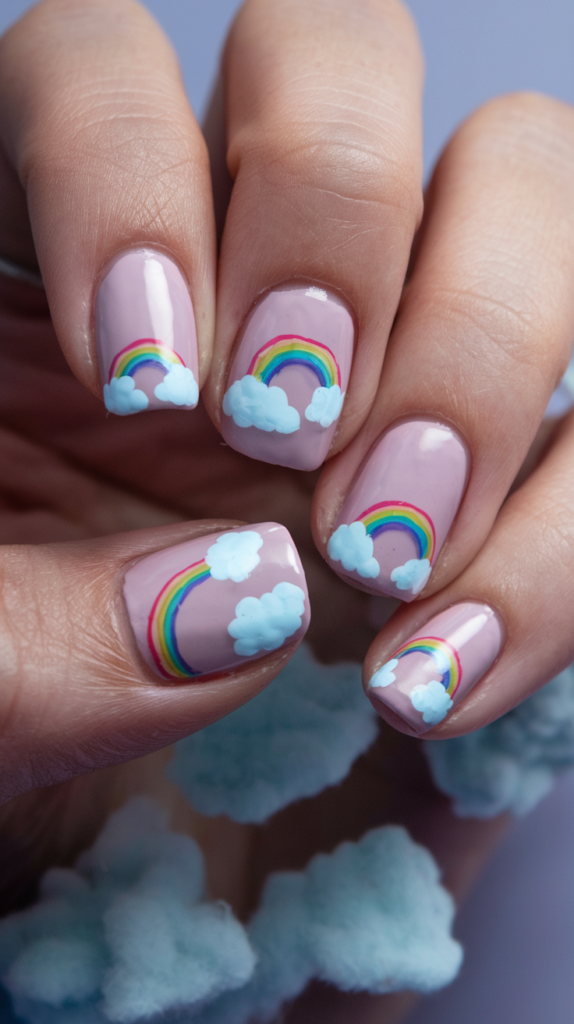
Pastel clouds and rainbows bring a whimsical and dreamy charm to your manicure. Combining soft hues with delicate designs, this playful nail art captures the fantasy and beauty of a bright, pastel sky.
How to Paint Clouds and Rainbows with Pastel Colors
Step 1: Apply a Pastel Base Color
Choose a light pastel shade for your base, such as pale blue or soft pink, to create the backdrop for your design. Allow it to dry completely.
Step 2: Paint Fluffy Clouds
Use a fine nail art brush or a dotting tool to create fluffy, rounded clouds in white or pale pastel shades like light lavender or mint.
- Start by painting small overlapping circles to form the top of the cloud.
- Fill in the bottom portion to create a soft, rounded look.
Step 3: Add Rainbow Arches
On one or two accent nails, paint thin, curved lines in pastel shades like lavender, baby pink, mint green, and pale yellow to form a rainbow.
- Use a steady hand and thin nail art brush to keep the lines smooth and even.
- Blend the edges of each color slightly for a seamless transition between the shades.
Step 4: Seal the Design
Finish with a clear topcoat to protect the design and enhance the softness of the pastel colors.
Perfect Base Shades to Enhance the Design
- Light Blue: Mimics the sky and provides the ideal background for clouds and rainbows.
- Pale Pink: Adds a whimsical, romantic touch to the design.
- Lavender or Mint Green: Offers a unique, dreamy feel that complements the pastel theme.
Choose a base shade that complements the details while maintaining the light and airy aesthetic of the design.
Tips for Keeping the Designs Soft and Subtle
- Use Light Strokes: Avoid harsh lines or bold colors; focus on soft, airy strokes for a delicate finish.
- Minimal Sparkle: If adding glitter, choose a fine, subtle glitter topcoat or place small rhinestone accents sparingly to enhance the dreamy vibe.
- Balance the Elements: Limit the number of clouds and rainbows per nail to keep the design uncluttered and elegant.
Why It Works
Pastel Clouds and Rainbow Nail Art is a perfect blend of playful whimsy and soft sophistication.
The light pastel tones and dreamy designs evoke feelings of fantasy and wonder, making this manicure a standout choice for those who love creative yet subtle nail art.
Perfect for spring, summer, or any occasion that calls for a touch of magic, this design is a delightful way to showcase your imaginative side.
24. Pastel Jelly Nail Art
Pastel jelly nails are a trendy and modern take on traditional pastel manicures. With their translucent, glass-like finish, these nails offer a fresh and stylish look that’s perfect for those who want to embrace subtle elegance with a contemporary twist.
How to Achieve a Translucent, Jelly-Like Effect with Pastel Colors
Step 1: Use Sheer, Translucent Polishes
Select pastel polishes with a jelly-like formula that allows light to pass through, creating a semi-transparent finish. Sheer pastel shades like baby blue, pale pink, or mint green work beautifully.
Step 2: Apply Thin Layers
Start with a thin coat of your chosen sheer pastel polish. Let it dry completely before applying additional layers.
Step 3: Build Up Color Gradually
Add one or two more layers, depending on your desired level of opacity. The goal is to maintain the jelly-like transparency while building up the color for a soft, vibrant effect.
Step 4: Finish with a Glossy Topcoat
Seal the design with a high-shine topcoat to enhance the glass-like finish and protect the manicure.
Why Jelly Nails Are a Perfect Modern Twist for Pastel Shades
- Translucent Appeal: The jelly-like transparency adds a fresh, modern aesthetic to traditional pastel colors, giving them a unique, light-reflecting quality.
- Soft and Stylish: The glassy finish enhances the vibrancy of pastel shades while keeping the design soft and subtle.
- Elegant and Trendy: Jelly nails strike a balance between sophistication and contemporary style, making them ideal for casual and formal occasions alike.
This design is perfect for those who want their nails to look effortlessly chic and fashionable.
Ideas for Layering Jelly Polishes for More Dimension
- Multi-Color Layers: Start with a base of sheer pink and layer translucent lavender or baby blue on top for a multi-dimensional effect. The overlapping colors create a soft, blended look that’s both vibrant and dynamic.
- Embedded Accents: Add tiny decals, glitter, or rhinestones beneath the jelly layers for a playful, layered design that catches the light.
- Gradient Jelly Nails: Use different shades of sheer pastel polish to create a gradient effect from the base to the tip of the nail, adding depth and visual interest.
Why It Works
Pastel Jelly Nail Art combines the soft elegance of pastel tones with the modern appeal of a translucent, glossy finish.
The semi-transparent effect enhances the vibrancy and dimension of the colors, while the glass-like sheen adds sophistication to the design.
Versatile, trendy, and effortlessly chic, pastel jelly nails are a must-try for anyone looking to elevate their nail art with a contemporary twist.
25. Pastel Gradient with Gold Foil Nail Art
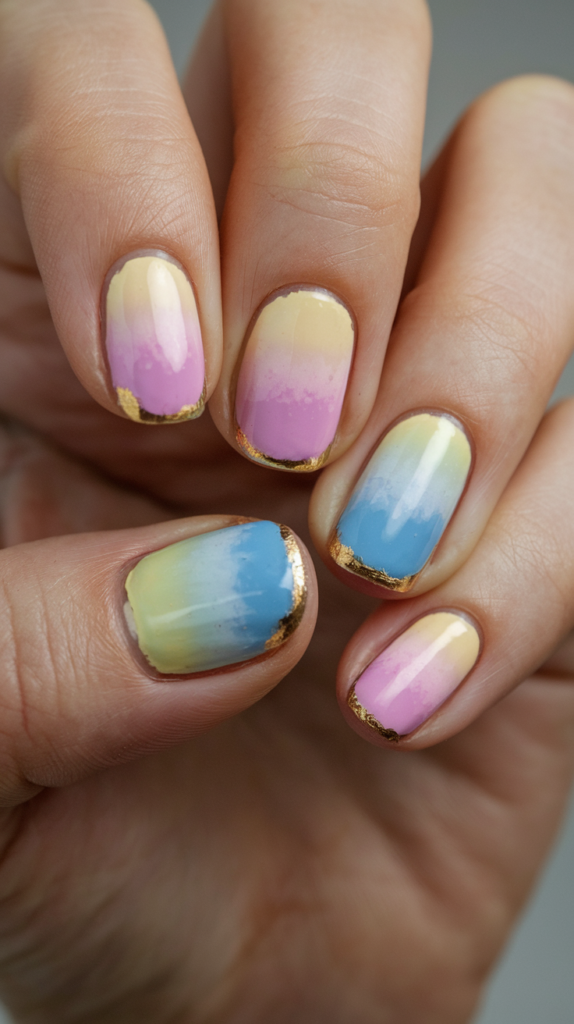
A pastel gradient paired with gold foil accents is the perfect combination of soft elegance and luxurious detail.
This chic and sophisticated design is ideal for those who want to elevate their manicure with a subtle touch of shimmer and class.
Steps to Combine a Pastel Gradient with Subtle Gold Foil
Step 1: Apply the Gradient Base
Start by choosing two or more pastel shades, such as baby pink fading into lavender or soft yellow blending into mint green.
Use a makeup sponge to dab the lightest color at the base of the nail and the darkest at the tip, blending them seamlessly in the middle.
Step 2: Perfect the Gradient
Overlap the colors slightly as you blend to avoid harsh lines. Go back with a clean sponge if needed to smooth out any uneven areas and achieve a flawless transition.
Step 3: Add Gold Foil Accents
Once the gradient is dry, apply small pieces of gold foil to one or two accent nails. Focus on areas like the tips, near the cuticle, or scattered lightly across the nail for an elegant effect.
Step 4: Seal the Design
Finish with a clear topcoat to lock in the gradient and gold foil, giving your nails a glossy, polished finish.
How to Blend the Gradient Seamlessly Across Each Nail
- Use a Makeup Sponge: Lightly dab the colors onto the nail, blending where they meet for a smooth transition.
- Overlap the Colors: Ensure the pastel shades overlap slightly to avoid harsh lines.
- Build in Layers: Apply multiple thin layers, blending after each application to achieve a soft, fluid gradient.
Patience and a light touch are key to creating a flawless pastel gradient.
Using Gold Foil for an Extra Touch of Luxury
- Focus on Accent Areas: Apply gold foil to specific parts of the nail, such as the tips or cuticle, for a refined look.
- Abstract Application: Scatter tiny pieces of foil randomly across the nails for a modern, artistic effect.
- Combine with Negative Space: Leave parts of the nail bare while incorporating gold foil to enhance the minimalistic elegance of the design.
The gold foil adds just the right amount of shimmer to elevate the pastel gradient, making the manicure perfect for weddings, parties, or any special event.
Why It Works
Pastel Gradient with Gold Foil Nail Art combines the softness of pastel hues with the glamour of gold, creating a look that feels luxurious yet understated.
The seamless blending of colors adds depth and elegance, while the gold foil accents provide a touch of sophistication and sparkle.
This versatile design is perfect for special occasions or as a statement manicure for those who love refined, artistic nail art.
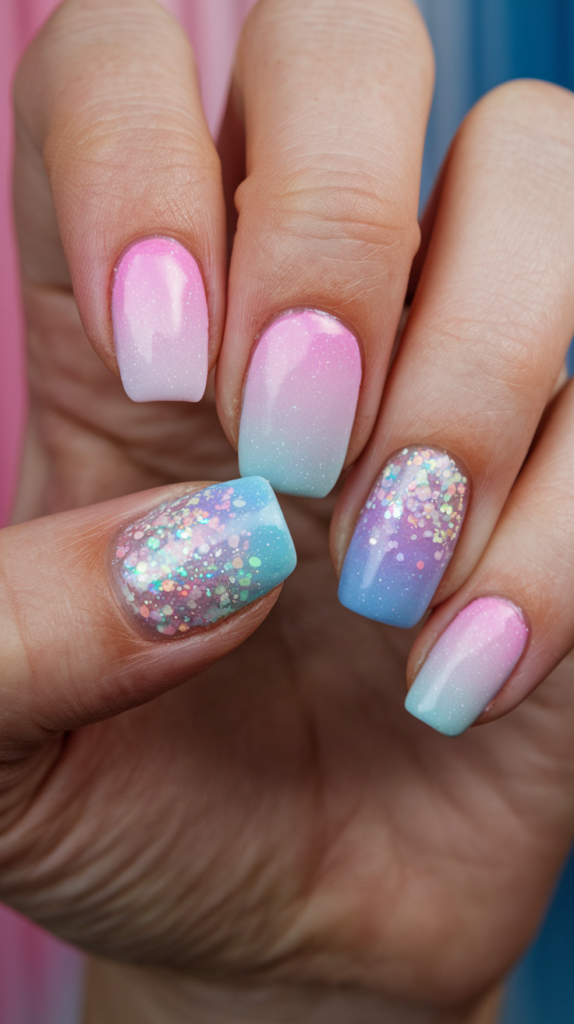
26. Pastel Glitter Fade Nail Art
Pastel glitter fade nails combine the soft elegance of pastel shades with the dazzling charm of glitter.
This design is perfect for creating a subtle yet glamorous look that works for both everyday wear and special occasions.
How to Apply Glitter at the Base of Pastel Nails and Fade Upwards
Step 1: Apply the Pastel Base Color
Start with a pastel base, such as light lavender, pale pink, or mint green. Let the base coat dry completely.
Step 2: Add Glitter to the Base
Use a fine glitter polish or loose glitter and focus on the area near the cuticle. Apply the glitter more densely at the base for a concentrated sparkle.
Step 3: Create the Fade Effect
Using a makeup sponge or a small nail art brush, gently dab the glitter upwards toward the tip of the nail. Allow the glitter to become more sparse as it moves upward, creating a smooth gradient effect.
Step 4: Refine the Glitter Placement
Go back with a small brush to fill in any gaps or add more glitter to areas that need extra sparkle, ensuring an even fade.
Step 5: Seal with a Topcoat
Finish with a clear, glossy topcoat to smooth out the glitter and enhance the sparkle, giving the nails a polished, professional look.
Best Pastel Shades for Glitter Fade Designs
- Baby Pink: Pairs beautifully with holographic or pastel pink glitter for a romantic and feminine look.
- Mint Green: A refreshing choice that works well with silver or multi-colored glitter for a modern vibe.
- Soft Lavender: Perfect for pairing with iridescent glitter, creating an ethereal, dreamy design.
- Pale Blue: Combines beautifully with gold or icy blue glitter for a chic, wintry effect.
Experiment with different glitter types, such as holographic, metallic, or pastel-colored glitter, to find the combination that best suits your style.
Tips for Achieving a Smooth, Even Glitter Fade
- Use a Sponge for Precision: A makeup sponge helps apply glitter evenly and blends it seamlessly for a natural fade.
- Build Gradually: Apply the glitter in light layers, concentrating on the base and gradually reducing the amount as you move upwards.
- Refine with a Brush: Use a small nail art brush to perfect the fade and fill in any sparse areas near the cuticle.
- Topcoat for a Polished Finish: A clear topcoat not only smooths the glitter but also enhances the shine, making the gradient appear more seamless and vibrant.
Why It Works
Pastel Glitter Fade Nail Art is the perfect blend of soft pastels and shimmering sparkle, creating a design that’s both elegant and eye-catching.
The gradient effect adds depth and sophistication, while the glitter enhances the pastel base with a touch of glamour.
Versatile and easy to customize, this manicure is ideal for anyone looking to add a bit of dazzle to their nails without overwhelming the design.
27. Pastel Geode Nail Art
Pastel geode nails bring the intricate beauty of nature to your manicure, inspired by the shimmering layers and organic patterns of geode stones.
This design blends soft pastel hues with glitter and metallic accents for a look that’s both natural and luxurious.
How to Create a Geode-Inspired Design with Pastel Colors
Step 1: Apply a Pastel Base Color
Start with a soft pastel base, such as pale pink or lavender, to set the stage for your geode design. Allow the base coat to dry completely.
Step 2: Paint Irregular Shapes
Use a fine nail art brush to create organic, irregular shapes on the nails in contrasting pastel shades, like mint green or light blue. These shapes will represent the geode’s crystal layers.
Step 3: Add Metallic Veins
Outline the edges of the shapes with thin lines of metallic polish, such as gold or silver. These veins mimic the natural ridges found in geodes and add a touch of sophistication.
Step 4: Layer Glitter or Holographic Accents
Fill in parts of the geode shapes with fine glitter or holographic polish to replicate the sparkle of crystals. Focus on the center of the shapes for a realistic effect.
Step 5: Seal the Design
Finish with a clear topcoat to smooth the layers and enhance the overall shine, giving the nails a polished, professional appearance.
Tips for Adding Glitter and Metallic Accents for Depth
- Strategic Glitter Placement: Use glitter sparingly to highlight certain areas within the geode shapes, creating depth and visual interest.
- Thin Metallic Lines: Keep the metallic veins thin and precise to avoid overpowering the soft pastel hues.
- Layering for Dimension: Add darker pastel shades to the edges or centers of the shapes to create contrast and a more realistic geode effect.
The interplay of pastel colors, glitter, and metallic accents creates a dynamic, multi-dimensional design reminiscent of real geode stones.
Step-by-Step Guide for a Realistic Geode Effect
- Paint Organic Shapes: Use varying pastel shades to create unique, irregular shapes on each nail.
- Outline with Metallic Polish: Add thin metallic lines around the edges of the shapes to define the geode’s layers.
- Layer Glitter Accents: Apply glitter polish to parts of the shapes, focusing on the centers to mimic crystal sparkle.
- Blend with Darker Pastels: Incorporate darker pastel tones for added depth and contrast, blending them seamlessly with the lighter shades.
- Seal with a Topcoat: Apply a glossy topcoat to unify the layers and enhance the shine, giving the design a polished look.
Why It Works
Pastel Geode Nail Art captures the natural beauty and complexity of geodes, blending soft pastel tones with shimmering details for a stunning, sophisticated design.
The organic shapes and layered accents create depth and dimension, while the metallic veins and glitter add a touch of elegance.
This manicure is perfect for anyone who loves nature-inspired designs with a luxurious twist.
28. Pastel Leopard Print Nail Art
Pastel leopard print nails are the perfect blend of bold and feminine, combining the fierce energy of animal print with the softness of pastel tones. This playful yet chic design is ideal for those who want to make a stylish statement while embracing a more subtle, colorful palette.
How to Balance Bold Animal Prints with Soft Pastel Shades
Step 1: Apply a Light Base Color
Start with a pastel base, such as pale pink, baby blue, or soft lavender, to create a soft canvas for the design. Allow the base to dry completely.
Step 2: Paint the Leopard Spots
- Use a small nail art brush or dotting tool to paint irregular spots in a darker pastel shade, such as mint green, soft peach, or lavender.
- Vary the size and shape of the spots for a natural, organic look.
Step 3: Outline the Spots
Outline each spot with a slightly darker pastel shade, like pastel black, gray, or a deeper version of the spot color. Use a light hand to keep the lines soft and fluid.
Step 4: Seal the Design
Finish with a glossy topcoat to protect the print and enhance the colors, giving the nails a polished, professional finish.
Tips for Creating Precise Leopard Spots Using Pastel Colors
- Tools for Precision: A fine nail art brush or small dotting tool ensures better control over the size and shape of the spots.
- Irregular Patterns: Avoid making the spots too uniform; vary their size and placement to mimic natural leopard patterns.
- Soft Outlines: Use a thin brush and light pressure to outline the spots gently, keeping the design cohesive and refined.
Patience and a steady hand are key to achieving a clean, polished leopard print look.
Ideal Base Shades to Make the Pastel Print Pop
- Soft Pink Base with Mint Green and Lavender Spots: A playful and feminine combination that feels fresh and modern.
- Pale Lavender Base with Baby Blue and Soft Gray Spots: A calming, sophisticated palette that maintains the design’s boldness.
- Light Mint Green Base with Peach and Pastel Black Spots: A unique and vibrant pairing that adds a contemporary twist to the classic leopard print.
Experiment with complementary pastel shades to customize the design and create a look that suits your personal style.
Why It Works
Pastel Leopard Print Nail Art transforms a bold, edgy design into a playful and elegant manicure by pairing it with soft, dreamy pastel shades.
The contrast between the wild animal print and the gentle tones creates a balanced, eye-catching look that’s versatile and chic.
Perfect for adding a fun twist to your nails, this design is both trendy and timeless, ideal for any occasion.
29. Pastel Speckled Egg Nail Art
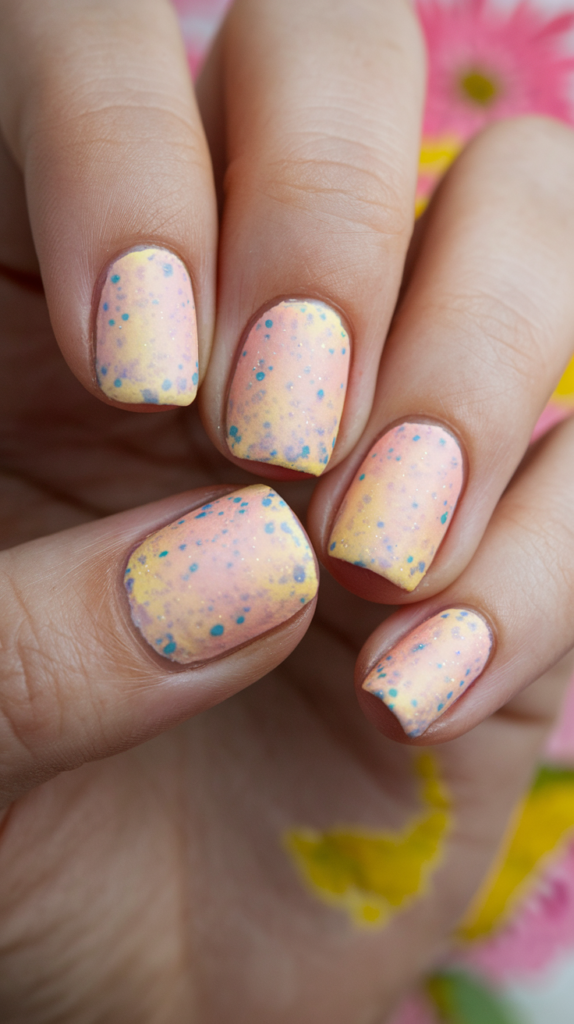
Pastel speckled egg nails are a playful and festive design that captures the essence of spring and Easter. With their delicate speckles and soft pastel tones, this manicure is perfect for adding a touch of seasonal charm to your nails.
A Guide to Achieving a Speckled Egg Look with Pastel Shades
Step 1: Apply the Pastel Base
Start by painting your nails with a light pastel base color, such as pale yellow, mint green, or soft pink. Allow the base coat to dry completely.
Step 2: Create the Speckles
- Dip a small nail art brush or an old toothbrush into a darker pastel shade, like lavender or baby blue.
- Gently tap or flick the brush to splatter tiny speckles onto the nails.
- Focus on creating irregular patterns to mimic the natural look of speckled eggs.
Step 3: Layer for Dimension
For added depth, use multiple pastel shades to layer speckles over each other, ensuring they blend harmoniously while maintaining a natural, textured effect.
Step 4: Seal the Design
Finish with a clear topcoat to smooth out the surface and enhance the speckled effect, giving the nails a polished, festive finish.
How to Vary the Size and Placement of Speckles for a Realistic Effect
- Use Different Tools: A toothbrush creates fine, random splatters, while a small brush can add larger, more deliberate speckles.
- Layering for Depth: Apply speckles in varying sizes and shades to replicate the texture of real speckled eggs.
- Focus on Natural Placement: Scatter the speckles unevenly across each nail, concentrating in some areas and leaving others sparse for an organic look.
Popular Pastel Shades for Speckled Egg Designs
- Base Colors: Pale yellow, mint green, light pink, or baby blue create a soft and springlike backdrop.
- Speckle Colors: Lavender, soft gray, or darker pastel tones add contrast and texture.
- Metallic Accents: Incorporate gold or silver speckles for a touch of shimmer and a celebratory feel.
Why It Works
Pastel Speckled Egg Nail Art combines the softness of pastel hues with playful, textured speckles, resulting in a design that’s both festive and chic.
The irregular patterns and delicate contrasts mimic the look of real speckled eggs, making this manicure perfect for spring celebrations, Easter, or simply embracing a fresh seasonal style.
This design is easy to customize with your favorite pastel shades, ensuring a unique and delightful manicure every time.
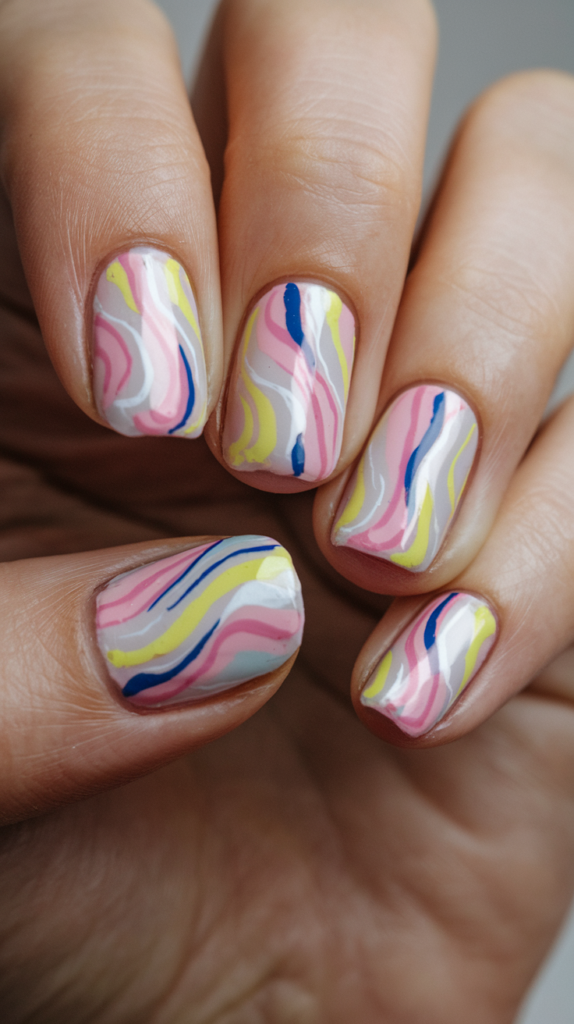
30. Pastel Abstract Art Nail Design
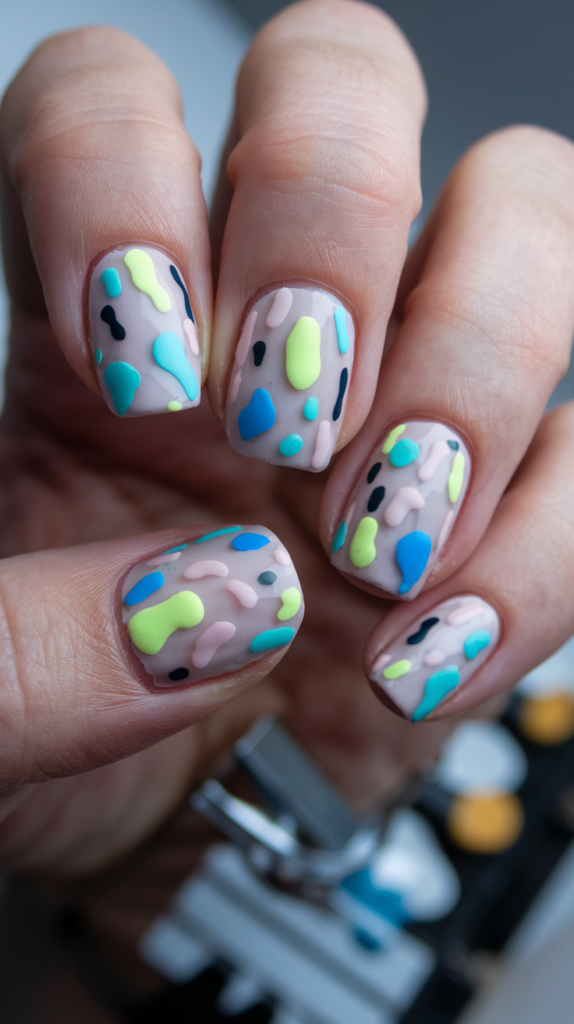
Pastel abstract art nails bring creativity and individuality to your manicure with freeform shapes and splashes of soft, complementary colors. This modern design is perfect for showcasing your artistic side while embracing the elegance of pastel tones.
Steps to Creating Freeform Shapes and Splashes in Pastel Tones
Step 1: Apply a Light Pastel Base
Start with a soft pastel base color, such as pale pink, baby blue, or light lavender, to set the stage for your abstract design. Let the base dry completely.
Step 2: Paint Abstract Shapes
Using a thin nail art brush, paint irregular shapes in contrasting pastel shades like mint green, peach, or soft yellow.
- Keep the shapes loose and organic, avoiding sharp edges or rigid patterns.
- Allow the shapes to overlap or blend slightly for a more dynamic, artistic effect.
Step 3: Add Splashes and Dots
Incorporate additional elements like small splashes of color, dots, or lines for added texture and movement.
Step 4: Seal the Design
Finish with a clear, glossy topcoat to enhance the colors and protect the design, giving your nails a polished, cohesive look.
Ideas for Combining Multiple Abstract Patterns in One Set
- Variety Across Nails: Paint freeform shapes on some nails and add dots, lines, or color splashes on others to create variation within the set.
- Layering Colors: Overlap multiple pastel shades on a single nail to add depth and complexity to the design.
- Incorporate Negative Space: Leave portions of the nail bare to balance the design and create a modern, minimalist effect.
Best Pastel Shades for Abstract Nail Art
- Soft Pink and Peach: Create a warm, romantic palette that feels light and playful.
- Lavender and Pale Blue: A calming combination that adds a serene, dreamy quality.
- Mint Green and Soft Yellow: A fresh, vibrant pairing that brings a cheerful energy to the design.
- Metallic Accents: Add gold or silver touches to elevate the design and create a sophisticated shimmer.
Why It Works
Pastel Abstract Art Nail Design celebrates individuality and creativity with its freeform, artistic style.
The soft pastel tones create a cohesive and harmonious look, while the abstract shapes and patterns add movement and intrigue.
Perfect for those who love modern, unique nail art, this design is endlessly customizable and ideal for expressing your personality through color and form.
31. Pastel Butterfly Nail Art
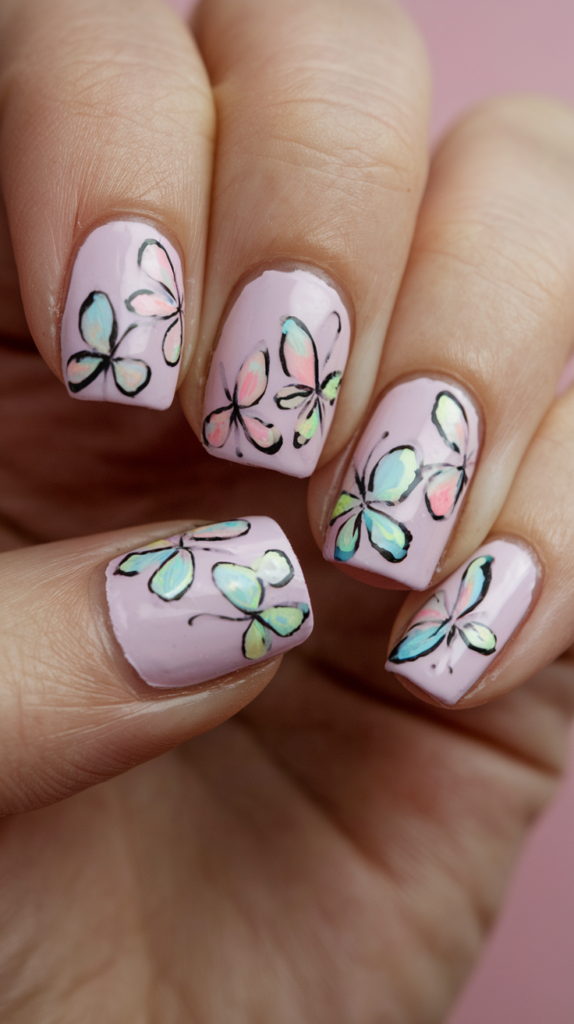
Pastel butterfly nails are a delicate and dreamy design, perfect for adding a touch of elegance and whimsy to your manicure.
With soft pastel hues and intricate butterfly details, this look is ideal for celebrating the beauty of spring and summer.
How to Paint Tiny Butterflies Using Pastel Colors
Step 1: Apply a Pastel Base Color
Start by painting your nails with a light pastel base, such as pale lavender, blush pink, or mint green. Let the base coat dry completely.
Step 2: Paint the Butterfly Shapes
- Use a fine nail art brush to carefully paint small butterfly shapes in contrasting pastel shades like soft pink or baby blue.
- Begin with a central body line for the butterfly and add two pairs of wings, ensuring they are symmetrical and delicate.
Step 3: Add Details to the Wings
- Outline the wings with a slightly darker pastel shade to define their shape.
- Use a dotting tool or fine brush to add small dots or veins within the wings for texture and dimension.
- Blend multiple pastel shades within the wings to create a soft gradient effect.
Step 4: Final Touches
- Add tiny antennae to each butterfly using a fine brush or toothpick.
- Seal the design with a clear, glossy topcoat to protect the artwork and enhance the dreamy quality of the design.
Ideal Base Colors to Complement Pastel Butterflies
- Blush Pink: A soft, romantic base that enhances the ethereal beauty of pastel butterflies.
- Pale Blue: Mimics the sky, providing a natural and serene backdrop for the design.
- Soft Lavender: Adds a calming, magical feel that pairs beautifully with pastel butterfly details.
- Ombre Background: Create a gradient base with two or more pastel shades to give the design an extra dreamy touch.
Tips for Creating Intricate Details in Butterfly Designs
- Use the Right Tools: A fine nail art brush or a dotting tool ensures precision when painting the wings and adding details.
- Blend Colors for Realism: Mix and blend pastel shades within the wings to mimic the gradient and iridescence of real butterfly wings.
- Keep It Delicate: Focus on light, thin lines and avoid heavy strokes to maintain the softness of the design.
- Practice Makes Perfect: If freehand feels challenging, try using butterfly nail decals or stencils as a guide.
Why It Works
Pastel Butterfly Nail Art captures the delicate elegance of butterflies, combining soft pastel hues with intricate details to create a design that feels both whimsical and sophisticated.
The ethereal quality of the pastel tones paired with the graceful shapes of the butterflies makes this manicure a standout choice for springtime events, weddings, or simply embracing the beauty of nature.
This design is perfect for expressing your artistic side with a touch of dreamy, natural charm.
32. Pastel Butterfly Nail Art
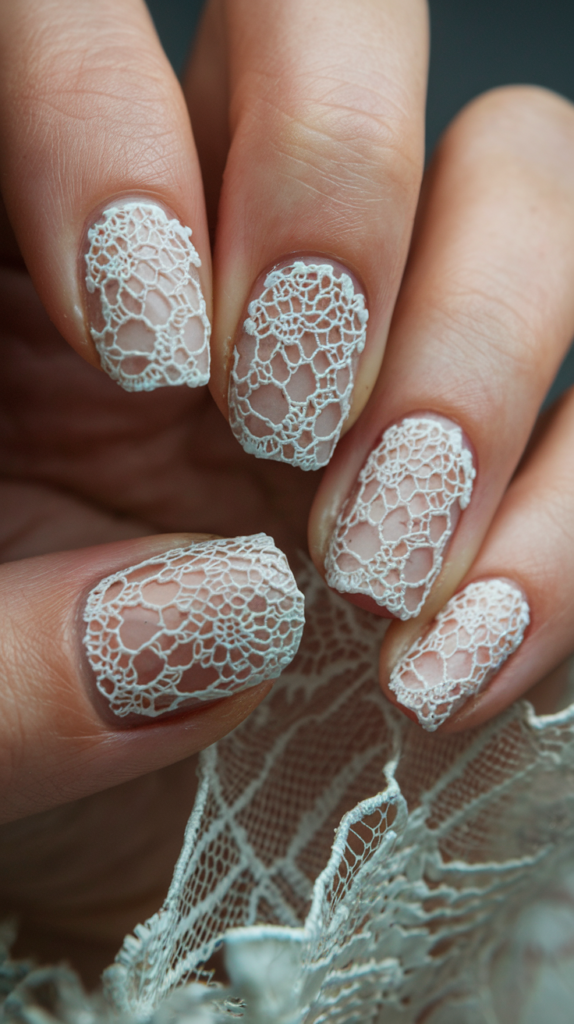
Pastel butterfly nails are a delicate and dreamy design, perfect for adding a touch of elegance and whimsy to your manicure.
With soft pastel hues and intricate butterfly details, this look is ideal for celebrating the beauty of spring and summer.
How to Paint Tiny Butterflies Using Pastel Colors
Step 1: Apply a Pastel Base Color
Start by painting your nails with a light pastel base, such as pale lavender, blush pink, or mint green. Let the base coat dry completely.
Step 2: Paint the Butterfly Shapes
- Use a fine nail art brush to carefully paint small butterfly shapes in contrasting pastel shades like soft pink or baby blue.
- Begin with a central body line for the butterfly and add two pairs of wings, ensuring they are symmetrical and delicate.
Step 3: Add Details to the Wings
- Outline the wings with a slightly darker pastel shade to define their shape.
- Use a dotting tool or fine brush to add small dots or veins within the wings for texture and dimension.
- Blend multiple pastel shades within the wings to create a soft gradient effect.
Step 4: Final Touches
- Add tiny antennae to each butterfly using a fine brush or toothpick.
- Seal the design with a clear, glossy topcoat to protect the artwork and enhance the dreamy quality of the design.
Ideal Base Colors to Complement Pastel Butterflies
- Blush Pink: A soft, romantic base that enhances the ethereal beauty of pastel butterflies.
- Pale Blue: Mimics the sky, providing a natural and serene backdrop for the design.
- Soft Lavender: Adds a calming, magical feel that pairs beautifully with pastel butterfly details.
- Ombre Background: Create a gradient base with two or more pastel shades to give the design an extra dreamy touch.
Tips for Creating Intricate Details in Butterfly Designs
- Use the Right Tools: A fine nail art brush or a dotting tool ensures precision when painting the wings and adding details.
- Blend Colors for Realism: Mix and blend pastel shades within the wings to mimic the gradient and iridescence of real butterfly wings.
- Keep It Delicate: Focus on light, thin lines and avoid heavy strokes to maintain the softness of the design.
- Practice Makes Perfect: If freehand feels challenging, try using butterfly nail decals or stencils as a guide.
Why It Works
Pastel Butterfly Nail Art captures the delicate elegance of butterflies, combining soft pastel hues with intricate details to create a design that feels both whimsical and sophisticated.
The ethereal quality of the pastel tones paired with the graceful shapes of the butterflies makes this manicure a standout choice for springtime events, weddings, or simply embracing the beauty of nature.
This design is perfect for expressing your artistic side with a touch of dreamy, natural charm.
33. Pastel Color-Blocking Nail Art
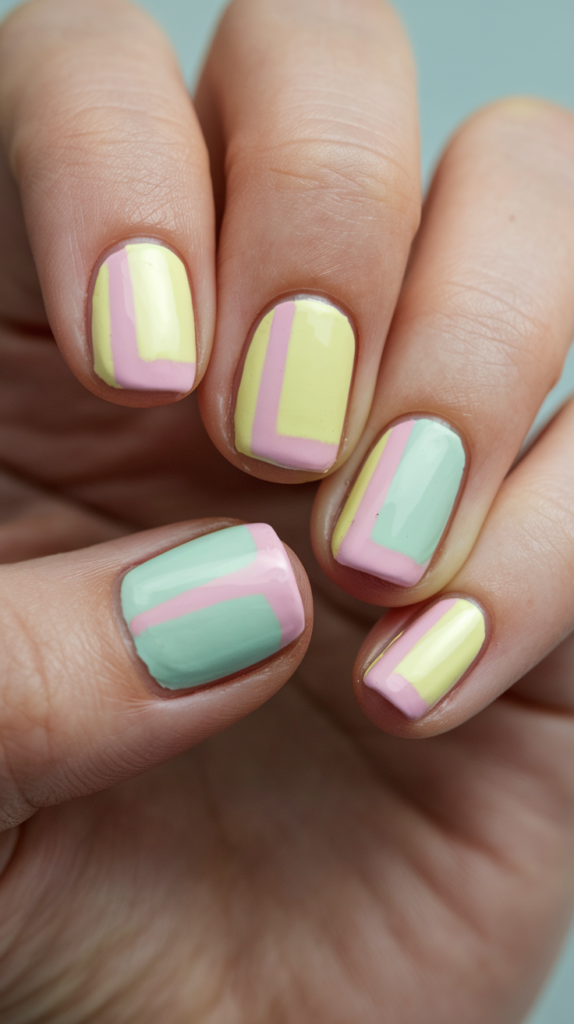
Pastel color-blocking nails combine the bold, geometric appeal of color-blocking with the softness of pastel hues.
This vibrant and modern design is perfect for adding a pop of personality to your nails while keeping the look fresh and elegant.
A Guide to Creating Color-Blocked Sections with Pastel Shades
Step 1: Apply the Base Color
Start by painting your nails with a light pastel base, such as baby pink or mint green. Allow the base coat to dry completely.
Step 2: Section the Nail
Use striping tape or a fine nail art brush to divide the nail into different sections. The sections can be geometric shapes like triangles, squares, or diagonal lines.
Step 3: Paint Each Section
Fill each section with a contrasting pastel shade, such as lavender or soft yellow, ensuring clean, even coverage.
Step 4: Remove the Tape and Refine
Carefully remove the striping tape while the polish is still wet. Use a fine brush to touch up any edges for a sharp, polished finish.
Step 5: Seal the Design
Apply a clear topcoat to smooth the surface and enhance the pastel colors, giving the design a glossy, professional look.
Tips for Balancing Bold Blocks of Color with Negative Space
- Use Negative Space Strategically: Leave parts of the nail bare or painted in a neutral shade like white or nude to prevent the design from feeling too busy.
- Add Minimal Accents: Incorporate thin lines, dots, or subtle glitter within the color-blocked sections for added detail and dimension without overwhelming the design.
- Balance Color Placement: Distribute bold blocks evenly across the nails to maintain a harmonious look.
Best Pastel Pairings for a Striking Color-Blocked Look
- Soft Pink and Lavender: A classic and feminine pairing that feels fresh and light.
- Mint Green and Pale Blue: A calming combination with a modern, beachy vibe.
- Peach and Baby Blue: A fun, vibrant duo that adds a playful touch.
- Coral and Light Yellow: An unexpected yet cheerful combination perfect for summer.
Experiment with contrasting pastel shades to create a bold, eye-catching look while keeping the overall design cohesive and elegant.
Why It Works
Pastel Color-Blocking Nail Art combines the structured boldness of geometric patterns with the softness of pastel tones, resulting in a manicure that’s both vibrant and balanced.
The contrast between the colors and negative space keeps the design visually dynamic, while the pastel palette ensures a fresh and approachable look.
Perfect for spring, summer, or anytime you want to make a statement, this manicure is a stylish way to showcase your creativity and love for color.
34. Pastel Drip Nail Art
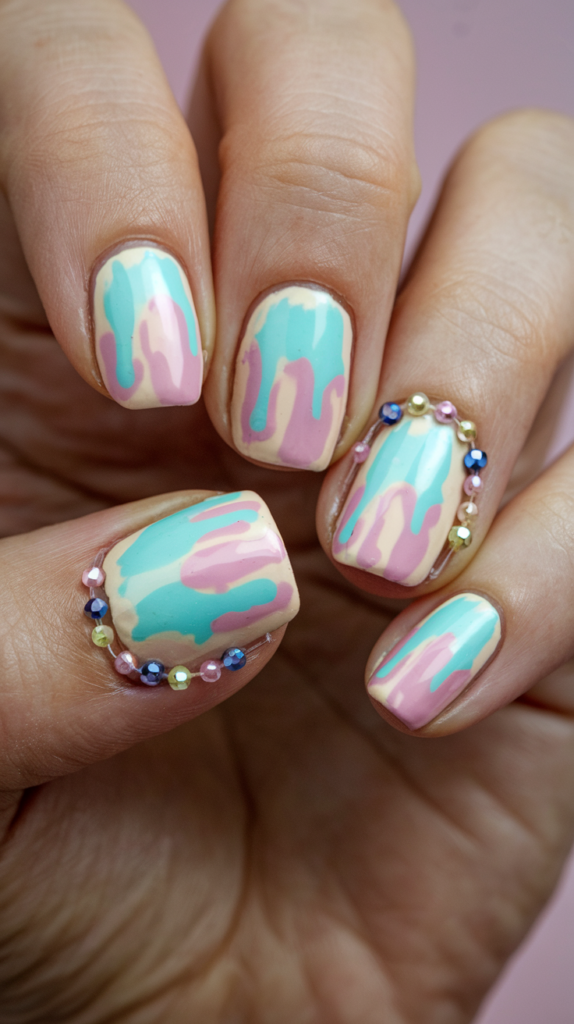
Pastel drip nails are a bold and edgy design with a playful twist, combining soft pastel tones with a fluid, melting effect.
Perfect for those who want to make a statement, this artistic look is both fun and eye-catching.
How to Achieve a Melting Drip Effect Using Pastel Tones
Step 1: Apply the Pastel Base
Begin by painting your nails with a light pastel base color, such as pale pink, mint green, or soft peach. Allow the base coat to dry completely.
Step 2: Outline the Drips
Using a fine nail art brush, outline the shape of the drips starting from the top of the nail.
- Create curved lines that mimic liquid flowing down.
- Vary the length and thickness of the drips for a natural, organic look.
Step 3: Fill in the Drips
Carefully fill in the outlined drips with a contrasting pastel shade, such as lavender or baby blue. Apply multiple layers if needed for opacity.
Step 4: Add Depth and Dimension
For added impact, blend a second pastel shade within the drips to create a gradient effect, making the drips appear more dynamic and fluid.
Step 5: Finish with a Topcoat
Apply a clear, glossy topcoat to smooth out the design and enhance the glossy, melting effect.
Tips for Creating a Realistic, Fluid Drip Design
- Use a Fine Brush: A thin nail art brush provides precision for outlining and filling the drips.
- Mimic Natural Flow: Keep the drips slightly curved and irregular to replicate the natural movement of liquid.
- Layer Colors: Blend pastel shades within the drips for a gradient effect, adding depth and dimension.
- Be Patient: Allow each layer to dry fully before adding additional colors or details to avoid smudging.
Best Pastel Shades for a Bold and Edgy Look
- Light Pink and Lavender: A classic and feminine pairing that adds a soft, artistic touch.
- Mint Green and Soft Yellow: A fresh, spring-inspired combination with playful energy.
- Pastel Coral and Baby Blue: A vibrant and modern duo that feels bold yet approachable.
- Soft Peach and Pale Purple: A unique pairing that adds sophistication to the edgy design.
Why It Works
Pastel Drip Nail Art balances the boldness of the melting effect with the softness of pastel tones, creating a design that’s both edgy and playful.
The fluid lines and contrasting colors make the design visually dynamic, while the pastel palette ensures a fresh and approachable look.
This manicure is perfect for making a stylish statement while showcasing your artistic and creative side.
35. Pastel Rose Quartz Nail Art
Pastel rose quartz nails capture the timeless elegance of the gemstone with soft swirling patterns and delicate veining. This chic and sophisticated design is perfect for creating a subtle yet captivating look inspired by nature’s beauty.
How to Mimic the Natural Swirls of Rose Quartz with Pastel Colors
Step 1: Apply a Pastel Base Color
Start by painting your nails with a pale pink or light lavender base, mimicking the soft hues of rose quartz stone. Allow the base coat to dry completely.
Step 2: Create the Swirls
- Use a fine nail art brush or a sponge to gently swirl white polish across the nails.
- Keep the lines thin and soft, focusing on creating irregular, flowing patterns that resemble natural veining.
- Concentrate more swirls in some areas while leaving others sparse for a realistic, organic effect.
Step 3: Blend the Design
To soften the swirls and create a more seamless look, lightly blend the edges of the white lines using a small sponge or a clean brush dipped in clear polish.
Step 4: Add Dimension
For added depth, incorporate a second pastel shade, such as pale peach or soft lavender, into the swirls, blending it gently with the base color.
Step 5: Finish with a Topcoat
Seal the design with a glossy topcoat to enhance the soft, glowing finish and give the nails a polished, stone-like appearance.
Ideal Color Pairings to Achieve a Rose Quartz Effect
- Classic Pairing: Pale pink base with white veining for a look that closely resembles natural rose quartz.
- Modern Twist: Lavender or pale peach base with white and soft silver swirls for a unique variation.
- Shimmering Accents: Add a touch of iridescent or metallic polish, such as gold or silver, to highlight the veining and give the nails a luxurious finish.
Tips for Adding Metallic Accents for Added Dimension
- Outline the Veins: Use a fine nail art brush to trace thin lines of metallic gold or silver polish along the edges of the white veining for a shimmering effect.
- Subtle Sparkle: Add small flecks of glitter or metallic polish within the design to mimic the reflective crystals found in rose quartz stone.
- Blend Metallics: Lightly blend metallic accents with the base color to create a soft, glowing effect without overpowering the design.
Why It Works
Pastel Rose Quartz Nail Art combines the softness of pastel hues with the natural beauty of swirling patterns and shimmering accents.
The delicate veining and subtle metallic details create a design that feels both elegant and timeless, perfect for special occasions or elevating your everyday look.
This manicure is a luxurious way to embrace the sophistication of rose quartz while showcasing your creative style.
Conclusion
Pastel nail designs are a perfect way to add a touch of elegance, fun, or whimsy to your nails without overwhelming them.
The soft hues blend effortlessly with a variety of patterns and accents, making them suitable for both casual and formal settings.
From delicate florals and playful polka dots to modern abstract art and bold geometric patterns, the 35 designs we’ve covered provide endless inspiration for anyone looking to experiment with pastel nail art.
Whether you’re a beginner or a seasoned nail artist, these ideas will help you create beautiful, show-stopping nails that express your personal style.
Try out these pastel nail designs and bring a subtle pop of color to your look, no matter the season!