Nails have transcended their basic function, evolving into miniature canvases for self-expression and high fashion.
They are potent accessories, capable of conveying personality, status, and an appreciation for intricate artistry.
In the realm of beauty, luxury nail designs stand apart, blending sophisticated techniques with premium materials.
These are not merely manicures; they are meticulously crafted statements of elegance and refinement.
This guide delves into an exclusive collection of the most sought-after luxury nail designs trending today.
Prepare to discover looks that range from understated chic to opulent glamour, each with its unique allure.
We will explore the defining features, the methods to achieve these exquisite styles, and what makes each design a standout choice.
Join us as we journey through a world where nail art meets haute couture.
Diamond Dust French Tips
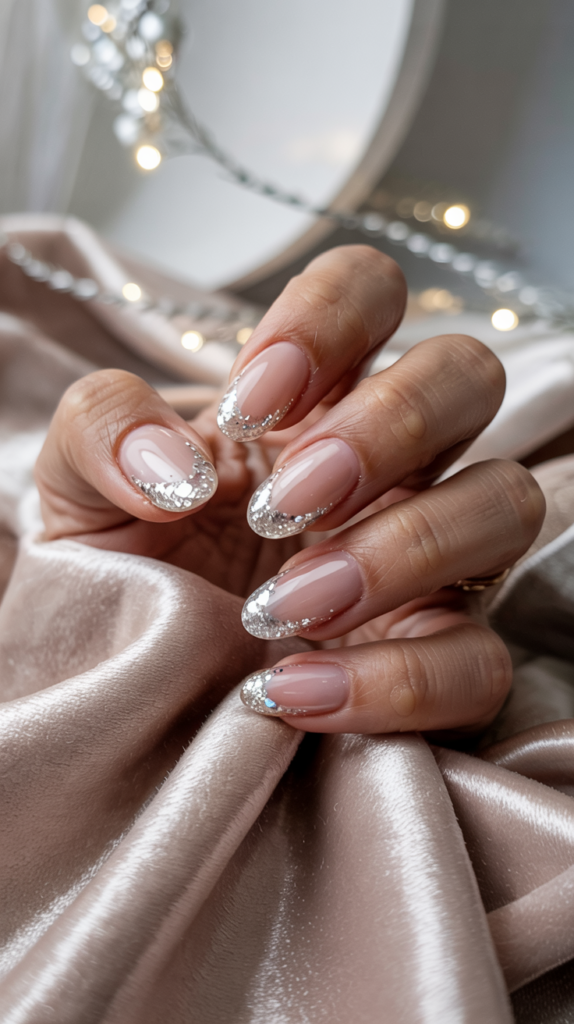
This design reimagines the timeless French manicure with a touch of ethereal sparkle and modern clarity.
It offers a subtle yet captivating brilliance perfect for sophisticated occasions.
Design Features
The foundation is a soft, flattering nude base polish that complements the natural nail bed beautifully.
This creates a clean and elegant backdrop for the main feature.
Micro-diamond glitter is carefully faded from the cuticle area towards the middle of the nail, creating a delicate ombré effect.
The tips are crafted from crystal-clear polish or extensions, offering a striking contrast.
How To Achieve This Look
Begin with meticulous nail preparation, shaping, and applying a high-quality base coat for longevity.
Apply two thin coats of the chosen soft nude gel polish, curing each layer properly.
Using a sponge or fine brush, gently dab the micro-diamond glitter starting near the cuticle, gradually decreasing the density towards the center.
Create the French tip using clear builder gel or clear polish, ensuring a crisp smile line, and cure thoroughly.
Finish with a high-gloss top coat to encapsulate the glitter and enhance the shine.
Why This Stands Out
The Diamond Dust French Tip stands out for its sophisticated fusion of classic style and modern luxury.
The subtle glitter fade adds glamour without being ostentatious.
Its versatility makes it suitable for both bridal events and everyday elegance, offering a refined sparkle.
The clear tips provide a unique, contemporary twist that catches the eye.
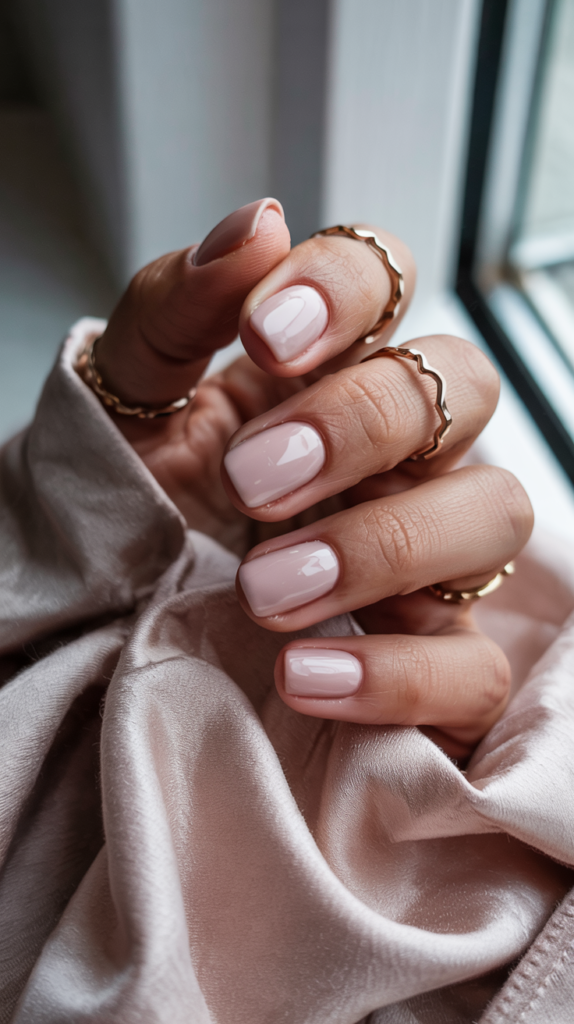
Rose Quartz Elegance
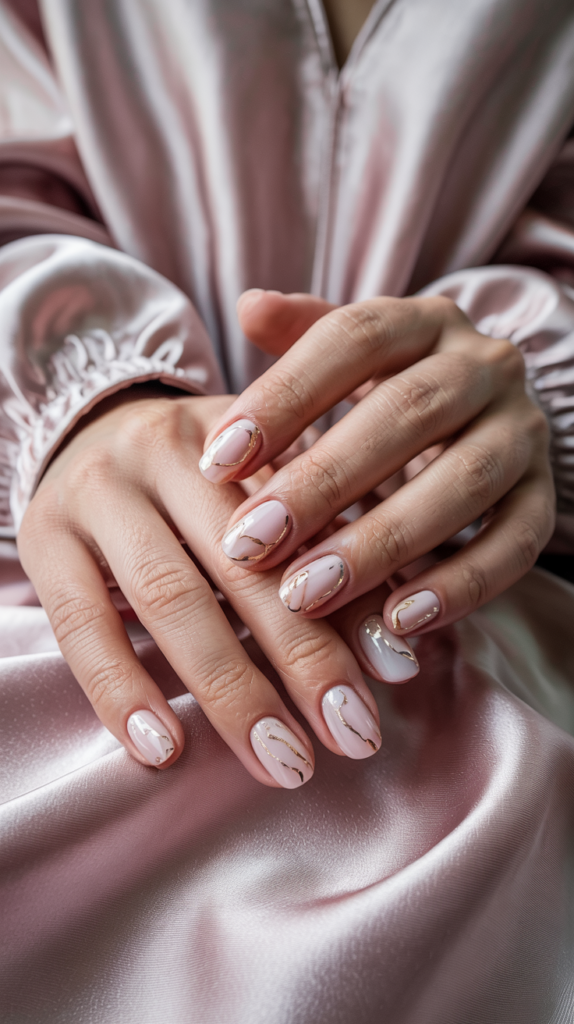
Inspired by the natural beauty of the rose quartz gemstone, this design exudes romance and soft sophistication.
It captures the stone’s delicate hues and characteristic marbled patterns.
Design Features
The base is a translucent, milky pink polish that mimics the gentle color of rose quartz.
Swirls of white or lighter pink are delicately marbled through the base to replicate the stone’s natural inclusions.
Fine veins of gold foil are strategically placed within the marbling, adding a touch of opulence.
The overall effect is soft, feminine, and incredibly chic.
How To Achieve This Look
Start with a prepared nail and apply a sheer pink base coat, leaving it slightly uncured or using a blooming gel.
Use a fine nail art brush to draw thin, swirling lines with white or a lighter pink polish, allowing them to bloom slightly into the base.
Before fully curing, carefully place tiny pieces of gold foil along some of the swirls using tweezers or a wax pen.
Cure the design completely, then apply a glossy top coat to smooth the surface and enhance the quartz-like depth.
Why This Stands Out
Rose Quartz Elegance is notable for its organic beauty and understated luxury, mimicking a precious gemstone.
The combination of soft pink, marbling, and gold foil creates a truly unique and captivating look.
This design feels calming and romantic, making it perfect for those seeking elegance with a natural touch.
It’s a sophisticated way to incorporate texture and subtle metallic accents.
Golden Hour Luxe
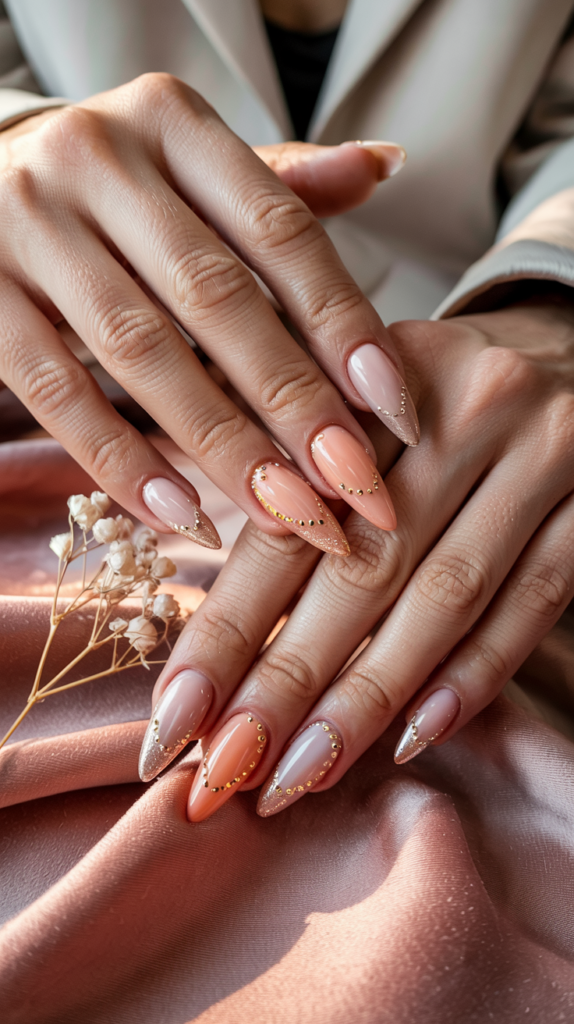
This design captures the warm, ethereal glow of the sunset, often referred to as the “golden hour.” It uses a gradient effect and subtle embellishments for a radiant finish.
Design Features
A seamless gradient transitions through soft gold, warm peach, and champagne hues across the nail.
This blend evokes the breathtaking colors of a sunset sky.
Tiny golden studs or microbeads are sparsely placed, often near the cuticle or along one edge.
These add a delicate point of interest and a touch of luxe texture.
How To Achieve This Look
After applying a base coat, use a makeup sponge to apply the gradient.
Paint stripes of the soft gold, peach, and champagne polish onto the sponge, then gently dab it onto the nail, repeating for opacity.
Clean up the edges carefully before the polish fully dries.
While the top coat is still wet, use a dotting tool or wax pen to place the tiny golden studs strategically, then cure or let dry completely before applying a final layer of top coat.
Why This Stands Out
Golden Hour Luxe stands out for its warm, radiant glow and sophisticated color blending.
The sunset gradient is universally flattering and evokes a sense of warmth and beauty.
The addition of tiny gold studs provides a subtle, luxurious detail that elevates the design beyond a simple gradient.
It’s perfect for adding a touch of sunshine and elegance to any look.
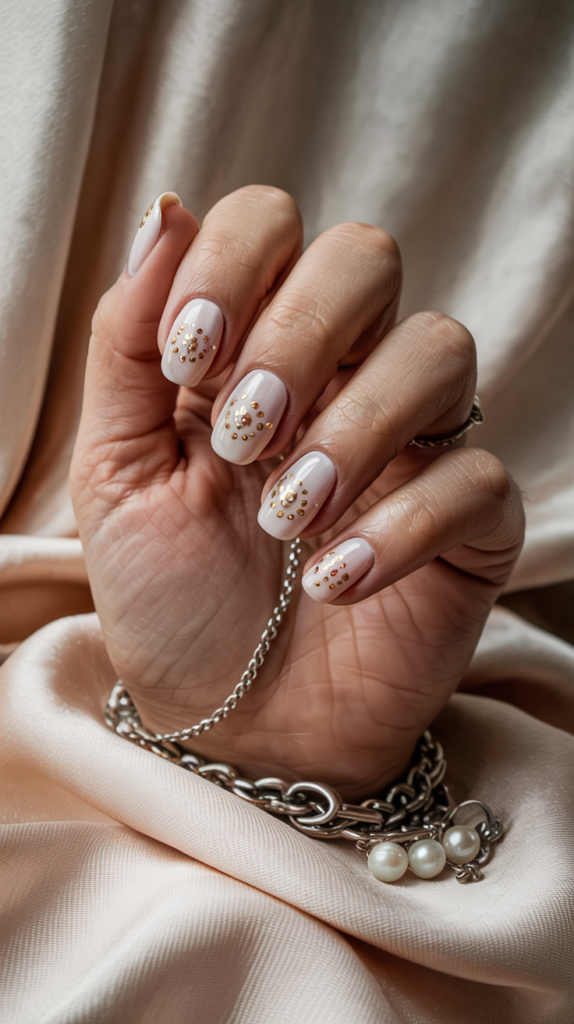
Chanel Pearl Press
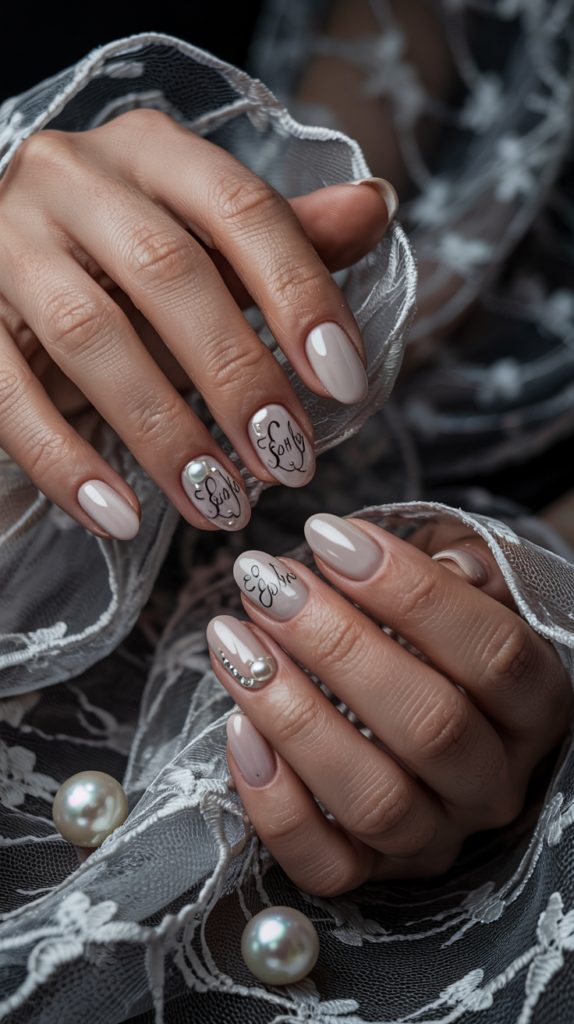
This design pays homage to the iconic elegance of Chanel, combining classic elements like pearls and logos.
It achieves a look that is both sophisticated and distinctly fashion-forward.
Design Features
The base is typically a chic matte nude or soft pink polish, providing an understated canvas.
Dainty pearls, varying slightly in size, are meticulously placed on each nail or as accent details.
Subtle, black micro-logos (like the Chanel CC) are often incorporated, either hand-painted or as decals.
These elements create a look that is instantly recognizable and luxurious.
How To Achieve This Look
Prepare the nails and apply the chosen nude base color, followed by a matte top coat, curing if using gel.
Use nail glue or gel resin to adhere the dainty pearls in the desired pattern, ensuring they are secure.
Apply the black micro-logos using a fine nail art brush and black polish or by carefully placing pre-made decals.
Allow everything to set completely; avoid applying a top coat over the matte finish and pearls unless it’s a specialized matte top coat applied around the embellishments.
Why This Stands Out
Chanel Pearl Press stands out for its direct reference to high fashion, exuding timeless elegance and brand sophistication.
The combination of matte nude, delicate pearls, and iconic logos is undeniably chic.
This design makes a statement about personal style and appreciation for classic luxury motifs.
It’s perfect for fashion enthusiasts looking for a refined yet branded nail look.
Crystal Veil Nails
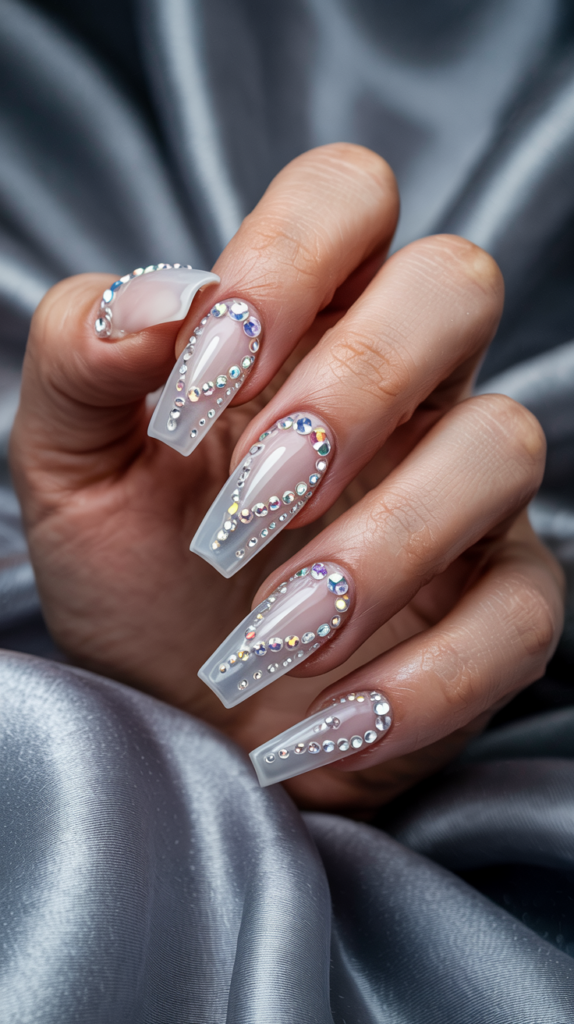
Evoking the delicate beauty of a bridal veil, this design features a cascade of crystals over a soft base.
It’s a look synonymous with romance, elegance, and special occasions.
Design Features
A milky white or very soft sheer nude polish forms the base, creating an ethereal and translucent effect.
Swarovski crystals or high-quality rhinestones of varying small sizes are arranged in a cascading pattern.
The crystals typically start denser near the cuticle and fade out towards the tip, mimicking a veil gently draping.
The overall effect is luminous and incredibly detailed.
How To Achieve This Look
Apply the milky white or sheer nude base polish and cure.
Apply a layer of gem glue or clear builder gel where the crystals will be placed, but do not cure yet.
Using a wax pen or crystal picker tool, carefully place the crystals, starting with slightly larger ones near the cuticle and using progressively smaller ones as you move down the nail.
Once satisfied with the placement, cure the gel thoroughly, then carefully apply top coat around the base of the crystals to secure them without covering their facets.
Why This Stands Out
Crystal Veil Nails are exceptionally striking due to their intricate sparkle and delicate arrangement.
The cascading effect creates beautiful movement and light reflection.
This design is the epitome of bridal or special occasion elegance, offering unmatched glamour and sophistication.
The use of high-quality crystals ensures a brilliant shine that captures attention.
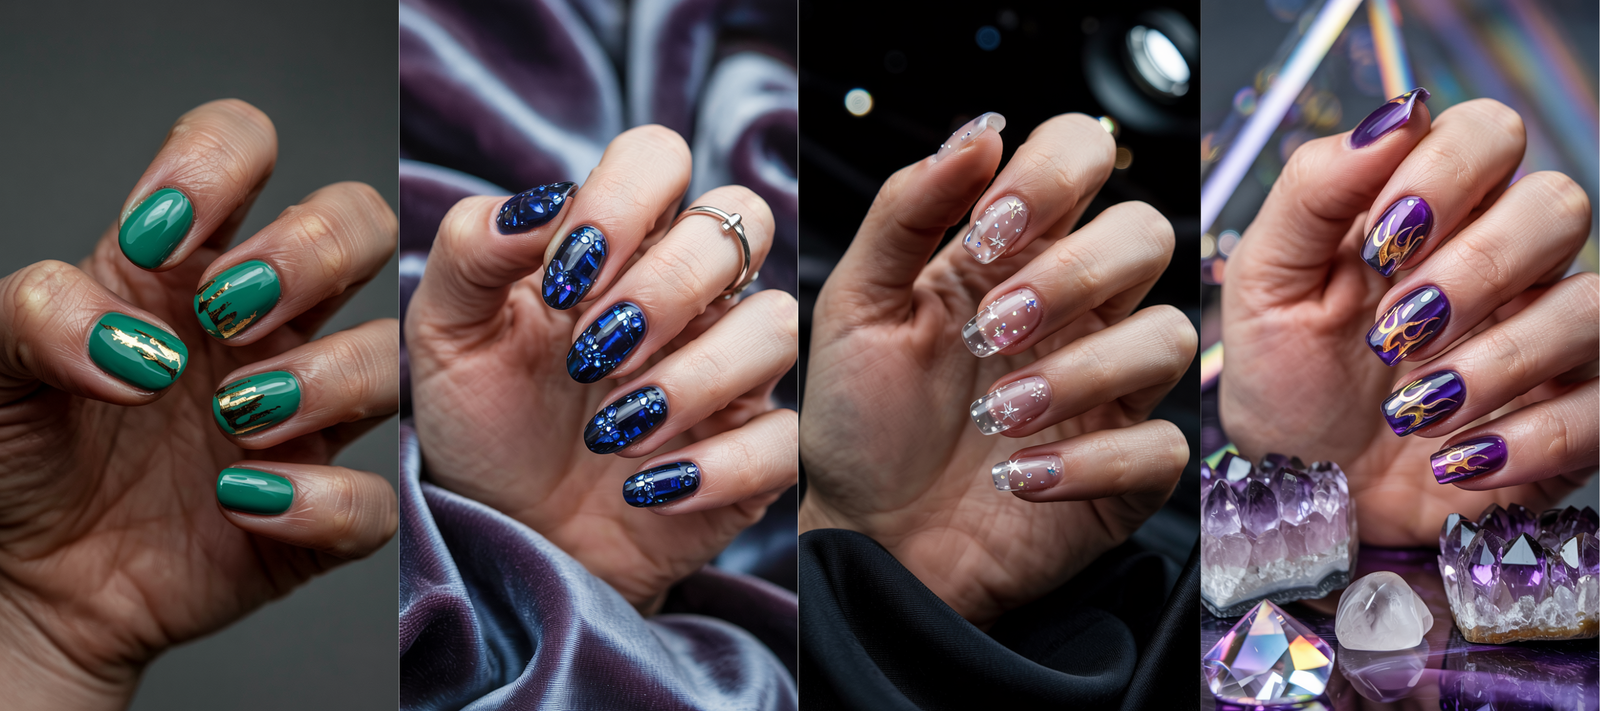
Emerald Skyline
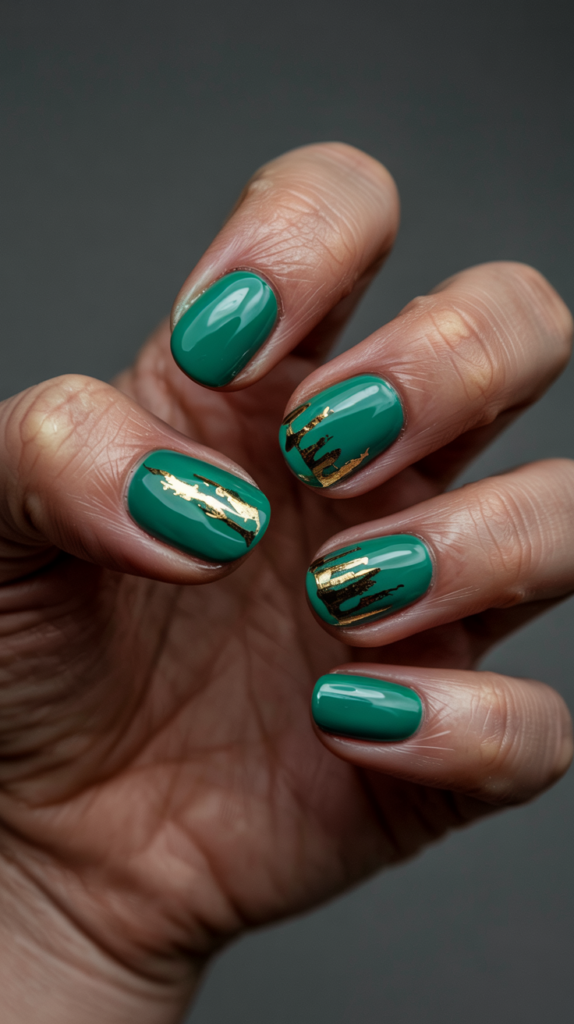
This bold design combines a rich jewel tone with modern metallic accents and graphic elements.
It’s a sophisticated and slightly edgy take on luxury nail art.
Design Features
The base is a deep, glossy emerald green polish, providing a luxurious and vibrant foundation.
Thin chrome gold lines are used to outline the nail shape or create geometric patterns.
The tips often feature a stylized silhouette of a city skyline, also rendered in chrome gold.
This adds a unique graphic element to the design.
How To Achieve This Look
Apply the glossy emerald green base color and cure thoroughly.
Use a fine striping brush and gold chrome polish or gel to carefully paint the outlines or geometric accents.
For the skyline tip, use the same chrome gold and a fine brush to draw the silhouette, or apply a pre-made skyline decal.
Finish with a high-gloss top coat to protect the design and maximize shine.
Why This Stands Out
Emerald Skyline stands out for its striking color combination and unique graphic element.
The deep emerald green paired with reflective gold chrome creates a rich, luxurious contrast.
The skyline silhouette adds an unexpected, modern twist that makes the design memorable and artistic.
It’s perfect for those who appreciate bold color and contemporary design.
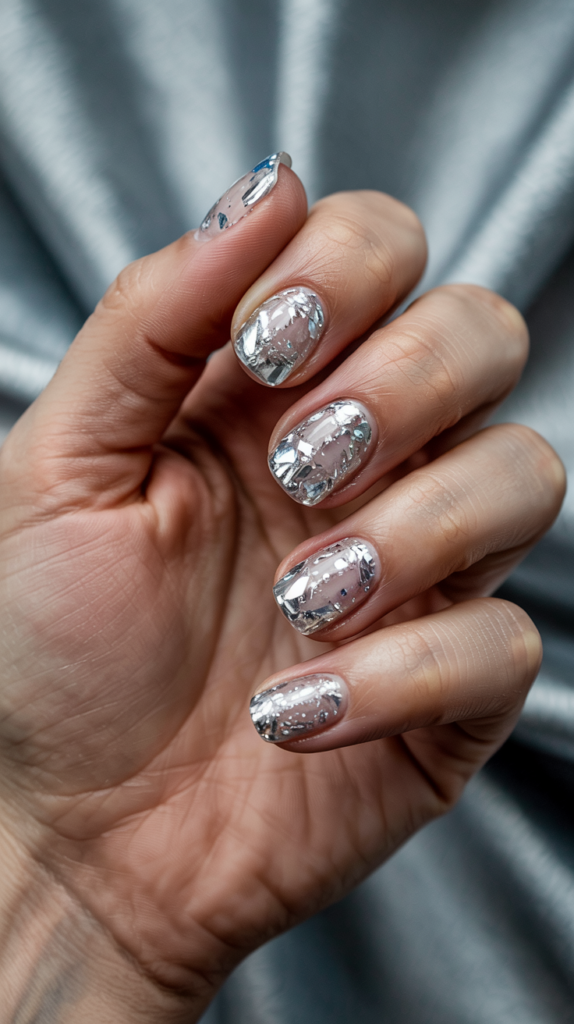
24K Foil Fade
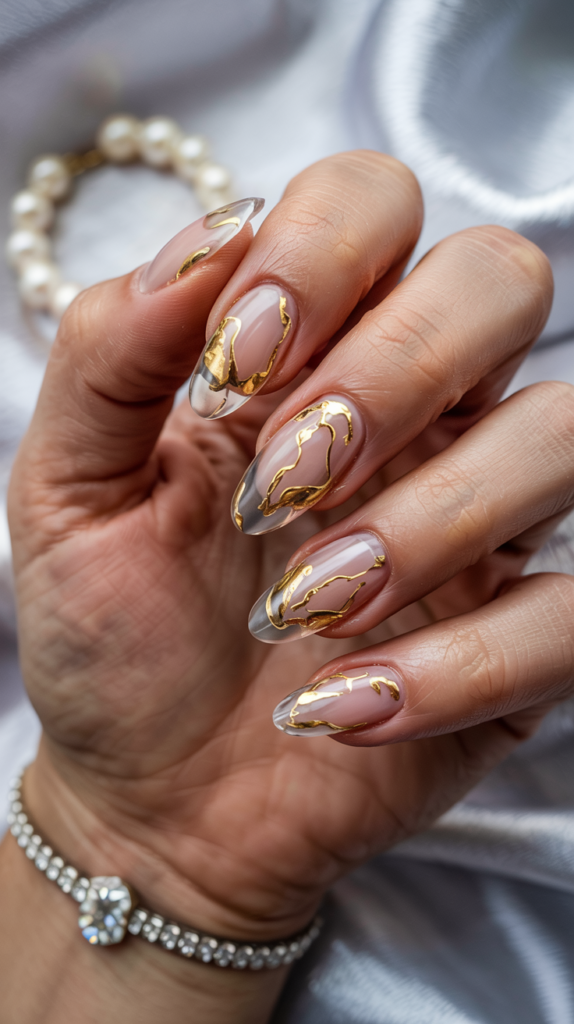
This design incorporates genuine gold foil for an undeniably luxurious and opulent effect.
The foil application creates a rustic yet glamorous texture.
Design Features
The nail shape is often almond or stiletto, providing an elegant canvas, typically left clear or with a very sheer nude base.
Real 24K gold foil flakes are applied starting densely at the cuticle.
The gold foil concentration fades out as it moves towards the middle or tip of the nail.
This creates a melted or organically dispersed appearance.
How To Achieve This Look
Prepare the nail and apply a clear base coat or a very sheer nude polish.
While the base is slightly tacky (or using foil glue/gel), carefully apply flakes of 24K gold foil using tweezers or a brush, concentrating them near the cuticle.
Gently break up and disperse the flakes as you move down the nail to create the fade effect.
Encapsulate the foil thoroughly with a clear builder gel or several layers of top coat to ensure a smooth, durable finish.
Why This Stands Out
The use of genuine 24K gold foil makes this design inherently luxurious and exclusive.
The way the foil catches the light provides a unique, textured shimmer.
Its organic fade effect feels both glamorous and slightly undone, offering a sophisticated yet artistic appeal.
It’s a statement of pure opulence directly on the fingertips.
Blush Cashmere Velvet
This design focuses on texture, replicating the soft, plush feel of cashmere or velvet.
It combines a popular color with a unique finish for tactile and visual appeal.
Design Features
The base color is a soft, matte blush pink, evoking a sense of cozy sophistication.
A special velvet powder or matte top coat with a velvety additive is used to create the signature texture.
Subtle shimmer accents, perhaps a dusting of fine glitter or a single shimmer accent nail, can be added.
This enhances the luxurious feel without compromising the matte texture.
How To Achieve This Look
Apply the blush pink base color and cure.
Apply a matte top coat specifically designed for velvet effects, or sprinkle fine velvet powder onto a wet layer of regular matte top coat before curing.
Gently brush off any excess powder after curing.
If adding shimmer, apply it sparingly before the final matte coat or incorporate it onto an accent nail finished with a standard glossy top coat for contrast.
Why This Stands Out
Blush Cashmere Velvet stands out primarily for its unique, touchable texture, which is unexpected in nail art.
The matte finish combined with the soft blush color creates an understated yet deeply luxurious feel.
It’s a sophisticated choice that plays with sensory experience beyond just visual appeal.
The subtle shimmer adds just enough sparkle to keep it elegant.
Dior Lace Dreams

Inspired by the delicate and intricate lace often seen in Dior couture, this design is the epitome of feminine elegance.
It requires precision and artistry to achieve its detailed look.
Design Features
A sheer ivory or pale nude polish provides a delicate, translucent base.
Intricate white lace patterns are meticulously hand-painted onto the nail surface.
Tiny silver embellishments, such as microbeads or small crystals, are often added to the lace pattern.
These accents enhance the detail and add a subtle sparkle.
How To Achieve This Look
Apply the sheer ivory base polish and cure.
Using a very fine nail art brush and white gel paint or polish, carefully hand-paint the lace details – florals, scrolls, and netting patterns require a steady hand.
While the white paint is still wet or using gem glue, add tiny silver microbeads or crystals at intersections or key points in the lace pattern.
Cure the design thoroughly and finish with a high-gloss top coat to protect the delicate artwork.
Why This Stands Out
Dior Lace Dreams stands out for its incredible intricacy and romantic, high-fashion aesthetic.
The hand-painted lace requires significant skill, making each manicure a work of art.
The combination of sheer base, delicate white lace, and subtle silver sparkle evokes couture quality.
It’s perfect for formal events or for anyone who appreciates detailed, feminine designs.
Sapphire Sparkle Almonds
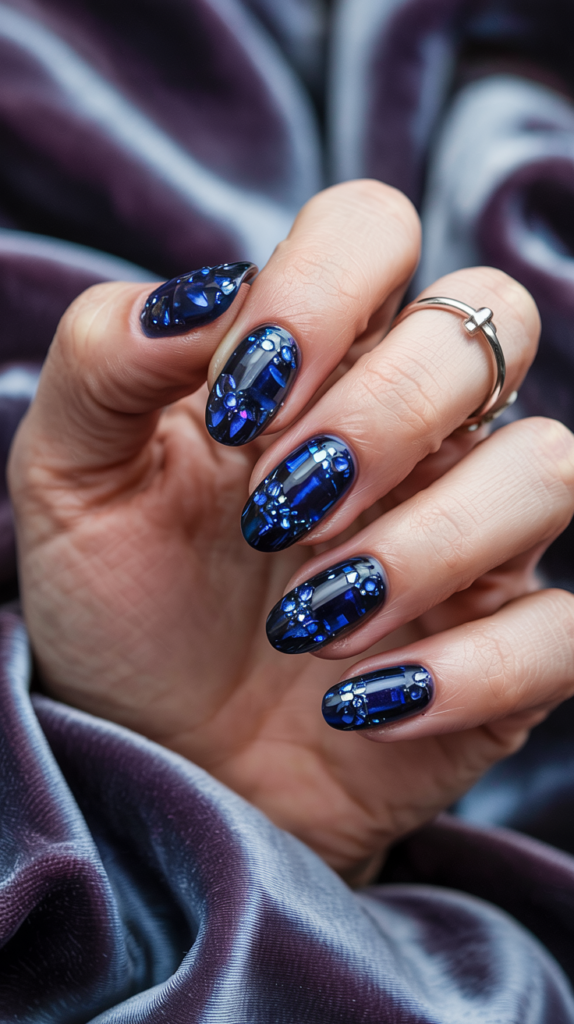
This design combines a deep, luxurious jewel tone with dazzling holographic effects and gem accents.
It’s a rich, eye-catching look perfect for making a statement.
Design Features
The base is a deep, vibrant sapphire blue polish, often with a glossy finish.
Layers of holographic flakes or glitter are embedded within the polish or top coat.
Small sapphire-colored gems or clear crystals are added as accents, often near the cuticle or on accent nails.
The preferred nail shape is typically almond, enhancing the elegance.
How To Achieve This Look
Apply the deep sapphire blue base color, possibly in multiple coats for full opacity, curing each layer.
Before the final color coat or within the top coat, embed holographic flakes using a brush or sponge.
Apply gem glue or gel resin and place the sapphire gems or crystals in the desired positions.
Cure thoroughly and apply a final glossy top coat, ensuring the gems are securely anchored.
Why This Stands Out
Sapphire Sparkle Almonds are striking due to the combination of the rich sapphire hue and the dazzling holographic effect.
The depth of the blue contrasts beautifully with the multi-tonal sparkle.
The addition of coordinating gem accents elevates the design, adding texture and reinforcing the luxurious jewel theme.
It’s a bold, glamorous choice that commands attention.
Monogram Mania
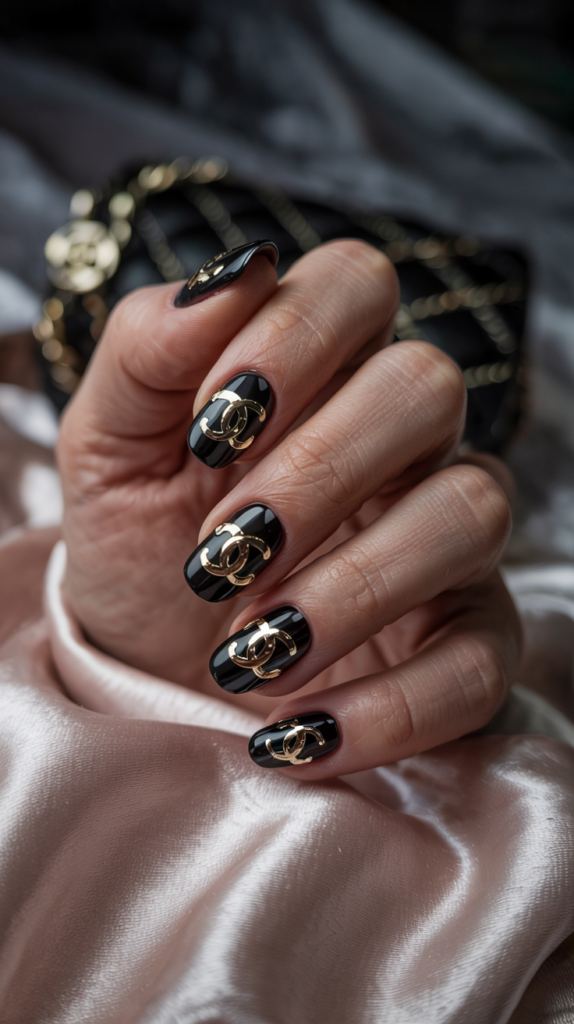
This design embraces logomania, featuring iconic designer monograms for a bold, fashion-forward statement.
It’s a direct nod to luxury branding and streetwear trends.
Design Features
The base is often a glossy black or another classic neutral like nude or white, allowing the monograms to pop.
Metallic monograms (e.g., LV, GG, CD) are the main feature, applied across the nails.
The monograms can be hand-painted, applied as decals, or even created as 3D charms.
The finish is typically high-gloss to enhance the sleekness.
How To Achieve This Look
Apply the chosen base color (e.g., glossy black) and cure thoroughly.
Carefully apply metallic monogram decals using tweezers, ensuring they lay flat without bubbles.
Alternatively, use a fine brush and metallic chrome paint to hand-paint the monograms.
For 3D charms, adhere them securely with strong nail glue or gel resin before applying the top coat around them.
Finish with a high-gloss top coat.
Why This Stands Out
Monogram Mania stands out for its bold branding and direct connection to high fashion labels.
It’s an unapologetically luxurious and trendy statement.
The contrast between a classic base color and metallic monograms creates a visually impactful look.
It appeals to fashion lovers who enjoy showcasing their favorite designer motifs.
Mother Of Pearl Mirage
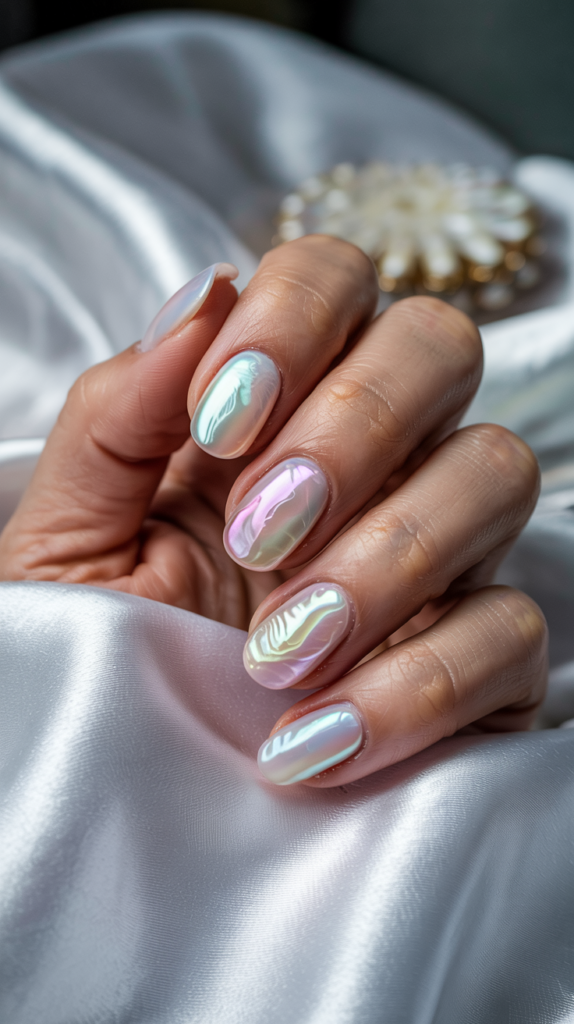
This design mimics the beautiful, iridescent quality of mother-of-pearl shells.
It creates a soft, shifting luminescence that is both subtle and captivating.
Design Features
The base features an opalescent or iridescent polish that shifts in color with the light.
Irregularly shaped pieces of nail foil, iridescent flakes, or actual shell fragments are embedded.
The patterns mimic the natural, unique formations found inside oyster shells.
A glossy top coat enhances the shine and smooths the surface.
How To Achieve This Look
Apply a base coat, followed by one or two coats of an opalescent polish.
While the polish is tacky or using a gel base, embed iridescent flakes or carefully broken pieces of thin shell or foil, arranging them in an irregular pattern.
Ensure the pieces lay relatively flat.
Encapsulate the design with a clear builder gel or several layers of glossy top coat, ensuring a perfectly smooth, high-shine finish that mimics the shell’s luster.
Why This Stands Out
Mother of Pearl Mirage is captivating due to its subtle yet complex iridescence and organic patterns.
It offers a unique shimmer that changes depending on the angle and light.
The design feels natural and ethereal, providing a softer approach to luxury compared to bold glitter or metallics.
It’s elegant, timeless, and endlessly fascinating to look at.
Platinum French Sculpt
This design offers a modern, edgy twist on the French manicure using bold metallic finishes and sculpted shapes.
It’s a futuristic and high-impact look.
Design Features
Instead of the traditional white tip, this features a reversed French or a full tip in striking platinum chrome.
The base of the nail is often kept nude or clear for contrast.
The preferred nail shapes are typically dramatic, such as sharp stiletto or defined almond, often with a sculpted C-curve.
This enhances the modern, architectural feel.
How To Achieve This Look
Prepare and sculpt the nail extensions into the desired stiletto or almond shape, paying attention to structure.
Apply a nude or clear base color to the nail bed area.
For the platinum French tip (or reversed French near the cuticle), apply a no-wipe top coat, cure, and then meticulously rub platinum chrome powder onto that specific area.
Seal the chrome carefully with another layer of top coat, ensuring clean lines.
Why This Stands Out
Platinum French Sculpt stands out for its bold use of chrome and its modern interpretation of a classic style.
The high-shine metallic finish combined with sharp, sculpted shapes creates a futuristic and edgy vibe.
The contrast between the metallic tip/base and the nude nail bed is visually striking.
It’s a powerful, high-fashion statement for those who embrace bold trends.
Rose Gold Drip
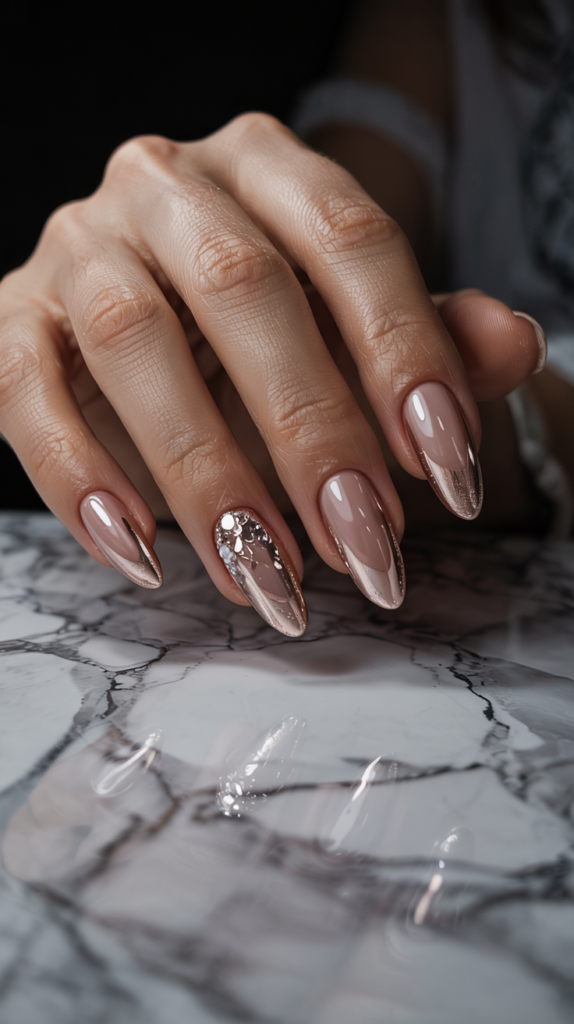
This design combines a neutral base with a trendy dripping effect in luxurious rose gold.
It adds an element of edgy glamour with a touch of sparkle.
Design Features
A neutral base color, such as nude, beige, or soft pink, provides a clean backdrop.
Metallic rose gold polish is applied to look like it’s dripping down from the cuticle or tip.
Often, the cuticle area is adorned with tiny crystals or studs, enhancing the “drip” origin point.
The contrast between the neutral base and metallic drip is key.
How To Achieve This Look
Apply the neutral base color and cure.
Using a dotting tool and a fine brush with rose gold metallic polish or gel, create the dripping effect: place dots near the cuticle/tip and draw thin lines trailing down, varying the lengths.
Before curing the drips (if using gel), or while the top coat is wet, place tiny crystals near the cuticle line.
Cure everything thoroughly and finish with a glossy top coat over the entire nail.
Why This Stands Out
Rose Gold Drip stands out for its playful yet luxurious dripping effect, combining edginess with elegance.
The use of rose gold adds warmth and a trendy metallic sheen.
The crystal cuticle accents enhance the glamour factor, making the design feel opulent.
It’s a creative and eye-catching way to incorporate metallics and embellishments.
Bridal Glimmer Veil
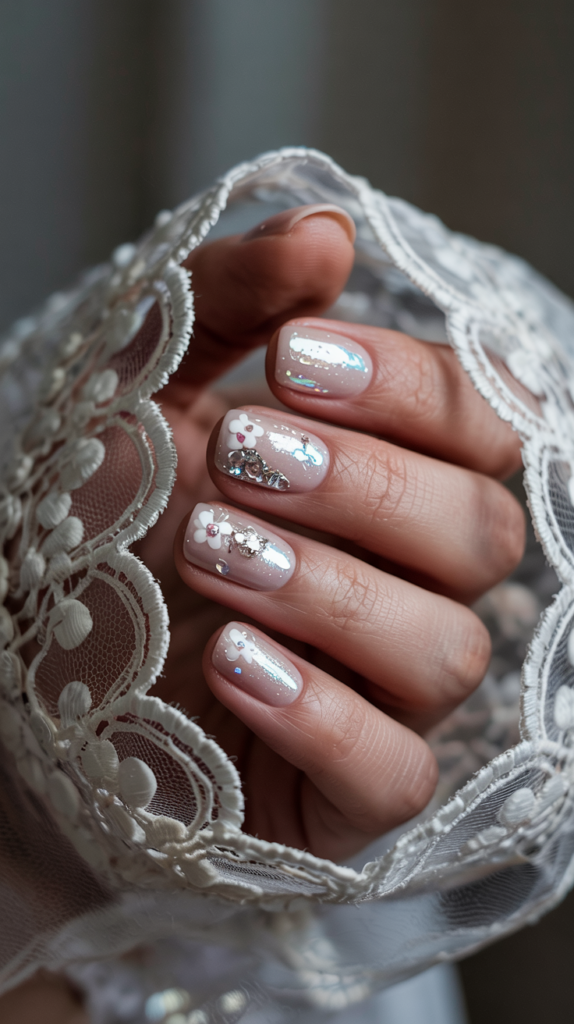
Similar to Crystal Veil, but with a softer, more diffused sparkle and floral accents, this design is perfect for a romantic bridal look.
It focuses on holographic shimmer rather than distinct crystals.
Design Features
The base is a soft nude or sheer pink, creating a natural and elegant foundation.
A holographic shimmer “veil” or powder is applied over the base, giving a diffused, ethereal glow.
Tiny white hand-painted florals or delicate 3D flower charms are added sparingly.
This enhances the bridal theme with a touch of feminine detail.
How To Achieve This Look
Apply the soft nude base color and cure.
Apply a layer of top coat or blooming gel and dust or burnish a fine holographic shimmer powder over the nail for the veil effect, then cure.
Using white nail art paint and a fine brush, add tiny floral details.
Alternatively, adhere small 3D white flower charms using nail glue or gel resin.
Finish with a glossy top coat.
Why This Stands Out
Bridal Glimmer Veil offers a softer, more ethereal take on bridal nails compared to heavy crystal designs.
The holographic shimmer provides a magical glow without sharp facets.
The addition of delicate white florals enhances the romantic, bridal feel.
It’s perfectly suited for brides seeking understated elegance with a touch of shimmer and detail.
Black Tie Luxury
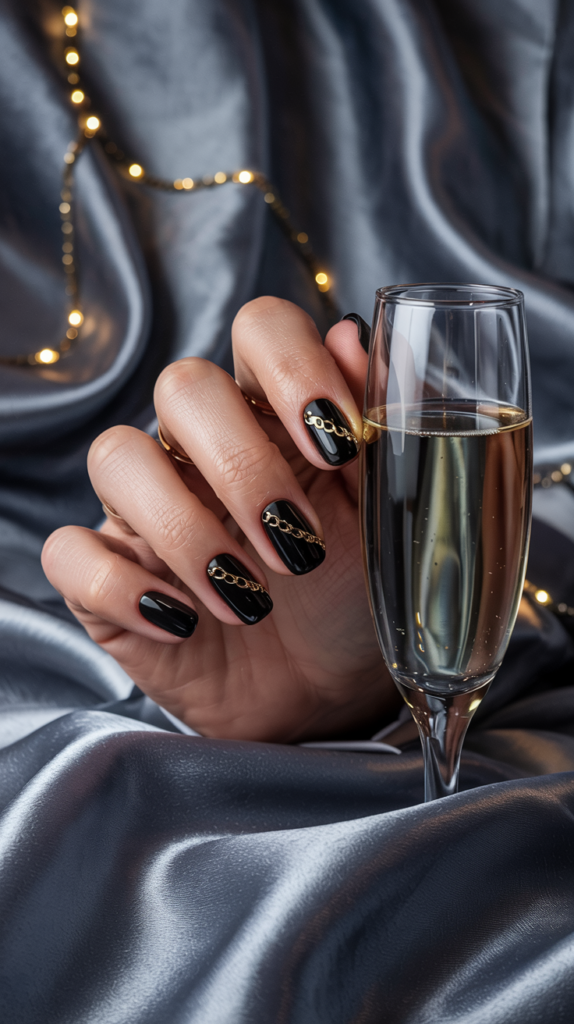
This design embodies the sophistication and drama of a black-tie event.
It uses high-gloss black, gold accents, and structured details for a powerful statement.
Design Features
The base is a high-gloss, opaque jet-black polish, creating a sleek and dramatic foundation.
Fine gold chain detailing is meticulously applied, often draping near the cuticle or along the sides.
Gold cuff accents, like a solid gold band near the cuticle or tip (similar to a reversed or capped French), add structure.
The overall look is sharp, polished, and opulent.
How To Achieve This Look
Apply the jet-black polish until fully opaque and glossy, curing each layer.
Use nail glue or gel resin to carefully adhere fine gold nail chains in the desired draped pattern.
For cuff accents, use gold chrome powder applied over a cured no-wipe top coat in the designated area, or use gold striping tape sealed thoroughly.
Finish with a high-gloss top coat over the entire nail, ensuring chains are embedded smoothly.
Why This Stands Out
Black Tie Luxury stands out for its bold contrast between deep black and radiant gold, exuding power and sophistication.
The use of chain detailing adds a unique, textural element of luxury.
The structured cuff accents provide a polished, high-fashion feel.
It’s the perfect nail design to complement formal wear or for anyone seeking a dramatic, elegant look.
Champagne Bubble Glitz
This design captures the effervescence and celebration associated with champagne.
It uses an iridescent base and strategically placed rhinestones to mimic bubbles.
Design Features
The base is an iridescent champagne or pale gold polish, providing a bubbly, luminous background.
Clusters of small, round rhinestones or clear gems are placed near the nail base (cuticle area).
The rhinestones are typically clear or champagne-colored, resembling bubbles rising in a glass.
The placement in clusters enhances this effervescent effect.
How To Achieve This Look
Apply the iridescent champagne base polish and cure.
Apply gem glue or clear builder gel in small areas near the cuticle where the clusters will be placed.
Using a wax pen, pick up and place the small, round rhinestones in tight clusters of varying sizes.
Cure the gems thoroughly, then apply top coat carefully around the base of the clusters to secure them.
Why This Stands Out
Champagne Bubble Glitz is unique for its celebratory and playful theme, executed with elegance.
The iridescent base combined with the “bubble” rhinestone clusters creates a visually delightful effect.
It’s a sophisticated way to incorporate bling, perfect for parties, celebrations, or adding a touch of festive glamour.
The clustered placement feels more dynamic than scattered gems.
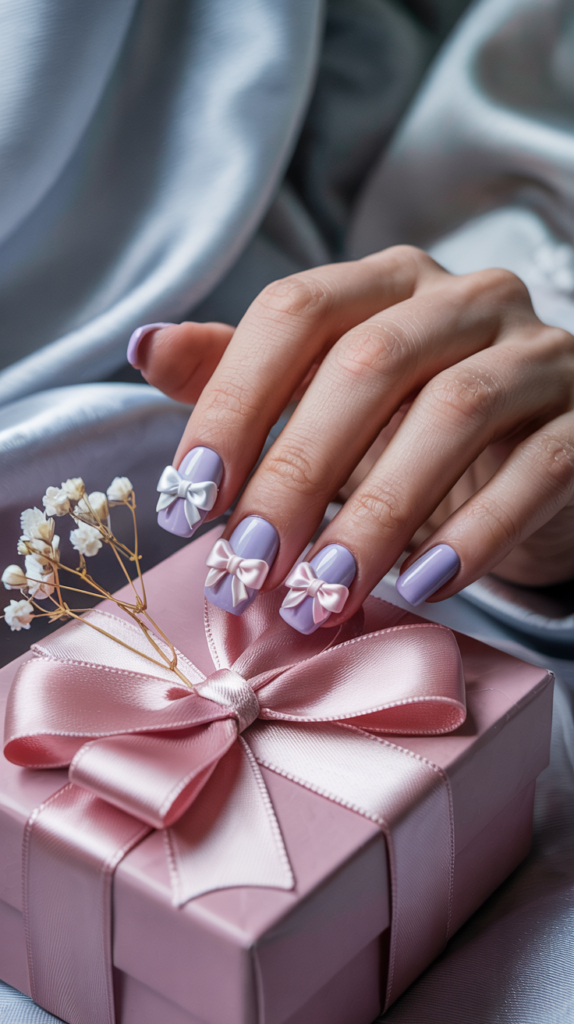
Silk Ribbon Nails

This design incorporates charming 3D elements that mimic soft silk ribbons and bows.
It offers a sweet, feminine, and textural look, often in pastel shades.
Design Features
A pastel base color (like baby pink, powder blue, or soft mint) sets a delicate tone.
3D ribbons and bows, sculpted from acrylic or gel, are the main focus.
The sculpted elements are often finished with a polish that mimics a silk-effect or satin sheen.
This enhances the realism and luxurious feel of the ribbons.
How To Achieve This Look
Apply the chosen pastel base color and cure.
Use colored acrylic powder or sculpting gel and a fine brush to meticulously sculpt the ribbon and bow shapes directly onto the nail.
Ensure the shapes have dimension and flow like real fabric.
Once cured, paint the sculpted elements with a satin or silk-effect polish, or seal with a matte top coat for a soft finish.
Apply glossy top coat to the base nail around the 3D elements.
Why This Stands Out
Silk Ribbon Nails stand out for their adorable 3D artistry and textural contrast.
The sculpted bows add a playful, feminine charm that is unique and eye-catching.
The silk-effect finish on the ribbons enhances the luxurious theme.
It’s a perfect choice for those who love intricate details and hyper-feminine aesthetics.
Luxury Leopard Tips
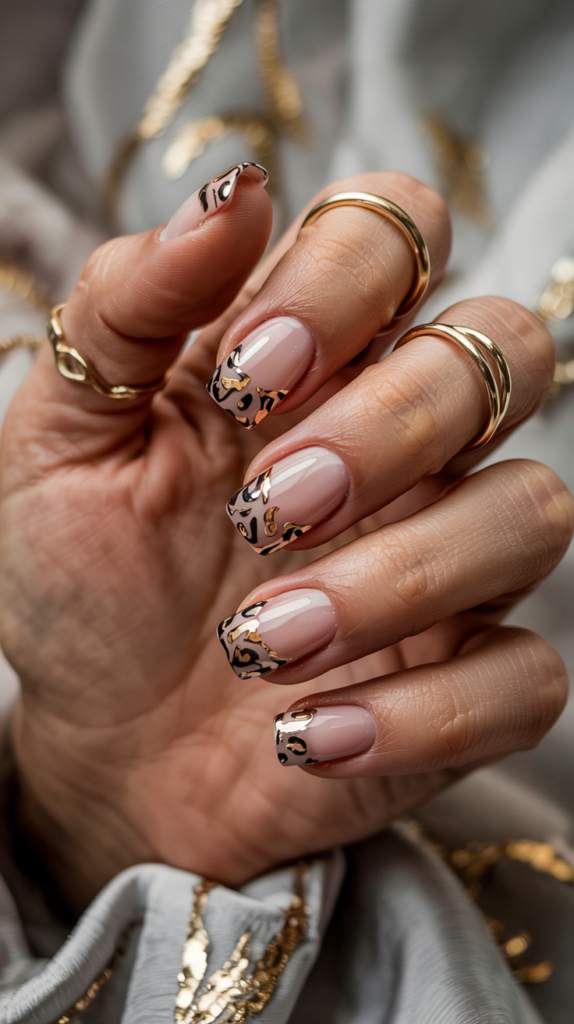
This design gives the classic French manicure a fierce and fashionable update using leopard print.
Metallic foils elevate the pattern for a luxurious twist.
Design Features
The base of the nail is typically kept nude or sheer pink, maintaining a classic French foundation.
The French tips are adorned with a leopard print pattern.
Instead of traditional brown and black, the leopard spots are created using gold and black foil or metallic polish.
This adds a glamorous and modern edge to the animal print.
How To Achieve This Look
Apply the nude base color and cure.
Create the French tip shape using a base color for the spots (e.g., a tan or gold shade).
Use black polish or gel paint to create the characteristic ‘C’ shapes and dots of the leopard pattern over the tip area.
Alternatively, apply small pieces of gold and black transfer foil onto a sticky layer over the tip to create the pattern.
Seal with a glossy top coat.
Why This Stands Out
Luxury Leopard Tips offer a bold and trendy take on the French manicure, blending classic with fierce.
The use of metallic foils for the leopard print makes it feel significantly more luxurious than standard print.
It’s a statement look that showcases personality and a flair for fashion.
The contrast between the nude base and the metallic patterned tip is striking.
Celestial Opulence
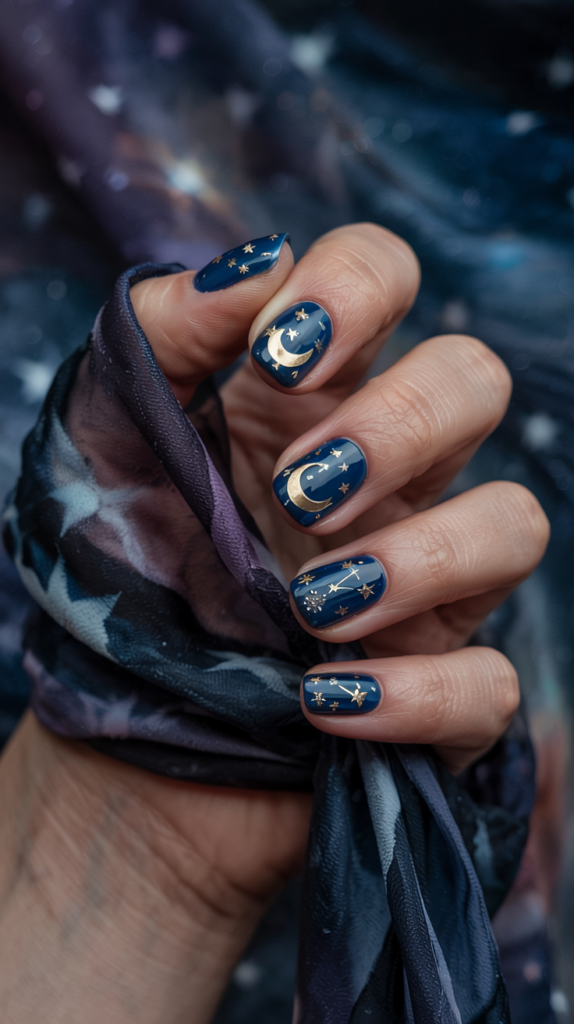
Drawing inspiration from the night sky, this design combines deep colors with cosmic symbols in gold.
It evokes a sense of mystery, magic, and infinite luxury.
Design Features
A deep navy blue or black polish serves as the base, representing the night sky.
Gold moons, stars, and constellation patterns are added using paint, decals, or charms.
Tiny crystals or studs are often incorporated to represent distant stars or add extra sparkle.
The overall effect is mystical and richly detailed.
How To Achieve This Look
Apply the deep navy or black base color and cure thoroughly.
Use gold metallic paint and a fine brush to hand-paint celestial shapes, or apply gold moon and star decals or thin metal charms.
Use gem glue or gel resin to add tiny crystals or studs for extra starry detail.
Finish with a high-gloss top coat to encapsulate the design and create a starry-night depth.
Why This Stands Out
Celestial Opulence stands out for its enchanting theme and rich color palette.
The combination of deep blue/black and shimmering gold creates a luxurious and magical contrast.
The intricate details of moons, stars, and constellations make it visually captivating.
It’s perfect for those who love mystical aesthetics blended with sophisticated glamour.
Gilded Garden Blooms

This design transforms nails into miniature canvases featuring elegant floral arrangements accented with gold.
It’s a romantic and artistic expression of luxury.
Design Features
An ivory, cream, or soft pastel base provides a delicate backdrop, reminiscent of fine china or parchment.
Hand-painted floral arrangements (roses, peonies, etc.) are the central feature.
Gold foil or gold paint is used to outline petals, add leaves, or create abstract gilded accents within the floral design.
This elevates the artwork with a touch of opulence.
How To Achieve This Look
Apply the ivory or pastel base color and cure.
Use fine nail art brushes and various polish colors to hand-paint the desired floral arrangements, building up layers for depth.
Once the floral painting is complete and cured, use gold foil glue and gold foil flakes, or a fine brush with gold paint, to add the gilded accents.
Seal the entire intricate design carefully with a glossy top coat.
Why This Stands Out
Gilded Garden Blooms stands out for its exquisite hand-painted artistry and romantic theme.
The combination of delicate florals and gold accents feels timelessly elegant and luxurious.
Each nail can be a unique composition, showcasing the skill of the nail artist.
It’s perfect for special occasions or for those who appreciate wearable art.
Haute Couture Chains
This design incorporates bold 3D chain elements onto the nail, inspired by high-fashion accessories.
It creates a look that is both edgy and undeniably luxurious.
Design Features
A matte white or nude base often provides a clean, modern canvas for the chains.
3D gold chain links, either full links or segments, are prominently featured.
Small gemstone studs or pearls might be added at the connection points or ends of the chains.
This enhances the jewelry-like quality of the design.
How To Achieve This Look
Apply the chosen base color and finish with a matte top coat, then cure.
Use strong nail glue or thick gel resin to adhere the 3D gold chain elements securely onto the nail surface.
If adding studs, place them strategically near the chains using the same adhesive method.
Cure thoroughly.
Avoid applying top coat over the matte base, applying it only under and around the base of the 3D elements if needed for security.
Why This Stands Out
Haute Couture Chains are exceptionally bold and textural, making a strong fashion statement.
The 3D element immediately draws the eye and mimics luxury hardware or jewelry.
The contrast between a potentially simple matte base and the chunky gold chains creates an edgy, high-fashion juxtaposition.
It’s perfect for trendsetters looking for a standout accessory.
Crushed Diamond Overlay
This design aims to replicate the intense sparkle of crushed diamonds using specialized glitter.
It offers maximum bling and a richly textured, glamorous finish.
Design Features
The base can be a silver-tinted polish or a clear base to let the glitter dominate.
A dense layer of crushed glass glitter or high-sparkle diamond-dust glitter is applied over the nail.
The glitter particles are usually irregular in shape, mimicking crushed gems.
The finish is intensely sparkly and textured, even under a top coat.
How To Achieve This Look
Apply the silver-tinted or clear base color.
While the base is wet, or over a layer of clear gel or glitter adhesive, generously apply the crushed glass or diamond-dust glitter, pressing it gently into the surface.
Ensure full coverage for maximum impact.
Encapsulate the glitter thoroughly with several layers of glossy top coat or clear builder gel to create a smoother (though still textured) finish and secure the particles.
Why This Stands Out
Crushed Diamond Overlay stands out for its unparalleled level of sparkle and textured finish.
It delivers maximum glamour and captures light intensely from all angles.
Unlike fine glitter, the larger, irregular particles create a more dimensional and luxurious diamond-like effect.
It’s the ultimate choice for those who want their nails to be the center of attention.
Cashmere Moonlight

This design combines a soft, sophisticated color palette with velvet texture and subtle celestial details.
It’s an understated yet elegant and moody look.
Design Features
The base color is a soft grey-mauve or taupe, evoking a sense of calm sophistication.
The finish is a velvet matte top coat, giving it that luxurious cashmere feel.
Subtle silver crescent moon details, either painted or as small charms/decals, are added.
These provide a delicate, mystical touch against the soft matte background.
How To Achieve This Look
Apply the grey-mauve base color and cure.
Apply a velvet matte top coat and cure thoroughly for the signature texture.
Using silver chrome paint and a fine brush, carefully paint small crescent moons.
Alternatively, apply silver moon decals or adhere small metallic moon charms using nail glue or resin near the cuticle or side of the nail.
Why This Stands Out
Cashmere Moonlight stands out for its sophisticated color palette and luxurious matte texture.
The combination of soft grey-mauve and velvet finish feels cozy yet chic.
The subtle silver crescent moon detail adds a touch of enchantment without overpowering the understated elegance.
It’s perfect for a refined, moody, and modern look.
Pink Champagne Crystals
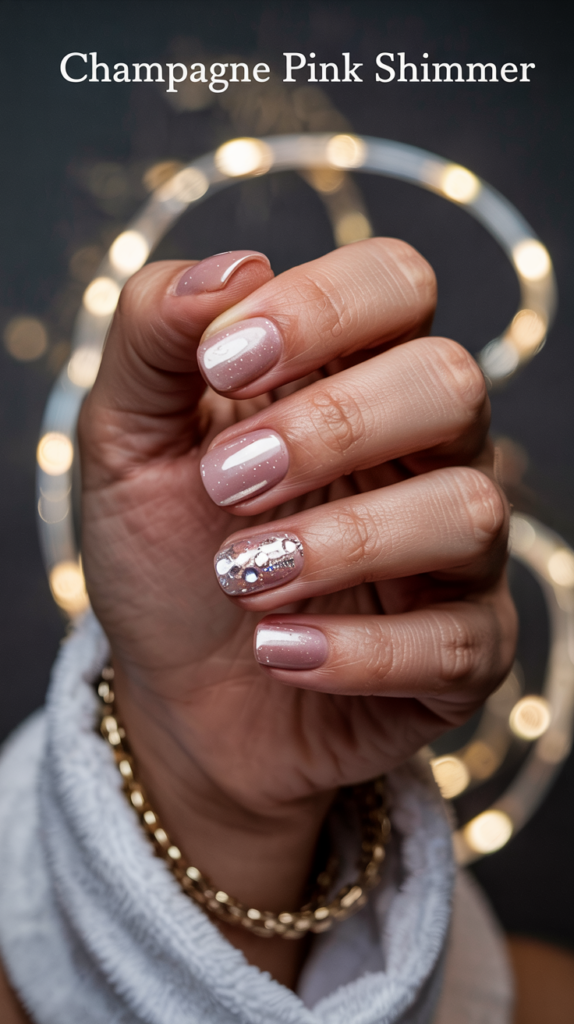
This design blends a popular bubbly hue with soft shimmer and crystal accents.
It’s a celebratory yet sophisticated look, often featuring accent nails.
Design Features
The base is a champagne-pink polish, offering warmth and subtle iridescence.
A soft, fine glimmer or shimmer is often incorporated into the base polish itself.
Accent nails typically feature clusters of “bubble” crystals (round, clear, or pinkish) near the base.
This echoes the Champagne Bubble Glitz design but with a warmer color scheme.
How To Achieve This Look
Apply the champagne-pink shimmer base color to all nails and cure.
On the chosen accent nails, apply gem glue or clear builder gel near the cuticle area.
Create clusters of small, round crystals in varying sizes using a wax pen for placement.
Cure the crystals thoroughly and seal around their base with top coat for durability.
Why This Stands Out
Pink Champagne Crystals offer a warmer, more romantic take on celebratory nail designs.
The champagne-pink hue is widely flattering and feels sophisticated.
The combination of soft shimmer and focused crystal accents creates a balanced look – glamorous but not overwhelming.
It’s perfect for weddings, parties, or everyday elegance.
Regal Baroque Nails
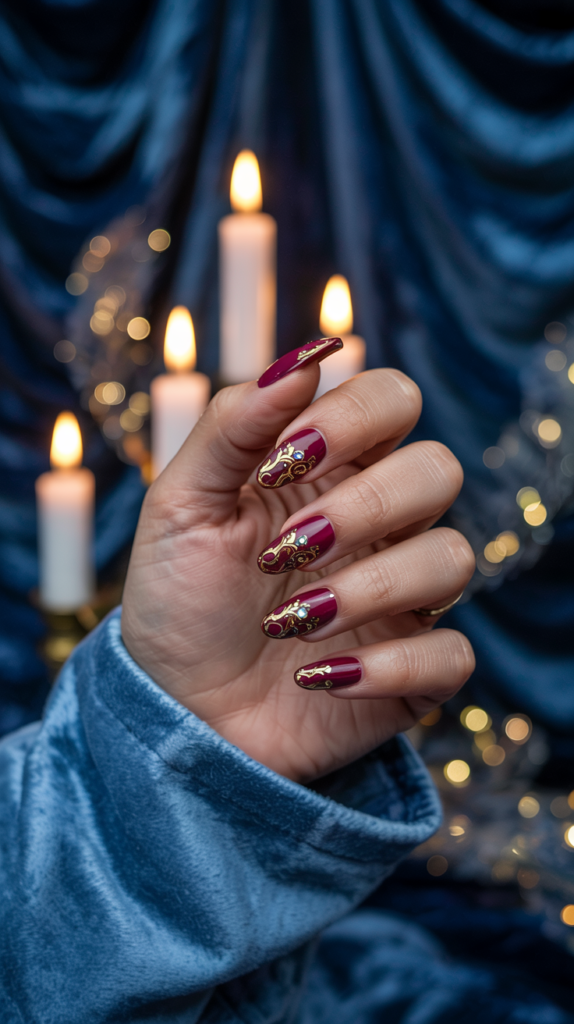
Inspired by the ornate detail of the Baroque era, this design features rich colors and intricate gold embellishments.
It’s a dramatic and opulent statement of luxury.
Design Features
A deep, regal base color like burgundy, deep red, or royal purple sets a dramatic tone.
Ornate gold decals or hand-painted scrollwork and filigree patterns are heavily featured.
Tiny jewel accents (small colored rhinestones) are often embedded within the gold patterns.
This enhances the richness and mimics inlaid gemstones on historical artifacts.
How To Achieve This Look
Apply the deep burgundy or chosen regal base color and cure.
Carefully apply ornate gold Baroque-style decals, ensuring they adhere smoothly.
Alternatively, hand-paint intricate scrollwork using gold gel paint and a fine brush.
Use gem glue or resin to embed tiny colored rhinestones within the gold designs.
Seal the entire nail, including decals and gems, with a high-gloss top coat for a luxurious finish.
Why This Stands Out
Regal Baroque Nails stand out for their historical richness and intricate, opulent detailing.
The combination of deep jewel tones and elaborate gold work creates an unmistakably luxurious and dramatic effect.
The tiny jewel accents add another layer of texture and luxury.
This design is perfect for making a bold, artistic statement reminiscent of royal artistry.
Luxury Tweed Texture
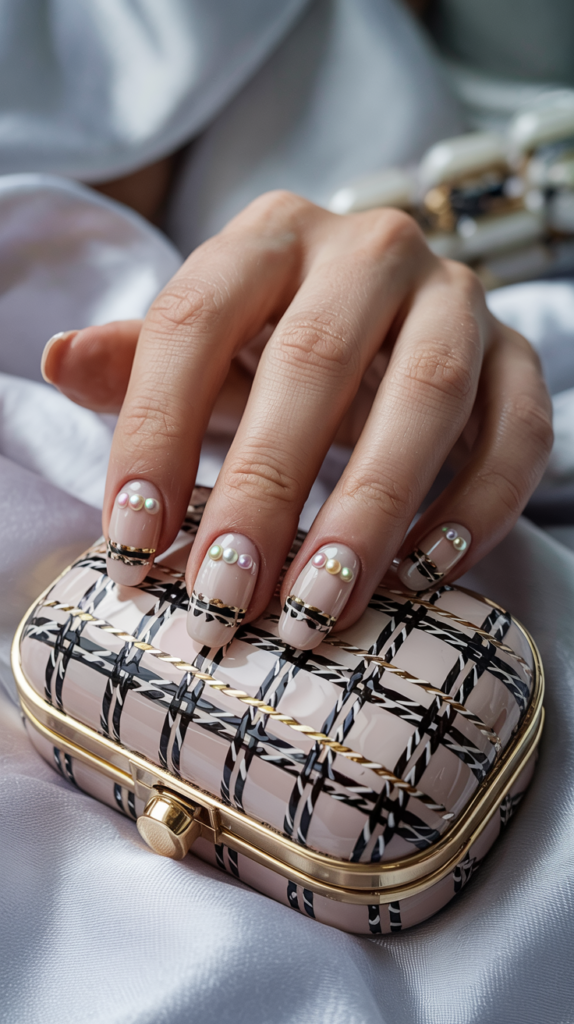
Inspired by Chanel’s iconic tweed fabric, this design replicates its woven texture using nail art techniques.
It combines sophisticated colors with tactile detail and classic embellishments.
Design Features
The base is often a creamy pink, white, or classic Chanel beige.
Fine lines of coordinating colors (e.g., black, white, gold, pink) are hand-painted in a crosshatch pattern to mimic tweed.
Tiny pearl beads or gold microbeads are sometimes added where the lines intersect.
This enhances the textural feel and adds a touch of classic Chanel elegance.
How To Achieve This Look
Apply the creamy base color and cure.
Using fine striping brushes, paint thin intersecting lines in various colors (e.g., white, black, gold) to create the woven tweed effect; cure between layers if needed.
Once the pattern is complete, apply tiny dots of nail glue or gel resin at some intersections and place miniature pearl or gold beads.
Seal the design carefully with a top coat, potentially using a matte top coat for a more fabric-like feel.
Why This Stands Out
Luxury Tweed Texture is unique for its clever replication of a famous fashion fabric on the nails.
The hand-painted detail required showcases skill and dedication to the theme.
Incorporating pearls or beads enhances the textural illusion and nods to classic Chanel styling.
It’s a sophisticated, fashion-forward choice for those who appreciate couture details.
Blue Topaz Fantasy
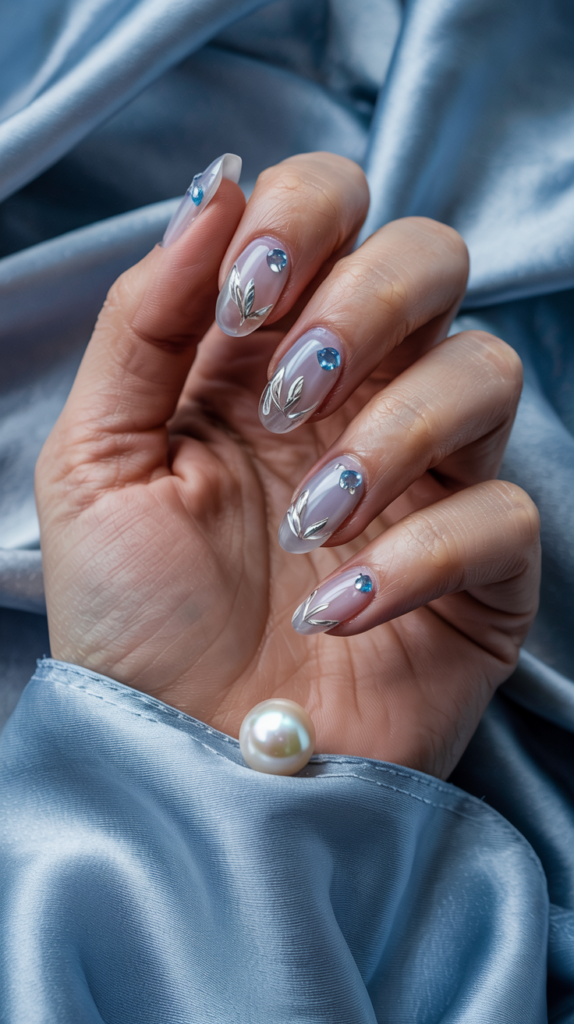
This design uses clear bases or extensions overlaid with gem-like effects and foil.
It aims to capture the cool, faceted beauty of blue topaz gemstones.
Design Features
The base is often clear or a very sheer blue tint, allowing light to pass through.
Blue topaz colored gel, jelly polish, or alcohol inks are used to create translucent, gem-like overlays.
Silver foil flecks or iridescent shards are embedded within the layers.
This mimics the inclusions and facets within a natural gemstone.
How To Achieve This Look
Build or apply clear nail extensions if desired.
Apply a sheer blue tint or clear base.
Layer translucent blue topaz colored jelly polish or diluted gel, potentially adding silver foil flecks or iridescent shards between layers.
Build up the layers to create depth, mimicking the facets of a cut gem.
Encapsulate everything smoothly with a high-gloss clear top coat to enhance the glassy, gem-like appearance.
Why This Stands Out
Blue Topaz Fantasy stands out for its captivating, translucent depth and gemstone mimicry.
The way light interacts with the layers and foil creates a beautiful, watery sparkle.
It offers a unique, ethereal take on luxury nails, focusing on clarity and cool tones.
It’s perfect for those seeking a design that is both intricate and refreshingly different.
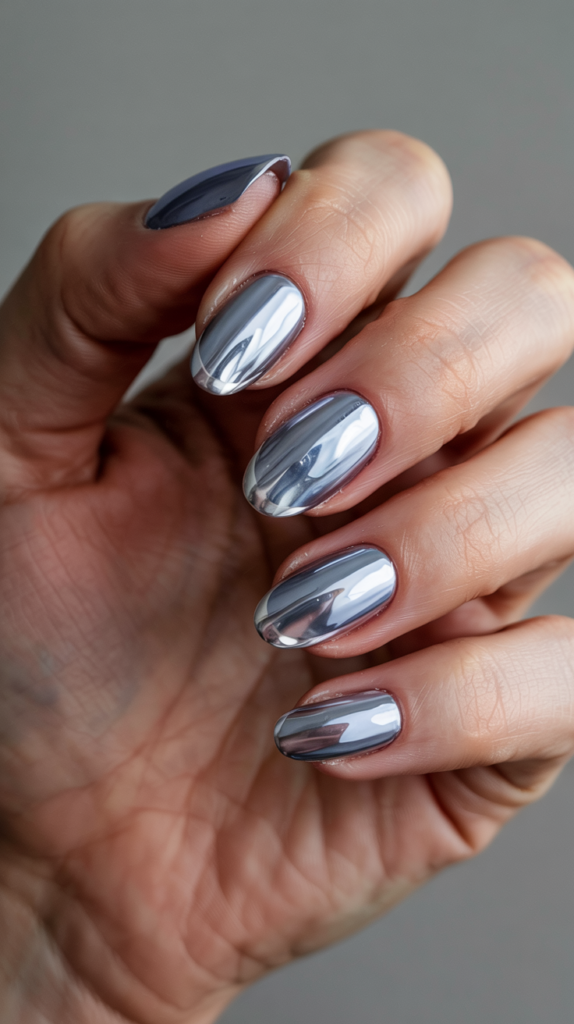
Mirror Shine Sculpted Tips
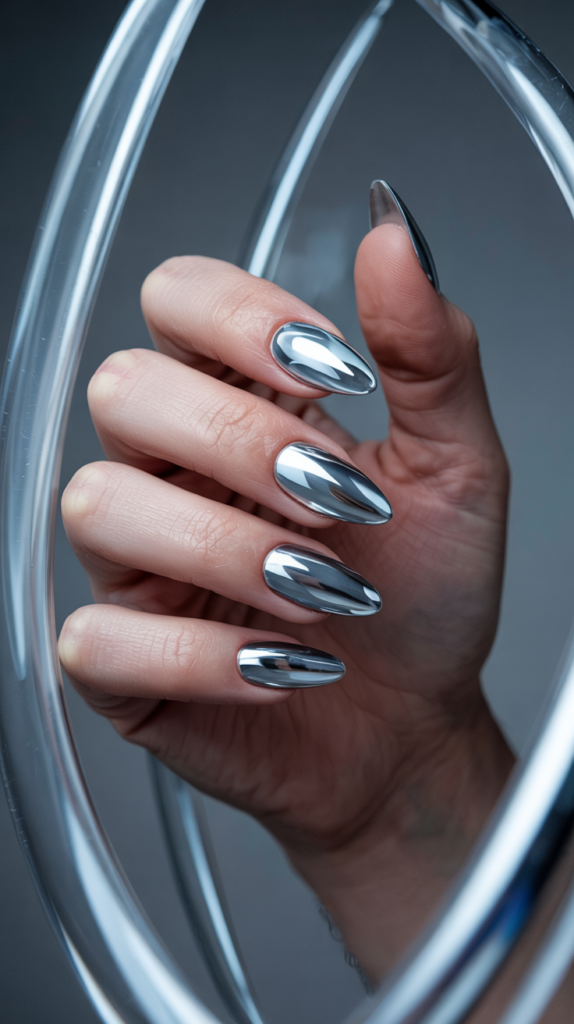
This design focuses on extreme shine and dramatic shape, using chrome finishes.
It’s a futuristic, high-impact look that emphasizes structure and reflection.
Design Features
The entire nail, or often just dramatically sculpted tips, is coated in a flawless silver or colored chrome finish.
The key is achieving a perfect mirror-like reflection.
The nail shape is usually extreme – long stiletto, sharp coffin, or other sculpted forms.
Dimension might be added through exaggerated C-curves or facets built into the nail structure before chroming.
How To Achieve This Look
Sculpt the nail extension into the desired dramatic shape using acrylic or hard gel, focusing on smooth surfaces and defined lines.
Apply a base color (often black for silver chrome) and cure.
Apply a no-wipe top coat, cure, and then meticulously burnish high-quality chrome powder onto the surface until a perfect mirror shine is achieved.
Seal carefully with another layer of top coat, ensuring the chrome’s brilliance is maintained.
Why This Stands Out
Mirror Shine Sculpted Tips are impossible to ignore due to their intense reflectivity and sharp, architectural shapes.
The flawless chrome finish provides unparalleled shine and a futuristic aesthetic.
The emphasis on sculpted form makes the nails themselves a statement piece.
It’s a bold, high-fashion choice for those who want maximum impact and a modern edge.
Opal Rainfall Effect
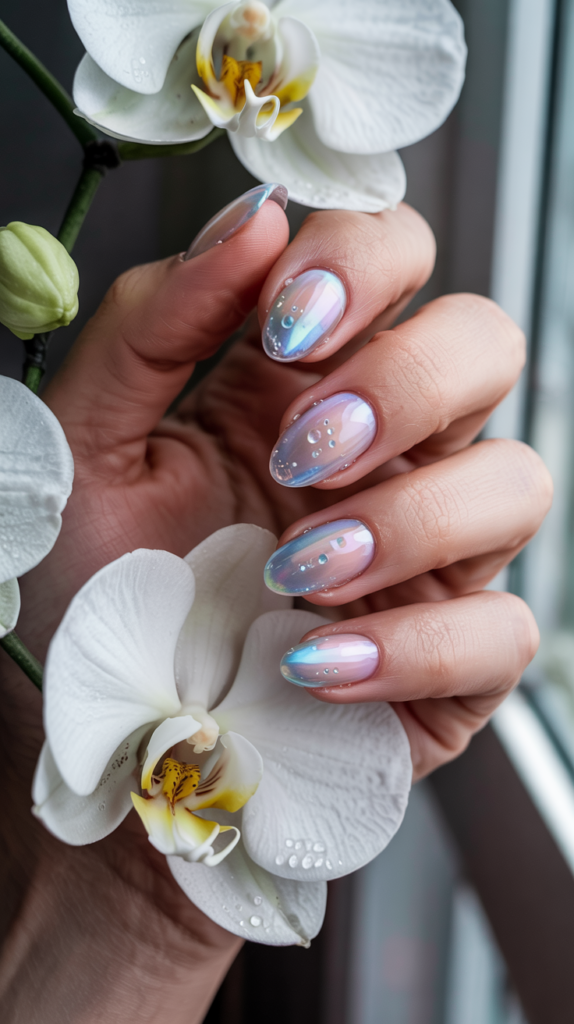
This design combines the milky, iridescent beauty of opal with a unique 3D droplet effect.
It evokes the image of morning dew on an opalescent surface.
Design Features
The base is an iridescent opal polish or effect, shifting with pink, blue, green, and gold tones.
Clear gel is used to create small, raised droplets on the nail surface.
The droplets are strategically placed to look like raindrops or morning dew.
They add a textural and visual point of interest over the shifting opal background.
How To Achieve This Look
Apply the opal base polish or create an opal effect using iridescent flakes or powders over a milky base, then cure.
Using a dotting tool or fine brush, place small beads of thick, clear builder gel onto the nail surface.
Do not flatten the beads; allow them to remain rounded like droplets.
Cure the clear gel droplets thoroughly.
Apply a glossy top coat over the entire nail, including the droplets, to enhance shine and secure them.
Why This Stands Out
Opal Rainfall Effect is unique for its combination of ethereal iridescence and tactile 3D droplets.
The opal base provides a dreamy, shifting color palette.
The clear droplets add a surprising textural element and enhance the watery, natural theme.
It’s a delicate, artistic, and captivating design that feels both luxurious and organic.
Gucci Garden Gloss
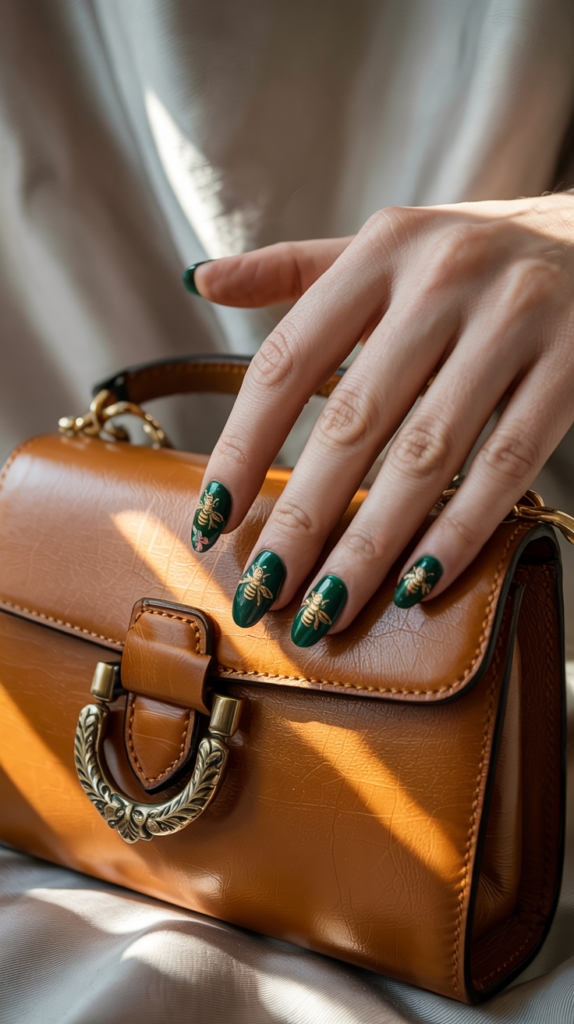
Inspired by Gucci’s iconic flora and fauna motifs, this design features recognizable symbols on a rich base.
It’s a high-fashion statement celebrating the brand’s garden aesthetic.
Design Features
A deep green or classic Gucci stripe base color sets the stage.
Gold bee decals or charms, intricate floral decals, and potentially snake motifs are key elements.
A high-gloss gel finish ensures a luxurious, polished look.
The combination of elements directly references Gucci’s popular design language.
How To Achieve This Look
Apply the deep green base color or create the Gucci stripe pattern (red and green) and cure.
Carefully apply gold bee decals, floral decals, or other Gucci-inspired elements using tweezers or a decal tool.
If using 3D charms like bees, adhere them securely with nail glue or gel resin.
Encapsulate the entire design, including decals, with a thick, high-gloss top coat for a smooth, durable, and shiny finish.
Why This Stands Out
Gucci Garden Gloss stands out for its direct and stylish reference to a major luxury fashion house.
The recognizable motifs like bees and florals are instantly associated with Gucci’s aesthetic.
The combination of deep green, gold, and intricate decals creates a rich, fashionable look.
It’s perfect for Gucci enthusiasts or anyone wanting a branded, nature-inspired luxury manicure.
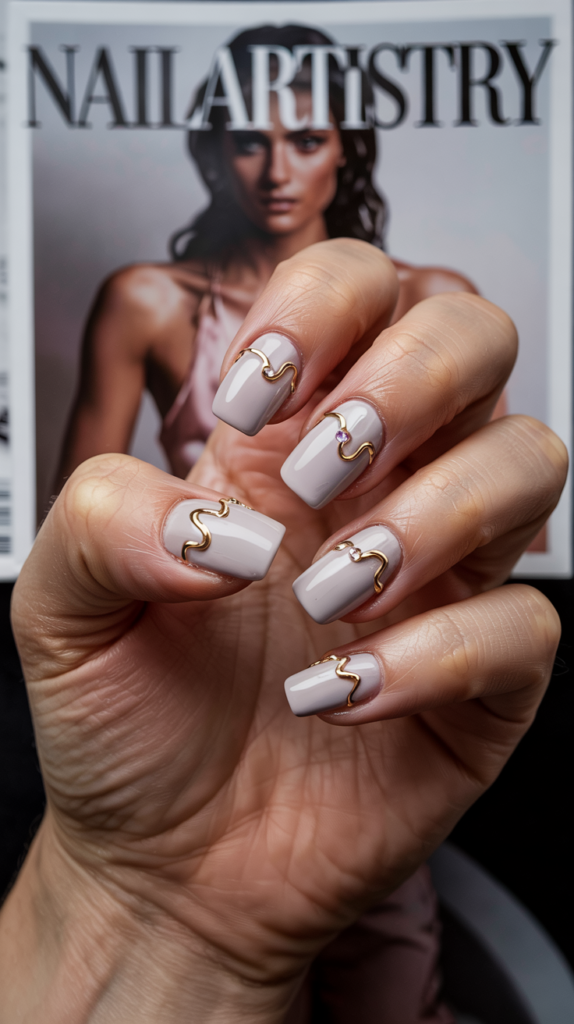
Couture Dotwork Detail
This design uses intricate dot patterns, often inspired by mandalas or pointillism, elevated with metallic accents.
It requires precision and patience, resulting in a mesmerizing effect.
Design Features
Often set against a clean white or nude base to highlight the detail.
Intricate patterns are created entirely from tiny dots, meticulously placed using dotting tools.
Metallic microbeads or contrasting colored dots are incorporated into the pattern.
This adds texture and emphasizes the complexity of the dotwork.
How To Achieve This Look
Apply the white or nude base color and cure.
Using various sizes of dotting tools and different polish colors (often including black or metallics), begin creating the mandala or geometric pattern, one dot at a time.
Build the pattern outwards, ensuring symmetry and precision.
Incorporate metallic microbeads by placing them onto wet dots of polish or using gem glue.
Finish with a glossy top coat to protect the intricate work.
Why This Stands Out
Couture Dotwork Detail is striking due to its incredible precision and mesmerizing patterns.
The dedication required to create such intricate designs solely from dots is evident.
The use of metallic beads adds a subtle touch of luxury and texture.
It’s an artistic and sophisticated choice for those who appreciate meticulous craftsmanship and detailed patterns.
Amethyst Flame Luxe
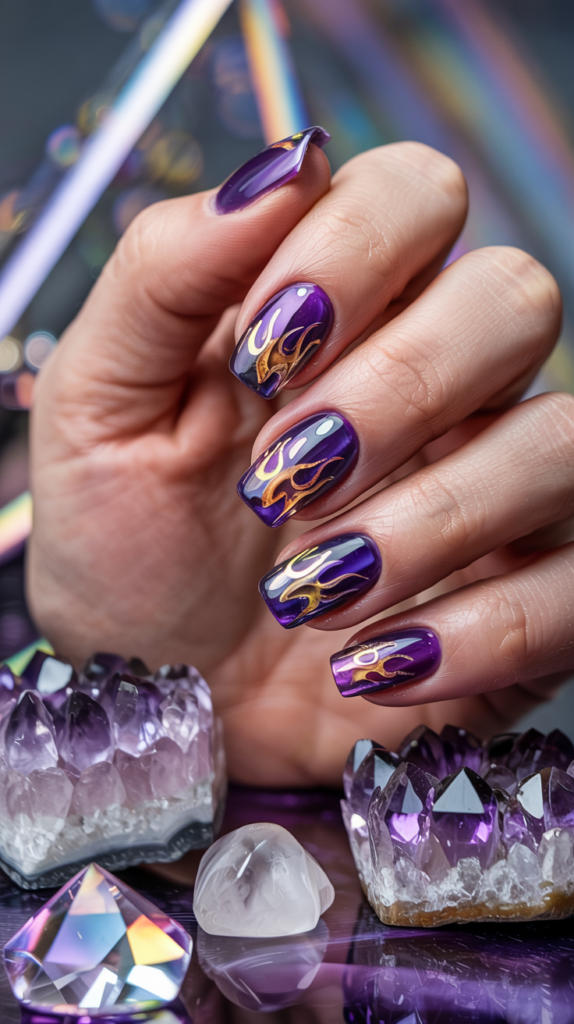
This design combines a deep purple base with dynamic chrome flame accents.
The flames often feature color-shifting properties for an extra touch of magic.
Design Features
The base is a deep, rich amethyst purple polish, providing a luxurious jewel-toned background.
Flame patterns lick up from the tips or cuticles, rendered in chrome.
The chrome used for the flames often has a duo-chrome effect, shifting between violet, gold, or other colors.
This adds movement and an ethereal quality to the design.
How To Achieve This Look
Apply the deep amethyst purple base color and cure.
Apply a no-wipe top coat where the flames will be, cure, and then use a fine brush or stencil to apply color-shifting chrome powder in a flame shape.
Alternatively, hand-paint the flames using chrome gel polish.
Seal the chrome carefully with top coat, ensuring clean edges around the flames.
Finish the rest of the nail with a glossy top coat.
Why This Stands Out
Amethyst Flame Luxe stands out for its dramatic combination of a rich jewel tone and dynamic, shifting chrome flames.
The contrast between the deep purple and the bright, color-shifting chrome is captivating.
The flame motif adds an edgy, powerful element, while the amethyst base keeps it luxurious.
It’s a bold, mystical, and modern design choice.
Starlight Crystal Cut
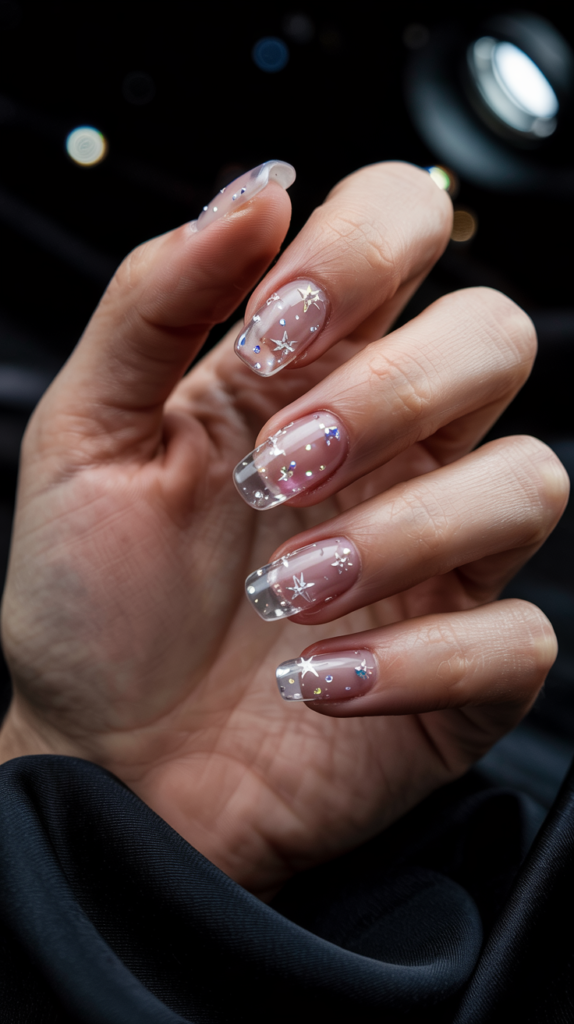
This design involves embedding crystals within clear sculpted nails for a unique, internal sparkle.
It mimics the look of stars frozen within ice or glass.
Design Features
The nails are typically clear, sculpted extensions, providing transparency.
Star-shaped crystals or glitter are embedded within the layers of acrylic or gel, not just on the surface.
The effect is one of depth, as the stars seem suspended inside the nail itself.
The finish is high-gloss to enhance the clarity and internal sparkle.
How To Achieve This Look
Begin sculpting the clear nail extension with acrylic or hard gel.
Before completing the full thickness, place star-shaped crystals or glitter onto a partially cured layer.
Continue building the clear nail structure over the embedded stars, fully encapsulating them.
Shape and refine the nail, then finish with a high-gloss top coat for maximum clarity and shine.
Why This Stands Out
Starlight Crystal Cut is unique because the decorative elements are suspended within the nail structure itself.
This creates a fascinating sense of depth and protects the embellishments.
The clear nail combined with the internal sparkle gives an ethereal, icy, or galaxy-like appearance.
It’s a sophisticated and innovative way to incorporate crystals into nail art.
Majestic Mauve Mirage
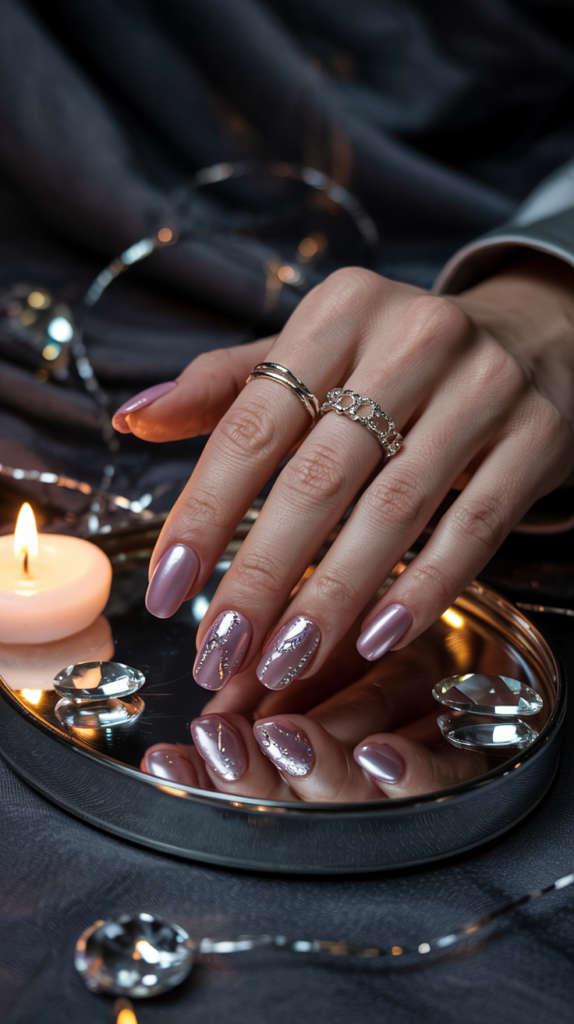
This design blends a sophisticated mauve color palette with metallic effects and reflective elements.
It creates a soft yet glamorous look with depth and shimmer.
Design Features
A metallic mauve polish, often applied as an ombré or gradient, forms the base.
Reflective flakes or iridescent foil pieces are layered within the mauve.
Crystal cuffs or accents near the cuticle add a touch of structured sparkle.
The overall effect is shimmering, multi-tonal, and elegant.
How To Achieve This Look
Apply the metallic mauve polish, potentially creating an ombré effect from light to dark mauve using a sponge.
While the polish is tacky or between layers, embed reflective flakes or foil pieces.
Apply gem glue or gel resin near the cuticle and create a cuff or accent using small clear or mauve crystals.
Cure thoroughly and seal the entire nail with a glossy top coat to enhance the metallic shine and reflective elements.
Why This Stands Out
Majestic Mauve Mirage stands out for its sophisticated color palette combined with dynamic reflective elements.
The mauve ombré provides a soft base, while the flakes and foil add depth and movement.
The crystal cuff provides a focal point of luxury, contrasting beautifully with the shimmering mauve.
It’s an elegant, multi-dimensional design that feels both modern and timeless.
Conclusion
The world of luxury nail design is a dazzling intersection of fashion, art, and personal expression.
From the subtle shimmer of diamond dust to the bold statement of haute couture chains, the possibilities are truly endless.
Each design we’ve explored offers a unique way to adorn your fingertips with elegance, creativity, and unparalleled sophistication.
These manicures go beyond simple color, embracing texture, dimension, and premium embellishments.
Whether you prefer understated chic or opulent glamour, there is a luxury nail design perfectly suited to elevate your style.
Consider these ideas as inspiration for your next salon visit or creative nail art session.
Embrace the artistry, indulge in the luxury, and let your nails become the ultimate fashion accessory.
Let them tell a story of elegance, confidence, and exquisite taste.