
Gradient nail designs are a stunning way to add depth, dimension, and creativity to your manicure.
By seamlessly blending colors together, these designs can range from soft and subtle to bold and dramatic, making them perfect for any occasion, season, or personal style.
Whether you’re looking for a vibrant neon look for summer, a luxurious metallic finish for a night out, or a soft pastel design for spring, gradient nails offer endless possibilities.
In this guide, we’ll explore 35 eye-catching gradient nail designs that will inspire you to elevate your nail game.
Get ready to fall in love with these mesmerizing color transitions that are guaranteed to make your nails the center of attention!
1. Sunset Ombre Gradient Nails
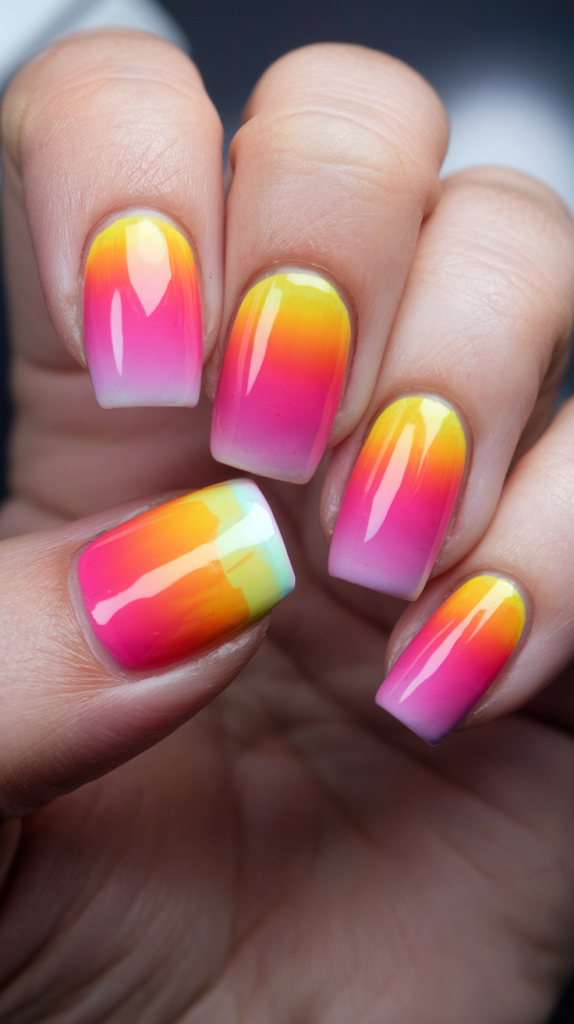
Sunset ombre nails embody the essence of summer with their radiant blend of warm hues.
The combination of orange, pink, and yellow mirrors the breathtaking beauty of a sunset, evoking memories of long, serene summer evenings.
This captivating design not only transitions seamlessly from one shade to another but also brings warmth, vibrancy, and joy to your nails—perfect for carrying that summer vibe with you wherever you go.
Creating The Perfect Sunset Gradient
Step 1: Apply the Orange Base
Begin with a vibrant orange polish at the base of your nails near the cuticle.
Ensure the layer is smooth and even, as this will set the foundation for the gradient effect.
Step 2: Blend in the Pink
Using a makeup sponge or nail art brush, gently blend a soft pink polish into the middle of the nail.
Overlap the orange and pink slightly to create a seamless transition.
Step 3: Add the Yellow Tips
Finish the gradient by blending a bright, sunny yellow polish onto the tips of your nails.
Make sure the colors fade smoothly into each other for a natural ombre effect.
Step 4: Seal with a Top Coat
Apply a glossy top coat to lock in the colors and amplify their vibrancy.
For an extra touch, consider adding a fine layer of shimmer to mimic the sun’s final rays as it sets.
Why It Works
Sunset Ombre Gradient Nails are a celebration of summer’s warmth and beauty.
The smooth transitions between orange, pink, and yellow replicate the charm of a summer sunset, making the design both eye-catching and nostalgic.
This vibrant gradient pairs perfectly with breezy summer outfits and tropical accessories, ensuring your nails are a radiant reflection of the season.
The optional shimmer detail adds a magical finishing touch, completing the look with elegance and a hint of sparkle.
2. Ocean Wave Gradient Nails
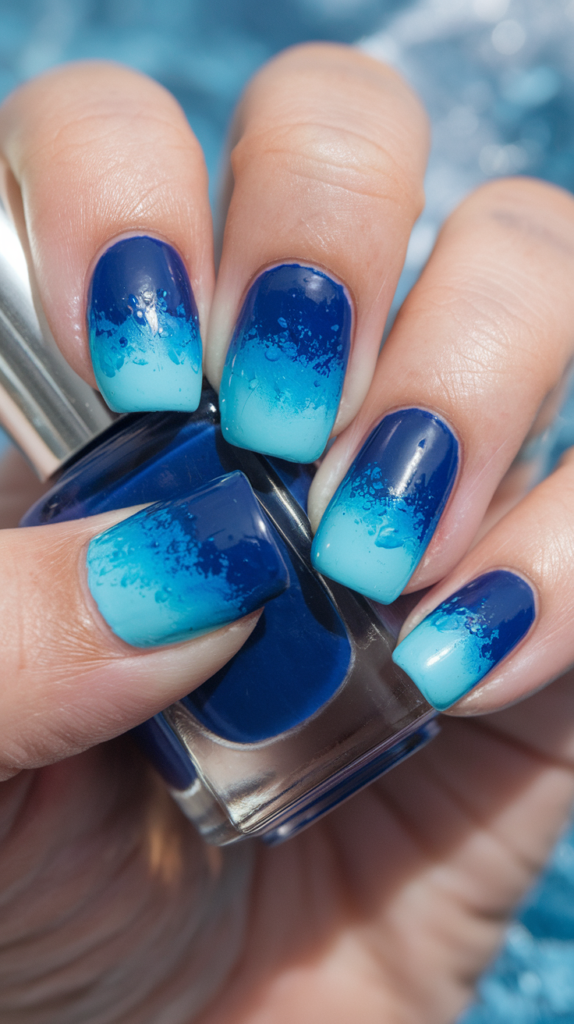
Ocean wave gradient nails bring the calming beauty of the sea right to your fingertips.
This stunning design transitions from deep navy to bright aqua and soft pale blue, perfectly mimicking the serene hues of ocean waves.
Whether you’re strolling along the shore or simply channeling beach vibes, these nails will instantly transport you to a seaside paradise.
Crafting the Ocean Wave Gradient
Step 1: Apply the Navy Base
Begin by applying a rich navy blue polish at the base of each nail, closest to the cuticle.
Ensure this layer is even, as it forms the foundation of the gradient.
Step 2: Blend in the Aqua
Use a makeup sponge or a nail art brush to blend a vibrant aqua shade into the middle of the nail.
Overlap the navy and aqua slightly for a smooth transition that mimics the ocean’s depths.
Step 3: Add the Pale Blue Tips
Finish the gradient with a soft pale blue polish at the tips of the nails.
This final touch captures the frothy appearance of waves lapping at the shore.
Step 4: Enhance with Shimmer
For an extra dimension, add a hint of shimmer or iridescence to reflect sunlight glistening on the water.
Step 5: Seal with a Glossy Top Coat
Complete the look with a glossy top coat to create a water-like finish and enhance the colors’ vibrancy.
Why It Works
Ocean Wave Gradient Nails encapsulate the tranquil allure of the sea with their seamless blend of blues.
The deep navy and aqua shades evoke the depth and motion of the ocean, while the pale blue tips and shimmer capture the frothy elegance of waves meeting the shore.
This versatile design pairs effortlessly with summer beachwear and casual outfits, making it a go-to choice for anyone looking to channel refreshing beach vibes.
The shimmering details and glossy finish add a touch of sophistication, bringing the ocean’s beauty straight to your nails.
3. Pink to Purple Ombre Nails
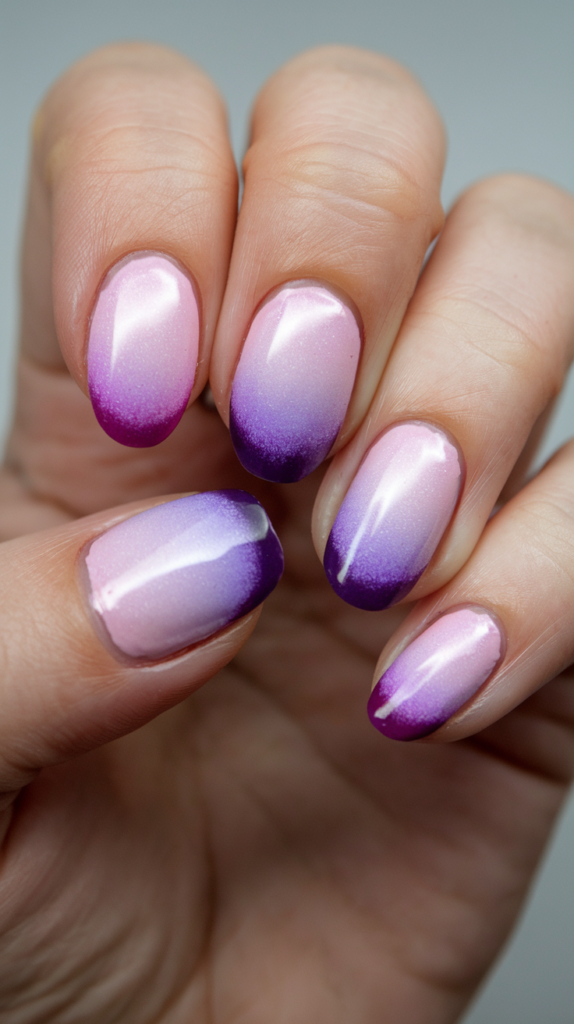
Pink to purple ombre nails exude elegance and romance, making them a perfect choice for any occasion.
The soft transition from baby pink to lavender and deep purple creates a dreamy, feminine aesthetic that is both graceful and playful.
Whether you’re attending a special event or keeping your look casual, this design adds a charming and versatile touch to your style.
Creating a Seamless Pink-to-Purple Gradient
Step 1: Apply the Baby Pink Base
Start by applying a soft baby pink polish at the base of your nails, near the cuticle.
Make sure the layer is even to create a smooth foundation for the gradient.
Step 2: Blend in the Lavender
Using a makeup sponge or nail art brush, blend a delicate lavender shade into the middle of the nail.
Slightly overlap the pink and lavender for a seamless transition.
Step 3: Add the Deep Purple Tips
Finish the gradient with a rich, deep purple polish at the tips.
Gently blend the lavender and purple to ensure the colors flow naturally.
Step 4: Seal with a Glossy Top Coat
Apply a glossy top coat to enhance the vibrancy of the colors and give the nails a polished finish.
This step also smooths out any imperfections in the gradient for a flawless look.
Why It Works
Pink to Purple Ombre Nails perfectly balance softness and boldness with their gentle transition from pastel to rich tones.
The dreamy blend of baby pink, lavender, and deep purple captures a feminine and romantic vibe that works for both casual and formal occasions.
This versatile design is especially ideal for spring and summer, complementing warm, sunny days with its harmonious mix of soft and vibrant colors.
The glossy finish enhances the gradient’s elegance, making these nails a sophisticated yet playful choice for any style.
4. Galaxy Gradient Nails

Galaxy gradient nails let you wear the beauty of the cosmos right on your fingertips.
The deep black base combined with swirling purples, blues, and shimmering glitter creates a celestial design that feels truly magical.
This cosmic-inspired look adds mystery and elegance to any outfit, making it perfect for anyone who wants to carry a piece of the universe with them.
Creating the Black to Purple and Blue Galaxy Gradient
Step 1: Apply the Black Base Coat
Begin by applying a deep black polish as the foundation for your galaxy nails.
This dark base sets the tone for the design, mimicking the infinite expanse of space.
Step 2: Blend in the Purples and Blues
Using a sponge or nail art brush, gently blend shades of dark purple and deep blue onto the black base.
Focus on creating a swirling effect, leaving some areas darker to add depth.
Step 3: Add Starry Glitter
Apply a layer of glitter polish to replicate the sparkle of stars across the night sky.
You can also use a dotting tool or fine brush to place individual white dots for a more realistic star effect.
Step 4: Highlight with Lighter Shades
Incorporate lighter blues and hints of white near the tips or in select areas to mimic distant stars and galaxies.
Blend these lightly to maintain the gradient effect.
Step 5: Seal with a Glossy Top Coat
Finish the look with a high-shine top coat to enhance the colors and give your nails a polished, stellar finish.
Why It Works
Galaxy Gradient Nails are a captivating blend of mystery and elegance, capturing the infinite beauty of the night sky.
The black base provides depth, while the swirling purples and blues add a vibrant, otherworldly charm.
The shimmering glitter and lighter highlights bring the design to life, perfectly mimicking stars and distant galaxies.
This cosmic-inspired look is versatile, pairing beautifully with nights out or adding a touch of magic to your everyday style.
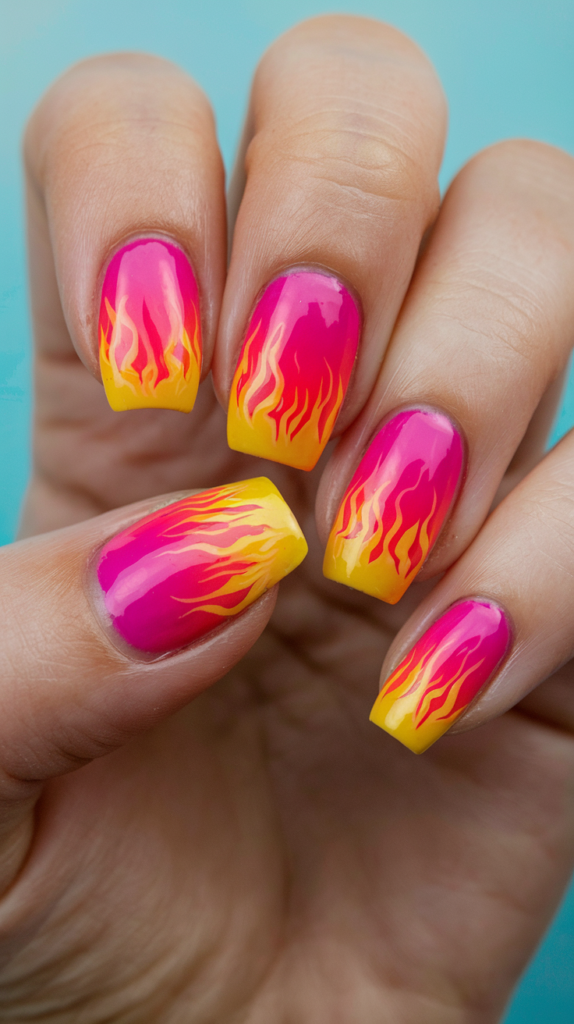
5. Neon Rainbow Gradient Nails
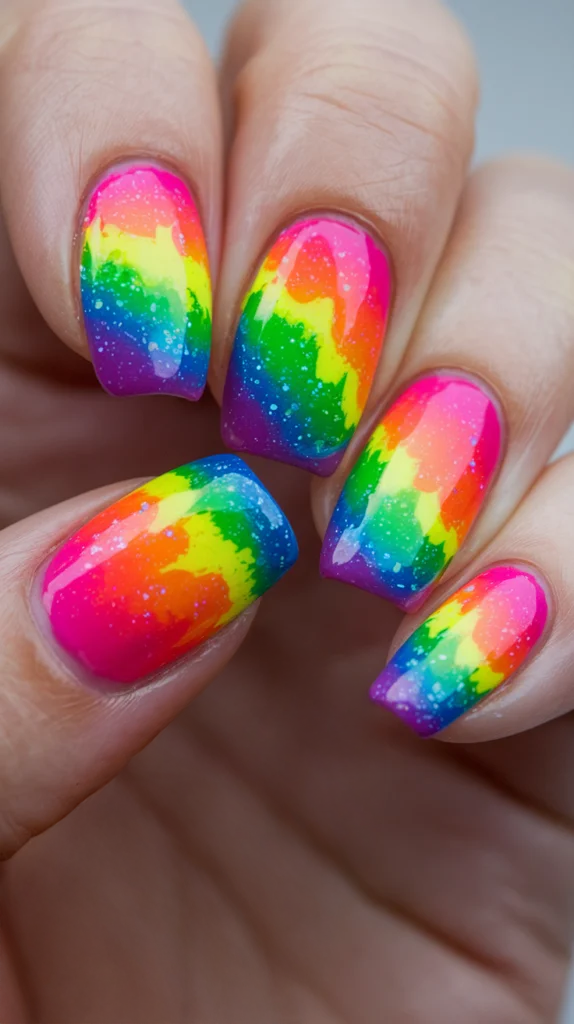
Neon rainbow gradient nails are the ultimate way to showcase your bold and vibrant side.
This striking design transitions seamlessly through neon pink, orange, yellow, green, blue, and purple, creating a colorful burst of energy on your fingertips.
Perfect for parties, festivals, or any event where you want to stand out, these nails are a fun and creative expression of personality and style.
Achieving the Neon Pink to Purple Rainbow Gradient
Step 1: Apply a White Base Coat
Start with a white base coat to make the neon colors pop and ensure the gradient is vibrant.
Let the base coat dry completely before proceeding to the next step.
Step 2: Begin with Neon Pink
Apply a neon pink polish at the cuticle using a sponge or nail art brush.
This will serve as the starting point of your gradient.
Step 3: Blend in the Rainbow Shades
Blend neon orange into the pink, followed by yellow, green, blue, and finally purple at the tips.
Overlap each color slightly to create a smooth, seamless transition.
Work quickly while the polish is still wet for the best blending results.
Step 4: Enhance the Vibrancy
Go over the gradient with a second layer of color if needed, ensuring the shades are bright and evenly blended.
Step 5: Seal with a Glossy Top Coat
Finish with a glossy top coat to lock in the design and amplify the neon hues.
This step also adds a polished shine, making the colors appear even more vivid.
Why It Works
Neon Rainbow Gradient Nails are a bold and playful celebration of color and creativity.
The smooth transition of neon shades from pink to purple captures attention instantly, making this design perfect for those who love to stand out.
The use of a white base enhances the vibrancy of the colors, while the glossy finish adds a professional, polished touch.
Ideal for summertime, festivals, or any lively occasion, these nails are the perfect way to express a fun, energetic personality.
6. Pastel Ombre Gradient Nails
Pastel ombre nails offer a soft, subtle elegance that’s perfect for embracing dreamy, delicate colors.
From pastel yellows to mint greens, pinks, and purples, this design creates a graceful gradient that’s ideal for spring or any time you want a fresh and clean look.
With their versatile charm, pastel ombre nails add a chic and elegant touch to both casual and formal styles.
Creating a Spring-Inspired Pastel Gradient
Step 1: Start with a Pastel Yellow Base
Apply a pastel yellow polish at the base of your nails.
This cheerful shade sets the tone for the fresh and airy spring-inspired design.
Step 2: Blend in the Mint Green
Using a sponge or nail art brush, blend a soft mint green into the yellow, transitioning seamlessly from one shade to the next.
Focus on creating a smooth gradient that feels light and natural.
Step 3: Add a Lavender or Pink Accent
For an extra delicate touch, blend in a hint of pastel lavender or pink at the tips of your nails.
This adds dimension and enhances the soft, springtime feel of the design.
Step 4: Choose Your Top Coat Finish
Decide between a matte top coat for a velvety, understated look or a glossy top coat for a polished shine.
Either option will beautifully complement the pastel tones.
Why It Works
Pastel Ombre Gradient Nails capture the gentle beauty of spring with their soft, harmonious blend of colors.
The transition from pastel yellow to mint green, with optional lavender or pink accents, evokes the light, airy feel of blooming flowers and fresh spring days.
This design is versatile enough to suit any occasion, adding a touch of elegance and charm to your style.
The option to choose between matte and glossy finishes allows for customization, ensuring your nails perfectly match your personal aesthetic.
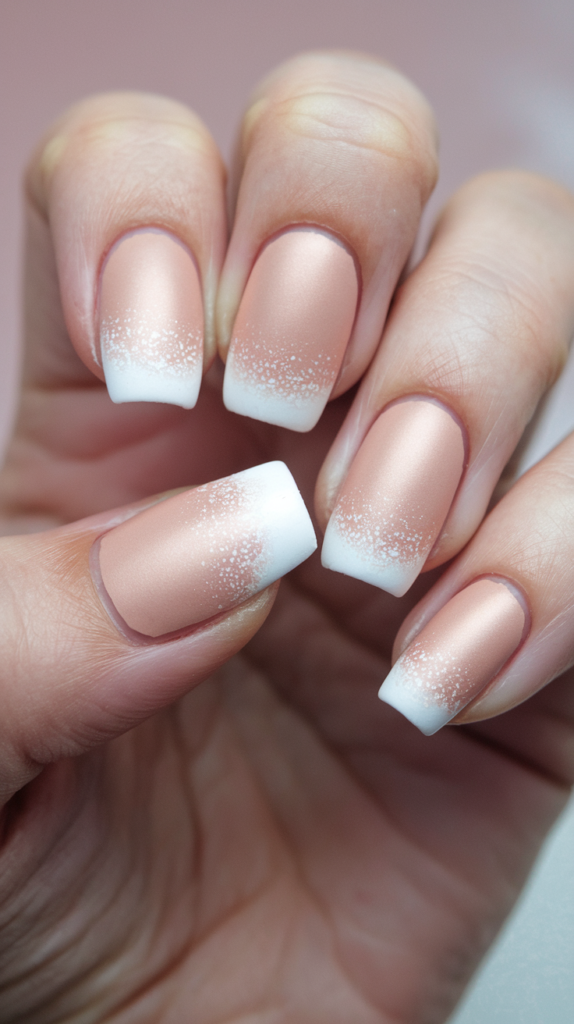
7. Nude to White Gradient Nails
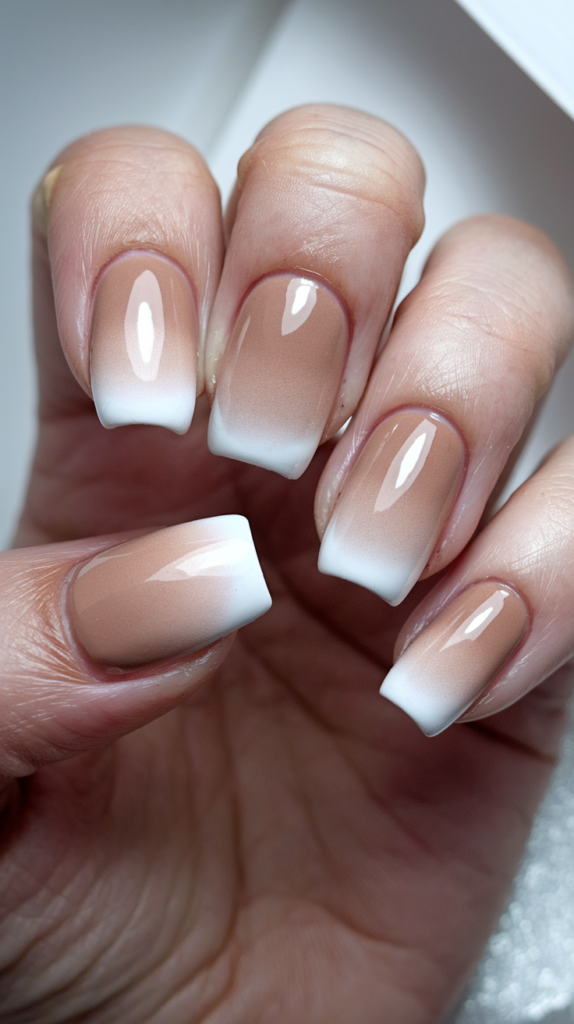
Nude to white gradient nails are a timeless choice, offering a subtle yet sophisticated design that complements any occasion.
The seamless fade from a natural nude tone to a crisp white creates an elegant, minimalistic look that is both stylish and versatile.
Whether for casual outings or formal events, this classic ombre design adds a refined touch to any outfit.
Creating the Perfect Nude to White Gradient
Step 1: Start with a Nude Base
Apply a natural nude polish as the base of your nails, covering the lower half.
This soft shade creates the perfect foundation for the gradient.
Step 2: Blend in the White Tips
Using a sponge or nail art brush, gently blend a crisp white polish from the middle of the nail to the tips.
Ensure the transition is smooth and subtle for a flawless ombre effect.
Step 3: Refine and Smooth
Go over the gradient with a second layer if needed, blending the colors for a seamless fade.
Step 4: Seal with a Top Coat
Finish with a glossy or matte top coat to enhance the look.
A glossy finish adds shine and polish, while a matte finish creates a modern, velvety effect.
Why It Works
Nude to White Gradient Nails are a classic design that radiates understated elegance.
The soft transition between nude and white complements any outfit, making this look suitable for both everyday wear and special occasions.
For weddings, this design is especially popular, offering a neutral, sophisticated aesthetic that pairs beautifully with traditional bridal colors.
Adding subtle enhancements, like shimmer or delicate nail art, elevates the design, making it ideal for brides, bridesmaids, or guests seeking a chic and graceful style.
8. Metallic Gradient Nails
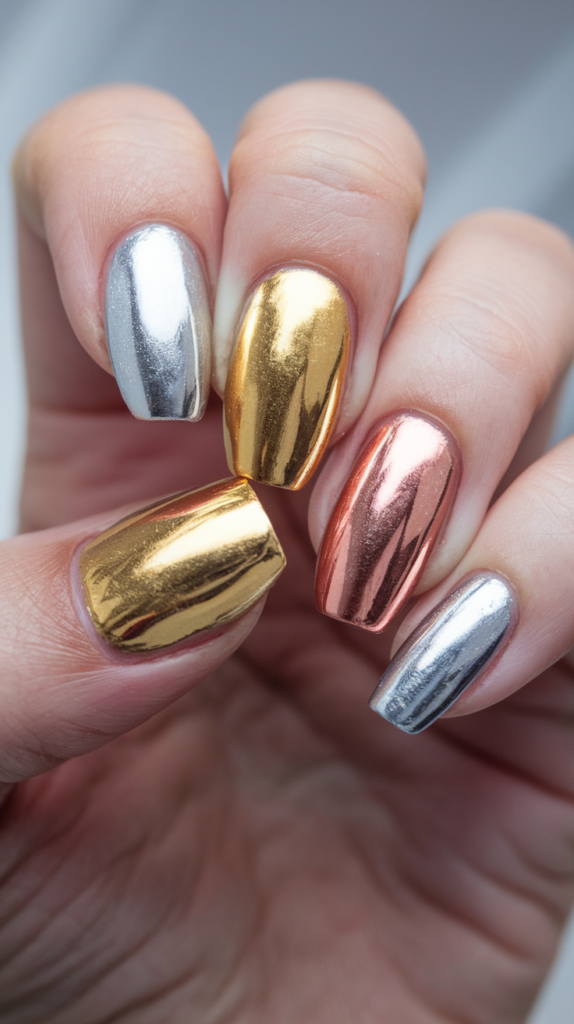
Metallic gradient nails are the epitome of glamour and sophistication.
Blending luxurious shades like silver, gold, and rose gold, this design exudes opulence and makes a bold, stylish statement.
The reflective quality of metallic tones adds a modern, edgy element, perfect for parties, formal events, or any occasion where you want to stand out.
Crafting the Perfect Silver, Gold, and Rose Gold Ombre
Step 1: Apply the Silver Base
Start with a metallic silver polish at the cuticle.
Ensure the layer is smooth and even, as this sets the foundation for the gradient.
Step 2: Blend in the Gold
Using a makeup sponge or nail art brush, blend metallic gold polish into the middle of the nail.
Overlap the silver slightly to create a seamless transition.
Step 3: Add the Rose Gold Tips
Finish the gradient with a metallic rose gold polish at the tips of your nails.
Blend carefully to achieve a smooth fade between all three shades.
Step 4: Enhance with a Glossy Top Coat
Seal the design with a glossy top coat to amplify the metallic shine and reflective quality.
This step also ensures the gradient looks polished and cohesive.
Why It Works
Metallic Gradient Nails combine elegance and boldness with their luxurious blend of reflective shades.
The seamless transition from silver to gold to rose gold creates a rich, opulent look that’s perfect for making a statement.
The high-shine finish enhances the futuristic and edgy vibe, making this design ideal for special occasions or adding a touch of glamour to everyday style.
With their striking blend of metallic tones, these nails are the ultimate expression of luxury and sophistication.
9. Autumn Leaves Gradient Nails
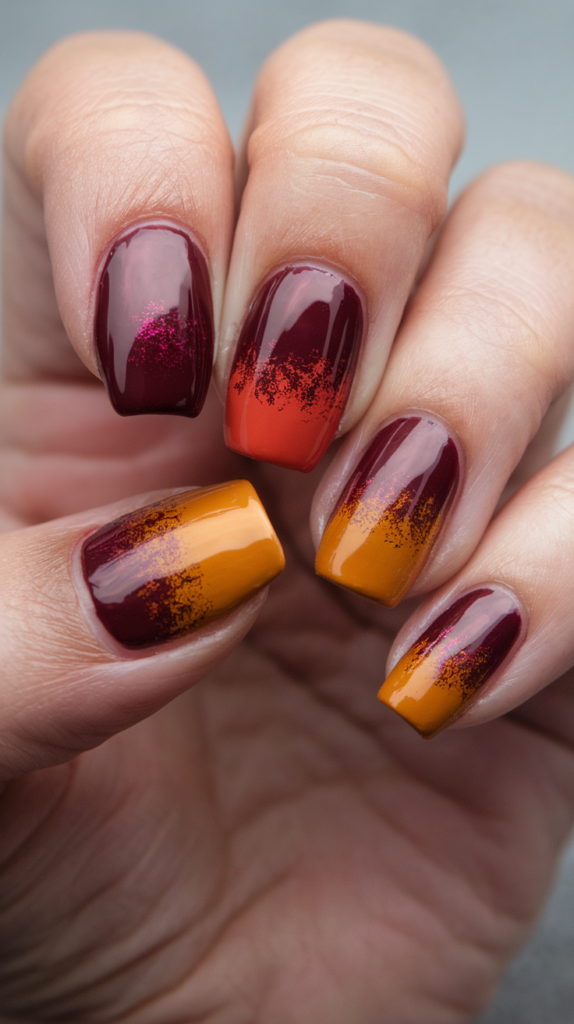
Autumn leaves gradient nails bring the cozy charm of fall to your fingertips.
With warm tones like burgundy, burnt orange, and mustard yellow, this design captures the richness of autumn foliage and the beauty of the season’s changing colors.
Perfect for fall fashion lovers, these nails complement the cooler months, cozy sweaters, and pumpkin spice vibes with elegance and style.
Crafting the Burgundy, Burnt Orange, and Mustard Yellow Gradient
Step 1: Apply the Burgundy Base
Start with a deep burgundy polish at the base of your nails, near the cuticle.
This rich shade sets the foundation for the gradient, reflecting the deep hues of fall leaves.
Step 2: Blend in the Burnt Orange
Using a makeup sponge or nail art brush, blend a warm burnt orange polish into the middle of your nails.
Overlap the burgundy slightly to create a smooth transition.
Step 3: Add the Mustard Yellow Tips
Finish the gradient by blending a mustard yellow polish onto the tips.
Ensure the colors flow seamlessly for a natural, autumn-inspired look.
Step 4: Choose Your Top Coat Finish
For added texture, apply a matte top coat to give the nails a velvety finish.
Alternatively, incorporate gold leaf accents for a touch of shimmer that mimics the texture of real autumn leaves.
Step 5: Seal the Look
Complete the design with a clear top coat to protect the details and enhance the overall effect.
Why It Works
Autumn Leaves Gradient Nails perfectly capture the essence of fall with their warm, earthy tones and seamless color transitions.
The burgundy, burnt orange, and mustard yellow hues evoke the cozy feeling of crisp autumn days and the beauty of changing leaves.
Optional matte finishes or gold leaf details add texture and sophistication, making this design a perfect seasonal statement that pairs beautifully with fall fashion.
Whether you’re sipping a latte or embracing sweater weather, these nails are the ideal autumn accessory.
10. Jewel Tone Gradient Nails

Jewel tone gradient nails are a luxurious choice for those who love to make a bold, elegant statement.
Blending rich shades of emerald green, sapphire blue, and ruby red, this design exudes sophistication and a regal charm.
Perfect for formal events or glamorous nights out, these nails captivate with their vibrant colors and gemstone-like allure.
Blending Emerald, Sapphire, and Ruby for a Perfect Gradient
Step 1: Apply the Emerald Green Base
Begin by applying a deep emerald green polish at the base of your nails, near the cuticle.
This vibrant shade sets the tone for the opulent design.
Step 2: Blend in the Sapphire Blue
Using a makeup sponge or nail art brush, blend sapphire blue polish into the middle of your nails.
Overlap the emerald slightly to create a seamless transition between the colors.
Step 3: Add the Ruby Red Tips
Finish the gradient by blending a bold ruby red polish onto the tips.
Ensure the transition is smooth, allowing each jewel tone to shine through harmoniously.
Step 4: Enhance with a Glossy Top Coat
Seal the design with a glossy top coat to amplify the depth and vibrancy of the colors.
The glossy finish mimics the shine and brilliance of polished gemstones.
Why It Works
Jewel Tone Gradient Nails are a striking blend of rich, bold colors that radiate elegance and luxury.
The seamless transitions between emerald, sapphire, and ruby create a dramatic yet harmonious design reminiscent of precious gemstones.
Perfect for formal occasions, date nights, or any time you want to stand out, this look adds a touch of regal sophistication to your style.
The glossy finish enhances the gemstone effect, ensuring your nails are the ultimate accessory for a glamorous statement.
11. Cotton Candy Gradient Nails
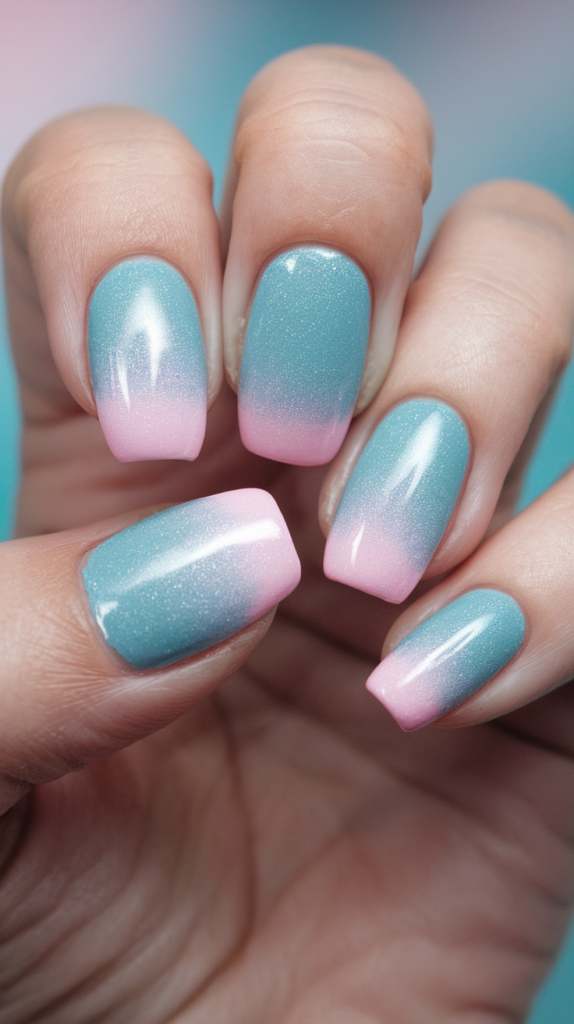
Cotton candy gradient nails bring a soft, whimsical charm to your fingertips.
With a dreamy blend of baby blue and soft pink, this design evokes the sweetness of everyone’s favorite carnival treat.
Perfect for spring and summer, these nails are a playful way to add a touch of fun and sweetness to your style.
Creating the Baby Blue to Soft Pink Cotton Candy Gradient
Step 1: Apply the Baby Blue Base
Start by applying a soft baby blue polish to the base of your nails.
This creates a delicate and dreamy foundation for the gradient.
Step 2: Blend in the Soft Pink
Using a sponge or nail art brush, blend a soft pink polish onto the tips of your nails.
Overlap the baby blue and pink slightly to create a smooth, seamless transition.
Step 3: Add Whimsical Details (Optional)
For extra charm, consider adding glitter or small nail decals to mimic the sugary texture of real cotton candy.
Scattered glitter or tiny stars can enhance the playful, dreamy vibe of the design.
Step 4: Seal with a Glossy Top Coat
Apply a glossy top coat to lock in the colors and add a polished shine that complements the soft pastel hues.
Why It Works
Cotton Candy Gradient Nails are a delightful blend of sweetness and elegance, making them perfect for spring, summer, or anytime you want a playful yet polished look.
The soft transition between baby blue and pink creates a subtle, dreamy effect that’s easy to pair with casual outfits or light, breezy styles.
Optional glitter or whimsical accents add a touch of magic, making this design a sweet and versatile choice for any occasion.
12. Rose Gold Gradient Nails

Rose gold gradient nails embody elegance and simplicity, making them a timeless choice for any occasion.
The soft transition from light pink to rose gold shimmer creates a refined, feminine look that complements a variety of outfits and styles.
With its subtle glamour, this design is perfect for anyone who loves chic, minimalist nail art with a touch of sparkle.
Creating the Perfect Pink to Rose Gold Gradient
Step 1: Apply the Light Pink Base
Start by applying a soft light pink polish to the base of your nails.
This delicate shade sets the stage for the elegant gradient.
Step 2: Blend in the Rose Gold Shimmer
Using a sponge or nail art brush, blend a rose gold shimmer polish from the middle of the nail to the tips.
Focus on creating a smooth, seamless transition for a polished finish.
Step 3: Enhance the Shimmer
For added dimension, apply a second layer of rose gold shimmer to intensify the sparkle.
This step enhances the luxurious feel of the design.
Step 4: Seal with a Glossy Top Coat
Finish with a glossy top coat to lock in the gradient and amplify the shine of the rose gold shimmer.
The top coat also ensures a smooth, flawless surface.
Why It Works
Rose Gold Gradient Nails combine subtle sophistication with a touch of glamour, making them ideal for weddings, parties, or everyday elegance.
The smooth transition from light pink to rose gold shimmer adds a feminine and refined touch, while the glossy finish enhances the sparkle for a luxurious effect.
This versatile design pairs effortlessly with any outfit or event, providing a polished, chic look that’s understated yet undeniably glamorous.
13. Twilight Ombre Gradient Nails
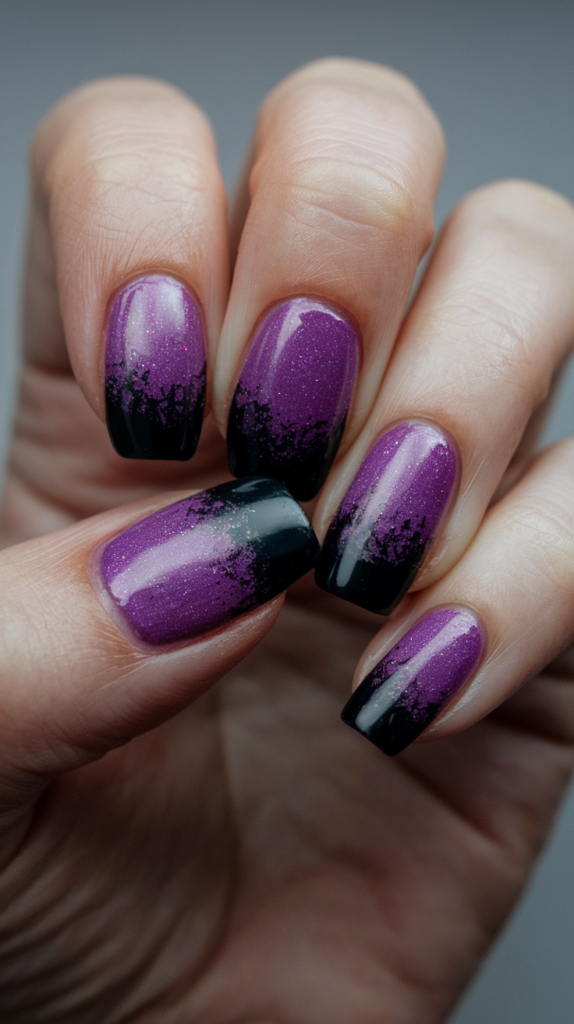
Twilight ombre nails capture the mystical beauty of a twilight sky with their enchanting blend of dark purple and black.
This bold yet elegant design exudes mystery and magic, making it perfect for evening events or when you want to add a touch of drama to your style.
With its striking gradient and optional glitter accents, this look is both versatile and captivating.
Creating the Dark Purple to Black Twilight Gradient
Step 1: Apply the Deep Purple Base
Start by applying a rich, dark purple polish to the base of your nails.
This shade sets the foundation for the ombre effect and evokes the vibrant hues of twilight.
Step 2: Blend in the Black Tips
Using a sponge or nail art brush, blend black polish from the middle of your nails to the tips.
Focus on creating a smooth, seamless transition between the purple and black for a flawless gradient.
Step 3: Add a Starry Glitter Effect
Sprinkle fine glitter across the gradient to mimic twinkling stars in the twilight sky.
For a more subtle effect, focus the glitter near the transition between purple and black.
Step 4: Seal with a Glossy Top Coat
Apply a glossy top coat to enhance the shine and make the glitter sparkle.
This step also smooths out the gradient for a polished, professional finish.
Why It Works
Twilight Ombre Gradient Nails are a captivating blend of dark, moody shades that exude elegance and mystery.
The gradient from deep purple to black creates a striking, magical effect reminiscent of a twilight sky.
Optional glitter accents elevate the design, adding a mesmerizing sparkle that enhances its celestial charm.
Perfect for nights out or special occasions, this design offers a dramatic yet sophisticated way to make a statement.
14. Ice Blue Gradient Nails
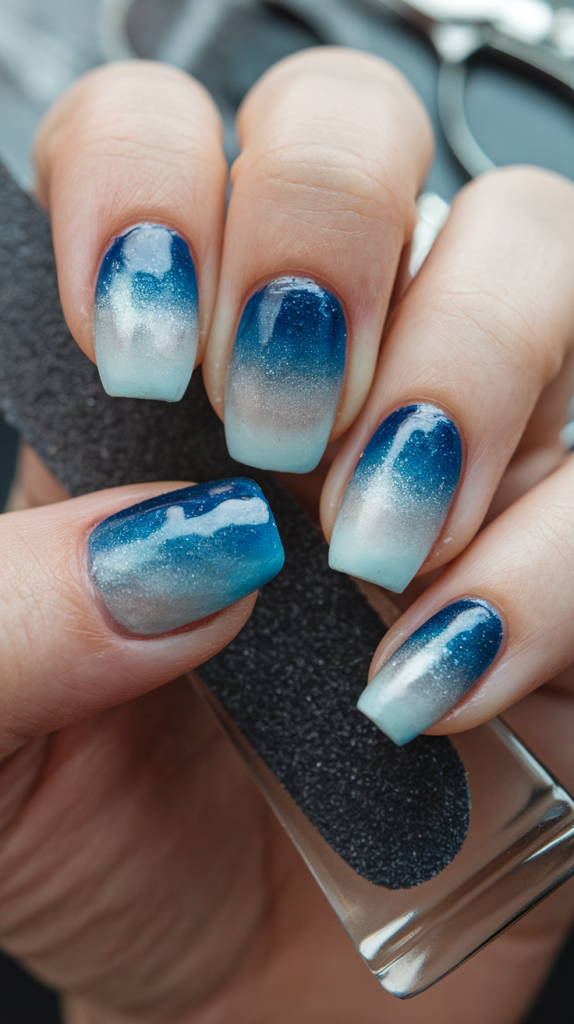
Ice blue gradient nails capture the crisp, frosty beauty of winter with their cool, refreshing tones.
The seamless blend of icy blue into frosty white creates a sophisticated and elegant design reminiscent of a wintry morning.
Perfect for the colder months or whenever you want to embrace a clean, icy aesthetic, these nails bring a touch of winter magic to your style.
Crafting the Icy Blue to White Gradient
Step 1: Apply the Ice Blue Base
Begin with a deep ice blue polish at the base of your nails, near the cuticle.
This bold, cool shade forms the foundation of your frosty gradient.
Step 2: Blend in the Frosty White Tips
Using a sponge or nail art brush, blend a frosty white polish from the middle of the nails to the tips.
Ensure the transition is smooth and natural to mimic the look of winter frost.
Step 3: Add a Sparkling Touch
For extra winter charm, apply a layer of fine shimmer or glitter across the gradient.
Focus on the tips to enhance the frosty effect, resembling the sparkle of freshly fallen snow.
Step 4: Seal with a Glossy Top Coat
Finish the look with a glossy top coat to amplify the shimmer and give your nails a sleek, polished appearance.
Why It Works
Ice Blue Gradient Nails embody the cool elegance of winter with their frosty tones and shimmering details.
The smooth transition from icy blue to white creates a crisp, refreshing look that’s perfect for winter holidays or anytime you want to channel a frosty aesthetic.
The addition of glitter enhances the design’s magical appeal, making your nails shine like snowflakes in the sun.
This versatile and elegant design adds a touch of seasonal sophistication to any outfit or occasion.
15. Lime to Yellow Ombre Gradient Nails
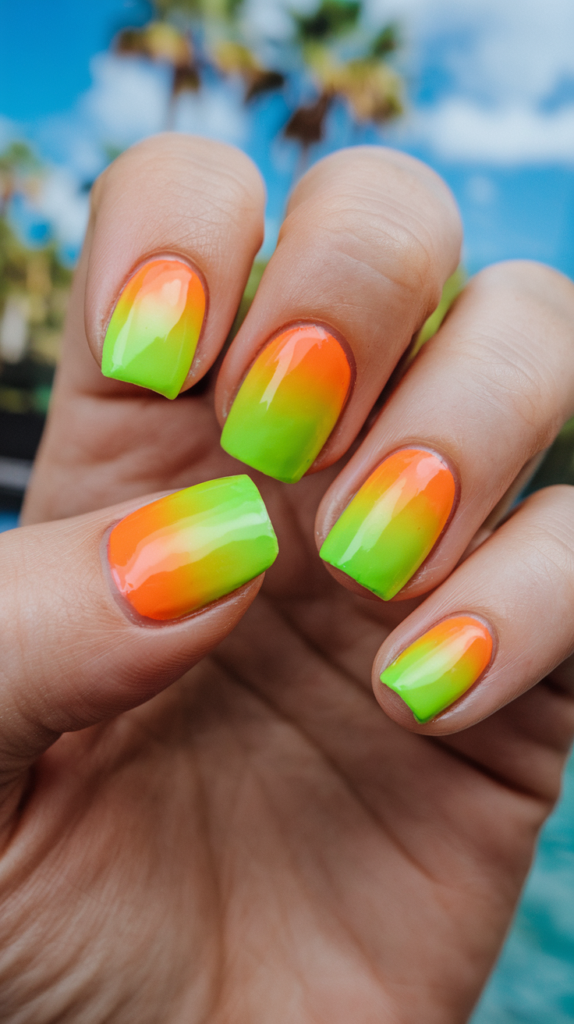
Lime to yellow gradient nails are the ultimate summer statement with their bold and vibrant colors.
The seamless transition from neon lime green to bright yellow creates an eye-catching design that’s perfect for festivals, beach trips, and any summer event.
This playful and lively look pairs effortlessly with summer outfits, adding a fun, dynamic touch to your style.
Creating the Perfect Neon Lime to Yellow Gradient
Step 1: Apply the Neon Lime Green Base
Start by applying a neon lime green polish at the base of your nails, near the cuticle.
This bold shade sets the foundation for the gradient and ensures the design pops.
Step 2: Blend in the Bright Yellow Tips
Using a sponge or nail art brush, blend a bright yellow polish onto the tips of your nails.
Overlap the lime green slightly to create a smooth and seamless transition between the two colors.
Step 3: Enhance with a Glossy Top Coat
Seal the design with a glossy top coat to amplify the brightness of the neon shades and give the nails a sleek, polished finish.
Step 4: Optional Accents
For extra summer flair, consider adding small white or silver accents, such as dots or stripes, to mimic the brightness of the sun.
Why It Works
Lime to Yellow Ombre Gradient Nails are a celebration of summer with their bold, neon hues that capture the season’s energy and vibrancy.
The smooth transition between lime green and yellow creates a dynamic and cheerful look that complements any casual or festive outfit.
The glossy finish enhances the design, making the colors pop and ensuring your nails stand out in any setting.
Perfect for festivals, beach days, or summer parties, this design brings a playful and bold element to your summer style.
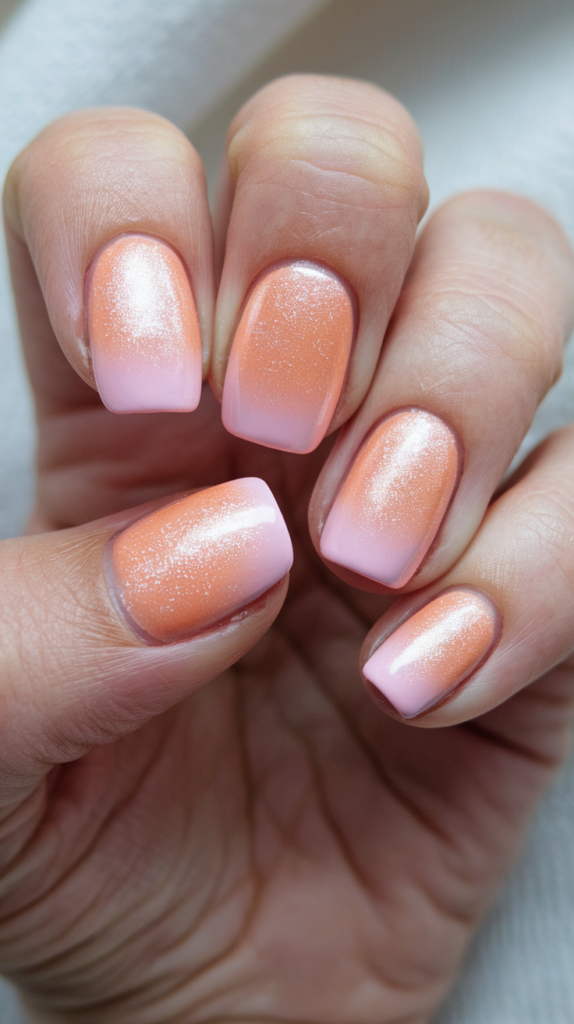
16. Coral to Peach Gradient Nails

Coral to peach gradient nails bring a warm, tropical touch to your style with their fresh and vibrant hues.
The seamless transition from soft coral to light peach captures the essence of a tropical paradise, making this design ideal for summer outings, beach vacations, or whenever you want to channel sunny, relaxed vibes.
This playful yet elegant look is perfect for creating a fun and polished summer aesthetic.
Creating the Perfect Coral to Peach Gradient
Step 1: Apply the Soft Coral Base
Start by applying a soft coral polish at the base of your nails, near the cuticle.
This warm shade sets the foundation for the gradient and evokes tropical energy.
Step 2: Blend in the Peach Tips
Using a sponge or nail art brush, blend a light peach polish from the middle of the nails to the tips.
Overlap the coral slightly to achieve a smooth and seamless transition.
Step 3: Enhance with a Glossy Top Coat
Finish with a glossy top coat to bring out the vibrancy of the coral and peach shades.
This step adds a polished, professional finish to the gradient and ensures the colors shine brightly.
Step 4: Optional Tropical Accents
For extra flair, add small tropical-inspired accents like gold or white palm tree decals, or a touch of fine glitter for a sunlit effect.
Why It Works
Coral to Peach Gradient Nails are the perfect blend of warmth and elegance, capturing the lively spirit of summer and tropical destinations.
The smooth transition between coral and peach creates a soft, natural gradient that is both fresh and vibrant.
The glossy finish enhances the colors, making the design stand out as polished and refined.
Ideal for beach trips, tropical vacations, or summer parties, these nails are a versatile and stylish way to embrace the sunny vibes of the season.
17. Tropical Sunset Gradient Nails
Tropical sunset gradient nails bring the warm, vibrant beauty of a sunset right to your fingertips.
Blending pink, orange, and yellow, this design mimics the stunning colors of a tropical sunset, evoking feelings of summer and sunny getaways.
Perfect for beach trips, vacations, or any time you want to embrace bold, sunny vibes, these nails are a radiant addition to your summer style.
Perfecting the Blend of Pink, Orange, and Yellow
Step 1: Apply the Hot Pink Base
Begin with a hot pink polish at the base of your nails, near the cuticle.
This vibrant shade sets the foundation for the sunset-inspired gradient.
Step 2: Blend in the Fiery Orange
Using a sponge or nail art brush, blend a fiery orange polish into the middle of your nails.
Overlap the pink slightly to create a seamless transition.
Step 3: Add the Bright Yellow Tips
Finish the gradient with a bright yellow polish at the tips of your nails.
Ensure the colors flow smoothly into one another to capture the essence of a sunset.
Step 4: Seal with a Glossy Top Coat
Apply a glossy top coat to enhance the vibrancy of the gradient and give your nails a polished finish.
Step 5: Optional Sunlit Accents
For an extra touch, consider adding gold glitter or tiny sun decals to elevate the tropical vibe.
Why It Works
Tropical Sunset Gradient Nails perfectly capture the dynamic beauty of a sunset with their bold blend of colors.
The transition from pink to orange to yellow mirrors the stunning hues of a tropical sky at dusk, creating a warm, inviting design.
The glossy finish enhances the vibrancy of the gradient, making the colors pop and adding a professional touch.
Ideal for summer vacations, beach outings, or simply embracing sunny vibes, this design is a bold, beautiful way to celebrate the season.
18. Frosted Lavender Gradient Nails

Frosted lavender gradient nails combine cool, soft tones with an elegant frosty finish, making them perfect for winter or anytime you want a classy and refreshing look.
The seamless blend of lavender into frosty silver adds a touch of winter magic, creating a sophisticated design that’s subtle yet captivating.
Ideal for formal occasions or everyday elegance, this design exudes a polished, wintry charm.
Achieving a Soft Frosted Lavender to Silver Gradient
Step 1: Apply the Lavender Base
Start with a soft lavender polish at the base of your nails, near the cuticle.
This delicate color creates a smooth foundation for the frosted gradient.
Step 2: Blend in the Frosty Silver
Using a sponge or nail art brush, gently blend frosty silver polish from the middle of the nails to the tips.
Overlap the lavender slightly to ensure a smooth and seamless transition.
Step 3: Choose Your Top Coat Finish
- For a velvety matte finish, apply a matte top coat to create a soft, understated look.
- For a glossy effect, use a glossy top coat to amplify the shimmer and give the silver a radiant sparkle.
Step 4: Optional Wintery Accents
Enhance the frosted effect with tiny silver glitter or snowflake decals for a festive, winter-inspired touch.
Why It Works
Frosted Lavender Gradient Nails perfectly balance cool sophistication and subtle elegance, making them an ideal winter accessory.
The smooth transition from lavender to silver mimics frosty tones, evoking the serene beauty of a snowy day.
Whether finished with a matte or glossy top coat, this versatile design pairs effortlessly with formal or casual outfits.
For a touch of festive flair, glitter or snowflake accents add a magical, wintry charm to the look, making it both stylish and seasonal.
19. Teal to Turquoise Ombre Gradient Nails

Teal to turquoise gradient nails bring cool, refreshing vibes to your style with their vibrant ocean-inspired hues.
The seamless blend of deep teal into bright turquoise creates a bold and energizing look, making these nails perfect for summer outings, beach vacations, or anytime you want to embrace refreshing, bold tones.
This design evokes the feeling of a cool dip in the ocean, adding a splash of color to any look.
Creating the Perfect Teal to Turquoise Gradient
Step 1: Apply the Deep Teal Base
Start by applying a rich teal polish to the base of your nails, near the cuticle.
This shade sets the foundation for the gradient and mirrors the deeper tones of the ocean.
Step 2: Blend in the Turquoise Tips
Using a sponge or nail art brush, blend a bright turquoise polish from the middle of your nails to the tips.
Overlap the teal slightly to create a smooth and seamless transition.
Step 3: Enhance with a Glossy Top Coat
Seal the design with a glossy top coat to amplify the vibrancy and give your nails a sleek, polished finish.
Step 4: Optional Ocean-Inspired Accents
For extra flair, add subtle ocean-inspired details, such as small wave designs, glitter, or shell decals, to enhance the aquatic theme.
Why It Works
Teal to Turquoise Ombre Gradient Nails perfectly capture the refreshing beauty of ocean colors, making them an ideal summer accessory.
The bold transition from deep teal to turquoise mimics the gradient of ocean water, evoking feelings of calm and energy simultaneously.
The glossy finish enhances the design’s vibrancy, ensuring your nails stand out with a polished, professional look.
Perfect for beach trips, summer parties, or whenever you want to embrace bold, refreshing tones, this design is a stunning way to celebrate the season.
20. Black to Burgundy Gradient Nails

Black to burgundy gradient nails offer a bold and dramatic look that’s perfect for fall and winter.
The seamless blend of deep black into rich burgundy creates an elegant, eye-catching design that exudes sophistication and style.
Ideal for formal events, nights out, or when you want to embrace dark, moody tones, this design is a striking way to make a statement.
Creating the Perfect Black to Burgundy Gradient
Step 1: Apply the Black Base
Start with a deep black polish at the base of your nails, near the cuticle.
This dark shade sets the tone for the dramatic gradient.
Step 2: Blend in the Burgundy Tips
Using a sponge or nail art brush, blend a rich burgundy polish from the middle of the nails to the tips.
Overlap the black slightly to ensure a smooth, seamless transition between the two shades.
Step 3: Enhance with a Glossy Top Coat
Seal the design with a glossy top coat to amplify the depth and vibrancy of the colors.
The glossy finish adds a polished, professional look that enhances the dramatic effect.
Step 4: Optional Luxe Accents
For extra flair, consider adding subtle accents like gold foil or a fine glitter stripe along the gradient transition for a touch of luxury.
Why It Works
Black to Burgundy Gradient Nails are the epitome of bold elegance, with their rich, dramatic tones that capture the essence of fall and winter fashion.
The smooth transition between black and burgundy creates a moody yet sophisticated look, perfect for making a statement.
The glossy finish enhances the design’s depth, while optional accents like gold foil elevate its luxurious feel.
This versatile design pairs beautifully with dark, chic outfits and is a must-have for anyone embracing bold, dramatic colors.
21. Mint to White Gradient Nails

Mint to white gradient nails offer a soft, refreshing look that’s perfect for spring or whenever you want a clean, minimalist design.
The seamless transition from mint green to crisp white creates an elegant and subtle aesthetic that suits both casual and formal occasions.
This design is a versatile way to embrace soft, understated colors while maintaining a polished, refined style.
Creating the Perfect Mint to White Gradient
Step 1: Apply the Mint Green Base
Begin with a soft mint green polish at the base of your nails, near the cuticle.
This delicate color sets the foundation for the gradient, adding a fresh and airy feel.
Step 2: Blend in the White Tips
Using a sponge or nail art brush, blend a crisp white polish from the middle of your nails to the tips.
Overlap the mint slightly to create a smooth, seamless transition for a clean gradient effect.
Step 3: Seal with a Glossy Top Coat
Finish with a glossy top coat to enhance the vibrancy of the mint green and white shades.
The glossy finish adds a sleek, polished look that completes the design.
Step 4: Optional Subtle Accents
For added charm, consider incorporating subtle details like fine glitter or small floral decals to enhance the springtime vibe.
Why It Works
Mint to White Gradient Nails capture the essence of fresh, soft tones, making them a perfect choice for spring or whenever you want a clean, crisp aesthetic.
The smooth transition between mint green and white creates an understated yet elegant look that pairs effortlessly with a variety of styles.
The glossy top coat adds a polished finish, ensuring the design looks professional and refined.
This versatile and refreshing design is ideal for embracing soft, subtle colors in a sophisticated way.
22. Gold to Champagne Gradient Nails

Gold to champagne gradient nails bring a luxurious touch to your style with their elegant metallic tones.
The seamless transition from rich gold to soft champagne creates a glamorous, sophisticated design that’s perfect for formal occasions or special events.
With their subtle shimmer and polished finish, these nails are a stunning way to add a touch of opulence to your look.
Creating the Perfect Gold to Champagne Gradient
Step 1: Apply the Gold Base
Start with a rich gold polish at the base of your nails, near the cuticle.
This bold, metallic shade sets the foundation for the gradient and adds a touch of luxury.
Step 2: Blend in the Champagne Tips
Using a sponge or nail art brush, blend a soft champagne polish from the middle of your nails to the tips.
Overlap the gold slightly to create a smooth, seamless transition between the two metallic tones.
Step 3: Seal with a Glossy Top Coat
Finish the design with a glossy top coat to amplify the shine and enhance the luxurious feel of the metallic gradient.
Step 4: Optional Glamorous Accents
For extra elegance, add small details like rhinestones, gold foil, or glitter near the transition for a sparkling effect.
Why It Works
Gold to Champagne Gradient Nails exude sophistication and glamour, making them ideal for formal events, weddings, or parties.
The smooth blend of metallic gold and champagne tones creates a rich, opulent look that elevates any outfit.
The glossy finish enhances the metallic shimmer, ensuring the design looks polished and refined.
Optional accents like rhinestones or glitter add an extra layer of elegance, making this luxurious design a perfect choice for any occasion where you want to shine.
23. Peach to Pink Gradient Nails
Peach to pink gradient nails offer a soft, feminine look that’s perfect for any occasion.
The delicate transition from light peach to baby pink creates an elegant and graceful design that complements both casual and formal styles.
Ideal for weddings, parties, or simply adding a touch of softness to your look, these nails exude charm and subtle sophistication.
Creating the Perfect Peach to Pink Gradient
Step 1: Apply the Peach Base
Start by applying a light peach polish at the base of your nails, near the cuticle.
This warm shade sets the foundation for the gradient and adds a soft, inviting tone.
Step 2: Blend in the Pink Tips
Using a sponge or nail art brush, gently blend a baby pink polish from the middle of your nails to the tips.
Overlap the peach slightly to ensure a smooth, seamless transition for a natural gradient effect.
Step 3: Seal with a Glossy Top Coat
Finish the design with a glossy top coat to enhance the vibrancy and give your nails a polished, radiant finish.
Step 4: Optional Feminine Accents
For added elegance, consider adding small details like fine glitter, rhinestones, or floral nail art for a romantic touch.
Why It Works
Peach to Pink Gradient Nails are a beautiful blend of softness and elegance, making them a versatile choice for any occasion.
The gentle transition from peach to pink creates a harmonious, natural gradient that’s both feminine and sophisticated.
The glossy finish enhances the design’s subtle charm, while optional accents can add a personalized flair.
Perfect for weddings, parties, or everyday wear, this design is a timeless way to embrace delicate, graceful colors.
24. Bronze to Copper Gradient Nails

Bronze to copper gradient nails are the ultimate expression of warm, metallic sophistication.
The seamless transition from rich bronze to radiant copper creates a luxurious, autumn-inspired look that’s perfect for the fall season or any occasion where you want to embrace warm, opulent tones.
With their metallic finish and polished elegance, these nails add a touch of luxury to both casual and formal styles.
Creating the Perfect Bronze to Copper Gradient
Step 1: Apply the Bronze Base
Begin with a rich bronze polish at the base of your nails, near the cuticle.
This warm, metallic shade serves as the foundation for the gradient and captures the essence of autumn.
Step 2: Blend in the Copper Tips
Using a sponge or nail art brush, blend a radiant copper polish from the middle of your nails to the tips.
Overlap the bronze slightly to create a smooth and seamless transition between the two metallic tones.
Step 3: Enhance with a Glossy Top Coat
Seal the design with a glossy top coat to amplify the shine and depth of the metallic colors.
The glossy finish gives your nails a polished, professional look and enhances the luxurious effect of the gradient.
Step 4: Optional Autumnal Accents
For an extra touch of seasonal charm, add subtle details like gold foil, fine glitter, or leaf-inspired nail art to complement the warm tones.
Why It Works
Bronze to Copper Gradient Nails embody the richness and warmth of autumn with their blend of metallic hues.
The transition from bronze to copper captures the essence of fall’s golden light and earthy tones, creating a design that’s both sophisticated and seasonal.
The glossy finish enhances the depth and brilliance of the metallic shades, ensuring a polished and elegant look.
Ideal for fall fashion or any time you want to embrace warm, luxurious tones, this design is a stunning way to celebrate the season in style.
25. Royal Blue to Silver Gradient Nails

Royal blue to silver gradient nails are a stunning way to showcase bold, regal elegance.
The seamless blend of deep royal blue into shiny silver creates a striking and luxurious design that’s perfect for formal events, parties, or anytime you want to make a bold statement.
With their sophisticated gradient and polished finish, these nails exude confidence and style.
Creating the Perfect Royal Blue to Silver Gradient
Step 1: Apply the Royal Blue Base
Start by applying a deep royal blue polish at the base of your nails, near the cuticle.
This vibrant shade sets the foundation for the gradient and captures the essence of regal elegance.
Step 2: Blend in the Silver Tips
Using a sponge or nail art brush, blend a shiny silver polish from the middle of your nails to the tips.
Overlap the blue slightly to create a smooth and seamless transition between the two bold colors.
Step 3: Enhance with a Glossy Top Coat
Seal the design with a glossy top coat to amplify the shine and depth of the gradient.
The glossy finish enhances the metallic silver and bold blue tones, giving your nails a polished, professional look.
Step 4: Optional Accents for Extra Glam
Add subtle accents like rhinestones, fine glitter, or a silver stripe along the gradient for a touch of extra glamour and sophistication.
Why It Works
Royal Blue to Silver Gradient Nails combine bold, striking colors with a smooth, elegant finish, making them a standout design for any occasion.
The transition from deep royal blue to shiny silver evokes a sense of luxury and sophistication, ensuring your nails turn heads and leave a lasting impression.
The glossy top coat enhances the depth and vibrancy of the colors, creating a polished, regal look.
Perfect for formal events, parties, or when you want to embrace bold elegance, this design is a glamorous way to make a statement with your nails.
26. Emerald Green Gradient Nails

Emerald green gradient nails capture the lush beauty of nature with their rich, earthy tones.
The seamless blend of deep emerald green into lighter shades creates a vibrant and sophisticated look that’s perfect for any season.
Ideal for both casual and formal occasions, these nails are a versatile addition to your nail art repertoire, bringing elegance and a touch of nature to your style.
Creating the Perfect Emerald Green Ombre
Step 1: Apply the Deep Emerald Base
Start by applying a deep emerald green polish to the base of your nails, near the cuticle.
This rich shade sets the foundation for the gradient and evokes the lushness of nature.
Step 2: Blend in Lighter Green Shades
Using a sponge or nail art brush, blend lighter shades of green from the middle of your nails to the tips.
Overlap the emerald green slightly to create a smooth and natural transition.
Step 3: Seal with a Glossy Top Coat
Finish the design with a glossy top coat to enhance the depth and vibrancy of the green tones.
The glossy finish adds a polished and sophisticated touch, ensuring the gradient looks seamless and professional.
Step 4: Optional Earthy Accents
For added charm, incorporate subtle accents like gold foil, fine glitter, or floral designs to enhance the earthy, natural feel of the gradient.
Why It Works
Emerald Green Gradient Nails combine the richness of emerald green with the softness of lighter tones, creating a design that is both vibrant and elegant.
The smooth gradient mimics the natural beauty of lush greenery, making it a timeless choice for any season.
The glossy finish enhances the depth of the colors, adding a polished, luxurious touch to the design.
Perfect for those who love earthy tones, this versatile look pairs beautifully with a wide range of outfits and occasions.
27. Peach to Gold Glitter Gradient Nails
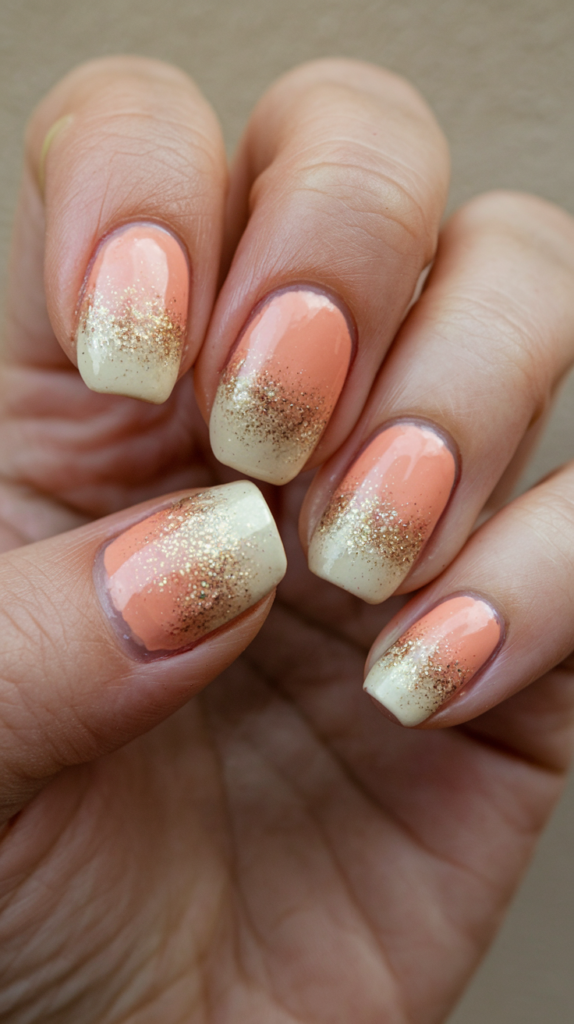
Peach to gold glitter gradient nails combine soft femininity with a dazzling touch of sparkle.
The seamless transition from light peach to shimmering gold glitter creates an elegant and playful design that’s perfect for any occasion.
Whether for parties, weddings, or casual outings, these nails add a subtle sparkle to your style, ensuring you shine wherever you go.
Creating the Perfect Peach to Gold Glitter Gradient
Step 1: Apply the Peach Base
Start by applying a light peach polish to the base of your nails, near the cuticle.
This soft, warm shade sets the foundation for the gradient and provides a delicate backdrop for the glitter.
Step 2: Blend in the Gold Glitter Tips
Using a sponge or nail art brush, blend fine gold glitter polish from the middle of your nails to the tips.
Overlap the peach slightly to create a smooth and seamless transition between the color and the glitter.
Step 3: Build Up the Glitter
For a more pronounced sparkle, apply an additional layer of gold glitter, focusing on the tips to enhance the gradient effect.
Step 4: Seal with a Glossy Top Coat
Finish with a glossy top coat to lock in the glitter and give your nails a polished, high-shine finish.
Step 5: Optional Embellishments
For extra glamour, add small embellishments like rhinestones or subtle decals near the cuticle or tips to complement the glitter.
Why It Works
Peach to Gold Glitter Gradient Nails combine softness and sparkle, creating a design that is both elegant and eye-catching.
The gentle transition from peach to glitter adds a playful, shimmering touch without being overwhelming.
The glossy top coat enhances the glitter’s brilliance, ensuring a polished, professional finish.
Perfect for any occasion, this design strikes a balance between subtle charm and festive flair, making it a versatile and timeless choice.
28. Turquoise to Coral Ombre Gradient Nails

Turquoise to coral gradient nails bring bold, tropical vibes to your fingertips with their vibrant and lively colors.
The seamless blend of bright turquoise into vibrant coral creates a striking design that’s perfect for summer, beach vacations, or any occasion where you want to embrace a fun, tropical aesthetic.
This head-turning gradient captures the essence of a tropical paradise and adds a playful splash of color to your style.
Creating the Perfect Turquoise to Coral Gradient
Step 1: Apply the Turquoise Base
Start by applying a bright turquoise polish at the base of your nails, near the cuticle.
This fresh and lively shade sets the foundation for the tropical gradient.
Step 2: Blend in the Coral Tips
Using a sponge or nail art brush, gently blend vibrant coral polish from the middle of your nails to the tips.
Overlap the turquoise slightly to create a smooth and seamless transition between the two bold colors.
Step 3: Enhance the Gradient
For a more pronounced tropical effect, apply a second layer of the gradient to intensify the colors and ensure they blend perfectly.
Step 4: Seal with a Glossy Top Coat
Finish with a glossy top coat to amplify the vibrancy of the turquoise and coral shades, giving your nails a polished and radiant finish.
Step 5: Optional Tropical Accents
Add small tropical-inspired details like palm tree decals, gold accents, or fine glitter for extra flair that complements the tropical theme.
Why It Works
Turquoise to Coral Ombre Gradient Nails combine the refreshing coolness of turquoise with the warmth of coral, creating a bold and tropical design.
The vibrant gradient mimics the colors of a tropical paradise, evoking sunny beaches and crystal-clear waters.
The glossy finish enhances the brightness of the colors, ensuring a polished and eye-catching look.
Perfect for summer outings, vacations, or any time you want to channel tropical vibes, this design is a fun and stylish way to make a statement.
29. Lilac to Baby Blue Gradient Nails

Lilac to baby blue gradient nails bring a dreamy and romantic touch to your style with their soft, pastel tones.
The seamless transition from delicate lilac to gentle baby blue creates an elegant, graceful design perfect for spring or anytime you want to embrace soft, romantic colors.
This subtle yet eye-catching gradient adds a sophisticated and dreamy aesthetic to any look.
Creating the Perfect Lilac to Baby Blue Gradient
Step 1: Apply the Lilac Base
Start by applying a soft lilac polish at the base of your nails, near the cuticle.
This light, pastel shade provides the foundation for a dreamy gradient.
Step 2: Blend in the Baby Blue Tips
Using a sponge or nail art brush, blend baby blue polish from the middle of your nails to the tips.
Overlap the lilac slightly to create a smooth and seamless transition between the two colors.
Step 3: Enhance the Gradient
Apply a second layer of the gradient if needed to ensure the colors are vibrant and the transition is flawless.
Step 4: Seal with a Glossy Top Coat
Finish the design with a glossy top coat to enhance the vibrancy of the pastel shades and give your nails a polished, professional finish.
Step 5: Optional Dreamy Accents
For added charm, consider incorporating subtle glitter, star decals, or iridescent flakes to enhance the ethereal, dreamy feel of the design.
Why It Works
Lilac to Baby Blue Gradient Nails are a perfect blend of softness and elegance, making them a versatile choice for spring or any occasion.
The smooth gradient between lilac and blue creates a harmonious, pastel aesthetic that’s delicate and romantic.
The glossy finish enhances the dreamy quality of the design, ensuring it looks polished and refined.
Ideal for pairing with spring fashion or light, breezy styles, this design is a graceful way to celebrate soft, pastel tones.
30. Moody Grey Gradient Nails

Moody grey gradient nails bring a sleek and minimalist touch to your style with their understated elegance.
The smooth blend of dark charcoal into soft grey creates a clean, sophisticated design that works beautifully for any season.
Perfect for both casual and formal occasions, these nails embody modern simplicity while adding a polished edge to your look.
Creating the Perfect Charcoal to Soft Grey Gradient
Step 1: Apply the Charcoal Base
Start by applying a dark charcoal polish at the base of your nails, near the cuticle.
This deep, moody shade serves as the foundation for the gradient and adds a bold, modern touch.
Step 2: Blend in the Soft Grey Tips
Using a sponge or nail art brush, blend soft grey polish from the middle of your nails to the tips.
Overlap the charcoal slightly to create a smooth and seamless transition between the shades of grey.
Step 3: Enhance with a Glossy Top Coat
Seal the design with a glossy top coat to amplify the depth and shine of the gradient.
The glossy finish adds a polished, professional look that enhances the sleek, modern vibe of the design.
Step 4: Optional Modern Accents
For an extra edge, add subtle details like matte stripes, metallic accents, or fine glitter to complement the minimalist aesthetic.
Why It Works
Moody Grey Gradient Nails combine the boldness of charcoal with the softness of grey, creating a balanced and versatile design.
The clean transition between dark and light shades embodies sleek modernity, making this style perfect for minimalist nail art lovers.
The glossy top coat enhances the design’s depth, ensuring a polished, refined finish.
Ideal for fall and winter fashion or any occasion where you want to embrace modern elegance, this design is a chic and stylish way to make a subtle statement.
31. Copper to Rose Gold Gradient Nails

Copper to rose gold gradient nails exude warmth and sophistication with their luxurious metallic tones.
The seamless transition from rich copper to radiant rose gold creates a glamorous, opulent look that’s perfect for formal events, parties, or any occasion where you want to make a bold, elegant statement.
With their polished finish and striking gradient, these nails are sure to turn heads and leave a lasting impression.
Creating the Perfect Copper to Rose Gold Gradient
Step 1: Apply the Copper Base
Start with a rich copper polish at the base of your nails, near the cuticle.
This bold, metallic shade forms the foundation for the gradient and adds warmth to the design.
Step 2: Blend in the Rose Gold Tips
Using a sponge or nail art brush, blend rose gold polish from the middle of your nails to the tips.
Overlap the copper slightly to create a smooth and seamless transition between the two metallic shades.
Step 3: Enhance with a Glossy Top Coat
Seal the design with a glossy top coat to amplify the shine and depth of the metallic tones.
The glossy finish adds a polished, professional look that enhances the luxurious feel of the gradient.
Step 4: Optional Glamorous Accents
For an extra touch of elegance, consider adding subtle accents like fine glitter, gold foil, or tiny rhinestones to complement the warm metallic shades.
Why It Works
Copper to Rose Gold Gradient Nails combine two warm, opulent shades to create a rich and sophisticated design.
The transition from copper to rose gold is both bold and elegant, making it ideal for formal occasions or nights out.
The glossy top coat enhances the metallic finish, ensuring your nails shine with a polished, luxurious look.
Perfect for anyone who loves warm, glamorous tones, this design is a stunning way to elevate your style with a touch of class and sophistication.
32. Pink Glitter Gradient Nails

Pink glitter gradient nails are a fun and playful way to add sparkle to your style.
The seamless blend of baby pink into shimmering pink glitter creates a soft yet eye-catching design that’s perfect for parties, weddings, or any occasion where you want to shine.
With their delicate base and sparkling accents, these nails offer a charming way to stand out without being overpowering.
Creating the Perfect Pink Glitter Gradient
Step 1: Apply the Baby Pink Base
Start by applying a soft baby pink polish to the base of your nails, near the cuticle.
This light and delicate shade sets the foundation for the gradient and adds a touch of softness.
Step 2: Blend in the Pink Glitter Tips
Using a sponge or nail art brush, blend fine pink glitter polish from the middle of your nails to the tips.
Overlap the baby pink slightly to create a smooth and seamless transition between the solid color and the glitter.
Step 3: Build Up the Glitter
For a more dramatic effect, apply an additional layer of glitter, focusing on the tips to intensify the sparkle.
Step 4: Seal with a Glossy Top Coat
Finish with a glossy top coat to enhance the shimmer and give your nails a polished, sparkling finish.
Step 5: Optional Extra Sparkle
For added glamour, consider incorporating small rhinestones or holographic glitter to accentuate the design.
Why It Works
Pink Glitter Gradient Nails combine softness and sparkle for a look that’s playful yet elegant.
The smooth transition from baby pink to glitter creates a balanced design that is both stylish and fun.
The glossy finish enhances the glitter’s brilliance, ensuring a polished and professional appearance.
Perfect for celebrations, weddings, or casual outings, this design adds a delightful touch of sparkle to any look, making it versatile and eye-catching.
33. Holographic Gradient Nails

Holographic gradient nails are a mesmerizing way to add magic and mystery to your style.
The seamless blend of holographic shimmer into a base color creates a stunning iridescent effect that’s perfect for parties, festivals, or any occasion where you want to stand out.
With their futuristic and eye-catching design, these nails are sure to leave a lasting impression.
Creating the Perfect Holographic Gradient
Step 1: Choose and Apply Your Base Color
Start by selecting a base color that complements the holographic shimmer. Popular choices include black, white, or pastel shades for maximum contrast.
Apply the base color to the entire nail, ensuring a smooth and even layer.
Step 2: Blend in the Holographic Shimmer
Using a sponge or nail art brush, blend a holographic shimmer polish from the middle of your nails to the tips.
Overlap the base color slightly to create a smooth, seamless transition.
Step 3: Intensify the Holographic Effect
For a more dramatic look, apply an additional layer of holographic shimmer, focusing on the tips for a gradient that shines with depth.
Step 4: Seal with a Glossy Top Coat
Finish with a glossy top coat to enhance the holographic effect and give your nails a sleek, polished finish.
Step 5: Optional Futuristic Accents
For extra flair, consider adding fine glitter, small rhinestones, or geometric decals to complement the holographic theme.
Why It Works
Holographic Gradient Nails combine futuristic shimmer with sleek design, creating a unique and eye-catching look.
The smooth transition from a solid base color to holographic shimmer adds depth and dimension, while the iridescent effect captures the light beautifully.
The glossy finish enhances the holographic brilliance, making the nails appear polished and professional.
Perfect for parties, festivals, or casual outings, this design brings a touch of magic and individuality to any look, ensuring you stand out in any crowd.
34. Red to Gold Gradient Nails

Red to gold gradient nails are a bold and glamorous way to make a striking statement with your style.
The seamless blend of rich red into shiny gold creates a fiery, luxurious design that’s perfect for formal events, parties, or any occasion where you want to embrace bold, sophisticated colors.
This vibrant and polished look exudes elegance and glamour, ensuring your nails stand out beautifully.
Creating the Perfect Red to Gold Gradient
Step 1: Apply the Red Base
Start with a rich red polish at the base of your nails, near the cuticle.
This bold shade sets the foundation for the gradient and adds a fiery, glamorous tone to the design.
Step 2: Blend in the Gold Tips
Using a sponge or nail art brush, blend shiny gold polish from the middle of your nails to the tips.
Overlap the red slightly to create a smooth, seamless transition between the two bold colors.
Step 3: Enhance the Gradient
For a more dramatic effect, apply a second layer of gold polish at the tips to intensify the metallic shine.
Step 4: Seal with a Glossy Top Coat
Finish with a glossy top coat to enhance the depth and vibrancy of the red and gold shades.
The glossy finish ensures the gradient looks polished and professional while adding a luxurious touch.
Step 5: Optional Festive Accents
For added glamour, consider incorporating glitter, rhinestones, or gold foil details to enhance the festive appeal of the design.
Why It Works
Red to Gold Gradient Nails combine the boldness of red with the opulence of gold, creating a fiery and glamorous look.
The smooth transition between the two colors exudes luxury and sophistication, making this design perfect for formal occasions or festive events.
The glossy finish enhances the rich tones and metallic shine, ensuring your nails are polished and eye-catching.
Ideal for special occasions or anytime you want to embrace bold, glamorous colors, this design is a stunning way to elevate your style.
35. Dark Blue to Light Grey Gradient Nails

Dark blue to light grey gradient nails offer a sleek and sophisticated look with their modern, moody tones.
The seamless blend of deep blue into soft grey creates a stylish, understated design that’s perfect for any occasion.
Ideal for both casual and formal settings, these nails bring a touch of minimalist elegance to your style, making them a versatile choice for fall or winter fashion.
Creating the Perfect Dark Blue to Light Grey Gradient
Step 1: Apply the Deep Blue Base
Start by applying a deep blue polish to the base of your nails, near the cuticle.
This rich shade forms the foundation of the gradient, adding depth and drama to the design.
Step 2: Blend in the Light Grey Tips
Using a sponge or nail art brush, gently blend a soft grey polish from the middle of your nails to the tips.
Overlap the blue slightly to create a smooth, seamless transition between the two shades.
Step 3: Refine and Enhance the Gradient
Apply a second layer of the gradient if needed to intensify the colors and ensure a flawless blend.
Step 4: Seal with a Glossy Top Coat
Finish with a glossy top coat to enhance the depth and vibrancy of the gradient.
The glossy finish adds a polished, professional look while highlighting the smooth transition between the shades.
Step 5: Optional Modern Accents
For a more unique twist, consider adding subtle details like silver glitter, metallic stripes, or small star decals for a celestial-inspired touch.
Why It Works
Dark Blue to Light Grey Gradient Nails combine bold and neutral tones for a design that’s both moody and elegant.
The smooth gradient between deep blue and soft grey exudes modern sophistication, making this design a standout for fall and winter.
The glossy finish enhances the depth of the colors, giving your nails a polished and refined appearance.
Perfect for minimalist nail art lovers, this versatile design pairs beautifully with casual and formal outfits, adding a touch of sleek, understated style to your look.
Conclusion
With so many stunning gradient nail designs to choose from, there’s no shortage of inspiration for your next manicure.
Whether you’re drawn to the soft elegance of pastel ombre, the bold statement of neon rainbows, or the luxurious shimmer of metallics, gradient nails allow you to express your creativity in a stylish and sophisticated way.
These designs are perfect for every occasion, from casual outings to glamorous events.
Now that you’ve explored these 35 unique gradient nail ideas, it’s time to pick your favorite and bring it to life.
Whether you do it yourself or take it to the salon, one thing is certain—your nails will look absolutely fabulous!