
Welcome to our vibrant exploration of springtime nail artistry, where fingertips become miniature canvases celebrating the season’s renewal.
This guide delves into a diverse array of designs inspired by the fresh colors and delicate beauty of spring.
From soft pastels and blooming florals to modern interpretations featuring holographic effects and unique textures, we have curated a comprehensive collection.
Prepare to be inspired by looks that capture the essence of sunny days, blossoming gardens, and the joyful spirit of spring.
Blooming Pastel Garden Nails

This nail design captures the gentle awakening of a garden in early spring, utilizing a soft and dreamy color palette.
It evokes images of flowerbeds brimming with delicate blossoms under a soft morning light.
Design Features
The core features include a base of mixed pastel shades like baby pink, mint green, sky blue, and soft lavender, often applied in a gradient or marbled effect.
Tiny, hand-painted flowers such as daisies, forget-me-nots, or abstract petals are scattered across the nails, creating a miniature garden scene.
These delicate florals are typically rendered in white or slightly contrasting pastel hues for a subtle yet intricate look.
A glossy top coat enhances the fresh, dewy appearance, mimicking morning dew on petals.
How To Achieve This Look
Begin by applying a base coat to protect your nails and create a smooth canvas for the polish.
Apply two coats of your chosen pastel base colors, perhaps alternating fingers or creating a soft ombre blend using a makeup sponge.
Once the base is dry, use a fine nail art brush or a dotting tool to carefully paint small flowers and leaves using white or complementary pastel polishes.
Finish with a high-shine top coat to seal the design and add durability.
Why This Stands Out
This design stands out for its quintessential representation of spring, combining the softness of pastels with the inherent beauty of florals.
It is universally appealing due to its delicate and feminine aesthetic.
The intricate yet understated nature makes it versatile enough for both everyday wear and special occasions, perfectly complementing spring wardrobes.
It offers a refreshing and optimistic vibe that resonates with the season’s renewal.
Cherry Blossom Drizzle Nails

Inspired by the fleeting beauty of cherry blossom season, this design incorporates delicate pink petals seemingly drizzled over the nails.
It aims to capture the gentle fall of blossoms carried by a spring breeze.
Design Features
This look typically features a sheer nude or pale pink base, allowing the natural nail to peek through, enhancing the delicate effect.
Fine lines or “drizzles” of white and varying shades of pink mimic falling petals and branches.
Small, stylized cherry blossoms, often just dots or simple five-petal shapes, are strategically placed along the drizzles.
A touch of subtle shimmer or glitter can be added to represent the magical quality of sakura season.
How To Achieve This Look
Start with a meticulously applied sheer base coat, followed by one or two layers of a translucent nude or light pink polish.
Using a very thin striping brush, draw fine, slightly wavy lines in white and pink across the nail, varying their direction and length.
Add tiny blossom details using a dotting tool or the tip of the brush, placing them near the ‘branches’.
Seal the design with a glossy top coat for a polished finish that enhances the drizzled effect.
Why This Stands Out
Cherry Blossom Drizzle Nails stand out for their elegance and symbolic meaning, representing beauty and renewal.
The minimalist approach combined with the iconic motif creates a sophisticated and culturally rich design.
Its subtlety makes it incredibly wearable and chic, perfect for those who appreciate refined nail art.
The design feels poetic and captures a specific, cherished moment of spring unlike any other.
Holographic Butterfly Kisses

This design brings a touch of whimsy and magic to spring nails, featuring iridescent butterflies fluttering against a shimmering backdrop.
It combines the enchantment of holographic finishes with the delicate symbolism of butterflies.
Design Features
The primary feature is the use of holographic nail polish or powder, creating a mesmerizing rainbow shift effect as the base.
Delicate butterfly wing decals, stickers, or hand-painted interpretations are applied over the holographic layer.
Often, only partial wings or abstract butterfly shapes are used, giving the impression of a light “kiss” rather than a full depiction.
The color palette can range from soft pastels to more vibrant holographic shifts.
How To Achieve This Look
Apply a base coat followed by two coats of a holographic nail polish, or apply a base color and then burnish holographic powder onto a cured gel top coat.
Once the holographic layer is ready, carefully apply butterfly decals or stickers.
For a hand-painted look, use a fine brush and black or white polish to outline delicate wing shapes, perhaps filling parts with complementary iridescent polish.
Finish with a high-gloss top coat to protect the decals and enhance the holo effect.
Why This Stands Out
Holographic Butterfly Kisses offer a futuristic and playful take on spring themes, moving beyond traditional florals.
The holographic element adds an eye-catching, dynamic quality that changes with light and movement.
This design appeals to those seeking something unique and magical, combining the ethereal beauty of butterflies with a modern, trendy finish.
It’s a statement look that feels both celebratory and enchanting.
Lemon Glaze French Tips

A sunny twist on a classic, this design updates the traditional French manicure with a cheerful lemon-yellow tip.
It evokes the brightness and zest associated with springtime sunshine and citrus fruits.
Design Features
This look maintains the structure of a French manicure, typically featuring a sheer nude or pink base.
The defining characteristic is the crisp, opaque tip painted in a vibrant, glossy lemon-yellow shade.
The line of the tip can be the classic smile line, or modernized with straight, V-shaped, or curved variations.
The finish is usually high-gloss, resembling a sugary lemon glaze.
How To Achieve This Look
Prepare the nails with a base coat and apply one or two coats of a sheer nude or pink polish for the base.
Using French tip guide stickers or a steady hand with a fine brush, apply the lemon-yellow polish to the tips of the nails.
Ensure clean, sharp lines for a polished look; two coats of the yellow may be needed for full opacity.
Finish with a glossy top coat to enhance the ‘glazed’ appearance and protect the tips.
Why This Stands Out
Lemon Glaze French Tips stand out by injecting a burst of optimistic color into a timeless nail style.
The unexpected pop of yellow is refreshing and modern, perfectly capturing spring’s energetic vibe.
It’s a sophisticated yet playful look that remains work-appropriate while still feeling seasonal and trendy.
This design offers a cheerful alternative for those who love French manicures but seek a seasonal update.
Rainbow Petal Confetti
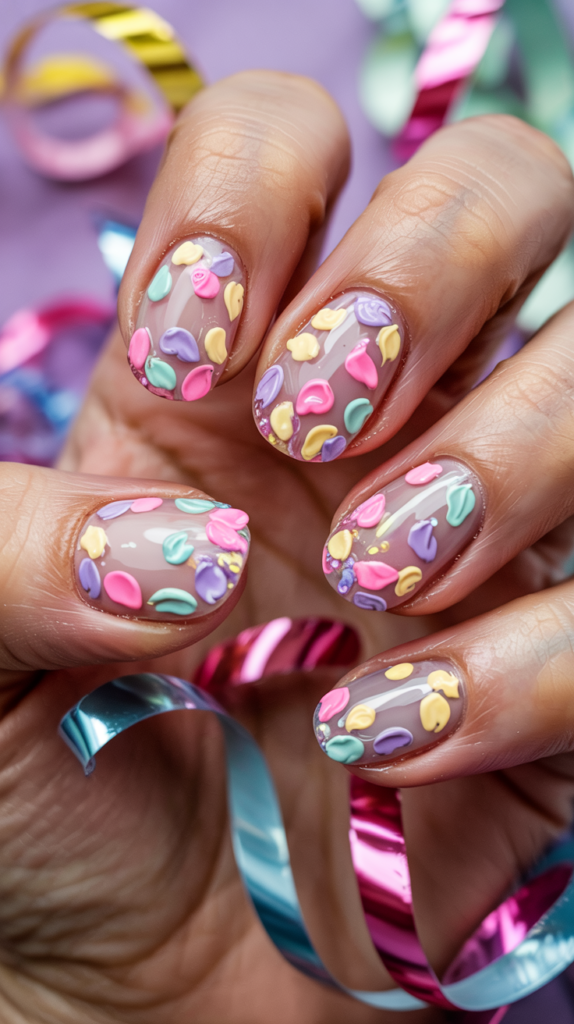
This joyful design mimics the celebratory scattering of colorful petals, creating a vibrant and playful look.
It uses a multitude of bright colors applied in small, petal-like shapes across the nail.
Design Features
The base is usually a clear or neutral shade to allow the ‘confetti’ to be the main focus.
Small, irregular dabs or short strokes of various bright and pastel colors like pink, yellow, blue, green, and purple are scattered randomly.
These dabs are meant to resemble fallen flower petals, creating a textured, layered appearance.
The overall effect is festive, colorful, and full of movement, like a joyful explosion of spring color.
How To Achieve This Look
Apply a base coat and one or two coats of a clear or sheer neutral polish.
Using various nail polish colors and a small brush or dotting tool, apply small, slightly elongated dabs randomly across each nail.
Overlap the colors slightly to create depth and mimic scattered petals; vary the size and orientation of the ‘petals’.
Seal the design with a glossy top coat once all the colors are dry.
Why This Stands Out
Rainbow Petal Confetti stands out for its exuberant and unrestrained use of color, perfectly embodying the joyful spirit of spring.
It is playful, artistic, and highly customizable in terms of color choices.
This design is less structured than traditional floral patterns, offering a more abstract and modern interpretation of spring blooms.
It’s a fun, eye-catching look that radiates happiness and energy.
Springtime Lace Veil Nails

This elegant design draws inspiration from delicate lace fabrics, translating intricate patterns onto the nails for a soft, romantic look.
It often uses white or pastel shades to mimic the fineness of lace.
Design Features
Typically set against a sheer nude, pale pink, or even a bare nail base, the design features intricate lace-like patterns.
These patterns can include floral motifs, netting, swirls, and scalloped edges, often concentrated near the cuticle or tip.
White polish is commonly used for the lace effect, creating a high-contrast yet delicate look.
Sometimes, subtle glitter or tiny pearls are added for extra embellishment, enhancing the bridal or vintage feel.
How To Achieve This Look
After applying a base coat and the sheer base color, the lace pattern can be achieved using several methods.
Use a very fine nail art brush and white polish for hand-painting, requiring a steady hand and patience.
Alternatively, use lace-patterned nail stamping plates or lace nail decals for a more precise and easier application.
Carefully seal the intricate design with a top coat, ensuring not to smudge the delicate lines.
Why This Stands Out
Springtime Lace Veil Nails stand out for their intricate detailing and sophisticated elegance.
They offer a romantic and feminine aesthetic that feels timeless yet appropriate for the lightness of spring.
The design evokes a sense of vintage charm and delicacy, making it perfect for special occasions like weddings or garden parties.
It’s a testament to detailed artistry in nail design.
Lavender Mist Ombre

This serene design features a soft gradient effect, transitioning smoothly between shades of lavender or from lavender to a complementary color.
It evokes the calming and dreamy feeling of lavender fields veiled in morning mist.
Design Features
The key feature is the ombre or gradient effect, usually fading from a darker lavender at the cuticle to a lighter shade at the tip, or vice versa.
It can also blend lavender with white, pale pink, or light grey for a misty appearance.
The finish is often kept glossy to enhance the smooth transition, but a matte top coat can also create a soft, velvety look.
Sometimes, a subtle shimmer is incorporated into one of the shades for a touch of magic.
How To Achieve This Look
Apply a base coat and then apply the lightest shade of the ombre (e.g., white or pale lavender) over the entire nail.
On a makeup sponge, paint stripes of the chosen lavender shades next to each other.
Dab the sponge onto the nail, slightly moving it up and down to blend the colors; repeat for intensity.
Clean up the excess polish around the cuticle and finish with a glossy or matte top coat once dry.
Why This Stands Out
Lavender Mist Ombre stands out for its soothing and ethereal quality, using a universally loved spring color in a blended, seamless way.
The gradient effect is visually appealing and adds depth to the manicure.
It’s a versatile look that can be both calming and chic, suitable for various styles and occasions.
The design offers a sophisticated way to wear pastel colors without intricate patterns.
Fresh Mint Floral Tips
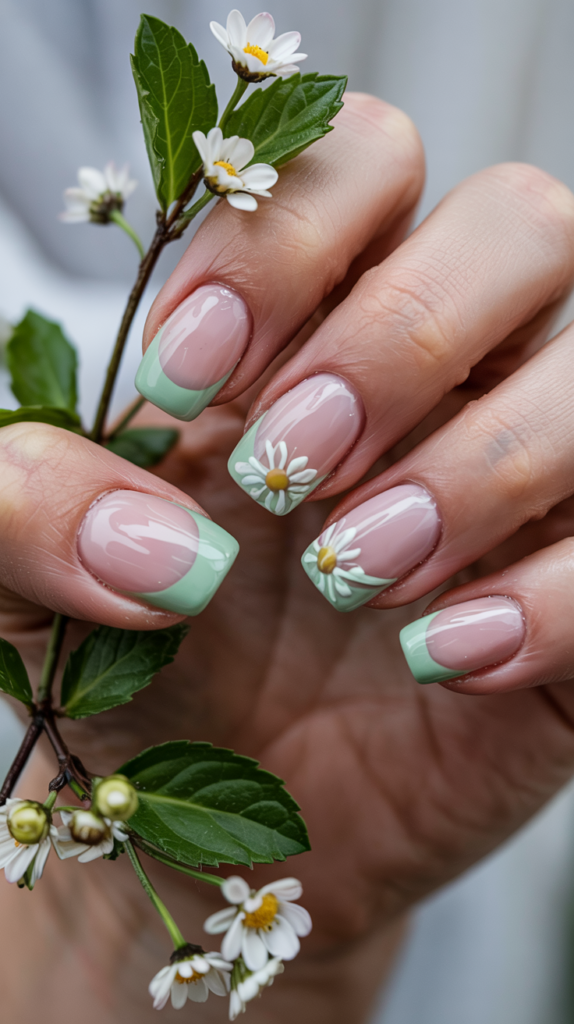
Combining the coolness of mint green with delicate floral accents, this design offers a refreshing take on spring nails.
It focuses the floral details primarily on the tips of the nails.
Design Features
The base of the nail is often kept neutral or painted in a soft, complementary pastel shade.
The tips feature a band of fresh mint green polish, similar to a French manicure but often with a less defined line.
Tiny floral details, like white daisies or pink buds, are painted overlapping the mint green tips.
The contrast between the cool mint and the delicate flowers creates a crisp, clean look.
How To Achieve This Look
Apply your base coat and chosen base color (optional, a nude base also works well).
Paint the tips of your nails with mint green polish; this can be a clean line or a more diffused, painterly edge.
Once the mint tips are dry, use a fine brush or dotting tool to add small floral details using white, pink, or yellow polish.
Finish with a glossy top coat to seal the design and add shine.
Why This Stands Out
Fresh Mint Floral Tips stand out due to the refreshing color combination and the focused placement of the design elements.
Mint green provides a cool, clean backdrop that makes the floral details pop.
It’s a modern and chic way to incorporate florals, feeling less overwhelming than an all-over pattern.
The design feels crisp, youthful, and perfectly aligned with the fresh beginnings of spring.
Peachy Daisies On Nude Base

This charming design pairs the warmth of peach tones with the simple beauty of daisies, set against a clean nude background.
It’s a sweet, subtle, and effortlessly pretty look for spring.
Design Features
A flawless nude base that complements the wearer’s skin tone is essential, providing a clean canvas.
Small, simple daisy flowers are the main motif, painted using peach hues for the petals and often a yellow or white center.
The daisies can be scattered randomly across the nails or clustered on accent nails.
The overall effect is soft, warm, and understatedly cheerful, like daisies basking in gentle sunlight.
How To Achieve This Look
Begin with a base coat and apply two coats of your preferred nude polish, ensuring an even finish.
Using a dotting tool or a small brush, create the daisy petals with peach polish – typically five or six small dots arranged in a circle.
Add a contrasting dot (yellow or white) in the center of each daisy.
Allow the design to dry completely before applying a glossy top coat for protection and shine.
Why This Stands Out
Peachy Daisies on Nude Base stand out for their charming simplicity and warm color palette.
The combination of peach and nude is soft and flattering on many skin tones.
It’s an easily achievable design that looks effortlessly chic and feminine.
This look embodies a gentle, approachable kind of spring beauty, perfect for everyday wear.
Iridescent Dewdrop Highlights

Mimicking the glistening effect of morning dew on plants, this design uses iridescent elements to add subtle sparkle and dimension.
It focuses on light-catching highlights rather than bold patterns.
Design Features
The base color can vary widely, from sheer nudes and pastels to deeper spring tones, allowing the dewdrops to catch the light.
Small, strategically placed dots or accents using iridescent glitter polish, flakes, or small gems create the ‘dewdrop’ effect.
These highlights are often placed near the cuticle, along the tips, or scattered sparsely across the nail.
The key is subtlety and the play of light, creating a fresh, glistening appearance.
How To Achieve This Look
Apply your chosen base color and let it dry completely.
Using a fine dotting tool or brush, apply small dots of iridescent glitter polish or clear polish followed by placing iridescent flakes or tiny rhinestones.
Focus on irregular placement to mimic natural dewdrops.
Finish with a glossy top coat to secure the embellishments and enhance the overall shine.
Why This Stands Out
Iridescent Dewdrop Highlights stand out for their delicate and magical quality, adding a touch of subtle glamour.
The focus on light play rather than overt color or pattern makes it unique.
It’s an incredibly versatile design that can elevate any base color, adding a fresh, ethereal dimension.
This look captures the specific beauty of early morning light in spring.
Neon Bloom Burst Nails

This energetic design takes spring florals in a bold direction, using vibrant neon colors for an electrifying bloom effect.
It’s a high-impact look that demands attention.
Design Features
A neutral or contrasting dark base often makes the neon colors pop even more intensely.
Abstract or stylized floral shapes are created using bright neon polishes like electric pink, lime green, fluorescent yellow, and vibrant orange.
The ‘burst’ effect can be achieved through splattered techniques, bold brushstrokes, or graphic floral outlines.
The design is dynamic, modern, and exudes confidence and energy.
How To Achieve This Look
Apply a base coat and your chosen background color (e.g., white, black, or nude).
Using neon polishes and various tools (brushes, dotting tools, sponges), create abstract floral burst shapes.
Don’t aim for perfect realism; focus on bold color placement and dynamic lines or splatters.
Layer colors for more impact and finish with a glossy top coat to make the neons shine.
Why This Stands Out
Neon Bloom Burst Nails stand out because they subvert the traditional pastel palette of spring with high-voltage color.
The energetic and abstract style is modern and fashion-forward.
This design is perfect for those who want to make a bold statement and embrace the vibrancy of the season in an unconventional way.
It’s youthful, fun, and guaranteed to turn heads.
Soft Coral Sunrise Fade

Inspired by the gentle colors of a spring sunrise, this design features a soft gradient blending warm coral tones with lighter hues.
It captures the peaceful yet hopeful feeling of dawn.
Design Features
The core feature is a vertical or horizontal ombre effect, typically fading from a soft coral shade into pale peach, light yellow, or creamy white.
The transition between colors is seamless and gentle, evoking a soft sky.
The finish is usually glossy to enhance the blended effect and mimic the gentle light of sunrise.
No additional patterns are needed; the beauty lies in the smooth color transition.
How To Achieve This Look
After the base coat, apply the lightest color of your gradient (e.g., pale yellow or white) to the entire nail.
On a makeup sponge, paint stripes of the coral and lighter shades next to each other.
Gently dab the sponge onto the nail, blending the colors until the desired gradient is achieved.
Clean up any excess polish and apply a glossy top coat for a luminous finish.
Why This Stands Out
Soft Coral Sunrise Fade stands out for its warm, optimistic color palette and the elegance of the gradient effect.
Coral is a flattering and cheerful spring color, presented here in a soft, sophisticated manner.
The design evokes a sense of calm and beauty, reminiscent of peaceful spring mornings.
It’s a chic and wearable way to incorporate warmer tones into your spring nail wardrobe.
Tiny Tulip Trail Design

This delicate design features miniature tulips arranged in subtle lines or trails across the nails.
It’s a specific and charming nod to one of spring’s most beloved flowers.
Design Features
Set against a simple base, often a pale pastel or nude, the design showcases tiny, simplified tulip shapes.
These tulips are usually painted in classic spring colors like pink, red, yellow, or purple, often with small green stems or leaves.
The tulips might form a vertical line down the center or side of the nail, trail diagonally, or adorn just the tips or cuticle area.
The look is minimalist yet detailed and undeniably spring-like.
How To Achieve This Look
Apply your base coat and chosen background color.
Using a fine nail art brush, paint the tiny tulip shapes: start with a small ‘U’ shape for the base of the bloom, then add two or three pointed petal shapes on top.
Use green polish and the fine brush to add thin stems and perhaps tiny leaves.
Keep the scale small and delicate, and seal with a top coat once dry.
Why This Stands Out
Tiny Tulip Trail Design stands out for its specific focus on tulips, offering a unique alternative to generic floral patterns.
The miniature scale and delicate execution give it a refined charm.
It’s a sweet and sophisticated design that clearly celebrates spring without being overly bold.
The trail effect adds a sense of direction and elegance to the nail art.
Gilded Honeybee Accents

Adding a touch of luxury and nature’s industry, this design incorporates tiny golden honeybee motifs into a spring manicure.
It pairs the sweetness of spring with a hint of metallic glamour.
Design Features
The base color can range from pastels and nudes to deeper greens or even black for contrast.
The key elements are small, detailed honeybee accents, either hand-painted using gold polish or achieved with metallic bee charms or decals.
These accents are often placed sparingly, perhaps on just one or two accent nails per hand.
They might be paired with subtle honeycomb patterns or tiny floral details for a cohesive theme.
How To Achieve This Look
Apply your base coat and background color.
For hand-painted bees, use a fine brush and gold metallic polish to create the bee’s body, adding black or brown details for stripes and wings.
Alternatively, apply bee-shaped metallic decals or small 3D bee charms using nail glue or a strong top coat.
Seal the entire design carefully with a top coat, ensuring any 3D elements are well-secured.
Why This Stands Out
Gilded Honeybee Accents stand out by incorporating a unique and symbolic motif – the industrious bee – with a touch of metallic elegance.
The gold element adds a luxurious feel to the spring theme.
It’s a sophisticated and slightly unexpected design that sparks conversation.
The combination of nature and glamour makes it distinctive and stylish.
Baby Blue Skies With Cloud Art

This dreamy design captures the essence of a perfect spring day with clear blue skies dotted with fluffy white clouds.
It’s a simple yet evocative look that brings a sense of peace and openness.
Design Features
The primary feature is a base coat of soft, sky-like baby blue polish.
Delicate, fluffy white clouds are then added, often using a dabbing or stippling technique to create a soft, diffused look.
The clouds can vary in size and placement, sometimes concentrated near the tips or scattered across the nail.
The finish is typically glossy to enhance the brightness of the blue sky.
How To Achieve This Look
Apply a base coat and two coats of a smooth baby blue polish.
Once dry, use a small piece of sponge or a dotting tool dipped sparingly in white polish to gently dab cloud shapes onto the blue base.
Build up the white in layers for a fluffy effect, keeping the edges soft and irregular.
Finish with a glossy top coat to complete the serene sky scene.
Why This Stands Out
Baby Blue Skies with Cloud Art stands out for its simple, universally understood imagery and its calming effect.
The soft blue and white combination is clean, fresh, and inherently cheerful.
It’s an easy-to-achieve design that effectively captures a key element of pleasant spring weather.
This look offers a refreshing alternative to floral patterns while still feeling perfectly seasonal.
Green Meadow Marble Effect

Inspired by lush spring meadows, this design uses marbling techniques to blend various shades of green.
It creates an abstract, natural look reminiscent of rolling hills and fresh grass.
Design Features
The design features swirls and blends of different green tones, ranging from deep forest green to light mint or even yellow-green accents.
White or gold veins can be added to enhance the marble effect.
The marbling can cover the entire nail or be used as an accent, creating an organic, fluid pattern.
The finish can be glossy for a polished stone look or matte for a softer, more natural feel.
How To Achieve This Look
Apply a base coat.
While the base is still wet, or using a specific marbling technique (like water marbling or blooming gel), drop dots of various green polishes onto the nail.
Use a fine brush or needle tool to gently swirl the colors together, creating the marbled pattern.
Alternatively, use the saran wrap technique by dabbing crumpled plastic wrap over wet polish.
Clean edges and apply a top coat.
Why This Stands Out
Green Meadow Marble Effect stands out for its sophisticated, abstract interpretation of a spring landscape.
The blend of greens is refreshing and grounding, evoking nature in a non-literal way.
The marble technique itself adds an element of elegance and uniqueness, as each nail’s pattern will be slightly different.
It’s a chic and modern way to wear spring green.
Pink Tulip French Twist

This design puts a floral spin on the French manicure by incorporating pink tulip motifs into the tip design.
It’s a feminine and creative update to a classic style.
Design Features
Similar to a French manicure, it usually has a nude or sheer pink base.
Instead of a simple white or colored tip, the tip area features stylized pink tulip shapes, often with green leaves integrated into the design.
The tulips might form the entire tip line or be clustered at the corners.
The result is a playful yet elegant look that combines the structure of a French tip with a distinct floral element.
How To Achieve This Look
Prepare the nails with a base coat and the sheer base color.
Using a fine nail art brush, carefully paint the outlines of tulip blooms and leaves along the nail tips using pink and green polishes.
Fill in the shapes, ensuring clean lines where the design meets the rest of the nail.
Build opacity with a second coat if needed and finish with a glossy top coat.
Why This Stands Out
Pink Tulip French Twist stands out by cleverly integrating a specific flower shape into the structure of a French manicure.
It’s more detailed and artistic than a simple colored tip.
The design is distinctly feminine and celebratory of spring flowers, particularly tulips.
It offers a unique and charming alternative for fans of French manicures.
Lemon-Lime Zest Swirls

This vibrant design captures the tangy freshness of citrus fruits with energetic swirls of lemon yellow and lime green.
It’s a zesty and eye-catching look perfect for sunny spring days.
Design Features
The design features dynamic swirls or waves blending bright lemon yellow and zesty lime green polishes.
The base can be white or clear to make the citrus colors pop, or one of the citrus shades itself.
The swirls should feel fluid and energetic, mimicking citrus peel or juice splashes.
A glossy top coat enhances the juicy, vibrant appearance of the colors.
How To Achieve This Look
Apply a base coat and your chosen background color.
Using a striping brush or a marbling tool, apply lines or dots of lemon and lime polish onto the nail (either wet-on-wet or over a dry base).
Gently drag a clean tool through the colors to create the swirl pattern.
Work quickly if applying wet-on-wet, and seal with a glossy top coat once the design is dry.
Why This Stands Out
Lemon-Lime Zest Swirls stand out for their bold, high-contrast color combination and energetic pattern.
The yellow and green pairing is inherently cheerful and screams spring and summer freshness.
The abstract swirl design is modern and playful, offering a non-floral way to embrace bright seasonal colors.
It’s a fun, attention-grabbing look that radiates positivity.
Sunset Petal Spectrum

Drawing inspiration from the warm hues of a spring sunset blended with floral shapes, this design offers a romantic and colorful look.
It combines gradient color blending with petal-like forms.
Design Features
This design features a gradient base transitioning through sunset colors like soft pink, warm orange, and golden yellow.
Over this gradient, abstract petal shapes or silhouettes are often added in a contrasting color like white or a deeper shade.
The petals might appear to be floating or layered over the sunset background.
The overall effect is warm, dreamy, and reminiscent of flowers viewed against a colorful evening sky.
How To Achieve This Look
Create the sunset gradient base using a makeup sponge and stripes of pink, orange, and yellow polish, dabbing onto the nail until blended.
Once the gradient is dry, use a fine brush to paint abstract petal shapes.
These can be simple curves or outlines scattered across the nail.
Finish with a glossy top coat to meld the layers and enhance the sunset glow.
Why This Stands Out
Sunset Petal Spectrum stands out by combining two beautiful natural phenomena: sunsets and flowers, using a warm, inviting color palette.
The gradient background adds depth and romance to the floral theme.
It’s a more complex and artistic design that evokes a specific mood of warm spring evenings.
The blend of colors and shapes creates a visually stunning and unique manicure.
Transparent Butterfly Wings

This ethereal design mimics the delicate translucency of butterfly wings, often using sheer colors and fine details.
It creates a light, airy, and almost magical effect on the nails.
Design Features
The base is typically clear or a very sheer wash of color to emphasize the transparency.
Intricate butterfly wing patterns are drawn using fine lines, often in black, white, or metallic shades.
Sections of the wing pattern might be filled with sheer, jelly-like polishes in various colors or iridescent flakes to mimic the wing’s natural shimmer.
The key is maintaining a sense of lightness and translucency.
How To Achieve This Look
Apply a clear base coat, possibly followed by a single, very sheer coat of a nude or pastel jelly polish.
Using a very fine nail art brush or stamping plate, create the detailed outline of butterfly wings.
Carefully fill in some sections with sheer colored polishes or apply iridescent flakes.
Finish with a glossy top coat to enhance the transparent, glassy effect.
Why This Stands Out
Transparent Butterfly Wings stand out for their incredible delicacy and technical artistry, capturing the fragile beauty of butterfly wings.
The use of transparency creates a unique, ethereal look unlike solid color designs.
It feels magical and intricate, showcasing a high level of skill or the beauty of well-designed decals.
This design is perfect for those seeking a truly enchanting and sophisticated spring nail look.
Watercolor Wildflower Wash

Inspired by watercolor paintings, this design features soft, blended patches of color adorned with delicate wildflower illustrations.
It has an artistic and romantic, free-flowing feel.
Design Features
The base often involves soft washes of pastel colors (like pink, blue, yellow, purple) blended together with soft edges, mimicking watercolor paints on paper.
Over this dreamy background, fine black or dark grey outlines of various wildflowers and grasses are drawn.
The wildflowers are typically simple and illustrative rather than realistic.
The overall effect is painterly, soft, and reminiscent of a wildflower meadow rendered in watercolor.
How To Achieve This Look
Apply a base coat and a light base color (like white or pale nude).
Using sheer or diluted polishes in pastel shades, dab patches of color onto the nail, allowing them to blend slightly where they meet – the ‘blooming’ technique with gel polish works well here.
Once the watercolor background is dry, use a very fine brush and black or dark grey polish to draw delicate wildflower outlines and stems.
Finish with a matte or glossy top coat, depending on the desired effect.
Why This Stands Out
Watercolor Wildflower Wash stands out for its artistic, painterly quality that beautifully captures the delicate nature of wildflowers.
The soft, blended background combined with fine line art creates a unique and sophisticated look.
It feels romantic and subtly bohemian, offering a softer, more illustrative take on spring florals.
The technique mimics actual watercolor art, making it distinctive.
Cherry Soda Shimmer Nails

This fun and bubbly design combines the deep red hues of cherries with a sparkling, fizzy effect.
It’s a playful and glamorous take on a classic spring fruit motif.
Design Features
The base color is typically a rich cherry red or a deep pinkish-red.
A layer of fine iridescent or silver glitter is applied over the red, concentrated more densely at either the base or the tip to mimic fizz, or scattered throughout for an all-over shimmer.
Sometimes, tiny cherry motifs (small red dots with green stems) are added as accents.
The finish must be glossy to enhance the ‘soda’ shimmer and juicy red color.
How To Achieve This Look
Apply a base coat and two coats of a vibrant cherry red polish.
While the second coat is still slightly tacky, or after it dries, apply a glitter top coat or loose glitter, concentrating it where desired for the ‘fizz’ effect.
If adding cherry motifs, paint them with a dotting tool and fine brush after the base color is dry but before the final top coat.
Seal everything thoroughly with a high-shine top coat.
Why This Stands Out
Cherry Soda Shimmer Nails stand out for their playful concept and glamorous execution.
The combination of juicy red and sparkling glitter is eye-catching and festive.
It offers a fun, slightly retro vibe while still feeling fresh for spring.
The design is less about delicate florals and more about bold color and sparkling fun.
Whispering Wisteria Vines
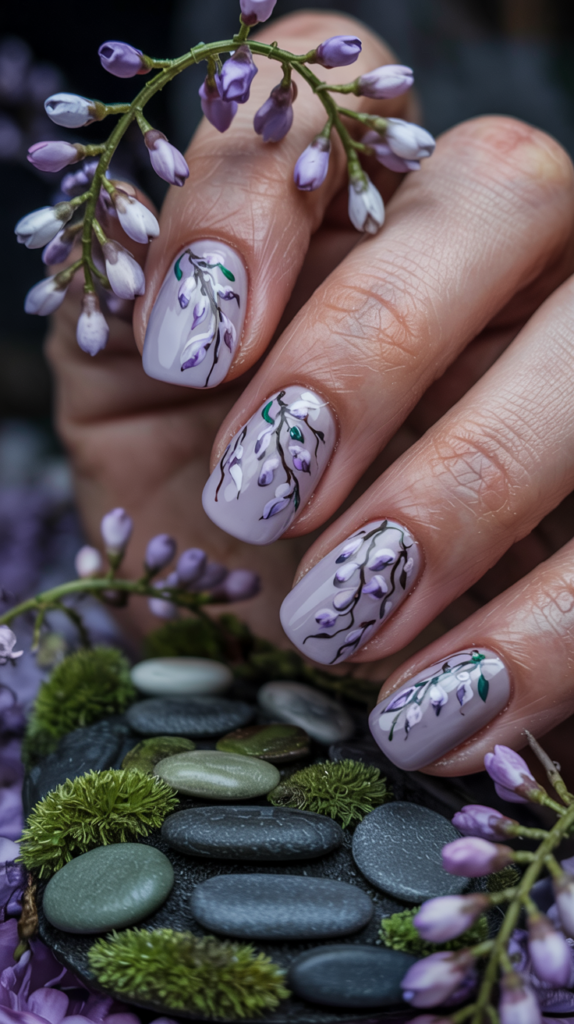
Inspired by the gracefully drooping blossoms of wisteria trees, this design features delicate lavender or purple vine-like patterns.
It evokes a sense of romantic elegance and enchantment.
Design Features
Set against a soft background (nude, pale grey, white, or light lavender), the design showcases fine, trailing vines with clusters of small dots or brush strokes representing wisteria blossoms.
The colors are typically shades of purple and lavender, with hints of green for leaves.
The vines often flow diagonally across the nail or cascade down from the cuticle.
The overall look is delicate, flowing, and reminiscent of hanging wisteria flowers.
How To Achieve This Look
Apply your base coat and chosen background color.
Using a fine nail art brush, draw thin, slightly curved lines in a darker purple or brown to represent the vines.
Along these vines, use dotting tools or the tip of the brush to add small clusters of lavender and purple dots or short strokes to mimic the cascading wisteria blossoms.
Add tiny green leaves if desired, and finish with a top coat.
Why This Stands Out
Whispering Wisteria Vines stand out for their elegant, flowing composition and focus on a specific, romantic spring flower.
The cascading effect is visually appealing and unique compared to standard floral placements.
The purple and lavender color palette feels sophisticated and enchanting.
This design captures the graceful beauty of wisteria in a delicate, artistic manner.
Radiant Rosé Gold Blooms

This luxurious design incorporates the trendy warmth of rosé gold into floral patterns.
It combines the softness of spring blooms with a metallic, sophisticated finish.
Design Features
The base color can vary – nudes, pinks, whites, or even deeper shades like burgundy can work well.
The key feature is the use of rosé gold polish or foil to create floral elements, either as outlines or full metallic blooms.
The floral shapes can be abstract or more defined, often paired with delicate rosé gold lines or accents.
The mix of metallic shine and floral softness creates a rich, contemporary look.
How To Achieve This Look
Apply your base coat and background color.
Use a fine brush and rosé gold metallic polish to hand-paint floral outlines or shapes.
Alternatively, apply small pieces of rosé gold transfer foil over tacky polish or foil adhesive applied in floral patterns.
Seal the design with a top coat, ensuring any foil edges are smooth.
Why This Stands Out
Radiant Rosé Gold Blooms stand out by infusing a traditional spring motif with a modern, metallic twist.
Rosé gold adds warmth, luxury, and trendiness to the floral design.
It’s a sophisticated and glamorous option that elevates the standard floral manicure.
This look bridges the gap between delicate spring aesthetics and contemporary metallic trends.
Pastel Plaid Picnic Design
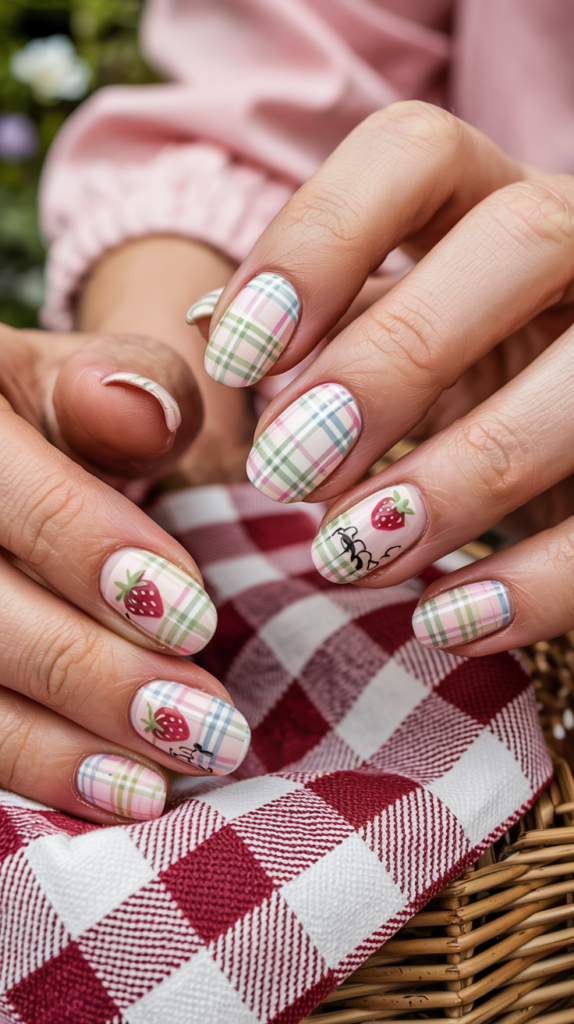
Inspired by classic picnic blankets, this charming design features a plaid pattern rendered in soft spring pastel colors.
It evokes nostalgic feelings of sunny park picnics and gingham dresses.
Design Features
The core element is a plaid or gingham pattern created using intersecting lines in various pastel shades like baby pink, blue, yellow, mint green, and lavender.
The base is often white or a very pale pastel to keep the look light and airy.
The lines can vary in thickness and spacing to create different plaid effects.
The overall aesthetic is sweet, slightly retro, and reminiscent of cheerful spring outings.
How To Achieve This Look
Apply a base coat and your chosen light background color.
Using a thin striping brush or nail art tape for guidance, paint horizontal and vertical lines in your chosen pastel colors.
Layer the lines, allowing each color to dry before adding the next, to create the woven plaid effect.
Finish with a glossy or matte top coat; a matte finish can enhance the fabric-like feel.
Why This Stands Out
Pastel Plaid Picnic Design stands out by using a pattern typically associated with fabric, giving the nails a unique textural suggestion.
The pastel color palette keeps the classic pattern fresh and spring-appropriate.
It’s a charming and nostalgic design that offers a break from floral motifs while still feeling perfectly seasonal.
The look is both playful and structured.
Citrus Bloom Jelly Nails
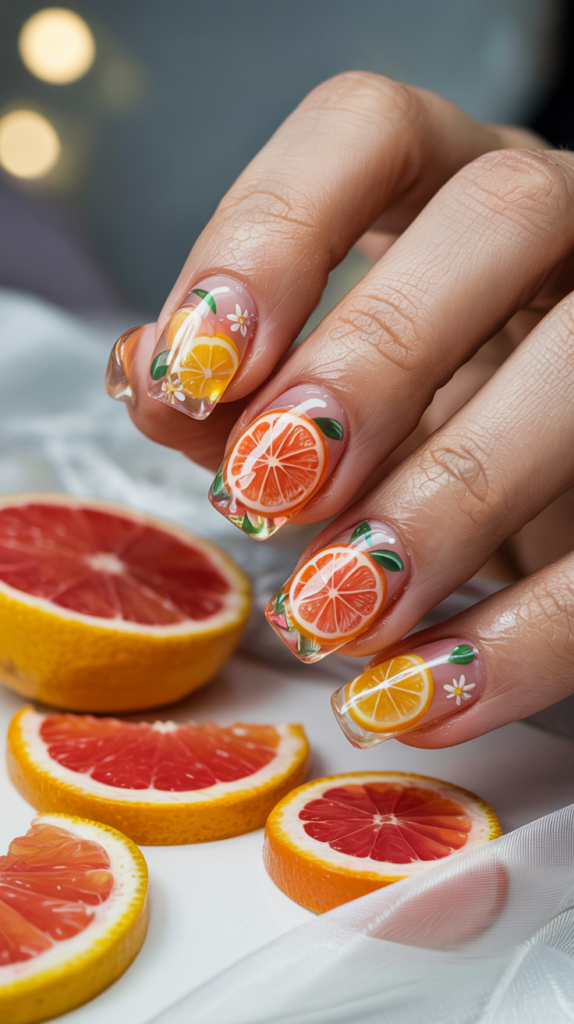
This fun design combines the translucent, juicy look of jelly nails with bright citrus colors and floral elements.
It feels fresh, modern, and reminiscent of citrus-flavored gummy candies.
Design Features
The base consists of one or more layers of sheer, translucent ‘jelly’ polish in citrus shades like orange, lemon yellow, or lime green.
Embedded within the jelly layers or painted on top are simple floral shapes or citrus slice motifs.
The transparency of the jelly polish gives depth and a ‘squishy’, high-gloss appearance.
White or contrasting citrus colors are often used for the embedded designs.
How To Achieve This Look
Apply a base coat.
Apply one layer of citrus-colored jelly polish.
Before it cures (if using gel) or while slightly wet, place tiny floral decals, dried flowers, or paint simple white floral/citrus shapes.
Apply another layer or two of the jelly polish over the design, encapsulating it.
Finish with a high-gloss top coat to maximize the juicy, translucent effect.
Why This Stands Out
Citrus Bloom Jelly Nails stand out due to the trendy jelly finish combined with bright, cheerful colors and motifs.
The translucent effect adds a unique dimension and playful quality.
It’s a youthful, fun, and tactile-looking design that perfectly captures the juicy aspect of spring fruits.
The combination of transparency, color, and embedded elements is eye-catching.
Daisy Chain Fringe Tips

This sweet design reimagines the French tip by creating a ‘fringe’ of delicate daisy chains along the edge.
It’s a whimsical and detailed take on a classic floral motif.
Design Features
Typically applied over a nude or clear base, the design focuses on the nail tips.
A connected line of small, simple daisies forms a chain or fringe along the free edge of the nail.
The daisies are usually white with yellow centers, creating a classic, cheerful look.
The chain can follow the natural curve of the nail tip or create a straight or scalloped edge.
How To Achieve This Look
Apply your base coat and nude or clear base color.
Using a fine dotting tool or brush, create a continuous line of small white daisy petals along the nail tip.
Connect the daisies visually, making them look like a chain.
Add tiny yellow dots in the center of each daisy and finish with a glossy top coat.
Why This Stands Out
Daisy Chain Fringe Tips stand out for their creative placement of a beloved spring flower, transforming the French tip concept.
The connected ‘chain’ effect is unique and charming.
It’s a detailed and delicate design that feels youthful and celebratory of spring.
This look offers a whimsical twist on both floral nails and French manicures.
Floating Floral Garden

This ethereal design creates the illusion of delicate flowers and petals floating in clear or subtly tinted space.
It often utilizes negative space or sheer bases for a light, airy effect.
Design Features
The key feature is the use of negative space or a very sheer base color.
Tiny, detailed flowers, petals, and leaves seem suspended or ‘floating’ on the nail.
These floral elements can be hand-painted, decals, or even tiny dried flowers encapsulated in clear gel or acrylic.
The effect is delicate, three-dimensional, and dreamlike.
How To Achieve This Look
Apply a clear base coat.
Carefully place tiny dried flowers or floral decals onto the nail using tweezers and a small amount of nail glue or clear polish.
Alternatively, use fine brushes to paint small, scattered floral elements directly onto the clear base.
Encapsulate the design with a clear builder gel or several layers of top coat for a smooth, glassy finish.
Why This Stands Out
Floating Floral Garden stands out for its ethereal, almost magical quality, making flowers appear suspended in mid-air.
The use of negative space or clear encapsulation creates depth and lightness.
It’s a sophisticated and intricate design that feels delicate and otherworldly.
This look elevates floral nail art to a more artistic and dimensional level.
Matcha Green And Gold Foil
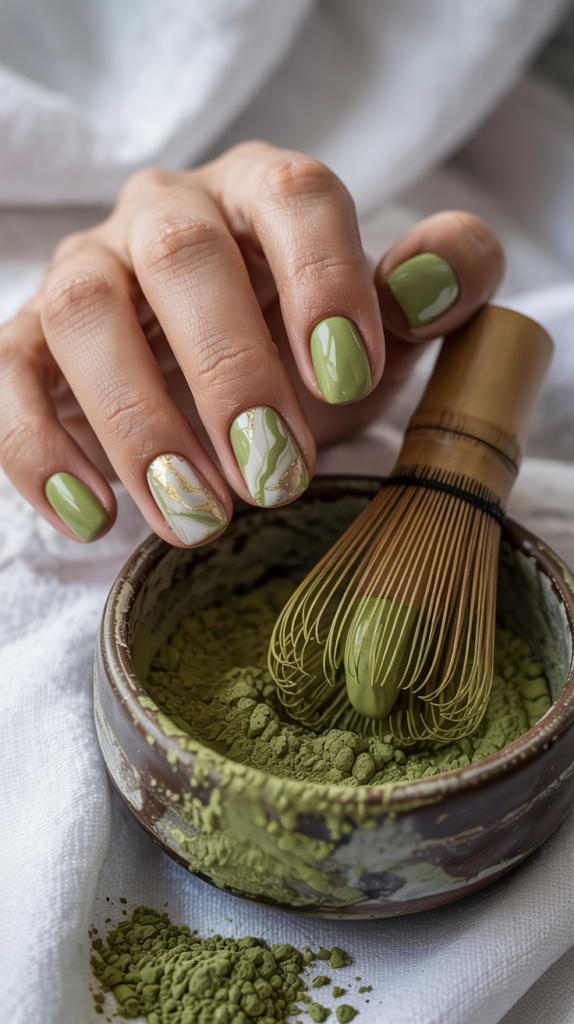
This chic design pairs the earthy, sophisticated tone of matcha green with the luxurious touch of gold foil.
It’s a modern and elegant color combination perfect for a refined spring look.
Design Features
The primary color is a muted, slightly dusty green reminiscent of matcha powder.
Accents of randomly placed gold foil flakes or leafing provide contrast and a touch of glamour.
The gold foil can be applied sparingly over the matcha base or concentrated on accent nails.
The finish can be either glossy or matte; a matte finish particularly enhances the sophisticated, earthy feel.
How To Achieve This Look
Apply a base coat and two coats of matcha green polish.
While the polish is still slightly tacky, or after applying a layer of foil adhesive, carefully press small pieces of gold foil onto the nail.
Use a brush or tool to gently rub the foil, then peel away the backing sheet (if using transfer foil) or just leave the flakes.
Seal the design with a top coat (glossy or matte).
Why This Stands Out
Matcha Green and Gold Foil stand out for their unique and sophisticated color pairing.
Matcha green is a trendy, muted alternative to brighter spring greens, while gold foil adds undeniable luxury.
The combination feels modern, earthy, and elegant, suitable for those seeking a less conventional spring palette.
It’s a chic statement that balances natural tones with metallic accents.
Rosy Hologram Swirls

Combining the romance of rose shades with the futuristic shimmer of holographic effects, this design features swirling patterns.
It’s a dynamic and mesmerizing look that blends softness with high-tech shine.
Design Features
The design incorporates various shades of pink and rose, often swirled together with a silver or iridescent holographic polish or powder.
The swirls create a fluid, marble-like effect with flashes of rainbow color from the holographic elements.
The base can be one of the rose shades, or the swirl can be done over a neutral base.
The holographic effect is key, catching the light and adding a magical dimension to the rosy tones.
How To Achieve This Look
Apply a base coat.
Apply a base color (e.g., soft pink) or work directly on the base coat for a sheerer look.
Place dots or lines of rosy polishes and holographic polish onto the nail.
Use a fine tool to gently swirl the colors together, creating a fluid pattern without over-mixing.
Alternatively, burnish holographic powder over parts of the rosy base before adding more swirls and sealing with a top coat.
Why This Stands Out
Rosy Hologram Swirls stand out by merging romantic rose colors with the captivating, modern appeal of holographic finishes.
The swirling pattern adds movement and intrigue to the color combination.
It’s a glamorous and eye-catching design that feels both feminine and futuristic.
The interplay of soft color and rainbow shimmer makes it uniquely mesmerizing.
Sakura Snowfall Over Nude Base

This delicate design captures the image of cherry blossom petals gently falling like snow against a neutral background.
It’s a subtle, elegant, and poetic interpretation of the sakura season.
Design Features
A clean nude base that matches the skin tone provides the perfect understated canvas.
Tiny, simplified cherry blossom petals, mainly in white and pale pink, are painted sparsely, appearing to drift down the nail.
The focus is on lightness and sparseness, mimicking a gentle ‘snowfall’ of petals rather than dense blooms.
A touch of fine white glitter can enhance the snowy effect.
How To Achieve This Look
Apply a base coat and two coats of your chosen nude polish.
Using a very fine brush or dotting tool, paint small, individual petals in white and pale pink, scattering them randomly down the nail.
Vary the size and orientation slightly to look like falling petals.
Optionally, add a few dots of fine white glitter, then seal with a glossy top coat.
Why This Stands Out
Sakura Snowfall Over Nude Base stands out for its minimalist elegance and poetic imagery.
It captures the fleeting beauty of cherry blossoms in a uniquely understated and graceful way.
The sparse placement on a nude base makes it incredibly chic and wearable.
This design appeals to those who appreciate subtle artistry and symbolic beauty.
Glossy Tulip Bed In Bloom

This vibrant design aims to replicate the dense, colorful sight of a tulip bed in full bloom.
It uses bright colors and a high-gloss finish for maximum impact.
Design Features
Unlike delicate single tulips, this design features tightly packed, simplified tulip shapes covering most of the nail.
Bright, classic tulip colors like red, yellow, pink, orange, and purple are used, often side-by-side.
The tulip shapes are usually graphic or slightly abstract, focusing on the block of color.
A super glossy top coat is essential to give the ‘tulip bed’ a vibrant, fresh, almost wet look.
How To Achieve This Look
Apply a base coat.
Using various bright tulip colors and a nail art brush, paint tightly packed, upright tulip bloom shapes across the nail.
Overlap them slightly and vary the colors to mimic a dense flower bed.
Don’t worry about perfect realism; focus on the impression of dense color blocks.
Finish with a generous layer of high-shine top coat.
Why This Stands Out
Glossy Tulip Bed in Bloom stands out for its bold, concentrated use of color and its graphic interpretation of a tulip field.
The density of the pattern creates a strong visual impact.
The high-gloss finish enhances the vibrancy and makes the colors pop, feeling energetic and joyful.
It’s a less delicate, more graphic floral look that fully embraces spring’s bright palette.
Dreamy Dandelion Glow

Capturing the whimsical moment of blowing on a dandelion clock, this design features delicate dandelion seed puffs.
It often incorporates subtle shimmer or glow-in-the-dark elements for a magical touch.
Design Features
Usually set against a darker base (like deep blue, purple, or black) to mimic a twilight sky, or a soft gradient base.
The design features fine white lines radiating from a central point to form dandelion seed heads (‘clocks’).
Tiny white dots or fine glitter represent the seeds drifting away.
Some designs incorporate glow-in-the-dark powder or polish into the white elements for an ethereal nighttime effect.
How To Achieve This Look
Apply your base coat and chosen background color.
Using a very fine striping brush and white polish, draw thin lines radiating outwards from a small central dot to create the dandelion puff.
Add tiny white dots scattering away from the puff to represent drifting seeds.
If using glow powder, mix it into the white polish or apply it over the white paint before the top coat.
Seal with a top coat.
Why This Stands Out
Dreamy Dandelion Glow stands out for its whimsical and nostalgic theme, capturing a common childhood memory associated with spring and summer fields.
The fine linework creates a delicate, airy feel.
The potential addition of a glow-in-the-dark effect adds a unique, magical surprise.
It’s a poetic and imaginative design that differs from typical floral patterns.
Crushed Rose Quartz Shards

Inspired by the healing crystal, this design mimics the look of crushed rose quartz, with its soft pink hues and subtle veining.
It often incorporates iridescent flakes or foil for a crystalline sparkle.
Design Features
The base involves soft, milky pink shades applied in a marbled or layered technique to resemble rose quartz stone.
Fine white or gold lines are often added to mimic the natural veins or cracks in the crystal.
Iridescent flakes or shards of pink or opalescent foil are embedded or layered within the pink base to create a ‘crushed’, faceted effect.
The finish is typically very glossy, enhancing the stone-like appearance.
How To Achieve This Look
Apply a base coat and a layer of milky pink or sheer white polish.
While wet, add drops of slightly different pink shades and gently swirl or blot them for a marbled effect (or use blooming gel).
Embed iridescent flakes or foil shards into a wet layer or adhere them with clear polish.
Add fine white/gold vein details with a striping brush.
Encapsulate everything smoothly with a glossy top coat.
Why This Stands Out
Crushed Rose Quartz Shards stand out by translating the beauty of a popular crystal into nail art.
The combination of soft pinks, marbling, and iridescent elements creates a sophisticated and subtly glamorous look.
It offers a non-floral spring option that feels calming, feminine, and connected to natural elements.
The design has a luxurious, polished feel reminiscent of gemstone jewelry.
Soft Bloom French Fade

This elegant design combines the softness of an ombre effect with delicate floral elements concentrated near the tip, fading into a French manicure style.
It’s a subtle and romantic blend of popular techniques.
Design Features
The base of the nail features a classic French fade or baby boomer ombre, typically blending from nude or pink at the cuticle to soft white at the tip.
Over the white or faded tip area, subtle floral designs are added.
These florals are often kept soft and ethereal, perhaps using pale pastel shades or just white outlines, blending slightly into the faded background.
The overall effect is a soft, seamless transition from nude nail to floral-accented tip.
How To Achieve This Look
Create the French fade base: apply the nude/pink base color, then use a sponge to dab white polish onto the tip, blending upwards for a soft gradient.
Once the fade is dry, use a fine brush to paint delicate floral details (like small roses, petals, or forget-me-nots) over the white tip area.
Use soft colors or white, keeping the design subtle so it integrates with the fade.
Finish with a glossy top coat to smooth the transition and add shine.
Why This Stands Out
Soft Bloom French Fade stands out for its seamless integration of two popular and elegant nail trends: the French fade and delicate florals.
The subtlety of the design makes it incredibly sophisticated and versatile.
It offers a romantic and modern twist on the French manicure, perfect for bridal nails or everyday elegance.
The soft, faded effect gives the florals an ethereal, integrated appearance.
Conclusion
As we conclude our journey through spring’s nail palette, we hope you feel inspired by the creativity and beauty this season offers.
The designs showcased here range from timelessly elegant to playfully modern, reflecting the diverse moods of spring.Whether you opt for delicate pastels, vibrant blooms, or chic abstract patterns, let your nails be a joyful expression of the season’s arrival.
Embrace the freshness, experiment with color, and wear your chosen spring design with confidence and style.