Red nails possess an undeniable power, radiating confidence, passion, and timeless elegance unlike any other color.
They are a classic choice that somehow always feels fresh, adapting to trends while maintaining their iconic status.
Whether you prefer a subtle hint of crimson or a bold, stop-and-stare scarlet, there is a red nail design perfectly suited to your personality and occasion.
This guide delves into a stunning array of red nail art possibilities, exploring diverse textures, finishes, and creative embellishments to inspire your next manicure.
From sophisticated satin finishes and edgy chrome shines to playful drips and intricate patterns, prepare to discover the incredible versatility of red.
Let this compilation be your ultimate resource for finding the perfect red nail look that makes you feel empowered and utterly chic.
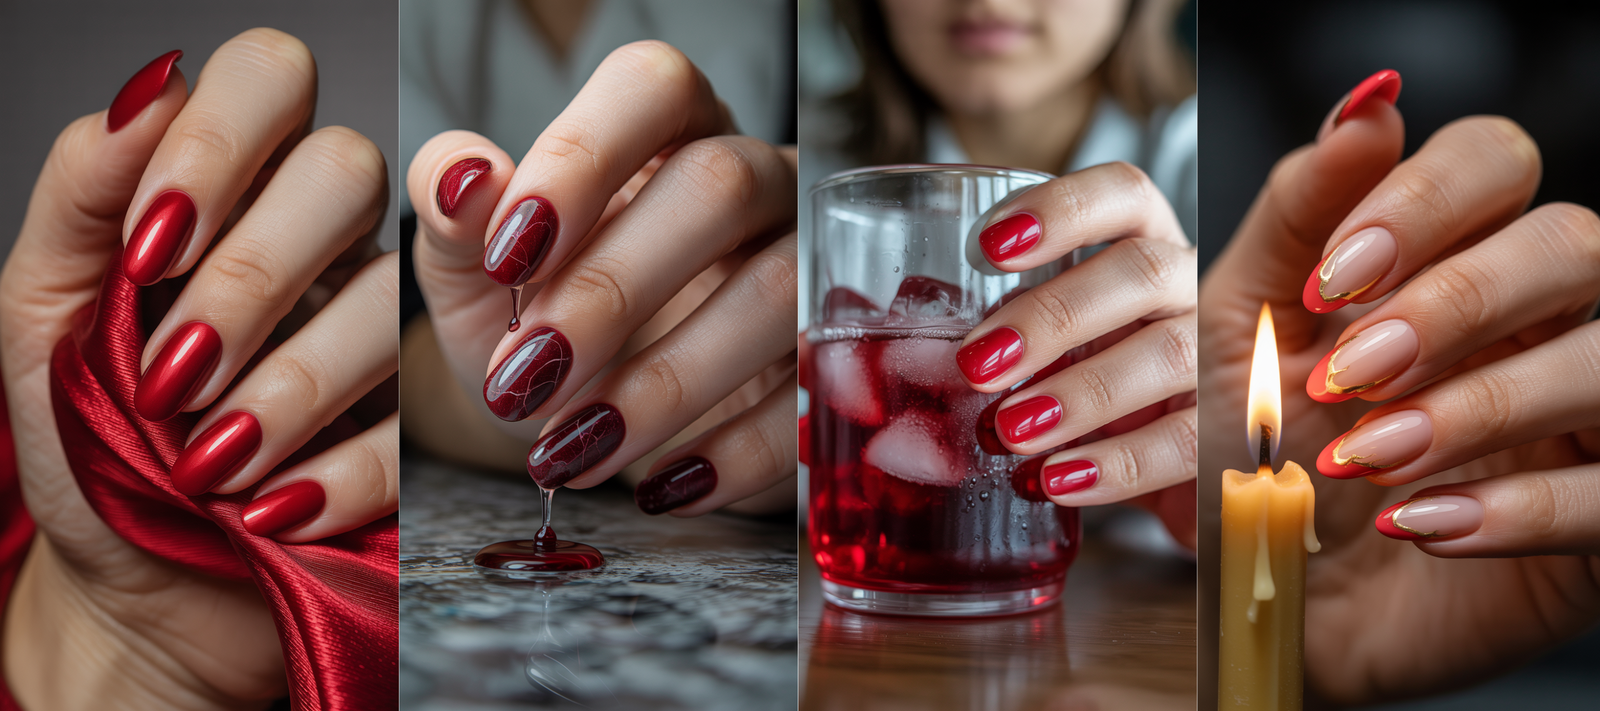
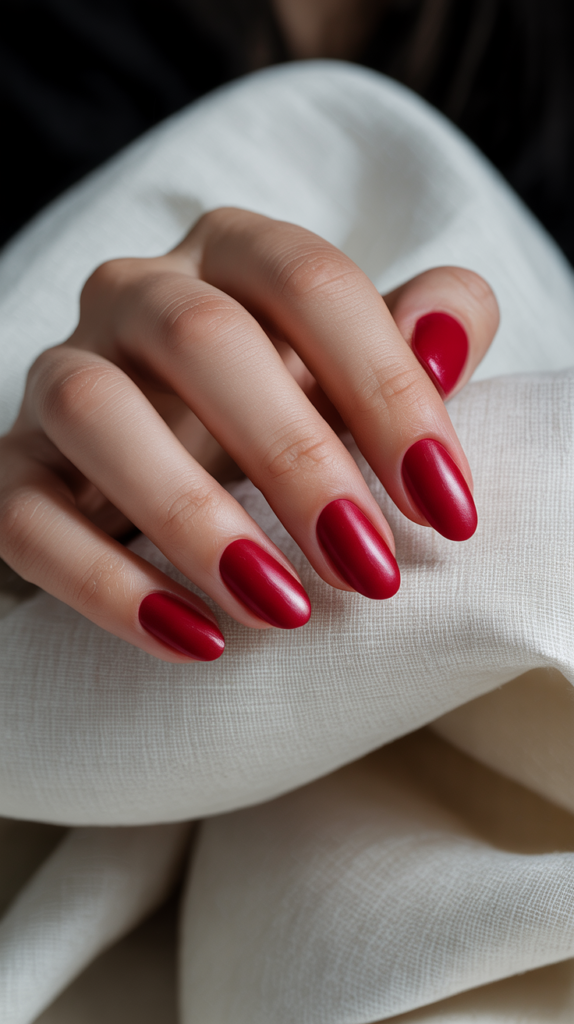
Scarlet Satin Nails
Lustrous red nails featuring a soft satin finish offer an aesthetic that speaks of elegance and understated luxury.
This look moves away from high gloss, embracing a more subtle and tactile appeal.
Design Features
The defining characteristic of Scarlet Satin Nails is their unique demi-matte finish, providing a soft glow rather than a reflective shine.
The color is typically a classic scarlet or true red, chosen for its vibrancy and universal appeal.
This design intentionally avoids embellishments or complex patterns, allowing the sophisticated texture and rich color to command attention.
The overall effect is one of refined simplicity, focusing on the beauty of the color and its unique surface quality.
How To Achieve This Look
Achieving this look begins with perfectly prepped nails; ensure they are cleaned, shaped uniformly, and lightly buffed for smoothness.
Apply a reliable base coat to protect the natural nail plate and create an even canvas for the color application.
Select a nail polish specifically formulated for a satin finish, or choose a standard scarlet crème polish paired with a satin top coat.
Apply two thin coats of the chosen red polish, ensuring each layer dries completely or is properly cured if using gel polish.
For regular polish, finish with a dedicated satin top coat; for gel, use a satin gel top coat and cure it according to the lamp’s specifications.
Why This Stands Out
Scarlet Satin Nails stand out because their unique texture offers a modern twist on the classic red manicure, feeling both luxurious and contemporary.
This finish provides a sophisticated alternative to the ubiquitous glossy or stark matte looks, suggesting effortless chic.
It’s incredibly versatile, transitioning seamlessly from professional environments to elegant evening affairs without feeling out of place.
The subtle sheen catches the light beautifully without being distracting, making it perfect for those who appreciate understated elegance and refined details.
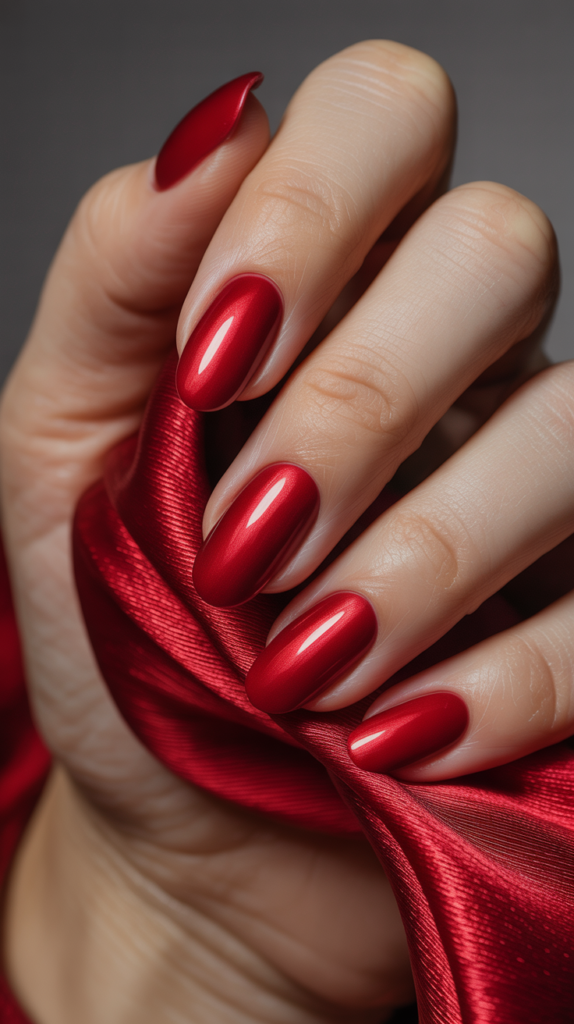
Ruby French Drip Tips
This design reimagines the timeless French manicure by adding a dramatic flair with rich ruby drips appearing to ooze down from the tips.
It combines classic structure with a modern, slightly edgy twist.
Design Features
The base of this look is typically a sheer nude or pale pink, consistent with traditional French manicure styles, providing a clean backdrop.
The standout feature is the tips, which swap the classic white crescent for deep ruby red applied in a dripping or melting pattern.
These drips vary in length and thickness, creating an organic, dynamic effect as if liquid ruby is flowing down the nail.
The finish is usually glossy to enhance the wet look of the drips and the richness of the ruby hue.
How To Achieve This Look
Start by applying a sheer nude or pink base coat over the entire nail, creating the classic French foundation and allowing it to dry or cure completely.
Using a fine nail art brush or a dotting tool, carefully paint the ruby red polish onto the tips, extending it downwards in uneven lines to simulate drips.
Build up the color for opacity and vary the drip lengths across different nails for a more natural, uneven appearance.
Once the drip design is complete and dry or cured, apply a high-gloss top coat over the entire nail to seal the design and maximize the shine.
Why This Stands Out
Ruby French Drip Tips offer a striking and unexpected update to a beloved classic, blending elegance with a touch of playful gore or artistic edge.
The contrast between the delicate nude base and the bold, dripping ruby tips creates immediate visual interest and conversation.
It’s a design that feels both sophisticated due to its French manicure roots and daringly modern because of the drip effect.
This style appeals to those who love classic looks but want to inject a unique and slightly rebellious personality into their manicure.
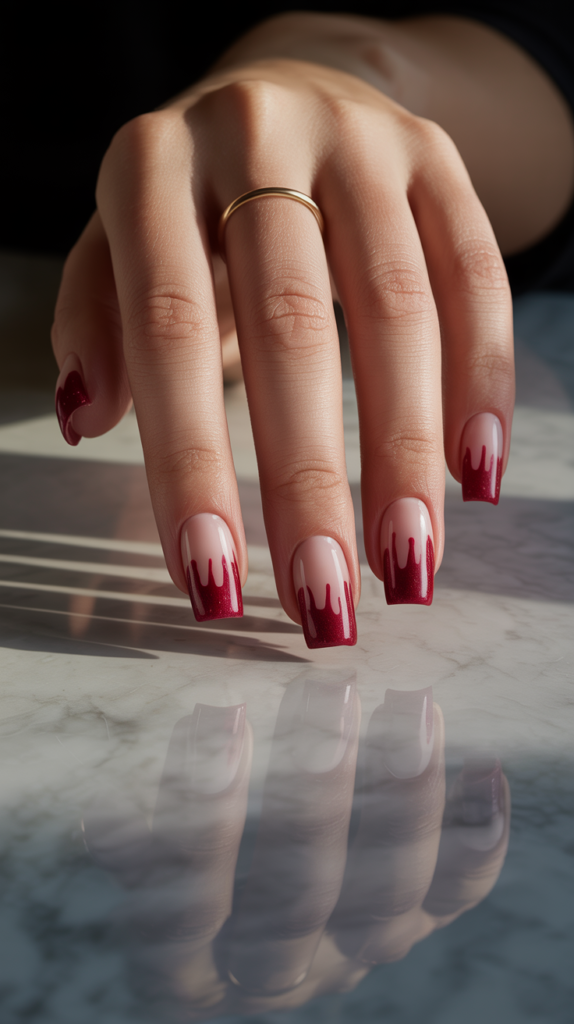
Cherry Glaze Marble
Cherry Glaze Marble nails capture attention with their beautiful blend of red and white swirls, finished with a jelly-like translucence.
This style mimics the look of polished stone but with a sweet, glossy twist.
Design Features
This design features swirling patterns of cherry red and opaque white, blended together to create a soft marble effect without harsh lines.
A key element is the translucent, jelly-like finish achieved through specific polishes or top coats, giving the nails a ‘glazed’ appearance.
The combination of the vibrant cherry red and the softening white creates a look that is both bright and delicate.
The high gloss finish enhances the depth and the juicy, glazed quality of the marble pattern.
How To Achieve This Look
Prepare the nails and apply a base coat; sometimes a sheer white or pink jelly base is applied first to enhance the glazed effect.
Place drops of cherry red jelly polish and opaque white polish onto the nail or a palette.
Use a fine brush or marbling tool to gently swirl the colors together directly on the nail, being careful not to overmix them.
Allow the marble pattern to partially dry or flash cure, then apply a layer of clear jelly polish or a high-gloss top coat to encapsulate the design and create the signature glazed finish.
Why This Stands Out
Cherry Glaze Marble stands out for its delicious, almost edible appearance, combining the elegance of marble with a playful, candy-like sheen.
The translucent quality adds depth and makes the colors appear softer and more integrated than traditional marble nails.
It’s a fresh, youthful take on nail art that feels light and perfect for warmer months, yet sophisticated enough for any occasion.
The glossy, glazed finish catches the light beautifully, making the nails look luminous and exceptionally smooth.
Crimson Chrome Shine

Crimson Chrome Shine delivers an intense, high-impact look with a reflective surface that glistens like polished metal.
This style is all about bold color and mirror-like brilliance.
Design Features
The defining characteristic is the ultra-reflective chrome finish in a deep crimson or rich red shade.
The surface is perfectly smooth and mirror-like, reflecting light intensely and creating a liquid metal appearance.
This look requires a flawless application to achieve its maximum impact, as any imperfections are highlighted by the chrome effect.
It typically uses chrome powder applied over a base color, usually black or a matching red, to achieve the metallic sheen.
How To Achieve This Look
This effect is most commonly achieved using gel polish and chrome powder.
Apply and cure a base coat, followed by one or two coats of a base color (often black gel polish for maximum reflectivity, or a matching crimson).
After curing the color, apply a no-wipe gel top coat and cure it completely.
Vigorously rub the crimson chrome powder onto the surface of the cured top coat using a dedicated applicator until the entire nail is covered and exhibits a mirror shine.
Gently brush away any excess powder and seal the look with another layer of no-wipe top coat, carefully capping the edges, and cure thoroughly.
Why This Stands Out
Crimson Chrome Shine nails are undeniably eye-catching due to their intense reflectivity and bold metallic finish; they command attention instantly.
The liquid metal effect gives the nails a futuristic and luxurious appearance, making a strong style statement.
It’s a perfect choice for special events, nights out, or anytime you want your nails to be the center of attention.
The combination of the powerful crimson color and the high-tech chrome finish creates a look that is both glamorous and edgy.
Fiery Red Aura Nails
Fiery Red Aura Nails feature soft, blended gradients of vibrant red radiating from the center of the nail outwards, fading into a clear or blush base.
This style creates a captivating, ethereal glow effect.
Design Features
This design is characterized by a soft, airbrushed-like gradient, typically with the most intense fiery red color concentrated in the center of the nail.
The red then softly diffuses outwards, blending seamlessly into a sheer nude, pale pink, or clear base towards the cuticles and edges.
The transition between colors is smooth and lacks harsh lines, creating an ‘aura’ or ‘blush’ effect emanating from within the nail.
The finish is usually glossy to enhance the glowing, ethereal quality of the gradient.
How To Achieve This Look
Apply a base coat and then the chosen base color (clear, nude, or blush) over the entire nail, allowing it to dry or cure.
The aura effect is often best achieved using an airbrush tool, spraying the fiery red pigment onto the center of the nail and carefully controlling the spray to create a soft fade.
Alternatively, use a makeup sponge: apply the red polish to the center of the sponge and dab it onto the nail’s center, gently blending outwards.
Build the color intensity gradually and finish with a glossy top coat to smooth the gradient and add shine.
Why This Stands Out
Fiery Red Aura Nails offer a unique and mesmerizing visual effect, appearing as if the color glows from within the nail itself.
The soft gradient is subtle yet captivating, providing a gentler way to wear bold red compared to a full-color manicure.
This style feels modern, mystical, and artistic, standing apart from more traditional nail designs.
It allows for a beautiful interplay of color and negative space, resulting in a look that is both striking and delicate.
Red Lace Overlay
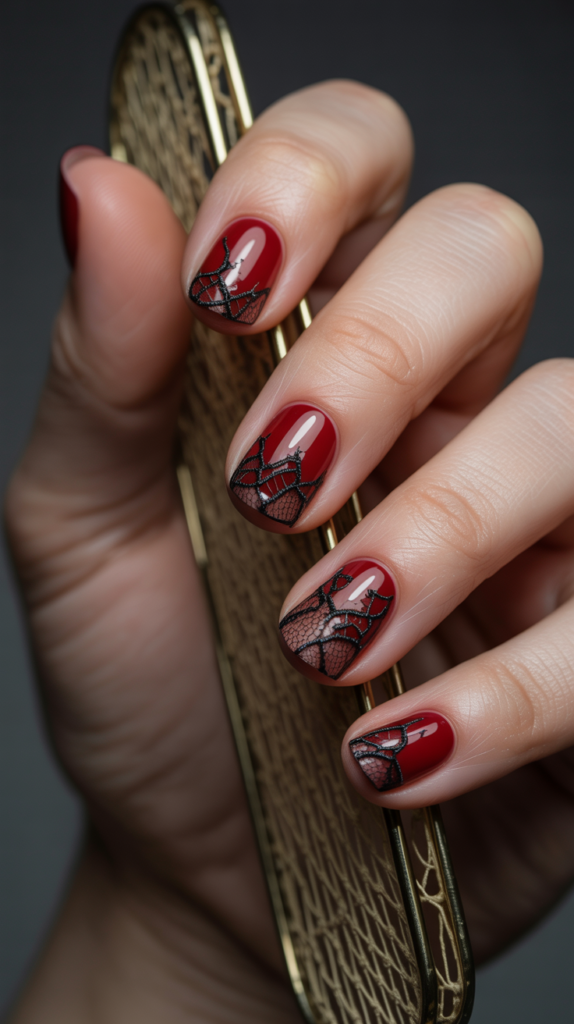
This design combines the boldness of a deep red base with the intricate, feminine detail of lace patterns stamped or painted over it.
It creates a look that is simultaneously daring and delicate.
Design Features
A rich, opaque red polish serves as the canvas for this intricate design, providing a strong background contrast.
Delicate lace patterns, often in black or white for maximum visibility, are applied over the red base.
The lace patterns can vary from fine floral motifs to more geometric or traditional textile designs, often covering the entire nail or used as accent details.
The finish is typically glossy to highlight the intricacy of the lace, though a matte top coat can offer a unique, vintage fabric feel.
How To Achieve This Look
Begin with a smooth, opaque application of the chosen deep red polish over a base coat, ensuring it’s fully dry or cured.
The lace pattern can be created using nail stamping plates specifically designed with lace motifs; apply black or white stamping polish to the plate, scrape excess, pick up the design with a stamper, and transfer it onto the red nail.
Alternatively, skilled nail artists can hand-paint intricate lace details using a very fine nail art brush.
Seal the design carefully with a top coat, ensuring not to smudge the delicate lines of the lace pattern.
Why This Stands Out
Red Lace Overlay nails stand out due to the striking contrast between the bold red background and the delicate, intricate lace detailing.
This juxtaposition creates a look that is both powerfully feminine and subtly romantic, with a touch of vintage elegance.
It’s a sophisticated design that showcases attention to detail and adds a layer of texture and complexity to the manicure.
This style is perfect for formal occasions or for anyone wanting to express both strength and femininity through their nail art.
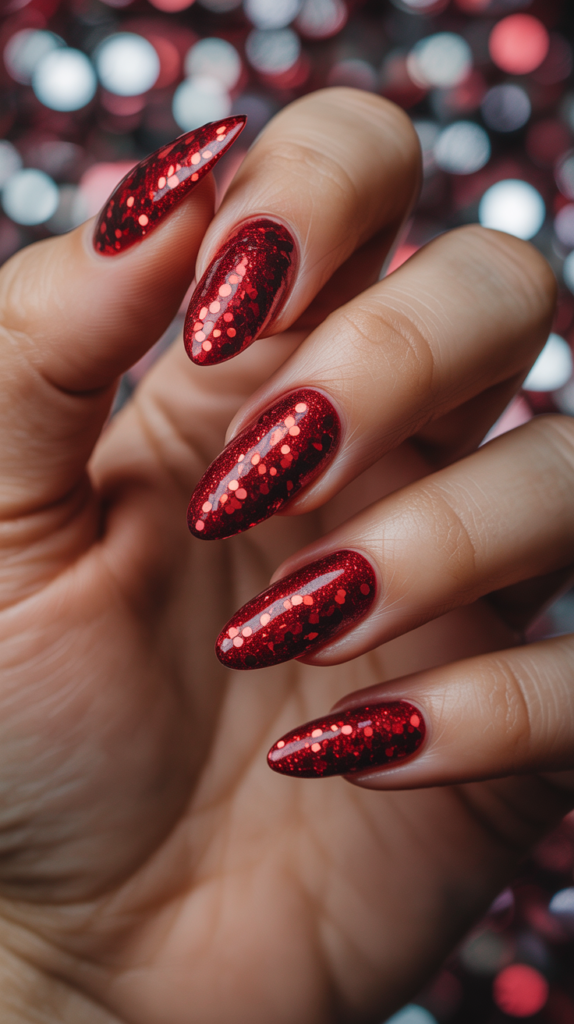
Blood Moon Glitter
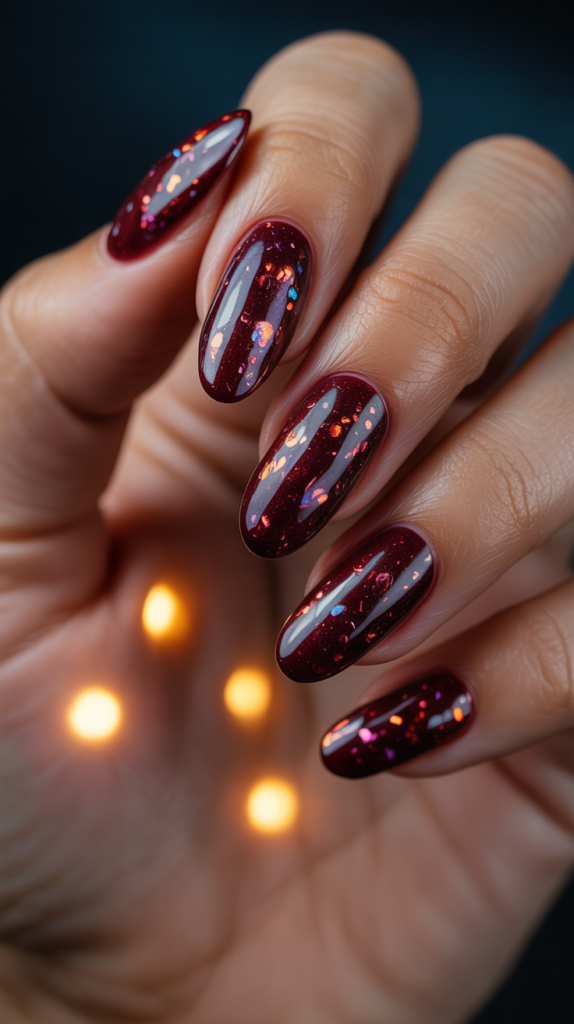
Blood Moon Glitter nails evoke a mystical night sky with a dark, deep red base subtly illuminated by holographic or iridescent flakes.
The effect mimics the shimmer of moonlight on a dark surface.
Design Features
The foundation of this look is a deep, vampy red polish, often bordering on oxblood or burgundy, representing the darkness.
Scattered throughout this dark base are fine holographic or iridescent glitter flakes, catching the light like distant stars or moon shimmer.
The glitter is used sparingly, providing subtle flashes of light rather than full coverage, enhancing the mysterious ‘blood moon’ theme.
A glossy top coat is typically used to maximize the sparkle of the flakes and deepen the base color’s richness.
How To Achieve This Look
Apply a base coat followed by two coats of the chosen deep red polish, ensuring full opacity and allowing it to dry or cure.
While the second coat is still slightly tacky (for regular polish) or before applying the top coat (for gel), carefully place the holographic or iridescent flakes onto the nail using a brush or tool.
Distribute the flakes sparsely and unevenly for a natural, starlit effect rather than uniform coverage.
Gently press the flakes flat and seal the entire design with one or two layers of glossy top coat to smooth the surface and enhance the shimmer.
Why This Stands Out
Blood Moon Glitter nails offer a captivating and subtly glamorous look, perfect for those who love dark, moody aesthetics with a touch of sparkle.
The restrained use of glitter against the deep red base creates a sophisticated shimmer rather than an overwhelming sparkle, evoking mystery and elegance.
It stands out as a more refined and atmospheric take on glitter nails, ideal for autumn, winter, or evening events.
The holographic or iridescent quality of the flakes adds an unexpected dimension as the light catches them from different angles.
Red Velvet Heart Nails
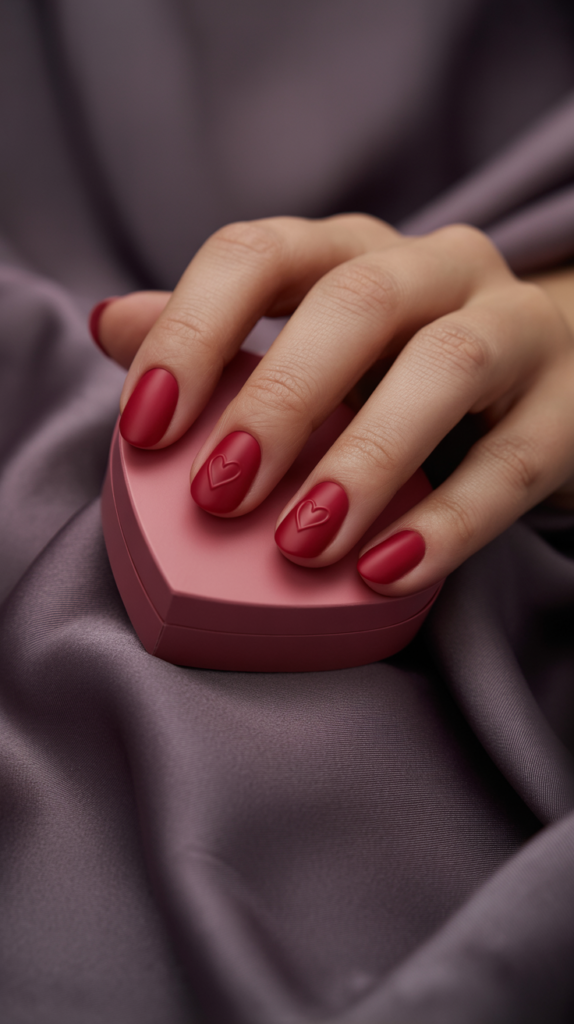
This design features a luxurious matte velvet finish in red, accented with tiny, delicately embossed hearts, often on the ring fingers.
It combines a unique texture with a sweet, romantic detail.
Design Features
The primary feature is the matte finish that mimics the soft, plush texture of velvet fabric, achieved using a special matte top coat or velvet-effect powder.
The color is typically a classic or deep red to enhance the luxurious feel associated with velvet.
Small, raised or embossed heart shapes are added as accents, usually on one or two nails per hand, providing subtle tactile and visual interest.
These hearts are often created in the same red color for a tone-on-tone effect or sometimes in a contrasting shade like pink or white.
How To Achieve This Look
Apply the red base color smoothly over a base coat and allow it to dry or cure.
To create the velvet effect, apply a matte top coat; for an enhanced texture, flocking powder in a matching red can be carefully applied onto a wet top coat before it dries or cures.
For the embossed hearts, use a small amount of thick gel or acrylic sculpting medium, shape it into a tiny heart using a fine tool or brush directly onto the nail surface, and cure it.
Paint over the cured heart with the same red polish and finish the entire nail (including the heart) with the matte top coat for a seamless, textured look.
Why This Stands Out
Red Velvet Heart Nails stand out due to their unique, touchable texture combined with delicate, romantic detailing.
The matte velvet finish is unexpected and luxurious, offering a sophisticated departure from standard glossy or matte looks.
The subtle embossed hearts add a sweet, personal touch without being overly elaborate, making the design charming and elegant.
This style is perfect for Valentine’s Day, romantic occasions, or for anyone who loves texture play and understated romantic motifs in their nail art.
Strawberry Drip Nails
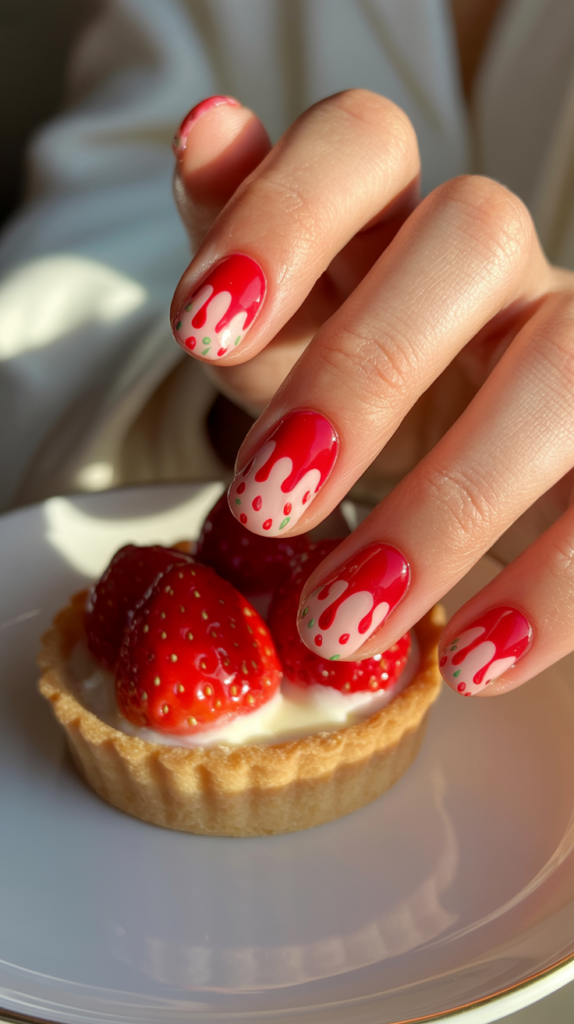
Juicy strawberry red nails get a playful update with artistic milky drips and tiny black “seed” details.
This design is fun, fresh, and reminiscent of summertime treats.
Design Features
This look features a vibrant, juicy strawberry red as the main color, often with a high-gloss finish to mimic the fruit’s sheen.
Playful drips, usually in a milky white or pale pink shade, are painted cascading down from the cuticle area or sometimes up from the tips.
Tiny black dots representing strawberry seeds are strategically scattered across the red areas, adding to the realistic and whimsical effect.
The overall aesthetic is bright, cheerful, and slightly cartoonish in a charming way.
How To Achieve This Look
Paint the nails with the bright strawberry red polish over a base coat, applying two coats for full opacity, and let it dry or cure.
Using a fine nail art brush, paint the milky white or pale pink polish in dripping shapes starting near the cuticle (or tips, depending on the desired look), letting them flow unevenly down the nail.
Once the drips are dry or cured, use a dotting tool or the tip of a fine brush dipped in black polish to add small, irregular dots over the red areas to simulate strawberry seeds.
Finish with a high-gloss top coat to enhance the juicy appearance and protect the detailed artwork.
Why This Stands Out
Strawberry Drip Nails stand out for their playful and whimsical charm, directly referencing a beloved fruit in a fun, artistic way.
The combination of the bright red, milky drips, and tiny seed details creates a unique and eye-catching design that is instantly recognizable.
It’s a cheerful and youthful style, perfect for summer or spring, or for anyone looking to add a touch of lighthearted fun to their look.
The glossy finish enhances the ‘juicy’ concept, making the nails look fresh and appealing.
Crimson Rose Embossed
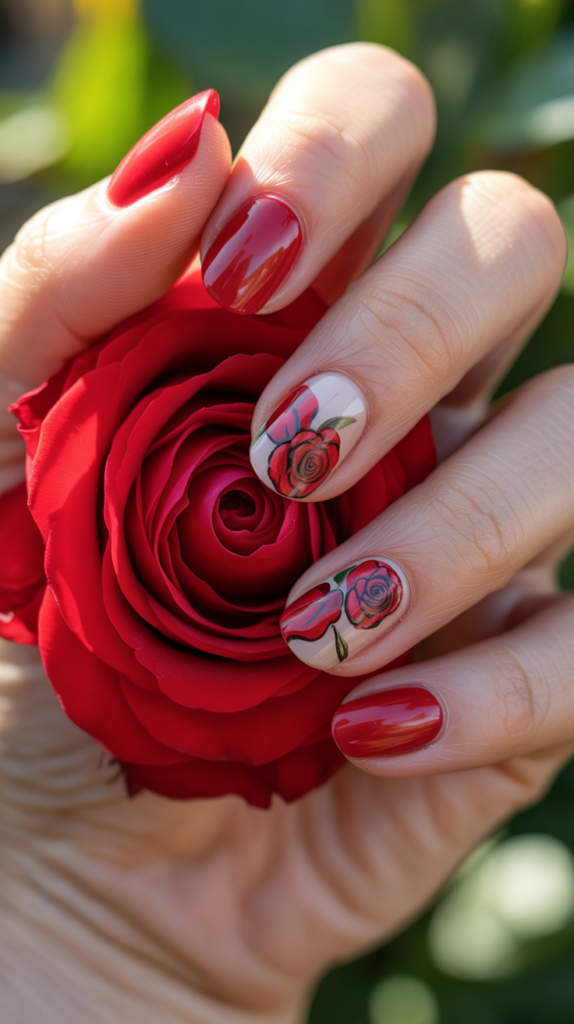
This sophisticated design elevates red nails with three-dimensional sculpted rose petals in a deep crimson hue, set against a glossy red background.
It offers texture, artistry, and romantic elegance.
Design Features
The base is a smooth, glossy red polish, providing a vibrant backdrop for the 3D elements.
The focal point is the sculpted rose, crafted directly onto the nail surface using acrylic or sculpting gel in a matching or slightly deeper crimson shade.
These roses feature distinct petals with depth and texture, creating a realistic or stylized floral embellishment that rises off the nail.
Often placed on an accent nail, the embossed rose adds a luxurious, tactile dimension to the manicure.
How To Achieve This Look
Apply the glossy red base color over a prepared nail and base coat, allowing it to dry or cure completely.
Using 3D sculpting gel or acrylic powder and monomer liquid, carefully sculpt rose petals directly onto the nail surface.
Build the rose layer by layer, shaping individual petals with a specialized brush or tool to create depth and dimension, then cure (for gel) or allow to air dry (for acrylic).
Once the rose structure is complete and hardened, it can be painted with the same crimson polish or left as is if the sculpting medium was colored.
Finish by applying a glossy top coat around the base of the rose and over any other nails without 3D art.
Why This Stands Out
Crimson Rose Embossed nails stand out due to their intricate, three-dimensional artistry, transforming the nail into a miniature sculpture.
The tactile quality of the embossed rose adds a layer of luxury and sophistication that flat nail art cannot replicate.
This design feels incredibly romantic and opulent, making it perfect for special occasions like weddings, anniversaries, or formal events.
It showcases advanced nail artistry skills and offers a truly unique and memorable way to wear red.
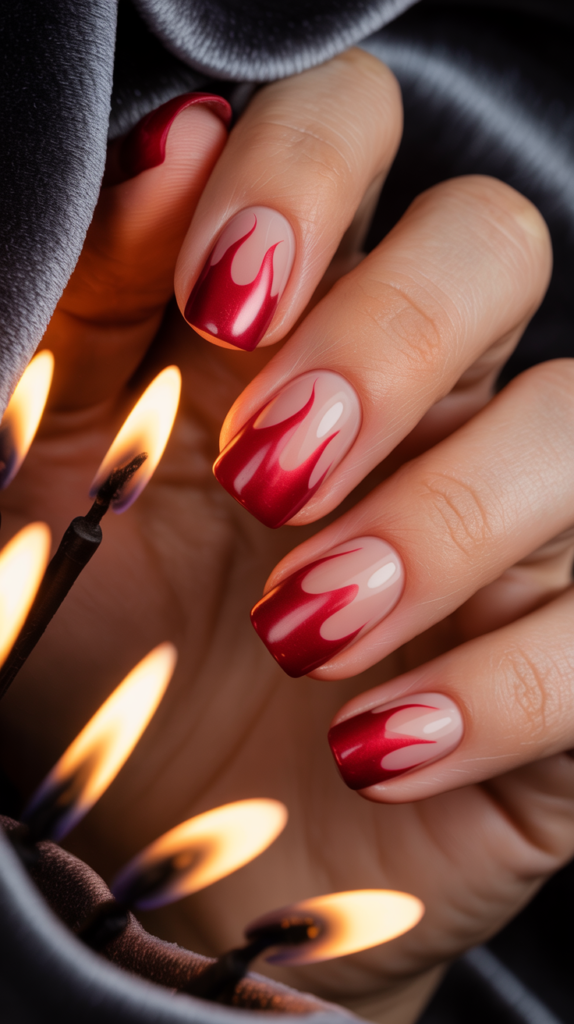
Red Flame French Tips
This edgy design puts a fiery spin on the classic French manicure, replacing the traditional white tips with sharp, flame-like shapes in bold red.
It’s a fierce and modern interpretation.
Design Features
Similar to a traditional French manicure, this style typically uses a nude or clear base to keep the focus on the tips.
Instead of a simple curved line, the tips feature jagged, flame-like designs painted in a vibrant red color.
These flames lick up from the free edge towards the nail bed, varying in height and shape across different nails for a dynamic, fiery effect.
The finish is usually glossy, enhancing the intensity of the red flames against the neutral base.
How To Achieve This Look
Apply the sheer nude or clear base color over the entire nail after the base coat, letting it dry or cure.
Using a fine nail art brush and an opaque red polish, carefully paint flame shapes starting from the free edge of the nail.
Create pointed, licking shapes extending upwards, varying the height and curves to mimic the movement of fire.
Ensure the red is fully opaque at the tips and clean up any lines for sharpness.
Seal the entire design with a high-gloss top coat once the flames are dry or cured.
Why This Stands Out
Red Flame French Tips stand out by transforming the elegant French manicure into something bold, edgy, and full of attitude.
The sharp, fiery shapes provide a striking contrast to the soft base, creating a look that is both fierce and stylish.
It’s a perfect choice for those who want to make a statement and showcase a bit of rebellious energy while still referencing a classic nail structure.
This design is modern, eye-catching, and adds significant personality to the nails.
Jelly Red Glass Nails
Jelly Red Glass Nails offer a chic, translucent look, resembling stained glass or hard candy.
Design Features
The key characteristic of this design is its translucence; the red color is sheer, allowing some light to pass through, similar to glass or jelly.
The color is often a bright, clear red, applied in multiple thin layers to build up the desired intensity while maintaining the see-through quality.
Sometimes, holographic foils or shards are embedded within the layers to mimic shattered glass or add extra dimension.
The finish is always ultra-glossy to enhance the glassy, luminous effect.
How To Achieve This Look
Start with a clear base coat.
Apply a thin layer of red jelly polish – these polishes are specifically formulated to be sheer and buildable.
Allow it to dry or cure, then apply subsequent thin layers until the desired level of color saturation and translucency is reached.
If adding ‘glass’ shards, embed small pieces of iridescent or holographic foil between layers of the jelly polish.
Finish with a thick, high-gloss top coat to encapsulate everything and maximize the glassy shine, ensuring a perfectly smooth surface.
Why This Stands Out
Jelly Red Glass Nails stand out for their unique, see-through quality, offering a lighter and more modern take on red nails compared to opaque creams.
The translucence creates depth and a luminous effect that is both sophisticated and intriguing, resembling precious gems or stained glass.
It’s a versatile look that can be kept simple or embellished with foils for extra flair.
This style feels fresh, chic, and particularly appealing during warmer months or for those seeking a less intense red manicure.
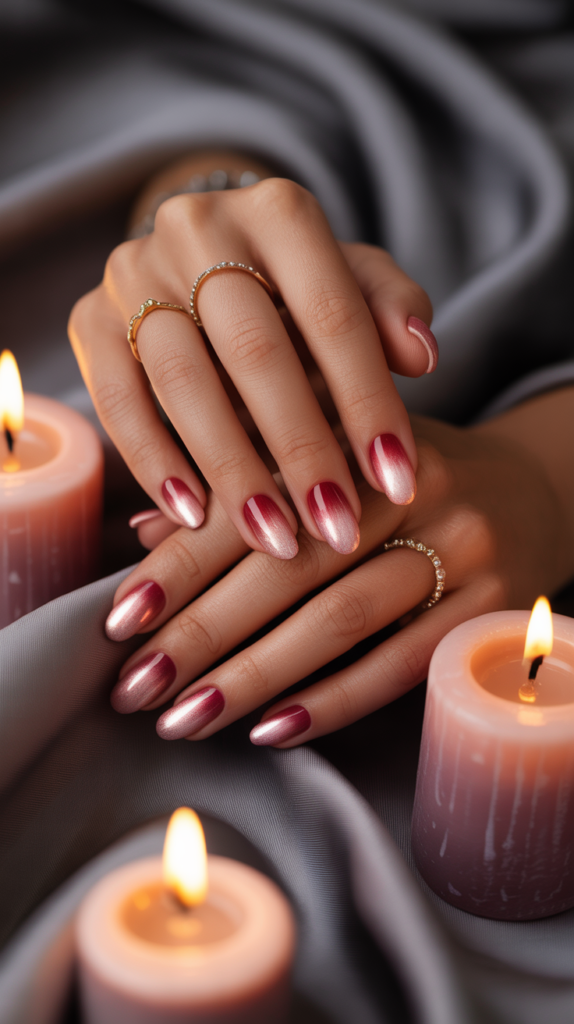
Red Ombré Fade
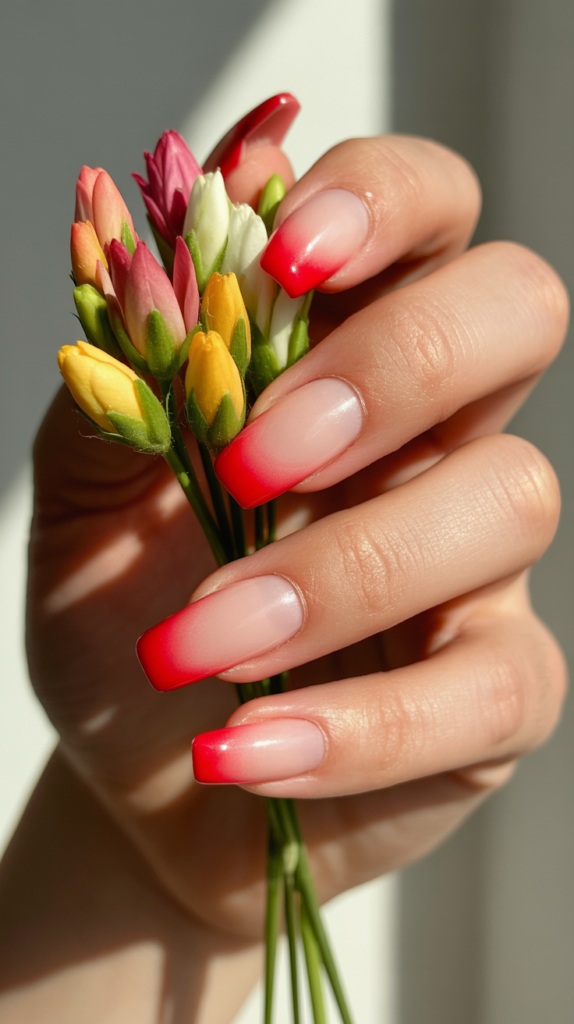
This design features a smooth gradient transition, typically starting with a vibrant cherry red at the tips that softly fades into a sheer blush or nude color towards the base.
It offers a softer approach to wearing bold red.
Design Features
The defining element is the seamless gradient effect, where two or more colors blend smoothly without any discernible lines.
In this case, a bolder red shade is concentrated at the free edge of the nail, gradually lightening and transitioning into a much softer, neutral shade near the cuticle.
The color transition is key; it should be soft and well-blended for an elegant finish.
The finish is typically glossy to enhance the smoothness of the gradient and the vibrancy of the red tip.
How To Achieve This Look
Apply the base coat and then the lighter base color (sheer blush or nude) over the entire nail.
On a makeup sponge, apply stripes of the light base color and the cherry red color next to each other, slightly overlapping them.
Gently dab the sponge onto the nail, moving it slightly up and down to blend the colors and create the gradient effect; repeat until the desired opacity and blend are achieved.
Clean up the polish around the cuticles using a brush dipped in acetone or remover.
Finish with a glossy top coat to smooth out the texture from sponging and enhance the shine.
Why This Stands Out
Red Ombré Fade nails stand out by offering a beautiful, blended transition that softens the impact of a full red nail while still providing a pop of color.
The gradient effect is visually appealing and elegant, adding a touch of sophistication to the manicure.
It’s a versatile style that combines the neutrality of the base with the boldness of red tips, making it suitable for various occasions and preferences.
This technique provides a modern and artistic way to incorporate red into nail design.
Fire Opal Red Foil
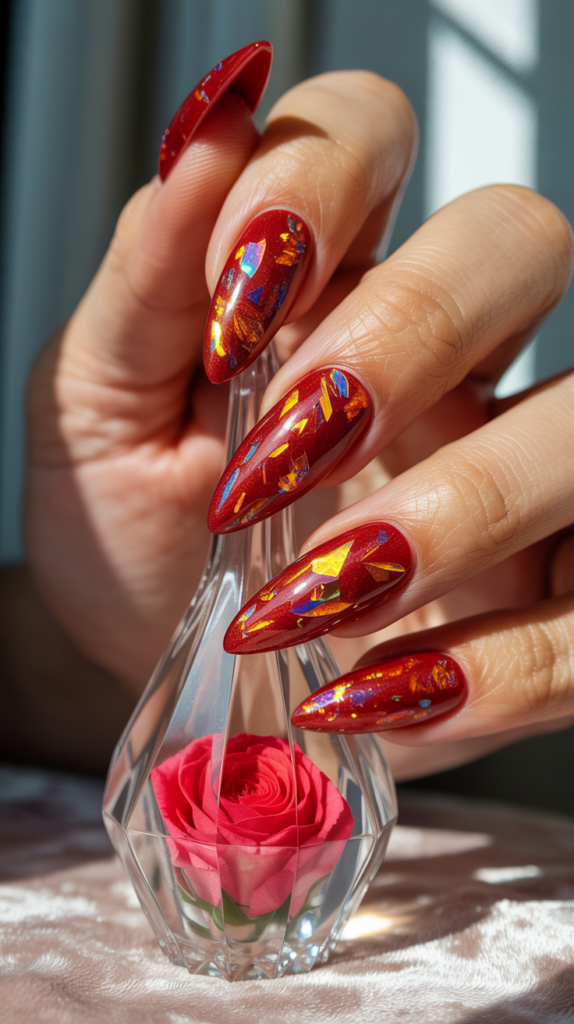
This mystical design uses a red base color embellished with iridescent foil flakes that shift color like a fire opal gemstone.
It creates a captivating, multi-dimensional shimmer effect.
Design Features
The base color is typically a rich red, which can range from bright to deep shades, providing a backdrop for the foil.
The key feature is the addition of iridescent or color-shifting foil flakes, often showing flashes of orange, gold, green, or yellow as the light hits them, mimicking the play-of-color in a fire opal.
These flakes are randomly distributed over the nail, creating texture and a dynamic, shimmering effect.
A glossy top coat is essential to smooth the surface and enhance the foil’s reflective qualities.
How To Achieve This Look
Apply the red base color over a base coat and let it dry or cure.
While the polish is slightly tacky or before applying the top coat (for gel), use tweezers or a tool to place pieces of the iridescent foil onto the nail surface.
Break the foil into small, irregular shapes and scatter them randomly across the nail, pressing them down gently.
Once the foil is adhered, carefully apply one or two layers of a glossy top coat, ensuring all foil edges are sealed and the surface is smooth to the touch.
Why This Stands Out
Fire Opal Red Foil nails stand out due to their mesmerizing, color-shifting shimmer that adds a mystical and luxurious quality to the red base.
The way the foil catches light creates a dynamic and eye-catching effect that is more complex than simple glitter.
It evokes the beauty of gemstones, making the nails look precious and unique.
This design is perfect for those who want a touch of magic and iridescence in their manicure, offering a sophisticated sparkle.
Neon Strawberry Glitz

This design screams summer fun with an intensely bright, almost fluorescent neon red base packed with micro-glitter.
It’s energetic, eye-catching, and perfect for warm evenings.
Design Features
The core of this look is an ultra-bright, neon strawberry red polish that demands attention.
Embedded within this vibrant base is fine micro-glitter, often in silver, gold, or iridescent tones, adding a layer of dense sparkle.
The combination of the electric neon hue and the shimmering glitter creates a high-energy, dazzling effect.
A glossy top coat is typically used to maximize both the neon brightness and the glitter’s sparkle.
How To Achieve This Look
Begin with a base coat; sometimes applying a white base coat first can help the neon red color pop even more intensely.
Apply two to three thin coats of the neon strawberry red glitter polish, allowing each coat to dry thoroughly, as neons can sometimes take longer or require more layers for opacity.
Build up the color and glitter density to your liking.
Finish with a high-gloss top coat, possibly needing two layers to fully smooth out the texture of the micro-glitter and achieve a super shiny finish.
Why This Stands Out
Neon Strawberry Glitz nails stand out because of their sheer intensity – the combination of eye-searing neon red and dense sparkle is impossible to ignore.
This design is unapologetically bold, playful, and perfect for making a statement, especially during summer or for parties and festivals.
It captures a fun, youthful energy and radiates vibrancy.
The micro-glitter adds a touch of glamour to the electric color, making it both fun and dazzling.
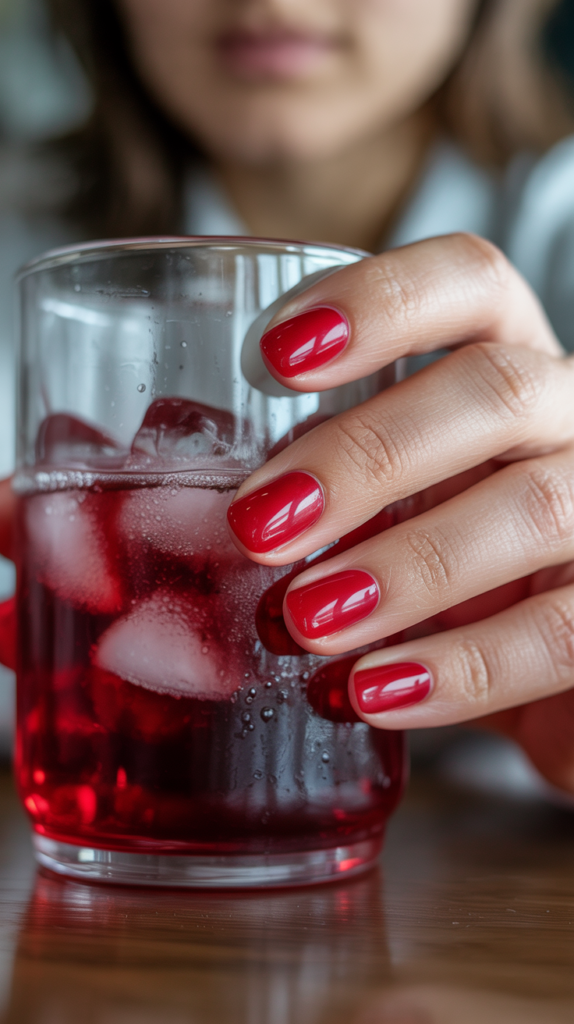
Candy Apple Gloss
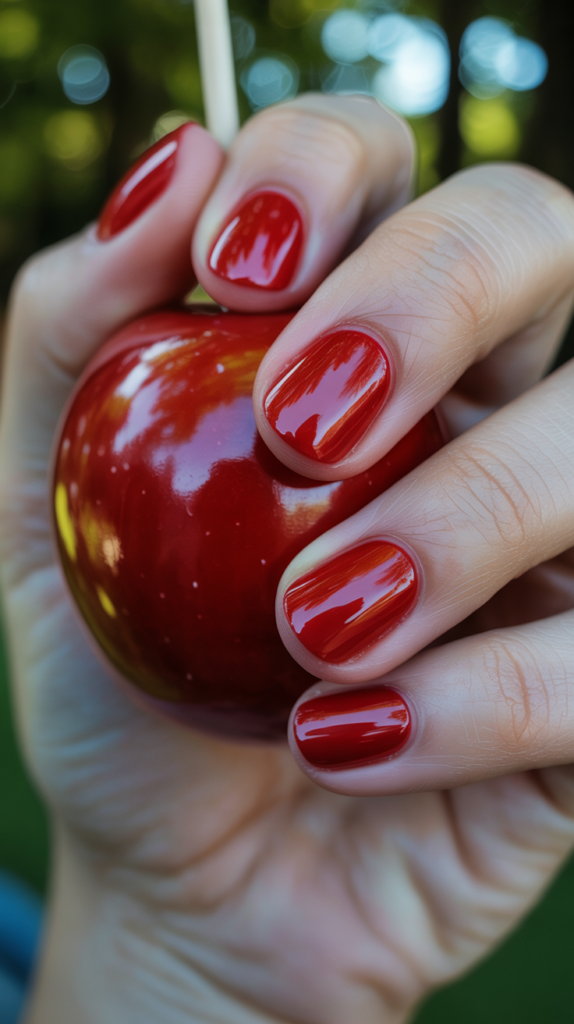
This look aims for the irresistible shine and intense color of a freshly dipped candy apple.
It’s all about an ultra-glossy, juicy red finish that looks almost edible.
Design Features
The defining characteristic is the extreme high-gloss finish, giving the nails a wet, lacquered look reminiscent of hard candy coating.
The color is typically a bright, true red or a slightly deeper candy apple red, chosen for its vibrancy and classic appeal.
There are no embellishments; the focus is entirely on the purity of the color and the mirror-like shine.
The nail shape is often rounded or oval to enhance the apple-like appearance.
How To Achieve This Look
Start with perfectly smooth nails – buffing is key for this look to ensure the gloss reflects evenly.
Apply a smoothing base coat.
Apply two to three thin coats of a vibrant red crème polish, ensuring even coverage and allowing ample drying time between coats.
The crucial step is the top coat: choose an ultra-glossy, high-shine top coat known for its wet-look finish.
Apply one or two generous layers, making sure to cap the free edge, and allow it to dry completely in a dust-free environment to maintain the flawless shine.
For gel, use a high-shine gel top coat and cure thoroughly.
Why This Stands Out
Candy Apple Gloss nails stand out for their incredible shine and classic, juicy color, creating a look that is both timelessly elegant and visually delicious.
The simplicity of the design allows the perfect red hue and the impeccable glossy finish to take center stage.
It’s a sophisticated yet impactful look that exudes confidence and polish.
The wet-look shine makes the red appear richer and more vibrant, catching the light beautifully.
Red Leopard Print Accents
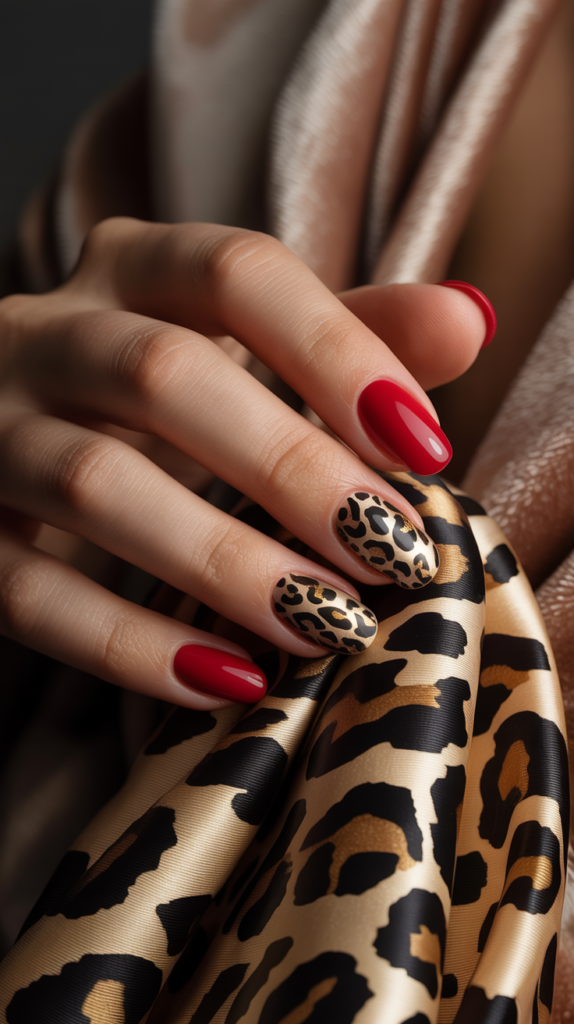
This design pairs classic glossy red nails with bold leopard print patterns on one or two accent fingers.
It combines timeless elegance with a touch of wild, fashionable flair.
Design Features
Most nails are painted in a solid, glossy red color, providing a classic and vibrant base.
One or two nails per hand (often the ring finger or thumb) feature a leopard print pattern.
This pattern typically involves irregular spots created with black and often a metallic gold or brown polish, set against a contrasting background which could be the same red, nude, or white.
The juxtaposition of the solid red and the patterned accent nail creates a balanced yet eye-catching look.
How To Achieve This Look
Paint the majority of the nails with the glossy red polish over a base coat and let dry or cure.
For the accent nail(s), apply the chosen background color for the leopard print (e.g., nude or the same red).
Using a dotting tool or fine brush, create irregular spot shapes with the brown or gold polish.
Before these spots dry completely, use black polish and a fine brush to draw partial outlines (C-shapes or curved lines) around the spots, characteristic of leopard print.
Add a few smaller black dots in the spaces between the main spots.
Finish all nails, both red and leopard print, with a glossy top coat.
Why This Stands Out
Red Leopard Print Accents stand out by successfully blending classic sophistication (the glossy red) with trendy, animal print boldness.
The accent nail provides a focal point and injects personality without overwhelming the entire manicure.
It’s a stylish way to participate in the animal print trend while maintaining an overall elegant look.
This design shows a fashionable edge and allows for creative expression through the choice of accent pattern colors.
Baroque Red Elegance
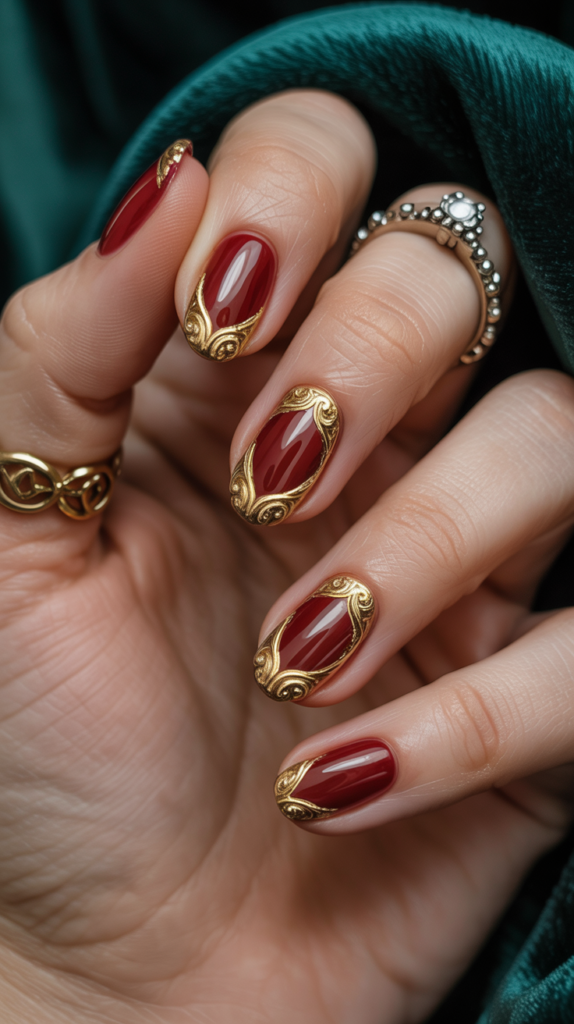
Inspired by the opulence of the Baroque era, this design features intricate gold filigree details painted over a deep oxblood red base.
It evokes a sense of royal, vintage-inspired luxury.
Design Features
The base color is a deep, rich oxblood or burgundy red, conveying depth and sophistication.
Elaborate, swirling filigree patterns, reminiscent of Baroque ornamentation, are meticulously painted over the dark red base, usually in a metallic gold polish for a luxurious contrast.
These patterns often include scrolls, flourishes, and leaf-like motifs, applied delicately to one or more nails.
The finish is typically glossy to enhance the richness of the red and the shimmer of the gold details.
How To Achieve This Look
Apply the deep oxblood red polish smoothly over a base coat, ensuring full opacity, and let it dry or cure.
Using a very fine nail art brush (a striper or detail brush) and metallic gold nail polish or acrylic paint, carefully hand-paint the intricate filigree designs onto the nails.
Work slowly, creating elegant swirls, scrolls, and symmetrical patterns typical of Baroque art.
Allow the gold details to dry completely before sealing the design with a glossy top coat, applying it gently to avoid smudging the fine lines.
Why This Stands Out
Baroque Red Elegance stands out for its incredible intricacy and luxurious aesthetic, transporting the viewer to a bygone era of opulence.
The combination of the deep, vampy red and the shimmering gold filigree creates a look that is undeniably regal and sophisticated.
It showcases high-level nail artistry and attention to detail, making a powerful statement of refined taste.
This design is perfect for formal events or for anyone who loves vintage-inspired glamour and ornate details.
Cherry Cola Sparkle
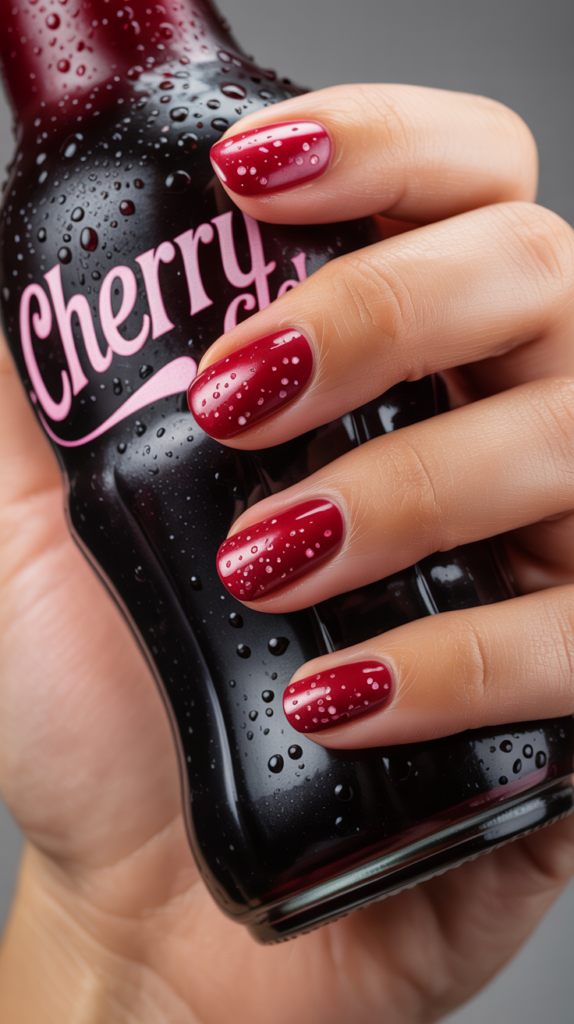
This design captures the effervescent look of cherry cola with a deep red base infused with subtle, fine shimmer.
It’s a sophisticated yet slightly playful take on dark red nails.
Design Features
The base color is a deep cherry or cola red, often with brown undertones, mimicking the beverage’s hue.
Embedded within this base is a very fine shimmer or micro-glitter, often in gold, copper, or red tones, creating a subtle sparkle reminiscent of carbonation bubbles.
The shimmer is dispersed throughout the polish rather than being densely packed, providing a sophisticated glow rather than overt glitter.
A high-gloss finish enhances the deep color and the subtle effervescent sparkle.
How To Achieve This Look
Select a nail polish that already contains the fine shimmer within the deep red base, often marketed with names suggesting cola or deep cherry hues.
Apply a base coat, followed by two or three thin coats of the cherry cola shimmer polish, ensuring even distribution of the shimmer particles.
Allow each coat to dry thoroughly.
Finish with a high-gloss top coat to bring out the depth of the color and maximize the subtle sparkle, giving it that fizzy, appealing look.
Why This Stands Out
Cherry Cola Sparkle nails stand out by offering a nuanced and sophisticated way to wear shimmer with a dark red polish.
The subtle sparkle adds depth and interest without being overly flashy, making it more versatile than traditional glitter polishes.
The deep, rich color feels elegant and mature, while the hint of shimmer adds a touch of playful effervescence.
It’s a chic and slightly unexpected choice, perfect for autumn or winter, or for those who appreciate understated glamour.
Red Chrome French Twist
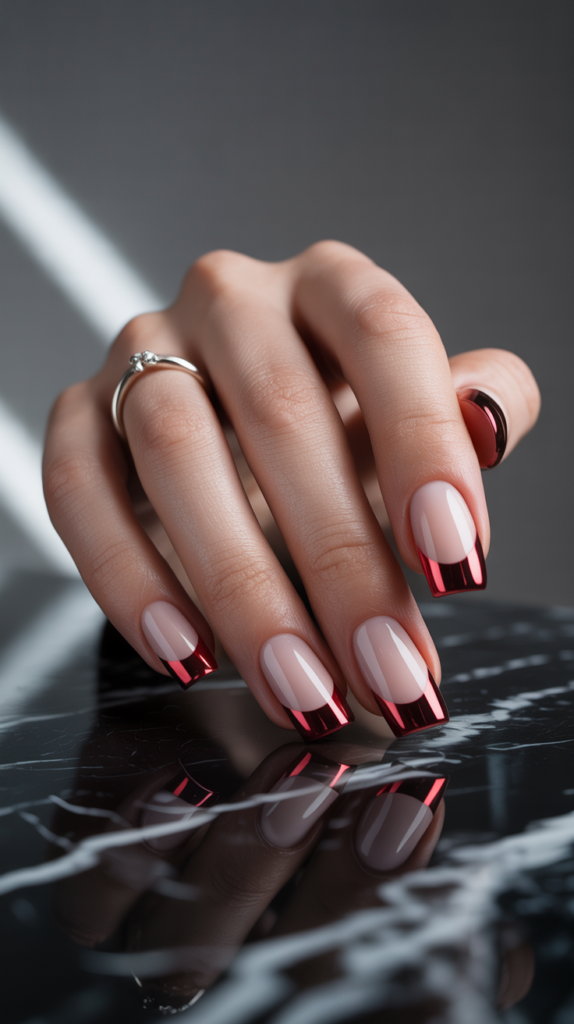
This design gives the French manicure a modern, metallic makeover using red chrome on the tips, often applied with a geometric or diagonal slant instead of the traditional curve.
Design Features
A classic nude or clear base sets the stage for the dramatic tips.
Instead of white, the tips feature a high-shine metallic red chrome finish.
The twist comes in the application: the French line might be a sharp diagonal, a V-shape (chevron), or another geometric interpretation, rather than the standard smile line.
This combination of metallic texture and unconventional tip shape creates a futuristic and edgy look.
How To Achieve This Look
Apply the nude or clear base color over a base coat and let it dry or cure.
Use nail vinyls or striping tape to mask off the desired geometric shape for the tips (diagonal, chevron, etc.).
Apply a no-wipe gel top coat over the exposed tip area and cure it.
Vigorously rub red chrome powder onto the cured top coat within the masked area until it shines.
Brush off excess powder, carefully remove the tape or vinyls, and seal the entire nail, including the chrome tip, with a final layer of glossy top coat, curing thoroughly.
Why This Stands Out
Red Chrome French Twist stands out by merging three distinct trends: French tips, chrome finishes, and geometric nail art.
This fusion results in a look that is incredibly modern, sharp, and eye-catching.
The metallic red tips provide a bold contrast against the neutral base, while the geometric lines add an architectural, edgy feel.
It’s a sophisticated yet daring choice for those who want to push the boundaries of the classic French manicure.
Garnet Stone Effect
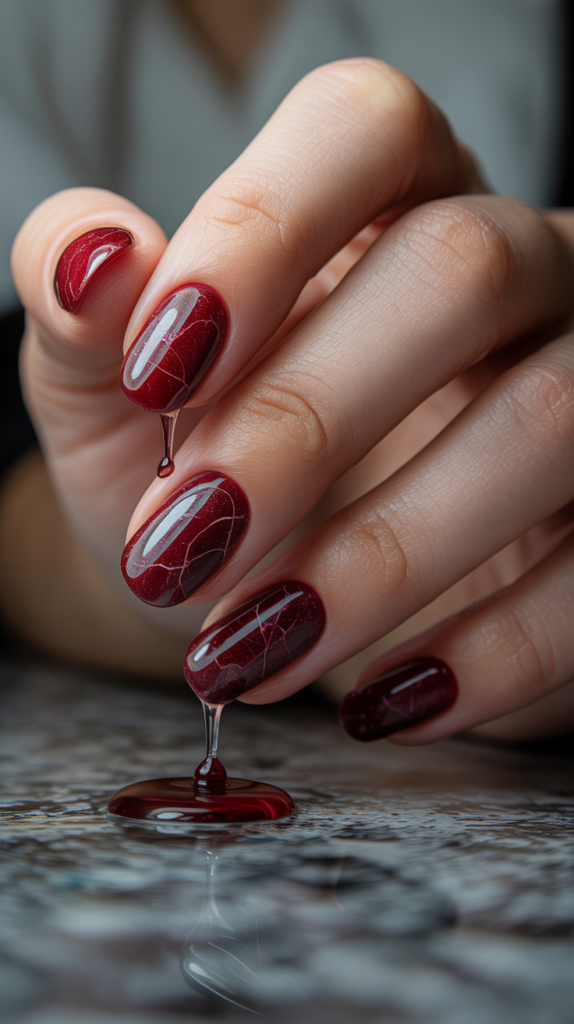
This design mimics the appearance of a polished garnet gemstone, using deep garnet red shades combined with subtle metallic flecks or marbling.
It creates a rich, textured, and luxurious look.
Design Features
The primary color is a deep, intense garnet red, often with hints of burgundy or brown undertones, reflecting the gemstone’s natural variations.
The effect incorporates subtle texture or visual depth, achieved through techniques like layering sheer and opaque polishes, gentle marbling with slightly darker or lighter reds, or embedding fine metallic flakes (gold or copper) within the layers.
The goal is to replicate the internal facets and inclusions seen in a natural garnet stone, finished with a high gloss to mimic a polished gem surface.
How To Achieve This Look
Apply a base coat, followed by a layer of the deep garnet red polish.
While it’s wet, you might add tiny drops of a slightly darker red or black and gently swirl them for subtle depth, or embed sparse, fine metallic flakes.
Another technique involves layering: apply a sheer garnet jelly polish over an opaque base, or layer different shades of garnet red.
The key is subtlety in the effects to mimic natural stone rather than creating obvious patterns.
Finish with a thick, glossy top coat to encapsulate the layers and create a smooth, polished gemstone appearance.
Why This Stands Out
Garnet Stone Effect nails stand out for their deep, luxurious appearance that closely mimics a precious gemstone.
The rich color and subtle internal details create a look of sophistication and earthy elegance.
It offers more depth and complexity than a simple crème polish but is more subdued than overt glitter or chrome finishes.
This design feels opulent and grounded, perfect for evoking a sense of timeless luxury and natural beauty.
Red Butterfly Wings
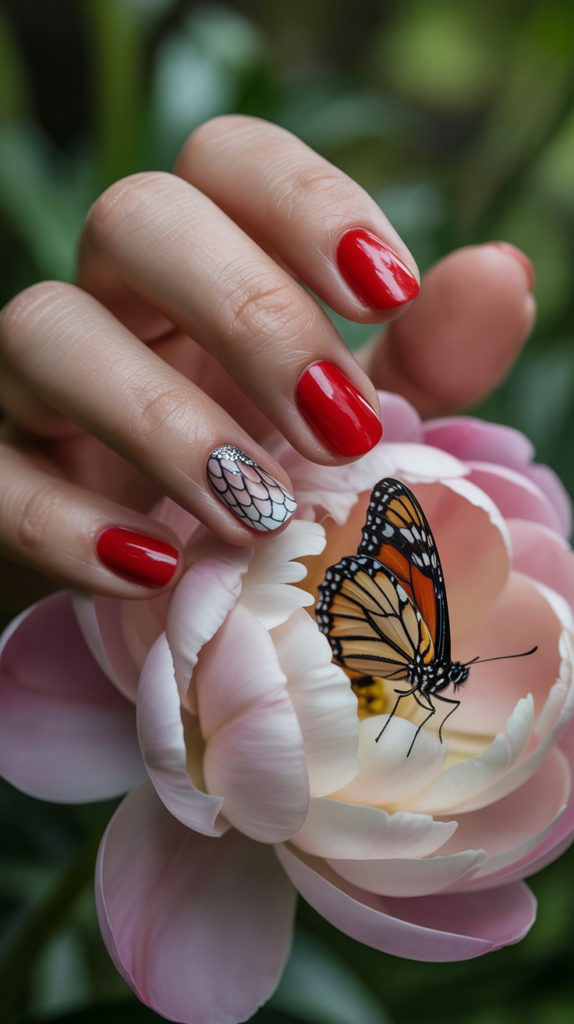
This delicate design features intricate butterfly wing patterns, often outlined in black, over a shimmery red base.
It combines the boldness of red with the ethereal beauty of butterflies.
Design Features
The base is typically a vibrant red polish, often with a subtle shimmer or holographic effect to add a touch of magic.
Delicate butterfly wing patterns are drawn onto one or more accent nails, usually using black polish for a clear outline.
These patterns mimic the intricate veins and shapes of butterfly wings, sometimes filled partially with other colors or left as outlines against the red background.
The design aims for elegance and lightness, capturing the grace of a butterfly.
How To Achieve This Look
Apply the shimmery red base color over a base coat and let it dry or cure completely.
Using a very fine nail art brush and black polish or acrylic paint, carefully draw the outline of butterfly wings onto the chosen nails.
Focus on creating delicate lines and the characteristic shapes and vein patterns of wings.
You can paint a full butterfly or just a section of a wing extending from the side or corner of the nail.
Add details like small dots or fill sections with contrasting colors if desired.
Seal the intricate design with a glossy top coat.
Why This Stands Out
Red Butterfly Wings stand out by pairing the passionate energy of red with the delicate, transformative symbolism of butterflies.
The intricate wing designs showcase artistry and add a touch of whimsical elegance to the bold base color.
It’s a beautiful, feminine design that feels both eye-catching due to the red and graceful due to the butterfly motif.
This style is perfect for spring or summer, or for anyone wanting a design that represents beauty, change, and lightness.
Scarlet Blush Petals
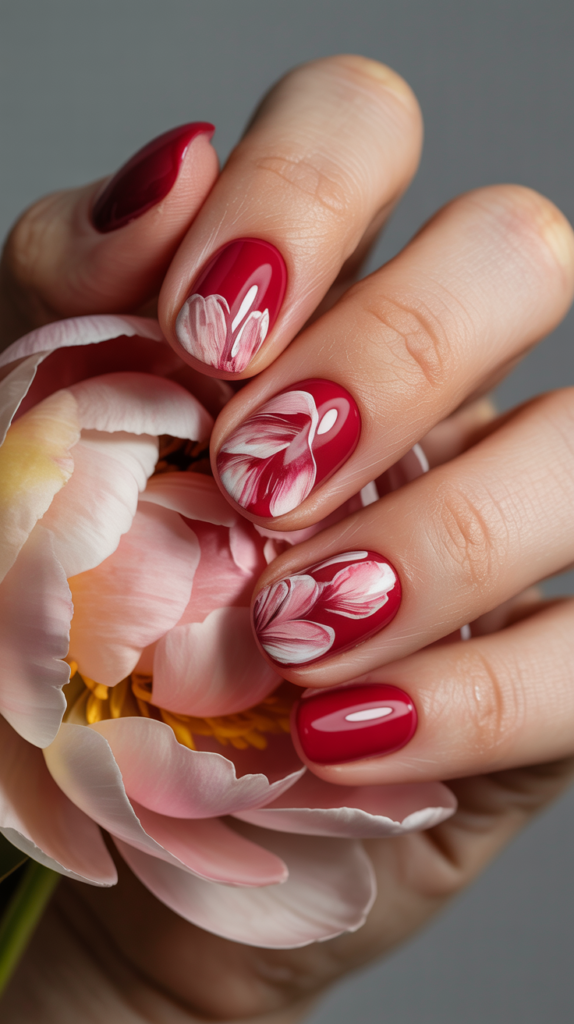
This artistic design features sheer red polish applied like watercolor, often with hand-painted blush-toned floral accents.
It creates a soft, romantic, and painterly effect.
Design Features
The base involves using a sheer scarlet or red jelly polish applied unevenly or concentrated in certain areas to create a soft, ‘blushed’ watercolor effect, rather than full opaque coverage.
Over this translucent red base, delicate floral accents, often roses or peonies, are hand-painted using blush pink, white, or lighter red tones.
The painting style is often soft and blended, contributing to the overall ethereal and artistic aesthetic.
A glossy finish enhances the watercolor feel.
How To Achieve This Look
Apply a base coat.
Using a sheer scarlet jelly polish, apply it in thin, uneven washes, perhaps concentrating more color towards the center or tips to create a blush effect, leaving some areas more transparent.
Allow this layer to dry or cure.
With fine nail art brushes, use blush pink, white, and possibly slightly opaque red polishes to hand-paint soft floral shapes (like petals) over the sheer red base.
Blend the edges softly for a painterly look.
Finish with a glossy top coat to seal the artwork and enhance the translucent base.
Why This Stands Out
Scarlet Blush Petals stand out for their delicate, artistic execution, resembling a watercolor painting on the nails.
The combination of the sheer scarlet base and the soft, hand-painted florals creates a uniquely romantic and ethereal look.
It’s a departure from bold, graphic designs, offering a softer, more nuanced way to wear red and floral motifs.
This style feels sophisticated, feminine, and showcases a gentle, artistic sensibility.
Glitter Bomb Red Tips
This dazzling design features a heavy concentration of red glitter starting at the tips of the nails, fading out towards the cuticle over a clear or nude base.
It’s like an explosion of sparkle focused at the free edge.
Design Features
The base of the nail is kept neutral with a clear or sheer nude polish, allowing the glitter to be the star.
A dense concentration of red glitter (which can be fine, chunky, or holographic) is applied heavily at the tips.
This glitter then gradually becomes sparser as it moves up towards the nail bed, creating a gradient or fade effect.
The finish is glossy to maximize the sparkle and smooth out the glitter texture.
How To Achieve This Look
Apply the clear or nude base color over a base coat.
While the base is still wet, or using a clear polish/gel, pick up red glitter with a brush or tool and apply it densely onto the nail tip.
Use a dry brush or sponge to gently drag or tap some of the glitter upwards towards the cuticle, creating a fading effect where the glitter becomes less concentrated.
Build the density at the tip as needed.
Encapsulate the glitter thoroughly with one or two layers of glossy top coat to ensure a smooth surface and high shine.
Why This Stands Out
Glitter Bomb Red Tips stand out for their high-impact sparkle concentrated in one area, creating a dramatic yet elegant effect.
The gradient fade prevents the glitter from overwhelming the entire nail, while the neutral base keeps the look relatively clean and sophisticated.
It’s a fun, festive design perfect for parties, holidays, or anytime you want maximum bling with a focused application.
The contrast between the bare base and the explosive glitter tip is visually striking.
Red Smoke Nails
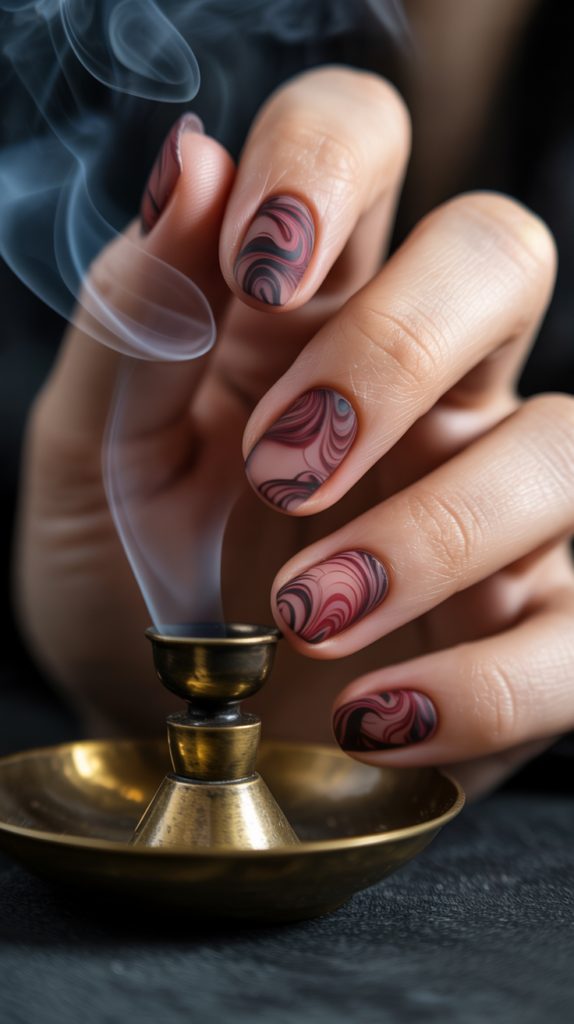
This mysterious and alluring design features ethereal swirls of red smoke seemingly trapped within the nail, often set against a black or nude base.
It creates a moody, captivating effect.
Design Features
The base color is typically black or a contrasting nude shade to make the red smoke effect pop.
Wispy, swirling patterns of red polish are created over the base, mimicking the look of rising smoke.
This effect is often achieved using blooming gel or by manipulating wet polish layers to create soft, blended tendrils of color.
The red smoke appears translucent and layered, adding depth and mystery to the design.
A glossy top coat enhances the depth and smoky illusion.
How To Achieve This Look
Apply the black or nude base color over a base coat and let it dry or cure.
One common technique uses blooming gel: apply a layer of blooming gel (do not cure), then place small drops or lines of red polish onto the wet gel.
The red color will naturally spread and ‘bloom’ outwards, creating soft, smoky edges; manipulate slightly with a fine tool if needed, then cure.
Alternatively, apply a wet layer of top coat over the base, add drops of red polish, and swirl gently with a fine brush before curing.
Finish with a glossy top coat.
Why This Stands Out
Red Smoke Nails stand out for their unique, ethereal aesthetic that is both mysterious and visually intriguing.
The soft, swirling patterns create a sense of movement and depth, unlike static patterns or solid colors.
The contrast between the dark or neutral base and the wispy red smoke is dramatic and captivating.
This design feels edgy, artistic, and sophisticated, perfect for those seeking a less conventional but highly impactful nail look.
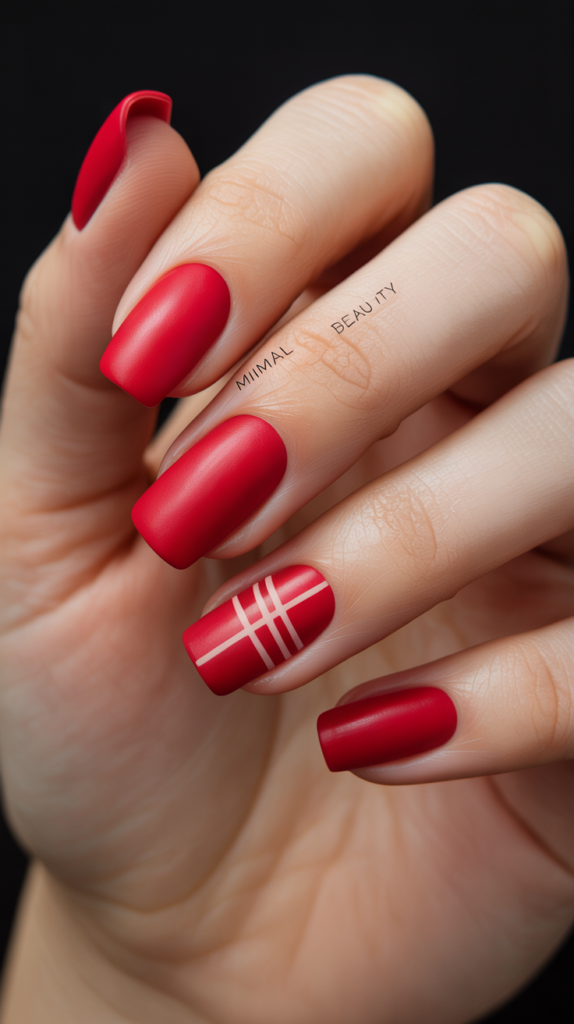
Heartbeat EKG Design

This minimalist yet meaningful design features a simple white electrocardiogram (EKG) line, complete with a heartbeat ‘blip’, running across a solid matte red nail.
It’s modern, clean, and symbolic.
Design Features
The base is a smooth, opaque red polish finished with a matte top coat for a flat, non-reflective surface, which makes the white line stand out sharply.
A thin, crisp white line representing an EKG reading runs horizontally across one or more nails.
This line typically includes the characteristic ‘up-down’ spike symbolizing a heartbeat, often placed strategically, perhaps over the ring finger.
The design is intentionally minimalist, focusing on the clean contrast and symbolic meaning.
How To Achieve This Look
Apply the red base color over a base coat, ensuring smooth, even coverage.
Once dry or cured, apply a matte top coat and allow it to dry or cure completely.
Using a very fine striping brush or nail art pen filled with opaque white polish or acrylic paint, carefully draw the thin EKG line across the nail.
Add the small ‘blip’ or heartbeat spike along the line.
Keep the line crisp and consistent in thickness.
Allow the white line to dry fully; typically, no additional top coat is applied over the matte finish unless necessary to protect the line, in which case a matte top coat can be applied very carefully just over the white line.
Why This Stands Out
Heartbeat EKG Design nails stand out for their clean, modern aesthetic and symbolic resonance, representing life, passion, or love.
The stark contrast between the crisp white line and the deep matte red background is visually striking and sophisticated.
It’s a minimalist design that carries significant meaning, making it both stylish and personal.
This look appeals to those who appreciate subtle yet impactful designs with a contemporary edge.
Red Negative Space
This modern design incorporates bare sections of the natural nail into the overall look, using glossy red polish to create bold shapes and patterns around the unpolished areas.
Design Features
Sections of the natural nail are intentionally left unpolished, creating ‘negative space’ within the design.
Glossy red polish is applied in specific shapes – geometric blocks, stripes, half-moons near the cuticle, or intricate cut-outs – contrasting sharply with the bare nail areas.
Nail art tape or vinyls are often used to achieve crisp, clean lines between the polished red sections and the negative space.
The interplay between the bold red color and the bare nail creates a chic, contemporary aesthetic.
How To Achieve This Look
Apply a clear base coat over the entire nail to protect it and provide a smooth surface.
Use thin striping tape or pre-cut nail vinyls to mask off the areas you want to remain bare (the negative space).
Carefully paint the glossy red polish over the exposed sections of the nail, ensuring clean edges against the tape.
Apply one or two coats for opacity.
While the red polish is still slightly wet (for regular polish) or immediately after curing (for gel), carefully remove the tape or vinyls to reveal the sharp lines and negative space.
Finish with a glossy top coat over the entire nail to seal the design and add shine.
Why This Stands Out
Red Negative Space nails stand out for their modern, minimalist, and slightly edgy appeal.
The use of negative space adds an element of visual interest and sophistication, breaking up the solid block of color.
It allows the natural nail to become part of the design, creating a look that feels light yet impactful.
This technique offers endless creative possibilities for geometric patterns and unique placements, making it highly customizable and fashion-forward.
Poppy Bloom Red Nails
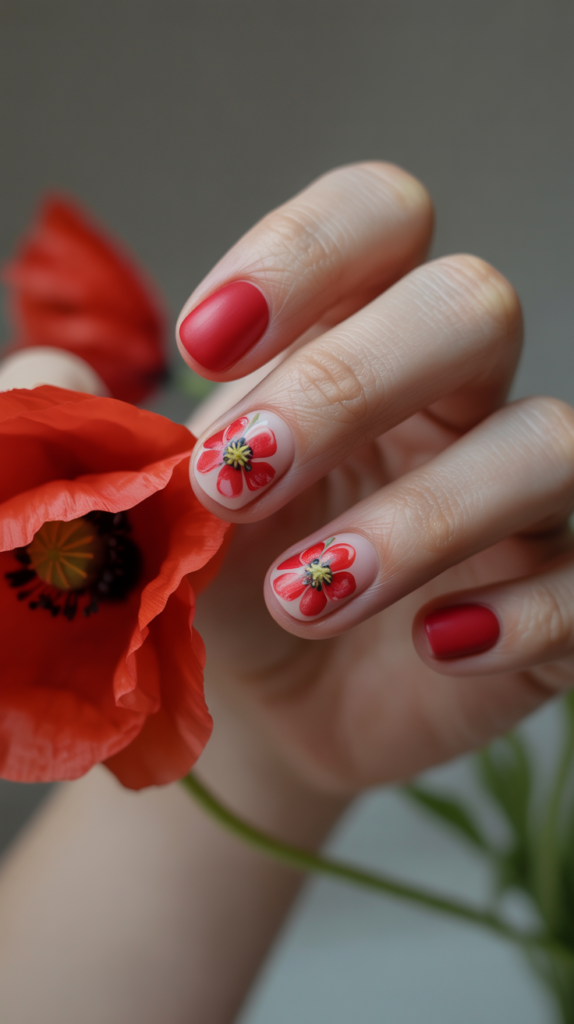
This design brings a touch of springtime charm with hand-painted poppy flowers set against a bright red background.
It’s cheerful, artistic, and nature-inspired.
Design Features
The base color is typically a vibrant poppy red, reflecting the flower itself, often with a glossy finish.
Delicate poppy flowers are hand-painted onto one or more nails.
These poppies usually feature black centers and sometimes subtle green stems or leaves, painted with fine detail using nail art brushes.
The flowers can vary in size and placement, adding an artistic, botanical touch to the bold red base.
How To Achieve This Look
Apply the vibrant poppy red base color over a base coat and let it dry or cure.
Using a fine dotting tool or brush, place a small black dot on the nail for the center of the poppy.
With a fine detail brush and black polish, paint thin lines radiating slightly from the center to suggest stamens.
Use white or a lighter red polish to paint the delicate, often slightly ruffled poppy petals around the black center.
Add small green details for leaves or stems if desired.
Seal the floral artwork with a glossy top coat.
Why This Stands Out
Poppy Bloom Red Nails stand out by combining the boldness of red with the delicate beauty of hand-painted poppies, creating a look that is both vibrant and charming.
The floral motif adds a touch of nature and artistry, softening the intensity of the red base.
It’s a cheerful design perfect for spring and summer, evoking fields of wildflowers.
The hand-painted element showcases skill and adds a personal, artistic touch to the manicure.
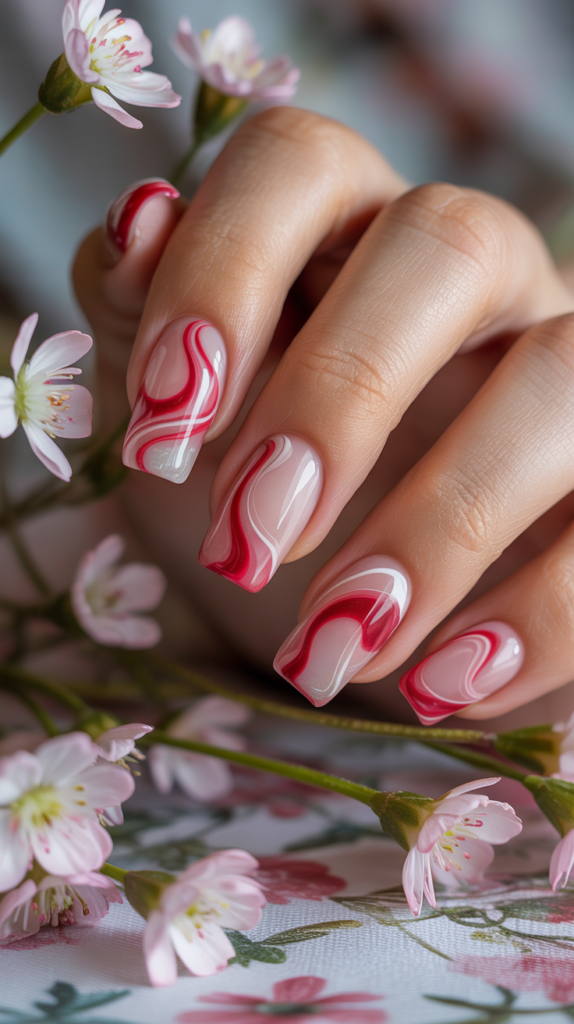
Juicy Red Swirls
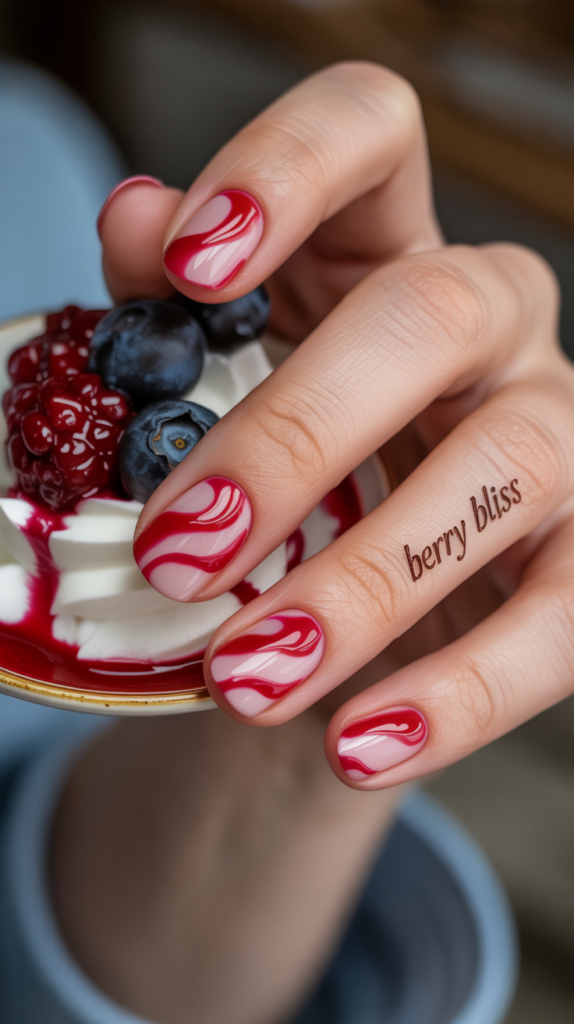
This playful design features glossy, syrup-like swirls of red artfully applied over a clear or nude base.
It mimics the look of drizzled candy or fruit syrup.
Design Features
The base is typically clear or a sheer nude, allowing the red swirls to take center stage and creating a sense of dimension.
Thick, glossy swirls of juicy red polish are applied in abstract, flowing patterns across the nail.
The swirls often have a slightly raised or dimensional quality, enhancing the ‘syrup’ or ‘drizzle’ effect.
The high-gloss finish is crucial to achieving the wet, candy-like appearance.
How To Achieve This Look
Apply the clear or nude base color over a base coat and let it dry or cure.
Using a nail art brush or dotting tool dipped in a vibrant, glossy red polish, create thick, flowing swirl patterns directly onto the base.
Vary the thickness and direction of the swirls for an organic, drizzled look.
Allow the red swirls to dry or cure completely.
Apply a generous layer of high-gloss top coat to enhance the shine and give it that luscious, wet, syrup-like finish.
Why This Stands Out
Juicy Red Swirls stand out for their playful, abstract, and almost edible appearance.
The contrast between the clear base and the bold, glossy red swirls creates a dynamic and eye-catching look.
The syrup-like texture and shine give the design a fun, youthful vibe while still feeling chic due to the abstract nature of the swirls.
It’s a unique way to wear red that feels modern, artistic, and delightfully unconventional.
Red And Rhinestone Luxe
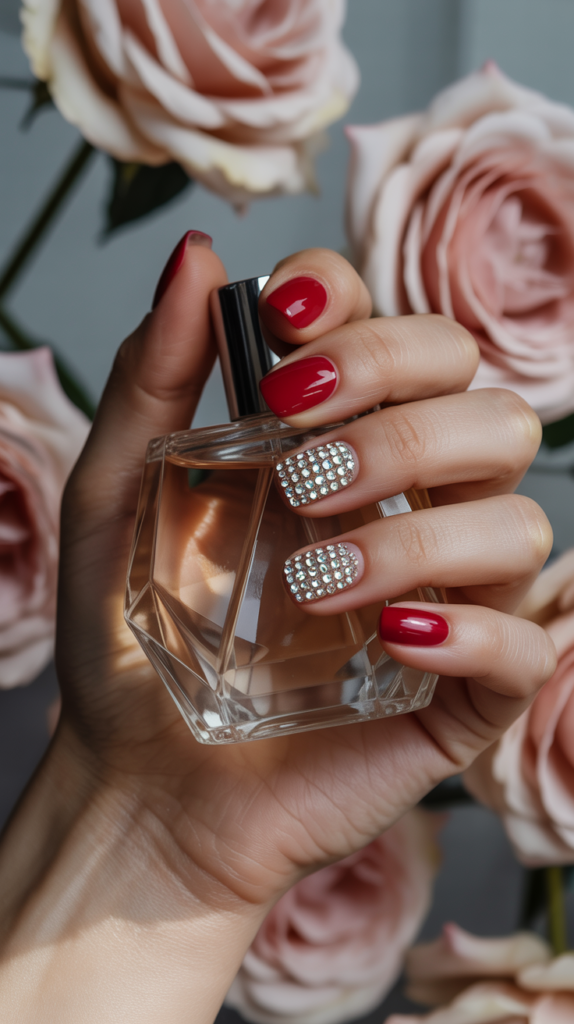
This glamorous design pairs classic glossy red nails with one or more accent nails heavily adorned with sparkling rhinestones.
It balances timeless color with dazzling embellishment.
Design Features
Most nails are painted in a solid, classic glossy red, providing a sophisticated and bold foundation.
One or two accent nails per hand (often the ring finger) become the focal point, lavishly decorated with rhinestones.
These rhinestones can vary in size, shape, and color (though clear or silver are common), arranged in patterns, clusters, or covering the entire accent nail for maximum impact.
The combination creates a luxurious look that balances simplicity with high-octane glamour.
How To Achieve This Look
Paint the designated nails with the glossy red polish over a base coat and let dry or cure.
Apply the red polish (or a clear base) to the accent nail(s).
While the polish is still wet or using nail glue/gem gel, carefully place the rhinestones onto the accent nail using a wax pencil or tweezers.
Arrange them in the desired pattern or density.
Gently press the rhinestones into place and allow the glue/polish to dry or cure thoroughly.
Apply top coat carefully around the rhinestones to help secure them without covering their facets (which dulls the sparkle), or use a specialized gem sealant.
Apply a glossy top coat to the solid red nails.
Why This Stands Out
Red And Rhinestone Luxe nails stand out by offering the best of both worlds: the timeless elegance of red polish and the undeniable glamour of sparkling rhinestones.
The accent nail provides a concentrated dose of luxury and visual excitement, elevating the entire manicure.
It’s a perfect choice for special occasions, celebrations, or anytime you want to feel extra glamorous and make a statement.
The contrast between the smooth red and the faceted sparkle creates a rich and eye-catching texture play.
Scarlet Almond Tips
This design focuses on the inherent elegance of a perfectly shaped almond nail painted in a classic scarlet red.
It’s pure, bold chic with no need for additional embellishment.
Design Features
The primary feature is the elegant almond nail shape, characterized by sides that taper towards a soft, rounded point.
The nails are painted in a single, striking shade of scarlet or true red crème polish.
There is a complete absence of nail art, glitter, or embellishments; the focus is entirely on the flawless color application and the sophisticated nail shape.
The finish is typically a classic high gloss, enhancing the vibrancy of the red.
How To Achieve This Look
Meticulous nail shaping is key; file the nails carefully into the desired almond shape, ensuring symmetry and smooth edges.
Apply a quality base coat.
Follow with two thin, even coats of the chosen scarlet red crème polish, aiming for perfect coverage right up to the cuticle line and along the tapered sides.
Allow each coat to dry completely.
Finish with a high-quality glossy top coat, capping the tips to prevent chipping and maximize shine.
Why This Stands Out
Scarlet Almond Tips stand out through their powerful simplicity and timeless elegance; they prove that sometimes less is more.
The combination of the universally flattering almond shape and the iconic scarlet red creates a look that is inherently sophisticated, confident, and feminine.
It’s a versatile style that works for any occasion, from everyday wear to the most formal events, always looking polished and chic.
The beauty lies in the perfection of the shape and the richness of the unadorned color.
Red Glitter Fade
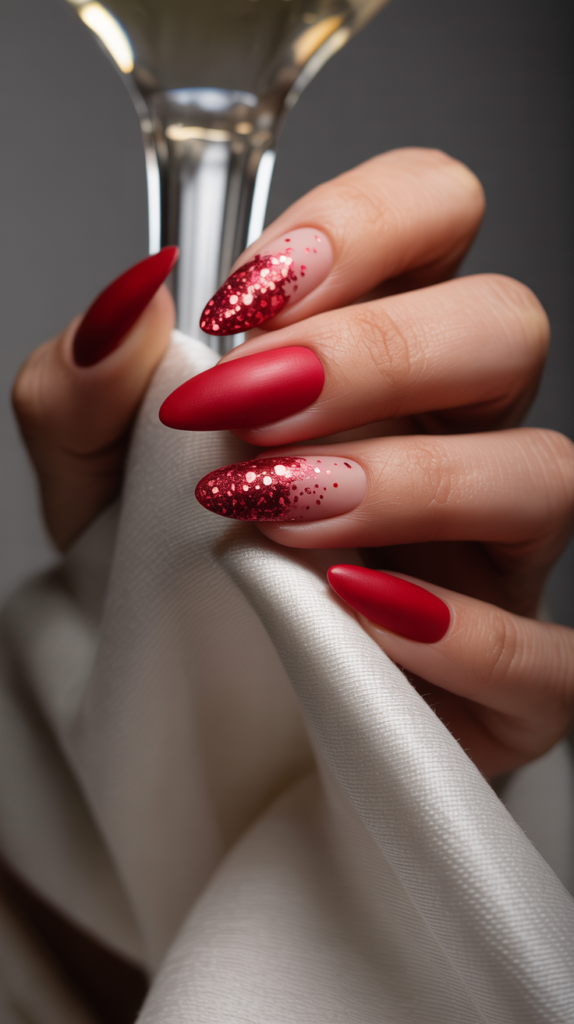
This glamorous look features an ombré effect created with chunky red glitter, typically fading from dense sparkle at the cuticle down towards the tip.
It reverses the usual glitter tip fade for a unique twist.
Design Features
The glitter gradient starts with the heaviest concentration of chunky red glitter near the cuticle area.
This sparkle then gradually becomes sparser as it extends down the nail towards the free edge, often fading into a clear or nude base at the tip.
The use of chunkier glitter pieces adds more texture and bold reflection compared to fine glitter fades.
A glossy top coat is essential to smooth the potentially rough texture of the chunky glitter and enhance its shine.
How To Achieve This Look
Apply a base coat and potentially a sheer nude base color if desired.
Using a clear polish or gel as an adhesive, pick up chunky red glitter with a brush or tool and apply it densely near the cuticle line.
Use a dry fan brush or sponge to gently drag and disperse the glitter downwards, creating the fade effect towards the tip.
Build the density at the cuticle as needed.
Encapsulate the chunky glitter thoroughly with one or two thick layers of glossy top coat to create a smooth surface.
Why This Stands Out
Red Glitter Fade (from cuticle) stands out by reversing the typical glitter gradient placement, drawing attention to the cuticle area for an unexpected and modern look.
The use of chunky glitter adds a bold, textural element and intense sparkle that is highly eye-catching.
It’s a festive and glamorous design, perfect for parties and celebrations, offering a unique twist on standard glitter applications.
The fade effect keeps it from being overwhelming while still delivering maximum impact.
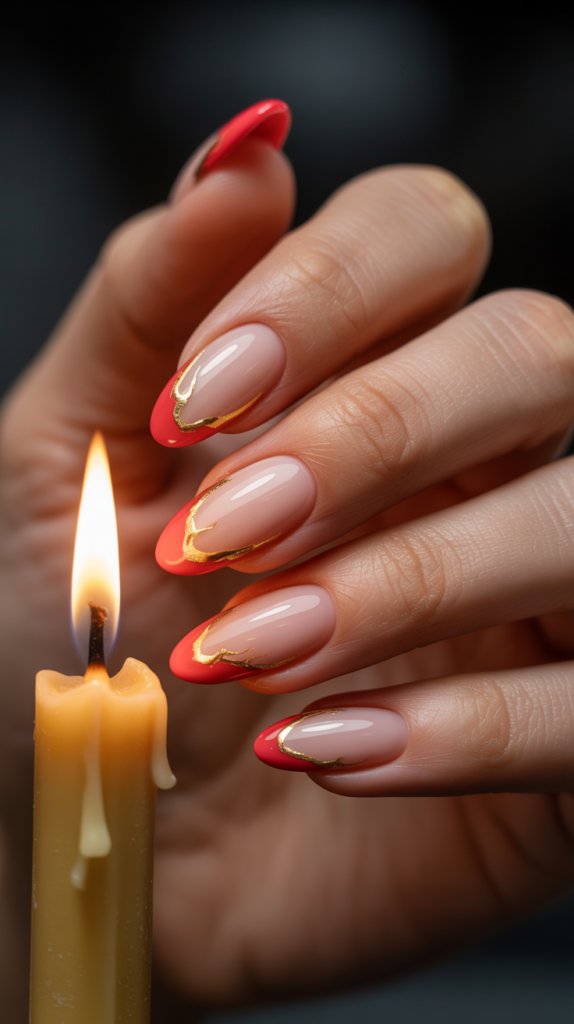
Ruby Flame French Fade
This design combines multiple elements: the French tip structure, the fiery flame shape, and an ombré or fade effect within the tip itself.
It features an angled gradient from nude to ruby red within flame-like tips.
Design Features
This complex look starts with a nude or clear base typical of French styles.
The tips are shaped like dynamic flames, licking up the nail.
Within these flame shapes, there is a gradient effect, smoothly transitioning from the nude base color into a rich ruby red towards the very edge of the flame tip.
The fade often follows the angled lines of the flames, enhancing the fiery illusion.
A glossy finish highlights the gradient and the sharpness of the flame design.
How To Achieve This Look
Apply the nude base color over a base coat.
Use thin nail art tape or freehand paint to create the outline of the flame shapes at the tips.
Create the gradient effect within the flame tip area: apply the nude and ruby red polishes adjacent to each other on a makeup sponge and dab carefully within the flame outline, blending them smoothly.
Clean up edges sharply.
Alternatively, paint the flame tip with the nude color first, then use a fine brush to blend the ruby red upwards from the very tip into the nude part of the flame.
Seal with a glossy top coat.
Why This Stands Out
Ruby Flame French Fade stands out due to its intricate combination of shape, color, and gradient technique, resulting in a highly artistic and dynamic look.
It takes the edgy flame tip concept and elevates it with a sophisticated ombré blend, creating depth and a more realistic fiery effect.
This design is complex, requiring precision, and showcases advanced nail art skills.
It’s a fierce yet elegant statement piece for those who love detailed and unique manicures.
Kiss-Print Red Nails
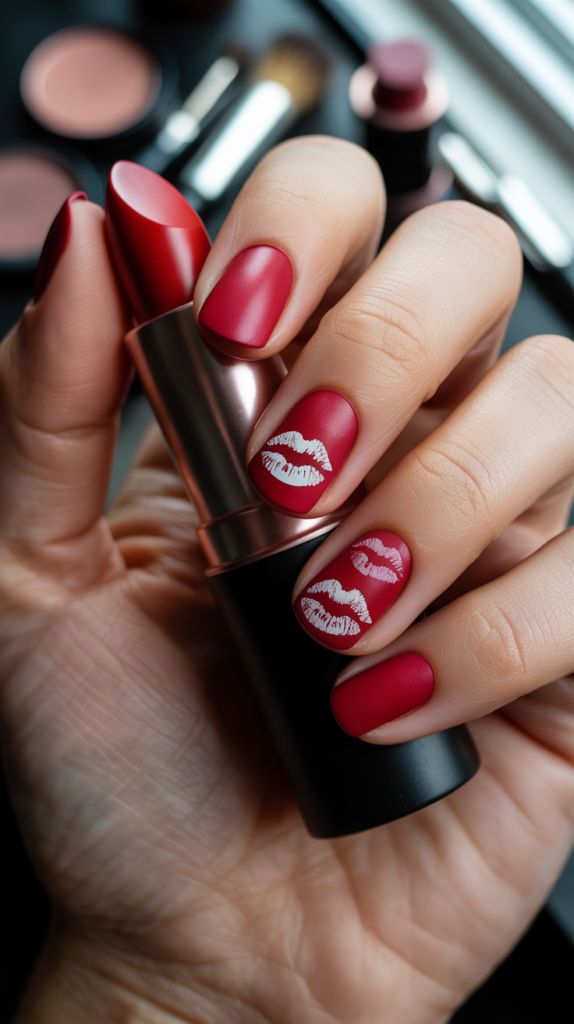
This playful and flirty design features tiny kiss mark stamps in contrasting colors like black or white scattered over a classic red base.
It’s cute, slightly retro, and full of personality.
Design Features
The background is a solid coat of classic red polish, providing a vibrant canvas.
Small, stylized lip prints or ‘kiss marks’ are stamped or hand-painted onto the red base.
These kiss prints are typically done in black or white for high contrast, though pink or metallic shades could also be used.
The placement is usually random and scattered across some or all nails, creating a fun, whimsical pattern.
A glossy finish keeps the look bright and playful.
How To Achieve This Look
Apply the red base color smoothly over a base coat and let it dry or cure completely.
Use a nail stamping plate featuring kiss print designs; apply black or white stamping polish to the plate, scrape excess, pick up the design with a stamper, and transfer it onto the red nail.
Repeat randomly across the nails as desired.
Alternatively, use a fine nail art brush to hand-paint small lip shapes.
Finish with a glossy top coat to seal the prints and add shine.
Why This Stands Out
Kiss-Print Red Nails stand out for their fun, flirty, and slightly cheeky vibe.
The kiss mark motif adds a touch of personality and playful romance to the classic red manicure.
It’s a relatively simple design to achieve (especially with stamping) but creates a significant visual impact.
This style is perfect for Valentine’s Day, date nights, or anytime you want to add a cute and conversation-starting element to your nails.
Metallic Red Snake Skin
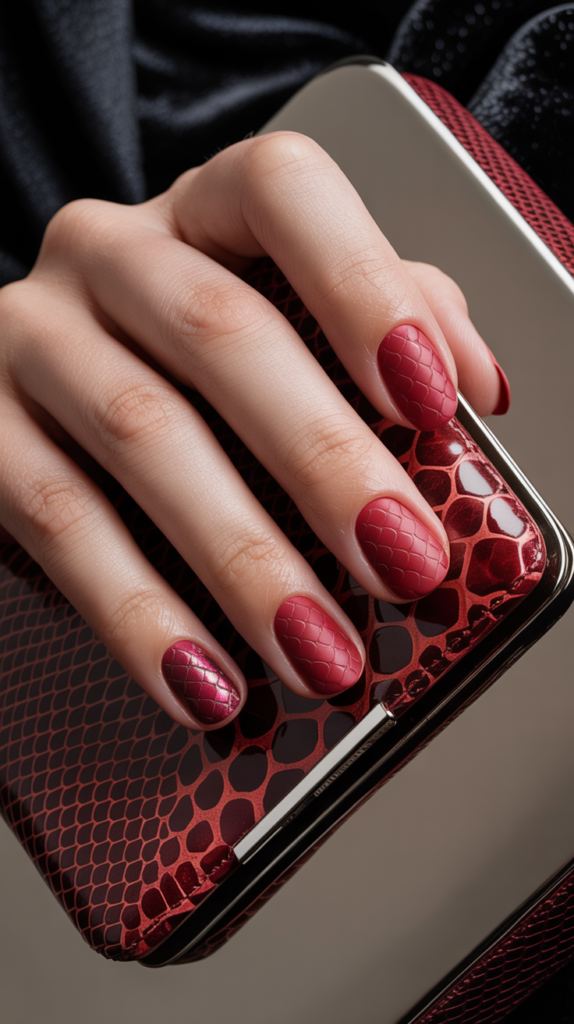
This design uses textured chrome or metallic polish techniques to mimic the look of reptile scales in a deep red hue.
It’s edgy, luxurious, and texturally interesting.
Design Features
The key feature is the textured effect that replicates the scales of a snake or reptile, applied over the entire nail.
This is often achieved using special effect polishes, magnets, or techniques involving blooming gel or mesh netting over metallic or chrome polish.
The color is typically a deep, metallic red or a red chrome, enhancing the sleek and slightly dangerous allure of snake skin.
The finish might be glossy or have a slight texture depending on the technique used.
How To Achieve This Look
One method involves applying a metallic red or red chrome base.
While a layer is still wet, gently press a piece of fine mesh netting (like from a loofah or fruit bag) onto the nail, then lift it off carefully to leave a scale-like pattern; allow to dry/cure.
Another technique uses blooming gel: apply blooming gel over the red base, then use a dotting tool to place dots of a darker red or black, allowing them to bloom into scale shapes before curing.
Magnetic polishes designed for snake skin effects can also be used following their specific instructions.
Seal with a top coat, which might be glossy or satin depending on the desired finish.
Why This Stands Out
Metallic Red Snake Skin nails stand out for their unique, textured appearance that adds an element of exotic luxury and edge.
The combination of the metallic red sheen and the reptile scale pattern creates a look that is both visually and tactilely intriguing.
It’s a bold, fashion-forward choice that deviates significantly from standard finishes.
This design appeals to those who love animal prints but want something more textural and unconventional than leopard or zebra.
Conclusion
As we have explored, the world of red nail designs is incredibly vast and versatile, extending far beyond a simple coat of classic crimson.
From the understated elegance of satin finishes and the modern edge of chrome tips to the playful charm of strawberry drips and the intricate artistry of embossed roses, there is truly a red nail look to suit every mood, style, and occasion.
Red remains a powerhouse color in nail fashion, capable of conveying confidence, romance, sophistication, or fierceness depending on how it’s applied and embellished.
We hope this extensive guide has sparked your imagination and inspired you to experiment with different shades, textures, and artistic details.
Embrace the power and endless possibilities of red, and find the perfect design that makes your nails—and you—feel absolutely stunning and uniquely expressive.