
Nail art is more than just polish—it’s a dynamic way to showcase your personality and adapt to the rhythms of the year.
Every month delivers a new wave of inspiration, from crisp winter tones to vibrant summer shades, turning your nails into a storytelling canvas.
Whether you’re drawn to intricate designs or prefer a minimalist vibe, this guide offers twelve months of creative ideas tailored to seasons, holidays, and trends.
Dive into a year-long journey of nail artistry that blends technique, color theory, and a touch of seasonal magic to keep your manicure fresh and captivating.
January: Icy Winter Wonderland Nail Designs
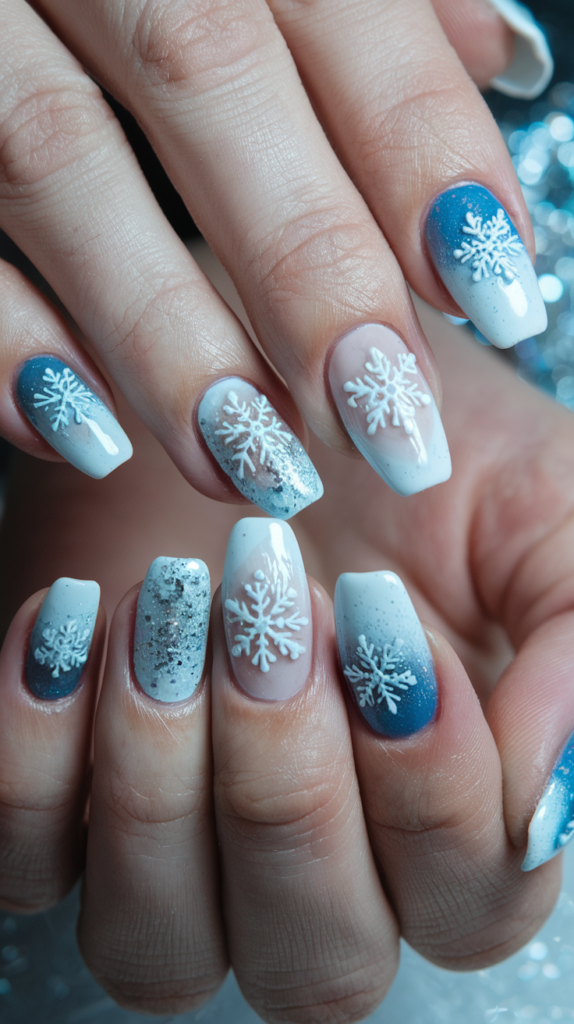
January’s Icy Winter Wonderland Nail Designs transform your nails into a frosty masterpiece, blending pale blues, silvers, and whites to mirror a snow-dusted landscape. This look captures the serene stillness of winter with a chic, shimmering elegance that’s perfect for post-holiday vibes or cozy nights in.
Creating the Icy Gradient Nail Look
Step 1: Prep and Apply Base Color
Start with a nourishing base coat to protect your nails, then layer on a frosty blue polish inspired by frozen lakes. Ensure two even coats for opacity, letting each dry to create a smooth, icy foundation.
Step 2: Blend the Gradient
Use a makeup sponge to dab white polish from the tips, fading it into the blue base for a soft, snow-like transition. For precision, lightly dampen the sponge and blend in small, circular motions until the gradient looks seamless.
Step 3: Add Shimmer and Texture
Brush on a sheer silver glitter polish over the gradient to mimic glistening ice crystals. Optionally, sprinkle loose glitter powder on wet polish for extra sparkle, tapping off excess for a refined finish.
Step 4: Detail with Snowflakes
With a fine nail art brush or dotting tool, paint intricate snowflakes in white or silver on one or two accent nails. Add tiny rhinestones at the centers for a 3D effect that catches the light like fresh snow.
Step 5: Seal with Top Coat
Finish with a high-shine top coat to lock in the design and give your nails a glass-like sheen reminiscent of ice under sunlight. For longevity, apply a second layer after a day to withstand winter’s chill.
Why It Works
This design channels January’s crisp, quiet beauty with a palette that evokes snow-covered hills and frozen streams, appealing to both minimalists and maximalists. The gradient, shimmer, and detailed snowflakes create a multidimensional look that’s sophisticated yet playful, offering a stylish nod to winter’s enchanting allure.
February: Romantic Valentine’s Day Nail Ideas
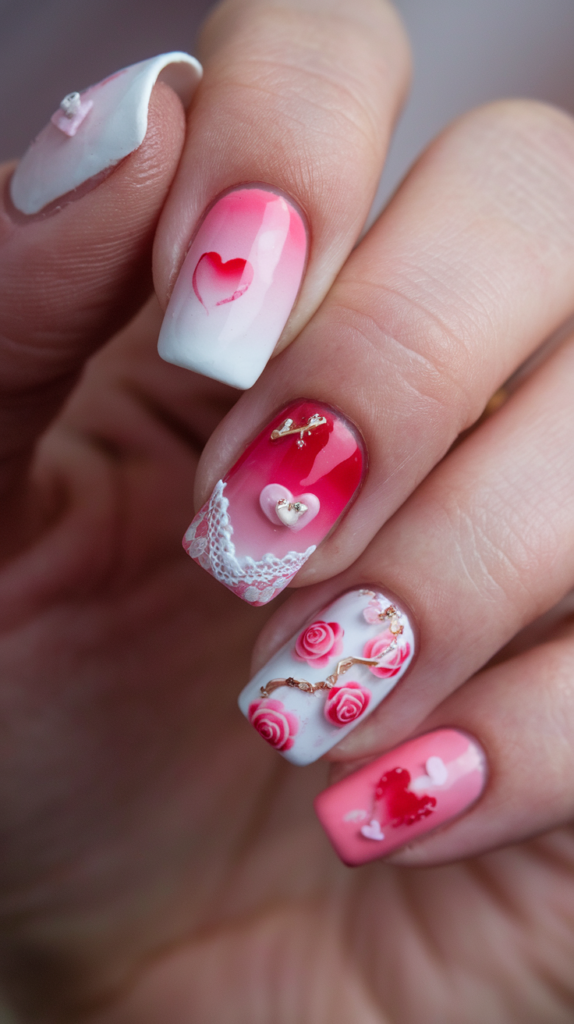
February’s Romantic Valentine’s Day Nail Ideas envelop your nails in a love-inspired palette of soft pinks, bold reds, and crisp whites, perfect for date nights or self-love celebrations. With heart motifs and floral accents, this design radiates warmth and elegance, capturing the month’s tender, passionate spirit.
Creating the Romantic Nail Look
Step 1: Prep and Choose Base
Begin with a strengthening base coat, then apply a creamy soft pink polish across all nails for a delicate, rosy glow. Double up on coats for rich color, letting each layer dry to avoid streaks.
Step 2: Craft Heart Details
Use a fine brush or nail stencil to paint small, vivid red hearts on accent nails, experimenting with sizes for a dynamic, hand-drawn charm. For precision, dip the brush in acetone to clean up edges if needed.
Step 3: Incorporate Floral Elements
With white polish and a detail brush, sketch tiny roses or petals on one nail, adding green stems for contrast and depth. Layer shades like blush pink in the centers to mimic real blooms.
Step 4: Enhance with Glitter
Dab a gradient of red or pink glitter from the tips inward using a sponge, creating a sparkling fade that echoes a lover’s blush. Alternatively, dust glitter over wet polish on accent nails for a bold, festive pop.
Step 5: Finish with Top Coat
Seal the design with a glossy top coat to protect the intricate details and boost the romantic shimmer. Add a matte top coat option on non-glitter nails for a modern texture contrast.
Why It Works
The interplay of soft pinks, fiery reds, and pure whites mirrors February’s emotional spectrum, from sweet affection to deep passion, making it universally flattering. Hearts and florals paired with glitter evoke a timeless romance, blending whimsy with sophistication for a standout Valentine’s Day look.
March: Spring Bloom Nail Art for a Fresh Look
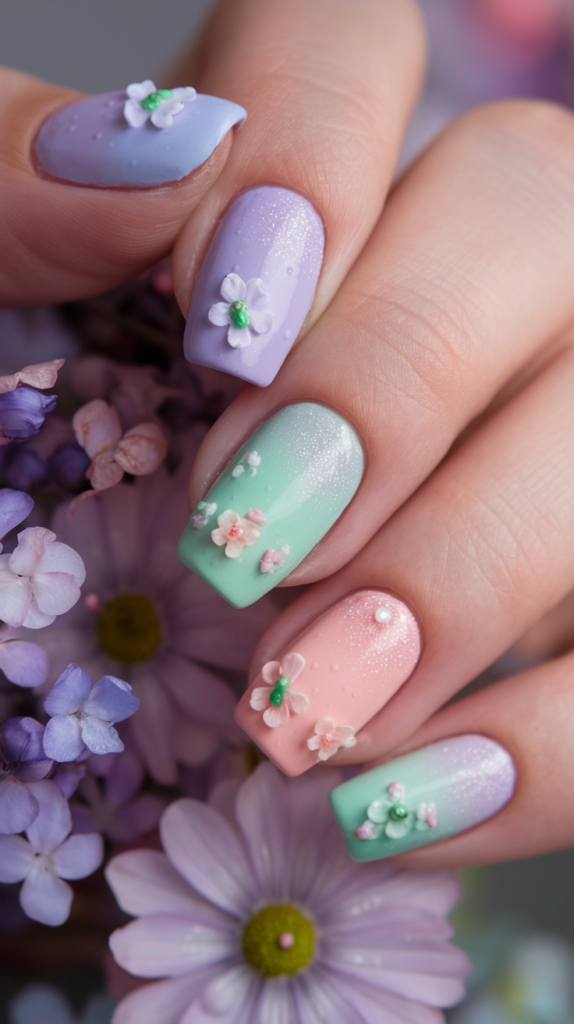
March’s Spring Bloom Nail Art ushers in renewal with a lush blend of pastel shades like lavender and mint, accented by delicate floral designs. This refreshing look embodies the season’s awakening, offering a soft yet vibrant style for outdoor brunches or early spring getaways.
Creating the Pastel Gradient Nail Look
Step 1: Prep and Select Pastels
Apply a hydrating base coat, then choose pastel hues like lavender, mint, and baby pink, starting with lavender as the base across all nails. Use two coats for a solid, even tone, drying thoroughly between layers.
Step 2: Blend the Gradient
With a makeup sponge, dab mint near the base, fading it upward into lavender, then add baby pink at the tips for a tri-color ombre effect. Blend gently with a clean sponge edge to soften lines and enhance the gradient’s flow.
Step 3: Add Floral Accents
Use a dotting tool or fine brush to paint white cherry blossoms or daisies on accent nails, layering pink centers for realism. Add green leaves with a striping brush to frame the flowers and tie in the spring theme.
Step 4: Enhance with Subtle Shine
Brush a sheer glitter polish over the gradient for a dewy, petal-like shimmer, or dot tiny pearls near the flowers for a touch of elegance. Keep it light to maintain the pastel softness.
Step 5: Seal with Top Coat
Finish with a glossy top coat to lock in the design and add a fresh, polished gleam that lasts through spring showers. For variety, try a satin finish on some nails to mimic morning dew.
Why It Works
The gentle pastel gradient reflects March’s budding landscapes, offering a versatile base that suits both casual and dressy occasions with its airy sophistication. Florals and subtle shine elevate the design into a wearable piece of springtime art, celebrating renewal with every glance.
April: Easter Egg Delight Nail Designs
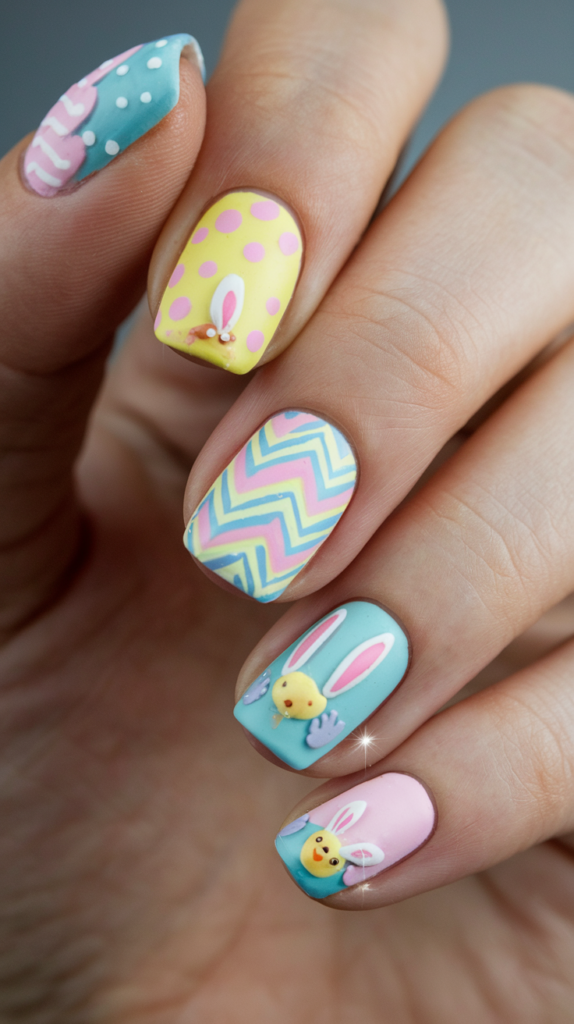
April’s Easter Egg Delight Nail Designs burst with cheerful pastels like lilac, yellow, and mint, adorned with whimsical patterns for a festive holiday vibe. This playful yet polished look is ideal for Easter egg hunts, family gatherings, or simply embracing spring’s joyful energy.
Creating the Easter Ombre Nail Look
Step 1: Prep and Apply Base
Start with a protective base coat, then layer on a lilac polish as the foundation, inspired by pastel Easter baskets. Apply two coats for vibrant coverage, letting each dry to prevent smudging.
Step 2: Blend the Ombre
Use a sponge to dab pale yellow from the cuticle upward, fading into lilac, then add mint at the tips for a multi-hued gradient. Blend with light taps to smooth transitions, mimicking the soft hues of dyed eggs.
Step 3: Add Playful Patterns
With a dotting tool, create white polka dots across one nail and paint bunny ears or mini eggs on another using pastel shades like pink or blue. For detail, outline shapes with a fine brush dipped in contrasting colors.
Step 4: Boost with Accents
Glue tiny 3D egg decals or rhinestones on an accent nail for a tactile, festive touch, or sprinkle fine glitter for a sugared-egg effect. Keep accents minimal to balance the playful design.
Step 5: Seal with Top Coat
Finish with a glossy top coat to enhance the colors and protect the intricate details from wear. Add a second layer after a day for extra durability during holiday fun.
Why It Works
The ombre pastels channel April’s Easter egg tradition, blending seamlessly for a cohesive, eye-catching base that’s both trendy and nostalgic. Playful patterns and subtle accents infuse the design with holiday spirit, making it a delightful mix of whimsy and springtime sophistication.
May: Floral Frenzy Nail Art Designs
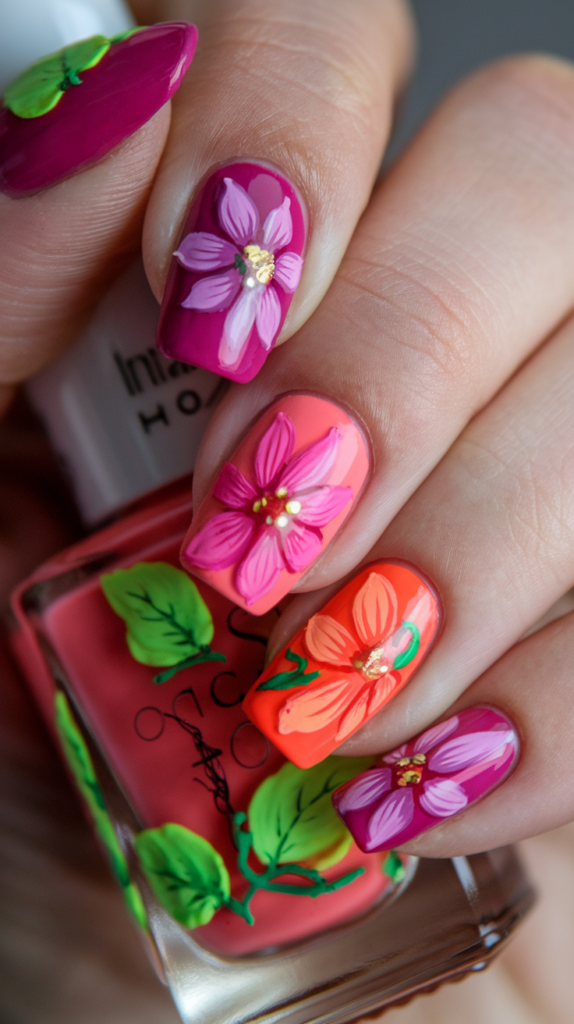
May’s Floral Frenzy Nail Art Designs explode with bold fuchsia, orange, and green tones, showcasing intricate floral patterns that celebrate spring’s vibrant peak. This lively, nature-inspired look is perfect for garden parties, outdoor adventures, or adding a burst of color to your everyday style.
Creating the Floral Frenzy Nail Look
Step 1: Prep and Apply Base
Begin with a strengthening base coat, then apply a vivid fuchsia polish across all nails for a striking, flower-inspired canvas. Use two coats for full opacity, drying each to ensure a smooth, bold surface.
Step 2: Craft Floral Details
With a fine brush, paint large sunflowers or roses in yellow and white on two accent nails, adding shading with orange for depth. Use a steady hand or nail stencils to keep petals crisp and lifelike.
Step 3: Add Leaf Accents
Paint lush green leaves and curling vines around the flowers with a striping brush, varying sizes for a natural, overgrown effect. Layer lighter green highlights to mimic sunlight filtering through foliage.
Step 4: Enhance with Metallics
Outline flower centers or leaf veins with gold polish using a detail brush, adding a luxurious shimmer that pops against the vibrant base. For extra flair, dot gold studs or glitter flecks sparingly across the design.
Step 5: Seal with Top Coat
Finish with a high-gloss top coat to protect the detailed artwork and amplify the colors’ intensity. Consider a UV top coat for a durable, chip-resistant finish that lasts through May’s festivities.
Why It Works
The bold, saturated hues reflect May’s thriving flora, offering a confident base that stands out in any setting, from casual to chic. Intricate flowers and metallic touches create a rich, layered design that blends natural beauty with a touch of opulence, perfect for spring’s exuberant finale.
June: Summer Sunset Nail Art Inspiration
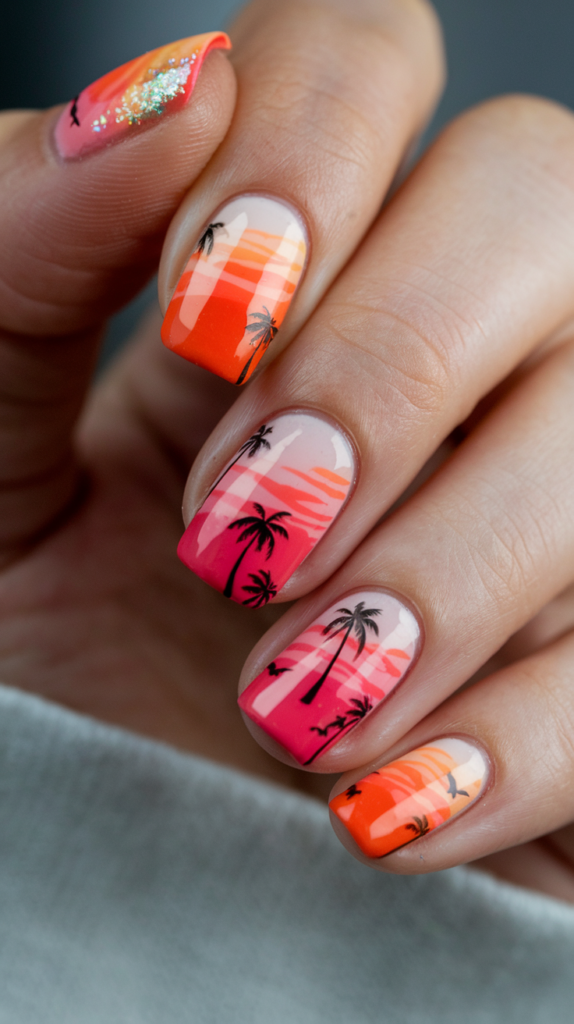
June’s Summer Sunset Nail Art Inspiration paints your nails with a warm gradient of coral, orange, and pink, capturing the tranquil beauty of a beachside dusk. Enhanced with tropical silhouettes, this design brings a vacation-ready glow to summer picnics, bonfires, or lazy days by the pool.
Creating the Sunset Gradient Nail Look
Step 1: Prep and Apply Base
Start with a lightweight base coat, then layer on a coral polish as the foundation, evoking the sun’s first dip below the horizon. Apply two coats for a rich, even tone, drying fully between applications.
Step 2: Blend the Gradient
With a sponge, dab orange polish at the tips, blending it into the coral base, then add pink midway for a smooth, sunset-inspired fade. Use a clean sponge section to refine the blend, ensuring a natural, sky-like transition.
Step 3: Add Tropical Details
Paint black palm tree silhouettes or flying birds on accent nails with a fine brush, positioning them near the tips to mimic a distant shoreline. For depth, layer a subtle purple hue at the base to suggest twilight’s onset.
Step 4: Sprinkle Glitter
Brush fine gold glitter along the tips or over the gradient to replicate sunlight dancing on waves, using a fan brush for a soft, scattered effect. Optionally, mix in iridescent glitter for a multidimensional shimmer.
Step 5: Seal with Top Coat
Finish with a glossy top coat to lock in the vibrant hues and add a wet, reflective finish that enhances the summery glow. Reapply after a few days to keep the design pristine through June’s heat.
Why It Works
The warm gradient mirrors June’s long, golden evenings, offering a versatile look that transitions effortlessly from day to night with its soothing yet striking palette. Tropical accents and glitter elevate it into a mini-vacation on your nails, blending relaxation with a bold, sun-kissed energy.
July: Patriotic Sparkle (Independence Day) Nail Art
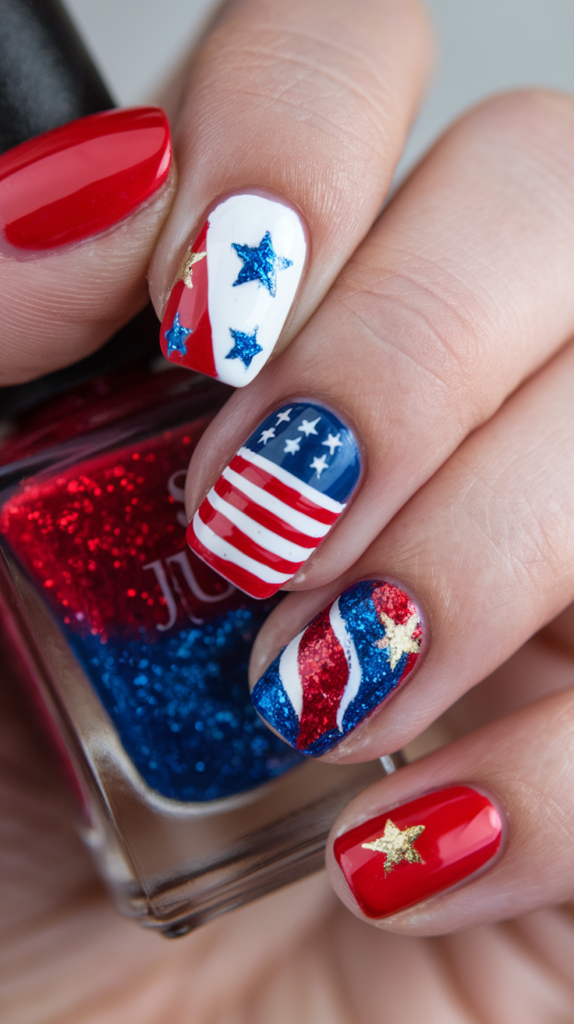
July’s Patriotic Sparkle Nail Art celebrates Independence Day with a dazzling mix of red, white, and blue, accented by stars, stripes, and shimmering glitter. This bold, festive design is perfect for Fourth of July barbecues, fireworks displays, or showcasing national pride all month long.
Creating the Patriotic Nail Look
Step 1: Prep and Apply Colors
Begin with a durable base coat, then paint nails in alternating red, white, and blue shades, inspired by the American flag. Use two coats per color for bold, even coverage, drying each layer completely.
Step 2: Craft Stars and Stripes
With a fine brush, paint white stars on blue nails and red stripes on white nails, using tape or stencils for clean lines if desired. Add a tiny silver star decal on one nail for a standout patriotic touch.
Step 3: Incorporate Glitter
Dab silver glitter polish on the tips of red and white nails, blending inward with a sponge for a firework-like sparkle. For variety, apply a blue glitter overlay on one nail to tie in the full color scheme.
Step 4: Add Chrome Accents
Use a chrome powder in silver or blue on an accent nail, buffing it to a mirror finish for a modern, festive flair. Seal the chrome with a no-wipe top coat to maintain its reflective shine.
Step 5: Finish with Top Coat
Seal the entire design with a glossy top coat to enhance the vibrancy and protect against chips during holiday celebrations. Double up on the top coat for extra resilience under July’s sun.
Why It Works
The iconic red, white, and blue palette instantly evokes July’s patriotic fervor, resonating with both tradition and modern flair through its detailed motifs and shimmering finishes. Stars, stripes, and glitter transform this design into a wearable celebration, offering a bold, joyful statement that shines as bright as fireworks.
August: Tropical Vibes Nail Designs
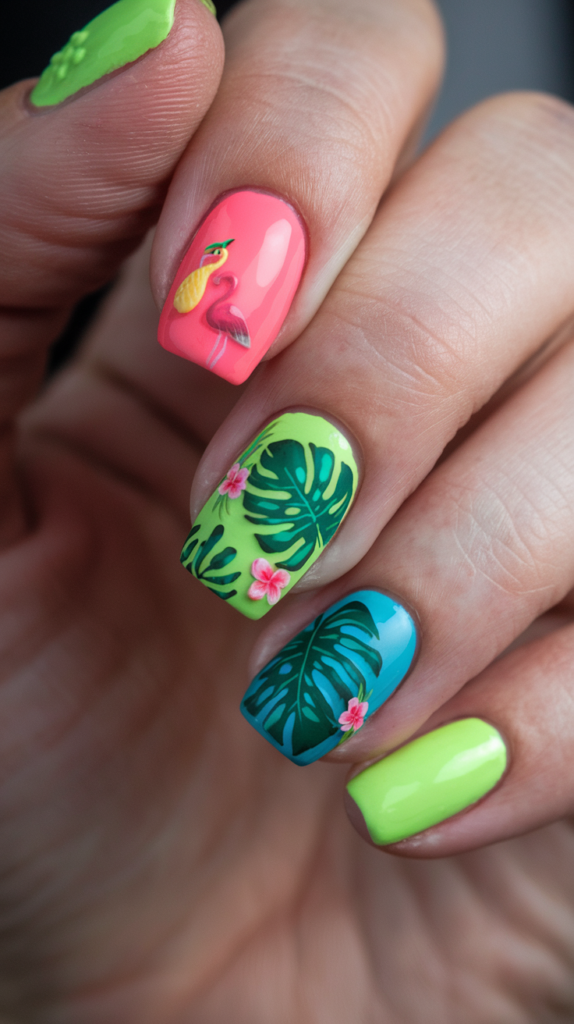
August’s Tropical Vibes Nail Designs transport you to a sun-soaked paradise with neon shades like lime green and coral, paired with lush leaf patterns and vibrant hibiscus blooms. This energetic design is ideal for beach trips, summer festivals, or infusing your routine with a burst of tropical flair.
Creating the Tropical Nail Look
Step 1: Prep and Apply Base
Start with a hydrating base coat, then layer on a neon green polish for a bold, jungle-inspired foundation. Apply two coats for maximum vibrancy, letting each dry to avoid patchiness.
Step 2: Paint Leaf Patterns
Use a striping brush to craft green palm or monstera leaves on accent nails, adding darker green shading for a lush, realistic effect. Experiment with leaf sizes and angles to mimic a tropical canopy.
Step 3: Add Hibiscus Accents
Paint large hibiscus flowers in neon pink or orange with a fine brush, layering yellow centers and white highlights for depth and pop. Position them near leaves to create a cohesive, island-inspired scene.
Step 4: Enhance with Gradient
Sponge a coral-to-green gradient on one nail for a sunset backdrop, blending with light strokes to complement the tropical motifs. Add a touch of turquoise at the base for an ocean-like twist.
Step 5: Seal with Top Coat
Finish with a glossy top coat to amplify the neon glow and protect the detailed artwork from fading. For extra durability, use a quick-dry formula to keep your design intact through August’s heat.
Why It Works
The neon palette captures August’s peak summer intensity, offering a striking base that makes the detailed leaves and hibiscus pop with vivid, eye-catching energy. This design blends bold color with natural elements, creating a wearable escape that’s both playful and polished, perfect for the season’s final flourish.
September: Back-To-School Chic Nail Art
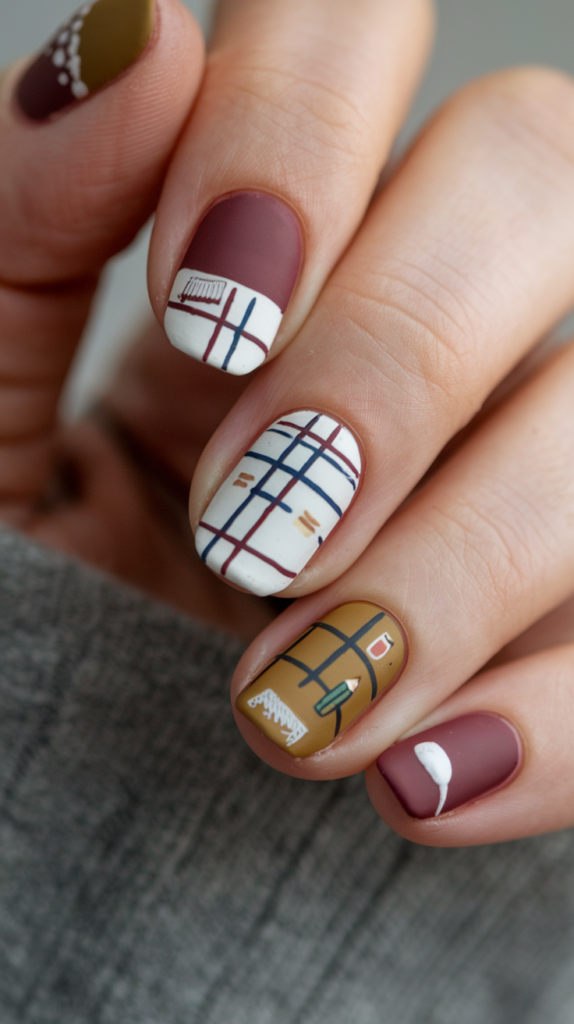
September’s Back-To-School Chic Nail Art shifts to a refined palette of muted tones like navy, burgundy, and mustard, paired with sleek geometric and plaid patterns. This sophisticated design suits the return to routine, perfect for classrooms, offices, or crisp autumn days.
Creating the Chic Nail Look
Step 1: Prep and Apply Base
Begin with a smoothing base coat, then apply a deep navy polish across all nails for a rich, understated elegance. Use two coats for a velvety finish, drying each layer to perfection.
Step 2: Add Geometric Shapes
With a fine brush, paint mustard triangles or thin lines on accent nails, using striping tape for crisp edges if preferred. Layer a second shape in burgundy for a subtle, scholarly contrast.
Step 3: Incorporate Plaid
Craft a plaid pattern on one nail with burgundy and mustard lines over a white base, crossing them precisely to mimic classic school uniforms. Add a gold thread detail with a striping brush for a touch of refinement.
Step 4: Enhance with Negative Space
Leave a small section of bare nail within a shape or line for a modern negative space effect, polishing around it with precision. Buff the exposed nail for a clean, glossy look that ties into the chic aesthetic.
Step 5: Finish with Top Coat
Seal with a matte top coat for a soft, sophisticated finish, or opt for glossy on accent nails to highlight details. Reapply after a few days to maintain the design’s polished edge.
Why It Works
The muted tones reflect September’s shift to cooler, structured days, offering a versatile, professional vibe that transitions effortlessly from summer to fall. Geometric and plaid elements add a tailored, academic charm, blending minimalism with a hint of nostalgia for a standout back-to-school look.
October: Halloween Spook Nail Art Designs
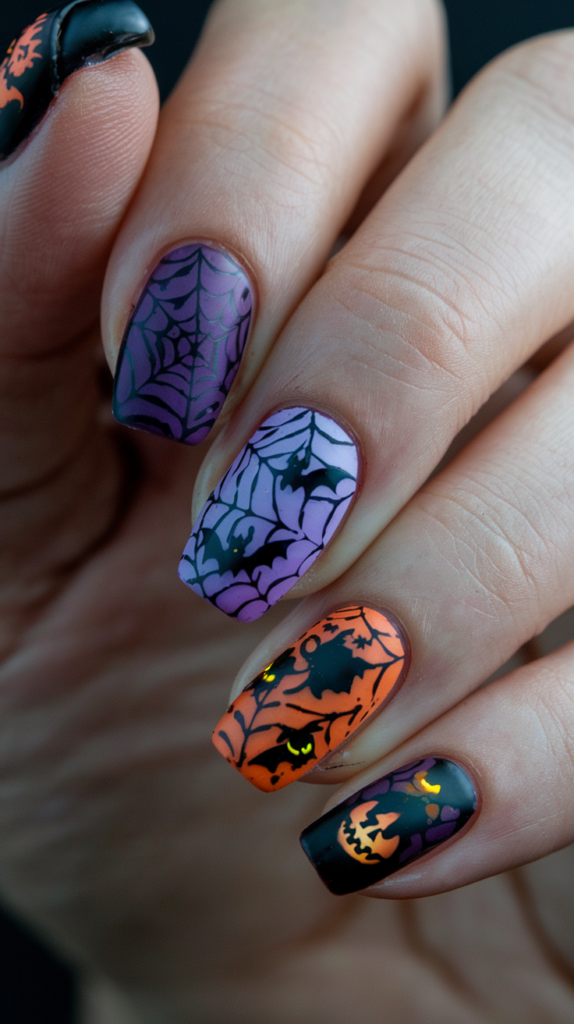
October’s Halloween Spook Nail Art Designs embrace the eerie with deep blacks, purples, and oranges, adorned with haunting motifs like spider webs and pumpkins. This thrilling design is perfect for costume parties, trick-or-treating, or adding a spooky edge to your autumn style.
Creating the Spooky Nail Look
Step 1: Prep and Apply Base
Start with a strengthening base coat, then layer on a jet-black polish for a moody, mysterious foundation. Apply two coats for a solid, opaque finish, drying each thoroughly.
Step 2: Add Halloween Motifs
Paint orange pumpkins on one nail and white spider webs on another with a fine brush, using stencils for precision if needed. Add tiny bat silhouettes in black or purple for a creepy, flying effect.
Step 3: Incorporate Glow-in-the-Dark
Brush glow-in-the-dark polish over the webs or pumpkins, charging it under light for a bold, nocturnal glow. Layer it thinly to maintain detail while maximizing the eerie effect.
Step 4: Enhance with Texture
Dot a matte black texture polish on one nail for a cobweb-like feel, or add orange glitter to the pumpkins for a glowing jack-o’-lantern vibe. Keep it subtle to balance the spooky aesthetic.
Step 5: Seal with Top Coat
Finish with a glossy top coat to protect the design and add a wet, ghostly shine that lasts through Halloween night. For extra flair, use a glow-enhancing top coat to amplify the luminescent details.
Why It Works
The dark, rich palette sets a haunting tone perfect for October’s spooky season, appealing to thrill-seekers and Halloween enthusiasts with its bold, atmospheric depth. Glow-in-the-dark motifs and textured accents make it a standout, blending creepy charm with playful interactivity for a truly memorable look.
November: Autumn Harvest Nail Ideas
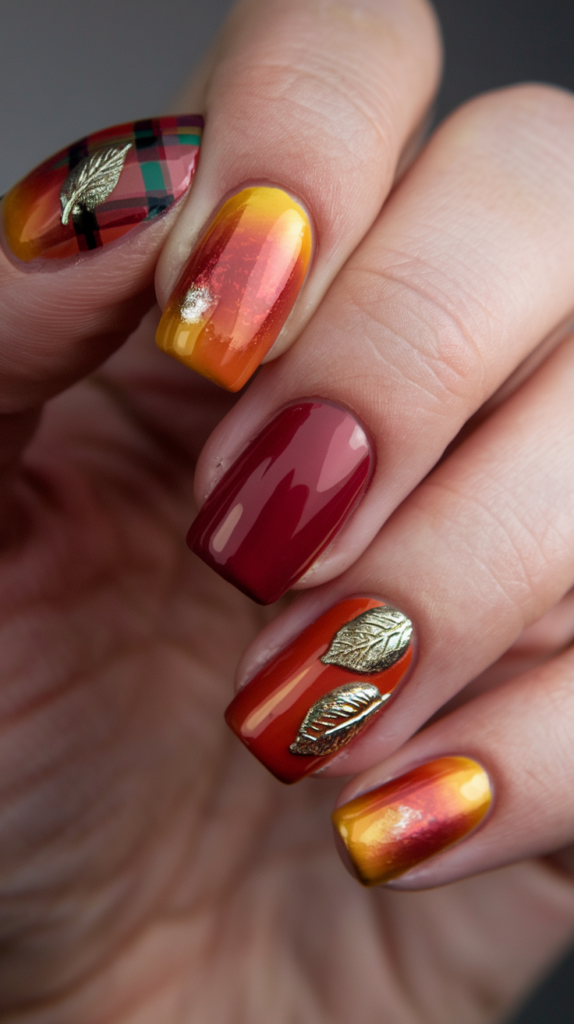
November’s Autumn Harvest Nail Ideas wrap your nails in warm hues of burnt orange, deep red, and golden yellow, accented by rustic leaf prints and subtle metallics. This cozy, seasonal design is perfect for Thanksgiving feasts, fall walks, or embracing the crisp air with earthy elegance.
Creating the Autumn Nail Look
Step 1: Prep and Apply Base
Begin with a nourishing base coat, then apply a burnt orange polish across all nails for a rich, harvest-inspired tone. Use two coats for depth, drying each to lock in the autumnal warmth.
Step 2: Add Leaf Prints
Paint golden yellow or deep red leaves on accent nails with a fine brush, layering brown veins for a realistic, falling-leaf effect. Use a stamping plate for uniform shapes if freehand feels tricky.
Step 3: Incorporate Plaid
Craft a plaid pattern on one nail with red and yellow lines over an orange base, adding a rustic, flannel-like texture. Outline with a thin brown stripe for a cozy, detailed finish.
Step 4: Enhance with Metallics
Brush gold polish along leaf edges or as glitter flecks across the tips, mimicking the glow of a harvest moon. Add bronze studs near the cuticle for a subtle, elegant accent.
Step 5: Seal with Top Coat
Finish with a glossy top coat to highlight the warm tones and protect the design through November’s chill. For a matte twist, apply it over non-glitter nails to contrast the metallic shine.
Why It Works
The earthy palette evokes November’s falling leaves and harvest bounty, offering a grounding, versatile look that pairs beautifully with fall wardrobes. Leaf prints and metallics add a rich, textured warmth, making this design a cozy yet chic celebration of autumn’s final embrace.
December: Festive Christmas Nail Art Designs

December’s Festive Christmas Nail Art Designs deck your nails in holiday splendor with a vibrant mix of red, green, and gold, featuring cheerful motifs like snowflakes and candy canes. This joyful, shimmering look is perfect for Christmas parties, gift exchanges, or spreading seasonal cheer wherever you go.
Creating the Festive Nail Look
Step 1: Prep and Apply Colors
Start with a protective base coat, then paint nails in alternating red and green shades, channeling Christmas wreaths and ribbons. Apply two coats per color for a bold, festive foundation, drying each fully.
Step 2: Add Holiday Motifs
With a fine brush, paint white snowflakes on green nails and gold candy canes on red ones, using stencils for precision if desired. Add tiny gift box designs with red bows on an accent nail for extra cheer.
Step 3: Incorporate Glitter
Brush gold glitter polish across the tips or as a full overlay on one nail, blending with a sponge for a soft, snowy sparkle. Mix in silver glitter on another nail to mimic twinkling lights.
Step 4: Enhance with Metallics
Outline motifs with gold or silver polish using a detail brush, adding a luxurious sheen that elevates the holiday vibe. Dot tiny gold studs near the cuticle for a gift-like embellishment.
Step 5: Seal with Top Coat
Finish with a high-gloss top coat to protect the design and amplify the festive glow, ensuring it lasts through December’s celebrations. For extra dazzle, use a quick-dry formula to keep the shine pristine.
Why It Works
The classic Christmas trio of red, green, and gold wraps December in nostalgic warmth, offering a universally loved palette that screams holiday spirit with every detail. Motifs and glitter transform this design into a festive masterpiece, blending tradition with a dazzling, modern flair that lights up the season.
Conclusion
Nail art is a year-long canvas for creativity, reflecting the shifting moods of each month with colors, patterns, and textures that tell a story. From January’s icy elegance to December’s festive sparkle, these designs offer endless ways to celebrate seasons and holidays with style.
Whether you’re a DIY enthusiast or a salon regular, this guide provides rich inspiration to keep your nails on-trend and expressive. Grab your tools, experiment with these ideas, and let your manicure shine as a personal masterpiece all year round.