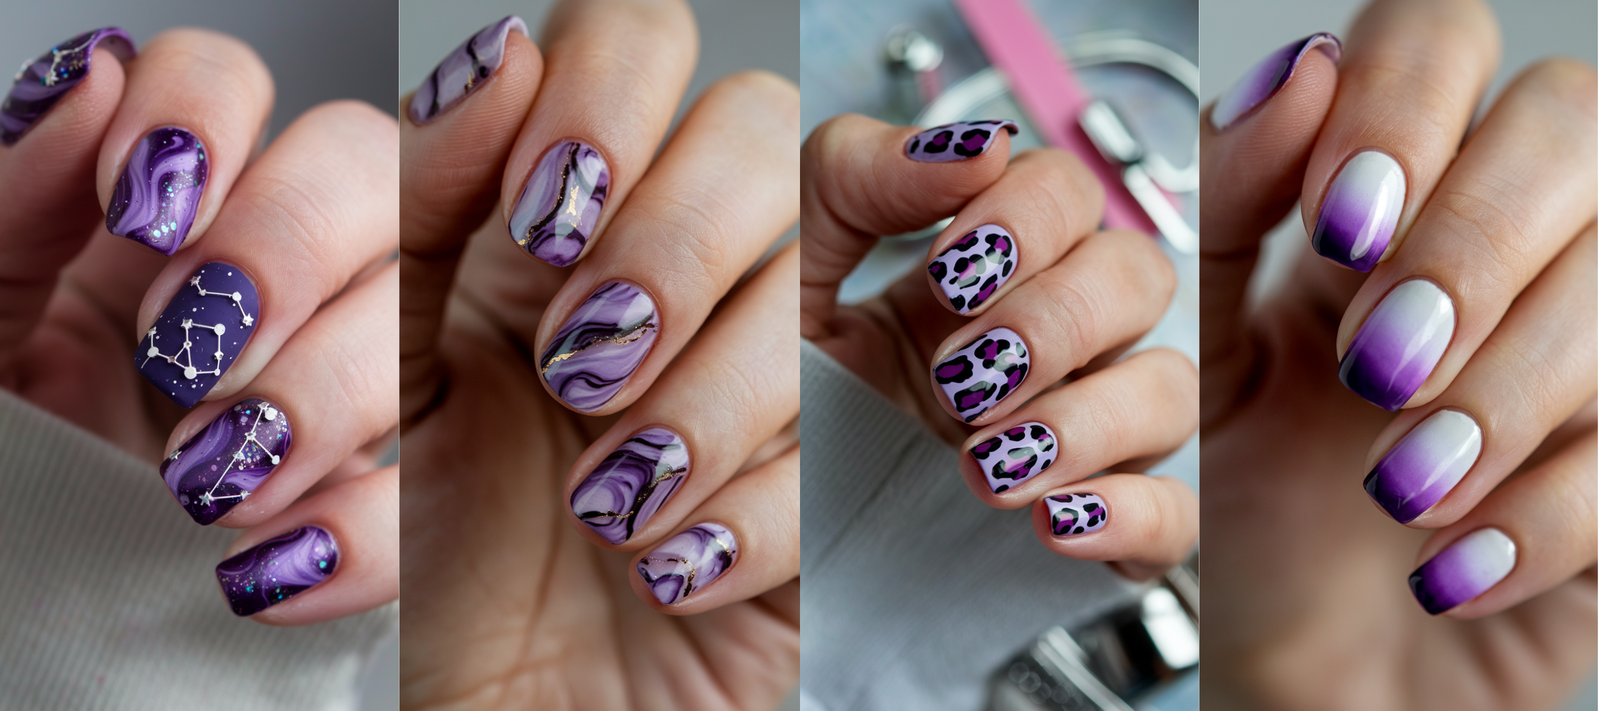
Purple nail art dances across the spectrum of style, weaving soft elegance with daring edge in a trend that’s as versatile as it is captivating.
From dreamy lilac fades to bold violet flames, these 35 designs offer a palette of possibilities for every mood and moment.
Whether you’re prepping for a romantic date or a high-energy festival, this guide unveils stunning ideas—from playful polka dots to luxe gemstone swirls—to spark your next manicure.
Dive into the world of purple and let your nails bloom with creativity and flair.
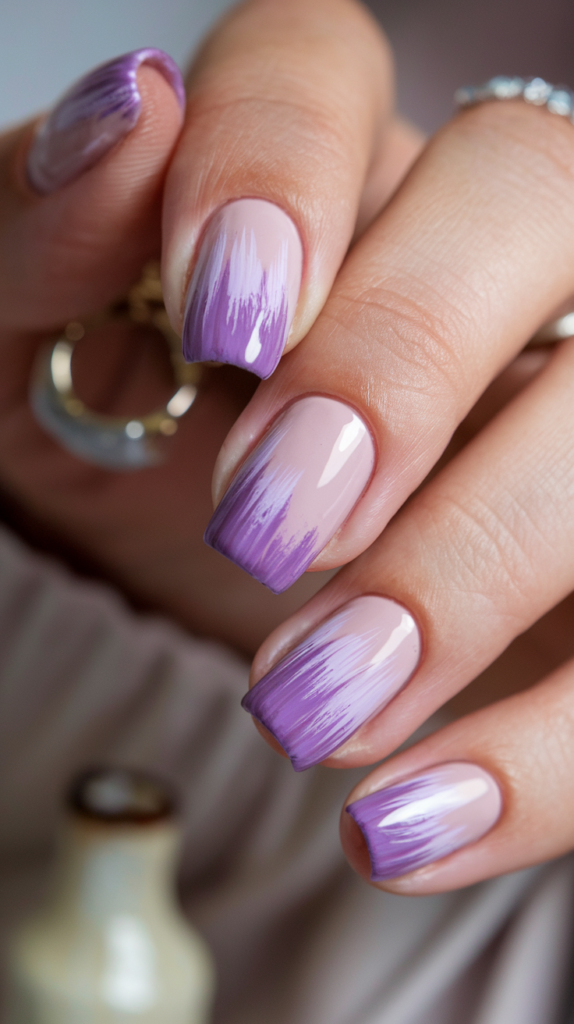
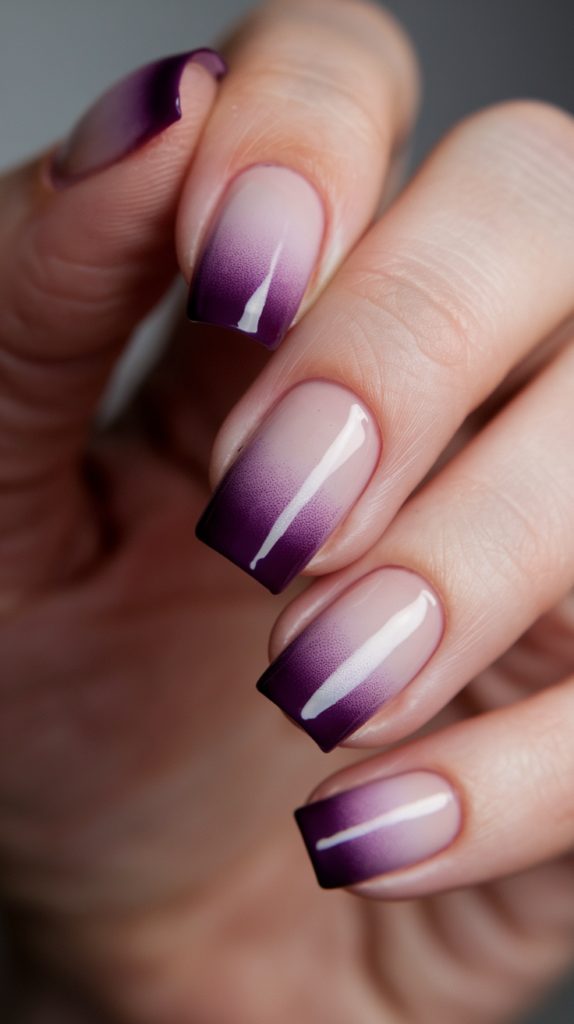
01. Lilac Whisper Ombre
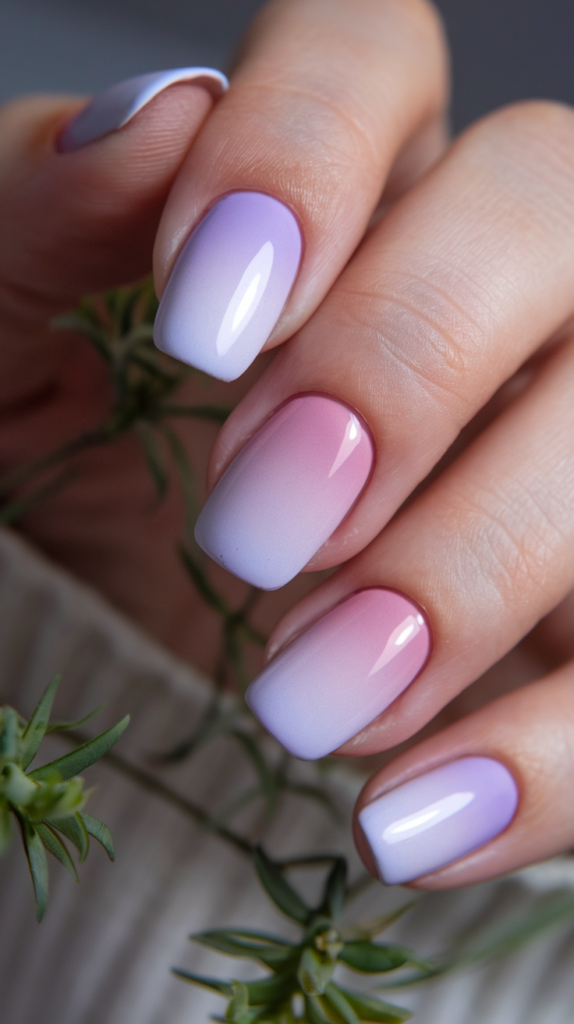
Drift into daily grace with Lilac Whisper Ombre, a gentle gradient that melts soft lavender into pastel pink for a look that’s both delicate and chic. Perfect for brunches or quiet coffee runs, this design wraps your nails in a whisper of femininity.
Creating the Lilac Whisper Ombre Nail Look
Step 1: Prep and Base
Start with a nourishing base coat to shield your nails, then apply two coats of pastel pink polish as the foundation. Let each layer dry fully for a smooth, even canvas.
Step 2: Sponge the Gradient
Paint lavender and pastel pink side-by-side on a makeup sponge, overlapping slightly, then dab it onto your nails from tip to base. Repeat with light taps until the colors blend seamlessly into a soft fade.
Step 3: Refine the Blend
Use a clean sponge edge to smooth any harsh lines, building the gradient with thin layers for a misty transition. Clean skin around the nails with a small brush dipped in acetone for a tidy finish.
Step 4: Add Shine
Brush on a glossy top coat to polish the ombre, enhancing the delicate hues with a lustrous sheen. Add a second layer after drying for extra durability and glow.
Step 5: Optional Flair
For a subtle twist, dust fine silver glitter at the tips with a fan brush before the top coat dries. Keep it light to preserve the soft elegance.
Why It Works
The lavender-to-pink fade blends soothing tones into a gentle wash of color, offering an effortless elegance that suits any day. Its understated charm shines through versatility, pairing with casual denim or a flowy sundress alike.
02. Cosmic Purple Galaxy
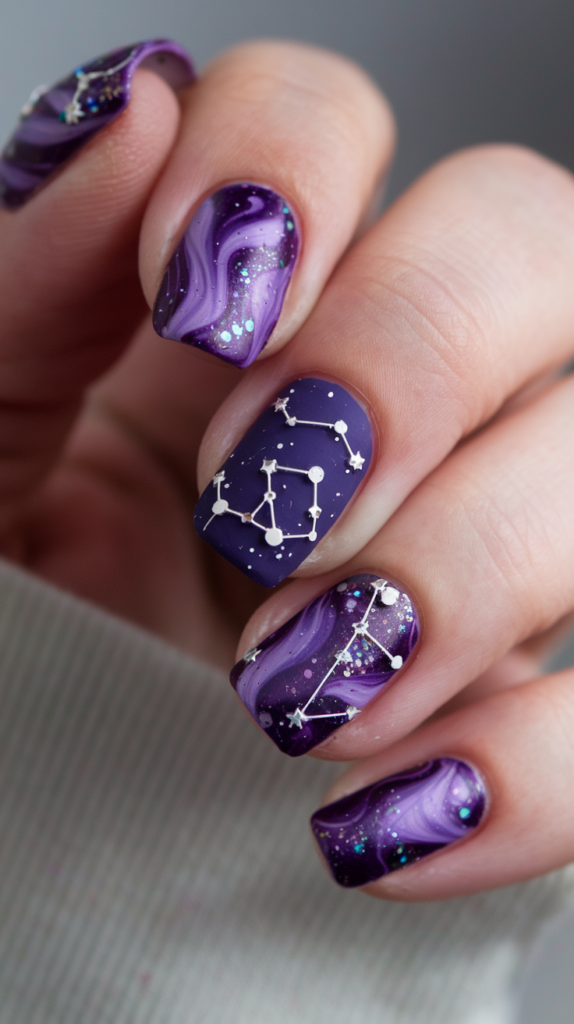
Soar among the stars with Cosmic Purple Galaxy, a cosmic design that swirls deep purple with shimmering glitter and twinkling accents for an out-of-this-world vibe. Ideal for stargazing nights or bold soirées, this look captures the universe’s mystique on your fingertips.
Creating the Cosmic Purple Galaxy Nail Look
Step 1: Base Prep
Apply a protective base coat, then layer a deep purple polish as your cosmic sky, using two coats for rich opacity. Let it dry completely to anchor the galaxy.
Step 2: Nebula Layers
Dab lighter purple, blue, and pink polishes onto a sponge in random patches, then press it onto your nails to mimic swirling nebulae. Build depth with multiple light layers, blending gently.
Step 3: Add Starry Glitter
Brush fine silver glitter polish across the nails, focusing on nebula edges for a starry shimmer. Use a fan brush to sprinkle loose glitter for extra cosmic sparkle.
Step 4: Dot the Stars
With a dotting tool or toothpick, paint tiny white stars in varied sizes—clusters on some nails, scattered on others—for a celestial touch. Layer twice for bright, standout stars.
Step 5: Seal with Top Coat
Finish with a glossy top coat to lock in the galaxy and amplify its shine, ensuring a vibrant, lasting cosmos. Add a second layer for a glass-like finish that mirrors the night sky.
Why It Works
The deep purple base anchors a universe of swirling colors, while glitter and stars ignite a dazzling cosmic dance that’s bold yet enchanting. Its versatility shines—from casual mystique to party glamour—making every glance a stellar journey.
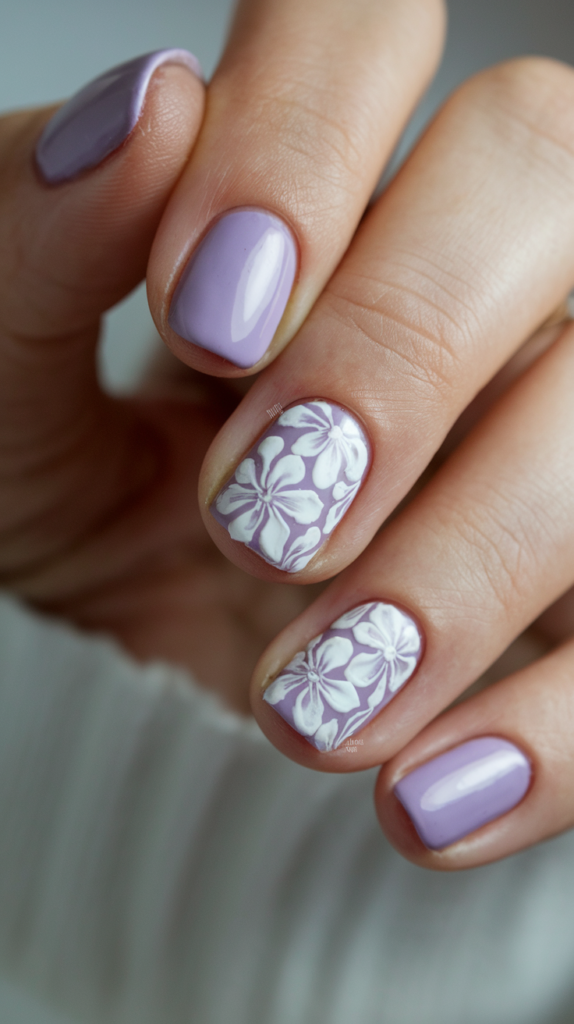
03. Lavender Petal Tips
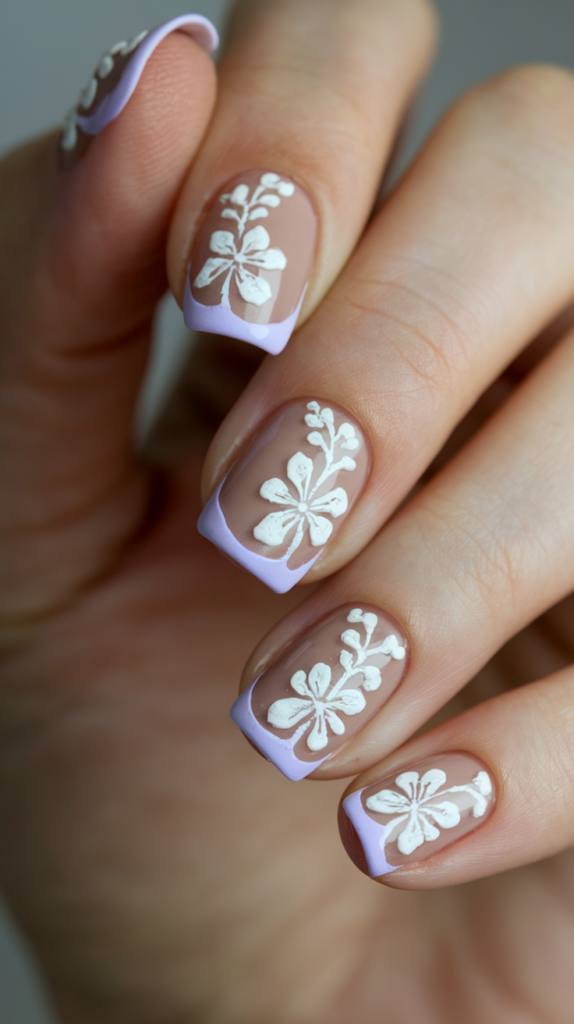
Bloom into warm days with Lavender Petal Tips, a fresh twist on the French manicure that pairs soft lavender tips with dainty white flowers. Perfect for picnics or garden parties, this chic design whispers springtime elegance.
Creating the Lavender Petal Tips Nail Look
Step 1: Base Prep
Start with a hydrating base coat, then apply a sheer nude polish for a natural glow across all nails. Let it dry fully to prep for the tips.
Step 2: Paint Lavender Tips
Use a striping brush to sweep lavender polish across each nail tip, curving gently for a French shape. Double up for a soft, opaque finish, cleaning edges with a Q-tip.
Step 3: Add Floral Accents
With a fine brush, paint small white flowers on the tips—dot a center, then swirl petals around it—varying sizes for a natural bouquet. Layer petals twice for delicate depth.
Step 4: Detail the Blooms
Dot tiny yellow or pink centers into the flowers with a toothpick, adding green leaf strokes for a fresh touch. Keep it light to maintain the airy vibe.
Step 5: Seal with Top Coat
Finish with a glossy top coat to protect the florals and boost the lavender’s shine, ensuring a polished look. Add a second layer for lasting springtime charm.
Why It Works
The lavender tips soften the classic French manicure with a pastel pop, while white florals sprinkle a garden-fresh elegance that’s effortlessly chic. Its subtle charm blooms in warm seasons, pairing with sundresses or linen for a breezy, feminine glow.
04. Neon Violet Blaze
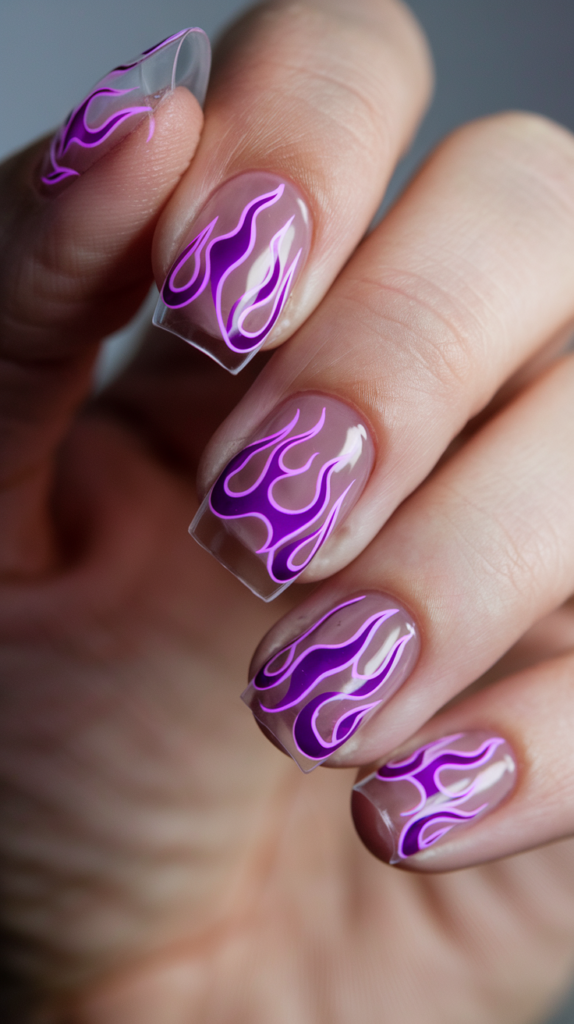
Ignite your style with Neon Violet Blaze, a fierce design that blazes vivid purple fire across a clear base for an unapologetically bold statement. Perfect for club nights or streetwear struts, this edgy look burns with fearless energy.
Creating the Neon Violet Blaze Nail Look
Step 1: Base Prep
Apply a strengthening base coat, then layer a clear or nude polish for a stark canvas that lets the flames pop. Use two coats, drying each for a smooth start.
Step 2: Outline the Flames
With a fine brush, sketch jagged flame shapes in neon purple from the tips downward, curving them for a flickering effect. Keep outlines thin and varied for a wild flare.
Step 3: Fill the Fire
Fill the flame outlines with neon purple polish, layering twice for a blazing intensity that glows under lights. Clean edges with acetone for sharp, fiery precision.
Step 4: Add Gradient Heat
Sponge a lighter purple or pink at the flame bases, blending upward for a hot-to-cool gradient. Keep it subtle to let the neon lead the charge.
Step 5: Seal with Top Coat
Finish with a glossy top coat to lock in the flames and amp their shine, ensuring a fierce, lasting burn. Add a second layer for a slick, untamed finish.
Why It Works
The neon purple flames sear through the clear base with electric vibrancy, delivering a fierce, rebellious edge that commands attention. Its bold contrast and dynamic shape make it a perfect match for urban grit or nightlife swagger.
05. Velvet Lilac Chrome
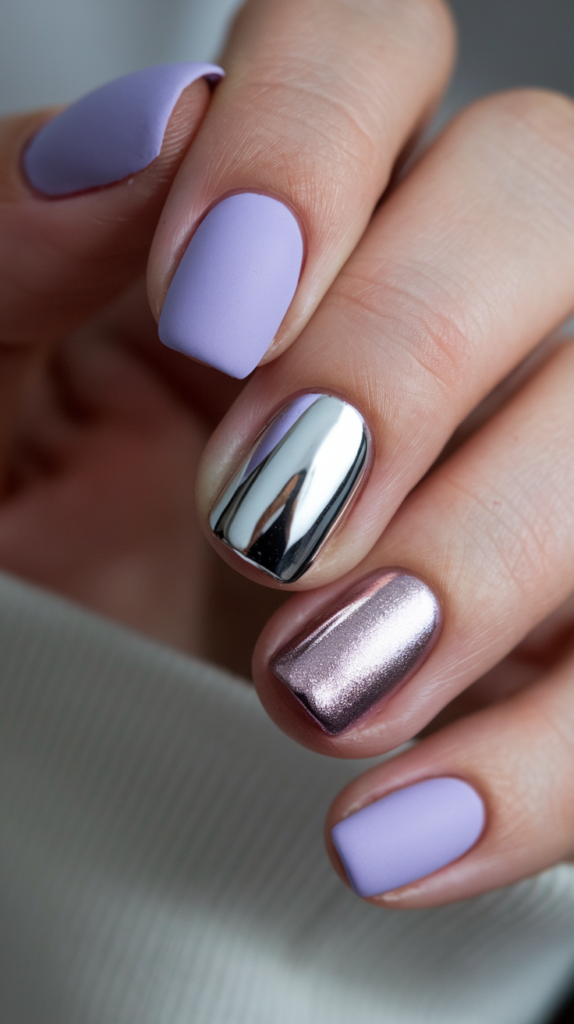
Blend soft luxury with sleek shine in Velvet Lilac Chrome, a sophisticated design that pairs velvety lilac with a mirror-like accent for a chic texture play. Perfect for gallery openings or upscale dinners, this look marries understated elegance with modern flair.
Creating the Velvet Lilac Chrome Nail Look
Step 1: Base Prep
Apply a hydrating base coat, then coat all nails with lilac polish, using two layers for a rich, even hue. Let it dry fully to prep for texture.
Step 2: Matte the Lilac
Brush a matte top coat over all but one nail per hand, letting it dry to a smooth, velvety finish. Ensure even coverage for a plush, soft touch.
Step 3: Chrome Accent
On the accent nails (like the ring finger), apply a chrome polish or rub chrome powder over the lilac base with a sponge for a mirror shine. Buff gently for a flawless reflection.
Step 4: Refine Edges
Clean any polish overlap with a small brush and acetone, ensuring sharp lines between matte and chrome for a polished contrast. Let it set to highlight the textures.
Step 5: Seal with Top Coat
Finish the chrome nails with a glossy top coat to lock in the shine, leaving the matte nails uncoated for texture purity. Add a second layer to chrome for lasting gleam.
Why It Works
The matte lilac wraps your nails in a soft, modern elegance, while the chrome accent slices through with a bold, reflective pop that’s pure sophistication. This tactile dance elevates any look, from tailored suits to evening silks, with effortless chic.
06. Amethyst Marble Swirls
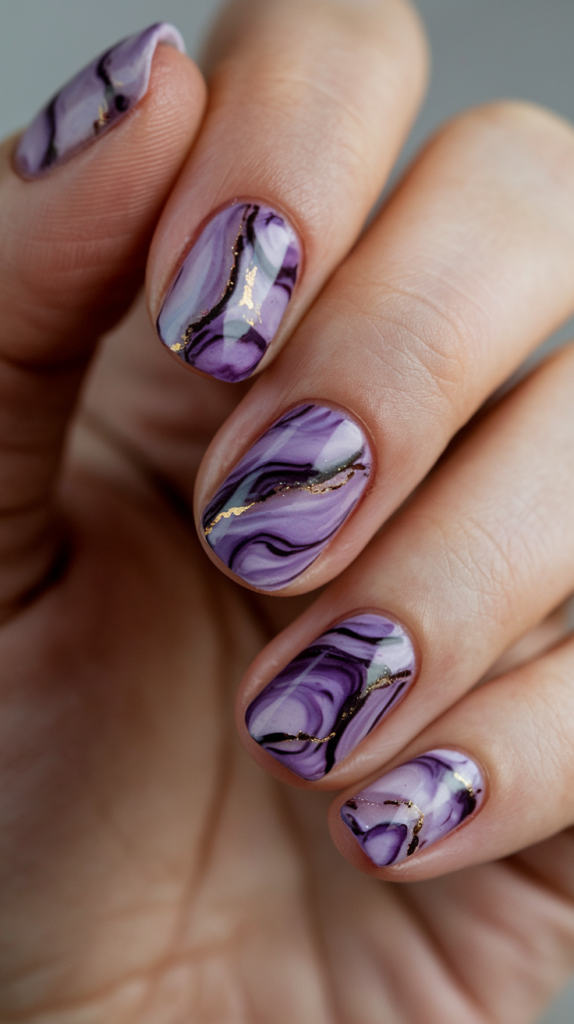
Indulge in opulence with Amethyst Marble Swirls, a luxurious design that swirls dark and light purple into a stone-like masterpiece. Perfect for wine tastings or formal affairs, this look drapes your nails in regal sophistication.
Creating the Amethyst Marble Swirls Nail Look
Step 1: Base Prep
Apply a protective base coat, then layer a light purple polish as your marble foundation, using two coats for a smooth start. Let it dry fully to anchor the swirls.
Step 2: Swirl the Marble
With a fine brush, drizzle dark purple polish in random, wavy lines across each nail, mimicking marble veins. Swirl lightly with a toothpick while wet for a fluid blend.
Step 3: Blend with Acetone
Dip a small brush in acetone and gently blur the dark veins into the light base, creating a soft, natural marble flow. Work quickly to keep the polish pliable.
Step 4: Add Depth
Dot faint white or silver streaks with a striping brush into the swirls, blending lightly for a crystalline shimmer. Keep it subtle to enhance the luxe stone effect.
Step 5: Seal with Top Coat
Finish with a glossy top coat to lock in the marble and give it a polished, gem-like shine. Add a second layer for a glassy finish that lasts.
Why It Works
The swirling purples mimic the timeless beauty of marble, wrapping your nails in a rich, royal elegance that feels both classic and contemporary. Its glossy sheen elevates the luxury, making it a stunning accent for velvet dresses or tailored looks.
07. Juicy Grape Sparkle
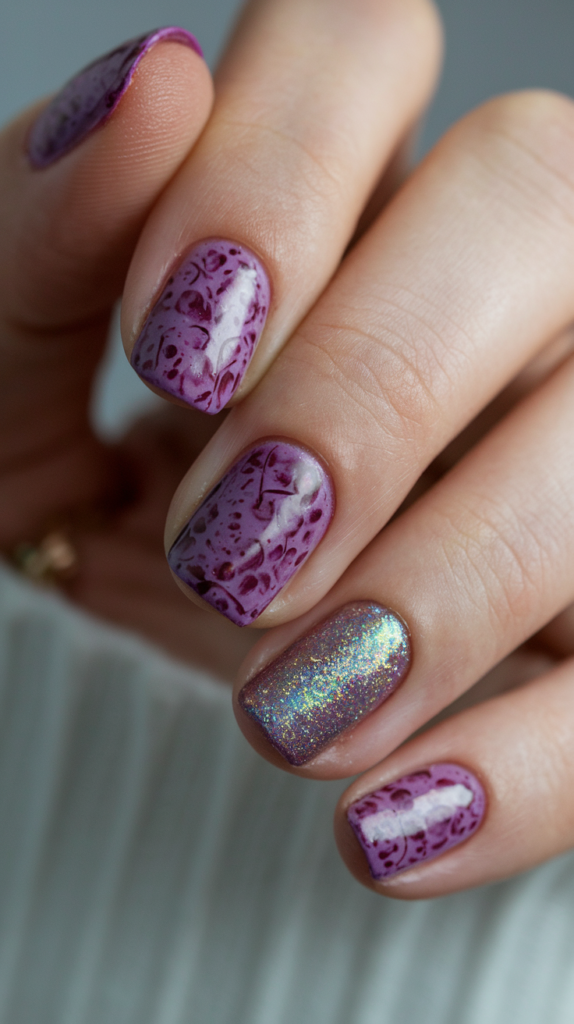
Savor the richness of Juicy Grape Sparkle, a glossy deep purple design that bursts with holographic glitter for a juicy, dazzling vibe. Perfect for cocktail parties or festive nights, this look blends bold color with radiant sparkle.
Creating the Juicy Grape Sparkle Nail Look
Step 1: Base Prep
Apply a strengthening base coat, then layer a deep purple polish for a lush, grape-like hue, using two coats for full opacity. Let it dry to a smooth, rich finish.
Step 2: Gloss the Base
Brush a glossy top coat over all nails except the accents, letting it dry to a wet, juicy sheen. This primes the deep purple for its starring role.
Step 3: Add Holo Glitter
On accent nails (like ring fingers), sponge holographic glitter polish from tip to base, layering for a rainbow shimmer that shifts in light. Tap gently for even sparkle.
Step 4: Enhance Shine
Brush a second glossy top coat over the glittered nails to lock in the holographic glow, amplifying its juicy dazzle. Clean edges with acetone for a crisp contrast.
Step 5: Final Seal
Finish all nails with a thick glossy top coat for a unified, succulent shine that lasts through the night. Add a second layer for extra durability and gloss.
Why It Works
The deep purple base oozes rich, fruity luxury, while holographic glitter ignites a playful, radiant twist that catches every light. Its glossy finish ties it together, making it a bold, festive pop for any celebratory vibe.
08. Lilac Abstract Flow
Unleash your inner artist with Lilac Abstract Flow, a free-form design that splashes lilac across a nude canvas for a playful, painterly vibe. Perfect for art walks or creative brunches, this look celebrates spontaneity with a soft twist.
Creating the Lilac Abstract Flow Nail Look
Step 1: Base Prep
Apply a nourishing base coat, then layer a nude polish for a soft, neutral backdrop, using two coats for even coverage. Let it dry to set the stage.
Step 2: Brush the Strokes
With a thin nail art brush, sweep lilac polish in loose, flowing strokes—curved on some nails, jagged on others—for a free-form dance. Vary pressure for thick-to-thin lines.
Step 3: Layer the Art
Add a second lilac shade (darker or lighter) over some strokes, overlapping slightly for depth and a painterly feel. Keep it random to embrace the abstract vibe.
Step 4: Refine Edges
Clean any polish on skin with a small brush and acetone, ensuring the strokes stay crisp against the nude base. Let it dry to lock in the flow.
Step 5: Seal with Top Coat
Finish with a glossy top coat to protect the strokes and add a subtle sheen, balancing the playful art with polish. Add a second layer for lasting charm.
Why It Works
The nude base offers a calm canvas, letting the lilac strokes whirl with carefree creativity that’s both soft and striking. Its abstract freedom makes it a versatile, artsy accent for boho vibes or minimalist chic.
09. Violet Gem Glow
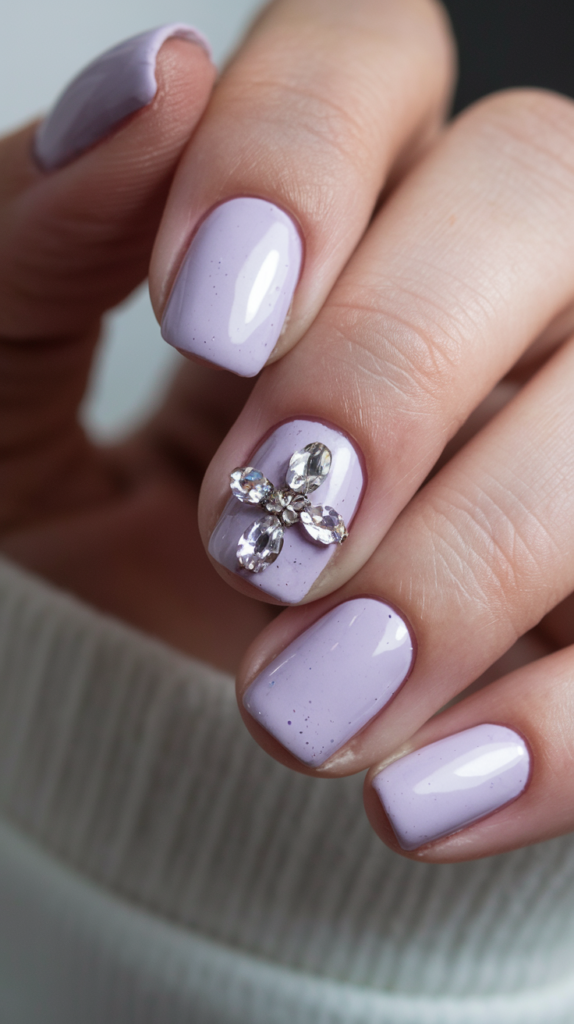
Crown your nails with Violet Gem Glow, a delicate light purple design that sparkles with rhinestone accents for a touch of regal glamour. Perfect for weddings or galas, this look blends soft hues with dazzling shine.
Creating the Violet Gem Glow Nail Look
Step 1: Base Prep
Apply a protective base coat, then layer a light purple polish for a soft, jewel-toned canvas, using two coats for even color. Let it dry fully to prep for gems.
Step 2: Paint the Base
Brush a glossy top coat over all nails to enhance the purple’s glow, letting it dry to a smooth, shiny finish. This sets a radiant stage for the rhinestones.
Step 3: Place Rhinestones
With tweezers, apply a dot of nail glue near each cuticle, then press small, clear rhinestones into place—three per nail for balance. Vary sizes for a luxe, cascading effect.
Step 4: Secure Gems
Press each rhinestone gently to ensure adhesion, letting the glue set for a minute before moving on. Clean any excess glue with a Q-tip for a pristine look.
Step 5: Seal with Top Coat
Finish with a glossy top coat around (not over) the rhinestones to lock them in while preserving their sparkle. Add a second layer for a durable, jewel-like shine.
Why It Works
The light purple base glows with gentle elegance, while rhinestones sprinkle a dazzling, royal flair that elevates any occasion. Its balance of softness and sparkle makes it a versatile gem for both subtle days and glittering nights.
10. Dreamy Lavender Clouds
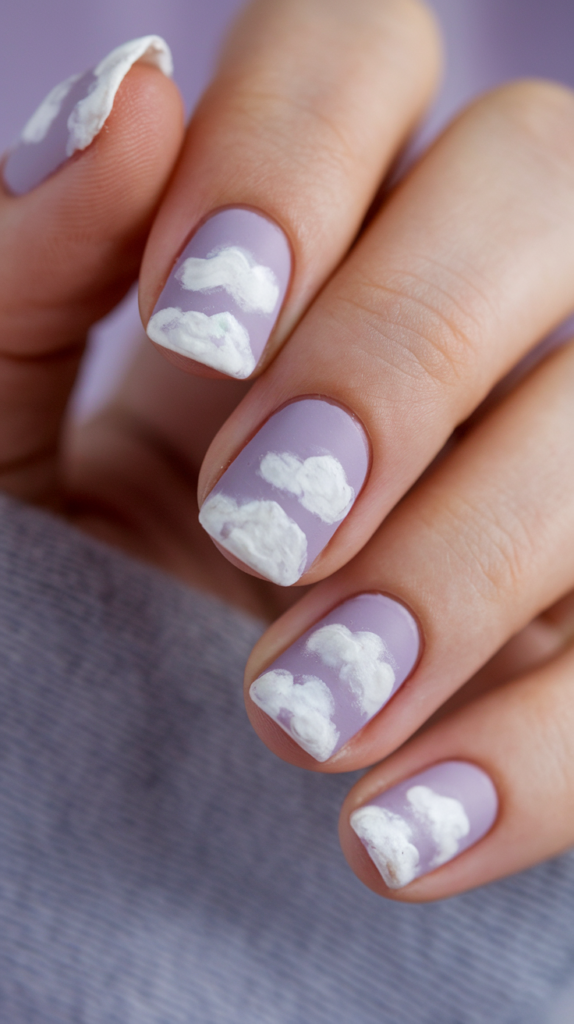
Float into serenity with Dreamy Lavender Clouds, a dreamy design that drifts fluffy white clouds across a matte lavender sky for a tranquil, whimsical vibe. Perfect for spa days or quiet escapes, this look wraps your nails in a soothing reverie.
Creating the Dreamy Lavender Clouds Nail Look
Step 1: Base Prep
Apply a smoothing base coat, then layer a lavender polish for a soft, sky-like hue, using two coats for full coverage. Let it dry to prep for texture.
Step 2: Matte the Base
Brush a matte top coat over all nails, letting it dry to a velvety finish that evokes a calm, hazy sky. Ensure even application for a plush feel.
Step 3: Paint the Clouds
With a small dotting tool, dab white polish into fluffy cloud shapes—round on some nails, wispy on others—for a dreamy drift. Layer lightly for a soft, airy look.
Step 4: Blend the Edges
Use a clean sponge to gently blur the cloud edges, softening them into the lavender for a hazy, floating effect. Keep it subtle to maintain the calm vibe.
Step 5: Seal with Top Coat
Finish with a matte top coat to lock in the clouds and preserve the velvety texture, ensuring a serene, lasting haze. Avoid gloss to keep the dreamy matte charm.
Why It Works
The matte lavender base casts a soothing, twilight glow, while fluffy clouds float with a whimsical lightness that calms the soul. Its tactile softness and gentle design make it a perfect escape for relaxed, introspective moments.
11. Playful Lilac Leopard
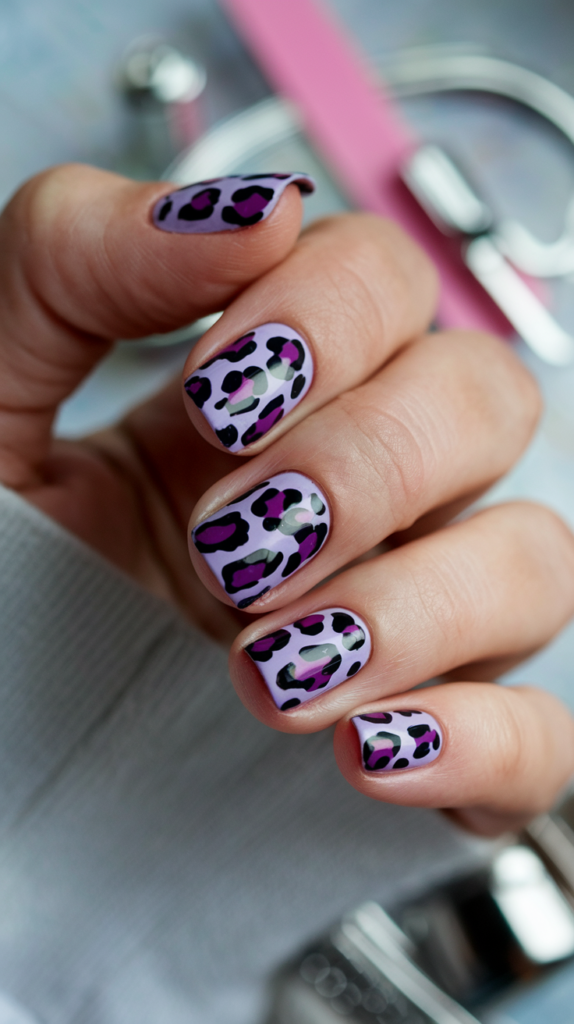
Roar with flair in Playful Lilac Leopard, a playful twist on animal print that blends a lilac base with bold black and purple spots for a wild, chic vibe. Perfect for safari-inspired outings or funky nights, this design pounces with personality.
Creating the Playful Lilac Leopard Nail Look
Step 1: Base Prep
Apply a protective base coat, then layer a lilac polish for a soft, playful backdrop, using two coats for even color. Let it dry to anchor the spots.
Step 2: Dot Black Spots
With a dotting tool, dab uneven black circles across each nail—larger on thumbs, smaller on pinkies—for a leopard’s random pattern. Vary shapes for a wild, natural look.
Step 3: Add Purple Accents
Fill some black outlines with a darker purple polish, layering twice for a bold, spotted contrast that ties into the lilac base. Keep it patchy for authenticity.
Step 4: Refine the Print
Use a fine brush to tweak spot edges, ensuring they’re jagged and organic, then clean skin with acetone for a crisp finish. Let it set to lock the pattern.
Step 5: Seal with Top Coat
Finish with a glossy top coat to protect the print and boost its playful shine, or opt for matte for a softer, trendy twist. Add a second layer for lasting roar.
Why It Works
The lilac base tames the classic leopard print into a softer, more whimsical wildness, while black and purple spots keep it bold and untamed. Its fun fusion of cute and fierce makes it a standout for adventurous spirits.
12. Purple Geometric Lines
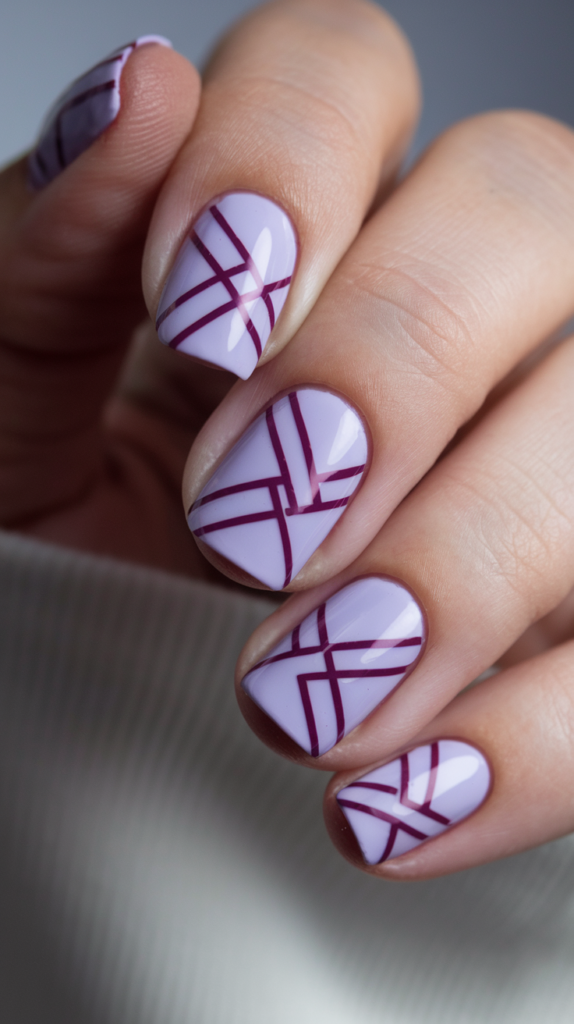
Slice into sleek style with Purple Geometric Lines, a modern design that layers clean, dark purple lines over a light purple base for a sharp, minimalist vibe. Perfect for office days or gallery hops, this look blends precision with playful color.
Creating the Purple Geometric Lines Nail Look
Step 1: Base Prep
Apply a smoothing base coat, then layer a light purple polish for a soft, modern canvas, using two coats for even hue. Let it dry to prep for stripes.
Step 2: Tape the Lines
Lay striping tape in diagonal or crisscross patterns across each nail, pressing firmly for crisp edges. Vary angles—steep on some, shallow on others—for dynamic geometry.
Step 3: Paint the Stripes
Brush dark purple polish over the taped nails, layering twice for bold, opaque lines, then peel the tape off carefully while wet. Clean smudges with acetone for sharpness.
Step 4: Add Contrast
Paint a thin white or silver stripe beside one dark line per nail with a fine brush for a subtle pop. Keep it minimal to enhance the geometric vibe.
Step 5: Seal with Top Coat
Finish with a glossy top coat to lock in the stripes and boost their shine, ensuring a sleek, lasting design. Add a second layer for a polished, modern edge.
Why It Works
The light purple base softens the sharp, dark stripes into a chic, modern harmony that’s both bold and restrained. Its clean lines and playful hues make it a minimalist’s dream, pairing effortlessly with structured looks.
13. Plush Violet Texture
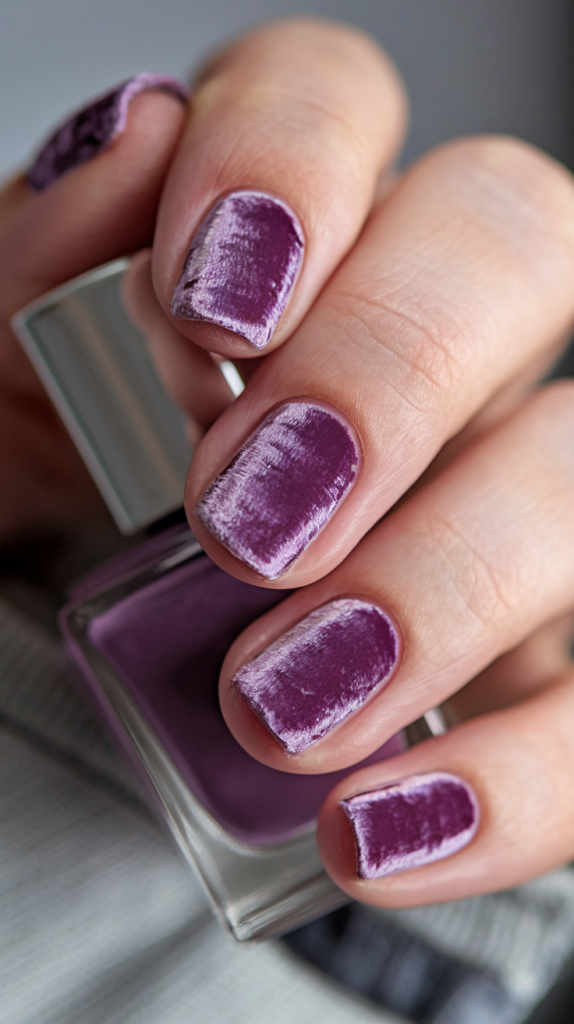
Plush up your style with Plush Violet Texture, a rich, deep purple design that mimics velvet’s luxe texture for a tactile, standout statement. Perfect for holiday galas or cozy nights, this look drapes your nails in sumptuous elegance.
Creating the Plush Violet Texture Nail Look
Step 1: Base Prep
Apply a durable base coat, then layer a deep purple polish for a rich, velvety hue, using two coats for full opacity. Let it dry slightly tacky for texture.
Step 2: Add Velvet Powder
Sprinkle violet velvet powder (from a nail art kit) over the tacky polish, pressing gently with a sponge for even coverage. Tap off excess for a plush, even finish.
Step 3: Set the Texture
Let the powder cure for a minute, then brush away loose bits with a soft brush, revealing a velvety, matte-like surface. Avoid water until fully set.
Step 4: Enhance Depth
Dot a darker purple polish in subtle patches with a toothpick, blending lightly for a shadowed, velvet-rich effect. Keep it minimal to preserve the texture.
Step 5: Seal with Top Coat
Finish with a matte top coat to protect the velvet without adding shine, ensuring a plush, lasting luxury. Skip gloss to keep the tactile charm intact.
Why It Works
The deep purple hue and velvet texture weave a luxurious, regal vibe that’s both bold and inviting, turning heads with its unique feel. Its plush finish elevates any ensemble, from evening gowns to cozy knits, with a touch of decadence.
14. Purple Glitter Fade
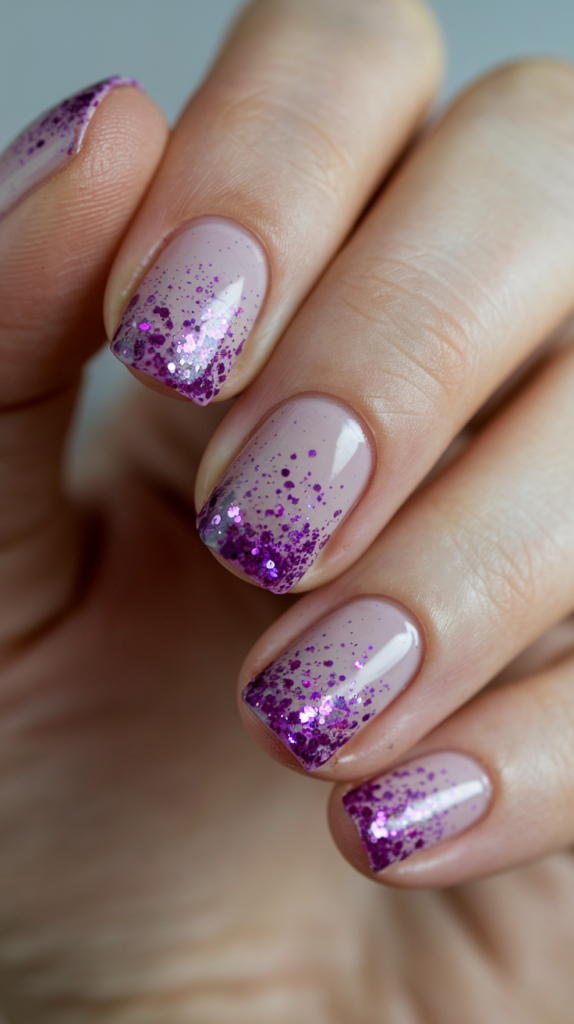
Sparkle into glamour with Purple Glitter Fade, a dazzling design that fades shimmering purple glitter from tip to base for a radiant, party-ready glow. Perfect for festive nights or bold brunches, this look twinkles with effortless chic.
Creating the Purple Glitter Fade Nail Look
Step 1: Base Prep
Apply a protective base coat, then layer a nude polish for a soft, neutral start, using two coats for even coverage. Let it dry to anchor the glitter.
Step 2: Sponge the Glitter
Dab purple glitter polish onto a makeup sponge, then press it onto the nail tips, fading downward with light taps for a gradient sparkle. Build layers for a dense, dazzling tip.
Step 3: Blend the Fade
Use a clean sponge section to soften the glitter’s edge, blending it into the nude base for a seamless, twinkling transition. Keep it smooth to avoid clumps.
Step 4: Add Extra Shine
Brush a fine glitter top coat over the tips for a radiant boost, focusing on the densest sparkle areas. Tap off excess for a polished glow.
Step 5: Seal with Top Coat
Finish with a glossy top coat to lock in the glitter and amplify its shine, ensuring a glamorous, lasting dazzle. Add a second layer for a slick, party-ready finish.
Why It Works
The nude base keeps the glitter gradient wearable yet chic, while the purple sparkle cascades with a bold, celebratory flair that lights up any room. Its seamless fade and radiant finish make it a glamorous go-to for festive sparkle.
15. Starlit Lilac Glow
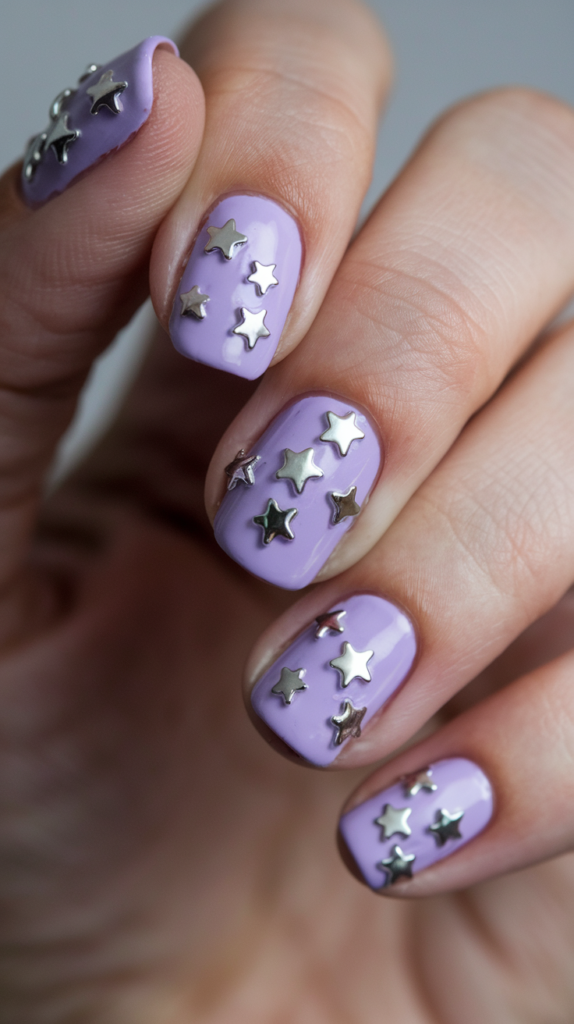
Twinkle softly with Starlit Lilac Glow, a celestial design that scatters glittering stars across a pale purple sky for a whimsical, starry-night vibe. Perfect for moonlit walks or cozy stargazing, this look blends gentle hues with cosmic charm.
Creating the Starlit Lilac Glow Nail Look
Step 1: Base Prep
Apply a hydrating base coat, then layer a pale lilac polish for a soft, twilight hue, using two coats for even color. Let it dry to set the sky.
Step 2: Paint the Base
Brush a glossy top coat over all nails to enhance the lilac’s glow, letting it dry to a smooth, starry-ready finish. This primes the celestial canvas.
Step 3: Add Star Accents
With a fine brush or dotting tool, paint tiny white or metallic stars—larger on thumbs, smaller on pinkies—for a scattered, night-sky effect. Layer twice for bright twinkle.
Step 4: Sprinkle Glitter
Dab a fine glitter polish over some stars with a sponge, adding a subtle shimmer that mimics distant constellations. Keep it light to preserve the softness.
Step 5: Seal with Top Coat
Finish with a glossy top coat to lock in the stars and boost their shine, ensuring a lasting, celestial glow. Add a second layer for a polished, starry finish.
Why It Works
The pale lilac base casts a gentle, twilight charm, while glittering stars sprinkle a whimsical, cosmic magic that’s both soft and enchanting. Its versatile glow transitions from day to night, pairing with pastels or denim for a dreamy touch.
16. Regal Purple Gold
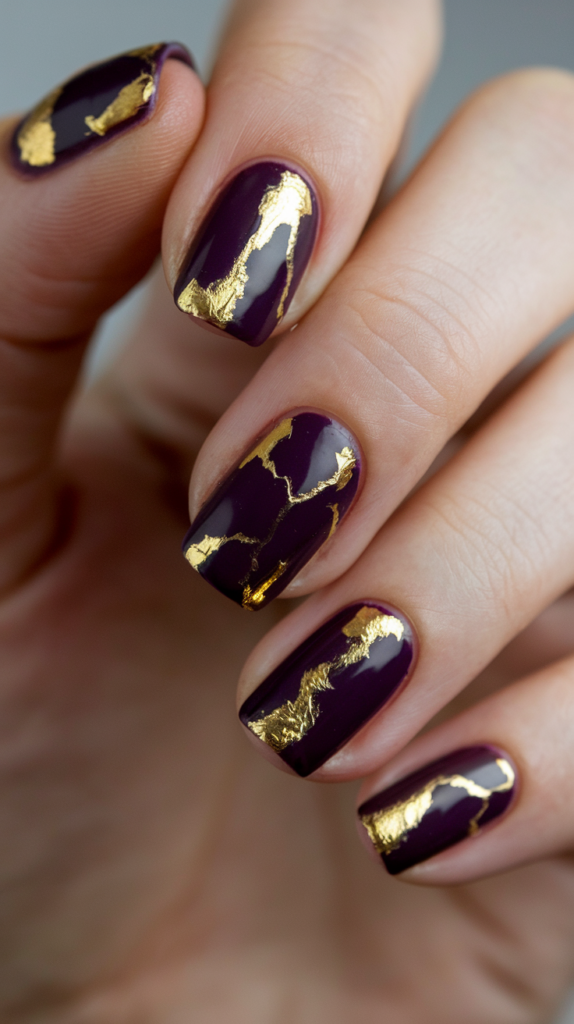
Reign supreme with Regal Purple Gold, a royal design that fuses deep purple with golden accents for a luxe, throne-worthy statement. Perfect for formal galas or holiday feasts, this look crowns your nails in opulent splendor.
Creating the Regal Purple Gold Nail Look
Step 1: Base Prep
Apply a durable base coat, then layer a deep purple polish for a rich, regal hue, using two coats for full opacity. Let it dry to anchor the gold.
Step 2: Paint the Base
Brush a glossy top coat over all nails to enhance the purple’s depth, letting it dry to a smooth, royal finish. This sets the stage for glamour.
Step 3: Add Gold Foil
With tweezers, press gold foil flakes onto random patches—tips or sides—over tacky polish for a gilded, luxe touch. Vary placement for a handcrafted feel.
Step 4: Draw Gold Lines
Use a fine brush to paint thin gold lines—diagonal on some nails, curved on others—for a regal accent that ties the foil together. Layer twice for bold shine.
Step 5: Seal with Top Coat
Finish with a glossy top coat to lock in the gold and boost the purple’s gleam, ensuring a lasting, throne-worthy shine. Add a second layer for a polished, royal finish.
Why It Works
The deep purple evokes royal richness, while gold foil and lines sprinkle a lavish, gilded glamour that’s fit for a queen. Its bold yet balanced opulence makes it a standout for any luxurious affair.
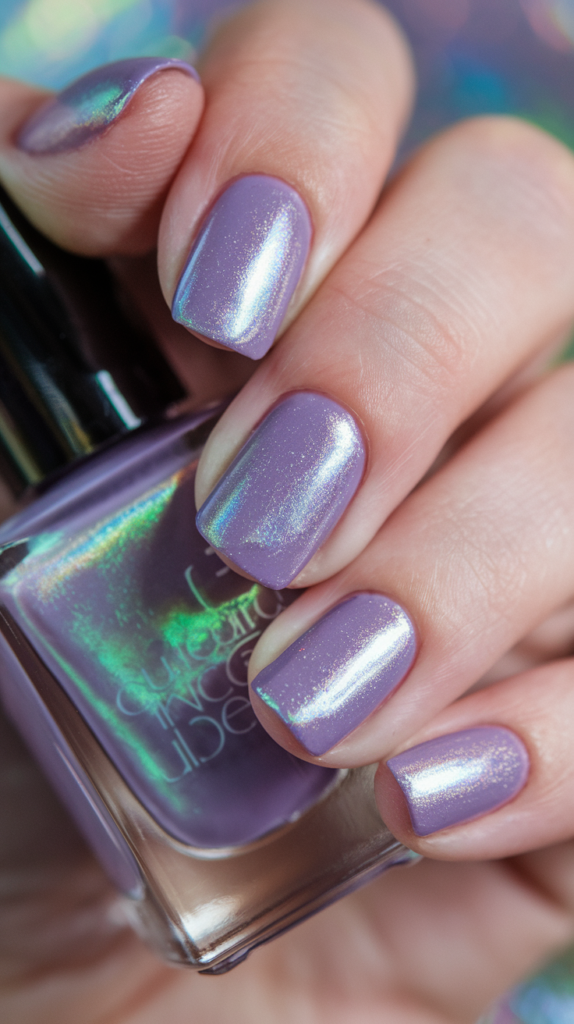
17. Lavender Holo Shine
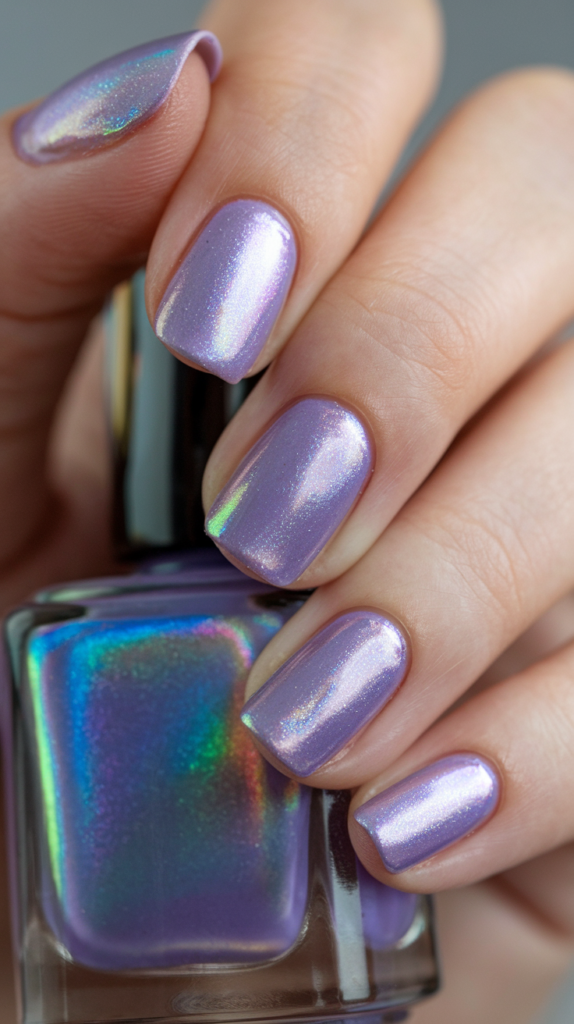
Beam into the future with Lavender Holo Shine, a shiny design that cloaks lavender nails in a shifting, iridescent glow for a sci-fi chic vibe. Perfect for festivals or bold nights out, this look dazzles with otherworldly flair.
Creating the Lavender Holo Shine Nail Look
Step 1: Base Prep
Apply a protective base coat, then layer a lavender polish for a soft, futuristic hue, using two coats for even color. Let it dry to prep for the holo shine.
Step 2: Paint the Base
Brush a glossy top coat over all nails to enhance the lavender’s glow, letting it dry to a smooth, radiant finish. This sets the stage for iridescence.
Step 3: Add Holo Top
Apply a holographic top coat or rub holo powder with a sponge over the lavender, buffing gently for a shifting, rainbow-like sheen. Layer twice for maximum dazzle.
Step 4: Enhance Shine
Brush a no-wipe glossy top coat over the holo layer to lock in the iridescence and boost its reflective glow. Clean edges with acetone for a sleek finish.
Step 5: Final Seal
Finish with a second glossy top coat for a slick, futuristic shine that lasts through the night. Let it cure fully for a beaming, sci-fi effect.
Why It Works
The lavender base softens the holographic shimmer into a wearable yet bold glow, while the shifting colors beam with futuristic charm that catches every eye. Its radiant edge makes it a dazzling pick for cutting-edge style or festive sparkle.
18. Purple Tie-Dye Twist
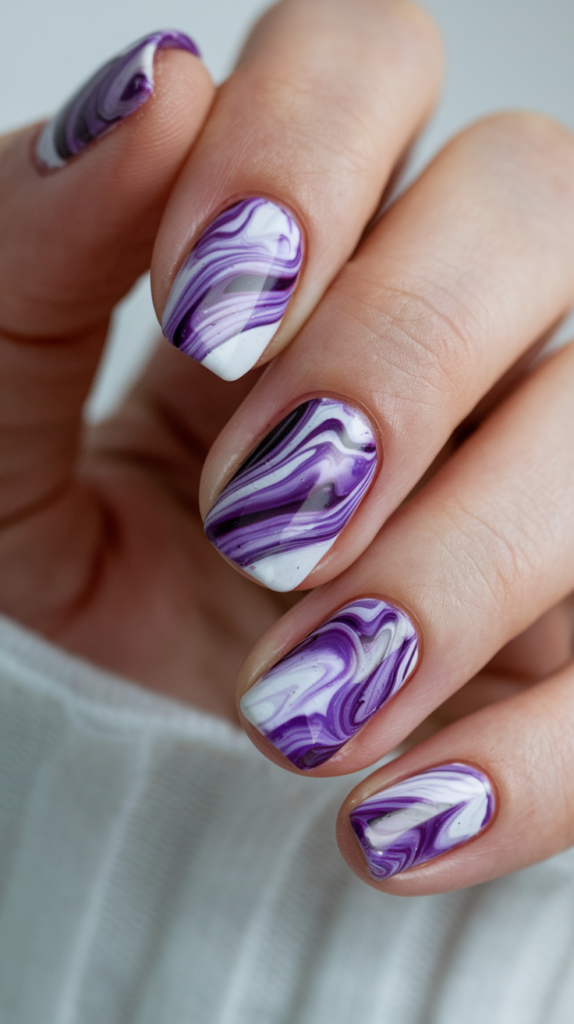
Swirl into free-spirited fun with Purple Tie-Dye Twist, a playful design that blends purple and white in a groovy, retro-inspired dance. Perfect for festivals or beach days, this look radiates carefree joy with every twist.
Creating the Purple Tie-Dye Twist Nail Look
Step 1: Base Prep
Apply a smoothing base coat, then layer a white polish for a bright, tie-dye canvas, using two coats for full opacity. Let it dry to prep for swirls.
Step 2: Drop the Colors
Dot light and dark purple polish in random spots on each nail, adding a few white drops for contrast, while the base is still tacky. Work quickly to keep them blendable.
Step 3: Swirl the Tie-Dye
Use a toothpick or fine brush to swirl the drops together, twisting them into groovy, overlapping patterns for a retro flow. Vary directions for a wild, organic look.
Step 4: Refine the Blend
Blur some edges with a brush dipped in acetone for a softer, tie-dye fade, keeping the swirls vibrant yet fused. Clean skin with acetone for a tidy finish.
Step 5: Seal with Top Coat
Finish with a glossy top coat to lock in the swirls and boost their shine, ensuring a lasting, free-spirited glow. Add a second layer for a slick, retro vibe.
Why It Works
The purple and white swirls spin a playful, nostalgic energy that’s both bold and breezy, evoking summer vibes with every twist. Its free-form chaos makes it a standout for laid-back, boho looks or festival flair.
19. Amethyst Crystal Charm
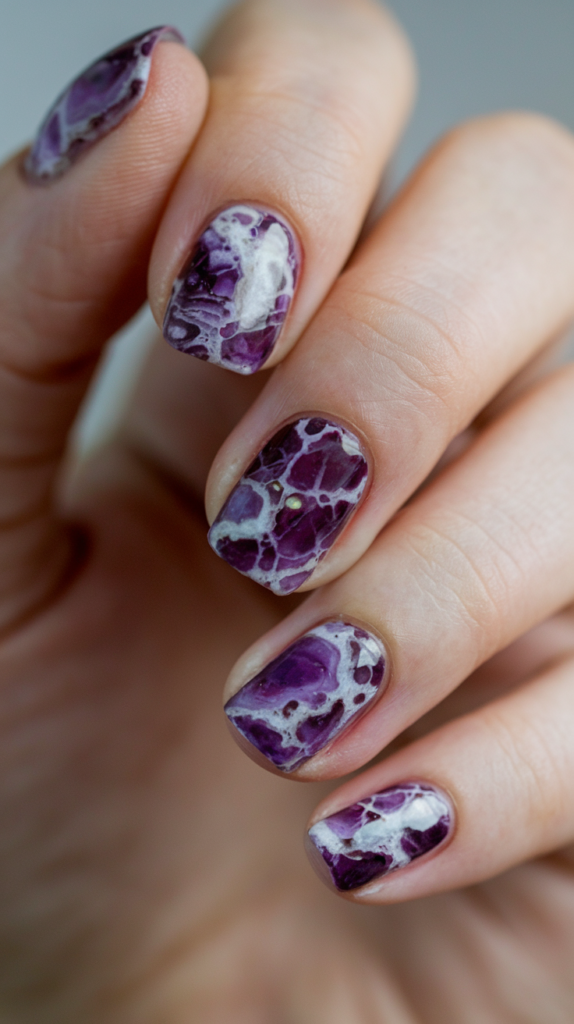
Gleam with mystique in Amethyst Crystal Charm, a design that mirrors polished amethyst with intricate purple veining for a crystalline, luxe look. Perfect for jewelry showcases or elegant nights, this style shines with gem-like allure.
Creating the Amethyst Crystal Charm Nail Look
Step 1: Base Prep
Apply a protective base coat, then layer a light lavender polish for a gemstone base, using two coats for a soft, even start. Let it dry to anchor the veins.
Step 2: Vein with Dark Purple
With a fine brush, drizzle dark purple polish in jagged, crisscrossing lines across each nail, mimicking amethyst’s natural striations. Vary thickness for a crystalline depth.
Step 3: Blend the Veins
Dip a sponge in acetone and lightly blur the dark veins into the base, softening edges for a polished, gem-like flow. Keep some lines sharp for contrast.
Step 4: Add Shimmer
Brush a sheer silver or holographic polish over some veins with a fan brush, adding a subtle, crystalline sparkle. Focus on intersections for a gemstone gleam.
Step 5: Seal with Top Coat
Finish with a glossy top coat to lock in the marble and give it a polished, amethyst shine, ensuring a lasting, luxe glow. Add a second layer for a glass-like finish.
Why It Works
The light-to-dark purple veining captures amethyst’s mystical beauty, wrapping your nails in a luxe, gemstone elegance that’s both bold and refined. Its glossy polish enhances the crystalline allure, making it a stunning match for elegant attire.
20. Violet French Blend
Reimagine tradition with Violet French Blend, a modern classic that blends deep violet tips into a nude base for a sleek, gradient twist. Perfect for office chic or subtle date nights, this look fuses timeless grace with contemporary flair.
Creating the Violet French Blend Nail Look
Step 1: Base Prep
Apply a hydrating base coat, then layer a nude polish for a soft, natural start, using two coats for even coverage. Let it dry to prep for the fade.
Step 2: Sponge the Tips
Dab deep violet polish onto a makeup sponge, then press it onto the nail tips, fading downward with light taps for a gradient French effect. Build layers for a smooth transition.
Step 3: Blend the Fade
Use a clean sponge section to soften the violet into the nude base, blending until the gradient flows seamlessly. Clean edges with acetone for a tidy tip.
Step 4: Add Shine
Brush a glossy top coat over all nails to polish the fade and enhance its depth, ensuring a sleek, modern glow. Let it dry for a refined finish.
Step 5: Final Seal
Finish with a second glossy top coat for a lasting, glass-like shine that ties the fade together. Cure fully for a polished, elegant look.
Why It Works
The deep violet tips modernize the French fade with a bold, purple punch, while the nude base keeps it soft and timeless for everyday elegance. Its smooth gradient bridges classic and contemporary, pairing effortlessly with any chic ensemble.
21. Lavender Mirror Gleam
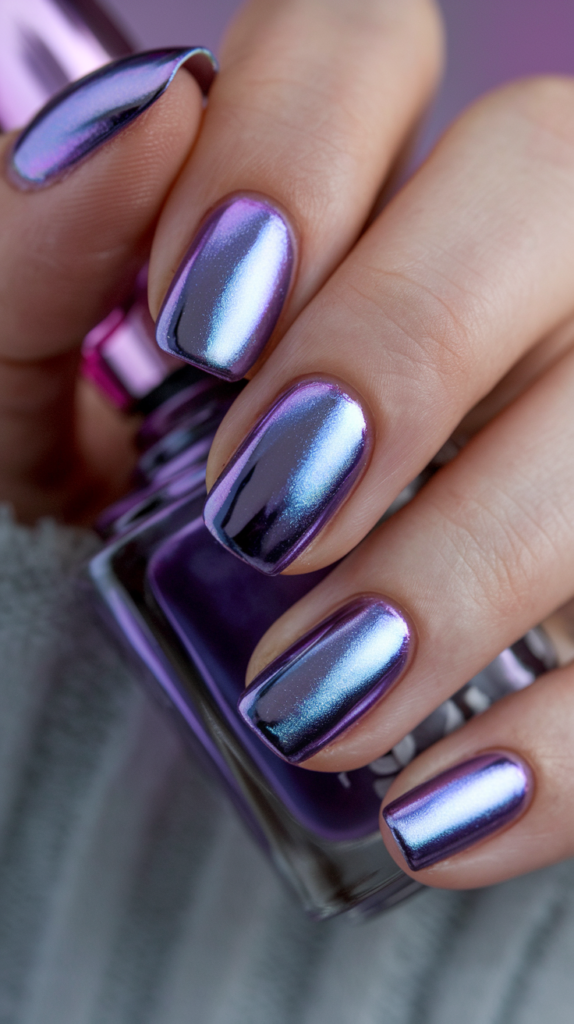
Reflect bold brilliance with Lavender Mirror Gleam, a high-shine design that coats lavender nails in a mirror-like finish for a striking, futuristic statement. Perfect for fashion-forward nights or runway-inspired days, this look gleams with sleek audacity.
Creating the Lavender Mirror Gleam Nail Look
Step 1: Base Prep
Apply a strengthening base coat, then layer a lavender polish for a soft, metallic-ready hue, using two coats for even color. Let it dry to prep for chrome.
Step 2: Paint the Base
Brush a glossy top coat over all nails to smooth the lavender, letting it dry to a radiant finish that boosts the chrome effect. This sets the reflective stage.
Step 3: Apply Chrome
Rub metallic lavender chrome powder over each nail with a sponge, buffing gently until it gleams with a mirror-like shine. Layer twice for a bold, reflective pop.
Step 4: Enhance Shine
Brush a no-wipe glossy top coat over the chrome to lock in its gleam and boost its reflective power. Clean edges with acetone for a sleek, futuristic edge.
Step 5: Final Seal
Finish with a second glossy top coat for a lasting, mirror-like shine that dazzles in any light. Cure fully for a bold, high-shine statement.
Why It Works
The lavender base softens the chrome’s bold shine into a wearable yet striking gleam, while the mirror finish reflects a futuristic edge that’s pure audacity. Its sleek brilliance makes it a dazzling pick for cutting-edge style or bold nights out.
22. Lilac Butterfly Dance
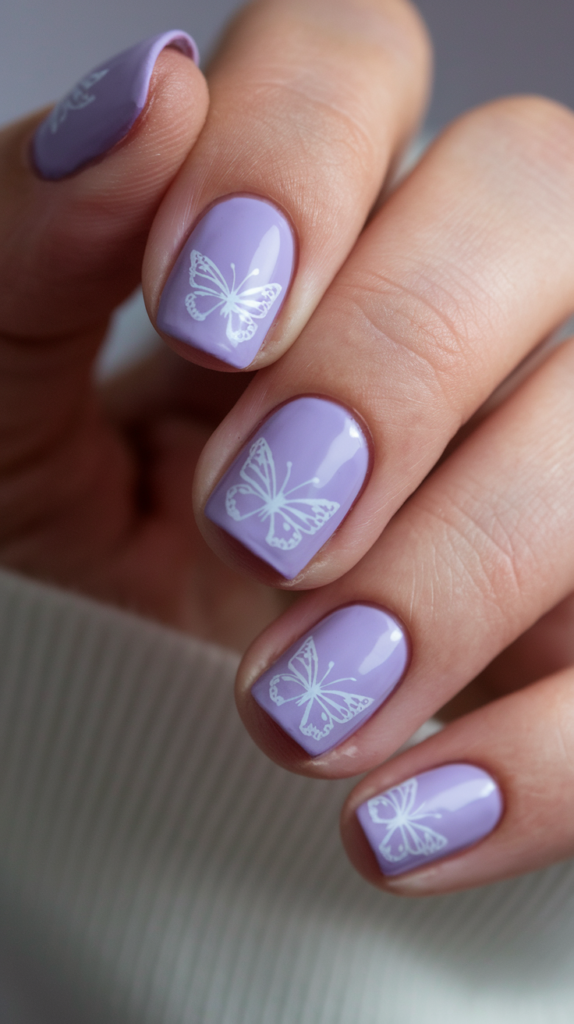
Flutter into grace with Lilac Butterfly Dance, a delicate design that pairs light purple nails with whimsical butterfly details for a touch of feminine elegance. Perfect for spring teas or romantic strolls, this look dances with soft, natural charm.
Creating the Lilac Butterfly Dance Nail Look
Step 1: Base Prep
Apply a hydrating base coat, then layer a light purple polish for a soft, floral hue, using two coats for even coverage. Let it dry to set the stage.
Step 2: Paint the Base
Brush a glossy top coat over all nails to enhance the purple’s glow, letting it dry to a smooth, radiant finish. This primes the butterfly canvas.
Step 3: Add Butterflies
On one or two accent nails (like ring fingers), paint white butterfly wings with a fine brush—two curved shapes per side—for a delicate flutter. Layer twice for soft opacity.
Step 4: Detail the Wings
Dot black or purple outlines and tiny vein lines within the wings with a toothpick, adding a yellow center for a natural pop. Keep it light for whimsy.
Step 5: Seal with Top Coat
Finish with a glossy top coat to protect the butterflies and boost their shine, ensuring a lasting, elegant flutter. Add a second layer for a polished, feminine finish.
Why It Works
The light purple base blooms with gentle elegance, while butterfly accents flutter with a soft, romantic charm that’s both subtle and enchanting. Its delicate balance makes it a timeless pick for springtime grace or tender moments.
23. Grape Velvet Tips
Play with texture in Grape Velvet Tips, a sophisticated design that cloaks grape purple nails in matte velvet with shiny tips for a chic, tactile twist. Perfect for evening dinners or stylish meetups, this look blends depth with dazzle.
Creating the Grape Velvet Tips Nail Look
Step 1: Base Prep
Apply a strengthening base coat, then layer a grape purple polish for a rich, velvety hue, using two coats for full coverage. Let it dry to prep for texture.
Step 2: Matte the Base
Brush a matte top coat over all nails, letting it dry to a plush, light-absorbing finish that evokes soft luxury. Ensure even application for a smooth feel.
Step 3: Gloss the Tips
Lay striping tape across each nail tip, then brush a glossy top coat over the exposed area, peeling the tape off for sharp, shiny tips. Layer twice for a bold contrast.
Step 4: Refine Edges
Clean any overlap with a small brush and acetone, ensuring crisp lines between matte and gloss for a polished texture play. Let it set to highlight the contrast.
Step 5: Final Seal
Finish the glossy tips with a second top coat to lock in their shine, leaving the matte base untouched for tactile purity. Cure fully for a lasting, chic finish.
Why It Works
The matte grape base drapes your nails in a deep, sophisticated velvet, while glossy tips slice through with a sleek, modern shine that catches the eye. Its textural harmony elevates any look, from tailored blazers to evening silks, with effortless flair.
24. Midnight Purple Gems

Shine with allure in Midnight Purple Gems, a glamorous design that pairs a velvety purple base with sparkling gems for a night-out dazzle. Perfect for club vibes or formal fêtes, this look blends matte richness with twinkling luxe.
Creating the Midnight Purple Gems Nail Look
Step 1: Base Prep
Apply a durable base coat, then layer a deep purple polish for a plush, velvety hue, using two coats for rich opacity. Let it dry to prep for texture.
Step 2: Matte the Base
Brush a matte top coat over all nails, letting it dry to a soft, light-absorbing finish that evokes midnight elegance. Ensure even coverage for a smooth, plush feel.
Step 3: Place Rhinestones
With tweezers, apply a dot of nail glue near each cuticle, pressing small, clear rhinestones—two or three per nail—for a sparkling crown. Vary sizes for a cascading, luxe effect.
Step 4: Secure Gems
Press each rhinestone firmly to set the glue, letting it cure for a minute to ensure they stay put under lights. Clean excess glue with a Q-tip for a pristine look.
Step 5: Seal with Top Coat
Finish with a matte top coat around (not over) the rhinestones to lock in the velvet texture while letting the gems shine. Add a second layer for a lasting, glamorous finish.
Why It Works
The deep purple matte base cloaks your nails in a rich, mysterious elegance, while rhinestones ignite a dazzling contrast that screams nightlife glamour. Its tactile luxury and sparkling pop make it a bold, chic choice for any evening spotlight.
25. Lilac Unicorn Shimmer
Cast a spell with Lilac Unicorn Shimmer, a magical design that drapes lilac nails in iridescent shimmer for a dreamy, unicorn-inspired glow. Perfect for fantasy-themed parties or whimsical days, this look sparkles with enchanting charm.
Creating the Lilac Unicorn Shimmer Nail Look
Step 1: Base Prep
Apply a hydrating base coat, then layer a lilac polish for a soft, mystical hue, using two coats for even color. Let it dry to prep for shimmer.
Step 2: Paint the Base
Brush a glossy top coat over all nails to enhance the lilac’s glow, letting it dry to a smooth, radiant finish. This sets the magical stage.
Step 3: Add Iridescence
Apply an iridescent shimmer polish or rub holo powder with a sponge over the lilac, buffing for a shifting, rainbow-like gleam. Layer twice for a full, unicorn glow.
Step 4: Enhance Magic
Sponge fine glitter flecks in pink or silver over some nails for a subtle, enchanted sparkle that dances in light. Keep it light to preserve the dreamy vibe.
Step 5: Seal with Top Coat
Finish with a glossy top coat to lock in the shimmer and boost its shine, ensuring a lasting, magical glow. Add a second layer for a slick, ethereal finish.
Why It Works
The lilac base weaves a soft, pastel magic, while iridescent shimmer casts a playful, unicorn-like spell that’s both whimsical and captivating. Its radiant, shifting glow makes it a dreamy standout for fantasy flair or lighthearted days.
26. Purple Watercolor Waves
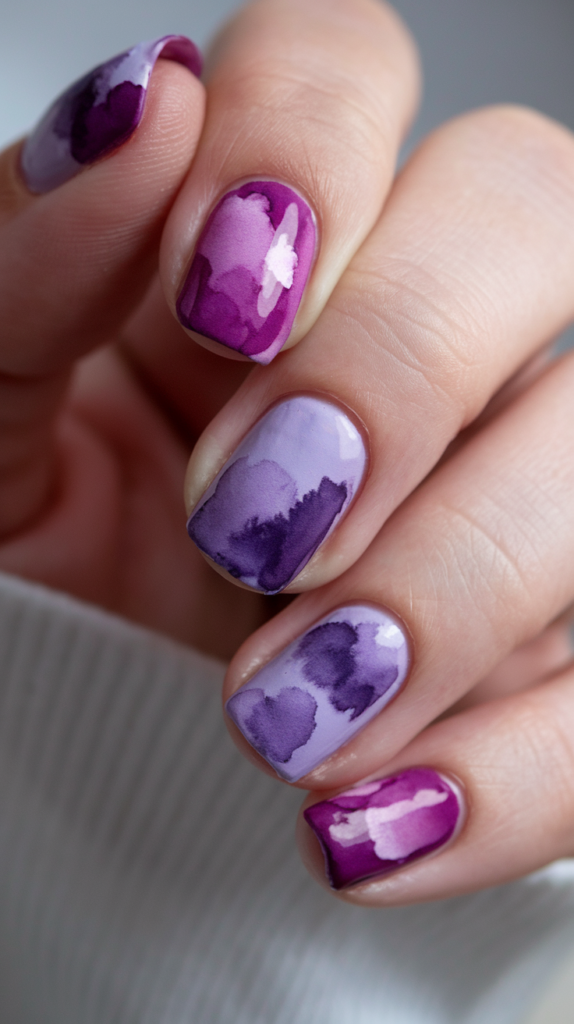
Paint your creativity with Purple Watercolor Waves, an abstract design that blends soft purple tones into a fluid, artistic wash for a soulful expression. Perfect for gallery visits or casual artsy days, this look flows with delicate, painterly charm.
Creating the Purple Watercolor Waves Nail Look
Step 1: Base Prep
Apply a protective base coat, then layer a white polish for a bright, watercolor-ready canvas, using two coats for even opacity. Let it dry to anchor the hues.
Step 2: Drop the Colors
Dot light lavender, violet, and lilac polish in random patches on each nail while the base is tacky, letting them bleed slightly. Work fast to keep them blendable.
Step 3: Blend with Acetone
Dip a fine brush in acetone and gently swirl the colors together, blurring edges for a soft, watercolor wash that flows organically. Vary pressure for a fluid, abstract effect.
Step 4: Add Depth
Dot a darker purple in some areas with a toothpick, blending lightly to deepen the wash without overpowering the softness. Keep it subtle for an artistic haze.
Step 5: Seal with Top Coat
Finish with a glossy top coat to protect the watercolor and boost its gentle shine, ensuring a lasting, fluid look. Add a second layer for a polished, painterly finish.
Why It Works
The soft purple tones melt into a watercolor blur, offering an artistic, free-form charm that’s both subtle and expressive. Its fluid beauty makes it a versatile canvas for boho vibes or creative escapes.
27. Lilac Silver Spark
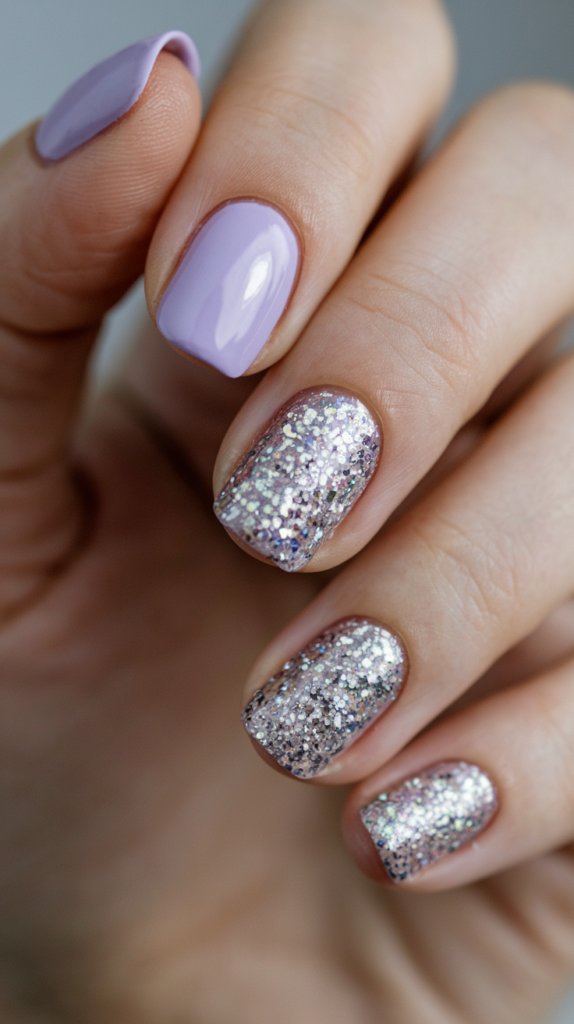
Blend softness with sparkle in Lilac Silver Spark, a design that alternates lilac polish with silver glitter for a chic, bold-meets-gentle vibe. Perfect for festive brunches or twinkling nights, this look balances delicate hues with radiant flair.
Creating the Lilac Silver Spark Nail Look
Step 1: Base Prep
Apply a smoothing base coat, then paint alternate nails with lilac polish—two coats for a soft, even hue—leaving others bare for glitter. Let it dry to prep the mix.
Step 2: Paint Lilac
Brush a glossy top coat over the lilac nails to enhance their gentle glow, letting it dry to a smooth, radiant finish. This sets the soft side of the duo.
Step 3: Add Silver Glitter
Sponge silver glitter polish onto the bare nails, layering from tip to base for a bold, twinkling shimmer that contrasts the lilac. Build layers for full, dazzling coverage.
Step 4: Refine the Mix
Clean edges between lilac and glitter with a small brush and acetone, ensuring a crisp, alternating pattern that pops. Let it set to lock the contrast.
Step 5: Seal with Top Coat
Finish all nails with a glossy top coat to unify the look and boost the glitter’s shine, ensuring a lasting, balanced sparkle. Add a second layer for a polished, bold finish.
Why It Works
The lilac nails soften the design with a gentle, pastel charm, while silver glitter bursts with a bold, radiant edge that catches every light. Its playful mix of textures makes it a versatile standout for both subtle and celebratory moments.
28. Violet Whirl Delight
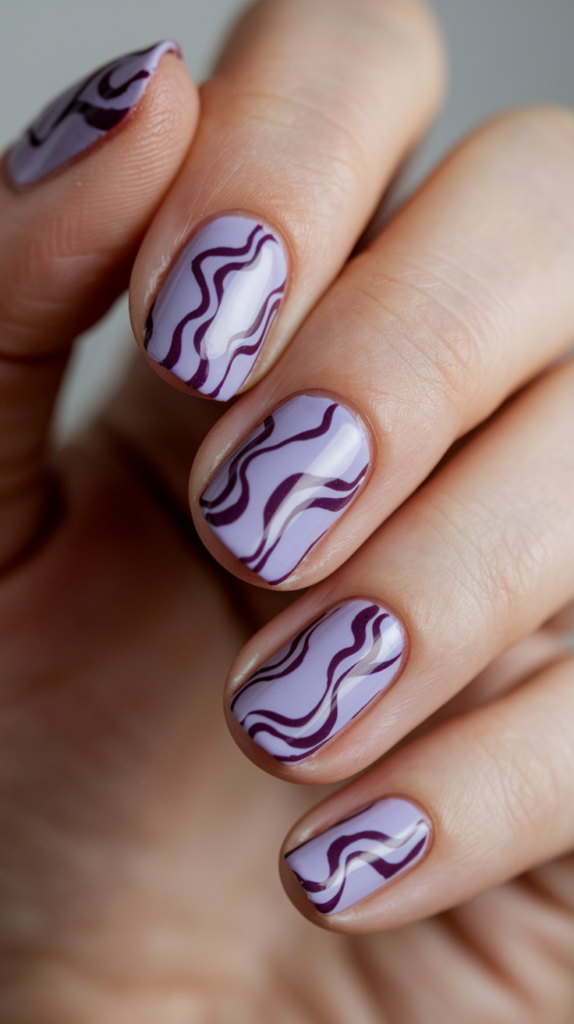
Twirl into fun with Violet Whirl Delight, a dynamic design that spins dark purple swirls across a light purple base for a playful, eye-catching vibe. Perfect for artsy outings or casual flair, this look dances with bold, fluid energy.
Creating the Violet Whirl Delight Nail Look
Step 1: Base Prep
Apply a protective base coat, then layer a light purple polish for a soft, swirling canvas, using two coats for even hue. Let it dry to anchor the design.
Step 2: Paint the Base
Brush a glossy top coat over all nails to enhance the purple’s glow, letting it dry to a smooth, radiant finish. This primes the swirling stage.
Step 3: Add Dark Swirls
With a fine brush, paint dark purple swirls—spiraling on some nails, wavy on others—for a dynamic, free-form flow. Layer twice for bold, standout lines.
Step 4: Refine the Flow
Use a toothpick to tweak swirl edges while wet, ensuring a smooth, organic dance, then clean skin with acetone for a crisp finish. Let it set to lock the motion.
Step 5: Seal with Top Coat
Finish with a glossy top coat to protect the swirls and boost their shine, ensuring a lasting, playful twist. Add a second layer for a polished, dynamic glow.
Why It Works
The light purple base offers a soft, playful backdrop, while dark violet swirls spin with a bold, energetic flair that’s both fun and striking. Its fluid, abstract charm makes it a trendy pick for creative, carefree vibes.
29. Purple Foil Flash
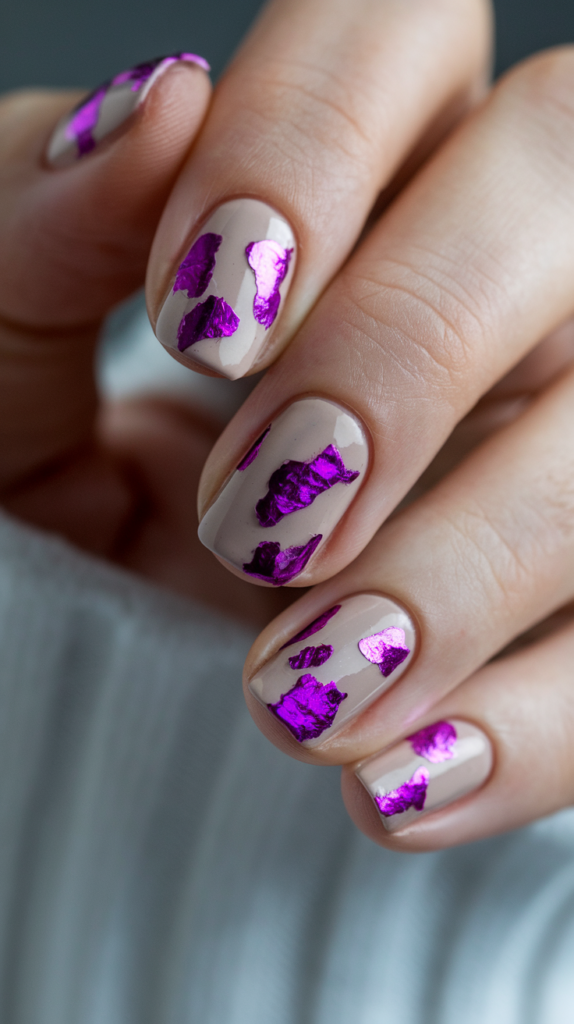
Gleam with edge in Purple Foil Flash, a modern design that scatters purple metallic foil over a nude base for an abstract, high-shine vibe. Perfect for gallery openings or bold days out, this look blends subtle tones with metallic flair.
Creating the Purple Foil Flash Nail Look
Step 1: Base Prep
Apply a protective base coat, then layer a nude polish for a soft, modern canvas, using two coats for even coverage. Let it dry to prep for foil.
Step 2: Paint the Base
Brush a glossy top coat over all nails to enhance the nude’s glow, letting it dry slightly tacky for foil adhesion. This sets the subtle stage.
Step 3: Add Foil Accents
With tweezers, press purple foil flakes in random patches—tips, sides, or centers—over the tacky polish for an abstract, metallic pop. Vary placement for a handcrafted feel.
Step 4: Secure Foil
Press the foil gently with a sponge to ensure it sticks, then tap off excess for a sleek, scattered effect. Let it set to lock the shine.
Step 5: Seal with Top Coat
Finish with a glossy top coat to protect the foil and boost its gleam, ensuring a lasting, modern shine. Add a second layer for a polished, metallic finish.
Why It Works
The nude base keeps the design soft and wearable, while purple foil flashes a bold, metallic edge that’s both chic and contemporary. Its abstract shimmer makes it a versatile standout for minimalist or avant-garde looks.
30. Violet White Ombre
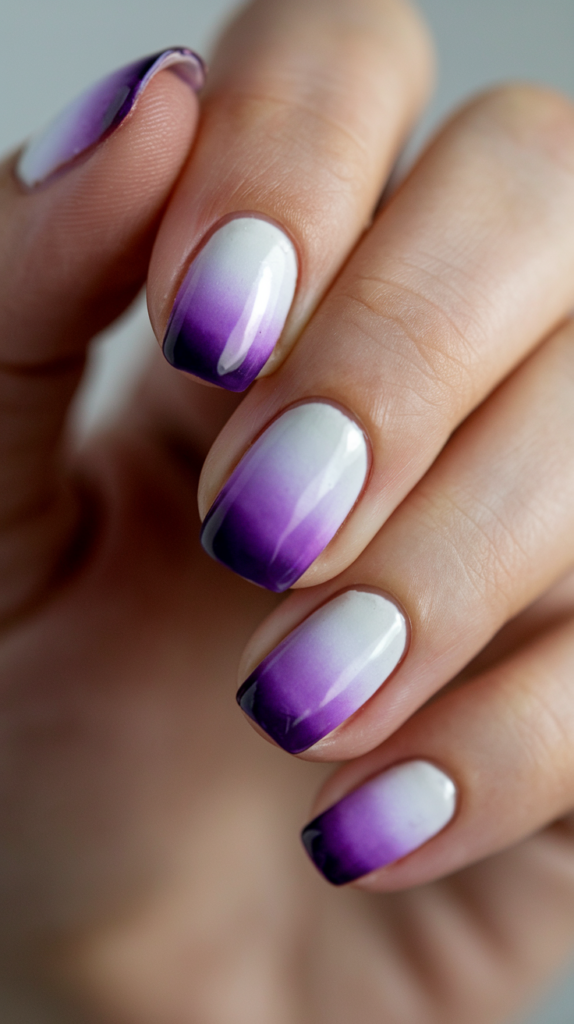
Fade into elegance with Violet White Ombre, a seamless gradient that flows from deep violet tips to a pure white base for a classic, polished look. Perfect for weddings or refined days, this design blends bold and soft with timeless grace.
Creating the Violet White Ombre Nail Look
Step 1: Base Prep
Apply a hydrating base coat, then layer a white polish for a bright, clean start, using two coats for full opacity. Let it dry to prep for the fade.
Step 2: Sponge the Gradient
Paint deep violet and white polish side-by-side on a makeup sponge, overlapping slightly, then dab it onto your nails from tip to base. Repeat with light taps for a smooth, flowing fade.
Step 3: Blend the Fade
Use a clean sponge section to soften the violet into the white, blending until the gradient melts seamlessly. Clean skin with acetone for a tidy transition.
Step 4: Add Shine
Brush a glossy top coat over all nails to polish the ombre and enhance its depth, ensuring a sleek, radiant glow. Let it dry for a refined finish.
Step 5: Final Seal
Finish with a second glossy top coat for a lasting, glass-like shine that ties the fade together. Cure fully for a polished, classic look.
Why It Works
The deep violet tips bring a bold, modern twist to the white base’s soft purity, creating a gradient that’s both striking and elegant. Its timeless flow makes it a versatile classic, pairing with formal gowns or casual whites effortlessly.
31. Lilac Dot Delight
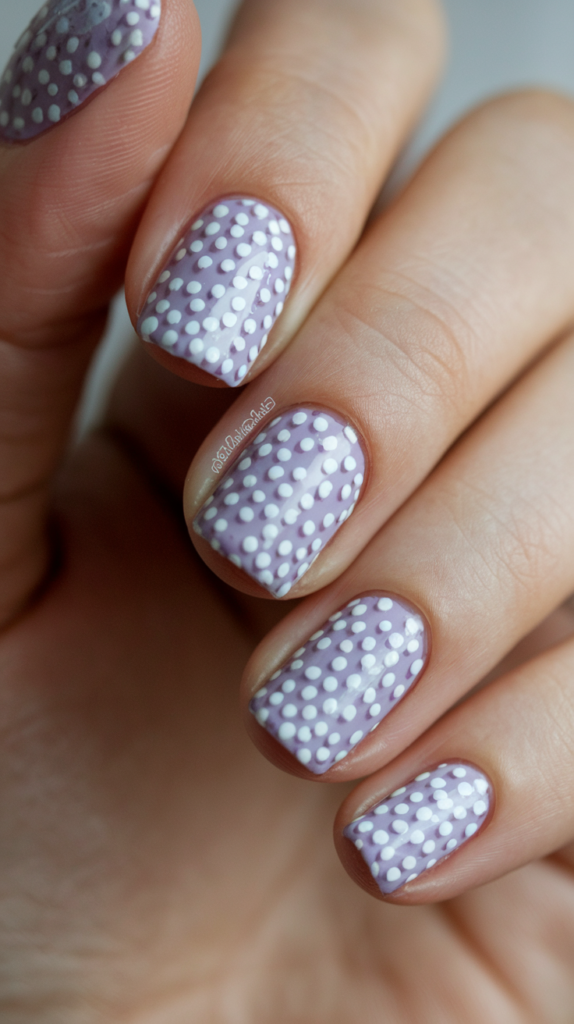
Dot your days with Lilac Dot Delight, a playful design that sprinkles white dots over a light purple base for a simple, cheerful vibe. Perfect for picnics or casual hangouts, this look bubbles with easy, timeless fun.
Creating the Lilac Dot Delight Nail Look
Step 1: Base Prep
Apply a protective base coat, then layer a light purple polish for a soft, playful hue, using two coats for even color. Let it dry to anchor the dots.
Step 2: Paint the Base
Brush a glossy top coat over all nails to enhance the lilac’s glow, letting it dry to a smooth, radiant finish. This primes the dotted canvas.
Step 3: Add Polka Dots
With a dotting tool or bobby pin tip, dab white polish into small, uniform dots across each nail—spaced evenly for a clean pattern. Layer twice for bright, standout spots.
Step 4: Refine the Dots
Use a fine brush to tweak any wobbly dots, ensuring a crisp, playful scatter, then clean skin with acetone for a tidy look. Let it set to lock the cheer.
Step 5: Seal with Top Coat
Finish with a glossy top coat to protect the dots and boost their shine, ensuring a lasting, bubbly glow. Add a second layer for a polished, fun finish.
Why It Works
The light purple base bubbles with gentle charm, while white polka dots sprinkle a playful, retro joy that’s effortlessly cute. Its simple, versatile pattern makes it a go-to for any casual, lighthearted moment.
32. Bold Purple Cutouts
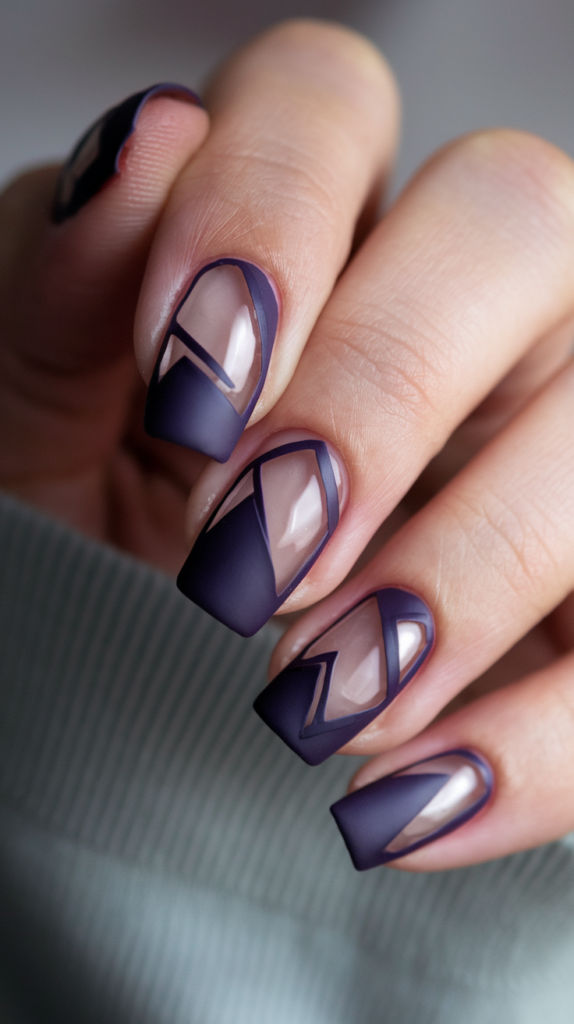
Cut through with Bold Purple Cutouts, a minimalist design that pairs bold purple with clear geometric cutouts for a sleek, modern vibe. Perfect for office chic or art openings, this look balances richness with airy simplicity.
Creating the Bold Purple Cutouts Nail Look
Step 1: Base Prep
Apply a strengthening base coat, leaving nails bare for the negative space effect, ensuring a clean, natural start. Let it dry to prep for polish.
Step 2: Tape the Shapes
Lay striping tape in geometric patterns—triangles or diagonals—across each nail, pressing firmly to block off clear sections. Vary designs for a modern, abstract feel.
Step 3: Paint the Purple
Brush deep purple polish over the taped nails, layering twice for a bold, opaque finish, then peel the tape off carefully while wet. Clean smudges with acetone for sharp lines.
Step 4: Add Shine
Brush a glossy top coat over the purple areas to enhance their depth, leaving the negative space clear for contrast. Let it dry for a sleek, minimalist glow.
Step 5: Final Seal
Finish with a second glossy top coat on the purple sections for a lasting, polished shine that highlights the cutouts. Cure fully for a bold, airy finish.
Why It Works
The deep purple delivers a rich, bold punch, while clear negative space cuts through with a light, modern simplicity that keeps it chic. Its geometric balance makes it a minimalist masterpiece, perfect for structured or subtle looks.
33. Purple Blossom Accents
Bloom year-round with Purple Blossom Accents, a feminine design that graces soft purple nails with intricate floral details for a delicate, timeless touch. Perfect for garden parties or quiet days, this look blossoms with gentle elegance.
Creating the Purple Blossom Accents Nail Look
Step 1: Base Prep
Apply a hydrating base coat, then layer a soft purple polish for a floral-ready hue, using two coats for even color. Let it dry to set the stage.
Step 2: Paint the Base
Brush a glossy top coat over all nails to enhance the purple’s glow, letting it dry to a smooth, radiant finish. This primes the floral canvas.
Step 3: Add Floral Accents
On one or two accent nails (like ring fingers), paint white flowers with a fine brush—dot a center, then swirl petals—for a delicate bloom. Layer twice for soft depth.
Step 4: Detail the Blooms
Dot pink or yellow centers with a toothpick, adding green leaves with a striping brush for a natural pop. Keep it light to maintain the feminine charm.
Step 5: Seal with Top Coat
Finish with a glossy top coat to protect the florals and boost their shine, ensuring a lasting, elegant bloom. Add a second layer for a polished, floral finish.
Why It Works
The soft purple base glows with gentle femininity, while floral accents sprinkle a delicate, garden-inspired charm that’s versatile across seasons. Its subtle elegance makes it a timeless pick for any occasion, from spring teas to winter cozies.
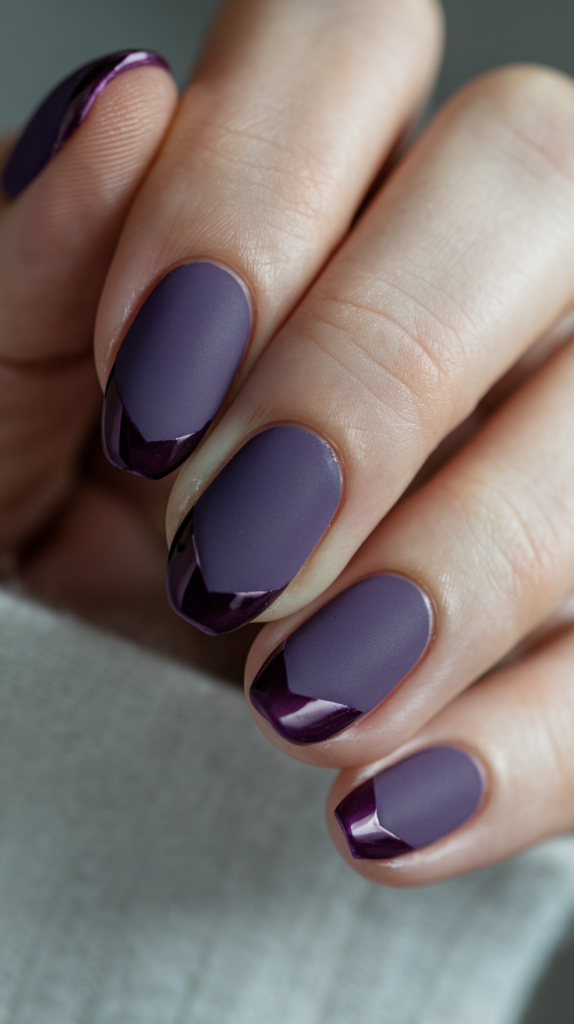
34. Grape Shine Contrast

Mix textures with Grape Shine Contrast, a chic design that pairs glossy grape purple nails with a matte lilac accent for a sophisticated, tactile twist. Perfect for dinner dates or stylish brunches, this look blends bold shine with soft restraint.
Creating the Grape Shine Contrast Nail Look
Step 1: Base Prep
Apply a strengthening base coat, then layer a grape purple polish on all but one nail per hand, using two coats for rich color. Let it dry to prep for texture.
Step 2: Gloss the Grape
Brush a glossy top coat over the grape nails, letting it dry to a slick, juicy shine that pops with depth. This sets the bold, radiant side.
Step 3: Matte the Accent
Paint the accent nail (like the ring finger) with lilac polish, then brush a matte top coat over it for a velvety, soft finish. Ensure even coverage for a plush contrast.
Step 4: Refine Edges
Clean any overlap between glossy and matte with a small brush and acetone, ensuring a sharp, chic divide. Let it set to highlight the texture play.
Step 5: Final Seal
Finish the glossy nails with a second top coat for lasting shine, leaving the matte accent untouched for tactile purity. Cure fully for a balanced, stylish finish.
Why It Works
The glossy grape nails gleam with bold, juicy richness, while the matte lilac accent softens the look with a velvety, chic restraint that’s pure sophistication. Its tactile contrast makes it a versatile standout for both bold and subtle ensembles.
35. Purple Heart Romance
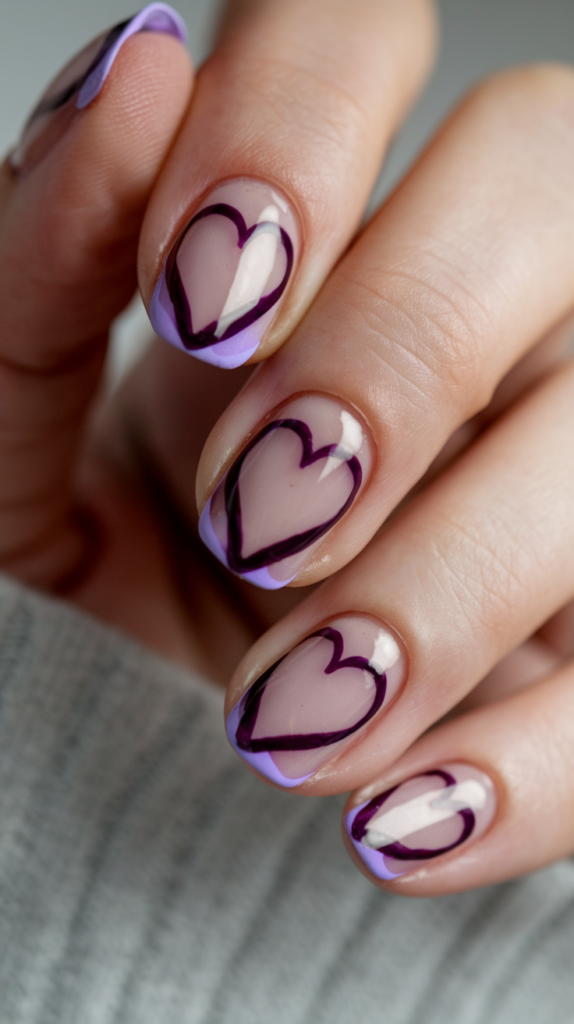
Flutter into romance with Purple Heart Romance, a unique French tip design that shapes deep purple hearts atop a lilac base for a tender, loving vibe. Perfect for Valentine’s dates or sweet celebrations, this look beats with heartfelt charm.
Creating the Purple Heart Romance Nail Look
Step 1: Base Prep
Apply a hydrating base coat, then layer a lilac polish for a soft, romantic hue, using two coats for even color. Let it dry to prep for hearts.
Step 2: Paint the Base
Brush a glossy top coat over all nails to enhance the lilac’s glow, letting it dry to a smooth, radiant finish. This sets the loving stage.
Step 3: Shape the Hearts
With a fine brush, paint deep purple hearts at each nail tip—two curved lines meeting in a point—for a romantic French twist. Layer twice for bold, heartfelt tips.
Step 4: Refine the Hearts
Use a toothpick to tweak heart edges, ensuring a crisp, loving shape, then clean skin with acetone for a tidy finish. Let it set to lock the romance.
Step 5: Seal with Top Coat
Finish with a glossy top coat to protect the hearts and boost their shine, ensuring a lasting, tender glow. Add a second layer for a polished, romantic finish.
Why It Works
The lilac base glows with soft, romantic charm, while deep purple heart tips add a bold, loving twist that’s both sweet and striking. Its playful elegance makes it a perfect beat for romantic moments or heartfelt celebrations.
Conclusion
These 35 purple nail art designs weave a vibrant thread through every style, from the soft whispers of lilac ombre to the bold blaze of neon violet, offering endless ways to express your unique flair.
Whether you’re dreaming up a romantic look or igniting a festival-ready edge, this collection proves purple’s power to transform your nails into a stunning statement.
With step-by-step guides and versatile inspiration, you’re equipped to recreate these looks or remix them into your own masterpiece, no matter the occasion.
Embrace the captivating charm of purple, and let your fingertips bloom with creativity that shines all year round.