Pink nail art is a timeless and versatile choice that never goes out of style, offering a wide range of designs from soft and romantic to bold and glamorous.
Whether you prefer minimalist styles or intricate details, pink nails can be customized to suit any occasion, mood, or personal style.
In this guide, we’ll explore 35 stunning pink nail art designs that are sure to inspire and delight, with detailed tips and techniques for creating everything from playful patterns to luxurious finishes.
Whether you’re looking to make a bold statement or add a subtle touch of elegance to your manicure, these pink nail art ideas are perfect for anyone seeking to elevate their nail game.
1. Elegant Glitter Ombre Nail Art
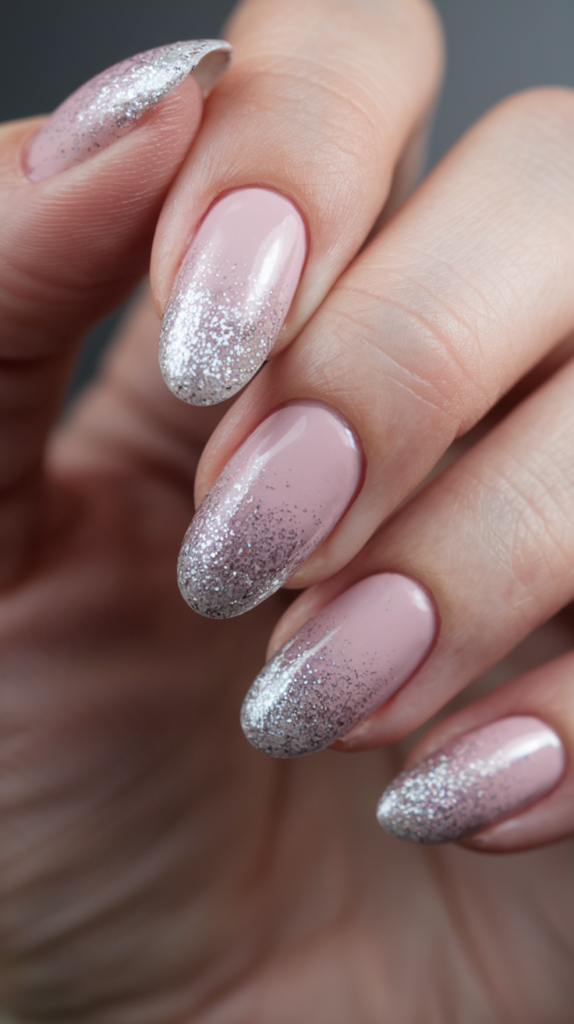
Elevate your look with a sophisticated blend of soft pink and sparkling silver in this elegant glitter ombre nail art design.
This style exudes class and modern charm, making it perfect for any occasion where you want to shine with subtle glamour.
Creating the Pink and Silver Ombre Effect
Step 1: Apply the Base Pink Color
Start by applying a soft pink nail polish as the base for your nails. Ensure the first layer is smooth and even, providing a perfect foundation for the ombre effect.
Step 2: Blend the Silver Glitter
While the pink polish is still wet, lightly apply silver glitter polish at the tips of your nails. Use a sponge or makeup sponge to gently blend the glitter into the pink, creating a smooth transition from the silver tips to the pink base.
Step 3: Set the Gradient Effect
Once the glitter is applied, use a clean sponge to help blend the ombre further, ensuring the gradient is soft and seamless. Allow the nails to dry completely before moving to the next step.
Adding the Finishing Touches
Step 1: Apply a Top Coat
To lock in the gradient design, apply a clear top coat over your nails. This step will help seal the glitter and give your nails a glossy, long-lasting finish.
Step 2: Add Extra Glitter (Optional)
For an extra touch of sparkle, you can apply additional glitter to the tips of your nails or around the cuticle area for a more dramatic effect.
Why It Works
Elegant Glitter Ombre Nail Art is a timeless design that combines the softness of pink with the radiant shimmer of silver glitter.
The ombre effect offers a modern yet understated look, perfect for both casual and formal events.
The subtle gradient adds depth to the nails, while the glitter brings an enchanting, eye-catching element. This design is ideal for anyone looking for a sophisticated yet dazzling nail art choice.
2. Soft Pink and Silver Glitter Ombre Nail Art
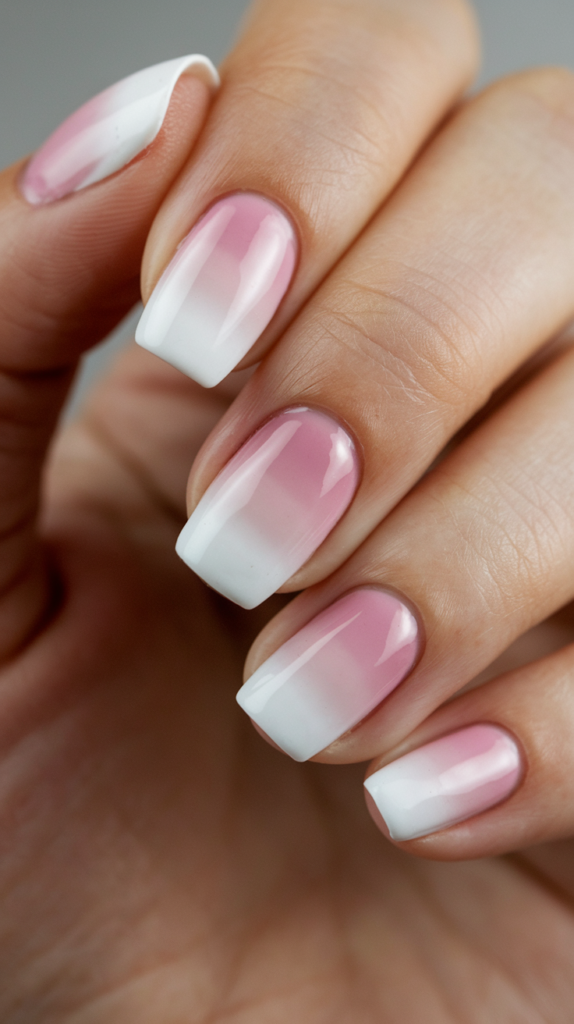
Transform your nails with this elegant blend of soft pink and silver glitter in an ombre design.
This nail art offers a sophisticated yet sparkling look, making it perfect for special occasions or whenever you want to add a touch of glamour to your style.
Creating the Pink and Silver Glitter Ombre Effect
Step 1: Apply the Base Pink Color
Start by applying a soft pink nail polish as the base color on all your nails. Ensure the color is even and smooth, creating the perfect canvas for the ombre effect.
Step 2: Apply the Silver Glitter
While the pink polish is still slightly wet, apply silver glitter polish to the tips of your nails. For a more seamless ombre effect, gently use a sponge to blend the glitter into the pink, creating a gradient.
Step 3: Blend the Ombre Effect
Once the glitter is applied, use a sponge to further blend the silver and pink together, ensuring the transition is smooth and soft. Allow the design to dry completely before proceeding.
Finishing Touches for a Polished Look
Step 1: Apply a Clear Top Coat
Seal your ombre design with a clear top coat to give it a glossy finish and enhance the shine of the glitter. This will also help the design last longer.
Step 2: Optional: Add Extra Glitter
If you want to add more sparkle, you can apply additional glitter to the tips or around the nail bed for extra emphasis.
Why It Works
Soft Pink and Silver Glitter Ombre Nail Art offers the perfect balance between elegance and sparkle.
The smooth gradient from pink to glitter creates a soft, feminine look, while the silver adds just the right amount of shimmer to capture attention.
This design is versatile enough for both casual and formal occasions, making it a timeless choice for anyone who wants a bit of magic on their nails.
3. Swirled Pink and White Marble Nail Art
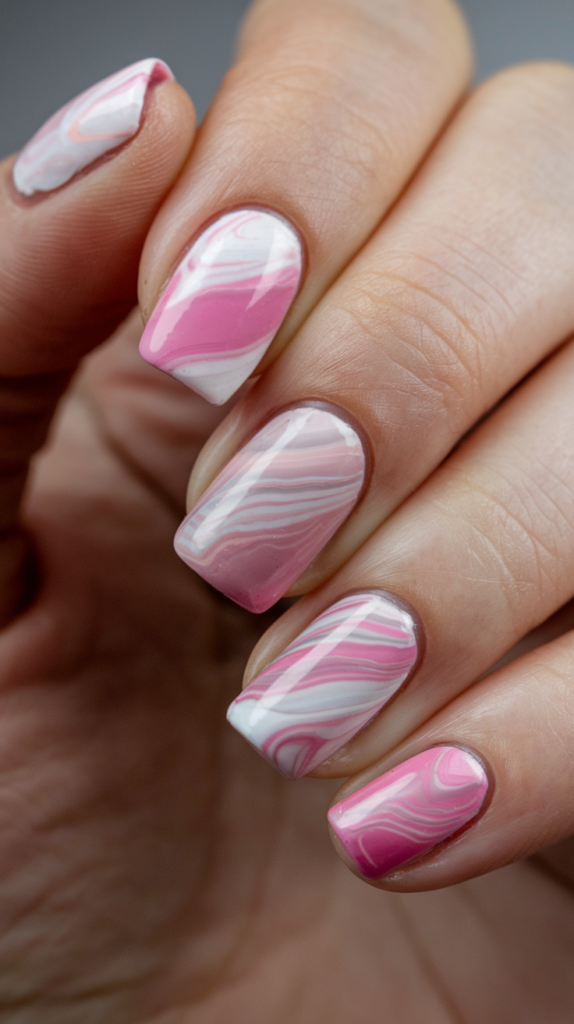
Achieve a soft and sophisticated look with this swirled pink and white marble nail art.
The flowing patterns and subtle hues create a dreamy, artistic design that brings an elegant touch to your nails.
This style is perfect for those who love a timeless, yet modern manicure.
Creating the Pink and White Marble Effect
Step 1: Apply the Base Color
Start with a clean base coat and apply a pale pink polish on all your nails. Allow it to dry fully, creating a smooth surface for the marble effect.
Step 2: Add White Polish
Next, apply a white polish to some parts of the nail. This doesn’t need to be uniform, as the irregularity will contribute to the marble effect.
Step 3: Swirl the Two Colors Together
Using a small nail art brush or a toothpick, gently swirl the pink and white polishes together. The key to achieving the perfect marble effect is to work quickly before the polishes dry, allowing the colors to blend while maintaining a unique pattern.
Step 4: Let It Dry
Allow the marble design to dry completely before moving forward. This ensures the lines and swirls set properly.
Adding a Touch of Gloss and Shine
Step 1: Apply a Top Coat
Once the design is dry, apply a clear top coat to seal in the marble pattern and give your nails a glossy finish.
Step 2: Optional: Add Extra Swirls
If you’d like more intricate patterns, you can add additional swirls or accents using a small detail brush. This will help create a more customized, artistic look.
Why It Works
Swirled Pink and White Marble Nail Art is a beautifully modern take on classic marble designs. The soft pink and white tones blend seamlessly, creating a look that is both delicate and striking.
The swirling effect adds depth and dimension to the nails, making them appear almost fluid.
This design is perfect for anyone looking for a graceful yet bold nail art choice that can transition well from everyday wear to more formal occasions.
4. Pink Heart French Tip Nail Art
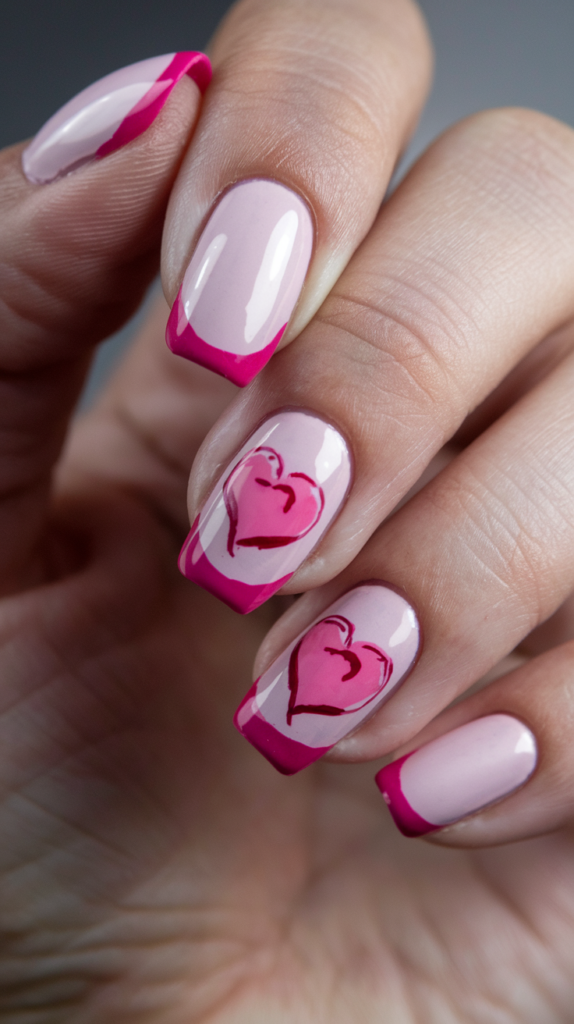
Add a fun and romantic twist to your nails with this Pink Heart French Tip Nail Art.
Combining classic French tips with adorable hand-drawn hearts, this design is perfect for special occasions like Valentine’s Day or any time you want to express love and creativity through your nails.
Creating the Pink French Tips
Step 1: Apply the Base Color
Start by applying a soft pink polish as the base color on all your nails. Ensure the base is smooth and even for the perfect foundation for your design.
Step 2: Apply the Pink French Tips
Once the base color has dried, use a vibrant pink polish to carefully create the French tips. You can use a French tip guide or freehand the tips, depending on your preferred technique. Ensure the tips are bold enough to stand out while complementing the base color.
Step 3: Clean Up the Tips
If needed, use a small brush or clean-up tool to fix any uneven lines or mistakes around the French tips.
Adding the Heart Details
Step 1: Draw the Hearts
Using a fine nail art brush and a deeper pink or red polish, carefully draw hearts on the center of one or two accent nails. Aim for a clean, symmetrical heart shape with a smooth outline.
Step 2: Fill in the Hearts
Once the outline is complete, fill in the hearts with the same pink polish or a slightly darker shade for contrast. Make sure the heart shapes are well-defined and the filling is smooth.
Finishing Touches for a Polished Look
Step 1: Apply a Top Coat
Seal your nail art with a clear top coat to give it a glossy finish and ensure the design lasts longer.
Step 2: Optional: Add Sparkle
For extra glamour, you can add a few small, sparkling rhinestones or a fine glitter polish over the hearts or French tips.
Why It Works
Pink Heart French Tip Nail Art is a playful yet chic design that combines the elegance of a classic French manicure with a fun, romantic flair.
The bold pink tips offer a striking contrast to the soft pink base, while the hand-drawn hearts add a personal and sweet touch.
This design is perfect for anyone looking for a fresh take on French tips, ideal for love-filled celebrations or simply adding a bit of charm to your nails.
5. Cherry Blossom Nail Art
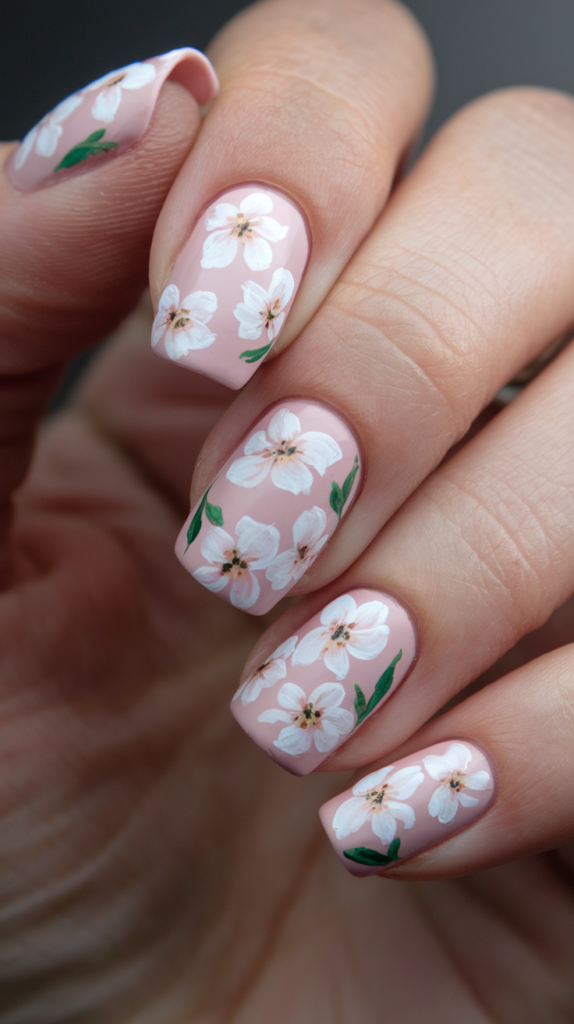
Celebrate the beauty of spring with this charming cherry blossom nail art.
The delicate white flowers paired with soft pink tones and green leaves bring a serene, nature-inspired look to your nails, making it perfect for any floral enthusiast or those seeking a fresh, feminine touch.
Creating the Cherry Blossom Design
Step 1: Apply the Base Pink Color
Start by applying a soft pink polish to all your nails. This light shade will act as the perfect canvas to bring out the vibrancy of the cherry blossoms.
Step 2: Paint the Cherry Blossoms
Using a fine detail brush, carefully paint five-petaled flowers in white polish across your nails. Add a subtle hint of pink in the center of each flower to mimic the natural depth of cherry blossoms. Spread the flowers across the nails to give a balanced, flowing effect.
Step 3: Add the Leaves
Use a green polish to create small, delicate leaves around the flowers. Vary the size of the leaves and scatter them naturally to enhance the organic feel of the design.
Enhancing the Details
Step 1: Outline the Flowers
For extra definition, outline the petals of the flowers with a thin line of light brown or soft pink polish. This will make the blossoms stand out against the pink base.
Step 2: Add Subtle Highlights to the Leaves
To bring out the leaves, add small highlights with a lighter green or even a touch of white near the veins to give them dimension and make them pop.
Finishing Touches
Step 1: Apply a Top Coat
Seal the design with a clear top coat to give the nail art a glossy finish and ensure the details stay intact.
Step 2: Optional: Add Subtle Sparkles
For a more ethereal look, you can add a touch of fine glitter over the blossoms for a soft shimmer effect that mimics sunlight glinting off the flowers.
Why It Works
Cherry Blossom Nail Art captures the delicate beauty of nature with its soft color palette and intricate floral details.
The pink base creates a serene foundation, while the white flowers and green leaves bring freshness and life to the design.
This elegant nail art is perfect for anyone looking to embrace the beauty of spring on their nails, with a sophisticated and feminine touch.
6. Mirror Rose Gold Stiletto Nails
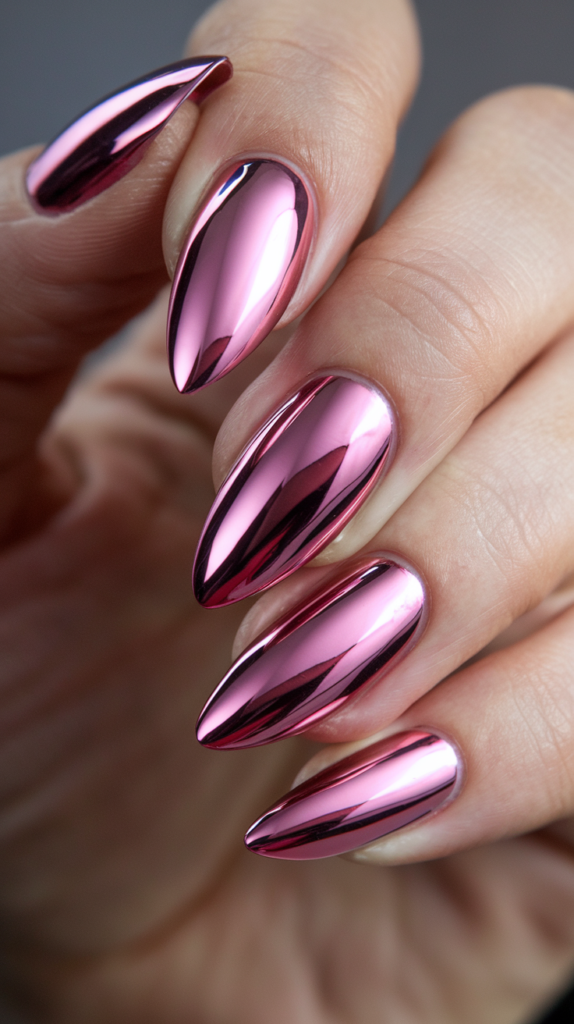
Step up your nail game with this stunning Mirror Rose Gold Stiletto Nail Art.
Featuring a sleek and shiny metallic finish, this design is perfect for those who love bold and modern nail aesthetics.
The reflective chrome effect gives the nails a luxurious, high-fashion feel that’s sure to turn heads.
Creating the Mirror Rose Gold Effect
Step 1: Apply the Base Coat
Start by applying a high-quality base coat to your nails. This will help protect your nails and provide a smooth surface for the chrome finish.
Step 2: Apply Rose Gold Polish
Apply a rose gold gel or chrome nail polish to each nail, ensuring the color is evenly distributed. Make sure to use a thin layer to avoid clumping and ensure smooth coverage.
Step 3: Cure the Gel Polish
If you’re using a gel polish, cure the polish under a UV/LED lamp to set the color and achieve a smooth, glossy base for the mirror effect.
Creating the Mirror Finish
Step 1: Apply the Mirror Powder
Once the rose gold polish has cured, apply a thin layer of mirror chrome powder over the nail. Gently rub the powder in with a soft applicator or sponge until the surface is completely reflective.
Step 2: Buff and Smooth the Surface
Buff the nails lightly to smooth out any uneven spots and ensure the mirror finish is flawless.
Finishing Touches
Step 1: Seal with a Top Coat
To preserve the mirror finish and add extra shine, apply a no-wipe top coat to your nails. This will also help your manicure last longer.
Step 2: Optional: Add Nail Art Details
For a more unique look, you can add subtle nail art accents, such as geometric lines or crystals, to further enhance the design.
Why It Works
Mirror Rose Gold Stiletto Nails create a bold statement with their eye-catching metallic finish.
The sleek, pointed stiletto shape amplifies the reflective shine, while the rose gold tone adds a touch of elegance and luxury.
This design is perfect for anyone looking for a modern, high-fashion nail art that’s sure to stand out at any event or occasion.
7. Classic French Manicure Nail Art
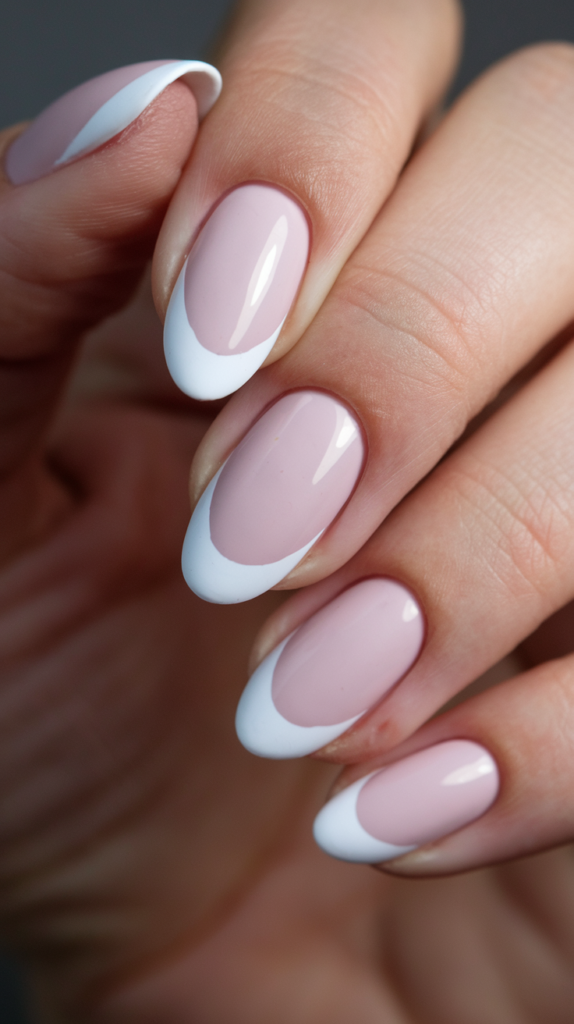
Elevate your nail game with the timeless elegance of this Classic French Manicure Nail Art.
Featuring a soft pink base and crisp white tips, this design is the epitome of sophistication and simplicity, making it ideal for both everyday wear and special occasions.
Creating the French Tip Design
Step 1: Apply the Base Pink Color
Start by applying a smooth, even coat of soft pink nail polish to each nail. This subtle shade serves as a neutral base that enhances the elegance of the white tips.
Step 2: Create the White Tips
Once the base coat is dry, use a fine nail brush or French tip stickers to carefully paint the tips of your nails with white polish. Ensure the white tips are even and crisp to maintain a clean and classic look.
Step 3: Perfect the Tip Line
If needed, use a small clean-up brush to sharpen the line of the French tips and fix any areas where the white polish has gone outside the lines.
Adding the Finishing Touches
Step 1: Apply a Top Coat
Seal the design with a glossy top coat to give the nails a smooth, shiny finish and protect the manicure from chips.
Step 2: Optional: Extra Shine
For an added touch of brilliance, apply an additional layer of top coat for extra shine and longevity.
Why It Works
Classic French Manicure Nail Art embodies elegance and simplicity with its subtle pink base and perfectly defined white tips.
This design is ideal for those who appreciate timeless beauty, providing a clean and refined look that is suitable for any occasion.
Whether you’re attending a formal event or simply want to elevate your everyday style, this French manicure will always be in fashion.
8. Leopard Print Nail Art with Gold Accents
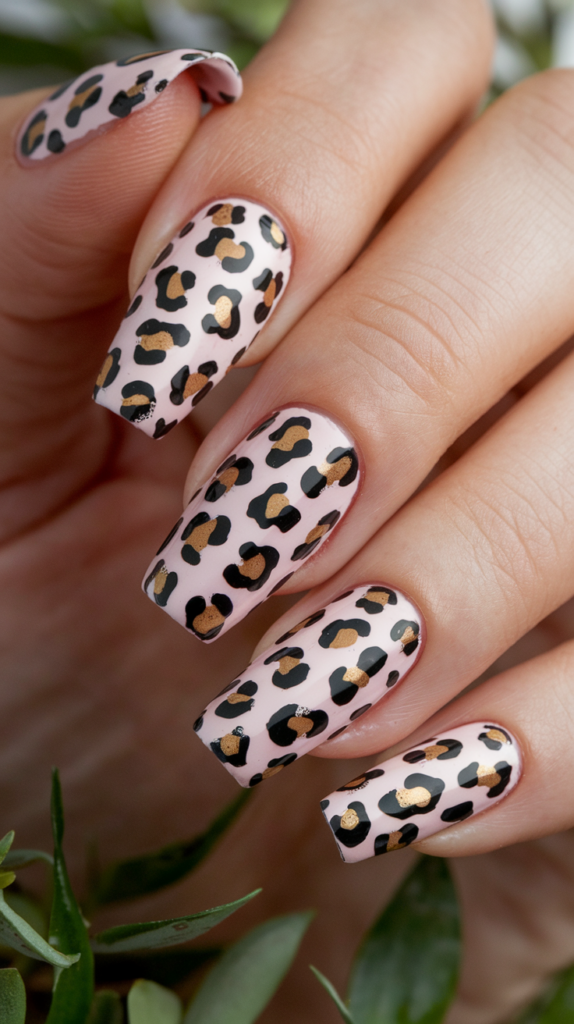
Unleash your wild side with this trendy Leopard Print Nail Art, featuring bold black and gold spots on a soft pink base.
This design combines the classic allure of animal prints with a touch of glam, making it the perfect statement look for anyone who wants to add a fierce and fashionable twist to their manicure.
Creating the Leopard Print Pattern
Step 1: Apply the Base Pink Color
Start by applying a soft pink polish to all your nails. This neutral shade will allow the bold leopard print to pop and create a soft contrast.
Step 2: Create the Leopard Spots
Using a black nail polish and a fine nail art brush, carefully paint irregular spots on the nails. Focus on making the spots appear organic and varied in size for a more natural animal print look.
Step 3: Add the Gold Accents
Using a gold nail polish or metallic paint, add small highlights or dots inside the black spots. This touch of gold adds a luxurious twist to the design and enhances its overall appeal.
Adding Finishing Details
Step 1: Outline the Spots
For more definition, outline some of the black spots with a thin line of gold to create contrast and emphasize the design.
Step 2: Apply a Top Coat
Seal the design with a glossy top coat to give it a smooth finish and make the colors pop. This also helps the manicure last longer and protects it from chipping.
Why It Works
Leopard Print Nail Art with Gold Accents combines a classic wild pattern with a modern, glamorous touch.
The soft pink base provides a perfect balance to the boldness of the black and gold spots, while the gold highlights add a luxurious shine.
This design is perfect for anyone who loves to experiment with edgy, statement-making nails while keeping a touch of sophistication.
9. Geometric Rose Gold Nail Art
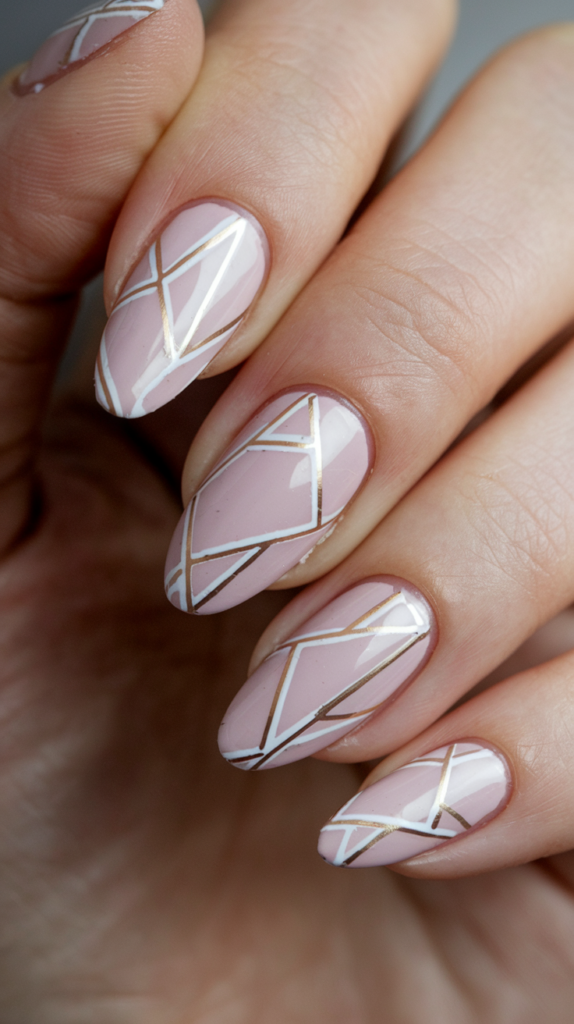
Add a modern and chic touch to your nails with this Geometric Rose Gold Nail Art.
Featuring delicate lines and angles in rose gold against a soft pink base, this design exudes sophistication and elegance, perfect for anyone looking for a stylish, fashion-forward manicure.
Creating the Geometric Design
Step 1: Apply the Base Pink Color
Start by applying a soft pink polish to all your nails. This neutral shade will act as the perfect backdrop for the geometric lines and create a clean, smooth surface.
Step 2: Draw the Geometric Shapes
Using a fine detail brush and white polish, create various geometric shapes across each nail. Focus on triangles, squares, and lines, ensuring they are asymmetrical to add dimension and interest.
Step 3: Outline the Shapes with Rose Gold
Once the white shapes are dry, carefully outline the geometric designs with rose gold nail polish. The rose gold will add a metallic shine and give the design a luxe feel.
Adding the Finishing Touches
Step 1: Apply a Top Coat
Seal the design with a clear top coat to smooth the surface and enhance the shine. This will also ensure the design lasts longer and stays fresh.
Step 2: Optional: Add Extra Lines
For added dimension and a more intricate design, you can add more fine lines or accents in the rose gold to further highlight the geometric patterns.
Why It Works
Geometric Rose Gold Nail Art brings together sleek lines and modern shapes with a touch of metallic glam.
The soft pink base provides an elegant backdrop, while the white and rose gold geometric accents create a stunning contrast.
This design is perfect for anyone looking to add a fashionable, bold statement to their manicure with a sophisticated and refined touch.
10. Neon French Tip Nail Art
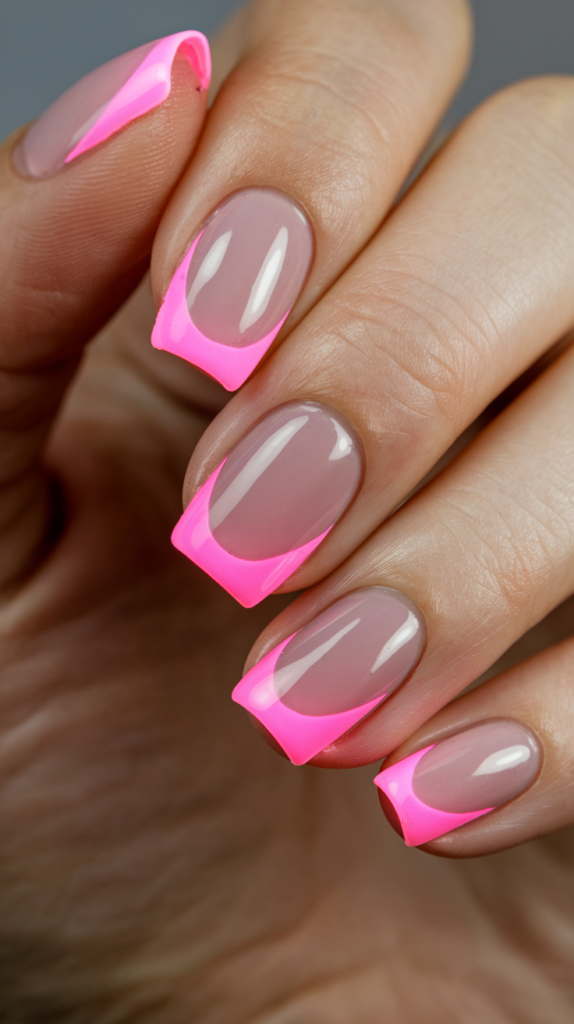
Neon French Tip nails take a bold twist on a classic design, featuring bright neon pink tips paired with a soft, nude base.
This design is perfect for anyone who loves a mix of elegance and flair, making it suitable for both casual and special occasions.
Creating Neon French Tips
Step 1: Apply the Base Coat
Begin by applying a nude or soft pink base color to all your nails. Ensure an even and smooth finish for a flawless look.
Step 2: Outline the Tips with Neon Pink
Once the base coat is dry, use a fine nail brush or French tip sticker to create a bold neon pink line along the tips of your nails. The clean, sharp contrast between the pink and nude colors is key to this design’s boldness.
Step 3: Smooth and Shape the Tips
For a perfect finish, carefully shape the neon pink tips to your liking. You can go for a classic straight edge or a soft, rounded curve for a more modern feel.
Step 4: Apply a Top Coat
Finish by applying a clear top coat to seal the design and add shine, ensuring it lasts longer while maintaining a sleek look.
Why It Works
Neon French Tip Nail Art stands out for its dynamic combination of classic French tips and striking neon color.
The nude base brings a sophisticated feel, while the neon pink tips add a playful, eye-catching pop.
This nail art strikes the perfect balance between timeless elegance and trendy flair, making it a versatile and fun design for any occasion.
11. Pink Marble Nail Art

Pink Marble Nail Art offers a stunning and sophisticated design with swirling pink and white tones that create a marble effect.
This design gives your nails a luxurious, modern vibe, perfect for anyone looking to add a touch of elegance to their manicure.
Creating the Pink Marble Effect
Step 1: Apply the Base Coat
Start by applying a light pink or nude base color to all your nails. This will serve as the background for the marbled effect. Allow the base coat to dry completely.
Step 2: Create the Marble Design
For the marble effect, use a small brush or a nail art sponge to apply alternating swirls of dark pink and white polish onto each nail.
Use a toothpick or nail art brush to gently swirl the two colors together, creating the marble-like patterns.
Step 3: Blend the Colors
Continue to swirl the colors until you achieve the desired effect. Try to avoid over-blending, as you want to keep some bold swirls for a more authentic marble look.
Step 4: Apply a Top Coat
Seal your design with a glossy top coat to smooth out the marbled surface and add extra shine. This will also help the design last longer.
Why It Works
Pink Marble Nail Art is a perfect balance of elegance and trendiness. The soft pink and white tones create a sophisticated marble effect that is both timeless and stylish.
The swirling pattern adds depth and texture, giving the nails a luxurious, high-fashion look. Whether you’re going for a chic event or just want to elevate your everyday style, this design is sure to impress.
12. Glitter Ombre Nail Art
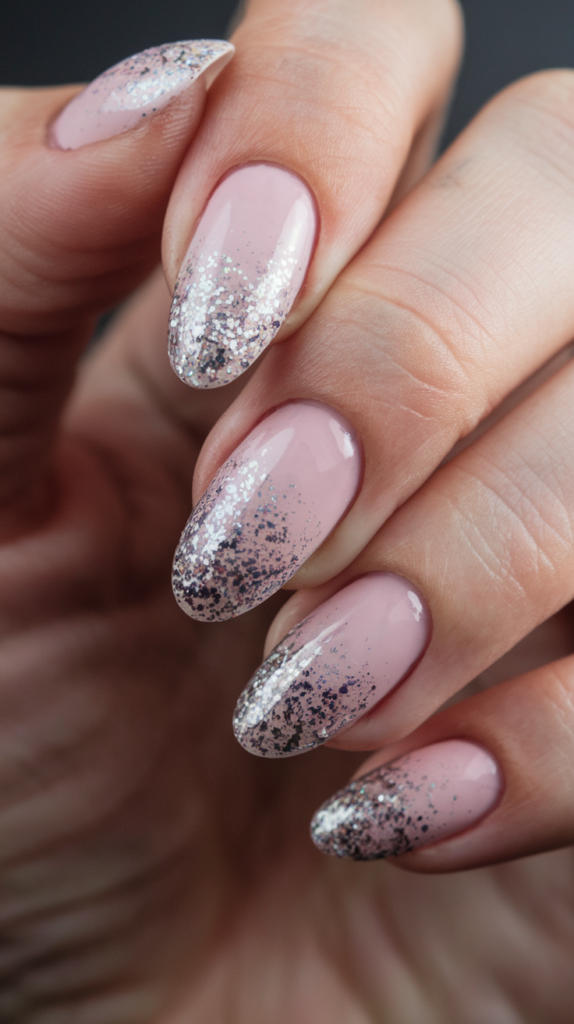
Glitter Ombre Nail Art is the perfect way to add a subtle yet glamorous sparkle to your manicure.
Featuring a soft nude base that transitions into a dazzling glitter tip, this design brings the ideal balance of sophistication and sparkle, making it a great choice for any occasion.
Creating the Glitter Ombre Effect
Step 1: Apply the Base Coat
Start by applying a nude or soft pink polish as the base color for your nails. Make sure the base is smooth and even, and allow it to dry completely.
Step 2: Add the Glitter
Using a glitter polish, apply a generous layer to the tips of your nails. Start by placing most of the glitter at the very tip, gradually fading it as you move toward the cuticle.
Step 3: Blend the Glitter
For a seamless ombre effect, lightly tap or blend the glitter with a sponge or brush, ensuring it transitions smoothly from the tip to the base of the nail. The goal is to achieve a soft, gradient look.
Step 4: Seal the Design
Once you’re satisfied with the glitter fade, apply a top coat to seal the design. This will also smooth out any texture from the glitter and add a glossy finish.
Why It Works
Glitter Ombre Nail Art combines the elegance of a nude base with the playful sparkle of glitter, creating a balanced and glamorous look.
The gradual transition of glitter from the tips to the base adds a touch of sophistication, while still maintaining a light, celebratory feel.
This design is perfect for those who want a little sparkle without going overboard, making it an ideal choice for both everyday wear and special events.
13. Pink Jelly Nail Art
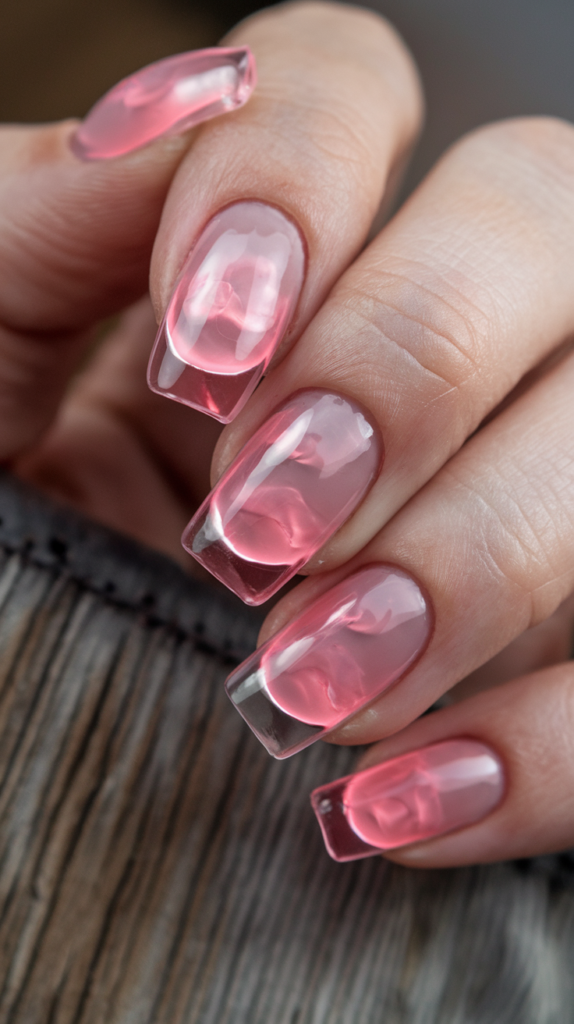
Pink Jelly Nail Art brings a refreshing and trendy twist to your manicure with its translucent, jelly-like finish.
The blend of soft pink and clear tips creates a unique, playful look that is perfect for anyone looking to experiment with modern, stylish designs.
Creating the Jelly Nail Effect
Step 1: Apply the Base Coat
Start by applying a nude or light pink base color to your nails. This will give you a smooth, clean canvas for the jelly effect. Allow it to dry completely before moving on to the next step.
Step 2: Apply a Jelly Gel Polish
Once the base is dry, use a pink jelly gel polish to cover the entire nail. The key to this design is achieving a translucent, glossy finish that mimics the soft, squishy texture of jelly. Apply a thin layer and cure under the lamp if using gel polish.
Step 3: Build the Jelly Effect
For a more pronounced jelly effect, apply a second layer of the pink jelly polish to the tips of your nails. The opacity should increase slightly as you build up the layers, leaving the tips with a more intense color.
Step 4: Finish with a Glossy Top Coat
Seal your design with a glossy top coat to enhance the jelly finish and ensure a long-lasting look. The shiny, almost wet appearance will give your nails that irresistible squishy vibe.
Why It Works
Pink Jelly Nail Art stands out for its unique translucent finish, which provides a modern and playful aesthetic.
The soft pink hue adds a touch of femininity, while the jelly texture makes the design feel fresh and innovative.
Perfect for those who love clean, chic nail art with a twist, this design is both stylish and eye-catching, making it perfect for everyday wear or special occasions.
14. Gold Leaf Accent Nail Art
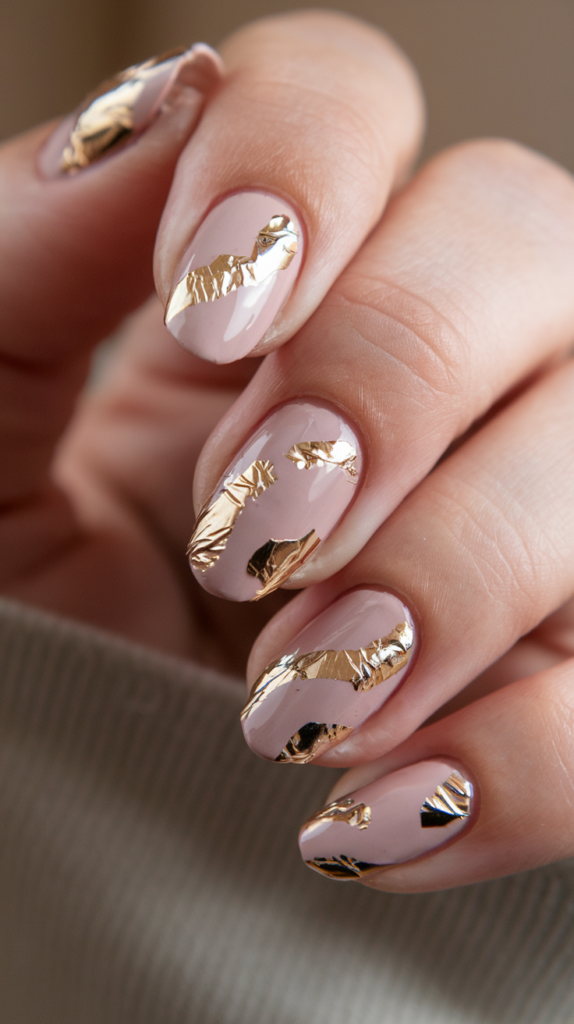
Gold Leaf Accent Nail Art is the perfect way to elevate your manicure with a touch of luxury.
Featuring delicate gold leaf pieces applied on a soft nude base, this design creates a sophisticated and stylish look that’s both modern and timeless.
Creating the Gold Leaf Effect
Step 1: Apply the Base Coat
Start by applying a nude or neutral pink polish as the base color for your nails. This provides a soft, elegant background that makes the gold leaf pop. Allow it to dry completely before proceeding.
Step 2: Apply the Gold Leaf
Once the base coat is dry, carefully place small pieces of gold leaf on your nails using a fine brush or tweezers. Focus on placing the gold leaf in random, organic shapes along the tips or across the nails for a more dynamic effect.
Step 3: Seal the Design
After arranging the gold leaf, apply a clear top coat to secure the pieces in place and smooth out any edges. This will also add a glossy finish and ensure the gold leaf stays in place for a longer-lasting design.
Step 4: Final Touches
If needed, carefully apply a second coat of top coat to ensure the design is fully sealed and the gold leaf doesn’t catch on anything.
Why It Works
Gold Leaf Accent Nail Art combines the minimalist elegance of a nude base with the bold luxury of gold leaf.
The contrast between the soft, understated color and the striking gold leaf accents creates a design that is both chic and eye-catching.
This look is perfect for those who want a sophisticated, high-end manicure that is still modern and unique, making it suitable for both casual and formal occasions.
15. Pink Polka Dot Nail Art

Pink Polka Dot Nail Art is a fun, playful design that never goes out of style.
The combination of soft pink polish and bold white dots gives your nails a whimsical, retro feel while maintaining a clean, modern look.
Perfect for anyone looking to add a touch of lighthearted charm to their nails.
Creating the Polka Dot Design
Step 1: Apply the Base Coat
Start by applying a soft pink or nude polish to all your nails. This will serve as the perfect backdrop for the bold white polka dots. Let it dry completely before proceeding to the next step.
Step 2: Create the Polka Dots
Using a dotting tool or a toothpick, carefully apply white polish to create even-sized dots across each nail. Arrange the dots in a grid-like pattern or scatter them randomly, depending on your preference.
Step 3: Allow the Dots to Dry
Make sure the dots are fully dry before moving on to the next step to avoid smudging.
Step 4: Apply a Top Coat
To seal the design and add shine, apply a clear top coat. This will also help to protect the dots and ensure the design lasts longer.
Why It Works
Pink Polka Dot Nail Art is a timeless design that adds a pop of fun and creativity to your look.
The contrast between the soft pink base and bright white dots is both bold and playful, making it a versatile design that suits a variety of occasions.
Whether you’re going for a casual, cute vibe or adding a bit of fun to a formal event, this design offers a charming and lighthearted touch to any manicure.
16. Crystal Crescent Nail Art
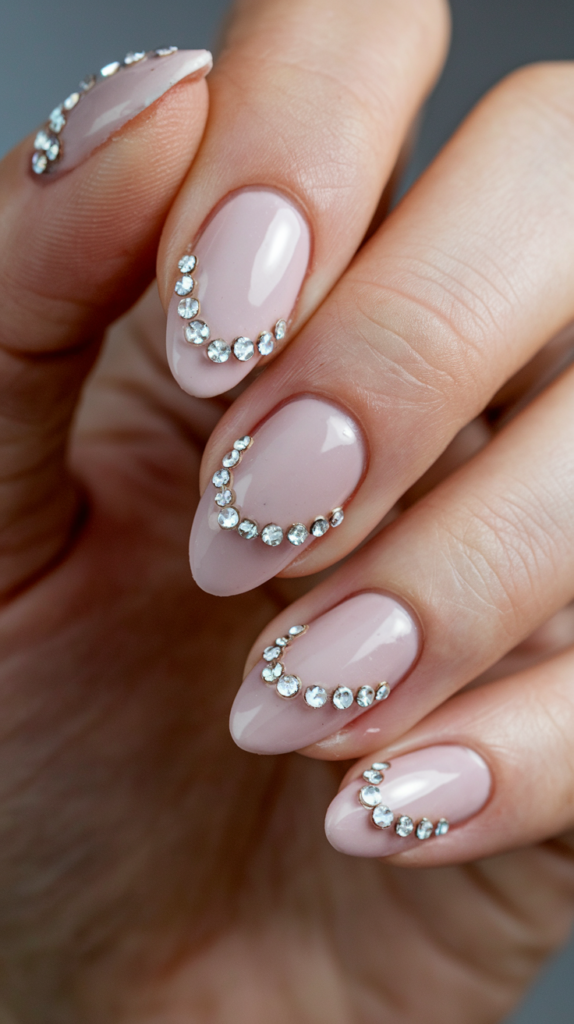
Crystal Crescent Nail Art adds a touch of glamour to your nails with its sparkling rhinestone accents arranged in a crescent shape.
The soft nude base provides an elegant backdrop for the stunning crystals, making this design both chic and sophisticated.
Creating the Crystal Crescent Design
Step 1: Apply the Base Coat
Start by applying a nude or soft pink polish to your nails. This subtle color creates a perfect canvas for the bold crystal accents. Let the base coat dry completely before moving to the next step.
Step 2: Apply the Rhinestone Crescent
Using a dotting tool or tweezers, carefully place rhinestones along the tips of your nails, forming a crescent shape. You can choose to place larger stones at the edges and gradually use smaller ones toward the center for a more dynamic design.
Step 3: Secure the Rhinestones
Once you’re satisfied with the placement, use a small amount of nail glue to secure the rhinestones in place. Ensure each stone is firmly adhered to avoid any lifting or shifting.
Step 4: Finish with a Top Coat
Apply a clear top coat to seal the rhinestones in place and add extra shine to your design. This will also smooth out the surface and ensure the design lasts longer.
Why It Works
Crystal Crescent Nail Art brings elegance and luxury to your nails.
The soft nude base contrasts beautifully with the eye-catching rhinestone accents, giving your manicure a chic and high-end finish.
The crescent shape of the rhinestones adds a unique twist to the classic nail design, making it ideal for formal events, parties, or anyone who wants to add a touch of sparkle to their look.
17. Lace French Tip Nail Art
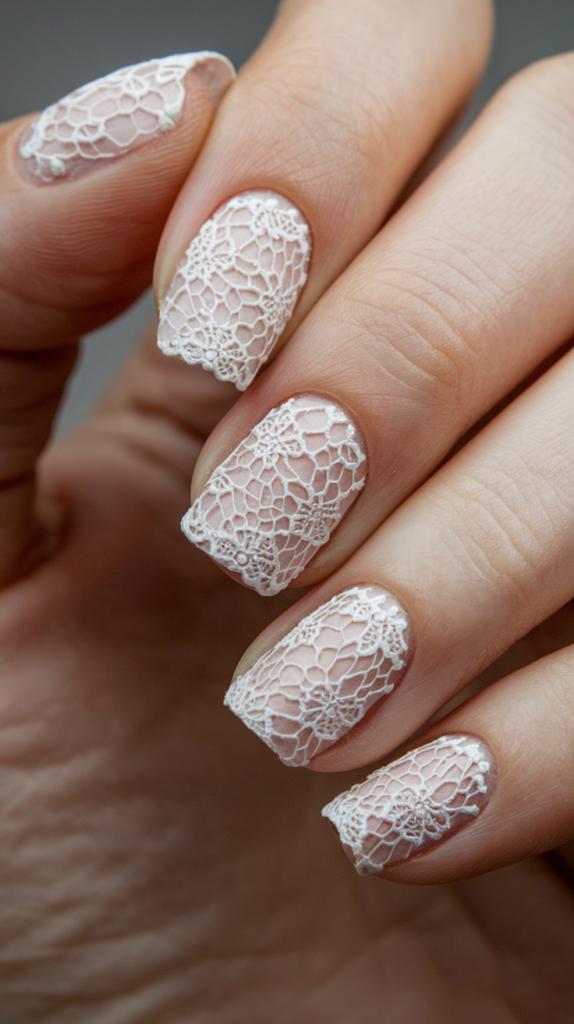
Lace French Tip Nail Art brings a delicate, vintage-inspired touch to your manicure with intricate lace patterns along the tips.
This design creates a sophisticated and feminine look that’s perfect for weddings, special events, or anyone who loves a refined and elegant nail art style.
Creating the Lace French Tip Design
Step 1: Apply the Base Coat
Start by applying a soft nude or pale pink polish as the base for your nails. This light shade serves as a delicate backdrop for the lace accents, allowing the intricate design to stand out. Allow it to dry completely before moving to the next step.
Step 2: Create the Lace Tips
Using a fine nail art brush or lace stamping plate, carefully paint or stamp lace patterns along the tips of your nails. Focus on achieving a thin, intricate design that mimics the delicate texture of lace. You can use a white polish or a slightly off-white shade to enhance the lace effect.
Step 3: Clean Up and Detail
If needed, use a small brush and remover to clean up any excess polish around the edges of your nails, ensuring the lace tips are sharp and well-defined.
Step 4: Seal the Design
Once the lace tips are complete and dry, apply a clear top coat to protect the design and add shine. This will also smooth out the surface for a glossy finish.
Why It Works
Lace French Tip Nail Art combines the timeless elegance of French tips with the romantic and intricate detail of lace patterns.
The soft nude base offers a neutral canvas, while the white lace accents add a touch of femininity and refinement.
This design is ideal for weddings, formal occasions, or anyone looking to elevate their manicure with a delicate and sophisticated flair.
18. Gradient Pink Ombre Nail Art
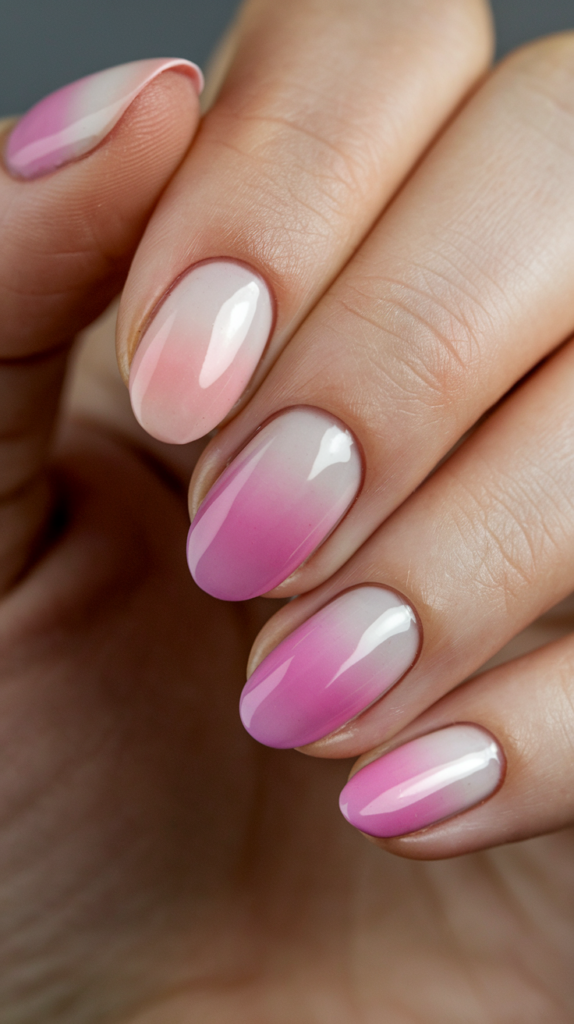
Gradient Pink Ombre Nail Art creates a soft, romantic look with a seamless transition from pale pink to a vibrant, deeper pink at the tips.
This design is perfect for adding a touch of elegance and a pop of color, making it a great choice for both casual and special occasions.
Creating the Gradient Ombre Effect
Step 1: Apply the Base Coat
Start with a sheer or light pink base color on your nails. This will help to create a soft, fresh background that complements the ombre effect. Allow the base coat to dry completely.
Step 2: Create the Gradient
To achieve the ombre effect, apply a slightly darker pink polish to the tips of your nails. Using a makeup sponge or a sponge tip applicator, gently blend the darker pink into the lighter pink base. Lightly dab the sponge to create a seamless transition between the colors.
Step 3: Blend the Colors
Continue applying and blending the colors using the sponge until you achieve a smooth, gradient effect. Focus on ensuring the transition is as seamless as possible, with no harsh lines.
Step 4: Seal the Design
Finish the look by applying a clear top coat. This will smooth the gradient and add extra shine to the design, making it look polished and professional.
Why It Works
Gradient Pink Ombre Nail Art is a beautiful, soft design that brings depth and dimension to your nails.
The smooth transition from light to dark pink is flattering and feminine, making this design perfect for a variety of occasions.
Whether you’re heading to a special event or simply want a subtle yet elegant manicure, this ombre design is sure to impress.
19. Zebra Stripes and Pink Accent Nail Art
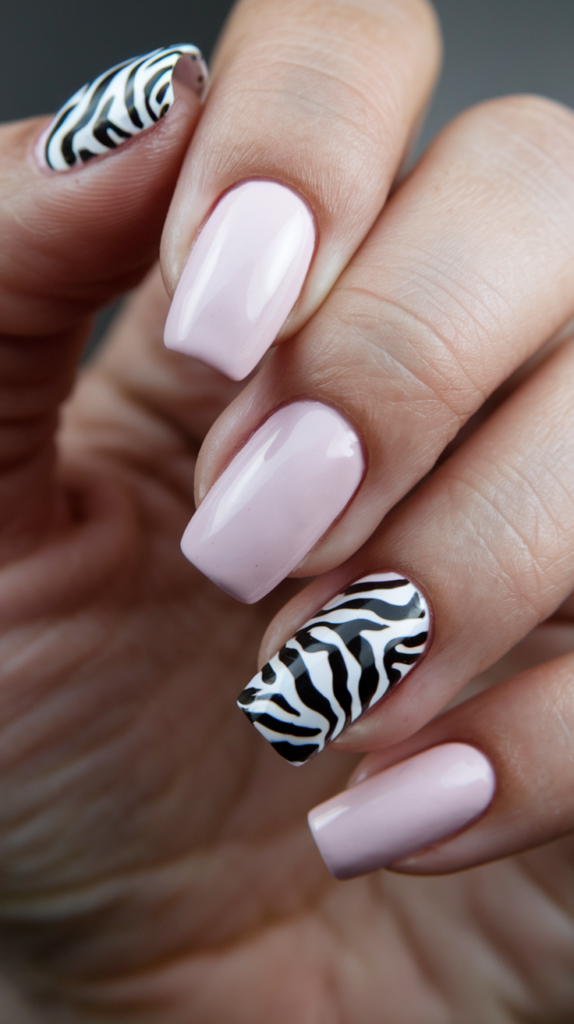
Zebra Stripes and Pink Accent Nail Art combines bold, striking animal print with a soft, feminine pink.
This design creates the perfect balance between edgy and elegant, making it ideal for those who love to make a statement with their nails.
Creating the Zebra Stripes and Pink Look
Step 1: Apply the Base Coat
Start by applying a soft pink polish to most of your nails. This light, neutral shade will complement the boldness of the zebra print and create a balanced look. Allow the base color to dry completely before continuing.
Step 2: Add the Zebra Stripes
On one or two accent nails, carefully apply black polish to create zebra stripes. Use a thin nail art brush to draw curvy lines, mimicking the natural patterns of zebra stripes.
Step 3: Enhance the Stripes
Once the black stripes are dry, you can go over them with a white polish to create contrast and add dimension to the design. This will make the zebra print stand out even more.
Step 4: Apply a Top Coat
Seal your design with a clear top coat to protect the stripes and pink base. The top coat will also provide a glossy finish and help the design last longer.
Why It Works
Zebra Stripes and Pink Accent Nail Art brings together the wild and the soft in one chic design.
The bold zebra stripes make a strong statement, while the light pink base adds a touch of elegance and sophistication.
This look is perfect for anyone who wants to add a bit of fun and edginess to their nails without compromising on style.
20. Glitter French Tip Nail Art
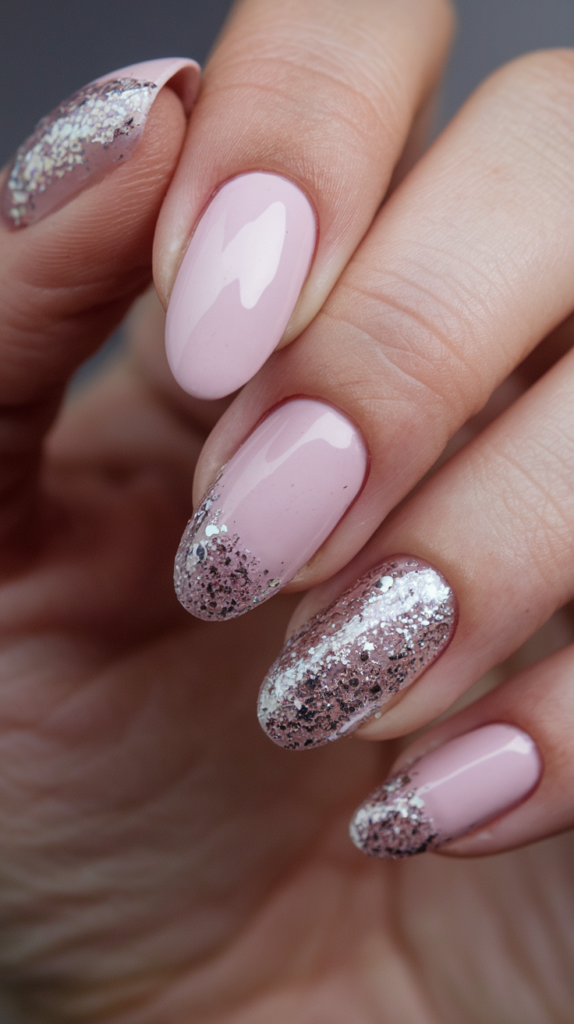
Glitter French Tip Nail Art adds a sparkling twist to the classic French manicure, creating a design that’s both elegant and fun.
The soft pink base with a gradient glitter tip makes this look perfect for anyone who loves a bit of shine without going overboard.
Creating the Glitter French Tip Design
Step 1: Apply the Base Coat
Start by applying a soft pink or nude polish to your nails. This neutral shade provides a beautiful backdrop for the sparkling glitter tips and ensures the design looks polished. Allow the base color to dry completely before continuing.
Step 2: Add the Glitter Tips
Using a glitter polish, apply the glitter at the tips of your nails. You can choose a fine glitter to create a delicate, shimmering effect, or a chunkier glitter for a more dramatic look. Gradually fade the glitter towards the center of the nail for a seamless transition.
Step 3: Blend the Glitter
If needed, gently blend the glitter with a sponge or a brush to make sure the transition between the pink base and glittery tips is smooth and ombre-like. Ensure the glitter is applied evenly to create a balanced, refined look.
Step 4: Seal the Design
Once you’re happy with the glitter tips, apply a clear top coat to seal the design and add a glossy finish. This will also smooth out the surface and ensure the glitter stays in place for a longer-lasting manicure.
Why It Works
Glitter French Tip Nail Art combines the timeless elegance of a classic French tip with a fresh, modern twist.
The soft pink base offers a sophisticated touch, while the glitter tips add just the right amount of sparkle.
Whether you’re dressing up for a special event or simply want a manicure that stands out, this design is both subtle and attention-grabbing.
21. Geometric Gold Accent Nail Art
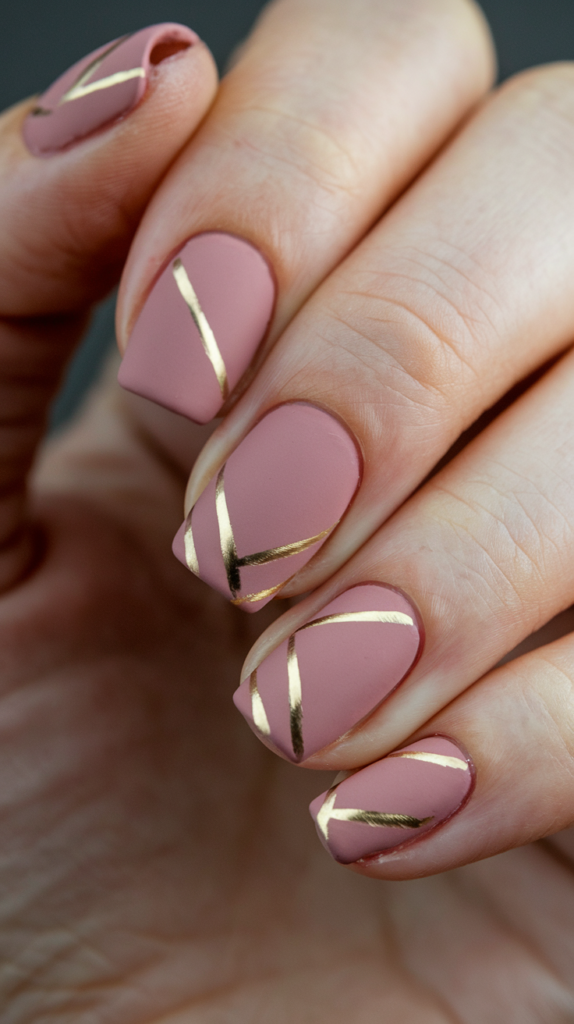
Geometric Gold Accent Nail Art is a chic and modern design that combines minimalist shapes with luxurious gold accents.
The soft pink base paired with gold lines creates a sophisticated yet trendy look, making this design perfect for any occasion.
Creating the Geometric Gold Accent Look
Step 1: Apply the Base Coat
Start by applying a soft pink or nude polish to all your nails. This neutral base color offers a perfect backdrop for the striking gold accents and allows them to pop. Allow the base color to dry completely.
Step 2: Create the Geometric Shapes
Using gold striping tape or a thin brush, create diagonal lines or intersecting geometric shapes across your nails. Focus on placing the gold lines in asymmetrical patterns for a more modern and dynamic effect.
Step 3: Ensure Clean Lines
If using a brush, make sure to apply the gold polish carefully to ensure clean and crisp lines. You can also use nail art tape to help achieve sharp, defined edges.
Step 4: Seal the Design
Once you’re happy with the geometric pattern, apply a clear top coat to seal the design. This will add extra shine and protect the gold lines from chipping.
Why It Works
Geometric Gold Accent Nail Art combines the timeless elegance of a soft pink base with the bold sophistication of gold accents.
The asymmetrical gold lines add a contemporary touch to the classic pink manicure, creating a chic and high-fashion look.
This design is perfect for those who love modern elegance with a touch of luxury.
22. Swirled Galaxy Nail Art
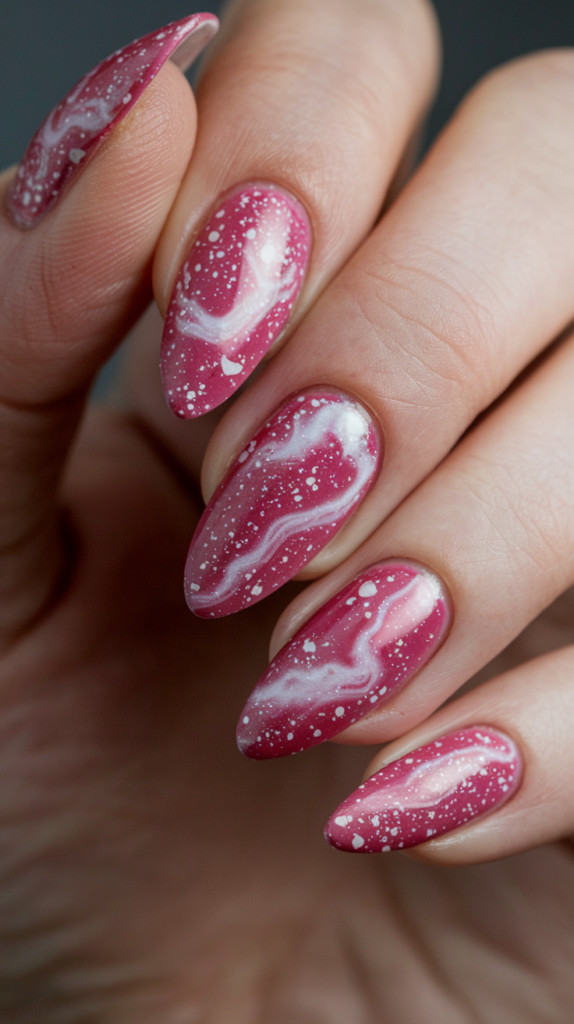
Swirled Galaxy Nail Art offers a cosmic and dreamy design with soft swirling patterns and a sparkling finish.
The rich pink base combined with the white swirls and flecks of shimmer creates a look that’s both mysterious and mesmerizing, perfect for those who want to add a bit of otherworldly charm to their nails.
Creating the Swirled Galaxy Effect
Step 1: Apply the Base Coat
Start with a deep pink or burgundy polish as the base color for your nails. This rich color will act as the backdrop for the galaxy swirls and will enhance the design’s depth. Allow the base coat to dry completely.
Step 2: Add the Swirls
Using a small nail art brush or a toothpick, gently apply white polish to create swirling patterns on your nails. Focus on adding random, organic curves that mimic the movement of a galaxy or nebula. You can also create soft, circular shapes for a more dynamic effect.
Step 3: Add the Stars
To add sparkle, gently dab small dots of white polish or glitter to your nails. These will represent the stars in the galaxy. Focus on spreading the stars throughout the design to give it that dreamy, celestial look.
Step 4: Seal the Design
Apply a glossy top coat to seal the design and enhance the shine. This will also help smooth out any rough edges from the swirls and ensure your design lasts longer.
Why It Works
Swirled Galaxy Nail Art offers a stunning blend of color and sparkle, creating a look that is both artistic and elegant.
The swirling pink and white patterns mimic the beauty of the cosmos, while the stars add an extra touch of magic and mystery.
This design is perfect for anyone looking to add a whimsical and chic touch to their nails, whether for a special event or a night out.
23. Soft Swirl Nail Art
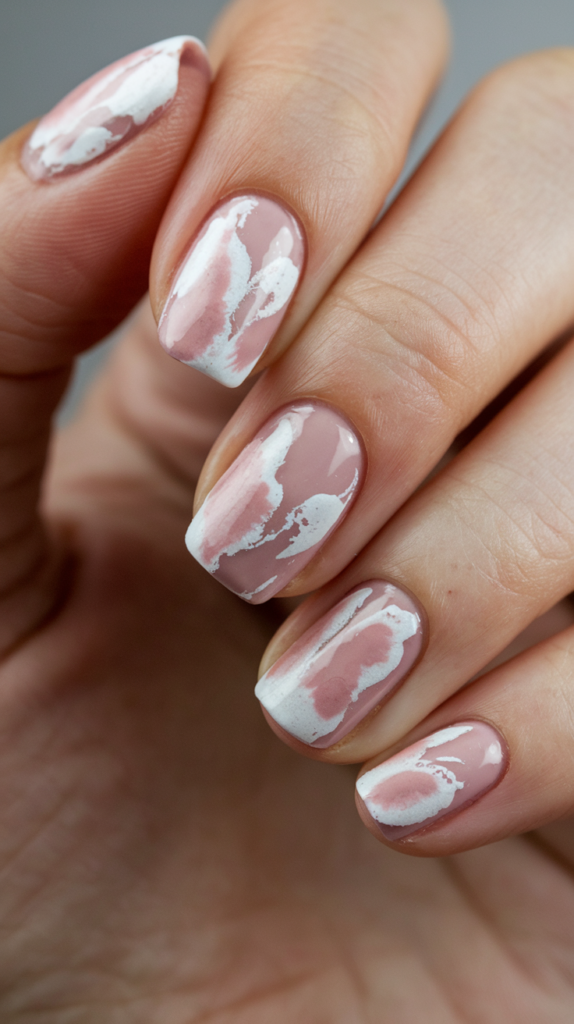
Soft Swirl Nail Art blends gentle swirls of white against a soft pink base, creating a design that feels modern, sophisticated, and effortlessly chic.
The contrast between the light hues and organic patterns gives this look a gentle, abstract feel, perfect for those seeking a minimalist yet artistic nail design.
Creating the Soft Swirl Design
Step 1: Apply the Base Coat
Start by applying a soft pink or nude polish to your nails. This will serve as the calm, neutral backdrop for the delicate swirls. Let the base coat dry completely.
Step 2: Add the White Swirls
Using a fine brush or a nail art tool, gently paint soft, curved white swirls on your nails. The key to this design is to keep the swirls light and flowing, avoiding harsh lines. The swirls should mimic a fluid, organic movement across the nail.
Step 3: Blend the Colors
While the white is still wet, use a thin brush or sponge to blend the white gently into the pink base. This will create a smooth, seamless transition between the two colors, enhancing the swirl effect.
Step 4: Seal the Design
Apply a clear top coat to protect the design and add a glossy finish. This will also help to smooth any uneven areas and ensure the swirls stay in place.
Why It Works
Soft Swirl Nail Art is a stunning design that combines simplicity with creativity. The soft pink base adds a calm, sophisticated touch, while the flowing white swirls introduce an element of abstract art to the nails.
This design works well for both everyday wear and special occasions, offering a modern, refined look with a unique twist.
24. Metallic Chevron Nail Art
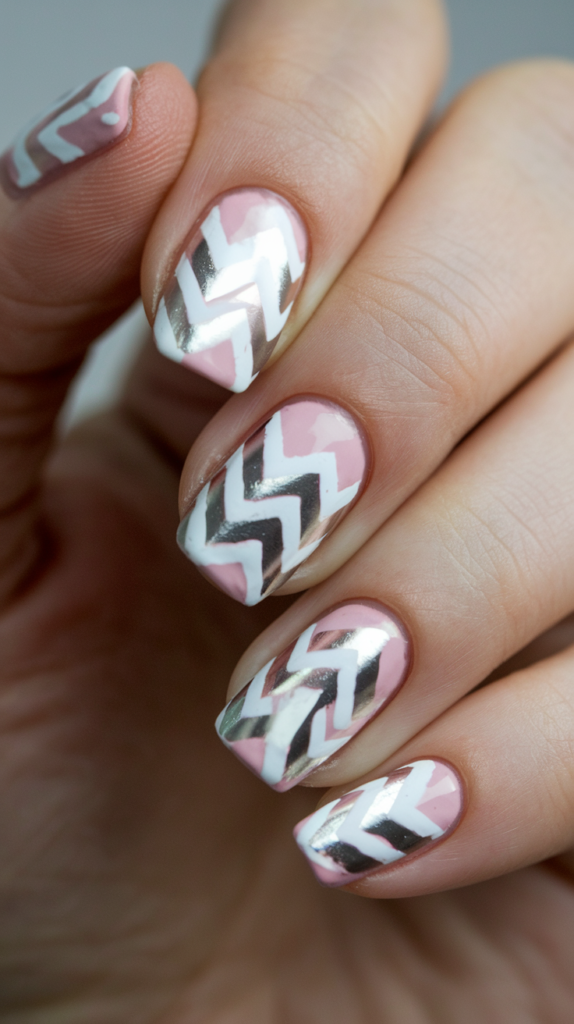
Metallic Chevron Nail Art combines bold geometric shapes with metallic accents for a modern, stylish look.
The striking contrast between the soft pink base and the silver and black chevron stripes creates a dynamic design that’s perfect for anyone looking to make a statement.
Creating the Metallic Chevron Design
Step 1: Apply the Base Coat
Begin by applying a soft pink or nude polish to your nails. This neutral base will highlight the sharpness of the chevron stripes and set a sophisticated tone for the design. Allow the base coat to dry completely before moving on to the next step.
Step 2: Create the Chevron Stripes
Using a thin nail art brush or tape, carefully apply silver and black polish in chevron patterns across your nails. The key to this design is to create clean, sharp lines, so take your time to make sure the chevron shapes are well-defined.
Step 3: Layer the Stripes
If needed, add additional layers of silver or black polish to make the stripes more opaque and bold. Ensure the colors are evenly applied, and allow the layers to dry completely between applications.
Step 4: Seal the Design
Apply a clear top coat to seal the design and give your nails a glossy finish. The top coat will also help prevent chipping and maintain the sharpness of the chevron stripes.
Why It Works
Metallic Chevron Nail Art is bold yet elegant, combining the sleekness of metallic tones with the geometric allure of chevron patterns.
The soft pink base serves as a subtle contrast to the striking metallic stripes, creating a balanced and modern look.
This design is perfect for those who want to showcase their bold side while keeping the manicure refined and stylish.
25. Celestial Stars and Moons Nail Art
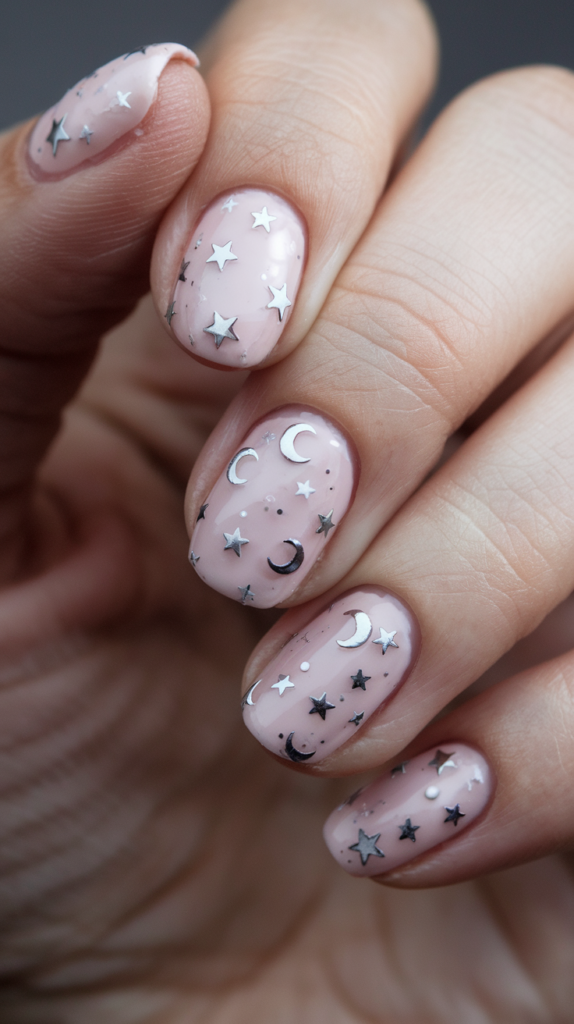
Celestial Stars and Moons Nail Art offers a dreamy and cosmic design with a delicate blend of stars and crescent moons scattered across a soft pink base.
This enchanting design brings the beauty of the night sky to your fingertips, perfect for those who want a whimsical and elegant touch.
Creating the Celestial Design
Step 1: Apply the Base Coat
Start by applying a nude or soft pink polish to your nails. This light, neutral base serves as a subtle backdrop for the celestial accents, allowing the stars and moons to stand out. Let the base coat dry completely.
Step 2: Add Stars and Moons
Using a fine brush or a dotting tool, carefully add small silver stars and crescent moons to your nails. Focus on placing the designs randomly across the nail to mimic the scattered beauty of the night sky.
Step 3: Create Variety in the Design
For a more dynamic look, vary the size of the stars and moons. You can place smaller ones near the cuticle area and larger ones toward the tips of your nails to create depth and balance.
Step 4: Seal the Design
Finish by applying a clear top coat to seal the celestial design and add shine. This will also ensure the designs stay in place and last longer.
Why It Works
Celestial Stars and Moons Nail Art brings the mystique and magic of the night sky to life.
The soft pink base provides an elegant backdrop, while the silver stars and moons introduce a cosmic charm.
The scattered designs create a dreamy, whimsical vibe that works perfectly for any occasion, whether you’re looking for something subtle or playful.
26. Floral Blossom Nail Art
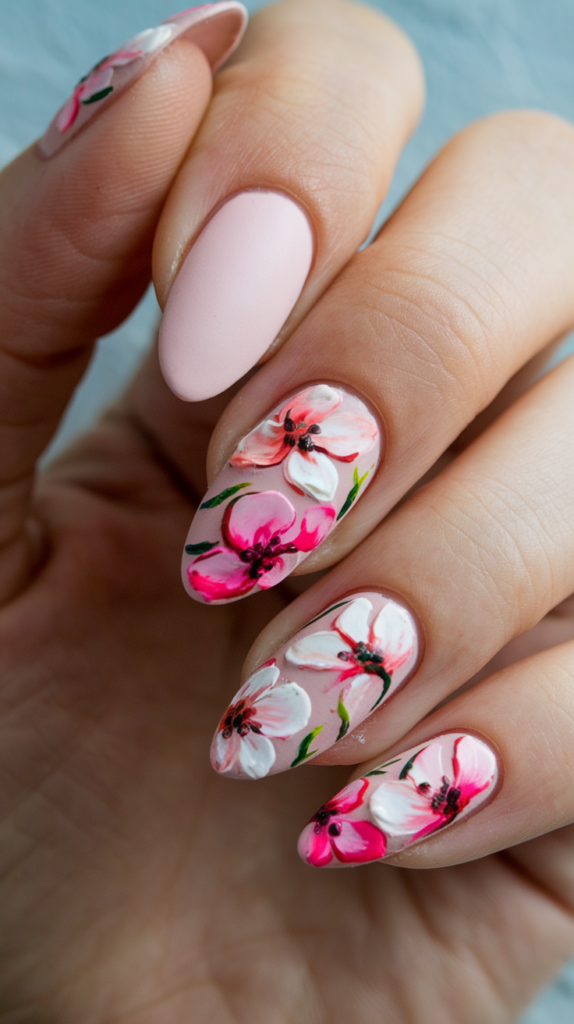
Floral Blossom Nail Art is a vibrant, delicate design that features hand-painted flowers in shades of pink and white, creating a soft, romantic feel.
The beautiful contrast of the matte pink base and the detailed flowers makes this design perfect for spring, summer, or any occasion that calls for a fresh, feminine touch.
Creating the Floral Blossom Design
Step 1: Apply the Base Coat
Start by applying a soft pink or nude matte polish to your nails. This creates a smooth and subtle background that enhances the vibrancy of the floral artwork. Allow the base coat to dry completely.
Step 2: Paint the Flowers
Using a fine nail art brush, paint delicate pink and white flowers on your nails. Focus on creating soft, flowing petals and adding intricate details like green leaves to give the design depth. The key to this design is ensuring the flowers look natural and fluid, so take your time with each petal.
Step 3: Add Shadows and Highlights
For extra dimension, add light shading with a darker pink polish on the edges of the flowers, and highlight the center of the flowers with white polish. This will make the flowers appear more lifelike and dynamic.
Step 4: Seal the Design
Once the floral design is dry, apply a clear top coat to protect the artwork and add shine. This will also help smooth out any uneven areas from the paint and keep the design in place longer.
Why It Works
Floral Blossom Nail Art is both playful and elegant, perfect for anyone looking to add a touch of nature to their manicure.
The soft matte pink base complements the vibrant flowers, creating a balanced design that is both chic and feminine.
This design is ideal for special occasions, springtime events, or anyone who loves a floral touch to their nails.
27. Pink and Glitter V-Tip Nail Art
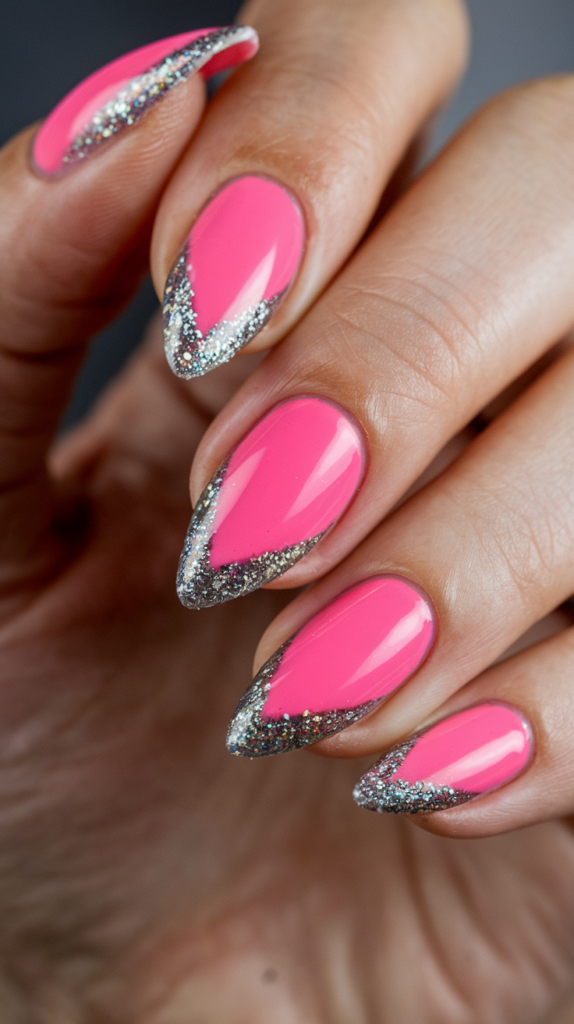
Pink and Glitter V-Tip Nail Art combines a bold, vibrant pink base with a striking glittery V-shaped tip.
This modern twist on the classic French tip design is perfect for anyone looking to make a statement with their nails, adding a touch of sparkle and edge to a playful color.
Creating the Pink and Glitter V-Tip Design
Step 1: Apply the Base Coat
Start by applying a vibrant pink polish to all your nails. This bold, eye-catching color serves as the perfect backdrop for the glittery V-tip design. Make sure to apply a smooth and even coat, then allow it to dry completely.
Step 2: Create the V-Tip Glitter Design
Using a fine nail art brush or striping tape, create a sharp V-shape at the tips of your nails. Apply glitter polish to the V-shape, making sure to cover the edges cleanly. The glitter will give the tips an elegant, sparkling finish.
Step 3: Clean Up the Edges
If necessary, use a nail art brush dipped in remover to clean up any excess glitter around the edges for a precise and sharp look. This will enhance the neatness of the V-tip design.
Step 4: Seal the Design
To finish, apply a clear top coat over the entire design. This will not only protect the pink and glitter tips but also provide a glossy finish to make the design pop.
Why It Works
Pink and Glitter V-Tip Nail Art is the perfect combination of playful color and sophisticated sparkle.
The vibrant pink color adds an energetic vibe, while the glitter V-tip offers an elegant, striking contrast.
This design is perfect for those who want to add some fun and glamour to their nails, whether for a night out or a special event.
28. Pink Geometric Nail Art
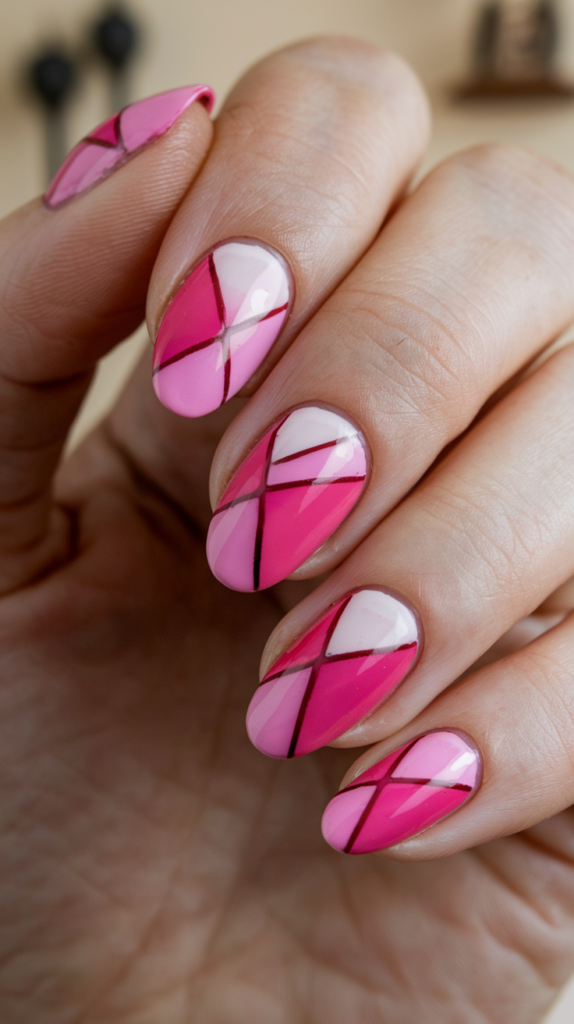
Pink Geometric Nail Art features a modern, bold design with a mix of light and dark pink shades arranged in a geometric pattern.
The black outlining adds contrast and precision, making this nail art both striking and sophisticated.
Perfect for anyone looking to make a statement with their nails while keeping it stylish and contemporary.
Creating the Pink Geometric Design
Step 1: Apply the Base Coat
Start by applying a soft nude or pale pink polish to all your nails. This will provide a clean, neutral backdrop for the geometric design, ensuring the colors pop. Allow it to dry completely before moving on to the next step.
Step 2: Create the Geometric Shapes
Using a fine nail art brush or striping tape, carefully create triangles and other geometric shapes on your nails with a darker pink polish. Each section should be distinct, and the lines should be clean and sharp to define the shapes.
Step 3: Outline with Black Polish
To make the design stand out, outline the geometric shapes with black polish. The black lines add contrast and help the shapes appear more defined. Make sure the lines are even and smooth for a precise look.
Step 4: Fill in the Sections
Once the outlines are dry, fill in the triangles and sections with different shades of pink. Use a brighter pink for some areas and a darker pink for others, creating a dynamic, eye-catching pattern.
Step 5: Seal the Design
Apply a clear top coat over the design to seal it and add a glossy finish. This will not only protect the design but also give it a polished, smooth look.
Why It Works
Pink Geometric Nail Art is a fresh and trendy design that adds a pop of color and precision to your nails.
The combination of soft and vibrant pinks, outlined with bold black lines, creates a design that’s both edgy and stylish.
This nail art is perfect for anyone who loves modern aesthetics and wants to add a touch of geometry and color to their manicure.
29. Plaid Chic Nail Art
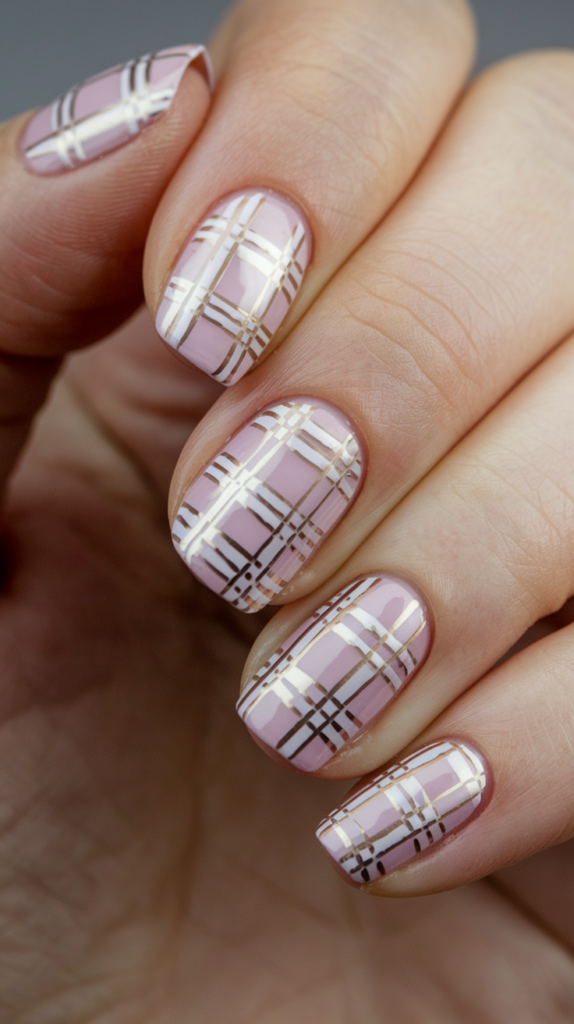
Plaid Chic Nail Art combines timeless elegance with a modern twist, featuring a soft pink base adorned with gold and black plaid patterns.
This sophisticated design adds a refined and stylish touch to your nails, making it perfect for both casual and formal occasions.
Creating the Plaid Chic Design
Step 1: Apply the Base Coat
Start by applying a soft pink or nude polish to all your nails. This subtle color will provide the perfect foundation for the plaid design, allowing the lines to stand out. Let the base coat dry completely before moving on to the next step.
Step 2: Create the Plaid Lines
Using a fine nail art brush or striping tape, begin by creating thin horizontal lines across the nail in gold and black polish. Make sure the lines are evenly spaced and straight to create a sharp, clean plaid pattern.
Step 3: Add Vertical Lines
Once the horizontal lines are dry, add vertical lines in the same gold and black polish to form the grid-like pattern. Take care to align the vertical lines carefully with the horizontal lines to maintain the plaid design’s symmetry.
Step 4: Seal the Design
Apply a clear top coat to seal the plaid design and add a glossy finish. The top coat will also ensure the lines stay in place and protect the design from chipping.
Why It Works
Plaid Chic Nail Art is the perfect blend of sophistication and modernity.
The combination of soft pink and bold plaid patterns with gold and black accents creates a chic, refined look that is versatile enough for any occasion.
This design is perfect for anyone looking to add a touch of timeless style to their nails.
30. Confetti Glitter Nail Art
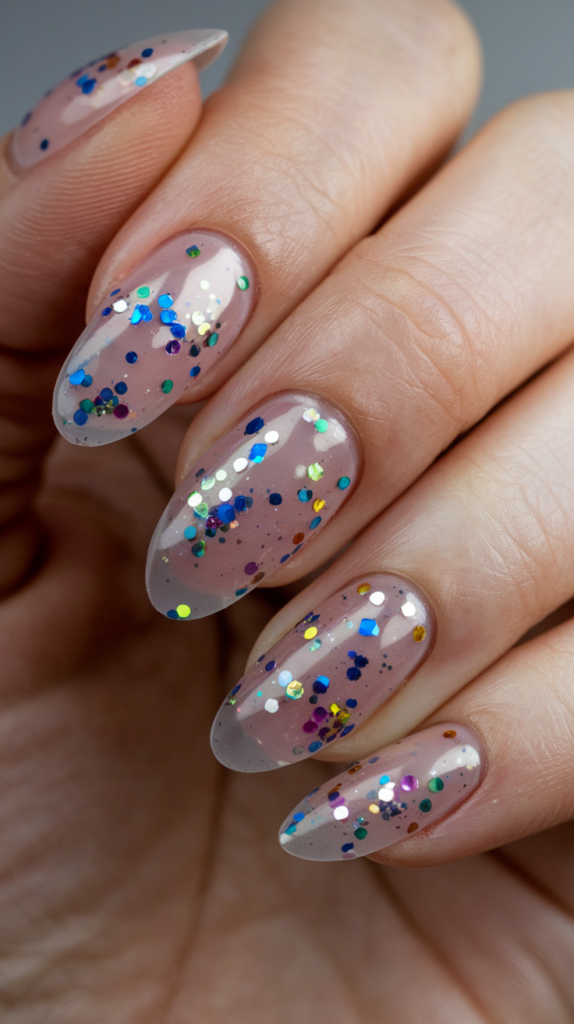
Confetti Glitter Nail Art is a playful and festive design that brings a touch of sparkle to your nails.
The transparent base combined with colorful confetti glitter creates a joyful, celebratory effect, perfect for special occasions or when you simply want to add some fun to your manicure.
Creating the Confetti Glitter Look
Step 1: Apply the Base Coat
Start by applying a nude or clear base coat to your nails. This allows the confetti glitter to shine through and creates a delicate foundation for the design. Let the base coat dry completely before moving on to the next step.
Step 2: Apply the Confetti Glitter
Using a glitter polish with large and small pieces of confetti, gently dab the glitter onto your nails. You can focus more on the tips or distribute the glitter evenly across the nail for a more scattered effect. Make sure to get a good mix of colors and sizes for a fun, vibrant look.
Step 3: Adjust the Glitter Placement
If needed, use a nail art brush to reposition the glitter and create a more balanced pattern. Feel free to layer more glitter for a more intense sparkle, depending on your preference.
Step 4: Seal the Design
Apply a clear top coat over the design to secure the glitter and add shine. This will also ensure that the glitter stays in place and helps to smooth out any rough edges from the confetti.
Why It Works
Confetti Glitter Nail Art is a fun and festive way to showcase your playful side.
The clear base allows the glitter to take center stage, while the varying sizes and colors of the confetti add a dynamic, eye-catching effect.
This design is perfect for birthdays, holidays, or any time you want to add a little sparkle to your look.
31. Diamond Tip Nail Art
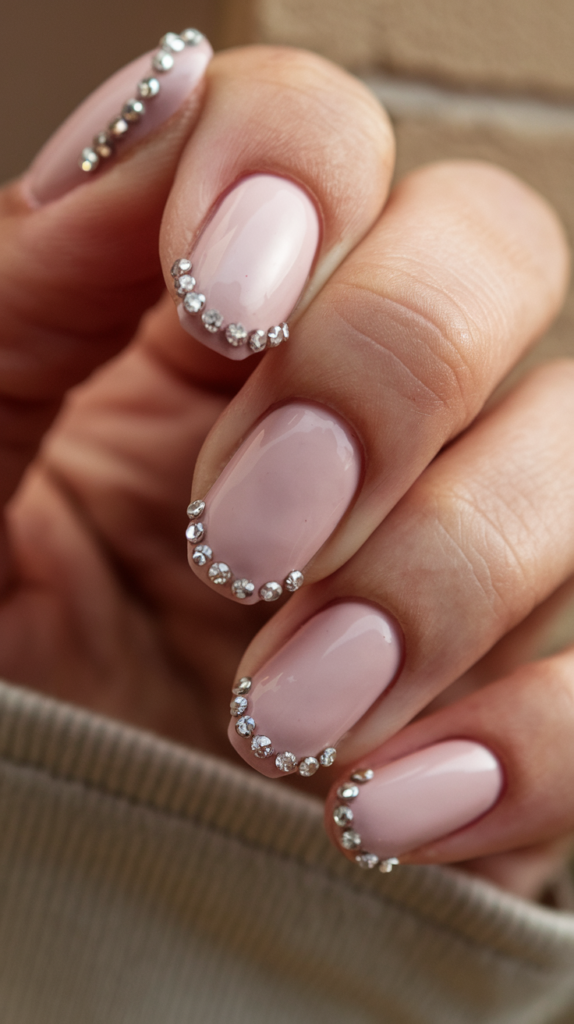
Diamond Tip Nail Art is a sleek and elegant design that features delicate rhinestone accents along the tips of the nails.
The soft pink base with the glimmering diamonds creates a sophisticated and timeless look, perfect for special occasions or anyone looking to add a touch of luxury to their manicure.
Creating the Diamond Tip Design
Step 1: Apply the Base Coat
Begin by applying a soft pink or nude polish to your nails. This subtle color will allow the rhinestones to stand out and create a clean, polished background. Let the base coat dry completely before moving on to the next step.
Step 2: Add the Rhinestones
Using a small dotting tool or tweezers, carefully place rhinestones along the tips of your nails. Create a curve or straight line, depending on your preference. For a more dynamic look, you can alternate between larger and smaller stones.
Step 3: Secure the Rhinestones
Once you have positioned the rhinestones, use a tiny amount of nail glue to secure them in place. Make sure each rhinestone is firmly adhered to avoid any lifting or shifting.
Step 4: Seal the Design
Apply a clear top coat over the entire nail, being careful not to disturb the rhinestones. This will seal the design and add extra shine, helping the rhinestones stay in place while providing a smooth finish.
Why It Works
Diamond Tip Nail Art combines elegance and luxury with a subtle, timeless design.
The soft pink base creates a refined backdrop, while the rhinestone tips add a sophisticated and glamorous touch.
This design is perfect for weddings, parties, or any event where you want your nails to sparkle with elegance.
32. Double French Tip Nail Art
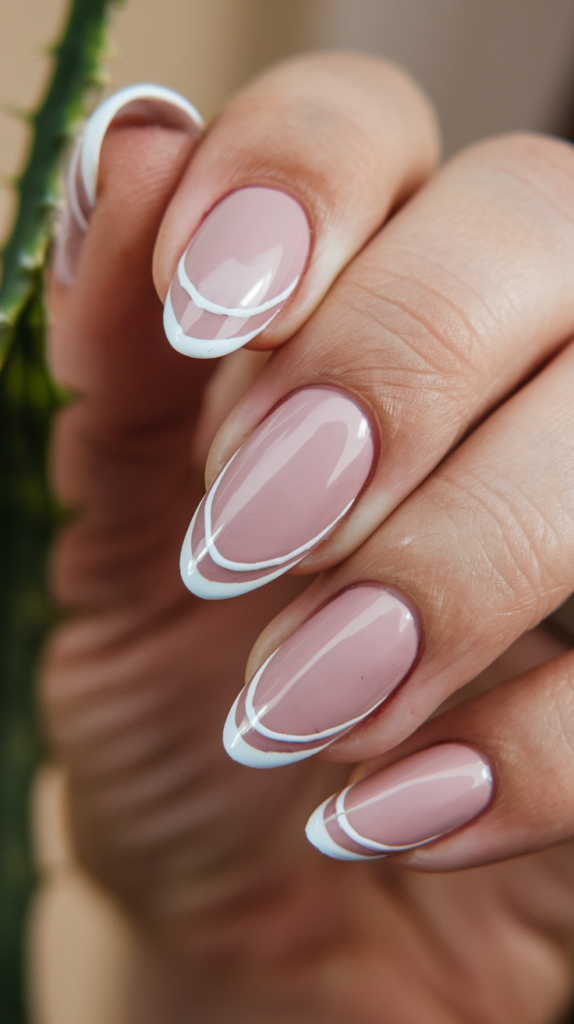
Double French Tip Nail Art offers a chic and modern twist on the classic French manicure, featuring two thin white lines along the tips for a unique, eye-catching design.
The soft pink base paired with the white tips creates an elegant and polished look, making this design perfect for both formal and everyday occasions.
Creating the Double French Tip Design
Step 1: Apply the Base Coat
Start by applying a soft pink or nude polish to your nails. This light and neutral color will provide a clean and elegant base for the white tips. Allow the base coat to dry completely before moving on to the next step.
Step 2: Create the French Tips
Using a fine nail art brush, create a traditional French tip by painting a white line along the edge of each nail. The key to this design is the precision of the lines, so take your time to ensure they are clean and crisp.
Step 3: Add the Double Line
For the double French tip, carefully add a second, thinner white line beneath the first line. The second line should be slightly thinner and parallel to the first for a sleek, layered effect.
Step 4: Seal the Design
Once the lines are dry, apply a clear top coat to seal the design and add a glossy finish. The top coat will smooth out the surface and protect the design from chipping.
Why It Works
Double French Tip Nail Art puts a modern spin on the classic French manicure by adding a stylish twist with the second line.
The soft pink base creates a balanced and sophisticated look, while the white tips add a refined, fresh element.
This design is perfect for anyone looking to update their French tips with a touch of contemporary elegance.
33. Rose Gold Foil Nail Art
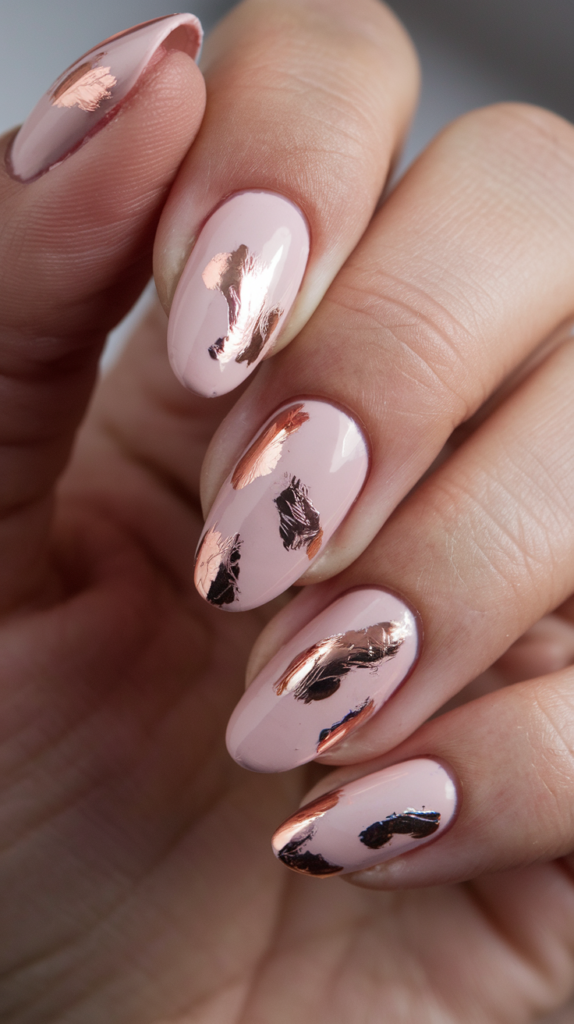
Rose Gold Foil Nail Art is a chic and luxurious design featuring delicate rose gold foil accents on a soft pink base.
This combination of feminine color and metallic shine creates an elegant and contemporary manicure that is perfect for those seeking a modern, polished look with a touch of glamour.
Creating the Rose Gold Foil Design
Step 1: Apply the Base Coat
Start by applying a soft pink or nude polish to your nails. This delicate base color provides the perfect backdrop for the bold rose gold foil accents. Allow the base coat to dry completely.
Step 2: Apply the Rose Gold Foil
Once the base coat is dry, use a small brush or your fingers to apply pieces of rose gold foil to your nails. Focus on adding small, random pieces of foil for an organic, metallic look. The foil should create a contrast with the pink base without overwhelming it.
Step 3: Gently Press the Foil
Make sure the foil is pressed firmly onto the nails to ensure it sticks well. You can use a tool or a soft brush to press down on the foil, ensuring it stays in place while still keeping some of its natural texture.
Step 4: Seal the Design
Apply a clear top coat to seal the foil design and add a glossy finish. This will also help to smooth out any edges from the foil and ensure the design lasts longer.
Why It Works
Rose Gold Foil Nail Art combines the subtle elegance of a pink base with the boldness of metallic rose gold.
The foil adds a sophisticated yet edgy feel, making this design perfect for any occasion where you want to make a statement.
Whether for a chic event or everyday glamour, this design offers a touch of luxury and modern flair.
34. Glitter Triangle French Tip Nail Art
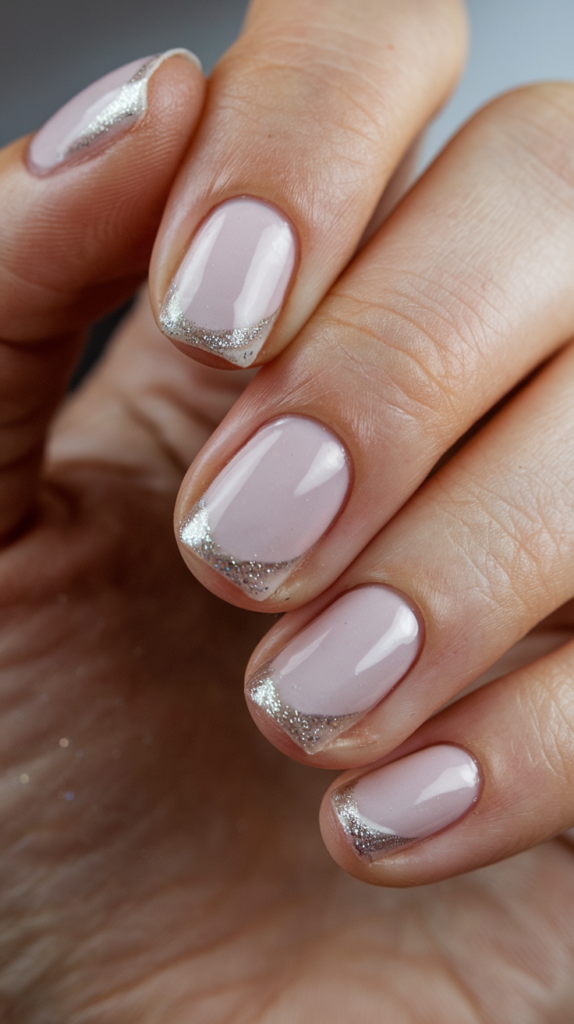
Glitter Triangle French Tip Nail Art gives a modern and glamorous twist to the classic French manicure.
Featuring a sleek, soft pink base with a shimmering glitter triangle at the tips, this design is perfect for those looking to combine elegance with a touch of sparkle.
Creating the Glitter Triangle French Tip Design
Step 1: Apply the Base Coat
Begin by applying a soft pink or nude polish to your nails. This subtle base creates a clean and sophisticated backdrop for the glittery triangle tips. Let the base coat dry completely before continuing.
Step 2: Create the Triangle Tips
Using a fine nail art brush or striping tape, carefully create a V-shaped triangle at the tips of your nails. Fill the triangle with glitter polish for a shimmering effect. The glitter adds a touch of sparkle while maintaining the elegance of the design.
Step 3: Blend the Glitter
If needed, use a small brush to blend the glitter slightly into the base for a smooth transition. Ensure that the glitter stays concentrated at the tips for a clean, sharp look.
Step 4: Seal the Design
Apply a clear top coat to seal the design and add a glossy finish. This will also smooth out any uneven areas from the glitter and help the design last longer.
Why It Works
Glitter Triangle French Tip Nail Art offers a fresh update to the classic French manicure.
The soft pink base creates a timeless, elegant feel, while the glitter triangle tips add a modern and glamorous touch.
This design is perfect for those who want to add a bit of sparkle and sophistication to their nails, whether for a night out or a special event.
35. Silver and Pink Ombre Nail Art
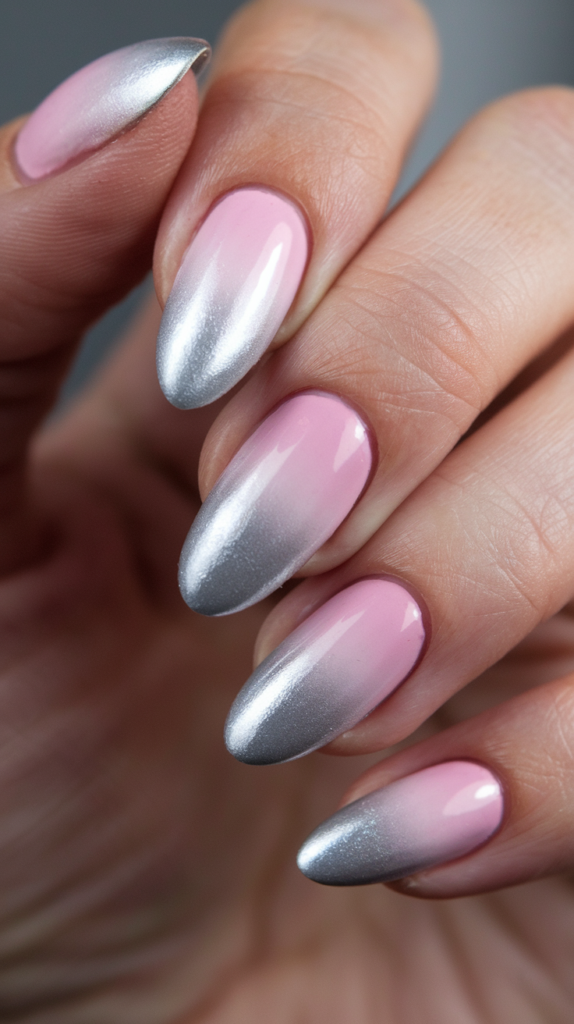
Silver and Pink Ombre Nail Art creates a stunning gradient effect that transitions from a soft pink base to a sleek silver at the tips.
The combination of these two elegant colors gives your nails a modern and sophisticated look, perfect for anyone wanting a chic yet understated design.
Creating the Silver and Pink Ombre Design
Step 1: Apply the Base Coat
Start by applying a soft pink polish to all your nails. This light, feminine color creates the perfect base for the ombre design. Let the base coat dry completely before continuing.
Step 2: Create the Ombre Effect
Using a makeup sponge or sponge applicator, apply silver polish to the tips of your nails. Gently tap the sponge to blend the silver into the pink polish. Focus on achieving a seamless gradient from pink to silver.
Step 3: Blend the Colors
For a smooth transition, lightly dab the sponge on the area where the pink and silver meet, blending the two shades together. You can add more layers of silver or pink as needed to get the perfect gradient.
Step 4: Seal the Design
Once you are satisfied with the ombre effect, apply a clear top coat to seal the design and add a glossy finish. This will also smooth out any rough areas and help the design last longer.
Why It Works
Silver and Pink Ombre Nail Art is a stylish and versatile design that combines the softness of pink with the sleekness of silver.
The smooth gradient creates a sophisticated, high-fashion look that is both modern and elegant.
Whether you’re heading to a formal event or just want a polished, trendy manicure, this ombre design is the perfect choice.
Conclusion
Pink nail art provides endless opportunities to express your personal style, whether you’re looking for something playful, romantic, or bold.
From subtle glitter accents to striking geometric patterns, the versatility of pink nails allows for creativity and customization.
With these 35 inspiring designs, you can explore different techniques, color combinations, and embellishments to create a unique look that suits your style.
Whether you’re preparing for a special occasion or simply want to refresh your everyday manicure, these pink nail art ideas will leave you feeling inspired and ready to make a statement with your nails.
