Minimalist nail art strips beauty down to its essentials—clean lines, soft hues, and delicate details that whisper sophistication without shouting for attention.
In a sea of bold patterns and dazzling embellishments, these designs carve out a quiet space, blending elegance with restraint to turn your nails into a canvas of understated charm.
Whether it’s a whisper of pastel, a single sharp line, or a fleeting geometric shape, this collection of 35 minimalist nail art ideas offers a sleek, modern vibe that fits any moment—casual or grand.
With step-by-step guides and a spark of inspiration, these looks invite you to embrace the power of less, proving that simplicity can still pack a punch of style.
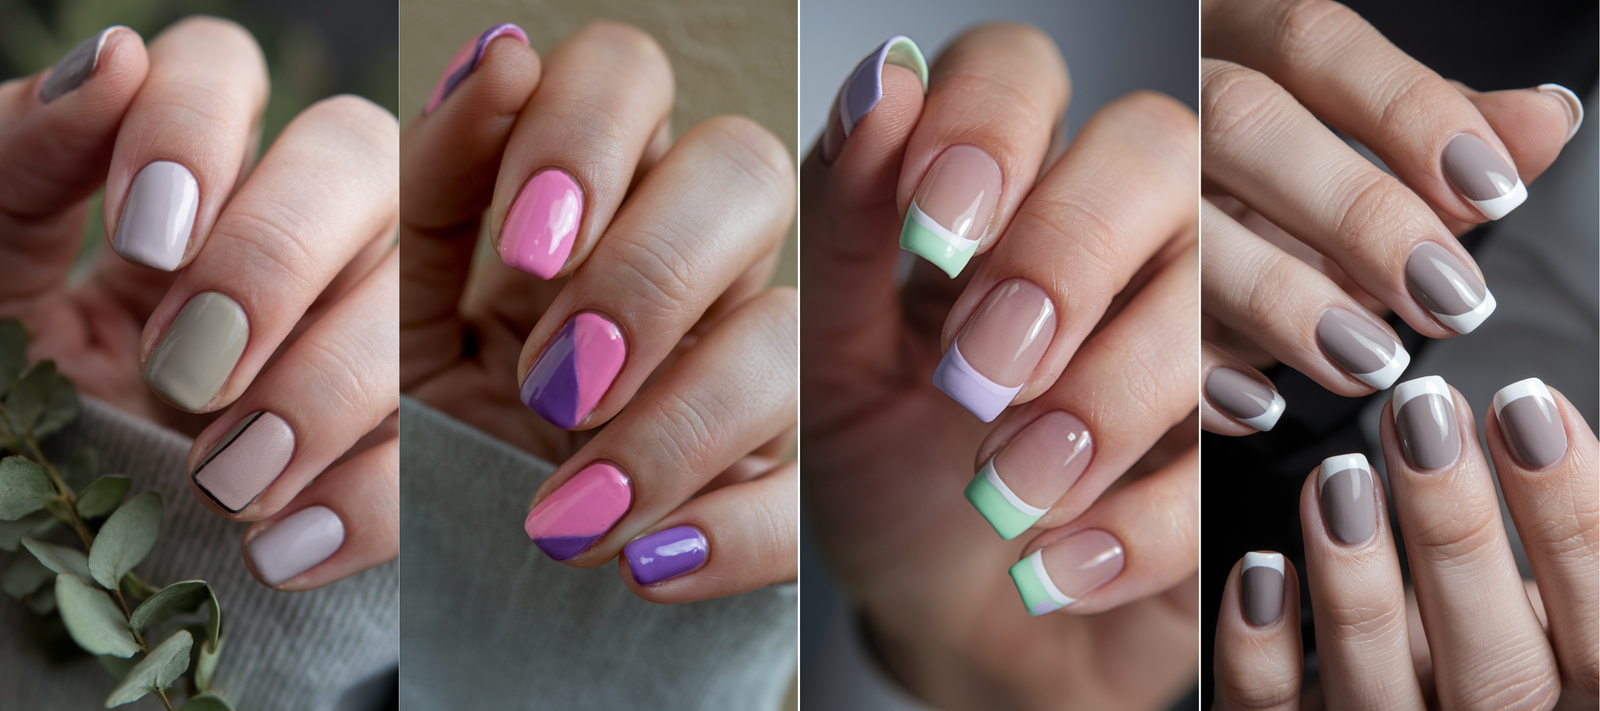
01. Single Color Sophistication
Step into elegance with Single Color Sophistication, a design that drapes your nails in a single muted pastel or neutral shade for a look that’s pure and polished.
This isn’t just polish—it’s a quiet statement of grace, ideal for crisp mornings, office days, or whenever you crave a touch of effortless refinement.
Each nail glows with the calm of a single hue, a testament to the beauty of simplicity in a chaotic world.
Creating Single Color Sophistication
Step 1: Prep and Base
Start with a nourishing base coat to shield your nails, then sweep on two coats of a muted pastel—think soft pink, beige, or lavender—across all five nails.
This gentle shade dries into a smooth canvas, catching light like a whisper of dawn on still water.
Step 2: Even Application
With a steady hand, apply the polish in thin, even layers, ensuring no streaks mar the sleek finish.
Let each coat dry fully to lock in a flawless, uniform sheen that feels like silk against your fingertips.
Step 3: Clean Edges
Dip a small brush in acetone to tidy any stray polish around the cuticles, sharpening the look to pristine perfection.
This step keeps the design crisp, a subtle nod to meticulous care in every detail.
Step 4: Seal with Top Coat
Finish with a glossy top coat to encase the color in a protective shine, amplifying its quiet glow.
Add a second layer for durability, ensuring your nails stay sleek through every day’s demands.
Why It Works
This design is a love note to minimalism’s core—the single hue wraps your nails in a serene embrace, soft yet striking in its purity.
The muted tone stands as a quiet sentinel of style, radiating calm confidence without a hint of excess.
It’s a versatile gem, pairing seamlessly with a tailored blazer or a cozy sweater, turning your nails into a timeless ode to elegance.
02. Tiny Heart Accents
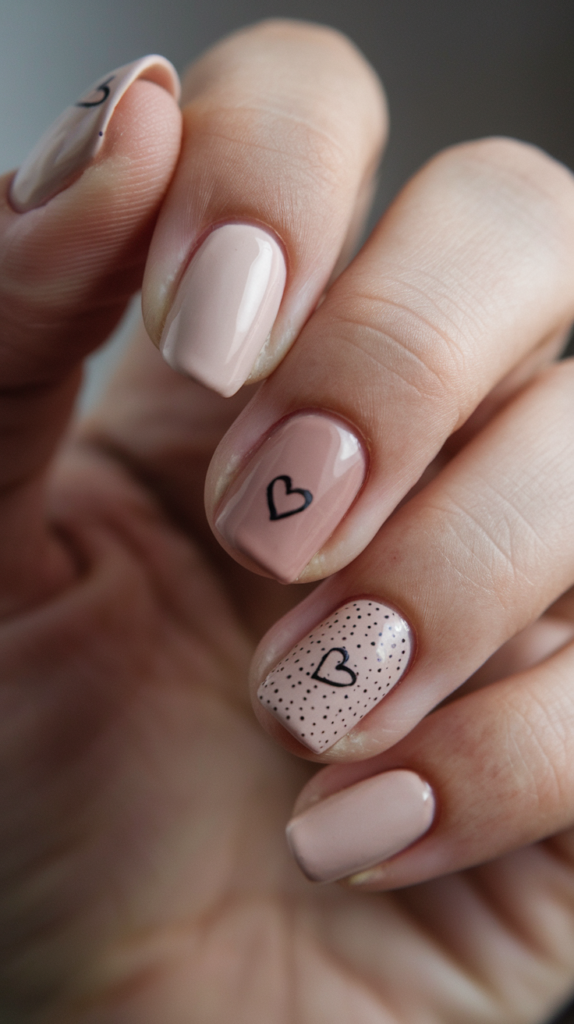
Whisper affection with Tiny Heart Accents, a design that dots your nails with delicate hearts on a nude base, weaving love into simplicity.
This isn’t just nail art—it’s a tender embrace on your fingertips, perfect for quiet dates, cozy evenings, or days when you want a subtle spark.
Each heart beats with understated charm, a small gesture that lifts the minimalist canvas.
Creating Tiny Heart Accents
Step 1: Prep and Base
Lay down a smoothing base coat, then paint all nails with two coats of nude polish, letting it dry into a soft, bare foundation.
This neutral tone sets a calm stage, echoing the warmth of a gentle touch.
Step 2: Heart Placement
With a fine brush, dab tiny black hearts on the ring and middle fingers, keeping them small and centered for balance.
Layer a second coat for depth, letting them dry into sweet, crisp shapes that catch the eye.
Step 3: Clean Precision
Use an acetone-dipped brush to refine the hearts’ edges, ensuring they stay dainty and sharp against the nude backdrop.
This keeps the design pure, a whisper of love in every stroke.
Step 4: Seal with Top Coat
Brush on a glossy top coat to lock in the hearts, giving the nude base a subtle sheen.
Add a second layer for resilience, ensuring your nails carry this tender accent through every moment.
Why It Works
This design hums with minimalist grace—the nude base cradles your nails in quiet elegance, while the tiny hearts flutter like a soft heartbeat, delicate yet bold.
The black accents wink with charm against the simplicity, a love letter to restraint that feels personal and pure.
Pair it with a silk scarf or a minimalist dress, and it’s a chic tribute to subtlety, radiating warmth with every gentle curve.
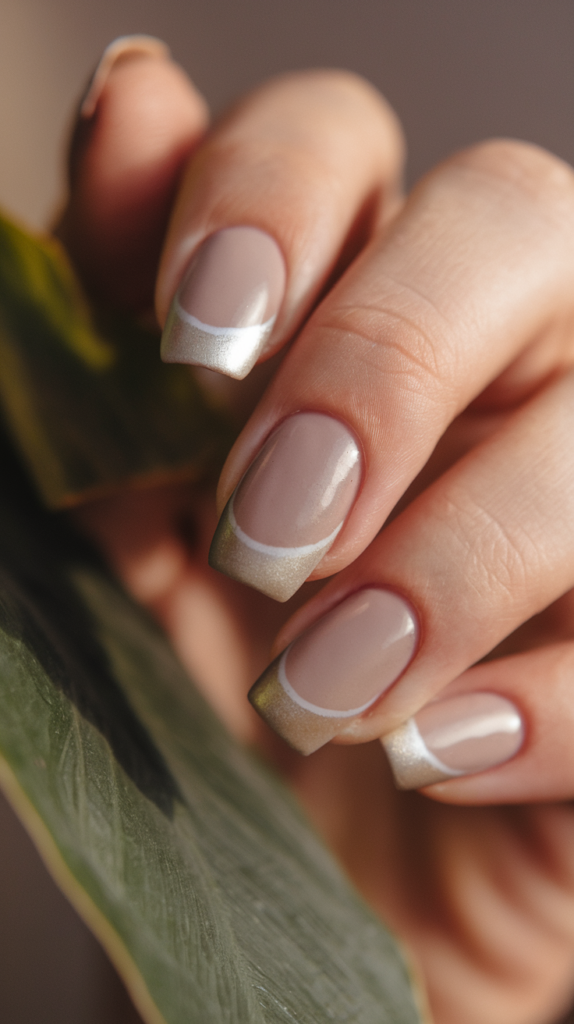
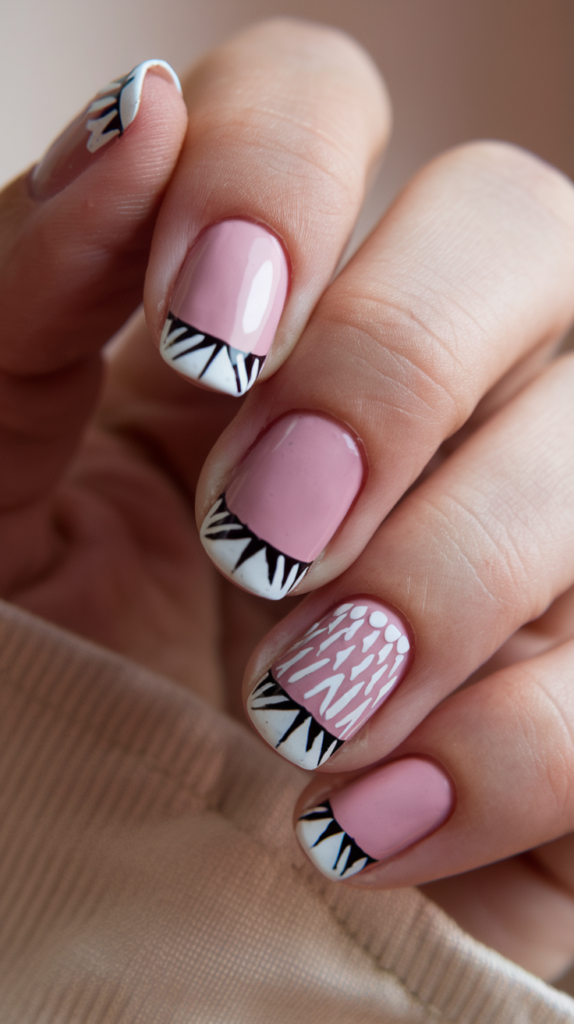
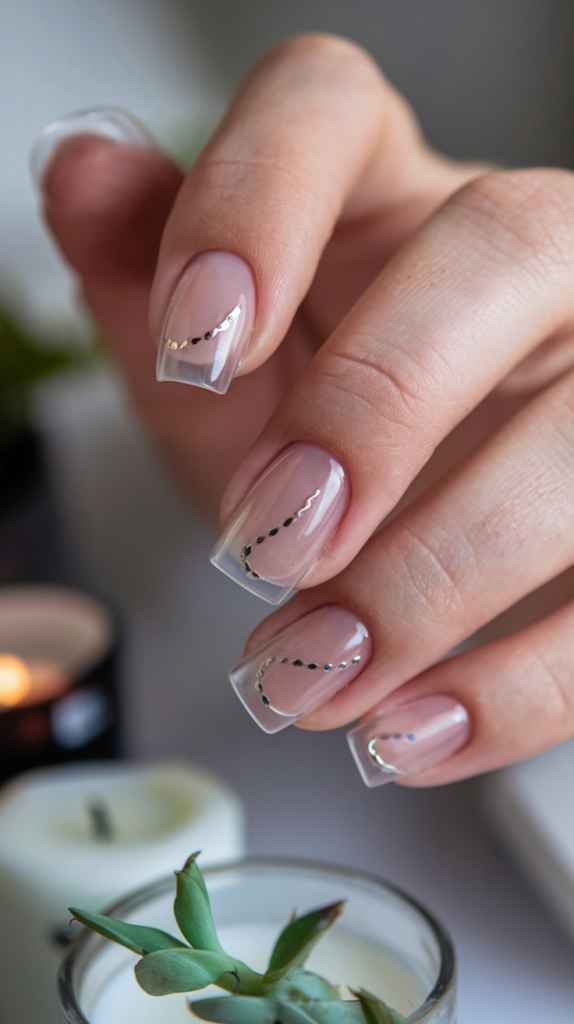
03. French Tips With a Twist

Reimagine tradition with French Tips With a Twist, a design that swaps classic white for metallic or black tips on a nude base, blending timeless with bold.
This isn’t just a manicure—it’s a sleek evolution, perfect for evening outings, workdays with flair, or moments when you want to edge up the everyday.
Each tip gleams with modern defiance, a minimalist riff on a familiar tune.
Creating French Tips With a Twist
Step 1: Prep and Base
Begin with a protective base coat, then layer two coats of nude polish across all nails, drying into a soft, natural canvas.
This bare shade hums with understated poise, ready for a sharp contrast.
Step 2: Tip Design
With a fine brush, paint metallic gold or black tips across each nail’s edge, keeping the line thin and precise.
Layer a second coat for intensity, letting them dry into a crisp, modern frame that catches light or shadow.
Step 3: Refine Edges
Dip a brush in acetone to sharpen the tips’ borders, ensuring a clean break between nude and bold.
This step locks in the twist, a subtle rebellion against the norm.
Step 4: Seal with Top Coat
Finish with a glossy top coat to encase the design, amplifying the tips’ sheen against the nude glow.
Add a second layer for strength, ensuring your nails shine through every gesture.
Why It Works
This design dances on the edge of tradition—the nude base roots it in classic calm, while the metallic or black tips flare with contemporary fire.
The contrast slices through with chic precision, a nod to French elegance remixed with modern grit.
Pair it with a tailored jacket or a sleek clutch, and it’s a sharp tribute to minimalism’s daring side, gleaming with every flick of your hand.
04. Negative Space Stripes

Slice through the ordinary with Negative Space Stripes, a design that carves sleek lines across bare nails, balancing bold with bare.
This isn’t just polish—it’s a breath of modern air, perfect for gallery visits, minimalist brunches, or days when you want your nails to speak quietly but sharply.
Each stripe hums with clean geometry, a whisper of art on a natural stage.
Creating Negative Space Stripes
Step 1: Prep and Base
Start with a strengthening base coat, then leave all nails bare or add a sheer nude coat, drying into a raw, natural foundation.
This untouched canvas sets the stage, letting the stripes carve their path.
Step 2: Stripe Layout
With a striping brush, paint thin black or metallic lines horizontally across each nail, spacing them unevenly for a dynamic edge.
Layer a second coat for definition, letting them dry into sharp, deliberate cuts against the bare backdrop.
Step 3: Clean Precision
Use acetone and a fine brush to perfect the lines’ edges, keeping them razor-sharp and uncluttered.
This ensures the negative space sings, a balance of polish and purity.
Step 4: Seal with Top Coat
Finish with a matte top coat to lock in the design, muting shine for a sleek, modern finish.
Add a second layer for endurance, ensuring your nails hold their edge through every scene.
Why It Works
This design is a quiet storm of minimalism—the bare nails breathe with natural grace, while the stripes slash through with architectural precision.
The negative space dances with the lines, a play of absence and presence that feels both bold and restrained.
Pair it with a linen shirt or a geometric ring, and it’s a crisp tribute to modern art, slicing through the everyday with every clean stroke.
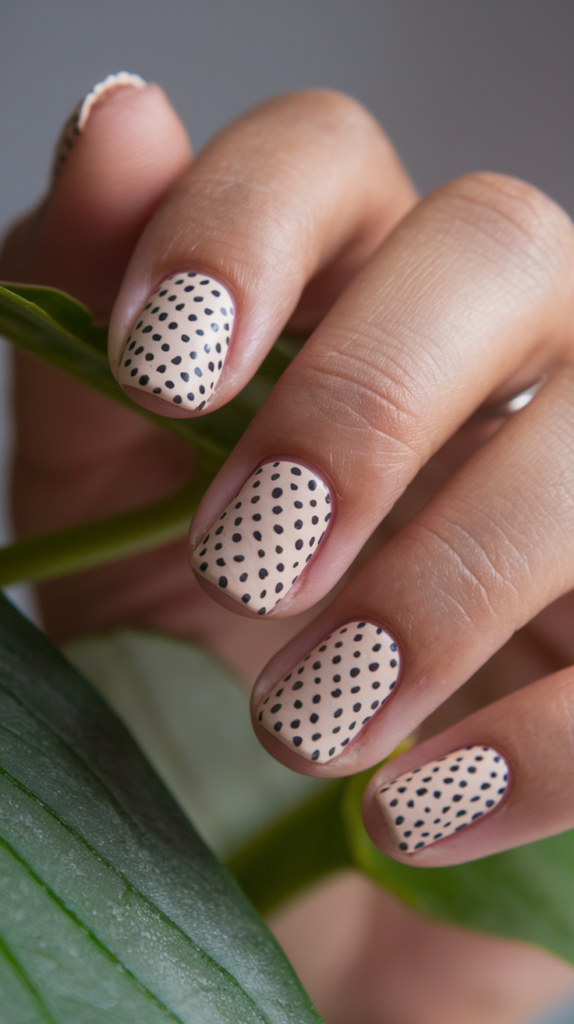
05. Dainty Dot Patterns
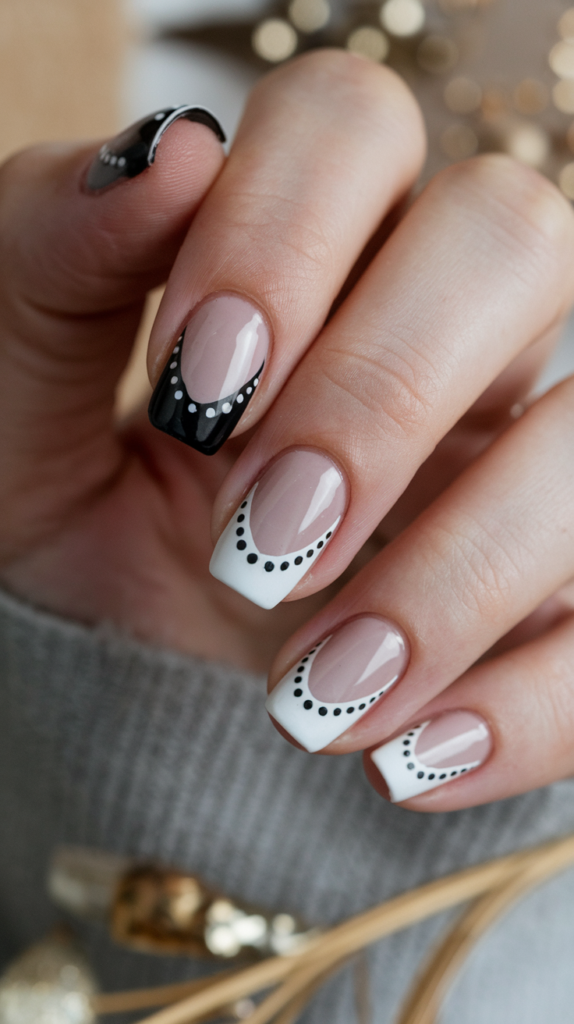
Sprinkle charm with Dainty Dot Patterns, a design that scatters tiny black dots across a nude base, blending symmetry with whimsy.
This isn’t just nail art—it’s a flicker of playfulness, perfect for tea dates, desk days, or moments when you want a touch of chic without the fuss.
Each dot twinkles with delicate intent, a minimalist constellation on your fingertips.
Creating Dainty Dot Patterns
Step 1: Prep and Base
Lay down a hydrating base coat, then coat all nails with two layers of nude polish, drying into a soft, even glow.
This gentle hue hums with quiet elegance, a perfect foil for the dots’ dance.
Step 2: Dot Placement
With a dotting tool, place tiny black dots at the base of each nail, arranging them in a neat row for balance.
Layer a second coat for depth, letting them dry into crisp, playful specks that catch the eye.
Step 3: Refine Details
Dip a brush in acetone to tidy any smudges, keeping the dots small and sharp against the nude canvas.
This step locks in their dainty charm, a whisper of pattern in every mark.
Step 4: Seal with Top Coat
Finish with a glossy top coat to encase the design, giving the dots a subtle shine against the soft base.
Add a second layer for durability, ensuring your nails twinkle through every gentle gesture.
Why It Works
This design is a soft symphony of minimalism—the nude base cradles your nails in calm, while the black dots sprinkle a playful rhythm, tiny yet bold.
Their symmetry hums with order, a delicate balance that lifts the simplicity into something special.
Pair it with a knit cardigan or a dainty bracelet, and it’s a chic tribute to subtle joy, sparkling with every quiet flick of your hand.
06. Monochrome Gradient Nails

Fade into style with Monochrome Gradient Nails, a design that flows from light to dark in a single color, weaving depth into minimalism.
This isn’t just a manicure—it’s a quiet shift of shadow and light, perfect for twilight walks, office elegance, or days when you want your nails to glow with subtle grace.
Each nail hums with a soft transition, a minimalist gradient that speaks volumes.
Creating Monochrome Gradient Nails
Step 1: Prep and Base
Begin with a protective base coat, then sponge a light gray polish onto the tips, blending into a darker shade toward the base across all nails.
This fade dries into a seamless flow, echoing dusk’s gentle creep.
Step 2: Blend the Gradient
With a makeup sponge, dab the two shades—light and dark—overlapping slightly, blending until the transition feels smooth and natural.
Let it dry into a soft ombre, a quiet wave of color that shifts with the light.
Step 3: Clean Edges
Use an acetone-dipped brush to tidy the cuticles, keeping the gradient crisp and uncluttered.
This step sharpens the flow, a subtle polish to the design’s grace.
Step 4: Seal with Top Coat
Finish with a glossy top coat to lock in the gradient, amplifying its soft shimmer.
Add a second layer for resilience, ensuring your nails carry this quiet elegance through every hour.
Why It Works
This design is a whisper of minimalism’s depth—the monochrome fade drifts across your nails like a shadow at dusk, soft yet striking in its shift.
The gradient weaves a tale of light and dark, a single hue that unfolds with quiet power.
Pair it with a silk blouse or a muted scarf, and it’s a sleek tribute to understated beauty, glowing with every subtle turn.
07. Matte Finish Elegance
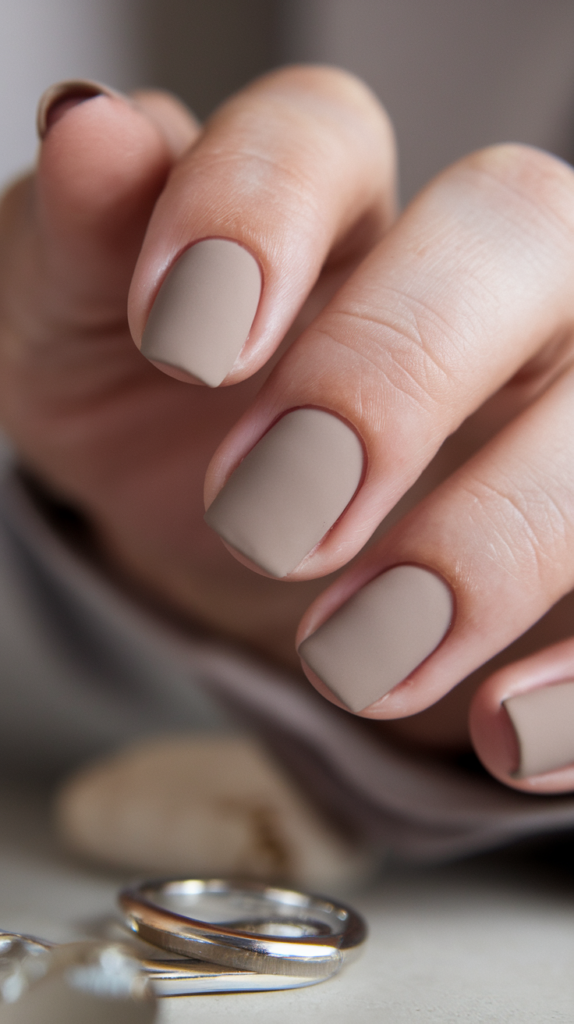
Soften the shine with Matte Finish Elegance, a design that cloaks your nails in a velvety nude coat, radiating quiet luxury.
This isn’t just polish—it’s a hush of refinement, perfect for crisp evenings, minimalist gatherings, or moments when you want your nails to feel effortlessly chic.
Each nail hums with a muted glow, a testament to sophistication without gloss.
Creating Matte Finish Elegance
Step 1: Prep and Base
Lay down a strengthening base coat, then sweep two coats of nude polish—beige or taupe—across all nails.
This soft shade dries into a smooth canvas, a whisper of warmth against your skin.
Step 2: Even Layers
Apply the polish in thin, even strokes, letting each layer dry to avoid streaks and build a flawless finish.
This step sets a silken base, ready for the matte magic.
Step 3: Matte Top Coat
Brush on a matte top coat, transforming the nude into a velvety sheen that mutes all shine.
Let it dry into a soft, tactile glow, a quiet rebellion against gloss.
Step 4: Clean Edges
Use acetone and a fine brush to sharpen the cuticles, ensuring the matte finish stays pristine.
Add a second matte layer for endurance, locking in the elegance through every touch.
Why It Works
This design is a velvet hymn to minimalism—the nude base drapes your nails in understated warmth, while the matte finish hushes the shine into a luxurious calm.
It’s a soft defiance, a glow that whispers rather than shouts, wrapping your nails in quiet poise.
Pair it with a cashmere sweater or a sleek watch, and it’s a refined tribute to simplicity, radiating elegance with every muted gleam.
08. Geometric Minimalism
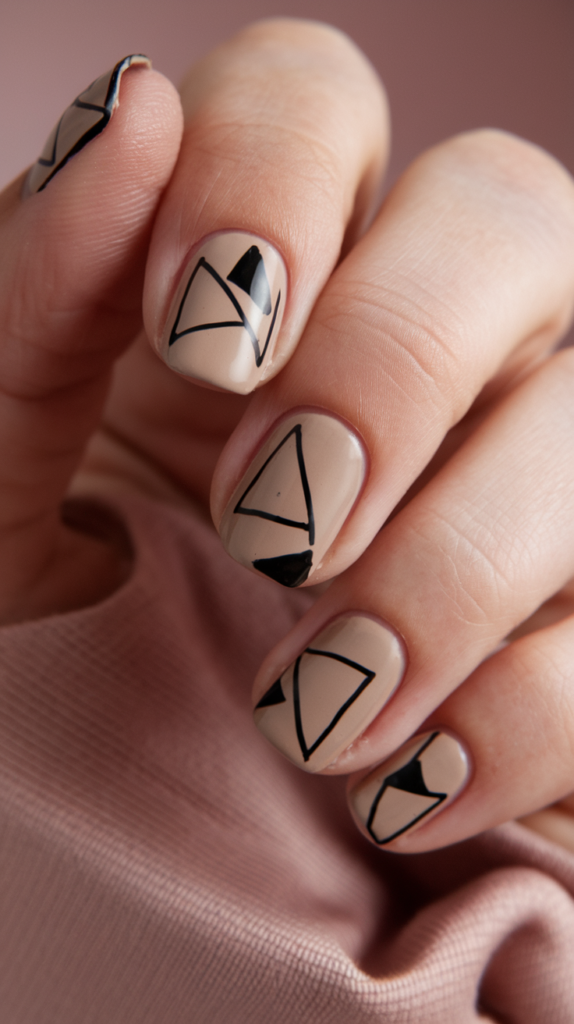
Shape the future with Geometric Minimalism, a design that sketches tiny triangles and squares across a nude base, blending structure with subtlety.
This isn’t just nail art—it’s a blueprint of chic, perfect for gallery nights, modern brunches, or days when you want your nails to echo sharp elegance.
Each shape carves a quiet edge, a minimalist dance of form and space.
Creating Geometric Minimalism
Step 1: Prep and Base
Start with a protective base coat, then layer two coats of nude polish across all nails, drying into a soft, neutral stage.
This calm hue hums with restraint, ready for geometric precision.
Step 2: Shape Design
With a fine brush, paint small black triangles near the tips and squares at the base of two nails, keeping them tiny and sharp.
Layer a second coat for clarity, letting them dry into crisp, architectural accents.
Step 3: Refine Lines
Dip a brush in acetone to perfect the shapes’ edges, ensuring they cut through the nude with clean precision.
This step locks in their stark beauty, a whisper of structure on bare skin.
Step 4: Seal with Top Coat
Finish with a glossy top coat to encase the design, giving the shapes a subtle gleam against the soft base.
Add a second layer for strength, ensuring your nails hold their edge through every move.
Why It Works
This design is a sharp sonnet of minimalism—the nude base breathes with quiet grace, while the geometric shapes slice through with modern intent.
The triangles and squares stand as tiny architects, building a look that’s both bold and restrained.
Pair it with a tailored skirt or a sleek pendant, and it’s a crisp tribute to form, cutting through the everyday with every precise angle.
09. Metallic Line Accents
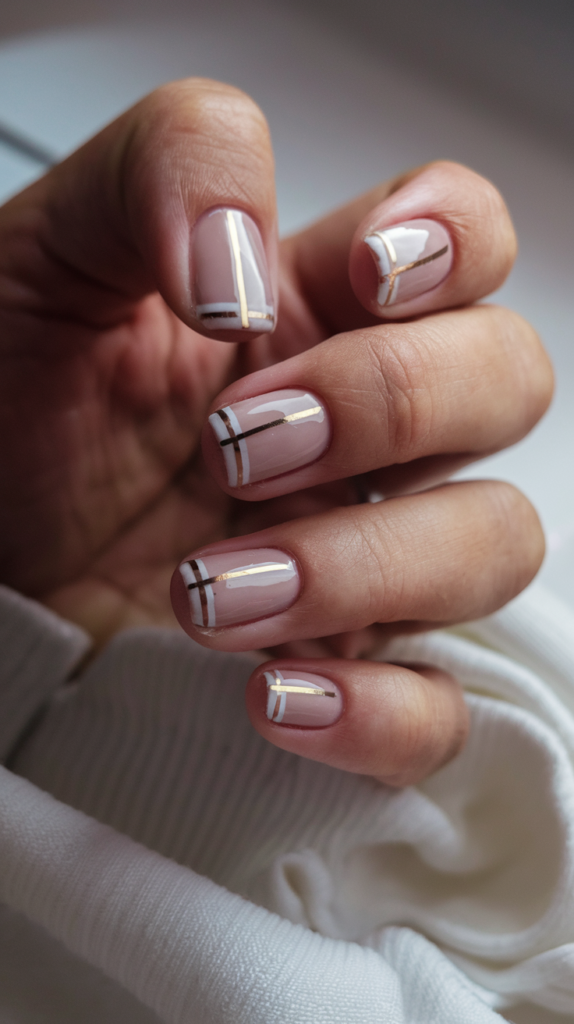
Gleam with precision in Metallic Line Accents, a design that threads a single gold line down each nail’s center, weaving luxury into minimalism.
This isn’t just polish—it’s a flash of elegance, perfect for rooftop drinks, sleek meetings, or moments when you want your nails to shine quietly.
Each line cuts with metallic grace, a minimalist spark on a nude stage.
Creating Metallic Line Accents
Step 1: Prep and Base
Lay down a smoothing base coat, then paint all nails with two coats of nude polish, drying into a soft, bare glow.
This neutral canvas hums with calm, ready for a golden thread.
Step 2: Line Design
With a striping brush, draw a thin gold line vertically down each nail’s center, keeping it straight and delicate.
Layer a second coat for intensity, letting it dry into a gleaming spine that catches every light.
Step 3: Sharpen Edges
Use an acetone-dipped brush to refine the line’s borders, ensuring it slices through the nude with crisp precision.
This step keeps the accent sleek, a whisper of luxury in every stroke.
Step 4: Seal with Top Coat
Finish with a glossy top coat to lock in the line, amplifying its metallic sheen against the soft base.
Add a second layer for durability, ensuring your nails gleam through every gesture.
Why It Works
This design is a golden thread of minimalism—the nude base cradles your nails in quiet elegance, while the metallic line flares with subtle opulence.
It cuts through with a sleek, modern edge, a single stroke that lifts the simplicity into something striking.
Pair it with a gold ring or a satin top, and it’s a luxe tribute to restraint, shimmering with every flick of your hand.
10. Mini Moon Design
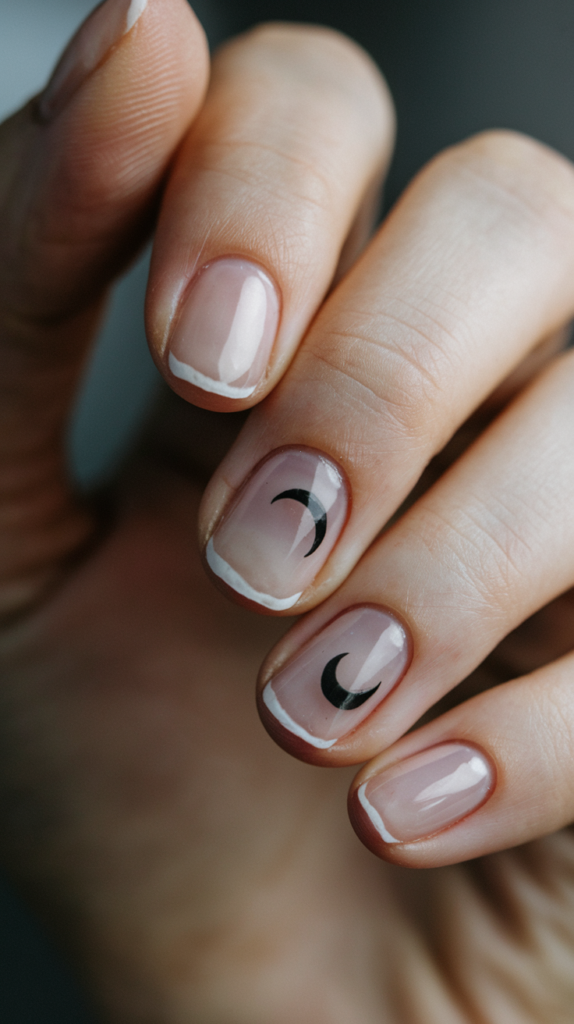
Gaze at the night with Mini Moon Design, a celestial whisper of tiny gold crescents perched near the cuticles on a nude base.
This isn’t just nail art—it’s a starlit dream, perfect for moonlit walks, quiet nights, or moments when you want your nails to shimmer with cosmic charm.
Each crescent glows with delicate mystery, a minimalist nod to the sky.
Creating Mini Moon Design
Step 1: Prep and Base
Start with a hydrating base coat, then layer two coats of nude polish across all nails, drying into a soft, natural sheen.
This bare glow hums with calm, a perfect stage for lunar light.
Step 2: Crescent Moons
With a fine brush, paint tiny gold crescent moons near the cuticle of each nail, keeping them small and curved.
Layer a second coat for a radiant gleam, letting them dry into delicate arcs that catch the eye.
Step 3: Refine Shapes
Dip a brush in acetone to sharpen the crescents’ edges, ensuring they shine crisp against the nude backdrop.
This step locks in their celestial grace, a whisper of the night sky.
Step 4: Seal with Top Coat
Finish with a glossy top coat to encase the moons, amplifying their golden glow against the soft base.
Add a second layer for endurance, ensuring your nails shimmer through every twilight.
Why It Works
This design is a lunar lullaby of minimalism—the nude base drifts with quiet elegance, while the gold crescents twinkle like stars in a clear night.
They hover with ethereal charm, a celestial whisper that lifts the simplicity into something magical.
Pair it with a flowing dress or a silver chain, and it’s a tender tribute to the cosmos, glowing with every gentle curve.
11. Minimal Half-Moon Manicure
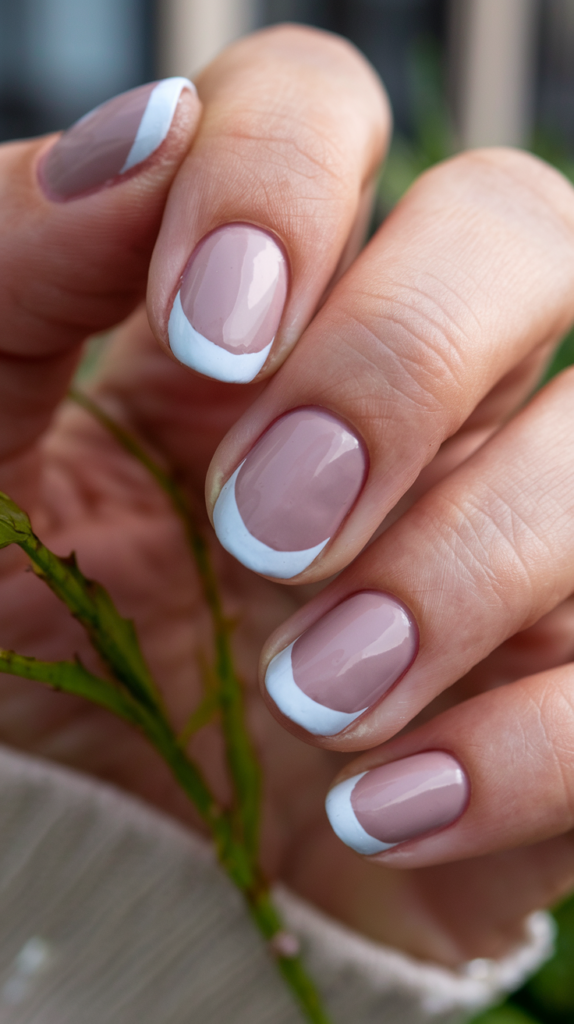
Frame simplicity with Minimal Half-Moon Manicure, a design that leaves a crescent of bare nail at the base, kissed with nude polish above.
This isn’t just a manicure—it’s a breath of refined calm, perfect for morning coffees, office poise, or days when you want your nails to whisper elegance.
Each half-moon glows with natural grace, a minimalist twist on classic form.
Creating Minimal Half-Moon Manicure
Step 1: Prep and Base
Start with a protective base coat, then place small stickers at the base of each nail to shield the crescent area.
This bare patch sets the stage, a quiet nod to natural beauty.
Step 2: Polish Application
Brush two coats of nude polish above the stickers, letting it dry into a soft, even sheen.
Peel off the stickers carefully, revealing a clean half-moon that contrasts with the polish.
Step 3: Clean Edges
Use an acetone-dipped brush to sharpen the line between bare and painted, keeping it crisp and smooth.
This step locks in the design’s quiet charm, a balance of nature and polish.
Step 4: Seal with Top Coat
Finish with a glossy top coat to encase the design, giving the nude a subtle shine while preserving the bare crescent.
Add a second layer for strength, ensuring your nails hold their poise through every day.
Why It Works
This design is a soft echo of minimalism—the bare half-moon breathes with natural elegance, while the nude polish cloaks the rest in quiet warmth.
The contrast hums with restraint, a gentle frame that lifts the simplicity into something timeless.
Pair it with a linen top or a delicate ring, and it’s a refined tribute to balance, glowing with every subtle curve.
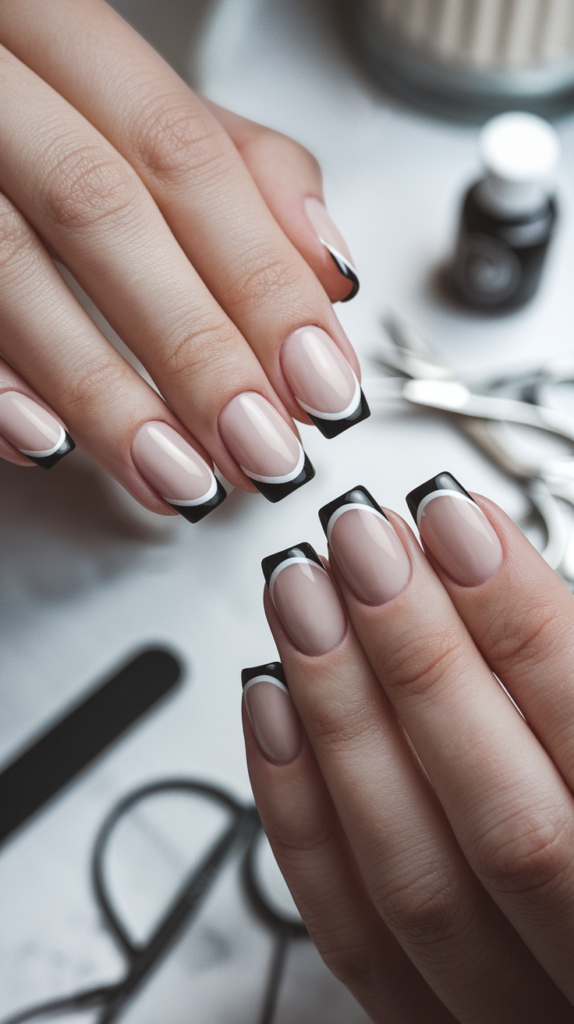
12. Neutral Base With Black Tips
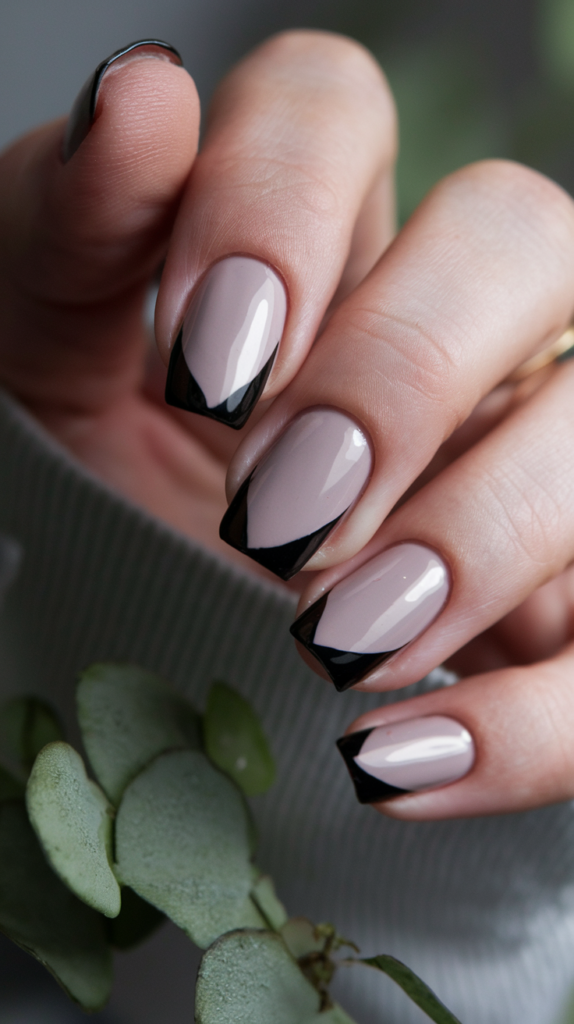
Strike a chord with Neutral Base With Black Tips, a design that crowns a nude base with sharp black edges, blending bold with bare.
This isn’t just a manicure—it’s a quiet rebellion, perfect for late-night chats, sleek events, or days when you want your nails to cut through with chic.
Each tip slices with graphic grace, a minimalist clash of light and shadow.
Creating Neutral Base With Black Tips
Step 1: Prep and Base
Lay down a strengthening base coat, then sweep two coats of nude polish across all nails, drying into a soft, natural glow.
This calm hue sets a gentle stage, ready for a stark contrast.
Step 2: Black Tips
With a fine brush, paint sharp black tips across each nail’s edge, keeping the line thin and precise.
Layer a second coat for depth, letting them dry into bold, crisp borders that pop against the nude.
Step 3: Sharpen Edges
Use an acetone-dipped brush to refine the tips’ edges, ensuring they cut through with clean, graphic precision.
This step locks in the contrast, a whisper of edge in every line.
Step 4: Seal with Top Coat
Finish with a glossy top coat to encase the design, amplifying the black’s shine against the soft base.
Add a second layer for endurance, ensuring your nails hold their boldness through every move.
Why It Works
This design is a stark ballad of minimalism—the nude base hums with quiet warmth, while the black tips slash through with modern defiance.
The contrast sings with graphic poise, a sleek edge that lifts the simplicity into something striking.
Pair it with a leather jacket or a bold cuff, and it’s a chic tribute to restraint, cutting through with every sharp gleam.
13. Subtle Glitter Accents
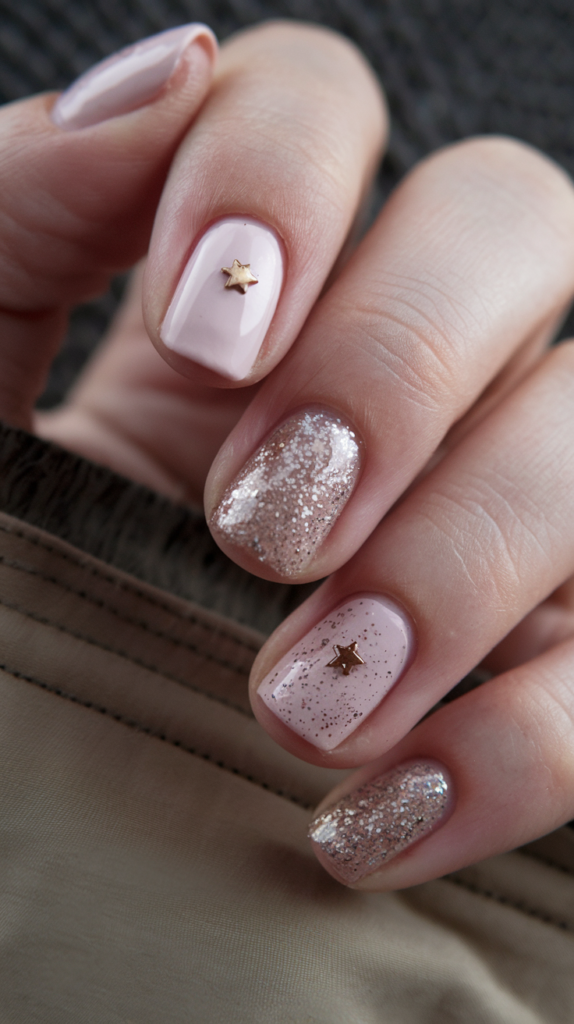
Twinkle softly with Subtle Glitter Accents, a design that dusts one nail with fine gold glitter atop a nude base, weaving sparkle into restraint.
This isn’t just polish—it’s a flicker of festivity, perfect for quiet celebrations, cozy nights, or moments when you want a hint of shine without the dazzle.
Each glittered nail gleams with delicate cheer, a minimalist spark in the calm.
Creating Subtle Glitter Accents
Step 1: Prep and Base
Start with a hydrating base coat, then layer two coats of nude polish across all nails, drying into a soft, natural sheen.
This bare glow hums with calm, a perfect foil for a single spark.
Step 2: Glitter Accent
With a small brush, dab fine gold glitter polish onto the ring finger, spreading it evenly for a subtle shimmer.
Layer lightly to keep it delicate, letting it dry into a quiet twinkle that catches the light.
Step 3: Clean Edges
Use an acetone-dipped brush to tidy the glitter’s borders, ensuring it stays contained and crisp against the nude.
This step locks in the subtlety, a whisper of sparkle in every gleam.
Step 4: Seal with Top Coat
Finish with a glossy top coat to encase the design, amplifying the glitter’s glow while smoothing the nude base.
Add a second layer for durability, ensuring your nails shimmer through every gentle moment.
Why It Works
This design is a soft serenade of minimalism—the nude base drapes your nails in quiet elegance, while the glittered accent flickers like a distant star.
It twinkles with restrained joy, a single note of festivity that lifts the simplicity into something special.
Pair it with a velvet dress or a gold stud, and it’s a tender tribute to subtle shine, gleaming with every quiet gesture.
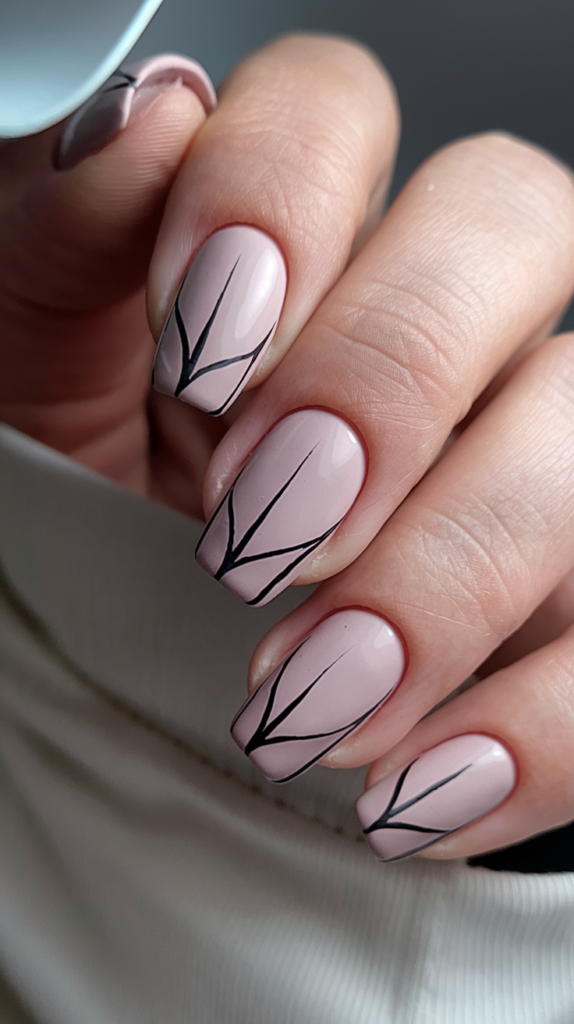
14. Minimal Outline Art

Trace elegance with Minimal Outline Art, a design that frames each nail with a thin black line, blending structure with bare beauty.
This isn’t just polish—it’s a whisper of precision, perfect for art openings, minimalist days, or moments when you want your nails to hum with quiet edge.
Each outline carves a sleek silhouette, a minimalist frame for natural grace.
Creating Minimal Outline Art
Step 1: Prep and Base
Start with a protective base coat, then leave all nails bare or add a sheer coat, drying into a raw, natural canvas.
This untouched glow sets a calm stage, ready for sharp lines.
Step 2: Outline Design
With a fine brush, trace a thin black line around each nail’s edge, keeping it close and precise.
Layer a second coat for clarity, letting it dry into a crisp, graphic frame that defines the shape.
Step 3: Sharpen Edges
Use an acetone-dipped brush to perfect the outline’s borders, ensuring it cuts through with clean, sharp precision.
This step locks in the sleekness, a whisper of structure in every stroke.
Step 4: Seal with Top Coat
Finish with a glossy top coat to encase the design, giving the outline a subtle sheen against the bare nail.
Add a second layer for strength, ensuring your nails hold their edge through every scene.
Why It Works
This design is a sharp sketch of minimalism—the bare nails breathe with natural calm, while the black outline slices through with architectural grace.
It frames with quiet intent, a single line that lifts the simplicity into something striking.
Pair it with a monochrome top or a bold watch, and it’s a sleek tribute to form, cutting through with every precise trace.
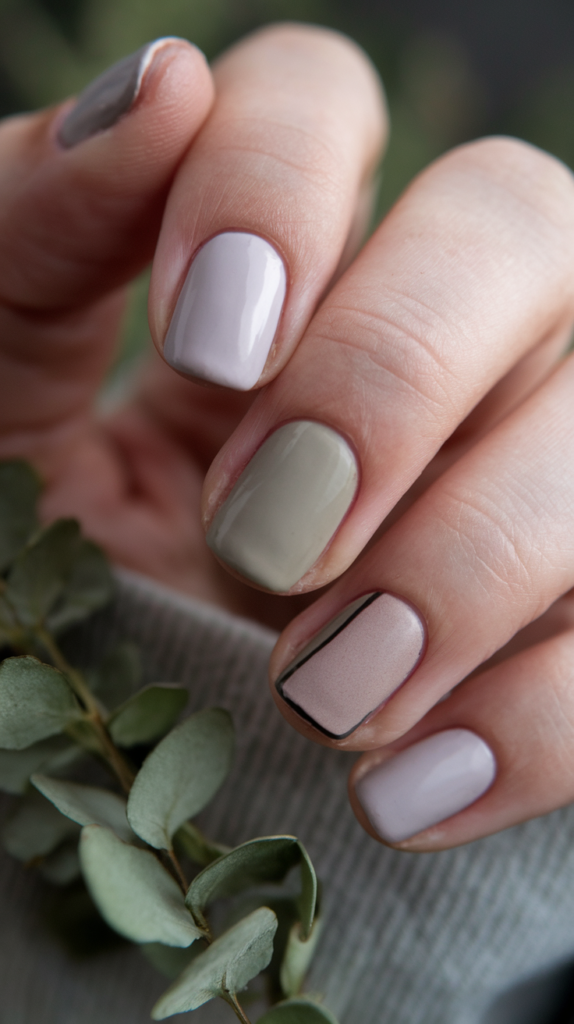
15. Two-Tone Neutrals
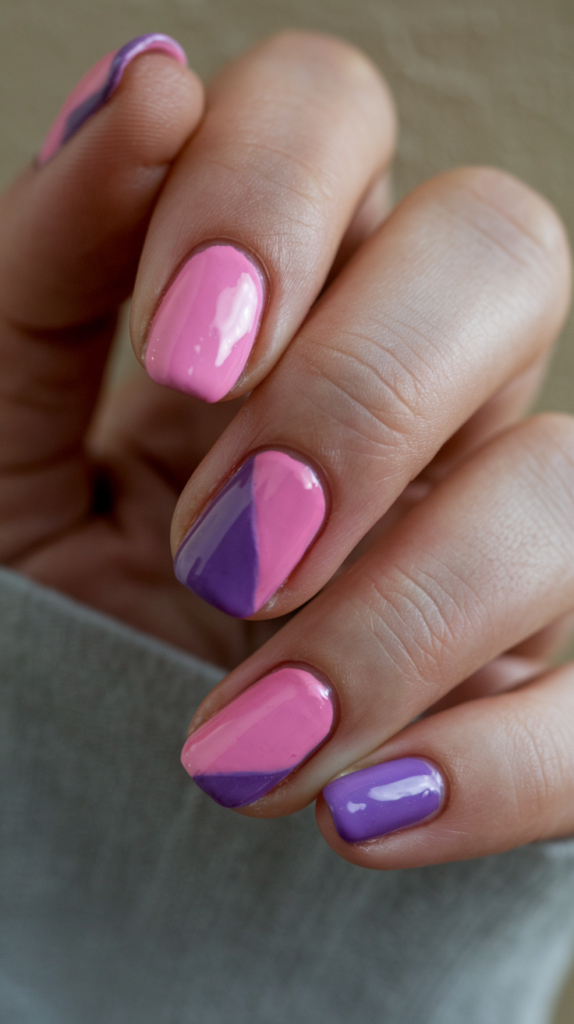
Blend calm with Two-Tone Neutrals, a design that splits each nail diagonally with beige and taupe, weaving subtle contrast into minimalism.
This isn’t just polish—it’s a quiet duet, perfect for soft mornings, desk days, or moments when you want your nails to hum with understated depth.
Each block glows with muted warmth, a minimalist harmony of tones.
Creating Two-Tone Neutrals
Step 1: Prep and Base
Start with a hydrating base coat, then paint all nails with a single coat of clear polish, drying into a bare foundation.
This sheer glow sets a neutral stage, ready for a soft split.
Step 2: Color Blocks
With a fine brush, paint beige on the top half and taupe on the bottom, meeting at a diagonal line across each nail.
Layer a second coat for depth, letting them dry into a smooth, muted divide that shifts with the angle.
Step 3: Refine Line
Use an acetone-dipped brush to sharpen the diagonal’s edge, ensuring a clean break between tones.
This step locks in the balance, a whisper of contrast in every block.
Step 4: Seal with Top Coat
Finish with a glossy top coat to encase the design, giving the tones a subtle sheen.
Add a second layer for endurance, ensuring your nails hold their harmony through every day.
Why It Works
This design is a soft chord of minimalism—the beige and taupe drift across your nails like a gentle breeze, blending warmth with quiet poise.
The diagonal split hums with subtle depth, a two-tone dance that lifts the simplicity into something special.
Pair it with a knit scarf or a neutral tote, and it’s a tender tribute to balance, glowing with every muted shift.
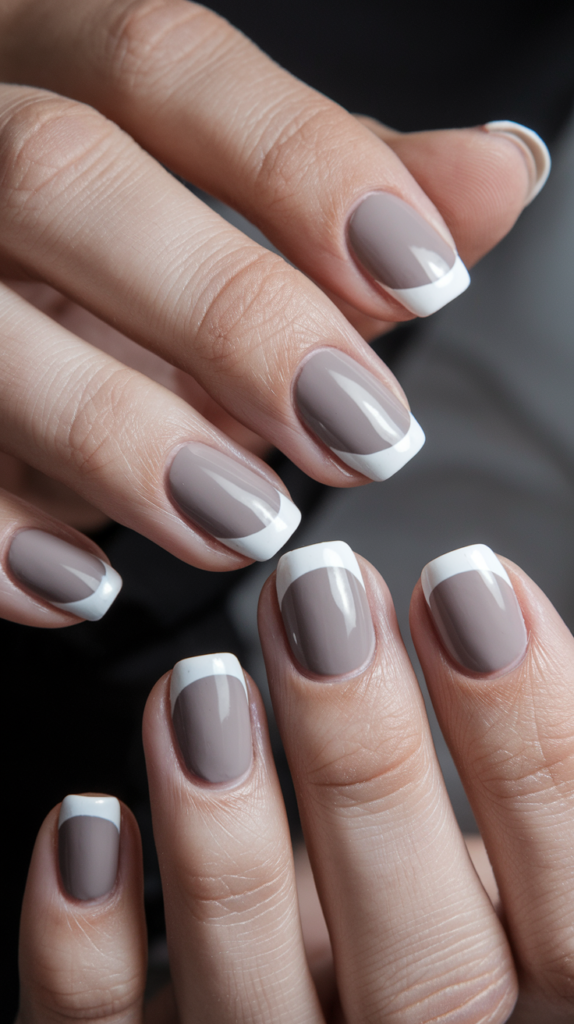
16. Fine Line French Tips
Whisper tradition with Fine Line French Tips, a design that traces ultra-thin white tips across a nude base, blending classic with calm.
This isn’t just a manicure—it’s a breath of refined grace, perfect for morning meetings, quiet dinners, or days when you want your nails to glow with subtle chic.
Each tip hums with delicate poise, a minimalist nod to timeless style.
Creating Fine Line French Tips
Step 1: Prep and Base
Lay down a protective base coat, then sweep two coats of nude polish across all nails, drying into a soft, natural sheen.
This calm hue sets a gentle stage, ready for a whisper of white.
Step 2: Fine Tips
With a striping brush, paint ultra-thin white lines across each nail’s edge, keeping them delicate and precise.
Layer a second coat for clarity, letting them dry into crisp, barely-there borders that catch the eye.
Step 3: Sharpen Edges
Use an acetone-dipped brush to refine the tips’ edges, ensuring they slice through with clean, subtle precision.
This step locks in the elegance, a whisper of tradition in every line.
Step 4: Seal with Top Coat
Finish with a glossy top coat to encase the design, amplifying the white’s glow against the nude base.
Add a second layer for strength, ensuring your nails hold their poise through every gesture.
Why It Works
This design is a soft echo of minimalism—the nude base cradles your nails in quiet warmth, while the fine white tips trace a delicate line of grace.
The barely-there contrast hums with timeless chic, a gentle nod to French elegance remixed with restraint.
Pair it with a silk blouse or a dainty ring, and it’s a refined tribute to simplicity, glowing with every subtle flick.
17. Diagonal Stripe Simplicity
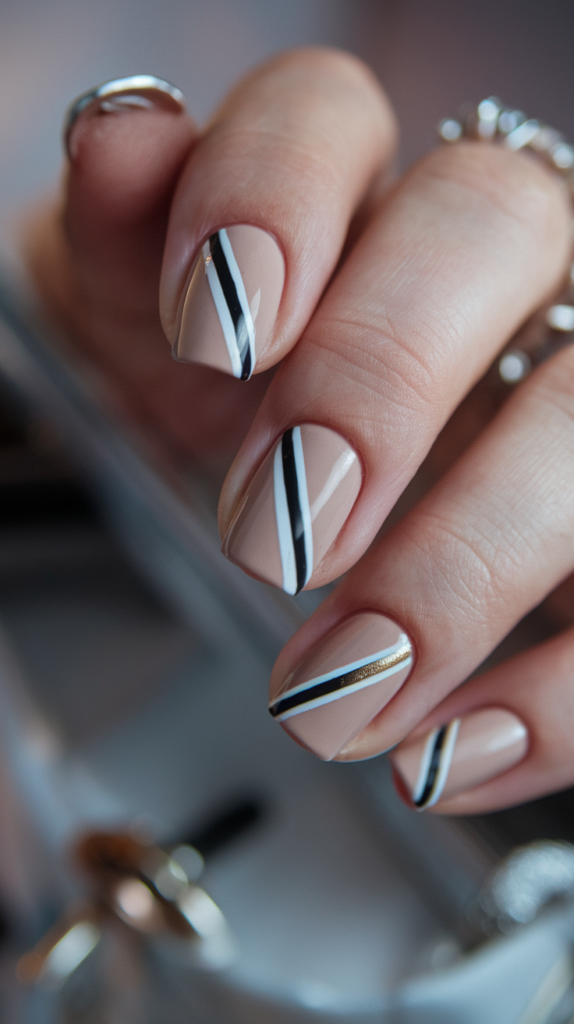
Slash through calm with Diagonal Stripe Simplicity, a design that cuts a single black stripe across a nude base, blending bold with bare.
This isn’t just polish—it’s a whisper of motion, perfect for gallery strolls, casual Fridays, or days when you want your nails to hum with quiet edge.
Each stripe carves a sharp path, a minimalist twist on sleek design.
Creating Diagonal Stripe Simplicity
Step 1: Prep and Base
Start with a strengthening base coat, then layer two coats of nude polish across all nails, drying into a soft, natural glow.
This calm canvas hums with restraint, ready for a sharp slash.
Step 2: Stripe Design
With a striping brush, paint a thin black line diagonally from corner to corner on each nail, keeping it crisp and angled.
Layer a second coat for depth, letting it dry into a bold, slanted accent that shifts with the light.
Step 3: Refine Edges
Use an acetone-dipped brush to sharpen the stripe’s borders, ensuring it cuts through with clean, graphic precision.
This step locks in the motion, a whisper of dynamism in every line.
Step 4: Seal with Top Coat
Finish with a glossy top coat to encase the design, giving the stripe a subtle sheen against the nude base.
Add a second layer for endurance, ensuring your nails hold their edge through every move.
Why It Works
This design is a sharp slant of minimalism—the nude base breathes with quiet elegance, while the black stripe slashes through with modern intent.
It cuts with dynamic grace, a single stroke that lifts the simplicity into something striking.
Pair it with a tailored blazer or a sleek bag, and it’s a chic tribute to motion, slicing through with every bold angle.
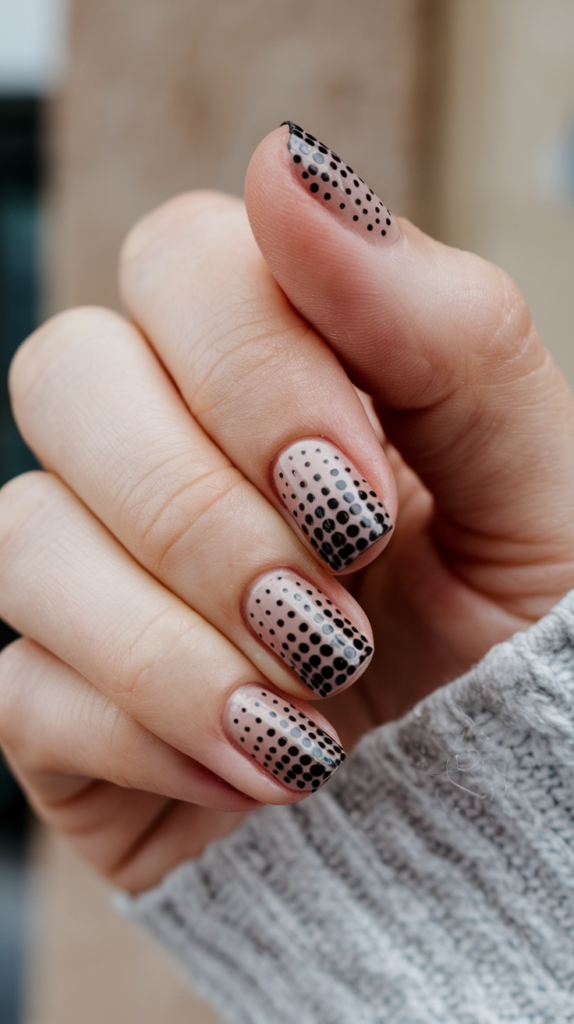
18. Minimal Polka Dots
Dot the calm with Minimal Polka Dots, a design that sprinkles tiny white dots across a nude base, weaving whimsy into minimalism.
This isn’t just nail art—it’s a flicker of joy, perfect for sunny picnics, soft afternoons, or moments when you want your nails to dance with quiet cheer.
Each dot twinkles with delicate play, a minimalist pattern on a gentle stage.
Creating Minimal Polka Dots
Step 1: Prep and Base
Lay down a hydrating base coat, then coat all nails with two layers of nude polish, drying into a soft, even glow.
This gentle hue hums with calm, a perfect foil for the dots’ dance.
Step 2: Dot Placement
With a dotting tool, scatter tiny white dots randomly across each nail, keeping them small and sparse.
Layer a second coat for clarity, letting them dry into crisp, playful specks that catch the eye.
Step 3: Refine Details
Dip a brush in acetone to tidy any smudges, ensuring the dots stay sharp and light against the nude canvas.
This step locks in their dainty charm, a whisper of pattern in every mark.
Step 4: Seal with Top Coat
Finish with a glossy top coat to encase the design, giving the dots a subtle shine against the soft base.
Add a second layer for durability, ensuring your nails twinkle through every gentle moment.
Why It Works
This design is a soft ripple of minimalism—the nude base cradles your nails in quiet elegance, while the white dots sprinkle a playful rhythm.
They twinkle with restrained glee, a delicate pattern that lifts the simplicity into something special.
Pair it with a linen dress or a straw hat, and it’s a chic tribute to subtle joy, dancing with every light flick.
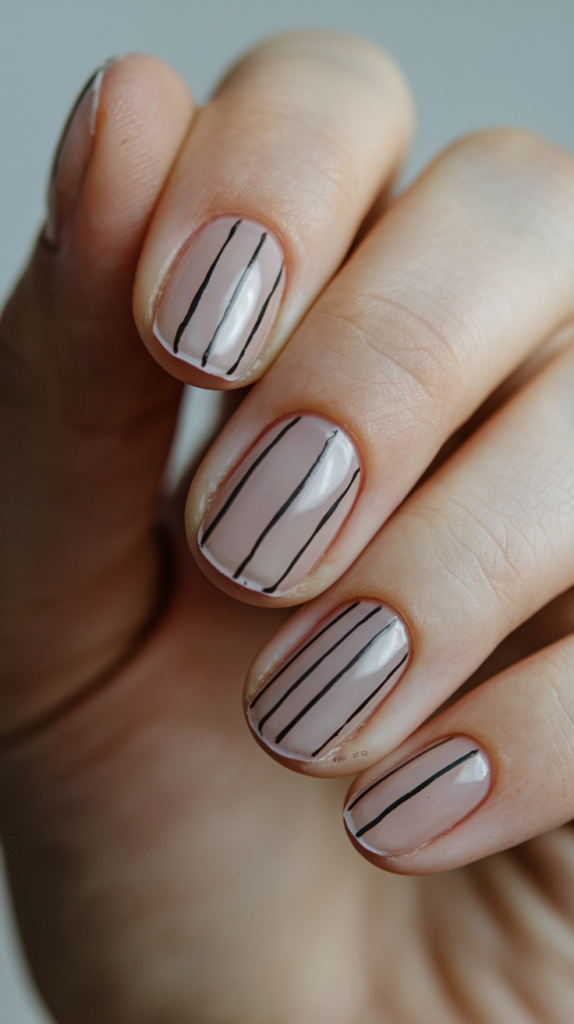
19. Clear Nails With Single Stripe

Cut through clarity with Clear Nails With Single Stripe, a design that threads a lone black line down a bare base, blending stark with serene.
This isn’t just polish—it’s a whisper of edge, perfect for minimalist mornings, sleek outings, or days when you want your nails to hum with quiet boldness.
Each stripe stands with sharp grace, a minimalist mark on a transparent stage.
Creating Clear Nails With Single Stripe
Step 1: Prep and Base
Start with a strengthening base coat, then leave all nails bare with just a clear coat, drying into a raw, natural sheen.
This transparent glow hums with calm, ready for a single slash.
Step 2: Stripe Design
With a striping brush, paint a thin black line vertically down each nail’s center, keeping it straight and precise.
Layer a second coat for depth, letting it dry into a bold, crisp spine that cuts through the clarity.
Step 3: Sharpen Edges
Use an acetone-dipped brush to refine the line’s borders, ensuring it slices through with clean, graphic precision.
This step locks in the starkness, a whisper of structure in every stroke.
Step 4: Seal with Top Coat
Finish with a glossy top coat to encase the design, giving the stripe a subtle sheen against the bare nail.
Add a second layer for strength, ensuring your nails hold their edge through every move.
Why It Works
This design is a sharp breath of minimalism—the clear base breathes with natural calm, while the black stripe slashes through with modern intent.
It stands with quiet defiance, a single mark that lifts the simplicity into something striking.
Pair it with a white tee or a bold cuff, and it’s a sleek tribute to clarity, cutting through with every stark line.
20. Asymmetrical Color Blocks
Break the mold with Asymmetrical Color Blocks, a design that dabs a small taupe block in one corner of a nude base, blending art with restraint.
This isn’t just polish—it’s a quiet rebellion, perfect for art walks, modern brunches, or days when you want your nails to hum with subtle flair.
Each block sits with offbeat charm, a minimalist twist on bold design.
Creating Asymmetrical Color Blocks
Step 1: Prep and Base
Start with a protective base coat, then layer two coats of nude polish across all nails, drying into a soft, natural glow.
This calm hue sets a gentle stage, ready for an offbeat splash.
Step 2: Color Block
With a fine brush, paint a small taupe block in the bottom left corner of each nail, keeping it irregular and contained.
Layer a second coat for depth, letting it dry into a muted, artistic patch that shifts with the angle.
Step 3: Refine Edges
Use an acetone-dipped brush to sharpen the block’s edges, ensuring it sits crisp and bold against the nude canvas.
This step locks in the asymmetry, a whisper of art in every corner.
Step 4: Seal with Top Coat
Finish with a glossy top coat to encase the design, giving the block a subtle sheen against the soft base.
Add a second layer for endurance, ensuring your nails hold their flair through every scene.
Why It Works
This design is a quiet canvas of minimalism—the nude base hums with calm elegance, while the taupe block sits like a brushstroke of modern art.
Its offbeat placement dances with subtle rebellion, a single patch that lifts the simplicity into something striking.
Pair it with a linen skirt or a bold earring, and it’s a chic tribute to creativity, glowing with every asymmetrical edge.
21. Tiny Triangles
Angle into chic with Tiny Triangles, a design that dots small black shapes near the cuticles on a nude base, blending geometry with grace.
This isn’t just nail art—it’s a whisper of structure, perfect for crisp days, modern meetups, or moments when you want your nails to hum with quiet precision.
Each triangle cuts with subtle sharpness, a minimalist nod to form.
Creating Tiny Triangles
Step 1: Prep and Base
Lay down a protective base coat, then sweep two coats of nude polish across all nails, drying into a soft, natural glow.
This calm hue sets a gentle stage, ready for sharp accents.
Step 2: Triangle Design
With a fine brush, paint tiny black triangles near the cuticle of each nail, keeping them small and angled.
Layer a second coat for depth, letting them dry into crisp, geometric specks that catch the eye.
Step 3: Refine Shapes
Use an acetone-dipped brush to sharpen the triangles’ edges, ensuring they slice through with clean precision.
This step locks in their stark charm, a whisper of geometry in every point.
Step 4: Seal with Top Coat
Finish with a glossy top coat to encase the design, giving the triangles a subtle sheen against the nude base.
Add a second layer for strength, ensuring your nails hold their edge through every gesture.
Why It Works
This design is a sharp stanza of minimalism—the nude base cradles your nails in quiet elegance, while the black triangles carve a geometric rhythm.
They angle with restrained boldness, a delicate pattern that lifts the simplicity into something striking.
Pair it with a tailored shirt or a sleek ring, and it’s a crisp tribute to form, cutting through with every precise point.
22. Subtle Ombre
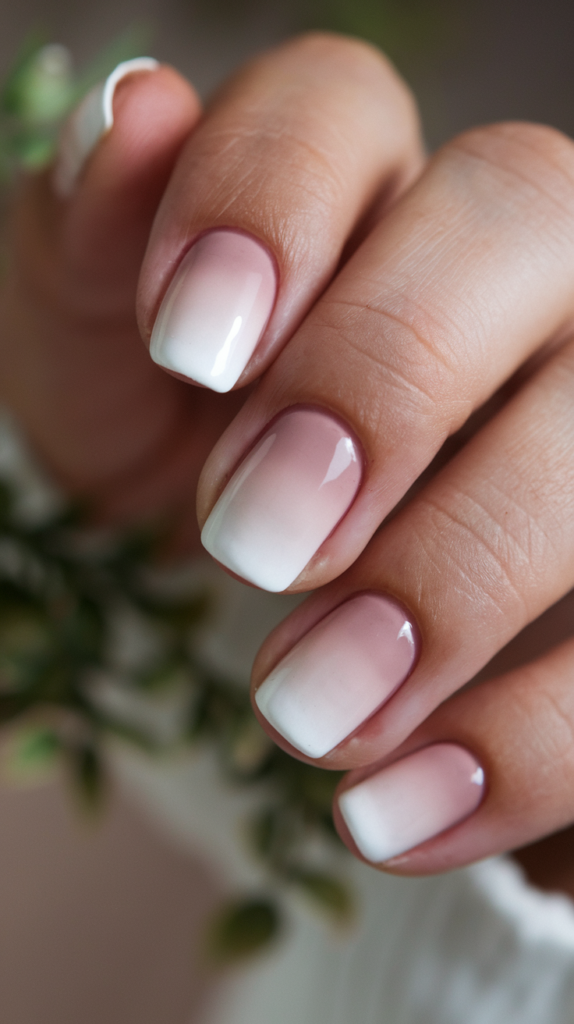
Fade into grace with Subtle Ombre, a design that drifts from nude to white across your nails, weaving softness into minimalism.
This isn’t just polish—it’s a breath of calm, perfect for quiet mornings, soft evenings, or days when you want your nails to glow with gentle depth.
Each fade hums with a tender shift, a minimalist flow of light.
Creating Subtle Ombre
Step 1: Prep and Base
Start with a hydrating base coat, then sponge nude polish at the base, blending into white at the tips across all nails.
This gentle fade dries into a seamless flow, echoing dawn’s soft rise.
Step 2: Blend the Gradient
With a makeup sponge, dab the nude and white shades, overlapping slightly to blend until the transition feels smooth.
Let it dry into a soft ombre, a quiet wave that shifts with the light.
Step 3: Clean Edges
Use an acetone-dipped brush to tidy the cuticles, keeping the gradient crisp and uncluttered.
This step sharpens the flow, a subtle polish to the design’s grace.
Step 4: Seal with Top Coat
Finish with a glossy top coat to lock in the ombre, amplifying its soft shimmer.
Add a second layer for endurance, ensuring your nails carry this quiet beauty through every hour.
Why It Works
This design is a tender whisper of minimalism—the nude-to-white fade drifts like a morning mist, soft yet striking in its shift.
The gradient weaves a tale of light and calm, a gentle flow that lifts the simplicity into something serene.
Pair it with a linen dress or a pearl stud, and it’s a soft tribute to grace, glowing with every subtle turn.
23. Single Dot Accent Nail
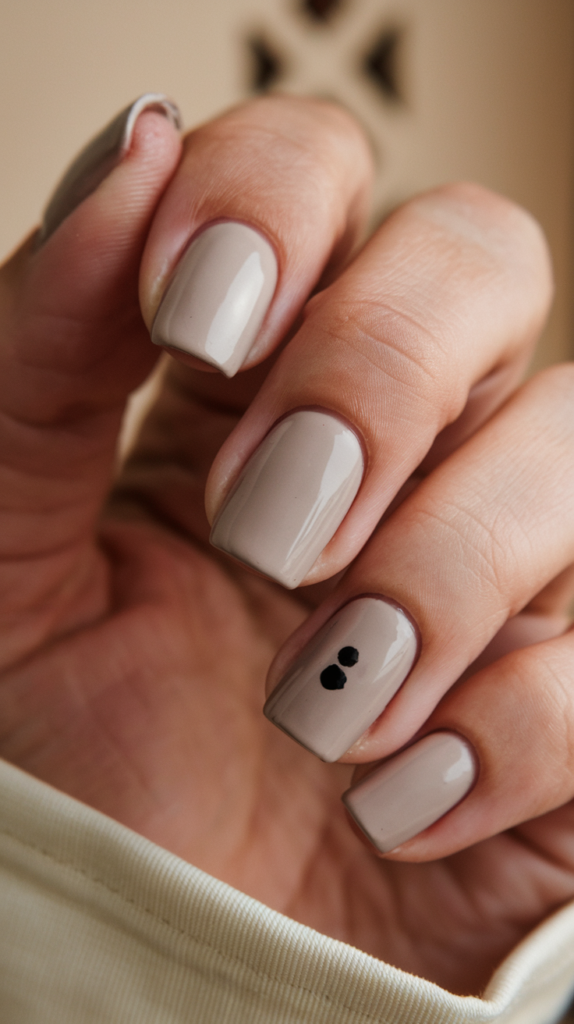
Mark the moment with Single Dot Accent Nail, a design that places one black dot on the ring finger amidst a nude base, blending focus with calm.
This isn’t just polish—it’s a quiet spotlight, perfect for soft days, casual meetups, or moments when you want your nails to hum with subtle charm.
Each dot stands with gentle intent, a minimalist spark in the stillness.
Creating Single Dot Accent Nail
Step 1: Prep and Base
Lay down a protective base coat, then sweep two coats of nude polish across all nails, drying into a soft, natural glow.
This calm hue sets a gentle stage, ready for a single mark.
Step 2: Dot Placement
With a dotting tool, place one small black dot in the center of the ring finger, keeping it precise and contained.
Layer a second coat for depth, letting it dry into a crisp, bold speck that draws the eye.
Step 3: Refine Detail
Use an acetone-dipped brush to tidy the dot’s edge, ensuring it sits sharp and clean against the nude.
This step locks in its quiet focus, a whisper of emphasis in every mark.
Step 4: Seal with Top Coat
Finish with a glossy top coat to encase the design, giving the dot a subtle sheen against the soft base.
Add a second layer for strength, ensuring your nails hold their charm through every gesture.
Why It Works
This design is a soft pulse of minimalism—the nude base cradles your nails in quiet elegance, while the single dot flares with gentle intent.
It stands as a tiny beacon, a focal point that lifts the simplicity into something special.
Pair it with a knit top or a delicate chain, and it’s a chic tribute to restraint, glowing with every subtle mark.
24. Fine Chevron Lines
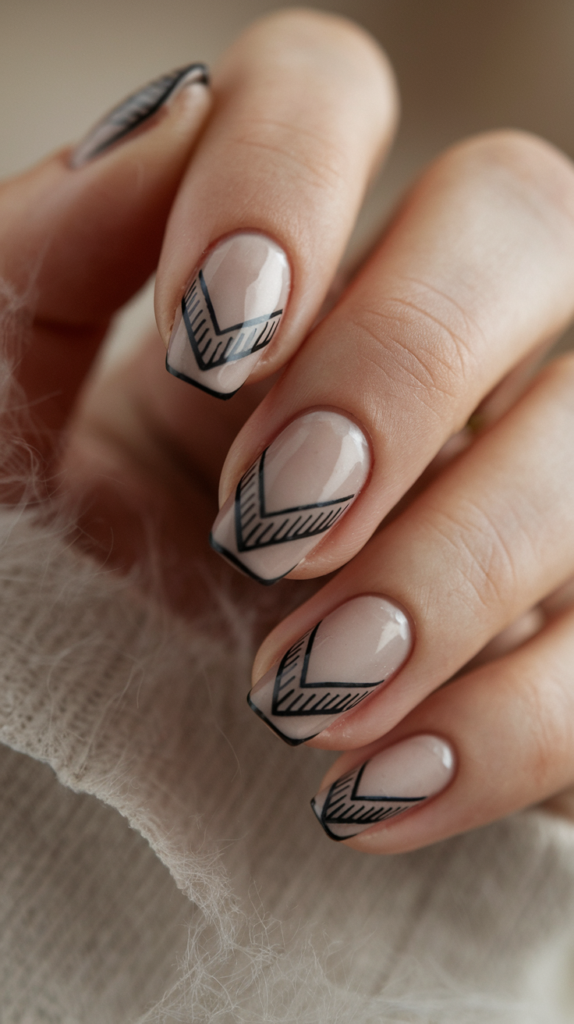
Angle into edge with Fine Chevron Lines, a design that carves thin black chevrons across a nude base, blending sharpness with subtlety.
This isn’t just nail art—it’s a whisper of geometry, perfect for crisp evenings, modern desks, or moments when you want your nails to hum with quiet precision.
Each chevron cuts with delicate intent, a minimalist dance of form.
Creating Fine Chevron Lines
Step 1: Prep and Base
Lay down a protective base coat, then sweep two coats of nude polish across all nails, drying into a soft, natural glow.
This calm hue sets a gentle stage, ready for sharp angles.
Step 2: Chevron Design
With a fine brush, paint thin black chevrons near the center of each nail, keeping them small and precise.
Layer a second coat for depth, letting them dry into crisp, angled lines that catch the eye.
Step 3: Refine Edges
Use an acetone-dipped brush to sharpen the chevrons’ borders, ensuring they slice through with clean, graphic precision.
This step locks in their stark charm, a whisper of structure in every angle.
Step 4: Seal with Top Coat
Finish with a glossy top coat to encase the design, giving the chevrons a subtle sheen against the nude base.
Add a second layer for strength, ensuring your nails hold their edge through every move.
Why It Works
This design is a sharp verse of minimalism—the nude base hums with quiet elegance, while the black chevrons carve a geometric rhythm.
They angle with restrained boldness, a delicate pattern that lifts the simplicity into something striking.
Pair it with a tailored jacket or a sleek bracelet, and it’s a chic tribute to form, cutting through with every precise peak.
25. Clear Nails With Metallic Accents
Gleam softly with Clear Nails With Metallic Accents, a design that scatters tiny gold dots across a bare base, weaving shine into simplicity.
This isn’t just polish—it’s a flicker of luxury, perfect for quiet nights, sleek outings, or moments when you want your nails to hum with subtle glamour.
Each dot twinkles with delicate poise, a minimalist spark on a clear stage.
Creating Clear Nails With Metallic Accents
Step 1: Prep and Base
Start with a strengthening base coat, then layer a single coat of clear polish across all nails, drying into a raw, natural sheen.
This transparent glow hums with calm, ready for a golden touch.
Step 2: Dot Placement
With a dotting tool, scatter tiny gold dots randomly across each nail, keeping them small and sparse.
Layer a second coat for intensity, letting them dry into crisp, shimmering specks that catch the light.
Step 3: Refine Details
Use an acetone-dipped brush to tidy any smudges, ensuring the dots stay sharp and clean against the clear base.
This step locks in their subtle charm, a whisper of shine in every mark.
Step 4: Seal with Top Coat
Finish with a glossy top coat to encase the design, amplifying the gold’s glow against the bare nail.
Add a second layer for durability, ensuring your nails shimmer through every gentle gesture.
Why It Works
This design is a soft shimmer of minimalism—the clear base breathes with natural elegance, while the gold dots twinkle like stars in a quiet sky.
They gleam with restrained luxury, a delicate pattern that lifts the simplicity into something special.
Pair it with a satin top or a gold ring, and it’s a chic tribute to subtle shine, glowing with every light flick.
26. Half-Painted Nails
Split the scene with Half-Painted Nails, a design that coats half each nail in nude while leaving the rest bare, blending bold with calm.
This isn’t just polish—it’s a quiet clash, perfect for modern days, sleek events, or moments when you want your nails to hum with subtle edge.
Each half glows with stark contrast, a minimalist dance of presence and absence.
Creating Half-Painted Nails
Step 1: Prep and Base
Start with a protective base coat, then place tape vertically down the center of each nail to shield one half.
This bare side sets the stage, a quiet nod to natural grace.
Step 2: Polish Application
Sweep two coats of nude polish over the exposed half, letting it dry into a soft, even sheen.
Peel off the tape carefully, revealing a clean divide that contrasts with the bare.
Step 3: Sharpen Line
Use an acetone-dipped brush to refine the edge between painted and bare, ensuring a crisp, bold break.
This step locks in the contrast, a whisper of structure in every split.
Step 4: Seal with Top Coat
Finish with a glossy top coat to encase the design, giving the nude half a subtle shine while preserving the bare.
Add a second layer for strength, ensuring your nails hold their boldness through every move.
Why It Works
This design is a stark hymn of minimalism—the bare half breathes with natural calm, while the nude half cloaks the rest in quiet warmth.
The split hums with graphic poise, a bold contrast that lifts the simplicity into something striking.
Pair it with a monochrome top or a bold cuff, and it’s a chic tribute to balance, glowing with every sharp divide.
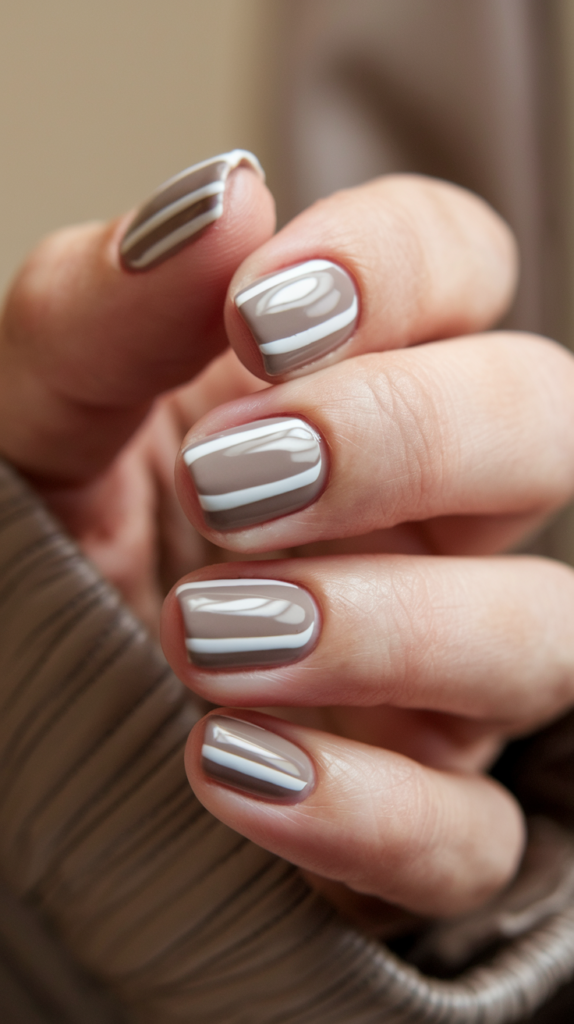
27. Single Vertical Line Design
Stand tall with Single Vertical Line Design, a sleek black stripe running down a nude base, blending boldness with bare elegance.
This isn’t just polish—it’s a whisper of structure, perfect for crisp mornings, modern desks, or days when you want your nails to hum with quiet poise.
Each line rises with sharp grace, a minimalist mark of intent.
Creating Single Vertical Line Design
Step 1: Prep and Base
Lay down a protective base coat, then sweep two coats of nude polish across all nails, drying into a soft, natural glow.
This calm hue sets a gentle stage, ready for a stark slash.
Step 2: Line Design
With a striping brush, paint a thin black line vertically down each nail’s center, keeping it straight and precise.
Layer a second coat for depth, letting it dry into a bold, crisp spine that cuts through the nude.
Step 3: Sharpen Edges
Use an acetone-dipped brush to refine the line’s borders, ensuring it slices through with clean, graphic precision.
This step locks in the sleekness, a whisper of edge in every stroke.
Step 4: Seal with Top Coat
Finish with a glossy top coat to encase the design, giving the line a subtle sheen against the soft base.
Add a second layer for strength, ensuring your nails hold their poise through every gesture.
Why It Works
This design is a sharp breath of minimalism—the nude base cradles your nails in quiet elegance, while the black line rises with modern intent.
It stands with sleek defiance, a single stroke that lifts the simplicity into something striking.
Pair it with a tailored blazer or a bold ring, and it’s a chic tribute to structure, cutting through with every precise line.
28. Muted Pastel French Tips
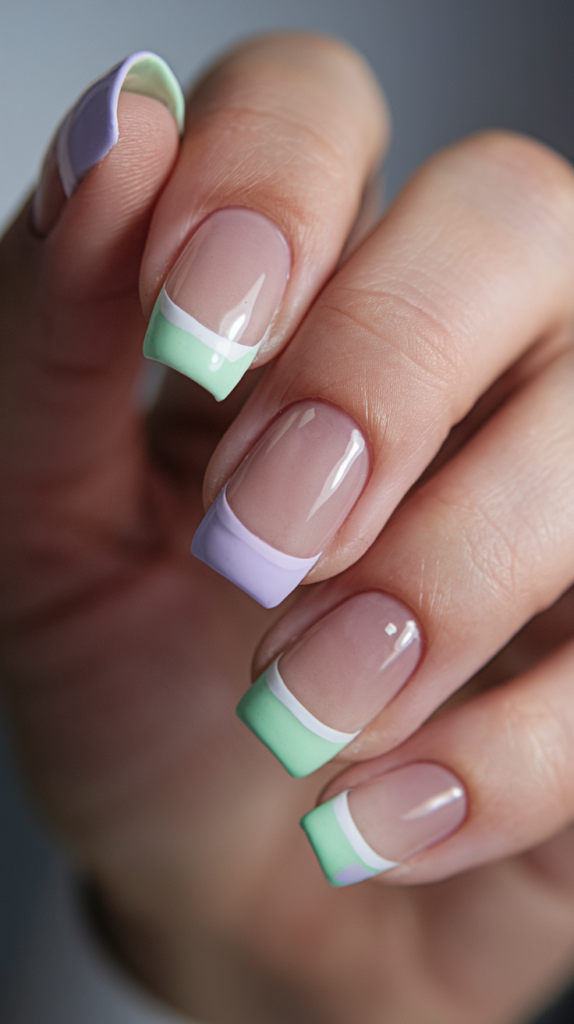
Soften tradition with Muted Pastel French Tips, a design that crowns a nude base with delicate lavender tips, blending classic with calm.
This isn’t just a manicure—it’s a whisper of whimsy, perfect for soft afternoons, quiet dates, or days when you want your nails to glow with gentle charm.
Each tip hums with pastel grace, a minimalist riff on timeless style.
Creating Muted Pastel French Tips
Step 1: Prep and Base
Lay down a protective base coat, then sweep two coats of nude polish across all nails, drying into a soft, natural sheen.
This calm hue sets a gentle stage, ready for a pastel kiss.
Step 2: Pastel Tips
With a fine brush, paint thin lavender tips across each nail’s edge, keeping them delicate and precise.
Layer a second coat for depth, letting them dry into crisp, soft borders that catch the eye.
Step 3: Sharpen Edges
Use an acetone-dipped brush to refine the tips’ edges, ensuring they slice through with clean, subtle precision.
This step locks in the elegance, a whisper of color in every line.
Step 4: Seal with Top Coat
Finish with a glossy top coat to encase the design, amplifying the lavender’s glow against the nude base.
Add a second layer for strength, ensuring your nails hold their charm through every gesture.
Why It Works
This design is a soft echo of minimalism—the nude base cradles your nails in quiet warmth, while the lavender tips trace a delicate line of whimsy.
The pastel contrast hums with gentle chic, a tender twist on French elegance.
Pair it with a floral skirt or a soft scarf, and it’s a refined tribute to subtlety, glowing with every pastel flick.
29. Miniature Star Designs
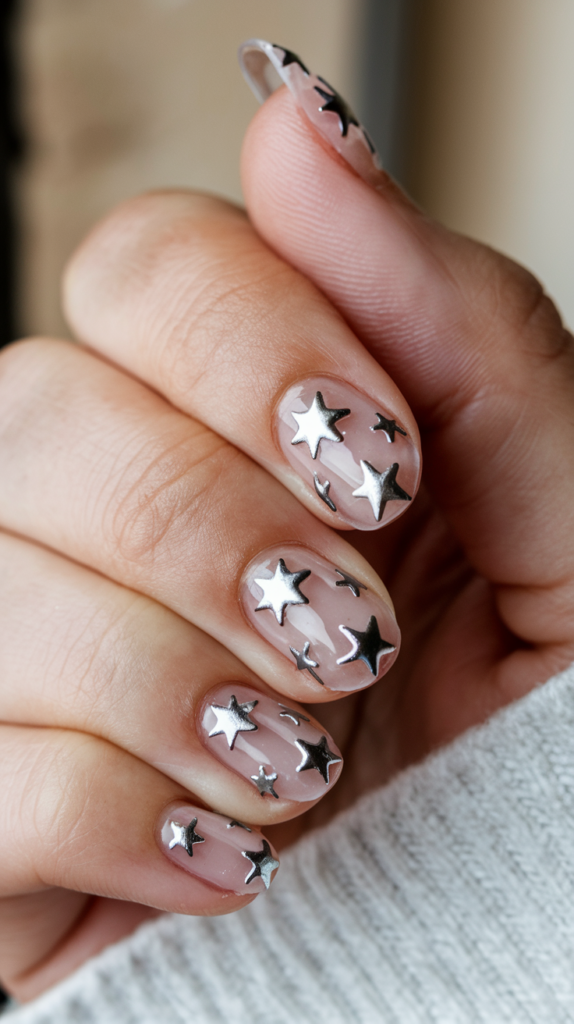
Twinkle with Miniature Star Designs, a celestial scattering of tiny gold stars across a nude base, weaving wonder into minimalism.
This isn’t just nail art—it’s a whisper of the night sky, perfect for starry evenings, quiet moments, or days when you want your nails to shimmer with subtle magic.
Each star glows with delicate charm, a minimalist constellation on your fingertips.
Creating Miniature Star Designs
Step 1: Prep and Base
Start with a hydrating base coat, then layer two coats of nude polish across all nails, drying into a soft, natural glow.
This calm hue hums with calm, a perfect stage for stellar light.
Step 2: Star Placement
With a fine brush, paint tiny gold stars randomly across each nail, keeping them small and scattered.
Layer a second coat for intensity, letting them dry into crisp, shimmering specks that catch the eye.
Step 3: Refine Shapes
Use an acetone-dipped brush to sharpen the stars’ edges, ensuring they shine clean against the nude backdrop.
This step locks in their celestial grace, a whisper of the cosmos in every point.
Step 4: Seal with Top Coat
Finish with a glossy top coat to encase the design, amplifying the gold’s glow against the soft base.
Add a second layer for strength, ensuring your nails shimmer through every twilight.
Why It Works
This design is a starry lullaby of minimalism—the nude base cradles your nails in quiet elegance, while the gold stars twinkle like a night sky’s breath.
They gleam with ethereal charm, a delicate pattern that lifts the simplicity into something magical.
Pair it with a flowing top or a silver stud, and it’s a tender tribute to the stars, glowing with every gentle point.
30. Matte & Glossy Combo
Play with texture in Matte & Glossy Combo, a design that splits each nail between matte and glossy nude finishes, blending touch with sight.
This isn’t just polish—it’s a quiet duet, perfect for soft days, sleek events, or moments when you want your nails to hum with subtle depth.
Each half glows with tactile contrast, a minimalist dance of finish.
Creating Matte & Glossy Combo
Step 1: Prep and Base
Lay down a protective base coat, then sweep two coats of nude polish across all nails, drying into a soft, even glow.
This calm hue sets a gentle stage, ready for a split finish.
Step 2: Matte Half
With tape, cover the top half of each nail, then brush a matte top coat over the bottom, letting it dry into a velvety sheen.
Peel off the tape, revealing a smooth divide between matte and gloss.
Step 3: Glossy Half
Brush a glossy top coat over the top half, letting it dry into a sleek, shining contrast against the matte.
This step locks in the texture, a whisper of duality in every split.
Step 4: Clean Edges
Use an acetone-dipped brush to sharpen the line between finishes, ensuring a crisp, bold break.
Add a second layer of each top coat for strength, ensuring your nails hold their contrast through every touch.
Why It Works
This design is a tactile hymn of minimalism—the nude base hums with quiet warmth, while the matte and glossy halves clash with subtle intent.
The split dances with texture, a gentle contrast that lifts the simplicity into something striking.
Pair it with a silk scarf or a bold ring, and it’s a chic tribute to duality, glowing with every tactile shift.
31. Understated Floral Accents
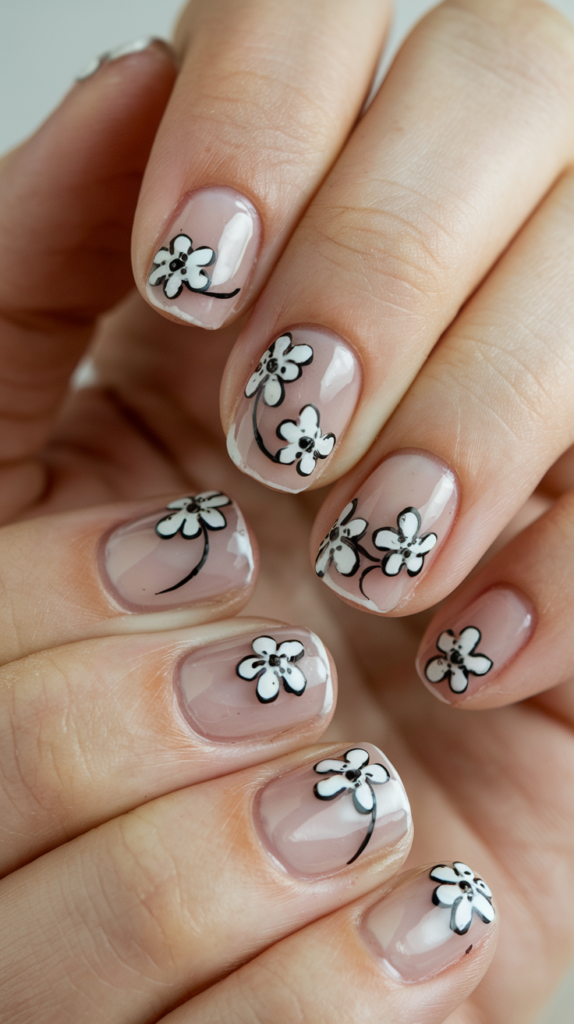
Bloom softly with Understated Floral Accents, a design that sketches a tiny black flower on the ring finger amidst a nude base, weaving nature into minimalism.
This isn’t just polish—it’s a whisper of spring, perfect for quiet walks, soft moments, or days when you want your nails to hum with gentle charm.
Each flower glows with delicate intent, a minimalist nod to beauty.
Creating Understated Floral Accents
Step 1: Prep and Base
Lay down a protective base coat, then sweep two coats of nude polish across all nails, drying into a soft, natural glow.
This calm hue sets a gentle stage, ready for a floral kiss.
Step 2: Flower Design
With a fine brush, paint a tiny black flower on the ring finger, keeping it small with simple petals.
Layer a second coat for depth, letting it dry into a crisp, delicate bloom that catches the eye.
Step 3: Refine Petals
Use an acetone-dipped brush to sharpen the flower’s edges, ensuring it sits clean and bold against the nude.
This step locks in its quiet charm, a whisper of nature in every curve.
Step 4: Seal with Top Coat
Finish with a glossy top coat to encase the design, giving the flower a subtle sheen against the soft base.
Add a second layer for strength, ensuring your nails hold their bloom through every gesture.
Why It Works
This design is a tender petal of minimalism—the nude base cradles your nails in quiet elegance, while the black flower blooms with subtle intent.
It stands with delicate grace, a single note that lifts the simplicity into something special.
Pair it with a floral top or a soft ring, and it’s a chic tribute to nature, glowing with every gentle curve.
32. Gradient Polka Dots
Fade into fun with Gradient Polka Dots, a design that sprinkles black dots from cuticle to tip on a nude base, blending play with minimalism.
This isn’t just nail art—it’s a whisper of rhythm, perfect for sunny days, soft outings, or moments when you want your nails to dance with quiet cheer.
Each dot fades with gentle intent, a minimalist pattern in motion.
Creating Gradient Polka Dots
Step 1: Prep and Base
Lay down a protective base coat, then sweep two coats of nude polish across all nails, drying into a soft, natural glow.
This calm hue hums with calm, a perfect stage for a dotted fade.
Step 2: Dot Gradient
With a dotting tool, place black dots densely near the cuticle, spacing them wider toward the tip for a fading effect.
Layer a second coat for depth, letting them dry into crisp, playful specks that shift with the eye.
Step 3: Refine Details
Use an acetone-dipped brush to tidy any smudges, ensuring the dots stay sharp and clean against the nude.
This step locks in the gradient, a whisper of motion in every mark.
Step 4: Seal with Top Coat
Finish with a glossy top coat to encase the design, giving the dots a subtle sheen against the soft base.
Add a second layer for strength, ensuring your nails dance through every gentle moment.
Why It Works
This design is a soft ripple of minimalism—the nude base cradles your nails in quiet elegance, while the black dots fade with playful intent.
They twinkle with dynamic grace, a gentle pattern that lifts the simplicity into something special.
Pair it with a sundress or a straw bag, and it’s a chic tribute to rhythm, dancing with every light fade.
33. Gold Foil Minimalism
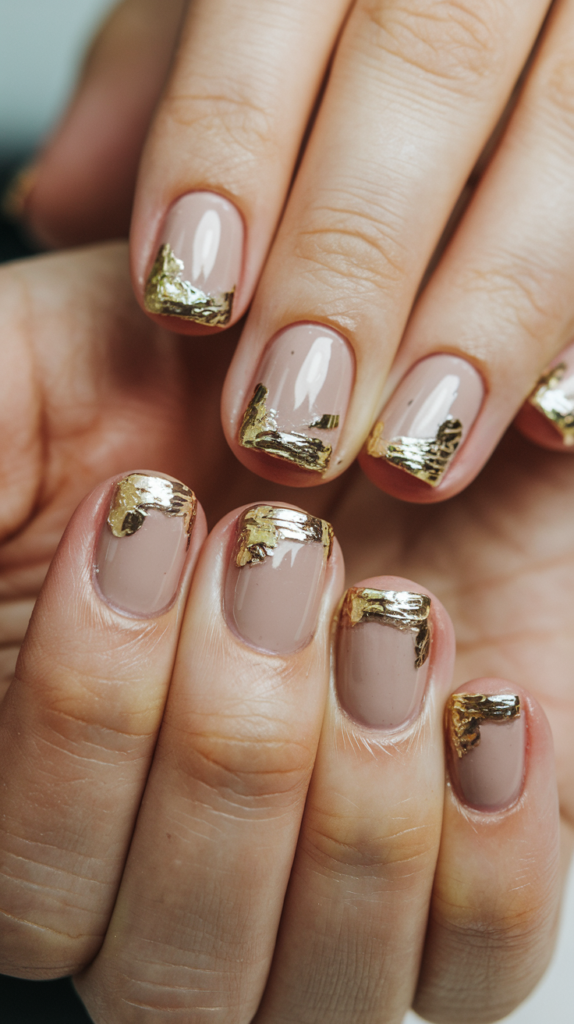
Shine with Gold Foil Minimalism, a design that scatters tiny gold foil flecks across a nude base, weaving opulence into restraint.
This isn’t just polish—it’s a whisper of luxury, perfect for quiet nights, sleek events, or moments when you want your nails to glow with subtle grandeur.
Each fleck gleams with delicate intent, a minimalist spark of gold.
Creating Gold Foil Minimalism
Step 1: Prep and Base
Lay down a protective base coat, then sweep two coats of nude polish across all nails, drying into a soft, natural glow.
This calm hue hums with calm, a perfect stage for golden light.
Step 2: Foil Placement
With tweezers, press tiny gold foil pieces randomly across each nail, keeping them sparse and irregular.
Press gently to adhere, letting them dry into shimmering flecks that catch the eye.
Step 3: Secure Flecks
Brush a thin layer of clear polish over the foil to lock it in, ensuring it stays crisp against the nude backdrop.
This step locks in their luxe charm, a whisper of shine in every piece.
Step 4: Seal with Top Coat
Finish with a glossy top coat to encase the design, amplifying the gold’s glow against the soft base.
Add a second layer for strength, ensuring your nails shimmer through every gesture.
Why It Works
This design is a golden thread of minimalism—the nude base cradles your nails in quiet elegance, while the gold foil flecks twinkle with subtle opulence.
They gleam with restrained luxury, a delicate pattern that lifts the simplicity into something special.
Pair it with a satin dress or a gold stud, and it’s a chic tribute to grandeur, glowing with every light fleck.
34. Subtle Color Block French Tips
Split the classic with Subtle Color Block French Tips, a design that divides nude-based tips between black and white, blending bold with calm.
This isn’t just a manicure—it’s a quiet clash, perfect for sleek days, modern nights, or moments when you want your nails to hum with subtle edge.
Each tip glows with graphic grace, a minimalist twist on tradition.
Creating Subtle Color Block French Tips
Step 1: Prep and Base
Lay down a protective base coat, then sweep two coats of nude polish across all nails, drying into a soft, natural sheen.
This calm hue sets a gentle stage, ready for a split contrast.
Step 2: Tip Design
With a fine brush, paint black on the left half and white on the right half of each nail’s tip, meeting at a vertical line.
Layer a second coat for depth, letting them dry into crisp, bold borders that catch the eye.
Step 3: Sharpen Edges
Use an acetone-dipped brush to refine the split’s edge, ensuring a clean, graphic break between colors.
This step locks in the contrast, a whisper of duality in every tip.
Step 4: Seal with Top Coat
Finish with a glossy top coat to encase the design, amplifying the black and white’s glow against the nude base.
Add a second layer for strength, ensuring your nails hold their edge through every gesture.
Why It Works
This design is a sharp duet of minimalism—the nude base hums with quiet elegance, while the black and white tips clash with modern intent.
The split sings with graphic poise, a bold twist that lifts the simplicity into something striking.
Pair it with a monochrome top or a bold cuff, and it’s a chic tribute to contrast, glowing with every sharp divide.
35. Tiny Stud Accents
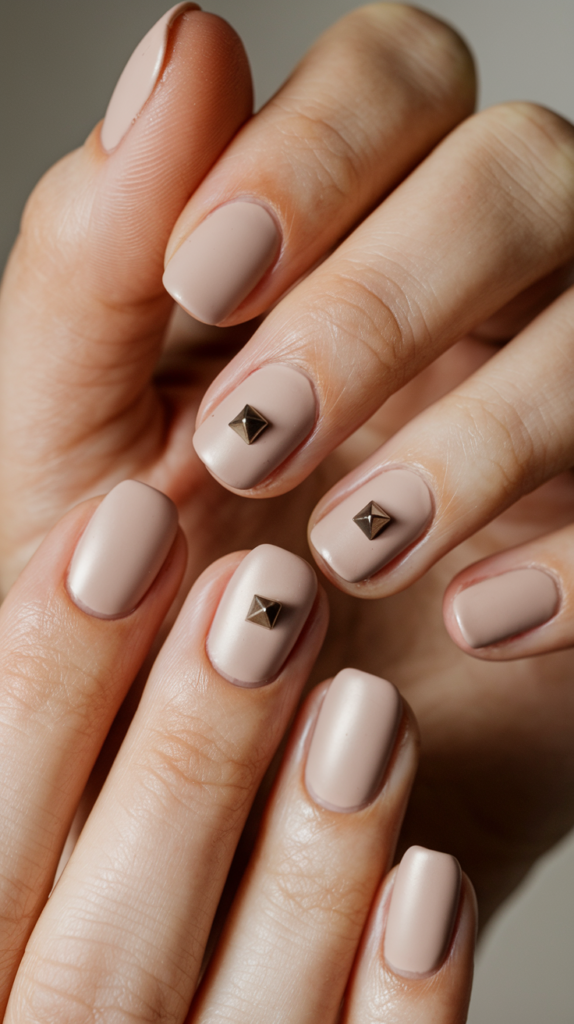
Shine with Tiny Stud Accents, a design that places a single gold stud on the ring finger amidst a nude base, blending bold with bare.
This isn’t just polish—it’s a whisper of edge, perfect for quiet days, sleek nights, or moments when you want your nails to hum with subtle flair.
Each stud gleams with delicate intent, a minimalist spark of texture.
Creating Tiny Stud Accents
Step 1: Prep and Base
Lay down a protective base coat, then sweep two coats of nude polish across all nails, drying into a soft, natural glow.
This calm hue sets a gentle stage, ready for a single shine.
Step 2: Stud Placement
With tweezers, place a tiny gold stud in the center of the ring finger, pressing it gently into a dab of clear polish.
Let it set into a crisp, bold accent that catches the light.
Step 3: Secure Stud
Brush a thin layer of clear polish over the stud to lock it in, ensuring it sits firm against the nude backdrop.
This step locks in its subtle charm, a whisper of texture in every gleam.
Step 4: Seal with Top Coat
Finish with a glossy top coat to encase the design, amplifying the stud’s glow against the soft base.
Add a second layer for strength, ensuring your nails hold their flair through every move.
Why It Works
This design is a soft pulse of minimalism—the nude base cradles your nails in quiet elegance, while the gold stud flares with subtle intent.
It stands with tactile grace, a single mark that lifts the simplicity into something striking.
Pair it with a velvet top or a bold ring, and it’s a chic tribute to texture, glowing with every gentle point.
Conclusion
These 35 minimalist nail designs weave a tapestry of quiet beauty, threading the sleek calm of Single Color Sophistication with the subtle edge of Tiny Stud Accents, and every delicate stroke in between.
From the sharp geometry of Fine Chevron Lines, each creation turns your nails into a gallery of restraint, a canvas where clean lines, muted tones, and small details collide in soft hues.
Whether you’re drawn to the tender fade of Subtle Ombre, the celestial charm of Miniature Star Designs, or the bold split of Half-Painted Nails, this collection offers a look for every soul craving simplicity with style.
These aren’t just manicures—they’re whispers etched in polish, each nail a note of elegance, calm, or quiet rebellion that echoes the moments you cherish.
With clear steps and a spark of inspiration, you’re ready to craft these designs or remix them into your own, perfect for sleek days, soft nights, or bold steps out.
Every brushstroke invites you to wear your calm—be it the playful dots of Gradient Polka Dots or the luxe flecks of Gold Foil Minimalism—and let your fingertips sing with the spirit of less.
Embrace the quiet realms of these looks, from French Tips With a Twist to Matte & Glossy Combo, and let your nails shine as a beacon of understated creativity, glowing with the grace, calm, and wonder of minimalism all year round.