
Neon nail art ignites the fingertips with a blaze of vibrant energy—bold shades, electric vibes, and designs that scream modernity without apology.
In a world of muted tones and subtle trends, these creations slash through the ordinary, fusing audacity with artistry to transform your nails into a gallery of vivid expression.
Whether it’s a flicker of neon tips, a cascade of glowing gradients, or a wild clash of patterns, this collection of 35 neon nail art ideas delivers a jolt of 2024’s fiercest trend—perfect for any scene, from quiet days to electric nights.
With detailed steps and a surge of inspiration, these designs beckon you to wield the power of bold, proving that neon isn’t just color—it’s a statement.
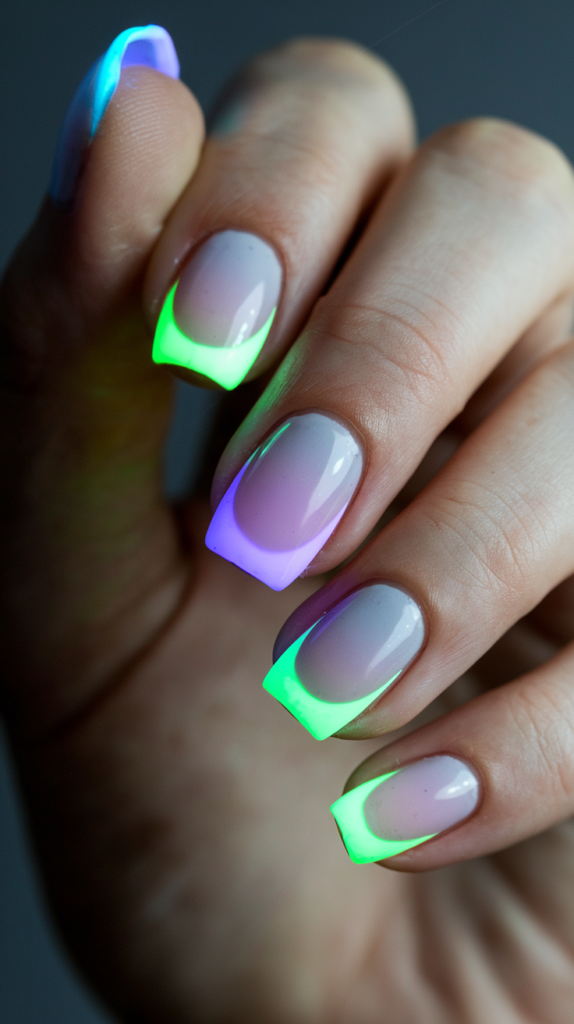
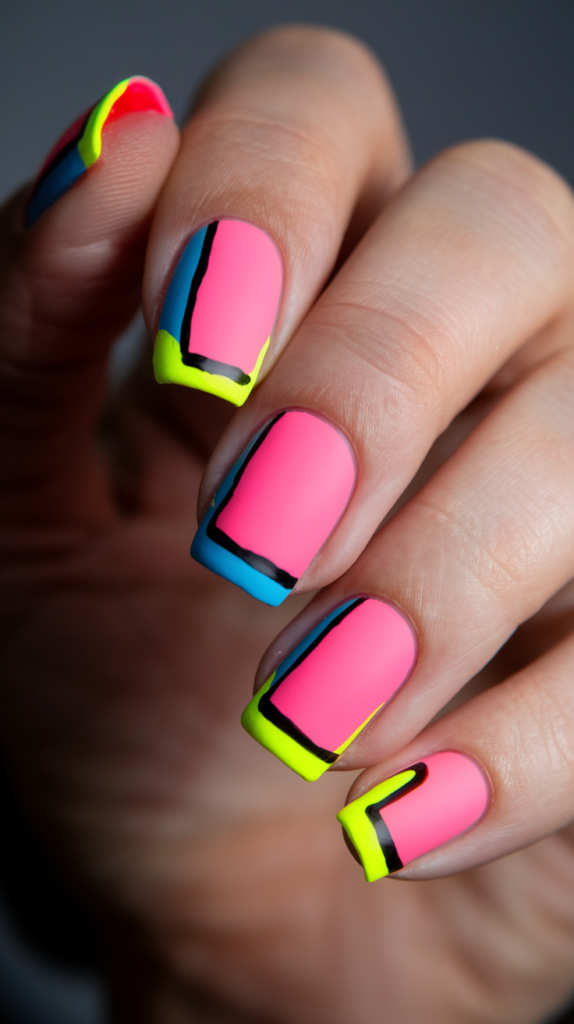
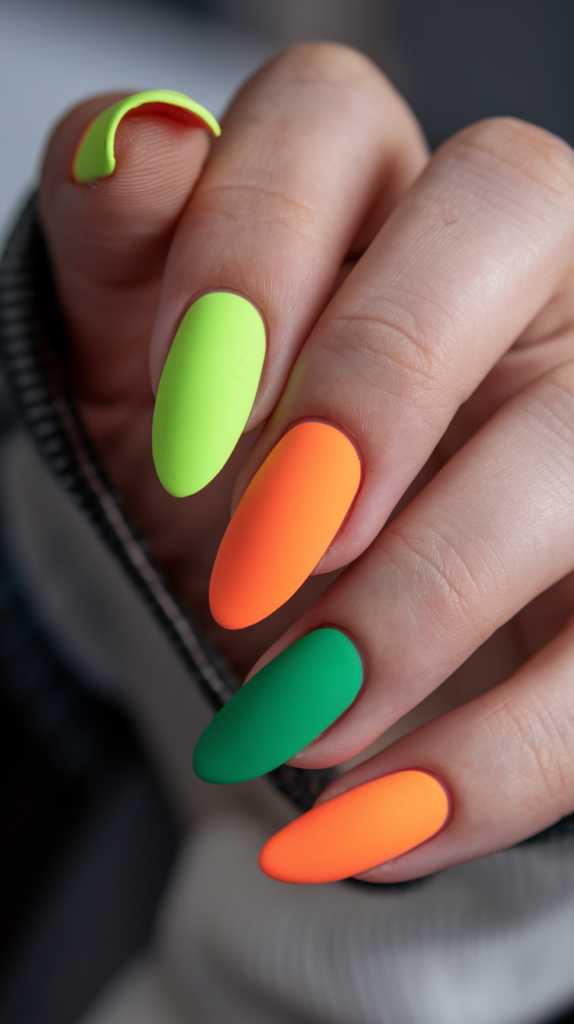
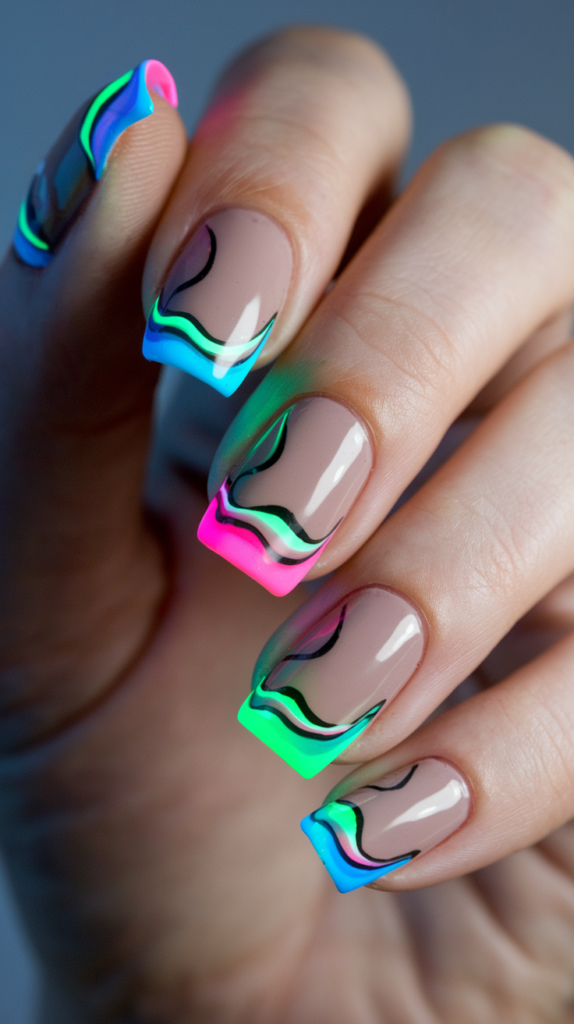
01. Neon French Tips
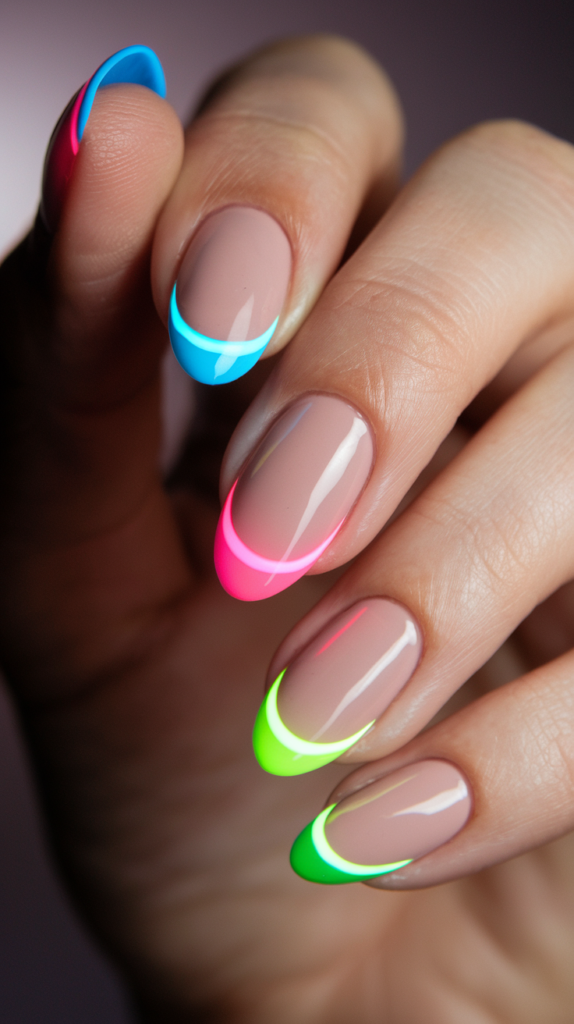
Recharge tradition with Neon French Tips, a design that electrifies the classic manicure with vivid hues slashing across almond tips.
This isn’t just polish—it’s a bold remix, perfect for crisp brunches, late-night revelry, or whenever you crave a spark of chic defiance.
Each tip pulses with neon pink, blue, or green, a radiant twist on timeless elegance.
Creating Neon French Tips
Step 1: Prep and Base
Lay down a smoothing base coat, then sweep two coats of nude polish across all nails, drying into a soft, bare canvas.
This neutral stage hums with calm, ready for a neon flare.
Step 2: Tip Design
With a fine brush, paint neon pink, blue, or green across each nail’s edge, keeping the line sharp and vivid.
Layer a second coat for intensity, letting it dry into a glowing frame that catches every glance.
Step 3: Refine Edges
Dip a brush in acetone to sharpen the tips’ borders, ensuring a clean break between nude and neon.
This step locks in the jolt, a subtle rebellion against the norm.
Step 4: Seal with Top Coat
Finish with a glossy top coat to encase the design, amplifying the neon’s shine against the soft base.
Add a second layer for resilience, ensuring your nails glow through every moment.
Why It Works
This design dances with neon’s edge—the nude base roots it in calm, while the vivid tips flare with contemporary fire.
The contrast cuts through with chic precision, a nod to French poise remixed with bold energy.
Pair it with a sleek jacket or a vibrant clutch, and it’s a sharp tribute to neon’s daring glow, gleaming with every flick.
02. Neon Ombre Fade
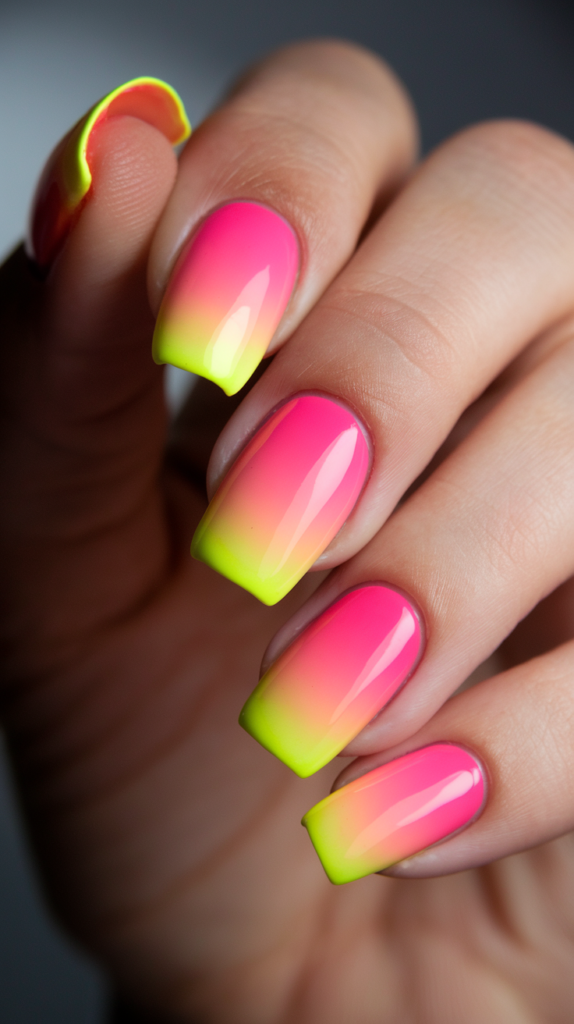
Melt into brilliance with Neon Ombre Fade, a design that flows from pink to yellow across square nails, weaving a gradient of electric dreams.
This isn’t just a manicure—it’s a surge of color, perfect for sunlit strolls, bold evenings, or days when your nails demand a vivid pulse.
Each fade hums with seamless energy, a neon tide that speaks volumes.
Creating Neon Ombre Fade
Step 1: Prep and Base
Begin with a protective base coat, then sponge neon pink onto the base, blending into yellow at the tips across all nails.
This fade dries into a fluid glow, echoing a sunset’s wild streak.
Step 2: Blend the Gradient
With a makeup sponge, dab the pink and yellow shades, overlapping slightly until the transition feels smooth and alive.
Let it dry into a neon wave, a vivid ripple that shifts with the light.
Step 3: Clean Edges
Use an acetone-dipped brush to tidy the cuticles, keeping the gradient sharp and uncluttered.
This step sharpens the flow, a bold polish to the design’s fire.
Step 4: Seal with Top Coat
Finish with a glossy top coat to lock in the ombre, amplifying its radiant shimmer.
Add a second layer for endurance, ensuring your nails blaze through every hour.
Why It Works
This design is a neon hymn—the pink-to-yellow fade drifts like a charged horizon, bold yet fluid in its shift.
The gradient weaves a tale of light and heat, a vivid surge that lifts simplicity into something electric.
Pair it with a flowing dress or a bright scarf, and it’s a fierce tribute to neon’s glow, pulsing with every turn.
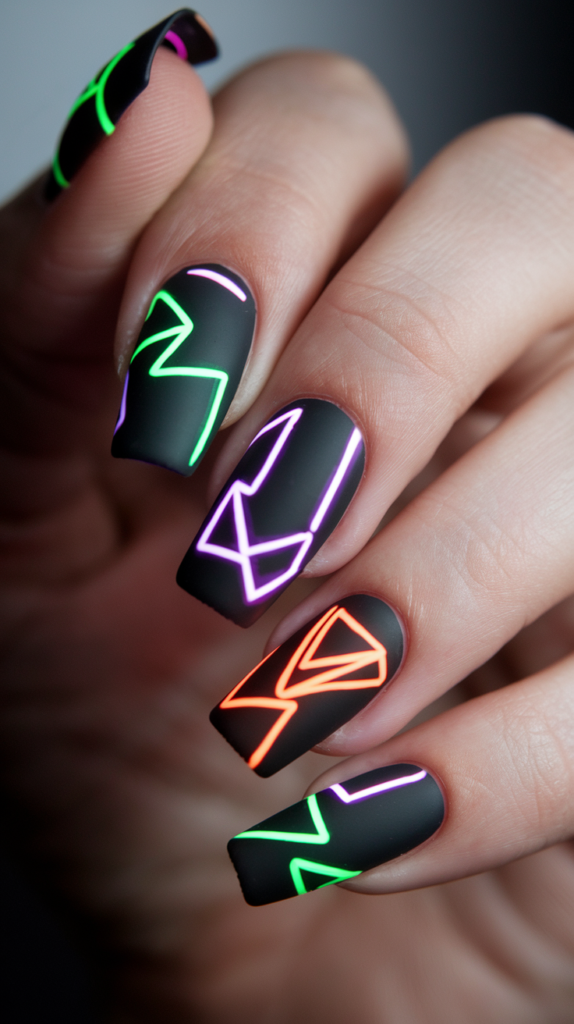
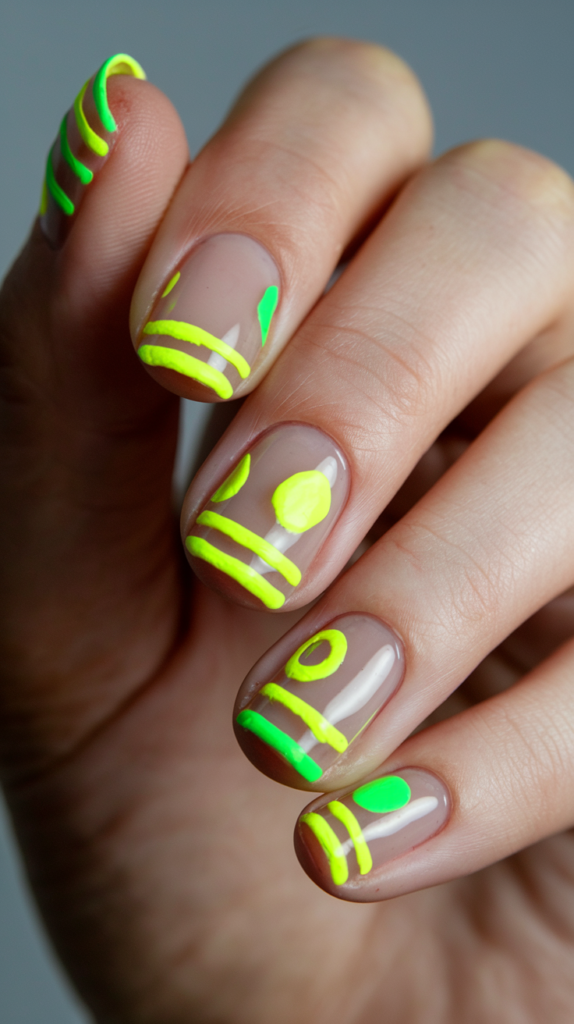
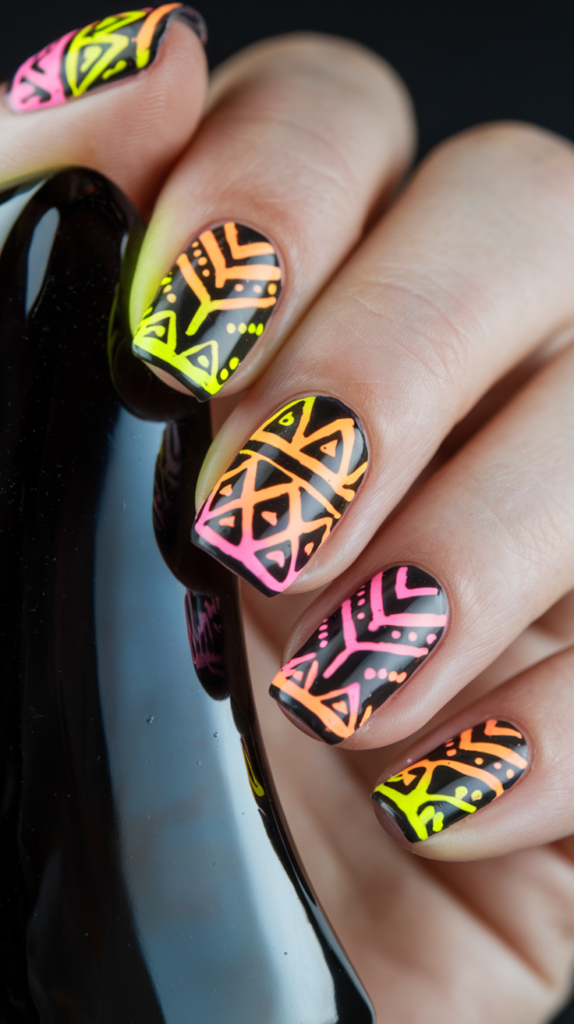
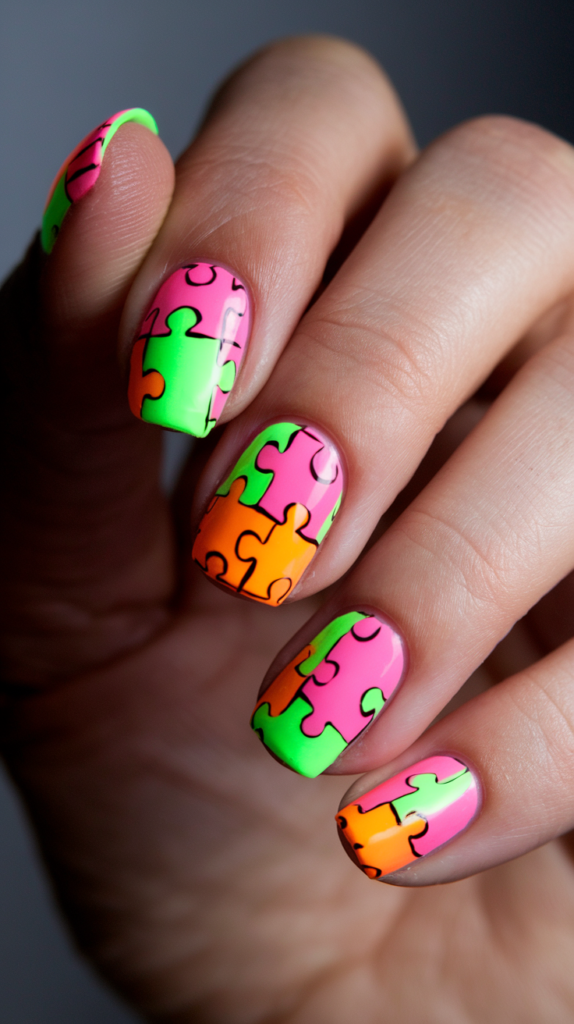
03. Neon Geometric Patterns
Carve the future with Neon Geometric Patterns, a design that slashes neon yellow and pink triangles across a matte black stage, blending edge with art.
This isn’t just nail art—it’s a jolt of modernity, perfect for gallery nights, urban escapes, or days when your nails crave sharp brilliance.
Each shape crackles with neon fire, a vivid dance of form and fury.
Creating Neon Geometric Patterns
Step 1: Prep and Base
Start with a strengthening base coat, then layer two coats of matte black polish, drying into a stark, bold canvas.
This dark stage hums with depth, ready for neon precision.
Step 2: Shape Design
With a fine brush, paint neon yellow triangles near the tips and pink zigzags at the base, keeping them sharp and vivid.
Layer a second coat for intensity, letting them dry into crisp, electric accents.
Step 3: Refine Lines
Dip a brush in acetone to perfect the shapes’ edges, ensuring they slash through the black with fierce clarity.
This step locks in their bold beauty, a whisper of structure in neon chaos.
Step 4: Seal with Top Coat
Finish with a glossy top coat to encase the design, giving the shapes a radiant gleam against the dark base.
Add a second layer for strength, ensuring your nails hold their edge through every scene.
Why It Works
This design is a neon sonnet—the matte black breathes with quiet power, while the geometric shapes flare with futuristic intent.
The triangles and zigzags stand as bold architects, building a look that’s both wild and restrained.
Pair it with a leather skirt or a sleek pendant, and it’s a fierce tribute to neon’s edge, cutting through with every vivid angle.
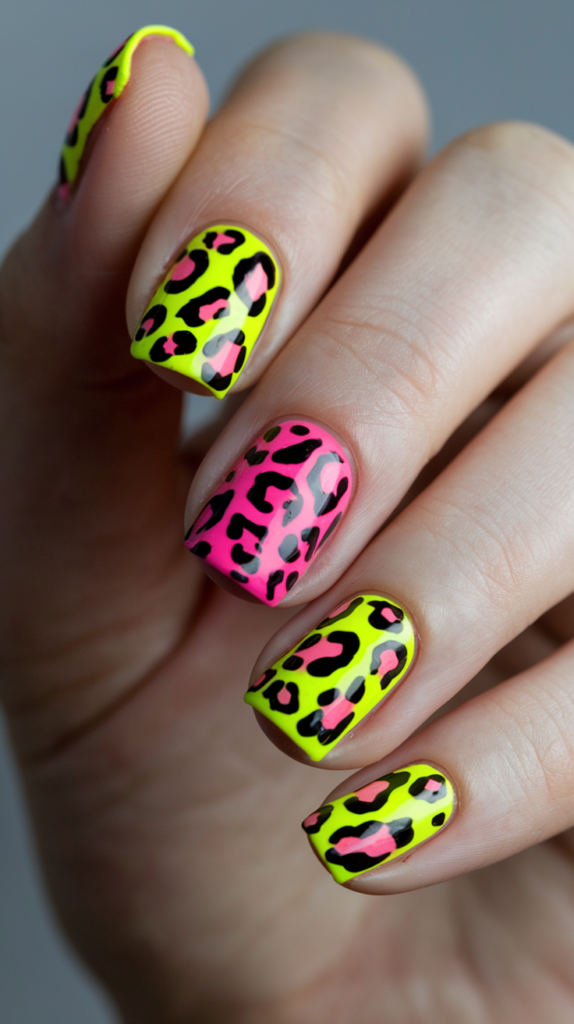
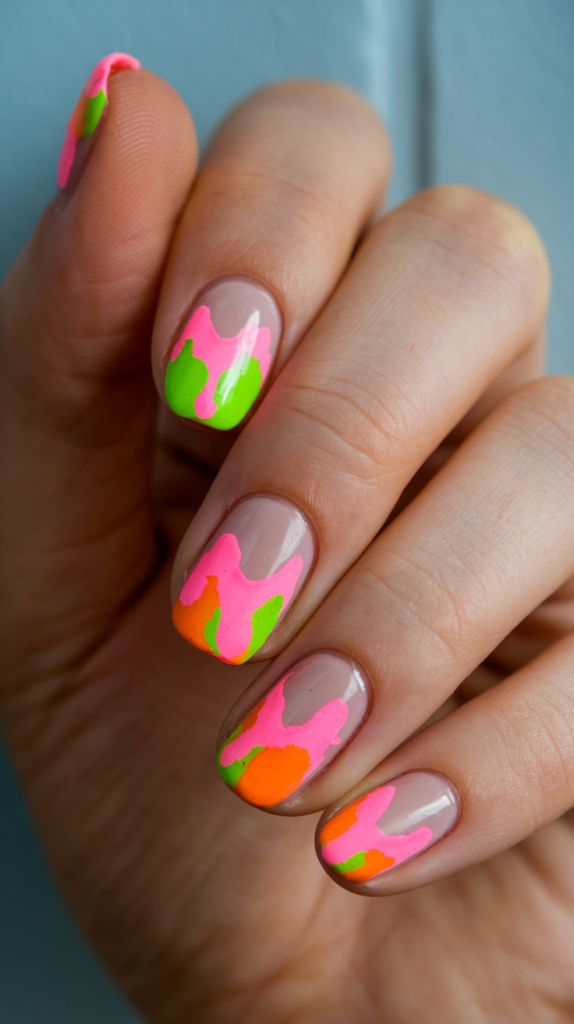
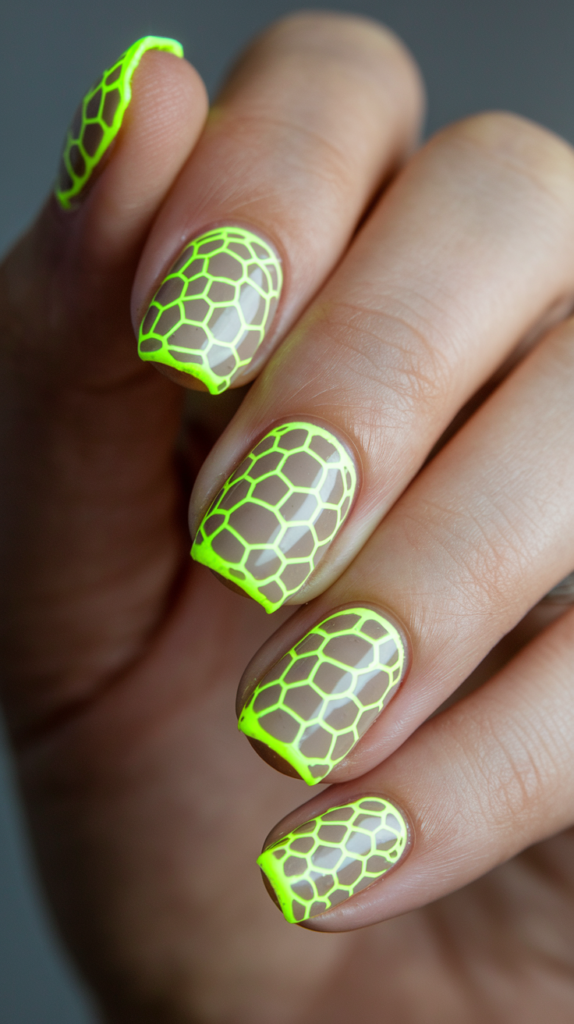
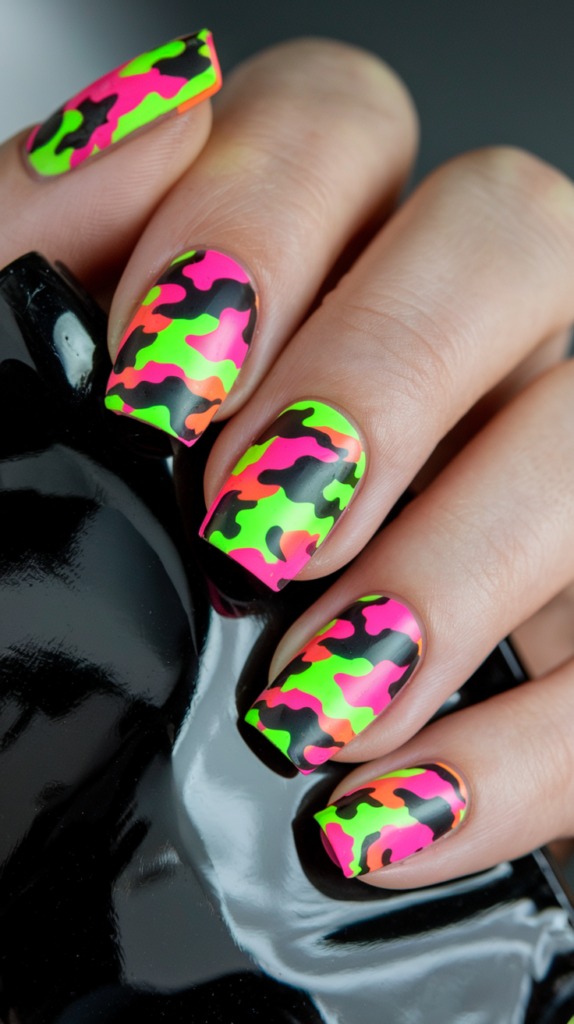
04. Neon Animal Print
Roar with Neon Animal Print, a design that claws neon lime and pink across a matte base, weaving wildness into vivid brilliance.
This isn’t just polish—it’s a feral spark, perfect for untamed nights, bold brunches, or moments when your nails demand fierce attention.
Each spot and stripe growls with neon heat, a radiant twist on nature’s patterns.
Creating Neon Animal Print
Step 1: Prep and Base
Lay down a protective base coat, then sweep two coats of neon lime polish across all nails, drying into a vivid, glowing stage.
This bright canvas hums with energy, ready for a wild dance.
Step 2: Print Design
With a fine brush, dab neon pink leopard spots or zebra stripes across each nail, keeping them irregular and bold.
Layer a second coat for depth, letting them dry into fierce, electric marks that leap off the lime.
Step 3: Refine Edges
Use an acetone-dipped brush to sharpen the patterns’ borders, ensuring they claw through with vivid precision.
This step locks in the ferocity, a whisper of wilderness in every stroke.
Step 4: Seal with Top Coat
Finish with a glossy top coat to encase the design, amplifying the neon’s roar against the bright base.
Add a second layer for durability, ensuring your nails prowl through every scene.
Why It Works
This design is a neon growl—the lime base surges with bold life, while the pink patterns slash through with untamed charm.
The contrast hums with feral grace, a vivid remix of nature’s wild heart.
Pair it with a bold dress or a chunky ring, and it’s a fierce tribute to neon’s untamed spirit, blazing with every flick.
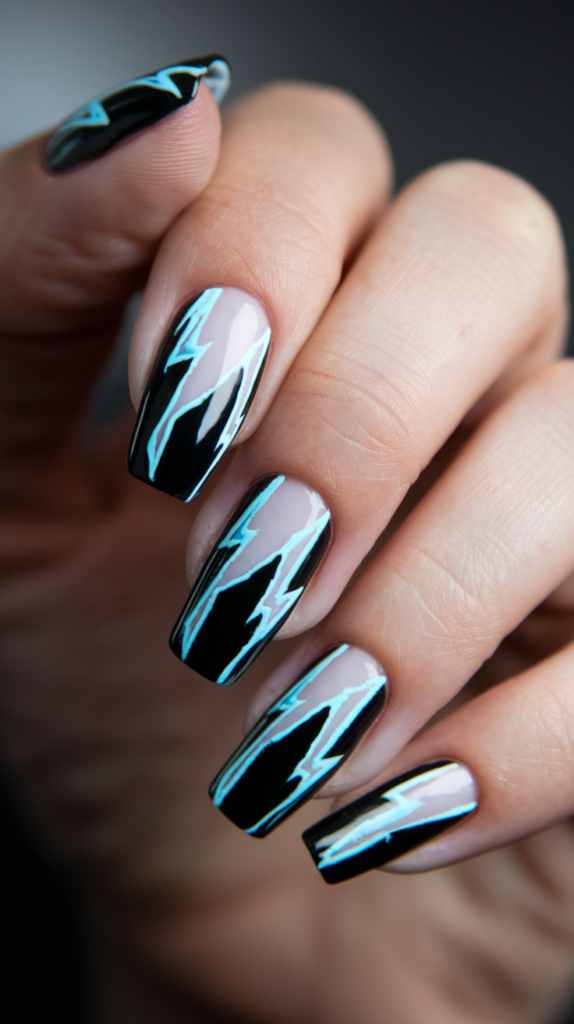
05. Neon Lightning Bolts
Strike with Neon Lightning Bolts, a design that zaps neon yellow across a black base, weaving electric drama into coffin nails.
This isn’t just nail art—it’s a thunderous jolt, perfect for stormy nights, bold outings, or moments when your nails crave a charged edge.
Each bolt crackles with vivid power, a neon storm on your fingertips.
Creating Neon Lightning Bolts
Step 1: Prep and Base
Start with a strengthening base coat, then layer two coats of matte black polish, drying into a dark, stormy stage.
This shadow hums with depth, ready for a neon strike.
Step 2: Bolt Design
With a fine brush, paint jagged neon yellow lightning bolts across each nail, keeping them sharp and dynamic.
Layer a second coat for intensity, letting them dry into vivid streaks that split the dark.
Step 3: Refine Edges
Dip a brush in acetone to sharpen the bolts’ borders, ensuring they flash through with electric precision.
This step locks in the charge, a whisper of chaos in every line.
Step 4: Seal with Top Coat
Finish with a glossy top coat to encase the design, amplifying the neon’s blaze against the black base.
Add a second layer for strength, ensuring your nails thunder through every gesture.
Why It Works
This design is a neon tempest—the black base broods with quiet power, while the yellow bolts flare with untamed energy.
The contrast crackles with dramatic poise, a vivid clash that lifts simplicity into something striking.
Pair it with a bold jacket or a sleek cuff, and it’s a fierce tribute to neon’s electric soul, flashing with every move.
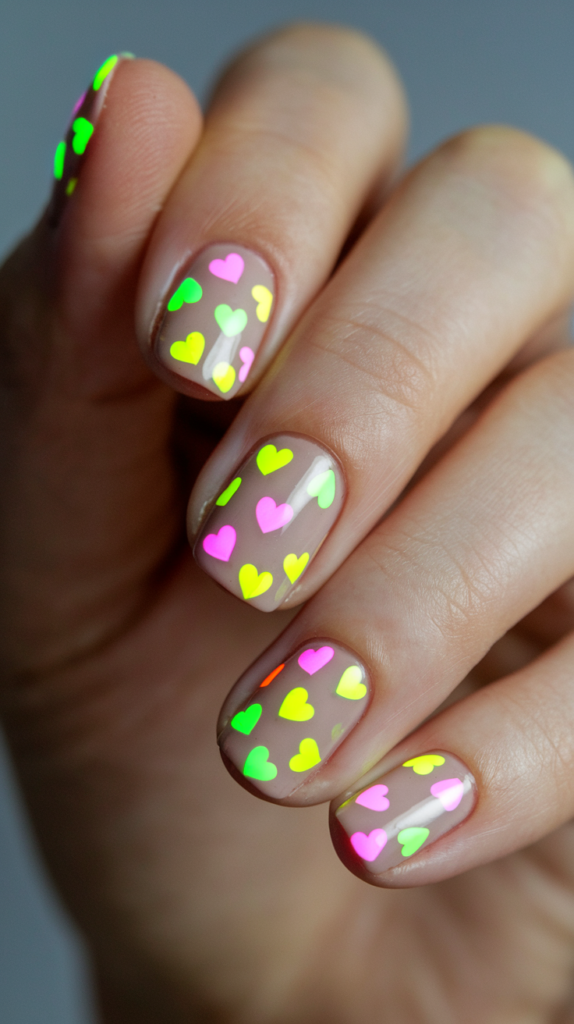
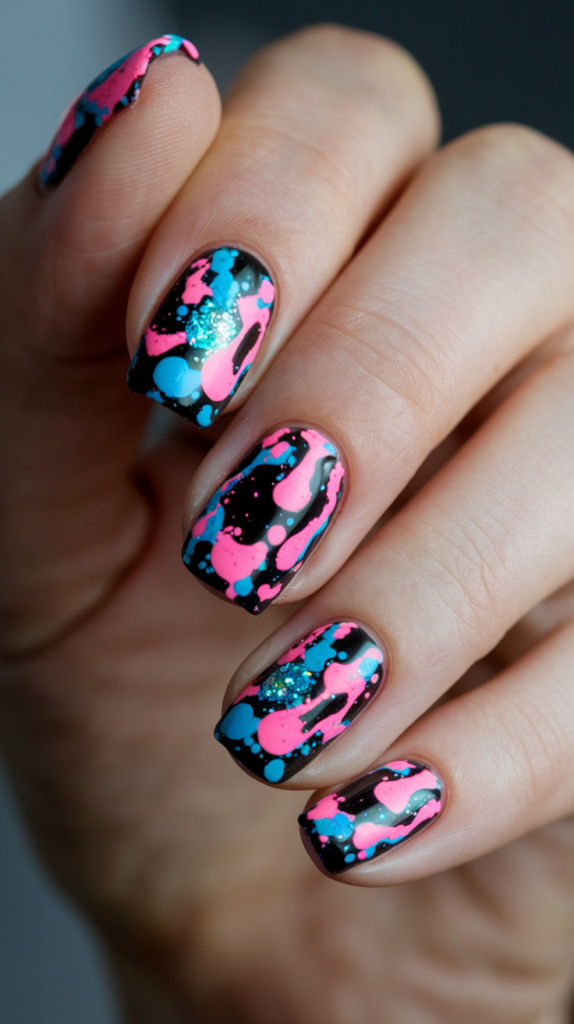
06. Neon Graffiti Art
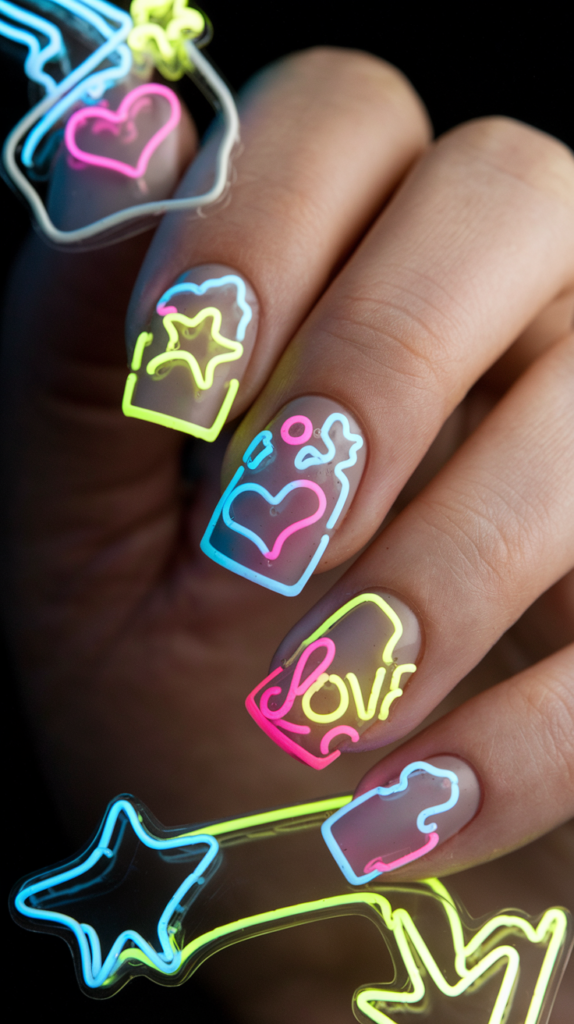
Splash the streets with Neon Graffiti Art, a design that scrawls neon pink hearts and blue stars across a nude base, weaving urban edge into vivid charm.
This isn’t just polish—it’s a city’s pulse, perfect for late-night wanders, bold brunches, or days when your nails demand a raw spark.
Each mark flares with neon grit, a radiant nod to street art’s soul.
Creating Neon Graffiti Art
Step 1: Prep and Base
Lay down a smoothing base coat, then paint two coats of nude polish, drying into a soft, bare stage.
This neutral glow hums with calm, ready for neon chaos.
Step 2: Graffiti Design
With a fine brush, scrawl neon pink hearts and blue stars randomly across each nail, keeping them bold and free.
Layer a second coat for depth, letting them dry into vivid tags that leap off the nude.
Step 3: Refine Edges
Use an acetone-dipped brush to sharpen the shapes’ borders, ensuring they slash through with urban precision.
This step locks in the grit, a whisper of rebellion in every stroke.
Step 4: Seal with Top Coat
Finish with a glossy top coat to encase the design, amplifying the neon’s flare against the soft base.
Add a second layer for durability, ensuring your nails pulse through every scene.
Why It Works
This design is a neon mural—the nude base cradles your nails in quiet elegance, while the pink and blue tags flare with streetwise fire.
The chaos hums with raw charm, a vivid remix of urban art’s wild heart.
Pair it with ripped jeans or a bold chain, and it’s a fierce tribute to neon’s gritty glow, blazing with every flick.
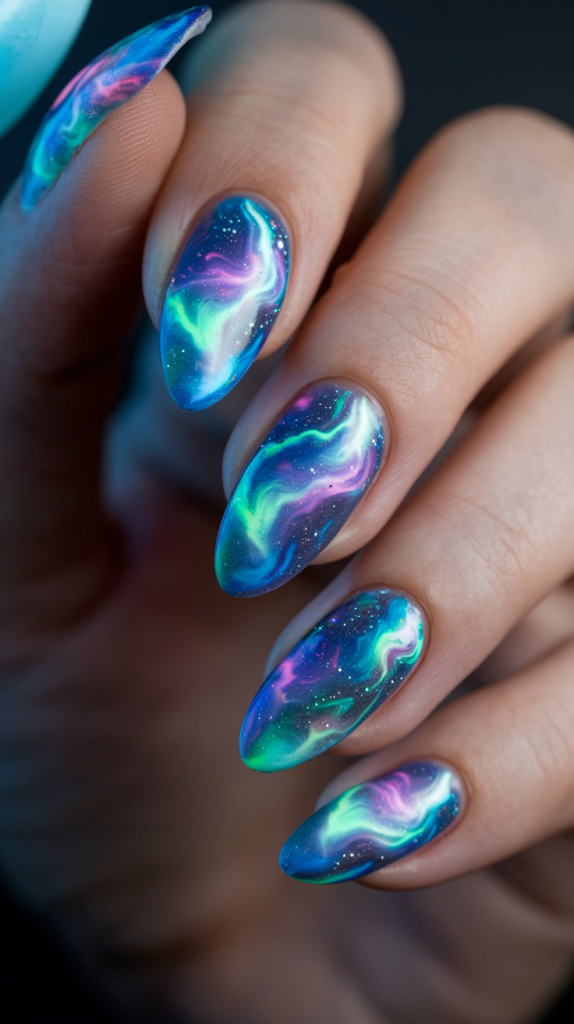
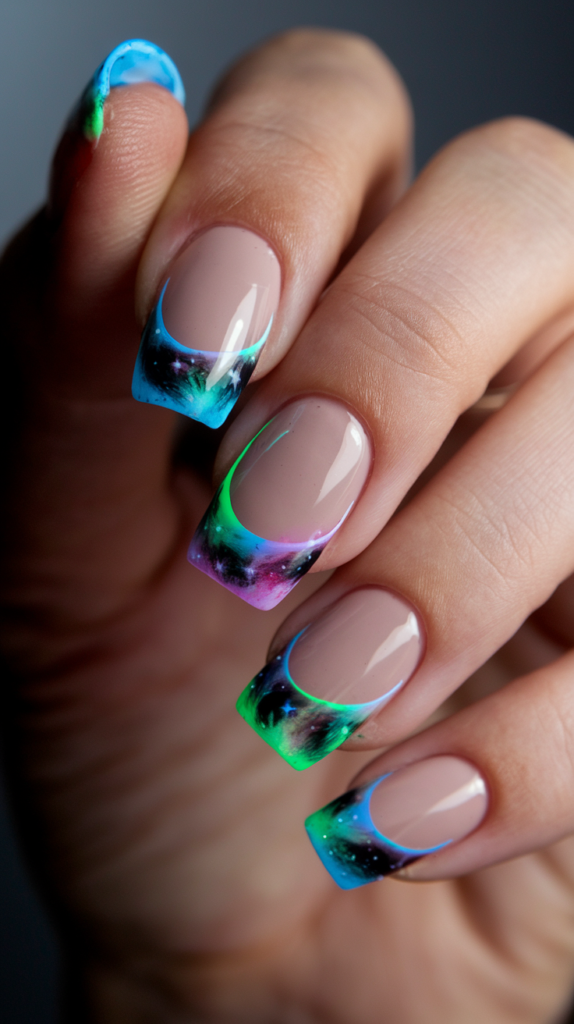
07. Neon Galaxy Nails
Drift into the cosmos with Neon Galaxy Nails, a design that scatters neon green stars across a deep purple sky, weaving celestial fire into stiletto tips.
This isn’t just nail art—it’s a cosmic blaze, perfect for starry nights, bold dreams, or moments when your nails crave otherworldly shine.
Each swirl glows with neon mystery, a radiant voyage on your fingertips.
Creating Neon Galaxy Nails
Step 1: Prep and Base
Start with a hydrating base coat, then layer two coats of deep purple polish, drying into a vast, cosmic stage.
This dark glow hums with depth, ready for neon light.
Step 2: Galaxy Design
With a sponge, dab neon green and pink swirls across each nail, then dot tiny white stars with a fine brush.
Layer a second coat for intensity, letting them dry into a radiant nebula that catches the eye.
Step 3: Refine Details
Dip a brush in acetone to sharpen the swirls’ edges, ensuring they shine crisp against the purple void.
This step locks in the cosmic grace, a whisper of the universe in every mark.
Step 4: Seal with Top Coat
Finish with a glossy top coat to encase the design, amplifying the neon’s glow against the dark base.
Add a second layer for endurance, ensuring your nails shimmer through every twilight.
Why It Works
This design is a neon constellation—the purple base drifts with quiet mystery, while the green and pink flare with celestial fire.
The swirls and stars twinkle with ethereal charm, a vivid voyage that lifts simplicity into something magical.
Pair it with a flowing gown or a silver chain, and it’s a fierce tribute to neon’s cosmic soul, glowing with every turn.
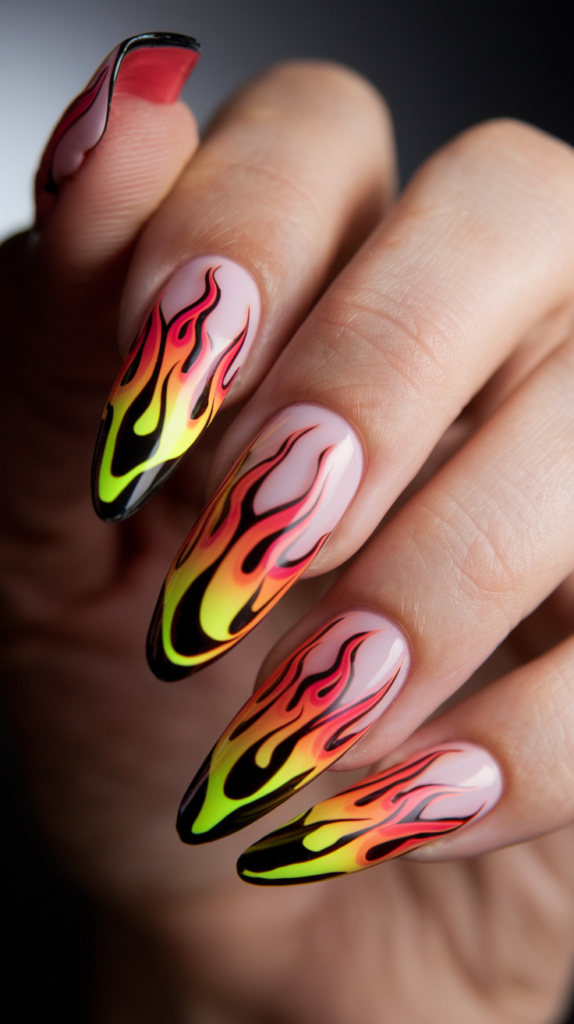
08. Neon Flames
Burn bright with Neon Flames, a design that licks neon orange and yellow across a black base, weaving fiery heat into stiletto nails.
This isn’t just polish—it’s a blazing surge, perfect for hot nights, bold strides, or moments when your nails demand untamed energy.
Each flame flares with neon fury, a radiant inferno on your fingertips.
Creating Neon Flames
Step 1: Prep and Base
Lay down a strengthening base coat, then sweep two coats of matte black polish, drying into a dark, smoldering stage.
This shadow hums with depth, ready for neon heat.
Step 2: Flame Design
With a fine brush, paint neon orange and yellow flames rising from the tips, keeping them sharp and dynamic.
Layer a second coat for intensity, letting them dry into vivid tongues that leap off the black.
Step 3: Refine Edges
Use an acetone-dipped brush to sharpen the flames’ borders, ensuring they blaze through with fierce precision.
This step locks in the fire, a whisper of chaos in every lick.
Step 4: Seal with Top Coat
Finish with a glossy top coat to encase the design, amplifying the neon’s roar against the dark base.
Add a second layer for durability, ensuring your nails burn through every scene.
Why It Works
This design is a neon inferno—the black base broods with quiet power, while the orange and yellow flare with untamed heat.
The flames dance with fierce grace, a vivid clash that lifts simplicity into something scorching.
Pair it with a bold top or a chunky ring, and it’s a fierce tribute to neon’s fiery soul, blazing with every flick.
09. Neon Polka Dots
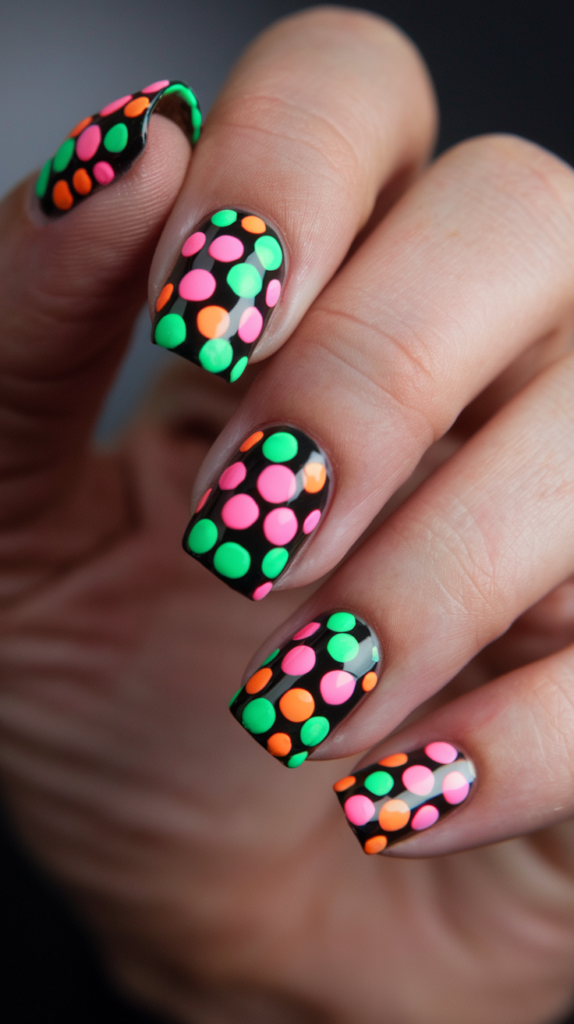
Scatter joy with Neon Polka Dots, a design that sprinkles neon green, pink, and orange across a black base, weaving play into vivid brilliance.
This isn’t just nail art—it’s a burst of cheer, perfect for sunny days, bold brunches, or moments when your nails crave a lively spark.
Each dot twinkles with neon glee, a radiant rhythm on your fingertips.
Creating Neon Polka Dots
Step 1: Prep and Base
Lay down a protective base coat, then sweep two coats of matte black polish, drying into a dark, bold canvas.
This shadow hums with depth, ready for neon play.
Step 2: Dot Design
With a dotting tool, scatter neon green, pink, and orange dots across each nail, keeping them round and vivid.
Layer a second coat for intensity, letting them dry into crisp specks that pop against the black.
Step 3: Refine Details
Dip a brush in acetone to tidy the dots’ edges, ensuring they shine sharp and clean against the dark.
This step locks in the joy, a whisper of rhythm in every mark.
Step 4: Seal with Top Coat
Finish with a glossy top coat to encase the design, amplifying the neon’s glow against the black base.
Add a second layer for strength, ensuring your nails dance through every gesture.
Why It Works
This design is a neon symphony—the black base cradles your nails in quiet power, while the colorful dots flare with playful intent.
They twinkle with lively grace, a vivid pattern that lifts simplicity into something special.
Pair it with a bright skirt or a bold bracelet, and it’s a fierce tribute to neon’s joyful soul, glowing with every flick.
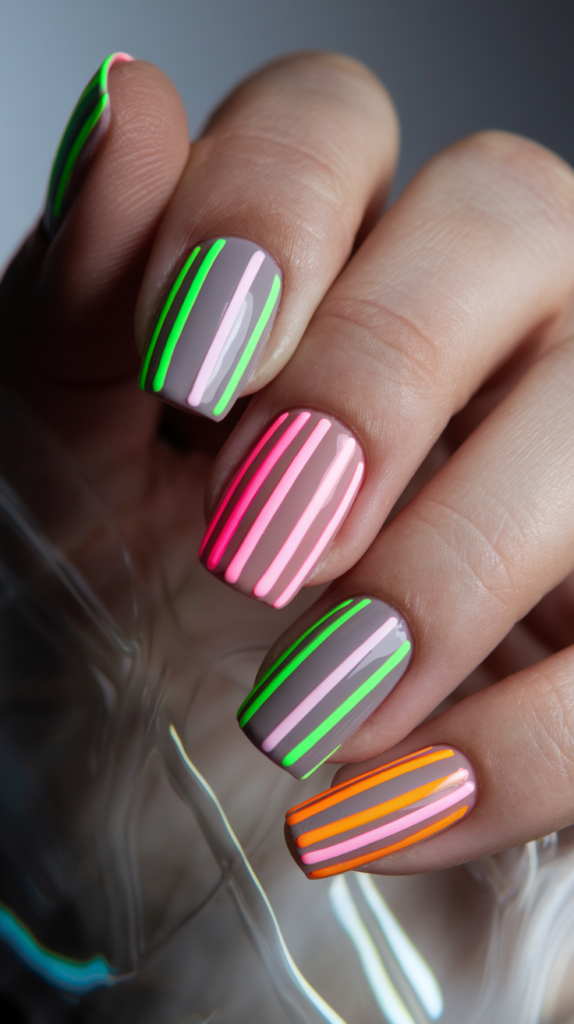
10. Neon Stripes
Slash with Neon Stripes, a design that streaks neon pink and green across a nude base, weaving bold lines into vivid charm.
This isn’t just polish—it’s a surge of structure, perfect for crisp days, sleek nights, or moments when your nails crave a radiant edge.
Each stripe cuts with neon fire, a vivid frame on your fingertips.
Creating Neon Stripes
Step 1: Prep and Base
Lay down a smoothing base coat, then paint two coats of nude polish, drying into a soft, bare stage.
This neutral glow hums with calm, ready for neon slashes.
Step 2: Stripe Design
With a striping brush, draw neon pink and green lines diagonally across each nail, keeping them thin and sharp.
Layer a second coat for intensity, letting them dry into vivid streaks that slice the nude.
Step 3: Sharpen Edges
Use an acetone-dipped brush to refine the lines’ borders, ensuring they cut through with bold precision.
This step locks in the edge, a whisper of structure in every stroke.
Step 4: Seal with Top Coat
Finish with a glossy top coat to encase the design, amplifying the neon’s shine against the soft base.
Add a second layer for durability, ensuring your nails flare through every move.
Why It Works
This design is a neon blade—the nude base cradles your nails in quiet elegance, while the pink and green stripes slash with modern fire.
They gleam with structured grace, a vivid frame that lifts simplicity into something striking.
Pair it with a tailored top or a bold watch, and it’s a fierce tribute to neon’s sharp soul, glowing with every line.
11. Neon Matte Nails
Mute the shine with Neon Matte Nails, a design that cloaks coffin nails in velvety neon green, radiating bold luxury without gloss.
This isn’t just polish—it’s a hushed roar, perfect for sleek evenings, bold desks, or moments when your nails crave vivid calm.
Each nail hums with a muted glow, a testament to neon’s quiet power.
Creating Neon Matte Nails
Step 1: Prep and Base
Lay down a strengthening base coat, then sweep two coats of neon green polish across all nails.
This vivid shade dries into a smooth canvas, a whisper of heat against your skin.
Step 2: Even Layers
Apply the polish in thin, even strokes, letting each layer dry to avoid streaks and build a flawless finish.
This step sets a bold base, ready for the matte magic.
Step 3: Matte Top Coat
Brush on a matte top coat, transforming the green into a velvety sheen that mutes all shine.
Let it dry into a soft, tactile glow, a quiet rebellion against gloss.
Step 4: Clean Edges
Use acetone and a fine brush to sharpen the cuticles, ensuring the matte finish stays pristine.
Add a second matte layer for endurance, locking in the boldness through every touch.
Why It Works
This design is a neon velvet hymn—the green base drapes your nails in vivid warmth, while the matte finish hushes the shine into a luxurious calm.
It’s a soft defiance, a glow that whispers rather than shouts, wrapping your nails in bold poise.
Pair it with a sleek blazer or a bold ring, and it’s a fierce tribute to neon’s muted edge, radiating with every subtle gleam.
12. Neon Outline Nails
Trace boldness with Neon Outline Nails, a design that frames each nail with neon pink lines, blending structure with vivid flare.
This isn’t just polish—it’s a sharp whisper, perfect for sleek days, bold nights, or moments when your nails crave a radiant edge.
Each outline cuts with neon grace, a vivid silhouette on a nude stage.
Creating Neon Outline Nails
Step 1: Prep and Base
Start with a protective base coat, then layer two coats of nude polish, drying into a soft, natural canvas.
This bare glow hums with calm, ready for neon lines.
Step 2: Outline Design
With a fine brush, trace a thin neon pink line around each nail’s edge, keeping it close and precise.
Layer a second coat for intensity, letting it dry into a crisp, vivid frame that defines the shape.
Step 3: Sharpen Edges
Dip a brush in acetone to perfect the outline’s borders, ensuring it slashes through with clean precision.
This step locks in the sleekness, a whisper of structure in every stroke.
Step 4: Seal with Top Coat
Finish with a glossy top coat to encase the design, amplifying the neon’s shine against the nude base.
Add a second layer for strength, ensuring your nails hold their edge through every scene.
Why It Works
This design is a neon sketch—the nude base breathes with quiet grace, while the pink outline slices through with bold intent.
It frames with vivid charm, a single line that lifts simplicity into something striking.
Pair it with a monochrome top or a sleek watch, and it’s a fierce tribute to neon’s sharp soul, glowing with every line.
13. Neon Water Marble
Swirl into brilliance with Neon Water Marble, a design that ripples neon blue and yellow across a nude base, weaving fluid art into vivid charm.
This isn’t just polish—it’s a liquid surge, perfect for bold days, sleek nights, or moments when your nails crave a radiant flow.
Each swirl hums with neon energy, a vivid tide on your fingertips.
Creating Neon Water Marble
Step 1: Prep and Base
Lay down a protective base coat, then sweep two coats of nude polish, drying into a soft, bare stage.
This neutral glow hums with calm, ready for neon waves.
Step 2: Marble Design
Drop neon blue and yellow polish into a bowl of water, swirl with a toothpick, then dip each nail to capture the pattern.
Let it dry into a fluid dance, a vivid ripple that catches the eye.
Step 3: Clean Edges
Use an acetone-dipped brush to tidy the cuticles, ensuring the marble flows crisp and uncluttered.
This step sharpens the tide, a bold polish to the design’s grace.
Step 4: Seal with Top Coat
Finish with a glossy top coat to encase the design, amplifying the neon’s shimmer against the nude base.
Add a second layer for strength, ensuring your nails surge through every gesture.
Why It Works
This design is a neon current—the nude base cradles your nails in quiet elegance, while the blue and yellow swirl with fluid fire.
The patterns hum with dynamic grace, a vivid flow that lifts simplicity into something striking.
Pair it with a flowing skirt or a bold ring, and it’s a fierce tribute to neon’s liquid soul, glowing with every ripple.
14. Neon Drips
Spill with Neon Drips, a design that cascades neon orange and pink from the tips across a nude base, weaving playful chaos into vivid charm.
This isn’t just polish—it’s a liquid jolt, perfect for bold days, sleek nights, or moments when your nails crave a radiant melt.
Each drip flows with neon energy, a vivid splash on your fingertips.
Creating Neon Drips
Step 1: Prep and Base
Lay down a protective base coat, then sweep two coats of nude polish, drying into a soft, bare stage.
This neutral glow hums with calm, ready for neon spills.
Step 2: Drip Design
With a fine brush, paint neon orange and pink drips from the tips downward, keeping them irregular and bold.
Layer a second coat for intensity, letting them dry into vivid streams that cascade off the nude.
Step 3: Refine Edges
Use an acetone-dipped brush to sharpen the drips’ borders, ensuring they flow with clean precision.
This step locks in the chaos, a whisper of play in every streak.
Step 4: Seal with Top Coat
Finish with a glossy top coat to encase the design, amplifying the neon’s shine against the nude base.
Add a second layer for strength, ensuring your nails spill through every gesture.
Why It Works
This design is a neon torrent—the nude base cradles your nails in quiet elegance, while the orange and pink drips flare with playful fire.
They flow with dynamic grace, a vivid splash that lifts simplicity into something striking.
Pair it with a bold top or a chunky bracelet, and it’s a fierce tribute to neon’s liquid soul, glowing with every drip.
15. Neon Butterfly Wings
Flutter with Neon Butterfly Wings, a design that spreads neon green and blue across a clear base, weaving delicate whimsy into vivid charm.
This isn’t just nail art—it’s a radiant flight, perfect for soft days, bold springs, or moments when your nails crave a lively spark.
Each wing glows with neon grace, a vivid dance on your fingertips.
Creating Neon Butterfly Wings
Step 1: Prep and Base
Lay down a protective base coat, then layer a single coat of clear polish, drying into a raw, natural sheen.
This transparent glow hums with calm, ready for neon wings.
Step 2: Wing Design
With a fine brush, paint neon green and blue butterfly wings on the ring and middle fingers, keeping them delicate and bold.
Layer a second coat for intensity, letting them dry into vivid arcs that catch the eye.
Step 3: Refine Shapes
Dip a brush in acetone to sharpen the wings’ edges, ensuring they flutter crisp against the clear backdrop.
This step locks in the whimsy, a whisper of flight in every curve.
Step 4: Seal with Top Coat
Finish with a glossy top coat to encase the design, amplifying the neon’s glow against the bare base.
Add a second layer for strength, ensuring your nails soar through every gesture.
Why It Works
This design is a neon flutter—the clear base breathes with quiet elegance, while the green and blue wings flare with lively fire.
They dance with delicate charm, a vivid pattern that lifts simplicity into something magical.
Pair it with a floral top or a soft ring, and it’s a fierce tribute to neon’s whimsical soul, glowing with every wing.
16. Neon Tribal Prints
Chant with Neon Tribal Prints, a design that carves neon orange zigzags across a black base, weaving exotic fire into vivid charm.
This isn’t just polish—it’s a bold rhythm, perfect for wild nights, sleek days, or moments when your nails crave a radiant edge.
Each line hums with neon power, a vivid echo on your fingertips.
Creating Neon Tribal Prints
Step 1: Prep and Base
Lay down a protective base coat, then sweep two coats of matte black polish, drying into a dark, bold canvas.
This shadow hums with depth, ready for neon chants.
Step 2: Tribal Design
With a fine brush, paint neon orange zigzags and triangles across each nail, keeping them sharp and vivid.
Layer a second coat for intensity, letting them dry into crisp patterns that leap off the black.
Step 3: Refine Edges
Use an acetone-dipped brush to sharpen the lines’ borders, ensuring they carve through with fierce precision.
This step locks in the rhythm, a whisper of the wild in every stroke.
Step 4: Seal with Top Coat
Finish with a glossy top coat to encase the design, amplifying the neon’s flare against the dark base.
Add a second layer for strength, ensuring your nails pulse through every scene.
Why It Works
This design is a neon ritual—the black base broods with quiet power, while the orange patterns flare with exotic fire.
They hum with structured grace, a vivid echo that lifts simplicity into something striking.
Pair it with a bold skirt or a chunky bracelet, and it’s a fierce tribute to neon’s primal soul, glowing with every line.
17. Neon Chrome
Gleam with Neon Chrome, a design that fuses neon pink with a metallic sheen, weaving futuristic fire into vivid elegance.
This isn’t just polish—it’s a radiant pulse, perfect for sleek nights, bold strides, or moments when your nails crave a luminous edge.
Each nail shines with neon brilliance, a vivid mirror on your fingertips.
Creating Neon Chrome
Step 1: Prep and Base
Lay down a smoothing base coat, then sweep two coats of neon pink polish, drying into a vivid, bold canvas.
This bright stage hums with energy, ready for a chrome flare.
Step 2: Chrome Effect
Apply a chrome powder with a sponge, rubbing it over the pink until it gleams with a metallic shine.
Let it set into a radiant sheen, a vivid reflection that catches every light.
Step 3: Clean Edges
Use an acetone-dipped brush to tidy the cuticles, ensuring the chrome stays sharp and uncluttered.
This step locks in the glow, a whisper of the future in every gleam.
Step 4: Seal with Top Coat
Finish with a glossy top coat to encase the design, amplifying the neon’s shine against the metallic base.
Add a second layer for durability, ensuring your nails blaze through every move.
Why It Works
This design is a neon beacon—the pink base surges with vivid life, while the chrome sheen flares with futuristic fire.
It gleams with liquid grace, a vivid mirror that lifts simplicity into something striking.
Pair it with a sleek dress or a bold ring, and it’s a fierce tribute to neon’s luminous soul, glowing with every reflection.
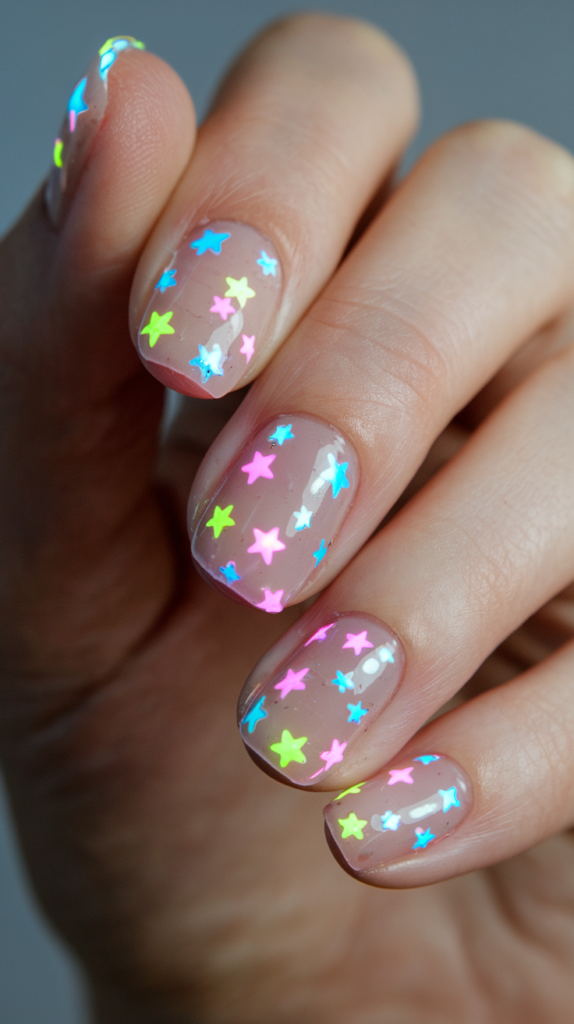
18. Neon Stars
Twinkle with Neon Stars, a design that scatters neon blue stars across a black base, weaving celestial fire into vivid charm.
This isn’t just nail art—it’s a starry jolt, perfect for quiet nights, bold dreams, or moments when your nails crave a radiant spark.
Each star glows with neon light, a vivid constellation on your fingertips.
Creating Neon Stars
Step 1: Prep and Base
Lay down a protective base coat, then sweep two coats of matte black polish, drying into a dark, cosmic stage.
This shadow hums with depth, ready for neon light.
Step 2: Star Design
With a fine brush, paint tiny neon blue stars randomly across each nail, keeping them small and sharp.
Layer a second coat for intensity, letting them dry into vivid points that pierce the dark.
Step 3: Refine Shapes
Dip a brush in acetone to sharpen the stars’ edges, ensuring they shine crisp against the black backdrop.
This step locks in the glow, a whisper of the sky in every point.
Step 4: Seal with Top Coat
Finish with a glossy top coat to encase the design, amplifying the neon’s flare against the dark base.
Add a second layer for strength, ensuring your nails shimmer through every twilight.
Why It Works
This design is a neon galaxy—the black base drifts with quiet mystery, while the blue stars flare with celestial fire.
They twinkle with ethereal charm, a vivid pattern that lifts simplicity into something magical.
Pair it with a flowing top or a silver stud, and it’s a fierce tribute to neon’s starry soul, glowing with every point.
19. Neon Flower Power
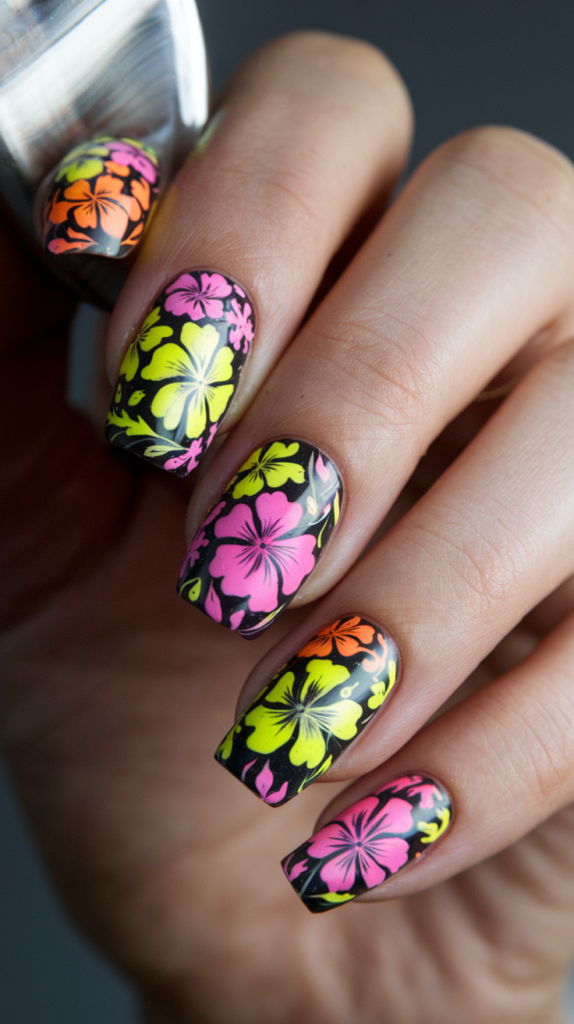
Bloom with Neon Flower Power, a design that sprouts neon orange petals across a nude base, weaving nature’s fire into vivid charm.
This isn’t just polish—it’s a radiant burst, perfect for soft days, bold springs, or moments when your nails crave a lively spark.
Each flower glows with neon grace, a vivid garden on your fingertips.
Creating Neon Flower Power
Step 1: Prep and Base
Lay down a protective base coat, then sweep two coats of nude polish, drying into a soft, bare stage.
This neutral glow hums with calm, ready for neon blooms.
Step 2: Flower Design
With a fine brush, paint neon orange flowers with green leaves on the ring and middle fingers, keeping them small and bold.
Layer a second coat for intensity, letting them dry into vivid petals that catch the eye.
Step 3: Refine Petals
Dip a brush in acetone to sharpen the flowers’ edges, ensuring they bloom crisp against the nude backdrop.
This step locks in the charm, a whisper of nature in every curve.
Step 4: Seal with Top Coat
Finish with a glossy top coat to encase the design, amplifying the neon’s glow against the soft base.
Add a second layer for strength, ensuring your nails flourish through every gesture.
Why It Works
This design is a neon blossom—the nude base cradles your nails in quiet elegance, while the orange flowers flare with lively fire.
They bloom with playful grace, a vivid garden that lifts simplicity into something special.
Pair it with a floral skirt or a soft ring, and it’s a fierce tribute to neon’s natural soul, glowing with every petal.
20. Neon Grid
Structure with Neon Grid, a design that carves neon yellow lines across a black base, weaving sharp order into vivid charm.
This isn’t just polish—it’s a radiant frame, perfect for sleek days, bold nights, or moments when your nails crave a modern edge.
Each line hums with neon power, a vivid lattice on your fingertips.
Creating Neon Grid
Step 1: Prep and Base
Lay down a protective base coat, then sweep two coats of matte black polish, drying into a dark, bold canvas.
This shadow hums with depth, ready for neon structure.
Step 2: Grid Design
With a striping brush, paint thin neon yellow lines in a grid pattern across each nail, keeping them sharp and even.
Layer a second coat for intensity, letting them dry into vivid frames that slice the black.
Step 3: Sharpen Edges
Use an acetone-dipped brush to refine the lines’ borders, ensuring they cut through with clean precision.
This step locks in the order, a whisper of modernity in every stroke.
Step 4: Seal with Top Coat
Finish with a glossy top coat to encase the design, amplifying the neon’s shine against the dark base.
Add a second layer for strength, ensuring your nails hold their edge through every scene.
Why It Works
This design is a neon blueprint—the black base broods with quiet power, while the yellow grid flares with structured fire.
It gleams with sharp grace, a vivid lattice that lifts simplicity into something striking.
Pair it with a tailored top or a bold watch, and it’s a fierce tribute to neon’s modern soul, glowing with every line.
21. Neon Negative Space
Bare it with Neon Negative Space, a design that slashes neon green lines across a clear base, weaving bold absence into vivid charm.
This isn’t just polish—it’s a radiant breath, perfect for sleek days, bold nights, or moments when your nails crave a modern spark.
Each line hums with neon energy, a vivid void on your fingertips.
Creating Neon Negative Space
Step 1: Prep and Base
Lay down a protective base coat, then layer a single coat of clear polish, drying into a raw, natural sheen.
This transparent glow hums with calm, ready for neon slashes.
Step 2: Line Design
With a striping brush, paint thin neon green lines diagonally across each nail, leaving bare spaces between.
Layer a second coat for intensity, letting them dry into vivid streaks that cut the clear.
Step 3: Sharpen Edges
Use an acetone-dipped brush to refine the lines’ borders, ensuring they slash through with clean precision.
This step locks in the void, a whisper of absence in every stroke.
Step 4: Seal with Top Coat
Finish with a glossy top coat to encase the design, amplifying the neon’s shine against the bare base.
Add a second layer for strength, ensuring your nails breathe through every gesture.
Why It Works
This design is a neon whisper—the clear base breathes with quiet elegance, while the green lines flare with bold fire.
They dance with stark grace, a vivid void that lifts simplicity into something striking.
Pair it with a sleek top or a bold ring, and it’s a fierce tribute to neon’s bare soul, glowing with every slash.
22. Neon Leopard Print
Prowl with Neon Leopard Print, a design that claws neon pink spots across a black base, weaving fierce fire into vivid charm.
This isn’t just polish—it’s a wild surge, perfect for bold nights, sleek days, or moments when your nails crave a radiant edge.
Each spot growls with neon heat, a vivid beast on your fingertips.
Creating Neon Leopard Print
Step 1: Prep and Base
Lay down a protective base coat, then sweep two coats of matte black polish, drying into a dark, bold canvas.
This shadow hums with depth, ready for neon claws.
Step 2: Print Design
With a fine brush, dab neon pink spots randomly across each nail, keeping them irregular and vivid.
Layer a second coat for intensity, letting them dry into fierce marks that leap off the black.
Step 3: Refine Edges
Use an acetone-dipped brush to sharpen the spots’ borders, ensuring they claw through with fierce precision.
This step locks in the wildness, a whisper of the hunt in every mark.
Step 4: Seal with Top Coat
Finish with a glossy top coat to encase the design, amplifying the neon’s roar against the dark base.
Add a second layer for strength, ensuring your nails prowl through every scene.
Why It Works
This design is a neon growl—the black base broods with quiet power, while the pink spots flare with untamed fire.
They hum with fierce grace, a vivid beast that lifts simplicity into something striking.
Pair it with a bold dress or a chunky ring, and it’s a fierce tribute to neon’s wild soul, glowing with every spot.
23. Neon Color Block
Clash with Neon Color Block, a design that stacks neon blue and green blocks across a nude base, weaving bold structure into vivid charm.
This isn’t just polish—it’s a radiant jolt, perfect for sleek days, bold nights, or moments when your nails crave a modern edge.
Each block hums with neon power, a vivid wall on your fingertips.
Creating Neon Color Block
Step 1: Prep and Base
Lay down a protective base coat, then sweep two coats of nude polish, drying into a soft, bare stage.
This neutral glow hums with calm, ready for neon stacks.
Step 2: Block Design
With a fine brush, paint neon blue and green blocks across each nail, keeping them sharp and bold.
Layer a second coat for intensity, letting them dry into vivid slabs that clash with the nude.
Step 3: Sharpen Edges
Use an acetone-dipped brush to refine the blocks’ borders, ensuring they stack with clean precision.
This step locks in the structure, a whisper of order in every slab.
Step 4: Seal with Top Coat
Finish with a glossy top coat to encase the design, amplifying the neon’s shine against the nude base.
Add a second layer for strength, ensuring your nails hold their edge through every scene.
Why It Works
This design is a neon fortress—the nude base cradles your nails in quiet elegance, while the blue and green blocks flare with bold fire.
They stack with structured grace, a vivid wall that lifts simplicity into something striking.
Pair it with a sleek top or a bold watch, and it’s a fierce tribute to neon’s modern soul, glowing with every block.
24. Neon Chevron
Angle with Neon Chevron, a design that zigzags neon pink across a nude base, weaving retro fire into vivid charm.
This isn’t just polish—it’s a radiant rhythm, perfect for bold days, sleek nights, or moments when your nails crave a lively edge.
Each chevron cuts with neon grace, a vivid peak on your fingertips.
Creating Neon Chevron
Step 1: Prep and Base
Lay down a protective base coat, then sweep two coats of nude polish, drying into a soft, bare stage.
This neutral glow hums with calm, ready for neon angles.
Step 2: Chevron Design
With a fine brush, paint neon pink chevrons across each nail, keeping them sharp and bold.
Layer a second coat for intensity, letting them dry into vivid peaks that slice the nude.
Step 3: Sharpen Edges
Use an acetone-dipped brush to refine the chevrons’ borders, ensuring they cut through with clean precision.
This step locks in the rhythm, a whisper of retro in every angle.
Step 4: Seal with Top Coat
Finish with a glossy top coat to encase the design, amplifying the neon’s shine against the nude base.
Add a second layer for strength, ensuring your nails flare through every gesture.
Why It Works
This design is a neon pulse—the nude base cradles your nails in quiet elegance, while the pink chevrons flare with lively fire.
They angle with dynamic grace, a vivid peak that lifts simplicity into something striking.
Pair it with a bold skirt or a chunky bracelet, and it’s a fierce tribute to neon’s retro soul, glowing with every zigzag.
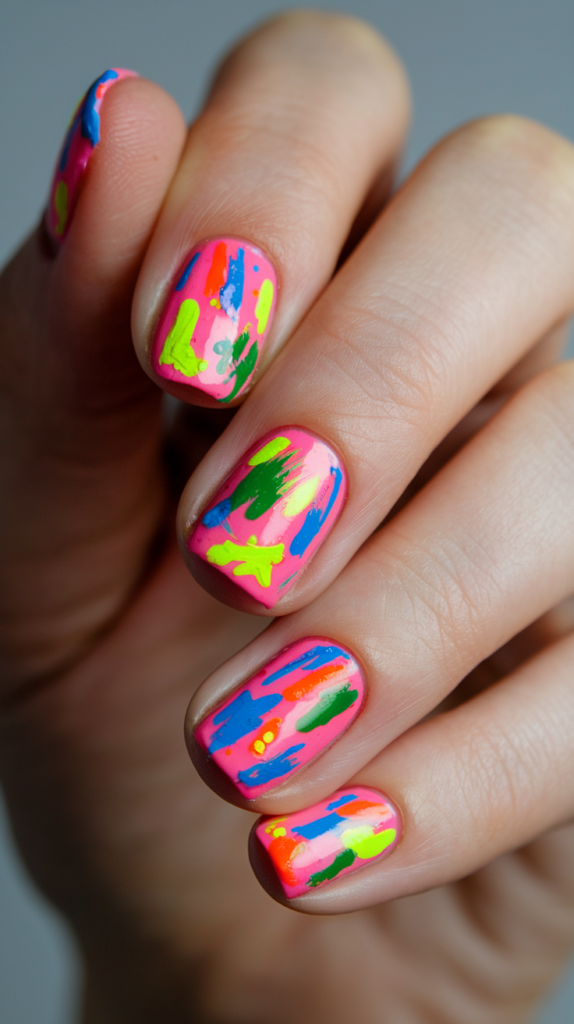
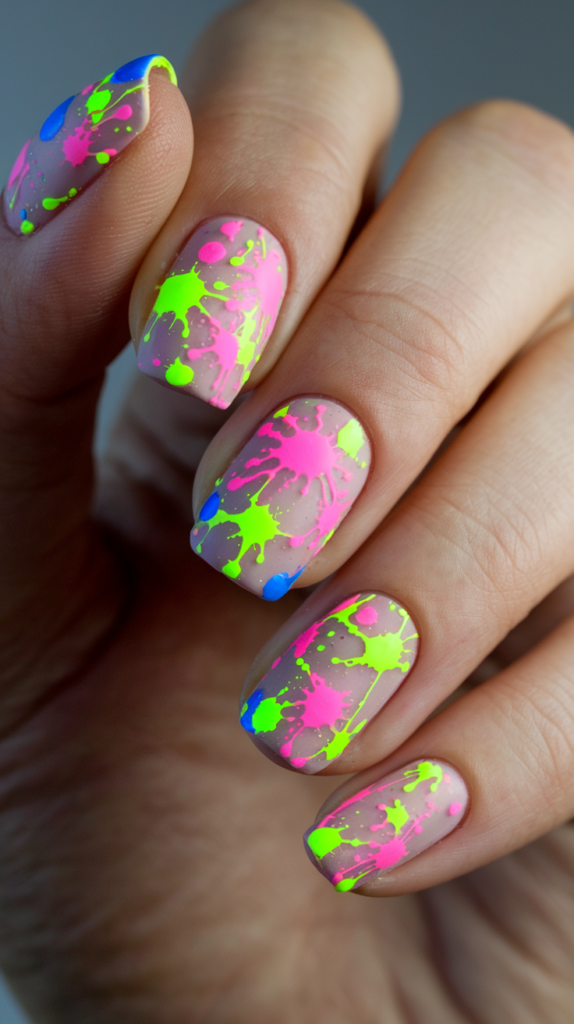
25. Neon Abstract Art

Splash with Neon Abstract Art, a design that streaks neon blue and pink across a nude base, weaving chaotic fire into vivid charm.
This isn’t just polish—it’s a radiant storm, perfect for bold days, sleek nights, or moments when your nails crave a wild edge.
Each stroke hums with neon energy, a vivid clash on your fingertips.
Creating Neon Abstract Art
Step 1: Prep and Base
Lay down a protective base coat, then sweep two coats of nude polish, drying into a soft, bare stage.
This neutral glow hums with calm, ready for neon chaos.
Step 2: Abstract Design
With a fine brush, splash neon blue and pink strokes randomly across each nail, keeping them bold and free.
Layer a second coat for intensity, letting them dry into vivid streaks that clash with the nude.
Step 3: Refine Edges
Use an acetone-dipped brush to sharpen the strokes’ borders, ensuring they slash through with clean precision.
This step locks in the storm, a whisper of art in every mark.
Step 4: Seal with Top Coat
Finish with a glossy top coat to encase the design, amplifying the neon’s shine against the nude base.
Add a second layer for strength, ensuring your nails flare through every gesture.
Why It Works
This design is a neon tempest—the nude base cradles your nails in quiet elegance, while the blue and pink strokes flare with wild fire.
They clash with chaotic grace, a vivid storm that lifts simplicity into something striking.
Pair it with a bold top or a chunky ring, and it’s a fierce tribute to neon’s artistic soul, glowing with every splash.
26. Neon Glitter
Sparkle with Neon Glitter, a design that dusts neon green glitter across a nude base, weaving radiant shimmer into vivid charm.
This isn’t just polish—it’s a dazzling jolt, perfect for bold nights, sleek days, or moments when your nails crave a lively edge.
Each speck gleams with neon light, a vivid twinkle on your fingertips.
Creating Neon Glitter
Step 1: Prep and Base
Lay down a protective base coat, then sweep two coats of nude polish, drying into a soft, bare stage.
This neutral glow hums with calm, ready for neon sparks.
Step 2: Glitter Design
With a small brush, dab neon green glitter polish across each nail, spreading it evenly for a radiant shimmer.
Layer lightly to keep it bold, letting it dry into a vivid twinkle that catches the light.
Step 3: Clean Edges
Use an acetone-dipped brush to tidy the glitter’s borders, ensuring it stays sharp against the nude.
This step locks in the dazzle, a whisper of shine in every speck.
Step 4: Seal with Top Coat
Finish with a glossy top coat to encase the design, amplifying the neon’s glow against the soft base.
Add a second layer for strength, ensuring your nails sparkle through every gesture.
Why It Works
This design is a neon flare—the nude base cradles your nails in quiet elegance, while the green glitter flares with dazzling fire.
It twinkles with radiant grace, a vivid shimmer that lifts simplicity into something striking.
Pair it with a bold dress or a chunky ring, and it’s a fierce tribute to neon’s sparkling soul, glowing with every speck.
27. Neon Tie-Dye
Swirl with Neon Tie-Dye, a design that twists neon yellow and pink across a nude base, weaving retro fire into vivid charm.
This isn’t just polish—it’s a radiant whirl, perfect for bold days, sleek summers, or moments when your nails crave a lively edge.
Each twist hums with neon energy, a vivid spiral on your fingertips.
Creating Neon Tie-Dye
Step 1: Prep and Base
Lay down a protective base coat, then sweep two coats of nude polish, drying into a soft, bare stage.
This neutral glow hums with calm, ready for neon swirls.
Step 2: Tie-Dye Design
With a sponge, dab neon yellow and pink polish in swirling patterns across each nail, blending them slightly.
Layer a second coat for intensity, letting them dry into vivid twists that clash with the nude.
Step 3: Clean Edges
Use an acetone-dipped brush to tidy the cuticles, ensuring the tie-dye flows crisp and uncluttered.
This step locks in the whirl, a whisper of retro in every swirl.
Step 4: Seal with Top Coat
Finish with a glossy top coat to encase the design, amplifying the neon’s shine against the nude base.
Add a second layer for strength, ensuring your nails spiral through every gesture.
Why It Works
This design is a neon vortex—the nude base cradles your nails in quiet elegance, while the yellow and pink swirls flare with lively fire.
They twist with dynamic grace, a vivid spiral that lifts simplicity into something striking.
Pair it with a bold top or a chunky bracelet, and it’s a fierce tribute to neon’s retro soul, glowing with every twist.
28. Neon Stars And Stripes
Salute with Neon Stars And Stripes, a design that streaks neon blue stripes and pink stars across a nude base, weaving bold fire into vivid charm.
This isn’t just polish—it’s a radiant clash, perfect for bold days, sleek nights, or moments when your nails crave a lively edge.
Each stripe and star hums with neon energy, a vivid banner on your fingertips.
Creating Neon Stars And Stripes
Step 1: Prep and Base
Lay down a protective base coat, then sweep two coats of nude polish, drying into a soft, bare stage.
This neutral glow hums with calm, ready for neon banners.
Step 2: Design
With a striping brush, paint neon blue stripes across each nail, then dot pink stars with a fine brush.
Layer a second coat for intensity, letting them dry into vivid marks that clash with the nude.
Step 3: Sharpen Edges
Use an acetone-dipped brush to refine the stripes and stars’ borders, ensuring they cut through with clean precision.
This step locks in the clash, a whisper of boldness in every mark.
Step 4: Seal with Top Coat
Finish with a glossy top coat to encase the design, amplifying the neon’s shine against the nude base.
Add a second layer for strength, ensuring your nails flare through every gesture.
Why It Works
This design is a neon anthem—the nude base cradles your nails in quiet elegance, while the blue stripes and pink stars flare with bold fire.
They clash with radiant grace, a vivid banner that lifts simplicity into something striking.
Pair it with a bold top or a chunky ring, and it’s a fierce tribute to neon’s spirited soul, glowing with every stripe.
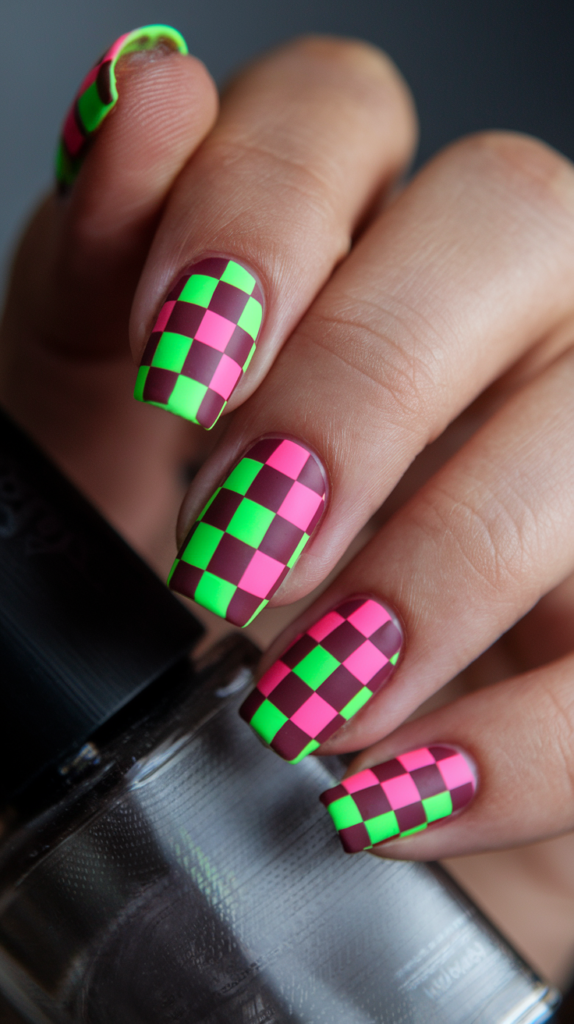
29. Neon Checkerboard

Play with Neon Checkerboard, a design that alternates neon green and pink squares across a black base, weaving bold order into vivid charm.
This isn’t just polish—it’s a radiant game, perfect for sleek days, bold nights, or moments when your nails crave a lively edge.
Each square hums with neon power, a vivid grid on your fingertips.
Creating Neon Checkerboard
Step 1: Prep and Base
Lay down a protective base coat, then sweep two coats of matte black polish, drying into a dark, bold canvas.
This shadow hums with depth, ready for neon play.
Step 2: Checkerboard Design
With a fine brush, paint alternating neon green and pink squares across each nail, keeping them sharp and even.
Layer a second coat for intensity, letting them dry into vivid blocks that clash with the black.
Step 3: Sharpen Edges
Use an acetone-dipped brush to refine the squares’ borders, ensuring they stack with clean precision.
This step locks in the order, a whisper of play in every block.
Step 4: Seal with Top Coat
Finish with a glossy top coat to encase the design, amplifying the neon’s shine against the dark base.
Add a second layer for strength, ensuring your nails flare through every gesture.
Why It Works
This design is a neon match—the black base broods with quiet power, while the green and pink squares flare with bold fire.
They stack with radiant grace, a vivid grid that lifts simplicity into something striking.
Pair it with a sleek top or a bold watch, and it’s a fierce tribute to neon’s playful soul, glowing with every square.
30. Neon Flames On Clear Base
Burn with Neon Flames On Clear Base, a design that licks neon orange flames across a bare stage, weaving fiery charm into vivid elegance.
This isn’t just polish—it’s a radiant blaze, perfect for bold days, sleek nights, or moments when your nails crave a wild edge.
Each flame flares with neon heat, a vivid spark on your fingertips.
Creating Neon Flames On Clear Base
Step 1: Prep and Base
Lay down a protective base coat, then layer a single coat of clear polish, drying into a raw, natural sheen.
This transparent glow hums with calm, ready for neon fire.
Step 2: Flame Design
With a fine brush, paint neon orange flames rising from the tips, keeping them sharp and bold.
Layer a second coat for intensity, letting them dry into vivid tongues that leap off the clear.
Step 3: Refine Edges
Use an acetone-dipped brush to sharpen the flames’ borders, ensuring they blaze through with clean precision.
This step locks in the heat, a whisper of fire in every lick.
Step 4: Seal with Top Coat
Finish with a glossy top coat to encase the design, amplifying the neon’s shine against the bare base.
Add a second layer for strength, ensuring your nails burn through every gesture.
Why It Works
This design is a neon inferno—the clear base breathes with quiet elegance, while the orange flames flare with wild fire.
They dance with radiant grace, a vivid blaze that lifts simplicity into something striking.
Pair it with a bold top or a chunky ring, and it’s a fierce tribute to neon’s fiery soul, glowing with every flame.
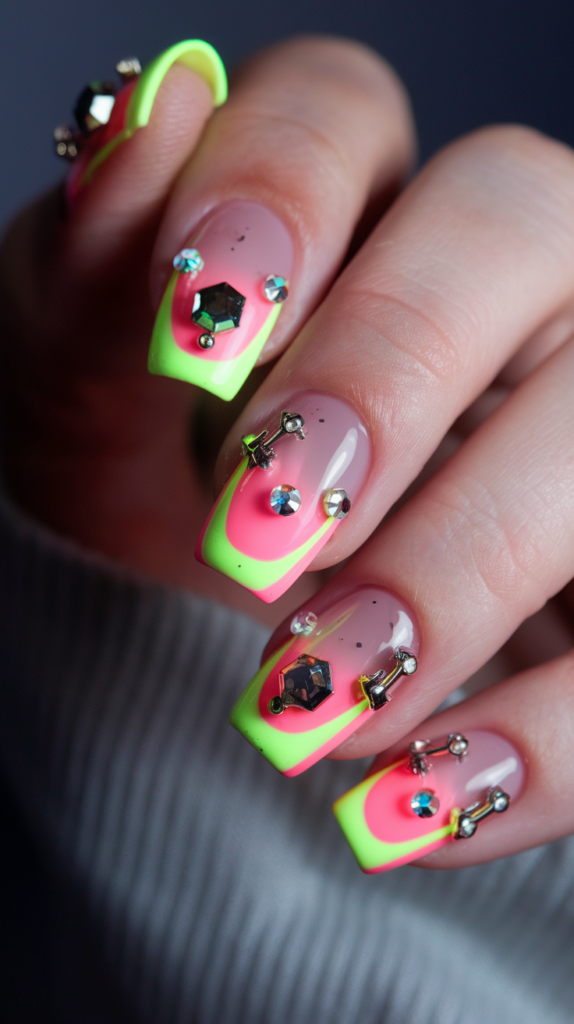
31. Neon French Fade
Fade with Neon French Fade, a design that blends neon yellow tips into a nude base, weaving elegant fire into vivid charm.
This isn’t just polish—it’s a radiant shift, perfect for sleek days, bold nights, or moments when your nails crave a modern edge.
Each fade hums with neon grace, a vivid gradient on your fingertips.
Creating Neon French Fade
Step 1: Prep and Base
Lay down a protective base coat, then sweep two coats of nude polish, drying into a soft, bare stage.
This neutral glow hums with calm, ready for neon flow.
Step 2: Fade Design
With a sponge, dab neon yellow polish from the tips, blending it into the nude base for a smooth gradient.
Layer a second coat for intensity, letting it dry into a vivid fade that catches the eye.
Step 3: Clean Edges
Use an acetone-dipped brush to tidy the cuticles, ensuring the fade flows crisp and uncluttered.
This step locks in the shift, a whisper of elegance in every blend.
Step 4: Seal with Top Coat
Finish with a glossy top coat to encase the design, amplifying the neon’s shine against the nude base.
Add a second layer for strength, ensuring your nails flare through every gesture.
Why It Works
This design is a neon whisper—the nude base cradles your nails in quiet elegance, while the yellow fade flares with modern fire.
It blends with radiant grace, a vivid gradient that lifts simplicity into something striking.
Pair it with a sleek top or a bold ring, and it’s a fierce tribute to neon’s elegant soul, glowing with every shift.
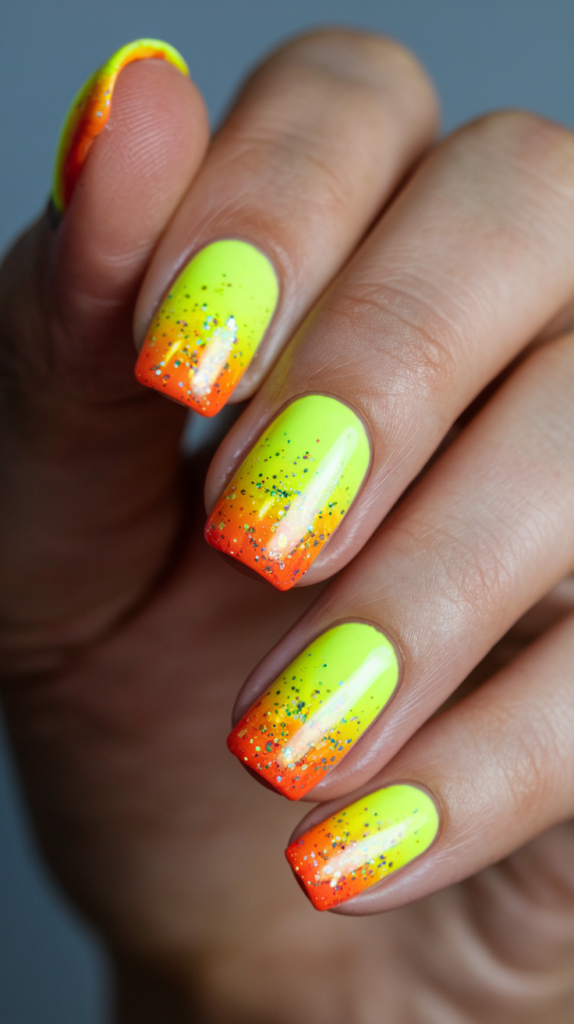
32. Neon Glitter Gradient
Shimmer with Neon Glitter Gradient, a design that fades neon orange into glitter tips on a nude base, weaving dazzling fire into vivid charm.
This isn’t just polish—it’s a radiant spark, perfect for bold nights, sleek days, or moments when your nails crave a lively edge.
Each fade gleams with neon light, a vivid twinkle on your fingertips.
Creating Neon Glitter Gradient
Step 1: Prep and Base
Lay down a protective base coat, then sweep two coats of nude polish, drying into a soft, bare stage.
This neutral glow hums with calm, ready for neon dazzle.
Step 2: Gradient Design
With a sponge, dab neon orange polish from the base, fading into glitter at the tips for a smooth blend.
Layer a second coat for intensity, letting it dry into a vivid shimmer that catches the eye.
Step 3: Clean Edges
Use an acetone-dipped brush to tidy the cuticles, ensuring the gradient flows crisp and uncluttered.
This step locks in the sparkle, a whisper of shine in every fade.
Step 4: Seal with Top Coat
Finish with a glossy top coat to encase the design, amplifying the neon’s glow against the nude base.
Add a second layer for strength, ensuring your nails sparkle through every gesture.
Why It Works
This design is a neon flare—the nude base cradles your nails in quiet elegance, while the orange and glitter fade flares with dazzling fire.
It twinkles with radiant grace, a vivid shimmer that lifts simplicity into something striking.
Pair it with a bold dress or a chunky ring, and it’s a fierce tribute to neon’s sparkling soul, glowing with every fade.
33. Neon Spikes
刺 with Neon Spikes, a design that jabs neon purple spikes across a black base, weaving fierce fire into vivid charm.
This isn’t just polish—it’s a radiant edge, perfect for bold days, sleek nights, or moments when your nails crave a wild spark.
Each spike hums with neon power, a vivid thorn on your fingertips.
Creating Neon Spikes
Step 1: Prep and Base
Lay down a protective base coat, then sweep two coats of matte black polish, drying into a dark, bold canvas.
This shadow hums with depth, ready for neon jabs.
Step 2: Spike Design
With a fine brush, paint neon purple spikes from the tips, keeping them sharp and bold.
Layer a second coat for intensity, letting them dry into vivid points that pierce the black.
Step 3: Sharpen Edges
Use an acetone-dipped brush to refine the spikes’ borders, ensuring they jab through with clean precision.
This step locks in the edge, a whisper of fierceness in every point.
Step 4: Seal with Top Coat
Finish with a glossy top coat to encase the design, amplifying the neon’s shine against the dark base.
Add a second layer for strength, ensuring your nails flare through every gesture.
Why It Works
This design is a neon thrust—the black base broods with quiet power, while the purple spikes flare with fierce fire.
They jab with radiant grace, a vivid thorn that lifts simplicity into something striking.
Pair it with a bold top or a chunky ring, and it’s a fierce tribute to neon’s edgy soul, glowing with every spike.
34. Neon Animal Faces
Grin with Neon Animal Faces, a design that sketches neon green cat faces across a nude base, weaving playful fire into vivid charm.
This isn’t just polish—it’s a radiant purr, perfect for bold days, sleek whimsy, or moments when your nails crave a lively spark.
Each face glows with neon cheer, a vivid critter on your fingertips.
Creating Neon Animal Faces
Step 1: Prep and Base
Lay down a protective base coat, then sweep two coats of nude polish, drying into a soft, bare stage.
This neutral glow hums with calm, ready for neon grins.
Step 2: Face Design
With a fine brush, paint neon green cat faces on the ring and middle fingers, keeping them small and bold with whiskers and eyes.
Layer a second coat for intensity, letting them dry into vivid features that catch the eye.
Step 3: Refine Details
Dip a brush in acetone to sharpen the faces’ edges, ensuring they purr crisp against the nude backdrop.
This step locks in the play, a whisper of whimsy in every line.
Step 4: Seal with Top Coat
Finish with a glossy top coat to encase the design, amplifying the neon’s glow against the soft base.
Add a second layer for strength, ensuring your nails prance through every gesture.
Why It Works
This design is a neon meow—the nude base cradles your nails in quiet elegance, while the green faces flare with playful fire.
They grin with radiant charm, a vivid critter that lifts simplicity into something striking.
Pair it with a bold top or a dainty ring, and it’s a fierce tribute to neon’s whimsical soul, glowing with every whisker.
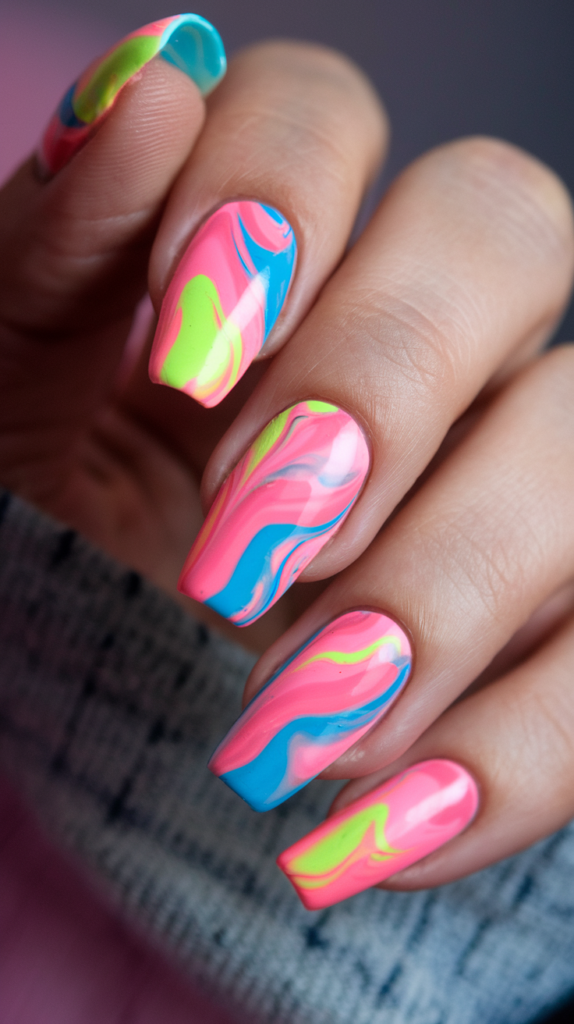
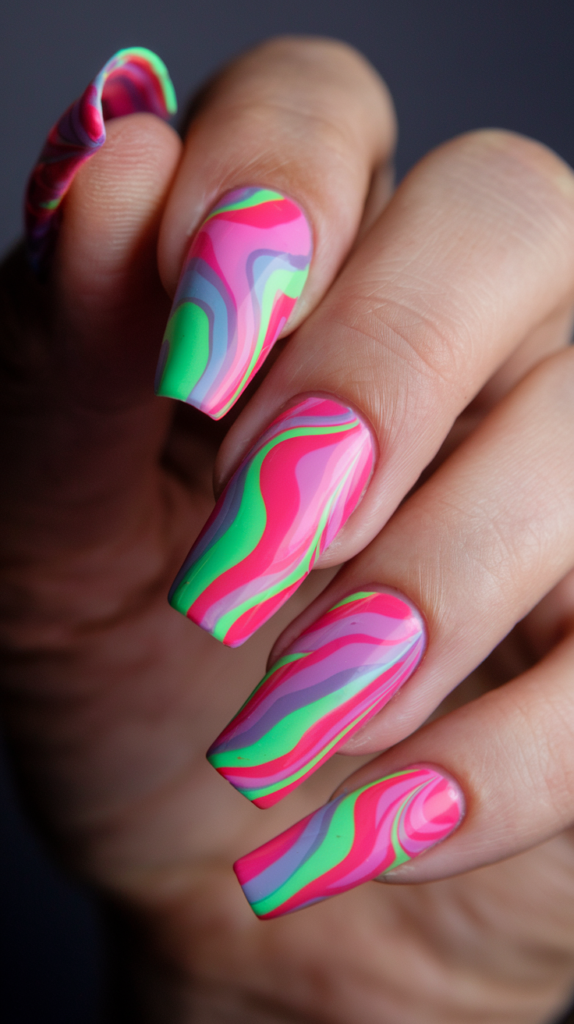
35. Neon Marble
Swirl with Neon Marble, a design that ripples neon pink and yellow across a nude base, weaving fluid fire into vivid charm.
This isn’t just polish—it’s a radiant tide, perfect for bold days, sleek nights, or moments when your nails crave a wild edge.
Each swirl hums with neon energy, a vivid vein on your fingertips.
Creating Neon Marble
Step 1: Prep and Base
Lay down a protective base coat, then sweep two coats of nude polish, drying into a soft, bare stage.
This neutral glow hums with calm, ready for neon waves.
Step 2: Marble Design
Drop neon pink and yellow polish into a bowl of water, swirl with a toothpick, then dip each nail to capture the pattern.
Layer a second coat for intensity, letting them dry into vivid ripples that clash with the nude.
Step 3: Clean Edges
Use an acetone-dipped brush to tidy the cuticles, ensuring the marble flows crisp and uncluttered.
This step locks in the tide, a whisper of art in every swirl.
Step 4: Seal with Top Coat
Finish with a glossy top coat to encase the design, amplifying the neon’s shine against the nude base.
Add a second layer for strength, ensuring your nails surge through every gesture.
Why It Works
This design is a neon current—the nude base cradles your nails in quiet elegance, while the pink and yellow swirls flare with fluid fire.
They ripple with radiant grace, a vivid vein that lifts simplicity into something striking.
Pair it with a sleek top or a bold ring, and it’s a fierce tribute to neon’s artistic soul, glowing with every swirl.
Conclusion
These 35 neon nail designs ignite a spectrum of vivid brilliance, threading the sleek elegance of Neon French Tips with the wild edge of Neon Animal Faces, and every radiant stroke in between.
From the sharp clash of Neon Checkerboard, each creation turns your nails into a canvas of bold energy, a gallery where vibrant hues, daring patterns, and electric details collide in a blaze of color.
Whether you’re drawn to the fluid fire of Neon Marble, the cosmic flare of Neon Galaxy Nails, or the fierce thrust of Neon Spikes, this collection offers a spark for every soul craving boldness with style.
These aren’t just manicures—they’re pulses etched in polish, each nail a burst of energy, defiance, or quiet rebellion that echoes the moments you seize.
With clear steps and a surge of inspiration, you’re ready to craft these designs or remix them into your own, perfect for sleek days, wild nights, or fearless steps out.
Every brushstroke invites you to wield your fire—be it the playful chaos of Neon Tie-Dye or the luminous sheen of Neon Chrome—and let your fingertips roar with the spirit of bold.
Embrace the electric realms of these looks, from Neon Lightning Bolts to Neon Glitter Gradient, and let your nails blaze as a beacon of vibrant creativity, glowing with the heat, edge, and wonder of neon through 2024 and beyond.